Video generation has become the latest frontier in AI research, following the success of text-to-image models. Luma AI’s recently launched Dream Machine represents a significant advancement in this field. This text-to-video API generates high-quality, realistic videos quickly from text and images. Trained on the Amazon SageMaker HyperPod, Dream Machine excels in creating consistent characters, smooth motion, and dynamic camera movements.
To accelerate iteration and innovation in this field, sufficient computing resources and a scalable platform are essential. During the iterative research and development phase, data scientists and researchers need to run multiple experiments with different versions of algorithms and scale to larger models. Model parallel training becomes necessary when the total model footprint (model weights, gradients, and optimizer states) exceeds the memory of a single GPU. However, building large distributed training clusters is a complex and time-intensive process that requires in-depth expertise. Furthermore, as clusters scale to larger sizes (for example, more than 32 nodes), they require built-in resiliency mechanisms such as automated faulty node detection and replacement to improve cluster goodput and maintain efficient operations. These challenges underscore the importance of robust infrastructure and management systems in supporting advanced AI research and development.
Amazon SageMaker HyperPod, introduced during re:Invent 2023, is a purpose-built infrastructure designed to address the challenges of large-scale training. It removes the undifferentiated heavy lifting involved in building and optimizing machine learning (ML) infrastructure for training foundation models (FMs). SageMaker HyperPod offers a highly customizable user interface using Slurm, allowing users to select and install any required frameworks or tools. Clusters are provisioned with the instance type and count of your choice and can be retained across workloads. With these capabilities, customers are adopting SageMaker HyperPod as their innovation platform for more resilient and performant model training, enabling them to build state-of-the-art models faster.
In this post, we share an ML infrastructure architecture that uses SageMaker HyperPod to support research team innovation in video generation. We will discuss the advantages and pain points addressed by SageMaker HyperPod, provide a step-by-step setup guide, and demonstrate how to run a video generation algorithm on the cluster.
Training video generation algorithms on Amazon SageMaker HyperPod: background and architecture
Video generation is an exciting and rapidly evolving field that has seen significant advancements in recent years. While generative modeling has made tremendous progress in the domain of image generation, video generation still faces several challenges that require further improvement.
Algorithms architecture complexity with diffusion model family
Diffusion models have recently made significant strides in generating high-quality images, prompting researchers to explore their potential in video generation. By leveraging the architecture and pre-trained generative capabilities of diffusion models, scientists aim to create visually impressive videos. The process extends image generation techniques to the temporal domain. Starting with noisy frames, the model iteratively refines them, removing random elements while adding meaningful details guided by text or image prompts. This approach progressively transforms abstract patterns into coherent video sequences, effectively translating diffusion models’ success in static image creation to dynamic video synthesis.
However, the compute requirements for video generation using diffusion models increase substantially compared to image generation for several reasons:
- Temporal dimension – Unlike image generation, video generation requires processing multiple frames simultaneously. This adds a temporal dimension to the original 2D UNet, significantly increasing the amount of data that needs to be processed in parallel.
- Iterative denoising process – The diffusion process involves multiple iterations of denoising for each frame. When extended to videos, this iterative process must be applied to multiple frames, multiplying the computational load.
- Increased parameter count – To handle the additional complexity of video data, models often require more parameters, leading to larger memory footprints and increased computational demands.
- Higher resolution and longer sequences – Video generation often aims for higher resolution outputs and longer sequences compared to single image generation, further amplifying the computational requirements.
Due to these factors, the operational efficiency of diffusion models for video generation is lower and significantly more compute-intensive compared to image generation. This increased computational demand underscores the need for advanced hardware solutions and optimized model architectures to make video generation more practical and accessible.
Handling the increased computational requirements
The improvement in video generation quality necessitates a significant increase in the size of the models and training data. Researchers have concluded that scaling up the base model size leads to substantial enhancements in video generation performance. However, this growth comes with considerable challenges in terms of computing power and memory resources. Training larger models requires more computational power and memory space, which can limit the accessibility and practical use of these models. As the model size increases, the computational requirements grow exponentially, making it difficult to train these models on single GPU, or even single node multi-GPUs environment. Moreover, storing and manipulating the large datasets required for training also pose significant challenges in terms of infrastructure and costs. High-quality video datasets tend to be massive, requiring substantial storage capacity and efficient data management systems. Transferring and processing these datasets can be time-consuming and resource-intensive, adding to the overall computational burden.
Maintaining temporal consistency and continuity
Maintaining temporal consistency and continuity becomes increasingly challenging as the length of the generated video increases. Temporal consistency refers to the continuity of visual elements, such as objects, characters, and scenes, across subsequent frames. Inconsistencies in appearance, movement, or lighting can lead to jarring visual artifacts and disrupt the overall viewing experience. To address this challenge, researchers have explored the use of multiframe inputs, which provide the model with information from multiple consecutive frames to better understand and model the relationships and dependencies across time. These techniques preserve high-resolution details in visual quality while simulating a continuous and smooth temporal motion process. However, they require more sophisticated modeling techniques and increased computational resources.
Algorithm overview
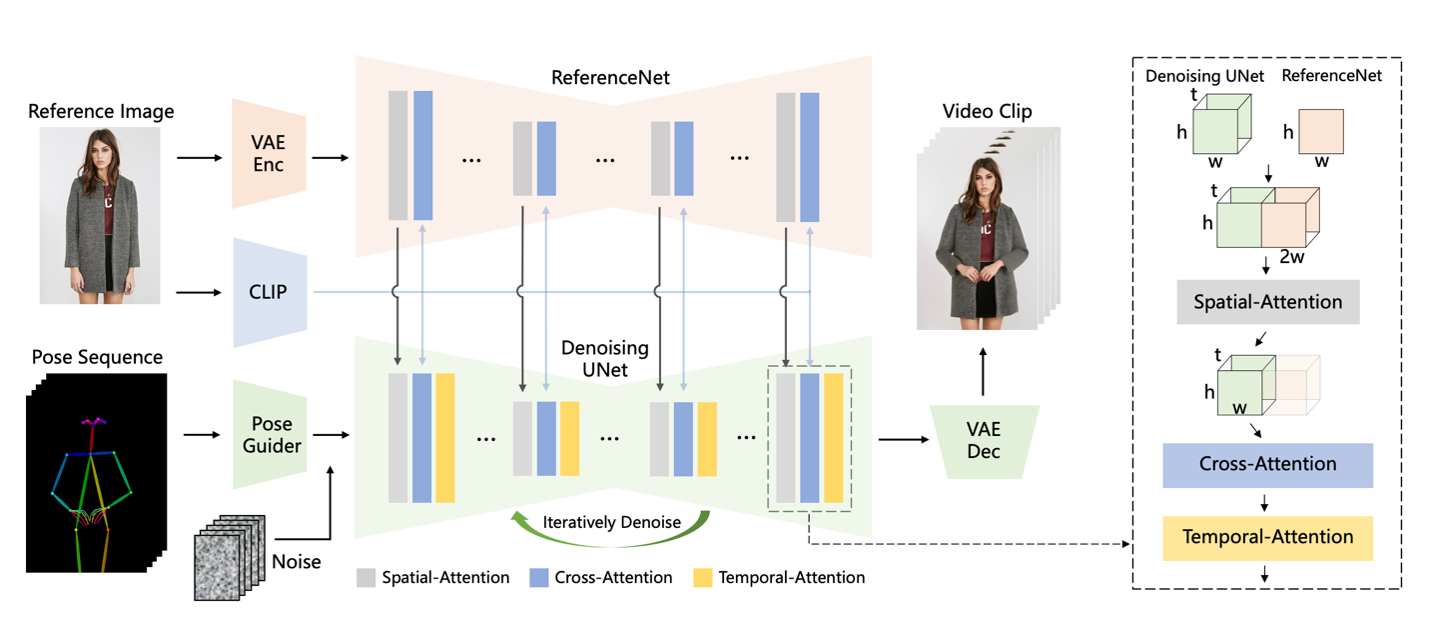
In the following sections, we illustrate how to run the Animate Anyone: Consistent and Controllable Image-to-Video Synthesis for Character Animation algorithm on Amazon SageMaker HyperPod for video generation. Animate Anyone is one of the methods for transforming character images into animated videos controlled by desired pose sequences. The key components of the architecture include:
- ReferenceNet – A symmetrical UNet structure that captures spatial details of the reference image and integrates them into the denoising UNet using spatial-attention to preserve appearance consistency
- Pose guider – A lightweight module that efficiently integrates pose control signals into the denoising process to ensure pose controllability
- Temporal layer – Added to the denoising UNet to model relationships across multiple frames, preserving high-resolution details and ensuring temporal stability and continuity of the character’s motion
The model architecture is illustrated in the following image from its original research paper. The method is trained on a dataset of video clips and achieves state-of-the-art results on fashion video and human dance synthesis benchmarks, demonstrating its ability to animate arbitrary characters while maintaining appearance consistency and temporal stability. The implementation of AnimateAnyone can be found in this repository.
To address the challenges of large-scale training infrastructure required in video generation training process, we can use the power of Amazon SageMaker HyperPod. While many customers have adopted SageMaker HyperPod for large-scale training, such as Luma’s launch of Dream Machine and Stability AI’s work on FMs for image or video generation, we believe that the capabilities of SageMaker HyperPod can also benefit lighter ML workloads, including full fine-tuning.
Amazon SageMaker HyperPod concept and advantage
SageMaker HyperPod offers a comprehensive set of features that significantly enhance the efficiency and effectiveness of ML workflows. From purpose-built infrastructure for distributed training to customizable environments and seamless integration with tools like Slurm, SageMaker HyperPod empowers ML practitioners to focus on their core tasks while taking advantage of the power of distributed computing. With SageMaker HyperPod, you can accelerate your ML projects, handle larger datasets and models, and drive innovation in your organization. SageMaker HyperPod provides several key features and advantages in the scalable training architecture.
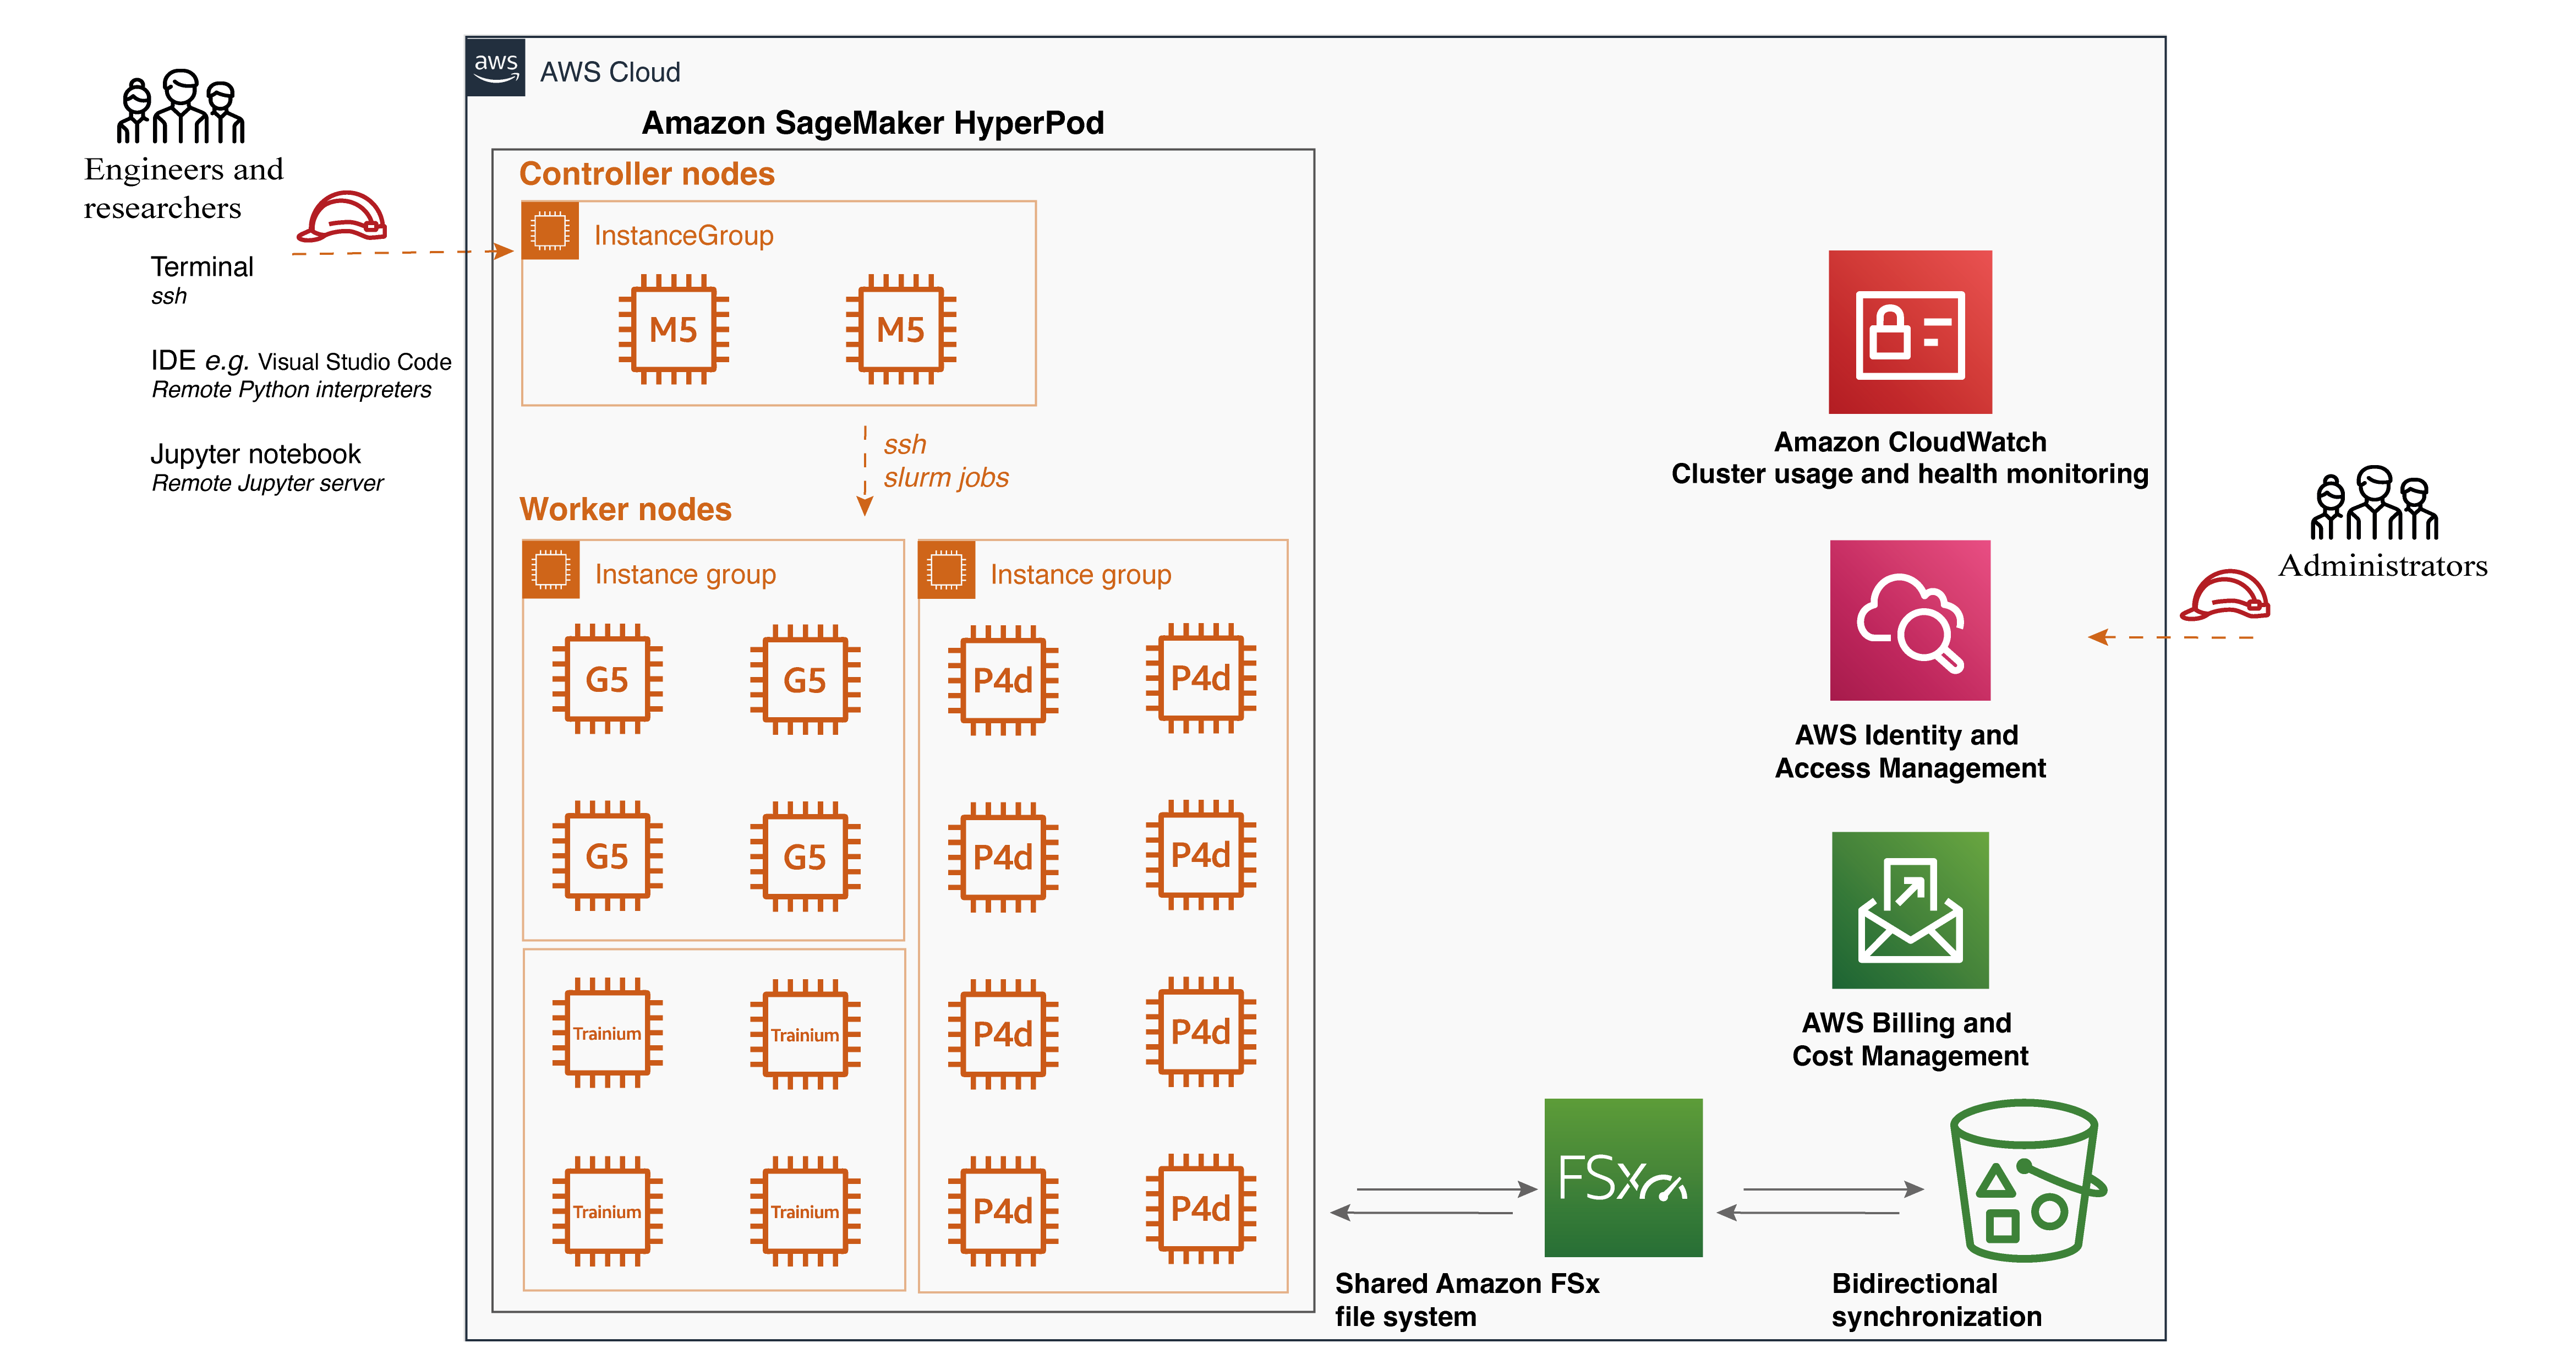
Purpose-built infrastructure – One of the primary advantages of SageMaker HyperPod is its purpose-built infrastructure for distributed training. It simplifies the setup and management of clusters, allowing you to easily configure the desired instance types and counts, which can be retained across workloads. As a result of this flexibility, you can adapt to various scenarios. For example, when working with a smaller backbone model like Stable Diffusion 1.5, you can run multiple experiments simultaneously on a single GPU to accelerate the iterative development process. As your dataset grows, you can seamlessly switch to data parallelism and distribute the workload across multiple GPUs, such as eight GPUs, to reduce compute time. Furthermore, when dealing with larger backbone models like Stable Diffusion XL, SageMaker HyperPod offers the flexibility to scale and use model parallelism.
Shared file system – SageMaker HyperPod supports the attachment of a shared file system, such as Amazon FSx for Lustre. This integration brings several benefits to your ML workflow. FSx for Lustre enables full bidirectional synchronization with Amazon Simple Storage Service (Amazon S3), including the synchronization of deleted files and objects. It also allows you to synchronize file systems with multiple S3 buckets or prefixes, providing a unified view across multiple datasets. In our case, this means that the installed libraries within the conda virtual environment will be synchronized across different worker nodes, even if the cluster is torn down and recreated. Additionally, input video data for training and inference results can be seamlessly synchronized with S3 buckets, enhancing the experience of validating inference results.
Customizable environment – SageMaker HyperPod offers the flexibility to customize your cluster environment using lifecycle scripts. These scripts allow you to install additional frameworks, debugging tools, and optimization libraries tailored to your specific needs. You can also split your training data and model across all nodes for parallel processing, fully using the cluster’s compute and network infrastructure. Moreover, you have full control over the execution environment, including the ability to easily install and customize virtual Python environments for each project. In our case, all the required libraries for running the training script are installed within a conda virtual environment, which is shared across all worker nodes, simplifying the process of distributed training on multi-node setups. We also installed MLflow Tracking on the controller node to monitor the training progress.
Job distribution with Slurm integration – SageMaker HyperPod seamlessly integrates with Slurm, a popular open source cluster management and job scheduling system. Slurm can be installed and set up through lifecycle scripts as part of the cluster creation process, providing a highly customizable user interface. With Slurm, you can efficiently schedule jobs across different GPU resources so you can run multiple experiments in parallel or use distributed training to train large models for improved performance. With Slurm, customers can customize the job queues, prioritization algorithms, and job preemption policies, ensuring optimal resource use and streamlining your ML workflows. If you are searching a Kubernetes-based administrator experience, recently, Amazon SageMaker HyperPod introduces Amazon EKS support to manage their clusters using a Kubernetes-based interface.
Enhanced productivity – To further enhance productivity, SageMaker HyperPod supports connecting to the cluster using Visual Studio Code (VS Code) through a Secure Shell (SSH) connection. You can easily browse and modify code within an integrated development environment (IDE), execute Python scripts seamlessly as if in a local environment, and launch Jupyter notebooks for quick development and debugging. The Jupyter notebook application experience within VS Code provides a familiar and intuitive interface for iterative experimentation and analysis.
Set up SageMaker HyperPod and run video generation algorithms
In this walkthrough, we use the AnimateAnyone algorithm as an illustration for video generation. AnimateAnyone is a state-of-the-art algorithm that generates high-quality videos from input images or videos. Our walkthrough guidance code is available on GitHub.
Set up the cluster
To create the SageMaker HyperPod infrastructure, follow the detailed intuitive and step-by-step guidance for cluster setup from the Amazon SageMaker HyperPod workshop studio.
The two things you need to prepare are a provisioning_parameters.json file required by HyperPod for setting up Slurm and a cluster-config.json file as the configuration file for creating the HyperPod cluster. Inside these configuration files, you need to specify the InstanceGroupName, InstanceType, and InstanceCount for the controller group and worker group, as well as the execution role attached to the group.
One practical setup is to set up bidirectional synchronization with Amazon FSx and Amazon S3. This can be done with the Amazon S3 integration for Amazon FSx for Lustre. It helps to establish a full bidirectional synchronization of your file systems with Amazon S3. In addition, it can synchronize your file systems with multiple S3 buckets or prefixes.
In addition, if you prefer a local IDE such as VSCode, you can set up an SSH connection to the controller node within your IDE. In this way, the worker nodes can be used for running scripts within a conda environment and a Jupyter notebook server.
Run the AnimateAnyone algorithm
When the cluster is in service, you can connect using SSH into the controller node, then go into the worker nodes, where the GPU compute resources are available. You can follow the SSH Access to compute guide. We suggest installing the libraries on the worker nodes directly.
To create the conda environment, follow the instructions at Miniconda’s Quick command line install. You can then use the conda environment to install all required libraries.
source ~/miniconda3/bin/activate
conda create -n videogen
pip install -r requirements.txt
To run AnimateAnyone, clone the GitHub repo and follow the instructions.
To train AnimateAnyone, launch stage 1 for training the denoising UNet and ReferenceNet, which enables the model to generate high-quality animated images under the condition of a given reference image and target pose. The denoising UNet and ReferenceNet are initialized based on the pre-trained weights from Stable Diffusion.
accelerate launch train_stage_1.py --config configs/train/stage1.yaml
In stage 2, the objective is to train the temporal layer to capture the temporal dependencies among video frames.
accelerate launch train_stage_2.py --config configs/train/stage2.yaml
Once the training script executes as expected, use a Slurm scheduled job to run on a single node. We provide a batch file to simulate the single-node training job. It can be a single GPU or a single node with multiple GPUs. If you want to know more, the documentation provides detailed instructions on running jobs on SageMaker HyperPod clusters.
sbatch submit-animateanyone-algo.sh
#!/bin/bash
#SBATCH --job-name=video-gen
#SBATCH -N 1
#SBATCH --exclusive
#SBATCH -o video-gen-stage-1.out
export OMP_NUM_THREADS=1
# Activate the conda environment
source ~/miniconda3/bin/activate
conda activate videogen
srun accelerate launch train_stage_1.py --config configs/train/stage1.yaml
Check the job status using the following code snippet.
squeue
JOBID PARTITION NAME USER ST TIME NODES NODELIST(REASON)
10 dev video-ge ubuntu R 0:16 1 ip-10-1-93-196
By using a small batch size and setting use_8bit_adam=True, you can achieve efficient training on a single GPU. When using a single GPU, use a multi-GPU cluster for running multiple experiments.
The following code block is one example of running four jobs in parallel to test different hyperparameters. We provide the batch file here as well.
sbatch submit-hyperparameter-testing.sh

squeue
JOBID PARTITION NAME USER ST TIME NODES NODELIST(REASON)
4_0 dev video-ge ubuntu R 0:08 1 ip-10-1-17-56
4_1 dev video-ge ubuntu R 0:08 1 ip-10-1-33-49
4_2 dev video-ge ubuntu R 0:08 1 ip-10-1-37-152
4_3 dev video-ge ubuntu R 0:08 1 ip-10-1-83-68
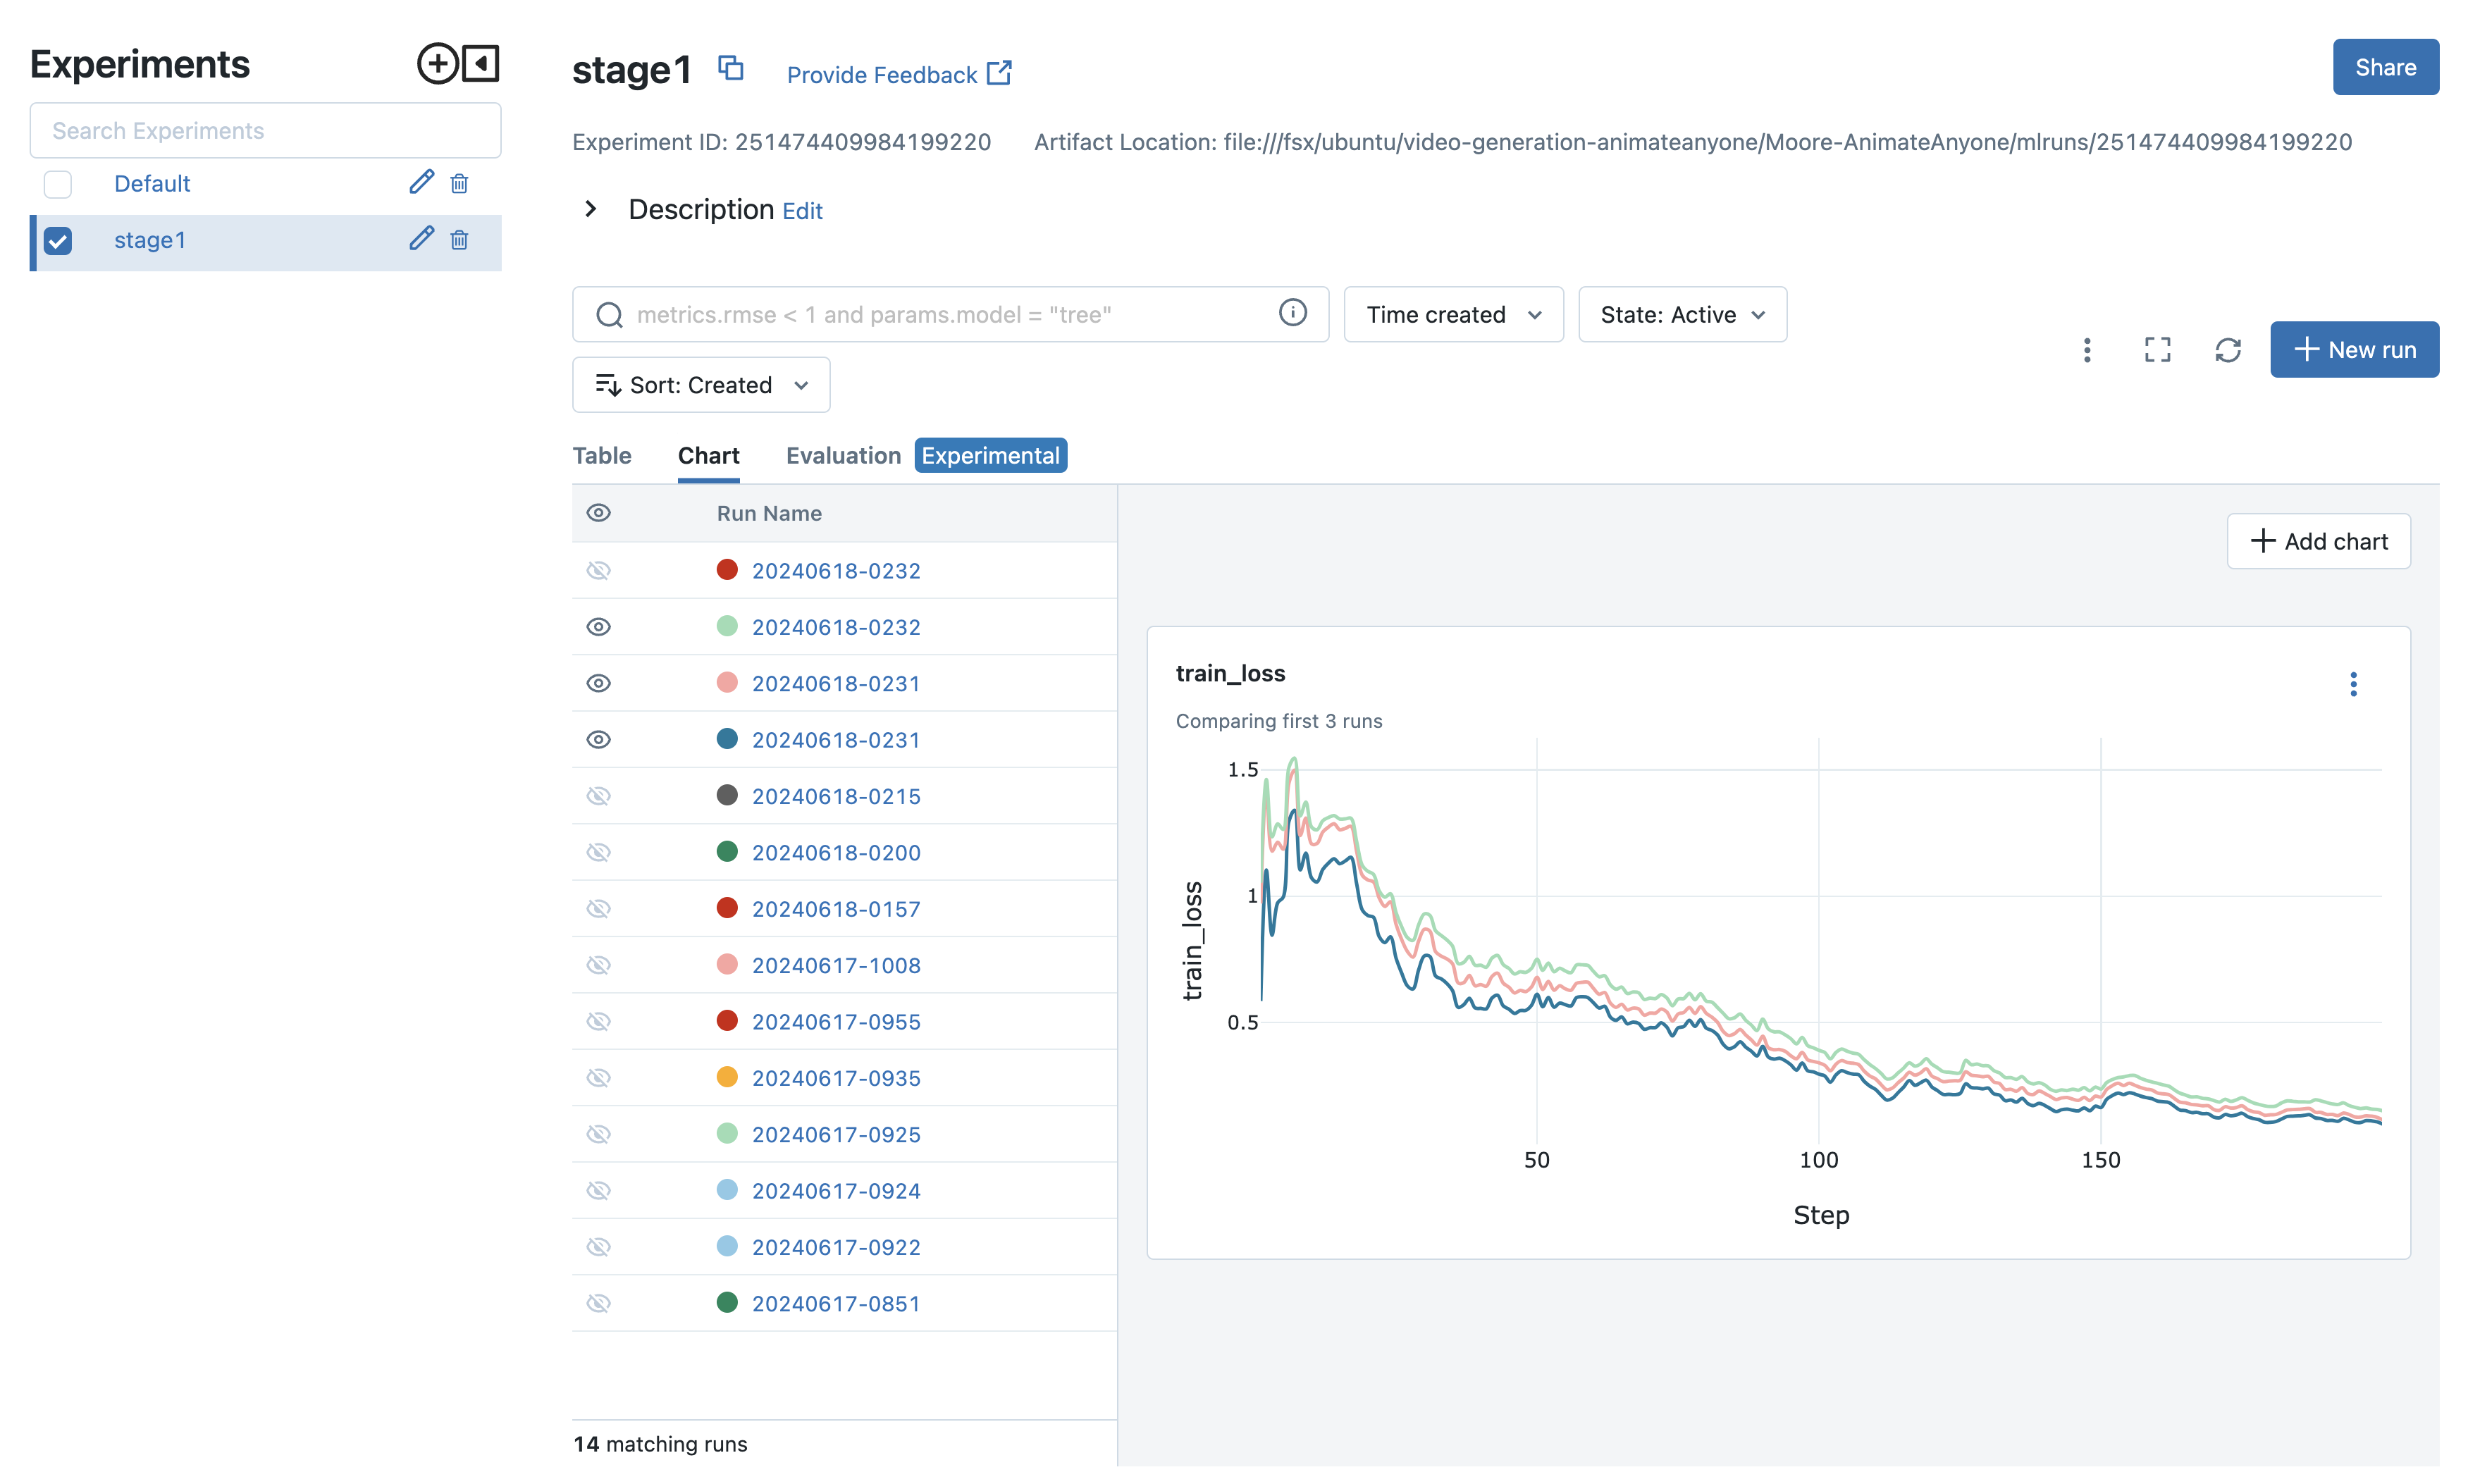
The experiments can then be compared, and you can move forward with the best configuration. In our scenario, shown in the following screenshot, we use different datasets and video preprocessing strategies to validate the stage 1 training. Then, we quickly draw conclusions about the impact on video quality with respect to stage 1 training results. For experiment tracking, besides installing MLflow on the controller node to monitor the training progress, you can also leverage the fully managed MLflow capability on Amazon SageMaker. This makes it easy for data scientists to use MLflow on SageMaker for model training, registration, and deployment.
Scale to multi-node GPU setup
As model sizes grow, single GPU memory quickly becomes a bottleneck. Large models easily exhaust memory with pure data parallelism, and implementing model parallelism can be challenging. DeepSpeed addresses these issues, accelerating model development and training.
ZeRO
DeepSpeed is a deep learning optimization library that aims to make distributed training easy, efficient, and effective. DeepSpeed’s ZeRO removes memory redundancies across data-parallel processes by partitioning three model states (optimizer states, gradients, and parameters) across data-parallel processes instead of replicating them. This approach significantly boosts memory efficiency compared to classic data-parallelism while maintaining computational granularity and communication efficiency.
ZeRO offers three stages of optimization:
- ZeRO Stage 1 – Partitions optimizer states across processes, with each process updating only its partition
- ZeRO Stage 2 – Additionally partitions gradients, with each process retaining only the gradients corresponding to its optimizer state portion
- ZeRO Stage 3 – Partitions model parameters across processes, automatically collecting and partitioning them during forward and backward passes
Each stage offers progressively higher memory efficiency at the cost of increased communication overhead. These techniques enable training of extremely large models that would otherwise be impossible. This is particularly useful when working with limited GPU memory or training very large models.
Accelerate
Accelerate is a library that enables running the same PyTorch code across any distributed configuration with minimal code changes. It handles the complexities of distributed setups, allowing developers to focus on their models rather than infrastructure. To put it briefly, Accelerate makes training and inference at scale straightforward, efficient, and adaptable.
Accelerate allows easy integration of DeepSpeed features through a configuration file. Users can supply a custom configuration file or use provided templates. The following is an example of how to use DeepSpeed with Accelerate.
Single node with multiple GPUs job
To run a job on a single node with multiple GPUs, we have tested this configuration on four GPU instances (for example, g5.24xlarge). For these instances, adjust train_width: 768 and train_height: 768, and set use_8bit_adam: False in your configuration file. You’ll likely notice that the model can handle much larger images for generation with these settings.
sbatch submit-deepspeed-singlenode.sh
This Slurm job will:
- Allocate a single node
- Activate the training environment
- Run
accelerate launch train_stage_1.py --config configs/train/stage1.yaml
Multi-node with multiple GPUs job
To run a job across multiple nodes, each with multiple GPUs, we have tested this distribution with two ml.g5.24xlarge instances.
sbatch submit-deepspeed-multinode.sh
This Slurm job will:
- Allocate the specified number of nodes
- Activate the training environment on each node
- Run
accelerate launch --multi_gpu --num_processes <num_processes> --num_machines <num_machines> train_stage_1.py --config configs/train/stage1.yaml
When running a multi-node job, make sure that the num_processes and num_machines arguments are set correctly based on your cluster configuration.
For optimal performance, adjust the batch size and learning rate according to the number of GPUs and nodes being used. Consider using a learning rate scheduler to adapt the learning rate during training.
Additionally, monitor the GPU memory usage and adjust the model’s architecture or batch size if necessary to prevent out-of-memory issues.
By following these steps and configurations, you can efficiently train your models on single-node and multi-node setups with multiple GPUs, taking advantage of the power of distributed training.
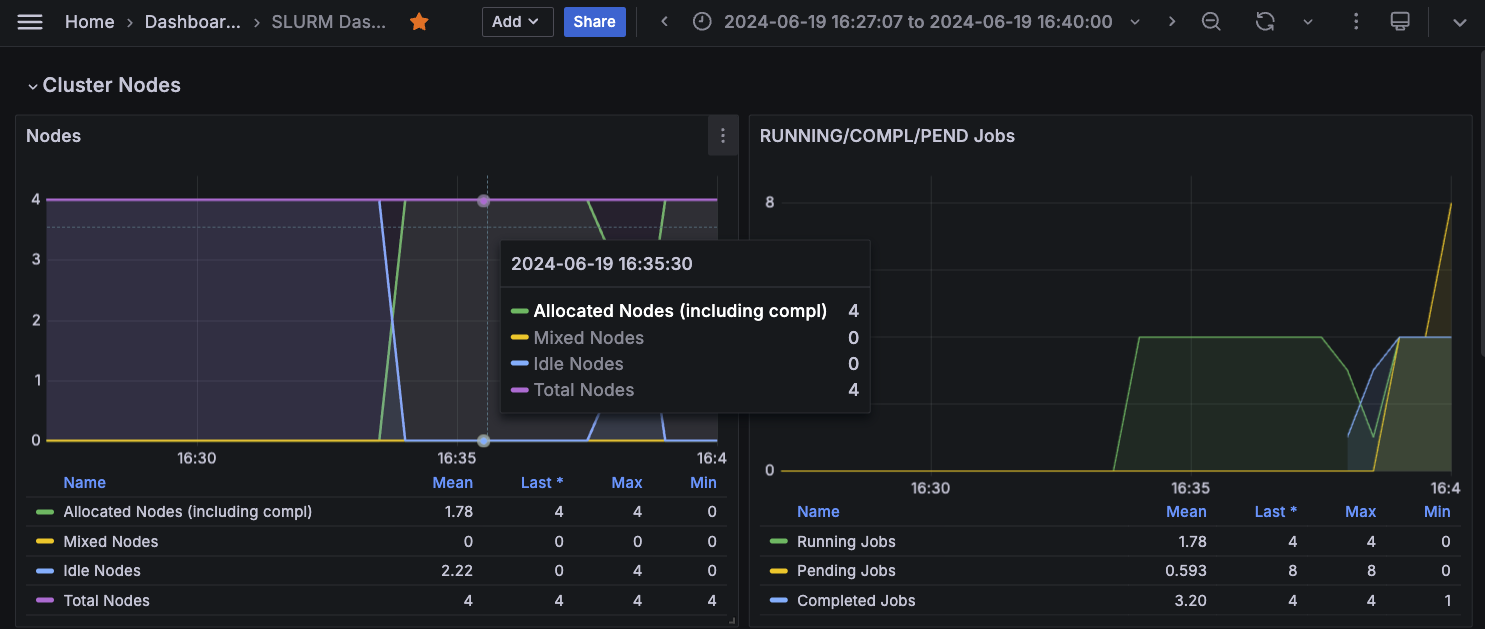
Monitor cluster usage
To achieve comprehensive observability into your SageMaker HyperPod cluster resources and software components, integrate the cluster with Amazon Managed Service for Prometheus and Amazon Managed Grafana. The integration with Amazon Managed Service for Prometheus makes it possible to export of metrics related to your HyperPod cluster resources, providing insights into their performance, utilization, and health. The integration with Amazon Managed Grafana makes it possible to visualize these metrics through various Grafana dashboards that offer intuitive interfaces for monitoring and analyzing the cluster’s behavior. You can follow the SageMaker documentation on Monitor SageMaker HyperPod cluster resources and Workshop Studio Observability section to bootstrap your cluster monitoring with the metric exporter services. The following screenshot shows a Grafana dashboard.
Inference and results discussion
When the fine-tuned model is ready, you have two primary deployment options: using popular image and video generation GUIs like ComfyUI or deploying an inference endpoint with Amazon SageMaker. The SageMaker option offers several advantages, including easy integration of image generation APIs with video generation endpoints to create end-to-end pipelines. As a managed service with auto scaling, SageMaker makes parallel generation of multiple videos possible using either the same reference image with different reference videos or the reverse. Furthermore, you can deploy various video generation model endpoints such as MimicMotion and UniAnimate, allowing for quality comparisons by generating videos in parallel with the same reference image and video. This approach not only provides flexibility and scalability but also accelerates the production process by making possible the generation of a large number of videos quickly, ultimately streamlining the process of obtaining content that meets business requirements. The SageMaker option thus offers a powerful, efficient, and scalable solution for video generation workflows. The following diagram shows a basic version of video generation pipeline. You can modify it based on your own specific business requirements.

Recent advancements in video generation have rapidly overcome limitations of earlier models like AnimateAnyone. Two notable research papers showcase significant progress in this domain.
Champ: Controllable and Consistent Human Image Animation with 3D Parametric Guidance enhances shape alignment and motion guidance. It demonstrates superior ability in generating high-quality human animations that accurately capture both pose and shape variations, with improved generalization on in-the-wild datasets.
UniAnimate: Taming Unified Video Diffusion Models for Consistent Human Image Animation makes it possible to generate longer videos, up to one minute, compared to earlier models’ limited frame outputs. It introduces a unified noise input supporting both random noise input and first frame conditioned input, enhancing long-term video generation capabilities.
Cleanup
To avoid incurring future charges, delete the resources created as part of this post:
- Delete the SageMaker HyperPod cluster using either the CLI or the console.
- Once the SageMaker HyperPod cluster deletion is complete, delete the CloudFormation stack. For more details on cleanup, refer to the cleanup section in the Amazon SageMaker HyperPod workshop.
- To delete the endpoints created during deployment, refer to the endpoint deletion section we provided in the Jupyter notebook. Then manually delete the SageMaker notebook.
Conclusion
In this post, we explored the exciting field of video generation and showcased how SageMaker HyperPod can be used to efficiently train video generation algorithms at scale. By using the AnimateAnyone algorithm as an example, we demonstrated the step-by-step process of setting up a SageMaker HyperPod cluster, running the algorithm, scaling it to multiple GPU nodes, and monitoring GPU usage during the training process.
SageMaker HyperPod offers several key advantages that make it an ideal platform for training large-scale ML models, particularly in the domain of video generation. Its purpose-built infrastructure allows for distributed training at scale so you can manage clusters with desired instance types and counts. The ability to attach a shared file system such as Amazon FSx for Lustre provides efficient data storage and retrieval, with full bidirectional synchronization with Amazon S3. Moreover, the SageMaker HyperPod customizable environment, integration with Slurm, and seamless connectivity with Visual Studio Code enhance productivity and simplify the management of distributed training jobs.
We encourage you to use SageMaker HyperPod for your ML training workloads, especially those involved in video generation or other computationally intensive tasks. By harnessing the power of SageMaker HyperPod, you can accelerate your research and development efforts, iterate faster, and build state-of-the-art models more efficiently. Embrace the future of video generation and unlock new possibilities with SageMaker HyperPod. Start your journey today and experience the benefits of distributed training at scale.
About the author
 Yanwei Cui, PhD, is a Senior Machine Learning Specialist Solutions Architect at AWS. He started machine learning research at IRISA (Research Institute of Computer Science and Random Systems), and has several years of experience building AI-powered industrial applications in computer vision, natural language processing, and online user behavior prediction. At AWS, he shares his domain expertise and helps customers unlock business potentials and drive actionable outcomes with machine learning at scale. Outside of work, he enjoys reading and traveling.
 Gordon Wang is a Senior Data Scientist at AWS. He helps customers imagine and scope the use cases that will create the greatest value for their businesses, define paths to navigate technical or business challenges. He is passionate about computer vision, NLP, generative AI, and MLOps. In his spare time, he loves running and hiking.
 Gary LO is a Solutions Architect at AWS based in Hong Kong. He is a highly passionate IT professional with over 10 years of experience in designing and implementing critical and complex solutions for distributed systems, web applications, and mobile platforms for startups and enterprise companies. Outside of the office, he enjoys cooking and sharing the latest technology trends and insights on his social media platforms with thousands of followers.
Read More


 Jay Pillai is a Principal Solutions Architect at Amazon Web Services. In this role, he functions as the Lead Architect, helping partners ideate, build, and launch Partner Solutions. As an Information Technology Leader, Jay specializes in artificial intelligence, generative AI, data integration, business intelligence, and user interface domains. He holds 23 years of extensive experience working with several clients across supply chain, legal technologies, real estate, financial services, insurance, payments, and market research business domains.
 Rupinder Grewal is a Senior AI/ML Specialist Solutions Architect with AWS. He currently focuses on serving of models and MLOps on Amazon SageMaker. Prior to this role, he worked as a Machine Learning Engineer building and hosting models. Outside of work, he enjoys playing tennis and biking on mountain trails.
 Evandro Franco is a Sr. AI/ML Specialist Solutions Architect at Amazon Web Services. He helps AWS customers overcome business challenges related to AI/ML on top of AWS. He has more than 18 years of experience working with technology, from software development, infrastructure, serverless, to machine learning.
 Felipe Lopez is a Senior AI/ML Specialist Solutions Architect at AWS. Prior to joining AWS, Felipe worked with GE Digital and SLB, where he focused on modeling and optimization products for industrial applications.
 Sandeep Singh is a Senior Generative AI Data Scientist at Amazon Web Services, helping businesses innovate with generative AI. He specializes in generative AI, artificial intelligence, machine learning, and system design. He is passionate about developing state-of-the-art AI/ML-powered solutions to solve complex business problems for diverse industries, optimizing efficiency and scalability.
 Ragha Prasad is a Principal Engineer and a founding member of Amazon Bedrock, where he has had the privilege to listen to customer needs first-hand and understands what it takes to build and launch scalable and secure Gen AI products. Prior to Bedrock, he worked on numerous products in Amazon, ranging from devices to Ads to Robotics.
 Paras Mehra is a Senior Product Manager at AWS. He is focused on helping build Amazon SageMaker Training and Processing. In his spare time, Paras enjoys spending time with his family and road biking around the Bay Area.


 Joe Wilson is a Solutions Architect at Amazon Web Services supporting nonprofit organizations. He has core competencies in data analytics, AI/ML and GenAI. Joe background is in data science and international development. He is passionate about leveraging data and technology for social good.
 Pat Wilson is a Solutions Architect at Amazon Web Services with a focus on AI/ML workloads and security. He currently supports Federal Partners. Outside of work Pat enjoys learning, working out, and spending time with family/friends.
 Josh Famestad is a Solutions Architect at Amazon Web Services. Josh works with public sector customers to build and execute cloud based approaches to deliver on business priorities.


 Eashan Kaushik is an Associate Solutions Architect at Amazon Web Services. He is driven by creating cutting-edge generative AI solutions while prioritizing a customer-centric approach to his work. Before this role, he obtained an MS in Computer Science from NYU Tandon School of Engineering. Outside of work, he enjoys sports, lifting, and running marathons.
 Chris Pecora is a Generative AI Data Scientist at Amazon Web Services. He is passionate about building innovative products and solutions while also focusing on customer-obsessed science. When not running experiments and keeping up with the latest developments in generative AI, he loves spending time with his kids.


 Scott Patterson is a Senior Solutions Architect at AWS.
 Andreas Astrom is the Head of Technology and Innovation at Northpower


 Peter Bellows is a Principal Solutions Architect and Head of Technology for Commercial Aviation in the Worldwide Specialist Organization (WWSO) at Amazon Web Services (AWS). He leads technical development for solutions across aerospace domains, including manufacturing, engineering, operations, and security. Prior to AWS, he worked in aerospace engineering for 20+ years.
 Shreyas Subramanian is a Principal Data Scientist and helps customers by using Machine Learning to solve their business challenges using the AWS platform. Shreyas has a background in large scale optimization and Machine Learning, and in use of Machine Learning and Reinforcement Learning for accelerating optimization tasks.
 Priyanka Mahankali is a Senior Specialist Solutions Architect for Aerospace at AWS, bringing over 7 years of experience across the cloud and aerospace sectors. She is dedicated to streamlining the journey from innovative industry ideas to cloud-based implementations.
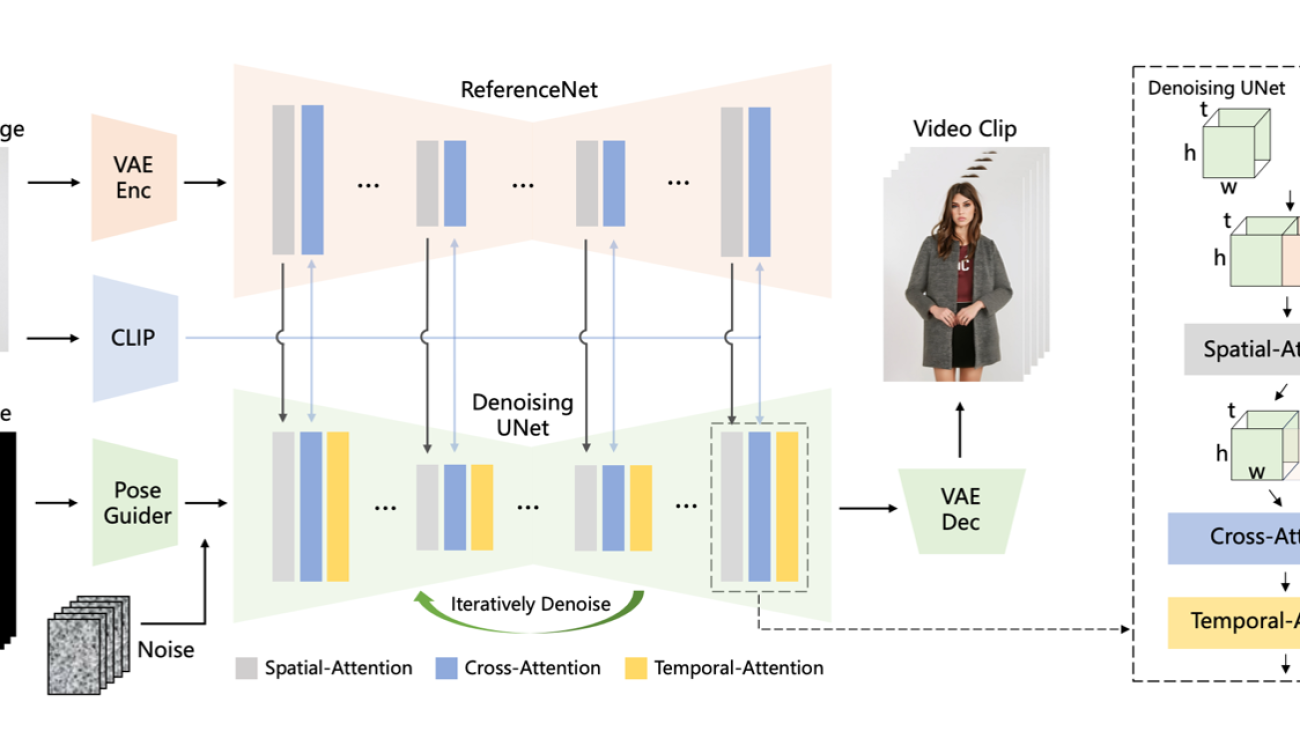


 Koushik Konjeti is a Senior Solutions Architect at Amazon Web Services. He has a passion for aligning architectural guidance with customer goals, ensuring solutions are tailored to their unique requirements. Outside of work, he enjoys playing cricket and tennis.
 Vijay Velpula is a Data Architect with AWS Professional Services. He helps customers implement Big Data and Analytics Solutions. Outside of work, he enjoys spending time with family, traveling, hiking and biking.
 Ram Vittal is a Principal ML Solutions Architect at AWS. He has over 3 decades of experience architecting and building distributed, hybrid, and cloud applications. He is passionate about building secure, scalable, reliable AI/ML and big data solutions to help enterprise customers with their cloud adoption and optimization journey. In his spare time, he rides motorcycle and enjoys the nature with his family.


 #LuxuryBrand #TimelessElegance #ExclusiveCollection


