The General Data Protection Regulation (GDPR) right to be forgotten, also known as the right to erasure, gives individuals the right to request the deletion of their personally identifiable information (PII) data held by organizations. This means that individuals can ask companies to erase their personal data from their systems and from the systems of any third parties with whom the data was shared.
Amazon Bedrock is a fully managed service that makes foundational models (FMs) from leading artificial intelligence (AI) companies and Amazon available through an API, so you can choose from a wide range of FMs to find the model that’s best suited for your use case. With the Amazon Bedrock serverless experience, you can get started quickly, privately customize FMs with your own data, and integrate and deploy them into your applications using the Amazon Web Services (AWS) tools without having to manage infrastructure.
FMs are trained on vast quantities of data, allowing them to be used to answer questions on a variety of subjects. However, if you want to use an FM to answer questions about your private data that you have stored in your Amazon Simple Storage Service (Amazon S3) bucket, you need to use a technique known as Retrieval Augmented Generation (RAG) to provide relevant answers for your customers.
Knowledge Bases for Amazon Bedrock is a fully managed RAG capability that allows you to customize FM responses with contextual and relevant company data. Knowledge Bases for Amazon Bedrock automates the end-to-end RAG workflow, including ingestion, retrieval, prompt augmentation, and citations, so you don’t have to write custom code to integrate data sources and manage queries.
Many organizations are building generative AI applications and powering them with RAG-based architectures to help avoid hallucinations and respond to the requests based on their company-owned proprietary data, including personally identifiable information (PII) data.
In this post, we discuss the challenges associated with RAG architectures in responding to GDPR right to be forgotten requests, how to build a GDPR compliant RAG architecture pattern using Knowledge Bases for Amazon Bedrock, and actionable best practices for organizations to respond to the right to be forgotten request requirements of the GDPR for data stored in vector datastores.
Who does GDPR apply to?
The GDPR applies to all organizations established in the EU and to organizations, whether or not established in the EU, that process the personal data of EU individuals in connection with either the offering of goods or services to data subjects in the EU or the monitoring of behavior that takes place within the EU.
The following are key terms used when discussing the GDPR:
- Data subject – An identifiable living person and resident in the EU or UK, on whom personal data is held by a business or organization or service provider.
- Processor – The entity that processes the data on the instructions of the controller (for example, AWS).
- Controller – The entity that determines the purposes and means of processing personal data (for example, an AWS customer).
- Personal data – Information relating to an identified or identifiable person, including names, email addresses, and phone numbers.
Challenges and considerations with RAG architectures
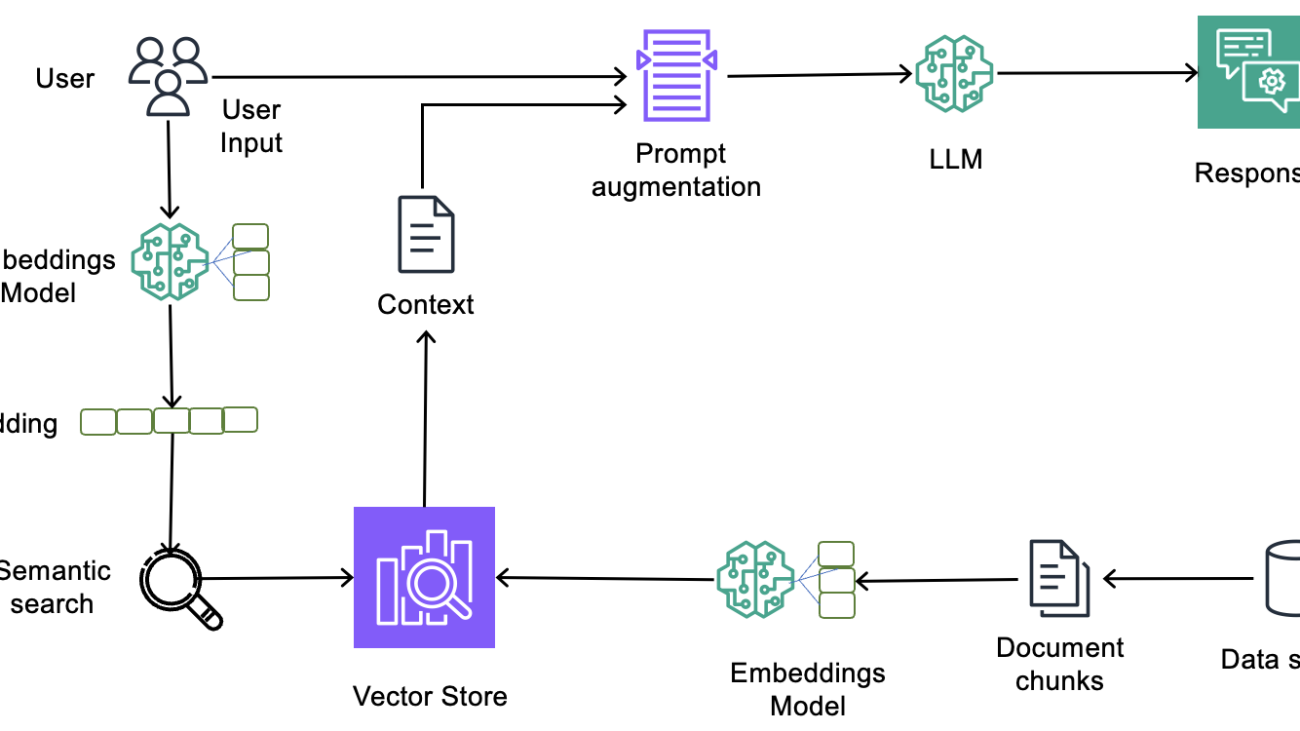
Typical RAG architecture at a high level involves three stages:
- Source data pre-processing
- Generating embeddings using an embedding LLM
- Storing the embeddings in a vector store.
Challenges associated with these stages involve not knowing all touchpoints where data is persisted, maintaining a data pre-processing pipeline for document chunking, choosing a chunking strategy, vector database, and indexing strategy, generating embeddings, and any manual steps to purge data from vector stores and keep it in sync with source data. The following diagram depicts a high-level RAG architecture.

Because Knowledge Bases for Amazon Bedrock is a fully managed RAG solution, no customer data is stored within the Amazon Bedrock service account permanently, and request details without prompts or responses are logged in Amazon CloudTrail. Model providers can’t access customer data in the deployment account. Crucially, if you delete data from the source S3 bucket, it’s automatically removed from the underlying vector store after syncing the knowledge base.
However, be aware that the service account keeps the data for eight days; after that, it will be purged from the service account. This data is maintained securely with server-side encryption (SSE) using a service key, and optionally using a customer-provided key. If the data needs to be purged immediately from the service account, you can contact the AWS team to do so. This streamlined approach simplifies the GDPR right to be forgotten compliance for generative AI applications.
When calling knowledge bases, using the RetrieveAndGenerate API, Knowledge Bases for Amazon Bedrock takes care of managing sessions and memory on your behalf. This data is SSE encrypted by default, and optionally encrypted using a customer-managed key (CMK). Data to manage sessions is automatically purged after 24 hours.
The following solution discusses a reference architecture pattern using Knowledge Bases for Amazon Bedrock and best practices to support your data subject’s right to be forgotten request in your organization.
Solution approach: Simplified RAG implementation using Knowledge Bases for Amazon Bedrock
With a knowledge base, you can securely connect foundation models (FMs) in Amazon Bedrock to your company data for RAG. Access to additional data helps the model generate more relevant, context-specific, and accurate responses without continuously retraining the FM. Information retrieved from the knowledge base comes with source attribution to improve transparency and minimize hallucinations.
Knowledge Bases for Amazon Bedrock manages the end-to-end RAG workflow for you. You specify the location of your data, select an embedding model to convert the data into vector embeddings, and have Knowledge Bases for Amazon Bedrock create a vector store in your account to store the vector data. When you select this option (available only in the console), Knowledge Bases for Amazon Bedrock creates a vector index in Amazon OpenSearch Serverless in your account, removing the need to do so yourself.
Vector embeddings include the numeric representations of text data within your documents. Each embedding aims to capture the semantic or contextual meaning of the data. Amazon Bedrock takes care of creating, storing, managing, and updating your embeddings in the vector store, and it verifies that your data is in sync with your vector store. The following diagram depicts a simplified architecture using Knowledge Bases for Amazon Bedrock:

Prerequisites to create a knowledge base
Before you can create a knowledge base, you must complete the following prerequisites.
Data preparation
Before creating a knowledge base using Knowledge Bases for Amazon Bedrock, it’s essential to prepare the data to augment the FM in a RAG implementation. In this example, we used a simple curated .csv file which contains customer PII information that needs to be deleted to respond to a GDPR right to be forgotten request by the data subject.
Configure an S3 bucket
You’ll need to create an S3 bucket and make it private. Amazon S3 provides several encryption options for securing the data at rest and in transit. Optionally, you can enable bucket versioning as a mechanism to check multiple versions of the same file. For this example, we created a bucket with versioning enabled with the name bedrock-kb-demo-gdpr. After you create the bucket, upload the .csv file to the bucket. The following screenshot shows what the upload looks like when it’s complete.

Select the uploaded file and from Actions dropdown and choose the Query with S3 Select option to query the .csv data using SQL if the data was loaded correctly.

The query in the following screenshot displays the first five records from the .csv file. In this demonstration, let’s assume that you need to remove the data related to a particular customer. Example: customer information pertaining to the email address art@venere.org.

Steps to create a knowledge base
With the prerequisites in place, the next step is to use Knowledge Bases for Amazon Bedrock to create a knowledge base.
- On the Amazon Bedrock console, select Knowledge Base under Orchestration in the left navigation pane.
- Choose Create Knowledge base.
- For Knowledge base name, enter a name.
- For Runtime role, select Create and use a new service role, enter a service role name, and choose Next.

- In the next stage, to configure the data source, enter a data source name and point to the S3 bucket created in the prerequisites.
- Expand the Advanced settings section and select Use default KMS key and then select Default chunking from Chunking strategy. Choose Next.

- Choose the embeddings model in the next screen. In this example we chose Titan Embeddings G1-Text v1.2.
- For Vector database, choose Quick create a new vector store – Recommended to set up an OpenSearch Serverless vector store on your behalf. Leave all the other options as default.

- Choose Review and Create and select Create knowledge base in the next screen which completes the knowledge base setup.

- Review the summary page, select the Data source and choose Sync. This begins the process of converting the data stored in the S3 bucket into vector embeddings in your OpenSearch Serverless vector collection.

- Note: The syncing operation can take minutes to hours to complete, based on the size of the dataset stored in your S3 bucket. During the sync operation, Amazon Bedrock downloads documents in your S3 bucket, divides them into chunks (we opted for the default strategy in this post), generates the vector embedding, and stores the embedding in your OpenSearch Serverless vector collection. When the initial sync is complete, the data source status will change to Ready.
- Now you can use your knowledge base. We use the Test knowledge base feature of Amazon Bedrock, choose the Anthropic Claude 2.1 model, and ask it a question about a sample customer.

We’ve demonstrated how to use Knowledge Bases for Amazon Bedrock and conversationally query the data using the knowledge base test feature. The query operation can also be done programmatically through the knowledge base API and AWS SDK integrations from within a generative AI application.
Delete customer information
In the sample prompt, we were able to retrieve the customer’s PII information—which was stored as part of the source dataset—using the email address. To respond to GDPR right to be forgotten requests, the next sequence of steps demonstrates how customer data deletion at source deletes the information from the generative AI application powered by Knowledge Bases for Bedrock.
- Delete the customer information part of the source .csv file and re-upload the file to the S3 bucket. The following snapshot of querying the .csv file using S3 Select shows that the customer information associated with the email attribute
art@venere.orgwas not returned in the results.
- Re-sync the knowledge base data source again from the Amazon Bedrock console.

- After the sync operation is complete and the data source status is Ready, test the knowledge base again using the prompt used earlier to verify if the customer PII information is returned in the response.

We were able to successfully demonstrate that after the customer PII information was removed from the source in the S3 bucket, the related entries from the knowledge base are automatically deleted after the sync operation. We can also confirm that the associated vector embeddings stored in OpenSearch Serverless collection were cleared by querying from the OpenSearch dashboard using dev tools.


Note: In some RAG-based architectures, session history will be persisted in an external database such as Amazon DynamoDB. It’s important to evaluate if this session history contains PII data and develop a plan to remove the data if necessary.
Audit tracking
To support GDPR compliance efforts, organizations should consider implementing an audit control framework to record right to be forgotten requests. This will help with your audit requests and provide the ability to roll back in case of accidental deletions observed during the quality assurance process. It’s important to maintain the list of users and systems that might be impacted during this process to maintain effective communication. Also consider storing the metadata of the files being loaded in your knowledge bases for effective tracking. Example columns include knowledge base name, File Name, Date of sync, Modified User, PII Check, Delete requested by, and so on. Amazon Bedrock will write API actions to AWS CloudTrail, which can also be used for audit tracking.
Some customers might need to persist the Amazon CloudWatch Logs to support their internal policies. By default, request details without prompts or responses are logged in CloudTrail and Amazon CloudWatch. However, customers can enable Model invocation logs, which can store PII information. You can help safeguard sensitive data that’s ingested by CloudWatch Logs by using log group data protection policies. These policies let you audit and mask sensitive data that appears in log events ingested by the log groups in your account. When you create a data protection policy, sensitive data that matches the data identifiers (for example, PII) you’ve selected is masked at egress points, including CloudWatch Logs Insights, metric filters, and subscription filters. Only users who have the logs: Unmask IAM permission can view unmasked data. You can also use custom data identifiers to create data identifiers tailored to your specific use case. There are many methods customers can employ to detect and purge the same. Complete implementation details are beyond the scope of this post.
Data discovery and findability
Findability is an important step of the process. Organizations need to have mechanisms to find the data under consideration in an efficient and quick manner for timely response. You can Refer to the FAIR blog and 5 Actionable steps to GDPR Compliance. In this current example, you can leverage S3 Macie to determine the PII data in S3.
Backup and restore
Data from underlying vector stores can be transferred, exported, or copied to different AWS services or outside of the AWS cloud. Organizations should have an effective governance process to detect and remove data to align with the GDPR compliance requirement. However, this is beyond the scope of this post. It’s the responsibility of the customer to remove the data from the underlying backups. It’s good practice to keep the retention period at 29 days (if applicable) so that the backups are cleared after 30 days. Organizations can also set the backup schedule to a certain date (for example, the first of every month). If the policy requires you to remove the data from the backup immediately, you can take a snapshot of the vector store after the deletion of required PII data and then purge the existing backup.
Communication
It’s important to communicate to the users and processes that might be impacted by this deletion. As an example, if the application is powered by single sign-on (SSO) using an identity store such as AWS IAM Identity Center or Okta user profile, then information can be used for managing the stakeholder communications.
Security controls
Maintaining security is of great importance in GDPR compliance. By implementing robust security measures, organizations can help protect personal data from unauthorized access, inadvertent access, and misuse, thereby helping maintain the privacy rights of individuals. AWS offers a comprehensive suite of services and features that can help support GDPR compliance and enhance security measures. To learn more about the shared responsibility between AWS and customers for security and compliance, see the AWS shared responsibility model. The shared responsibility model is a useful approach to illustrate the different responsibilities of AWS (as a data processor or sub processor) and its customers (as either data controllers or data processors) under the GDPR.
AWS offers a GDPR-compliant AWS Data Processing Addendum (AWS DPA), which helps you to comply with GDPR contractual obligations. The AWS DPA is incorporated into the AWS Service Terms.
Article 32 of the GDPR requires that organizations must “…implement appropriate technical and organizational measures to ensure a level of security appropriate to the risk, including …the pseudonymization and encryption of personal data[…].” In addition, organizations must “safeguard against the unauthorized disclosure of or access to personal data.” See the Navigating GDPR Compliance on AWS whitepaper for more details.
Conclusion
We encourage you to take charge of your data privacy today. Prioritizing GPDR compliance and data privacy not only strengthens trust, but can also build customer loyalty and safeguard personal information in the digital era. If you need assistance or guidance, reach out to an AWS representative. AWS has teams of Enterprise Support Representatives, Professional Services Consultants, and other staff to help with GDPR questions. You can contact us with questions. To learn more about GDPR compliance when using AWS services, see the General Data Protection Regulation (GDPR) Center.
Disclaimer: The information provided above is not a legal advice. It is intended to showcase commonly followed best practices. It is crucial to consult with your organization’s privacy officer or legal counsel and determine appropriate solutions.
About the Authors
 Yadukishore Tatavarthi is a Senior Partner Solutions Architect supporting Healthcare and life science customers at Amazon Web Services. He has been helping the customers over the last 20 years in building the enterprise data strategies, advising customers on Generative AI, cloud implementations, migrations, reference architecture creation, data modeling best practices, data lake/warehouses architectures.
 Krishna Prasad is a Senior Solutions Architect in Strategic Accounts Solutions Architecture team at AWS. He works with customers to help solve their unique business and technical challenges providing guidance in different focus areas like distributed compute, security, containers, serverless, artificial intelligence (AI), and machine learning (ML).
 Rajakumar Sampathkumar is a Principal Technical Account Manager at AWS, providing customer guidance on business-technology alignment and supporting the reinvention of their cloud operation models and processes. He is passionate about cloud and machine learning. Raj is also a machine learning specialist and works with AWS customers to design, deploy, and manage their AWS workloads and architectures.


 Maysara Hamdan is a Partner Solutions Architect based in Atlanta, Georgia. Maysara has over 15 years of experience in building and architecting Software Applications and IoT Connected Products in Telecom and Automotive Industries. In AWS, Maysara helps partners in building their cloud practices and growing their businesses. Maysara is passionate about new technologies and is always looking for ways to help partners innovate and grow.
 Eric Bolme is a Specialist Solution Architect with AWS based on the East Coast of the United States. He has 8 years of experience building out a variety of deep learning and other AI use cases and focuses on Personalization and Recommendation use cases with AWS.


 Jianying Lang is a Principal Solutions Architect at AWS Worldwide Specialist Organization (WWSO). She has over 15 years of working experience in the HPC and AI field. At AWS, she focuses on helping customers deploy, optimize, and scale their AI/ML workloads on accelerated computing instances. She is passionate about combining the techniques in HPC and AI fields. Jianying holds a PhD in Computational Physics from the University of Colorado at Boulder.
 Fei Chen has 15 years’ industry experiences of leading teams in developing and productizing AI/ML at internet scale. At AWS, she leads the worldwide solution teams in Advanced Compute, including AI accelerators, HPC, IoT, visual and spatial compute, and the emerging technology focusing on technical innovations (AI and generative AI) in the aforementioned domains.
 Haozheng Fan is a software engineer at AWS. He is interested in large language models (LLMs) in production, including pre-training, fine-tuning, and evaluation. His works span from framework application level to hardware kernel level. He currently works on LLM training on novel hardware, with a focus on training efficiency and model quality.
 Hao Zhou is a Research Scientist with Amazon SageMaker. Before that, he worked on developing machine learning methods for fraud detection for Amazon Fraud Detector. He is passionate about applying machine learning, optimization, and generative AI techniques to various real-world problems. He holds a PhD in Electrical Engineering from Northwestern University.
 Yida Wang is a principal scientist in the AWS AI team of Amazon. His research interest is in systems, high-performance computing, and big data analytics. He currently works on deep learning systems, with a focus on compiling and optimizing deep learning models for efficient training and inference, especially large-scale foundation models. The mission is to bridge the high-level models from various frameworks and low-level hardware platforms including CPUs, GPUs, and AI accelerators, so that different models can run in high performance on different devices.
 Jun (Luke) Huan is a Principal Scientist at AWS AI Labs. Dr. Huan works on AI and data science. He has published more than 160 peer-reviewed papers in leading conferences and journals and has graduated 11 PhD students. He was a recipient of the NSF Faculty Early Career Development Award in 2009. Before joining AWS, he worked at Baidu Research as a distinguished scientist and the head of Baidu Big Data Laboratory. He founded StylingAI Inc., an AI startup, and worked as the CEO and Chief Scientist from 2019–2021. Before joining the industry, he was the Charles E. and Mary Jane Spahr Professor in the EECS Department at the University of Kansas. From 2015–2018, he worked as a program director at the US NSF, in charge of its big data program.


 Dr. Changsha Ma is an AI/ML Specialist at AWS. She is a technologist with a PhD in Computer Science, a master’s degree in Education Psychology, and years of experience in data science and independent consulting in AI/ML. She is passionate about researching methodological approaches for machine and human intelligence. Outside of work, she loves hiking, cooking, hunting food, and spending time with friends and families.
 Jun Shi is a Senior Solutions Architect at Amazon Web Services (AWS). His current areas of focus are AI/ML infrastructure and applications. He has over a decade experience in the FinTech industry as software engineer.
 Alfred Shen is a Senior AI/ML Specialist at AWS. He has been working in Silicon Valley, holding technical and managerial positions in diverse sectors including healthcare, finance, and high-tech. He is a dedicated applied AI/ML researcher, concentrating on CV, NLP, and multimodality. His work has been showcased in publications such as EMNLP, ICLR, and Public Health.

 Roy Allela is a Senior AI/ML Specialist Solutions Architect at AWS based in Munich, Germany. Roy helps AWS customers—from small startups to large enterprises—train and deploy large language models efficiently on AWS. Roy is passionate about computational optimization problems and improving the performance of AI workloads.
 Kanwaljit Khurmi is a Principal Solutions Architect at Amazon Web Services. He works with AWS customers to provide guidance and technical assistance, helping them improve the value of their solutions when using AWS. Kanwaljit specializes in helping customers with containerized and machine learning applications.
 Robert Van Dusen is a Senior Product Manager with Amazon SageMaker. He leads frameworks, compilers, and optimization techniques for deep learning training.
 Teng Xu is a Software Development Engineer in the Distributed Training group in AWS AI. He enjoys reading.
 Suhit Kodgule is a Software Development Engineer with the AWS Artificial Intelligence group working on deep learning frameworks. In his spare time, he enjoys hiking, traveling, and cooking.