Retrieval Augmented Generation (RAG) models have emerged as a promising approach to enhance the capabilities of language models by incorporating external knowledge from large text corpora. However, despite their impressive performance in various natural language processing tasks, RAG models still face several limitations that need to be addressed.
Naive RAG models face limitations such as missing content, reasoning mismatch, and challenges in handling multimodal data. Although they can retrieve relevant information, they may struggle to generate complete and coherent responses when required information is absent, leading to incomplete or inaccurate outputs. Additionally, even with relevant information retrieved, the models may have difficulty correctly interpreting and reasoning over the content, resulting in inconsistencies or logical errors. Furthermore, effectively understanding and reasoning over multimodal data remains a significant challenge for these primarily text-based models.
In this post, we present a new approach named multimodal RAG (mmRAG) to tackle those existing limitations in greater detail. The solution intends to address these limitations for practical generative artificial intelligence (AI) assistant use cases. Additionally, we examine potential solutions to enhance the capabilities of large language models (LLMs) and visual language models (VLMs) with advanced LangChain capabilities, enabling them to generate more comprehensive, coherent, and accurate outputs while effectively handling multimodal data. The solution uses Amazon Bedrock, a fully managed service that offers a choice of high-performing foundation models (FMs) from leading AI companies, providing a broad set of capabilities to build generative AI applications with security, privacy, and responsible AI.
Solution architecture
The mmRAG solution is based on a straightforward concept: to extract different data types separately, you generate text summarization using a VLM from different data types, embed text summaries along with raw data accordingly to a vector database, and store raw unstructured data in a document store. The query will prompt the LLM to retrieve relevant vectors from both the vector database and document store and generate meaningful and accurate answers.
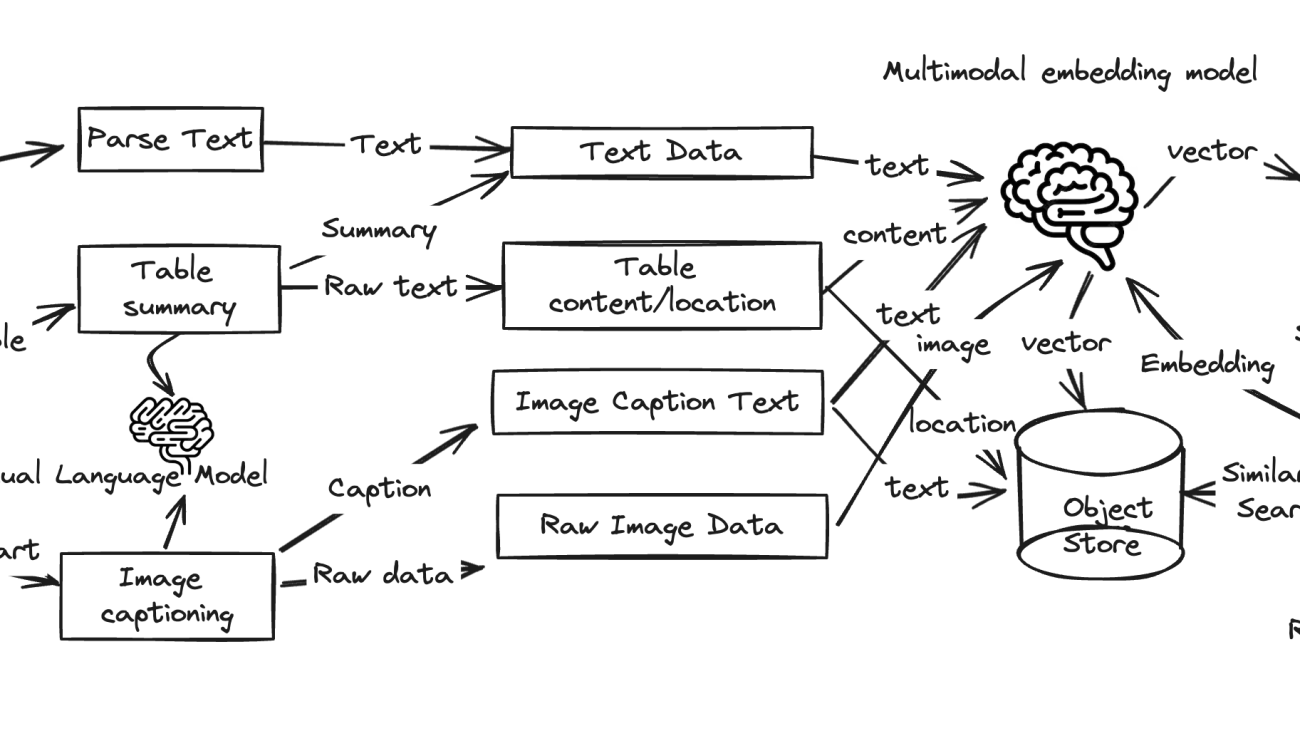
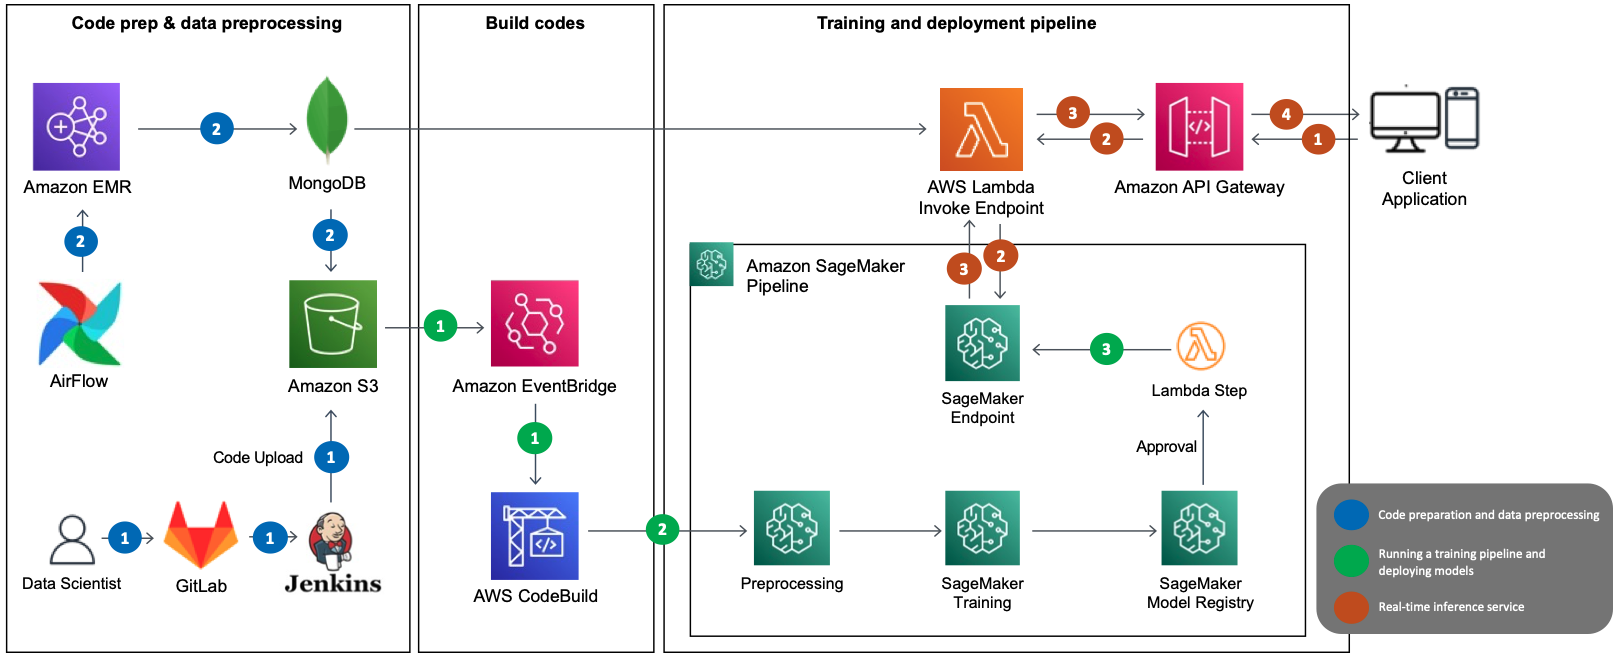
The following diagram illustrates the solution architecture.

The architecture diagram depicts the mmRAG architecture that integrates advanced reasoning and retrieval mechanisms. It combines text, table, and image (including chart) data into a unified vector representation, enabling cross-modal understanding and retrieval. The process begins with diverse data extractions from various sources such as URLs and PDF files by parsing and preprocessing text, table, and image data types separately, while table data is converted into raw text and image data into captions.
These parsed data streams are then fed into a multimodal embedding model, which encodes the various data types into uniform, high dimensional vectors. The resulting vectors, representing the semantic content regardless of original format, are indexed in a vector database for efficient approximate similarity searches. When a query is received, the reasoning and retrieval component performs similarity searches across this vector space to retrieve the most relevant information from the vast integrated knowledge base.
The retrieved multimodal representations are then used by the generation component to produce outputs such as text, images, or other modalities. The VLM component generates vector representations specifically for textual data, further enhancing the system’s language understanding capabilities. Overall, this architecture facilitates advanced cross-modal reasoning, retrieval, and generation by unifying different data modalities into a common semantic space.
Developers can access mmRAG source codes on the GitHub repo.
Configure Amazon Bedrock with LangChain
You start by configuring Amazon Bedrock to integrate with various components from the LangChain Community library. This allows you to work with the core FMs. You use the BedrockEmbeddings class to create two different embedding models: one for text (embedding_bedrock_text) and one for images (embeddings_bedrock_image). These embeddings represent textual and visual data in a numerical format, which is essential for various natural language processing (NLP) tasks.
Additionally, you use the LangChain Bedrock and BedrockChat classes to create a VLM model instance (llm_bedrock_claude3_haiku) from Anthropic Claude 3 Haiku and a chat instance based on a different model, Sonnet (chat_bedrock_claude3_sonnet). These instances are used for advanced query reasoning, argumentation, and retrieval tasks. See the following code snippet:
from langchain_community.embeddings import BedrockEmbeddings
from langchain_community.chat_models.bedrock import BedrockChat

embedding_bedrock_text = BedrockEmbeddings(client=boto3_bedrock, model_id="amazon.titan-embed-g1-text-02")
embeddings_bedrock_image = BedrockEmbeddings(client=boto3_bedrock, model_id="amazon.titan-embed-image-v1")

model_kwargs =  {
    "max_tokens": 2048,
    "temperature": 0.0,
    "top_k": 250,
    "top_p": 1,
    "stop_sequences": ["nnn"],
}
chat_bedrock_claude3_haiku = BedrockChat(
        model_id="anthropic:claude-3-haiku-20240307-v1:0",
        client=boto3_bedrock,
        model_kwargs=model_kwargs,
    )

chat_bedrock_claude3_sonnet = BedrockChat(
        model_id="anthropic.claude-3-sonnet-20240229-v1:0",
        client=boto3_bedrock,
        model_kwargs=model_kwargs,
    )
Parse content from data sources and embed both text and image data
In this section, we explore how to harness the power of Python to parse text, tables, and images from URLs and PDFs efficiently, using two powerful packages: Beautiful Soup and PyMuPDF. Beautiful Soup, a library designed for web scraping, makes it straightforward to sift through HTML and XML content, allowing you to extract the desired data from web pages. PyMuPDF offers an extensive set of functionalities for interacting with PDF files, enabling you to extract not just text but also tables and images with ease. See the following code:
from bs4 import BeautifulSoup as Soup
import fitz

def parse_tables_images_from_urls(url:str):
    ...
     # Parse the HTML content using BeautifulSoup
    soup = Soup(response.content, 'html.parser')

    # Find all table elements
    tables = soup.find_all('table')
    # Find all image elements
    images = soup.find_all('img')
    ...

def parse_images_tables_from_pdf(pdf_path:str):
    ...
    pdf_file = fitz.open(pdf_path)

    # Iterate through each page
    for page_index in range(len(pdf_file)):
        # Select the page
        page = pdf_file[page_index]

        # Search for tables on the page
        tables = page.find_tables()
        df = table.to_pandas()

        # Search for images on the page
        images = page.get_images()
        image_info = pdf_file.extract_image(xref)
        image_data = image_info["image"]
       ...
The following code snippets demonstrate how to generate image captions using Anthropic Claude 3 by invoking the bedrock_get_img_description utility function. Additionally, they showcase how to embed image pixels along with image captioning using the Amazon Titan image embedding model amazon.titan_embeding_image_v1 by calling the get_text_embedding function.
image_caption = bedrock_get_img_description(model_id,
            prompt='You are an expert at analyzing images in great detail. Your task is to carefully examine the provided
                    mage and generate a detailed, accurate textual description capturing all of the important elements and
                    context present in the image. Pay close attention to any numbers, data, or quantitative information visible,
                    and be sure to include those numerical values along with their semantic meaning in your description.
                    Thoroughly read and interpret the entire image before providing your detailed caption describing the
                    image content in text format. Strive for a truthful and precise representation of what is depicted',
            image=image_byteio,
            max_token=max_token,
            temperature=temperature,
            top_p=top_p,
            top_k=top_k,
            stop_sequences='Human:')

image_sum_vectors = get_text_embedding(image_base64=image_base64, text_description=image_caption,  embd_model_id=embd_model_id)
Embedding and vectorizing multimodality data
You can harness the capabilities of the newly released Anthropic Claude 3 Sonnet and Haiku on Amazon Bedrock, combined with the Amazon Titan image embedding model and LangChain. This powerful combination allows you to generate comprehensive text captions for tables and images, seamlessly integrating them into your content. Additionally, you can store vectors, objects, raw image file names, and source documents in an Amazon OpenSearch Serverless vector store and object store. Use the following code snippets to create image captions by invoking the utility function bedrock_get_img_description. Embed image pixels along with image captions using the Amazon Titan image embedding model amazon.titan_embeding_image_v1 by calling the get_text_embedding functions.
def get_text_embedding(image_base64=None, text_description=None,  embd_model_id:str="amazon.titan-embed-image-v1"):
    input_data = {}
    if image_base64 is not None:
        input_data["inputImage"] = image_base64
    if text_description is not None:
        input_data["inputText"] = text_description
    if not input_data:
        raise ValueError("At least one of image_base64 or text_description must be provided")
    body = json.dumps(input_data)
    response = boto3_bedrock.invoke_model(
        body=body,
        modelId=embd_model_id,
        accept="application/json",
        contentType="application/json"
    )
    response_body = json.loads(response.get("body").read())
    return response_body.get("embedding")

image_caption = bedrock_get_img_description(model_id,
            prompt='You are an expert at analyzing images in great detail. Your task is to carefully examine the provided
                    mage and generate a detailed, accurate textual description capturing all of the important elements and
                    context present in the image. Pay close attention to any numbers, data, or quantitative information visible,
                    and be sure to include those numerical values along with their semantic meaning in your description.
                    Thoroughly read and interpret the entire image before providing your detailed caption describing the
                    image content in text format. Strive for a truthful and precise representation of what is depicted',
            image=image_byteio,
            max_token=max_token,
            temperature=temperature,
            top_p=top_p,
            top_k=top_k,
            stop_sequences='Human:')

image_sum_vectors = get_text_embedding(image_base64=image_base64, text_description=image_sum,  embd_model_id=embd_model_id)
You can consult the provided code examples for more information on how to embed multimodal and insert vector documents into the OpenSearch Serverless vector store. For more information about data access, refer to Data access control for Amazon OpenSearch Serverless.
# Form a data dictionary with image metatadata, raw image object store location and base64 encoded image data
document = {
    "doc_source": image_url,
    "image_filename": s3_image_path,
    "embedding": image_base64
}
# Parse out only the iamge name from the full temp path
filename = f"jsons/{image_path.split('/')[-1].split('.')[0]}.json"

# Writing the data dict into JSON data
with open(filename, 'w') as file:
    json.dump(document, file, indent=4)

#Load all json files from the temp directory
loader = DirectoryLoader("./jsons", glob='**/*.json', show_progress=False, loader_cls=TextLoader)

#loader = DirectoryLoader("./jsons", glob='**/*.json', show_progress=True, loader_cls=JSONLoader, loader_kwargs = {'jq_schema':'.content'})
new_documents = loader.load()
new_docs = text_splitter.split_documents(new_documents)

# Insert into AOSS
new_docsearch = OpenSearchVectorSearch.from_documents(
    new_docs,
    bedrock_embeddings,
    opensearch_url=host,
    http_auth=auth,
    timeout = 100,
    use_ssl = True,
    verify_certs = True,
    connection_class = RequestsHttpConnection,
    index_name=new_index_name,
    engine="faiss",
)
Advanced RAG with fusion and decomposition
Fusion in RAG presents an innovative search strategy designed to transcend the limitations of conventional search techniques, aligning more closely with the complex nature of human inquiries. This initiative elevates the search experience by integrating multi-faceted query generation and using Reciprocal Rank Fusion for an enhanced re-ranking of search outcomes. This approach offers a more nuanced and effective way to navigate the vast expanse of available information, catering to the intricate and varied demands of users’ searches.
The following diagram illustrates this workflow.

We use the Anthropic Claude 3 Sonnet and Haiku models, which possess the capability to process visual and language data, which enables them to handle the query decomposition (Haiku) and answer fusion (Sonnet) stages effectively. The following code snippet demonstrates how to create a retriever using OpenSearch Serverless:
from langchain.vectorstores import OpenSearchVectorSearch
retriever  =  OpenSearchVectorSearch(
    opensearch_url = "{}.{}.aoss.amazonaws.com".format(<collection_id>, <my_region>),
    index_name = <index_name>,
    embedding_function = embd)
The combination of decomposition and fusion intend to address the limitations of the chain-of-thought (CoT) method in language models. It involves breaking down complex problems into simpler, sequential sub-problems, where each sub-problem builds upon the solution of the previous one. This technique significantly enhances the problem-solving abilities of language models in areas such as symbolic manipulation, compositional generalization, and mathematical reasoning.
The RAG-decomposition approach, which uses the decomposition step (see the following code), underscores the potential of a technique called least-to-most prompting. This technique not only improves upon existing methods but also paves the way for more advanced, interactive learning frameworks for language models. The ultimate goal is to move towards a future where language models can learn from bidirectional conversations, enabling more effective reasoning and problem-solving capabilities.
# Decomposition
prompt_rag = hub.pull("rlm/rag-prompt")
template = """You are a helpful assistant that generates multiple sub-questions related to an input question. n
The goal is to break down the input into a set of sub-problems / sub-questions that can be answers in isolation. n
Generate multiple search queries semantically related to: {question} n
Output (5 queries):"""
prompt_decomposition = ChatPromptTemplate.from_template(template)
generate_queries_decomposition = ( prompt_decomposition | llm_bedrock | StrOutputParser() | (lambda x: x.split("n")))
questions = generate_queries_decomposition.invoke({"question":question})

def reciprocal_rank_fusion(results: list[list], k=60):

    # Initialize a dictionary to hold fused scores for each unique document
    fused_scores = {}

    # Iterate through each list of ranked documents
    for docs in results:
        # Iterate through each document in the list, with its rank (position in the list)
        for rank, doc in enumerate(docs):
            # Convert the document to a string format to use as a key (assumes documents can be serialized to JSON)
            doc_str = dumps(doc)
            # If the document is not yet in the fused_scores dictionary, add it with an initial score of 0
            if doc_str not in fused_scores:
                fused_scores[doc_str] = 0
            # Retrieve the current score of the document, if any
            previous_score = fused_scores[doc_str]
            # Update the score of the document using the RRF formula: 1 / (rank + k)
            fused_scores[doc_str] += 1 / (rank + k)
    # Sort the documents based on their fused scores in descending order to get the final reranked results
    reranked_results = [
        (loads(doc), score)
        for doc, score in sorted(fused_scores.items(), key=lambda x: x[1], reverse=True)
    ]
    # Return the reranked results as a list of tuples, each containing the document and its fused score
    return reranked_results

def retrieve_and_rag(question,prompt_rag,sub_question_generator_chain):
    sub_questions = sub_question_generator_chain.invoke({"question":question})
    # Initialize a list to hold RAG chain results
    rag_results = []
    for sub_question in sub_questions:
        # Retrieve documents for each sub-question with reciprocal reranking
        retrieved_docs = retrieval_chain_rag_fusion.invoke({"question": sub_question})
        # Use retrieved documents and sub-question in RAG chain
        answer = (prompt_rag
            | chat_bedrock
            | StrOutputParser()
            | reciprocal_rank_fusion
            ).invoke({"context": retrieved_docs,"question": sub_question}
        rag_results.append(answer)
    return rag_results,sub_questions

def format_qa_pairs(questions, answers):
    """Format Q and A pairs"""

    formatted_string = ""
    for i, (question, answer) in enumerate(zip(questions, answers), start=1):
        formatted_string += f"Question {i}: {question}nAnswer {i}: {answer}nn"
    return formatted_string.strip()

context = format_qa_pairs(questions, answers)

# Prompt
template = """Here is a set of Q+A pairs:

{context}

Use these to synthesize an answer to the question: {question}
"""
prompt_fusion = ChatPromptTemplate.from_template(template)
final_rag_chain = (prompt_fusion | llm_bedrock| StrOutputParser())

# Decompsing and reciprocal reranking
retrieval_chain_rag_fusion = generate_queries_decomposition | retriever.map() | reciprocal_rank_fusion

# Wrap the retrieval and RAG process in a RunnableLambda for integration into a chain
answers, questions = retrieve_and_rag(question, prompt_rag, generate_queries_decomposition)
final_rag_chain.invoke({"context":context,"question":question})
The RAG process is further enhanced by integrating a reciprocal re-ranker, which uses sophisticated NLP techniques. This makes sure the retrieved results are relevant and also semantically aligned with the user’s intended query. This multimodal retrieval approach seamlessly operates across vector databases and object stores, marking a significant advancement in the quest for more efficient, accurate, and contextually aware search mechanisms.
Multimodality retrievals
The mmRAG architecture enables the system to understand and process multimodal queries, retrieve relevant information from various sources, and generate multimodal answers by combining textual, tabular, and visual information in a unified manner. The following diagram highlights the data flows from queries to answers by using an advanced RAG and a multimodal retrieval engine powered by a multimodal embedding model (amazon.titan-embed-image-v1), an object store (Amazon S3), and a vector database (OpenSearch Serverless). For tables, the system retrieves relevant table locations and metadata, and computes the cosine similarity between the multimodal embedding and the vectors representing the table and its summary. Similarly, for images, the system retrieves relevant image locations and metadata, and computes the cosine similarity between the multimodal embedding and the vectors representing the image and its caption.

# Connect to the AOSS with given host and index name
docsearch = OpenSearchVectorSearch(
    index_name=index_name,  # TODO: use the same index-name used in the ingestion script
    embedding_function=bedrock_embeddings,
    opensearch_url=host,  # TODO: e.g. use the AWS OpenSearch domain instantiated previously
    http_auth=auth,
    timeout = 100,
    use_ssl = True,
    verify_certs = True,
    connection_class = RequestsHttpConnection,
    engine="faiss",
)

# Query for images with text
query = "What is the math and reasoning score MMMU (val) for Anthropic Claude 3 Sonnet ?"
t2i_results = docsearch.similarity_search_with_score(query, k=3)  # our search query  # return 3 most relevant docs

# Or Query AOSS with image aka image-to-image
with open(obj_image_path, "rb") as image_file:
    image_data = image_file.read()
    image_base64 = base64.b64encode(image_data).decode('utf8')
    image_vectors = get_image_embedding(image_base64=image_base64)
    i2i_results = docsearch.similarity_search_with_score_by_vector(image_vectors, k=3)  # our search query  # return 3 most relevant docs
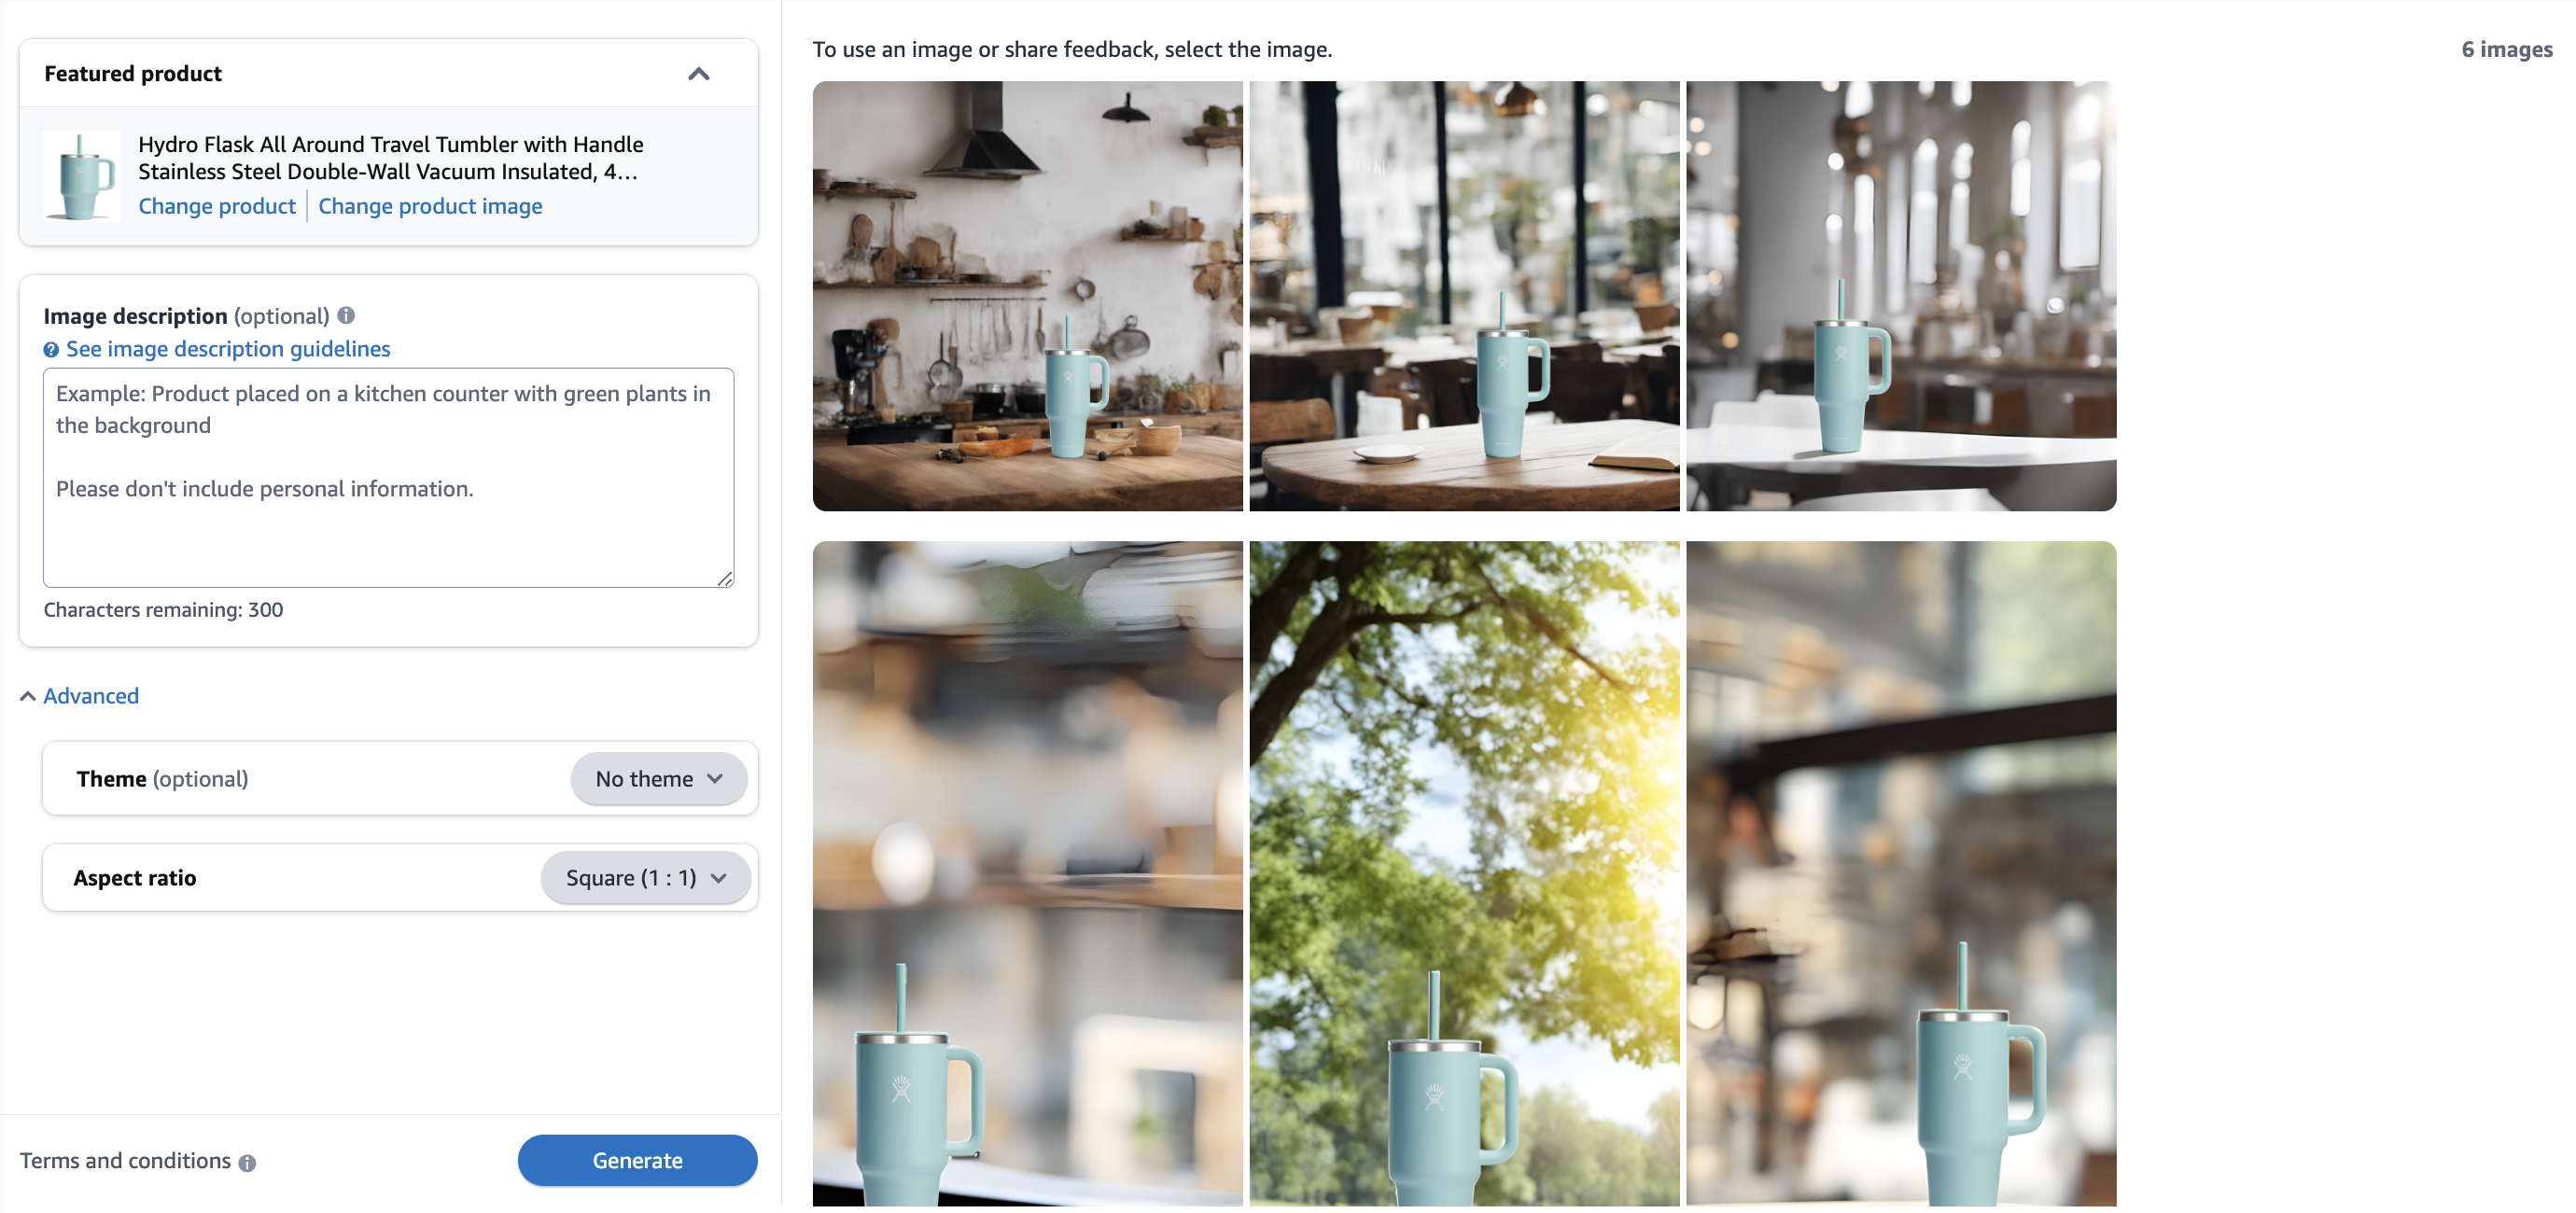
The following screenshot illustrates the improved accuracy and comprehensive understanding of the user’s query with multimodality capability. The mmRAG approach is capable of grasping the intent behind the query, extracting relevant information from the provided chart, and estimating the overall costs, including the estimated output token size. Furthermore, it can perform mathematical calculations to determine the cost difference. The output includes the source chart and a link to its original location.

Use cases and limitations
Amazon Bedrock offers a comprehensive set of generative AI models for enhancing content comprehension across various modalities. By using the latest advancements in VLMs, such as Anthropic Claude 3 Sonnet and Haiku, as well as the Amazon Titan image embedding model, Amazon Bedrock enables you to expand your document understanding beyond text to include tables, charts, and images. The integration of OpenSearch Serverless provides enterprise-grade vector storage and approximate k-NN search capabilities, enabling efficient retrieval of relevant information. With advanced LangChain decomposition and fusion techniques, you can use multi-step querying across different LLMs to improve accuracy and gain deeper insights. This powerful combination of cutting-edge technologies allows you to unlock the full potential of multimodal content comprehension, enabling you to make informed decisions and drive innovation across various data sources.
The reliance on visual language models and image embedding models for comprehensive and accurate image captions has its limitations. Although these models excel at understanding visual and textual data, the multi-step query decomposition, reciprocal ranking, and fusion processes involved can lead to increased inference latency. This makes such solutions less suitable for real-time applications or scenarios that demand instantaneous responses. However, these solutions can be highly beneficial in use cases where higher accuracy and less time-sensitive responses are required, allowing for more detailed and accurate analysis of complex visual and textual data.
Conclusion
In this post, we discussed how you can use multimodal RAG to address limitations in multimodal generative AI assistants. We invite you to explore mmRAG and take advantage of the advanced features of Amazon Bedrock. These powerful tools can assist your business in gaining deeper insights, making well-informed decisions, and fostering innovation driven by more accurate data. Ongoing research efforts are focused on developing an agenic and graph-based pipeline to streamline the processes of parsing, injection, and retrieval. These approaches hold the promise of enhancing the reliability and reusability of the mmRAG system.
Acknowledgement
Authors would like to expression sincere gratitude to Nausheen Sayed, Karen Twelves, Li Zhang, Sophia Shramko, Mani Khanuja, Santhosh Kuriakose, and Theresa Perkins for their comprehensive reviews.
About the Authors
 Alfred Shen is a Senior AI/ML Specialist at AWS. He has been working in Silicon Valley, holding technical and managerial positions in diverse sectors including healthcare, finance, and high-tech. He is a dedicated applied AI/ML researcher, concentrating on CV, NLP, and multimodality. His work has been showcased in publications such as EMNLP, ICLR, and Public Health.
 Changsha Ma is an generative AI Specialist at AWS. She is a technologist with a PhD in Computer Science, a master’s degree in Education Psychology, and years of experience in data science and independent consulting in AI/ML. She is passionate about researching methodological approaches for machine and human intelligence. Outside of work, she loves hiking, cooking, hunting food, mentoring college students for entrepreneurship, and spending time with friends and families.
 Julianna Delua is a Principal Specialist for AI/ML and generative AI. She serves the financial services industry customers including those in Capital Markets, Fintech and Payments. Julianna enjoys helping businesses turn new ideas into solutions and transform the organizations with AI-powered solutions.
 When working on articles in Storm, journalists have access to several AI tools implemented using Amazon Bedrock. Storm is a block-based editor that allows journalists to combine multiple blocks of content, such as title, lede, text, image, social media quotes, and more, into a complete article. With Amazon Bedrock, journalists can use AI to generate an article summary suggestion block and place it directly into the article. We use a single-shot prompt with the full article text in context to generate the summary.
 Aurélien Capdecomme is the Chief Technology Officer at 20 Minutes, where he leads the IT development and infrastructure teams. With over 20 years of experience in building efficient and cost-optimized architectures, he has a strong focus on serverless strategy, scalable applications and AI initiatives. He has implemented innovation and digital transformation strategies at 20 Minutes, overseeing the complete migration of digital services to the cloud.
 Bertrand d’Aure is a software developer at 20 Minutes. An engineer by training, he designs and implements the backend of 20 Minutes applications, with a focus on the software used by journalists to create their stories. Among other things, he is responsible for adding generative AI features to the software to simplify the authoring process.
 Dr. Pascal Vogel is a Solutions Architect at Amazon Web Services. He collaborates with enterprise customers across EMEA to build cloud-native solutions with a focus on serverless and generative AI. As a cloud enthusiast, Pascal loves learning new technologies and connecting with like-minded customers who want to make a difference in their cloud journey.


 Dhawal Patel is a Principal Machine Learning Architect at AWS. He has worked with organizations ranging from large enterprises to mid-sized startups on problems related to distributed computing, and Artificial Intelligence. He focuses on Deep learning including NLP and Computer Vision domains. He helps customers achieve high performance model inference on SageMaker.


 Marco Punio is a Solutions Architect focused on generative AI strategy, applied AI solutions, and conducting research to help customers hyper-scale on AWS. He is a qualified technologist with a passion for machine learning, artificial intelligence, and mergers and acquisitions. Marco is based in Seattle, WA, and enjoys writing, reading, exercising, and building applications in his free time.
 Preston Tuggle is a Sr. Specialist Solutions Architect working on generative AI.
 June Won is a product manager with Amazon SageMaker JumpStart. He focuses on making foundation models easily discoverable and usable to help customers build generative AI applications. His experience at Amazon also includes mobile shopping application and last mile delivery.
 Dr. Ashish Khetan is a Senior Applied Scientist with Amazon SageMaker built-in algorithms and helps develop machine learning algorithms. He got his PhD from University of Illinois Urbana-Champaign. He is an active researcher in machine learning and statistical inference, and has published many papers in NeurIPS, ICML, ICLR, JMLR, ACL, and EMNLP conferences.
 Shane Rai is a Principal GenAI Specialist with the AWS World Wide Specialist Organization (WWSO). He works with customers across industries to solve their most pressing and innovative business needs using AWS’s breadth of cloud-based AI/ML services including model offerings from top tier foundation model providers.
 Hemant Singh is an Applied Scientist with experience in Amazon SageMaker JumpStart. He got his master’s from Courant Institute of Mathematical Sciences and B.Tech from IIT Delhi. He has experience in working on a diverse range of machine learning problems within the domain of natural language processing, computer vision, and time series analysis.


 Veda Raman is a Senior Specialist Solutions Architect for Generative AI and machine learning based at AWS. Veda works with customers to help them architect efficient, secure and scalable machine learning applications. Veda specializes in generative AI services like Amazon Bedrock and Amazon Sagemaker.
 Uma Ramadoss is a Principal Solutions Architect at Amazon Web Services, focused on the Serverless and Integration Services. She is responsible for helping customers design and operate event-driven cloud-native applications using services like Lambda, API Gateway, EventBridge, Step Functions, and SQS. Uma has a hands on experience leading enterprise-scale serverless delivery projects and possesses strong working knowledge of event-driven, micro service and cloud architecture.
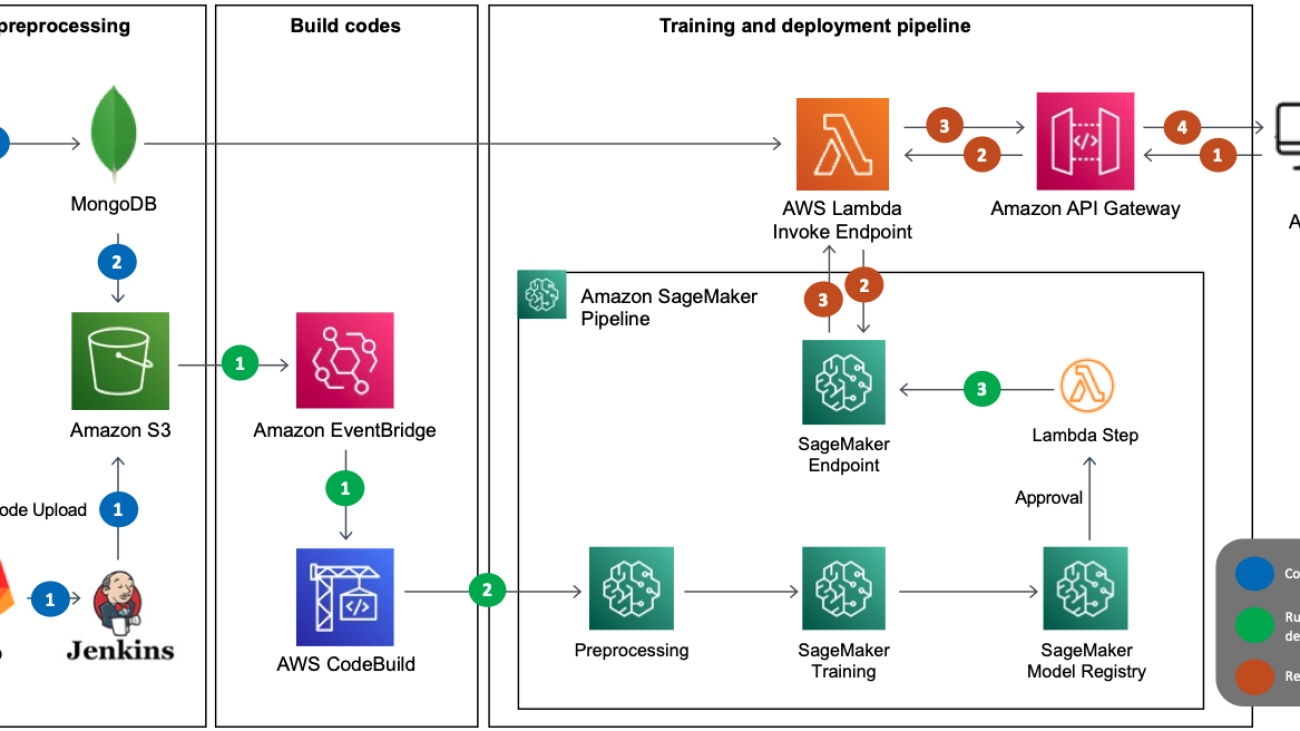


 Sunita Nadampalli is a Software Development Manager at AWS. She leads Graviton software performance optimizations for Machine Learning and HPC workloads. She is passionate about open source software development and delivering high-performance and sustainable software solutions with Arm SoCs.

 Anita Lacea is the Single-Threaded Leader of generative AI image ads at Amazon, enabling advertisers to create visually stunning ads with the click of a button. Anita pairs her broad expertise across the hardware and software industry with the latest innovations in generative AI to develop performant and cost-optimized solutions for her customers, revolutionizing the way businesses connect with their audiences. She is passionate about traditional visual arts and is an exhibiting printmaker.
 Burak Gozluklu is a Principal AI/ML Specialist Solutions Architect located in Boston, MA. He helps strategic customers adopt AWS technologies and specifically Generative AI solutions to achieve their business objectives. Burak has a PhD in Aerospace Engineering from METU, an MS in Systems Engineering, and a post-doc in system dynamics from MIT in Cambridge, MA. Burak is still a research affiliate in MIT. Burak is passionate about yoga and meditation.
 Christopher de Beer is a senior software development engineer at Amazon located in Edinburgh, UK. With a background in visual design. He works on creative building products for advertising, focusing on video generation, helping advertisers to reach their customers through visual communication. Building products that automate creative production, using traditional as well as generative techniques, to reduce friction and delight customers. Outside of his work as an engineer Christopher is passionate about Human-Computer Interaction (HCI) and interface design.
 Yashal Shakti Kanungo is an Applied Scientist III at Amazon Ads. His focus is on generative foundational models that take a variety of user inputs and generate text, images, and videos. It’s a blend of research and applied science, constantly pushing the boundaries of what’s possible in generative AI. Over the years, he has researched and deployed a variety of these models in production across the online advertising spectrum ranging from ad sourcing, click-prediction, headline generation, image generation, and more.
 Sravan Sripada is a Senior Applied Scientist at Amazon located in Seattle, WA. His primary focus lies in developing generative AI models that enable advertisers to create engaging ad creatives (images, video, etc.) with minimal effort. Previously, he worked on utilizing machine learning for preventing fraud and abuse on the Amazon store platform. When not at work, He is passionate about engaging in outdoor activities and dedicating time to meditation.
 Cathy Willcock is a Principal Technical Business Development Manager located in Seattle, WA. Cathy leads the AWS technical account team supporting Amazon Ads adoption of AWS cloud technologies. Her team works across Amazon Ads enabling discovery, testing, design, analysis, and deployments of AWS services at scale, with a particular focus on innovation to shape the landscape across the AdTech and MarTech industry. Cathy has led engineering, product, and marketing teams and is an inventor of ground-to-air calling (1-800-RINGSKY).