Building a multimodal RAG based application using Amazon Bedrock Data Automation and Amazon Bedrock Knowledge Bases

Building a multimodal RAG based application using Amazon Bedrock Data Automation and Amazon Bedrock Knowledge Bases

Organizations today deal with vast amounts of unstructured data in various formats including documents, images, audio files, and video files. Often these documents are quite large, creating significant challenges such as slower processing times and increased storage costs. Extracting meaningful insights from these diverse formats in the past required complex processing pipelines and significant development effort. Before generative AI, organizations had to rely on multiple specialized tools, custom-built solutions, and extensive manual review processes, making it time-consuming and error-prone to process and analyze these documents at scale. Generative AI technologies are revolutionizing this landscape by offering powerful capabilities to automatically process, analyze, and extract insights from these diverse document formats, significantly reducing manual effort while improving accuracy and scalability.

With Amazon Bedrock Data Automation and Amazon Bedrock Knowledge Bases, you can now build powerful multimodal RAG applications with minimal effort. Amazon Bedrock Data Automation provides automated workflows for efficiently processing various file formats at scale, while Amazon Bedrock Knowledge Bases creates a unified, searchable repository that can understand natural language queries. Together, they enable organizations to efficiently process, organize, and retrieve information from their multimodal content, transforming how they manage and use their unstructured data.

In this post, we walk through building a full-stack application that processes multimodal content using Amazon Bedrock Data Automation, stores the extracted information in an Amazon Bedrock knowledge base, and enables natural language querying through a RAG-based Q&A interface.

Real world use cases

The integration of Amazon Bedrock Data Automation and Amazon Bedrock Knowledge Bases enables powerful solutions for processing large volumes of unstructured data across various industries such as:

  • In healthcare, organizations deal with extensive patient records including medical forms, diagnostic images, and consultation recordings. Amazon Bedrock Data Automation automatically extracts and structures this information, while Amazon Bedrock Knowledge Bases enables medical staff to use natural language queries like “What was the patient’s last blood pressure reading?” or “Show me the treatment history for diabetes patients.”
  • Financial institutions process thousands of documents daily, from loan applications to financial statements. Amazon Bedrock Data Automation extracts key financial metrics and compliance information, while Amazon Bedrock Knowledge Bases allows analysts to ask questions like “What are the risk factors mentioned in the latest quarterly reports?” or “Show me all loan applications with high credit scores.”
  • Legal firms handle vast case files with court documents, evidence photos, and witness testimonies. Amazon Bedrock Data Automation processes these diverse sources, and Amazon Bedrock Knowledge Bases lets lawyers query “What evidence was presented about the incident on March 15?” or “Find all witness statements mentioning the defendant.”
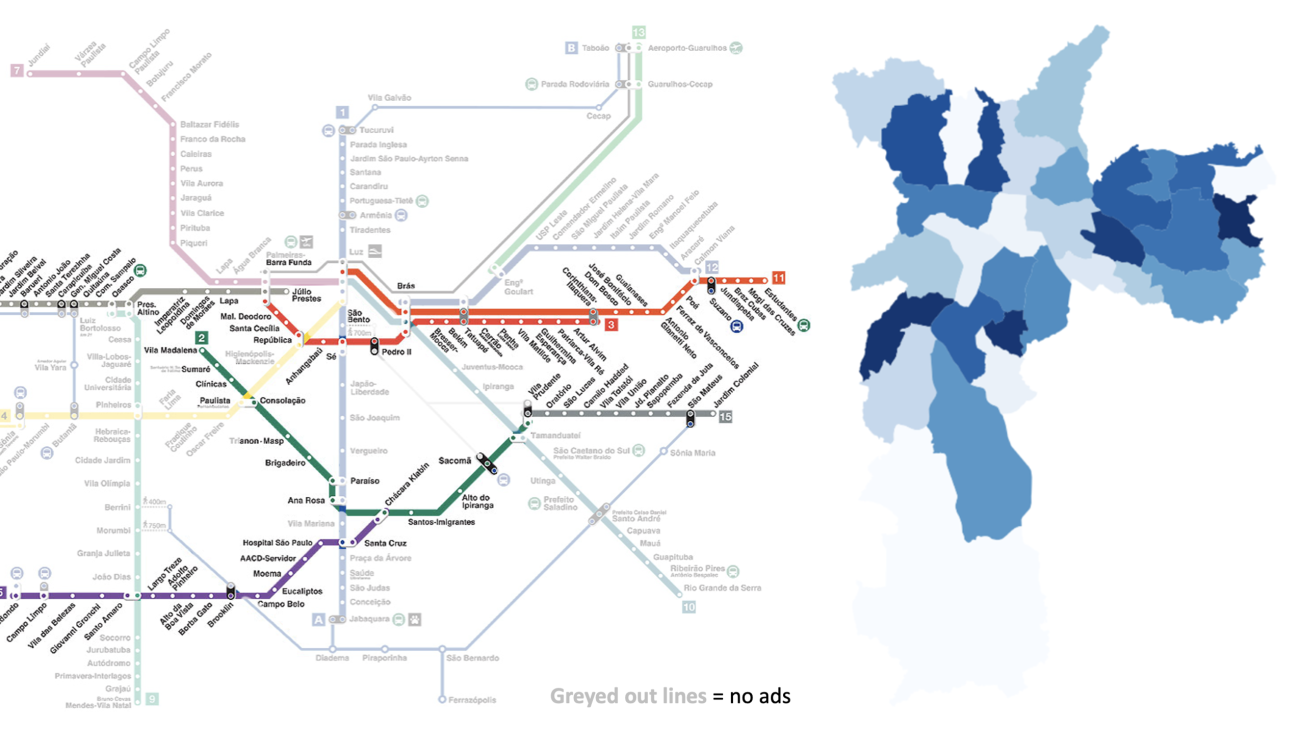
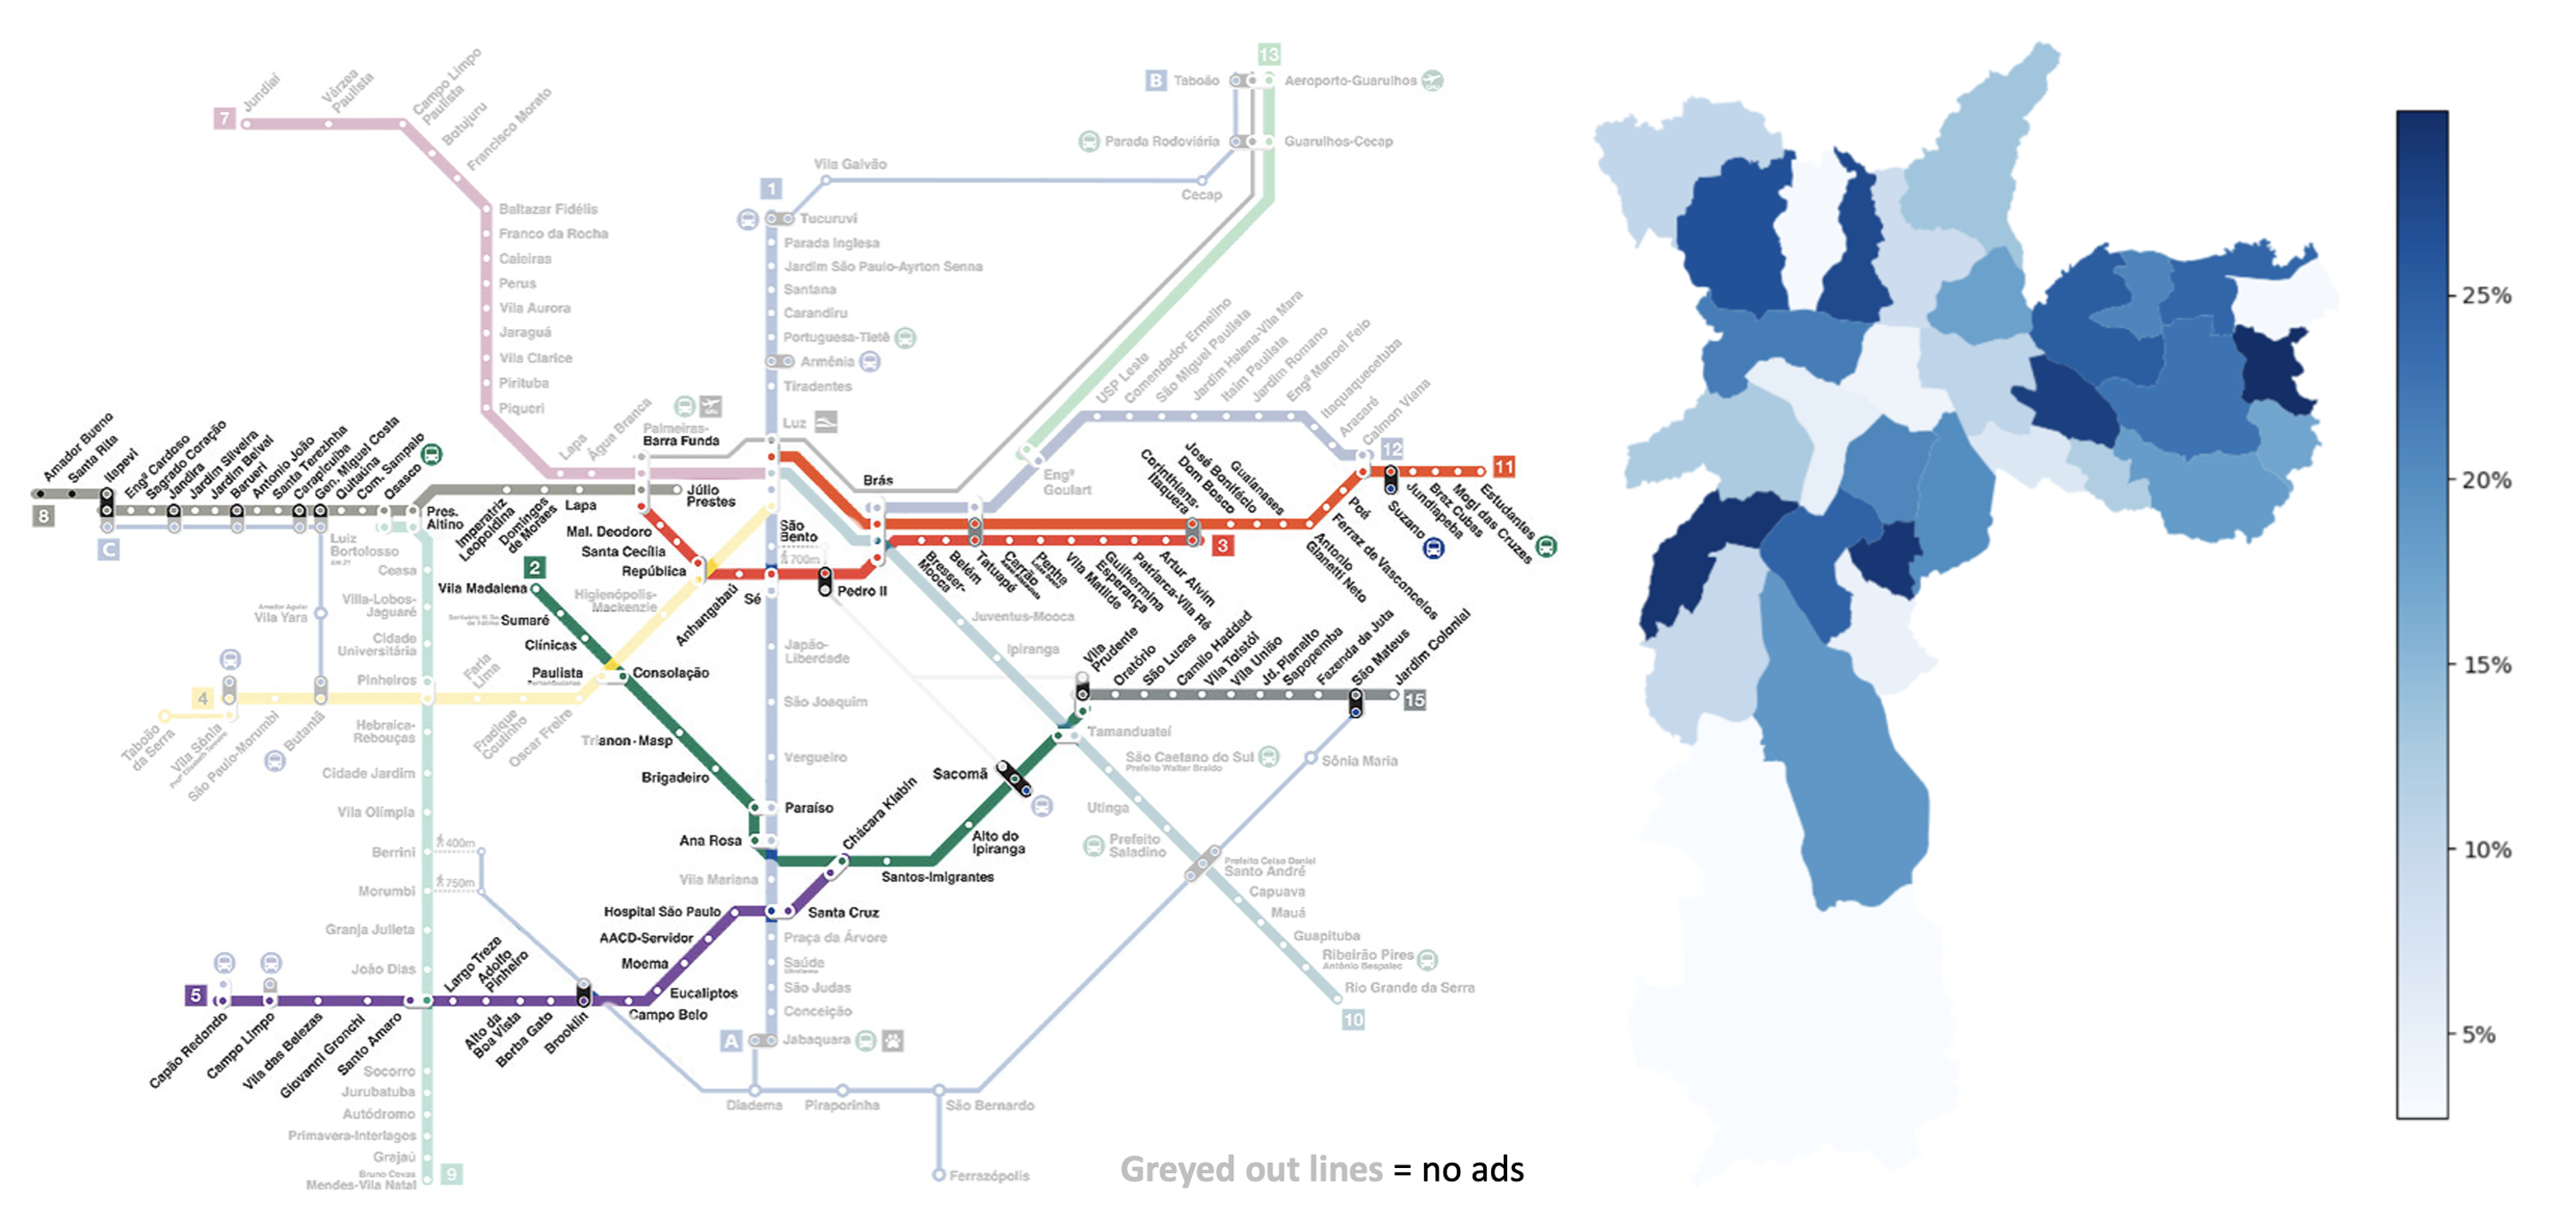
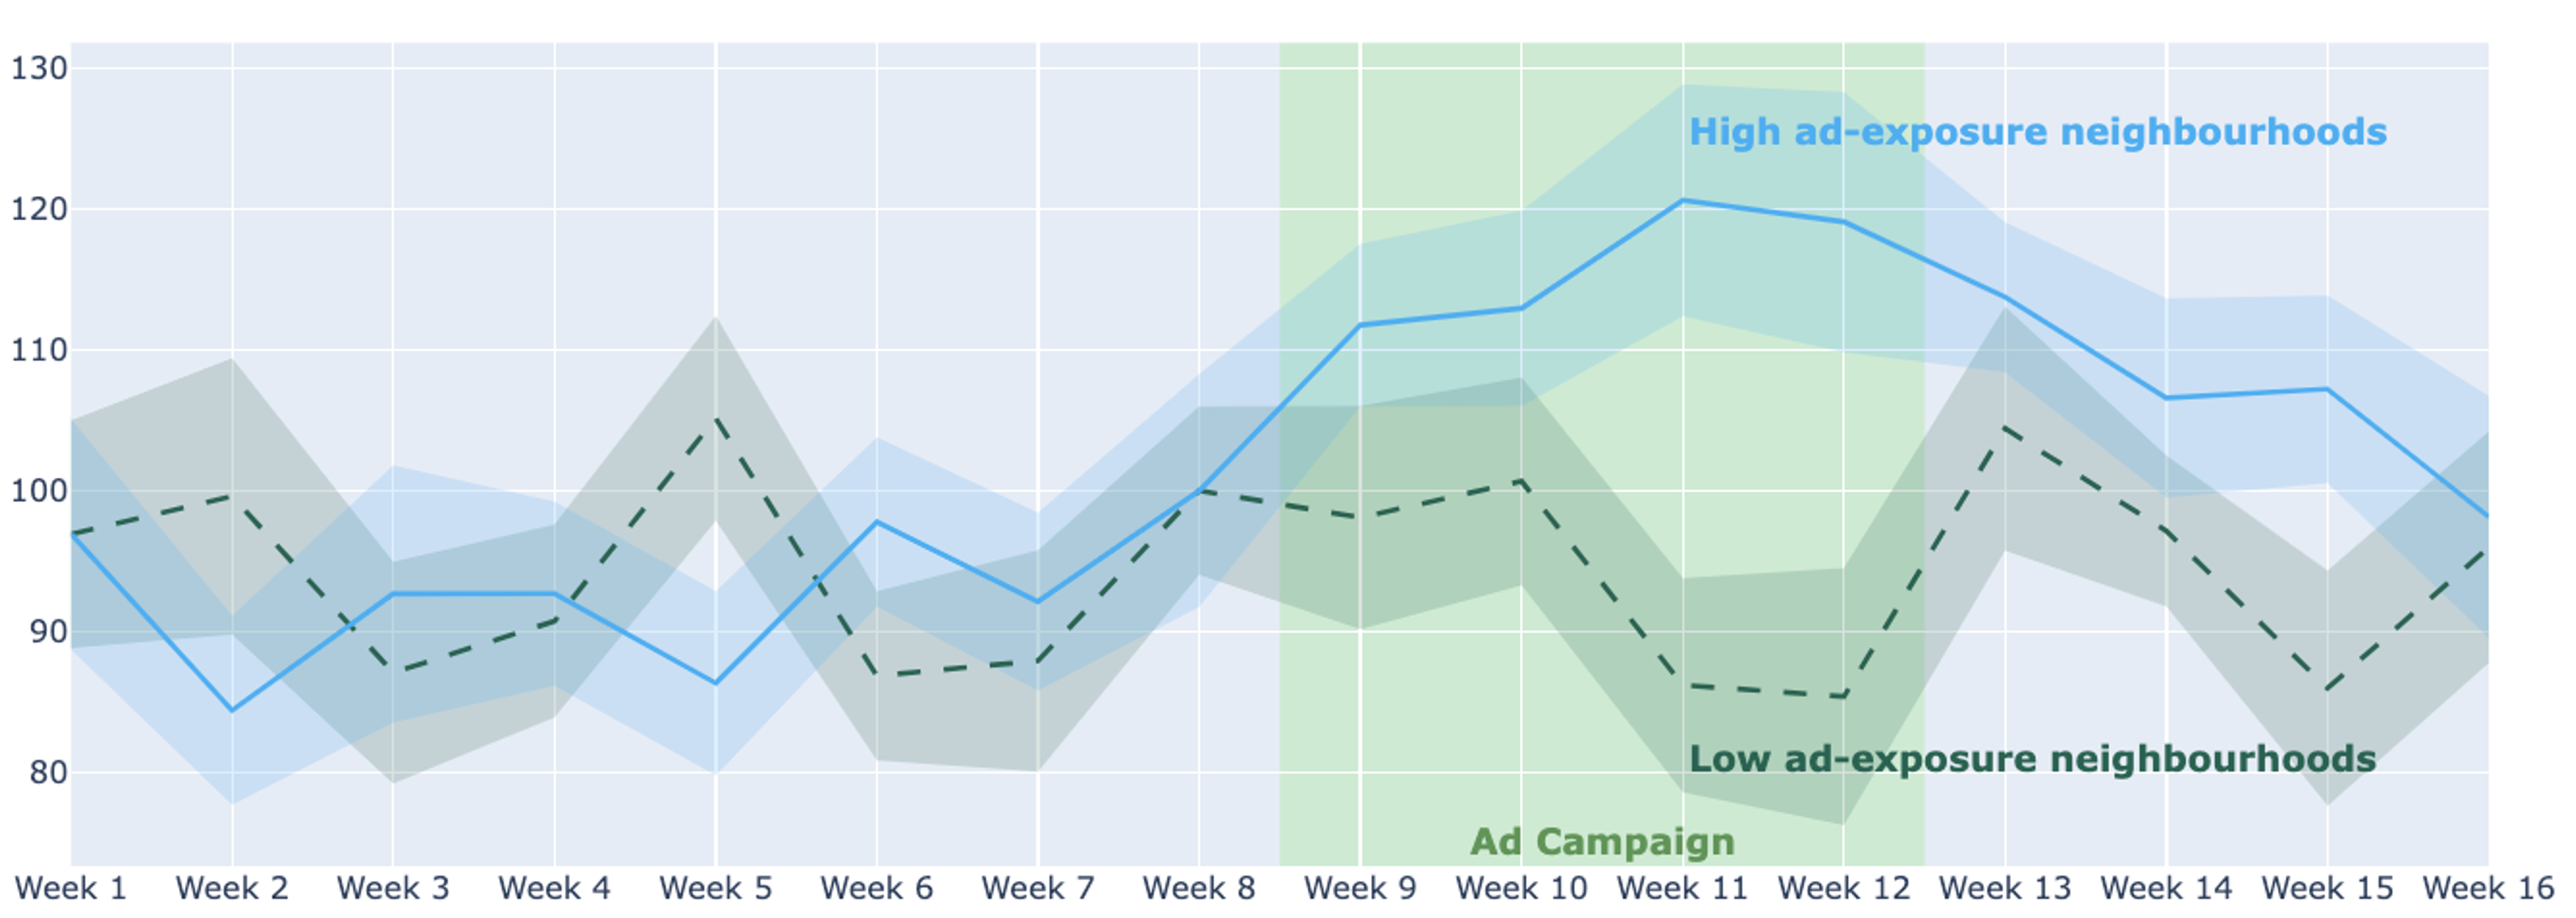
  • Media companies can use this integration for intelligent contextual ad placement. Amazon Bedrock Data Automation processes video content, subtitles, and audio to understand scene context, dialogue, and mood, while simultaneously analyzing advertising assets and campaign requirements. Amazon Bedrock Knowledge Bases then enables sophisticated queries to match ads with appropriate content moments, such as “Find scenes with positive outdoor activities for sports equipment ads” or “Identify segments discussing travel for tourism advertisements.” This intelligent contextual matching offers more relevant and effective ad placements while maintaining brand safety.

These examples demonstrate how the extraction capabilities of Amazon Bedrock Data Automation combined with the natural language querying of Amazon Bedrock Knowledge Bases can transform how organizations interact with their unstructured data.

Solution overview

This comprehensive solution demonstrates the advanced capabilities of Amazon Bedrock for processing and analyzing multimodal content (documents, images, audio files, and video files) through three key components: Amazon Bedrock Data Automation, Amazon Bedrock Knowledge Bases, and foundation models available through Amazon Bedrock. Users can upload various types of content including audio files, images, videos, or PDFs for automated processing and analysis.

When you upload content, Amazon Bedrock Data Automation processes it using either standard or custom blueprints to extract valuable insights. The extracted information is stored as JSON in an Amazon Simple Storage Service (Amazon S3) bucket, while job status is tracked through Amazon EventBridge and maintained in Amazon DynamoDB. The solution performs custom parsing of the extracted JSON to create knowledge base-compatible documents, which are then stored and indexed in Amazon Bedrock Knowledge Bases.

Through an intuitive user interface, the solution displays both the uploaded content and its extracted information. Users can interact with the processed data through a Retrieval Augmented Generation (RAG)-based Q&A system, powered by Amazon Bedrock foundation models. This integrated approach enables organizations to efficiently process, analyze, and derive insights from diverse content formats while using a robust and scalable infrastructure deployed using the AWS Cloud Development Kit (AWS CDK).

Architecture

Architecture diagram

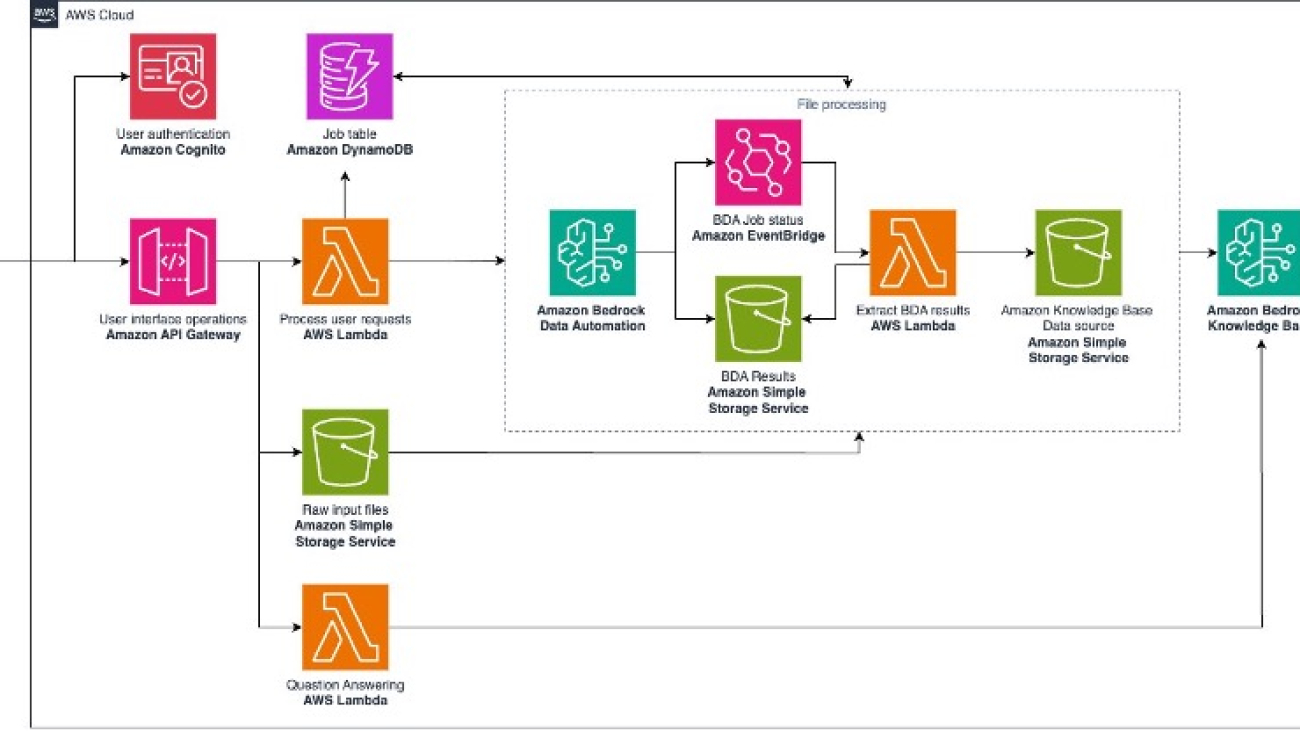
The preceding architecture diagram illustrates the flow of the solution:

  1. Users interact with the frontend application, authenticating through Amazon Cognito
  2. API requests are handled by Amazon API Gateway and AWS Lambda functions
  3. Files are uploaded to an S3 bucket for processing
  4. Amazon Bedrock Data Automation processes the files and extracts information
  5. EventBridge manages the job status and triggers post-processing
  6. Job status is stored in DynamoDB and processed content is stored in Amazon S3
  7. A Lambda function parses the processed content and indexed in Amazon Bedrock Knowledge Bases
  8. A RAG-based Q&A system uses Amazon Bedrock foundation models to answer user queries

Prerequisites

Backend

For the backend, you need to have the following prerequisites:

To use the Q&A feature, make sure that you enable access to the Amazon Bedrock foundation models that you’re planning to use, in the required AWS Regions.

  • For models in the dropdown list marked On demand, enable model access in the Region where you deployed this stack.
  • For models in the dropdown list marked CRIS, enable model access in every Region used by the system defined inference profile (cross Regions). For instance, to use Amazon Nova Pro - CRIS US, make sure you enable access to the Amazon Nova Pro model in every Region used by this inference profile: US East (Virginia) us-east-1, US West (Oregon) us-west-2, and US East (Ohio) us-east-2.
  • The models used in this solution include:
    • Anthropic’s Claude 3.5 Sonnet v2.0
    • Amazon Nova Pro v1.0
    • Anthropic’s Claude 3.7 Sonnet v1.0

Frontend

For the frontend, you need to have the following prerequisites:

  • Node/npm: v18.12.1
  • The deployed backend.
  • At least one user added to the appropriate Amazon Cognito user pool (required for authenticated API calls).

Everything you need is provided as open source code in our GitHub repository.

git clone https://github.com/aws-samples/generative-ai-cdk-constructs-samples.git

Deployment guide

This sample application codebase is organized into these key folders:

samples/bedrock-bda-media-solution

├── backend # Backend architecture CDK project
├── images # Images used for documentation
└── frontend # Frontend sample application

Deploy the backend

Use the following steps to deploy the backend AWS resources:

  • If you haven’t already done so, clone this repository:
    git clone https://github.com/aws-samples/generative-ai-cdk-constructs-samples.git

  • Enter the backend directory
    cd samples/multimodal-rag/backend

  • Create a virtualenv on MacOS and Linux:
    python3 -m venv .venv

  • Activate the virtualenv
    source .venv/bin/activate

  • After the virtualenv is activated, you can install the required dependencies.
    pip install -r requirements.txt

  • Bootstrap CDK. Bootstrapping is the process of preparing your AWS environment for use with the AWS CDK.
    cdk bootstrap

  • Run the AWS CDK Toolkit to deploy the backend stack with the runtime resources.
    cdk deploy

To help protect against unintended changes that affect your security posture, the AWS CDK Toolkit prompts you to approve security-related changes before deploying them. You need to answer yes to deploy the stack.

After the backend is deployed, you need to create a user. First, use the AWS CLI to locate the Amazon Cognito user pool ID:

$ aws cloudformation describe-stacks 
--stack-name BDAMediaSolutionBackendStack
--query "Stacks[0].Outputs[?contains(OutputKey, 'UserPoolId')].OutputValue"

[
    "OutputValue": "<region>_a1aaaA1Aa"
]

You can then go to the Amazon Cognito page in the AWS Management Console, search for the user pool, and add users.

Deploy the frontend

The repository provides a demo frontend application. With this, you can upload and review media files processed by the backend application. To deploy the UI, follow these steps:

  • Enter the frontend directory
    cd samples/multimodal-rag/frontend

  • Create a .env file by duplicating the included example.env and replace the property values with the values retrieved from the MainBackendStack outputs.
VITE_REGION_NAME=<BDAMediaSolutionBackendStack.RegionName>
VITE_COGNITO_USER_POOL_ID=<BDAMediaSolutionBackendStack.CognitoUserPoolId>
VITE_COGNITO_USER_POOL_CLIENT_ID=<2BDAMediaSolutionBackendStack.CognitoUserPoolClientId>
VITE_COGNITO_IDENTITY_POOL_ID=<BDAMediaSolutionBackendStack.CognitoIdentityPoolId>
VITE_API_GATEWAY_REST_API_ENDPOINT=<BDAMediaSolutionBackendStack.ApiGatewayRestApiEndpoint>
VITE_APP_NAME="Bedrock BDA Multimodal Media Solution"
VITE_S3_BUCKET_NAME=<BDAMediaSolutionBackendStack.BDAInputBucket>

You can run the following script is provided if you want to automate the preceding step:

./generate-dev-env.sh
  • Install the dependencies
    npm install

  • Start the web application
    npm run dev

A URL like http://localhost:5173/ will be displayed, so you can open the web application from your browser. Sign in to the application with the user profile you created in Amazon Cognito.

Set up Amazon Bedrock Data Automation

Before processing files, you need to set up an Amazon Bedrock Data Automation project and configure extraction patterns. The solution provides a control plane interface, shown in the following figure, where you can:

  • View existing Amazon Bedrock Data Automation projects in your account
  • Create new projects and blueprints
  • Select the appropriate project for processing

Setup bda

For specific documentation on how Amazon Bedrock Data Automation works, see How Bedrock Data Automation works.

After deciding the project to use, select it from the dropdown list in the list projects operation card. The selected project will be used for file processing.

Process multimodal content

To begin, go to the home page of the frontend application, shown in the following screenshot, and choose Choose file near the top right corner. Select a file. A tooltip will appear when you hover over the button, displaying the file requirements supported by Amazon Bedrock Data Automation. The application supports various file types that Amazon Bedrock Data Automation can process:

  1. PDF files
  2. Images
  3. Audio files
  4. Video files

Process multimodal content

For ready-to-use sample files, see the back-end/samples folder.

When you upload a file

The following process is triggered when a file is uploaded:

  1. The file is stored in an S3 bucket
  2. An Amazon Bedrock Data Automation job is initiated through the backend API
  3. The job status is tracked and updated in DynamoDB
  4. Extracted information is made available through the UI after processing completes

BDA analysis results

The processing time varies depending on the size of the file. You can check the status of processing tasks by choosing the refresh button. After a job is completed, you can select the file name in the table on the Home page to access the file details.

You can access the job details Amazon Bedrock Data Automation produced by navigating through the tabs on the right side of the screen. The Standard and Custom Output tabs provide details on the extracted information from Amazon Bedrock Data Automation.

Ask questions about your uploaded document

The Q&A tab will provide a chatbot to ask questions about the documents processed. You can select an Amazon Bedrock foundation model from the dropdown list and ask a question. Currently, the following models are supported:

  • Anthropic’s Claude 3.5 Sonnet v2.0
  • Amazon Nova Pro v1.0
  • Anthropic’s Claude 3.7 Sonnet v1.0

In the following image, an Amazon Bedrock foundation model is used to ask questions against the Amazon Bedrock knowledge base. Each processed document has been ingested and stored in the vector store.

bda-qa

Clean up

Delete the stack to avoid unexpected charges.

  1. First make sure to remove data from the S3 buckets created for this solution.
  2. Run CDK destroy
  3. Delete the S3 buckets.
  4. Delete the logs associated with this solution created by the different services in Amazon CloudWatch logs.

Conclusion

This solution demonstrates how the integration of Amazon Bedrock Data Automation and Amazon Bedrock Knowledge Bases represents a significant leap forward in how organizations can process and derive value from their multimodal content. This solution not only demonstrates the technical implementation but also showcases the transformative potential of combining automated content processing with intelligent querying capabilities. By using the AWS serverless architecture and the power of foundation models, you can now build scalable, cost-effective solutions that turn your unstructured data into actionable insights.

At the time of writing, this solution is available in the following AWS Regions: US East (N. Virginia), and US West (Oregon).


About the authors

Author - Lana Zhang Lana Zhang is a Senior Solutions Architect in the AWS World Wide Specialist Organization AI Services team, specializing in AI and generative AI with a focus on use cases including content moderation and media analysis. She’s dedicated to promoting AWS AI and generative AI solutions, demonstrating how generative AI can transform classic use cases by adding business value. She assists customers in transforming their business solutions across diverse industries, including social media, gaming, ecommerce, media, advertising, and marketing.

Alain Krok is a Senior Solutions Architect with a passion for emerging technologies. His experience includes designing and implementing IIoT solutions for the oil and gas industry and working on robotics projects. He enjoys pushing the limits and indulging in extreme sports when he’s not designing software.

Dinesh Sajwan is a Senior Prototyping Architect at AWS. He thrives on working with cutting-edge technologies and leverages his expertise to solve complex business challenges. His diverse technical background enables him to develop innovative solutions across various domains. When not exploring new technologies, he enjoys spending quality time with his family and indulging in binge-watching his favorite shows.

Read More

Tailoring foundation models for your business needs: A comprehensive guide to RAG, fine-tuning, and hybrid approaches

Tailoring foundation models for your business needs: A comprehensive guide to RAG, fine-tuning, and hybrid approaches

Foundation models (FMs) have revolutionised AI capabilities, but adopting them for specific business needs can be challenging. Organizations often struggle with balancing model performance, cost-efficiency, and the need for domain-specific knowledge. This blog post explores three powerful techniques for tailoring FMs to your unique requirements: Retrieval Augmented Generation (RAG), fine-tuning, and a hybrid approach combining both methods. We dive into the advantages, limitations, and ideal use cases for each strategy.

AWS provides a suite of services and features to simplify the implementation of these techniques. Amazon Bedrock is a fully managed service that offers a choice of high-performing FMs from leading AI companies like AI21 Labs, Anthropic, Cohere, Meta, Stability AI, and Amazon through a single API, along with a broad set of capabilities you need to build generative AI applications with security, privacy, and responsible AI. Amazon Bedrock Knowledge Bases provides native support for RAG, streamlining the process of enhancing model outputs with domain-specific information. Amazon Bedrock also offers native features for model customizations through continued pre-training and fine-tuning. In addition, you can use Amazon Bedrock Custom Model Import to bring and use your customized models alongside existing FMs through a single serverless, unified API. Use Amazon Bedrock Model Distillation to use smaller, faster, more cost-effective models that deliver use-case specific accuracy that is comparable to the most advanced models in Amazon Bedrock.

For this post, we have used Amazon SageMaker AI for the fine-tuning and hybrid approach to maintain more control over the fine-tuning script and try different fine-tuning methods. In addition, we have used Amazon Bedrock Knowledge Bases for the RAG approach as shown in Figure 1.

To help you make informed decisions, we provide ready-to-use code in our Github repo, using these AWS services to experiment with RAG, fine-tuning, and hybrid approaches. You can evaluate their performance based on your specific use case and your dataset, and use the model that best fits to effectively customize FMs for your business needs.

Figure 1: Architecture diagram for RAG, fine-tuning and hybrid approaches

Retrieval Augmented Generation

RAG is a cost-effective way to enhance AI capabilities by connecting existing models to external knowledge sources. For example, an AI powered customer service chatbot using RAG can answer questions about current product features by first checking the product documentation knowledge base. If a customer asks a question, the system retrieves the specific details from the product knowledge base before composing its response, helping to make sure that the information is accurate and up-to-date.

A RAG approach gives AI models access to external knowledge sources for better responses and has two main steps: retrieval for finding the relevant information from connected data sources and generation using an FM to generate an answer based on the retrieved information.

Fine-tuning

Fine-tuning is a powerful way to customize FMs for specific tasks or domains using additional training data. In fine-tuning, you adjust the model’s parameters using a smaller, labelled dataset relevant to the target domain.

For example, to build an AI powered customer service chatbot, you can fine-tune an existing FM using your own dataset to handle questions about a company’s product features. By training the model on historical customer interactions and product specifications, the fine-tuned model learns the context and the company messaging tone to provide more accurate responses.

If the company launches a new product, the model should be fine-tuned again with new data to update its knowledge and maintain relevance. Fine-tuning helps make sure that the model can deliver precise, context-aware responses. However, it requires more computational resources and time compared to RAG, because the model itself needs to be retrained with the new data.

Hybrid approach

The hybrid approach combines the strengths of RAG and fine-tuning to deliver highly accurate, context-aware responses. Let’s consider an example, a company frequently updates the features of its products. They want to customize their FM using internal data, but keeping the model updated with changes in the product catalog is challenging. Because product features change monthly, keeping the model up to date would be costly and time-consuming.

By adopting a hybrid approach, the company can reduce costs and improve efficiency. They can fine-tune the model every couple of months to keep it aligned with the company’s overall tone. Meanwhile, RAG can retrieve the latest product information from the company’s knowledge base, helping to make sure that responses are up-to-date. Fine-tuning the model also enhances RAG’s performance during the generation phase, leading to more coherent and contextually relevant responses. If you want to further improve the retrieval phase, you can customize the embedding model, use a different search algorithm, or explore other retrieval optimization techniques.

The following sections provide the background for dataset creation and implementation of the three different approaches

Prerequisites

To deploy the solution, you need:

Dataset description

For the proof-of-concept, we created two synthetic datasets using Anthropic’s Claude 3 Sonnet on Amazon Bedrock.

Product catalog dataset

This dataset is your primary knowledge source in Amazon Bedrock. We created a product catalog which consists of 15 fictitious manufacturing products by prompting Anthropic’s Claude 3 Sonnet using example product catalogs. You should create your dataset in .txt format. The format in the example for this post has the following fields:

  • Product names
  • Product descriptions
  • Safety instructions
  • Configuration manuals
  • Operation instructions

Train and test the dataset

We use the same product catalog we created for the RAG approach as training data to run domain adaptation fine-tuning.

The test dataset consists of question-and-answer pairs about the product catalog dataset created earlier. We used this code in the Question-Answer Dataset Jupyter notebook section to generate the test dataset.

Implementation

We implemented three different approaches: RAG, fine-tuning, and hybrid. See the Readme file for instructions to deploy the whole solution.

RAG

The RAG approach uses Amazon Bedrock Knowledge Bases and consists of two main parts.

To set up the infrastructure:

  1. Update the config file with your required data (details in the Readme)
  2. Run the following commands in the infrastructure folder:
cd infrastructure
./prepare.sh
cdk bootstrap aws://<<ACCOUNT_ID>>/<<REGION>>
cdk synth
cdk deploy --all

Context retrieval and response generation:

  1. The system finds relevant information by searching the knowledge base with the user’s question
  2. It then sends both the user’s question and the retrieved information to Meta LLama 3.1 8b LLM on Amazon Bedrock
  3. The LLM will then generate a response based on the user’s question and retrieved information

Fine-tuning

We used Amazon SageMaker AI JumpStart to fine-tune the Meta Llama 3.1 8b Instruct model using domain adaptation method for 5 epochs. You can adjust the following parameters in the config.py file:

  • Fine-tuning method: You can change the fine-tuning method in the config file, the default is domain_adaptation.
  • Number of epochs: Adjust number of epochs in the config file according to your data size.
  • Fine-tuning template: Change the template based on your use-case. The current one prompts the LLM to answer a customer question.

Hybrid

The hybrid approach combines RAG and fine-tuning, and uses the following high-level steps:

  1. Retrieve the most relevant context based on the user’s question from the Knowledge Base
  2. The fine-tuned model generates answers using the retrieved context

You can customize the prompt template in the config.py file.

Evaluation

For this example, we use three evaluation metrics to measure performance. You can modify src/evaluation.py to implement your own metrics for your evaluation implementation.

Each metric helps you understand different aspects of how well each of the approaches works:

  • BERTScore: BERTScore tells you how similar the generated answers are to the correct answers using cosine similarities. It calculates precision, recall, and F1 measure. We used the F1 measure as the evaluation score.
  • LLM evaluator score: We use different language models from Amazon Bedrock to score the responses from RAG, fine-tuning, and Hybrid approaches. Each evaluation receives both the correct answers and the generated answers and gives a score between 0 and 1 (closer to 1 indicates higher similarity) for each generated answer. We then calculate the final score by averaging all the evaluation scores. The process is shown in the following figure.

Figure 2: LLM evaluator method

  • Inference latency: Response times are important in applications like chatbots, so depending on your use case, this metric might be important in your decision. For each approach, we averaged the time it took to receive a full response for each sample.
  • Cost analysis: To do a full cost analysis, we made the following assumptions:
    • We used one OpenSearch compute unit (OCU) for indexing and another for the search related to document indexing in RAG. See OpenSearch Serverless pricing for more details.
    • We assume an application that has 1,000 users, each of them conducting 10 requests per day with an average of 2,000 input tokens and 1,000 output tokens. See Amazon Bedrock pricing for more details.
    • We used ml.g5.12xlarge instance for fine-tuning and hosting the fine-tuned model. The fine-tuning job took 15 minutes to complete. See SageMaker AI pricing for more details.
    • For fine-tuning and the hybrid approach, we assume that the model instance is up 24/7, which might vary according to your use case.
    • The cost calculation is done for one month.

Based on those assumptions, the cost associated with each of the three approaches is calculated as follows:

  • For RAG: 
    • OpenSearch Serverless monthly costs = Cost of 1 OCU per hour * 2 OCUs * 24 hours * 30 days
    • Total invocations for Meta Llama 3.1 8b = 1000 user * 10 requests * (price per input token * 2,000 + price per output token * 1,000) * 30 days
  • For fine-tuning:
    • (Number of minutes used for the fine-tuning job / 60) * Hourly cost of an ml.g5.12xlarge instance
    • Hourly cost of an ml.g5.12xlarge instance hosting * 24 hours * 30 days
  • For hybrid:
    • OpenSearch Serverless monthly costs = Cost of 1 OCU per hour * 2 OCUs * 24 hours * 30 days
    • (Number of minutes used for the finetuning job / 60) * cost of an ml.g5.12xlarge instance
    • Hourly cost of ml.g5.12xlarge instance hosting * 24 hours * 30 days

Results

You can find detailed evaluation results in two places in the code repository. The individual scores for each sample are in the JSON files under data/output, and a summary of the results is in summary_results.csv in the same folder.

The results shown in the following table show:

  • How each approach (RAG, fine-tuning, and hybrid) performs
  • Their scores from both BERTScore and LLM evaluators
  • The cost analysis for each method calculated for the US East region
Approach Average BERTScore Average LLM evaluator score Average inference time (in seconds) Cost per month (US East region)
RAG 0.8999 0.8200 8.336 ~=350 + 198 ~= 548$
Finetuning 0.8660 0.5556 4.159 ~= 1.77 + 5105 ~= 5107$
Hybrid 0.8908 0.8556 17.700 ~= 350 + 1.77 + 5105 ~= 5457$

Note that the costs for both the fine-tuning and hybrid approach can decrease significantly depending on the traffic pattern if you set the real-time inference endpoint from SageMaker to scaledown to zero instances when not in use. 

Clean up

Follow the cleanup section in the Readme file in order to avoid paying for unused resources.

Conclusion

In this post, we showed you how to implement and evaluate three powerful techniques for tailoring FMs to your business needs: RAG, fine-tuning, and a hybrid approach combining both methods. We provided ready-to-use code to help you experiment with these approaches and make informed decisions based on your specific use case and dataset.

The results in this example were specific to the dataset that we used. For that dataset, RAG outperformed fine-tuning and achieved comparable results to the hybrid approach with a lower cost, but fine-tuning led to the lowest latency. Your results will vary depending on your dataset.

We encourage you to test these approaches using our code as a starting point:

  1. Add your own datasets in the data folder
  2. Fill out the config.py file
  3. Follow the rest of the readme instructions to run the full evaluation

About the Authors

Idil Yuksel is a Working Student Solutions Architect at AWS, pursuing her MSc. in Informatics with a focus on machine learning at the Technical University of Munich. She is passionate about exploring application areas of machine learning and natural language processing. Outside of work and studies, she enjoys spending time in nature and practicing yoga.

Karim Akhnoukh is a Senior Solutions Architect at AWS working with customers in the financial services and insurance industries in Germany. He is passionate about applying machine learning and generative AI to solve customers’ business challenges. Besides work, he enjoys playing sports, aimless walks, and good quality coffee.

Read More

How Rufus doubled their inference speed and handled Prime Day traffic with AWS AI chips and parallel decoding

How Rufus doubled their inference speed and handled Prime Day traffic with AWS AI chips and parallel decoding

Large language models (LLMs) have revolutionized the way we interact with technology, but their widespread adoption has been blocked by high inference latency, limited throughput, and high costs associated with text generation. These inefficiencies are particularly pronounced during high-demand events like Amazon Prime Day, where systems like Rufus—the Amazon AI-powered shopping assistant—must handle massive scale while adhering to strict latency and throughput requirements. Rufus is an AI-powered shopping assistant designed to help customers make informed purchasing decisions. Powered by LLMs, Rufus answers customer questions about a variety of shopping needs and products and simplifies the shopping experience, as shown in the following image.

A comprehensive mobile e-commerce interaction showcasing Amazon's Rufus AI shopping assistant interface. The conversation demonstrates Rufus's ability to provide detailed product comparisons and recommendations. The assistant explains the technical differences between trail and running shoes, focusing on tread patterns, terrain adaptation, and specific use cases. The interface displays curated product suggestions including the Salomon X Ultra 4 GTX Hiking Shoes with Gore-Tex membrane and the Saucony Peregrine 12 Trail Running Shoes with PWRTRAC technology, complete with product images and detailed specifications. The layout includes a search bar, navigation menu, and voice input functionality, illustrating Amazon's integrated shopping experience.

Rufus relies on many components to deliver its customer experience including a foundation LLM (for response generation) and a query planner (QP) model for query classification and retrieval enhancement. The model parses customer questions to understand their intent, whether keyword-based or conversational natural language. QP is on the critical path for Rufus because Rufus cannot initiate token generation until QP provides its full output. Thus, reducing QP’s end-to-end text generation latency is a critical requirement for reducing the first chunk latency in Rufus, which refers to the time taken to generate and send the first response to a user request. Lowering this latency improves perceived responsiveness and overall user experience. This post focuses on how the QP model used draft centric speculative decoding (SD)—also called parallel decoding—with AWS AI chips to meet the demands of Prime Day. By combining parallel decoding with AWS Trainium and Inferentia chips, Rufus achieved two times faster response times, a 50% reduction in inference costs, and seamless scalability during peak traffic.

Scaling LLMs for Prime Day

Prime Day is one of the most demanding events for the Amazon infrastructure, pushing systems to their limits. In 2024, Rufus faced an unprecedented engineering challenge: handling millions of queries per minute and generating billions of tokens in real-time, all while maintaining a 300 ms latency SLA for QP tasks and minimizing power consumption. These demands required a fundamental rethinking of how LLMs are deployed at scale conquering the cost and performance bottlenecks. The key challenges of Prime Day included:

  • Massive scale: Serving millions of tokens per minute to customers worldwide, with peak traffic surges that strain even the most robust systems.
  • Strict SLAs: Delivering real-time responsiveness with a hard latency limit of 300 ms, ensuring a seamless customer experience.
  • Cost efficiency: Minimizing the cost of serving LLMs at scale while reducing power consumption, a critical factor for sustainable and economical operations.

Traditional LLM text generation is inherently inefficient because of its sequential nature. Each token generation requires a full forward pass through the model, leading to high latency and underutilization of computational resources. While techniques like speculative decoding have been proposed to address these inefficiencies, their complexity and training overhead have limited their adoption.

AWS AI chips and parallel decoding

To overcome these challenges, Rufus adopted parallel decoding, a simple yet powerful technique for accelerating LLM generation. With parallel decoding, the sequential dependency is broken, making autoregressive generation faster. This approach introduces additional decoding heads to the base model eliminating the need for a separate draft model for speculated tokens. These heads predict multiple tokens in parallel for future positions before it knows the previous tokens, and this significantly improves generation efficiency.

To accelerate the performance of parallel decoding for online inference, Rufus used a combination of AWS solutions: Inferentia2 and Trainium AI Chips, Amazon Elastic Compute Cloud (Amazon EC2) and Application Load Balancer. In addition, the Rufus team partnered with NVIDIA to power the solution using NVIDIA’s Triton Inference Server, providing capabilities to host the model using AWS chips.

To get the maximum efficiency of parallel decoding on AWS Neuron Cores, we worked in collaboration with AWS Neuron team to add the architectural support of parallel decoding on a Neuronx-Distributed Inference (NxDI) framework for single batch size.

Rufus extended the base LLM with multiple decoding heads. These heads are a small neural network layer and are trained using the base model’s learned representations to predict the next tokens in parallel. These heads are trained together with the original model, keeping the base model unchanged.Because the tokens aren’t generated sequentially, they must be verified to make sure that all of the tokens fit together. To validate the tokens predicted by the draft heads, Rufus uses a tree-based attention mechanism to verify and integrate tokens. Each draft head produces several options for each position. These options are then organized into a tree-like structure to select the most promising combination. This allows multiple candidate tokens to be processed in parallel, reducing latency and increasing neuron core utilization. The following figure shows a sparse tree constructed using our calibration set, with a depth of four, indicating the involvement of four heads in the calculation process. Each node represents a token from a top-k prediction of a draft head, and the edges depict the connections between these nodes.

Expansive hierarchical tree diagram with four main branches, each containing multiple numbered nodes arranged in descending levels

Results of using parallel decoding

By integrating parallel decoding with AWS AI chips and NxDI framework, we doubled the speed of text generation compared to autoregressive decoding, making it an ideal solution for the high-demand environment of Prime Day. During Amazon Prime Day 2024, Rufus demonstrated the power of AWS AI chips with impressive performance metrics:

  • Two times faster generation: AWS AI chips, optimized for parallel decoding operations, enabled doubled the token generation speed compared to traditional processors. This parallel processing capability allowed multiple future tokens to be predicted simultaneously, delivering real-time interactions for millions of customers.
  • 50% lower inference costs: The combination of purpose-built AWS AI chips and parallel decoding optimization eliminated redundant computations, cutting inference costs by half while maintaining response quality.
  • Simplified deployment: AWS AI chips efficiently powered the model’s parallel decoding heads, enabling simultaneous token prediction without the complexity of managing separate draft models. This architectural synergy simplified the deployment while delivering efficient inference at scale.
  • Seamless scalability: The combination handled peak traffic without compromising performance and response quality.

These advances not only enhanced the customer experience but also showcased the potential of NxDI framework and the adaptability of AWS AI chips for optimizing large-scale LLM performance.

How to use parallel decoding on Trainium and Inferentia

The flexibility of NxDI combined with AWS Neuron chips makes it a powerful solution for LLM text generation in production. Whether you’re using Trainium or Inferentia for inference, NxDI provides a unified interface to implement parallel decoding optimizations. This integration reduces operational complexity and provides a straightforward path for organizations looking to deploy and scale their LLM applications efficiently.

You can explore parallel decoding technique such as Medusa to accelerate your inference workflows on INF2 or TRN1 instances. To get started, you’ll need a Medusa-compatible model (such as text-generation-inference/Mistral-7B-Instruct-v0.2-medusa) and a Medusa tree configuration. Enable Medusa by setting is_medusa=True, configuring your medusa_speculation_length, num_medusa_heads, and specifying your medusa_tree. When using the HuggingFace generate() API, set the assistant_model to your target model. Note that Medusa currently supports only a batch size of 1.

 def load_json_file(json_path):
    with open(json_path, "r") as f:
        return json.load(f)
medusa_tree = load_json_file("medusa_mc_sim_7b_63.json")
neuron_config = NeuronConfig(
    is_medusa=True,
    medusa_speculation_length=64,
    num_medusa_heads=4,
    medusa_tree=medusa_tree
)

Conclusion

Prime Day is a testament to the power of innovation to overcome technical challenges. By using AWS AI chips, Rufus not only met the stringent demands of Prime Day but also set a new standard for LLM efficiency. As LLMs continue to evolve, frameworks such as NxDI will play a crucial role in making them more accessible, scalable, and cost-effective. We’re excited to see how the community will build on the NxDI foundation and AWS AI chips to unlock new possibilities for LLM applications. Try it out today and experience the difference for yourself!

Acknowledgments

We extend our gratitude to the AWS Annapurna team responsible for AWS AI chips and framework development. Special thanks to the researchers and engineers whose contributions made this achievement possible. The improvements in latency, throughput, and cost efficiency achieved with parallel decoding compared to autoregressive decoding have set a new benchmark for LLM deployments at scale.


About the authors

Shruti Dubey is a Software Engineer on Amazon’s Core Search Team, where she optimizes LLM inference systems to make AI faster and more scalable. She’s passionate about Generative AI and loves turning cutting-edge research into real-world impact. Outside of work, you’ll find her running, reading, or trying to convince her dog that she’s the boss.

Shivangi Agarwal is an Applied Scientist on Amazon’s Prime Video team, where she focuses on optimizing LLM inference and developing intelligent ranking systems for Prime Videos using query-level signals. She’s driven by a passion for building efficient, scalable AI that delivers real-world impact. When she’s not working, you’ll likely find her catching a good movie, discovering new places, or keeping up with her adventurous 3-year-old kid.

Sukhdeep Singh Kharbanda is an Applied Science Manager at Amazon Core Search. In his current role, Sukhdeep is leading Amazon Inference team to build GenAI inference optimization solutions and inference system at scale for fast inference at low cost. Outside work, he enjoys playing with his kid and cooking different cuisines.

Rahul Goutam is an Applied Science Manager at Amazon Core Search, where he leads teams of scientists and engineers to build scalable AI solutions that power flexible and intuitive shopping experiences. When he’s off the clock, he enjoys hiking a trail or skiing down one.

Yang Zhou is a software engineer working on building and optimizing machine learning systems. His recent focus is enhancing the performance and cost efficiency of generative AI inference. Beyond work, he enjoys traveling and has recently discovered a passion for running long distances.

RJ is an Engineer within Amazon. He builds and optimizes systems for distributed systems for training and works on optimizing adopting systems to reduce latency for ML Inference. Outside work, he is exploring using Generative AI for building food recipes.

James Park is a Principal Machine Learning Specialist Solutions Architect at Amazon Web Services. He works with Amazon to design, build, and deploy technology solutions on AWS, and has a particular interest in AI and machine learning. In his spare time he enjoys seeking out new cultures, experiences, and staying up to date with the latest technology trends.

Read More

New Amazon Bedrock Data Automation capabilities streamline video and audio analysis

New Amazon Bedrock Data Automation capabilities streamline video and audio analysis

Organizations across a wide range of industries are struggling to process massive amounts of unstructured video and audio content to support their core business applications and organizational priorities. Amazon Bedrock Data Automation helps them meet this challenge by streamlining application development and automating workflows that use content from documents, images, audio, and video. Recently, we announced two new capabilities that you can use to get custom insights from video and audio. You can streamline development and boost efficiency through consistent, multimodal analytics that can be seamlessly customized to their specific business needs.

Amazon Bedrock Data Automation accelerates development time from months to minutes through prepackaged foundation models (FMs), eliminating the need for multiple task-specific models and complex processing logic. Now developers can eliminate the time-consuming heavy lifting of unstructured multimodal content processing at scale, whether analyzing petabytes of video or processing millions of customer conversations. Developers can use natural language instructions to generate insights that meet the needs of their downstream systems and applications. Media and entertainment users can unlock custom insights from movies, television shows, ads, and user-generated video content. Customer-facing teams can generate new insights from audio—analyzing client consultations to identify best practices, categorize conversation topics, and extract valuable customer questions for training.

Customizing insights with Amazon Bedrock Data Automation for videos

Amazon Bedrock Data Automation makes it painless for you to tailor your generative AI–powered insights generated from video. You can specify which fields you want to generate from videos, such as scene context or summary, data format, and the natural language instructions for each field. You can customize Amazon Bedrock Data Automation output by generating specific insights in consistent formats for AI-powered multimedia analysis applications. For example, you can use Amazon Bedrock Data Automation to extract scene summaries, identify visually prominent objects, and detect logos in movies, television shows, and social media content. With Amazon Bedrock Data Automation, you can create new custom video output in minutes. Or you can select from a catalog of pre-built solutions—including advertisement analysis, media search, and more. Read the following example to understand how a customer is using Amazon Bedrock Data Automation for video analysis.

Air is an AI-based software product that helps businesses automate how they collect, approve, and share content. Creative teams love Air because they can replace their digital asset management (DAM), cloud storage solution, and workflow tools with Air’s creative operations system. Today, Air manages more than 250M images and videos for global brands such as Google, P&G, and Sweetgreen. Air’s product launched in March 2021, and they’ve raised $70M from world class venture capital firms. Air uses Amazon Bedrock Data Automation to help creative teams quickly organize their content.

“At Air, we are using Amazon Bedrock Data Automation to process tens of millions of images and videos. Amazon Bedrock Data Automation allows us to extract specific, tailored insights from content (such as video chapters, transcription, optical character recognition) in a matter of seconds. This was a virtually impossible task for us earlier. The new Amazon Bedrock Data Automation powered functionality on Air enables creative and marketing teams with critical business insights. With Amazon Bedrock Data Automation, Air has cut down search and organization time for its users by 90%. Today, every company needs to operate like a media company. Businesses are prioritizing the ability to generate original and unique creative work: a goal achievable through customization. Capabilities like Amazon Bedrock Data Automation allow Air to customize the extraction process for every customer, based on their specific goals and needs.”

—Shane Hedge, Co-Founder and CEO at Air

Extracting focused insights with Amazon Bedrock Data Automation for audio

The new Amazon Bedrock Data Automation capabilities make it faster and more streamlined for you to extract customized generative AI–powered insights from audio. You can specify the desired output configuration in natural language. And you can extract custom insights—such as summaries, key topics, and intents—from customer calls, clinical discussions, meetings, and other audio. You can use the audio insights in Amazon Bedrock Data Automation to improve productivity, enhance customer experience, ensure regulatory compliance, among others. For example, sales agents can improve their productivity by extracting insights such as summaries, key action items, and next steps from conversations between sales agents with clients.

Getting started with the new Amazon Bedrock Data Automation video and audio capabilities

To analyze your video and audio assets, follow these steps:

  1. On the Amazon Bedrock console, choose Data Automation in the navigation pane. The following screenshot shows the Data Automation page.
  2. In the Create a new BDA Project screen under BDA Project name, enter a name. Select Create project, as shown in the following screenshot.
  3. Choose a Sample Blueprint or create a Blueprint

To use a blueprint, follow these steps:

  • You can choose a sample blueprint or you can create a new one.
  • To create a blueprint, on the Amazon Bedrock Data Automation console in the navigation pane under Data Automation, select custom output.
  • Choose Create blueprint and select the tile for the video or audio file you want to create a blueprint for, as shown in the following screenshot.

Choosing a sample blueprint for video modality

Creating a new blueprint for audio modality

  1. Generate results for custom output
    • On the video asset, within the blueprint, you can choose Generate results to see the detailed analysis.

  2. Choose Edit field – In the Edit fields pane, enter a field name. Under Instructions, provide clear, step-by-step guidance for how to identify and classify the field’s data during the extraction process.
  3. Choose Save blueprint.

Conclusion

The new video and audio capabilities in Amazon Bedrock Data Automation represent a significant step forward in helping you unlock the value of their unstructured content at scale. By streamlining application development and automating workflows that use content from documents, images, audio, and video, organizations can now quickly generate custom insights. Whether you’re analyzing customer conversations to improve sales effectiveness, extracting insights from media content, or processing video feeds, Amazon Bedrock Data Automation provides the flexibility and customization options you need while eliminating the undifferentiated heavy lifting of processing multimodal content. To learn more about these new capabilities, visit the Amazon Bedrock Data Automation documentation, and start building your first video or audio analysis project today.

Resources

To learn more about the new Amazon Bedrock Data Automation capabilities, visit:

  1. Amazon Bedrock
  2. Amazon Bedrock Data Automation
  3. Get insights from multimodal content with Amazon Bedrock Data Automation, now generally available
  4. Creating blueprints for video and Creating blueprints for audio in the documentation
  5. The What’s New post for the new video capability in Amazon Bedrock Data Automation
  6. The What’s New post for the new audio capability in Amazon Bedrock Data Automation

About the author

Ashish Lal is an AI/ML Senior Product Marketing Manager for Amazon Bedrock. He has 11+ years of experience in product marketing and enjoys helping customers accelerate time to value and reduce their AI lifecycle cost.

Read More

GuardianGamer scales family-safe cloud gaming with AWS

GuardianGamer scales family-safe cloud gaming with AWS

This blog post is co-written with Heidi Vogel Brockmann and Ronald Brockmann from GuardianGamer.

Millions of families face a common challenge: how to keep children safe in online gaming without sacrificing the joy and social connection these games provide.

In this post, we share how GuardianGamer—a member of the AWS Activate startup community—has built a cloud gaming platform that helps parents better understand and engage with their children’s gaming experiences using AWS services. Built specifically for families with children under 13, GuardianGamer uses AWS services including Amazon Nova and Amazon Bedrock to deliver a scalable and efficient supervision platform. The team uses Amazon Nova for intelligent narrative generation to provide parents with meaningful insights into their children’s gaming activities and social interactions, while maintaining a non-intrusive approach to monitoring.

The challenge: Monitoring children’s online gaming experiences

Monitoring children’s online gaming activities has been overwhelming for parents, offering little visibility and limited control. GuardianGamer fills a significant void in the market for parents to effectively monitor their children’s gaming activities without being intrusive.

Traditional parental controls were primarily focused on blocking content rather than providing valuable data related to their children’s gaming experiences and social interactions. This led GuardianGamer’s founders to develop a better solution—one that uses AI to summarize gameplay and chat interactions, helping parents better understand and engage with their children’s gaming activities in a non-intrusive way, by using short video reels, while also helping identify potential safety concerns.

Creating connected experiences for parent and child

GuardianGamer is a cloud gaming platform built specifically for families with pre-teen children under 13, combining seamless gaming experiences with comprehensive parental insights. Built on AWS and using Amazon Nova for intelligent narrative generation, the platform streams popular games while providing parents with much-desired visibility into their children’s gaming activities and social interactions. The service prioritizes both safety and social connection through integrated private voice chat, delivering a positive gaming environment that keeps parents informed in a non-invasive way.

There are two connected experiences offered in the platform: one for parents to stay informed and one for kids to play in a highly trusted and safe GuardianGamer space.

For parents, GuardianGamer offers a comprehensive suite of parental engagement tools and insights, empowering them to stay informed and involved in their children’s online activities. Insights are generated from gaming and video understanding, and texted to parents to foster positive conversations between parents and kids. Through these tools, parents can actively manage their child’s gaming experience, enjoying a safe and balanced approach to online entertainment.

For kids, GuardianGamer offers uninterrupted gameplay with minimal latency, all while engaging in social interactions. The platform makes it possible for children to connect and play exclusively within a trusted circle of friends—each vetted and approved by parents—creating a secure digital extension of their real-world relationships. This transforms gaming sessions into natural extensions of friendships formed through school, sports, and community activities, all enhanced by advanced parental AI insights.

By seamlessly blending technology, community, and family, GuardianGamer creates a safer and enriching digital space, called “The Trusted Way for Kids to Play.”

Solution overview

When the GuardianGamer team set out to build a platform that would help parents supervise their children’s gaming experiences across Minecraft, Roblox, and beyond, they knew they needed a cloud infrastructure partner with global reach and proven scalability. Having worked with AWS on previous projects, the team found it to be the natural choice for their ambitious vision.

“Our goal was to build a solution that could scale from zero to millions of users worldwide while maintaining low latency and high reliability—all with a small, nimble engineering team. AWS serverless architecture gave us exactly what we needed without requiring a massive DevOps investment.”

– Heidi Vogel Brockmann, founder and CEO of GuardianGamer.

The following diagram illustrates the backend’s AWS architecture.

GuardianGamer’s backend uses a fully serverless stack built on AWS Lambda, Amazon DynamoDB, Amazon Cognito, Amazon Simple Storage Service (Amazon S3), and Amazon Simple Notification Service (Amazon SNS), making it possible to expand the platform effortlessly as user adoption grows while keeping operational overhead minimal. This architecture enables the team to focus on their core innovation: AI-powered game supervision for parents, rather than infrastructure management.

The cloud gaming component presented unique challenges, requiring low-latency GPU resources positioned close to users around the world.

“Gaming is an inherently global activity, and latency can make or break the user experience. The extensive Regional presence and diverse Amazon Elastic Compute Cloud (Amazon EC2) instance types give us the flexibility to deploy gaming servers where our users are.”

– Heidi Vogel Brockmann.

The team uses Amazon Elastic File System (Amazon EFS) for efficient game state storage within each AWS Region and Amazon Elastic Container Service (Amazon ECS) for streamlined cluster management.

For the AI analysis capabilities that form the heart of GuardianGamer’s parental supervision features, the team relies on AWS Batch to coordinate analysis jobs, and Amazon Bedrock provides access to powerful large language models (LLMs).

“We’re currently using Amazon Nova Lite for summary generation and highlight video selection, which helps parents quickly understand what’s happening in their children’s gameplay without watching hours of content, just a few minutes a day to keep up to date and start informed conversations with their child,”

– Heidi Vogel Brockmann.

Results

Together, AWS and GuardianGamer have successfully scaled GuardianGamer’s cloud gaming platform to handle thousands of concurrent users across multiple game environments. The company’s recent expansion to support Roblox—in addition to its existing Minecraft capabilities—has broadened its serviceable addressable market to 160 million children and their families.

“What makes our implementation special is how we use Amazon Nova to maintain a continuous record of each child’s gaming activities across sessions. When a parent opens our app, they see a comprehensive view of their child’s digital journey, not just isolated moments.”

– Ronald Brockmann, CTO of GuardianGamer.

Conclusion

GuardianGamer demonstrates how a small, agile team can use AWS services to build a sophisticated, AI-powered gaming platform that prioritizes both child safety and parent engagement. By combining cloud gaming infrastructure across multiple Regions with the capabilities of Amazon Bedrock and Amazon Nova, GuardianGamer is pioneering a new approach to family-friendly gaming. Through continuous parent feedback and responsible AI practices, the platform delivers safer, more transparent gaming experiences while maintaining rapid innovation.

“AWS has been exceptional at bringing together diverse teams and technologies across the company to support our vision. Our state-of-the-art architecture leverages several specialized AI components, including speech analysis, video processing, and game metadata collection. We’re particularly excited about incorporating Amazon Nova, which helps us transform complex gaming data into coherent narratives for parents. With AWS as our scaling partner, we’re confident we can deliver our service to millions of families worldwide.”

–  Heidi Vogel Brockmann.

Learn more about building family-safe gaming experiences on AWS. And for further reading, check out The psychology behind why children are hooked on Minecraft and Keep kids off Roblox if you’re worried, its CEO tells parents.


About the Authors

Heidi Vogel Brockmann is the CEO & Founder at GuardianGamer AI. Heidi is an engineer and a proactive mom of four with a mission to transform digital parenting in the gaming space. Frustrated by the lack of tools available for parents with gaming kids, Heidi built the platform to enable fun for kids and peace of mind for parents.

Ronald Brockmann is the CTO of GuardianGamer AI. With extensive expertise in cloud technology and video streaming, Ronald brings decades of experience in building scalable, secure systems. A named inventor on dozens of patents, he excels at building high-performance teams and deploying products at scale. His leadership combines innovative thinking with precise execution to drive GuardianGamer’s technical vision.

Raechel Frick is a Sr Product Marketing Manager at AWS. With over 20 years of experience in the tech industry, she brings a customer-first approach and growth mindset to building integrated marketing programs. Based in the greater Seattle area, Raechel balances her professional life with being a soccer mom and after-school carpool manager, demonstrating her ability to excel both in the corporate world and family life.

John D’Eufemia is an Account Manager at AWS supporting customers within Media, Entertainment, Games, and Sports. With an MBA from Clark University, where he graduated Summa Cum Laude, John brings entrepreneurial spirit to his work, having co-founded multiple ventures at Femia Holdings. His background includes significant leadership experience through his 8-year involvement with DECA Inc., where he served as both an advisor and co-founder of Clark University’s DECA chapter.

Read More

Principal Financial Group increases Voice Virtual Assistant performance using Genesys, Amazon Lex, and Amazon QuickSight

Principal Financial Group increases Voice Virtual Assistant performance using Genesys, Amazon Lex, and Amazon QuickSight

This post was cowritten by Mulay Ahmed, Assistant Director of Engineering, and Ruby Donald, Assistant Director of Engineering at Principal Financial Group. The content and opinions in this post are those of the third-party author and AWS is not responsible for the content or accuracy of this post.

Principal Financial Group® is an integrated global financial services company with specialized solutions helping people, businesses, and institutions reach their long-term financial goals and access greater financial security.

With US contact centers that handle millions of customer calls annually, Principal® wanted to further modernize their customer call experience. With a robust AWS Cloud infrastructure already in place, they selected a cloud-first approach to create a more personalized and seamless experience for their customers that would:

  • Understand customer intents through natural language (vs. touch tone experiences)
  • Assist customers with self-service offerings where possible
  • Accurately route customer calls based on business rules
  • Assist engagement center agents with contextual data

Initially, Principal developed a voice Virtual Assistant (VA) using an Amazon Lex bot to recognize customer intents. The VA can perform self-service transactions or route customers to specific call center queues in the Genesys Cloud contact center platform, based on customer intents and business rules.

As customers interact with the VA, it’s essential to continuously monitor its health and performance. This allows Principal to identify opportunities for fine-tuning, which can enhance the VA’s ability to understand customer intents. Consequently, this will reduce fallback intent rates, improve functional intent fulfillment rates, and lead to better customer experiences.

In this post, we explore how Principal used this opportunity to build an integrated voice VA reporting and analytics solution using an Amazon QuickSight dashboard.

Amazon Lex is a service for building conversational interfaces using voice and text. It provides high-quality speech recognition and language understanding capabilities, enabling the addition of sophisticated, natural language chatbots to new and existing applications.

Genesys Cloud, an omni-channel orchestration and customer relationship platform, provides a contact center platform in a public cloud model that enables quick and simple integration of AWS Contact Center Intelligence (AWS CCI). As part of AWS CCI, Genesys Cloud integrates with Amazon Lex, which enables self-service, intelligent routing, and data collection capabilities.

QuickSight is a unified business intelligence (BI) service that makes it straightforward within an organization to build visualizations, perform ad hoc analysis, and quickly get business insights from their data.

Solution overview

Principal required a reporting and analytics solution that would monitor VA performance based on customer interactions at scale, enabling Principal to improve the Amazon Lex bot performance.

Reporting requirements included customer and VA interaction and Amazon Lex bot performance (target metrics and intent fulfillment) analytics to identify and implement tuning and training opportunities.

The solution used a QuickSight dashboard that derives these insights from the following customer interaction data used to measure VA performance:

  • Genesys Cloud data such as queues and data actions
  • Business-specific data such as product and call center operations data
  • Business API-specific data and metrics such as API response codes

The following diagram shows the solution architecture using Genesys, Amazon Lex, and QuickSight.

The solution workflow involves the following steps:

  1. Users call in and interact with Genesys Cloud.
  2. Genesys Cloud calls an AWS Lambda routing function. This function will return a response to Genesys Cloud with the necessary data, to route the customer call. To generate a response, the function fetches routing data from an Amazon DynamoDB table, and requests an Amazon Lex V2 bot to provide an answer on the user intent.
  3. The Amazon Lex V2 bot processes the customer intent and calls a Lambda fulfillment function to fulfill the intent.
  4. The fulfillment function executes custom logic (routing and session variables logic) and calls necessary APIs to fetch the data required to fulfill the intent.
  5. The APIs process and return the data requested (such as data to perform a self-service transaction).
  6. The Amazon Lex V2 bot’s conversation logs are sent to Amazon CloudWatch (these logs will be used for business analytics, operational monitoring, and alerts).
  7. Genesys Cloud calls a third Lambda function to send customer interaction reports. The Genesys report function pushes these reports to an Amazon Simple Storage Service (Amazon S3) bucket (these reports will be used for business analytics).
  8. An Amazon Data Firehose delivery stream ships the conversation logs from CloudWatch to an S3 bucket.
  9. The Firehose delivery stream transforms the logs in Parquet or CSV format using a Lambda function.
  10. An AWS Glue crawler scans the data in Amazon S3.
  11. The crawler creates or updates the AWS Glue Data Catalog with the schema information.
  12. We use Amazon Athena to query the datasets (customer interaction reports and conversation logs).
  13. QuickSight connects to Athena to query the data from Amazon S3 using the Data Catalog.

Other design considerations

The following are other key design considerations to implement the VA solution:

  • Cost optimization – The solution uses Amazon S3 Bucket Keys to optimize on costs:
  • Encryption – The solution encrypts data at rest with AWS KMS and in transit using SSL/TLS.
  • Genesys Cloud integration – The integration between the Amazon Lex V2 bot and Genesys Cloud is done using AWS Identity and Access Management (IAM). For more details, see Genesys Cloud.
  • Logging and monitoring – The solution monitors AWS resources with CloudWatch and uses alerts to receive notification upon failure events.
  • Least privilege access – The solution uses IAM roles and policies to grant the minimum necessary permissions to uses and services.
  • Data privacy – The solution handles customer sensitive data such as personally identifiable information (PII) according to compliance and data protection requirements. It implements data masking when applicable and appropriate.
  • Secure APIs – APIs implemented in this solution are protected and designed according to compliance and security requirements.
  • Data types – The solution defines data types, such as time stamps, in the Data Catalog (and Athena) in order to refresh data (SPICE data) in QuickSight on a schedule.
  • DevOps – The solution is version controlled, and changes are deployed using pipelines, to enable faster release cycles.
  • Analytics on Amazon LexAnalytics on Amazon Lex empowers teams with data-driven insights to improve the performance of their bots. The overview dashboard provides a single snapshot of key metrics such as the total number of conversations and intent recognition rates. Principal does not use this capability due to the following reasons:
    • The dashboard can’t integrate with external data:
      • Genesys Cloud data (such as queues and data actions)
      • Business-specific data (such as product and call center operations data)
      • Business API-specific data and metrics (such as response codes)
  • The dashboard can’t be customized to add additional views and data.

Sample dashboard

With this reporting and analytics solution, Principal can consolidate data from multiple sources and visualize the performance of the VA to identify areas of opportunities for improvement. The following screenshot shows an example of their QuickSight dashboard for illustrative purposes.

Conclusion

In this post, we presented how Principal created a report and analytics solution for their VA solution using Genesys Cloud and Amazon Lex, along with QuickSight to provide customer interaction insights.

The VA solution allowed Principal to maintain its existing contact center solution with Genesys Cloud and achieve better customer experiences. It offers other benefits such as the ability for a customer to receive support on some inquiries without requiring an agent on the call (self-service). It also provides intelligent routing capabilities, leading to reduced call time and increased agent productivity.

With the implementation of this solution, Principal can monitor and derive insights from its VA solution and fine-tune accordingly its performance.

In its 2025 roadmap, Principal will continue to strengthen the foundation of the solution described in this post. In a second post, Principal will present how they automate the deployment and testing of new Amazon Lex bot versions.

AWS and Amazon are not affiliates of any company of the Principal Financial Group®. This communication is intended to be educational in nature and is not intended to be taken as a recommendation.

Insurance products issued by Principal National Life Insurance Co (except in NY) and Principal Life Insurance Company®. Plan administrative services offered by Principal Life. Principal Funds, Inc. is distributed by Principal Funds Distributor, Inc. Securities offered through Principal Securities, Inc., member SIPC and/or independent broker/dealers. Referenced companies are members of the Principal Financial Group®, Des Moines, IA 50392. ©2025 Principal Financial Services, Inc. 4373397-042025


About the Authors

Mulay Ahmed is an Assistant Director of Engineering at Principal and well-versed in architecting and implementing complex enterprise-grade solutions on AWS Cloud.

Ruby Donald is an Assistant Director of Engineering at Principal and leads the Enterprise Virtual Assistants Engineering Team. She has extensive experience in building and delivering software at enterprise scale.

Read More

Optimize query responses with user feedback using Amazon Bedrock embedding and few-shot prompting

Optimize query responses with user feedback using Amazon Bedrock embedding and few-shot prompting

Improving response quality for user queries is essential for AI-driven applications, especially those focusing on user satisfaction. For example, an HR chat-based assistant should strictly follow company policies and respond using a certain tone. A deviation from that can be corrected by feedback from users. This post demonstrates how Amazon Bedrock, combined with a user feedback dataset and few-shot prompting, can refine responses for higher user satisfaction. By using Amazon Titan Text Embeddings v2, we demonstrate a statistically significant improvement in response quality, making it a valuable tool for applications seeking accurate and personalized responses.

Recent studies have highlighted the value of feedback and prompting in refining AI responses. Prompt Optimization with Human Feedback proposes a systematic approach to learning from user feedback, using it to iteratively fine-tune models for improved alignment and robustness. Similarly, Black-Box Prompt Optimization: Aligning Large Language Models without Model Training demonstrates how retrieval augmented chain-of-thought prompting enhances few-shot learning by integrating relevant context, enabling better reasoning and response quality. Building on these ideas, our work uses the Amazon Titan Text Embeddings v2 model to optimize responses using available user feedback and few-shot prompting, achieving statistically significant improvements in user satisfaction. Amazon Bedrock already provides an automatic prompt optimization feature to automatically adapt and optimize prompts without additional user input. In this blog post, we showcase how to use OSS libraries for a more customized optimization based on user feedback and few-shot prompting.

We’ve developed a practical solution using Amazon Bedrock that automatically improves chat assistant responses based on user feedback. This solution uses embeddings and few-shot prompting. To demonstrate the effectiveness of the solution, we used a publicly available user feedback dataset. However, when applying it inside a company, the model can use its own feedback data provided by its users. With our test dataset, it shows a 3.67% increase in user satisfaction scores. The key steps include:

  1. Retrieve a publicly available user feedback dataset (for this example, Unified Feedback Dataset on Hugging Face).
  2. Create embeddings for queries to capture semantic similar examples, using Amazon Titan Text Embeddings.
  3. Use similar queries as examples in a few-shot prompt to generate optimized prompts.
  4. Compare optimized prompts against direct large language model (LLM) calls.
  5. Validate the improvement in response quality using a paired sample t-test.

The following diagram is an overview of the system.

End-to-end workflow diagram showing how user feedback and queries are processed through embedding, semantic search, and LLM optimization

The key benefits of using Amazon Bedrock are:

  • Zero infrastructure management – Deploy and scale without managing complex machine learning (ML) infrastructure
  • Cost-effective – Pay only for what you use with the Amazon Bedrock pay-as-you-go pricing model
  • Enterprise-grade security – Use AWS built-in security and compliance features
  • Straightforward integration – Integrate seamlessly existing applications and open source tools
  • Multiple model options – Access various foundation models (FMs) for different use cases

The following sections dive deeper into these steps, providing code snippets from the notebook to illustrate the process.

Prerequisites

Prerequisites for implementation include an AWS account with Amazon Bedrock access, Python 3.8 or later, and configured Amazon credentials.

Data collection

We downloaded a user feedback dataset from Hugging Face, llm-blender/Unified-Feedback. The dataset contains fields such as conv_A_user (the user query) and conv_A_rating (a binary rating; 0 means the user doesn’t like it and 1 means the user likes it). The following code retrieves the dataset and focuses on the fields needed for embedding generation and feedback analysis. It can be run in an Amazon Sagemaker notebook or a Jupyter notebook that has access to Amazon Bedrock.

# Load the dataset and specify the subset
dataset = load_dataset("llm-blender/Unified-Feedback", "synthetic-instruct-gptj-pairwise")

# Access the 'train' split
train_dataset = dataset["train"]

# Convert the dataset to Pandas DataFrame
df = train_dataset.to_pandas()

# Flatten the nested conversation structures for conv_A and conv_B safely
df['conv_A_user'] = df['conv_A'].apply(lambda x: x[0]['content'] if len(x) > 0 else None)
df['conv_A_assistant'] = df['conv_A'].apply(lambda x: x[1]['content'] if len(x) > 1 else None)

# Drop the original nested columns if they are no longer needed
df = df.drop(columns=['conv_A', 'conv_B'])

Data sampling and embedding generation

To manage the process effectively, we sampled 6,000 queries from the dataset. We used Amazon Titan Text Embeddings v2 to create embeddings for these queries, transforming text into high-dimensional representations that allow for similarity comparisons. See the following code:

import random import bedrock # Take a sample of 6000 queries 
df = df.shuffle(seed=42).select(range(6000)) 
# AWS credentials
session = boto3.Session()
region = 'us-east-1'
# Initialize the S3 client
s3_client = boto3.client('s3')

boto3_bedrock = boto3.client('bedrock-runtime', region)
titan_embed_v2 = BedrockEmbeddings(
    client=boto3_bedrock, model_id="amazon.titan-embed-text-v2:0")
    
# Function to convert text to embeddings
def get_embeddings(text):
    response = titan_embed_v2.embed_query(text)
    return response  # This should return the embedding vector

# Apply the function to the 'prompt' column and store in a new column
df_test['conv_A_user_vec'] = df_test['conv_A_user'].apply(get_embeddings)

Few-shot prompting with similarity search

For this part, we took the following steps:

  1. Sample 100 queries from the dataset for testing. Sampling 100 queries helps us run multiple trials to validate our solution.
  2. Compute cosine similarity (measure of similarity between two non-zero vectors) between the embeddings of these test queries and the stored 6,000 embeddings.
  3. Select the top k similar queries to the test queries to serve as few-shot examples. We set K = 10 to balance between the computational efficiency and diversity of the examples.

See the following code:

# Step 2: Define cosine similarity function
def compute_cosine_similarity(embedding1, embedding2):
embedding1 = np.array(embedding1).reshape(1, -1) # Reshape to 2D array
embedding2 = np.array(embedding2).reshape(1, -1) # Reshape to 2D array
return cosine_similarity(embedding1, embedding2)[0][0]

# Sample query embedding
def get_matched_convo(query, df):
    query_embedding = get_embeddings(query)
    
    # Step 3: Compute similarity with each row in the DataFrame
    df['similarity'] = df['conv_A_user_vec'].apply(lambda x: compute_cosine_similarity(query_embedding, x))
    
    # Step 4: Sort rows based on similarity score (descending order)
    df_sorted = df.sort_values(by='similarity', ascending=False)
    
    # Step 5: Filter or get top matching rows (e.g., top 10 matches)
    top_matches = df_sorted.head(10) 
    
    # Print top matches
    return top_matches[['conv_A_user', 'conv_A_assistant','conv_A_rating','similarity']]

This code provides a few-shot context for each test query, using cosine similarity to retrieve the closest matches. These example queries and feedback serve as additional context to guide the prompt optimization. The following function generates the few-shot prompt:

import boto3
from langchain_aws import ChatBedrock
from pydantic import BaseModel

# Initialize Amazon Bedrock client
bedrock_runtime = boto3.client(service_name="bedrock-runtime", region_name="us-east-1")

# Configure the model to use
model_id = "us.anthropic.claude-3-5-haiku-20241022-v1:0"
model_kwargs = {
"max_tokens": 2048,
"temperature": 0.1,
"top_k": 250,
"top_p": 1,
"stop_sequences": ["nnHuman"],
}

# Create the LangChain Chat object for Bedrock
llm = ChatBedrock(
client=bedrock_runtime,
model_id=model_id,
model_kwargs=model_kwargs,
)

# Pydantic model to validate the output prompt
class OptimizedPromptOutput(BaseModel):
optimized_prompt: str

# Function to generate the few-shot prompt
def generate_few_shot_prompt_only(user_query, nearest_examples):
    # Ensure that df_examples is a DataFrame
    if not isinstance(nearest_examples, pd.DataFrame):
    raise ValueError("Expected df_examples to be a DataFrame")
    # Construct the few-shot prompt using nearest matching examples
    few_shot_prompt = "Here are examples of user queries, LLM responses, and feedback:nn"
    for i in range(len(nearest_examples)):
    few_shot_prompt += f"User Query: {nearest_examples.loc[i,'conv_A_user']}n"
    few_shot_prompt += f"LLM Response: {nearest_examples.loc[i,'conv_A_assistant']}n"
    few_shot_prompt += f"User Feedback: {'👍' if nearest_examples.loc[i,'conv_A_rating'] == 1.0 else '👎'}nn"
    
    # Add the user query for which the optimized prompt is required
    few_shot_prompt += f"Based on these examples, generate a general optimized prompt for the following user query:nn"
    few_shot_prompt += f"User Query: {user_query}n"
    few_shot_prompt += "Optimized Prompt: Provide a clear, well-researched response based on accurate data and credible sources. Avoid unnecessary information or speculation."
    
    return few_shot_prompt

The get_optimized_prompt function performs the following tasks:

  1. The user query and similar examples generate a few-shot prompt.
  2. We use the few-shot prompt in an LLM call to generate an optimized prompt.
  3. Make sure the output is in the following format using Pydantic.

See the following code:

# Function to generate an optimized prompt using Bedrock and return only the prompt using Pydantic
def get_optimized_prompt(user_query, nearest_examples):
    # Generate the few-shot prompt
    few_shot_prompt = generate_few_shot_prompt_only(user_query, nearest_examples)
    
    # Call the LLM to generate the optimized prompt
    response = llm.invoke(few_shot_prompt)
    
    # Extract and validate only the optimized prompt using Pydantic
    optimized_prompt = response.content # Fixed to access the 'content' attribute of the AIMessage object
    optimized_prompt_output = OptimizedPromptOutput(optimized_prompt=optimized_prompt)
    
    return optimized_prompt_output.optimized_prompt

# Example usage
query = "Is the US dollar weakening over time?"
nearest_examples = get_matched_convo(query, df_test)
nearest_examples.reset_index(drop=True, inplace=True)

# Generate optimized prompt
optimized_prompt = get_optimized_prompt(query, nearest_examples)
print("Optimized Prompt:", optimized_prompt)

The make_llm_call_with_optimized_prompt function uses an optimized prompt and user query to make the LLM (Anthropic’s Claude Haiku 3.5) call to get the final response:

# Function to make the LLM call using the optimized prompt and user query
def make_llm_call_with_optimized_prompt(optimized_prompt, user_query):
    start_time = time.time()
    # Combine the optimized prompt and user query to form the input for the LLM
    final_prompt = f"{optimized_prompt}nnUser Query: {user_query}nResponse:"

    # Make the call to the LLM using the combined prompt
    response = llm.invoke(final_prompt)
    
    # Extract only the content from the LLM response
    final_response = response.content  # Extract the response content without adding any labels
    time_taken = time.time() - start_time
    return final_response,time_taken

# Example usage
user_query = "How to grow avocado indoor?"
# Assume 'optimized_prompt' has already been generated from the previous step
final_response,time_taken = make_llm_call_with_optimized_prompt(optimized_prompt, user_query)
print("LLM Response:", final_response)

Comparative evaluation of optimized and unoptimized prompts

To compare the optimized prompt with the baseline (in this case, the unoptimized prompt), we defined a function that returned a result without an optimized prompt for all the queries in the evaluation dataset:

def get_unoptimized_prompt_response(df_eval):
    # Iterate over the dataframe and make LLM calls
    for index, row in tqdm(df_eval.iterrows()):
        # Get the user query from 'conv_A_user'
        user_query = row['conv_A_user']
        
        # Make the Bedrock LLM call
        response = llm.invoke(user_query)
        
        # Store the response content in a new column 'unoptimized_prompt_response'
        df_eval.at[index, 'unoptimized_prompt_response'] = response.content  # Extract 'content' from the response object
    
    return df_eval

The following function generates the query response using similarity search and intermediate optimized prompt generation for all the queries in the evaluation dataset:

def get_optimized_prompt_response(df_eval):
    # Iterate over the dataframe and make LLM calls
    for index, row in tqdm(df_eval.iterrows()):
        # Get the user query from 'conv_A_user'
        user_query = row['conv_A_user']
        nearest_examples = get_matched_convo(user_query, df_test)
        nearest_examples.reset_index(drop=True, inplace=True)
        optimized_prompt = get_optimized_prompt(user_query, nearest_examples)
        # Make the Bedrock LLM call
        final_response,time_taken = make_llm_call_with_optimized_prompt(optimized_prompt, user_query)
        
        # Store the response content in a new column 'unoptimized_prompt_response'
        df_eval.at[index, 'optimized_prompt_response'] = final_response  # Extract 'content' from the response object
    
    return df_eval

This code compares responses generated with and without few-shot optimization, setting up the data for evaluation.

LLM as judge and evaluation of responses

To quantify response quality, we used an LLM as a judge to score the optimized and unoptimized responses for alignment with the user query. We used Pydantic here to make sure the output sticks to the desired pattern of 0 (LLM predicts the response won’t be liked by the user) or 1 (LLM predicts the response will be liked by the user):

# Define Pydantic model to enforce predicted feedback as 0 or 1
class FeedbackPrediction(BaseModel):
    predicted_feedback: conint(ge=0, le=1)  # Only allow values 0 or 1

# Function to generate few-shot prompt
def generate_few_shot_prompt(df_examples, unoptimized_response):
    few_shot_prompt = (
        "You are an impartial judge evaluating the quality of LLM responses. "
        "Based on the user queries and the LLM responses provided below, your task is to determine whether the response is good or bad, "
        "using the examples provided. Return 1 if the response is good (thumbs up) or 0 if the response is bad (thumbs down).nn"
    )
    few_shot_prompt += "Below are examples of user queries, LLM responses, and user feedback:nn"
    
    # Iterate over few-shot examples
    for i, row in df_examples.iterrows():
        few_shot_prompt += f"User Query: {row['conv_A_user']}n"
        few_shot_prompt += f"LLM Response: {row['conv_A_assistant']}n"
        few_shot_prompt += f"User Feedback: {'👍' if row['conv_A_rating'] == 1 else '👎'}nn"
    
    # Provide the unoptimized response for feedback prediction
    few_shot_prompt += (
        "Now, evaluate the following LLM response based on the examples above. Return 0 for bad response or 1 for good response.nn"
        f"User Query: {unoptimized_response}n"
        f"Predicted Feedback (0 for 👎, 1 for 👍):"
    )
    return few_shot_prompt

LLM-as-a-judge is a functionality where an LLM can judge the accuracy of a text using certain grounding examples. We have used that functionality here to judge the difference between the result received from optimized and un-optimized prompt. Amazon Bedrock launched an LLM-as-a-judge functionality in December 2024 that can be used for such use cases. In the following function, we demonstrate how the LLM acts as an evaluator, scoring responses based on their alignment and satisfaction for the full evaluation dataset:

# Function to predict feedback using few-shot examples
def predict_feedback(df_examples, df_to_rate, response_column, target_col):
    # Create a new column to store predicted feedback
    df_to_rate[target_col] = None
    
    # Iterate over each row in the dataframe to rate
    for index, row in tqdm(df_to_rate.iterrows(), total=len(df_to_rate)):
        # Get the unoptimized prompt response
        try:
            time.sleep(2)
            unoptimized_response = row[response_column]

            # Generate few-shot prompt
            few_shot_prompt = generate_few_shot_prompt(df_examples, unoptimized_response)

            # Call the LLM to predict the feedback
            response = llm.invoke(few_shot_prompt)

            # Extract the predicted feedback (assuming the model returns '0' or '1' as feedback)
            predicted_feedback_str = response.content.strip()  # Clean and extract the predicted feedback

            # Validate the feedback using Pydantic
            try:
                feedback_prediction = FeedbackPrediction(predicted_feedback=int(predicted_feedback_str))
                # Store the predicted feedback in the dataframe
                df_to_rate.at[index, target_col] = feedback_prediction.predicted_feedback
            except (ValueError, ValidationError):
                # In case of invalid data, assign default value (e.g., 0)
                df_to_rate.at[index, target_col] = 0
        except:
            pass

    return df_to_rate

In the following example, we repeated this process for 20 trials, capturing user satisfaction scores each time. The overall score for the dataset is the sum of the user satisfaction score.

df_eval = df.drop(df_test.index).sample(100)
df_eval['unoptimized_prompt_response'] = "" # Create an empty column to store responses
df_eval = get_unoptimized_prompt_response(df_eval)
df_eval['optimized_prompt_response'] = "" # Create an empty column to store responses
df_eval = get_optimized_prompt_response(df_eval)
Call the function to predict feedback
df_with_predictions = predict_feedback(df_eval, df_eval, 'unoptimized_prompt_response', 'predicted_unoptimized_feedback')
df_with_predictions = predict_feedback(df_with_predictions, df_with_predictions, 'optimized_prompt_response', 'predicted_optimized_feedback')

# Calculate accuracy for unoptimized and optimized responses
original_success = df_with_predictions.conv_A_rating.sum()*100.0/len(df_with_predictions)
unoptimized_success  = df_with_predictions.predicted_unoptimized_feedback.sum()*100.0/len(df_with_predictions) 
optimized_success = df_with_predictions.predicted_optimized_feedback.sum()*100.0/len(df_with_predictions) 

# Display results
print(f"Original success: {original_success:.2f}%")
print(f"Unoptimized Prompt success: {unoptimized_success:.2f}%")
print(f"Optimized Prompt success: {optimized_success:.2f}%")

Result analysis

The following line chart shows the performance improvement of the optimized solution over the unoptimized one. Green areas indicate positive improvements, whereas red areas show negative changes.

Detailed performance analysis graph comparing optimized vs unoptimized solutions, highlighting peak 12% improvement at test case 7.5

As we gathered the result of 20 trials, we saw that the mean of satisfaction scores from the unoptimized prompt was 0.8696, whereas the mean of satisfaction scores from the optimized prompt was 0.9063. Therefore, our method outperforms the baseline by 3.67%.

Finally, we ran a paired sample t-test to compare satisfaction scores from the optimized and unoptimized prompts. This statistical test validated whether prompt optimization significantly improved response quality. See the following code:

from scipy import stats
# Sample user satisfaction scores from the notebook
unopt = [] #20 samples of scores for the unoptimized promt
opt = [] # 20 samples of scores for the optimized promt]
# Paired sample t-test
t_stat, p_val = stats.ttest_rel(unopt, opt)
print(f"t-statistic: {t_stat}, p-value: {p_val}")

After running the t-test, we got a p-value of 0.000762, which is less than 0.05. Therefore, the performance boost of optimized prompts over unoptimized prompts is statistically significant.

Key takeaways

We learned the following key takeaways from this solution:

  • Few-shot prompting improves query response – Using highly similar few-shot examples leads to significant improvements in response quality.
  • Amazon Titan Text Embeddings enables contextual similarity – The model produces embeddings that facilitate effective similarity searches.
  • Statistical validation confirms effectiveness – A p-value of 0.000762 indicates that our optimized approach meaningfully enhances user satisfaction.
  • Improved business impact – This approach delivers measurable business value through improved AI assistant performance. The 3.67% increase in satisfaction scores translates to tangible outcomes: HR departments can expect fewer policy misinterpretations (reducing compliance risks), and customer service teams might see a significant reduction in escalated tickets. The solution’s ability to continuously learn from feedback creates a self-improving system that increases ROI over time without requiring specialized ML expertise or infrastructure investments.

Limitations

Although the system shows promise, its performance heavily depends on the availability and volume of user feedback, especially in closed-domain applications. In scenarios where only a handful of feedback examples are available, the model might struggle to generate meaningful optimizations or fail to capture the nuances of user preferences effectively. Additionally, the current implementation assumes that user feedback is reliable and representative of broader user needs, which might not always be the case.

Next steps

Future work could focus on expanding this system to support multilingual queries and responses, enabling broader applicability across diverse user bases. Incorporating Retrieval Augmented Generation (RAG) techniques could further enhance context handling and accuracy for complex queries. Additionally, exploring ways to address the limitations in low-feedback scenarios, such as synthetic feedback generation or transfer learning, could make the approach more robust and versatile.

Conclusion

In this post, we demonstrated the effectiveness of query optimization using Amazon Bedrock, few-shot prompting, and user feedback to significantly enhance response quality. By aligning responses with user-specific preferences, this approach alleviates the need for expensive model fine-tuning, making it practical for real-world applications. Its flexibility makes it suitable for chat-based assistants across various domains, such as ecommerce, customer service, and hospitality, where high-quality, user-aligned responses are essential.

To learn more, refer to the following resources:


About the Authors

Tanay Chowdhury is a Data Scientist at the Generative AI Innovation Center at Amazon Web Services.

Parth Patwa is a Data Scientist at the Generative AI Innovation Center at Amazon Web Services.

Yingwei Yu is an Applied Science Manager at the Generative AI Innovation Center at Amazon Web Services.

Read More

Boosting team productivity with Amazon Q Business Microsoft 365 integrations for Microsoft 365 Outlook and Word

Boosting team productivity with Amazon Q Business Microsoft 365 integrations for Microsoft 365 Outlook and Word

Amazon Q Business, with its enterprise grade security, seamless integration with multiple diverse data sources, and sophisticated natural language understanding, represents the next generation of AI business assistants. What sets Amazon Q Business apart is its support of enterprise requirements from its ability to integrate with company documentation to its adaptability with specific business terminology and context-aware responses. Combined with comprehensive customization options, Amazon Q Business is transforming how organizations enhance their document processing and business operations.

Amazon Q Business integration with Microsoft 365 applications offers powerful AI assistance directly within the tools that your team already uses daily.

In this post, we explore how these integrations for Outlook and Word can transform your workflow.

Prerequisites

Before you get started, make sure that you have the following prerequisites in place:

  • Create an Amazon Q Business application. Configuring an Amazon Q Business application using AWS IAM Identity Center.
  • Access to the Microsoft Entra admin center.
  • Microsoft Entra tenant ID (this should be treated as sensitive information). How to find your Microsoft Entra tenant ID.

Set up Amazon Q Business M365 integrations

Follow the steps below to setup Microsoft 365 integrations with Amazon Q Business.

  1. Go to the AWS Management Console for Amazon Q Business and choose Enhancements then Integrations. On the Integrations page, choose Add integrations.
  2. Select Outlook or Word. In this example, we selected Outlook.
  3. Under Integration name, enter a name for the integration. Under Workspace, enter your Microsoft Entra tenant ID. Leave the remaining values as the default, and choose Add Integration.
  4. After the integration is successfully deployed, select the integration name and copy the manifest URL to use in a later step.

  5. Go to the Microsoft admin center. Under Settings choose Integrated apps, and choose Upload custom apps.
  6. Choose App type and then select Office Add-in. Enter the manifest URL from the Amazon Q Business console, in Provide link to the manifest file. Choose Validate.
  7. On the User page, add users, choose Accept permissions and choose Finish Deployment.

Amazon Q Business in Outlook: Email efficiency reimagined

By integrating Amazon Q Business with Outlook, you have access to several tools to improve email efficiency. To access these tools in Outlook, select Amazon Q Business icon in Outlook on top right side of the email section. Amazon Q Business can help you summarize an email thread, extract insights and action items, and suggest follow-ups.

  • Email summarization: Quickly understand the key points of lengthy email threads by choosing Summarize in the Amazon Q Business sidebar.
  • Draft responses: Generate contextually appropriate email replies based on the conversation history and insert them directly into your email draft from the Amazon Q Business sidebar.

Received email:
Hi team,
I wanted to share the key points from today’s quarterly strategy meeting with John Doe and the leadership team.

Key Takeaways:

Q4 2024 targets were exceeded by 12%, setting a strong foundation for 2025
New product launch timeline confirmed for July 2025
Need to accelerate hiring for the technical team (6 positions to fill by end of Q2)

Action Items:
John Smith will finalize the budget allocation for Q2 by March 5
Marketing team to present updated campaign metrics next week
HR to fast track technical recruitment process
Sales team to provide updated pipeline report by Friday

Project Updates:
Project Phoenix is on track for May deployment
Customer feedback program launching next month
International expansion plans under review

Next Steps:
Follow-up meeting scheduled for March 12 at 2 PM EST
Department heads to submit Q2 objectives by March 1
John to distribute updated organizational chart next week
Please let me know if I missed anything or if you have any questions.

Best regards,
Jane Doe

Amazon Q Business draft reply:
You will see a draft reply in the Amazon Q Business sidebar. Choose the highlighted icon at the bottom of the sidebar to create an email using the draft reply.

Hi Jane,
Thank you for sharing the meeting notes from yesterday’s Q1 Strategy Review. The summary is very helpful.
I noticed the impressive Q4 results and the confirmed July product launch timeline. The hiring acceleration for the technical team seems to be a priority we should focus on.
I’ll make note of all the action items, particularly the March 1 deadline for Q2 objectives submission. I’ll also block my calendar for the follow up meeting on March 12 at 2 PM EST.
Is there anything specific you’d like me to help with regarding any of these items? I’m particularly interested in the Project Phoenix deployment and the customer feedback program.

Thanks again for the comprehensive summary.
Regards

  • Meeting preparation: Extract action items by choosing Action items and next steps in the Amazon Q Business sidebar. Also find important details from email conversations by asking questions in the Amazon Q Business sidebar chat box.

Amazon Q Business in Word: Content creation accelerated

You can select Amazon Q Business on the top right corner of the word document access Amazon Q Business. You can access the Amazon Q Business document processing features from the Word context menu when you highlight text. You can also access Amazon Q Business in the sidebar when working in a Word document. When you select a document processing feature, the output will appear in the Amazon Q Business sidebar, as shown in the following figure.

You can use Amazon Q Business in Word to summarize, explain, simplify, or fix the content of a Word document.

  • Summarize: Document summarization is a powerful capability of Amazon Q Business that you can use to quickly extract key information from lengthy documents. This feature uses natural language processing to identify the most important concepts, facts, and insights within text documents, then generates concise summaries that preserve the essential meaning while significantly reducing reading time. You can customize the summary length and focus areas based on your specific needs, making it straightforward to process large volumes of information efficiently. Document summarization helps professionals across industries quickly grasp the core content of reports, research papers, articles, and other text-heavy materials without sacrificing comprehension of critical details. To summarize a document, select Amazon Q Business from the ribbon, choose Summarize from the Amazon Q Business sidebar and enter a prompt describing what type of summary you want.

Quickly understand the key points of lengthy word document by choosing Summarize in the Amazon Q Business sidebar

  • Simplify: The Amazon Q Business Word add-in analyzes documents in real time, identifying overly complex sentences, jargon, and verbose passages that might confuse readers. You can have Amazon Q Business rewrite selected text or entire documents to improve readability while maintaining the original meaning. The Simplify feature is particularly valuable for professionals who need to communicate technical information to broader audiences, educators creating accessible learning materials, or anyone looking to enhance the clarity of their written communication without spending hours manually editing their work.

Select the passage in the work document and choose Simplify in the Amazon Q Business sidebar.

  • Explain: You can use Amazon Q Business to help you better understand complex content within their documents. You can select difficult terms, technical concepts, or confusing passages and receive clear, contextual explanations. Amazon Q Business analyzes the selected text and generates comprehensive explanations tailored to your needs, including definitions, simplified descriptions, and relevant examples. This functionality is especially beneficial for professionals working with specialized terminology, students navigating academic papers, or anyone encountering unfamiliar concepts in their reading. The Explain feature transforms the document experience from passive consumption to interactive learning, making complex information more accessible to users.

Select the passage in the work document and choose Explain in the Amazon Q Business sidebar.

  • Fix: Amazon Q Business scans the selected passages for grammatical errors, spelling mistakes, punctuation problems, inconsistent formatting, and stylistic improvements, and resolves those issues. This functionality is invaluable for professionals preparing important business documents, students finalizing academic papers, or anyone seeking to produce polished, accurate content without the need for extensive manual proofreading. This feature significantly reduces editing time while improving document quality.

Select the passage in the work document and choose Fix in the Amazon Q Business sidebar.

Measuring impact

Amazon Q Business helps measure the effectiveness of the solution by empowering users to provide feedback. Feedback information is stored in Amazon Cloudwatch logs where admins can review it to identify issues and improvements.

Clean up

When you are done testing Amazon Q Business integrations, you can remove them through the Amazon Q Business console.

  1. In the console, choose Applications and select your application ID.
  2. Select Integrations.
  3. In the Integrations page, select the integration that you created.
  4. Choose Delete.

Conclusion

Amazon Q Business integrations with Microsoft 365 applications represents a significant opportunity to enhance your team’s productivity. By bringing AI assistance directly into the tools where work happens, teams can focus on higher-value activities while maintaining quality and consistency in their communications and documents.

Experience the power of Amazon Q Business, by exploring its seamless integration with your everyday business tools. Start enhancing your productivity today by visiting the Amazon Q Business User Guide to understand the full potential of this AI-powered solution. Transform your email communication with our Microsoft Outlook integration and revolutionize your document creation process with our Microsoft Word features. To discover the available integrations that can streamline your workflow, see Integrations.


About the author

Leo Mentis Raj Selvaraj is a Sr. Specialist Solutions Architect – GenAI at AWS with 4.5 years of experience, currently guiding customers through their GenAI implementation journeys. Previously, he architected data platform and analytics solutions for strategic customers using a comprehensive range of AWS services including storage, compute, databases, serverless, analytics, and ML technologies. Leo also collaborates with internal AWS teams to drive product feature development based on customer feedback, contributing to the evolution of AWS offerings.

Read More

Integrate Amazon Bedrock Agents with Slack

Integrate Amazon Bedrock Agents with Slack

As companies increasingly adopt generative AI applications, AI agents capable of delivering tangible business value have emerged as a crucial component. In this context, integrating custom-built AI agents within chat services such as Slack can be transformative, providing businesses with seamless access to AI assistants powered by sophisticated foundation models (FMs). After an AI agent is developed, the next challenge lies in incorporating it in a way that provides straightforward and efficient use. Organizations have several options: integration into existing web applications, development of custom frontend interfaces, or integration with communication services such as Slack. The third option—integrating custom AI agents with Slack—offers a simpler and quicker implementation path you can follow to summon the AI agent on-demand within your familiar work environment.

This solution drives team productivity through faster query responses and automated task handling, while minimizing operational overhead. The pay-per-use model optimizes cost as your usage scales, making it particularly attractive for organizations starting their AI journey or expanding their existing capabilities.

There are numerous practical business use cases for AI agents, each offering measurable benefits and significant time savings compared to traditional approaches. Examples include a knowledge base agent that instantly surfaces company documentation, reducing search time from minutes to seconds. A compliance checker agent that facilitates policy adherence in real time, potentially saving hours of manual review. Sales analytics agents provide immediate insights, alleviating the need for time consuming data compilation and analysis. AI agents for IT support help with common technical issues, often resolving problems faster than human agents.

These AI-powered solutions enhance user experience through contextual conversations, providing relevant assistance based on the current conversation and query context. This natural interaction model improves the quality of support and helps drive user adoption across the organization. You can follow this implementation approach to provide the solution to your Slack users in use cases where quick access to AI-powered insights would benefit team workflows. By integrating custom AI agents, organizations can track improvements in key performance indicators (KPIs) such as mean time to resolution (MTTR), first-call resolution rates, and overall productivity gains, demonstrating the practical benefits of AI agents powered by large language models (LLMs).

In this post, we present a solution to incorporate Amazon Bedrock Agents in your Slack workspace. We guide you through configuring a Slack workspace, deploying integration components in Amazon Web Services (AWS), and using this solution.

Solution overview

The solution consists of two main components: the Slack to Amazon Bedrock Agents integration infrastructure and either your existing Amazon Bedrock agent or a sample agent we provide for testing. The integration infrastructure handles the communication between Slack and the Amazon Bedrock agent, and the agent processes and responds to the queries.

The solution uses Amazon API Gateway, AWS Lambda, AWS Secrets Manager, and Amazon Simple Queue Service (Amazon SQS) for a serverless integration. This alleviates the need for always-on infrastructure, helping to reduce overall costs because you only pay for actual usage.

Amazon Bedrock agents automate workflows and repetitive tasks while securely connecting to your organization’s data sources to provide accurate responses.

An action group defines actions that the agent can help the user perform. This way, you can integrate business logic with your backend services by having your agent process and manage incoming requests. The agent also maintains context throughout conversations, uses the process of chain of thought, and enables more personalized interactions.

The following diagram represents the solution architecture, which contains two key sections:

  • Section A – The Amazon Bedrock agent and its components are included in this section. With this part of the solution, you can either connect your existing agent or deploy our sample agent using the provided AWS CloudFormation template
  • Section B – This section contains the integration infrastructure (API Gateway, Secrets Manager, Lambda, and Amazon SQS) that’s deployed by a CloudFormation template.

Solutions Overview Slack Integration with Amazon Bedrock Agents

The request flow consists of the following steps:

  1. A user sends a message in Slack to the bot by using @appname.
  2. Slack sends a webhook POST request to the API Gateway endpoint.
  3. The request is forwarded to the verification Lambda function.
  4. The Lambda function retrieves the Slack signing secret and bot token to verify request authenticity.
  5. After verification, the message is sent to a second Lambda function.
  6. Before putting the message in the SQS queue, the Amazon SQS integration Lambda function sends a “🤔 Processing your request…” message to the user in Slack within a thread under the original message.
  7. Messages are sent to the FIFO (First-In-First-Out) queue for processing, using the channel and thread ID to help prevent message duplication.
  8. The SQS queue triggers the Amazon Bedrock integration Lambda function.
  9. The Lambda function invokes the Amazon Bedrock agent with the user’s query, and the agent processes the request and responds with the answer.
  10. The Lambda function updates the initial “🤔 Processing your request…” message in the Slack thread with either the final agent’s response or, if debug mode is enabled, the agent’s reasoning process.

Prerequisites

You must have the following in place to complete the solution in this post:

  • An AWS account
  • A Slack account (two options):
    • For company Slack accounts, work with your administrator to create and publish the integration application, or you can use a sandbox organization
    • Alternatively, create your own Slack account and workspace for testing and experimentation
  • Model access in Amazon Bedrock for Anthropic’s Claude 3.5 Sonnet in the same AWS Region where you’ll deploy this solution (if using your own agent, you can skip this requirement)
  • The accompanying CloudFormation templates provided in GitHub repo:
    • Sample Amazon Bedrock agent (virtual-meteorologist)
    • Slack integration to Amazon Bedrock Agents

Create a Slack application in your workspace

Creating applications in Slack requires specific permissions that vary by organization. If you don’t have the necessary access, you’ll need to contact your Slack administrator. The screenshots in this walkthrough are from a personal Slack account and are intended to demonstrate the implementation process that can be followed for this solution.

  1. Go to Slack API and choose Create New App

SlackAPI Create New App

  1. In the Create an app pop-up, choose From scratch

Create an app from scratch

  1. For App Name, enter virtual-meteorologist
  2. For Pick a workspace to develop your app in, choose the workspace where you want to use this application
  3. Choose Create App

Name app and choose workspace

After the application is created, you’ll be taken to the Basic Information page.

  1. In the navigation pane under Features, choose OAuth & Permissions
  2. Navigate to the Scopes section and under Bot Tokens Scopes, add the following scopes by choosing Add an OAuth Scope and entering im:read, im:write, and chat:write

Slack Scopes

  1. On the OAuth & Permissions page, navigate to the OAuth Tokens section and choose Install to {Workspace}
  2. On the following page, choose Allow to complete the process

Install App in Slack

  1. On the OAuth & Permissions page, navigate to OAuth Tokens and copy the value for Bot User OAuth Token that has been created. Save this in a notepad to use later when you’re deploying the CloudFormation template.

Copy OAuthToken

  1. In the navigation pane under Settings, choose Basic Information
  2. Navigate to Signing Secret and choose Show
  3. Copy and save this value to your notepad to use later when you’re deploying the CloudFormation template

Signing Secret

Deploy the sample Amazon Bedrock agent resources with AWS CloudFormation

If you already have an Amazon Bedrock agent configured, you can copy its ID and alias from the agent details. If you don’t, then when you run the CloudFormation template for the sample Amazon Bedrock agent (virtual-meteorologist), the following resources are deployed (costs will be incurred for the AWS resources used):

  • Lambda functions:
    • GeoCoordinates – Converts location names to latitude and longitude coordinates
    • Weather – Retrieves weather information using coordinates
    • DateTime – Gets current date and time for specific time zones
  • AWS Identity and Access Management IAM roles:
    • GeoCoordinatesRole – Role for GeoCoordinates Lambda function
    • WeatherRole – Role for Weather Lambda function
    • DateTimeRole – Role for DateTime Lambda function
    • BedrockAgentExecutionRole – Role for Amazon Bedrock agent execution
  • Lambda permissions:
    • GeoCoordinatesLambdaPermission – Allows Amazon Bedrock to invoke the GeoCoordinates Lambda function
    • WeatherLambdaPermission – Allows Amazon Bedrock to invoke the Weather Lambda function
    • DateTimeLambdaPermission – Allows Amazon Bedrock to invoke the DateTime Lambda function
  • Amazon Bedrock agent:
    • BedrockAgent – Virtual meteorologist agent configured with three action groups
  • Amazon Bedrock agent action groups:
    • obtain-latitude-longitude-from-place-name
    • obtain-weather-information-with-coordinates
    • get-current-date-time-from-timezone

Choose Launch Stack to deploy the resources:

cloudformation-launch-stack-slack-bedrockagent-integration

After deployment is complete, navigate to the Outputs tab and copy the BedrockAgentId and BedrockAgentAliasID values. Save these to a notepad to use later when deploying the Slack integration to Amazon Bedrock Agents CloudFormation template.

Virtual meteorologist cfn Output

Deploy the Slack integration to Amazon Bedrock Agents resources with AWS CloudFormation

When you run the CloudFormation template to integrate Slack with Amazon Bedrock Agents, the following resources are deployed (costs will be incurred for the AWS resources used):

  • API Gateway:
    • SlackAPI – A REST API for Slack interactions
  • Lambda functions:
    • MessageVerificationFunction – Verifies Slack message signatures and tokens
    • SQSIntegrationFunction – Handles message queueing to Amazon SQS
    • BedrockAgentsIntegrationFunction – Processes messages with the Amazon Bedrock agent
  • IAM roles:
    • MessageVerificationFunctionRole – Role for MessageVerificationFunction Lambda function permissions
    • SQSIntegrationFunctionRole – Role for SQSIntegrationFunction Lambda function permissions
    • BedrockAgentsIntegrationFunctionRole – Role for BedrockAgentsIntegrationFunction Lambda function permissions
  • SQS queues:
    • ProcessingQueue – FIFO queue for ordered message processing
    • DeadLetterQueue – FIFO queue for failed message handling
  • Secrets Manager secret:
    • SlackBotTokenSecret – Stores Slack credentials securely

Choose Launch Stack to deploy these resources:

cloudformation-launch-stack-slack-bedrockagent-integration

Provide your preferred stack name. When deploying the CloudFormation template, you’ll need to provide four values: the Slack bot user OAuth token, the signing secret from your Slack configuration, and the BedrockAgentId and BedrockAgentAliasID values saved earlier. If your agent is in draft version, use TSTALIASID as the BedrockAgentAliasID. Although our example uses a draft version, you can use the alias ID of your published version if you’ve already published your agent.

Slack Integration CFN Deployment

Keep SendAgentRationaleToSlack set to False by default. However, if you want to troubleshoot or observe how Amazon Bedrock Agents processes your questions, you can set this to True. This way, you can receive detailed processing information in the Slack thread where you invoked the Slack application.

When deployment is complete, navigate to the Outputs tab and copy the WebhookURL value. Save this to your notepad to use in your Slack configuration in the next step.

Slack Integration CFN Output

Integrate Amazon Bedrock Agents with your Slack workspace

Complete the following steps to integrate Amazon Bedrock Agents with your Slack workspace:

  1. Go to Slack API and choose the virtual-meteorologist application

Slack Select Your Apps

  1. In the navigation pane, choose Event Subscriptions
  2. On the Event Subscriptions page, turn on Enable Events
  3. Enter your previously copied API Gateway URL for Request URL—verification will happen automatically
  4. For Subscribe to bot events, select Add Bot User Event button and add app_mention and message.im
  5. Choose Save Changes
  6. Choose Reinstall your app and choose Allow on the following page

Slack Event Subscriptions

Test the Amazon Bedrock Agents bot application in Slack

Return to Slack and locate virtual-meteorologist in the Apps section. After you add this application to your channel, you can interact with the Amazon Bedrock agent by using @virtual-meteorologist to get weather information.

Slack Add App

Let’s test it with some questions. When we ask about today’s weather in Chicago, the application first sends a “🤔 Processing your request…” message as an initial response. After the Amazon Bedrock agent completes its analysis, this temporary message is replaced with the actual weather information.

Slack First Question

You can ask follow-up questions within the same thread, and the Amazon Bedrock agent will maintain the context from your previous conversation. To start a new conversation, use @virtual-meteorologist in the main channel instead of the thread.

Slack Followup Quesiton

Clean up

If you decide to stop using this solution, complete the following steps to remove it and its associated resources deployed using AWS CloudFormation:

  1. Delete the Slack integration CloudFormation stack:
    • On the AWS CloudFormation console, choose Stacks in the navigation pane
    • Locate the stack you created for the Slack integration for Amazon Bedrock Agents during the deployment process (you assigned a name to it)
    • Select the stack and choose Delete
  2. If you deployed the sample Amazon Bedrock agent (virtual-meteorologist), repeat these steps to delete the agent stack

Considerations

When designing serverless architectures, separating Lambda functions by purpose offers significant advantages in terms of maintenance and flexibility. This design pattern allows for straightforward behavior modifications and customizations without impacting the overall system logic. Each request involves two Lambda functions: one for token validation and another for SQS payload processing. During high-traffic periods, managing concurrent executions across both functions requires attention to Lambda concurrency limits. For use cases where scaling is a critical concern, combining these functions into a single Lambda function might be an alternative approach, or you could consider using services such as Amazon EventBridge to help manage the event flow between components. Consider your use case and traffic patterns when choosing between these architectural approaches.

Summary

This post demonstrated how to integrate Amazon Bedrock Agents with Slack, a widely used enterprise collaboration tool. After creating your specialized Amazon Bedrock Agents, this implementation pattern shows how to quickly integrate them into Slack, making them readily accessible to your users. The integration enables AI-powered solutions that enhance user experience through contextual conversations within Slack, improving the quality of support and driving user adoption. You can follow this implementation approach to provide the solution to your Slack users in use cases where quick access to AI-powered insights would benefit team workflows. By integrating custom AI agents, organizations can track improvements in KPIs such as mean time to resolution (MTTR), first-call resolution rates, and overall productivity gains, showcasing the practical benefits of Amazon Bedrock Agents in enterprise collaboration settings.

We provided a sample agent to help you test and deploy the complete solution. Organizations can now quickly implement their Amazon Bedrock agents and integrate them into Slack, allowing teams to access powerful generative AI capabilities through a familiar interface they use daily. Get started today by developing your own agent using Amazon Bedrock Agents.

Additional resources

To learn more about building Amazon Bedrock Agents, refer to the following resources:


About the Authors

Salman AhmedSalman Ahmed is a Senior Technical Account Manager in AWS Enterprise Support. He specializes in guiding customers through the design, implementation, and support of AWS solutions. Combining his networking expertise with a drive to explore new technologies, he helps organizations successfully navigate their cloud journey. Outside of work, he enjoys photography, traveling, and watching his favorite sports teams.

Sergio BarrazaSergio Barraza is a Senior Technical Account Manager at AWS, helping customers on designing and optimizing cloud solutions. With more than 25 years in software development, he guides customers through AWS services adoption. Outside work, Sergio is a multi-instrument musician playing guitar, piano, and drums, and he also practices Wing Chun Kung Fu.

Ravi KumarRavi Kumar is a Senior Technical Account Manager in AWS Enterprise Support who helps customers in the travel and hospitality industry to streamline their cloud operations on AWS. He is a results-driven IT professional with over 20 years of experience. In his free time, Ravi enjoys creative activities like painting. He also likes playing cricket and traveling to new places.

Ankush GoyalAnkush Goyal is a Enterprise Support Lead in AWS Enterprise Support who helps customers streamline their cloud operations on AWS. He is a results-driven IT professional with over 20 years of experience.

Read More

A first-of-its-kind experiment to measure the impact of out-of-home advertising

A first-of-its-kind experiment to measure the impact of out-of-home advertising


A first-of-its-kind experiment to measure the impact of out-of-home advertising

By combining surveys with ads targeted to metro and commuter rail lines, Amazon researchers identify the fraction of residents of different neighborhoods exposed to the ads and measure ad effectiveness.

Economics

May 21, 02:47 PMMay 21, 02:47 PM

Amazon promotes its products and services through many advertising channels, and we naturally want to know how much bang we get for our buck. We thus try to measure the effectiveness of our ads through a combination of data modeling and, most importantly, experimentation.

In online environments, where the majority of ads live today, researchers can randomize ads and make use of tracking technologies like cookies to measure behavior. This approach provides high-quality data and statistically significant results. In contrast, more-conventional ads found outdoors, in malls and airports, and on transport, referred to as out-of-home (OOH) ads, dont offer the same opportunity for personalized behavior measurements and therefore havent lent themselves well to experiments.

To close this gap, our team at Amazon has developed and successfully implemented an experimental design that focuses on metro and commuter lines. Based on the knowledge of Amazon marketing teams and marketing agencies engaged by Amazon including several that specialize in OOH advertising this is the first experiment of its kind.

First, we randomized ads across commuter lines in a particular city (not So Paulo: the figure below is a hypothetical example). Second, we sent out an e-mail survey to residents, asking which lines they regularly use. From the survey, we calculated the fraction of residents who had the opportunity to see ads in various neighborhoods. We then used this data to directly measure the effectiveness of an ad campaign.

A hypothetical experiment in So Paulo, Brazil. The left panel shows which metro and rail lines have ads. The right panel shows hypothetical percentages of residents who take the lines with ads in each of So Paulos prefectures.

This radically simple approach produces strikingly clear results: over the course of a four-week ad campaign, the high-ad-exposure neighborhoods saw a measurable increase in sales versus neighborhoods with low exposure.

Sales in neighborhoods with high ad exposure vs. sales in neighborhoods with low exposure, before, during, and after an ad campaign. Sales in both neighborhoods are pegged to 100 the week before the campaign starts.

Our experimental design borrows concepts from a technique called geoexperimentation, an approach commonly used for online ads when individual user tracking or personalized ads arent available. Researchers deploying geoexperimentation take a given country and isolate geographical units states, regions, or metropolitan areas in which they randomly apply an ad campaign or not.

Geographic units are typically selected to be large enough that advertisements within a given unit are seen almost exclusively by people living there; that way, the campaigns impact is concentrated within the unit. To estimate the campaigns impact, researchers then compare sales numbers from different geographical units over time, with and without ads. Geoexperiments are effective because within any given country, there is usually a large enough number of relevant geographical units for the experiment to have sufficient statistical power.

There was a working assumption that OOH advertising wouldnt be a good candidate for a real-world implementation of geo experimentation, given how geographically concentrated OOH ad campaigns are. The typical geoexperiment requires dozens of geographic units to ensure sufficient statistical power, but OOH ads are generally deployed in only a handful of bigger cities or, in some cases, a single city within a country.

Using more-granular geographic units for example, city neighborhoods or districts is not an option either, as thered be no way to isolate or identify users who might see the ads. This, for instance, is the challenge posed by a billboard in one district that residents of other districts may drive past.

We realized, however, that these challenges can be met if you choose your OOH ad environments wisely. Targeting ads to metro and commuter rail lines lets us isolate and identify the users who have the opportunity to see them. Our survey asks which metro and commuter rail lines respondents use for commute and occasional travel, how often they so use them, and which part of the city they live in; this gives the fraction of residents exposed to our ads in each neighborhood. At the same time, the random ad placement creates random variation in ad exposure across the citys neighborhoods, giving us the number of geographic units we need for statistical power.

The idea, then, is to compare changes in sales in the treated and control regions, adjusted for historical sales trends. Many techniques used for analyzing geoexperiments apply here, too, including synthetic-control and difference-in-difference methods.

With this first-ever experimental design for OOH advertising, we believe weve opened the door for causal measurement of OOH ad effectiveness. To be sure, this implementation is specific to metro and commuter rail ads, which limits it to cities that support that kind of public transportation. However, we believe lessons learned from such experiments can be extrapolated to other types of OOH ad environments and can be combined with other, non-experiment-based measures of ad performance such as awareness surveys or multimedia models.

Research areas: Economics

Tags: Experimental design

Read More