Announcing the express testing capability in Amazon Lex

Announcing the express testing capability in Amazon Lex

Amazon Lex now provides the express testing capability on the AWS Management Console to expedite building your chatbot. You can start testing your bot soon after you initiate the build process without having to wait for the entire build to complete. You can use the new testing option to check the basic interaction elements such as the conversation flow, prompts, responses, and fulfillment logic.

Previously, you had to wait for the entire bot to build, which included multiple machine learning models, before you could confirm or test your changes. The new express testing feature allows you to confirm your changes with an intermediate model. You can start testing with exact input utterances right away and continue with more rigorous testing after the entire build is complete. This express testing capability enables you to test only exact matches with training data. With the new process, you can quickly iterate through the build and test phase, reducing the overall time required to deploy a bot in production.

How it works

After you choose Build, Amazon Lex starts preparing the build for express testing. You can view the status via the test window, as shown in the following screenshot.

Figure 1: Preparing build for express testing

For us-east-1, us-west-2, ap-southeast-2, or eu-west-1, scroll down to Advanced options and select Yes to opt in to the advanced features and enable the express testing capability. The feature is enabled by default in other Regions.

When the build completes for express testing, you can test utterances that are an exact match to the sample utterances in the test window. At this point you can test the dialog management, confirmation prompts, and the validation and fulfillment code hooks and responses. Amazon Lex completes the build process in the background.

Figure 2: Ready for express testing

You can test variations of the sample utterances after the bot build is complete. The build is then available for publishing to an alias, as shown in the following screenshot.

Figure 3: Complete build ready for deployment

When the build is successfully complete, the bot is ready for deployment, and you can publish the bot to enable complete conversations via interactive voice response (IVR), mobile apps, channels, and SDKs.

Conclusion

The new express testing capability for Amazon Lex allows you to accelerate iteration, test ideas, and make faster design decisions. The feature is available today in the N. Virginia, Oregon, Dublin, London, Sydney, Frankfurt, Tokyo, and Singapore regions.

For more information, see the Amazon Lex Developer Guide.


About the Authors

Esther Lee is a Product Manager for AWS Language AI Services. She is passionate about the intersection of technology and education. Out of the office, Esther enjoys long walks along the beach, dinners with friends and friendly rounds of Mahjong.

Read More

Announcing TensorFlow Lite Micro support on the ESP32

Announcing TensorFlow Lite Micro support on the ESP32

A guest article by Vikram Dattu, Aditya Patwardhan, Kedar Sovani of Espressif Systems

Introducing ESP32: The Wi-Fi MCU

We are glad to announce TensorFlow Lite Micro support for the ESP32 chipset.

The ESP32 is a Wi-Fi/BT/BLE enabled MCU (micro-controller) that is widely used by hobbyists and makers to build cool and interesting projects that sense or modify real world data/object, and also commonly deployed in smart home appliances like light bulbs, switches, refrigerators, and air conditioners to provide connectivity.
The interesting part of ESP32 is that it’s a unique SoC that can be used right from quick prototypes to high-volume production. A wide community, numerous development kits, and plethora of tutorials/SDKs make it a great vehicle for quick prototypes with almost any vertical you might be interested in. The all-in-one package (Wi-Fi/BT/MCU) and existing high volume deployments in the field make it ideal for building end-products with.

ESP32 is already being used in a number of smart-home/connected-device projects with a variety of sensors and actuators connected to the microcontroller to sense the environment and act accordingly. With TensorFlow Lite for Microcontrollers executing on ESP32, this opens up scenarios for all kinds of use-cases that are triggered by local inference. ESP32 has 2 CPU cores and a bunch of optimizations, making it easier to run heavy TF Micro workfloads. The Wi-Fi backhaul helps to raise remote events and trigger actions based on the inferences made.

Person Detection or a Door-Bell Camera?

As an example, we have modified the person_detection example that you all might be familiar with to make it a smart door-bell camera. We use the ESP-EYE developer kit for this demonstration. Note that this example uses person detection (it detects when a face is in front of the camera), and not person identification (identifying who the person is).

The ESP-EYE dev-kit includes the ESP32 Wi-Fi/BT MCU coupled with a 2MP camera.

In Action

In our example, we will use this camera to observe and send out an email notification if we detect a person in the vicinity.

Building it for yourself

  1. Order the ESP-EYE: You can get the ESP-EYE Development Kit from your favourite distributor, or from here. You will need a USB to micro-USB cable for connecting this to your Windows/Linux/macOS host.
  2. Clone the repository: https://github.com/espressif/tensorflow/
  3. Setup your development host: Setup your development host with toolchains and utilities required to cross-build for ESP32. Follow the instructions of the ESP-IDF get started guide to set up the toolchain and the ESP-IDF itself.
  4. Generate the example: The example project can be generated with the following command:
    make -f tensorflow/lite/micro/tools/make/Makefile TARGET=esp generate_doorbell_camera_esp_project
  5. Build the example:

    a. Go to the example project directory

    cd tensorflow/lite/micro/tools/make/gen/esp_xtensa-esp32/prj/doorbell_camera/esp-idf

    b. Clone the esp32-camera component with following command:

    $ git clone https://github.com/espressif/esp32-camera components/esp32-camera

    c. Configure the camera and the email address:

    idf.py menuconfig

    d. Enter the Camera Pins configuration and SMTP Configuration menus to select the camera details, and also the email details.

    e. Build the example:

    idf.py build
  6. Flash and Run the program: Use the following command to flash and run the program:
    idf.py --port /dev/ttyUSB0 flash monitor
  7. Now, whenever a person’s face is detected, the program will send out an email to the configured email address.

What Next?

Now that you have tried the door bell camera example, you may try the other applications that are part of the TF Micro repository: hello_world and micro_speech.
ESP32 is pretty powerful for a microcontroller. Clocked at 240MHz, with just a single core it can do the detection well under 1 second (roughly ~700ms; additional optimizations are on the way to reduce this even further). This leaves the second core free for other tasks from your application.
The TinyML book is an excellent resource for a thorough understanding of TensorFlow Lite for Microcontrollers.Read More

Using Machine Learning to Detect Deficient Coverage in Colonoscopy Screenings

Using Machine Learning to Detect Deficient Coverage in Colonoscopy Screenings

Posted by Daniel Freedman and Ehud Rivlin, Research Scientists, Google Health

Colorectal cancer (CRC) is a global health problem and the second deadliest cancer in the United States, resulting in an estimated 900K deaths per year. While deadly, CRC can be prevented by removing small precancerous lesions in the colon, called polyps, before they become cancerous. In fact, it is estimated that a 1% increase in the adenoma detection rate (ADR, defined as the fraction of procedures in which a physician discovers at least one polyp) can lead to a 6% decrease in the rate of interval CRCs (a CRC that is diagnosed within 60 months of a negative colonoscopy).

Colonoscopy is considered the gold standard procedure for the detection and removal of polyps. Unfortunately, the literature indicates that endoscopists miss on average 22%-28% of polyps during colonoscopies; furthermore, 20% to 24% of polyps that have the potential to become cancerous (adenomas) are missed. Two major factors that may cause an endoscopist to miss a polyp are (1) the polyp appears in the field of view, but the endoscopist misses it, perhaps due to its small size or flat shape; and (2) the polyp does not appear in the field of view, as the endoscopist has not fully covered the relevant area during the procedure.

In “Detecting Deficient Coverage in Colonoscopies”, we introduce the Colonoscopy Coverage Deficiency via Depth algorithm, or C2D2, a machine learning-based approach to improving colonoscopy coverage. The C2D2 algorithm performs a local 3D reconstruction of the colon as images are captured during the procedure, and on that basis, identifies which areas of the colon were covered and which remained outside of the field of view. C2D2 can then indicate in real time whether a particular area of the colon has suffered from deficient coverage so the endoscopist can return to that area. Our work proposes a novel approach to compute coverage in real time, for which 3D reconstruction is done using a calibration-free, unsupervised learning method, and evaluate it in a large scale way.

The C2D2 Algorithm
When considering colon coverage, it is important to estimate the coverage fraction — what percentage of the relevant regions were covered by a complete procedure. While a retrospective analysis is useful for the physician and could provide general guidance for future procedures, it is more useful to have real-time estimation of coverage fraction, on a segment by segment basis, i.e. knowledge of what fraction of the current segment has been covered while traversing the colon. The helpfulness of such functionality is clear: during the procedure itself, a physician may be alerted to segments with deficient coverage, and can immediately return to review these areas. Higher coverage will result in a higher proportion of polyps being seen.

The C2D2 algorithm is designed to compute such a segment-by-segment coverage in two phases: computing depth maps for each frame of the colonoscopy video, followed by computation of coverage based on these depth maps.

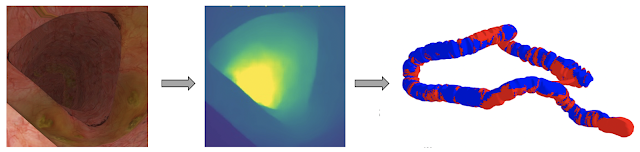
C2D2 computes a depth image from a single RGB image. Then, based on the computed depth images for a video sequence, C2D2 calculates local coverage, so it can detect where the coverage has been deficient and a second look is required.

Depth map creation consists of both depth estimation as well as pose estimation — the localization of where the endoscope is in space, as well as the direction it is pointing. In addition to the detection of deficient coverage, depth and pose estimation are useful for a variety of other interesting tasks. For example, depth can be used for improved detection of flat polyps, while pose estimation can be used for relocalizing areas of the colon (including polyps) that the endoscopist wishes to revisit, and both together can be used for visualization and navigation.

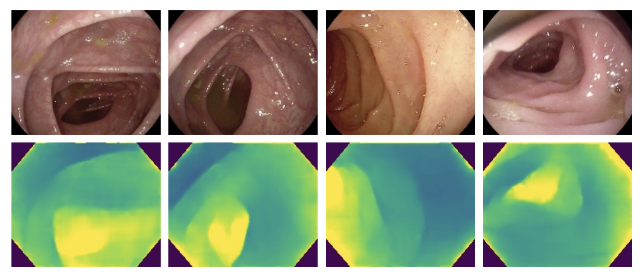
Top row: RGB image, from which the depth is computed. Bottom row: Depth image as computed by C2D2. Yellow is deeper, blue is shallower. Note that the “tunnel” structure is captured, as well as the Haustral ridges.

In order to compute coverage fractions from these depth maps, we trained C2D2 on two sources of data: synthetic sequences and real sequences. We generated the synthetic videos using a graphical model of a colon. For each synthetic video, ground truth coverage is available in the form of a number between 0 (completely uncovered) and 1 (completely covered). For real sequences, we analyzed de-identified colonoscopy videos, for which ground truth coverage is unavailable.

Performance on Synthetic Videos
When using synthetic videos, the availability of ground truth coverage enables the direct measurement of C2D2’s performance. We quantify this using the mean absolute error (MAE), which indicates how much the algorithm’s prediction differs, on average, from the ground truth. We find that C2D2’s MAE = 0.075; meaning that, on average, the prediction of C2D2 is within 7.5% of the ground truth. By contrast, a group of physicians given the same task achieved MAE = 0.177, i.e., within 17.7% of the ground truth. Thus, the C2D2 attained an accuracy rate 2.4 times higher on synthetic sequences.

Performance on Real Videos
Of course, what matters most is performance on videos of real colonoscopies. The challenge in this case is the absence of ground truth labelling: we don’t know what the actual coverage is. Additionally, one cannot use labels provided by experts directly as they are not always accurate, due to the challenges described earlier. However, C2D2 can still perform inference on real colonoscopy videos. Indeed, the learning pipeline is designed to perform equally well on synthetic and real colonoscopy videos.

To verify performance on real sequences, we used a variant of a technique common in the generative modelling literature, which involves providing video sequences to human experts along with C2D2’s coverage scores for those sequences. We then ask the experts to assess whether C2D2’s score is correct. The idea is that while it is difficult for experts to assign a score directly, the task of verifying a given score is considerably easier. (This is similar to the fact that verifying a proposed solution to an algorithmic problem is generally much easier than computing that solution.) Using this methodology, experts verified C2D2’s score 93% of the time. And in a more qualitative sense, C2D2’s output seems to pass the “eyeball test”, see the figure below.

Coverage on real colonoscopy sequences. Top row: Frames from a well covered sequence — the entire “tunnel” down the lumen may be seen; C2D2 coverage = 0.931. Middle row: A partially covered sequence — the bottom may be seen, but the top is not as visible; C2D2 coverage = 0.427. Bottom row: A poorly covered sequence, much of what is seen is the wall; C2D2 coverage = 0.227.

Next steps
By alerting physicians to missed regions of the colon wall, C2D2 promises to lead to the discovery of more adenomas, thereby increasing the ADR and concomitantly decreasing the rate of interval CRC. This would be of tremendous benefit to patients.

In addition to this work that addresses colonoscopy coverage, we are concurrently conducting research to improve polyp detection by combining C2D2 with an automatic, real-time polyp detection algorithm. This study adds to the mounting evidence that physicians may use machine learning methods to augment their efforts, especially during procedures, to improve the quality of care for patients.

Acknowledgements
This research was conducted by Daniel Freedman, Yochai Blau, Liran Katzir, Amit Aides, Ilan Shimshoni, Danny Veikherman, Tomer Golany, Ariel Gordon, Greg Corrado, Yossi Matias, and Ehud Rivlin, with support from Verily. We would like to thank all of our team members and collaborators who worked on this project with us, including: Nadav Rabani, Chen Barshai, Nia Stoykova, David Ben-Shimol, Jesse Lachter, and Ori Segol, 3D-Systems and many others. We’d also like to thank Yossi Matias for support and guidance. The research was conducted by teams from Google Health and Google Research, Israel.

Read More

Learn from the first place winner of the first AWS DeepComposer Chartbusters Bach to the Future Challenge

Learn from the first place winner of the first AWS DeepComposer Chartbusters Bach to the Future Challenge

AWS is excited to announce the winner of the first AWS DeepComposer Chartbusters Challenge, Catherine Chui. AWS DeepComposer gives developers a creative way to get started with machine learning (ML). To make the learning more fun, in June 2020 we launched the Chartbusters Challenge, a competition where developers use AWS DeepComposer to create original compositions and compete to showcase their ML and generative AI skills. The first challenge, Bach to the Future, required developers to use a new generative AI algorithm provided on the AWS DeepComposer console to create compositions in the style of the classical composer Bach.

When Catherine Chui first learned about AWS DeepComposer, she had no idea that one day she would be the winner for the Chartbusters Challenge and be the star of a blog post on the AWS Machine Learning Blog. We interviewed Catherine about her experience with the challenge and how she created her winning composition.

Catherine with her gold record award

Getting started with machine learning

Before entering the Chartbusters Challenge, Catherine had no prior experience with ML, and described herself as a beginner with AI. She was first introduced to AWS DeepComposer when her husband, Kitson, attended AWS re:Invent in 2019. Kitson is a teacher of the first AWS Educate Cloud Degree course, Higher Diploma in Cloud and Data Centre Administration, at the Hong Kong Institute of Vocational Education (IVE).

“After Kitson accompanied an IVE student to AWS re:Invent 2019 to join the AWS DeepRacer Championship Cup, he attended an AWS DeepComposer workshop and brought one unit back to Hong Kong,” recalled Catherine. “That was the first time I had a look at the actual product and got some understanding of it.”

Catherine with her AWS DeepComposer keyboard

Catherine was inspired to compete in the Chartbusters Challenge when she saw her husband playing with the AWS DeepComposer keyboard with his students. Catherine loves classical piano music, having achieved the Associated Board of Royal Schools of Music (ABRSM) level 7.

“At first, I was surprised why he was playing a tiny piano at home with his students, as I knew he is an IT teacher, not a music teacher. I do feel his piano skills are weak, so I started to help him to teach his students piano skills.”

Her curiosity with the AWS DeepComposer keyboard led her to work with Kitson’s students, who were also competing in the Chartbusters Challenge. After helping the students with their piano skills, she was inspired to compete in Bach to the Future.

“Within an hour of learning, I completed my first song with AI, which is fun and exciting!”

Catherine recording her first composition

Building in AWS DeepComposer

To get started, she connected her AWS DeepComposer keyboard to the console and recorded an input melody. Catherine chose the Autoregressive Generative AI technique and Autoregressive CNN (AR-CNN) Bach model. The AR-CNN algorithm allows you to collaborate iteratively with the ML algorithm by experimenting with the hyperparameters to create an original composition. When deciding how to manipulate her model, she took the following into account:

“We can use the output from one iteration of the AR-CNN algorithm as an input to the next iteration to help make it better and smoother. I kept the creative risk as low as possible, and didn’t remove too much original notes as I would like to keep my original melody.”

The following screenshot shows the Music studio page on the AWS DeepComposer console.

Catherine spent a couple of hours recording her melody, then spent time adjusting the compositions to enhance her composition. She created around 10 compositions and evaluated each composition until she was satisfied with her final melody. Catherine found the arpeggio and chord functions within the AWS DeepComposer keyboard to be helpful for auto-generating notes for her composition.

She learned more about the AR-CNN algorithm in the AWS DeepComposer learning capsules. Learning capsules provide easy-to-consume, bite-size content to help you learn the concepts of generative AI algorithms.

“I learned the concept of AR-CNN, two neural networks that have a sophisticated design to help in adding and removing notes. I wouldn’t get to experience it outside this setting. Although at the moment I’m still not familiar with Amazon SageMaker, I think the learning capsules will help me in the future.”

The following screenshot shows the available learning capsules on the AWS DeepComposer console.

You can listen to Catherine’s winning composition, “Garden Partying in Bach,” on the AWS DeepComposer Soundcloud page.

Conclusion

The AWS DeepComposer Chartbusters Challenge Bach to the Future helped Catherine, who had no background in ML, develop her understanding of generative AI in just a few hours and then win the first AWS DeepComposer Chartbusters Challenge.

Catherine with IVE students in Hong Kong.

“The challenge inspired me that machine learning can bring up some ideas on composing new and creative music. I will keep joining the next challenges to learn something new and advanced about machine learning. Also, I will further help my husband’s students at IVE by giving them feedback on music.”

Congratulations to Catherine Chui for her well-deserved win!

We hope Catherine’s story has inspired you to learn more about ML and AWS DeepComposer. Check out the next AWS DeepComposer Chartbusters Challenge, The Sounds of Science, that will run from 9/1 to 9/23.


About the Author

Paloma Pineda is a Product Marketing Manager for AWS Artificial Intelligence Devices. She is passionate about the intersection of technology, art, and human centered design. Out of the office, Paloma enjoys photography, watching foreign films, and cooking French cuisine.

Read More

Scaling Up Fundamental Quantum Chemistry Simulations on Quantum Hardware

Scaling Up Fundamental Quantum Chemistry Simulations on Quantum Hardware

Posted by Nicholas Rubin and Charles Neill, Research Scientists, Google AI Quantum

Accurate computational prediction of chemical processes from the quantum mechanical laws that govern them is a tool that can unlock new frontiers in chemistry, improving a wide variety of industries. Unfortunately, the exact solution of quantum chemical equations for all but the smallest systems remains out of reach for modern classical computers, due to the exponential scaling in the number and statistics of quantum variables. However, by using a quantum computer, which by its very nature takes advantage of unique quantum mechanical properties to handle calculations intractable to its classical counterpart, simulations of complex chemical processes can be achieved. While today’s quantum computers are powerful enough for a clear computational advantage at some tasks, it is an open question whether such devices can be used to accelerate our current quantum chemistry simulation techniques.

In “Hartree-Fock on a Superconducting Qubit Quantum Computer”, appearing today in Science, the Google AI Quantum team explores this complex question by performing the largest chemical simulation performed on a quantum computer to date. In our experiment, we used a noise-robust variational quantum eigensolver (VQE) to directly simulate a chemical mechanism via a quantum algorithm. Though the calculation focused on the Hartree-Fock approximation of a real chemical system, it was twice as large as previous chemistry calculations on a quantum computer, and contained ten times as many quantum gate operations. Importantly, we validate that algorithms being developed for currently available quantum computers can achieve the precision required for experimental predictions, revealing pathways towards realistic simulations of quantum chemical systems. Furthermore, we have released the code for the experiment, which uses OpenFermion, our open source repository for quantum computations of chemistry.

Google’s Sycamore processor mounted in a cryostat, recently used to demonstrate quantum supremacy and the largest quantum chemistry simulation on a quantum computer. Photo Credit: Rocco Ceselin

Developing an Error Robust Quantum Algorithm for Chemistry
There are a number of ways to use a quantum computer to simulate the ground state energy of a molecular system. In this work we focused on a quantum algorithm “building block”, or circuit primitive, and perfect its performance through a VQE (more on that later). In the classical setting this circuit primitive is equivalent to the Hartree-Fock model and is an important circuit component of an algorithm we previously developed for optimal chemistry simulations. This allows us to focus on scaling up without incurring exponential simulation costs to validate our device. Therefore, robust error mitigation on this component is crucial for accurate simulations when scaling to the “beyond classical” regime.

Errors in quantum computation emerge from interactions of the quantum circuitry with the environment, causing erroneous logic operations — even minor temperature fluctuations can cause qubit errors. Algorithms for simulating chemistry on near-term quantum devices must account for these errors with low overhead, both in terms of the number of qubits or additional quantum resources, such as implementing a quantum error correcting code. The most popular method to account for errors (and why we used it for our experiment) is to use a VQE. For our experiment, we selected the VQE we developed a few years ago, which treats the quantum processor like an neural network and attempts to optimize a quantum circuit’s parameters to account for noisy quantum logic by minimizing a cost function. Just like how classical neural networks can tolerate imperfections in data by optimization, a VQE dynamically adjusts quantum circuit parameters to account for errors that occur during the quantum computation.

Enabling High Accuracy with Sycamore
The experiment was run on the Sycamore processor that was recently used to demonstrate quantum supremacy. Though our experiment required fewer qubits, even higher quantum gate fidelity was needed to resolve chemical bonding. This led to the development of new, targeted calibration techniques that optimally amplify errors so they can be diagnosed and corrected.

Energy predictions of molecular geometries by the Hartree-Fock model simulated on 10 qubits of the Sycamore processor.

Errors in the quantum computation can originate from a variety of sources in the quantum hardware stack. Sycamore has 54-qubits and consists of over 140 individually tunable elements, each controlled with high-speed, analog electrical pulses. Achieving precise control over the whole device requires fine tuning more than 2,000 control parameters, and even small errors in these parameters can quickly add up to large errors in the total computation.

To accurately control the device, we use an automated framework that maps the control problem onto a graph with thousands of nodes, each of which represent a physics experiment to determine a single unknown parameter. Traversing this graph takes us from basic priors about the device to a high fidelity quantum processor, and can be done in less than a day. Ultimately, these techniques along with the algorithmic error mitigation enabled orders of magnitude reduction in the errors.

Left: The energy of a linear chain of Hydrogen atoms as the bond distance between each atom is increased. The solid line is the Hartree-Fock simulation with a classical computer while the points are computed with the Sycamore processor. Right: Two accuracy metrics (infidelity and mean absolute error) for each point computed with Sycamore. “Raw” is the non-error-mitigated data from Sycamore. “+PS” is data from a type of error mitigation correcting the number of electrons. “+Purification” is a type of error mitigation correcting for the right kind of state. “+VQE” is the combination of all the error mitigation along with variational relaxation of the circuit parameters. Experiments on H8, H10, and H12 show similar performance improvements upon error mitigation.

Pathways Forward
We hope that this experiment serves as a blueprint for how to run chemistry calculations on quantum processors, and as a jumping off point on the path to physical simulation advantage. One exciting prospect is that it is known how to modify the quantum circuits used in this experiment in a simple way such that they are no longer efficiently simulable, which would determine new directions for improved quantum algorithms and applications. We hope that the results from this experiment can be used to explore this regime by the broader research community. To run these experiments, you can find the code here.

Read More

More Than a Wheeling: Boston Band of Roboticists Aim to Rock Sidewalks With Personal Bots

More Than a Wheeling: Boston Band of Roboticists Aim to Rock Sidewalks With Personal Bots

With Lime and Bird scooters covering just about every major U.S. city, you’d think all bets were off for walking. Think again.

Piaggio Fast Forward is staking its future on the idea that people will skip e-scooters or ride-hailing once they take a stroll with its gita robot. A Boston-based subsidiary of the iconic Vespa scooter maker, the company says the recent focus on getting fresh air and walking during the COVID-19 pandemic bodes well for its new robotics concept.

The fashionable gita robot — looking like a curvaceous vintage scooter — can carry up to 40 pounds and automatically keeps stride so you don’t have to lug groceries, picnic goodies or other items on walks. Another mark in gita’s favor: you can exercise in the fashion of those in Milan and Paris, walking sidewalks to meals and stores. “Gita” means short trip in Italian.

The robot may turn some heads on the street. That’s because Piaggio Fast Forward parent Piaggio Group, which also makes Moto Guzzi motorcycles, expects sleek, flashy designs under its brand.

The first idea from Piaggio Fast Forward was to automate something like a scooter to autonomously deliver pizzas. “The investors and leadership came from Italy, and we pitched this idea, and they were just horrified,” quipped CEO and founder Greg Lynn.

If the company gets it right, walking could even become fashionable in the U.S. Early adopters have been picking up gita robots since the November debut. The stylish personal gita robot, enabled by the NVIDIA Jetson TX2 supercomputer on a module, comes in signal red, twilight blue or thunder gray.

Gita as Companion

The robot was designed to follow a person. That means the company didn’t have to create a completely autonomous robot that uses simultaneous localization and mapping, or SLAM, to get around fully on its own, said Lynn. And it doesn’t use GPS.

Instead, a gita user taps a button and the robot’s cameras and sensors immediately capture images that pair it with its leader to follow the person.

Using neural networks and the Jetson’s GPU to perform complex image processing tasks, the gita can avoid collisions with people by understanding how people move  in sidewalk traffic, according to the company. “We have a pretty deep library of what we call ‘pedestrian etiquette,’ which we use to make decisions about how we navigate,” said Lynn.

Pose-estimation networks with 3D point cloud processing allow it to see the gestures of people to anticipate movements, for example. The company recorded thousands of hours of walking data to study human behavior and tune gita’s networks. It used simulation training much the way the auto industry does, using virtual environments. Piaggio Fast Forward also created environments in its labs for training with actual gitas.

“So we know that if a person’s shoulders rotate at a certain degree relative to their pelvis, they are going to make a turn,” Lynn said. “We also know how close to get to people and how close to follow.”

‘Impossible’ Without Jetson 

The robot has a stereo depth camera to understand the speed and distance of moving people, and it has three other cameras for seeing pedestrians for help in path planning. The ability to do split-second inference to make sidewalk navigation decisions was important.

“We switched over and started to take advantage of CUDA for all the parallel processing we could do on the Jetson TX2,” said Lynn.

Piaggio Fast Forward used lidar on its early design prototype robots, which were tethered to a bulky desktop computer, in all costing tens of thousands of dollars. It needed to find a compact, energy-efficient and affordable embedded AI processor to sell its robot at a reasonable price.

“We have hundreds of machines out in the world, and nobody is joy-sticking them out of trouble. It would have been impossible to produce a robot for $3,250 if we didn’t rely on the Jetson platform,” he said.

Enterprise Gita Rollouts

Gita robots have been off to a good start in U.S. sales with early technology adopters, according to the company, which declined to disclose unit sales. They have also begun to roll out in enterprise customer pilot tests, said Lynn.   

Cincinnati-Northern Kentucky International Airport is running gita pilots for delivery of merchandise purchased in airports as well as food and beverage orders from mobile devices at the gates.

Piaggio Fast Forward is also working with some retailers who are experimenting with the gita robots for handling curbside deliveries, which have grown in popularity for avoiding the insides of stores.

The company is also in discussions with residential communities exploring usage of gita robots for the replacement of golf carts to encourage walking in new developments.

Piaggio Fast Forward plans to launch several variations in the gita line of robots by next year.

“Rather than do autonomous vehicles to move people around, we started to think about a way to unlock the walkability of people’s neighborhoods and of businesses,” said Lynn.


Piaggio Fast Forward is a member of NVIDIA Inception, a virtual accelerator program that helps startups in AI and data science get to market faster.

The post More Than a Wheeling: Boston Band of Roboticists Aim to Rock Sidewalks With Personal Bots appeared first on The Official NVIDIA Blog.

Read More

Announcing the winners of the 2020 Networking request for proposals

Networking is fundamental to the large-scale, distributed systems that power the family of Facebook applications that are used by billions of people. To foster further innovation in networking and to deepen our collaboration with academia, Facebook launched the 2020 Networking request for proposals (RFP) in March. Today, we’re announcing the recipients of these research awards.
View RFPThis RFP was the latest iteration of the 2019 Networking Systems RFP, which focused on improving network efficiency with intelligent control and programmable switches and their applications. This year, we asked for proposals in the areas of host networking and transport security.

“This year’s submissions continue to reflect the quality and breadth of research topics in academia, and at the same time, their relevance to addressing Facebook’s growing networking infrastructure needs was indeed impressive,” says Rajiv Krishnamurthy, Software Engineering Director at Facebook. “I look forward to continuing our close collaboration with academia to solve interesting technical challenges as we build a more social network.”

We received 67 proposals from 15 countries and 57 universities. Thank you to everyone who took the time to submit a proposal, and congratulations to the winners. All winners are invited to the annual Networking and Communications Faculty Summit in 2021.

Research award recipients

A custom NIC and network stack to support parallel network fabrics
George Porter, Aaron Schulman, and Alex C. Snoeren (University of California, San Diego)

Automated cross-validation of TLS 1.3 implementations
Erez Zadok, Amir Rahmati, and Scott A. Smolka (Stony Brook University)

Automatic optimization of software network data planes
Gianni Antichi (Queen Mary University of London), Gabor Retvari (Budapest University of Technology and Economics), and Sebastiano Miano (Queen Mary University of London)

Flexible, practical, and end-to-end scheduling for networked applications
Christos Kozyrakis and Kostis Kaffes (Stanford University)

Host networking for application-oriented congestion control
Michael Schapira (Hebrew University of Jerusalem), Philip Brighten Godfrey (University of Illinois at Urbana-Champaign), and Yedid Hoshen (Hebrew University of Jerusalem)

Taming datacenter micro-bursts at hosts
Soudeh Ghorbani (Johns Hopkins University)

The post Announcing the winners of the 2020 Networking request for proposals appeared first on Facebook Research.

Read More

Axial-DeepLab: Long-Range Modeling in All Layers for Panoptic Segmentation

Axial-DeepLab: Long-Range Modeling in All Layers for Panoptic Segmentation

Posted by Huiyu Wang, Student Researcher, and Yukun Zhu, Software Engineer, Google Research

The success of convolutional neural networks (CNNs) mainly comes from two properties of convolution: translation equivariance and locality. Translation equivariance, although not exact, ensures that the model functions well for objects at different positions in an image or for images of different sizes. Locality ensures efficient computation, but at the cost of making the modeling of long-range spatial relations challenging for panoptic segmentation of large images. For example, segmenting a large object requires modeling the shape of it, which could potentially cover a very large pixel area, and context that could be helpful for segmenting the object may come from farther away. In such cases, the inability to inform the model from context far from the convolution kernel could negatively impact the performance.

A rich set of literature has discussed approaches to solving the limitation of locality and enabling long-range interactions in CNNs. Some employ atrous convolutions, or image pyramids, which expand the receptive field somewhat, but it is still limited to a small local region. Another line of work adopts self-attention mechanisms, e.g., non-local neural networks, which allow the receptive field to cover the entire input image, as opposed to local convolutions. Unfortunately, such approaches are computationally expensive, especially for large inputs. Recent works enable building fully attentional models, but at a cost of applying local constraints to non-local neural networks. These restrictions limit the model receptive field, which is harmful to tasks such as segmentation, especially on high-resolution inputs.

In our recent ECCV 2020 paper, “Axial-DeepLab: Stand-Alone Axial-Attention for Panoptic Segmentation”, we propose to adopt axial-attention (or criss-cross attention), which recovers large receptive field in fully attentional models. The core idea is to separate 2D attention into two steps that apply 1D attention in the height and width axes sequentially. The efficiency of this approach enables attention over large regions, allowing models that learn long-range, or even global, interactions. Additionally, we propose a novel formulation for self-attention modules, which is more sensitive to the position of relevant context in a large receptive field with marginal costs. We evaluate our position-sensitive axial-attention method on panoptic segmentation by applying it to Panoptic-DeepLab, a simple and efficient method for panoptic segmentation. The effectiveness of our model is demonstrated on ImageNet, COCO, and Cityscapes. Axial-DeepLab achieves state-of-the-art results on panoptic segmentation and semantic segmentation, outperforming Panoptic-DeepLab by a large margin.

Axial-Attention Architecture
Axial-DeepLab consists of an Axial-ResNet backbone and Panoptic-DeepLab output heads, which produce panoptic segmentation results. Our Axial-ResNet is built on a ResNet architecture, in which all the 3×3 local convolutions in the ResNet bottleneck blocks are replaced by our proposed global position-sensitive axial-attention, thus enabling both a large receptive field and precise positional information.

An axial-attention block consists of two position-sensitive axial-attention layers operating along height- and width-axis sequentially.

The Axial-DeepLab height axial attention layer provides 1-dimensional self-attention globally, propagating information within individual columns — it does not transfer information between columns. The second 1D attention layer operating in the horizontal direction allows one to capture both column-wise and row-wise information. This separation reduces the complexity of self-attention from quadratic (2D) to linear (1D), which enables using a much larger (65×65 vs. previously 3×3) or even global context in all layers for long-range modeling in panoptic segmentation.

A message can be passed globally with two hops.

Note that a message or feature vector at (x1, y1) can always be passed globally on a 2D lattice to any position (x2, y2), with one hop on the height-axis (x1, y1 →x1, y2), followed by another hop on the width axis (x1, y2 → x2, y2). In this way, we are able to model 2D long-range relations in a single residual block. This axial-attention design also reduces the complexity from quadratic to linear and enables global receptive fields in all layers of a model.

Position-Sensitive Self-Attention
Additionally, we propose a position-sensitive formulation for self-attention. Previous self-attention formulations enabled a given pixel A to aggregate long-range context B, but provided no information about where in the receptive field the context originated. For example, perhaps the feature at pixel A represents the eye of a cat, and the context B might be the nose and another eye. In this case, the aggregated feature at pixel A would be a nose and two eyes, regardless of the geometric structure of a face. This could cause a false indication of the presence of a face when the two eyes are on the bottom-left of an image and the nose is on the top-right. A recently proposed solution is to impose a positional bias on where in the receptive field the context can originate. This bias depends on the feature at A only, (an eye), but not the feature at B, which contains important contextual information.

In this work, we let this bias also depend on the context feature at B (i.e., the nose and another eye). This change enables a more accurate positional bias when a pixel and the context informing it are far away from one another and thus contains different information about the bias. In addition, when pixel A aggregates the context feature B, we also include a feature that indicates the relative position from A to B. This change enables A to know precisely where B originated. These two changes make self-attention position-sensitive, especially in the situation of long-range modeling.

Results
We have tested Axial-DeepLab on COCO, and Cityscapes for panoptic segmentation. Improvements over the state-of-the-art Panoptic-DeepLab for each dataset can be seen in the table below. In particular, our Axial-DeepLab outperforms Panoptic-DeepLab by 2.8% Panoptic Quality (PQ) on the COCO test-dev set. Our single-scale small model performs better than multi-scale Panoptic-DeepLab while improving computational efficiency by 27x and using only 1/4 the number of parameters. We also show state-of-the-art results on Cityscapes. Moreover, we find that the performance increases as the block receptive field increases from 5 × 5 to 65 × 65. Our model is also more robust to out-of-distribution scales, on which the model was not trained.

Model     COCO     Citiscapes
Panoptic-DeepLab     39.7     65.3
Axial-DeepLab (ours)     43.4 (+3.7)     66.5 (+1.2)
Single scale comparison with Panoptic-DeepLab on validation sets

Besides our main results on panoptic segmentation, our full axial-attention model, Axial-ResNet, also performs better than the previous best stand-alone self-attention model on ImageNet.

Model     Params     M-Adds     Top-1
ResNet-50     25.6M     4.1B     76.9
Stand-Alone     18.0M     3.6B     77.6
Full Axial-Attention (ours)     12.5M     3.3B     78.1
Full Axial-Attention also works well on ImageNet.

Conclusion
We have proposed and demonstrated the effectiveness of position-sensitive axial-attention on image classification and panoptic segmentation. On ImageNet, our Axial-ResNet, formed by stacking axial-attention blocks, achieves state-of-the-art results among stand-alone self-attention models. We further convert Axial-ResNet to Axial-DeepLab for bottom-up panoptic segmentation, and also show state-of-the-art performance on several benchmarks, including COCO, and Cityscapes. We hope our promising results could establish that axial-attention is an effective building block for modern computer vision models.

Acknowledgements
This post reflects the work of the authors as well as Bradley Green, Hartwig Adam, Alan Yuille, and Liang-Chieh Chen. We also thank Niki Parmar for discussion and support; Ashish Vaswani, Xuhui Jia, Raviteja Vemulapalli, Zhuoran Shen for their insightful comments and suggestions; Maxwell Collins and Blake Hechtman for technical support.

Read More