Getting a batch job completion message from Amazon Translate

Getting a batch job completion message from Amazon Translate

Amazon Translate is a neural machine translation service that delivers fast, high-quality, and affordable language translation. Neural machine translation is a form of language translation automation that uses deep learning models to deliver more accurate and natural-sounding translation than traditional statistical and rule-based translation algorithms. The translation service is trained on a wide variety of content across different use cases and domains to perform well on many kinds of content.

The Amazon Translate asynchronous batch processing capability enables organizations to translate a large collection of text or HTML documents. They can translate the collection of documents from one language to another with just a single API call. The ability to process data at scale is becoming important to organizations across all industries. In this blog post, we are going to demonstrate how you can build a notification mechanism to message you when a batch translation job is complete. This can enable end-end automation by triggering other Lambda functions or integrate with SQS for any post processing steps.

Solution overview

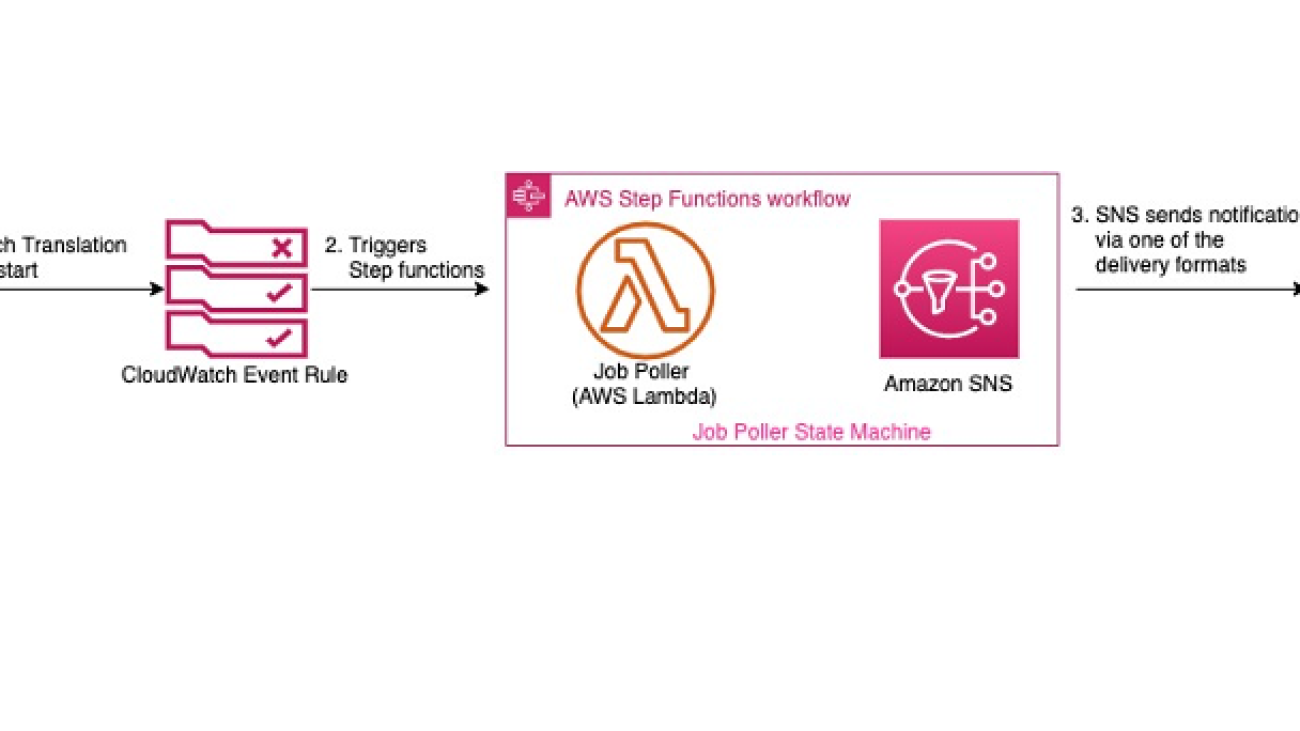
The following diagram illustrates the high-level architecture of the solution.

Architecture diagram depicting polling mechanism for batch translation job

The solution contains the following steps:

  1. A user starts a batch translation job.
  2. An Amazon CloudWatch Events rule picks up the event and triggers the AWS Step Functions
  3. The Job Poller AWS Lambda function polls the job status every 5 minutes.
  4. When the Amazon Translate batch job is complete, an email notification is sent via an Amazon Simple Notification Service (Amazon SNS) topic.

To implement this solution, you must create the following:

  1. An SNS topic
  2. An AWS Identity and Access Management (IAM) role
  3. A Lambda function
  4. A Step Functions state machine
  5. A CloudWatch Events rule

Creating an SNS topic

To create an SNS topic, complete the following steps:

  1. On the Amazon SNS console, create a new topic.
  2. For Topic name, enter a name (for example, TranslateJobNotificationTopic).
  3. Choose Create topic.

You can now see the TranslateJobNotificationTopic page. The Details section displays the topic’s name, ARN, display name (optional), and the AWS account ID of the Topic owner.

  1. In the Details section, copy the topic ARN to the clipboard (arn:aws:sns:us-east-1:123456789012:TranslateJobNotificationTopic).
  2. On the left navigation pane, choose Subscriptions.
  3. Choose Create subscription.
  4. On the Create subscription page, enter the topic ARN of the topic you created earlier (arn:aws:sns:us-east-1:123456789012:TranslateJobNotificationTopic).
  5. For Protocol, select Email.
  6. For Endpoint, enter an email address that can receive notifications.
  7. Choose Create subscription.

For email subscriptions, you have to first confirm the subscription by choosing the confirm subscription link in the email you received.

Creating an IAM role for the Lambda function

To create an IAM role, complete the following steps. For more information, see Creating an IAM Role.

  1. On the IAM console, choose Policies.
  2. Choose Create Policy.
  3. On the JSON tab, enter the following IAM policy:
{    "Version": "2012-10-17",
    "Statement": [
        {
            "Sid": "VisualEditor0",
            "Effect": "Allow",
            "Action": "translate:DescribeTextTranslationJob",
            "Resource": "*"
        },
        {
            "Effect": "Allow",
            "Action": [
                "logs:CreateLogGroup",
                "logs:CreateLogStream",
                "logs:PutLogEvents"
            ],
            "Resource": "arn:aws:logs:us-east-1:123456789012:log-group:/aws/lambda/TranslateJobStatusPoller:*"
        }
    ]
}

Update the resource property for CloudWatch Logs permission to reflect your configuration for Region, AWS account ID, and the Lambda function name.

  1. Choose Review policy.
  2. Enter a name (MyLambdaPolicy) for this policy and choose Create policy.
  3. Record the name of this policy for later steps.
  4. On the left navigation pane, choose Roles.
  5. Choose Create role.
  6. On the Select role type page, choose Lambda and the Lambda use case.
  7. Choose Next: Permissions.
  8. Filter policies by the policy name that you just created, and select the check-box.
  9. Choose Next: Tags.
  10. Add an appropriate tag.
  11. Choose Next: Review.
  12. Give this IAM role an appropriate name, and note it for future use.
  13. Choose Create role.

Creating a Lambda function

To create a Lambda function, complete the following steps. For more information, see Create a Lambda Function with the Console.

  1. On the Lambda console, choose Author from scratch.
  2. For Function Name, enter the name of your function (for example, TranslateJobStatusPoller).
  3. For Runtime, choose Python 3.8.
  4. For Execution role, select Use an existing role.
  5. Choose the IAM role you created in the previous step.
  6. Choose Create Function.
  7. Remove the default function and enter the following code into the Function Code window:
# Copyright 2020 Amazon.com, Inc. or its affiliates. All Rights Reserved.
# Licensed under the Apache License, Version 2.0 (the "License").
# You may not use this file except in compliance with the License.
# A copy of the License is located at## http://aws.amazon.com/apache2.0/
# or in the "license" file accompanying this file.
# This file is distributed on an "AS IS" BASIS, WITHOUT WARRANTIES OR CONDITIONS OF ANY KIND,
# either express or implied. See the License for the specific language governing permissions
# and limitations under the License.
# Description: This Lambda function is part of the a step function that checks the status of Amazon translate batch job. 
# Author: Sudhanshu Malhotra
import boto3
import logging
import os

from botocore.exceptions import ClientError

logging.basicConfig(level=logging.DEBUG)
logger = logging.getLogger(__name__)

def msgpublish(jobid):
    client = boto3.client('translate')
    try:
        response = client.describe_text_translation_job(JobId=jobid)
        logger.debug('Job Status is: {}' .format(response['TextTranslationJobProperties']['JobStatus']))
        return(response['TextTranslationJobProperties']['JobStatus'])
    
    except ClientError as e:
        logger.error("An error occured: %s" % e)
    
def lambda_handler(event, context):
    logger.setLevel(logging.DEBUG)
    logger.debug('Job ID is: {}' .format(event))
    return(msgpublish(event))
  1. Choose Save.

Creating a state machine

To create a state machine, complete the following steps. For more information, see Create a State Machine.

  1. On the Step Functions console, on the Define state machine page, choose Start with a template.
  2. Choose Hello world.
  3. Under Type, choose Standard.
  4. Under Definition, enter the following Amazon States Language. Make sure to replace the Lambda function and SNS topic ARN.
{
"Comment": "Polling step function for translate job complete",
"StartAt": "LambdaPoll",
"States": {
"LambdaPoll": {
"Type": "Task",
"Resource": "<ARN of the Lambda Function created in step 3>",
"InputPath": "$.detail.responseElements.jobId",
"ResultPath": "$.detail.responseElements.jobStatus",
"Next": "Job Complete?",
"Retry": [
{
"ErrorEquals": [
"States.ALL"
],
"IntervalSeconds": 1,
"MaxAttempts": 3,
"BackoffRate": 2
}
]
},
"Job Complete?": {
"Type": "Choice",
"Choices": [
{
"Variable": "$.detail.responseElements.jobStatus",
"StringEquals": "IN_PROGRESS",
"Next": "Wait X Seconds"
},
{
"Variable": "$.detail.responseElements.jobStatus",
"StringEquals": "SUBMITTED",
"Next": "Wait X Seconds"
},
{
"Variable": "$.detail.responseElements.jobStatus",
"StringEquals": "COMPLETED",
"Next": "Notify"
},
{
"Variable": "$.detail.responseElements.jobStatus",
"StringEquals": "FAILED",
"Next": "Notify"
},
{
"Variable": "$.detail.responseElements.jobStatus",
"StringEquals": "STOPPED",
"Next": "Notify"
}
],
"Default": "Wait X Seconds"
},
"Wait X Seconds": {
"Type": "Wait",
"Seconds": 60,
"Next": "LambdaPoll"
},
"Notify": {
"Type": "Task",
"Resource": "arn:aws:states:::sns:publish",
"Parameters": {
"Subject": "Translate Batch Job Notification",
"Message": {
"JobId.$": "$.detail.responseElements.jobId",
"S3OutputLocation.$": "$.detail.requestParameters.outputDataConfig.s3Uri",
"JobStatus.$": "$.detail.responseElements.jobStatus"
},
"MessageAttributes": {
"JobId": {
"DataType": "String",
"StringValue.$": "$.detail.responseElements.jobId"
},
"S3OutputLocation": {
"DataType": "String",
"StringValue.$": "$.detail.requestParameters.outputDataConfig.s3Uri"
}
},
"TopicArn": "<ARN of the SNS topic created in step 1>"
},
"End": true
}
}
}
  1. Use the graph in the Visual Workflow pane to check that your Amazon States Language code describes your state machine correctly. You should see something like the following screenshot.
    Amazon State machine depicting various states of batch translation job
  1. Choose Next.
  2. For Name, enter a name for the state machine.
  3. Under Permissions, select Create new role.

You now see an info block with the details of the role and the associated permissions.

IAM policy screenshot for State machine

  1. Choose Create state machine.

Creating a CloudWatch Events rule

To create a CloudWatch Events rule, complete the following steps. This rule catches when a user performs a StartTextTranslationJob API event and triggers the step function (set as a target).

  1. On the CloudWatch console, choose Rules.
  2. Choose Create rule.
  3. On the Step 1: Create rule page, under Event Source, select Event Pattern.
  4. Choose Build custom event pattern from the drop-down menu.
  5. Enter the following code into the preview pane:
{ 
    "source": [ "aws.translate" ], 
    "detail-type": [ "AWS API Call via CloudTrail" ], 
    "detail": { 
            "eventSource": [ "translate.amazonaws.com" ], 
            "eventName": [ "StartTextTranslationJob" ] 
            } 
 }
  1. For Targets, select Step Functions state machine.
  2. Select the state machine you created earlier.
  3. For permission to send events to Step Functions, select Create a new role for this specific resource.
  4. Choose Configure details.
  5. On the Step 2: Configure rule details page, enter a name and description for the rule.
  6. For State, select Enabled.
  7. Choose Create rule.

Validating the solution

To test this solution, I first create an Amazon Translate batch job and provide the input text Amazon Simple Storage Service (Amazon S3) location, output Amazon S3 location, target language, and the data access service role ARN. For instructions on creating a batch translate job, see Asynchronous Batch Processing or Translating documents with Amazon Translate, AWS Lambda, and the new Batch Translate API.

The following screenshot shows my batch job on the Translation jobs page.

Amazon translate job start screenshot of Translate console

The CloudWatch Events rule picks up the StartTextTranslationJob API and triggers the state machine. When the job is complete, I get an email notification via Amazon SNS.

Translate job complete notification email screenshot showing job status, job name and output location of the translated job

Conclusion

In this post, we demonstrated how you can use Step Functions to poll for an Amazon Translate batch job. For this use case, we configured an email notification to send when a job is complete; however, you can use this framework to trigger other Lambda functions or integrate with Amazon Simple Queue Service (Amazon SQS) for any postprocessing automated steps, enabling you to build an end-to-end automated workflow. For further reading, see the following:

About the Authors


Sudhanshu Malhotra is a Boston-based Enterprise Solutions Architect for AWS. He is a technology enthusiast who enjoys helping customers find innovative solutions to complex business challenges. His core areas of focus are DevOps, Machine Learning, and Security. When he’s not working with customers on their journey to the cloud, he enjoys reading, hiking, and exploring new cuisines.


Siva Rajamani is a Boston-based Enterprise Solutions Architect for AWS. He enjoys working closely with customers, supporting their digital transformation and AWS adoption journey. His core areas of focus are Serverless, Application Integration, and Security. Outside of work, he enjoys outdoor activities and watching documentaries.


Read More

Supercharging the TensorFlow.js WebAssembly backend with SIMD and multi-threading

Supercharging the TensorFlow.js WebAssembly backend with SIMD and multi-threading

Posted by Ann Yuan and Marat Dukhan, Software Engineers at Google

In March we introduced a new WebAssembly (Wasm) accelerated backend for TensorFlow.js (scroll further down to learn more about Wasm and why this is important). Today we are excited to announce a major performance update: as of TensorFlow.js version 2.3.0, our Wasm backend has become up to 10X faster by leveraging SIMD (vector) instructions and multithreading via XNNPACK, a highly optimized library of neural network operators.

Benchmarks

SIMD and multithreading bring major performance improvements to our Wasm backend. Below are benchmarks in Google Chrome that demonstrate the improvements on BlazeFace – a light model with 0.1 million parameters and about 20 million multiply-add operations:

(times listed are milliseconds per inference)

Larger models, such as MobileNet V2, a medium-sized model with 3.5 million parameters and roughly 300 million multiply-add operations, attain even greater speedups:

*Note: Benchmarks for the TF.js multi-threaded Wasm backend are not available for Pixel 4 because multi-threading support in mobile browsers is still a work-in-progress. SIMD support in iOS is also still under development.

**Note: Node support for the TF.js multi-threaded Wasm backend is coming soon.

The performance gains from SIMD and multithreading are independent of each other. These benchmarks show that SIMD brings a 1.7-4.5X performance improvement to plain Wasm, and multithreading brings another 1.8-2.9X speedup on top of that.

Usage

SIMD is supported as of TensorFlow.js 2.1.0, and multithreading is supported as of TensorFlow.js 2.3.0.

At runtime we test for SIMD and multithreading support and serve the appropriate Wasm binary. Today we serve a different binary for each of the following cases:

  • Default: The runtime does not support SIMD or multithreading
  • SIMD: The runtime supports SIMD but not multithreading
  • SIMD + multithreading: The runtime supports SIMD and multithreading

Since most runtimes that support multi-threading also support SIMD, we decided to omit the multi-threading-only runtime to keep our bundle size down. This means that if your runtime supports multithreading but not SIMD, you will be served the default binary. There are two ways to use the Wasm backend:

  1. With NPM
    // Import @tensorflow/tfjs or @tensorflow/tfjs-core
    const tf = require('@tensorflow/tfjs');
    // Add the WAsm backend to the global backend registry.
    require('@tensorflow/tfjs-backend-wasm');

    // Set the backend to WAsm and wait for the module to be ready.
    tf.setBackend('wasm').then(() => main());

    The library expects the Wasm binaries to be located relative to the main JS file. If you’re using a bundler such as parcel or webpack, you may need to manually indicate the location of the Wasm binaries with our setWasmPaths helper:

    import {setWasmPaths} from '@tensorflow/tfjs-backend-wasm';
    setWasmPaths(yourCustomFolder);
    tf.setBackend('wasm').then(() => {...});

    See the “Using bundlers” section in our README for more information.

  2. With script tags
    <!-- Import @tensorflow/tfjs or @tensorflow/tfjs-core -->
    <script src="https://cdn.jsdelivr.net/npm/@tensorflow/tfjs"></script>

    <!-- Adds the WAsm backend to the global backend registry -->
    <script src="https://cdn.jsdelivr.net/npm/@tensorflow/tfjs-backend-wasm/dist/tf-backend-wasm.js"></script>

    <script>
    tf.setBackend('wasm').then(() => main());
    </script>

    NOTE: TensorFlow.js defines a priority for each backend and will automatically choose the best supported backend for a given environment. Today, WebGL has the highest priority, followed by Wasm, then the vanilla JS backend. To always use the Wasm backend, we need to explicitly call tf.setBackend(‘wasm’).

Demo

To see the performance improvements for yourself, check out this demo of our BlazeFace model, which has been updated to use the new Wasm backend: https://tfjs-wasm-simd-demo.netlify.app/ To compare against the unoptimized binary, try this version of the demo, which manually turns off SIMD and multithreading support.

What is Wasm?

WebAssembly (Wasm) is a cross-browser binary format that brings near-native code execution speed to the web. Wasm serves as a compilation target for programs written in statically typed high level languages, such as C, C++, Go, and Rust. In TensorFlow.js, we implement our Wasm backend in C++ and compile with Emscripten. The XNNPACK library provides a heavily optimized implementation of neural network operators underneath.
Wasm has been supported by Chrome, Safari, Firefox, and Edge since 2017, and is supported by 90% of devices worldwide.
The WebAssembly specification is evolving quickly and browsers are working hard to support a growing number of experimental features. You can visit this site to see which features are supported by your runtime, including:

  1. SIMD
    SIMD stands for Single Instruction, Multiple Data, which means that SIMD instructions operate on small fixed-size vectors of elements rather than individual scalars. The Wasm SIMD proposal makes the SIMD instructions supported by modern processors usable inside Web browsers, unlocking significant performance gains.

    Wasm SIMD is a phase 3 proposal, and is available via an origin trial in Chrome 84-86. This means developers can opt in their websites to Wasm SIMD and all their visitors will enjoy its benefits without needing to explicitly enable the feature in their browser settings. Besides Google Chrome, Firefox Nightly supports Wasm SIMD by default.

  2. Multi-threading
    Nearly all modern processors have multiple cores, each of which is able to carry out instructions independently and concurrently. WebAssembly programs can spread their work across cores via the threads proposal for performance. This proposal allows multiple Wasm instances in separate web workers to share a single WebAssembly.Memory object for fast communication between workers.

    Wasm threads is a phase 2 proposal, and has been available in Chrome desktop by default since version 74. There is an ongoing cross-browser effort to enable this functionality for mobile devices as well.

To see which browsers support SIMD, threads, and other experimental features, check out the WebAssembly roadmap.

Other improvements

Since the original launch of our Wasm backend in March, we have extended operator coverage and now support over 70 operators. Many of the new operators are accelerated through the XNNPACK library, and unlock support for additional models, like the HandPose model.

Looking ahead

We expect the performance of our Wasm backend to keep improving. We’re closely following the progress of several evolving specifications in WebAssembly, including flexible vectors for wider SIMD, quasi fused multiply-add, and pseudo-minimum and maximum instructions. We’re also looking forward to ES6 module support for WebAssembly modules. As with SIMD and multithreading, we intend to take advantage of these features as they become available with no implications for TF.js user code.

More information

Acknowledgements

We would like to thank Daniel Smilkov and Nikhil Thorat for laying the groundwork of the WebAssembly backend and the integration with XNNPACK, Matsvei Zhdanovich for collecting Pixel 4 benchmark numbers, and Frank Barchard for implementing low-level Wasm SIMD optimizations in XNNPACK.Read More

In a Class of Its Own: New Mercedes-Benz S-Class Sports Next-Gen AI Cockpit, Powered by NVIDIA

In a Class of Its Own: New Mercedes-Benz S-Class Sports Next-Gen AI Cockpit, Powered by NVIDIA

The Mercedes-Benz S-Class has always combined the best in engineering with a legendary heritage of craftsmanship. Now, the flagship sedan is adding intelligence to the mix, fusing AI with the embodiment of automotive luxury.

At a world premiere event, the legendary premium automaker debuted the redesigned flagship S-Class sedan. It features the all-new MBUX AI cockpit system, with an augmented reality head-up display, AI voice assistant and rich interactive graphics to enable every passenger in the vehicle, not just the driver, to enjoy personalized, intelligent features.

“This S-Class is going to be the most intelligent Mercedes ever,” said Mercedes-Benz CEO Ola Källenius during the virtual launch.

Like its predecessor, the next-gen MBUX system runs on the high-performance, energy-efficient compute of NVIDIA GPUs for instantaneous AI processing and sharp graphics.

“Mercedes-Benz is a perfect match for NVIDIA, because our mission is to use AI to solve problems no ordinary computers can,” said NVIDIA founder and CEO Jensen Huang, who took the new S-Class for a spin during the launch. “The technology in this car is remarkable.”

Jensen was featured alongside Grammy award-winning artist Alicia Keys and Formula One driver Lewis Hamilton at the premiere event, each showcasing the latest innovations of the premium sedan.

Watch NVIDIA founder and CEO Jensen Huang take the all new Mercedes-Benz S-Class for a spin.

The S-Class’s new intelligent system represents a significant step toward a software-defined, autonomous future. When more automated and self-driving features are integrated into the car, the driver and passengers alike can enjoy the same entertainment and productivity features, experiencing a personalized ride, no matter where they’re seated.

Unparalleled Performance

AI cockpits orchestrate crucial safety and convenience features, constantly learning to continuously deliver joy to the customer.

“For decades, the magic moment in car manufacturing was when the chassis received its engine,” Källenius said. “Today, there’s another magic moment that is incredibly important — the ‘marriage’ of the car’s body and its brain — the all-new head unit with the next-level MBUX-system.”

A vehicle’s cockpit typically requires a collection of electronic control units and switches to perform basic functions, such as powering entertainment or adjusting temperature. Leveraging NVIDIA technology, Mercedes-Benz was able to consolidate these components into an AI platform — removing 27 switches and buttons — to simplify the architecture while creating more space to add new features.

And the S-Class’s new compute headroom is as massive as its legroom. With NVIDIA at the helm, the premium sedan contains about the same computing power as 60 average vehicles. Just one chip each controls the 3D cluster, infotainment and rear seat displays.

“There’s more computing power packed into this car than any car, ever — three powerful computer chips with NVIDIA GPUs,” Jensen said. “Those three computer chips represent the brain and the nervous system of this car.”

Effortless Convenience

The new MBUX system makes the cutting edge in graphics, passenger detection and natural language processing seem effortless.

The S-Class features five large screens, each with brilliant displays — the 12.8-inch central infotainment with OLED technology — making vehicle and comfort controls even more user-friendly for every passenger. The new 3D driver display gives a spatial view at the touch of a button, providing a realistic view of the car in its surroundings.

The system delivers even more security, enabling fingerprint, face and voice recognition, alongside a traditional PIN to access personal features. Its cameras can detect if a passenger is about to exit into oncoming traffic and warn them before they open the door. The same technology is used to monitor whether a child seat is correctly attached and if the driver is paying attention to the road.

MBUX can even carry on more conversation. It can answer a wider range of questions, some without the key phrase “Hey Mercedes,” and can interact in 27 languages, including Thai and Czech.

These futuristic functions are the result of over 30 million lines of code written by hundreds of engineers, who are continuously developing new and innovative ways for customers to enjoy their drive.

“These engineers are practically in your garage and they’re constantly working on the software, improving it, enhancing it, creating more features, and will update it over the air,” Jensen said. “Your car can now get better and better over time.”

The post In a Class of Its Own: New Mercedes-Benz S-Class Sports Next-Gen AI Cockpit, Powered by NVIDIA appeared first on The Official NVIDIA Blog.

Read More

Partnering with NSF on human-AI collaboration

Today, in partnership with the U.S. National Science Foundation (NSF), we are announcing a National AI Research Institute for Human-AI Interaction and Collaboration. Google will provide $5 million in funding to support the Institute. We will also offer AI expertise, research collaborations, and Cloud support for Institute researchers and educators as they advance knowledge and progress in the field of AI.

Studies have shown that humans and AI systems operating together can make smarter decisions than either acting alone. In the past few years we’ve seen the increasing use of AI to support people and their decision making in sectors like medicine, education, transportation and agriculture. Conversely, people also support AI systems and their decision making through training data and model design, testing and operation, and continued feedback and iteration on system performance. People and AI systems shape each other, and in order to realize the full potential of AI for social benefit, positive and productive human-AI interaction and collaboration is critical.

Google has been working in this area over the last several years, publishing hundreds of research papers in human-computer interaction and visualization; bringing industry and academic experts together at events like the PAIR Symposium and top research conferences; designing tools like Facets, the What-If Tool, and the Language Interpretability Tool to better understand datasets and models; creating the Model Card Toolkit for model transparency and a People + AI guidebookto support human-centered AI development; building better human-AI interfaces in our products like smart predictions in Gboard and auto-captioning with the Live Transcribe app; and enabling anyone to help make AI-powered products more useful through efforts like Crowdsource and Translate Community.

The Institute we are announcing with NSF will support interdisciplinary research on a variety of modes of interaction between people and AI—like speech, written language, visuals and gestures—and how to make these interactions more effective. Importantly, the research, tools and techniques from the Institute will be developed with human-centered principles in mind: social benefit, inclusive design, safety and robustness, privacy, and high standards of scientific excellence, consistent with the Google AI Principles. Research projects in the Institute will engage a diverse set of experts, educate the next generation and promote workforce development, and broaden participation from underrepresented groups and institutions across the country. All research outcomes will be published to advance knowledge and progress in the field.

U.S. universities and research institutions, individually and in collaboration, are welcome to apply. We are proud to partner with NSF in our ongoing efforts to promote innovation and technology leadership, and look forward to supporting many brilliant and creative ideas.

Read More

Announcing the winner of the AWS DeepComposer Chartbusters Spin the Model challenge

Announcing the winner of the AWS DeepComposer Chartbusters Spin the Model challenge

We’re excited to announce the top 10 compositions and the winner of the AWS DeepComposer Chartbusters Spin the Model challenge. AWS DeepComposer provides a creative and hands-on experience for learning generative AI and machine learning. Chartbusters is a global monthly challenge where you can use AWS DeepComposer to create original compositions and compete to top the charts and win prizes.

The Spin the Model challenge that ran from July 31, 2020, to August 23, 2020, required developers to create a custom genre model.

Top 10 compositions

The competition was intense! The high-quality submissions made it challenging for our judges to select the chart-toppers. Our panel of experts, Kesha Williams, Umut Isik, and Wayne Chi selected the top 10 ranked compositions by evaluating the quality of the music and creativity. They also checked the submitted notebooks to ensure that the compositions were generated by custom models.

The winner of the Spin the Model challenge is… (cue drumroll) Lena Taupier! You can listen to her winning composition and the top 10 compositions on SoundCloud or on the AWS DeepComposer console. The following screenshot shows the top 10 compositions for the Spin the Model challenge.

Lena will receive an AWS DeepComposer Chartbusters gold record and tell her story in an upcoming blog post, right here on the AWS Machine Learning Blog.

Congratulations, Lena Taupier!

It’s time to move on to the next Chartbusters challenge: The Sounds of Science. The challenge launches today and is open until September 23rd, 2020. Although you don’t need a physical keyboard to compete, you can take advantage of the September price promotion and buy the AWS DeepComposer keyboard for $89.00 to enhance your music generation experience. For more information about the competition and how to participate, see the Sounds of Science Chartbusters challenge blog post.


About the Author

Maryam Rezapoor is a Senior Product Manager with AWS AI Ecosystem team. As a former biomedical researcher and entrepreneur, she finds her passion in working backward from customers’ needs to create new impactful solutions. Outside of work, she enjoys hiking, photography, and gardening.


Read More

How to run distributed training using Horovod and MXNet on AWS DL Containers and AWS  Deep Learning AMIs

How to run distributed training using Horovod and MXNet on AWS DL Containers and AWS  Deep Learning AMIs

Distributed training of large deep learning models has become an indispensable way of model training for computer vision (CV) and natural language processing (NLP) applications. Open source frameworks such as Horovod provide distributed training support to Apache MXNet, PyTorch, and TensorFlow. Converting your non-distributed Apache MXNet training script to use distributed training with Horovod only requires 4-5 lines of additional code. Horovod is an open-source distributed deep learning framework created by Uber. It leverages efficient inter-GPU and inter-node communication methods such as NVIDIA Collective Communications Library (NCCL) and Message Passing Interface (MPI) to distribute and aggregate model parameters between workers. The primary use case of Horovod is to make distributed deep learning fast and easy: to take a single-GPU training script and scale it successfully to train across many GPUs in parallel. For those unfamiliar with using Horovod and Apache MXNet for distributed training, we recommend first reading our previous blog post on the subject before diving into this example.

MXNet is integrated with Horovod through the common distributed training APIs defined in Horovod. You can convert the non-distributed training script to a Horovod world by following the higher level code skeleton.  This is a streamlined user experience where the user only has to add few lines of code to make it Horovod compatible. However, other pain points may still make distributed training not flow as smoothly as expected. For example, you may need to install additional software and libraries and resolve your incompatibilities to make distributed training works. Horovod requires a certain version of Open MPI, and if you want to leverage high-performance training on NVIDIA GPUs, you need to install a NCCL library. Another pain point you may encounter is when trying to scale up the number of training nodes in the cluster. You need to make sure all the software and libraries in the new nodes are properly installed and configured.

AWS Deep Learning Containers (AWS DL Containers) has greatly simplified the process of launching new training instances in a cluster, and the latest release includes all the required libraries to run distributed training using MXNet with Horovod. The AWS Deep Learning AMIs (DLAMI) comes with popular open-source deep learning frameworks and pre-configured CUDA, cuDNN, Open MPI, and NCCL libraries.

In this post, we demonstrate how to run distributed training using Horovod and MXNet via AWS DL Containers and the DLAMIs.

Getting started with AWS DL Containers

AWS DL Containers are a set of Docker images pre-installed with deep learning frameworks to make it easy to deploy custom machine learning (ML) environments quickly. The AWS DL Containers provide optimized environments with different deep learning frameworks (MXNet, TensorFlow, PyTorch), Nvidia CUDA (for GPU instances), and Intel MKL (for CPU instances) libraries, and are available in Amazon Elastic Container Registry (Amazon ECR). You can launch AWS DL Containers on Amazon Elastic Kubernetes Service (Amazon EKS), self-managed Kubernetes on Amazon Elastic Compute Cloud (Amazon EC2), and Amazon Elastic Container Service (Amazon ECS). For more information about launching AWS DL Containers, follow this link.

Training an MXNet model with Deep Learning Containers on Amazon EC2

The MXNet Deep Learning Container comes with pre-installed libraries such as MXNet, Horovod, NCCL, MPI, CUDA, and cuDNN. The following diagram illustrates this architecture.

For instructions on setting up AWS DL Containers on an EC2 instance, see: Train a Deep Learning model with AWS Deep Learning Containers on Amazon EC2. For a hands-on tutorial running a Horovod training script, complete steps 1-5 of the preceding post. To use an MXNet framework, complete the following for step 6:

CPU:

  1. Download the Docker image from Amazon ECR repository.
docker run -it 763104351884.dkr.ecr.us-east-1.amazonaws.com/mxnet-training:1.6.0-cpu-py27-ubuntu16.04

  1. In the terminal of the container, run the following command to train the MNIST example.
git clone --recursive https://github.com/horovod/horovod.git
mpirun -np 1 -H localhost:1 --allow-run-as-root python horovod/examples/mxnet_mnist.py

GPU:

  1. Download the Docker image from Amazon ECR repository.
nvidia-docker run -it 763104351884.dkr.ecr.us-east-1.amazonaws.com/mxnet-training:1.6.0-gpu-py27-cu101-ubuntu16.04

  1. In the terminal of the container, run the following command to train the MNIST example.
git clone --recursive https://github.com/horovod/horovod.git
mpirun -np 4 -H localhost:4 --allow-run-as-root python horovod/examples/mxnet_mnist.py

If the final output looks like the following code, you successfully ran the training script:

[1,0]<stderr>:INFO:root:Epoch[4]    Train: accuracy=0.987580    Validation: accuracy=0.988582
[1,0]<stderr>:INFO:root:Training finished with Validation Accuracy of 0.988582

For instructions on ending the EC2 instances, execute the step 7 of the preceding post. One can follow the same steps as described above for their own training script.

Training a MXNet model with Deep Learning Containers on Amazon EKS

Amazon EKS is a managed service that makes it easy for you to run Kubernetes on AWS without needing to install, operate, and maintain your own Kubernetes control plane or nodes. Kubernetes is an open-source system for automating the deployment, scaling, and management of containerized applications. In this post, we show you how to set up a deep learning environment using Amazon EKS and AWS DL Containers. With Amazon EKS, you can scale a production-ready environment for multiple-node training and inference with Kubernetes containers.

The following diagram illustrates this architecture:

For instructions on setting up a deep learning environment with Amazon EKS and AWS DL Containers, see Amazon EKS Setup. To set up an Amazon EKS cluster, use the open-source tool called eksctl. It is recommended to use an EC2 instance with the latest DLAMI. You can spin up a GPU cluster or CPU cluster based on your use case. For this post, follow the Amazon EKS Setup instructions until the Manage Your Cluster section.

When your Amazon EKS cluster is up and running, you can run the Horovod MXNet training on the cluster. For instructions, see MXNet with Horovod distributed GPU training, which uses a Docker image that already contains a Horovod training script and a three-node cluster with node-type=p3.8xlarge. This tutorial runs the Horovod example script for MXNet on an MNIST model. The Horovod examples directory also contains an Imagenet script, which you can run on the same Amazon EKS cluster.

Getting started with the AWS DLAMI

The AWS DLAMI are machine learning images loaded with deep learning frameworks and their dependent libraries such as NVIDIA CUDA, NVIDIA cuDNN, NCCL, Intel MKL-DNN, and many others. DLAMI is a one-stop shop for deep learning in the cloud. You can launch EC2 instances with Ubuntu or Amazon Linux. DLAMI comes with pre-installed deep learning frameworks such as Apache MXNet, TensorFlow, Keras, and PyTorch. You can train custom models, experiment with new deep learning algorithms, and learn new deep learning skills and techniques. The AMIs also offer GPU and CPU acceleration through pre-configured drivers, Anaconda virtual environments, and come with popular Python packages.

The DLAMI for Ubuntu and Amazon Linux now comes with pre-installed Horovod support with a MXNet backend. You can scale your ML model from a single GPU to multiple GPUs or a multi-node cluster using an EC2 GPU instance. You can also achieve greater scaling efficiency and higher multi-GPU training performance by using Horovod with MXNet as compared to native MXNet KVStore.

All versions of the DLAMI beginning with Ubuntu 18.04 v27.0, Amazon Linux v27.0, and Amazon Linux 2 v27.0 support Horovod with MXNet. You can use any AWS CPU or GPU machine to spin up the instance using deep learning images. It is recommended to use CPU instances of type C5, C5n, or C4 (optimized for high-performance, compute-intensive workloads) and GPU instances of type P2 and P3 (the latest generation of general-purpose GPU instances).

You can run Horovod training on a single-node or multi-node cluster. A single-node cluster consists of a single machine. A multi-node cluster consists of more than one homogeneous machine. In this post, we walk you through running Horovod multi-node cluster training using MXNet.

Creating a multi-node cluster using the DLAMI

You can spin up the EC2 instances with AWS CloudFormation templates, the AWS Command Line Interface (AWS CLI), or on the Amazon EC2 console. For this post, we use the Amazon EC2 console. We launch an identical number of EC2 instances with the same DLAMI. We spin up the instances in the same Region, placement group, and security zone because those factors play an important role in achieving high performance.

  1. On the Amazon EC2 console, search for Deep Learning AMI.
  2. Choose Select for any Deep Learning AMI (Ubuntu).

  1. You now have to choose the instance type.

AWS supports various categories of instances. Based on your use case such as training time and cost, you can select General Purpose instances such as M5, Compute optimized instances such as C5, or GPU based instances such as family of P2 or P3. You can create a cluster of as many instances as possible based on your requirement. For this post, we select four p3.8xlarge instances with a total of 16 GPUs.

  1. Choose Next: Configure Instance Details.

Next, we need to configure the instances.

  1. For Number of instances, enter 4.
  2. Enter your specific network, subnet, and placement group.

If you don’t have a placement group, you can create one.

  1. Choose Next: Add Storage.

You can change this number based on your dataset size. For the demo purpose, we used the default value.

  1. Choose Next: Add Tags.
  2. For Key, enter Name.
  3. For Value, enter Horovod_MXNet.

  1. Choose Next: Configure Security Group.
  2. Create your own security group or use the existing one.

  1. Choose Review and Launch.
  2. Review your instance launch details and choose Launch.

After you choose Launch, you’re asked to select an existing key pair or create a new one.

  1. For Key pair name, enter a key pair.

If you don’t have a key pair, choose Download Key Pair.

  1. Choose Launch Instances.

If you see a green banner message, you launched the instance successfully.

  1. Choose View Instances.

  1. Search for horovod_MXNet to see the four instances you created.

We need to do one more step in our cluster setup. All the instances should be able to communicate with each other, so we have to add our security group ID to all the instances’ inbound rules.

  1. Select one instance from the four which you created.
  2. On the Description tab, choose Security groups (for this post, launch-wizard-144).

  1. On the Inbound tab, copy the security group ID (sg-00e9376c8f3cab57f).
  2. Choose Edit inbound rules.
  3. Choose Add rule.
  4. Select All traffic and SSH.
  5. Choose Save rules.

You can now see your inbound rules listed.

  1. Repeat the process to add a security group in the inbound rules for all the instances so they can communicate with each other.

You are now done with setting up your cluster.

Horovod with MXNet training on a multi-node cluster

For Horovod with MXNet training on a multi-node cluster, complete the following steps:

  1. Copy your PEM key from your local machine to one of the EC2 instances (primary node):
// For Ubuntu user
scp -i <your_pem_key_path> ubuntu@<IPv4_Public_IP>:/home/ubuntu/

// For Amazon Linux user
scp -I <your_pem_key_path> ec2-user@<IPv4_Public_IP>:/home/ec2-user/

  1. SSH into your primary node:
// For Ubuntu user
$ ssh -i <your_pem_key> ubuntu@<IPv4_Public_IP>

// For Amazon Linux user
$ ssh -i <your_pem_key> ec2-user@<IPv4_Public_IP>

  1. Enable the passwordless SSHing between EC2 instances, without providing the PEM file. Enter the following command into your primary node:
eval `ssh-agent`
ssh-add <your_pem_key>

  1. When you SSH or connect for the first time from one EC2 instance to another, you see the following message:
$ ssh <another_ec2_ipv4_address>
The authenticity of host 'xxx.xx.xx.xx' can't be established.
ECDSA key fingerprint is SHA256:xxxaaabbbbccc.
Are you sure you want to continue connecting (yes/no)?

# Make sure you are able to SSH from one EC2 to another without this authenticity, otherwise horovod won't able to communicate with other machines

# SOLUTION:
# Open file "/etc/ssh/ssh_config" and add this lines at the end
Host *
   StrictHostKeyChecking no
   UserKnownHostsFile=/dev/null
   
  1. Activate the CONDA environment:
// If using Python 3.6
$ source activate mxnet_p36
  1. As an optional step, confirm Horovod is using MXNet on the backend by running the following command (as of this writing, the Horovod version is 0.19.5):
$ horovodrun -cb

// Output
Horovod v0.19.5:

Available Frameworks:
    [ ] TensorFlow
    [ ] PyTorch
    [X] MXNet

Available Controllers:
    [X] MPI
    [X] Gloo

Available Tensor Operations:
    [X] NCCL
    [ ] DDL
    [ ] CCL
    [X] MPI
    [X] Gloo
  1. We have provided a sample MNIST example for you to run the Horovod training.
$ horovodrun -np 4 python examples/horovod/mxnet/train_mxnet_hvd_mnist.py

// Output
[1,0]<stderr>:INFO:root:Namespace(batch_size=64, dtype='float32', epochs=5, lr=0.002, momentum=0.9, no_cuda=True)
[1,1]<stderr>:INFO:root:Namespace(batch_size=64, dtype='float32', epochs=5, lr=0.002, momentum=0.9, no_cuda=True)
[1,1]<stderr>:INFO:root:downloaded http://data.mxnet.io/mxnet/data/mnist.zip into data-1/mnist.zip successfully
[1,1]<stderr>:[04:29:14] src/io/iter_mnist.cc:113: MNISTIter: load 30000 images, shuffle=1, shape=[64,1,28,28]
// ....... <output truncated> ...........
[1,0]<stderr>:INFO:root:Epoch[4]    Train: accuracy=0.987647    Validation: accuracy=0.986178
[1,0]<stderr>:INFO:root:Training finished with Validation Accuracy of 0.986178
[1,1]<stderr>:INFO:root:Training finished with Validation Accuracy of 0.986178
  1. Don’t forget to stop or terminate the instance when you no longer need it.

For more information about the horovodrun command, see here.

The preceding code just shows how to run the Horovod training script on a multi-node EC2 instance. You can find the Horovod MXNet example script on the Horovod GitHub repo. Additionally, you can bring your own training script that’s compatible with Horovod and MXNet and train the model on a single node and multi-node cluster. To learn more about the performance comparison between Horovod and Parameter Server, this blog post illustrates the difference as ResNet50 scales from 1 to 64 GPUs.

When using Horovod, keep the following in mind:

  • All your instances must be the same type
  • All your instances must have the same environment
  • The data should be stored in the same location across nodes.
  • The training script should be in the same location across nodes.

Conclusion

In this post, we demonstrated how to run the distributed training using Horovod and MXNet on Amazon EC2 and Amazon EKS using AWS DL Containers and AWS DLAMI. Using Horovod, your Apache MXNet models can be distributed across a cluster of instances, providing a significant increase in performance with only minimal changes to your training script.

For more information about deep learning and MXNet, see the MXNet crash course and Dive into Deep Learning book. You can also get started on the MXNet website and MXNet GitHub examples directory.

If you are new to distributed training, we highly recommend reading the paper Horovod: fast and easy distributed deep learning inTensorFlow. You can also install Horovod, build Horovod with MXNet, and follow the MNIST or ImageNet use case. You can find more Horovod MXNet examples in GluonCV example and GluonNLP example on GitHub.


About the Authors

Chaitanya Bapat is a Software Engineer with the AWS Deep Learning team. He works on Apache MXNet and integrating the framework with Sagemaker, DLC and DLAMI. In his spare time, he loves watching sports and enjoys reading books and learning Spanish.


Karan Jariwala is a Software Development Engineer on the AWS Deep Learning team. His work focuses on training deep neural networks. Outside of work, he enjoys hiking, swimming, and playing tennis.

Read More

Using Amazon Textract with AWS PrivateLink

Using Amazon Textract with AWS PrivateLink

Amazon Textract now supports Amazon Virtual Private Cloud (Amazon VPC) endpoints via AWS PrivateLink so you can securely initiate API calls to Amazon Textract from within your VPC and avoid using the public internet.

In this post, we show you how to access Amazon Textract APIs from within your VPC without traversing the public internet, and how to use VPC endpoint policies to restrict access to Amazon Textract.

Amazon Textract is a fully managed machine learning (ML) service that automatically extracts text and data from scanned documents. It goes beyond simple optical character recognition (OCR) to identify, understand, and extract data from forms and tables.

You can use AWS PrivateLink to access Amazon Textract securely by keeping your network traffic within the AWS network, while simplifying your internal network architecture. It enables you to privately access Amazon Textract APIs from your VPC in a scalable manner by using interface VPC endpoints. A VPC endpoint is an elastic network interface in your subnet with a private IP address that serves as the entry point for all Amazon Textract API calls. A VPC endpoint enables you to privately connect your VPC to supported AWS services and VPC endpoint services powered by AWS PrivateLink without requiring an internet gateway, NAT device, VPN connection, or AWS Direct Connect connection. Instances in your VPC don’t require public IP addresses to communicate with resources in the service. Traffic between your VPC and the other service doesn’t leave the AWS network.

The following diagram illustrates the solution architecture.

Prerequisites

To get started, you need to have a VPC set up in the AWS Region of your choice. For instructions, see Getting started with Amazon VPC. In this post, we use the us-east-2 Region. You should also have an AWS account with sufficient access to create resources in the following services:

  • Amazon Textract
  • AWS PrivateLink

Solution overview

The walkthrough includes the following high-level steps:

  1. Create VPC endpoints.
  2. Use Amazon Textract via AWS PrivateLink.

Creating VPC endpoints

To create a VPC endpoint, complete the following steps. We use the us-east-2 Region in this post, so the console and URLs may differ depending on the Region you choose.

  1. On the Amazon VPC console, choose Endpoints.
  2. Choose Create Endpoint.
  3. For Service category, select AWS services.
  4. For Service Name, choose amazonaws.us-east-2-textract or com.amazonaws.us-east-2.textract-fips.
  5. For VPC, enter the VPC you want to use.
  6. For Availability Zone, select your preferred Availability Zones.
  7. For Enable DNS name, select Enable for this endpoint.

This creates a private hosted zone that enables you to access the resources in your VPC using custom DNS domain names, such as example.com, instead of using private IPv4 addresses or private DNS hostnames provided by AWS. The Amazon Textract DNS hostname that the AWS Command Line Interface (AWS CLI) and Amazon Textract SDKs use by default (https://textract.Region.amazonaws.com) resolves to your VPC endpoint.

  1. For Security group, choose the security group to associate with the endpoint network interface.

If you don’t specify a security group, the default security group for your VPC is associated.

  1. Choose Create Endpoint.

When the Status changes to available, your VPC endpoint is ready for use.

  1. Choose the Policy tab to apply more restrictive access control to the VPC endpoint.

The following example policy limits VPC endpoint access to only the DetectDocumentText API. An IAM principal, even with access to all Textract APIs, can still only access the specific API in the following policy using this VPC endpoint. This is an additional layer of access control applied at the VPC endpoint. You should apply the principle of least privilege when defining your own policy. For more information, see Controlling access to services with VPC endpoints.

{
    "Version": "2012-10-17",
    "Statement": [
        {
            "Action": [
                "textract:DetectDocumentText"
            ],
            "Resource": [
                "*"
            ],
            "Effect": "Allow",
            "Principal": "*"
        }
    ]
}

Now that you have set up your VPC endpoint, the following section shows you how to access Amazon Textract APIs from within that VPC using AWS PrivateLink.

Accessing Amazon Textract APIs via AWS PrivateLink

After you set up the relevant VPC endpoint policies, you have two options to configure endpoints in order to access Amazon Textract APIs:

The following code is an example AWS CLI command to run from within the VPC:

$ aws textract detect-document-text --document '{"S3Object":{"Bucket":"textract-test-bucket","Name":"example-doc.jpg"}}' --region us-east-2
  • You can also use the DNS name that was generated when creating the VPC endpoint. These DNS names are in the form of *.us-east-2.vpce.amazonaws.com or *.textract-fips.us-east-2.vpce.amazonaws.com. For example: vpce-0f1aa01f0ce676709-il663k5n.textract.us-east-2.vpce.amazonaws.com.

The following code is an example AWS CLI command to run from within the VPC:

aws textract detect-document-text --document '{"S3Object":{"Bucket":"textract-test-bucket","Name":"example-doc.jpg"}}' --region us-east-2 --endpoint https://vpce-05e9d346575f9cb38-1wdh6mi2.textract.us-east-2.vpce.amazonaws.com

Conclusion

You now have successfully configured a VPC endpoint for Amazon Textract in your AWS account. Traffic to Amazon Textract APIs from that VPC endpoint are only within the AWS network. The VPC endpoint policy you configured further allows you to restrict which Amazon Textract APIs are accessible from within that VPC.


About the Author

Raj Copparapu is a Product Manager focused on putting machine learning in the hands of every developer.


Thomas joined Amazon Web Services in 2016 initially working on Application Auto Scaling before moving into this current role at Textract. Before joining AWS, he worked in engineering roles in the domains of computer graphics and networking. Thomas holds a master’s degree in engineering from the university of Leuven in Belgium.


Read More

Announcing the AWS DeepComposer Chartbusters challenge, The Sounds of Science

Announcing the AWS DeepComposer Chartbusters challenge, The Sounds of Science

We’re excited to announce the next AWS DeepComposer Chartbusters challenge, in which developers interactively collaborate with AI using the new edit melody feature launching today! Chartbusters is a monthly challenge where you can use AWS DeepComposer to create original compositions on the console using machine learning techniques, compete to top the charts, and win prizes. Following the completion of the Bach to the Future and Spin the Model challenges, we’re thrilled to announce the launch of the third Chartbusters challenge: The Sounds of Science. This challenge launches today and participants can submit their compositions until September 23, 2020.

To improve your music creation experience, we’re offering the AWS DeepComposer keyboard at a special price of $89 for a limited time during September on amazon.com.

In this challenge, you need to create background music using AWS DeepComposer to accompany a short video clip. The Autoregressive CNN (AR-CNN) algorithm and newly released edit melody feature on the AWS DeepComposer console enables you to iterate on the musical quality while allowing you to retain creativity and uniqueness, as you create the perfect composition to match the video’s theme.

The following screenshot shows the new Edit melody option.

The AR-CNN algorithm in the AWS DeepComposer Music Studio enhances your original input melody by adding or removing notes, and makes the newly generated input melody sound more Bach-like. Next, you can use the edit melody feature to assist the AI by adding or removing specific notes or even change their pitch and length by using an interactive view of the input piano roll. The edit melody feature facilitates better human-AI collaboration by allowing you to correct mistakes made by the model during inference. You can then resubmit your newly modified track, and choose Enhance input melody to create another composition.

How to compete

To take part in The Sounds of Science, just do the following:

  1. Watch the competition video. Your goal is to create background music that best matches this video.
  2. Go to AWS DeepComposer Music Studio and create a melody with the keyboard, import a melody, or choose a sample melody on the console.
  3. Choose the Autoregressive generative AI technique, and then choose the Autoregressive CNN Bach. You have four parameters that you can choose to adjust: Maximum notes to add, Maximum notes to remove, Sampling iterations, and Creative risk.
  4. Choose the appropriate values and then choose Enhance input melody.
  5. Use the Edit melody feature to add or remove notes. You can also change the note duration and pitch.
  6. When finished, choose Apply changes.
  7. Repeat these steps until you’re satisfied with the generated music.

When you’re happy with your composition, you can submit to SoundCloud.

  1. On the navigation panel, choose Chartbusters and choose Submit a composition.
  2. Choose your composition from the drop-down menu, provide a track name for your composition, and choose Submit.

AWS DeepComposer then submits your composition to the Sounds of Science playlist on SoundCloud. You don’t need to submit the video.

Conclusion

Congratulations! You’ve successfully submitted your composition to the AWS DeepComposer Chartbusters challenge The Sounds of Science. Invite your friends and family to listen to your creation on SoundCloud and vote on it!

To learn more about the different generative AI techniques supported by AWS DeepComposer, check out the learning capsules available on the AWS DeepComposer console.


About the Authors

Rahul Suresh is an Engineering Manager with the AWS AI org, where he has been working on AI based products for making machine learning accessible for all developers. Prior to joining AWS, Rahul was a Senior Software Developer at Amazon Devices and helped launch highly successful smart home products. Rahul is passionate about building machine learning systems at scale and is always looking for getting these advanced technologies in the hands of customers. In addition to his professional career, Rahul is an avid reader and a history buff.


Maryam Rezapoor is a Senior Product Manager with AWS AI Ecosystem team. As a former biomedical researcher and entrepreneur, she finds her passion in working backward from customers’ needs to create new impactful solutions. Outside of work, she enjoys hiking, photography, and gardening.


Read More