Join AWS and NVIDIA at GTC, October 5–9

Join AWS and NVIDIA at GTC, October 5–9

Starting Monday, October 5, 2020, the NVIDIA GPU Technology Conference (GTC) is offering online sessions for you to learn AWS best practices to accomplish your machine learning (ML), virtual workstations, high performance computing (HPC), and internet of things (IoT) goals faster and more easily.

Amazon Elastic Compute Cloud (Amazon EC2) instances powered by NVIDIA GPUs deliver the scalable performance needed for fast ML training, cost-effective ML inference, flexible remote virtual workstations, and powerful HPC computations. At the edge, you can use AWS IoT Greengrass and SageMaker Neo to extend a wide range of AWS Cloud services and ML inference to NVIDIA-based edge devices so the devices can act locally on the data they generate.

AWS is a Global Diamond Sponsor of the conference.

Available sessions

The following sessions are available from AWS:

A Developer’s Guide to Choosing the Right GPUs for Deep Learning (Scheduled session IDs: A22318, A22319, A22320, and A22321)

  • As a deep learning developer or data scientist, you can choose from multiple GPU EC2 instance types based on your training and deployment requirements. You can access instances with different GPU memory sizes, NVIDIA GPU architectures, capabilities (precisions, Tensor Cores, NVLink), GPUs per instance, number of vCPUs, system memory, and network bandwidth. We’ll share some guidance on how you can choose the right GPU instance on AWS for your deep learning projects. You’ll get all the information you need to make an informed choice for GPU instance for your training and inference workload.
  • Speaker: Shashank Prasanna, Senior Developer Advocate, AI/ML, Amazon Web Services

Virtual Workstations on AWS for Digital Content Creation (On-Demand session IDs: A22276, A22311, A22312, and A22314)

  • Virtual workstations on AWS enable studios, departments, and freelancers to take on bigger projects, work from anywhere, and pay only for what they need. Running on Amazon EC2 G4 instances, virtual workstations employ the power of NVIDIA T4 Tensor Core GPUs and Quadro technology, the visual computing platform trusted by creative and technical professionals. Virtual workstations have become essential to creative professionals seeking cloud solutions that enable remote teams to work more efficiently, and keep creative productions moving forward. Join this session to learn more about how virtual workstations on AWS work, who is using them today, and how to get started.
  • Speaker: Haley Kannall, CG Supervisor, Amazon Web Services

Empower DeepStream Applications with AWS Data Services (On-Demand session IDs: A22279, A22315, A22316, and A22317)

  • We’ll discuss how we can optimize edge video inferencing performance by leveraging AWS infrastructure and NVIDA Deepstream. We’ll emphasize three major features at the edge: (1) massively deploying trained models to NVIDIA Jetson devices using AWS IoT Greengrass, (2) local communication and control between AWS IoT Greengrass engines and Deepstream applications through MQTT messaging, and (3) uploading inferencing results to the cloud for further analytics.
  • Speaker: Yuxin Yang, IoT Architect, Amazon Web Services

GPU-Powered Edge Computing Applications Enabled by AWS Wavelength (On-Demand session IDs: A22374, A22375, A22376, and A22377)

  • In this presentation, we provide an overview of AWS Wavelength, how it integrates with the Mobile Edge carrier network and improves the performance of Mobile Edge applications. Wavelength Zones are AWS infrastructure deployments that embed AWS compute and storage services within telecommunications providers’ datacenters at the edge of the 5G network, so application traffic can reach application servers running in Wavelength Zones without leaving the mobile providers’ network. Customers with edge data processing needs such as image and video recognition, inference, data aggregation, and responsive analytics can use Wavelength to perform low-latency operations and processing right where their data is generated, reducing the need to move large amounts of data to be processed in centralized locations. We deep dive into these Mobile Edge applications running at the AWS Wavelength Zones using Amazon EC2 G4 instances powered by NVIDIA T4 Tensor Core GPUs.
  • Speaker: Sebastian Dreisch, Head of Wavelength GTM, Amazon Web Services

Next Generation Cloud Platform for Autonomous Vehicle (AV) Development (Scheduled session ID: A21517)

  • Development of autonomous driving systems presents a massive computational challenge, including processing petabytes of sensor data, which impacts time to market, scale, and cost, throughout the development cycle. Training, testing, validating, and deploying self-driving systems requires large-scale compute and storage infrastructure to support the end-to-end workflow. AWS offers a highly scalable and reliable solution for AV development including the latest generation GPUs from NVIDIA. By attending this webinar, you will learn about AWS AV solution architectures for data ingest, data management, simulation, and distributed model training, as well as strategies for cost optimization. NVIDIA will share new details about the next generation NVIDIA Ampere (A100) architecture. Attendees will walk away with an understanding of how AWS and NVIDIA can help streamline AV development and reduce IT costs and time-to-market.
  • Speakers: Shyam Kumar, Principal HPC Business Development Manager, Amazon Web Services, and Norm Marks, Global Senior Director, Automotive Industry, NVIDIA

Embracing Volatility: Using ML to Become More Efficient Amid Epic Uncertainty (Scheduled session ID: A22219)

  • We’re all used to change. In business, change is often predictable—different seasons, large-scale events, and new releases all drive fluctuations we’re used to. But right now, there’s nothing normal about the changes you’re facing. The only constant is uncertainty. And uncertainty is expensive. In the absence of an omniscient crystal ball, the next best thing is cloud and ML. This presentation is going to cover how to deal with the unexpected. Whether it’s rapidly changing traffic, shifting data sources, or model drift, we’ll cover how you can better manage spikes and dips of all sizes and improve predictions with AI to maximize your efficiencies today.
  • Speaker: Allie Miller, US Head of ML Business Development for Startups and Venture Capital at AWS, Amazon Web Services

Accelerating Data Science with NVIDIA RAPIDS (Scheduled session ID: A22042)

  • Data science workflows have become increasingly computationally intensive in recent years, and GPUs have stepped up to address this challenge. With the RAPIDS suite of open-source software libraries and APIs, data scientists can run end-to-end data science and analytics pipelines entirely on GPUs, allowing organizations to deliver results faster than ever. The AWS Cloud lets you access a large number of powerful NVIDIA GPUs with Amazon EC2 P3 based on V100 GPUs, Amazon EC2 G4 based on T4 GPUs, and upcoming A100-based GPU instances. We’ll go through the end-to-end process of running on RAPIDS on AWS. We’ll start by running RAPIDS libraries on a single GPU instance. Next, we’ll see how you can run large-scale hyperparameter search experiments with RAPIDS and Amazon SageMaker. Finally, we’ll run RAPIDS distributed ML using Dask clusters on Amazon EKS and Amazon ECS.
  • Speaker: Shashank Prasanna, Senior Developer Advocate, AI/ML, Amazon Web Services

Interactive Scientific Visualization on AWS with NVIDIA IndeX SDK (On-Demand session ID: A21610)

  • Scientific visualization is critical to understanding complex phenomena modeled using HPC simulations. However, it has been challenging to do this effectively due to the inability to visualize large data volumes (> 1 PB) and lack of collaborative workflow solutions. NVIDIA IndeX on AWS, a 3D volumetric interactive visualization toolkit, addresses these problems by providing a scalable scientific visualization solution. NVIDIA IndeX allows you to make real-time modifications and navigate to the most pertinent parts of the data to gather better insights faster. IndeX leverages GPU clusters for scalable, real-time visualization and computing of multi-valued volumetric data together with embedded geometry data. We’ll demonstrate 3D volume rendering at scale on AWS using IndeX.
  • Speakers: Karthik Raman, Senior Solutions Architect, HPC, Amazon Web Services, and Dragos Tatulea, Software Engineer, NVIDIA

Conclusion

You can also visit AWS and NVIDIA to learn more or apply for a free trial to use NVIDIA GPU-based Amazon EC2 P3 instances powered by NVIDIA V100 Tensor Core GPUs and Amazon EC2 G4 instances powered by NVIDIA T4 Tensor Core GPUs. Learn more about GTC on the GTC 2020 website. We look forward to seeing you there!


About the Author

Geoff Murase is a Senior Product Marketing Manager for AWS EC2 accelerated computing instances, helping customers meet their compute needs by providing access to hardware-based compute accelerators such as Graphics Processing Units (GPUs) or Field Programmable Gate Arrays (FPGAs). In his spare time, he enjoys playing basketball and biking with his family.

Read More

Optimizing TensorFlow Lite Runtime Memory

Optimizing TensorFlow Lite Runtime Memory

Posted by Juhyun Lee and Yury Pisarchyk, Software Engineers

Running inference on mobile and embedded devices is challenging due to tight resource constraints; one has to work with limited hardware under strict power requirements. In this article, we want to showcase improvements in TensorFlow Lite’s (TFLite) memory usage that make it even better for running inference at the edge.

Intermediate Tensors

Typically, a neural network can be thought of as a computational graph consisting of operators, such as CONV_2D or FULLY_CONNECTED, and tensors holding the intermediate computation results, called intermediate tensors. These intermediate tensors are typically pre-allocated to reduce the inference latency at the cost of memory space. However, this cost, when implemented naively, can’t be taken lightly in a resource-constrained environment; it can take up a significant amount of space, sometimes even several times larger than the model itself. For example, the intermediate tensors in MobileNet v2 take up 26MB memory (Figure 1) which is about twice as large as the model itself.

Figure 1. The intermediate tensors of MobileNet v2 (top) and a mapping of their sizes onto a 2D memory space (bottom). If each intermediate tensor uses a dedicated memory buffer (depicted with 65 distinct colors), they take up ~26MB of runtime memory.

The good news is that these intermediate tensors don’t have to co-exist in memory thanks to data dependency analysis. This allows us to reuse the memory buffers of the intermediate tensors and reduce the total memory footprint of the inference engine. If the network has the shape of a simple chain, two large memory buffers are sufficient as they can be swapped back and forth interchangeably throughout the network. However, for arbitrary networks forming complicated graphs, this NP-complete resource allocation problem requires a good approximation algorithm.

We have devised a number of different approximation algorithms for this problem, and they all perform differently depending on the neural network and the properties of memory buffers, but they all use one thing in common: tensor usage records. A tensor usage record of an intermediate tensor is an auxiliary data structure that contains information about how big the tensor is and when it is used for the first and the last time in a given execution plan of the network. With the help of these records, the memory manager is able to compute the intermediate tensor usages at any moment in the network’s execution and optimize its runtime memory for the smallest footprint possible.

Shared Memory Buffer Objects

In TFLite GPU OpenGL backend, we employ GL textures for these intermediate tensors. These come with a couple of interesting restrictions: (a) A texture’s size can’t be modified after its creation, and (b) only one shader program gets exclusive access to the texture object at a given time. In this Shared Memory Buffer Objects mode, the objective is to minimize the sum of the sizes of all created shared memory buffer objects in the object pool. This optimization is similar to the well-known register allocation problem, except that it’s much more complicated due to the variable size of each object.

With the aforementioned tensor usage records, we have devised 5 different algorithms as shown in Table 1. Except for Min-Cost Flow, they are greedy algorithms, each using a different heuristic, but still reaching or getting very close to the theoretical lower bound. Some algorithms perform better than others depending on the network topology, but in general, GREEDY_BY_SIZE_IMPROVED and GREEDY_BY_BREADTH produce the object assignments with the smallest memory footprint.

Table 1. Memory footprint of Shared Objects strategies (in MB; best results highlighted in green). The first 5 rows are our strategies, and the last 2 serve as a baseline (Lower Bound denotes an approximation of the best number possible which may not be achievable, and Naive denotes the worst number possible with each intermediate tensor assigned its own memory buffer).

Coming back to our opening example, GREEDY_BY_BREADTH performs best on MobileNet v2 which leverages each operator’s breadth, i.e. the sum of all tensors in the operator’s profile. Figure 2, especially when compared to Figure 1, highlights how big of a gain one can get when employing a smart memory manager.

Figure 2. The intermediate tensors of MobileNet v2 (top) and a mapping of their sizes onto a 2D memory space (bottom). If the intermediate tensors share memory buffers (depicted with 4 distinct colors), they only take up ~7MB of runtime memory.

Memory Offset Calculation

For TFLite running on the CPU, the memory buffer properties applicable to GL textures don’t apply. Thus, it is more common to allocate a huge memory arena upfront and have it shared among all readers and writers which access it by a given offset that does not interfere with other read and writes. The objective in this Memory Offset Calculation approach is to minimize the size of the memory arena.

We have devised 3 different algorithms for this optimization problem and have also explored prior work (Strip Packing by Sekiyama et al. 2018). Similar to the Shared Objects approach, some algorithms perform better than others depending on the network as shown in Table 2. One takeaway from this investigation is that the Offset Calculation approach has a smaller footprint than the Shared Objects approach in general, and thus, one should prefer the former over the latter if applicable.

Table 2. Memory footprint of Offset Calculation strategies (in MB; best results highlighted in green). The first 3 rows are our strategies, the next 1 is prior work, and the last 2 serve as baseline (Lower Bound denotes an approximation of the best number possible which may not be achievable, and Naive denotes the worst number possible with each intermediate tensor assigned its own memory buffer).

These memory optimizations, for both CPU and GPU, have shipped by default with the last few stable TFLite releases, and have proven valuable in supporting more demanding, state-of-the-art models like MobileBERT. You can find more details about the implementation by looking at the GPU implementation and CPU implementation directly.

Acknowledgements

Matthias Grundmann, Jared Duke, Sarah Sirajuddin, and special thanks to Andrei Kulik for initial brainstorming and Terry Heo for the final implementation in TFLite.

Read More

Building an end-to-end intelligent document processing solution using AWS

Building an end-to-end intelligent document processing solution using AWS

As organizations grow larger in size, so does the need for having better document processing. In industries such as healthcare, legal, insurance, and banking, the continuous influx of paper-based or PDF documents (like invoices, health charts, and insurance claims) have pushed businesses to consider evolving their document processing capabilities. In such scenarios, businesses and organizations find themselves in a race against time to deploy a sophisticated document analysis pipeline that can handle these documents in an automated and scalable fashion.

You can use Amazon Textract and Amazon Augmented AI (Amazon A2I) to process critical documents and for your NLP-based entity recognition models with Amazon SageMaker Ground Truth, Amazon Comprehend, and Amazon A2I. This post introduces another way to create a retrainable end-to-end document analysis solution with Amazon Textract, Amazon Comprehend, and Amazon A2I.

This solution takes scanned images of physical documents as input and extracts the text using Amazon Textract. It sends the text to be analyzed by a custom entity recognizer trained in Amazon Comprehend. Machine Learning applications such as Amazon Comprehend work really well at scale, and in order to achieve 100% accuracy, you can use human reviewers to review and validate low confidence predictions. Additionally, you can use this human input to improve your underlying machine learning models. This is done by sending the output from Amazon Comprehend to be reviewed by human reviewers using Amazon A2I so that you can feed it back to retrain the models and improve the quality for future iterations. You can also use Amazon A2I to provide human oversight to your machine learning models and randomly send some data for human review to sample the output quality of your custom entity recognizer. This automated pipeline can scale to millions of documents with the help of these services and allow businesses to do more detailed analysis of their documents.

Solution overview

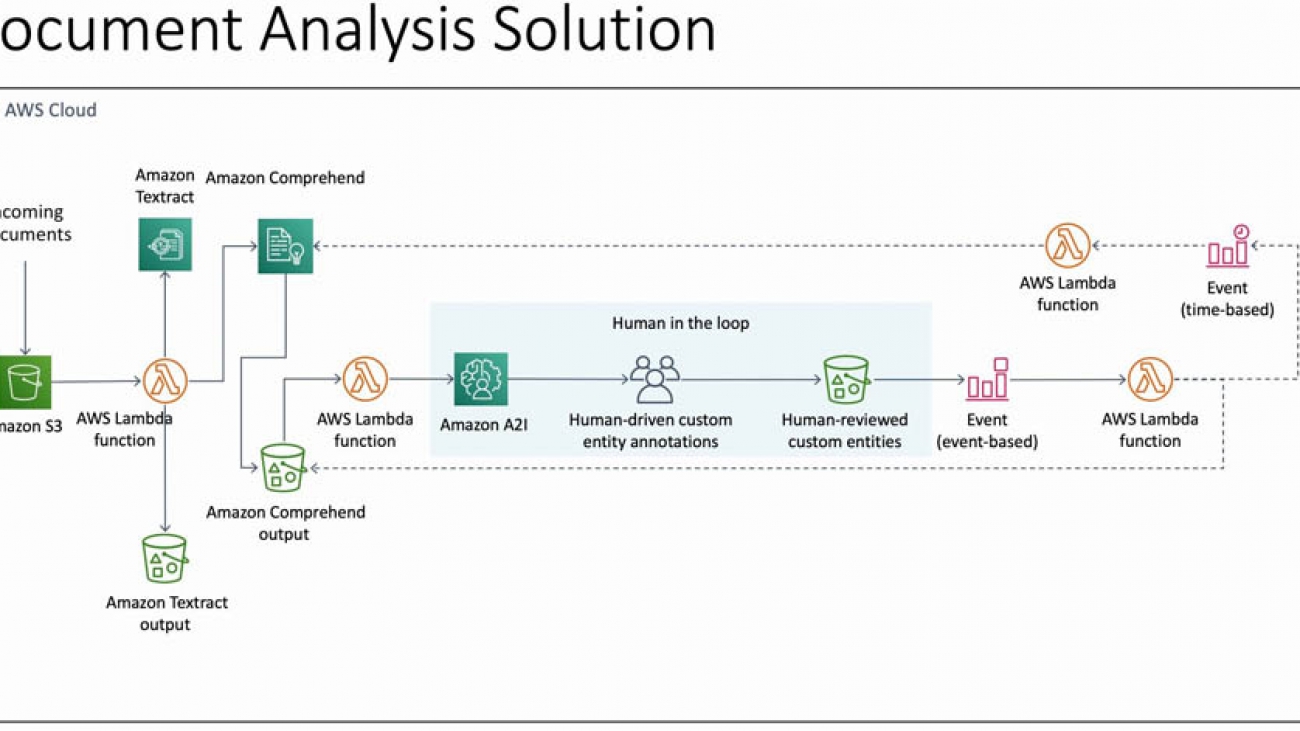
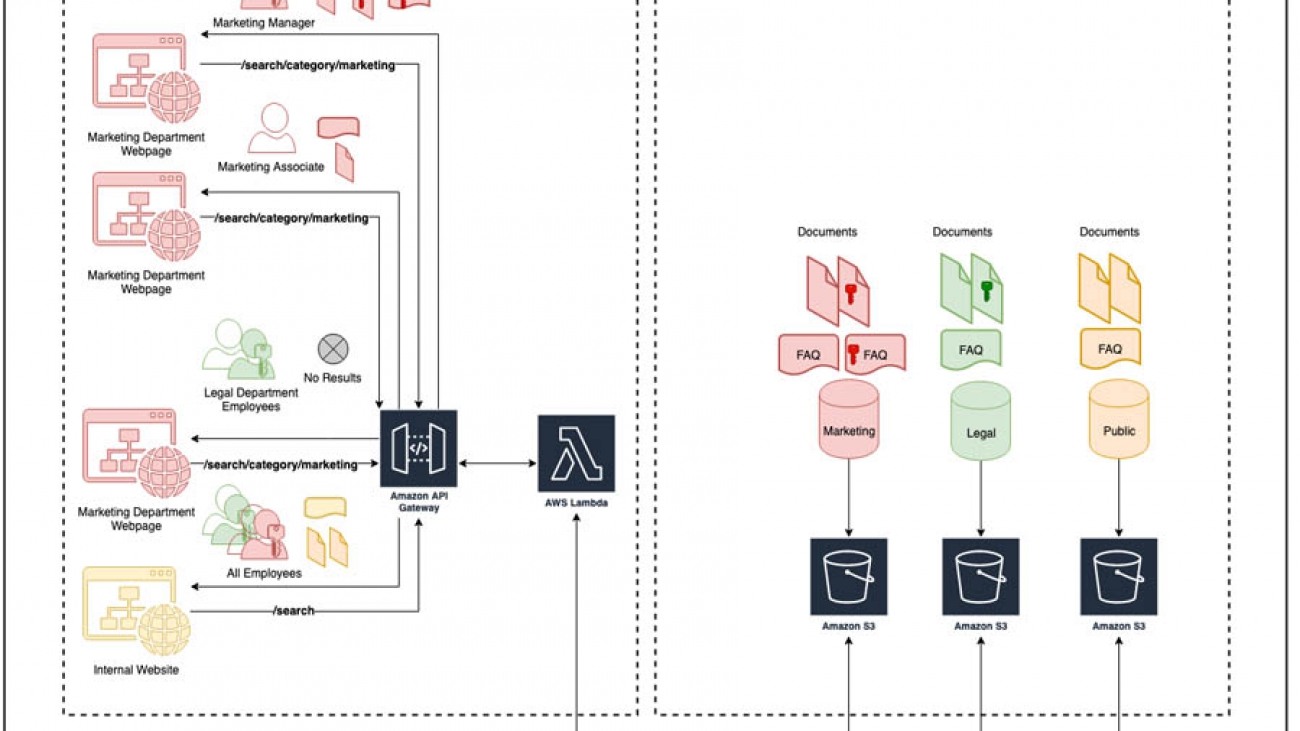
The following diagram illustrates the solution architecture.

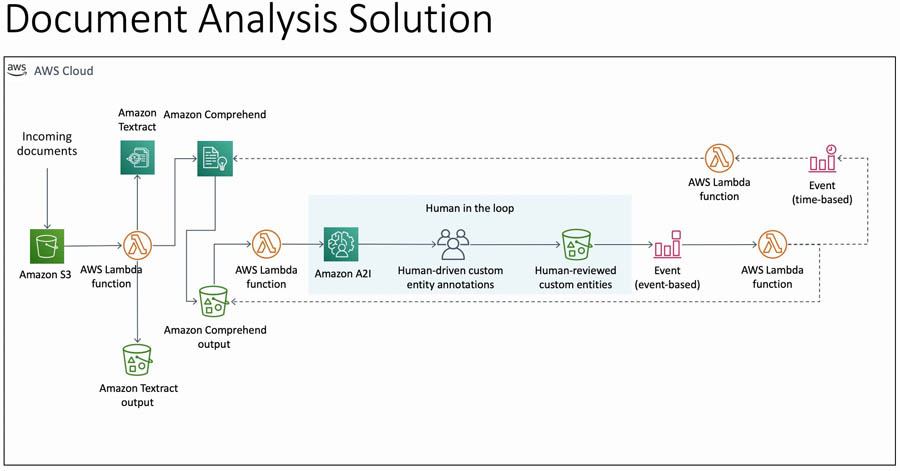
This solution takes images (scanned documents or screenshots or pictures of documents) as input. You can upload these files programmatically or through the AWS Management Console into an Amazon Simple Storage Service (Amazon S3) bucket in the input folder. This action triggers an AWS Lambda function, TextractComprehendLambda, through event notifications.

The TextractComprehendLambda function sends the image to Amazon Textract to extract the text from the image. When it acquires the results, it collates the results and sends the text to the Amazon Comprehend custom entity recognizer. The custom entity recognizer is a pre-trained model that identifies entities in the text that are valuable to your business. This post demonstrates how to do this, in detail, in the following sections.

The custom entity recognizer stores the results in a separate bucket, which acts as a temporary storage for this data. This bucket has another event notification, which triggers the ComprehendA2ILambda function. This Lambda function takes the output from the custom entity recognizer, processes it, and send the results to Amazon A2I by creating a human loop for review and verification.

Amazon A2I starts the human loop, providing reviewers an interface to double-check and correct the results that may not have been identified in the custom entity recognition process. These reviewers submit their responses through the Amazon A2I worker console. When the human loop is complete, Amazon A2I sends an Amazon CloudWatch event, which triggers the HumanReviewCompleted Lambda.

The HumanReviewCompleted function checks if the human reviewers have added any more annotations (because they found more custom entities). If the human reviewers found something that the custom entity recognizer missed, the function creates a new file called updated_entity_list.txt. This file contains all the entities that weren’t present in the previous training dataset.

At the end of each day, a CloudWatch alarm triggers the NewEntityCheck function. This function compares the entity_list.txt file and the updated_entity_list.txt file to check if any new entities were added in the last day. If so, it starts a new Amazon Comprehend custom entity recognizer training job and enables the CloudWatch time-based event trigger that triggers the CERTrainingCompleteCheck function every 15 minutes.

The CERTrainingCompleteCheck function checks if the Amazon Comprehend custom entity recognizer has finished training. If so, the function adds the entries from updated_entity_list.txt to entity_list.txt so it doesn’t train the model again, unless even more entities are found by the human reviewers. It also disables its own CloudWatch time-based event trigger, because it doesn’t need to check the training process until it starts again. The next invocation of the TextractComprehend function uses the new custom entity recognizer, which has learned from the previous reviews of the humans.

All these Lambda functions use AWS Systems Manager Parameter Store for sharing, retaining, and updating the various variables, like which custom entity recognizer is the current one and where all the data is stored.

We demonstrate this solution in the us-east-1 Region but, you can run it in any compatible Region. For more information about availability of services in your Region, see the AWS Region Table.

Prerequisites

This post requires that you have an AWS account with appropriate AWS Identity and Access Management (IAM) permissions to launch the AWS CloudFormation template.

Deploying your solution

To deploy your solution, you complete the following high-level steps:

  1. Create an S3 bucket.
  2. Create a custom entity recognizer.
  3. Create a human review workflow.
  4. Deploy the CloudFormation stack.

Creating an S3 bucket

You first create the main bucket for this post. You use it to receive the input (the original scans of documents), and store the outputs for each step of the analysis. The Lambda functions pick up the results at the end of each state and collate them for further use and record-keeping. For instructions on creating a bucket, see Create a Bucket.

Capture the name of the S3 bucket and save it to use later in this walkthrough. We refer this bucket as <primary_bucket> in this post. Replace this with the name of your actual bucket as you follow along.

Creating a custom entity recognizer

Amazon Comprehend allows you to bring your own training data, and train custom entity recognition models to customize the entity recognition process to your business-specific use cases. You can do this without having to write any code or have any in-house machine learning (ML) expertise. For this post, we provide a training dataset and document image, but you can use your own datasets when customizing Amazon Comprehend to suit your use case.

  1. Download the training dataset.
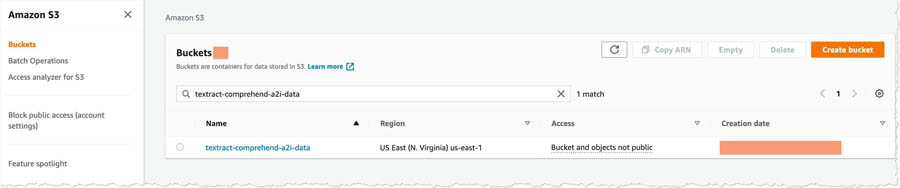
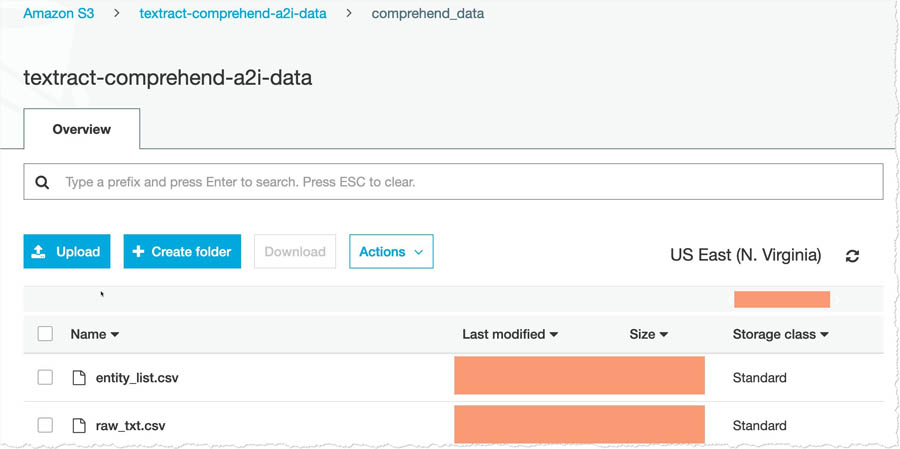
  2. Locate the bucket you created on the Amazon S3 console.

For this post, we use the bucket textract-comprehend-a2i-data, but you should use the name that you used for <primary_bucket>.

  1. Open the bucket and choose Create folder.
  2. For name, enter comprehend_data.

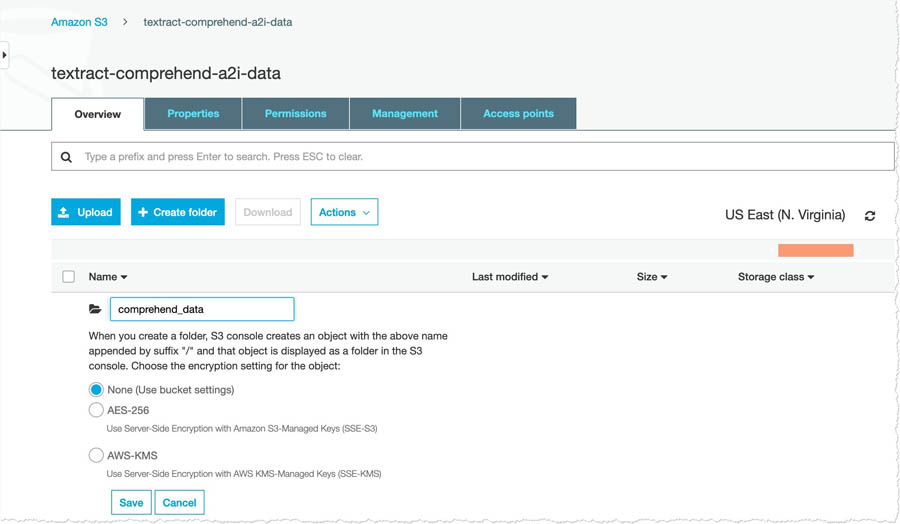
  1. Uncompress the file you downloaded earlier and upload the files to the comprehend_data folder.

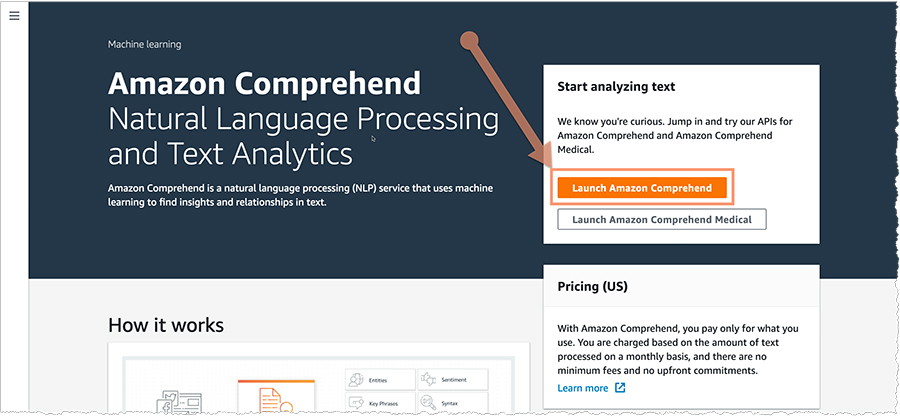
  1. On the Amazon Comprehend console, click on Launch Amazon Comprehend.

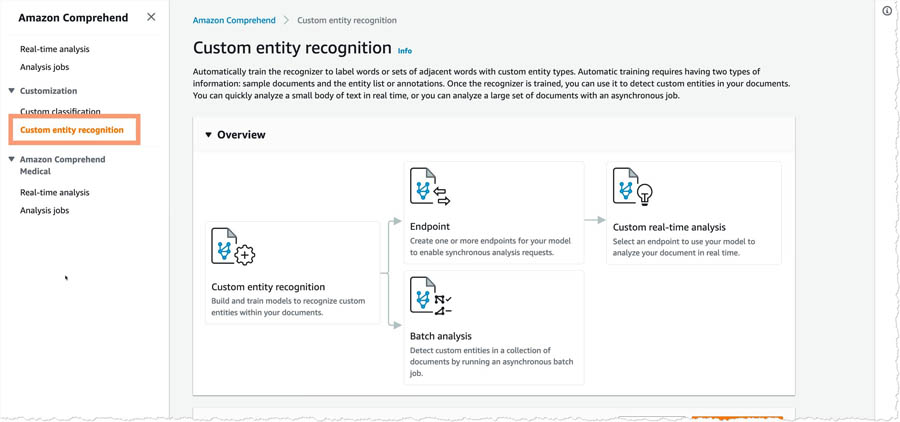
  1. Under Customization, choose Custom entity recognition.

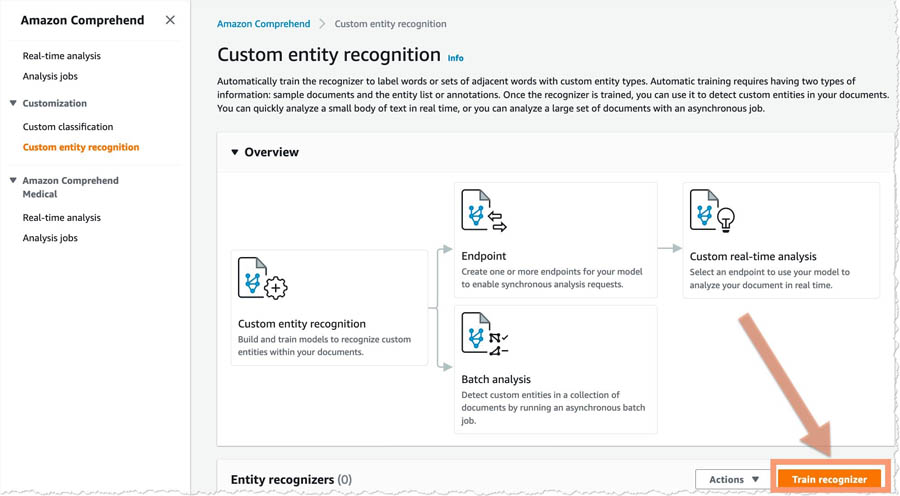
  1. Choose Train Recognizer to open the entity recognizer training page.

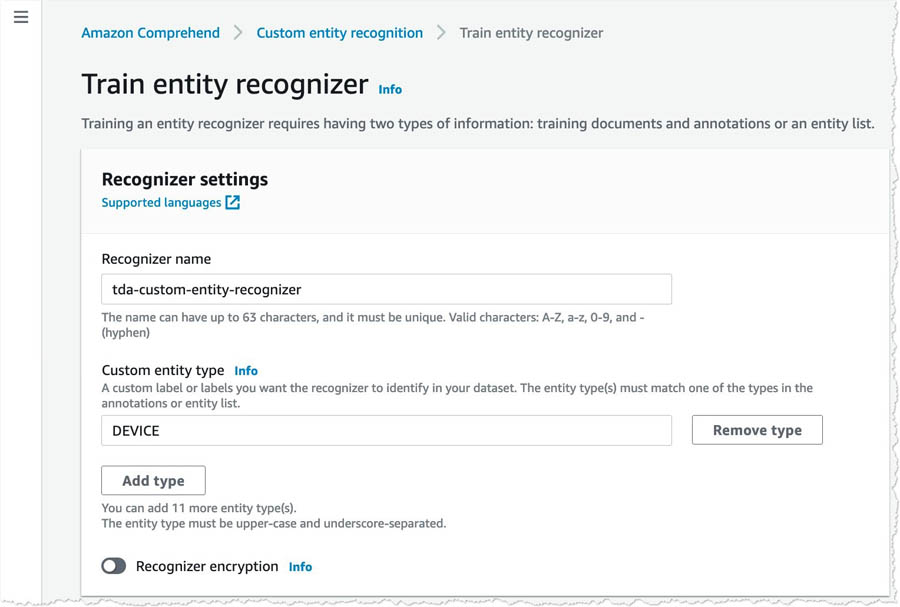
  1. For Recognizer name, enter a name.

The name that you choose appears in the console hereafter, so something human readable and easily identifiable is ideal.

  1. For Custom entity types, enter your custom entity type (for this post, we enter DEVICE).

At the time of this writing, you can have up to 25 entity types per custom entity recognizer in Amazon Comprehend.

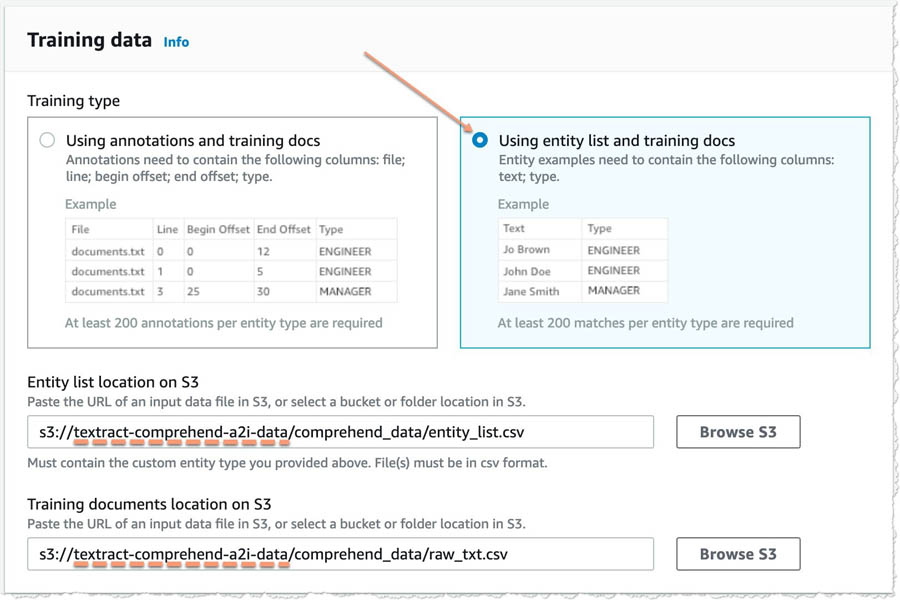
  1. In the Training data section, select Using entity list and training docs.
  2. Add the paths to entity_list.csv and raw_txt.csv for your <primary_bucket>.

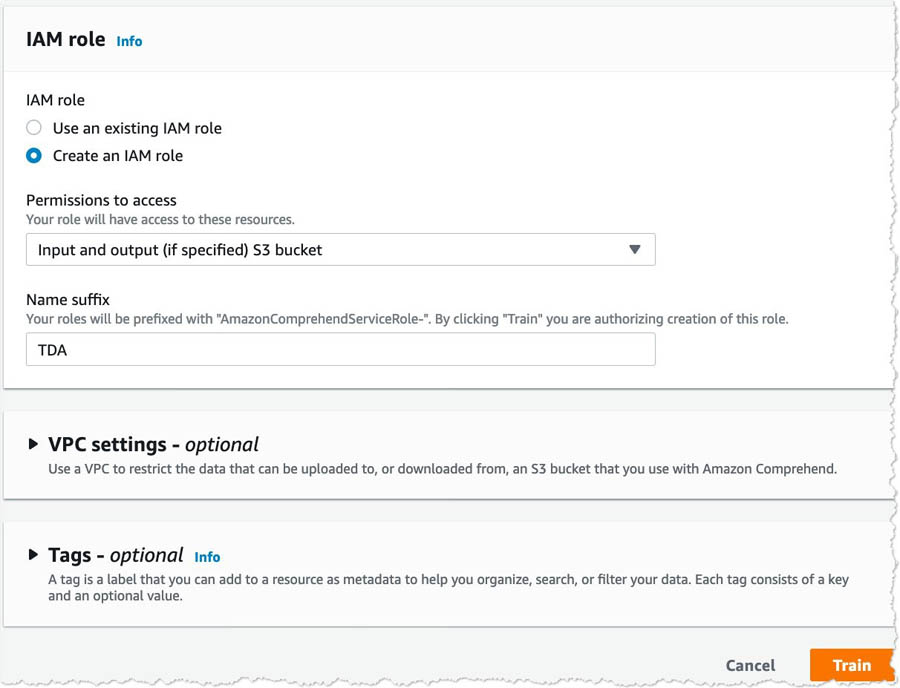
  1. In the IAM role section, select Create a new role.
  2. For Name suffix, enter a suffix you can identify later (for this post, we enter TDA).
  3. Leave the remaining settings as default and choose Train.

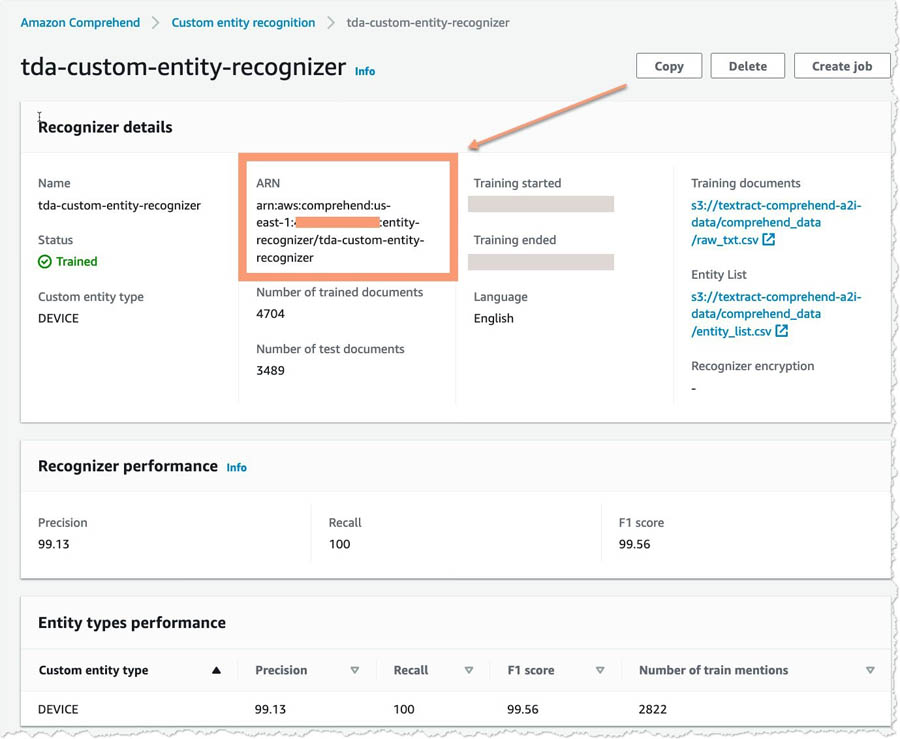
  1. When the training is complete, choose your recognizer and copy the ARN for your custom entity recognizer for future use.

Creating a human review workflow

To create a human review workflow, you need to have three things ready:

  • Reviewing workforce – A work team is a group of people that you select to review your documents. You can create a work team from a workforce, which is made up of Amazon Mechanical Turk workers, vendor-managed workers, or your own private workers that you invite to work on your tasks. Whichever workforce type you choose, Amazon A2I takes care of sending tasks to workers. For this post, you create a work team using a private workforce and add yourself to the team to preview the Amazon A2I workflow.
  • Worker task template – This is a template that defines what the console looks like to the reviewers.
  • S3 bucket – This is where the output of Amazon A2I is stored. You already created a bucket earlier, so this post uses the same bucket.

Creating a workforce

To create and manage your private workforce, you can use the Labeling workforces page on the Amazon SageMaker console. When following the instructions, you can create a private workforce by entering worker emails or importing a pre-existing workforce from an Amazon Cognito user pool.

If you already have a work team, you can use the same work team with Amazon A2I and skip to the following section.

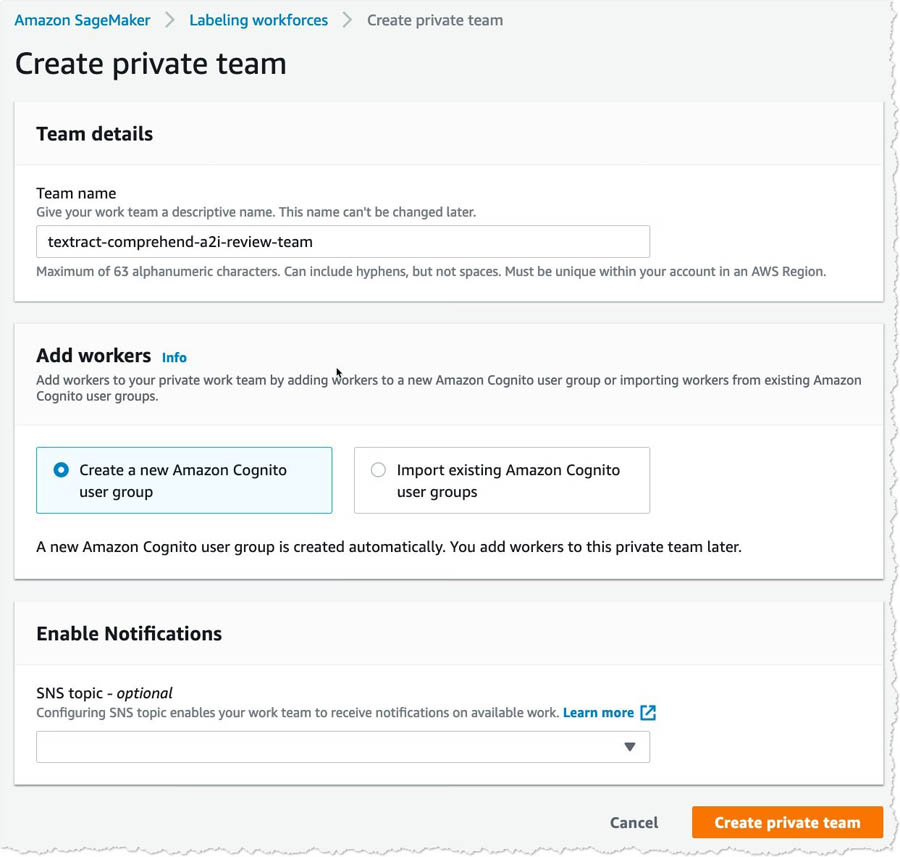
To create your private work team, complete the following steps:

  1. Navigate to the Labeling workforces page on the Amazon SageMaker console.
  2. On the Private tab, choose Create private team.

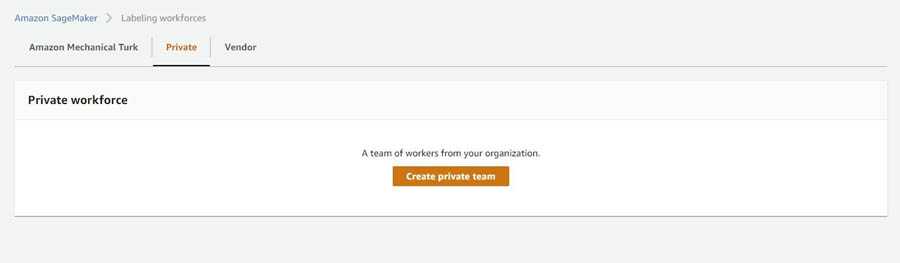
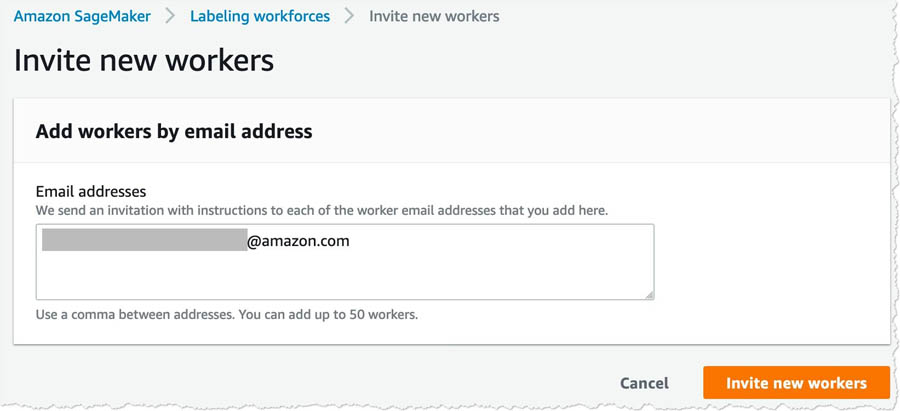
  1. Choose Invite new workers by email.
  2. For this post, enter your email address to work on your document processing tasks.

You can enter a list of up to 50 email addresses, separated by commas, into the Email addresses box.

  1. Enter an organization name and contact email.
  2. Choose Create private team.

  1. After you create a private team, choose the team to start adding reviewers to your private workforce.

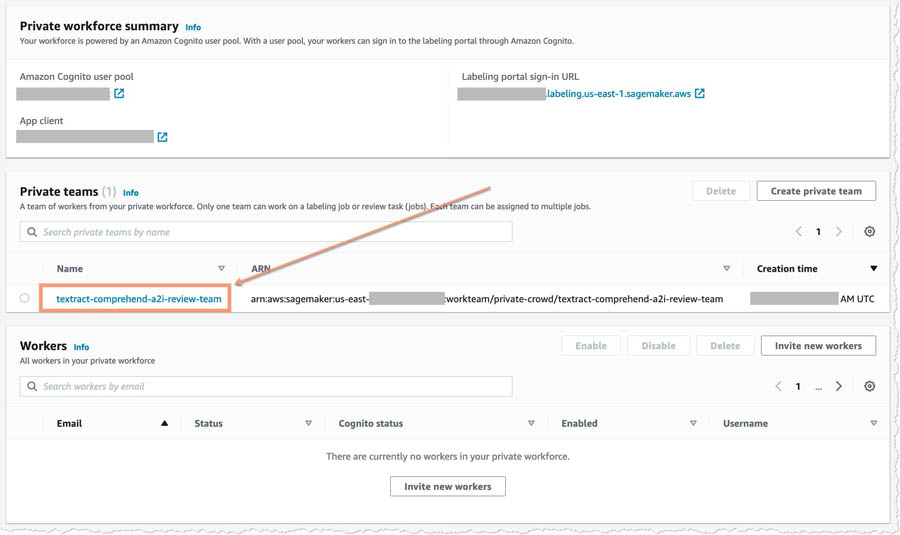
  1. On the Workers tab, choose Add workers to team.

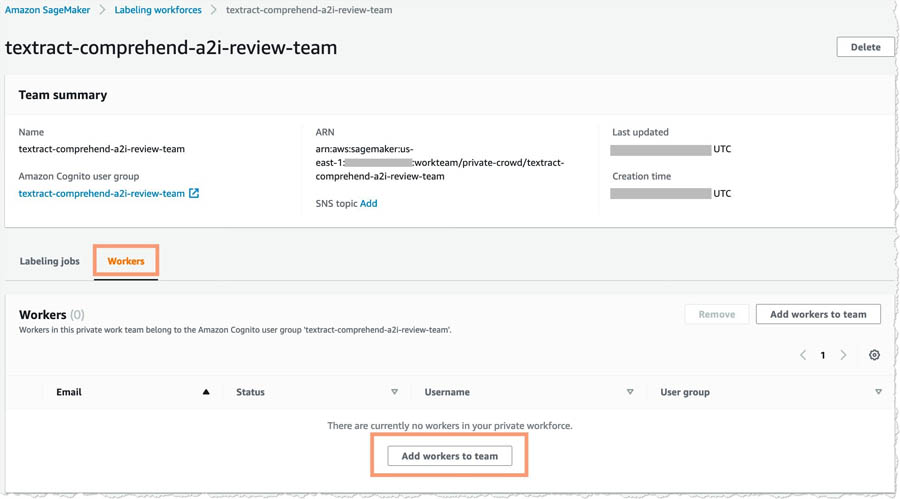
  1. Enter the email addresses you want to add and choose Invite new workers.

After you add the workers (in this case, yourself), you get an email invitation. The following screenshot shows an example email.

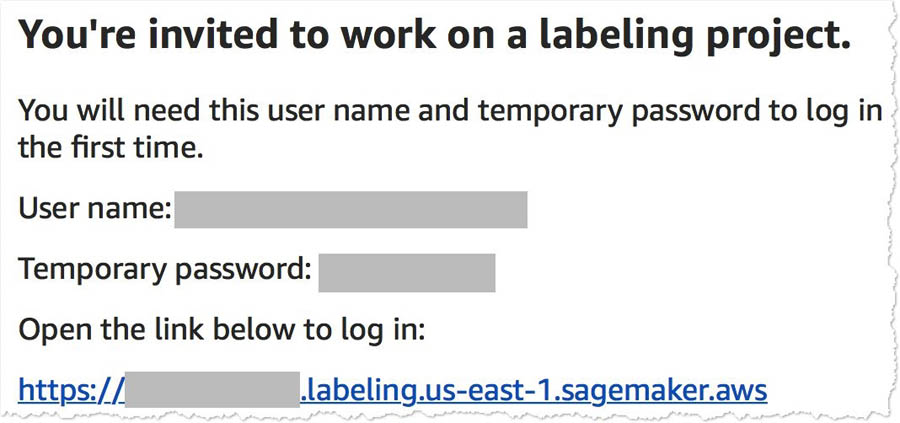
After you choose the link and change your password, you’re registered as a verified worker for this team. Your one-person team is now ready to review.

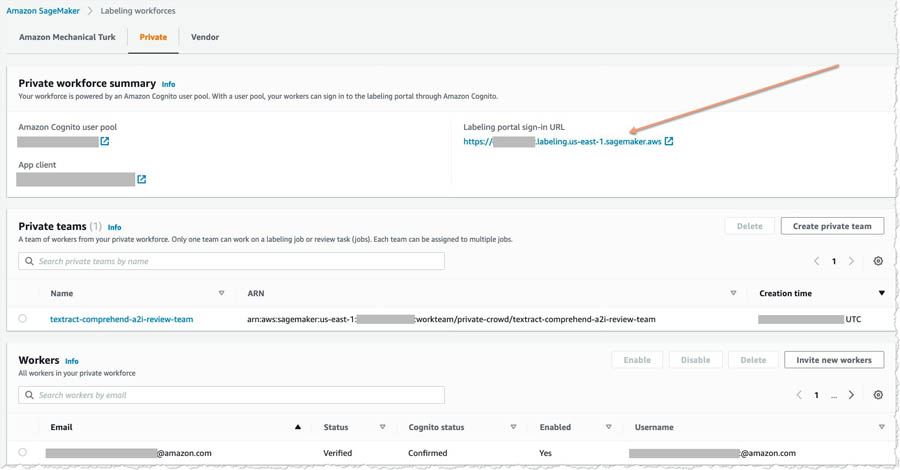
  1. Choose the link for Labeling Portal Sign-in URL and log in using the credentials generated in the previous step.

You should see a page similar to the following screenshot.

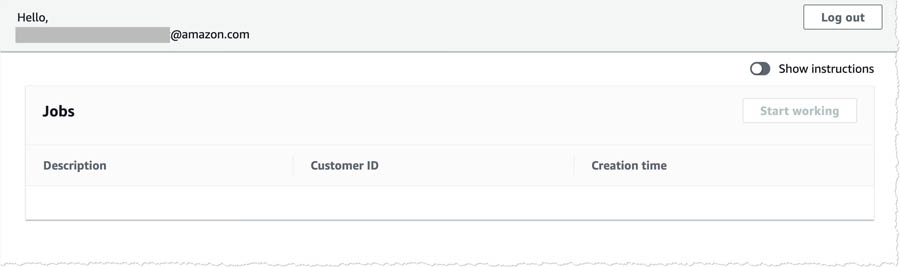
This is the Amazon A2I worker portal.

Creating a worker task template

You can use a worker template to customize the interface and instructions that your workers see when working on your tasks. To create a worker task template, complete the following steps:

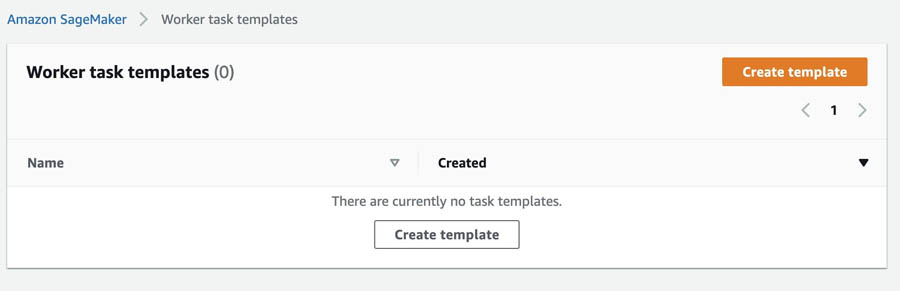
  1. Navigate to the Worker task templates page on the Amazon SageMaker console.

For this post, we use Region us-east-1. For availability details for Amazon A2I and Amazon Translate in your preferred Region, see the AWS Region Table.

  1. Choose Create template.

  1. For Template name, enter translate-a2i-template.

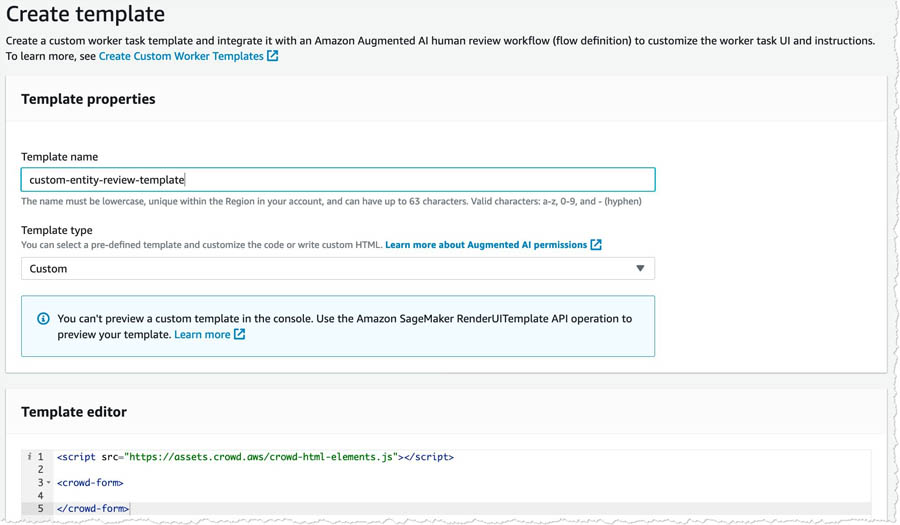
  1. In the Template editor field, enter the code from the following task-template.html.zip file:
<!-- Copyright Amazon.com, Inc. and its affiliates. All Rights Reserved.
SPDX-License-Identifier: MIT

Licensed under the MIT License. See the LICENSE accompanying this file
for the specific language governing permissions and limitations under
the License. -->

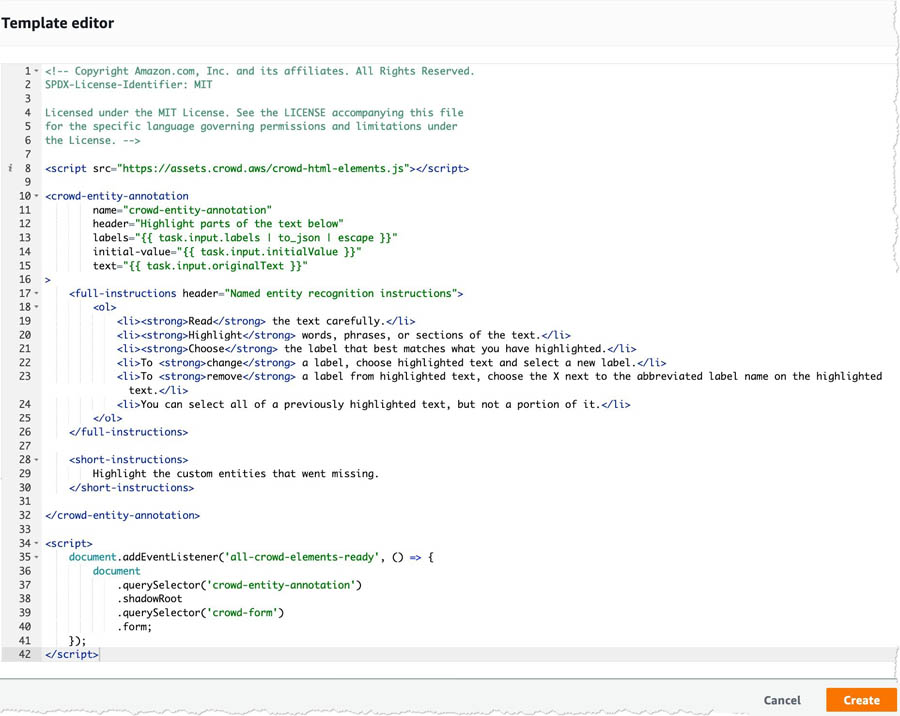
<script src="https://assets.crowd.aws/crowd-html-elements.js"></script>

<crowd-entity-annotation
        name="crowd-entity-annotation"
        header="Highlight parts of the text below"
        labels="{{ task.input.labels | to_json | escape }}"
        initial-value="{{ task.input.initialValue }}"
        text="{{ task.input.originalText }}"
>
    <full-instructions header="Named entity recognition instructions">
        <ol>
            <li><strong>Read</strong> the text carefully.</li>
            <li><strong>Highlight</strong> words, phrases, or sections of the text.</li>
            <li><strong>Choose</strong> the label that best matches what you have highlighted.</li>
            <li>To <strong>change</strong> a label, choose highlighted text and select a new label.</li>
            <li>To <strong>remove</strong> a label from highlighted text, choose the X next to the abbreviated label name on the highlighted text.</li>
            <li>You can select all of a previously highlighted text, but not a portion of it.</li>
        </ol>
    </full-instructions>

    <short-instructions>
        Highlight the custom entities that went missing.
    </short-instructions>

</crowd-entity-annotation>

<script>
    document.addEventListener('all-crowd-elements-ready', () => {
        document
            .querySelector('crowd-entity-annotation')
            .shadowRoot
            .querySelector('crowd-form')
            .form;
    });
</script>

  1. Choose Create

Creating a human review workflow

Human review workflows allow human reviewers to audit the custom entities that are detected using Amazon Comprehend on an ongoing basis. To create a human review workflow, complete the following steps:

  1. Navigate to the Human review workflow page the Amazon SageMaker console.
  2. Choose Create human review workflow.

  1. In the Workflow settings section, for Name, enter a unique workflow name.
  2. For S3 bucket, enter the S3 bucket where you want to store the human review results.

For this post, we use the same bucket that we created earlier, but add the suffix /a2i-raw-output. For example, if you created a bucket called textract-comprehend-a2i-data, enter the path s3://textract-comprehend-a2i-data/a2i-raw-output. This subfolder contains the edits that the reviewers make in all the human review workflow jobs that are created for Amazon Comprehend custom entity recognition. (Replace the bucket name with the value of <primary_bucket>.)

  1. For IAM role, choose Create a new role from the drop-down menu.

Amazon A2I can create a role automatically for you.

  1. For S3 buckets you specify, select Specific S3 buckets.
  2. Enter the name of the S3 bucket you created earlier (<primary_bucket>).
  3. Choose Create.

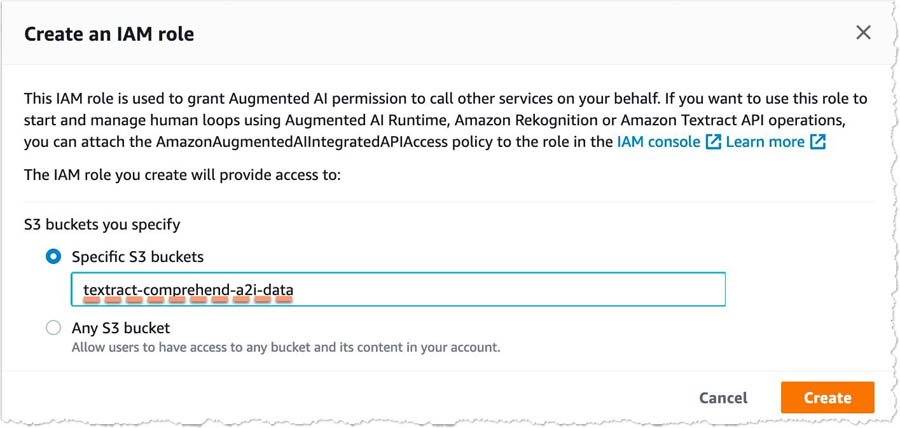
You see a confirmation when role creation is complete and your role is now pre-populated in the IAM role drop-down menu.

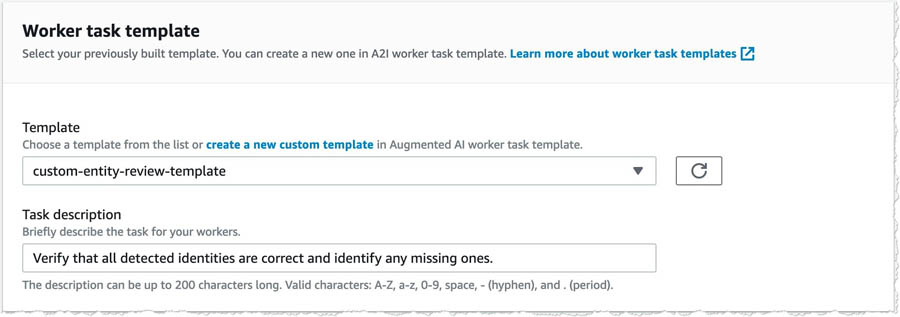
  1. For Task type, select Custom.

  1. In the Worker task template section, for Template, choose custom-entity-review-template.
  2. For Task description, add a description that briefly describes the task for your workers.

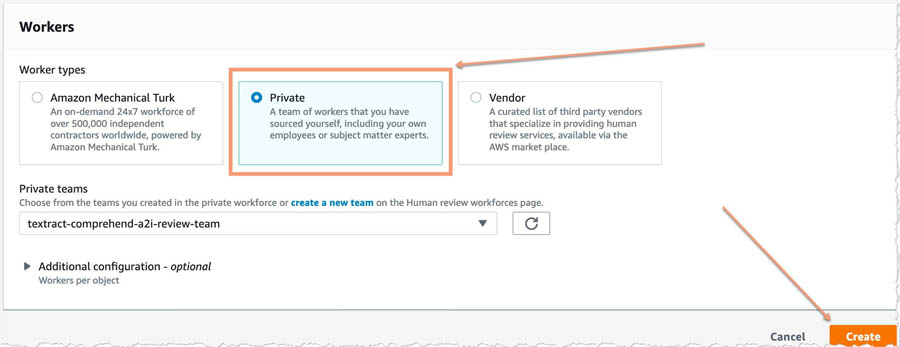
  1. In the Workers section, select
  2. For Private teams, choose textract-comprehend-a2i-review-team.
  3. Choose Create.

You see a confirmation when human review workflow creation is complete.

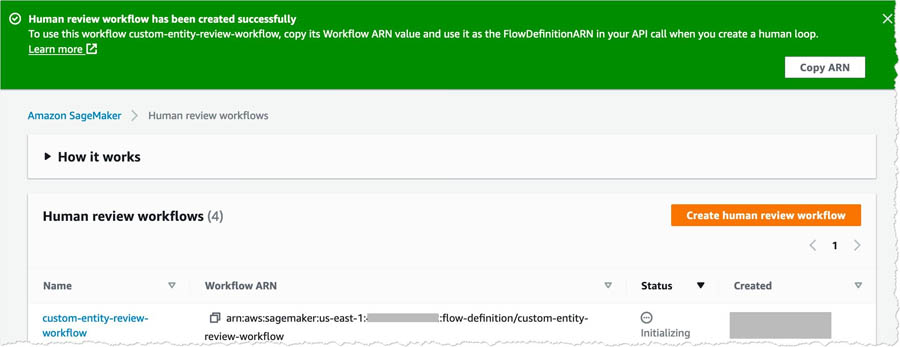
Copy the workflow ARN and save it somewhere. You need this in the upcoming steps. You also need to keep the Amazon A2I Worker Portal (created earlier) open and ready after this step.

Deploying the CloudFormation stack

Launch the following CloudFormation stack to deploy the stack required for running the entire flow:

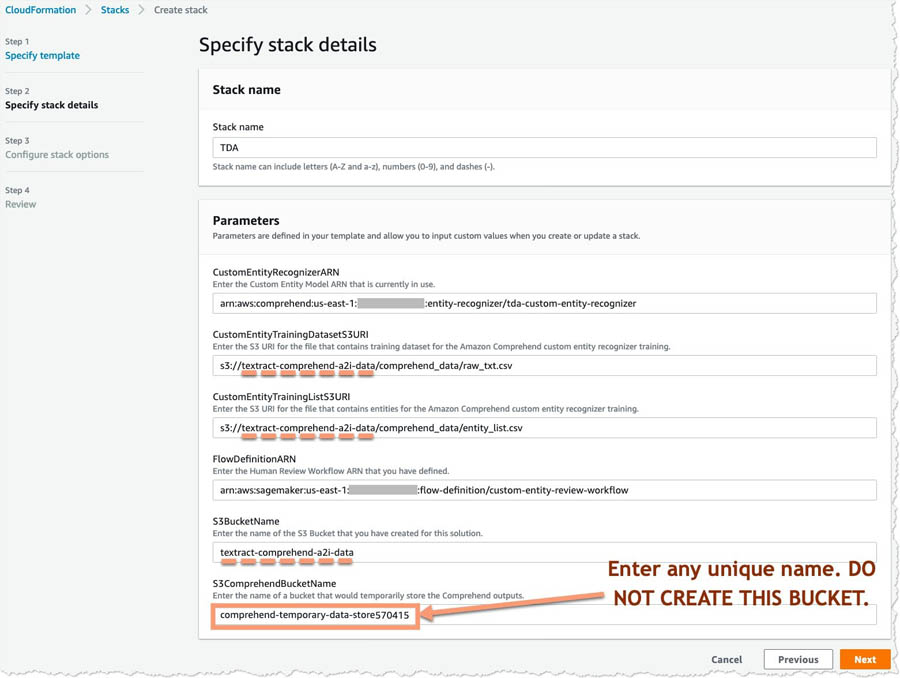
This creates the remaining elements for running your human review workflow for the custom entity recognizer. When creating the stack, enter the following values:

  • CustomEntityRecognizerARN – The ARN for the custom entity recognizer.
  • CustomEntityTrainingDatasetS3URI – The path to the training dataset that you used for creating the custom entity recognizer.
  • CustomEntityTrainingListS3URI – The path to the entity list that you used for training the custom entity recognizer.
  • FlowDefinitionARN – The ARN of the human review workflow.
  • S3BucketName – The name of the bucket you created.
  • S3ComprehendBucketName – A random name that must be unique so the template can create an empty S3 bucket to store temporary output from Amazon Comprehend in. You don’t need to create this bucket—the Cloudformation template does that for you, just provide a unique name here.

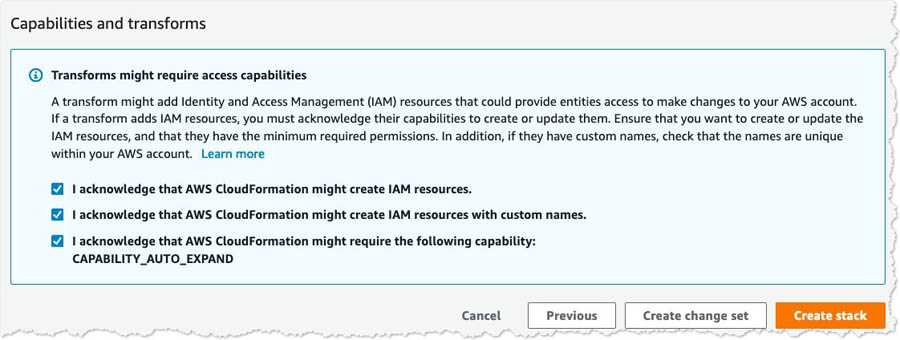
Choose the defaults of the stack deployment wizard. On the Review page, in the Capabilities and transforms section, select the three check-boxes and choose Create stack.

You need to confirm that the stack was deployed successfully on your account. You can do so by navigating to the AWS CloudFormation console and looking for the stack name TDA.

When the status of the stack changes to CREATE_COMPLETE, you have successfully deployed the document analysis solution to your account.

Testing the solution

You can now test the end-to-end flow of this solution. To test each component, you complete the following high-level steps:

  1. Upload a file.
  2. Verify the Amazon Comprehend job status.
  3. Review the worker portal.
  4. Verify the changes were recorded.

Uploading a file

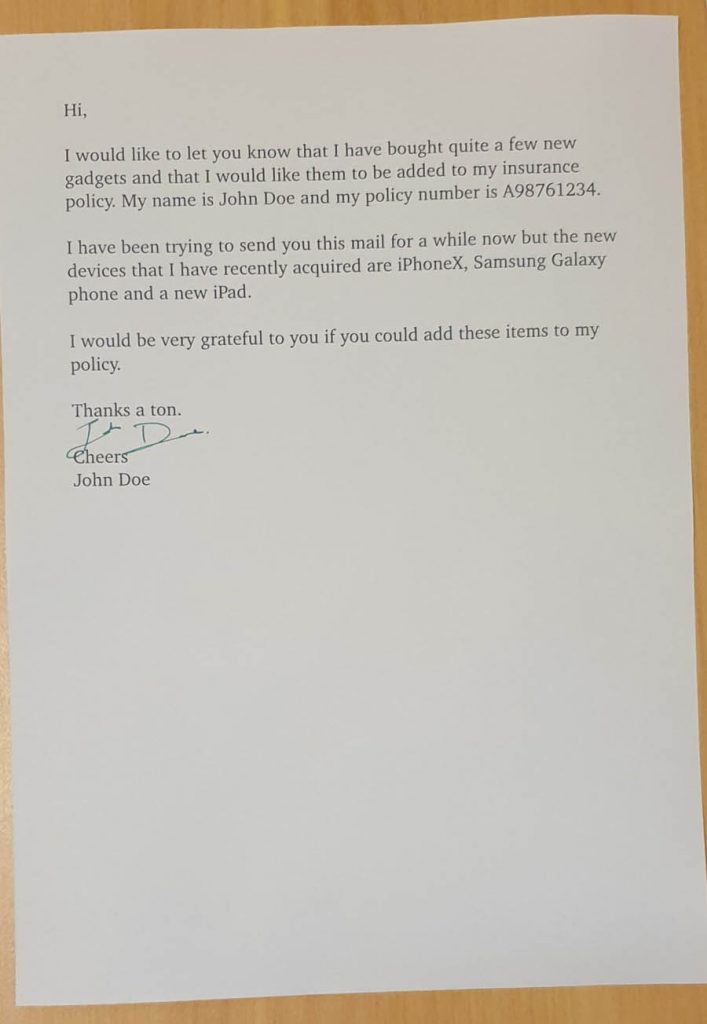
In real-world situations, when businesses receive a physical document, they scan, photocopy, email, or upload it to some form of an image-based format for safe-keeping as a backup mechanism. The following is the sample document we use in this post.

To upload the file, complete the following steps:

  1. Download the image.
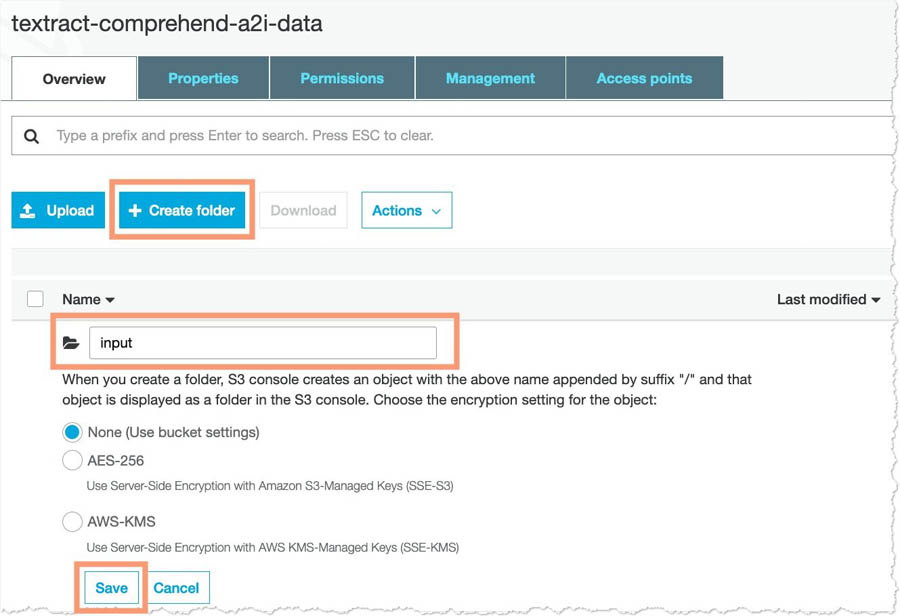
  2. On the Amazon S3 console, navigate to your <primary_bucket>.
  3. Choose Create folder.
  4. For Name, enter input.
  5. Choose Save.

  1. Upload the image you downloaded into this folder.

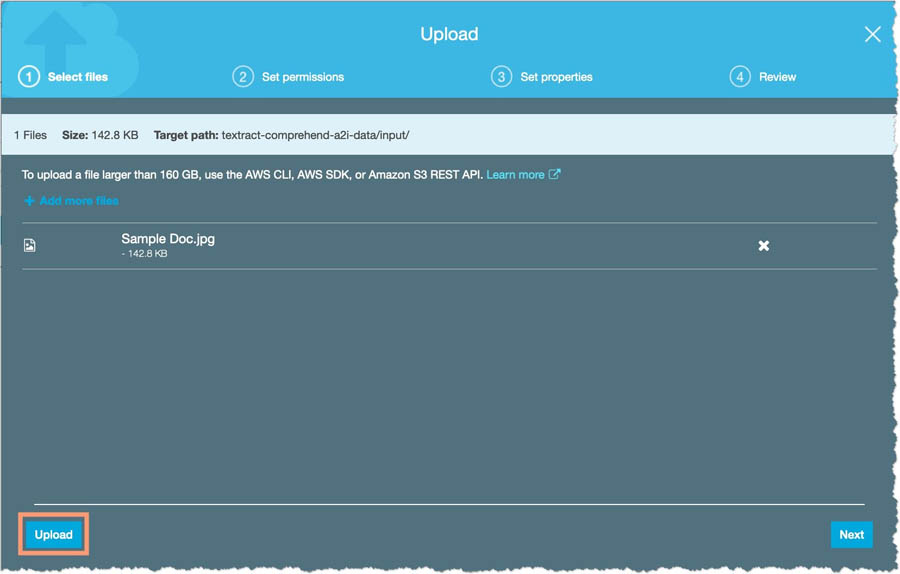
This upload triggers the TextractComprehendA2ILambda function, which sends the uploaded image to Amazon Textract and sends the response received from Amazon Comprehend.

Verifying Amazon Comprehend job status

You can now verify that the Amazon Comprehend job is working.

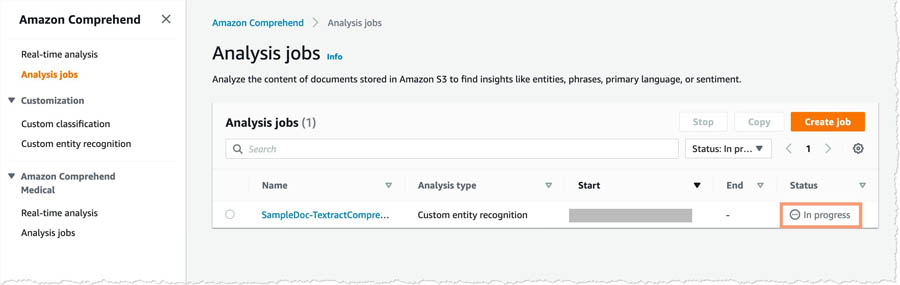
  1. On the Amazon Comprehend console, choose Analysis jobs.
  2. Verify that your job is in status In progress.

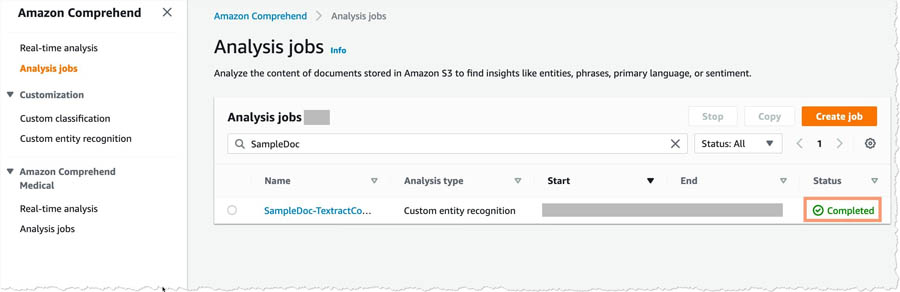
When the status switches to Completed, you can proceed to the next step.

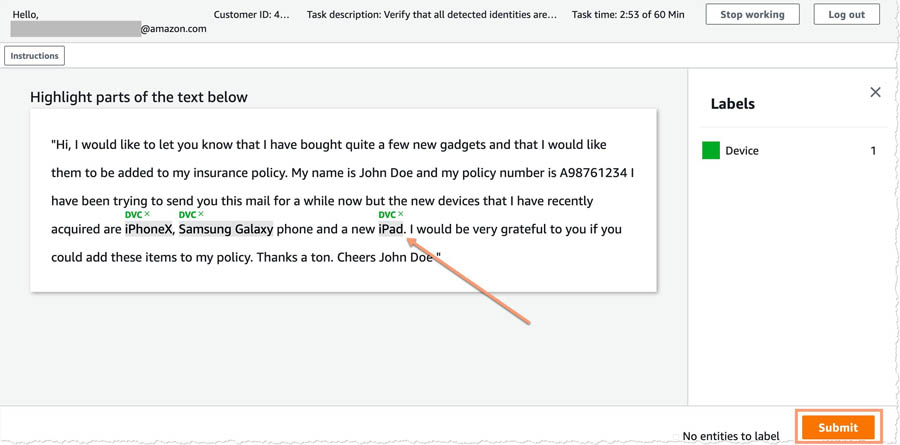
Reviewing the worker portal

You can now test out the human review worker portal.

  1. Navigate to the Amazon A2I worker portal that you created.

You should have a new job waiting to be processed.

  1. Select the job and choose Start working.

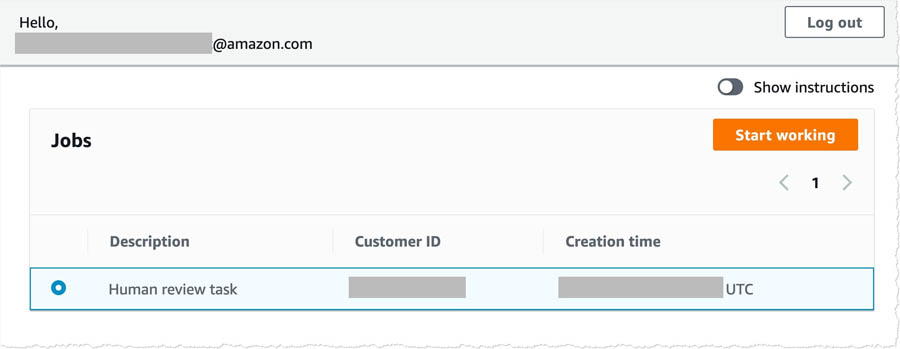
You’re redirected to the review screen.

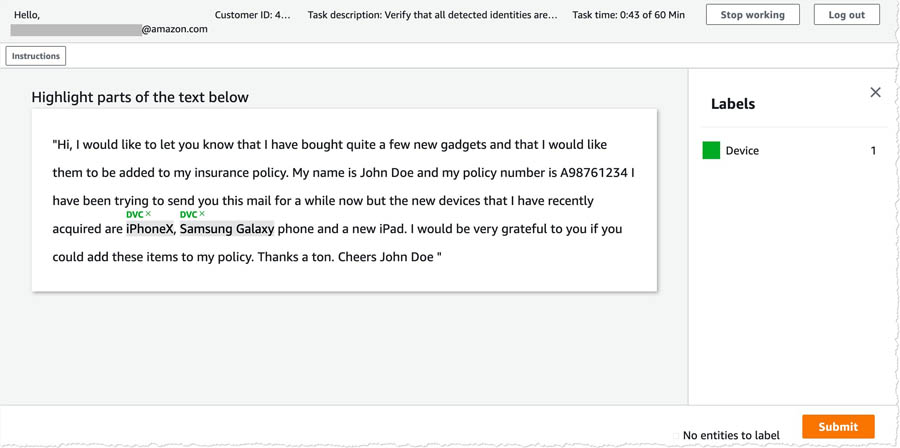
  1. Tag any new entities that the algorithm missed.
  2. When you’re finished, choose Submit.

Verify that the changes were recorded

Now that you have added your inputs in the A2I console, the HumanWorkflowCompleted Lambda function adds the identified entities to the already existing file and stores it in a separate entity list in the S3 bucket. You can verify that this has happened by navigating to <primary_bucket> on the Amazon S3 console.

In the folder comprehend_data, you should see a new file called updated_entity_list.csv.

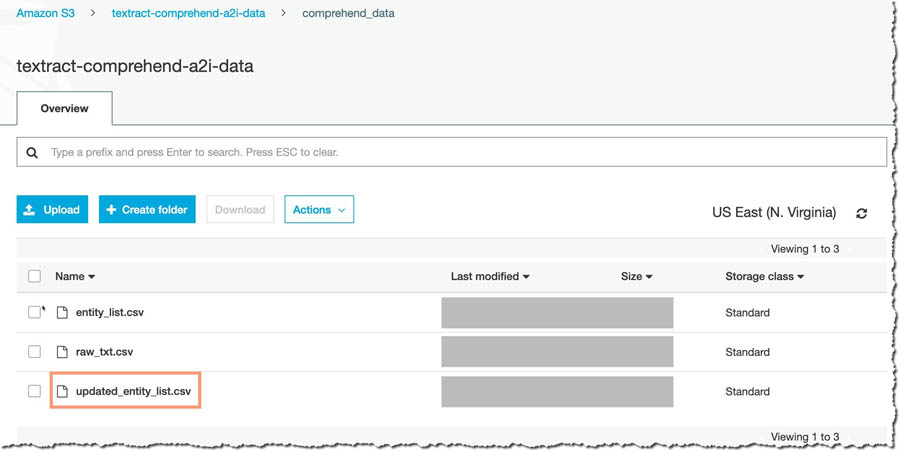
The NewEntityCheck Lambda function uses this file at the end of each day to compare against the original entity_list.csv file. If new entities are in the updated_entity_list.csv file, the model is retrained and replaces the older custom entity recognition model.

This allows the Amazon Comprehend custom entity recognition model to improve continuously by incorporating the feedback received from human reviewers through Amazon A2I. Over time, this can reduce the need for reviewers and manual intervention by analyzing documents in a more intelligent and sophisticated manner.

Cost

With this solution, you can now process scanned and physical documents at scale and do ML-powered analysis on them. The cost to run this example is less than $5.00. For more information about exact costs, see Amazon Textract pricing, Amazon Comprehend pricing, and Amazon A2I pricing.

Cleaning up

To avoid incurring future charges, delete the resources when not in use.

Conclusion

This post demonstrated how you can build an end-to-end document analysis solution for analyzing scanned images of documents using Amazon Textract, Amazon Comprehend, and Amazon A2I. This allows you to create review workflows for the critical documents you need to analyze using your own private workforce, and provides increased accuracy and context.

This solution also demonstrated how you can improve your Amazon Comprehend custom entity recognizer over time by retraining the models on the newer entities that the reviewers identify.

For the code used in this walkthrough, see the GitHub repo. For information about adding another review layer for Amazon Textract using Amazon A2I, see Using Amazon Textract with Amazon Augmented AI for processing critical documents.


About the Author

Purnesh Tripathi is a Solutions Architect at Amazon Web Services. He has been a data scientist in his previous life, and is passionate about the benefits that Machine Learning and Artificial Intelligence bring to a business. He works with small and medium businesses, and startups in New Zealand to help them innovate faster using AWS.

Read More

Creating a multi-department enterprise search using custom attributes in Amazon Kendra

Creating a multi-department enterprise search using custom attributes in Amazon Kendra

An enterprise typically houses multiple departments such as engineering, finance, legal, and marketing, creating a growing number of documents and content that employees need to access. Creating a search experience that intuitively delivers the right information according to an employee’s role, and the department is critical to driving productivity and ensuring security.

Amazon Kendra is a highly accurate and easy-to-use enterprise search service powered by machine learning. Amazon Kendra delivers powerful natural language search capabilities to your websites and applications. These capabilities help your end-users easily find the information they need within the vast amount of content spread across your company.

With Amazon Kendra, you can index the content from multiple departments and data sources into one Amazon Kendra index. To tailor the search experience by user role and department, you can add metadata to your documents and FAQs using Kendra’s built-in attributes and custom attributes and apply user context filters.

For search queries issued from a specific department’s webpage, you can set Kendra to only return content from that department filtered by the employee’s access level. For example, an associate role may only access a subset of restricted documents. In contrast, the department manager might have access to all the documents.

This post provides a solution to indexing content from multiple departments into one Amazon Kendra index. To manage content access, the organization can create restrictions based on an employee’s role and department or provide page-level filtering of search results. It demonstrates how content is filtered based on the web page location and individual user groups.

Solution architecture

The following architecture is comprised of two primary components: document ingestion into Amazon Kendra and document query using Amazon API Gateway.

Architecture diagram depicting a pattern for multi-department enterprise search

The preceding diagram depicts a fictitious enterprise environment with two departments: Marketing and Legal. Each department has its own webpage on their internal website. Every department has two employee groups: associates and managers. Managers are entitled to see all the documents, but associates can only see a subset.

When employees from Marketing issue a search query on their department page, they only see the documents they are entitled to within their department (pink documents without the key). In contrast, the Marketing Manager sees all Marketing documents (all pink documents).

When employees from Legal search on a Marketing department page, they don’t see any documents. When all employees search on the internal website’s main page, they see the public documents common to all departments (yellow).

The following table shows the types of documents an employee gets for the various query combinations of webpage, department, and access roles.

Access Control Table

Ingesting documents into Amazon Kendra

The document ingestion step consists of ingesting content and metadata from different departments’ specific S3 buckets, indexed by Amazon Kendra. Content can comprise structured data like FAQs and unstructured content like HTML, Microsoft PowerPoint, Microsoft Word, plain text, and PDF documents. For ingesting FAQ documents into Amazon Kendra, you can provide the questions, answers, and optional custom and access control attributes either in a CSV or JSON format.

You can add metadata to your documents and FAQs using the built-in attributes in Amazon Kendra, custom attributes, and user context filters. You can filter content using a combination of these custom attributes and user context filters. For this post, we index each document and FAQ with:

  1. Built-in attribute _category to represent the web page.
  2. User context filter attribute for the employee access level.
  3. Custom attribute department representing the employee department.

The following code is an example of the FAQ document for the Marketing webpage:

{
"SchemaVersion": 1,
"FaqDocuments": [{
"Question": "What is the reimbursement policy for business related expenses?",
"Answer": "All expenses must be submitted within 2 weeks.",
"Attributes": {
"_category": "page_marketing",
"department": "marketing"
},
"AccessControlList": [{
"Name": "associate",
"Type": "GROUP",
"Access": "ALLOW"
},{
"Name": "manager",
"Type": "GROUP",
"Access": "ALLOW"
}
]
},
{
"Question": "What are the manager guidelines for employee promotions ?",
"Answer": "Guidelines for employee promotions can be found on the manager portal.",
"Attributes": {
"_category": "page_marketing",
"department": "marketing"
},
"AccessControlList": [{
"Name": "manager",
"Type": "GROUP",
"Access": "ALLOW"
}]
}
]
}

The following code is an example of the metadata document for the Legal webpage:

{
"DocumentId": "doc1",
"Title": "What is the immigration policy?",
"ContentType": "PLAIN_TEXT",
"Attributes": {
"_category": "page_legal",
"department": "legal"
},
"AccessControlList": [
{
"Name": "associate",
"Type": "GROUP",
"Access": "ALLOW"
}
]
}

Document search by department

The search capability is exposed to the client application using an API Gateway endpoint. The API accepts an optional path parameter for the webpage on which the query was issued. If the query comes from the Marketing-specific page, the query looks like /search/dept/marketing. For a comprehensive website search covering all the departments, you will leave out the path parameter. The query looks like /searchEvery API request also has two header values: EMP_ROLE, representing the employee access level, and EMP_DEPT, representing the department name. In this post, we don’t describe how to authenticate users. We assume that you populate these two header values after authenticating the user with Amazon Cognito or your custom solutions.

The AWS Lambda function that serves the API Gateway parses the path parameters and headers and issues an Amazon Kendra query call with AttributeFilters set to the category name from the path parameter (if present), the employee access level, and department from the headers. Amazon Kendra returns the FAQs and documents for that particular category and filters them by the employee access level and department. The Lambda function constructs a response with these search results and sends the FAQ and document search results back to the client application.

Deploying the AWS CloudFormation template

  1. You can deploy this architecture using the provided AWS CloudFormation template in us-east-1. Please click to get started.

CloudFormation Stack

  1. Choose Next.
  2. Provide a stack name and choose Next.
  3. In the Capabilities and transforms section, select all three check-boxes to provide acknowledgment to AWS CloudFormation to create IAM resources and expand the template. Acknowledgement section of CloudFormation template
  4. Choose Create stack.

This process might take 15 minutes or more to complete and creates the following resources:

  • An Amazon Kendra index
  • Three S3 buckets representing the departments: Legal, Marketing, and Public
  • Three Amazon Kendra data sources that connect to the S3 buckets
  • A Lambda function and an API Gateway endpoint that is called by the client application

After the CloudFormation template finishes deploying the above infrastructure, you will see the following Outputs.

CloudWatch Outputs Section

API Key and Usage Plan

  1. The KendraQueryAPI will require an API key. The CloudFormation output ApiGWKey refers to the name of the API key. Currently, this API key is associated with a usage plan that allows 2000 requests per month.
  2. Click the link in the Value column corresponding to the Key ApiGWKey. This will open the API Keys section of the API Gateway console.
  3. Click Show next to the API key.
  4. Copy the API key. We will use this when testing the API.API Key section in API Gateway Console
  5. You can manage the usage plan by following the instructions on, Create, configure, and test usage plans with the API Gateway console.
  6. You can also add fine-grained authentication and authorization to your APIs. For more information on securing your APIs, you can follow instructions on Controlling and managing access to a REST API in API Gateway.

Uploading sample documents and FAQ

Add your documents and FAQs file to their corresponding S3 buckets. We’ve also provided you with some sample document files and sample FAQs file to download.

Upload all the document files whose file name prefix corresponds to the S3 buckets created as part of the CloudFormation. For example, all Marketing documents and their corresponding metadata files go into the kendra-blog-data-source-marketing-[STACK_NAME] bucket. Upload the FAQ document into to the kendra-blog-faqs-[STACK_NAME]bucket.

Creating the facet definition for custom attributes

In this step, you add a facet definition to the index.

  1. On the Amazon Kendra console, choose the index created in the previous step.
  2. Choose Facet definition.
  3. Choose the Add
  4. For Field name, enter department.
  5. For Data type, choose String.
  6. For Usage types, select Facetable, Searchable, Displayable, and Sortable.
  7. Choose Add.

Adding a Facet to Kendra index

  1. On the Amazon Kendra console, choose the newly created index.
  2. Choose Data sources.
  3. Sync kendra-blog-data-source-legal-[STACK_NAME], kendra-blog-data-source-marketing-[STACK_NAME], and kendra-blog-data-source-public-[STACK_NAME] by selecting the data source name and choosing Sync now. You can sync multiple data sources simultaneously.

This should start the indexing process of the documents in the S3 buckets.

Adding FAQ documents

After you create your index, you can add your FAQ data.

  1. On the Amazon Kendra console, choose the new index.
  2. Choose FAQs.
  3. Choose Add FAQ.
  4. For FAQ name, enter a name, such as demo-faqs-with-metadata.
  5. For FAQ file format, choose JSON file.
  6. For S3, browse Amazon S3 to find kendra-blog-faqs-[STACK_NAME], and choose the faqs.json file.
  7. For IAM role, choose Create a new role to allow Amazon Kendra to access your S3 bucket.
  8. For Role name, enter a name, such as AmazonKendra-blog-faq-role.
  9. Choose Add.

Setting up FAQs in Amazon Kendra

Testing the solution

You can test the various combinations of page and user-level attributes on the API Gateway console. You can refer to Test a method with API Gateway console to learn about how to test your API using the API Gateway console.

The following screenshot is an example of testing the scenario where an associate from the Marketing department searches on the department-specific page.

You will have to pass the following parameters while testing the above scenario.

  1. Path: page_marketing
  2. Query String: queryInput="financial targets"
  3. Headers:
    1. x-api-key: << Your API Key copied earlier from the CloudFormation step >>
    2. EMP_ROLE:associate
    3. EMP_DEPT:marketing

You will see a JSON response with a FAQ result matching the above conditions.

…
"DocumentExcerpt": {"Text": "Please work with your manager to understand the goals for your department.", 
…

You can keep the queryInput="financial targets" but change the EMP_ROLE from associate to manager, and you should see a different answer.

…
"DocumentExcerpt": { "Text": "The plan is achieve 2x the sales in the next quarter.", 
….

Cleaning up

To remove all resources created throughout this process and prevent additional costs, complete the following steps:

  1. Delete all the files from the S3 buckets.
  2. On the AWS CloudFormation console, delete the stack you created. This removes the resources the CloudFormation template created.

Conclusion

In this post, you learned how to use Amazon Kendra to deploy a cognitive search service across multiple departments in your organization and filter documents using custom attributes and user context filters. To enable, Amazon Kendra you don’t need to have any previous ML or AI experience. Use Amazon Kendra to provide your employees with faster access to information that is spread across your organization.


About the Authors

Shanthan Kesharaju is a Senior Architect in the AWS ProServe team. He helps our customers with AI/ML strategy, architecture, and develop products with a purpose. Shanthan has an MBA in Marketing from Duke University and an MS in Management Information Systems from Oklahoma State University.


Marty Jiang is a Conversational AI Consultant with AWS Professional Services. Outside of work, he loves spending time outdoors with his family and exploring new technologies.

Read More

Developing Real-Time, Automatic Sign Language Detection for Video Conferencing

Developing Real-Time, Automatic Sign Language Detection for Video Conferencing

Posted by Amit Moryossef, Research Intern, Google Research

Video conferencing should be accessible to everyone, including users who communicate using sign language. However, since most video conference applications transition window focus to those who speak aloud, it makes it difficult for signers to “get the floor” so they can communicate easily and effectively. Enabling real-time sign language detection in video conferencing is challenging, since applications need to perform classification using the high-volume video feed as the input, which makes the task computationally heavy. In part, due to these challenges, there is only limited research on sign language detection.

In “Real-Time Sign Language Detection using Human Pose Estimation”, presented at SLRTP2020 and demoed at ECCV2020, we present a real-time sign language detection model and demonstrate how it can be used to provide video conferencing systems a mechanism to identify the person signing as the active speaker.

Maayan Gazuli, an Israeli Sign Language interpreter, demonstrates the sign language detection system.

Our Model
To enable a real-time working solution for a variety of video conferencing applications, we needed to design a light weight model that would be simple to “plug and play.” Previous attempts to integrate models for video conferencing applications on the client side demonstrated the importance of a light-weight model that consumes fewer CPU cycles in order to minimize the effect on call quality. To reduce the input dimensionality, we isolated the information the model needs from the video in order to perform the classification of every frame.

Because sign language involves the user’s body and hands, we start by running a pose estimation model, PoseNet. This reduces the input considerably from an entire HD image to a small set of landmarks on the user’s body, including the eyes, nose, shoulders, hands, etc. We use these landmarks to calculate the frame-to-frame optical flow, which quantifies user motion for use by the model without retaining user-specific information. Each pose is normalized by the width of the person’s shoulders in order to ensure that the model attends to the person signing over a range of distances from the camera. The optical flow is then normalized by the video’s frame rate before being passed to the model.

To test this approach, we used the German Sign Language corpus (DGS), which contains long videos of people signing, and includes span annotations that indicate in which frames signing is taking place. As a naïve baseline, we trained a linear regression model to predict when a person is signing using optical flow data. This baseline reached around 80% accuracy, using only ~3μs (0.000003 seconds) of processing time per frame. By including the 50 previous frames’ optical flow as context to the linear model, it is able to reach 83.4%.

To generalize the use of context, we used a long-short-term memory (LSTM) architecture, which contains memory over the previous timesteps, but no lookback. Using a single layer LSTM, followed by a linear layer, the model achieves up to 91.5% accuracy, with 3.5ms (0.0035 seconds) of processing time per frame.

Classification model architecture. (1) Extract poses from each frame; (2) calculate the optical flow from every two consecutive frames; (3) feed through an LSTM; and (4) classify class.

Proof of Concept
Once we had a functioning sign language detection model, we needed to devise a way to use it for triggering the active speaker function in video conferencing applications. We developed a lightweight, real-time, sign language detection web demo that connects to various video conferencing applications and can set the user as the “speaker” when they sign. This demo leverages PoseNet fast human pose estimation and sign language detection models running in the browser using tf.js, which enables it to work reliably in real-time.

When the sign language detection model determines that a user is signing, it passes an ultrasonic audio tone through a virtual audio cable, which can be detected by any video conferencing application as if the signing user is “speaking.” The audio is transmitted at 20kHz, which is normally outside the hearing range for humans. Because video conferencing applications usually detect the audio “volume” as talking rather than only detecting speech, this fools the application into thinking the user is speaking.

The sign language detection demo takes the webcam’s video feed as input, and transmits audio through a virtual microphone when it detects that the user is signing.

You can try our experimental demo right now! By default, the demo acts as a sign language detector. The training code and models as well as the web demo source code is available on GitHub.

Demo
In the following video, we demonstrate how the model might be used. Notice the yellow chart at the top left corner, which reflects the model’s confidence in detecting that activity is indeed sign language. When the user signs, the chart values rise to nearly 100, and when she stops signing, it falls to zero. This process happens in real-time, at 30 frames per second, the maximum frame rate of the camera used.

Maayan Gazuli, an Israeli Sign Language interpreter, demonstrates the sign language detection demo.

User Feedback
To better understand how well the demo works in practice, we conducted a user experience study in which participants were asked to use our experimental demo during a video conference and to communicate via sign language as usual. They were also asked to sign over each other, and over speaking participants to test the speaker switching behavior. Participants responded positively that sign language was being detected and treated as audible speech, and that the demo successfully identified the signing attendee and triggered the conferencing system’s audio meter icon to draw focus to the signing attendee.

Conclusions
We believe video conferencing applications should be accessible to everyone and hope this work is a meaningful step in this direction. We have demonstrated how our model could be leveraged to empower signers to use video conferencing more conveniently.

Acknowledgements
Amit Moryossef, Ioannis Tsochantaridis, Roee Aharoni, Sarah Ebling, Annette Rios, Srini Narayanan, George Sung, Jonathan Baccash, Aidan Bryant, Pavithra Ramasamy and Maayan Gazuli

Read More

Getting started with AWS DeepRacer community races

Getting started with AWS DeepRacer community races

AWS DeepRacer allows you to get hands-on with machine learning (ML) through a fully autonomous 1/18th scale race car driven by reinforcement learning, a 3D racing simulator on the AWS DeepRacer console, a global racing league, and hundreds of customer-initiated community races.

With AWS DeepRacer community races, you can create your own race and invite your friends and colleagues to compete. The AWS DeepRacer console now supports object avoidance and head-to-bot races in addition to time trial racing formats, enabling racers at all skill levels to engage and learn about ML and challenge their friends. There’s never been a better time to get rolling with AWS DeepRacer!

The Accenture Grand Prix

We have worked with partners all over the world to bring ML to their employees and customers by enabling them to host their own races. One of these partners, Accenture, has been hosting its own internal AWS DeepRacer event since 2019. Accenture enables customers all over the world to build artificial intelligence (AI) and ML-powered solutions through their team of more than 8,000 AWS-trained technologists. They’re always looking for new and engaging ways to develop their teams with hands-on training.

In November 2019, Accenture launched their own internal AWS DeepRacer League. The Accenture league was planned to run throughout 2020, spanning 30 global locations in 17 countries, with a physical and virtual track at each location, for their employees to compete for the title of Accenture AWS DeepRacer Champion. At the start of their league season, Accenture hosted some in-person local events, which were well-attended and received, but as the COVID-19 pandemic unfolded, Accenture pivoted to all virtual events. This was made possible with AWS DeepRacer community races. Accenture quickly set up and customized races with the ability to select, date, time, track, and invite participants.

This fall, Accenture takes their racing to a new level with their 2-month-long finals championship, the Accenture Grand Prix. This event takes advantage of the latest update to community races as of October 1, 2020: the addition of object avoidance and head-to-bot racing formats. In object avoidance races, you use sensors to detect and avoid obstacles placed on the track. In head-to-bot, you race against another AWS DeepRacer bot on the same track and try to avoid it while still turning in the best lap time. You can use visual information to sense and avoid objects being approached on the track.

Amanda Jensen, Associate Director in the Accenture AWS Business Group, is heading up the Accenture Grand Prix. Making sure their employees are trained with the right skills is crucial to their business of helping other organizations unlock the advantages of ML.

“The skills most relevant are a combination of basic cloud skills as well as programming, including languages such as Python and R, statistics and regression, and data science,” Jensen says. “One of the largest obstacles in training for employees staffed on non-AI or ML projects is the opportunity to apply or grow skills in a setting where they can visualize how data science works. Applying algorithms on paper or reading about them isn’t the same.”

That’s where AWS DeepRacer comes in. It’s a great way for teams to get started in ML training, see it come to life, and enable team building. AWS DeepRacer makes the experience of learning fun and accessible.

“One of our team members mentioned that before getting hands-on with DeepRacer, she didn’t have any background in ML,” Jensen says. “The console, models, and training module for AWS DeepRacer made it easy to visualize the steps and understand how the model was being trained in the background without getting too deep into the complicated mathematics. With the added bonus of having the physical car, she was able to actually see in real time the changes, failures, and successes of the model.”

Jensen also sees the added head-to-bot format as a key new feature to elevate the AWS DeepRacer competition experience.

“In our global competition last year, it quickly became apparent that the competition between the locations was really the driving force behind the engagement,” Jensen says. “People wanted their office location to be on the board. This will bring that level of competition to the individual races and get people enthusiastic.”

Starting your own race

Whether or not you have competed in races before, creating and hosting a community race may be what you’re looking for to get you started with AWS DeepRacer and ML. Anyone can start a community race for free and invite participants to join.

With community races, you can select your own track, race date, time, and who you want to invite to participate. Hosting your own race provides an opportunity for you to build your own community and provide team-building events for friends and work colleagues. Community races are another exciting way AWS DeepRacer provides an opportunity for you to compete, meet fellow enthusiasts, and get started with ML!

In this section, we walk you through setting up your own community race. All you need to do is sign up for an AWS account (if you don’t already have one) and go to the AWS DeepRacer console.

  1. On the AWS DeepRacer console, choose Community races.
  2. Choose Create a race.
  3. For Choose race type, select the type of race you want. For this post, we select Time Trial.
  4. For Name of the racing event, enter a name for your race.
  5. For Race dates, enter the start and end dates for your race.

In the Race customization section, you can optionally customize your race details with track and evaluation criteria.

  1. For Competition tracks, select your track. For this post, we select Cumulo Turnpike.
  2. Customize the remaining race track options as desired.
  3. Choose Next.

  1. Review your race settings and choose Submit.

An invitation page and link is generated for you to copy and send out to your friends and colleagues you want to invite to compete in your race.

Now that the race is created, you’re ready to host your own event. Make sure that everyone you invited takes the proper training to build, train, and evaluate their model before the race. When everyone is ready, you’re all set to start racing with your friends!

Who can host an event?

Community races are hosted by all kinds of people and groups, from large companies like Accenture to ML enthusiasts who want to test their skills.

Juv Chan, a community hero for AWS DeepRacer, recently hosted his own event. “I was the main organizer for the AWS DeepRacer Beginner Challenge virtual community race, which started on April 3, 2020, and ended May 31, 2020,” Chan says. “It was the first community race that was organized exclusively for the DeepRacer beginner community globally.”

After Chan decided he wanted to get more beginner-level developers involved in racing and learning ML, he set out to create his own event through the AWS DeepRacer console.

“My first experience on setting up a new community race in the AWS DeepRacer console was easy, fast, and straightforward” Chan says. “I was able to create my first community race in less than 3 minutes when I had all the necessary requirements and details to create the race. I would recommend new users who want to create a new community race to create a mock race in advance to get familiar with all the required details and limitations. It’s possible to edit race details after creating the event too.”

After you set up the race, you need to invite other developers to create an account, train models, and compete in your race. Chan worked with AWS and the AWS ML community to convince racers to join the fun.

“Getting beginner racers to participate was my next challenge,” Chan says. “I worked with AWS and AWS Machine Learning Community Heroes to create a community race event landing page and step-by-step race guide blog post on how to get started and participate the race. I have promoted the events through various AWS, autonomous driving, reinforcement learning, and relevant AI user groups and social media channels in different regions globally. I also created a survey to get feedback from the communities.”

Overall, Chan had a great experience hosting the race. For more information about his experiences and best-kept secrets, see Train a Viable Model in 45 minutes for AWS DeepRacer Beginner Challenge Virtual Community Race 2020.

Join the race to win glory and prizes!

As you can see, there are plenty of ways to compete against your fellow racers right now! If you think you’re ready to create your own community race and invite fellow racers to create a model and compete, it’s easy to get started.

If you’re new to AWS DeepRacer but still want to compete, you can create your own model on the console and submit it compete in the AWS DeepRacer Virtual Circuit, where you can compete in time trial, object avoidance, and head-to-head racing formats. Hundreds of developers have extended their ML journey by competing in the Virtual Circuit races in 2020.

For more information about an AWS DeepRacer competition from earlier in the year, check out the AWS DeepRacer League F1 ProAm event. You can also learn more about AWS DeepRacer in upcoming AWS Summit Online events. Sign in to the AWS DeepRacer console now to learn more, start your ML journey, and get rolling with AWS DeepRacer!


About the Author

Dan McCorriston is a Senior Product Marketing Manager for AWS Machine Learning. He is passionate about technology, collaborating with developers, and creating new methods of expanding technology education. Out of the office he likes to hike, cook and spend time with his family.


Read More

Onboarding Amazon SageMaker Studio with AWS SSO and Okta Universal Directory

Onboarding Amazon SageMaker Studio with AWS SSO and Okta Universal Directory

In 2019, AWS announced Amazon SageMaker Studio, a unified integrated development environment (IDE) for machine learning (ML) development. You can write code, track experiments, visualize data, and perform debugging and monitoring within a single, integrated visual interface.

Amazon SageMaker Studio supports a single sign-on experience with AWS Single Sign-On (AWS SSO) authentication. External identity provider (IdP) such as Azure Active Directory and Okta Universal Directory can be integrated with AWS SSO to be the source of truth for Amazon SageMaker Studio. Users are given access to Amazon SageMaker Studio via a unique login URL that directly opens Amazon SageMaker Studio, and they can sign-in with their existing corporate credentials. Administrators can continue to manage users and groups in their existing identity systems which can then be synchronized with AWS SSO. For instance, AWS SSO enables administrators to connect their on-premises Active Directory (AD) or their AWS Managed Microsoft AD directory, as well as other Supported Identity Providers. For more information, see The Next Evolution in AWS Single Sign-On and Single Sign-On between Okta Universal Directory and AWS.

In this post, we walk you through setting up SSO with Amazon SageMaker Studio and enabling SSO with Okta Universal Directory. I also demonstrate the SSO experience for system administrators and Amazon SageMaker Studio users.

Prerequisites

To use the same Okta user login for Amazon SageMaker Studio, you need to set up AWS SSO and connect to Okta Universal Directory. The high-level steps are as follows:

  1. Enable AWS SSO on the AWS Management Console. Create this AWS SSO account in the same AWS Region as Amazon SageMaker Studio.
  2. Add AWS SSO as an application Okta users can connect to.
  3. Configure the mutual agreement between AWS SSO and Okta, download IdP metadata in Okta, and configure an external IdP in AWS SSO.
  4. Enable identity synchronization between Okta and AWS SSO.

For instructions, see Single Sign-On between Okta Universal Directory and AWS.

This setup makes sure that when a new account is added to Okta and connected to the AWS SSO, a corresponding AWS SSO user is created automatically.

After you complete these steps, you can see the users assigned on the Okta console.

You can also see the users on the AWS SSO console, on the Users page.

Creating Amazon SageMaker Studio with AWS SSO authentication

We now need to create Amazon SageMaker Studio with AWS SSO as the authentication method. Complete the following steps:

  1. On the Amazon SageMaker console, choose Amazon SageMaker Studio.
  2. Select Standard setup.
  3. For Authentication method, select AWS Single Sign-On (SSO).
  4. For Permission, choose the Amazon SageMaker execution role.

If you don’t have this role already, choose Create role. Amazon SageMaker creates a new AWS Identity and Access Management (IAM) role with the AmazonSageMakerFullAccess policy attached.

  1. Optionally, you can specify other settings such as notebook sharing configuration, networking and storage, and tags.

  1. Choose Submit to create Amazon SageMaker Studio.

A few moments after initialization, the Amazon SageMaker Studio Control Panel appears.

  1. Choose Assign users.

The Assign users page contains a list of all the users from AWS SSO (synchronised from your Okta Universal Directory).

  1. Select the users that are authorized to access Amazon SageMaker Studio.
  2. Choose Assign users.

You can now see these users listed on the Amazon SageMaker Studio Control Panel.

On the AWS SSO console, under Applications, you can see the detailed information about the newly created Amazon SageMaker Studio.

In addition, you can view the assigned users.

Amazon SageMaker Studio also automatically creates a user profile with the domain execution role for each SSO user. A user profile represents a single user within a domain, and is the main way to reference a user for the purposes of sharing, reporting, and other user-oriented features such as allowed instance types. You can use the UpdateUserProfile API to associate a different role for a user, allowing fine-grained permission control so the user can pass this associated IAM role when creating a training job, hyperparameter tuning job, or a model. For more information about available Amazon SageMaker SDK API references, see Amazon SageMaker API Reference.

Using Amazon SageMaker Studio via SSO

As a user, you can start in one of three ways:

  1. Start from the Okta user portal page, select AWS SSO application, and choose Amazon SageMaker Studio
  2. Start from the AWS SSO user portal (the URL is on the AWS SSO Settings page), redirect to Okta login page, choose Amazon SageMaker Studio
  3. Bookmark the Amazon SageMaker Studio address (the URL is on the Amazon SageMaker Studio page), the page redirects automatically to Okta login page

For this post, we start in the AWS SSO user portal and are redirected to the Okta login page.

After you log in, you see an application named Amazon SageMaker Studio.

When you choose the application, the Amazon SageMaker Studio welcome page launches.

Now data scientists and ML builders can rely on this web-based IDE and use Amazon SageMaker to quickly and easily build and train ML models, and directly deploy them into a production-ready hosted environment. To learn more about the key features of Amazon SageMaker Studio, see Amazon SageMaker Studio Tour.

Conclusion

In this post, I showed how you can take advantage of the new AWS SSO capabilities to use Okta identities to open Amazon SageMaker Studio. Administrators can now use a single source of truth to manage their users, and users no longer need to manage an additional identity and password to sign in to their AWS accounts and applications.

AWS SSO with Okta is free to use and available in all Regions where AWS SSO is available. Amazon SageMaker Studio is now generally available in US East (Ohio), US East (N. Virginia), US West (Oregon), EU (Ireland) and China (Beijing and Ningxia), with additional Regions coming soon. Please read the product documentation to learn more.


About the Author

Yanwei Cui, PhD, is a Machine Learning Specialist Solution Architect at AWS. He started machine learning research at IRISA (Research Institute of Computer Science and Random Systems), and has several years of experience building artificial intelligence powered industrial applications in computer vision, natural language processing and online user behavior prediction. At AWS, he shares the domain expertise and helps customers to unlock business potentials, and to drive actionable outcomes with machine learning at scale. Outside of work, he enjoys reading and traveling.

Read More

SMART researchers receive Intra-CREATE grant for personalized medicine and cell therapy

SMART researchers receive Intra-CREATE grant for personalized medicine and cell therapy

Researchers from Critical Analytics for Manufacturing Personalized-Medicine (CAMP), an interdisciplinary research group at Singapore-MIT Alliance for Research and Technology (SMART), MIT’s research enterprise in Singapore, have been awarded Intra-CREATE grants from the National Research Foundation (NRF) Singapore to help support research on retinal biometrics for glaucoma progression and neural cell implantation therapy for spinal cord injuries. The grants are part of the NRF’s initiative to bring together researchers from Campus for Research Excellence And Technological Enterprise (CREATE) partner institutions, in order to achieve greater impact from collaborative research efforts.

SMART CAMP was formed in 2019 to focus on ways to produce living cells as medicine delivered to humans to treat a range of illnesses and medical conditions, including tissue degenerative diseases, cancer, and autoimmune disorders.

“Singapore’s well-established biopharmaceutical ecosystem brings with it a thriving research ecosystem that is supported by skilled talents and strong manufacturing capabilities. We are excited to collaborate with our partners in Singapore, bringing together an interdisciplinary group of experts from MIT and Singapore, for new research areas at SMART. In addition to our existing research on our three flagship projects, we hope to develop breakthroughs in manufacturing other cell therapy platforms that will enable better medical treatments and outcomes for society,” says Krystyn Van Vliet, co-lead principal investigator at SMART CAMP, professor of materials science and engineering, and associate provost at MIT.

Understanding glaucoma progression for better-targeted treatments

Hosted by SMART CAMP, the first research project, Retinal Analytics via Machine learning aiding Physics (RAMP), brings together an interdisciplinary group of ophthalmologists, data scientists, and optical scientists from SMART, Singapore Eye Research Institute (SERI), Agency for Science, Technology and Research (A*STAR), Duke-NUS Medical School, MIT, and National University of Singapore (NUS). The team will seek to establish first principles-founded and statistically confident models of glaucoma progression in patients. Through retinal biomechanics, the models will enable rapid and reliable forecast of the rate and trajectory of glaucoma progression, leading to better-targeted treatments.

Glaucoma, an eye condition often caused by stress-induced damage over time at the optic nerve head, accounts for 5.1 million of the estimated 38 million blind in the world and 40 percent of blindness in Singapore. Currently, health practitioners face challenges forecasting glaucoma progression and its treatment strategies due to the lack of research and technology that accurately establish the relationship between its properties, such as the elasticity of the retina and optic nerve heads, blood flow, intraocular pressure and, ultimately, damage to the optic nerve head.

The research is co-led by George Barbastathis, principal investigator at SMART CAMP and professor of mechanical engineering at MIT, and Aung Tin, executive director at SERI and professor at the Department of Ophthalmology at NUS. The team includes CAMP principal investigators Nicholas Fang, also a professor of mechanical engineering at MIT; Lisa Tucker-Kellogg, assistant professor with the Cancer and Stem Biology program at Duke-NUS; and Hanry Yu, professor of physiology with the Yong Loo Lin School of Medicine, NUS and CAMP’s co-lead principal investigator.

“We look forward to leveraging the ideas fostered in SMART CAMP to build data analytics and optical imaging capabilities for this pressing medical challenge of glaucoma prediction,” says Barbastathis.

Cell transplantation to treat irreparable spinal cord injury

Engineering Scaffold-Mediated Neural Cell Therapy for Spinal Cord Injury Treatment (ScaNCellS), the second research project, gathers an interdisciplinary group of engineers, cell biologists, and clinician scientists from SMART, Nanyang Technological University (NTU), NUS, IMCB A*STAR, A*STAR, French National Centre for Scientific Research (CNRS), the University of Cambridge, and MIT. The team will seek to design a combined scaffold and neural cell implantation therapy for spinal cord injury treatment that is safe, efficacious, and reproducible, paving the way forward for similar neural cell therapies for other neurological disorders. The project, an intersection of engineering and health, will achieve its goals through an enhanced biological understanding of the regeneration process of nerve tissue and optimized engineering methods to prepare cells and biomaterials for treatment.

Spinal cord injury (SCI), affecting between 250,00 and 500,000 people yearly, is expected to incur higher societal costs as compared to other common conditions such as dementia, multiple sclerosis, and cerebral palsy. SCI can lead to temporary or permanent changes in spinal cord function, including numbness or paralysis. Currently, even with the best possible treatment, the injury generally results in some incurable impairment.

The research is co-led by Chew Sing Yian, principal investigator at SMART CAMP and associate professor of the School of Chemical and Biomedical Engineering and Lee Kong Chian School of Medicine at NTU, and Laurent David, professor at University of Lyon (France) and leader of the Polymers for Life Sciences group at CNRS Polymer Engineering Laboratory. The team includes CAMP principal investigators Ai Ye from Singapore University of Technology and Design; Jongyoon Han and Zhao Xuanhe, both professors at MIT; as well as Shi-Yan Ng and Jonathan Loh from Institute of Molecular and Cell Biology, A*STAR.

Chew says, “Our earlier SMART and NTU scientific collaborations on progenitor cells in the central nervous system are now being extended to cell therapy translation. This helps us address SCI in a new way, and connect to the methods of quality analysis for cells developed in SMART CAMP.”

“Cell therapy, one of the fastest-growing areas of research, will provide patients with access to more options that will prevent and treat illnesses, some of which are currently incurable. Glaucoma and spinal cord injuries affect many. Our research will seek to plug current gaps and deliver valuable impact to cell therapy research and medical treatments for both conditions. With a good foundation to work on, we will be able to pave the way for future exciting research for further breakthroughs that will benefit the health-care industry and society,” says Hanry Yu, co-lead principal investigator at SMART CAMP, professor of physiology with the Yong Loo Lin School of Medicine, NUS, and group leader of the Institute of Bioengineering and Nanotechnology at A*STAR.

The grants for both projects will commence on  Oct. 1, with RAMP expected to run until Sept. 30, 2022, and ScaNCellS expected to run until Sept. 30, 2023.

SMART was. established by the MIT in partnership with the NRF in 2007. SMART is the first entity in the CREATE developed by NRF. SMART serves as an intellectual and innovation hub for research interactions between MIT and Singapore, undertaking cutting-edge research projects in areas of interest to both Singapore and MIT. SMART currently comprises an Innovation Centre and five interdisciplinary research groups (IRGs): Antimicrobial Resistance, CAMP, Disruptive and Sustainable Technologies for Agricultural Precision, Future Urban Mobility, and Low Energy Electronic Systems.

CAMP is a SMART IRG launched in June 2019. It focuses on better ways to produce living cells as medicine, or cellular therapies, to provide more patients access to promising and approved therapies. The investigators at CAMP address two key bottlenecks facing the production of a range of potential cell therapies: critical quality attributes (CQA) and process analytic technologies (PAT). Leveraging deep collaborations within Singapore and MIT in the United States, CAMP invents and demonstrates CQA/PAT capabilities from stem to immune cells. Its work addresses ailments ranging from cancer to tissue degeneration, targeting adherent and suspended cells, with and without genetic engineering.

CAMP is the R&D core of a comprehensive national effort on cell therapy manufacturing in Singapore.

Read More

Boosting quantum computer hardware performance with TensorFlow

Boosting quantum computer hardware performance with TensorFlow

A guest article by Michael J. Biercuk, Harry Slatyer, and Michael Hush of Q-CTRL

Google recently announced the release of TensorFlow Quantum – a toolset for combining state-of-the-art machine learning techniques with quantum algorithm design. This was an important step to build tools for developers working on quantum applications – users operating primarily at the “top of the stack”.

In parallel we’ve been building a complementary TensorFlow-based toolset working from the hardware level up – from the bottom of the stack. Our efforts have focused on improving the performance of quantum computing hardware through the integration of a set of techniques we call quantum firmware.

In this article we’ll provide an overview of the fundamental driver for this work – combating noise and error in quantum computers – and describe how the team at Q-CTRL uses TensorFlow to efficiently characterize and suppress the impact of noise and imperfections in quantum hardware. These are key challenges in the global effort to make quantum computers useful.

Q-CTRL image

The Achilles heel of quantum computers – noise and error

Quantum computing, simply put, is a new way to process information using the laws of quantum physics – the rules that govern nature on tiny size scales. Through decades of effort in science and engineering we’re now ready to put this physics to work solving problems that are exceptionally difficult for regular computers.

Realizing useful computations on today’s systems requires a recognition that performance is predominantly limited by hardware imperfections and failures, not system size. Susceptibility to noise and error remains the Achilles heel of quantum computers, and ultimately limits the range and utility of algorithms run on quantum computing hardware.

As a broad community average, most quantum computer hardware can run just a few dozen calculations over a time much less than one millisecond before requiring a reset due to the influence of noise. Depending on the specifics that’s about 1024 times worse than the hardware in a laptop!

This is the heart of why quantum computing is really hard. In this context, “noise” describes all of the things that cause interference in a quantum computer. Just like a mobile phone call can suffer interference leading it to break up, a quantum computer is susceptible to interference from all sorts of sources, like electromagnetic signals coming from WiFi or disturbances in the Earth’s magnetic field.

When qubits in a quantum computer are exposed to this kind of noise, the information in them gets degraded just the way sound quality is degraded by interference on a call. In a quantum system this process is known as decoherence. Decoherence causes the information encoded in a quantum computer to become randomized – and this leads to errors when we execute an algorithm. The greater the influence of noise, the shorter the algorithm that can be run.

So what do we do about this? To start, for the past two decades teams have been working to make their hardware more passively stable – shielding it from the noise that causes decoherence. At the same time theorists have designed a clever algorithm called Quantum Error Correction that can identify and fix errors in the hardware, based in large part on classical error correction codes. This is essential in principle, but the downside is that to make it work you have to spread the information in one qubit over lots of qubits; it may take 1000 or more physical qubits to realize just one error-corrected “logical qubit”. Today’s machines are nowhere near capable of getting benefits from this kind of Quantum Error Correction.

Q-CTRL adds something extra – quantum firmware – which can stabilize the qubits against noise and decoherence without the need for extra resources. It does this by adding new solutions at the lowest layer of the quantum computing stack that improve the hardware’s robustness to error.

Building quantum firmware with TensorFlow

Quantum firmware graphic

Quantum firmware describes a set of protocols whose purpose is to deliver quantum hardware with augmented performance to higher levels of abstraction in the quantum computing stack. The choice of the term firmware reflects the fact that the relevant routines are usually software-defined but embedded proximal to the physical layer and effectively invisible to higher layers of abstraction.

Quantum computing hardware generally relies on a form of precisely engineered light-matter interaction in order to enact quantum logic operations. These operations in a sense constitute the native machine language for a quantum computer; a timed pulse of microwaves on resonance with a superconducting qubit can translate to an effective bit-flip operation while another pulse may implement a conditional logic operation between a pair of qubits. An appropriate composition of these electromagnetic signals then implements the target quantum algorithm.

Quantum firmware determines how the physical hardware should be manipulated, redefining the hardware machine language in a way that improves stability against decoherence. Key to this process is the calculation of noise-robust operations using information gleaned from the hardware itself.

Building in TensorFlow was essential to moving beyond “home-built’’ code to commercial-grade products for Q-CTRL. Underpinning these techniques (formally coming from the field of quantum control) are tools allowing us to perform complex gradient-based optimizations. We express all optimization problems as data flow graphs, which describe how optimization variables (variables that can be tuned by the optimizer) are transformed into the cost function (the objective that the optimizer attempts to minimize). We combine custom convenience functions with access to TensorFlow primitives in order to efficiently perform optimizations as used in many different parts of our workflow. And critically, we exploit TensorFlow’s efficient gradient calculation tools to address what is often the weakest link in home-built implementations, especially as the analytic form of the relevant function is often nonlinear and contains many complex dependencies.

For example, consider the case of defining a numerically optimized error-robust quantum bit flip used to manipulate a qubit – the analog of a classical NOT gate. As mentioned above, in a superconducting qubit this is achieved using a pulse of microwaves. We have the freedom to “shape” various aspects of the envelope of the pulse in order to enact the same mathematical transformation in a way that exhibits robustness against common noise sources, such as fluctuations in the strength or frequency of the microwaves.

To do this we first define the data flow graph used to optimize the manipulation of this qubit – it includes objects that describe available “knobs” to adjust, the sources of noise, and the target operation (here a Hadamard gate).

data flow graph

The data flow graph used to optimize quantum controls. The loop at left is run through our TensorFlow optimization engine

Once the graph has been defined inside our context manager, an object must be created that ties together the objective function (in this case minimizing the resultant gate error) and the desired outputs defining the shape of the microwave pulse. With the graph object created, an optimization can be run using a service that returns a new graph object containing the results of the optimization.

This structure allows us to simply create helper functions which enable physically motivated constraints to be built directly into the graph. For instance, these might be symmetry requirements, limits on how a signal changes in time, or even incorporation of characteristics of the electronics systems used to generate the microwave pulses. Any other capabilities not directly covered by this library of helper functions can also be directly coded as TensorFlow primitives.

With this approach we achieve an extremely flexible and high-performance optimization engine; our direct benchmarking has revealed order-of-magnitude benefits in time to solution relative to the best available alternative architectures.

The capabilities enabled by this toolkit span the space of tasks required to stabilize quantum computing hardware and reduce errors at the lowest layer of the quantum computing stack. And importantly they’re experimentally verified on real quantum computing hardware; quantum firmware has been shown to reduce the likelihood of errors, mitigate system performance variations across devices, stabilize hardware against slowly drifting out of calibration, and even make quantum logic operations more compatible with higher level abstractions in quantum computing such as quantum error correction. All of these capabilities and real hardware demonstrations are accessible via our publicly available User Guides and Application Notes in executable Jupyter notebook form.

Ultimately, we believe that building and operating large-scale quantum computing systems will be effectively impossible without the integration of the capabilities encapsulated in quantum firmware. There are many concepts to be drawn from across the fields of machine learning and robotic control in the drive for performance and autonomy, and TensorFlow has proven an efficient language to support the development of the critical toolsets.

A brief history of QC, from Shor to quantum machine learning

The quantum computing boom started in 1994 with the discovery of Shor’s algorithm for factoring large numbers. Public key cryptosystems — which is to say, most encryption — rely on the mathematical complexity of factoring primes to keep messages safe from prying computers. By virtue of their approach to encoding and processing information, however, quantum computers are conjectured to be able to factor primes faster — exponentially faster — than a classical machine. In principle this poses an existential threat not only to national security, but also emerging technologies such as cryptocurrencies.

This realization set in motion the development of the entire field of quantum computing. Shor’s algorithm spurred the NSA to begin one of its first ever open, University-driven research programs asking the question of whether such systems could be built. Fast forward to 2020 and quantum supremacy has been achieved, meaning that a real quantum computing hardware system has performed a task that’s effectively impossible for even the world’s largest supercomputers.

Quantum supremacy is an important technical milestone whose practical importance in solving problems of relevance to end users remains a bit unclear. Our community is continuing to make great progress towards quantum advantage – a threshold indicating that it’s actually cheaper or faster to use a quantum computer for a problem of practical relevance. And for the right problems, we think that within the next 5-10 years we’ll cross that threshold with a quantum computer that isn’t that much bigger than the ones we have today. It just needs to perform much better.

So, which problems are the right problems for quantum computers to address first?

In many respects, Shor’s algorithm has receded in importance as the scale of the challenge emerged. A recent technical analysis suggests that we’re unlikely to see Shor deployed at a useful scale until 2039. Today, small-scale machines with a couple of dozen interacting qubits exist in labs around the world, built from superconducting circuits, individual trapped atoms, or similarly exotic materials. The problem is that these early machines are just too small and too fragile to solve problems relevant to factoring.

To factor a number sufficiently large to be relevant in cryptography, one would need a system composed of thousands of qubits capable of handling trillions of operations each. This is nothing for a conventional machine where hardware can run for a billion years at a billion operations per second and never be likely to suffer a fault. But as we’ve seen it’s quite a different story for quantum computers.

These limits have driven the emergence of a new class of applications in materials science and chemistry that could prove equally impactful, using much smaller systems. Quantum computing in the near term could also help develop new classes of artificial intelligence systems. Recent efforts have demonstrated a strong and unexpected link between quantum computation and artificial neural networks, potentially portending new approaches to machine learning.

This class of problem can often be cast as optimizations where input into a classical machine learning algorithm comes from a small quantum computation, or where data is represented in the quantum domain and a learning procedure implemented. TensorFlow Quantum provides an exciting toolset for developers seeking new and improved ways to exploit the small quantum computers existing now and in the near future.

Still, even those small machines don’t perform particularly well. Q-CTRL’s quantum firmware enables users to extract maximum performance from hardware. Thus we see that TensorFlow has a critical role to play across the emerging quantum computing software stack – from quantum firmware through to algorithms for quantum machine learning.

Resources if you’d like to learn more

We appreciate that members of the TensorFlow community may have varying levels of familiarity with quantum computing, and that this overview was only a starting point. To help readers interested in learning more about quantum computing we’re happy to provide a few resources:

  • For those knowledgeable about machine learning, Q-CTRL has also produced a series of webinars introducing the concept of Robust Control in quantum computing and even demonstrating reinforcement learning to discover gates on real quantum hardware.
  • If you need to start from zero, Q-CTRL has produced a series of introductory video tutorials helping the uninitiated begin their quantum journey via our learning center. We also offer a visual interface enabling new users to discover and build intuition for the core concepts underlying quantum computing – including the impact of noise on quantum hardware.
  • Jack Hidary from X wrote a great text focused on linking the foundations of quantum computing with how teams today write code for quantum machines.
  • The traditional “formal” starting point for those interested in quantum computing is the timeless textbook from “Mike and Ike

Read More