Unreal Engine and NVIDIA: From One Generation to the Next

Square/Enix presents the fictional city of Midgar in Final Fantasy VII Remake at a filmic level of detail. Epic’s Fortnite bathes its environments in ray-traced sunlight, simulating how light bounces in the real world. And artists at Lucasfilm revolutionized virtual production techniques in The Mandalorian, using synchronized NVIDIA RTX GPUs to drive pixels on LED walls that act as photoreal backdrops.

In the eight years since Epic Games launched Unreal Engine 4, graphics has evolved at an unprecedented rate. UE4’s advances in world-building, animation, lighting and simulation enabled creators to bring to life environments only hinted at in the past.

In that same time, NVIDIA produced the optimal GPUs, libraries and APIs for supporting the new features the engine introduced. Tens of thousands of developers have enjoyed the benefits of pairing Unreal Engine with NVIDIA technology. That support continues with today’s debut of Unreal Engine 5.

Epic and NVIDIA: Building the Future of Graphics

From the launch of the GeForce GTX 680 in 2012 to the recent release of the RTX 30 Series, NVIDIA has supported UE4 developers in their quest to stay on the bleeding edge of technology.

At Game Developers Conference 2013, Epic showed off what Unreal Engine 4 could do on a single GTX 680 with their “Infiltrator” demo. It would be one of many times Unreal Engine and NVIDIA raised the bar.

In 2015, NVIDIA founder and CEO Jensen Huang appeared as a surprise guest at an Epic Games event to announce the GTX TITAN X. Onstage, Tim Sweeney was given the very first GTX TITAN X off the production line. It’s a moment in tech history that’s still discussed today.

At GDC 2018, the development community got their first look at real-time ray tracing running in UE4 with the reveal of “Reflections,” a Star Wars short video. The results were so convincing you’d have been forgiven for thinking the clip was pulled directly out of a J.J. Abrams movie.

Textured area lights, ray-traced area light shadows, reflections, and cinematic depth of field all combined to create a sequence that redefined what was possible with real-time graphics. It was shown on a NVIDIA DGX workstation powered by four Volta architecture GPUs.

Later in the year at GamesCom, that same demo was shown running on one consumer-grade GeForce RTX graphics card, thanks to the Turing architecture’s RT Cores, which greatly accelerate ray-tracing performance.

In 2019, Unreal Engine debuted a short called “Troll” (from Goodbye Kansas and Deep Forest Films), running on a GeForce RTX 2080 Ti. It showed what could be done with complex soft shadows and reflections. The short broke ground by rendering convincing human faces in real time, capturing a broad range of emotional states.

Epic and NVIDIA sponsored three installments in the DXR Spotlight Contest, which showed that even one-person teams could achieve remarkable results with DXR, Unreal Engine 4 and NVIDIA GeForce RTX.

One standout was “Attack from Outer Space,” a video demo developed solely by artist Christian Hecht.

Today, Epic debuts Unreal Engine 5. This launch introduces Nanite and Lumen, which enables developers to create games and apps that contain massive amounts of geometric detail with fully dynamic global illumination.

Nanite enables film-quality source art consisting of billions of polygons to be directly imported into Unreal Engine — all while maintaining a real-time frame rate and without sacrificing fidelity.

With Lumen, developers can create more dynamic scenes where indirect lighting adapts on the fly, such as changing the sun angle with the time of day, turning on a flashlight or opening an exterior door. Lumen removes the need for authoring lightmap UVs, waiting for lightmaps to bake or placing reflection captures, which results in crucial time savings in the development process.

NVIDIA is supporting Unreal Engine 5 with plugins for key technologies, including Deep Learning Super Sampling (DLSS), NVIDIA Reflex and RTX Global Illumination.

DLSS taps into the power of a deep learning neural network to boost frame rates and generate beautiful, sharp images. Reflex aligns CPU work to complete just in time for the GPU to start processing, minimizing latency and improving system responsiveness. RTX Global illumination computes multibounce indirect lighting without bake times, light leaks or expensive per-frame costs.

You can see DLSS and Reflex in action on Unreal Engine 5 by playing Epic’s Fortnite on an NVIDIA GeForce RTX-powered PC.

NVIDIA Ominiverse is the ideal companion to the next generation of Unreal Engine. The platform enables artists and developers to connect their 3D design tools for more collaborative workflows, build their own tools for 3D worlds, and use NVIDIA AI technologies. The Unreal Engine Connector enables creators and developers to achieve live-sync workflows between Omniverse and Unreal Engine. This connector will supercharge any game developer’s art pipeline.

Learn more about NVIDIA technologies for Unreal Engine 5.

The post Unreal Engine and NVIDIA: From One Generation to the Next appeared first on NVIDIA Blog.

Read More

Green Teams Achieve the Dream: NVIDIA Announces NPN Americas Partners of the Year

A dozen companies today received NVIDIA’s highest award for partners, recognizing their impact on AI education and adoption across such industries as education, federal, healthcare and technology.

The winners of the 2021 NPN Americas Partner of the Year Awards have created a profound impact on AI by helping customers meet the demands of recommender systems, conversational AI applications, computer vision services and more.

“From systems to software, NVIDIA’s leadership in creating opportunities for its partner ecosystem is unmatched,” said Rob Enderle, president and principal analyst at the Enderle Group. “The winners of the 2021 NPN Awards reflect a diverse group of trusted technology providers who have cultivated deep expertise in NVIDIA-accelerated AI to serve their markets and industries.”

The past few years have brought new ways of working to every business. Companies have adopted new processes that apply AI to customer service, supply chain optimization, manufacturing, safety and more. NVIDIA’s accelerated computing platforms open new markets to create growth opportunities for our partner ecosystem.

The 2021 NPN award winners for the Americas are:

  • Cambridge Computer – awarded 2021 Americas Higher Education Partner of the Year for its continued focus on the higher-ed market, resulting in broad growth across platforms and NVIDIA DGX AI infrastructure solutions.
  • CDW Canada – awarded 2021 Canadian Partner of the Year for fostering extensive growth of AI in the Canadian market through strategic collaboration with NVIDIA and customers.
  • Colfax – awarded 2021 Americas Networking Partner of the Year for driving end-to-end NVIDIA AI solutions through a skilled team with robust resources, enabling the company to become a leader in the NVIDIA networking space across industries, including manufacturing, higher education, healthcare and life sciences.
  • Deloitte Consulting – awarded 2021 Americas Global Consulting Partner of the Year for building specialized practices around Omniverse Enterprise, NVIDIA Metropolis and new NVIDIA DGX-Ready Managed Services, plus adding the NVIDIA DGX POD to its Innovation Center.
  • Future Tech – awarded 2021 Americas Public Sector Partner of the Year for leading the federal government through the world’s largest AI transformation. Future Tech is the first company to bring Omniverse Enterprise real-time 3D design collaboration and simulation to federal customers, helping to improve their workflows in the physical world.
  • Insight Enterprises – awarded 2021 Americas Software Partner of the Year for the second year in a row, for broad collaboration with NVIDIA across AI, virtualization and simulation software, with leadership in making continued investment in NVIDIA technology with proof-of-concept labs, NVIDIA certifications, sales and technical training.
  • Lambda  – awarded 2021 Americas Solution Integration Partner of the Year for the second consecutive year for its extensive expertise and commitment to providing the full NVIDIA portfolio with AI and deep learning hardware and software solutions across industries, including higher education and research, the federal and public sector, health and life sciences.
  • Mark III – awarded 2021 Americas Rising Star Partner of the Year – a new category added to recognize growing excellence in innovation, go-to-market strategies and growth in the AI business landscape. Mark III won for creatively setting the pace for NVIDIA partners as they guide clients toward architecting AI Centers of Excellence.
  • PNY – awarded 2021 Americas Distribution Partner of the Year for being a value-added partner and trusted advisor to the channel that has delivered NVIDIA’s accelerated computing platforms and software across the media and entertainment and healthcare industries, and many other vertical markets, as well as with cloud service providers.
  • Quantiphi – awarded 2021 Americas Service Delivery Partner of the Year for its diverse engineering services, application-first approach and commitment to solving customer problems using NVIDIA DGX and software development kits, positioning itself to capitalize on the rapidly growing field of data science enablement services.
  • World Wide Technology – awarded 2021 Americas AI Solution Provider of the Year for its leadership and commitment in driving adoption of the complete NVIDIA portfolio of AI and accelerated computing solutions, as well as continued investments in AI infrastructure for customer testing and labs in the WWT Advanced Technology Center.
  • World Wide Technology – also named 2021 Americas Healthcare Partner of the Year for expertise in driving NVIDIA AI solutions and accelerated computing to healthcare and life sciences organizations, demonstrating strong capabilities in end-to-end scalable AI solutions and professional development to support biopharma, genomics, medical imaging and more.

Congratulations to all of the 2021 NPN award winners in the Americas, and our thanks to all NVIDIA partners supporting customers worldwide as they work to integrate the transformative potential of AI into their businesses.

The post Green Teams Achieve the Dream: NVIDIA Announces NPN Americas Partners of the Year appeared first on NVIDIA Blog.

Read More

Build an MLOps sentiment analysis pipeline using Amazon SageMaker Ground Truth and Databricks MLflow

As more organizations move to machine learning (ML) to drive deeper insights, two key stumbling blocks they run into are labeling and lifecycle management. Labeling is the identification of data and adding labels to provide context so an ML model can learn from it. Labels might indicate a phrase in an audio file, a car in a photograph, or an organ in an MRI. Data labeling is necessary to enable ML models to work against the data. Lifecycle management has to do with the process of setting up an ML experiment and documenting the dataset, library, version, and model used to get results. A team might run hundreds of experiments before settling on one approach. Going back and recreating that approach can be difficult without records of the elements of that experiment.

Many ML examples and tutorials start with a dataset that includes a target value. However, real-world data doesn’t always have such a target value. For example, in sentiment analysis, a person can usually make a judgment on whether a review is positive, negative, or mixed. But reviews are made up of a collection of text with no judgment value attached to it. In order to create a supervised learning model to solve this problem, a high-quality labeled dataset is essential. Amazon SageMaker Ground Truth is a fully managed data labeling service that makes it easy to build highly accurate training datasets for ML.

For organizations that use Databricks as their data and analytics platform on AWS to perform extract, transform, and load (ETL) tasks, the ultimate goal is often training a supervised learning model. In this post, we show how Databricks integrates with Ground Truth and Amazon SageMaker for data labeling and model distribution.

Solution overview

Ground Truth is a fully managed data labeling service that makes it easy to build highly accurate training datasets for ML. Through the Ground Truth console, we can create custom or built-in data labeling workflows in minutes. These workflows support a variety of use cases, including 3D point clouds, video, images, and text. In addition, Ground Truth offers automatic data labeling, which uses an ML model to label our data.

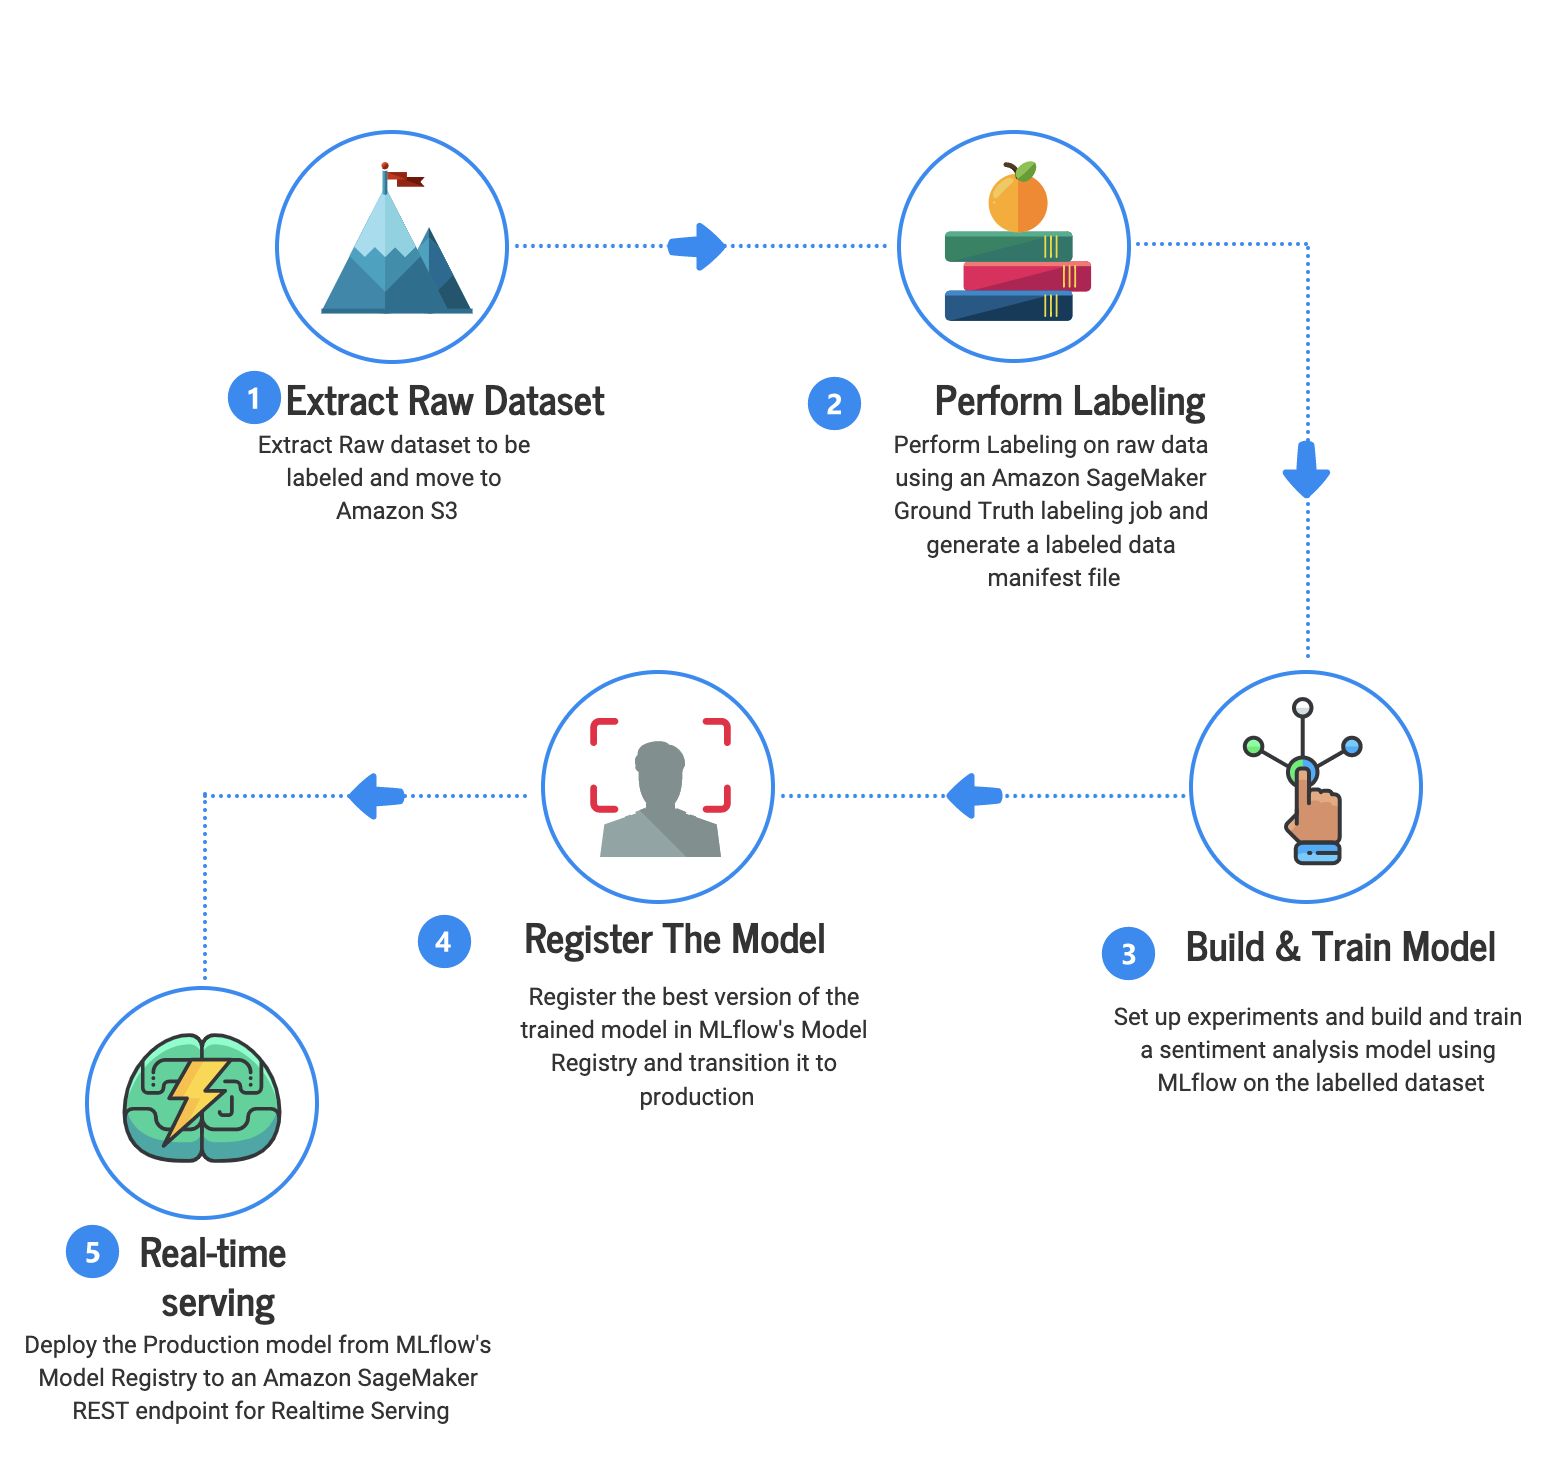
We train our model on the publicly available Amazon Customer Reviews dataset. At a high level, the steps are as follows:

  1. Extract a raw dataset to be labeled and move it to Amazon Simple Storage Service (Amazon S3).
  2. Perform labeling by creating a labeling job in SageMaker.
  3. Build and train a simple Scikit-learn linear learner model to classify the sentiment of the review text on the Databricks platform using a sample notebook.
  4. Use MLflow components to create and perform MLOps and save the model artifacts.
  5. Deploy the model as a SageMaker endpoint using the MLflow SageMaker library for real-time inference.

The following diagram illustrates the labeling and ML journey using Ground Truth and MLflow.

Create a labeling job in SageMaker

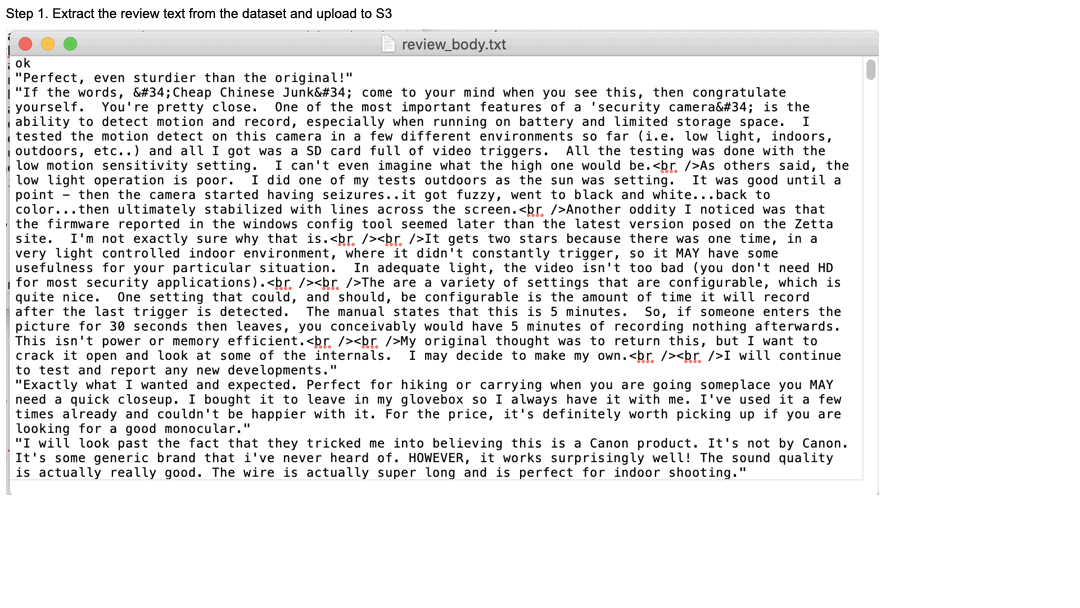
From the Amazon Customer Reviews dataset, we extract the text portions only, because we’re building a sentiment analysis model. Once extracted, we put the text in an S3 bucket and then create a Ground Truth labeling job via the SageMaker console.

On the Create labeling job page, fill out all required fields. As a part of step on this page, Ground Truth allows you to generate the job manifest file. Ground Truth uses the input manifest file to identify the number of files or objects in the labeling job so that the right number of tasks are created and sent to human (or machine) labelers. The file is automatically saved in the S3 bucket. The next step is to specify the task category and task selection. In this use case, we choose Text as the task category, and Text Classification with a single label for task selection, which means a review text will have a single sentiment: positive, negative, or neutral.

Finally, we write simple but concise instructions for labelers on how to label the text data. The instructions are displayed on the labeling tool and you can optionally review the annotator’s view at this time. Finally, we submit the job and monitor the progress on the console.

While the labeling job is in progress, we can also look at the labeled data on the Output tab. We can monitor each review text and label, and if the job was done by a human or machine. We can select 100% of the labeling jobs to be done by humans or choose machine annotation, which speeds up the job and reduces labor costs.

When the job is complete, the labeling job summary contains links to the output manifest and the labeled dataset. We can also go to Amazon S3 and download both from our S3 bucket folder.

In the next steps, we use a Databricks notebook, MLflow, and datasets labeled by Ground Truth to build a Scikit-learn model.

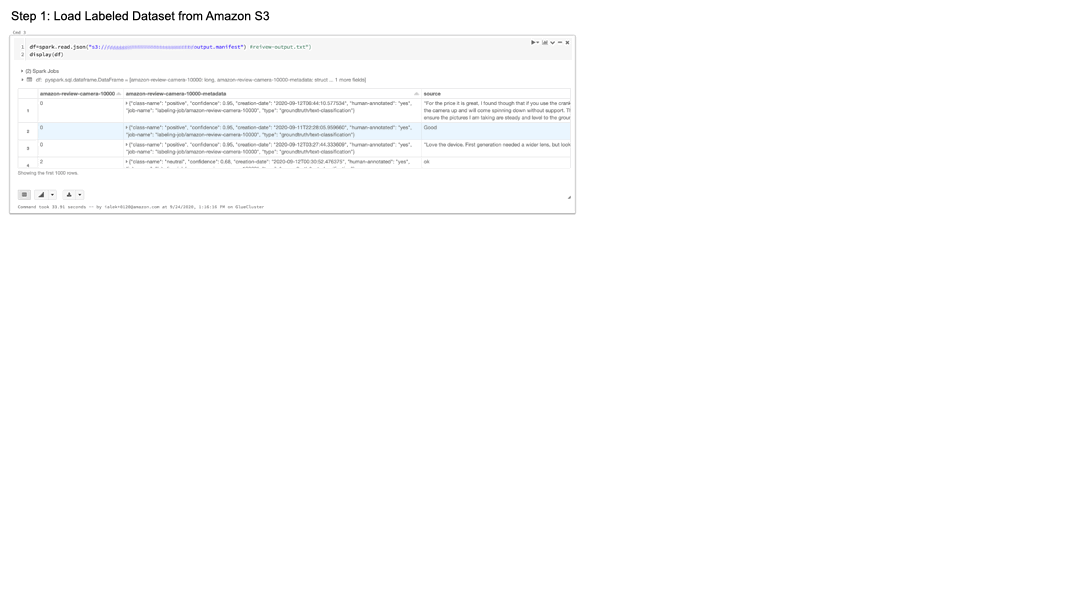
Download a labeled dataset from Amazon S3

We start by downloading the labeled dataset from Amazon S3. The manifest is saved in JSON format and we load it into a Spark DataFrame in Databricks. For training the sentiment analysis model, we only need the review text and sentiment that was annotated by the Ground Truth labeling job. We use select() to extract those two features. Then we convert the dataset from a PySpark DataFrame to a Pandas DataFrame, because the Scikit-learn algorithm requires Pandas DataFrame format.

Next, we use Scikit-learn CountVectorizer to transform the review text into a bigram vector by setting the ngram_range max value to 2. CountVectorizer converts text into a matrix of token counts. Then we use TfidfTransformer to transform the bigram vector into a term frequency-inverse document frequency (TF-IDF) format.

We compare the accuracy scores for training done with a bigram vector vs. bigram with TF-IDF. TF-IDF is a statistical measure that evaluates how relevant a word is to a document in a collection of documents. Because the review text tends to be relatively short, we can observe how TF-IDF affects the performance of the predictive model.

Set up an MLflow experiment

MLflow was developed by Databricks and is now an open-source project. MLflow manages the ML lifecycle, so you can track, recreate, and publish experiments easily.

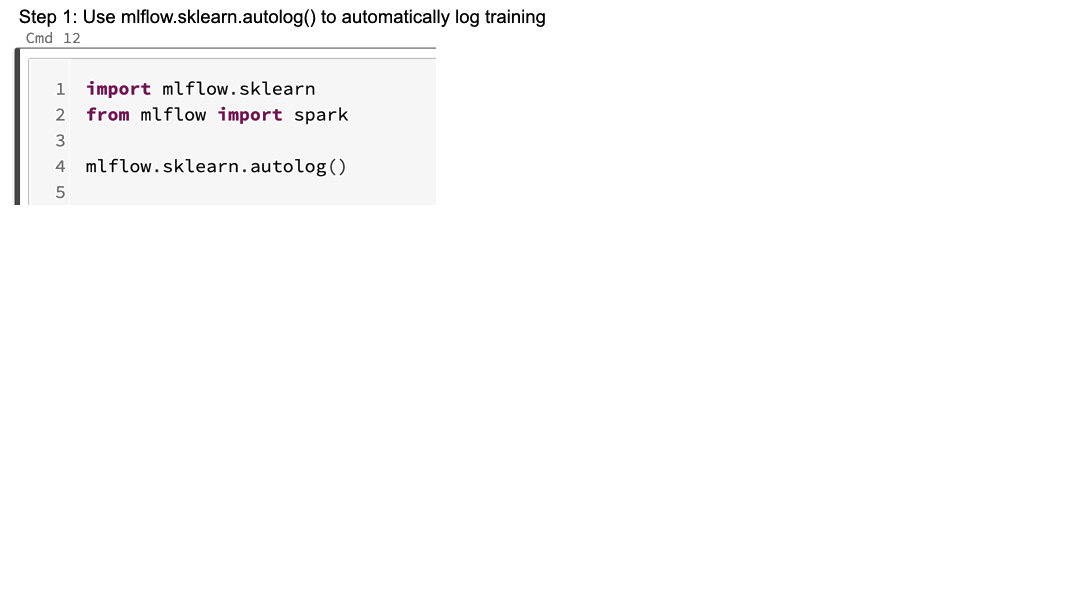
To set up MLflow experiments, we use mlflow.sklearn.autolog() to enable auto logging of hyperparameters, metrics, and model artifacts whenever estimator.fit(), estimator.fit_predict(), and estimator.fit_transform() are called. Alternatively, you can do this manually by calling mlflow.log_param() and mlflow.log_metric().

We fit the transformed dataset to a linear classifier with Stochastic Gradient Descent (SGD) learning. With SGD, the gradient of the loss is estimated one sample at a time and the model is updated along the way with a decreasing strength schedule.

Those two datasets we prepared earlier are passed to the train_and_show_scores() function for training. After training, we need to register a model and save its artifacts. We use mlflow.sklearn.log_model() to do so.

Before deploying, we look at the experiment’s results and choose two experiments (one for bigram and the other for bigram with TF-IDF) to compare. In our use case, the second model trained with bigram TF-IDF performed slightly better, so we pick that model to deploy. After the model is registered, we deploy the model, changing the model stage to production. We can accomplish this on the MLflow UI, or in the code using transition_model_version_stage().

Deploy and test the model as a SageMaker endpoint

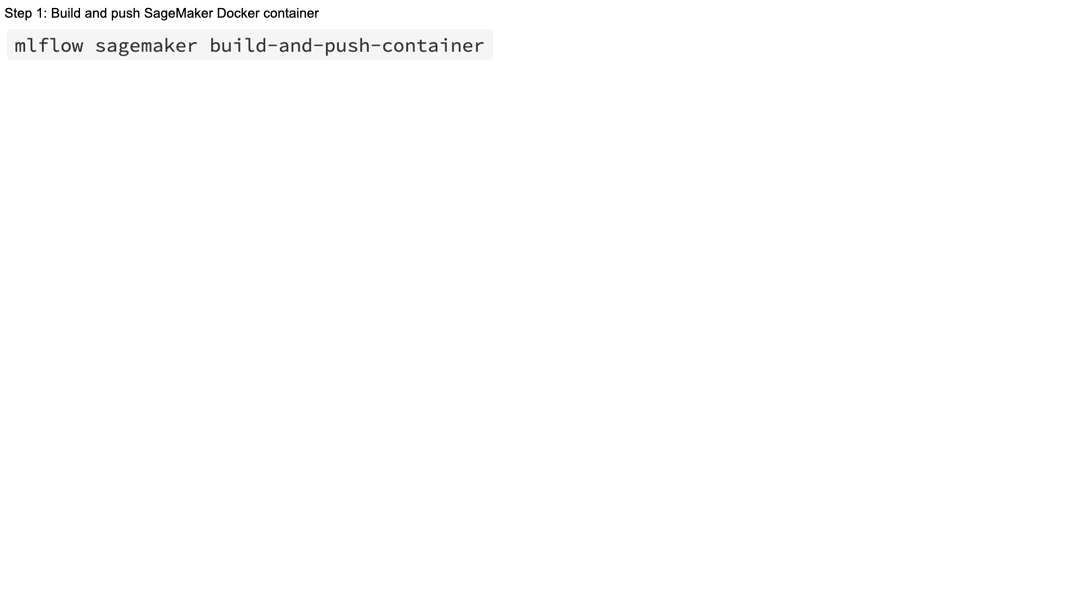
Before we deploy the trained model, we need to build a Docker container to host the model in SageMaker. We do this by running a simple MLflow command that builds and pushes the container to Amazon Elastic Container Registry (Amazon ECR) in our AWS account.

We can now find the image URI on the Amazon ECR console. We pass the image URI as an image_url parameter, and use DEPLOYMENT_MODE_CREATE for the mode parameter if this is a new deployment. If updating an existing endpoint with a new version, use DEPLOYMENT_MODE_REPLACE.

To test the SageMaker endpoint, we create a function that takes the endpoint name and input data as its parameters.

Conclusion

In this post, we showed you how to use Ground Truth to label a raw dataset, and the use the labeled data to train a simple linear classifier using Scikit-learn. In this example, we use MLflow to track hyperparameters and metrics, register a production-grade model, and deploy the trained model to SageMaker as an endpoint. Along with Databricks to process the data, you can automate this whole use case, so as new data is introduced, it can be labeled and processed into the model. By automating these pipelines and models, data science teams can focus on new use cases and uncover more insights instead of spending their time managing data updates on a day-to-day basis.

To get started, check out Use Amazon SageMaker Ground Truth to Label Data and sign up for a 14-day free trial of Databricks on AWS. To learn more about how Databricks integrates with SageMaker, as well as other AWS services like AWS Glue and Amazon Redshift, visit Databricks on AWS.

Additionally, check out the following resources used in this post:

Use the following notebook to get started.


About the Authors

Rumi Olsen is a Solutions Architect in the AWS Partner Program. She specializes in serverless and machine learning solutions in her current role, and has a background in natural language processing technologies. She spends most of her spare time with her daughter exploring the nature of Pacific Northwest.

Igor Alekseev is a Partner Solution Architect at AWS in Data and Analytics. Igor works with strategic partners helping them build complex, AWS-optimized architectures. Prior joining AWS, as a Data/Solution Architect, he implemented many projects in Big Data, including several data lakes in the Hadoop ecosystem. As a Data Engineer, he was involved in applying AI/ML to fraud detection and office automation. Igor’s projects were in a variety of industries including communications, finance, public safety, manufacturing, and healthcare. Earlier, Igor worked as full stack engineer/tech lead.

Naseer Ahmed is a Sr. Partner Solutions Architect at Databricks supporting its AWS business. Naseer specializes in Data Warehousing, Business Intelligence, App development, Container, Serverless, Machine Learning Architectures on AWS. He was voted 2021 SME of the year at Databricks and is an avid crypto enthusiast.

Read More

School of Engineering welcomes Thomas Tull as visiting innovation scholar

Thomas Tull, leading visionary entrepreneur and investor, has been appointed a School of Engineering visiting innovation scholar, effective April 1.

Throughout his career, Tull has leveraged the power of technology, artificial intelligence, and data science to disrupt and revolutionize disparate industries. Today, as the founder, chair, and CEO of Tulco LLC, a privately held holding company, he looks to partner with companies employing cutting-edge ideas in industries that are established but often underfunded and under-innovated. Under Tull’s leadership Tulco has deployed proprietary technology, including new methods in data creation and deep learning, to help companies bring their ideas to fruition and facilitate industry-leading change.

Tull’s hands-on approach involves not only data science and analytical tools, but also a close partnership with business leaders. Along with Tull’s success on the infusion of transformational technology into business practices has come a focus on its societal impact and human interface.

As part of his role in the School of Engineering, Tull will focus on how cutting-edge programs centered around AI, quantum computing, and semiconductors might be leveraged for the greater good, while likewise helping to advance the role of humanities in developing emerging technologies and leaders. Tull will also engage with students, faculty, and staff through a variety of activities including seminars and speaking engagements, and will serve as a strategic advisor to the dean on various initiatives.

“Thomas is an incredible advocate and ambassador for innovation and technology,” says Anantha Chandrakasan, dean of the MIT School of Engineering and Vannevar Bush Professor for Electrical Engineering and Computer Science. “His commitment to these areas and impact on so many industries have been impressive, and we’re thrilled that he will join us to foster innovation across the school.”

Prior to starting Tulco, Tull was the founder and CEO of the film company Legendary Entertainment, which he started in 2004, producing a number of blockbuster films including “The Dark Knight” trilogy, “300,” “The Hangover” franchise, and many others. At Legendary, Tull deployed sophisticated and innovative AI, machine learning, and data analytics into the company to increase the commercial success of its films,  forever changing how movies are marketed.  

“Technological advancement is essential to our future and MIT is one of the leaders committed to exploring new frontiers and the latest technologies to enable the next generation to continue to create cutting-edge innovation,” says Tull. “I have always greatly admired MIT’s and the School of Engineering’s work on this front and it is an honor to be invited to contribute to this amazing institution. I look forward to working with the school over the next year.”

Tull is also an active supporter of philanthropic causes that support education, medical and scientific research, and conservation through the Tull Family Foundation. He is a member of the MIT School of Engineering Dean’s Advisory Council, and a trustee of Carnegie Mellon University, Yellowstone Forever, the National Baseball Hall of Fame and Museum, and the Smithsonian Institution. Tull is also part of the ownership group of the Pittsburgh Steelers and owns a farm in Pittsburgh where he has implemented the use of robotics, drones, analytics, and other advanced technologies to boost yields of high-quality natural foods.

Tull received his undergraduate degree from Hamilton College and resides in Pittsburgh, Pennsylvania.

Read More

Enable Amazon Kendra search for a scanned or image-based text document

Amazon Kendra is an intelligent search service powered by machine learning (ML). Amazon Kendra reimagines search for your websites and applications so your employees and customers can easily find the content they’re looking for, even when it’s scattered across multiple locations and content repositories within your organization.

Amazon Kendra supports a variety of document formats, such as Microsoft Word, PDF, and text. While working with a leading Edtech customer, we were asked to build an enterprise search solution that also utilizes images and PPT files. This post focuses on extending the document support in Amazon Kendra so you can preprocess text images and scanned documents (JPEG, PNG, or PDF format)  to make them searchable. The solution combines Amazon Textract for document preprocessing and optical character recognition (OCR), and Amazon Kendra for intelligent search.

With the new Custom Document Enrichment feature in Amazon Kendra, you can now preprocess your documents during ingestion and augment your documents with new metadata. Custom Document Enrichment allows you to call external services like Amazon Comprehend, Amazon Textract, and Amazon Transcribe to extract text from images, transcribe audio, and analyze video. For more information about using Custom Document Enrichment, refer to Enrich your content and metadata to enhance your search experience with custom document enrichment in Amazon Kendra.

In this post, we propose an alternate method of preprocessing the content prior to calling the ingestion process in Amazon Kendra.

Solution overview

Amazon Textract is an ML service that automatically extracts text, handwriting, and data from scanned documents and goes beyond basic OCR to identify, understand, and extract data from forms and tables. Today, many companies manually extract data from scanned documents like PDFs, images, tables, and forms through basic OCR software that requires manual configuration, which often requires reconfiguration when the form changes.

To overcome these manual and expensive processes, Amazon Textract uses machine learning to read and process a wide range of documents, accurately extracting text, handwriting, tables, and other data without any manual effort. You can quickly automate document processing and take action on the information extracted, whether it’s automating loans processing or extracting information from invoices and receipts.

Amazon Kendra is an easy-to-use enterprise search service that allows you to add search capabilities to your applications so that end-users can easily find information stored in different data sources within your company. This could include invoices, business documents, technical manuals, sales reports, corporate glossaries, internal websites, and more. You can harvest this information from storage solutions like Amazon Simple Storage Service (Amazon S3) and OneDrive; applications such as Salesforce, SharePoint, and ServiceNow; or relational databases like Amazon Relational Database Service (Amazon RDS).

The proposed solution enables you to unlock the search potential in scanned documents, extending the ability of Amazon Kendra to find accurate answers in a wider range of document types. The workflow includes the following steps:

  1. Upload a document (or documents of various types) to Amazon S3.
  2. The event triggers an AWS Lambda function that uses the synchronous Amazon Textract API (DetectDocumentText).
  3. Amazon Textract reads the document in Amazon S3, extracts the text from it, and returns the extracted text to the Lambda function.
  4. The data source on the new text file needs to be reindexed.
  5. When reindexing is complete, you can search the new dataset either via the Amazon Kendra console or API.

The following diagram illustrates the solution architecture.

In the following sections, we demonstrate how to configure the Lambda function, create the event trigger, process a document, and then reindex the data.

Configure the Lambda function

To configure your Lambda function, add the following code to the function Python editor:

import urllib
import boto3

textract = boto3.client('textract')
def handler(event, context):
	source_bucket = event['Records'][0]['s3']['bucket']['name']
	object_key = urllib.parse.unquote_plus(event['Records'][0]['s3']['object']['key'])
	
	textract_result = textract.detect_document_text(
		Document={
			'S3Object': {
				'Bucket': source_bucket,
				'Name': object_key
			}
		})
	page=""
	blocks = [x for x in textract_result['Blocks'] if x['BlockType'] == "LINE"]
	for block in blocks:
		page += " " + block['Text']
        	
	print(page)
	s3 = boto3.resource('s3')
	object = s3.Object('demo-kendra-test', 'text/apollo11-summary.txt')
	object.put(Body=page)

We use the DetectDocumentText API to extract the text from an image (JPEG or PNG) retrieved in Amazon S3.

Create an event trigger at Amazon S3

In this step, we create an event trigger to start the Lambda function when a new document is uploaded to a specific bucket. The following screenshot shows our new function on the Amazon S3 console.

You can also verify the event trigger on the Lambda console.

Process a document

To test the process, we upload an image to the S3 folder that we defined for the S3 event trigger. We use the following sample image.

When the Lambda function is complete, we can go to the Amazon CloudWatch console to check the output. The following screenshot shows the extracted text, which confirms that the Lambda function ran successfully.

Reindex the data with Amazon Kendra

We can now reindex our data.

  1. On the Amazon Kendra console, under Data management in the navigation pane, choose Data sources.
  2. Select the data source demo-s3-datasource.
  3. Choose Sync now.

The sync state changes to Synching - crawling.

When the sync is complete, the sync status changes to Succeeded and the sync state changes to Idle.

Now we can go back to the search console and see our faceted search in action.

  1. In the navigation pane, choose Search console.

We added metadata for a few items; two of them are the ML algorithms XGBoost and BlazingText.

  1. Let’s try searching for Sagemaker.

Our search was successful, and we got a list of results. Let’s see what we have for facets.

  1. Expand Filter search results.

We have the category and tags facets that were part of our item metadata.

  1. Choose BlazingText to filter results just for that algorithm.
  2. Now let’s perform the search on newly uploaded image files. The following screenshot shows the search on new preprocessed documents.

Conclusion

This blog will be helpful in improving the effectiveness of search results and search experience. You can use Amazon Textract to extract text from scanned images that are added as metadata and later available as facets to interact with the search results. This is just an illustration of how you can use AWS native services to create a differentiated search experience for your users. This also helps in unlocking the full potential of your knowledge assets.

For a deeper dive into what you can achieve by combining other AWS services with Amazon Kendra, refer to Make your audio and video files searchable using Amazon Transcribe and Amazon KendraBuild an intelligent search solution with automated content enrichment, and other posts on the Amazon Kendra blog.


About of Author

Sanjay Tiwary is a Specialist Solutions Architect AI/ML. He spends his time working with strategic customers to define business requirements, provide L300 sessions around specific use cases, and design ML applications and services that are scalable, reliable, and performant. He has helped launch and scale the AI/ML powered Amazon SageMaker service and has implemented several proofs of concept using Amazon AI services. He has also developed the advanced analytics platform as a part of the digital transformation journey.

Read More

Interpret caller input using grammar slot types in Amazon Lex

Customer service calls require customer agents to have the customer’s account information to process the caller’s request. For example, to provide a status on an insurance claim, the support agent needs policy holder information such as the policy ID and claim number. Such information is often collected in the interactive voice response (IVR) flow at the beginning of a customer support call. IVR systems have typically used grammars based on the Speech Recognition Grammar Specification (SRGS) format to define rules and parse caller information (policy ID, claim number). You can now use the same grammars in Amazon Lex to collect information in a speech conversation. You can also provide semantic interpretation rules using ECMAScript tags within the grammar files. The grammar support in Amazon Lex provides granular control for collecting and postprocessing user input so you can manage an effective dialog.

In this post, we review the grammar support in Amazon Lex and author a sample grammar for use in an Amazon Connect contact flow.

Use grammars to collect information in a conversation

You can author the grammar as a slot type in Amazon Lex. First, you provide a set of rules in the SRGS format to interpret user input. As an optional second step, you can write an ECMA script that transforms the information collected in the dialog. Lastly, you store the grammar as an XML file in an Amazon Simple Storage Service (Amazon S3) bucket and reference the link in your bot definition. SRGS grammars are specifically designed for voice and DTMF modality. We use the following sample conversations to model our bot:

Conversation 1

IVR: Hello! How can I help you today?

User: I want to check my account balance.

IVR: Sure. Which account should I pull up?

User: Checking.

IVR: What is the account number?

User: 1111 2222 3333 4444

IVR: For verification purposes, what is your date of birth?

User: Jan 1st 2000.

IVR: Thank you. The balance on your checking account is $123 dollars.

Conversation 2

IVR: Hello! How can I help you today?

User: I want to check my account balance.

IVR: Sure. Which account should I pull up?

User: Savings.

IVR: What is the account number?

User: I want to talk to an agent.

IVR: Ok. Let me transfer the call. An agent should be able to help you with your request.

In the sample conversations, the IVR requests the account type, account number, and date of birth to process the caller’s requests. In this post, we review how to use the grammars to collect the information and postprocess it with ECMA scripts. The grammars for account ID and date cover multiple ways to provide the information. We also review the grammar in case the caller can’t provide the requested details (for example, their savings account number) and instead opts to speak with an agent.

Build an Amazon Lex chatbot with grammars

We build an Amazon Lex bot with intents to perform common retail banking functions such as checking account balance, transferring funds, and ordering checks. The CheckAccountBalance intent collects details such as account type, account ID, and date of birth, and provides the balance amount. We use a grammar slot type to collect the account ID and date of birth. If the caller doesn’t know the information or asks for an agent, the call is transferred to a human agent. Let’s review the grammar for the account ID:

<grammar version="1.0" xmlns="http://www.w3.org/2001/06/grammar" xml:lang="en-US" tag-format="semantics/1.0" root="captureAccount"><!-- Header definition for US language and the root rule "captureAccount" to start with-->

	<rule id="captureAccount" scope="public">
		<tag> out=""</tag>
		<one-of>
			<item><ruleref uri="#digit"/><tag>out += rules.digit.accountNumber</tag></item><!--Call the subrule to capture 16 digits--> 
			<item><ruleref uri="#agent"/><tag>out =rules.agent;</tag></item><!--Exit point to route the caller to an agent--> 
		</one-of>
	</rule>

	<rule id="digit" scope="public"> <!-- Capture digits from 1 to 9 -->
		<tag>out.accountNumber=""</tag>
		<item repeat="16"><!-- Repeat the rule exactly 16 times -->
			<one-of>
				<item>1<tag>out.accountNumber+=1;</tag></item>
				<item>2<tag>out.accountNumber+=2;</tag></item>
				<item>3<tag>out.accountNumber+=3;</tag></item>
				<item>4<tag>out.accountNumber+=4;</tag></item>
				<item>5<tag>out.accountNumber+=5;</tag></item>
				<item>6<tag>out.accountNumber+=6;</tag></item>
				<item>7<tag>out.accountNumber+=7;</tag></item>
				<item>8<tag>out.accountNumber+=8;</tag></item>
				<item>9<tag>out.accountNumber+=9;</tag></item>
				<item>0<tag>out.accountNumber+=0;</tag></item>
				<item>oh<tag>out.accountNumber+=0</tag></item>
				<item>null<tag>out.accountNumber+=0;</tag></item>
			</one-of>
		</item>
	</rule>
	
	<rule id="agent" scope="public"><!-- Exit point to talk to an agent-->
		<item>
			<item repeat="0-1">i</item>
			<item repeat="0-1">want to</item>
			<one-of>
				<item repeat="0-1">speak</item>
				<item repeat="0-1">talk</item>
			</one-of>
			<one-of>
				<item repeat="0-1">to an</item>
				<item repeat="0-1">with an</item>
			</one-of>
			<one-of>
				<item>agent<tag>out="agent"</tag></item>
				<item>employee<tag>out="agent"</tag></item>
			</one-of>
		</item>
    </rule>
</grammar>

The grammar has two rules to parse user input. The first rule interprets the digits provided by the caller. These digits are appended to the output via an ECMA script tag variable (out). The second rule manages the dialog if the caller wants to talk to an agent. In this case the out tag is populated with the word agent. After the rules are parsed, the out tag carries the account number (out.AccountNumber) or the string agent. The downstream business logic can now use the out tag handle the call.

Deploy the sample Amazon Lex bot

To create the sample bot and add the grammars, perform the following steps. This creates an Amazon Lex bot called BankingBot, and two grammar slot types (accountNumber, dateOfBirth).

  1. Download the Amazon Lex bot.
  2. On the Amazon Lex console, choose Actions, then choose Import.
  3. Choose the file BankingBot.zip that you downloaded, and choose Import. In the IAM Permissions section, for Runtime role, choose Create a new role with basic Amazon Lex permissions.
  4. Choose the bot BankingBot on the Amazon Lex console.
  5. Download the XML files for accountNumber and dateOfBirth. (Note: In some browsers you will have to “Save the link” to download the XML files)
  6. On the Amazon S3 console, upload the XML files.
  7. Navigate to the slot types on the Amazon Lex console, and click on the accountNumber slot type
  8. In the slot type grammar select the S3 bucket with the XML file and provide the object key. Click on Save slot type.
  9. Navigate to the slot types on the Amazon Lex console, and click on the dateOfBirth slot type
  10. In the slot type grammar select the S3 bucket with the XML file and provide the object key. Click on Save slot type.
  11. After the grammars are saved, choose Build.
  12. Download the supporting AWS Lambda and Navigate to the AWS Lambda console.
  13. On the create function page select Author from scratch. As basic information please provide the following: function name BankingBotEnglish, and Runtime Python 3.8.
  14. Click on Create function. In the Code source section, open lambda_funciton.py and delete the existing code. Download the code and open it in a text editor. Copy and paste the code into the empty lambda_funciton.py tab.
  15. Choose deploy.
  16. Navigate to the Amazon Lex Console and select BankingBot. Click on Deployment and then Aliases followed by TestBotAlias
  17. On the Aliases page select languages and navigate to English (US).
  18. For source select BankingBotEnglish, for Lambda version or alias select $LATEST
  19. Navigate to the Amazon Connect console, choose Contact flows.
  20. Download the contact flow to integrate with the Amazon Lex bot.
  21. In the Amazon Lex section, select your Amazon Lex bot and make it available for use in the Amazon Connect contact flows.
  22. Select the contact flow to load it into the application.
  23. Make sure the right bot is configured in the “Get Customer Input” block. Add a phone number to the contact flow.
  24. Choose a queue in the “Set working queue” block.
  25. Test the IVR flow by calling in to the phone number.
  26. Test the solution.

Test the solution

You can call in to the Amazon Connect phone number and interact with the bot. You can also test the solution directly on the Amazon Lex V2 console using voice and DTMF.

Conclusion

Custom grammar slots provide the ability to collect different types of information in a conversation. You have the flexibility to capture transitions such as handover to an agent. Additionally, you can postprocess the information before running the business logic. You can enable grammar slot types via the Amazon Lex V2 console or AWS SDK. The capability is available in all AWS Regions where Amazon Lex operates in the English (Australia), English (UK), and English (US) locales.

To learn more, refer to Using a custom grammar slot type. You can also view the Amazon Lex documentation for SRGS or ECMAScript for more information.


About the Authors

Kai Loreck is a professional services Amazon Connect consultant. He works on designing and implementing scalable customer experience solutions. In his spare time, he can be found playing sports, snowboarding, or hiking in the mountains.

Harshal Pimpalkhute is a Product Manager on the Amazon Lex team. He spends his time trying to get machines to engage (nicely) with humans.

Read More