Break through language barriers with Amazon Transcribe, Amazon Translate, and Amazon Polly

Imagine a surgeon taking video calls with patients across the globe without the need of a human translator. What if a fledgling startup could easily expand their product across borders and into new geographical markets by offering fluid, accurate, multilingual customer support and sales, all without the need of a live human translator? What happens to your business when you’re no longer bound by language?

It’s common today to have virtual meetings with international teams and customers that speak many different languages. Whether they’re internal or external meetings, meaning often gets lost in complex discussions and you may encounter language barriers that prevent you from being as effective as you could be.

In this post, you will learn how to use three fully managed AWS services (Amazon Transcribe, Amazon Translate, and Amazon Polly) to produce a near-real-time speech-to-speech translator solution that can quickly translate a source speaker’s live voice input into a spoken, accurate, translated target language, all with zero machine learning (ML) experience.

Overview of solution

Our translator consists of three fully managed AWS ML services working together in a single Python script by using the AWS SDK for Python (Boto3) for our text translation and text-to-speech portions, and an asynchronous streaming SDK for audio input transcription.

Amazon Transcribe: Streaming speech to text

The first service you use in our stack is Amazon Transcribe, a fully managed speech-to-text service that takes input speech and transcribes it to text. Amazon Transcribe has flexible ingestion methods, batch or streaming, because it accepts either stored audio files or streaming audio data. In this post, you use the asynchronous Amazon Transcribe streaming SDK for Python, which uses the HTTP/2 streaming protocol to stream live audio and receive live transcriptions.

When we first built this prototype, Amazon Transcribe streaming ingestion didn’t support automatic language detection, but this is no longer the case as of November 2021. Both batch and streaming ingestion now support automatic language detection for all supported languages. In this post, we show how a parameter-based solution though a seamless multi-language parameterless design is possible through the use of streaming automatic language detection. After our transcribed speech segment is returned as text, you send a request to Amazon Translate to translate and return the results in our Amazon Transcribe EventHandler method.

Amazon Translate: State-of-the-art, fully managed translation API

Next in our stack is Amazon Translate, a neural machine translation service that delivers fast, high-quality, affordable, and customizable language translation. As of June of 2022, Amazon Translate supports translation across 75 languages, with new language pairs and improvements being made constantly. Amazon Translate uses deep learning models hosted on a highly scalable and resilient AWS Cloud architecture to quickly deliver accurate translations either in real time or batched, depending on your use case. Using Amazon Translate is straightforward and requires no management of underlying architecture or ML skills. Amazon Translate has several features, like creating and using a custom terminology to handle mapping between industry-specific terms. For more information on Amazon Translate service limits, refer to Guidelines and limits. After the application receives the translated text in our target language, it sends the translated text to Amazon Polly for immediate translated audio playback.

Amazon Polly: Fully managed text-to-speech API

Finally, you send the translated text to Amazon Polly, a fully managed text-to-speech service that can either send back lifelike audio clip responses for immediate streaming playback or batched and saved in Amazon Simple Storage Service (Amazon S3) for later use. You can control various aspects of speech such as pronunciation, volume, pitch, speech rate, and more using standardized Speech Synthesis Markup Language (SSML).

You can synthesize speech for certain Amazon Polly Neural voices using the Newscaster style to make them sound like a TV or radio newscaster. You can also detect when specific words or sentences in the text are being spoken based on the metadata included in the audio stream. This allows the developer to synchronize graphical highlighting and animations, such as the lip movements of an avatar, with the synthesized speech.

You can modify the pronunciation of particular words, such as company names, acronyms, foreign words, or neologisms, for example “P!nk,” “ROTFL,” or “C’est la vie” (when spoken in a non-French voice), using custom lexicons.

Architecture overview

The following diagram illustrates our solution architecture.

Architectural Diagram

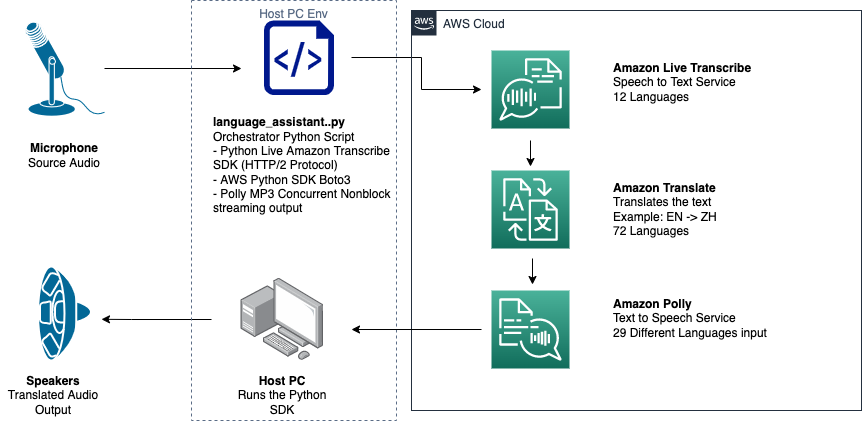
This diagram shows the data flow from the client device to Amazon Transcribe, Amazon Translate, and Amazon Polly

The workflow is as follows:

  1. Audio is ingested by the Python SDK.
  2. Amazon Polly converts the speech to text, in 39 possible languages.
  3. Amazon Translate converts the languages.
  4. Amazon Live Transcribe converts text to speech.
  5. Audio is outputted to speakers.

Prerequisites

You need a host machine set up with a microphone, speakers, and reliable internet connection. A modern laptop should work fine for this because no additional hardware is needed. Next, you need to set up the machine with some software tools.

You must have Python 3.7+ installed to use the asynchronous Amazon Transcribe streaming SDK and for a Python module called pyaudio, which you use to control the machine’s microphone and speakers. This module depends on a C library called portaudio.h. If you encounter issues with pyaudio errors, we suggest checking your OS to see if you have the portaudio.h library installed.

For authorization and authentication of service calls, you create an AWS Identity and Access Management (IAM) service role with permissions to call the necessary AWS services. By configuring the AWS Command Line Interface (AWS CLI) with this IAM service role, you can run our script on your machine without having to pass in keys or passwords, because the AWS libraries are written to use the configured AWS CLI user’s credentials. This is a convenient method for rapid prototyping and ensures our services are being called by an authorized identity. As always, follow the principle of least privilege when assigning IAM policies when creating an IAM user or role.

To summarize, you need the following prerequisites:

  • A PC, Mac, or Linux machine with microphone, speakers, and internet connection
  • The portaudio.h C library for your OS (brew, apt get, wget), which is needed for pyaudio to work
  • AWS CLI 2.0 with properly authorized IAM user configured by running aws configure in the AWS CLI
  • Python 3.7+
  • The asynchronous Amazon Transcribe Python SDK
  • The following Python libraries:
    • boto3
    • amazon-transcribe
    • pyaudio
    • asyncio
    • concurrent

Implement the solution

You will be relying heavily on the asynchronous Amazon Transcribe streaming SDK for Python as a starting point, and are going to build on top of that specific SDK. After you have experimented with the streaming SDK for Python, you add streaming microphone input by using pyaudio, a commonly used Python open-source library used for manipulating audio data. Then you add Boto3 calls to Amazon Translate and Amazon Polly for our translation and text-to-speech functionality. Finally, you stream out translated speech through the computer’s speakers again with pyaudio. The Python module concurrent gives you the ability to run blocking code in its own asynchronous thread to play back your returned Amazon Polly speech in a seamless, non-blocking way.

Let’s import all our necessary modules, transcribe streaming classes, and instantiate some globals:

import boto3
 import asyncio
 import pyaudio
 import concurrent
 from amazon_transcribe.client import TranscribeStreamingClient
 from amazon_transcribe.handlers import TranscriptResultStreamHandler
 from amazon_transcribe.model import TranscriptEvent


 polly = boto3.client('polly', region_name = 'us-west-2')
 translate = boto3.client(service_name='translate', region_name='us-west-2', use_ssl=True)
 pa = pyaudio.PyAudio()

 #for mic stream, 1024 should work fine
 default_frames = 1024

 #current params are set up for English to Mandarin, modify to your liking
 params['source_language'] = "en"
 params['target_language'] = "zh"
 params['lang_code_for_polly'] = "cmn-CN"
 params['voice_id'] = "Zhiyu"
 params['lang_code_for_transcribe'] = "en-US"

First, you use pyaudio to obtain the input device’s sampling rate, device index, and channel count:

#try grabbing the default input device and see if we get lucky
 default_indput_device = pa.get_default_input_device_info()

 # verify this is your microphone device 
 print(default_input_device)

 #if correct then set it as your input device and define some globals
 input_device = default_input_device

 input_channel_count = input_device["maxInputChannels"]
 input_sample_rate = input_device["defaultSampleRate"]
 input_dev_index = input_device["index"]

If this isn’t working, you can also loop through and print your devices as shown in the following code, and then use the device index to retrieve the device information with pyaudio:

print ("Available devices:n")
 for i in range(0, pa.get_device_count()):
     info = pa.get_device_info_by_index(i)
     print (str(info["index"])  + ": t %s n t %s n" % (info["name"], p.get_host_api_info_by_index(info["hostApi"])["name"]))

 # select the correct index from the above returned list of devices, for example zero
 dev_index = 0 
 input_device = pa.get_device_info_by_index(dev_index)

 #set globals for microphone stream
 input_channel_count = input_device["maxInputChannels"]
 input_sample_rate = input_device["defaultSampleRate"]
 input_dev_index = input_device["index"]

You use channel_count, sample_rate, and dev_index as parameters in a mic stream. In that stream’s callback function, you use an asyncio nonblocking thread-safe callback to put the input bytes of the mic stream into an asyncio input queue. Take note of the loop and input_queue objects created with asyncio and how they’re used in the following code:

async def mic_stream():
     # This function wraps the raw input stream from the microphone forwarding
     # the blocks to an asyncio.Queue.
     
     loop = asyncio.get_event_loop()
     input_queue = asyncio.Queue()
     
     def callback(indata, frame_count, time_info, status):
         loop.call_soon_threadsafe(input_queue.put_nowait, indata)
         return (indata, pyaudio.paContinue)
         
     # Be sure to use the correct parameters for the audio stream that matches
     # the audio formats described for the source language you'll be using:
     # https://docs.aws.amazon.com/transcribe/latest/dg/streaming.html
     
     print(input_device)
     
     #Open stream
     stream = pa.open(format = pyaudio.paInt16,
                 channels = input_channel_count,
                 rate = int(input_sample_rate),
                 input = True,
                 frames_per_buffer = default_frames,
                 input_device_index = input_dev_index,
                 stream_callback=callback)
     # Initiate the audio stream and asynchronously yield the audio chunks
     # as they become available.
     stream.start_stream()
     print("started stream")
     while True:
         indata = await input_queue.get()
         yield indata

Now when the generator function mic_stream() is called, it continually yields input bytes as long as there is microphone input data in the input queue.

Now that you know how to get input bytes from the microphone, let’s look at how to write Amazon Polly output audio bytes to a speaker output stream:

#text will come from MyEventsHandler
 def aws_polly_tts(text):

     response = polly.synthesize_speech(
         Engine = 'standard',
         LanguageCode = params['lang_code_for_polly'],
         Text=text,
         VoiceId = params['voice_id'],
         OutputFormat = "pcm",
     )
     output_bytes = response['AudioStream']
     
     #play to the speakers
     write_to_speaker_stream(output_bytes)
     
 #how to write audio bytes to speakers

 def write_to_speaker_stream(output_bytes):
     """Consumes bytes in chunks to produce the response's output'"""
     print("Streaming started...")
     chunk_len = 1024
     channels = 1
     sample_rate = 16000
     
     if output_bytes:
         polly_stream = pa.open(
                     format = pyaudio.paInt16,
                     channels = channels,
                     rate = sample_rate,
                     output = True,
                     )
         #this is a blocking call - will sort this out with concurrent later
         while True:
             data = output_bytes.read(chunk_len)
             polly_stream.write(data)
             
         #If there's no more data to read, stop streaming
             if not data:
                 output_bytes.close()
                 polly_stream.stop_stream()
                 polly_stream.close()
                 break
         print("Streaming completed.")
     else:
         print("Nothing to stream.")

Now let’s expand on what you built in the post Asynchronous Amazon Transcribe Streaming SDK for Python. In the following code, you create an executor object using the ThreadPoolExecutor subclass with three workers with concurrent. You then add an Amazon Translate call on the finalized returned transcript in the EventHandler and pass that translated text, the executor object, and our aws_polly_tts() function into an asyncio loop with loop.run_in_executor(), which runs our Amazon Polly function (with translated input text) asynchronously at the start of next iteration of the asyncio loop.

#use concurrent package to create an executor object with 3 workers ie threads
 executor = concurrent.futures.ThreadPoolExecutor(max_workers=3)

 class MyEventHandler(TranscriptResultStreamHandler):
     async def handle_transcript_event(self, transcript_event: TranscriptEvent):

         #If the transcription is finalized, send it to translate
 
         results = transcript_event.transcript.results
         if len(results) > 0:
             if len(results[0].alternatives) > 0:
                 transcript = results[0].alternatives[0].transcript
                 print("transcript:", transcript)

                 print(results[0].channel_id)
                 if hasattr(results[0], "is_partial") and results[0].is_partial == False:
                     
                     #translate only 1 channel. the other channel is a duplicate
                     if results[0].channel_id == "ch_0":
                         trans_result = translate.translate_text(
                             Text = transcript,
                             SourceLanguageCode = params['source_language'],
                             TargetLanguageCode = params['target_language']
                         )
                         print("translated text:" + trans_result.get("TranslatedText"))
                         text = trans_result.get("TranslatedText")

                         #we run aws_polly_tts with a non-blocking executor at every loop iteration
                         await loop.run_in_executor(executor, aws_polly_tts, text)  

Finally, we have the loop_me() function. In it, you define write_chunks(), which takes an Amazon Transcribe stream as an argument and asynchronously writes chunks of streaming mic input to it. You then use MyEventHandler() with the output transcription stream as its argument and create a handler object. Then you use await with asyncio.gather() and pass in the write_chunks() and handler with the handle_events() method to handle the eventual futures of these coroutines. Lastly, you gather all event loops and loop the loop_me() function with run_until_complete(). See the following code:

async def loop_me():
 # Setup up our client with our chosen AWS region

     client = TranscribeStreamingClient(region="us-west-2")
     stream = await client.start_stream_transcription(
         language_code=params['lang_code_for_transcribe'],
         media_sample_rate_hz=int(device_info["defaultSampleRate"]),
         number_of_channels = 2,
         enable_channel_identification=True,
         media_encoding="pcm",
     )
     recorded_frames = []
     async def write_chunks(stream):
         
         # This connects the raw audio chunks generator coming from the microphone
         # and passes them along to the transcription stream.
         print("getting mic stream")
         async for chunk in mic_stream():
             t.tic()
             recorded_frames.append(chunk)
             await stream.input_stream.send_audio_event(audio_chunk=chunk)
             t.toc("chunks passed to transcribe: ")
         await stream.input_stream.end_stream()

     handler = MyEventHandler(stream.output_stream)
     await asyncio.gather(write_chunks(stream), handler.handle_events())

 #write a proper while loop here
 loop = asyncio.get_event_loop()
 loop.run_until_complete(loop_me())
 loop.close()

When the preceding code is run together without errors, you can speak into the microphone and quickly hear your voice translated to Mandarin Chinese. The automatic language detection feature for Amazon Transcribe and Amazon Translate translates any supported input language into the target language. You can speak for quite some time and because of the non-blocking nature of the function calls, all your speech input is translated and spoken, making this an excellent tool for translating live speeches.

Conclusion

Although this post demonstrated how these three fully managed AWS APIs can function seamlessly together, we encourage you to think about how you could use these services in other ways to deliver multilingual support for services or media like multilingual closed captioning for a fraction of the current cost. Medicine, business, and even diplomatic relations could all benefit from an ever-improving, low-cost, low-maintenance translation service.

For more information about the proof of concept code base for this use case check out our Github.


About the Authors

Michael Tran is a Solutions Architect with Envision Engineering team at Amazon Web Services. He provides technical guidance and helps customers accelerate their ability to innovate through showing the art of the possible on AWS. He has built multiple prototypes around AI/ML, and IoT for our customers. You can contact me @Mike_Trann on Twitter.

Cameron Wilkes is a Prototyping Architect on the AWS Industry Accelerator team. While on the team he delivered several ML based prototypes to customers to demonstrate the “Art of the Possible” of ML on AWS. He enjoys music production, off-roading and design.

Read More

An update on our work in responsible innovation

Over the last year, we’ve seen artificial intelligence (AI) systems advance our work in areas like inclusive product development and support for small businesses and job seekers. We’ve also seen its potential to be helpful in addressing major global needs — like forecasting and planning humanitarian responses to natural disasters, addressing global environmental challenges, and delivering groundbreaking scientific research.

AI is exciting — both from a technical perspective and when considering its underlying social benefits. And yet, to fully realize AI’s potential, it must be developed responsibly, thoughtfully and in a way that gives deep consideration to core ethical questions. After all, the promise of great reward inherently involves risk — and we’re committed to ethically developing AI in a way that is socially beneficial.

Our AI Principles guide how we integrate AI research into Google’s products and services and engage with external partners. Internally, we implement the Principles, every day, through education programs, AI ethics reviews and technical tools. There are more than 200 Googlers across the company whose full-time roles are to operationalize responsible practices for developing AI.

We’re committed to sharing our lessons learned so others across the industry can learn, too (see our posts from 2018, 2019, 2020 and 2021, and our in-depth annual AI Principles Progress Updates).

Internal education

It’s important to craft principles, but putting them into practice requires both training and constant dialogue.

Launched in late 2019, to date more than 32,000 employees across Google have engaged in AI Principles training. Given our growing understanding of effective hybrid and remote learning, we continue to expand and modify the courses. For example, this year we adapted our popular four-part Tech Ethics self-study course to a one-part deep dive based on Googler feedback. Similarly, we launched the Responsible Innovation Challenge — taken by more than 13,000 employees — as a series of engaging online puzzles, quizzes and games to raise awareness of the AI Principles and measure employees’ retention of ethical concepts, such as avoiding unfair bias.

We also piloted a new Moral Imagination workshop, a two-day, live-video immersive set of activities for product teams to walk through the ethical implications of potential AI products. To date, 248 Googlers across 23 Google product and research teams have taken the workshop, resulting in deeper, ongoing AI ethics consultations on product development.

As we develop internal training, we’re committed to incorporating the input of both Googlers and outside experts. This year, when we launched a live workshop to educate our internal user experience and product teams on the concept of AI explainability, we first piloted the workshop with outside experts at the international Trust, Transparency and Control Labs summit in May.

We believe this approach complements programs like our internal AI Principles Ethics Fellows program, a six-month fellowship that this year involved Googlers from 17 different global offices. We also just launched a version of the fellowship program tailored for senior leaders.

Putting the Principles into practice

Our approach to responsible AI innovation starts early, before teams plan a new AI application. When a team starts to build a machine learning (ML) model, dataset or product feature, they can attend office hours with experts to ask questions and engage in analyses using responsible AI tools that Google develops, or seek adversarial proactive fairness (ProFair) testing. Pre-launch, a team then can request an AI Principles review.

AI Principles reviewers are in place to implement a structured assessment to identify, measure and analyze potential risk of harm. The risk rating focuses on the extent to which people and society may be impacted if solutions did not exist or were to fail. Reviewers also consider a growing body of lessons from thousands of previous AI Principles reviews conducted since 2019.

When reviewers find medium- to high-risk issues, such as product exclusion or a potential privacy or security concern, they work with the teams to address these issues. Reviews either result in an approval, approval with conditions or recommendations, or non-approval. New AI applications that might affect multiple product areas are escalated to the Advanced Technology Review Council — a group of senior research, product and business leaders who make the final decision.

To supplement the expertise of our internal AI Principles group members, we often incorporate trusted external advisors. For example, a team was incorporating AI to help build a near real-time dataset to enable reliable measurement of global land cover for environmental and social benefit. They submitted for AI Principles review and then collaborated with the review team to design several safeguards. The review team also worked with third-party experts at the World Resources Institute and BSR. Following the example of the European Commission’s Copernicus mission’s open data and services terms, the product team applied open data principles, making the ML model’s training and test data used to create the dataset, as well as the dataset itself, freely available under CC-BY-4.0, and the model available on Github under an Apache 2.0 license. We recently released a Codelab for developers to walk through the ethics review process and apply learnings to their own projects.

A video explaining Google's AI Principles Review process

10:25

Projects such as research methods for evaluating misinformation and datasets that need more diverse representation tend to receive conditions to proceed toward a launch. A recurring condition given to teams is to engage in ProFair testing with people from a diversity of backgrounds, often in partnership with our central Product Inclusion and Equity team. This year, the number of ProFair consultations increased annually by 100%. A recurring approach is to create and release detailed documentation in the form ofdata cards and model cards for transparency and accountability. The number of AI Principles reviews with model or data card mitigations increased 68% in the last year.

As we’ve stated, we’ve embedded customized AI governance and review committees within certain product areas (like Cloud and Health). As a result, both the Health Ethics Committee and Cloud make decisions with specialized expertise, such as establishing policies for potentially winding down the Covid-19 Community Mobility Reports and the Covid-19 Forecaster, respectively, if situations arise that might cause the data quality to degrade. This year, we extended this specialized approach and created a dedicated consumer hardware AI Principles review process.

It’s important to note that product teams across Google engage in everyday responsible AI practices even if not in formal reviews. YouTube is leveraging a more targeted mix of classifiers, keywords in additional languages, and information from regional analysts. This work is a result of collaboration with our researchers who focus on new tools for AI fairness. The Photos team participated in an Equitable AI Research Roundtable (EARR) with a group of external advisors on potential fairness considerations. And the Gboard team deployed a new, privacy-by-design approach to federated machine learning. These examples did not stem from AI Principles reviews, but reflect the adoption of the AI Principles across Google.

Tools and research

In early 2022, to offer easier access to our publications on responsible AI, we curated an external collection of more than 200 research papers focused on the topic. We continue to launch, refine and consolidate technical resources, including proactive tools like:

  • The Monk Skin Tone Scale, developed by Harvard University Sociology Professor Dr. Ellis Monk. The scale offers a spectrum of skin tones from all around the world for use in evaluating and addressing fairness considerations in AI.
  • The Know Your Data tool (KYD), which helps developers with tasks such as quickly identifying issues in fairness, and which has integrated the Monk Scale to help developers examine skin tone data for unfair bias.
  • The Language Interpretability Tool, or LIT, to help developers probe an ML model, now with a new method to better understand, test and debug its behaviors.
  • Counterfactual Logit Pairing, which helps ensure that a model’s prediction doesn’t change when sensitive attributes or identity terms referenced in an example are removed or replaced, now added to the TensorFlow Model Remediation Library (see the research paper for more).
  • And to help teams measure their progress against the AI Principles, we’re piloting an internal tool to help teams assess how ML models were developed in accordance with emerging smart practices, previous reviews, and our growing body of ethics, fairness, and human-rights work.

Many responsible AI tools developed by researchers are actively in use by product teams at Google. For example, Photos, Pixel and Image Search are leveraging the Monk Skin Tone Scale.

External engagement

Ensuring the responsible development and deployment of AI is an ongoing process. We believe it should be a collaborative one, too, so we remain deeply engaged with governments across Europe, the Middle East and Africa, Latin America, Asia Pacific, and the U.S. to advocate for AI regulation that supports innovation around the world for businesses of all sizes. We share our approach to responsible AI and recommendations, comments and responses to open requests for information. We also initiated and are leading an effort with the International Standards Organization (ISO/IEC PWI TS 17866) to share best practice guidance for the development of AI.

As these efforts look toward the future, Responsible AI needs to be supported across industries today. So for current Google Cloud Partners and customers seeking best practices to help with the responsible implementation and AI governance in their organization, we added responsible AI prerequisites to the Google Cloud Partner Advantage ML Specialization, including a newly-released training, “Applying AI Principles with Google Cloud.”

To help nurture the next generation of responsible AI practitioners, we launched a free introduction to AI and machine learning for K-12 students. And we continue to develop an external Responsible Innovation Fellowship program in the U.S. for students at historically Black colleges and universities.

Our approach to responsible innovation also means keeping an eye on emerging markets where AI is being developed. We launched a new AI research center in Bulgaria and expanded support for African entrepreneurs whose businesses use AI through our Startup Accelerator Africa.

The examples we’re sharing today are a sampling of our ongoing commitment to responsible innovation. They also reflect our ability to change and keep setting a high bar for trustworthy AI standards for our company. We remain dedicated to sharing helpful information on Google’s journey, as recommended practices for responsible AI continue to emerge and evolve.

Read More

MLGO: A Machine Learning Framework for Compiler Optimization

The question of how to compile faster and smaller code arose together with the birth of modem computers. Better code optimization can significantly reduce the operational cost of large datacenter applications. The size of compiled code matters the most to mobile and embedded systems or software deployed on secure boot partitions, where the compiled binary must fit in tight code size budgets. With advances in the field, the headroom has been heavily squeezed with increasingly complicated heuristics, impeding maintenance and further improvements.

Recent research has shown that machine learning (ML) can unlock more opportunities in compiler optimization by replacing complicated heuristics with ML policies. However, adopting ML in general-purpose, industry-strength compilers remains a challenge.

To address this, we introduce “MLGO: a Machine Learning Guided Compiler Optimizations Framework”, the first industrial-grade general framework for integrating ML techniques systematically in LLVM (an open-source industrial compiler infrastructure that is ubiquitous for building mission-critical, high-performance software). MLGO uses reinforcement learning (RL) to train neural networks to make decisions that can replace heuristics in LLVM. We describe two MLGO optimizations for LLVM: 1) reducing code size with inlining; and 2) improving code performance with register allocation (regalloc). Both optimizations are available in the LLVM repository, and have been deployed in production.

How Does MLGO Work? With Inlining-for-Size As a Case Study
Inlining helps reduce code size by making decisions that enable the removal of redundant code. In the example below, the caller function foo() calls the callee function bar(), which itself calls baz(). Inlining both callsites returns a simple foo() function that reduces the code size.

Inlining reduces code size by removing redundant code.

In real code, there are thousands of functions calling each other, and thus comprise a call graph. During the inlining phase, the compiler traverses over the call graph on all caller-callee pairs, and makes decisions on whether to inline a caller-callee pair or not. It is a sequential decision process as previous inlining decisions will alter the call graph, affecting later decisions and the final result. In the example above, the call graph foo()bar()baz() needs a “yes” decision on both edges to make the code size reduction happen.

Before MLGO, the inline / no-inline decision was made by a heuristic that, over time, became increasingly difficult to improve. MLGO substitutes the heuristic with an ML model. During the call graph traversal, the compiler seeks advice from a neural network on whether to inline a particular caller-callee pair by feeding in relevant features (i.e., inputs) from the graph, and executes the decisions sequentially until the whole call graph is traversed.

Illustration of MLGO during inlining. “#bbs”, “#users”, and “callsite height” are example caller-callee pair features.

MLGO trains the decision network (policy) with RL using policy gradient and evolution strategies algorithms. While there is no ground truth about best decisions, online RL iterates between training and running compilation with the trained policy to collect data and improve the policy. In particular, given the current model under training, the compiler consults the model for inline / no-inline decision making during the inlining stage. After the compilation finishes, it produces a log of the sequential decision process (state, action, reward). The log is then passed to the trainer to update the model. This process repeats until we obtain a satisfactory model.

Compiler behavior during training. The compiler compiles the source code foo.cpp to an object file foo.o with a sequence of optimization passes, one of which is the inline pass.

The trained policy is then embedded into the compiler to provide inline / no-inline decisions during compilation. Unlike the training scenario, the policy does not produce a log. The TensorFlow model is embedded with XLA AOT, which converts the model into executable code. This avoids TensorFlow runtime dependency and overhead, minimizing the extra time and memory cost introduced by ML model inference at compilation time.

Compiler behavior in production.

We trained the inlining-for-size policy on a large internal software package containing 30k modules. The trained policy is generalizable when applied to compile other software and achieves a 3% ~ 7% size reduction. In addition to the generalizability across software, generalizability across time is also important — both the software and compiler are under active development so the trained policy needs to retain good performance for a reasonable time. We evaluated the model’s performance on the same set of software three months later and found only slight degradation.

Inlining-for-size policy size reduction percentages. The x-axis presents different software and the y-axis represents the percentage size reduction. “Training” is the software on which the model was trained and “Infra[1|2|3]” are different internal software packages.

The MLGO inlining-for-size training has been deployed on Fuchsia — a general purpose open source operating system designed to power a diverse ecosystem of hardware and software, where binary size is critical. Here, MLGO showed a 6.3% size reduction for C++ translation units.

Register-Allocation (for performance)
As a general framework, we used MLGO to improve the register allocation pass, which improves the code performance in LLVM. Register Allocation solves the problem of assigning physical registers to live ranges (i.e., variables).

As the code executes, different live ranges are completed at different times, freeing up registers for use by subsequent processing stages. In the example below, each “add” and “multiply” instruction requires all operands and the result to be in physical registers. The live range x is allocated to the green register and is completed before either live ranges in the blue or yellow registers. After x is completed, the green register becomes available and is assigned to live range t.

Register allocation example.

When it’s time to allocate live range q, there are no available registers, so the register allocation pass must decide which (if any) live range can be “evicted” from its register to make room for q. This is referred to as the “live range eviction” problem, and is the decision for which we train the model to replace original heuristics. In this particular example, it evicts z from the yellow register, and assigns it to q and the first half of z.

We now consider the unassigned second half of live range z. We have a conflict again, and this time the live range t is evicted and split, and the first half of t and the final part of z end up using the green register. The middle part of z corresponds to the instruction q = t * y, where z is not being used, so it is not assigned to any register and its value is stored in the stack from the yellow register, which later gets reloaded to the green register. The same happens to t. This adds extra load/store instructions to the code and degrades performance. The goal of the register allocation algorithm is to reduce such inefficiencies as much as possible. This is used as the reward to guide RL policy training.

Similar to the inlining-for-size policy, the register allocation (regalloc-for-performance) policy is trained on a large Google internal software package, and is generalizable across different software, with 0.3% ~1.5% improvements in queries per second (QPS) on a set of internal large-scale datacenter applications. The QPS improvement has persisted for months after its deployment, showing the model’s generalizability across the time horizon.

Conclusion and Future Work
We propose MLGO, a framework for integrating ML techniques systematically in an industrial compiler, LLVM. MLGO is a general framework that can be expanded to be: 1) deeper, e.g., adding more features, and applying better RL algorithms; and 2) broader, by applying it to more optimization heuristics beyond inlining and regalloc. We are enthusiastic about the possibilities MLGO can bring to the compiler optimization domain and look forward to its further adoption and to future contributions from the research community.

Try it Yourself
Check out the open-sourced end-to-end data collection and training solution on github and a demo that uses policy gradient to train an inlining-for-size policy.

Acknowledgements
We’d like to thank MLGO’s contributors and collaborators Eugene Brevdo, Jacob Hegna, Gaurav Jain, David Li, Zinan Lin, Kshiteej Mahajan, Jack Morris, Girish Mururu, Jin Xin Ng, Robert Ormandi, Easwaran Raman, Ondrej Sykora, Maruf Zaber, Weiye Zhao. We would also like to thank Petr Hosek, Yuqian Li, Roland McGrath, Haowei Wu for trusting us and deploying MLGO in Fuchsia as MLGO’s very first customer; thank David Blaikie, Eric Christopher, Brooks Moses, Jordan Rupprecht for helping to deploy MLGO in Google internal large-scale datacenter applications; and thank Ed Chi, Tipp Moseley for their leadership support.

Read More

Startup lets doctors classify skin conditions with the snap of a picture

At the age of 22, when Susan Conover wanted to get a strange-looking mole checked out, she was told it would take three months to see a dermatologist. When the mole was finally removed and biopsied, doctors determined it was cancerous. At the time, no one could be sure the cancer hadn’t spread to other parts of her body — the difference between stage 2 and stage 3 or 4 melanoma.

Thankfully, the mole ended up being confined to one spot. But the experience launched Conover into the world of skin diseases and dermatology. After exploring those topics and possible technological solutions in MIT’s System Design and Management graduate program, Conover founded Piction Health.

Piction Health began as a mobile app that used artificial intelligence to recognize melanoma from images. Over time, however, Conover realized that other skin conditions make up the vast majority of cases physicians and dermatologists see. Today, Conover and her co-founder Pranav Kuber focus on helping physicians identify and manage the most common skin conditions — including rashes like eczema, acne, and shingles — and plan to partner with a company to help diagnose skin cancers down the line.

“All these other conditions are the ones that are often referred to dermatology, and dermatologists become frustrated because they’d prefer to be spending time on skin cancer cases or other conditions that need their help,” Conover says. “We realized we needed to pivot away from skin cancer in order to help skin cancer patients see the dermatologist faster.”

After primary care physicians take a photo of a patient’s skin condition, Piction’s app shows images of similar skin presentations. Piction also helps physicians differentiate between the conditions they most suspect to make better care decisions for the patient.

Conover says Piction can reduce the time it takes physicians to evaluate a case by around 30 percent. It can also help physicians refer a patient to a dermatologist more quickly for special cases they’re not confident in managing. More broadly, Conover is focused on helping health organizations reduce costs related to unnecessary revisits, ineffective prescriptions, and unnecessary referrals.

So far, more than 50 physicians have used Piction’s product, and the company has established partnerships with several organizations, including a well-known defense organization that had two employees diagnosed with late-stage melanoma recently after they couldn’t see a dermatologist right away.

“A lot of people don’t realize that it’s really hard to see a dermatologist — it can take three to six months — and with the pandemic it’s never been a worse time to try to see a dermatologist,” Conover says.

Shocked into action

At the time of Conover’s melanoma diagnosis, she had recently earned a bachelor’s degree in mechanical engineering from the University of Texas at Austin. But she didn’t do a deep dive into dermatology until she needed a thesis topic for her master’s at MIT.

“It was just a really scary experience,” Conover says of her melanoma. “I consider myself very lucky because I learned at MIT that there’s a huge number of people with skin problems every year, two-thirds of those people go into primary care to get help, and about half of those cases are misdiagnosed because these providers don’t have as much training in dermatology.”

Conover first began exploring the idea of starting a company to diagnose melanoma during the Nuts and Bolts of Founding New Ventures course offered over MIT’s Independent Activities Period in 2015. She also went through the IDEAS Social Innovation Challenge and the MIT $100K Entrepreneurship Competition while building her system. After graduation, she spent a year at MIT as a Catalyst Fellow in the MIT linQ program, where she worked in the lab of Martha Gray, the J.W. Kieckhefer Professor of Health Sciences and Technology and a member of MIT’s Institute for Medical Engineering and Science (IMES).

Through MIT’s Venture Mentoring Service, Conover also went through the I-Corps program, where she continued to speak with stakeholders. Through those conversations, she learned that skin rashes like psoriasis, eczema, and rosacea account for the vast majority of skin problems seen by primary care physicians.

Meanwhile, while public health campaigns have focused on the importance of protection from the sun, public knowledge around conditions like shingles, which effects up to 1 percent of Americans each year, is severely lacking.

Although training a machine-learning model to recognize a myriad of diverse conditions would be more difficult than training a model to recognize melanoma, Conover’s small team decided that was the best path forward.

“We decided it’s better to just jump to making the full product, even though it sounded scary and huge: a product that identifies all different rashes across multiple body parts and skin tones and age groups,” Conover says.

The leap required Piction to establish data partnerships with hundreds of dermatologists in countries around the world during the pandemic. Conover says Piction now has the world’s largest dataset of rashes, containing over 1 million photos taken by dermatologists in 18 countries.

“We focused on getting photos of different skin tones, as many skin tones are underrepresented even in medical literature and teaching,” Conover says. “Providers don’t always learn how all the different skin tones can present conditions, so our representative database is a substantial statement about our commitment to health equity.”

Conover says Piction’s image database helps doctors evaluate conditions more accurately in primary care. After a provider has determined the most likely condition, Piction presents physicians with information on treatment options for each condition.

“This front-line primary care environment is the ideal place for our innovation because they care for patients with skin conditions every day,” Conover says.

Helping doctors at scale

Conover is constantly reminded of the need for her system from family and friends, who have taken to sending her pictures of their skin condition for advice. Recently, Conover’s friend developed shingles, a disease that can advance quickly and can cause blindness if it spreads to certain locations on the body. A doctor misdiagnosed the shingles on her forehead as a spider bite and prescribed the wrong medication. The shingles got worse and caused ear and scalp pain before the friend went to the emergency room and received the proper treatment.

“It was one of those moments where we thought, ‘If only physicians had the right tools,’” Conover says. “The PCP jumped to what she thought the problem was but didn’t build the full list of potential conditions and narrow from there.”

Piction will be launching several additional pilots this year. Down the line, Conover wants to add capabilities to identify and evaluate wounds and infectious diseases that are more common in other parts of the world, like leprosy. By partnering with nonprofit groups, the company also hopes to bring its solution to doctors in low-resource settings.

“This has potential to become a full diagnostic tool in the future,” Conover says. “I just don’t want anyone to feel the way I felt when I had my first diagnosis, and I want other people like me to be able to get the care they need at the right time and move on with their lives.”

Read More

Use Amazon SageMaker Data Wrangler in Amazon SageMaker Studio with a default lifecycle configuration

If you use the default lifecycle configuration for your domain or user profile in Amazon SageMaker Studio and use Amazon SageMaker Data Wrangler for data preparation, then this post is for you. In this post, we show how you can create a Data Wrangler flow and use it for data preparation in a Studio environment with a default lifecycle configuration.

Data Wrangler is a capability of Amazon SageMaker that makes it faster for data scientists and engineers to prepare data for machine learning (ML) applications via a visual interface. Data preparation is a crucial step of the ML lifecycle, and Data Wrangler provides an end-to-end solution to import, explore, transform, featurize, and process data for ML in a visual, low-code experience. It lets you easily and quickly connect to AWS components like Amazon Simple Storage Service (Amazon S3), Amazon Athena, Amazon Redshift, and AWS Lake Formation, and external sources like Snowflake and DataBricks DeltaLake. Data Wrangler supports standard data types such as CSV, JSON, ORC, and Parquet.

Studio apps are interactive applications that enable Studio’s visual interface, code authoring, and run experience. App types can be either Jupyter Server or Kernel Gateway:

  • Jupyter Server – Enables access to the visual interface for Studio. Every user in Studio gets their own Jupyter Server app.
  • Kernel Gateway – Enables access to the code run environment and kernels for your Studio notebooks and terminals. For more information, see Jupyter Kernel Gateway.

Lifecycle configurations (LCCs) are shell scripts to automate customization for your Studio environments, such as installing JupyterLab extensions, preloading datasets, and setting up source code repositories. LCC scripts are triggered by Studio lifecycle events, such as starting a new Studio notebook. To set a lifecycle configuration as the default for your domain or user profile programmatically, you can create a new resource or update an existing resource. To associate a lifecycle configuration as a default, you first need to create a lifecycle configuration following the steps in Creating and Associating a Lifecycle Configuration

Note: Default lifecycle configurations set up at the domain level are inherited by all users, whereas those set up at the user level are scoped to a specific user. If you apply both domain-level and user profile-level lifecycle configurations at the same time, the user profile-level lifecycle configuration takes precedence and is applied to the application irrespective of what lifecycle configuration is applied at the domain level. For more information, see Setting Default Lifecycle Configurations.

Data Wrangler accepts the default Kernel Gateway lifecycle configuration, but some of the commands defined in the default Kernel Gateway lifecycle configuration aren’t applicable to Data Wrangler, which can cause Data Wrangler to fail to start. The following screenshot shows an example of an error message you might get when launching the Data Wrangler flow. This may happen only with default lifecycle configurations and not with lifecycle configurations.

Data Wrangler Error

Solution overview

Customers using the default lifecycle configuration in Studio can follow this post and use the supplied code block within the lifecycle configuration script to launch a Data Wrangler app without any errors.

Set up the default lifecycle configuration

To set up a default lifecycle configuration, you must add it to the DefaultResourceSpec of the appropriate app type. The behavior of your lifecycle configuration depends on whether it’s added to the DefaultResourceSpec of a Jupyter Server or Kernel Gateway app:

  • Jupyter Server apps – When added to the DefaultResourceSpec of a Jupyter Server app, the default lifecycle configuration script runs automatically when the user logs in to Studio for the first time or restarts Studio. You can use this to automate one-time setup actions for the Studio developer environment, such as installing notebook extensions or setting up a GitHub repo. For an example of this, see Customize Amazon SageMaker Studio using Lifecycle Configurations.
  • Kernel Gateway apps – When added to the DefaultResourceSpec of a Kernel Gateway app, Studio defaults to selecting the lifecycle configuration script from the Studio launcher. You can launch a notebook or terminal with the default script or choose a different one from the list of lifecycle configurations.

A default Kernel Gateway lifecycle configuration specified in DefaultResourceSpec applies to all Kernel Gateway images in the Studio domain unless you choose a different script from the list presented in the Studio launcher.

When you work with lifecycle configurations for Studio, you create a lifecycle configuration and attach it to either your Studio domain or user profile. You can then launch a Jupyter Server or Kernel Gateway application to use the lifecycle configuration.

The following table summarizes these errors you may encounter when launching a Data Wrangler application with default lifecycle configurations.

Level at Which the Lifecycle Configuration Is Applied

Create Data Wrangler Flow Works (or) Error

Workaround
Domain Bad Request Error Apply the script (see below)
User Profile Bad Request Error Apply the script (see below)
Application Works—No issue Not required

When you use the default lifecycle configuration associated with Studio and Data Wrangler (Kernel Gateway app), you might encounter Kernel Gateway app failure. In this post, we demonstrate how to set the default lifecycle configuration properly to exclude running commands in a Data Wrangler application so you don’t encounter Kernel Gateway app failure.

Let’s say you want to install a git-clone-repo script as the default lifecycle configuration that checks out a Git repository under the user’s home folder automatically when the Jupyter server starts. Let’s look at each scenario of applying a lifecycle configuration (Studio domain, user profile, or application level).

Apply lifecycle configuration at the Studio domain or user profile level

To apply the default Kernel Gateway lifecycle configuration at the Studio domain or user profile level, complete the steps in this section. We start with instructions for the user profile level.

In your lifecycle configuration script, you have to include the following code block that checks and skips the Data Wrangler Kernel Gateway app:

#!/bin/bash
set -eux
STATUS=$(
python3 -c "import sagemaker_dataprep"
echo $?
)
if [ "$STATUS" -eq 0 ]; then
echo 'Instance is of Type Data Wrangler'
else
echo 'Instance is not of Type Data Wrangler'
<remainder of LCC here within in else block – this contains some pip install, etc>
fi

For example, let’s use the following script as our original (note that the folder to clone the repo is changed to /root from /home/sagemaker-user):

# Clones a git repository into the user's home folder
#!/bin/bash

set -eux

# Replace this with the URL of your git repository
export REPOSITORY_URL="https://github.com/aws-samples/sagemaker-studio-lifecycle-config-examples.git"

git -C /root clone $REPOSITORY_URL

The new modified script looks like the following:

#!/bin/bash
set -eux
STATUS=$(
python3 -c "import sagemaker_dataprep"
echo $?
)
if [ "$STATUS" -eq 0 ]; then
echo 'Instance is of Type Data Wrangler'
else
echo 'Instance is not of Type Data Wrangler'

# Replace this with the URL of your git repository
export REPOSITORY_URL="https://github.com/aws-samples/sagemaker-studio-lifecycle-config-examples.git"

git -C /root clone $REPOSITORY_URL

fi

You can save this script as git_command_test.sh.

Now you run a series of commands in your terminal or command prompt. You should configure the AWS Command Line Interface (AWS CLI) to interact with AWS. If you haven’t set up the AWS CLI, refer to Configuring the AWS CLI.

  1. Convert your git_command_test.sh file into Base64 format. This requirement prevents errors due to the encoding of spacing and line breaks.
    LCC_GIT=openssl base64 -A -in /Users/abcde/Downloads/git_command_test.sh

  2. Create a Studio lifecycle configuration. The following command creates a lifecycle configuration that runs on launch of an associated Kernel Gateway app:
    aws sagemaker create-studio-lifecycle-config —region us-east-2 —studio-lifecycle-config-name lcc-git —studio-lifecycle-config-content $LCC_GIT —studio-lifecycle-config-app-type KernelGateway

  3. Use the following API call to create a new user profile with an associated lifecycle configuration:
    aws sagemaker create-user-profile --domain-id d-vqc14vvvvvvv 
    --user-profile-name test 
    --region us-east-2 
    --user-settings '{
    "KernelGatewayAppSettings": {
    "LifecycleConfigArns" : ["arn:aws:sagemaker:us-east-2:000000000000:studio-lifecycle-config/lcc-git"],
    "DefaultResourceSpec": {
    "InstanceType": "ml.m5.xlarge",
    "LifecycleConfigArn": "arn:aws:sagemaker:us-east-2:00000000000:studio-lifecycle-config/lcc-git"
    }
    }
    }'

    Alternatively, if you want to create a Studio domain to associate your lifecycle configuration at the domain level, or update the user profile or domain, you can follow the steps in Setting Default Lifecycle Configurations.

  4. Now you can launch your Studio app from the SageMaker Control Panel.control Panel
  5. In your Studio environment, on the File menu, choose New and Data Wrangler Flow.The new Data Wrangler flow should open without any issues.
    New Data Wrangler Flow
  6. To validate the Git clone, you can open a new Launcher in Studio.
  7. Under Notebooks and compute resources, choose the Python 3 notebook and the Data Science SageMaker image to start your script as your default lifecycle configuration script.
    Notebook and Compute

You can see the Git cloned to /root in the following screenshot.

Git cloned to /root

We have successfully applied the default Kernel lifecycle configuration at the user profile level and created a Data Wrangler flow. To configure at the Studio domain level, the only change is instead of creating a user profile, you pass the ARN of the lifecycle configuration in a create-domain call.

Apply lifecycle configuration at the application level

If you apply the default Kernel Gateway lifecycle configuration at the application level, you won’t have any issues because Data Wrangler skips the lifecycle configuration applied at the application level.

Conclusion

In this post, we showed how to configure your default lifecycle configuration properly for Studio when you use Data Wrangler for data preparation and visualization requirements.

To summarize, if you need to use the default lifecycle configuration for Studio to automate customization for your Studio environments and use Data Wrangler for data preparation, you can apply the default Kernel Gateway lifecycle configuration at the user profile or Studio domain level with the appropriate code block included in your lifecycle configuration so that the default lifecycle configuration checks it and skips the Data Wrangler Kernel Gateway app.

For more information, see the following resources:


About the Authors

Rajakumar Sampathkumar is a Principal Technical Account Manager at AWS, providing customers guidance on business-technology alignment and supporting the reinvention of their cloud operation models and processes. He is passionate about cloud and machine learning. Raj is also a machine learning specialist and works with AWS customers to design, deploy, and manage their AWS workloads and architectures.

Vicky Zhang is a Software Development Engineer at Amazon SageMaker. She is passionate about problem solving. In her spare time, she enjoys watching detective movies and playing badminton.

Rahul Nabera is a Data Analytics Consultant in AWS Professional Services. His current work focuses on enabling customers build their data and machine learning workloads on AWS. In his spare time, he enjoys playing cricket and volleyball.

Read More

Computer Graphics Artist Xueguo Yang Shares Fractal Art Series This Week ‘In the NVIDIA Studio’

Editor’s note: This post is part of our weekly In the NVIDIA Studio series, which celebrates featured artists, offers creative tips and tricks, and demonstrates how NVIDIA Studio technology accelerates creative workflows. 

Putting art, mathematics and computers together in the mid-1980s created a new genre of digital media: fractal art.

In the NVIDIA Studio this week, computer graphics (CG) artist, educator and curator Xueguo Yang shares his insights behind fractal art — which uses algorithms to artistically represent calculations derived from geometric objects as digital images and animations.

The internationally renowned artist showcases his extraordinary fractal art series, Into the Void, and his process for creating it. Yang’s artistic collaborations include major publishing organizations and global entertainment companies, and his artwork has been selected for international A-class CG galleries and competition shortlists.

A Fractal Art Masterclass, Courtesy of NVIDIA Studio 

Yang started each Into the Void piece in Daz Studio or Autodesk 3ds Max, generating a very basic 3D shape and carefully extracting its dimensions. He then used one of his preferred fractal art applications, including Chaotica, Mandelbulb3D or, more recently, JWildfire.

Fractal artwork includes 3D mathematical shapes that are infinitely complex.

Traditionally, these 3D-heavy apps operated exclusively on CPU architecture, with limited speed and excruciating slowdowns. Newer technology using NVIDIA GeForce RTX GPUs and the OpenCL programming framework dramatically accelerates the creative process so now, complex fractal geometry can be generated, previewed and modified in seconds — a boon for Yang’s efficiency.

Graphical dynamics visual effects created using Tyflow in Autodesk 3ds Max, powered by NVIDIA PhysX.

Yang then started to build mathematical formulas to create the fractal art pieces. The formulas, ever-changing samples expressed in 3D, required random trial-and-error combinations until Yang reached a satisfactory result.

Next, he added some stylish 2D effects before importing the raw files into NVIDIA Omniverse, a 3D design collaboration and world simulation platform.


By using Omniverse’s NVIDIA vMaterials library, which is derived from physical, real-world materials, Yang built cosmic voids with photorealistic details such as glass and metal pieces.

Yang constantly experiments with new colors and textures to further provoke thought.

Yang further refined textures with the Adobe Substance 3D Painter Connector. He applied Smart Materials — a feature that automatically adjusts the scene to show realistic surface details — tweaking the piece until the perfect combination presented itself.


The Omniverse Create app allowed Yang to adjust lighting and shadows, all in original quality, for final compositing and rendering. His GeForce RTX 3080 Ti Laptop GPU powered the built-in RTX Renderer, unlocking hardware-accelerated ray tracing for fast and interactive 3D modeling.

Yang then turned to the NVIDIA Canvas app to quickly generate a variety of sky and space backgrounds. This process took mere minutes and was far more efficient than searching for backgrounds or even creating several from scratch.

In Photoshop, Yang applies the Canvas backgrounds and adjusted colors to his liking. Final exports were rapidly generated, and the Into the Void masterpiece was complete. By entering In the NVIDIA Studio, viewers can now enter the void.

Yang noted his entire creative workflow is accelerated by GPUs, with his ASUS ProArt Studio laptop serving as a necessity rather than a luxury.

“You can’t imagine how to deal without real-time ray tracing and AI acceleration of RTX GPUs,” Yang said.

Fractal Origins

For Yang, fractal artwork manifests the purest form of his introspective views on origins. “The world was originally empty,” he said. “Everything from basic particles to real matter came from the void. No one knows when, where and how things in the known world appear.”

“Into the Void” series by Xueguo Yang.

Yang hopes to give audiences a sense of déjà vu as his art deconstructs and reconstructs places, scenes, memories or any form of beauty that can often be taken for granted.

The idea of “exploring” rather than “creating” comes from Yang’s strong interests in nature, physics, philosophy and traditional Chinese medicine.

The series is a journey through time and space, tracing an origin in the void, he said.

Humanoid presence invokes the presence of Tao.

Yang intentionally adds human consciousness into the void when creating fantasy worlds.

Yang’s journey is fueled by music, especially rock and heavy metal, which strongly influences his expression with color and texture.

“Without physical media, all creation begins in the void,” Yang noted. “All the essence is just the electrons and energy shuttling in the machine and human consciousness.” Chinese culture calls this Tao, or seeking meanings in the unknown world, which is what Yang seeks to express.

CG artist, educator and curator Xueguo Yang.

Check out more of Yang’s work.

Learn more about NVIDIA Omniverse, including tips, tricks and more on the Omniverse YouTube channel. For additional support, explore the Omniverse forums or join the Discord server to chat with the community. Check out the Omniverse Twitter, Instagram and Medium page to stay up to date.

Follow NVIDIA Studio on Instagram, Twitter and Facebook. Access tutorials on the Studio YouTube channel and get updates directly in your inbox by subscribing to the NVIDIA Studio newsletter.

The post Computer Graphics Artist Xueguo Yang Shares Fractal Art Series This Week ‘In the NVIDIA Studio’ appeared first on NVIDIA Blog.

Read More