Reduce the time taken to deploy your models to Amazon SageMaker for testing

Data scientists often train their models locally and look for a proper hosting service to deploy their models. Unfortunately, there’s no one set mechanism or guide to deploying pre-trained models to the cloud. In this post, we look at deploying trained models to Amazon SageMaker hosting to reduce your deployment time.

SageMaker is a fully managed machine learning (ML) service. With SageMaker, you can quickly build and train ML models and directly deploy them into a production-ready hosted environment. Additionally, you don’t need to manage servers. You get an integrated Jupyter notebook environment with easy access to your data sources. You can perform data analysis, train your models, and test them using your own algorithms or use SageMaker-provided ML algorithms that are optimized to run efficiently against large datasets spread across multiple machines. Training and hosting are billed by minutes of usage, with no minimum fees and no upfront commitments.

Solution overview

Data scientists sometimes train models locally using their IDE and either ship those models to the ML engineering team for deployment or just run predictions locally on powerful machines. In this post, we introduce a Python library that simplifies the process of deploying models to SageMaker for hosting on real-time or serverless endpoints.

This Python library gives data scientists a simple interface to quickly get started on SageMaker without needing to know any of the low-level SageMaker functionality.

If you have models trained locally using your preferred IDE and want to benefit from the scale of the cloud, you can use this library to deploy your model to SageMaker. With SageMaker, in addition to all the scaling benefits of a cloud-based ML platform, you have access to purpose-built training tools (distributed training, hyperparameter tuning), experiment management, model management, bias detection, model explainability, and many other capabilities that can help you in any aspect of the ML lifecycle. You can choose from the three most popular frameworks for ML: Scikit-learn, PyTorch, and TensorFlow, and can pick the type of compute you want. Defaults are provided along the way so users of this library can deploy their models without needing to make complex decisions or learn new concepts. In this post, we show you how to get started with this library and optimize deploying your ML models on SageMaker hosting.

The library can be found in the GitHub repository.

The SageMaker Migration Toolkit

The SageMakerMigration class is available through a Python library published to GitHub. Instructions to install this library are provided in the repository; make sure that you follow the README to properly set up your environment. After you install this library, the rest of this post talks about how you can use it.

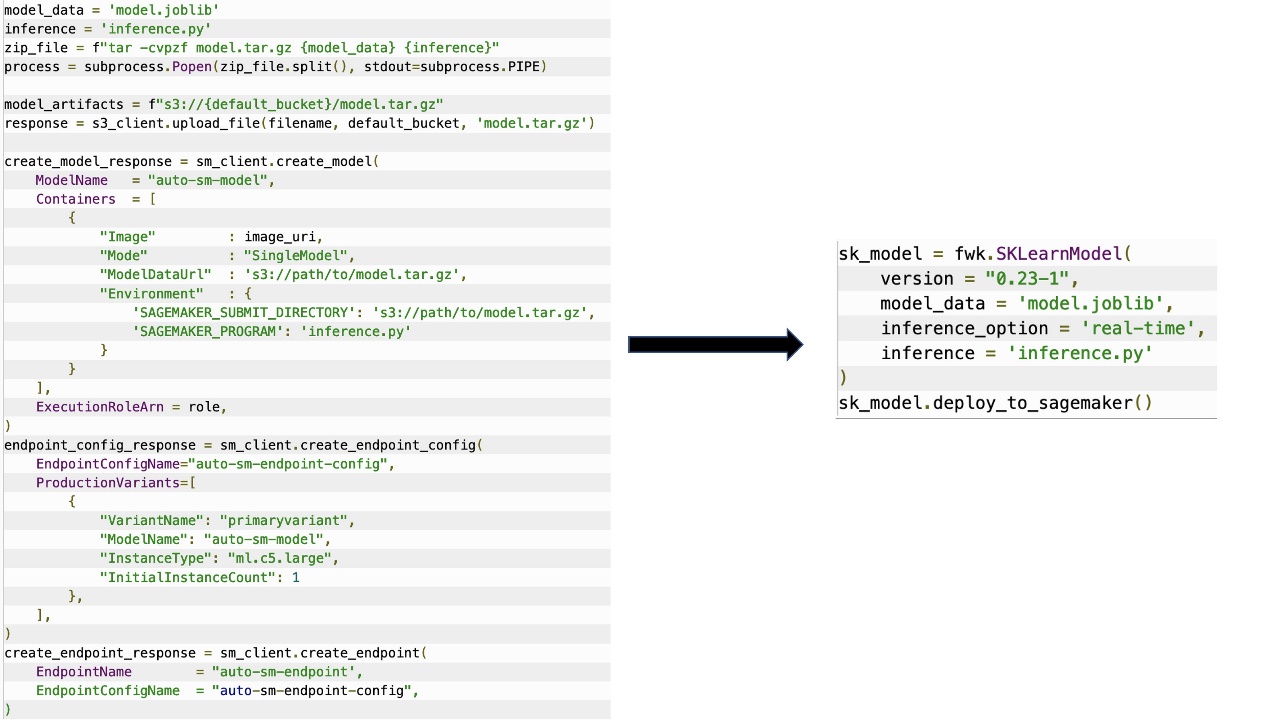
The SageMakerMigration class consists of high-level abstractions over SageMaker APIs that significantly reduce the steps needed to deploy your model to SageMaker, as illustrated in the following figure. This is intended for experimentation so developers can quickly get started and test SageMaker. It is not intended for production migrations.

For Scikit-learn, PyTorch, and TensorFlow models, this library supports deploying trained models to a SageMaker real-time endpoint or serverless endpoint. To learn more about the inference options in SageMaker, refer to Deploy Models for Inference.

Real-time vs. serverless endpoints

Real-time inference is ideal for inference workloads where you have real-time, interactive, low latency requirements. You can deploy your model to SageMaker hosting services and get an endpoint that can be used for inference. These endpoints are fully managed and support auto scaling.

SageMaker Serverless Inference is a purpose-built inference option that makes it easy for you to deploy and scale ML models. Serverless Inference is ideal for workloads that have idle periods between traffic spurts and can tolerate cold starts. Serverless endpoints automatically launch compute resources and scale them in and out depending on traffic, eliminating the need to choose instance types or manage scaling policies. This takes away the undifferentiated heavy lifting of selecting and managing servers.

Depending on your use case, you may want to quickly host your model on SageMaker without actually having an instance always on and incurring costs, in which case a serverless endpoint is a great solution.

Prepare your trained model and inference script

After you’ve identified the model you want to deploy on SageMaker, you must ensure the model is presented to SageMaker in the right format. SageMaker endpoints generally consist of two components: the trained model artifact (.pth, .pkl, and so on) and an inference script. The inference script is not always mandatory, but if not provided, the default handlers for the serving container that you’re using are applied. It’s essential to provide this script if you need to customize your input/output functionality for inference.

The trained model artifact is simply a saved Scikit-learn, PyTorch, or TensorFlow model. For Scikit-learn, this is typically a pickle file, for PyTorch this is a .pt or .pth file, and for TensorFlow this is a folder with assets, .pb files, and other variables.

Generally, you need to able to control how your model processes input and performs inference, and control the output format for your response. With SageMaker, you can provide an inference script to add this customization. Any inference script used by SageMaker must have one or more of the following four handler functions: model_fn, input_fn, predict_fn, and output_fn.

Note that these four functions apply to PyTorch and Scikit-learn containers specifically. TensorFlow has slightly different handlers because it’s integrated with TensorFlow Serving. For an inference script with TensorFlow, you have two model handlers: input_handler and output_handler. Again, these have the same preprocessing and postprocessing purpose that you can work with, but they’re configured slightly differently to integrate with TensorFlow Serving. For PyTorch models, model_fn is a compulsory function to have in the inference script.

model_fn

This is the function that is first called when you invoke your SageMaker endpoint. This is where you write your code to load the model. For example:

def model_fn(model_dir):
    model = Your_Model()
    with open(os.path.join(model_dir, 'model.pth'), 'rb') as f:
        model.load_state_dict(torch.load(f))
    return model

Depending on the framework and type of model, this code may change, but the function must return an initialized model.

input_fn

This is the second function that is called when your endpoint is invoked. This function takes the data sent to the endpoint for inference and parses it into the format required for the model to generate a prediction. For example:

def input_fn(request_body, request_content_type):
    """An input_fn that loads a pickled tensor"""
    if request_content_type == 'application/python-pickle':
        return torch.load(BytesIO(request_body))
    else:
        # Handle other content-types here or raise an Exception
        # if the content type is not supported.
        pass

The request_body contains the data to be used for generating inference from the model and is parsed in this function so that it’s in the required format.

predict_fn

This is the third function that is called when your model is invoked. This function takes the preprocessed input data returned from input_fn and uses the model returned from model_fn to make the prediction. For example:

def predict_fn(input_data, model):
    device = torch.device('cuda' if torch.cuda.is_available() else 'cpu')
    model.to(device)
    model.eval()
    with torch.no_grad():
        return model(input_data.to(device))

You can optionally add output_fn to parse the output of predict_fn before returning it to the client. The function signature is def output_fn(prediction, content_type).

Move your pre-trained model to SageMaker

After you have your trained model file and inference script, you must put these files in a folder as follows:

#SKLearn Model

model_folder/
    model.pkl
    inference.py
    
# Tensorflow Model
model_folder/
    0000001/
        assets/
        variables/
        keras_metadata.pb
        saved_model.pb
    inference.py
    
# PyTorch Model
model_folder/
    model.pth
    inference.py

After your model and inference script have been prepared and saved in this folder structure, your model is ready for deployment on SageMaker. See the following code:

from sagemaker_migration import frameworks as fwk

if __name__ == "__main__":
    ''' '''
    sk_model = fwk.SKLearnModel(
        version = "0.23-1", 
        model_data = 'model.joblib',
        inference_option = 'real-time',
        inference = 'inference.py',
        instance_type = 'ml.m5.xlarge'
    )
    sk_model.deploy_to_sagemaker()

After deployment of your endpoint, make sure to clean up any resources you won’t utilize via the SageMaker console or through the delete_endpoint Boto3 API call.

Conclusion

The goal of the SageMaker Migration Toolkit project is to make it easy for data scientists to onboard their models onto SageMaker to take advantage of cloud-based inference. The repository will continue to evolve and support more options for migrating workloads to SageMaker. The code is open source and we welcome community contributions through pull requests and issues.

Check out the GitHub repository to explore more on utilizing the SageMaker Migration Toolkit, and feel free to also contribute examples or feature requests to add to the project!


About the authors

Kirit Thadaka is an ML Solutions Architect working in the Amazon SageMaker Service SA team. Prior to joining AWS, Kirit spent time working in early stage AI startups followed by some time in consulting in various roles in AI research, MLOps, and technical leadership.

Ram Vegiraju is a ML Architect with the SageMaker Service team. He focuses on helping customers build and optimize their AI/ML solutions on Amazon SageMaker. In his spare time, he loves traveling and writing.

Read More

Automated Deployment of TensorFlow Models with TensorFlow Serving and GitHub Actions

Automated Deployment of TensorFlow Models with TensorFlow Serving and GitHub Actions

Posted by Chansung Park and Sayak Paul (ML-GDEs)


If you are an applications developer, or if your organization doesn’t have a dedicated ML Engineering team, it is common to deploy a machine learning model without worrying about the end to end machine learning pipeline or MLOps. TFX and TensorFlow Serving can help you create the heart of an MLOps infrastructure. 

In this post, we will share how we serve a TensorFlow image classification model as RESTful and gRPC based services with TensorFlow Serving on a Kubernetes (k8s) cluster running on Google Kubernetes Engine (GKE) through a set of GitHub Actions workflows. 

Overview

In any GitHub project, you can make releases, with up to 2 GB of assets included in each release when using a free account. This is a good place to manage different versions of machine learning models for various reasons. One can also replace this with a more private component for managing model versions such as Google Cloud Storage buckets. For our purposes, the 2 GB space provided by GitHub Releases will be enough.

Figure 1. Three steps to deploy TF Serving on GKE (original).

The basic idea is to:

  1. Automatically detect a newly released version of a TensorFlow-based ML model in GitHub Releases
  2. Build a custom TensorFlow Serving Docker image containing the released ML model
  3. Deploy it on a k8s cluster running on GKE through a set of GitHub Actions.

The entire workflow can be logically divided into three subtasks, so it’s a good idea to write three separate composite GitHub Actions:

  • First subtask handles the environmental setup
    • GCP Authentication (GCP credentials are injected from the GitHub Action Secret)
    • Install gcloud CLI toolkit to access the GKE cluster for the third subtask
    • Authenticate Docker to push images to the Google Cloud Registry (GCR)
    • Connect to a designated GKE cluster for further accesses
  • Second subtask builds a custom TensorFlow Serving image
    • Download and extract your latest released SavedModel from your GitHub repository
    • Run the official or a custom built TensorFlow Serving docker image
    • Copy the extracted SavedModel into the running TensorFlow Serving docker container
    • Commit the changes of the running container and give it a new name with the tags of special token to denote GCR, GCP project ID, and latest
    • Push the committed image to the GCR
  • Third subtask deploys the custom built TensorFlow Serving image to the GKE cluster
    • Download the Kustomize toolkit to handle overlay configurations
    • Pick one of the scenarios from the various experiments
    • Apply Deployment, Service, and ConfigMap according to the selected experiment to the currently connected GKE cluster
      • ConfigMap is used for batching-enabled scenarios to inject batching configurations dynamically into the Deployment.

There are a number of parameters that you can customize such as the GCP project ID, GKE cluster name, the repository where the ML model will be released, and so on. The full list of parameters can be found here. As noted above, the GCP credentials should be set as a GitHub Action Secret beforehand. If the entire workflow goes without any errors, you will see something similar to the output below.

NAME         TYPE            CLUSTER-IP      EXTERNAL-IP     PORT(S)                            AGE
tfs-server   LoadBalancer    xxxxxxxxxx      xxxxxxxxxx       8500:30869/TCP,8501:31469/TCP      23m

The combinations of the EXTERNAL-IP and the PORT(S) represent endpoints where external users can connect to the TensorFlow Serving pods in the k8s cluster. As you see, two ports are exposed, and 8500 and 8501 are for RESTful and gRPC services respectively. One thing to note is that we used LoadBalancer as the service type, but you may want to consider including Ingress controllers such as GKE Ingress for securing the k8s clusters with SSL/TLS and defining more flexible routing rules in production. You can check out the complete logs from the past runs.

Build a Custom TensorFlow Serving Image within a GitHub Action

As described in the overview and the official document, a custom TensorFlow Serving Docker image can be built in five steps. We also provide a notebook for local testing of these steps. In this section, we show how to write a composite GitHub Action for this partial subtask of the whole workflow (note that .inputs, .env, and ${{ }} for the environment variables are omitted for brevity).

First, a model can be downloaded by an external robinraju/release-downloader GitHub Action with custom information about the URL of the GitHub repository and the filename in the list of assets from the latest release. The default filename is saved_model.tar.gz.

Second, the downloaded file should be decompressed to fetch the actual SavedModel that TensorFlow Serving can understand.

runs:
  using: “composite”
  steps:
      – name: Download the latest SavedModel release
        uses: robinraju/release-downloader@v1.3
        with:
          repository: $MODEL_RELEASE_REPO
          fileName: $MODEL_RELEASE_FILE

          latest: true
         
      – name: Extract the SavedModel
        run: |
          mkdir MODEL_NAME
          tar -xvf $MODEL_RELEASE_FILE –strip-components=1 –directory $MODEL_NAME
   
      – name: Run the CPU Optimized TensorFlow Serving container
        run: |
          docker run -d –name serving_base $BASE_IMAGE_TAG
         
      – name: Copy the SavedModel to the running TensorFlow Serving container
        run: |
          docker cp $MODEL_NAME serving_base:/models/$MODEL_NAME
         
      – id: push-to-registry
        name: Commit and push the changed running TensorFlow Serving image
        run: |
          export NEW_IMAGE_NAME=tfserving-$MODEL_NAME:latest
          export NEW_IMAGE_TAG=gcr.io/$GCP_PROJECT_ID/$NEW_IMAGE_NAME
          echo “::set-output name=NEW_IMAGE_TAG::$(echo $NEW_IMAGE_TAG)”
          docker commit –change “ENV MODEL_NAME $MODEL_NAME” serving_base $NEW_IMAGE_TAG
          docker push $NEW_IMAGE_TAG

Third, we can modify a running TensorFlow Serving Docker container by placing a custom SavedModel inside. In order to do this, we need to run the base TensorFlow Serving container instantiated either from the official image or a custom-built image. We have used the CPU-optimized version as the base image by compiling from source, and it is publicly available here.

Fourth, the SavedModel should be copied to the /models directory inside the running TensorFlow Serving container. In the last step, we set the MODEL_NAME environment variable to let TensorFlow Serving know which model to expose as services, and commit the two changes that we made to the base image. Finally, the updated TensorFlow Serving Docker image can be pushed into the designated GCR.

Notes on the TensorFlow Serving Parameters

We consider three TensorFlow Serving specific parameters in this post: tensorflow_inter_op_parallelism, tensorlfow_inter_op_parallelism, and the batching option. Here, we provide brief overviews of each of them.

Parallelism threads: tesorflow_intra_op_parallelism controls the number of threads to parallelize the execution of an individual operation. tensorflow_inter_op_parallelism controls the number of threads to parallelize the execution of multiple independent operations. To know more, refer to this resource.

Batching: As mentioned above, we can allow TensorFlow Serving to batch requests by setting the enable_batching parameter to True. If we do so, we also need to define the batching configurations for TensorFlow in a separate file (passed via the batching_parameters_file argument). Please refer to this resource for more information about the options we can specify in that file.

Configuring TensorFlow Serving

Once you have a custom TensorFlow Serving Docker image, you can deploy it with the k8s resource objects: Deployment and ConfigMap as shown below. This section shows how to write ConfigMap to write batching configurations and Deployment to add TensorFlow Serving specific runtime options. We also show you how to mount the ConfigMap to inject batching configurations into TensorFlow Serving’s batching_parameters_file option.

apiVersion: apps/v1

kind: Deployment


    spec:
      containers:
      – image: gcr.io/gcp-ml-172005/tfs-resnet-cpu-opt:latest
        name: tfs-k8s
        imagePullPolicy: Always
        args: [“–tensorflow_inter_op_parallelism=2”,
              “–tensorflow_intra_op_parallelism=8”,
              “–enable_batching=true”,
              “–batching_parameters_file=/etc/tfs-config/batching_config.txt”]
        …
        volumeMounts:
          – mountPath: /etc/tfs-config/batching_config.txt
            subPath: batching_config.txt
            name: tfs-config

The URI of the custom built TensorFlow Serving Docker image can be specified in spec.containers.image, and the behavior of TensorFlow Serving can be customized by providing arguments in the spec.containers.args in the Deployment. This post shows how to configure three kinds of custom behavior: tensorflow_inter_op_parallelism, tensorflow_intra_op_parallelism, and enable_batching.

apiVersion: v1

kind: ConfigMap
metadata:
  name: tfs-config
data:
  batching_config.txt: |
    max_batch_size { value: 128 }
    batch_timeout_micros { value: 0 }
    max_enqueued_batches { value: 2 }
    num_batch_threads { value: 2 }

When enable_batching is set to true, we can further customize the batch inference by defining its specific batching-related configurations in a ConfigMap. Then, the ConfigMap can be mounted as a file with spec.containers.volumeMounts, and we can specify which file to look up for the batching_parameters_file argument in Deployment.

Kustomize to Manage Various Experiments

As you see, there are lots of parameters to determine the behavior of TensorFlow Serving, and the optimal values for them are usually found by running experiments. Indeed, we have experimented with various parameters within a number of different environmental setups: different numbers of nodes, different numbers of vCPU cores, and different RAM capacity.

├── base

|   ├──kustomization.yaml

|   ├──deployment.yaml

|   └──service.yaml
└── experiments
    ├── 2vCPU+4GB+inter_op2

    …

    ├── 4vCPU+8GB+inter_op2
    …

    ├── 8vCPU+64GB+inter_op2_w_batch

    |   ├──kustomization.yaml

    |   ├──deployment.yaml

    |   └──tfs-config.yaml
    …

We used kustomize to manage the YAML files of various experiments. We keep common YAML files of Deployment and Service in the base directory while having specific YAML files for certain experimental environments and configurations under the experiments directory. With this and kustomize, the contents of the base YAML files could be easily overlaid with different numbers of replicas, different values of tensorflow_inter_op_parallelism, tensorflow_intra_op_parallelism, enable_batching, and batch configurations.

runs:
  using: “composite”
  steps:
    – name: Setup Kustomize
      …

    – name: Deploy to GKE
      working-directory: .kube/
      run: |-
        ./kustomize build experiments/$TARGET_EXPERIMENT | kubectl apply -f –

You can simply select the experiment that you want to test or that you think is optimal by setting $TARGET_EXPERIMENT. For example, the best experiment that we found was “8vCPU+16GB+inter_op4” which means each VM is configured with an 8vCPU and 16GB RAM while tensorflow_inter_op_parallelism is set to 4. Then the kustomize build command will provision the YAML files for the selected experiment for the k8s clusters.

Costs

We used the GCP cost estimator for this purpose. Pricing for each experiment configuration was assumed to be live for 24 hours per month (which was sufficient for our experiments).


Machine Configuration (E2 series) Pricing (USD)

2vCPUs, 4GB RAM, 8 Nodes

11.15
4vCPUs, 8GB RAM, 4 Nodes

11.15
8vCPUs, 16GB RAM, 2 Nodes

11.15

8vCPUs, 64GB RAM, 2 Nodes

18.21

Conclusion

In this post, we discussed how to automatically deploy and experiment with an already trained model with various configurations. We leveraged TensorFlow Serving, Kubernetes, and GitHub Actions to streamline the deployment and experiments. We hope that you found this setup useful and reliable and that you will use this in your own model deployment projects.


Acknowledgements

We are grateful to the ML Developer Programs team that provided GCP credits for supporting our experiments. We also thank Hannes Hapke and Robert Crowe for providing us with helpful feedback and guidance.

Read More

Q&A: Global challenges surrounding the deployment of AI

Q&A: Global challenges surrounding the deployment of AI

The AI Policy Forum (AIPF) is an initiative of the MIT Schwarzman College of Computing to move the global conversation about the impact of artificial intelligence from principles to practical policy implementation. Formed in late 2020, AIPF brings together leaders in government, business, and academia to develop approaches to address the societal challenges posed by the rapid advances and increasing applicability of AI.

The co-chairs of the AI Policy Forum are Aleksander Madry, the Cadence Design Systems Professor; Asu Ozdaglar, deputy dean of academics for the MIT Schwarzman College of Computing and head of the Department of Electrical Engineering and Computer Science; and Luis Videgaray, senior lecturer at MIT Sloan School of Management and director of MIT AI Policy for the World Project. Here, they discuss talk some of the key issues facing the AI policy landscape today and the challenges surrounding the deployment of AI. The three are co-organizers of the upcoming AI Policy Forum Summit on Sept. 28, which will further explore the issues discussed here.

Q: Can you talk about the ­ongoing work of the AI Policy Forum and the AI policy landscape generally?

Ozdaglar: There is no shortage of discussion about AI at different venues, but conversations are often high-level, focused on questions of ethics and principles, or on policy problems alone. The approach the AIPF takes to its work is to target specific questions with actionable policy solutions and engage with the stakeholders working directly in these areas. We work “behind the scenes” with smaller focus groups to tackle these challenges and aim to bring visibility to some potential solutions alongside the players working directly on them through larger gatherings.

Q: AI impacts many sectors, which makes us naturally worry about its trustworthiness. Are there any emerging best practices for development and deployment of trustworthy AI?

Madry: The most important thing to understand regarding deploying trustworthy AI is that AI technology isn’t some natural, preordained phenomenon. It is something built by people. People who are making certain design decisions.

We thus need to advance research that can guide these decisions as well as provide more desirable solutions. But we also need to be deliberate and think carefully about the incentives that drive these decisions. 

Now, these incentives stem largely from the business considerations, but not exclusively so. That is, we should also recognize that proper laws and regulations, as well as establishing thoughtful industry standards have a big role to play here too.

Indeed, governments can put in place rules that prioritize the value of deploying AI while being keenly aware of the corresponding downsides, pitfalls, and impossibilities. The design of such rules will be an ongoing and evolving process as the technology continues to improve and change, and we need to adapt to socio-political realities as well.

Q: Perhaps one of the most rapidly evolving domains in AI deployment is in the financial sector. From a policy perspective, how should governments, regulators, and lawmakers make AI work best for consumers in finance?

Videgaray: The financial sector is seeing a number of trends that present policy challenges at the intersection of AI systems. For one, there is the issue of explainability. By law (in the U.S. and in many other countries), lenders need to provide explanations to customers when they take actions deleterious in whatever way, like denial of a loan, to a customer’s interest. However, as financial services increasingly rely on automated systems and machine learning models, the capacity of banks to unpack the “black box” of machine learning to provide that level of mandated explanation becomes tenuous. So how should the finance industry and its regulators adapt to this advance in technology? Perhaps we need new standards and expectations, as well as tools to meet these legal requirements.

Meanwhile, economies of scale and data network effects are leading to a proliferation of AI outsourcing, and more broadly, AI-as-a-service is becoming increasingly common in the finance industry. In particular, we are seeing fintech companies provide the tools for underwriting to other financial institutions — be it large banks or small, local credit unions. What does this segmentation of the supply chain mean for the industry? Who is accountable for the potential problems in AI systems deployed through several layers of outsourcing? How can regulators adapt to guarantee their mandates of financial stability, fairness, and other societal standards?

Q: Social media is one of the most controversial sectors of the economy, resulting in many societal shifts and disruptions around the world. What policies or reforms might be needed to best ensure social media is a force for public good and not public harm?

Ozdaglar: The role of social media in society is of growing concern to many, but the nature of these concerns can vary quite a bit — with some seeing social media as not doing enough to prevent, for example, misinformation and extremism, and others seeing it as unduly silencing certain viewpoints. This lack of unified view on what the problem is impacts the capacity to enact any change. All of that is additionally coupled with the complexities of the legal framework in the U.S. spanning the First Amendment, Section 230 of the Communications Decency Act, and trade laws.

However, these difficulties in regulating social media do not mean that there is nothing to be done. Indeed, regulators have begun to tighten their control over social media companies, both in the United States and abroad, be it through antitrust procedures or other means. In particular, Ofcom in the U.K. and the European Union is already introducing new layers of oversight to platforms. Additionally, some have proposed taxes on online advertising to address the negative externalities caused by current social media business model. So, the policy tools are there, if the political will and proper guidance exists to implement them.

Read More

Q&A: Global challenges surrounding the deployment of AI

The AI Policy Forum (AIPF) is an initiative of the MIT Schwarzman College of Computing to move the global conversation about the impact of artificial intelligence from principles to practical policy implementation. Formed in late 2020, AIPF brings together leaders in government, business, and academia to develop approaches to address the societal challenges posed by the rapid advances and increasing applicability of AI.

The co-chairs of the AI Policy Forum are Aleksander Madry, the Cadence Design Systems Professor; Asu Ozdaglar, deputy dean of academics for the MIT Schwarzman College of Computing and head of the Department of Electrical Engineering and Computer Science; and Luis Videgaray, senior lecturer at MIT Sloan School of Management and director of MIT AI Policy for the World Project. Here, they discuss talk some of the key issues facing the AI policy landscape today and the challenges surrounding the deployment of AI. The three are co-organizers of the upcoming AI Policy Forum Summit on Sept. 28, which will further explore the issues discussed here.

Q: Can you talk about the ­ongoing work of the AI Policy Forum and the AI policy landscape generally?

Ozdaglar: There is no shortage of discussion about AI at different venues, but conversations are often high-level, focused on questions of ethics and principles, or on policy problems alone. The approach the AIPF takes to its work is to target specific questions with actionable policy solutions and engage with the stakeholders working directly in these areas. We work “behind the scenes” with smaller focus groups to tackle these challenges and aim to bring visibility to some potential solutions alongside the players working directly on them through larger gatherings.

Q: AI impacts many sectors, which makes us naturally worry about its trustworthiness. Are there any emerging best practices for development and deployment of trustworthy AI?

Madry: The most important thing to understand regarding deploying trustworthy AI is that AI technology isn’t some natural, preordained phenomenon. It is something built by people. People who are making certain design decisions.

We thus need to advance research that can guide these decisions as well as provide more desirable solutions. But we also need to be deliberate and think carefully about the incentives that drive these decisions. 

Now, these incentives stem largely from the business considerations, but not exclusively so. That is, we should also recognize that proper laws and regulations, as well as establishing thoughtful industry standards have a big role to play here too.

Indeed, governments can put in place rules that prioritize the value of deploying AI while being keenly aware of the corresponding downsides, pitfalls, and impossibilities. The design of such rules will be an ongoing and evolving process as the technology continues to improve and change, and we need to adapt to socio-political realities as well.

Q: Perhaps one of the most rapidly evolving domains in AI deployment is in the financial sector. From a policy perspective, how should governments, regulators, and lawmakers make AI work best for consumers in finance?

Videgaray: The financial sector is seeing a number of trends that present policy challenges at the intersection of AI systems. For one, there is the issue of explainability. By law (in the U.S. and in many other countries), lenders need to provide explanations to customers when they take actions deleterious in whatever way, like denial of a loan, to a customer’s interest. However, as financial services increasingly rely on automated systems and machine learning models, the capacity of banks to unpack the “black box” of machine learning to provide that level of mandated explanation becomes tenuous. So how should the finance industry and its regulators adapt to this advance in technology? Perhaps we need new standards and expectations, as well as tools to meet these legal requirements.

Meanwhile, economies of scale and data network effects are leading to a proliferation of AI outsourcing, and more broadly, AI-as-a-service is becoming increasingly common in the finance industry. In particular, we are seeing fintech companies provide the tools for underwriting to other financial institutions — be it large banks or small, local credit unions. What does this segmentation of the supply chain mean for the industry? Who is accountable for the potential problems in AI systems deployed through several layers of outsourcing? How can regulators adapt to guarantee their mandates of financial stability, fairness, and other societal standards?

Q: Social media is one of the most controversial sectors of the economy, resulting in many societal shifts and disruptions around the world. What policies or reforms might be needed to best ensure social media is a force for public good and not public harm?

Ozdaglar: The role of social media in society is of growing concern to many, but the nature of these concerns can vary quite a bit — with some seeing social media as not doing enough to prevent, for example, misinformation and extremism, and others seeing it as unduly silencing certain viewpoints. This lack of unified view on what the problem is impacts the capacity to enact any change. All of that is additionally coupled with the complexities of the legal framework in the U.S. spanning the First Amendment, Section 230 of the Communications Decency Act, and trade laws.

However, these difficulties in regulating social media do not mean that there is nothing to be done. Indeed, regulators have begun to tighten their control over social media companies, both in the United States and abroad, be it through antitrust procedures or other means. In particular, Ofcom in the U.K. and the European Union is already introducing new layers of oversight to platforms. Additionally, some have proposed taxes on online advertising to address the negative externalities caused by current social media business model. So, the policy tools are there, if the political will and proper guidance exists to implement them.

Read More

Introducing self-service quota management and higher default service quotas for Amazon Textract

Today, we’re excited to announce self-service quota management support for Amazon Textract via the AWS Service Quotas console, and higher default service quotas in select AWS Regions.

Customers tell us they need quick turnaround times to process their requests for quota increases and visibility into their service quotas so they may continue to scale their Amazon Textract usage. With this launch, we’re improving Amazon Textract support for service quotas by enabling you to self-manage your service quotas via the Service Quotas console. In addition to viewing the default service quotas, you can now view your account’s applied custom quotas for a specific Region, view your historical utilization metrics per applied quota, set up alarms to notify when utilization approaches a threshold, and add tags to your quotas for easier organization. Additionally, we’re launching the Amazon Textract Service Quota Calculator, which will help you quickly estimate service quota requirements for your workload prior to submitting a quota increase request.

In this post, we discuss the updated default service quotas, the new service quota management capabilities, and the service quota calculator for Amazon Textract.

Increased default service quotas for Amazon Textract

Amazon Textract now has higher service quotas for several asynchronous and synchronous APIs in multiple major AWS Regions. The updated default service quotas are available for US East (Ohio), US East (N. Virginia), US West (Oregon), Asia Pacific (Mumbai), and Europe (Ireland) Regions. The following table summarizes the before and after default quota numbers for each of these Regions for the respective synchronous and asynchronous APIs. You can refer to Amazon Textract endpoints and quotas to learn more about the current default quotas.

Synchronous Operations API Region Before After
Transactions per second per account for synchronous operations AnalyzeDocument US East (Ohio) 1 10
Asia Pacific (Mumbai) 1 5
Europe (Ireland) 1 5
DetectDocumentText US East (Ohio) 1 10
US East (N. Virginia) 10 25
US West (Oregon) 10 25
Asia Pacific (Mumbai) 1 5
Europe (Ireland) 1 5
Asynchronous Operations API Region Before After
Transactions per second per account for all Start (asynchronous) operations StartDocumentAnalysis US East (Ohio) 2 10
Asia Pacific (Mumbai) 2 5
Europe (Ireland) 2 5
StartDocumentTextDetection US East (Ohio) 1 5
US East (N. Virginia) 10 15
US West (Oregon) 10 15
Asia Pacific (Mumbai) 1 5
Europe (Ireland) 1 5
Transactions per second per account for all Get (asynchronous) operations GetDocumentAnalysis US East (Ohio) 5 10
GetDocumentTextDetection US East (Ohio) 5 10
US East (N. Virginia) 10 25
US West (Oregon) 10 25

Improved service quota support for Amazon Textract

Starting today, you can manage your Amazon Textract service quotas via the Service Quotas console. Requests may now be processed automatically, speeding up approval times. After a quota request for a specific Region is approved, the new quota is immediately available for scaling your Amazon Textract usage and also visible on the Service Quotas console. You can see the default and applied quota values for your account in a given Region, and view the historical utilization metrics via an integrated Amazon CloudWatch graph. This enables you to make informed decisions about whether a quota increase is required to scale your workload. You can also use CloudWatch alarms to notify whenever a specified quota reaches a predefined threshold, which can help investigate issues with your applications or monitor spikey workloads. You can also add tags to the quotas, which allows better administration and monitoring.

The following sections discusses the features that are now available via the Service Quotas console for Amazon Textract.

Default and applied quotas

You can now have visibility into the AWS default quota value and applied quota value of a specific quota for Amazon Textract on the Service Quotas console. The default quota value is the default value of the quota in that specific Region, and the applied quota value is the currently applied value for that quota for the account in that Region.

Monitoring via CloudWatch graphs

The Service Quotas console also displays a utilization against the total applied quota value. You can also view the weekly, daily, and hourly trend in utilization of the applied quota through an integrated CloudWatch graph, right from the Service Quotas console, for a given quota. You can add this graph to a custom CloudWatch dashboard for better monitoring and reporting of service usage and overall utilization.

Amazon Textract Service Quota Console cloudwatch graph and alarms

We have also added the capability to set up CloudWatch alarms to notify you automatically whenever a specified quota reaches a certain configurable threshold. This helps you monitor the usage of Amazon Textract from your applications, analyze spikey workloads, make informed decisions about the overall utilization, control costs, and make improvements to the application’s architecture.

Quota tagging

With quota tagging, you can now add tags to applied quotas to simplify administration. Tags help you identify and organize AWS resources. With quota tags, you can manage the applied service quotas for Amazon Textract along with other AWS service quotas, as part of your administration and governance practices. You can better manage and monitor quotas and quota utilization for different environments based on tags. For example, you can use production or development tags to logically separate and monitor dev environment and production environment quotas and quota utilization for accounts under AWS Organizations and unified reporting.

Amazon Textract Service Quota Calculator

We’re introducing a new quota calculator on the Amazon Textract console. The quota calculator helps forecast service quota requirements based on answers to questions about your workload and usage of Amazon Textract. With calculations based on your usage patterns, such as number of documents and number of pages per document, it provides actionable recommendations in the form of a required quota value for the workload.

As shown in the following screenshot, the quota calculator is now accessible directly from the Amazon Textract console. You can also navigate to the Service Quotas console directly from the calculator, where you can manage the service quotas based on the calculated recommendations.

Amazon Textract Quota Calculator

Quota calculator for synchronous operations

To view the current quota values and recommended quota values for synchronous operations, you start by selecting Synchronous under Processing type. For example, if you’re interested in calculating the desired quota values for your workload that uses the DetectDocumentText API, you select the Synchronous processing type, and then choose Detect Document Text on the Use case type drop-down menu.

Amazon Quota Calculator sync calculation

After you specify your desired options, the quota calculator prompts for additional inputs, which include the maximum number of documents you expect to process via the API per day or per hour. The corresponding numbers of documents to be processed shown under View calculation is automatically calculated based on the input. Because synchronous processing allows text detection and analysis of single-page documents, the number of pages per document defaults to 1. For multi-page documents, we recommend using asynchronous processing.

Amazon Quota Calculator sync input usage values

The output of this calculation is a current quota value applicable for that account in the current Region, and the recommended quota value, based on the quota type selected and the provided number of documents.

Amazon Quota Calculator sync calculation output

You can copy the recommended quota value within the calculator and use the Quota type (in this case, DetectDocumentText) deep link to navigate to the specific quota on the Service Quotas console to create a quota increase request.

Quota calculator for asynchronous operations

The way to view current quota values and recommended quota values for asynchronous operations is similar to that of the synchronous operations. Specify the use case type for your asynchronous operation usage, and answer a few questions relevant to your workload to view the current quotas and recommended quotas for all the asynchronous operations relevant to the use case.

For example, if you’re running asynchronous jobs using the StartDocumentTextDetection API and consecutively using the GetDocumentTextDetection API to get the results of the job in your workload, choose the Document Text Detection option as your use case. Because these two APIs are always used in conjunction to each other, the calculator provides recommendations for both the APIs. For asynchronous operations, there are limits on the total number of concurrent jobs that can be run per account in a given Region. Therefore, the calculator also calculates the recommended total number of concurrent asynchronous jobs recommended for your workload.

Amazon Quota Calculator Async calculation

In addition to the processing type and use case type, you need to provide specific values relevant to your workload:

  • The maximum number of documents you expect to process
  • A processing time frame value in hours, which is the approximate length of time over which you expect to process the documents
  • The maximum number of pages per document, because asynchronous operations allow processing multi-page documents

Amazon Quota Calculator Async calculation input usage values

Quota calculation for asynchronous operations generates recommended quota values for all the asynchronous APIs relevant to the selected use case. In our example, the quota values for the StartDocumentTextDetection API, GetDocumentTextDetection API, and number of concurrent text detection jobs are generated by the calculator, as shown in the following screenshot. You can then use the required quota value to request quota increases via the Service Quotas console using the corresponding deep links under Quota type.

Amazon Quota Calculator Async calculation output

It’s worth noting that the all the quota-related information within the calculator is shown for the current AWS Region for the AWS Management Console. To view the quota information for a different Region, you can change the Region manually from the top navigation bar of the console. Recommendations generated by the calculator are based on the current applied quota for that account for the current Region, the selected processing type (asynchronous and synchronous), and other information relevant to your workload. You can use these recommendations to submit quota increase requests via the Service Quotas console. Although most requests are processed automatically, some requests may need additional manual review prior to being approved.

Conclusion

In this post, we announced the updated default service quotas in select AWS Regions and the self-service quota management capabilities of Amazon Textract. We also announced the availability of a new quota calculator, available on the Amazon Textract console. You can start taking advantage of the new default service quotas, and use the Amazon Textract quota calculator to generate recommended quota values to quickly scale your workload. With the improved Service Quotas console for Amazon Textract, you can request quota increases, monitor quota utilization and service usage, and set up alarms. With the features announced in this post, you can now easily monitor your quota utilization, manage costs, and follow best practices to scale your Amazon Textract usage.

To learn more about the Amazon Textract service quota calculator and extended features for quota management, visit Quotas in Amazon Textract.


About the authors

Anjan BiswasAnjan Biswas is a Senior AI Services Solutions Architect with focus on AI/ML and Data Analytics. Anjan is part of the world-wide AI services team and works with customers to help them understand, and develop solutions to business problems with AI and ML. Anjan has over 14 years of experience working with global supply chain, manufacturing, and retail organizations and is actively helping customers get started and scale on AWS AI services.

Shashwat SapreShashwat Sapre is a Senior Technical Product Manager with the Amazon Textract team. He is focused on building machine learning-based services for AWS customers. In his spare time, he likes reading about new technologies, traveling and exploring different cuisines.

Read More

Bridging communities: TensorFlow Federated (TFF) and OpenMined

Bridging communities: TensorFlow Federated (TFF) and OpenMined

Posted by Krzys Ostrowski (Research Scientist), Alex Ingerman (Product Manager), and Hardik Vala (Software Engineer)

Since the announcement of TensorFlow Federated (TFF) on this blog 3.5 years ago, a number of organizations have developed frameworks for Federated Learning (FL). While growing attention to privacy and investments in FL are a welcome trend, one challenge that arises is fragmentation of community and industry efforts, which leads to code duplication and reinvention. One way we can address this as a community is by investing in interoperability mechanisms that could enable our platforms and developers to work together and leverage each other’s strengths.

In this context, we’re excited to announce the collaboration between TFF and OpenMined – an OSS community dedicated to development of privacy-preserving technologies. OpenMined’s PySyft framework has attracted a vibrant community of hundreds of OSS contributors, and includes tools and APIs to facilitate containerized deployment and integrations with diverse data sources that complement the capabilities we offer in TFF.

OpenMined is joining Special Interest Group (SIG) Federated (see the charter, forum, meeting notes, and the Discord server) we’ve recently established to enable developers of TFF, together with a growing set of OSS and industry partners, to openly engage in conversations about how to jointly evolve the TFF ecosystem and grow the adoption of FL.

Introducing PySyTFF

To kick off the collaboration, we – the developers of TFF and OpenMined’s PySyft – decided to focus our initial efforts on building together a new platform, with an endearing name PySyTFF, that combines elements of TFF and PySyft to support what we believe will be an increasingly common scenario, illustrated below.

In this scenario, an owner of a sensitive dataset would like to invite researchers to experiment with training and evaluating ML models on their dataset to advance the current understanding of what model architectures, parameters, etc., work best, while protecting the data and adhering to policies that may govern its use. In practice, such scenarios often end up involving negotiating data usage contracts. On the one hand, these can be tedious to set up, and on the other hand, they largely rely on goodwill.

What we’d like instead is, to have a platform that can offer structural safeguards in place that limit the disclosure of sensitive information and ensure policy compliance by construction – this is our goal for PySyTFF.

As an aside, note that even though this blog post is about FL, we aren’t necessarily talking here about scenarios where data is physically siloed across physical locations – the data can also be hosted in a datacenter and logically siloed. More on this below.

Developer experience

The initial proof-of-concept implementation of PySyTFF offers an early glimpse of what the developer experience for the data scientist will look like. Note how we combine the advantages of both frameworks – e.g., TFF’s ability to define models in Keras, and PySyft’s access control mechanism and APIs for data access:


domain = sy.login(email=“sam@stargate.net”, password=“changethis”, port=8081)


model_fn = lambda: tf.keras.models.Sequential(…)


params = {

    ’rounds’: 10,

    ‘no_clients’: 3,

    ‘noise_multiplier’: 0.05,

    ‘clients_per_round’: 2,

    ‘train_data_id’: domain.dataset[0][‘images’].id_at_location.to_string(),

    ‘label_data_id’: domain.datasets[0][‘labels’].id_at_location.to_string()

}


model, metrics = sy.tff.train_model(model_fn, params, domain, timeout=5000)

Here, the data scientist is logging into a PySyft’s domain node – an infrastructure component provisioned by or on behalf of the data provider – and gains a limited, access control-guarded ability to enumerate the available resources and perform actions on them. This includes obtaining references to datasets managed by the node and their metadata (but not content) and issuing the train_model calls, wherein the data scientist can supply a Keras model they wish to train, and the various parameters that control the training process and affect the privacy guarantees of the computed result, such as the number of rounds or the amount of noise added in order to make the results of the model training more private. In return, the researcher may get computed outputs such as a set of evaluation metrics, or the trained model parameters.

Exactly what ranges of parameters supplied by the researcher are accepted by the platform, and what results the researcher can get will, in general, depend on the policies defined by the data owner that might, e.g., mandate the use of privacy-preserving algorithms and constrain the allowed privacy budget – and these may constrain parameters such as the number of training rounds, clients per round, or the noise multiplier. Whereas at the current stage of development, PySyTFF does not yet offer policy engine integration, this is an important part of the future development plans.

Under the hood

The domain node is a docker-based environment that bundles together a web-based frontend that you can securely log into, with a mechanism for authenticating and authorizing users, and a set of internal services that includes database connectivity, as illustrated below.

The train_model call in the code snippet above, perhaps embedded in the data scientist’s Python colab notebook, is implemented as a network request, carrying a serialized representation of the TensorFlow code of the model to train, along with the training parameters, and the references to the PySyft datasets to use for training and evaluation.

Inside the domain node, the call is relayed to a PySyTFF service, a new component introduced to the PySyft ecosystem to orchestrate the training process. This involves interacting with PySyft’s data backend to obtain handles to shards of user data, calling TFF APIs to construct TFF computations to run, and passing the constructed TFF computations and data handles to an embedded instance of TFF runtime that loads the data using the supplied handles and runs the FL algorithms.

FL on logically-siloed data

At this point, some of you may be wondering how exactly FL fits into the picture. After all, FL is mostly known as a technology that supports computations on data that’s distributed across a set of devices, or (in what’s called a cross-silo flavor of FL) a set of data centers owned by a group of institutions, yet here, we’re talking about a scenario where the data is already in the customer’s PySyft database.

To explain this, let’s pop up a level and consider the high level objective – to enable researchers to perform ML computations on sensitive data with platform-level, structural and formal privacy guarantees. In order to do so, the platform should ideally uphold formal privacy principles, such as data minimization (a guarantee on how the computation is executed and how sensitive data is handled), and anonymous aggregation (a guarantee on what is being computed and released).

Federated Learning is a great fit in this context because it structurally embodies these principles, and provides a framework for implementing algorithms that provably achieve user-level Differential Privacy (DP) – the current gold standard. The FL algorithms that enable us to achieve these guarantees can be used to process data in datacenter deployments, even in scenarios where – as is the case here with the PySyft database – all of that data resides in a single administrative domain.

To see this, just imagine that for each user in the database, we draw a virtual boundary around all their data, and think of it as a kind of virtual silo. We can treat such virtual silos of user data in the same way as how we treat “client” devices in a more traditional FL setting, and orchestrate FL algorithms to run across virtual silos as clients.

Thus, for example, when training an ML model, we’d repeatedly pick sets of users from the database, locally and independently train local model updates on their data – separately for each user, add clipping to each local update and noise for privacy, aggregate these local updates across users to produce an updated global model, and repeat this process for thousands of rounds until the ML model converges, as shown below.

Whereas the data may be only logically partitioned, following this approach enables us to achieve the very same types of formal guarantees, including provable user-level differential privacy, as those cited above – and indeed, TFF enables us to leverage the same FL algorithm implementation – literally the same TFF code – as that which powers Google’s mobile/IoT production deployments.

Collaborate with us!

As noted earlier, the initial version of PySyTFF is still missing a number of components – and this, dear reader, is where you come in. If the vision laid out above excites you, we – the TFF and PySyft teams – would love to work with you to evolve this platform together. In addition to policy engine integration, we plan to augment PySyTFF with the ability to spawn distributed instances of the TFF runtime on cloud or compute clusters to power very compute-intensive workloads, a system of charging for the use of resources, and to extend the scope of PySyTFF to include classical types of cross-silo FL deployments, to name just a few.

There are a great many ways to go about this – from joining the TFF and PySyft’s collaborative efforts and directly helping us build and deploy this platform, to helping design and build generic components and APIs that can enable TFF and PySyft/PyGrid to interoperate.

Ready to get started? You can visit the SIG Federated forum and join the Discord server, or you can reach out directly – see the contact info in the SIG charter, and the engagement channels created by the OpenMined’s PySyft team. We’re looking forward to hearing from you!

Acknowledgments

On behalf of the TFF team at Google, we’d like to thank our OpenMined partners Andrew Trask, Tudor Cebere, and Teo Milea for the productive collaboration leading up to this announcement.

Read More