From edge computing and causal reasoning to differential privacy and visual-field mapping, the top blog posts of the year display the range of scientific research at Amazon.Read More

These 6 NVIDIA Jetson Users Win Big at CES in Las Vegas
Six companies with innovative products built using the NVIDIA Jetson edge AI platform will leave CES, one of the world’s largest consumer technology trade shows, as big winners next week.
The CES Innovation Awards each year honor outstanding design and engineering in more than two dozen categories of consumer technology products. The companies to be awarded for their Jetson-enabled products at the conference, which runs Jan. 5-8 in Las Vegas, include:
- John Deere: Best of Innovation awardee in the robotics category and honoree in the vehicle tech and advanced mobility category for its fully autonomous tractor. The tractor is capable of using GPS guidance, cameras, sensors and AI to perform essential tasks on the farm without an operator inside the cab.
- AGRIST: Honoree for its robot that automatically harvests bell peppers. The smart agriculture company will be at CES booth 62201.
- Skydio: Honoree for its Scout drone, which an operator can fly at a set distance and height using the Skydio Enterprise Controller or the Skydio Beacon while on the move, and without having to manually operate the drone. Skydio, at booth 18541 in Central Hall, is a member of NVIDIA Inception, a free, global program for cutting-edge startups.
- GlüxKind: Honoree for GlüxKind Ella, an AI-powered intelligent baby stroller that offers advanced safety and convenience for busy parents. The NVIDIA Inception member will be at CES booth 61710.
- Neubility: Honoree for its self-driving delivery robot, Neubie, a cost-effective and sustainable alternative for delivery needs that can help alleviate traffic congestion in urban areas. The NVIDIA Inception member will be at Samsung Electronics C-LAB’s booth 61032 in Venetian Hall.
- Seoul Robotics: Honoree for its Level 5 Control Tower, which can turn standard vehicles into self-driving cars through a mesh network of sensors and computers installed on infrastructure. The NVIDIA Inception member will be at CES booth 5408.
Also, NVIDIA Inception members and Jetson ecosystem partners, including DriveU, Ecotron, Infineon, Leopard Imaging, Orbecc, Quest Global, Slamcore, Telit, VVDN, Zvision and others, will be at CES, with many announcing systems and demonstrating applications based on the Jetson Orin platform.
Deepu Talla, vice president of embedded and edge computing at NVIDIA, will join a panel discussion, “The Journey to Autonomous Operations,” on Friday, Jan. 6, at 12:30 p.m. PT, at the Accenture Innovation Hub in ballroom F of the Venetian Expo.
And tune in to NVIDIA’s virtual special address at CES on Tuesday, Jan. 3, at 8 a.m. PT, to hear the latest in accelerated computing. NVIDIA executives will unveil products, partnerships and offerings in autonomous machines, robotics, design, simulation and more.
Torchserve Performance Tuning, Animated Drawings Case-Study
Serving models in production
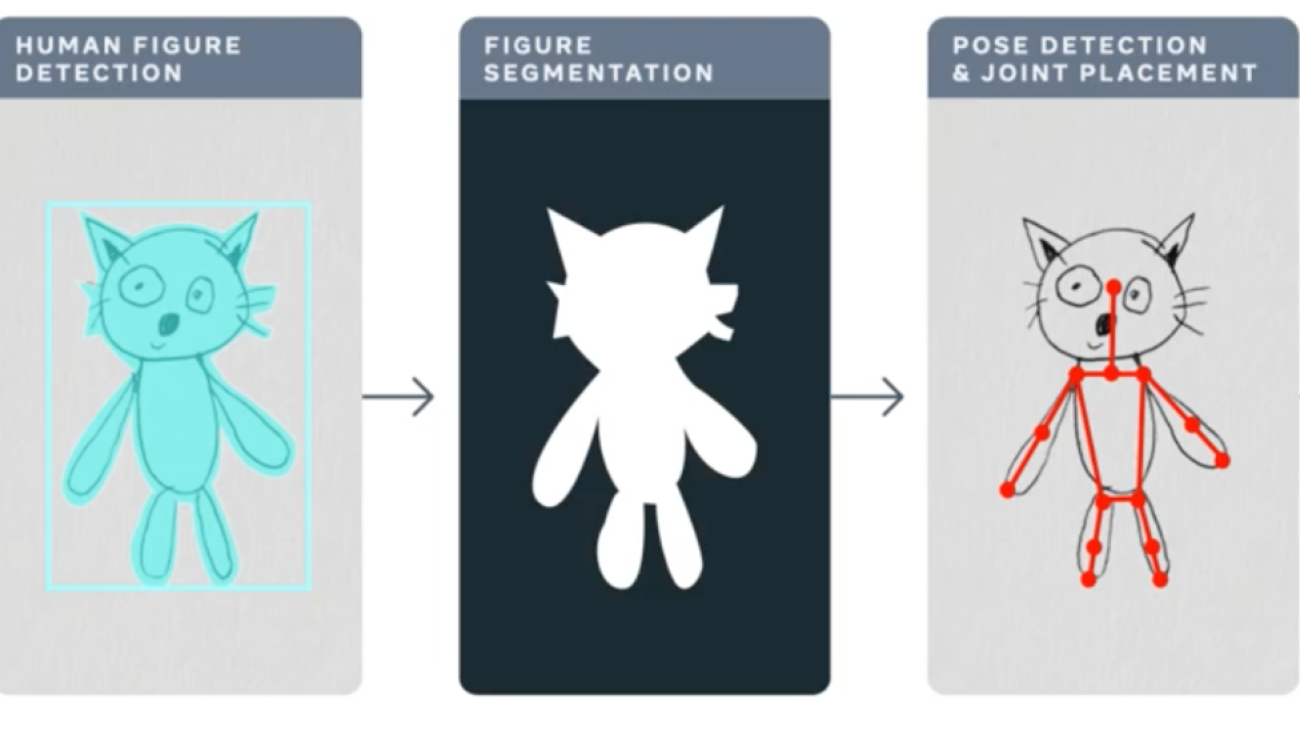
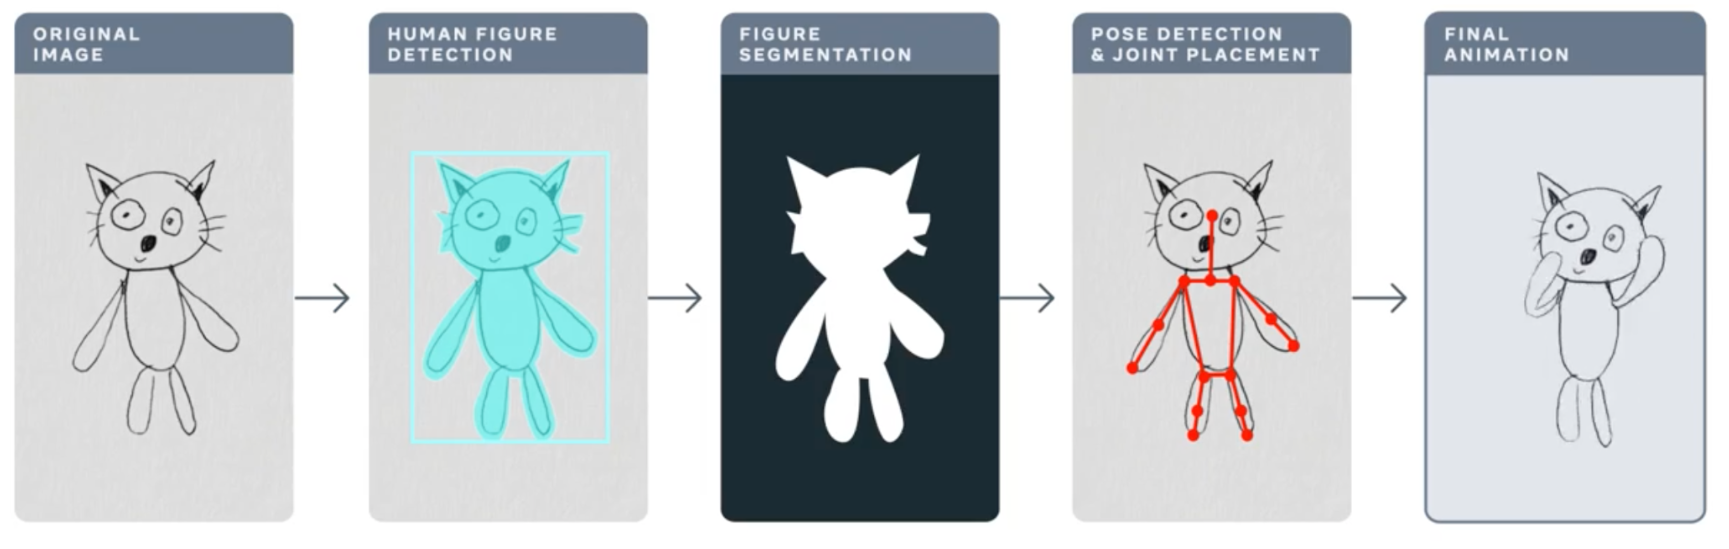
In this post we discuss performance tuning of Torchserve for serving your models in production. One of the biggest challenges in the life cycle of a ML project is deploying models in production. This requires a reliable serving solution along with solutions that address the MLOps needs. A robust serving solution needs to provide support for multi model serving, model versioning, metric logging, monitoring and scaling to serve the peak traffic. In this post, we will have an overview of Torchserve and how to tune its performance for production use-cases. We discuss the Animated Drawings app from Meta that can turn your human figure sketches to animations and how it could serve the peak traffic with Torchserve. The Animated Drawing’s workflow is below.
https://ai.facebook.com/blog/using-ai-to-bring-childrens-drawings-to-life/
Many AI systems and tools are designed to handle realistic images of humans, children’s drawings add a level of complexity and unpredictability as they are often constructed in abstract, fanciful ways. These types of morphological and stylistic variations can confuse even state-of-the-art AI systems that excel at spotting objects in photorealistic images and drawings.
Meta AI researchers are working to overcome this challenge so that AI systems will be better able to recognize drawings of human figures in the wildly varied ways that children create them. This great blog post provides more details about the Animated Drawings and the approach taken.
Torchserve
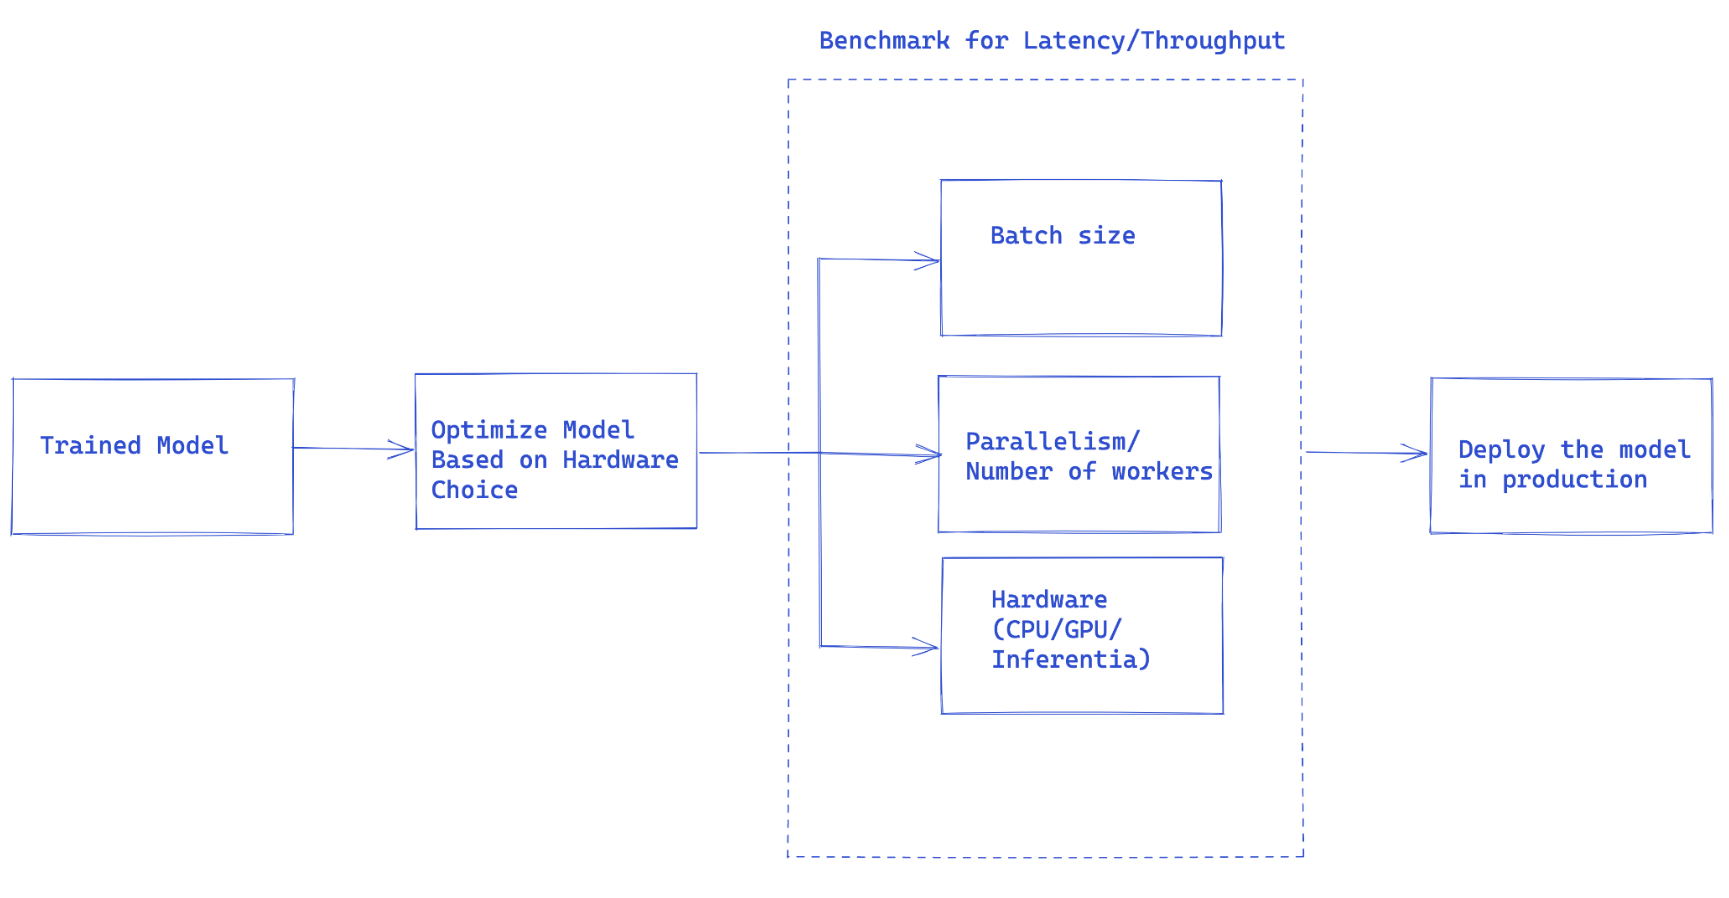
Fig1. Overall flow of Torchserve performance tuning
Once you have trained your model, it needs to be integrated into a larger system to have a full-fledged application, we use the term “model serving” to refer to this integration. Basically model serving is making your trained model available to run inferences and subsequent use of the model.
Torchserve is the Pytorch preferred solution for serving models in production. It is a performant and scalable tool that wraps your model in a HTTP or HTTPS API. It has a frontend implemented in Java that handles multiple tasks from assigning workers for serving models to handling the connection between client and server. Torchserve has a Python backend that is responsible for handling the inference service.
Torchserve supports multi model serving and versioning for AB test, dynamic batching, logging and metrics. It exposes four APIs for inference, explanations, management and metrics.
Inference API is listening on port 8080 and accessible through localhost by default, this can be configured in Torchserve configuration and enable getting predictions from the model.
Explanation API uses Captum under the hood to provide explanations of the model that is being served and listens to the port 8080 as well.
Management API allows to register or unregister and describe a model. It also enables users to scale up or down the number of workers that serve the model.
Metric API by default listens to port 8082 and enables us to monitor the model that is being served.
Torchserve let you scale your model serving and handle the peak traffic by supporting batch inference and multiple workers that serve your model. Scaling can be done through management API and settings through a configuration file. Also, metric API helps you to monitor your model serving through default and customizable metrics.
Other advanced settings such as the length of the queue for the received requests, maximum wait time for a batch of inputs and many other properties are configurable through a config file that can be passed to Torchserve when it is started.
Steps to serve your model with Torchserve
- Install Torchserve, model archiver and its requirements.
- Choose a default handler that fits your task (e.g image classification, etc) or author a custom handler.
- Package your model artifacts (trained model checkpoint and all other necessary files for loading and running your model) and the handler into a “.mar” file using Torcharchive and place it in the model store.
- Start serving your model.
- Run inference.
We will discuss model handlers and metrics in more detail here.
Model handlers
Torchserve uses a handler in the backend to load the models, preprocess the received data, run inference and post-process the response. Handler in torchserve is a python script that all the model initialization, preprocessing, inference and post processing logic goes into.
Torchserve provides an out of the box handler for a number of applications like image classification, segmentation, object detection and text classification. It also supports custom handlers, in case your use case is not supported in default handlers.
It provides a great flexibility in custom handlers, this potentially make Torchserve as multi-framework serving tool. Custom handlers let you define your custom logic to initialize a model that can be used also to load models from other frameworks such as ONNX.
Torchserve handler is made of four main functions, initialize, preprocess, inference and postprocess that each return a list. The code snippet below shows an example of a custom handler.Custom handlers inherit from BaseHandler in Torchserve and can overwrite any of the main functions. Here is an example of the handler used for loading the Detectron2 model for figure detection, this model has been exported to Torchscript and uses model.half() to run the inference with FP16, details are explained in another section in this post.
class MyModelHandler(BaseHandler):
    def initialize(self, context):
        self.manifest = ctx.manifest
        properties = ctx.system_properties
        model_dir = properties.get("model_dir")
        serialized_file = self.manifest["model"]["serializedFile"]
        model_pt_path = os.path.join(model_dir, serialized_file)

        self.device = torch.device(
        "cuda:" + str(properties.get("gpu_id"))
        if torch.cuda.is_available() and properties.get("gpu_id") is not None
        else "cpu"
        )
        self.model = torch.jit.load(model_pt_path, map_location=self.device)

        self.model = self.model.half()

    def preprocess(self, data):

        inputs = []
        for request in batch:

            request_body = request.get("body")

            input_ = io.BytesIO(request_body)
            image = cv2.imdecode(np.fromstring(input_.read(), np.uint8), 1)
            input = torch.Tensor(image).permute(2, 0, 1)
            input = input.to(self.device)
            input = input.half()
            inputs.append({"image": input})

        return inputs

    def inference(self,inputs):
        predictions = self.model(**inputs)
        return predictions

    def postprocess(self, output):
        responses = []
        for inference_output in inference_outputs:
            responses_json = {
            'classes': inference_output['pred_classes'].tolist(),
            'scores': inference_output['scores'].tolist(),
            "boxes": inference_output['pred_boxes'].tolist()
            }
            responses.append(json.dumps(responses_json))

        return responses
Metrics
An essential component in serving models in production is the ability to monitor them. Torchserve collects system level metrics regularly and allows adding custom metrics as well.
System level metrics consist of CPU utilization, available and used disk space and memory on the host machine along with number of requests with different response codes (e.g 200-300, 400-500 and above 500). Custom metrics can be added to the metrics as explained here. TorchServe logs these two sets of metrics to different log files. Metrics are collected by default at:
- System metrics – log_directory/ts_metrics.log
- Custom metrics – log directory/model_metrics.log
As mentioned before, Torchserve also exposes metric API, that by default listens to port 8082 and enables users to query and monitor the collected metrics. The default metrics endpoint returns Prometheus formatted metrics. You can query metrics using curl requests or point a Prometheus Server to the endpoint and use Grafana for dashboards.
While serving a model you can query metrics using curl request as follows:
curl http://127.0.0.1:8082/metrics
In case you are looking into exporting the logged metrics, please refer to this example that uses mtail to export metrics to Prometheus. Tracking these metrics in a dashboard allows you to monitor performance regressions that may have been sporadic or hard to spot during an offline benchmark run.
What to consider for tuning performance of a model in production
The workflow suggested in Fig 1, is the general idea on how to approach model deployment in production with Torchserve.
In many cases serving models in production is optimized based on throughput or latency service level agreement (SLA)s. Usually real-time applications are more concerned about latency whereas off-line applications may care more about higher throughput.
There are a number of main factors contributing to the performance of a serving model in production. In particular, we are focusing on serving Pytorch models with Torchserve here, however most of these factors generalize to all models from other frameworks as well.
- Model optimizations: this is a pre-step for deploying models into production. This is a very broad discussion that we will get into in a series of future blogs. This includes techniques like quantization, pruning to decrease the size of the model, using Intermediate representations (IR graphs) such as Torchscript in Pytorch, fusing kernels and many others. Currently torchprep provides many of these techniques as a CLI tool.
- Batch inference: it refers to feeding multiple inputs into a model, while it is essential during training, it can be very helpful to manage the cost at inference time as well. Hardware accelerators are optimized for parallelism and batching helps to saturate the compute capacity and often leads to higher throughput. The main difference in inference is you can’t wait too long to get a batch filled from clients, something we call dynamic batching
-
Number of Workers : Torchserve uses workers to serve models. Torchserve workers are Python processes that hold a copy of the model weights for running inference. Too few workers means you’re not benefitting from enough parallelism but too many can cause worker contention and degrade end to end performance.
- Hardware : choosing the appropriate hardware based on the model, application and latency, throughput budget. This could be one of the supported hardwares in Torchserve, CPU, GPU, AWS Inferentia. Some hardware configurations are intended for best in class performance and others are better suited for cost effective inference. From our experiments we’ve found that GPUs shine best at larger batch sizes whereas the right CPUs and AWS Inferentia can be far more cost effective for lower batch sizes and low latency.
Best Practices for Performance tuning on Torchserve
To get the best performance out of your model while serving it with Torchserve, we are sharing some of the best practices here. Torchserve provides a benchmark suite that provides helpful insight to make informed decisions on different choices as detailed below.
- Optimize your model as the first step, Pytorch model optimization tutorials. Model optimization choices are also closely tied to the hardware of choice. We will discuss it in more detail in another blog post.
- Deciding the hardware for model deployment can be closely related to the latency and throughput budget and cost per inference. Depending on the size of model and application it can vary, for some models like computer vision models it has been historically not affordable to run in production on CPU. However, by having optimizations such IPEX as recently added to Torchserve this has been much more affordable and cost beneficial and you can learn more in this investigative case study
-
Workers in Torchserve are Python processes that provide parallelism, setting the number of workers should be done carefully. By default Torchserve launch number of workers equal to VCPUs or available GPUs on the host, this can add a considerable amount of time to the Torchserve start.
Torchserve exposes a config property to set the number of workers. To provide an efficient parallelism through multiple workers and avoiding them to compete over resources, as a baseline we recommend following setting on CPU and GPU:
CPU : In the handler,
torch.set_num_threads(1)then set the number of workers tonum physical cores / 2.But the the best threading configurations can be achieved by leveraging the Intel CPU launcher script.GPU: number of available GPUs can be set through number_gpus in config.properties. Torchserve uses round robin to assign workers to GPUs. We recommend setting the number of workers as follows.
Number of worker = (Number of available GPUs) / (Number of Unique Models).Note that GPUs that are pre-Ampere do not provide any resource isolation with Multi Instance GPUs. - Batch size can directly affect the latency and the throughput. To better utilize the compute resources batch size needs to be increased. However, there is a tradeoff between latency and throughput. Larger batch sizes can increase the throughput but results in a higher latency as well. Batch size can be set in Torchserve in two ways, either through model config in config.properties or while registering the model using Management API.
In the next section, we are going to use Torchserve benchmark suite to decide the best combination of model optimization, hardware, workers, and batch size.
Animated Drawings Performance Tuning
To use the Torchserve benchmark suite, first we need to have an archived file, “.mar” file as discussed above, that contains the model, handler and all other artifacts to load and run inference. Animated Drawings uses Detectron2’s implementation of Mask-RCNN for an object detection model.
How to run benchmark suite
The Automated benchmark suite in Torchserve let you benchmark multiple models with different setting including batch size and number of worker and finally generate a report for you. To get started:
git clone https://github.com/pytorch/serve.git

cd serve/benchmarks

pip install -r requirements-ab.txt

apt-get install apache2-utils
Model level settings can be configured in a yaml file similar to
Model_name:
    eager_mode:
        benchmark_engine: "ab"
        url: "Path to .mar file"
        workers:
            - 1
            - 4
        batch_delay: 100
        batch_size:
            - 1
            - 2
            - 4
            - 8
        requests: 10000
        concurrency: 10
        input: "Path to model input"
        backend_profiling: False
        exec_env: "local"
        processors:
            - "cpu"
            - "gpus": "all"
This yaml file will be referenced in the benchmark_config_template.yaml file that includes other settings for generating reports, this can optionally work with AWS cloud watch for logs as well.
python benchmarks/auto_benchmark.py --input benchmark_config_template.yaml
Running the benchmarks, results will be written in “csv” file that can be found in “_ /tmp/benchmark/ab_report.csv_” and full report “/tmp/ts_benchmark/report.md”. It will include items such as Torchserve average latency, model P99 latency, throughput, number of concurrency, number of requests, handler time, and some other metrics. Here we focus on some of the important ones that we track to tune the performance which are, concurrency, model P99 latency, throughput. We look at these numbers specifically in combination with batch size, the used device, number of workers and if any model optimization has been done.
The latency SLA for this model has been set to 100 ms, this is real-time application and as we discussed earlier, latency is more of a concern and throughput ideally should be as high as possible while it does not violate the latency SLA.
Through searching the space, over different batch sizes (1-32), number of workers (1-16) and devices (CPU,GPU), we have run a set of experiments that summarized the best ones in the table below.
| Device | Concurrency | # Requests | #workers | Batch size | Payload/image | Optimization | Throughput | Latency P99 |
| CPU | 10 | 1000 | 1 | 1 | small | N/A | 3.45 | 305.3 ms |
| CPU | 1 | 1000 | 1 | 1 | small | N/A | 3.45 | 291.8 ms |
| GPU | 10 | 1000 | 1 | 1 | small | N/A | 41.05 | 25.48 ms |
| GPU | 1 | 1000 | 1 | 1 | small | N/A | 42.21 | 23.6 ms |
| GPU | 10 | 1000 | 1 | 4 | small | N/A | 54.78 | 73.62 ms |
| GPU | 10 | 1000 | 1 | 4 | small | model.half() | 78.62 | 50.69 ms |
| GPU | 10 | 1000 | 1 | 8 | small | model.half() | 85.29 | 94.4 ms |
The latency of this model on CPU with all of the tried settings in terms of batch size, concurrency and number of workers did not meet the SLA, in fact ~13x higher.
Moving the model serving to GPU, immediately could improve the latency ~**13x **from 305 ms down to 23.6 ms.
One of the simplest optimizations that we could do for the model was lowering its precision to fp16, it is one liner (model.half()) and could reduce the model P99 latency **by **32% and increase the throughput by almost the same amount.
There could be other optimization done by Torchscripting the model and using optimize_for_inference or other tricks including onnx or tensorrt runtime optimizations which leverage aggressive fusions are out of the scope of this post. We will discuss model optimizations in a separate post.
We found both on CPU and GPU , setting **number of workers=1 **worked the best in this case.
- Moving the model to GPU, using number of workers = 1, and batch size = 1 increased the Throughput ~12x compared to CPU and latency ~13x.
- Moving the model to GPU, using model.half(), number of workers = 1, and batch size = 8 yielded best results in terms of Throughput and tolerable latency. Throughput increased ~25x compared to CPU with latency still meeting the SLA (94.4ms).
Note: if you are running the benchmark suite, make sure you are setting a proper batch_delay and set the concurrency of the request to a number proportional to your batch size. Concurrency here means the number of concurrent requests being sent to the server.
Conclusion
In this post, we have discussed the considerations and knobs that Torchserve expose to tune the performance in production. We have discussed the Torchserve benchmark suite as a means to tune the performance and get insights on possible choices for model optimizations, hardware choice and cost in general. We used Animated Drawings app which uses Detectron2’s Mask-RCNN model as a case-study to showcase the performance tuning with benchmark suite.
For more details on Performance tuning in Torchserve please refer to our documentation here.
Also feel free to open a ticket on Torchserve repo for any further questions and feedback.
Acknowledgement
We would like to thank Somya Jain (Meta), Christopher Gustave (Meta) for their great support and guidance throughout many steps of this blog and providing insights to Sketch Animator workflow. Also, special thanks to Li Ning from AWS for the great efforts to make performance tuning much easier on Torchserve with automated benchmark suite.
The 10 most viewed publications of 2022
From a look back at Amazon Redshift to personalized complementary product recommendation, these are the most viewed publications authored by Amazon scientists and collaborators in 2022.Read More
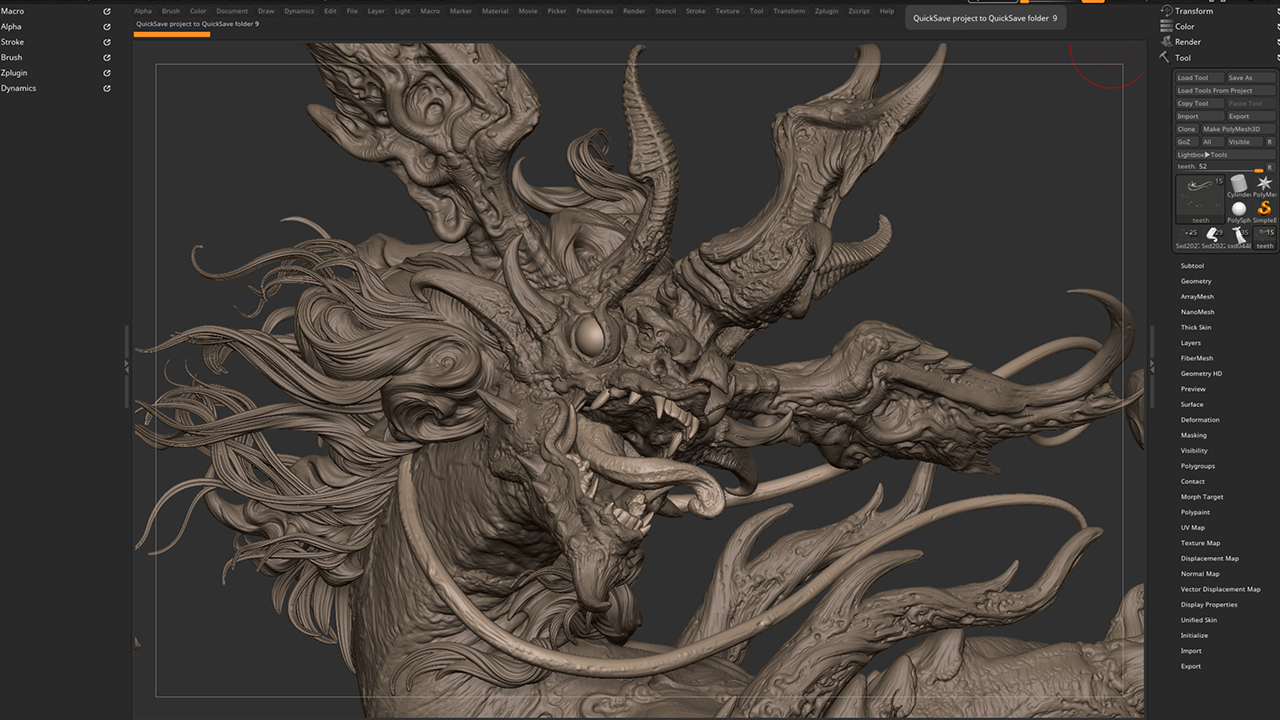
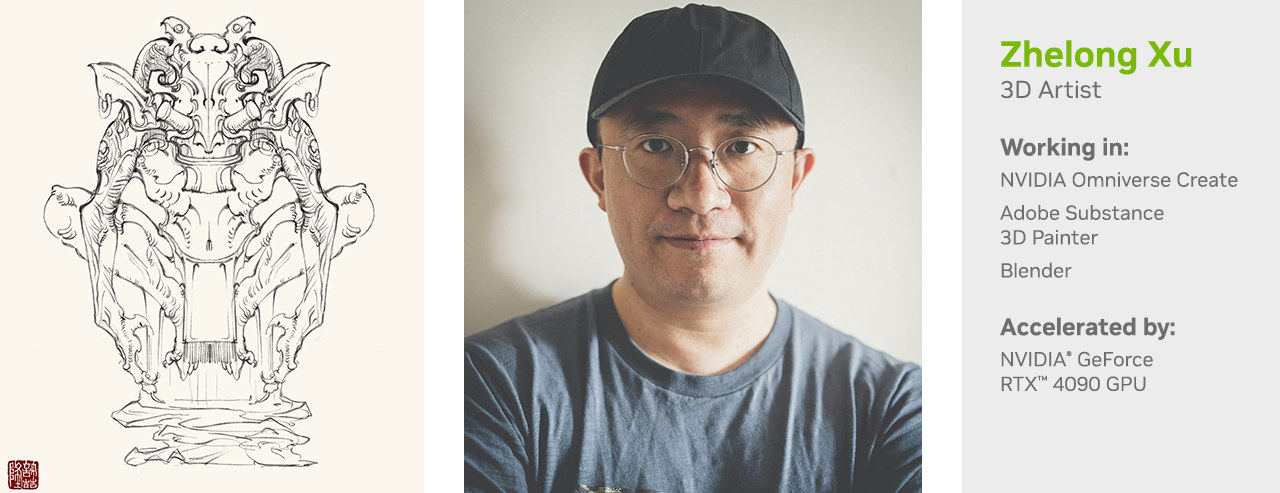
3D Artist Zhelong Xu Revives Chinese Relics This Week ‘In the NVIDIA Studio’
Editor’s note: This post is part of our weekly In the NVIDIA Studio series, which celebrates featured artists, offers creative tips and tricks, and demonstrates how NVIDIA Studio technology improves creative workflows. We’re also deep diving on new GeForce RTX 40 Series GPU features, technologies and resources, and how they dramatically accelerate content creation.
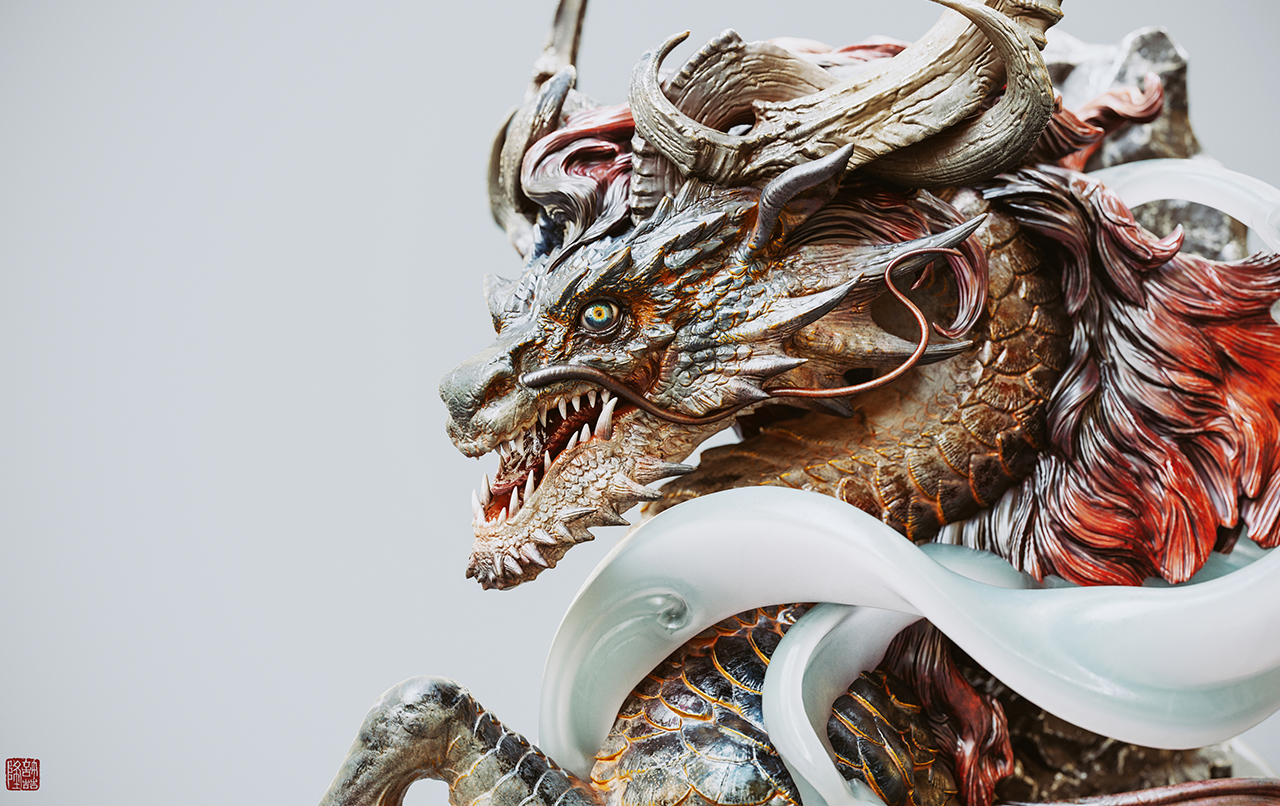
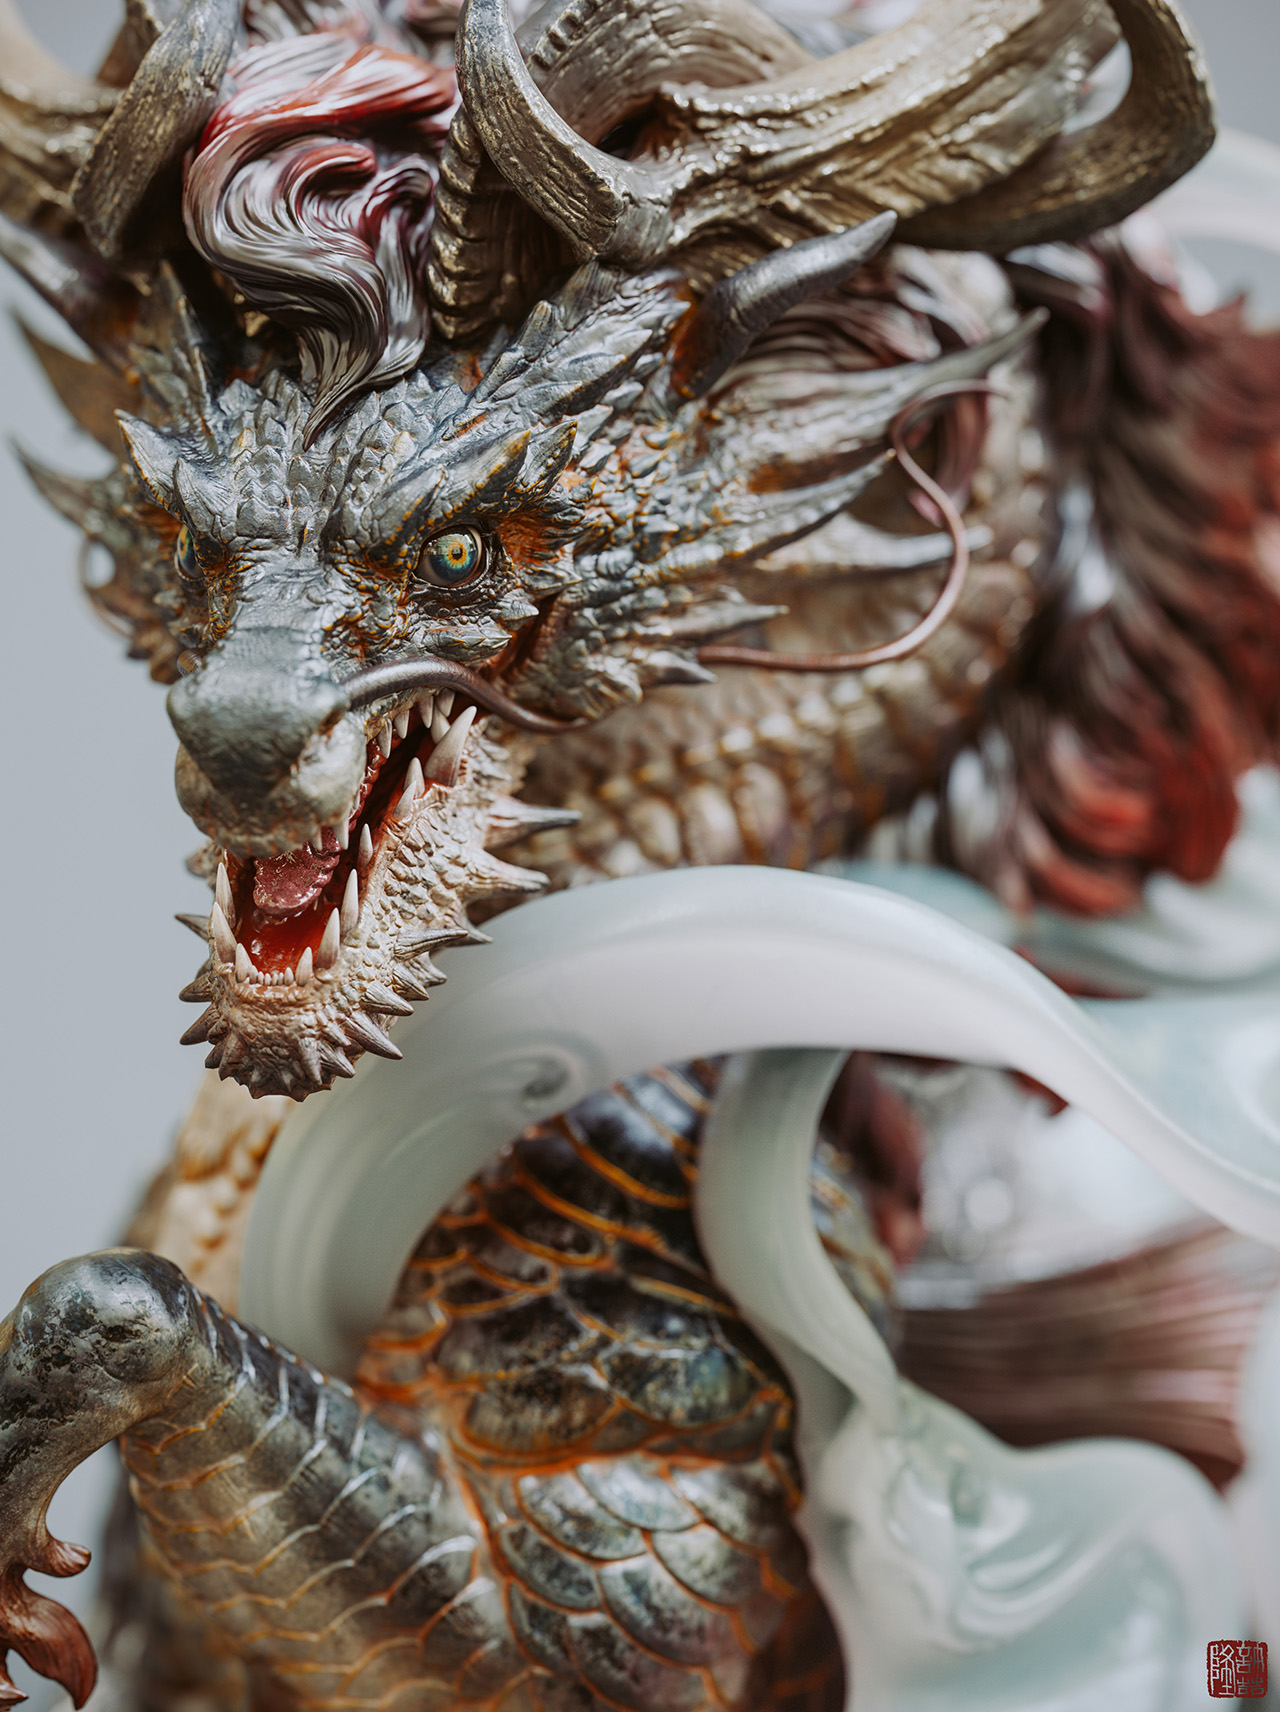
Artist Zhelong Xu, aka Uncle Light, brought to life Blood Moon — a 3D masterpiece combining imagination, craftsmanship and art styles from the Chinese Bronze Age — along with Kirin, a symbol of hope and good fortune, using NVIDIA technologies.
Also this week In the NVIDIA Studio, the #WinterArtChallenge is coming to a close. Enter by sharing winter-themed art on Instagram, Twitter or Facebook for a chance to be featured on NVIDIA Studio’s social media channels. Be sure to tag #WinterArtChallenge to join.
‘Tis the season!
Join us as we partner with @NVIDIAStudio on their #WinterArtChallenge.
Through the end of the year, share any winter themed art #MadeInOmniverse with us using #WinterArtChallenge!
by Edward McEvenue, created using #OmniverseCreate & @sketchfab. pic.twitter.com/pdRQ2eJRX1
— NVIDIA Omniverse (@nvidiaomniverse) November 16, 2022


Ring in the season and check out the NVIDIA RTX Winter World in Minecraft — now available in the NVIDIA Omniverse Launcher. Download today to use it in your #WinterArtChallenge scenes.
Tune in to NVIDIA’s special address at CES on Tuesday, Jan. 3, at 8 a.m. PT, when we’ll share the latest innovations made possible by accelerated computing and AI.
Dare to Dragon
Xu is a veteran digital artist who has worked at top game studio Tencent, made key contributions to the third season of Netflix’s Love, Death & Robots, and won ZBrush 2018 Sculpt of the Year award. He carries massive influence in the 3D community in China, and the country’s traditional culture is an inexhaustible treasure of inspiration for the artist.
“Ancient Chinese artisans have created countless unique, aesthetic systems over time that are completely different from Western art,” said Xu. “My dream is to use modern means to reinterpret Chinese culture and aesthetics as I understand them.”
Blood Moon is a tribute to the lost Shu civilization, which existed from 2,800 B.C. to 1,100 B.C. The work demonstrates the creative power of ancient China. During a trip to the Sanxingdui Museum in the Sichuan province, where many relics from this era are housed, Xu became inspired by the mysterious, ancient Shu civilization.
The artist spent around 10 minutes sketching in the Procreate app, looking to capture the general direction and soul of the piece. This conceptual stage is important so that the heart of the artwork doesn’t get lost once 3D is applied, Xu said.

He then began sculpting in Maxon’s ZBrush, which is his preferred tool as he says it contains the most convenient sculpting features.
Next, Xu used Adobe Substance 3D Painter to apply colors and textures directly to 3D models. NVIDIA RTX-accelerated light- and ambient-occlusion features baked and optimized scene assets in mere seconds, giving Xu the option to experiment with visual aesthetics quickly and easily.
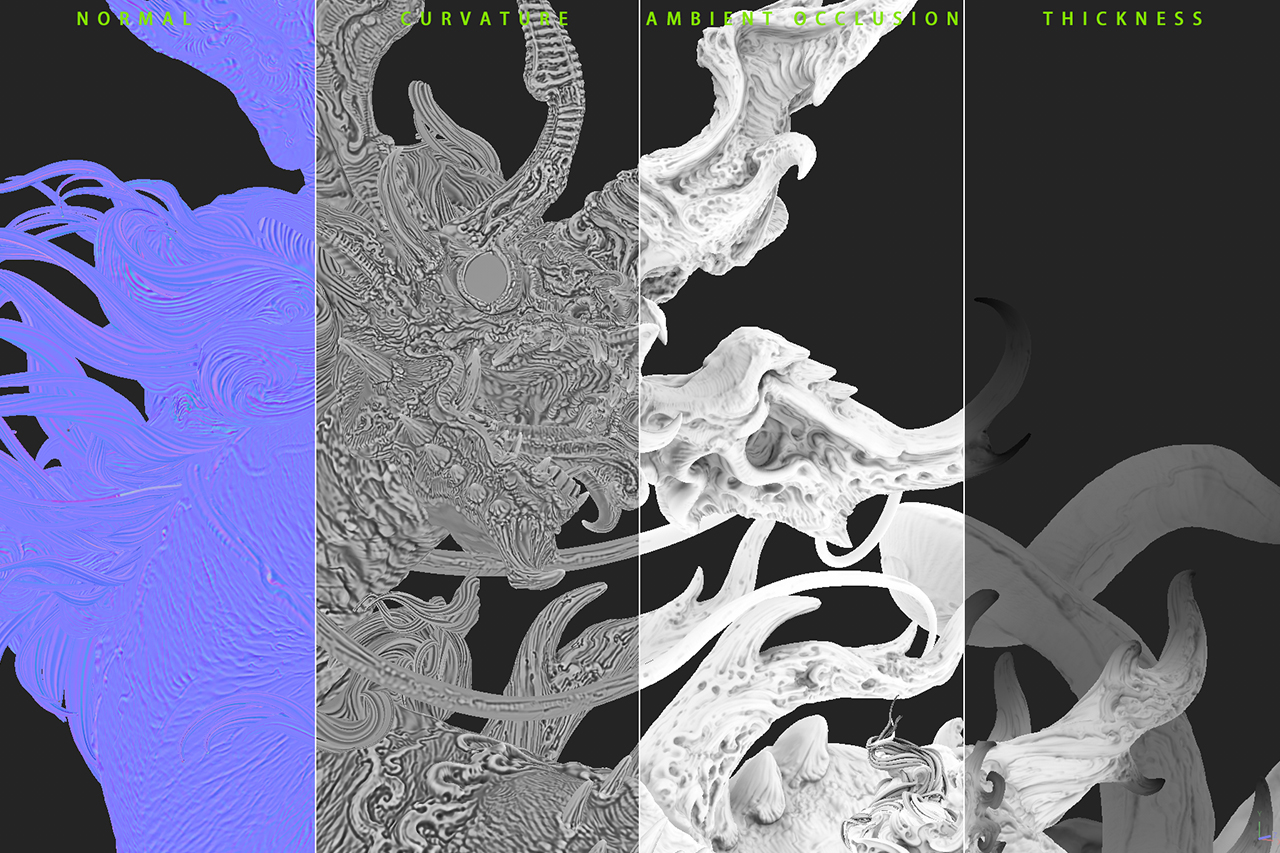
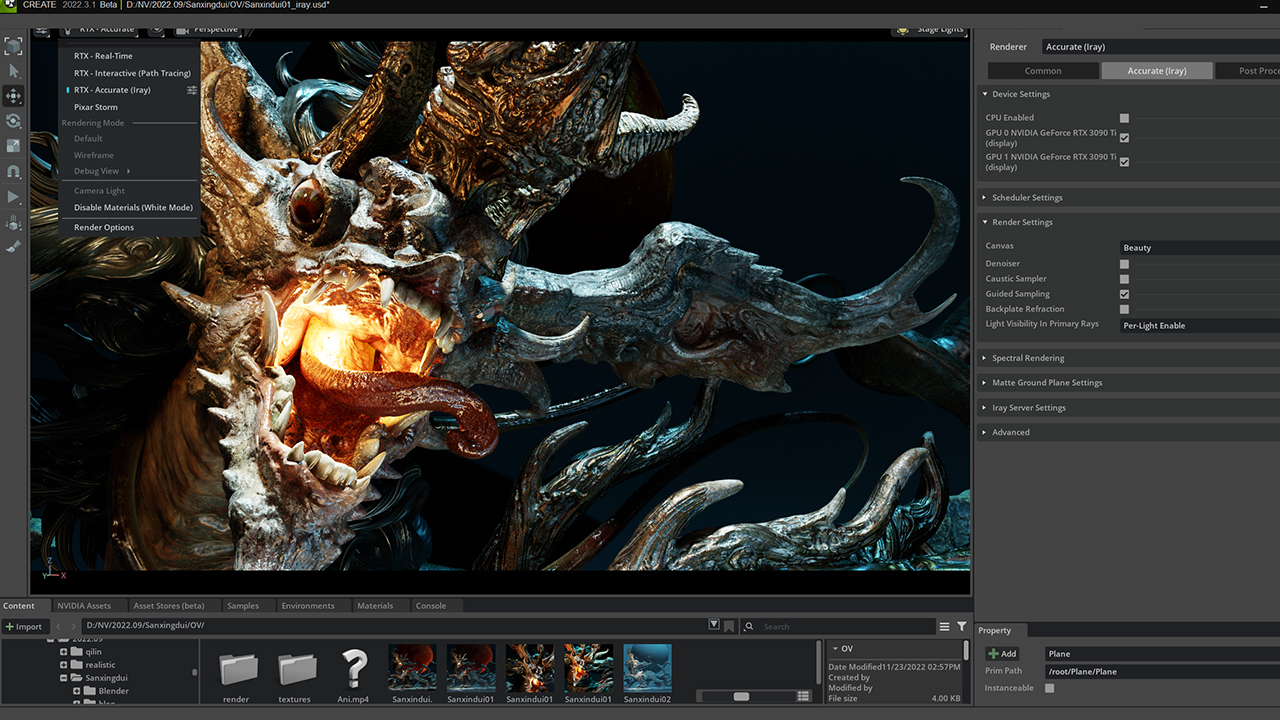
NVIDIA Iray technology in the viewport enabled Xu to edit interactively and use ray-traced baking for faster rendering speeds — all accelerated by his GeForce RTX 4090 GPU.
“The RTX 4090 GPU always gives me reliable performance and smooth interaction; plus, the Iray renderer delivers unbiased rendering,” Xu said.
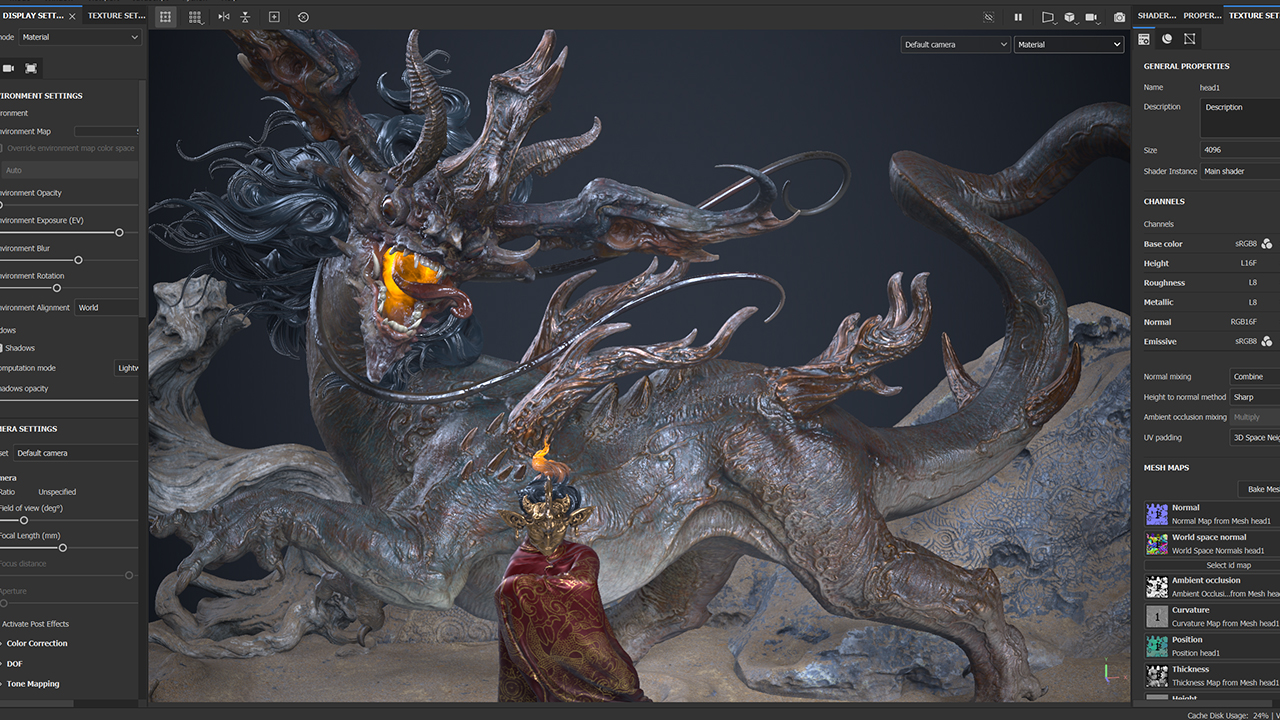
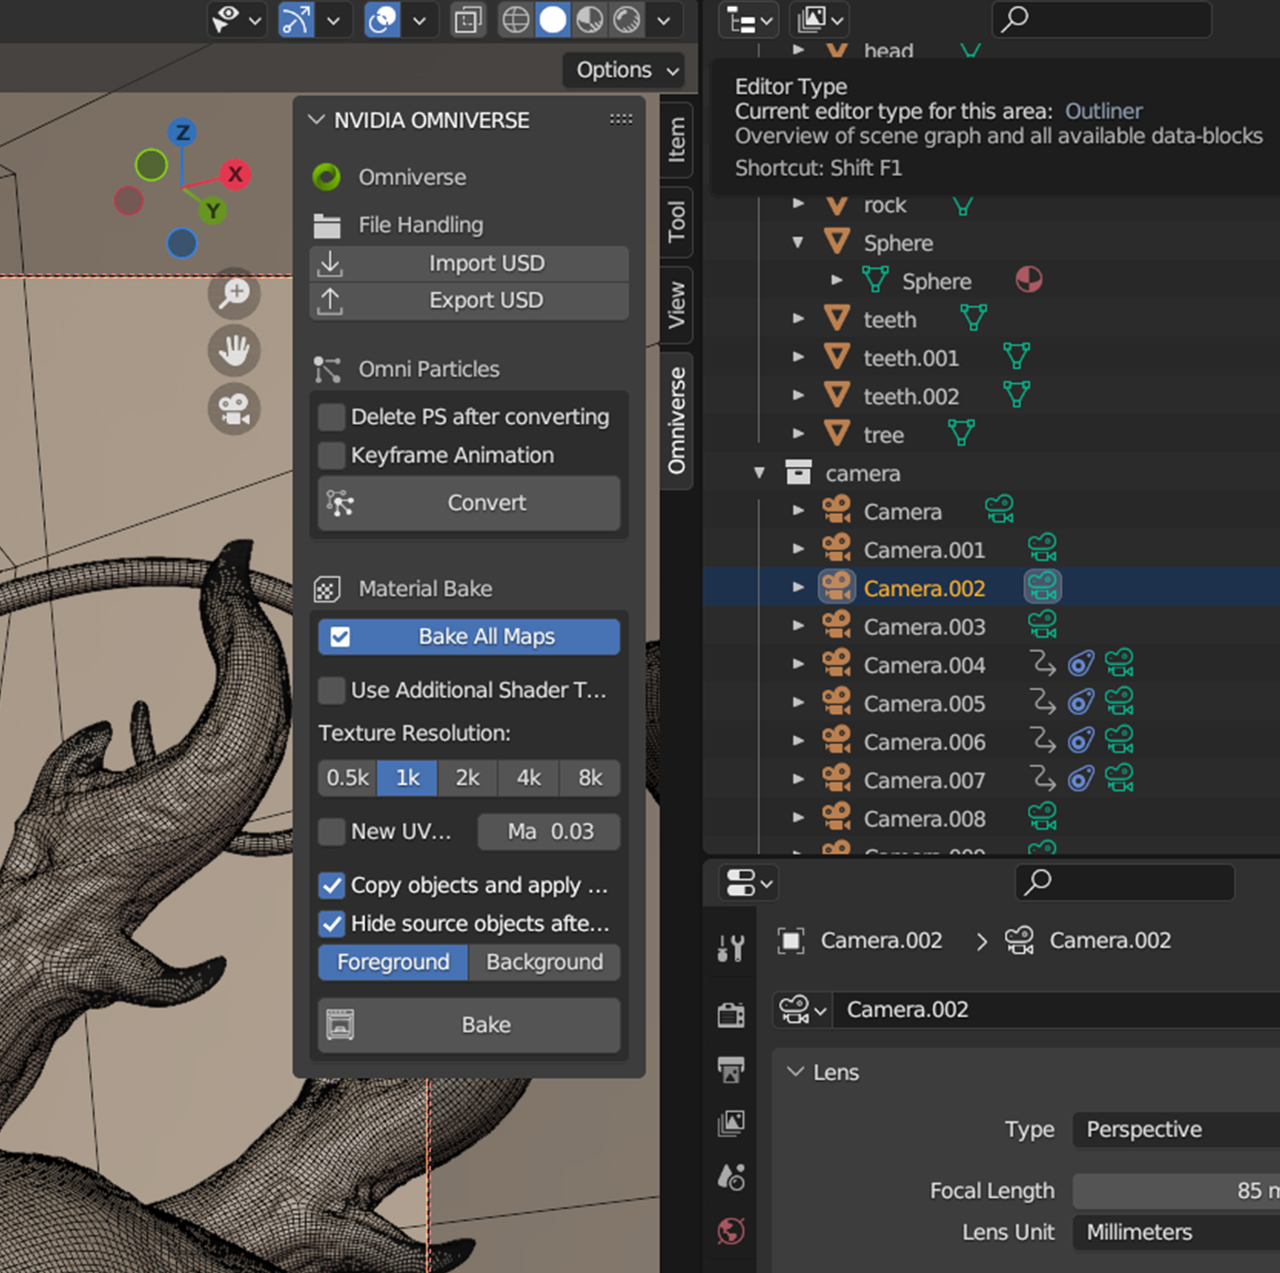
Xu used the Universal Scene Description file framework to export the scene from Blender into the Omniverse Create app, where he used the advanced RTX Renderer, with path tracing, global illumination, reflections and refractions, to create incredibly realistic visuals.
NVIDIA Omniverse — a platform for creating and operating metaverse applications — was incredibly useful for scene modifications, Xu said, as it enabled him to test lighting scenarios with his scene rendering in real time. This provided Xu with the most accurate iteration of final renders, allowing for more meaningful edits in the moment, he said.
Further edits included adding fog and volume effects, easily applied in Omniverse Create.
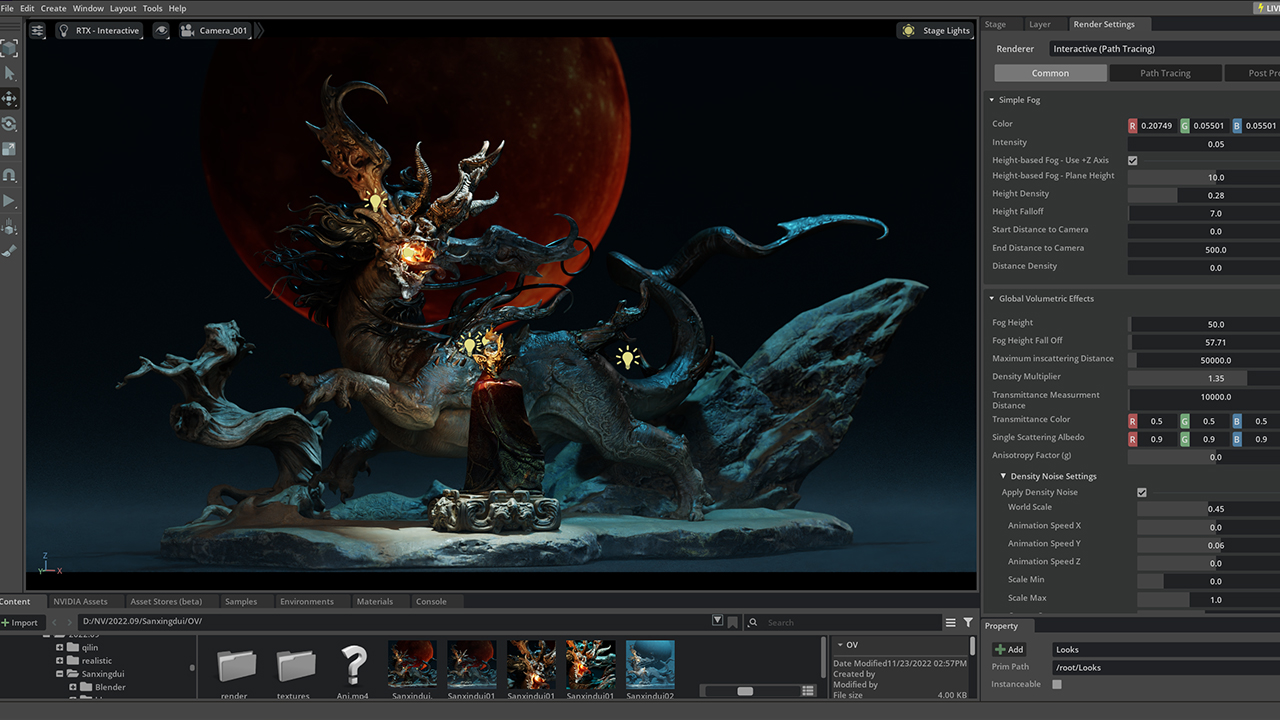
Omniverse gives 3D artists their choice of renderer within the viewport, with support for Pixar HD Storm, Chaos V-Ray, Maxon’s Redshift, OTOY Octane, Blender Cycles and more. Xu deployed the unbiased NVIDIA Iray renderer to complete the project.
“Omniverse is already an indispensable part of my work,” Xu added.
The artist demonstrated this in another history-inspired piece, Kirin, built in Omniverse Create.
“Kirin, or Qilin, is always a symbol of hope and good fortune in China, but there are few realistic works in the traditional culture,” said Xu.
He wanted to create a Kirin, a legendary hooved creature in Chinese mythology, with a body structure in line with Western fine art and anatomy, as well as with a sense of peace and the wisdom of silence based on Chinese culture.
“It is not scary,” said Xu. “Instead, it is a creature of great power and majesty.”
Kirin is decorated with jade-like cloud patterns, symbolizing the intersection of tradition and modernity, something the artist wanted to express and explore. Clouds and fogs are difficult to depict in solid sculpture, though they are often carved in classical Chinese sculpture. These were easily brought to life in Xu’s 3D artwork.
Check out Zhelong Xu’s website for more inspirational artwork.
For the latest creative app updates, download the monthly NVIDIA Studio Driver.
Access tutorials on the Studio YouTube channel and get updates directly in your inbox by subscribing to the Studio newsletter.
11 Essential Explainers to Keep You in the Know in 2023
The NVIDIA corporate blog has long been a go-to source for information on the latest developments in AI and accelerated computing.
The blog’s series of “explainers” are among our most-read posts, offering a quick way to catch up on the newest technologies.
In this post, we’ve rounded up 11 of the most popular explainers from the blog, providing a beginner’s guide to understanding the concepts and applications of these cutting-edge technologies.
From AI models to quantum computing, these explainers are a must-read for anyone looking to stay informed on the latest tech developments in 2022.
- “What Is a Pretrained AI Model?” – This post covers the basics of pretrained AI models, including how they work and why they’re useful.
- “What Is Denoising?” – This piece explains denoising and its use in image and signal processing.
- “What Are Graph Neural Networks?” – This article introduces graph neural networks, including how they work and are used in various applications.
- “What Is Green Computing?” – This post explains the basics of green computing, including why it’s important and how it can be achieved.
- “What is Direct and Indirect Lighting?” – This piece covers the differences between direct and indirect lighting in computer graphics, and how they’re used in different applications.
- “What Is a QPU?” – This blog introduces the quantum processing unit, including what it is and how they’re used in quantum computing.
- “What Is an Exaflop?” – This article explains what an exaflop is and why it’s an important measure of computational power.
- “What Is Zero Trust?” – This post covers the basics of zero trust, including what it is and how it can improve network security.
- “What Is Extended Reality?” – This piece provides an overview of extended reality — the umbrella term for virtual, augmented and mixed reality — including what it is and how it’s used in different applications.
- “What Is a Transformer Model?” – This blog explains what transformer models are and how they’re used in AI.
- “What Is Path Tracing?” – This article covers the basics of path tracing, including how it works and why it’s important for creating realistic computer graphics. It provides examples of its applications in different fields.
Let us know in the comments section below which AI and accelerated computing concepts you’d like explained next on our blog. We’re always looking for suggestions and feedback.
Improving automatic discrimination of logos with similar texts
Combining contrastive training and selection of hard negative examples establishes new benchmarks.Read More
Recent honors and awards for Amazon scientists
Researchers honored for their contributions to the scientific community.Read More
How to redact PII data in conversation transcripts
Customer service interactions often contain personally identifiable information (PII) such as names, phone numbers, and dates of birth. As organizations incorporate machine learning (ML) and analytics into their applications, using this data can provide insights on how to create more seamless customer experiences. However, the presence of PII information often restricts the use of this data. In this blog post, we will review a solution to automatically redact PII data from a customer service conversation transcript.
Let’s take an example conversation between a customer and a call center agent.
Agent: Hi, thank you for calling us today. Whom do I have the pleasure of speaking with today?
Caller: Hello, my name is John Stiles.
Agent: Hi John, how may I help you?
Caller: I haven’t received my W2 statement yet and wanted to check on its status.
Agent: Sure, I can help you with that. Can you please confirm the last four digits of your Social Security number?
Caller: Yes, it’s 1111.
Agent: Ok. I’m pulling up the status now. I see that it was sent out yesterday, and the estimated arrival is early next week. Would you like me to turn on automated alerts so you can be notified of any delays?
Caller: Yes, please.
Agent: The number we have on file for you is 555-456-7890. Is that still correct?
Caller: Yes, it is.
Agent: Great. I have turned on automated notifications. Is there anything else I can assist you with John?
Caller: No, that’s all. Thank you.
Agent: Thank you, John. Have a great day.
In this brief interaction, there are several pieces of data that would generally be considered PII, including the caller’s name, the last four digits of their Social Security number, and the phone number. Let’s review how we can redact this PII data in the transcript.
Solution overview
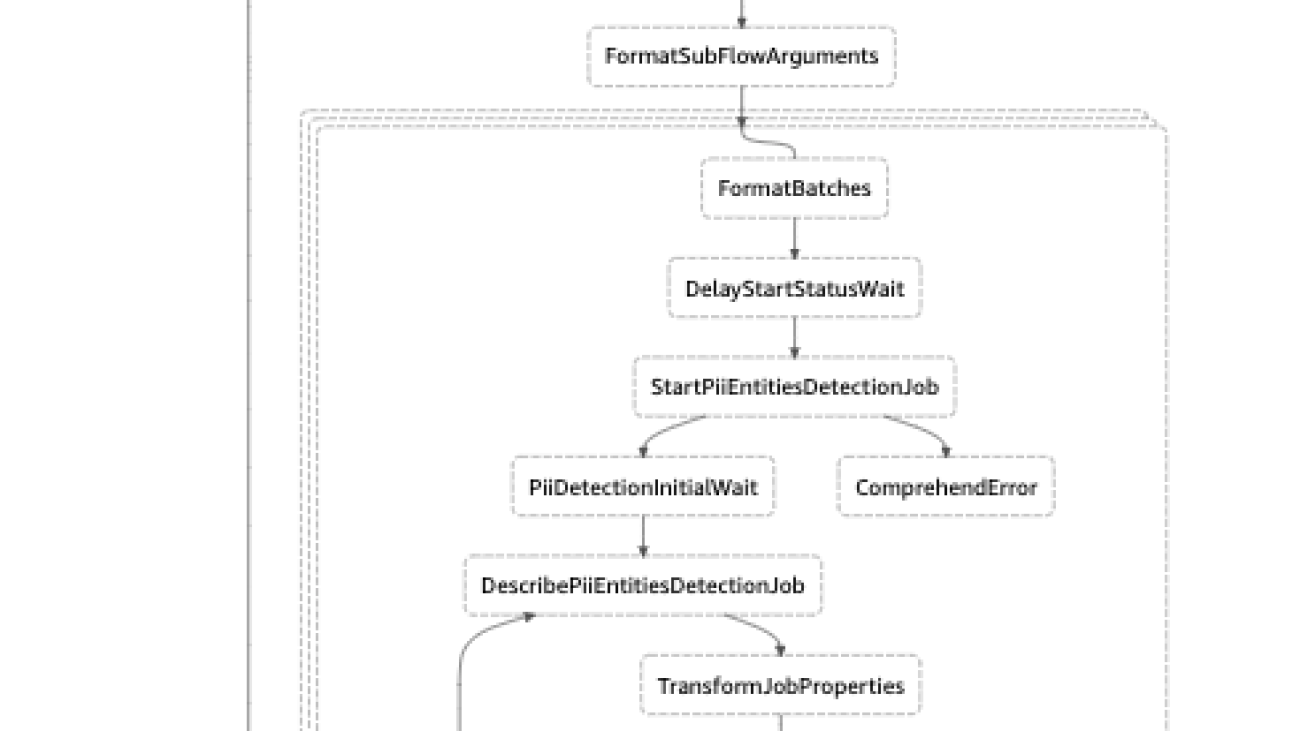
We will create an AWS Step Functions state machine, which orchestrates an Amazon Comprehend PII redaction job. Amazon Comprehend is a natural-language processing (NLP) service that uses machine learning to uncover valuable insights and connections in text, including the ability to detect and redact PII data.
You will provide the transcripts in the input Amazon S3 bucket. The transcripts are in the format used by Contact Lens for Amazon Connect. You will also specify an output S3 bucket, which stores the redaction output as well as intermediate data. The intermediate data are micro-batched versions of the input data. For example, if there are 10,000 conversations to be redacted, the workflow will split them into 10 batches of 1000 conversations each. Each batch is stored using a unique prefix, which is then used as the input source for Comprehend. The Step Functions map state is used to execute these redaction jobs in parallel by calling the StartPIIEntitiesDetectionJob API. This approach allows you to run multiple jobs in parallel rather than individual jobs in sequence. Since the job is implemented as a Step Functions state machine, it can be triggered to run manually or automatically as part of a daily process.
You can learn more about how Comprehend detects and redacts PII data in this blog post.

Deploy the sample solution
First, sign in to the AWS Management Console in your AWS account.
You will need an S3 bucket with some sample transcript data to redact and another bucket for output. If you don’t have existing sample transcript data, follow these steps:
- Navigate to the Amazon S3 console.
- Choose Create bucket.
- Enter a bucket name, such as
text-redaction-data-<your-account-number>. - Accept the defaults, and choose Create bucket.
- Open the bucket you created, and choose Create folder.
- Enter a folder name, such as “sample-data” and choose Create folder.
- Click on your new folder name to open it.
- Download the SampleData.zip file.
- Open the .zip file on your local computer and then drag the folder to the S3 bucket you created.
- Choose Upload.
Now click the following link to deploy the sample solution to US East (N. Virginia):
![]()
This will create a new AWS CloudFormation stack.

Enter the Stack name (e.g., pii-redaction-workflow), the name of the S3 input bucket containing the input transcript data, and the name of the S3 output bucket. Choose Next and add any tags that you want for your stack (optional). Choose Next again and review the stack details. Select the checkbox to acknowledge that AWS Identity and Access Management (IAM) resources will be created, and then choose Create stack.
The CloudFormation stack will create an IAM role with the ability to list and read the objects from the bucket. You can further customize the role per your requirements. It will also create a Step Functions state machine, several AWS Lambda functions used by the state machine, and an S3 bucket for storing the redacted output versions of the transcripts.
After a few minutes, your stack will be complete, and then you can examine the Step Functions state machine that was created as part of the CloudFormation template.
Run a redaction job
To run a job, navigate to Step Functions in the AWS console, select the state machine, and choose Start execution.

Next provide the input arguments to run the job. For the job input, you want to provide the name of your input S3 bucket as the S3InputDataBucket value, the folder name as the S3InputDataPrefix value, the name of your output S3 bucket as the S3OutputDataBucket value, and the folder to store the results as S3OutputDataPrefix value then click Start execution.

As the job executes, you can monitor its status in the Step Functions graph view. It will take a few minutes to run the job. Once the job is complete, you will see the output for each of the jobs in the Execution input and output section of the console. You can use the output URI to retrieve the output of a job. If multiple jobs were executed, you can copy the results of all jobs to a destination bucket for further analysis.
Let’s take a look at the redacted version of the conversation that we started with.
Agent: Hi, thank you for calling us today. Whom do I have the pleasure of speaking with today?
Caller: Hello, my name is [NAME].
Agent: Hi [NAME], how may I help you?
Caller: I haven’t received my W2 statement yet and wanted to check on its status.
Agent: Sure, I can help you with that. Can you please confirm the last four digits of your Social Security number?
Caller: Yes, it’s [SSN].
Agent: Ok. I’m pulling up the status now. I see that it was sent out yesterday, and the estimated arrival is early next week. Would you like me to turn on automated alerts so you can be notified of any delays?
Caller: Yes, please.
Agent: The number we have on file for you is [PHONE]. Is that still correct?
Caller: Yes, it is.
Agent: Great. I have turned on automated notifications. Is there anything else I can assist you with, [NAME]?
Caller: No, that’s all. Thank you.
Agent: Thank you, [NAME]. Have a great day.
Clean up
You may want to clean up the resources created as part of CloudFormation template after you are complete to avoid ongoing charges. To do so, delete the deployed CloudFormation stack and delete the S3 bucket with the sample transcript data if one was created.
Conclusion
With customers demanding seamless experiences across channels and also expecting security to be embedded at every point, the use of Step Functions and Amazon Comprehend to redact PII data in text conversation transcripts is a powerful tool at your disposal. Organizations can speed time to value by using the redacted transcripts to analyze customer service interactions and glean insights to improve the customer experience.
Try using this workflow to redact your data and leave us a comment!
About the author
 Alex Emilcar is a Senior Solutions Architect in the Amazon Machine Learning Solutions Lab, where he helps customers build digital experiences with AWS AI technologies. Alex has over 10 years of technology experience working in different capacities from developer, infrastructure engineer, and Solutions Architecture. In his spare time, Alex likes to spend time reading and doing yard work.
AmazonNext program hosts final project presentations at Virginia HQ2
Program focuses on diversifying tech-industry talent.Read More