Best Egg achieved three times faster ML model training with Amazon SageMaker Automatic Model Tuning

Best Egg achieved three times faster ML model training with Amazon SageMaker Automatic Model Tuning

This post is co-authored by Tristan Miller from Best Egg.

Best Egg is a leading financial confidence platform that provides lending products and resources focused on helping people feel more confident as they manage their everyday finances. Since March 2014, Best Egg has delivered $22 billion in consumer personal loans with strong credit performance, welcomed almost 637,000 members to the recently launched Best Egg Financial Health platform, and empowered over 180,000 cardmembers who carry the new Best Egg Credit Card in their wallet.

Amazon SageMaker is a fully managed machine learning (ML) service providing various tools to build, train, optimize, and deploy ML models. SageMaker provides automated model tuning, which manages the undifferentiated heavy lifting of provisioning and managing compute infrastructure to run several iterations and select the optimized model candidate from training.

To help you efficiently tune your required hyperparameters and determine the best-performing model, this post will discuss how Best Egg used SageMaker hyperparameter tuning with warm pools and achieved a three-fold improvement in model training time.

Use case overview

Risk credit analysts use credit rating models when lending or offering a credit card to customers by taking a variety of user attributes into account. This statistical model generates a final score, or Good Bad Indicator (GBI), which determines whether to approve or reject a credit application. ML insights facilitate decision-making. To assess the risk of credit applications, ML uses various data sources, thereby predicting the risk that a customer will be delinquent.

The challenge

A significant problem in the financial sector is that there is no universally accepted method or structure for dealing with the overwhelming array of possibilities that must be considered at any one time. It’s difficult to standardize the tools that teams use in order to promote transparency and tracking across the board. The application of ML can help those in the finance industry make better judgments regarding pricing, risk management, and consumer behavior. Data scientists train multiple ML algorithms to examine millions of consumer data records, identify anomalies, and evaluate if a person is eligible for credit.

SageMaker can run automated hyperparameter tuning based on multiple optimization techniques such as grid search, Bayesian, random search, and Hyperband. Automatic model tuning makes it easy to zero in on the optimal model configuration, freeing up time and money for better use elsewhere in the financial sector. As part of hyperparameter tuning, SageMaker runs several iterations of the training code on the training dataset with various hyperparameter combinations. SageMaker then determines the best model candidate with the optimal hyperparameters based on the objective metric configured.

Best Egg was able to automate hyperparameter tuning with the automated hyperparameter optimization (HPO) feature of SageMaker and parallelize it. However, each hyperparameter tuning job could take hours, and selecting the best model candidate took many hyperparameter tuning jobs run over the course of several days. Hyperparameter tuning jobs could be slow due to the nature of the iterative tasks that HPO runs under the hood. Every time a training job is initiated, new resource provisioning occurs, which consumes a significant amount of time before the training actually begins. This is a common problem that data scientists face when training their models. Time efficiency was a major pain point because these long-running training jobs were impeding productivity and data scientists were stuck on these jobs for hours.

Solution overview

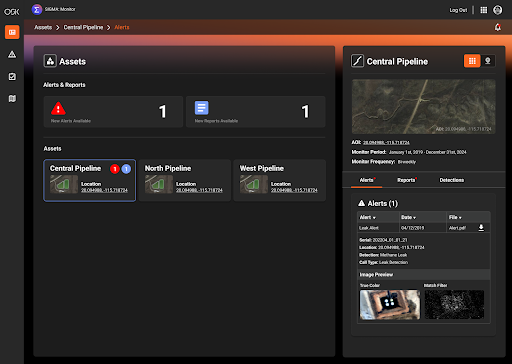
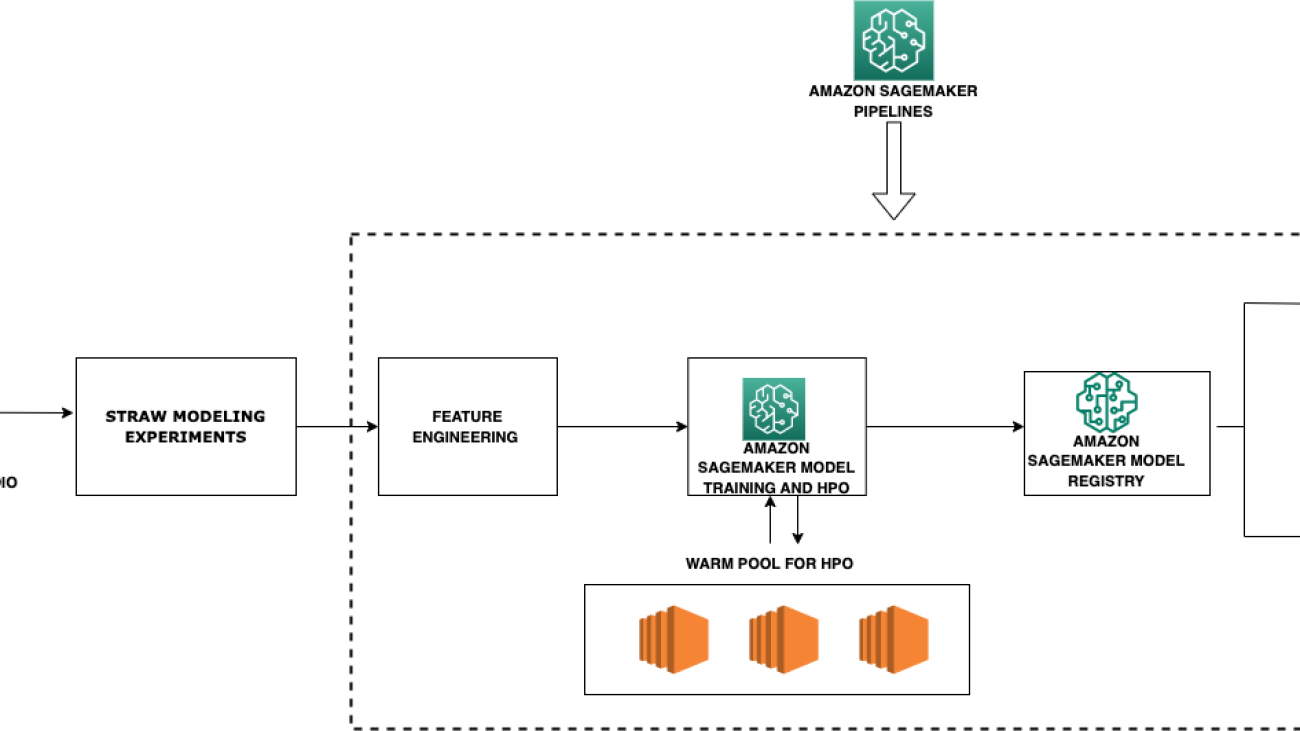
The following diagram represents the different components used in this solution.

The Best Egg data science team uses Amazon SageMaker Studio for building and running Jupyter notebooks. SageMaker processing jobs run feature engineering pipelines on the input dataset to generate features. Best Egg trains multiple credit models using classification and regression algorithms. The data science team must sometimes work with limited training data in the order of tens of thousands of records given the nature of their use cases. Best Egg runs SageMaker training jobs with automated hyperparameter tuning powered by Bayesian optimization. To reduce variance, Best Egg uses k-fold cross validation as part of their custom container to evaluate the trained model.

The trained model artifact is registered and versioned in the SageMaker model registry. Inference is run in two ways—real time and batch—based on the user requirements. The trained model artifact is hosted on a SageMaker real-time endpoint using the built-in auto scaling and load balancing features. The model is also scored through batch transform jobs scheduled on a daily basis. The whole pipeline is orchestrated through Amazon SageMaker Pipelines, consisting of a sequence of steps such as a processing step for feature engineering, a tuning step for training and automated model tuning, and a model step for registering the artifact.

With respect to the core problem of long-running hyperparameter tuning jobs, Best Egg explored the recently released warm pools feature managed by SageMaker. SageMaker Managed Warm Pools allows you to retain and reuse provisioned infrastructure after the completion of a training job to reduce latency for repetitive workloads, such as iterative experimentation or consecutively running jobs where specific job configuration parameters like instance type or count match with the previous runs. This allowed Best Egg to reuse the existing infrastructure for their repetitive training jobs without wasting time on infrastructure provisioning.

Deep Dive into Model Tuning and Benefits of Warm Pools

SageMaker Automated Model Tuning leverages Warm Pools by default for any tuning job as of August 2022 (announcement). This makes it straightforward to reap the benefits of Warm Pools as you just need to launch a tuning job and SageMaker Automatic Model Tuning will automatically use Warm Pools between subsequent training jobs launched as part of the tuning. When each training job completes, the provisioned resources are kept alive in a warm pool so that the next training job launched as part of the tuning will start on the same pool with minimal startup overhead.

The below workflow depicts a series of training job runs using warm pool.

  1. After the first training job is complete, the instances used for training are retained in the warm pool cluster.
  2. The next training job triggered will use the instance in the warm pool to run, eliminating the cold start time needed to prepare the instance to start up.
  3. Likewise, if more training jobs come in with instance type, instance count, volume & networking criteria similar to the warm pool cluster resources, then the matched instances will be used for running the jobs.
  4. Once the training job is completed, the instances will be retained in the warm pool waiting for new jobs.
  5. The maximum length of time that a warm pool cluster can continue running consecutive training jobs is 7 days.
    • As long as the cluster is healthy and the warm pool is within the specified time duration, the warm pool status is Available.
    • The warm pool stays Available until it identifies a matching training job for reuse. If the warm pool status is Terminated, then this is the end of the warm pool lifecycle.

The following diagram illustrates this workflow.

How Best Egg benefitted: Improvements and data points

Best Egg noticed that with warm pools, their training jobs on SageMaker were running faster by a factor of 3. In one credit model project, the best model was selected from eight different HPO jobs, each of which had 40 iterations with five parallel jobs at a time. Each iteration took about 1 minute to compute, whereas without warm pools they typically took 5 minutes each. In total, the process took 2 hours of computation time, with additional input from the data scientist adding up to about half a business day. Without warm pools, we estimate that the computation would have taken 6 hours alone, likely spread out over the course of 2–3 business days.

Summary

In conclusion, this post discussed elements of Best Egg’s business and the company’s ML landscape. We reviewed how Best Egg was able to speed up its model training and tuning by enabling warm pools for their hyperparameter tuning jobs on SageMaker. We also explained how simple it is to implement warm pools for your training jobs with a simple configuration. At AWS, we recommend our readers start exploring warm pools for iterative and repetitive training jobs.


About the Authors

Tristan Miller is a Lead Data Scientist at Best Egg. He builds and deploys ML models to make important underwriting and marketing decisions. He develops bespoke solutions to address specific problems, as well as automation to increase efficiency and scale. He is also a skilled origamist.

Valerio Perrone is an Applied Science Manager at AWS. He leads the science and engineering team owning the service for automatic model tuning across Amazon SageMaker. Valerio’s expertise lies in developing algorithms for large-scale machine learning and statistical models, with a focus on data-driven decision making and the democratization of artificial intelligence

Ganapathi Krishnamoorthi is a Senior ML Solutions Architect at AWS. Ganapathi provides prescriptive guidance to startup and enterprise customers, helping them design and deploy cloud applications at scale. He is specialized in machine learning and is focused on helping customers use AI/ML for their business outcomes. When not at work, he enjoys exploring the outdoors and listening to music

Ajjay Govindaram is a Sr. Solutions Architect at AWS. He works with strategic customers who are using AI/ML to solve complex business problems. His experience lies in providing technical direction as well as design assistance for modest to large-scale AI/ML application deployments. His knowledge ranges from application architecture to big data, analytics, and machine learning. He enjoys listening to music while resting, experiencing the outdoors, and spending time with his loved ones.

Hariharan Suresh is a Senior Solutions Architect at AWS. He is passionate about databases, machine learning, and designing innovative solutions. Prior to joining AWS, Hariharan was a product architect, core banking implementation specialist, and developer, and worked with BFSI organizations for over 11 years. Outside of technology, he enjoys paragliding and cycling.

Read More

What Are Large Language Models Used For?

What Are Large Language Models Used For?

AI applications are summarizing articles, writing stories and engaging in long conversations — and large language models are doing the heavy lifting.

A large language model, or LLM, is a deep learning algorithm that can recognize, summarize, translate, predict and generate text and other content based on knowledge gained from massive datasets.

Large language models are among the most successful applications of transformer models. They aren’t just for teaching AIs human languages, but for understanding proteins, writing software code, and much, much more.

In addition to accelerating natural language processing applications — like translation, chatbots and AI assistants — large language models are used in healthcare, software development and use cases in many other fields.

What Are Large Language Models Used For?

Language is used for more than human communication.

Code is the language of computers. Protein and molecular sequences are the language of biology. Large language models can be applied to such languages or scenarios in which communication of different types is needed.

These models broaden AI’s reach across industries and enterprises, and are expected to enable a new wave of research, creativity and productivity, as they can help to generate complex solutions for the world’s toughest problems.

For example, an AI system using large language models can learn from a database of molecular and protein structures, then use that knowledge to provide viable chemical compounds that help scientists develop groundbreaking vaccines or treatments.

Large language models are also helping to create reimagined search engines, tutoring chatbots, composition tools for songs, poems, stories and marketing materials, and more.

How Do Large Language Models Work?

Large language models learn from huge volumes of data. As its name suggests, central to an LLM is the size of the dataset it’s trained on. But the definition of “large” is growing, along with AI.

Now, large language models are typically trained on datasets large enough to include nearly everything that has been written on the internet over a large span of time.

Such massive amounts of text are fed into the AI algorithm using unsupervised learning — when a model is given a dataset without explicit instructions on what to do with it. Through this method, a large language model learns words, as well as the relationships between and concepts behind them. It could, for example, learn to differentiate the two meanings of the word “bark” based on its context.

And just as a person who masters a language can guess what might come next in a sentence or paragraph — or even come up with new words or concepts themselves — a large language model can apply its knowledge to predict and generate content.

Large language models can also be customized for specific use cases, including through techniques like fine-tuning or prompt-tuning, which is the process of feeding the model small bits of data to focus on, to train it for a specific application.

Thanks to its computational efficiency in processing sequences in parallel, the transformer model architecture is the building block behind the largest and most powerful LLMs.

Top Applications for Large Language Models

Large language models are unlocking new possibilities in areas such as search engines, natural language processing, healthcare, robotics and code generation.

The popular ChatGPT AI chatbot is one application of a large language model. It can be used for a myriad of natural language processing tasks.

The nearly infinite applications for LLMs also include:

  • Retailers and other service providers can use large language models to provide improved customer experiences through dynamic chatbots, AI assistants and more.
  • Search engines can use large language models to provide more direct, human-like answers.
  • Life science researchers can train large language models to understand proteins, molecules, DNA and RNA.
  • Developers can write software and teach robots physical tasks with large language models.
  • Marketers can train a large language model to organize customer feedback and requests into clusters, or segment products into categories based on product descriptions.
  • Financial advisors can summarize earnings calls and create transcripts of important meetings using large language models. And credit-card companies can use LLMs for anomaly detection and fraud analysis to protect consumers.
  • Legal teams can use large language models to help with legal paraphrasing and scribing.

Running these massive models in production efficiently is resource-intensive and requires expertise, among other challenges, so enterprises turn to NVIDIA Triton Inference Server, software that helps standardize model deployment and deliver fast and scalable AI in production.

Where to Find Large Language Models

In June 2020, OpenAI released GPT-3 as a service, powered by a 175-billion-parameter model that can generate text and code with short written prompts.

In 2021, NVIDIA and Microsoft developed Megatron-Turing Natural Language Generation 530B, one of the world’s largest models for reading comprehension and natural language inference, which eases tasks like summarization and content generation.

And HuggingFace last year introduced BLOOM, an open large language model that’s able to generate text in 46 natural languages and over a dozen programming languages.

Another LLM, Codex, turns text to code for software engineers and other developers.

NVIDIA offers tools to ease the building and deployment of large language models:

  • NVIDIA NeMo LLM service provides a fast path to customizing large language models and deploying them at scale using NVIDIA’s managed cloud API, or through private and public clouds.
  • NVIDIA NeMo Megatron, part of the NVIDIA AI platform, is a framework for easy, efficient, cost-effective training and deployment of large language models. Designed for enterprise application development, NeMo Megatron provides an end-to-end workflow for automated distributed data processing, training large-scale, customized GPT-3, T5 and multilingual T5 models, and deploying models for inference at scale.
  • NVIDIA BioNeMo is a domain-specific managed service and framework for large language models in proteomics, small molecules, DNA and RNA. It’s built on NVIDIA NeMo Megatron for training and deploying large biomolecular transformer AI models at supercomputing scale.

Challenges of Large Language Models

Scaling and maintaining large language models can be difficult and expensive.

Building a foundational large language model often requires months of training time and millions of dollars.

And because LLMs require a significant amount of training data, developers and enterprises can find it a challenge to access large-enough datasets.

Due to the scale of large language models, deploying them requires technical expertise, including a strong understanding of deep learning, transformer models and distributed software and hardware.

Many leaders in tech are working to advance development and build resources that can expand access to large language models, allowing consumers and enterprises of all sizes to reap their benefits.

Learn more about large language models.

Read More

DLSS 3 Delivers Ultimate Boost in Latest Game Updates on GeForce NOW

DLSS 3 Delivers Ultimate Boost in Latest Game Updates on GeForce NOW

GeForce NOW RTX 4080 SuperPODs are rolling out now, bringing RTX 4080-class performance and features to Ultimate members — including support for NVIDIA Ada Lovelace GPU architecture technologies like NVIDIA DLSS 3

This GFN Thursday brings updates to some of GeForce NOW’s hottest games that take advantage of these amazing technologies, all from the cloud.

Plus, RTX 4080 SuperPOD upgrades are nearly finished in the London data center, expanding the number of regions where Ultimate members can experience the most powerful cloud gaming technology on the planet. Look for updates on Twitter once the upgrade is complete and be sure to check back each week to see which cities light up next on the map.

Members can also look for six more supported games in the GeForce NOW library this week. 

AI-Powered Performance

NVIDIA DLSS has revolutionized graphics rendering, using AI and GeForce RTX Tensor Cores to boost frame rates while delivering crisp, high-quality images that rival native resolution.

Powered by new hardware capabilities of the Ada Lovelace architecture, DLSS 3 generates entirely new high-quality frames, rather than just pixels. It combines DLSS Super Resolution technology and DLSS Frame Generation to reconstruct seven-eighths of the displayed pixels, accelerating performance.

DLSS 3 games are backwards compatible with DLSS 2 technology — when developers integrate DLSS 3, DLSS 2, aka DLSS Super Resolution, is supported by default. Additionally, integrations of DLSS 3 include NVIDIA Reflex, reducing system latency for all GeForce RTX users and making games more responsive.

Support for DLSS 3 is growing, and soon GeForce NOW Ultimate members can experience this technology in new updates to HITMAN World of Assassination and Marvel’s Midnight Suns.

A Whole New ‘World of Assassination’

The critically acclaimed HITMAN 3 from IOI transforms into HITMAN World of Assassination, an upgrade that includes content from HITMAN 1, HITMAN 2 and HITMAN 3. With DLSS 3 support, streaming from the cloud in 4K looks better than ever, even with ray tracing and settings cranked to the max.

HITMAN World of Assassination on GeForce NOW
Death waits for no one, especially when streaming from the cloud.

Become legendary assassin Agent 47 and use creativity and improvisation to execute ingenious, spectacular eliminations in sprawling sandbox locations all around the globe. Stick to the shadows to stalk and eliminate targets — or take them out in plain sight.

Along with DLSS 3 support, Ultimate members can enjoy ray-traced opaque reflections and shadows in the world of HITMAN as they explore open-world missions with multiple ways to succeed. 

Deadpool Does DLSS 3

Marvel’s Midnight Suns’ first downloadable content, The Good, The Bad, and the Undead, adds Deadpool to the team roster, along with new story missions, new enemies and more. Add in DLSS 3 support coming soon, and Ultimate members have a lot to look forward to.

Marvel Midnight Suns on GeForce NOW
Don’t miss out on Deadpool in ‘Marvel’s Midnight Suns’ first DLC.

Launched last month to critical acclaim, VGC awarded Marvel’s Midnight Suns with a five-out-of-five rating, calling it a “modern strategy classic.” PC Gamer said it was “completely brilliant” and scored it an 88 out of 100, and Rock Paper Shotgun called it “one of the best superhero games full stop.”

Ultimate members can explore the abbey grounds and get to know the Merc with a Mouth at up to 4K resolutions and 120 frames per second, or immerse themselves in their mission with ultrawide resolutions at up to 3840 x 1600 at 120 frames per second — plus many other popular formats including 3440 x 1440 and 2560 x 1080. 

GeForce NOW members can also take their games and save data with them wherever they go, from underpowered PCs to Macs, Samsung and LG TVs, mobile devices and Chromebooks.

Game On

Get ready to game: Six more games join the supported list in the GeForce NOW library this week:

  • Tom Clancy’s Ghost Recon: Breakpoint (New release on Steam, Jan. 23)
  • Oddballers (New release on Ubisoft Connect, Jan. 26)
  • Watch Dogs: Legion (New release on Steam, Jan. 26)
  • Cygnus Enterprises (Steam)
  • Rain World (Steam)
  • The Eternal Cylinder (Steam)

There’s only one question left to kick off a weekend full of gaming in the cloud. Let us know on Twitter or in the comments below.

Read More

Learning with Queried Hints

Learning with Queried Hints

In many computing applications the system needs to make decisions to serve requests that arrive in an online fashion. Consider, for instance, the example of a navigation app that responds to driver requests. In such settings there is inherent uncertainty about important aspects of the problem. For example, the preferences of the driver with respect to features of the route are often unknown and the delays of road segments can be uncertain. The field of online machine learning studies such settings and provides various techniques for decision-making problems under uncertainty.

A navigation engine has to decide how to route this user’s request. The satisfaction of the user will depend on the (uncertain) congestion of the two routes and unknown preferences of the user on various features, such as how scenic, safe, etc., the route is.

A very well known problem in this framework is the multi-armed bandit problem, in which the system has a set of n available options (arms) from which it is asked to choose in each round (user request), e.g., a set of precomputed alternative routes in navigation. The user’s satisfaction is measured by a reward that depends on unknown factors such as user preferences and road segment delays. An algorithm’s performance over T rounds is compared against the best fixed action in hindsight by means of the regret (the difference between the reward of the best arm and the reward obtained by the algorithm over all T rounds). In the experts variant of the multi-armed bandit problem, all rewards are observed after each round and not just the one played by the algorithm.

An instance of the experts problem. The table presents the rewards obtained by following each of the 3 experts at each round = 1, 2, 3, 4. The best expert in hindsight (and hence the benchmark to compare against) is the middle one, with total reward 21. If, for example, we had selected expert 1 in the first two rounds and expert 3 in the last two rounds (recall that we need to select before observing the rewards of each round), we would have extracted reward 17, which would give a regret equal to 21 – 17 = 4.

These problems have been extensively studied, and existing algorithms can achieve sublinear regret. For example, in the multi-armed bandit problem, the best existing algorithms can achieve regret that is of the order √T. However, these algorithms focus on optimizing for worst-case instances, and do not account for the abundance of available data in the real world that allows us to train machine learned models capable of aiding us in algorithm design.

In “Online Learning and Bandits with Queried Hints” (presented at ITCS 2023), we show how an ML model that provides us with a weak hint can significantly improve the performance of an algorithm in bandit-like settings. Many ML models are trained accurately using relevant past data. In the routing application, for example, specific past data can be used to estimate road segment delays and past feedback from drivers can be used to learn the quality of certain routes. Models trained with such data can, in certain cases, give very accurate feedback. However, our algorithms achieve strong guarantees even when the feedback from the model is in the form of a less explicit weak hint. Specifically, we merely ask that the model predict which of two options will be better. In the navigation application this is equivalent to having the algorithm pick two routes and query an ETA model for which of the two is faster, or presenting the user with two routes with different characteristics and letting them pick the one that is best for them. By designing algorithms that leverage such a hint we can: Improve the regret of the bandits setting on an exponential scale in terms of dependence on T and improve the regret of the experts setting from order of √T to become independent of T. Specifically, our upper bound only depends on the number of experts n and is at most log(n).

Algorithmic Ideas

Our algorithm for the bandits setting utilizes the well known upper confidence bound (UCB) algorithm. The UCB algorithm maintains, as a score for each arm, the average reward observed on that arm so far and adds to it an optimism parameter that becomes smaller with the number of times the arm has been pulled, thus balancing between exploration and exploitation. Our algorithm applies the UCB scores on pairs of arms, mainly in an effort to utilize the available pairwise comparison model that can designate the better of two arms. Each pair of arms i and j is grouped as a meta-arm (i, j) whose reward in each round is equal to the maximum reward between the two arms. Our algorithm observes the UCB scores of the meta-arms and picks the pair (i, j) that has the highest score. The pair of arms are then passed as a query to the ML auxiliary pairwise prediction model, which responds with the best of the two arms. This response is the arm that is finally used by the algorithm.

The decision problem considers three candidate routes. Our algorithm instead considers all pairs of the candidate routes. Suppose pair 2 is the one with the highest score in the current round. The pair is given to the auxiliary ML pairwise prediction model, which outputs whichever of the two routes is better in the current round.

Our algorithm for the experts setting takes a follow-the-regularized-leader (FtRL) approach, which maintains the total reward of each expert and adds random noise to each, before picking the best for the current round. Our algorithm repeats this process twice, drawing random noise two times and picking the highest reward expert in each of the two iterations. The two selected experts are then used to query the auxiliary ML model. The model’s response for the best between the two experts is the one played by the algorithm.

Results

Our algorithms utilize the concept of weak hints to achieve strong improvements in terms of theoretical guarantees, including an exponential improvement in the dependence of regret on the time horizon or even removing this dependence altogether. To illustrate how the algorithm can outperform existing baseline solutions, we present a setting where 1 of the n candidate arms is consistently marginally better than the n-1 remaining arms. We compare our ML probing algorithm against a baseline that uses the standard UCB algorithm to pick the two arms to submit to the pairwise comparison model. We observe that the UCB baseline keeps accumulating regret whereas the probing algorithm quickly identifies the best arm and keeps playing it, without accumulating regret.

An example in which our algorithm outperforms a UCB based baseline. The instance considers n arms, one of which is always marginally better than the remaining n-1.

Conclusion

In this work we explore how a simple pairwise comparison ML model can provide simple hints that prove very powerful in settings such as the experts and bandits problems. In our paper we further present how these ideas apply to more complex settings such as online linear and convex optimization. We believe our model of hints can have more interesting applications in ML and combinatorial optimization problems.

Acknowledgements

We thank our co-authors Aditya Bhaskara (University of Utah), Sungjin Im (University of California, Merced), and Kamesh Munagala (Duke University).

Read More

Research Focus: Week of January 23, 2023

Research Focus: Week of January 23, 2023

Microsoft Research Focus 08 edition, week of January 23

Welcome to Research Focus, a new series of blog posts that highlights notable publications, events, code/datasets, new hires and other milestones from across the research community at Microsoft.

Revolutionizing Document AI with multimodal document foundation models  

Organizations must digitize various documents, many with charts and images, to manage and streamline essential functions. Yet manually digitized documents are often of uneven quality, while web pages and electronic documents can come with multiple layouts.

Document AI technology is designed to efficiently extract, organize and analyze the information in different documents, freeing employees and companies from this repetitive and tedious work. The results are automated extraction, classification and understanding of information with rich typesetting formats from webpages, digital-born documents, or scanned documents, along with lower costs and reduced errors.

Microsoft Research Asia has been studying Document AI since 2019, working at the intersection of natural language processing and computer vision and using deep learning techniques. In their most recent work, researchers have developed new skills for Document AI, unveiled industry-leading models, and begun developing general-purpose and unified frameworks.


Tapping into Large Language Models with Microsoft’s Turing Academic Program

Large language models (LLMs) deliver impressive performance with difficult tasks and across various applications. As AI researchers explore LLMs, many questions persist. Answering these questions will require a range of different perspectives and proficiencies from experts from industry, research, and government.
 
To better understand opportunities and challenges with LLMs, Eric Horvitz, Microsoft’s Chief Scientific Officer, moderated a panel discussion “Towards a Healthy Research Ecosystem for Large Language Models.” Panelists included Ahmed Awadallah (Microsoft Research), Erwin Gianchandani (National Science Foundation), Percy Liang (Stanford University), and Saurabh Tiwary (Microsoft Turing).

A key theme of the panel was the need to expand access to LLMs, which requires large amounts of data and computing resources. The Microsoft Turing Academic Program (MS-TAP) supports this effort through multiple in-depth collaborations with partner universities.

You can learn more about MS-TAP and the panel discussion in this recent blog post.


Microsoft researchers named 2022 ACM Fellows

Three researchers from Microsoft were among the 57 Fellows named by the Association for Computing Machinery (ACM) for fundamental contributions to computing technologies in 2022.

This award, which recognizes the top 1% of ACM members for accomplishments in computing and information technology and/or outstanding service to ACM and the larger computing community, was presented to the following Microsoft researchers:

Ranveer Chandra
For contributions to software-defined wireless networking and applications to agriculture and rural broadband

Marc Pollefeys
For contributions to geometric computer vision and applications to AR/VR/MR, robotics and autonomous vehicles

Jaime Teevan
For contributions to human-computer interaction, information retrieval, and productivity

The ACM Fellows program was launched in 1993. Candidates are nominated by their peers and then reviewed by a selection committee. ACM is the world’s largest educational and scientific computing society, uniting educators, researchers, and professionals to inspire dialogue, share resources, and address challenges.

The post Research Focus: Week of January 23, 2023 appeared first on Microsoft Research.

Read More

Build a loyalty points anomaly detector using Amazon Lookout for Metrics

Build a loyalty points anomaly detector using Amazon Lookout for Metrics

Today, gaining customer loyalty cannot be a one-off thing. A brand needs a focused and integrated plan to retain its best customers—put simply, it needs a customer loyalty program. Earn and burn programs are one of the main paradigms. A typical earn and burn program rewards customers after a certain number of visits or spend.

For example, a fast food chain has launched its earn and burn loyalty pilot program in some locations. They are looking to use the loyalty program to make their customer experience more personal. Upon testing, they want to expand it to more locations across different countries in the future. The program allows customers to earn points for every dollar that they spend. They can redeem the points toward different rewards options. To attract new customers, they also give points to new customers. They test the redeem pattern every month to check the performance of the loyalty program at different locations. Identifying redeem pattern anomalies is crucial in order to take corrective action in time and ensure the overall success of the program. Customers have different earn and redeem patterns at different locations based on their spend and choice of food. Therefore, the process of identifying an anomaly and quickly diagnosing the root cause is difficult, costly, and error-prone.

This post shows you how to use an integrated solution with Amazon Lookout for Metrics to break these barriers by quickly and easily detecting anomalies in the key performance indicators (KPIs) of your interest.

Lookout for Metrics automatically detects and diagnoses anomalies (outliers from the norm) in business and operational data. You don’t need ML experience to use Lookout for Metrics. It’s a fully managed machine learning (ML) service that uses specialized ML models to detect anomalies based on the characteristics of your data. For example, trends and seasonality are two characteristics of time series metrics in which threshold-based anomaly detection doesn’t work. Trends are continuous variations (increases or decreases) in a metric’s value. On the other hand, seasonality is periodic patterns that occur in a system, usually rising above a baseline and then decreasing again.

In this post, we demonstrate a common loyalty points earn and burn scenario, in which we detect anomalies in the customer’s earn and redeem pattern. We show you how to use these managed services from AWS to help find anomalies. You can apply this solution to other use cases such as detecting anomalies in air quality, traffic patterns, and power consumption patterns, to name a few.

Solution overview

This post demonstrates how you can set up anomaly detection on a loyalty points earn and redeem pattern using Lookout for Metrics. The solution allows you to download relevant datasets and set up anomaly detection to detect earn and redeem patterns.

Let’s see how a loyalty program typically works, as shown in the following diagram.

Customers earn points for the money they spend on the purchase. They can redeem the accumulated points in exchange for discounts, rewards, or incentives.

Building this system requires three simple steps:

  1. Create an Amazon Simple Storage Service (Amazon S3) bucket and upload your sample dataset.
  2. Create a detector for Lookout for Metrics.
  3. Add a dataset and activate the detector to detect anomalies on historical data.

Then you can review and analyze the results.

Create an S3 bucket and upload your sample dataset

Download the file loyalty.csv and save it locally. Then continue through the following steps:

  1. On the Amazon S3 console, create an S3 bucket to upload the loyalty.csv file.

This bucket needs to be unique and in the same Region where you’re using Lookout for Metrics.

  1. Open the bucket you created.
  2. Choose Upload.

  1. Choose Add files and choose the loyalty.csv file.
  2. Choose Upload.

Create a detector

A detector is a Lookout for Metrics resource that monitors a dataset and identifies anomalies at a predefined frequency. Detectors use ML to find patterns in data and distinguish between expected variations in data and legitimate anomalies. To improve its performance, a detector learns more about your data over time.

In our use case, the detector analyzes daily data. To create the detector, complete the following steps:

  1. On the Lookout for Metrics console, choose Create detector.
  2. Enter a name and optional description for the detector.
  3. For Interval, choose 1 day intervals.
  4. Choose Create.

Your data is encrypted by default with a key that AWS owns and manages for you. You can also configure if you want to use a different encryption key from the one that is used by default.

Now let’s point this detector to the data that you want it to run anomaly detection on.

Create a dataset

A dataset tells the detector where to find your data and which metrics to analyze for anomalies. To create a dataset, complete the following steps:

  1. On the Lookout for Metrics console, navigate to your detector.
  2. Choose Add a dataset.

  1. For Name, enter a name (for example, loyalty-point-anomaly-dataset).
  2. For Timezone, choose as applicable.
  3. For Datasource, choose your data source (for this post, Amazon S3).
  4. For Detector mode, select your mode (for this post, Backtest).

With Amazon S3, you can create a detector in two modes:

  • Backtest – This mode is used to find anomalies in historical data. It needs all records to be consolidated in a single file. We use this mode with our use case because we want to detect anomalies in a customer’s historical loyalty points redeem pattern in different locations.
  • Continuous – This mode is used to detect anomalies in live data.
  1. Enter the S3 path for the live S3 folder and path pattern.
  2. Choose Detect format settings.
  3. Leave all default format settings as is and choose Next.

Configure measures, dimensions, and timestamps

Measures define KPIs that you want to track anomalies for. You can add up to five measures per detector. The fields that are used to create KPIs from your source data must be of numeric format. The KPIs can be currently defined by aggregating records within the time interval by doing a SUM or AVERAGE.

Dimensions give you the ability to slice and dice your data by defining categories or segments. This allows you to track anomalies for a subset of the whole set of data for which a particular measure is applicable.

In our use case, we add two measures, which calculate the sum of the objects seen in the 1-day interval, and have one dimension, for which earned and redeemed points are measured.

Every record in the dataset must have a timestamp. The following configuration allows you to choose the field that represents the timestamp value and also the format of the timestamp.

The next page allows you to review all the details you added and then choose Save and activate to create the detector.

The detector then begins learning the data inthe data source. At this stage, the status of the detector changes to Initializing.

It’s important to note the minimum amount of data that is required before Lookout for Metrics can start detecting anomalies. For more information about requirements and limits, see Lookout for Metrics quotas.

With minimal configuration, you have created your detector, pointed it at a dataset, and defined the metrics that you want Lookout for Metrics to find anomalies in.

Review and analyze the results

When the backtesting job is complete, you can see all the anomalies that Lookout for Metrics detected in the last 30% of your historical data. From here, you can begin to unpack the kinds of results you will see from Lookout for Metrics in the future when you start getting the new data.

Lookout for Metrics provides a rich UI experience for users who want to use the AWS Management Console to analyze the anomalies being detected. It also provides the capability to query the anomalies via APIs.

Let’s look at an example anomaly detected from our loyalty points anomaly detector use case. The following screenshot shows an anomaly detected in loyalty points redemption at a specific location on the designated time and date with a severity score of 91.

It also shows the percentage contribution of the dimension towards the anomaly. In this case, 100% contribution comes from the location ID A-1002 dimension.

Clean up

To avoid incurring ongoing charges, delete the following resources created in this post:

  • Detector
  • S3 bucket
  • IAM role

Conclusion

In this post, we showed you how to use Lookout for Metrics to remove the undifferentiated heavy lifting involved in managing the end-to-end lifecycle of building ML-powered anomaly detection applications. This solution can help you accelerate your ability to find anomalies in key business metrics and allow you focus your efforts on growing and improving your business.

We encourage you to learn more by visiting the Amazon Lookout for Metrics Developer Guide and trying out the end-to-end solution enabled by these services with a dataset relevant to your business KPIs.


About the Author

Dhiraj Thakur is a Solutions Architect with Amazon Web Services. He works with AWS customers and partners to provide guidance on enterprise cloud adoption, migration, and strategy. He is passionate about technology and enjoys building and experimenting in the analytics and AI/ML space.

Read More

Explain text classification model predictions using Amazon SageMaker Clarify

Explain text classification model predictions using Amazon SageMaker Clarify

Model explainability refers to the process of relating the prediction of a machine learning (ML) model to the input feature values of an instance in humanly understandable terms. This field is often referred to as explainable artificial intelligence (XAI). Amazon SageMaker Clarify is a feature of Amazon SageMaker that enables data scientists and ML engineers to explain the predictions of their ML models. It uses model agnostic methods like SHapely Additive exPlanations (SHAP) for feature attribution. Apart from supporting explanations for tabular data, Clarify also supports explainability for both computer vision (CV) and natural language processing (NLP) using the same SHAP algorithm.

In this post, we illustrate the use of Clarify for explaining NLP models. Specifically, we show how you can explain the predictions of a text classification model that has been trained using the SageMaker BlazingText algorithm. This helps you understand which parts or words of the text are most important for the predictions made by the model. Among other things, these observations can then be used to improve various processes like data acquisition that reduces bias in the dataset and model validation to ensure that models are performing as intended, and earn trust with all stakeholders when the model is deployed. This can be a key requirement in many application domains like sentiment analysis, legal reviews, medical diagnosis, and more.

We also provide a general design pattern that you can use while using Clarify with any of the SageMaker algorithms.

Solution overview

SageMaker algorithms have fixed input and output data formats. For example, the BlazingText algorithm container accepts inputs in JSON format. But customers often require specific formats that are compatible with their data pipelines. We present a couple of options that you can follow to use Clarify.

Option A

In this option, we use the inference pipeline feature of SageMaker hosting. An inference pipeline is a SageMaker model that constitutes a sequence of containers that processes inference requests. The following diagram illustrates an example.

Clarify job invokes inference pipeline with one container handling the format of data and the other container holding the model.

You can use inference pipelines to deploy a combination of your own custom models and SageMaker built-in algorithms packaged in different containers. For more information, refer to Hosting models along with pre-processing logic as serial inference pipeline behind one endpoint. Because Clarify supports only CSV and JSON Lines as input, you need to complete the following steps:

  1. Create a model and a container to convert the data from CSV (or JSON Lines) to JSON.
  2. After the model training step with the BlazingText algorithm, directly deploy the model. This will deploy the model using the BlazingText container, which accepts JSON as input. When using a different algorithm, SageMaker creates the model using that algorithm’s container.
  3. Use the preceding two models to create a PipelineModel. This chains the two models in a linear sequence and creates a single model. For an example, refer to Inference pipeline with Scikit-learn and Linear Learner.

With this solution, we have successfully created a single model whose input is compatible with Clarify and can be used by it to generate explanations.

Option B

This option demonstrates how you can integrate the use of different data formats between Clarify and SageMaker algorithms by bringing your own container for hosting the SageMaker model. The following diagram illustrates the architecture and the steps that are involved in the solution:

The steps are as follows:

  1. Use the BlazingText algorithm via the SageMaker Estimator to train a text classification model.
  2. After the model is trained, create a custom Docker container that can be used to create a SageMaker model and optionally deploy the model as a SageMaker model endpoint.
  3. Configure and create a Clarify job to use the hosting container for generating an explainability report.
  4. The custom container accepts the inference request as a CSV and enables Clarify to generate explanations.

It should be noted that this solution demonstrates the idea of obtaining offline explanations using Clarify for a BlazingText model. For more information about online explainability, refer to Online Explainability with SageMaker Clarify.

The rest of this post explains each of the steps in the second option.

Train a BlazingText model

We first train a text classification model using the BlazingText algorithm. In this example, we use the DBpedia Ontology dataset. DBpedia is a crowd-sourced initiative to extract structured content using information from various Wikimedia projects like Wikipedia. Specifically, we use the DBpedia ontology dataset as created by Zhang et al. It is constructed by selecting 14 non-overlapping classes from DBpedia 2014. The fields contain an abstract of a Wikipedia article and the corresponding class. The goal of a text classification model is to predict the class of an article given its abstract.

A detailed step-by-step process for training the model is available in the following notebook. After you have trained the model, take note of the Amazon Simple Storage Service (Amazon S3) URI path where the model artifacts are stored. For a step-by-step guide, refer to Text Classification using SageMaker BlazingText.

Deploy the trained BlazingText model using your own container on SageMaker

With Clarify, there are two options to provide the model information:

  • Create a SageMaker model without deploying it to an endpoint – When a SageMaker model is provided to Clarify, it creates an ephemeral endpoint using the model.
  • Create a SageMaker model and deploy it to an endpoint – When an endpoint is made available to Clarify, it uses the endpoint for obtaining explanations. This avoids the creation of an ephemeral endpoint and can reduce the runtime of a Clarify job.

In this post, we use the first option with Clarify. We use the SageMaker Python SDK for this purpose. For other options and more details, refer to Create your endpoint and deploy your model.

Bring your own container (BYOC)

We first build a custom Docker image that is used to create the SageMaker model. You can use the files and code in the source directory of our GitHub repository.

The Dockerfile describes the image we want to build. We start with a standard Ubuntu installation and then install Scikit-learn. We also clone fasttext and install the package. It’s used to load the BlazingText model for making predictions. Finally, we add the code that implements our algorithm in the form of the preceding files and set up the environment in the container. The entire Dockerfile is provided in our repository and you can use it as it is. Refer to Use Your Own Inference Code with Hosting Services for more details on how SageMaker interacts with your Docker container and its requirements.

Furthermore, predictor.py contains the code for loading the model and making the predictions. It accepts input data as a CSV, which makes it compatible with Clarify.

After you have the Dockerfile, build the Docker container and upload it to Amazon Elastic Container Registry (Amazon ECR). You can find the step-by-step process in the form of a shell script in our GitHub repository, which you can use to create and upload the Docker image to Amazon ECR.

Create the BlazingText model

The next step is to create a model object from the SageMaker Python SDK Model class that can be deployed to an HTTPS endpoint. We configure Clarify to use this model for generating explanations. For the code and other requirements for this step, refer to Deploy your trained SageMaker BlazingText Model using your own container in Amazon SageMaker.

Configure Clarify

Clarify NLP is compatible with regression and classification models. It helps you understand which parts of the input text influence the predictions of your model. Clarify supports 62 languages and can handle text with multiple languages. We use the SageMaker Python SDK to define the three configurations that are used by Clarify for creating the explainability report.

First, we need to create the processor object and also specify the location of the input dataset that will be used for the predictions and the feature attribution:

import sagemaker
sagemaker_session = sagemaker.Session()
from sagemaker import clarify
clarify_processor = clarify.SageMakerClarifyProcessor(
role=role,
instance_count=1,
instance_type="ml.m5.xlarge",
sagemaker_session=sagemaker_session,
)
file_path = "<location of the input dataset>"

DataConfig

Here, you should configure the location of the input data, the feature column, and where you want the Clarify job to store the output. This is done by passing the relevant arguments while creating a DataConfig object:

explainability_output_path = "s3://{}/{}/clarify-text-explainability".format(
sagemaker_session.default_bucket(), "explainability"
)

explainability_data_config = clarify.DataConfig(
s3_data_input_path=file_path,
s3_output_path=explainability_output_path,
headers=["Review Text"],
dataset_type="text/csv",
)

ModelConfig

With ModelConfig, you should specify information about your trained model. Here, we specify the name of the BlazingText SageMaker model that we created in a prior step and also set other parameters like the Amazon Elastic Compute Cloud (Amazon EC2) instance type and the format of the content:

model_config = clarify.ModelConfig(
model_name=model_name,
instance_type="ml.m5.xlarge",
instance_count=1,
accept_type="application/jsonlines",
content_type="text/csv",
endpoint_name_prefix=None,
)

SHAPConfig

This is used to inform Clarify about how to obtain the feature attributions. TextConfig is used to specify the granularity of the text and the language. In our dataset, because we want to break down the input text into words and the language is English, we set these values to token and English, respectively. Depending on the nature of your dataset, you can set granularity to sentence or paragraph. The baseline is set to a special token. This means that Clarify will drop subsets of the input text and replace them with values from the baseline while obtaining predictions for computing the SHAP values. This is how it determines the effect of the tokens on the model’s predictions and in turn identifies their importance. The number of samples that are to be used in the Kernel SHAP algorithm is determined by the value of the num_samples argument. Higher values result in more robust feature attributions, but that can also increase the runtime of the job. Therefore, you need to make a trade-off between the two. See the following code:

shap_config = clarify.SHAPConfig(
baseline=[["<UNK>"]],
num_samples=1000,
agg_method="mean_abs",
save_local_shap_values=True,
text_config=clarify.TextConfig(granularity="token", language="english"),
)

For more information, see Feature Attributions that Use Shapley Values and Amazon AI Fairness and Explainability Whitepaper.

ModelPredictedLabelConfig

For Clarify to extract a predicted label or predicted scores or probabilities, this config object needs to be set. See the following code:

from sagemaker.clarify import ModelPredictedLabelConfig
modellabel_config = ModelPredictedLabelConfig(probability="prob", label="label")

For more details, refer to the documentation in the SDK.

Run a Clarify job

After you create the different configurations, you’re now ready to trigger the Clarify processing job. The processing job validates the input and parameters, creates the ephemeral endpoint, and computes local and global feature attributions using the SHAP algorithm. When that’s complete, it deletes the ephemeral endpoint and generates the output files. See the following code:

clarify_processor.run_explainability(
data_config=explainability_data_config,
model_config=model_config,
explainability_config=shap_config,
model_scores=modellabel_config,
)

The runtime of this step depends on the size of the dataset and the number of samples that are generated by SHAP.

Visualize the results

Finally, we show a visualization of the results from the local feature attribution report that was generated by the Clarify processing job. The output is in a JSON Lines format and with some processing; you can plot the scores for the tokens in the input text like the following example. Higher bars have more impact on the target label. Furthermore, positive values are associated with higher predictions in the target variable and negative values with lower predictions. In this example, the model makes a prediction for the input text “Wesebach is a river of Hesse Germany.” The predicted class is Natural Place and the scores indicate that the model found the word “river” to be the most informative to make this prediction. This is intuitive for a human and by examining more samples, you can determine if the model is learning the right features and behaving as expected.

Conclusion

In this post, we explained how you can use Clarify to explain predictions from a text classification model that was trained using SageMaker BlazingText. Get started with explaining predictions from your text classification models using the sample notebook Text Explainability for SageMaker BlazingText.

We also discussed a more generic design pattern that you can use when using Clarify with SageMaker built-in algorithms. For more information, refer to What Is Fairness and Model Explainability for Machine Learning Predictions. We also encourage you to read the Amazon AI Fairness and Explainability Whitepaper, which provides an overview on the topic and discusses best practices and limitations.


About the Authors

Pinak Panigrahi works with customers to build machine learning driven solutions to solve strategic business problems on AWS. When not occupied with machine learning, he can be found taking a hike, reading a book or catching up with sports.

Dhawal Patel is a Principal Machine Learning Architect at AWS. He has worked with organizations ranging from large enterprises to mid-sized startups on problems related to distributed computing, and Artificial Intelligence. He focuses on Deep learning including NLP and Computer Vision domains. He helps customers achieve high performance model inference on SageMaker.

Read More

Upscale images with Stable Diffusion in Amazon SageMaker JumpStart

Upscale images with Stable Diffusion in Amazon SageMaker JumpStart

In November 2022, we announced that AWS customers can generate images from text with Stable Diffusion models in Amazon SageMaker JumpStart. Today, we announce a new feature that lets you upscale images (resize images without losing quality) with Stable Diffusion models in JumpStart. An image that is low resolution, blurry, and pixelated can be converted into a high-resolution image that appears smoother, clearer, and more detailed. This process, called upscaling, can be applied to both real images and images generated by text-to-image Stable Diffusion models. This can be used to enhance image quality in various industries such as ecommerce and real estate, as well as for artists and photographers. Additionally, upscaling can improve the visual quality of low-resolution images when displayed on high-resolution screens.

Stable Diffusion uses an AI algorithm to upscale images, eliminating the need for manual work that may require manually filling gaps in an image. It has been trained on millions of images and can accurately predict high-resolution images, resulting in a significant increase in detail compared to traditional image upscalers. Additionally, unlike non-deep-learning techniques such as nearest neighbor, Stable Diffusion takes into account the context of the image, using a textual prompt to guide the upscaling process.

In this post, we provide an overview of how to deploy and run inference with the Stable Diffusion upscaler model in two ways: via JumpStart’s user interface (UI) in Amazon SageMaker Studio, and programmatically through JumpStart APIs available in the SageMaker Python SDK.

Solution overview

The following images show examples of upscaling performed by the model. On the left is the original low-resolution image enlarged to match the size of the image generated by the model. On the right is the image generated by the model.

The first generated image is the result of low resolution cat image and the prompt “a white cat.”

The second generated image is the result of low resolution butterfly image and the prompt “a butterfly on a green leaf.”

Running large models like Stable Diffusion requires custom inference scripts. You have to run end-to-end tests to make sure that the script, the model, and the desired instance work together efficiently. JumpStart simplifies this process by providing ready-to-use scripts that have been robustly tested. You can access these scripts with one click through the Studio UI or with very few lines of code through the JumpStart APIs.

The following sections provide an overview of how to deploy the model and run inference using either the Studio UI or the JumpStart APIs.

Note that by using this model, you agree to the CreativeML Open RAIL++-M License.

Access JumpStart through the Studio UI

In this section, we demonstrate how to train and deploy JumpStart models through the Studio UI. The following video shows how to find the pre-trained Stable Diffusion upscaler model on JumpStart and deploy it. The model page contains valuable information about the model and how to use it. For inference, we use the ml.p3.2xlarge instance type because it provides the GPU acceleration needed for low-inference latency at a low price point. After you configure the SageMaker hosting instance, choose Deploy. It will take 5–10 minutes until the endpoint is up and running and ready to respond to inference requests.

Video: stable diffusion upscaling.mov

To accelerate the time to inference, JumpStart provides a sample notebook that shows how to run inference on the newly created endpoint. To access the notebook in Studio, choose Open Notebook in the Use Endpoint from Studio section of the model endpoint page.

Use JumpStart programmatically with the SageMaker SDK

You can use the JumpStart UI to deploy a pre-trained model interactively in just a few clicks. However, you can also use JumpStart models programmatically by using APIs that are integrated into the SageMaker Python SDK.

In this section, we choose an appropriate pre-trained model in JumpStart, deploy this model to a SageMaker endpoint, and run inference on the deployed endpoint, all using the SageMaker Python SDK. The following examples contain code snippets. For the full code with all of the steps in this demo, see the Introduction to JumpStart – Enhance image quality guided by prompt example notebook.

Deploy the pre-trained model

SageMaker utilizes Docker containers for various build and runtime tasks. JumpStart utilizes the SageMaker Deep Learning Containers (DLCs) that are framework-specific. We first fetch any additional packages, as well as scripts to handle training and inference for the selected task. Then the pre-trained model artifacts are separately fetched with model_uris, which provides flexibility to the platform. This allows multiple pre-trained models to be used with a single inference script. The following code illustrates this process:

model_id, model_version = "model-upscaling-stabilityai-stable-diffusion-x4-upscaler-fp16", "*"
# Retrieve the inference docker container uri
deploy_image_uri = image_uris.retrieve(
    region=None,
    framework=None,  # automatically inferred from model_id
    image_scope="inference",
    model_id=model_id,
    model_version=model_version,
    instance_type=inference_instance_type,
)
# Retrieve the inference script uri
deploy_source_uri = script_uris.retrieve(model_id=model_id, model_version=model_version, script_scope="inference")

base_model_uri = model_uris.retrieve(model_id=model_id, model_version=model_version, model_scope="inference")

Next, we provide those resources into a SageMaker model instance and deploy an endpoint:

# Create the SageMaker model instance
model = Model(
    image_uri=deploy_image_uri,
    source_dir=deploy_source_uri,
    model_data=base_model_uri,
    entry_point="inference.py",  # entry point file in source_dir and present in deploy_source_uri
    role=aws_role,
    predictor_cls=Predictor,
    name=endpoint_name,
)

# deploy the Model - note that we need to pass the Predictor class when we deploy the model through the Model class,
# in order to run inference through the SageMaker API
base_model_predictor = model.deploy(
    initial_instance_count=1,
    instance_type=inference_instance_type,
    predictor_cls=Predictor,
    endpoint_name=endpoint_name,
)

After our model is deployed, we can get predictions from it in real time!

Input format

The endpoint accepts a low-resolution image as raw RGB values or a base64 encoded image. The inference handler decodes the image based on content_type:

  • For content_type = “application/json”, the input payload must be a JSON dictionary with the raw RGB values, a textual prompt, and other optional parameters
  • For content_type = “application/json;jpeg”, the input payload must be a JSON dictionary with the base64 encoded image, a textual prompt, and other optional parameters

Output format

The following code examples give you a glimpse of what the outputs look like. Similarly to the input format, the endpoint can respond with the raw RGB values of the image or a base64 encoded image. This can be specified by setting accept to one of the two values:

  • For accept = “application/json”, the endpoint returns the a JSON dictionary with RGB values for the image
  • For accept = “application/json;jpeg”, the endpoint returns a JSON dictionary with the JPEG image as bytes encoded with base64.b64 encoding

Note that sending or receiving the payload with the raw RGB values may hit default limits for the input payload and the response size. Therefore, we recommend using the base64 encoded image by setting content_type = “application/json;jpeg” and accept = “application/json;jpeg”.

The following code is an example inference request:

content_type = “application/json;jpeg” 

# We recommend rescaling the image of low_resolution_image such that both height and width are powers of 2.
# This can be achieved by original_image = Image.open('low_res_image.jpg'); rescaled_image = original_image.rescale((128,128)); rescaled_image.save('rescaled_image.jpg')
with open(low_res_img_file_name,'rb') as f: low_res_image_bytes = f.read()

encoded_image = base64.b64encode(bytearray(low_res_image_bytes)).decode()

payload = { "prompt": "a cat", "image": encoded_image,  "num_inference_steps":50, "guidance_scale":7.5}

accept = "application/json;jpeg"

def query(model_predictor, payload, content_type, accept):
    """Query the model predictor."""
    query_response = model_predictor.predict(
        payload,
        {
            "ContentType": content_type,
            "Accept": accept,
        },
    )
    return query_response

The endpoint response is a JSON object containing the generated images and the prompt:

def parse_response(query_response):
"""Parse response and return the generated images and prompt."""

    response_dict = json.loads(query_response)
    return response_dict["generated_images"], response_dict["prompt"]
    
query_response = query(model_predictor, json.dumps(payload).encode('utf-8'), content_type, accept)
generated_images, prompt = parse_response(query_response)

Supported parameters

Stable Diffusion upscaling models support many parameters for image generation:

  • image – A low resolution image.
  • prompt – A prompt to guide the image generation. It can be a string or a list of strings.
  • num_inference_steps (optional) – The number of denoising steps during image generation. More steps lead to higher quality image. If specified, it must a positive integer. Note that more inference steps will lead to a longer response time.
  • guidance_scale (optional) – A higher guidance scale results in an image more closely related to the prompt, at the expense of image quality. If specified, it must be a float. guidance_scale<=1 is ignored.
  • negative_prompt (optional) – This guides the image generation against this prompt. If specified, it must be a string or a list of strings and used with guidance_scale. If guidance_scale is disabled, this is also disabled. Moreover, if the prompt is a list of strings, then the negative_prompt must also be a list of strings.
  • seed (optional) – This fixes the randomized state for reproducibility. If specified, it must be an integer. Whenever you use the same prompt with the same seed, the resulting image will always be the same.
  • noise_level (optional) – This adds noise to latent vectors before upscaling. If specified, it must be an integer.

You can recursively upscale an image by invoking the endpoint repeatedly to get higher and higher quality images.

Image size and instance types

Images generated by the model can be up to four times the size of the original low-resolution image. Furthermore, the model’s memory requirement (GPU memory) grows with the size of the generated image. Therefore, if you’re upscaling an already high-resolution image or are recursively upscaling images, select an instance type with a large GPU memory. For instance, ml.g5.2xlarge has more GPU memory than the ml.p3.2xlarge instance type we used earlier. For more information on different instance types, refer to Amazon EC2 Instance Types.

Upscaling images piece by piece

To decrease memory requirements when upscaling large images, you can break the image into smaller sections, known as tiles, and upscale each tile individually. After the tiles have been upscaled, they can be blended together to create the final image. This method requires adapting the prompt for each tile so the model can understand the content of the tile and avoid creating strange images. The style part of the prompt should remain consistent for all tiles to make blending easier. When using higher denoising settings, it’s important to be more specific in the prompt because the model has more freedom to adapt the image. This can be challenging when the tile contains only background or isn’t directly related to the main content of the picture.

Limitations and bias

Even though Stable Diffusion has impressive performance in upscaling, it suffers from several limitations and biases. These include but are not limited to:

  • The model may not generate accurate faces or limbs because the training data doesn’t include sufficient images with these features
  • The model was trained on the LAION-5B dataset, which has adult content and may not be fit for product use without further considerations
  • The model may not work well with non-English languages because the model was trained on English language text
  • The model can’t generate good text within images

For more information on limitations and bias, refer to the Stable Diffusion upscaler model card.

Clean up

After you’re done running the notebook, make sure to delete all resources created in the process to ensure that the billing is stopped. The code to clean up the endpoint is available in the associated notebook.

Conclusion

In this post, we showed how to deploy a pre-trained Stable Diffusion upscaler model using JumpStart. We showed code snippets in this post—the full code with all of the steps in this demo is available in the Introduction to JumpStart – Enhance image quality guided by prompt example notebook. Try out the solution on your own and send us your comments.

To learn more about the model and how it works, see the following resources:

To learn more about JumpStart, check out the following blog posts:


About the Authors

Dr. Vivek Madan is an Applied Scientist with the Amazon SageMaker JumpStart team. He got his PhD from University of Illinois at Urbana-Champaign and was a Post Doctoral Researcher at Georgia Tech. He is an active researcher in machine learning and algorithm design and has published papers in EMNLP, ICLR, COLT, FOCS, and SODA conferences.

Heiko Hotz is a Senior Solutions Architect for AI & Machine Learning with a special focus on Natural Language Processing (NLP), Large Language Models (LLMs), and Generative AI. Prior to this role, he was the Head of Data Science for Amazon’s EU Customer Service. Heiko helps our customers being successful in their AI/ML journey on AWS and has worked with organizations in many industries, including Insurance, Financial Services, Media and Entertainment, Healthcare, Utilities, and Manufacturing. In his spare time Heiko travels as much as possible.

Read More

Braced From Space: Startup Keeps Watchful Eye on Gas Pipeline Leaks Across the Globe

Braced From Space: Startup Keeps Watchful Eye on Gas Pipeline Leaks Across the Globe

As its name suggests, Orbital Sidekick is creating technology that acts as a buddy in outer space, keeping an eye on the globe using satellites to help keep it safe and sustainable.

The San Francisco-based startup, a member of the NVIDIA Inception program, enables commercial and government users to optimize sustainable operations and security with hyperspectral intelligence — information collected from across the electromagnetic spectrum.

“Space-based hyperspectral intelligence basically breaks up the spectrum of light so it’s possible to see what’s happening at a chemical level without needing an aircraft,” said Kaushik Bangalore, vice president of payload engineering at Orbital Sidekick, or OSK.

Founded in 2016, OSK is among the first to use hyperspectral intelligence to detect hydrocarbon or gas leaks. These are some of the world’s most pressing energy issues — 6,000 U.S. pipeline incidents from 2002-2021 resulted in over $11 billion in damages.

“Previous industry-standard ways of detecting such issues were unreliable as they used small aircraft and pilots looking out the window for leaks, depending on the trained eye rather than sensors or other technologies,” said Bangalore.

OSK operates a constellation of satellites that collect hyperspectral imagery from space. That data is processed and analyzed in real time using the NVIDIA Jetson edge AI platform. Then, insights — like the type of leak at a GPS point, its size and its urgency — can be viewed on a screen by users of OSK’s SIGMA Monitor platform.

The technology accomplishes what a pilot would, but much more quickly, objectively and with higher accuracy, Bangalore said.

A methane leak detected by OSK technology.

Sustainable Operations

OSK technologies have so far monitored more than 20,000 kilometers of pipelines for various customers, according to Tushar Prabhakar, its founder and chief operating officer.

The platform has detected nearly 100 suspected methane leaks, 200 suspected liquid hydrocarbon leaks or contamination issues, and more than 300 intrusive events related to digging or construction activities, Prabhakar added. OSK helped eliminate the potential for these events to become serious energy crises.

OSK’s SIGMA Monitor platform dashboard.

“We’re taking hyperspectral intelligence to the finest commercial resolution that the world has ever seen to make the Earth a more sustainable place,” Bangalore said. “The biggest challenge with hyperspectral imagery is dealing with huge amounts of data, which can be up to 400x the size of 2D visual data. NVIDIA technology helps process this data in real time.”

OSK uses the NVIDIA Jetson AGX Xavier module as an AI engine at the satellites’ edge to process the hyperspectral data collected from various sensors and crunch algorithms for leak detection.

The module, along with the NVIDIA CV-CUDA and CUDA Python software toolkits, have sped up OSK’s analysis by 5x, according to Bangalore. This acceleration enhances the platform’s ability to detect and recognize anomalies from space — then project the data back to Earth.

“There are around 15 sun-synchronous orbits per day,” Bangalore said. “With NVIDIA Jetson AGX Xavier, we can process all the data taken onboard a satellite in an orbit within that same orbit, enabling continuous data capture.”

In 2018, OSK’s previous-generation system was launched on the International Space Station. Its data was analyzed using the NVIDIA Jetson TX2 module.

In addition, OSK uses the next-generation NVIDIA Jetson AGX Orin module for an aerial version of the platform that collects hyperspectral imagery from airplanes. Compared to the previous-generation module, the Jetson AGX Orin — with upgraded memory and speed — can run larger amounts of map data streamed in real time to pilots, Bangalore said.

“We chose the NVIDIA Jetson platform because it offers off-the-shelf products for industrial applications with extended shock, vibration and temperature, and software that has been optimized for the NVIDIA GPU architecture,” Bangalore said.

And as a member of NVIDIA Inception, a free, global program for cutting-edge startups, OSK received technical support to optimize the team’s use of such safety features and SDK acceleration.

Versatile Use Cases

Hyperspectral intelligence offers a multitude of applications. For this reason, the OSK platform is deployed across a broad range of customers, including the U.S. Department of Defense and energy sector.

OSK’s GHOSt constellation of satellites.

Energy Transfer, a major pipeline operator, will use OSK’s GHOSt constellation for asset monitoring.

For the commercial oil and gas industry, OSK technology helps detect gas and hydrocarbon leaks, allowing pipeline operators to quickly halt work and fix issues.

To accelerate the energy transition, the platform can enhance exploration of lithium, cobalt and more, display a hyperspectral index of areas on a map that have signals of the elements, and differentiate between these materials and soil.

Creating sustainable supply chains for battery materials like lithium is key to advancing the global energy transition and scaling electric vehicle adoption, as lithium-ion batteries power the majority of EVs. The EV battery market is projected to reach over $218 billion in 2027, and EV sales are estimated to reach up to 50 million units by 2030.

“Our tech can help discover lithium, and prevent methane or greenhouse gasses from being let out into the atmosphere,” Bangalore said. “It’s a very direct impact, and it’s what the planet needs.”

Read more about innovative energy startups, including MinervaCQ, which is using speech AI to coach contact-center agents in retail energy, and Skycatch, which is building digital twins to make mining and construction sites safer, more efficient and sustainable.

Learn more about NVIDIA’s work in energy and apply to join NVIDIA Inception.

Read More

Biomedical Research Platform Terra Now Available on Microsoft Azure

Biomedical Research Platform Terra Now Available on Microsoft Azure

Terra's logo on a black background with abstract DNA strand pattern

We stand at the threshold of a new era of precision medicine, where health and life sciences data hold the potential to dramatically propel and expand our understanding and treatment of human disease. One of the tools that we believe will help to enable precision medicine is Terra, the secure biomedical research platform co-developed by Broad Institute of MIT and Harvard, Microsoft, and Verily. Today, we are excited to share that Terra is available for preview on Microsoft Azure.

Starting today, any researcher can bring their data, access publicly available datasets, run analyses, and collaborate with others on Terra using Microsoft Azure. Learn more about accessing Terra and exploring its capabilities on the Terra blog.

By joining forces on Terra, the Broad Institute, Microsoft, and Verily are accelerating the next generation of collaborative biomedical research to positively impact health outcomes now and in the future. Terra’s cloud-based platform offers a secure, centralized location for biomedical research, connecting researchers to each other and to the datasets and tools they need to collaborate effectively, advance their work, and achieve scientific breakthroughs. Terra on Azure will also provide valuable support for enterprise organizations across industries. 

Terra on Azure is built to be enterprise-ready and natively supports single sign-on (SSO) with Azure Active Directory. Operating as platform as a service (PaaS), Terra deploys resources into an end-user’s Azure tenant, allowing customers to apply their Enterprise Agreements to their use of Terra and giving them more control over the cloud resources running in their environment as well as the different types of tools and data they can use within their Terra workspace.

Figure 1: Terra brings together components of the Microsoft Genomics and healthcare ecosystems to offer optimized, secure, and collaborative genomic research.
Figure 1: Terra brings together components of the Microsoft Genomics and healthcare ecosystems to offer optimized, secure, and collaborative biomedical research.

At Microsoft, with our focus on standards-driven data interoperability, we are building seamless connections between Terra and Azure Health Data Services to enable multi-modal data analysis—across clinical, genomics, imaging, and other modes—and to accelerate precision medicine research, discovery, development, and delivery. Terra on Azure can connect to other Azure services, allowing customers to draw on Azure innovations that are beneficial to biomedical analysis, such as those in Azure Confidential Computing for data privacy, Azure Synapse for data analytics, Azure Purview for data governance, and Azure ML for machine learning. 

How does the biomedical research community benefit from Terra?

Data and partnerships form the bedrock of biomedical research, but researchers often face significant challenges on the path to effective collaboration. Part of the challenge for data scientists and researchers is accessing large and diverse sample sizes. Although the volume and availability of data is increasing, silos are growing stronger as data becomes more globally distributed. Different regions and organizations have their own unique data access policies, making access to data nearly impossible and collaboration a sometimes daunting challenge.

Terra powers research collaborations within and across organizational boundaries by giving researchers and data stewards new tools and capabilities to help them overcome those challenges and achieve their goals. As a biomedical research platform, Terra provides a foundation for data stewards to manage dataset access and use policies across the research lifecycle, and it enables researchers to access, build, and analyze larger datasets much faster.

Figure 2: Terra is built to support researchers and data custodians.

Through Terra on Azure, researchers can operate in secure environments purpose-built for health and life sciences; retrieve and examine public, controlled-access, and private data; reproduce analyses; and share hypotheses and analysis results. Analyses are performed within a security perimeter that enables data-access and data-use policies and compliance standards to be met.

How does Terra on Azure advance Health Futures’ goals?

Microsoft Health Futures is focused on empowering every person on the planet to live healthier lives and create a healthier future. We are responsible for research, incubations, and moonshots that drive cross-company strategy to support that goal. We believe the future of medicine is data-driven, predictive, and precise. Yet one of the major barriers to scientific discovery is access to data—at scale, longitudinally, and in multiple modalities.

Innovation within the life sciences is a core Health Futures priority, and we partner with leading organizations to advance and build infrastructure for emerging precision health modalities, including genomics, immunomics, and beyond. The Terra collaboration is a key piece of this broader priority and sets the foundation to scale real-world impact through our customers, partners, and the life sciences ecosystem.

It is an honor to partner with the Broad Institute and Verily to help researchers around the world understand and treat our toughest human diseases. Terra is a powerful platform that will enhance biomedical research collaboration and scientific exploration for the betterment of humankind.

The post Biomedical Research Platform Terra Now Available on Microsoft Azure appeared first on Microsoft Research.

Read More