The rise of text and semantic search engines has made ecommerce and retail businesses search easier for its consumers. Search engines powered by unified text and image can provide extra flexibility in search solutions. You can use both text and images as queries. For example, you have a folder of hundreds of family pictures in your laptop. You want to quickly find a picture that was taken when you and your best friend were in front of your old house’s swimming pool. You can use conversational language like “two people stand in front of a swimming pool” as a query to search in a unified text and image search engine. You don’t need to have the right keywords in image titles to perform the query.
Amazon OpenSearch Service now supports the cosine similarity metric for k-NN indexes. Cosine similarity measures the cosine of the angle between two vectors, where a smaller cosine angle denotes a higher similarity between the vectors. With cosine similarity, you can measure the orientation between two vectors, which makes it a good choice for some specific semantic search applications.
Contrastive Language-Image Pre-Training (CLIP) is a neural network trained on a variety of image and text pairs. The CLIP neural network is able to project both images and text into the same latent space, which means that they can be compared using a similarity measure, such as cosine similarity. You can use CLIP to encode your products’ images or description into embeddings, and then store them into an OpenSearch Service k-NN index. Then your customers can query the index to retrieve products that they’re interested in.
You can use CLIP with Amazon SageMaker to perform encoding. Amazon SageMaker Serverless Inference is a purpose-built inference service that makes it easy to deploy and scale machine learning (ML) models. With SageMaker, you can deploy serverless for dev and test, and then move to real-time inference when you go to production. SageMaker serverless helps you save cost by scaling down infrastructure to 0 during idle times. This is perfect for building a POC, where you will have long idle times between development cycles. You can also use Amazon SageMaker batch transform to get inferences from large datasets.
In this post, we demonstrate how to build a search application using CLIP with SageMaker and OpenSearch Service. The code is open source, and it is hosted on GitHub.
Solution overview
OpenSearch Service provides text-matching and embedding k-NN search. We use embedding k-NN search in this solution. You can use both image and text as a query to search items from the inventory. Implementing this unified image and text search application consists of two phases:
- k-NN reference index – In this phase, you pass a set of corpus documents or product images through a CLIP model to encode them into embeddings. Text and image embeddings are numerical representations of the corpus or images, respectively. You save those embeddings into a k-NN index in OpenSearch Service. The concept underpinning k-NN is that similar data points exist in close proximity in the embedding space. As an example, the text “a red flower,” the text “rose,” and an image of red rose are similar, so these text and image embeddings are close to each other in the embedding space.
- k-NN index query – This is the inference phase of the application. In this phase, you submit a text search query or image search query through the deep learning model (CLIP) to encode as embeddings. Then, you use those embeddings to query the reference k-NN index stored in OpenSearch Service. The k-NN index returns similar embeddings from the embedding space. For example, if you pass the text of “a red flower,” it would return the embeddings of a red rose image as a similar item.
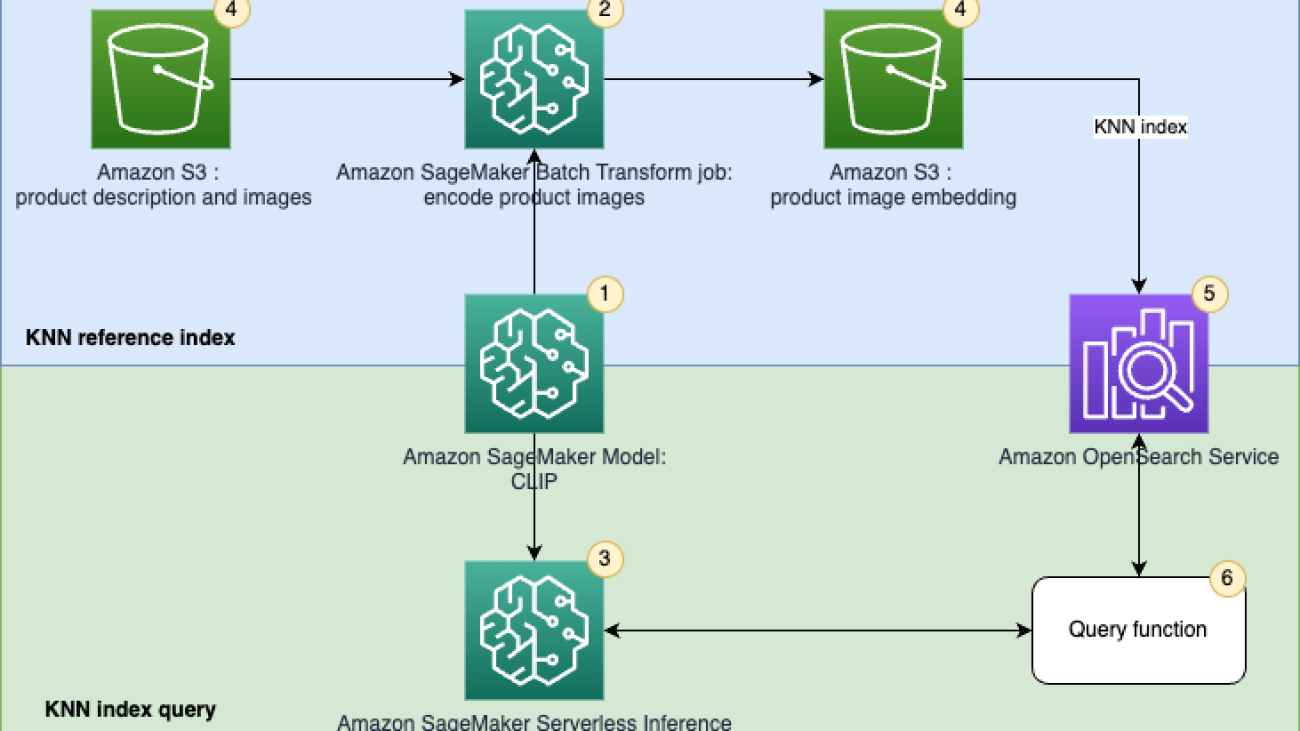
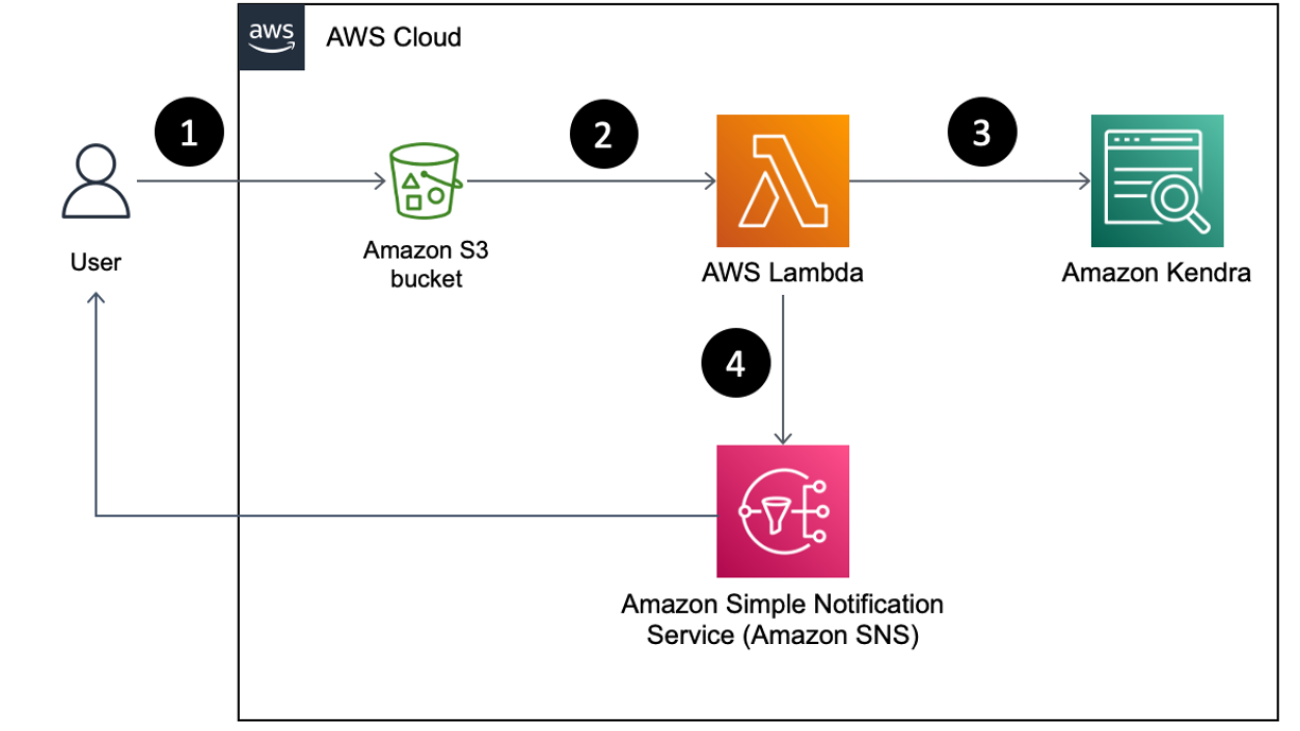
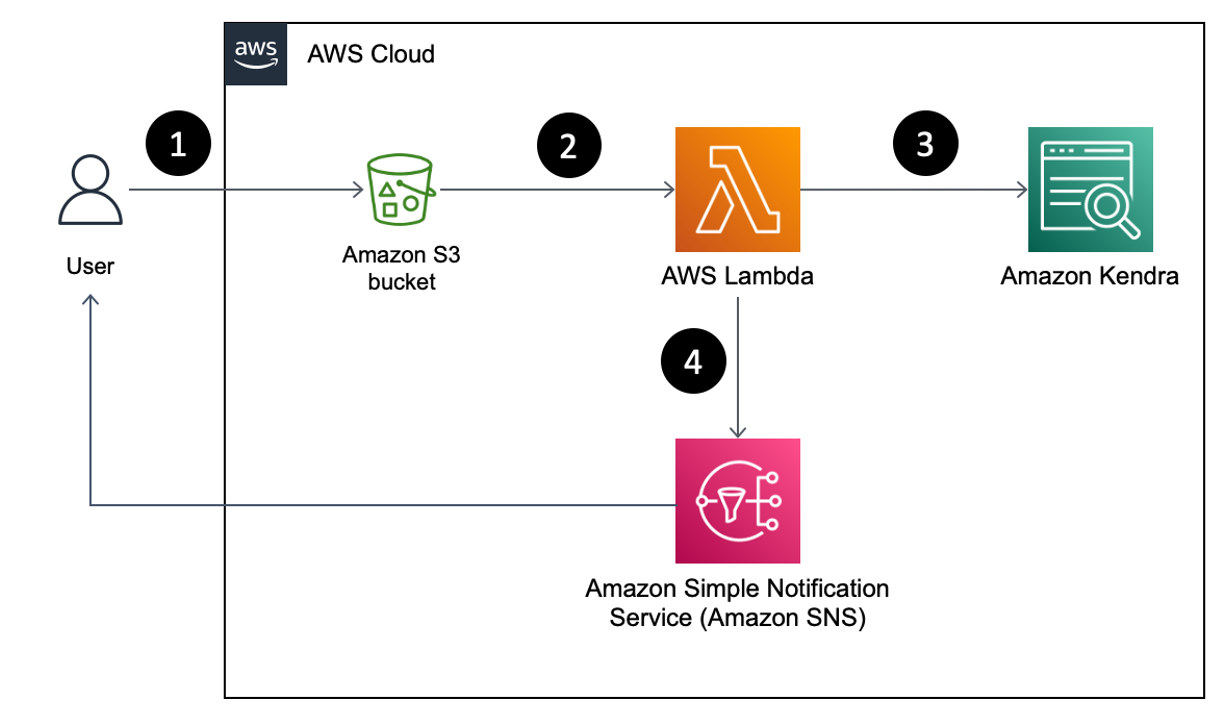
The following figure illustrates the solution architecture.

The workflow steps are as follows:
- Create a SageMaker model from a pretrained CLIP model for batch and real-time inference.
- Generate embeddings of product images using a SageMaker batch transform job.
- Use SageMaker Serverless Inference to encode query image and text into embeddings in real time.
- Use Amazon Simple Storage Service (Amazon S3) to store the raw text (product description) and images (product images) and image embedding generated by the SageMaker batch transform jobs.
- Use OpenSearch Service as the search engine to store embeddings and find similar embeddings.
- Use a query function to orchestrate encoding the query and perform a k-NN search.
We use Amazon SageMaker Studio notebooks (not shown in the diagram) as the integrated development environment (IDE) to develop the solution.
Set up solution resources
To set up the solution, complete the following steps:
- Create a SageMaker domain and a user profile. For instructions, refer to Step 5 of Onboard to Amazon SageMaker Domain Using Quick setup.
- Create an OpenSearch Service domain. For instructions, see Creating and managing Amazon OpenSearch Service domains.
You can also use an AWS CloudFormation template by following the GitHub instructions to create a domain.
You can connect Studio to Amazon S3 from Amazon Virtual Private Cloud (Amazon VPC) using an interface endpoint in your VPC, instead of connecting over the internet. By using an interface VPC endpoint (interface endpoint), the communication between your VPC and Studio is conducted entirely and securely within the AWS network. Your Studio notebook can connect to OpenSearch Service over a private VPC to ensure secure communication.
OpenSearch Service domains offer encryption of data at rest, which is a security feature that helps prevent unauthorized access to your data. Node-to-node encryption provides an additional layer of security on top of the default features of OpenSearch Service. Amazon S3 automatically applies server-side encryption (SSE-S3) for each new object unless you specify a different encryption option.
In the OpenSearch Service domain, you can attach identity-based policies define who can access a service, which actions they can perform, and if applicable, the resources on which they can perform those actions.
Encode images and text pairs into embeddings
This section discusses how to encode images and text into embeddings. This includes preparing data, creating a SageMaker model, and performing batch transform using the model.
Data overview and preparation
You can use a SageMaker Studio notebook with a Python 3 (Data Science) kernel to run the sample code.
For this post, we use the Amazon Berkeley Objects Dataset. The dataset is a collection of 147,702 product listings with multilingual metadata and 398,212 unique catalogue images. We only use the item images and item names in US English. For demo purposes, we use approximately 1,600 products. For more details about this dataset, refer to the README. The dataset is hosted in a public S3 bucket. There are 16 files that include product description and metadata of Amazon products in the format of listings/metadata/listings_<i>.json.gz. We use the first metadata file in this demo.
You use pandas to load the metadata, then select products that have US English titles from the data frame. Pandas is an open-source data analysis and manipulation tool built on top of the Python programming language. You use an attribute called main_image_id to identify an image. See the following code:
There are 1,639 products in the data frame. Next, link the item names with the corresponding item images. images/metadata/images.csv.gz contains image metadata. This file is a gzip-compressed CSV file with the following columns: image_id, height, width, and path. You can read the metadata file and then merge it with item metadata. See the following code:

You can use the SageMaker Studio notebook Python 3 kernel built-in PIL library to view a sample image from the dataset:

Model preparation
Next, create a SageMaker model from a pretrained CLIP model. The first step is to download the pre-trained model weighting file, put it into a model.tar.gz file, and upload it to an S3 bucket. The path of the pretrained model can be found in the CLIP repo. We use a pretrained ResNet-50 (RN50) model in this demo. See the following code:
You then need to provide an inference entry point script for the CLIP model. CLIP is implemented using PyTorch, so you use the SageMaker PyTorch framework. PyTorch is an open-source ML framework that accelerates the path from research prototyping to production deployment. For information about deploying a PyTorch model with SageMaker, refer to Deploy PyTorch Models. The inference code accepts two environment variables: MODEL_NAME and ENCODE_TYPE. This helps us switch between different CLIP model easily. We use ENCODE_TYPE to specify if we want to encode an image or a piece of text. Here, you implement the model_fn, input_fn, predict_fn, and output_fn functions to override the default PyTorch inference handler. See the following code:
The solution requires additional Python packages during model inference, so you can provide a requirements.txt file to allow SageMaker to install additional packages when hosting models:
You use the PyTorchModel class to create an object to contain the information of the model artifacts’ Amazon S3 location and the inference entry point details. You can use the object to create batch transform jobs or deploy the model to an endpoint for online inference. See the following code:
Batch transform to encode item images into embeddings
Next, we use the CLIP model to encode item images into embeddings, and use SageMaker batch transform to run batch inference.
Before creating the job, use the following code snippet to copy item images from the Amazon Berkeley Objects Dataset public S3 bucket to your own bucket. The operation takes less than 10 minutes.
Next, you perform inference on the item images in a batch manner. The SageMaker batch transform job uses the CLIP model to encode all the images stored in the input Amazon S3 location and uploads output embeddings to an output S3 folder. The job takes around 10 minutes.
Load embeddings from Amazon S3 to a variable, so you can ingest the data into OpenSearch Service later:
Create an ML-powered unified search engine
This section discusses how to create a search engine that that uses k-NN search with embeddings. This includes configuring an OpenSearch Service cluster, ingesting item embedding, and performing free text and image search queries.
Set up the OpenSearch Service domain using k-NN settings
Earlier, you created an OpenSearch cluster. Now you’re going to create an index to store the catalog data and embeddings. You can configure the index settings to enable the k-NN functionality using the following configuration:
This example uses the Python Elasticsearch client to communicate with the OpenSearch cluster and create an index to host your data. You can run %pip install elasticsearch in the notebook to install the library. See the following code:
Ingest image embedding data into OpenSearch Service
You now loop through your dataset and ingest items data into the cluster. The data ingestion for this practice should finish within 60 seconds. It also runs a simple query to verify if the data has been ingested into the index successfully. See the following code:
Perform a real-time query
Now that you have a working OpenSearch Service index that contains embeddings of item images as our inventory, let’s look at how you can generate embedding for queries. You need to create two SageMaker endpoints to handle text and image embeddings, respectively.
You also create two functions to use the endpoints to encode images and texts. For the encode_text function, you add this is before an item name to translate an item name to a sentence for item description. memory_size_in_mb is set as 6 GB to serve the underline Transformer and ResNet models. See the following code:
You can firstly plot the picture that will be used.

Let’s look at the results of a simple query. After retrieving results from OpenSearch Service, you get the list of item names and images from dataset:

The first item has a score of 1.0, because the two images are the same. Other items are different types of glasses in the OpenSearch Service index.
You can use text to query the index as well:

You’re now able to get three pictures of water glasses from the index. You can find the images and text within the same latent space with the CLIP encoder. Another example of this is to search for the word “pizza” in the index:

Clean up
With a pay-per-use model, Serverless Inference is a cost-effective option for an infrequent or unpredictable traffic pattern. If you have a strict service-level agreement (SLA), or can’t tolerate cold starts, real-time endpoints are a better choice. Using multi-model or multi-container endpoints provide scalable and cost-effective solutions for deploying large numbers of models. For more information, refer to Amazon SageMaker Pricing.
We suggest deleting the serverless endpoints when they are no longer needed. After finishing this exercise, you can remove the resources with the following steps (you can delete these resources from the AWS Management Console, or using the AWS SDK or SageMaker SDK):
- Delete the endpoint you created.
- Optionally, delete the registered models.
- Optionally, delete the SageMaker execution role.
- Optionally, empty and delete the S3 bucket.
Summary
In this post, we demonstrated how to create a k-NN search application using SageMaker and OpenSearch Service k-NN index features. We used a pre-trained CLIP model from its OpenAI implementation.
The OpenSearch Service ingestion implementation of the post is only used for prototyping. If you want to ingest data from Amazon S3 into OpenSearch Service at scale, you can launch an Amazon SageMaker Processing job with the appropriate instance type and instance count. For another scalable embedding ingestion solution, refer to Novartis AG uses Amazon OpenSearch Service K-Nearest Neighbor (KNN) and Amazon SageMaker to power search and recommendation (Part 3/4).
CLIP provides zero-shot capabilities, which makes it possible to adopt a pre-trained model directly without using transfer learning to fine-tune a model. This simplifies the application of the CLIP model. If you have pairs of product images and descriptive text, you can fine-tune the model with your own data using transfer learning to further improve the model performance. For more information, see Learning Transferable Visual Models From Natural Language Supervision and the CLIP GitHub repository.
About the Authors
 Kevin Du is a Senior Data Lab Architect at AWS, dedicated to assisting customers in expediting the development of their Machine Learning (ML) products and MLOps platforms. With more than a decade of experience building ML-enabled products for both startups and enterprises, his focus is on helping customers streamline the productionalization of their ML solutions. In his free time, Kevin enjoys cooking and watching basketball.
 Ananya Roy is a Senior Data Lab architect specialised in AI and machine learning based out of Sydney Australia . She has been working with diverse range of customers to provide architectural guidance and help them to deliver effective AI/ML solution via data lab engagement. Prior to AWS , she was working as senior data scientist and dealt with large-scale ML models across different industries like Telco, banks and fintech’s. Her experience in AI/ML has allowed her to deliver effective solutions for complex business problems, and she is passionate about leveraging cutting-edge technologies to help teams achieve their goals.


 Maran Chandrasekaran is a Senior Solutions Architect at Amazon Web Services, working with our enterprise customers. Outside of work, he loves to travel.
 Kartik Mittal is a Software Engineer at Amazon Web Services, working on Amazon Kendra, an enterprise search engine. Outside of work, he enjoys hiking and loves to travel.
 Surya Ram is a Software Engineer at Amazon Web Services, working on Amazon Kendra. Outside of work, he enjoys chess, basketball and cricket.


 Aleksandr Patrushev is AI/ML Specialist Solutions Architect at AWS, based in Luxembourg. He is passionate about the cloud and machine learning, and the way they could change the world. Outside work, he enjoys hiking, sports, and spending time with his family.
 Chong En Lim is a Solutions Architect at AWS. He is always exploring ways to help customers innovate and improve their workflows. In his free time, he loves watching anime and listening to music.
 Egor Miasnikov is a Solutions Architect at AWS based in Germany. He is passionate about the digital transformation of our lives, businesses, and the world itself, as well as the role of artificial intelligence in this transformation. Outside of work, he enjoys reading adventure books, hiking, and spending time with his family.