Exploring summarization options for Healthcare with Amazon SageMaker

Exploring summarization options for Healthcare with Amazon SageMaker

In today’s rapidly evolving healthcare landscape, doctors are faced with vast amounts of clinical data from various sources, such as caregiver notes, electronic health records, and imaging reports. This wealth of information, while essential for patient care, can also be overwhelming and time-consuming for medical professionals to sift through and analyze. Efficiently summarizing and extracting insights from this data is crucial for better patient care and decision-making. Summarized patient information can be useful to a number of downstream processes like data aggregation, effectively coding patients, or grouping patients with similar diagnoses for review.

Artificial intelligence (AI) and machine learning (ML) models have shown great promise in addressing these challenges. Models can be trained to analyze and interpret large volumes of text data, effectively condensing information into concise summaries. By automating the summarization process, doctors can quickly gain access to relevant information, allowing them to focus on patient care and make more informed decisions. See the following case study to learn more about a real-world use case.

Amazon SageMaker, a fully managed ML service, provides an ideal platform for hosting and implementing various AI/ML-based summarization models and approaches. In this post, we explore different options for implementing summarization techniques on SageMaker, including using Amazon SageMaker JumpStart foundation models, fine-tuning pre-trained models from Hugging Face, and building custom summarization models. We also discuss the pros and cons of each approach, enabling healthcare professionals to choose the most suitable solution for generating concise and accurate summaries of complex clinical data.

Two important terms to know before we begin: pre-trained and fine-tuning. A pre-trained or foundation model is one that has been built and trained on a large corpus of data, typically for general language knowledge. Fine-tuning is the process by which a pre-trained model is given another more domain-specific dataset in order to enhance its performance on a specific task. In a healthcare setting, this would mean giving the model some data including phrases and terminology pertaining specifically to patient care.

Build custom summarization models on SageMaker

Though the most high-effort approach, some organizations might prefer to build custom summarization models on SageMaker from scratch. This approach requires more in-depth knowledge of AI/ML models and may involve creating a model architecture from scratch or adapting existing models to suit specific needs. Building custom models can offer greater flexibility and control over the summarization process, but also requires more time and resources compared to approaches that start from pre-trained models. It’s essential to weigh the benefits and drawbacks of this option carefully before proceeding, because it may not be suitable for all use cases.

SageMaker JumpStart foundation models

A great option for implementing summarization on SageMaker is using JumpStart foundation models. These models, developed by leading AI research organizations, offer a range of pre-trained language models optimized for various tasks, including text summarization. SageMaker JumpStart provides two types of foundation models: proprietary models and open-source models. SageMaker JumpStart also provides HIPAA eligibility, making it useful for healthcare workloads. It is ultimately up to the customer to ensure compliance, so be sure to take the appropriate steps. See Architecting for HIPAA Security and Compliance on Amazon Web Services for more details.

Proprietary foundation models

Proprietary models, such as Jurassic models from AI21 and the Cohere Generate model from Cohere, can be discovered through SageMaker JumpStart on the AWS Management Console and are currently under preview. Utilizing proprietary models for summarization is ideal when you don’t need to fine-tune your model on custom data. This offers an easy-to-use, out-of-the-box solution that can meet your summarization requirements with minimal configuration. By using the capabilities of these pre-trained models, you can save time and resources that would otherwise be spent on training and fine-tuning a custom model. Furthermore, proprietary models typically come with user-friendly APIs and SDKs, streamlining the integration process with your existing systems and applications. If your summarization needs can be met by pre-trained proprietary models without requiring specific customization or fine-tuning, they offer a convenient, cost-effective, and efficient solution for your text summarization tasks. Because these models are not trained specifically for healthcare use cases, quality can’t be guaranteed for medical language out of the box without fine-tuning.

Jurassic-2 Grande Instruct is a large language model (LLM) by AI21 Labs, optimized for natural language instructions and applicable to various language tasks. It offers an easy-to-use API and Python SDK, balancing quality and affordability. Popular uses include generating marketing copy, powering chatbots, and text summarization.

On the SageMaker console, navigate to SageMaker JumpStart, find the AI21 Jurassic-2 Grande Instruct model, and choose Try out model.

If you want to deploy the model to a SageMaker endpoint that you manage, you can follow the steps in this sample notebook, which shows you how to deploy Jurassic-2 Large using SageMaker.

Open-source foundation models

Open-source models include FLAN T5, Bloom, and GPT-2 models that can be discovered through SageMaker JumpStart in the Amazon SageMaker Studio UI, SageMaker JumpStart on the SageMaker console, and SageMaker JumpStart APIs. These models can be fine-tuned and deployed to endpoints under your AWS account, giving you full ownership of model weights and script codes.

Flan-T5 XL is a powerful and versatile model designed for a wide range of language tasks. By fine-tuning the model with your domain-specific data, you can optimize its performance for your particular use case, such as text summarization or any other NLP task. For details on how to fine-tune Flan-T5 XL using the SageMaker Studio UI, refer to Instruction fine-tuning for FLAN T5 XL with Amazon SageMaker Jumpstart.

Fine-tuning pre-trained models with Hugging Face on SageMaker

One of the most popular options for implementing summarization on SageMaker is fine-tuning pre-trained models using the Hugging Face Transformers library. Hugging Face provides a wide range of pre-trained transformer models specifically designed for various natural language processing (NLP) tasks, including text summarization. With the Hugging Face Transformers library, you can easily fine-tune these pre-trained models on your domain-specific data using SageMaker. This approach has several advantages, such as faster training times, better performance on specific domains, and easier model packaging and deployment using built-in SageMaker tools and services. If you’re unable to find a suitable model in SageMaker JumpStart, you can choose any model offered by Hugging Face and fine-tune it using SageMaker.

To start working with a model to learn about the capabilities of ML, all you need to do is open SageMaker Studio, find a pre-trained model you want to use in the Hugging Face Model Hub, and choose SageMaker as your deployment method. Hugging Face will give you the code to copy, paste, and run in your notebook. It’s as easy as that! No ML engineering experience required.

The Hugging Face Transformers library enables builders to operate on the pre-trained models and do advanced tasks like fine-tuning, which we explore in the following sections.

Provision resources

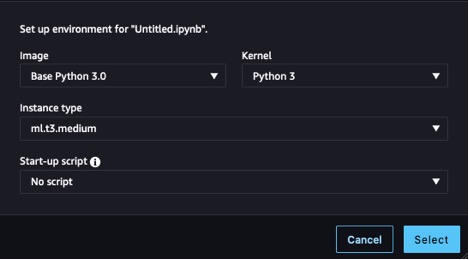
Before we can begin, we need to provision a notebook. For instructions, refer to Steps 1 and 2 in Build and Train a Machine Learning Model Locally. For this example, we used the settings shown in the following screenshot.

We also need to create an Amazon Simple Storage Service (Amazon S3) bucket to store the training data and training artifacts. For instructions, refer to Creating a bucket.

Prepare the dataset

To fine-tune our model to have better domain knowledge, we need to get data suitable for the task. When training for an enterprise use case, you’ll need to go through a number of data engineering tasks to prepare your own data to be ready for training. Those tasks are outside the scope of this post. For this example, we’ve generated some synthetic data to emulate nursing notes and stored it in Amazon S3. Storing our data in Amazon S3 enables us to architect our workloads for HIPAA compliance. We start by getting those notes and loading them on the instance where our notebook is running:

from datasets import load_dataset
dataset = load_dataset("csv", data_files={
    "train": "s3://" + bucket_name + train_data_path,
    "validation": "s3://" + bucket_name + test_data_path
})

The notes are composed of a column containing the full entry, note, and a column containing a shortened version exemplifying what our desired output should be, summary. The purpose of using this dataset is to improve our model’s biological and medical vocabulary so that it’s more attuned to summarizing in a healthcare context, called domain fine-tuning, and show our model how to structure its summarized output. In some summarization cases, we may want to create an abstract out of an article or a one-line synopsis of a review, but in this case, we’re trying to get our model to output an abbreviated version of the symptoms and actions taken for a patient so far.

Load the model

The model we use as our foundation is a version of Google’s Pegasus, made available in the Hugging Face Hub, called pegasus-xsum. It’s already pre-trained for summarization, so our fine-tuning process can focus on extending its domain knowledge. Modifying the task our model runs is a different type of fine-tuning not covered in this post. The Transformer library supplies us with a class to load the model definition from our model_checkpoint: google/pegasus-xsum. This will load the model from the hub and instantiate it in our notebook so we can use it later on. Because pegasus-xsum is a sequence-to-sequence model, we want to use the Seq2Seq type of the AutoModel class:

from transformers import AutoModelForSeq2SeqLM
model = AutoModelForSeq2SeqLM.from_pretrained(model_checkpoint)

Now that we have our model, it’s time to put our attention to the other components that will enable us to run our training loop.

Create a tokenizer

The first of these components is the tokenizer. Tokenization is the process by which words from the input data are transformed into numerical representations that our model can understand. Again, the Transformer library provides a class for us to load a tokenizer definition from the same checkpoint we used to instantiate the model:

from transformers import AutoTokenizer
tokenizer = AutoTokenizer.from_pretrained(model_checkpoint)

With this tokenizer object, we can create a preprocessing function and map it onto our dataset to give us tokens ready to be fed into the model. Finally, we format the tokenized output and remove the columns containing our original text, because the model will not be able to interpret them. Now we’re left with a tokenized input ready to be fed into the model. See the following code:

tokenized_datasets = dataset.map(preprocess_function, batched=True)

tokenized_datasets.set_format("torch")

tokenized_datasets = tokenized_datasets.remove_columns(
    dataset["train"].column_names
)

Create a data collator and optimizer

With our data tokenized and our model instantiated, we’re almost ready to run a training loop. The next components we want to create are the data collator and the optimizer. The data collator is another class provided by Hugging Face through the Transformers library, which we use to create batches of our tokenized data for training. We can easily build this using the tokenizer and model objects we already have just by finding the corresponding class type we’ve used previously for our model (Seq2Seq) for the collator class. The optimizer’s function is to maintain the training state and update the parameters based on our training loss as we work through the loop. To create an optimizer, we can import the optim package from the torch module, where a number of optimization algorithms are available. Some common ones you may have encountered before are Stochastic Gradient Descent and Adam, the latter of the which is applied in our example. Adam’s constructor takes in the model parameters and the parameterized learning rate for the given training run. See the following code:

from transformers import DataCollatorForSeq2Seq
from torch.optim import Adam

data_collator = DataCollatorForSeq2Seq(tokenizer, model=model)
optimizer = Adam(model.parameters(), lr=learning_rate)

Build the accelerator and scheduler

The last steps before we can begin training are to build the accelerator and the learning rate scheduler. The accelerator comes from a different library (we’ve been primarily using Transformers) produced by Hugging Face, aptly named Accelerate, and will abstract away logic required to manage devices during training (using multiple GPUs for example). For the final component, we revisit the ever-useful Transformers library to implement our learning rate scheduler. By specifying the scheduler type, the total number of training steps in our loop, and the previously created optimizer, the get_scheduler function returns an object that enables us to adjust our initial learning rate throughout the training process:

from accelerate import Accelerator
from transformers import get_scheduler

accelerator = Accelerator()
model, optimizer = accelerator.prepare(
    model, optimizer
)

lr_scheduler = get_scheduler(
    "linear",
    optimizer=optimizer,
    num_warmup_steps=0,
    num_training_steps=num_training_steps,
)

Configure a training job

We’re now fully set up for training! Let’s set up a training job, starting by instantiating the training_args using the Transformers library and choosing parameter values. We can pass these, along with our other prepared components and dataset, directly to the trainer and start training, as shown in the following code. Depending on the size of your dataset and chosen parameters, this may take a significant amount of time.

from transformers import Seq2SeqTrainer
from transformers import Seq2SeqTrainingArguments

training_args = Seq2SeqTrainingArguments(
    output_dir="output/",
    save_total_limit=1,
    num_train_epochs=num_train_epochs,
    per_device_train_batch_size=batch_size,
    per_device_eval_batch_size=batch_size,
    evaluation_strategy="epoch",
    logging_dir="output/",
    load_best_model_at_end=True,
    disable_tqdm=True,
    logging_first_step=True,
    logging_steps=1,
    save_strategy="epoch",
    predict_with_generate=True
)

trainer = Seq2SeqTrainer(
    model=model,
    tokenizer=tokenizer,
    args=training_args,
    train_dataset=tokenized_datasets["train"],
    eval_dataset=tokenized_datasets["validation"],
    data_collator=data_collator,
    optimizers=(optimizer, lr_scheduler)
)
    
trainer.train()

To operationalize this code, we can package it as an entry point file and call it through a SageMaker training job. This allows us to separate the logic we just built away from the training call and allows SageMaker to run training on a separate instance.

Package the model for inference

After training has been run, the model object is ready to be used for inference. As a best practice, let’s save our work for future use. We need to create our model artifacts, zip them together, and upload our tarball to Amazon S3 for storage. To prepare our model for zipping, we need to unwrap the now fine-tuned model, then save the model binary and associated config files. We also need to save our tokenizer to the same directory that we saved our model artifacts to so it is available when we use the model for inference. Our model_dir folder should now look something like the following code:

config.json		pytorch_model.bin	tokenizer_config.json
generation_config.json	special_tokens_map.json		tokenizer.json

All that’s left is to run a tar command to zip up our directory and upload the tar.gz file to Amazon S3:

unwrapped_model = accelerator.unwrap_model(trainer.model)

unwrapped_model.save_pretrained('model_dir', save_function=accelerator.save)

tokenizer.save_pretrained('model_dir')

!cd model_dir/ && tar -czvf model.tar.gz *
!mv model_dir/model.tar.gz ./

with open("model.tar.gz", "rb") as f:
    s3.upload_fileobj(f, bucket_name, artifact_path + "model/model.tar.gz")

Our newly fine-tuned model is now ready and available to be used for inference.

Perform inference

To use this model artifact for inference, open a new file and use the following code, modifying the model_data parameter to fit your artifact save location in Amazon S3. The HuggingFaceModel constructor will rebuild our model from the checkpoint we saved to model.tar.gz, which we can then deploy for inference using the deploy method. Deploying the endpoint will take a few minutes.

from sagemaker.huggingface import HuggingFaceModel
from sagemaker import get_execution_role

role = get_execution_role()

huggingface_model = HuggingFaceModel(
   model_data=”s3://{bucket_name}/{artifact_path}/model/model.tar.gz”,
   role=role,
   transformers_version=”4.26”,
   pytorch_version=”1.13”,
   py_version=”py39”
)

predictor = huggingface_model.deploy(
   initial_instance_count=1,
   instance_type=”ml.m5.xlarge”
)

After the endpoint is deployed, we can use the predictor we’ve created to test it. Pass the predict method a data payload and run the cell, and you’ll get the response from your fine-tuned model:

data = {
    "inputs": "Text to summarize”
}
predictor.predict(data)

Results

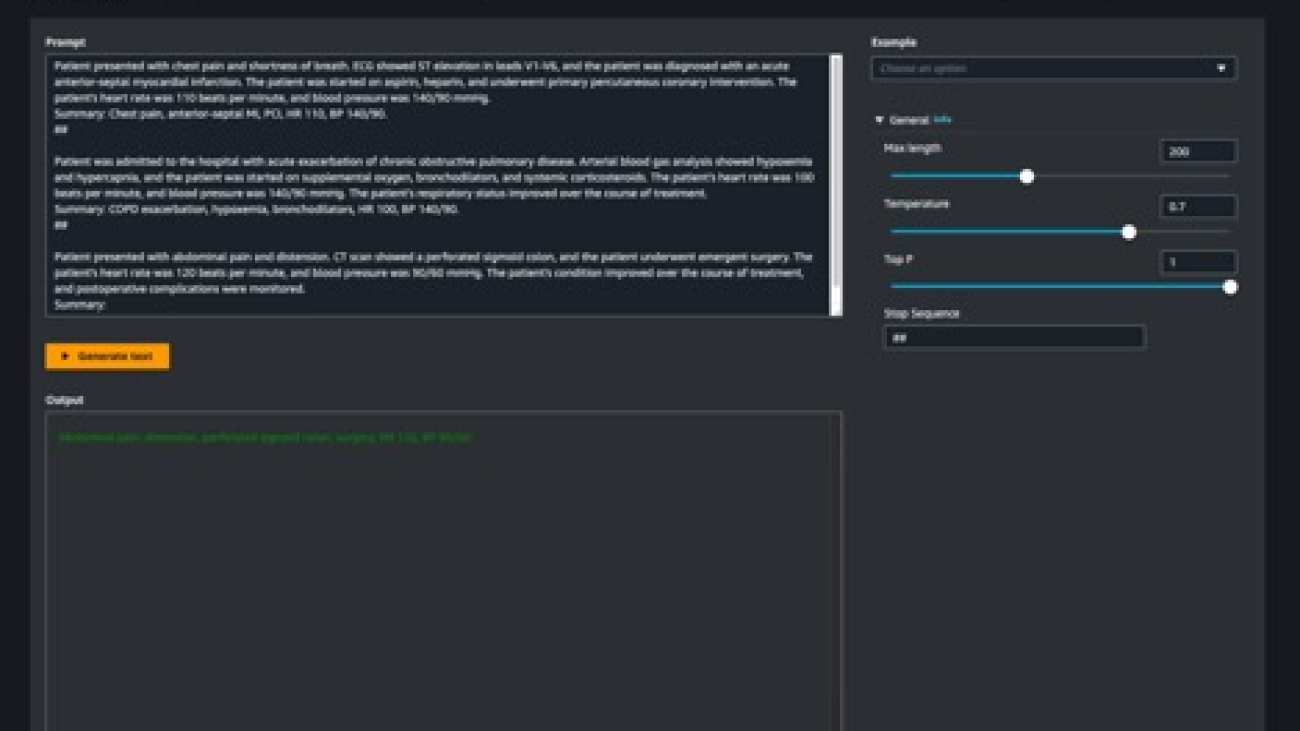
To see the benefit of fine-tuning a model, let’s do a quick test. The following table includes a prompt and the results of passing that prompt to the model before and after fine-tuning.

Prompt Response with No Fine-Tuning Response with Fine-Tuning
Summarize the symptoms that the patient is experiencing. Patient is a 45 year old male with complaints of substernal chest pain radiating to the left arm. Pain is sudden onset while he was doing yard work, associated with mild shortness of breath and diaphoresis. On arrival patient’s heart rate was 120, respiratory rate 24, blood pressure 170/95. 12 lead electrocardiogram done on arrival to the emergency department and three sublingual nitroglycerin administered without relief of chest pain. Electrocardiogram shows ST elevation in anterior leads demonstrating acute anterior myocardial infarction. We have contacted cardiac catheterization lab and prepping for cardiac catheterization by cardiologist. We present a case of acute myocardial infarction. Chest pain, anterior MI, PCI.

As you can see, our fine-tuned model uses health terminology differently, and we’ve been able to change the structure of the response to fit our purposes. Note that results are dependent on your dataset and the design choices made during training. Your version of the model could offer very different results.

Clean up

When you’re finished with your SageMaker notebook, be sure to shut it down to avoid costs from long-running resources. Note that shutting down the instance will cause you to lose any data stored in the instance’s ephemeral memory, so you should save all your work to persistent storage before cleanup. You will also need to go to the Endpoints page on the SageMaker console and delete any endpoints deployed for inference. To remove all artifacts, you also need to go to the Amazon S3 console to delete files uploaded to your bucket.

Conclusion

In this post, we explored various options for implementing text summarization techniques on SageMaker to help healthcare professionals efficiently process and extract insights from vast amounts of clinical data. We discussed using SageMaker Jumpstart foundation models, fine-tuning pre-trained models from Hugging Face, and building custom summarization models. Each approach has its own advantages and drawbacks, catering to different needs and requirements.

Building custom summarization models on SageMaker allows for lots of flexibility and control but requires more time and resources than using pre-trained models. SageMaker Jumpstart foundation models provide an easy-to-use and cost-effective solution for organizations that don’t require specific customization or fine-tuning, as well as some options for simplified fine-tuning. Fine-tuning pre-trained models from Hugging Face offers faster training times, better domain-specific performance, and seamless integration with SageMaker tools and services across a broad catalog of models, but it requires some implementation effort. At the time of writing this post, Amazon has announced another option, Amazon Bedrock, which will offer summarization capabilities in an even more managed environment.

By understanding the pros and cons of each approach, healthcare professionals and organizations can make informed decisions on the most suitable solution for generating concise and accurate summaries of complex clinical data. Ultimately, using AI/ML-based summarization models on SageMaker can significantly enhance patient care and decision-making by enabling medical professionals to quickly access relevant information and focus on providing quality care.

Resources

For the full script discussed in this post and some sample data, refer to the GitHub repo. For more information on how to run ML workloads on AWS, see the following resources:


About the authors

Cody Collins is a New York based Solutions Architect at Amazon Web Services. He works with ISV customers to build industry leading solutions in the cloud. He has successfully delivered complex projects for diverse industries, optimizing efficiency and scalability. In his spare time, he enjoys reading, traveling, and training jiu jitsu.

Ameer Hakme is an AWS Solutions Architect residing in Pennsylvania. His professional focus involves collaborating with Independent software vendors throughout the Northeast, guiding them in designing and constructing scalable, state-of-the-art platforms on the AWS Cloud.

Read More

Unlocking creativity: How generative AI and Amazon SageMaker help businesses produce ad creatives for marketing campaigns with AWS

Unlocking creativity: How generative AI and Amazon SageMaker help businesses produce ad creatives for marketing campaigns with AWS

Advertising agencies can use generative AI and text-to-image foundation models to create innovative ad creatives and content. In this post, we demonstrate how you can generate new images from existing base images using Amazon SageMaker, a fully managed service to build, train, and deploy ML models for at scale. With this solution, businesses large and small can develop new ad creatives much faster and at lower cost than ever before. This allows you to develop new custom ad creative content for your business at low cost and at a rapid pace.

Solution overview

Consider the following scenario: a global automotive company needs new marketing material generated for their new car design being released and hires a creative agency that is known for providing advertising solutions for clients with strong brand equity. The car manufacturer is looking for low-cost ad creatives that display the model in diverse locations, colors, views, and perspectives while maintaining the brand identity of the car manufacturer. With the power of state-of-the-art techniques, the creative agency can support their customer by using generative AI models within their secure AWS environment.

The solution is developed with Generative AI and Text-to-Image models in Amazon SageMaker. SageMaker is a fully managed machine learning (ML) service that that makes it straightforward to build, train, and deploy ML models for any use case with fully managed infrastructure, tools, and workflows. Stable Diffusion is a text-to-image foundation model from Stability AI that powers the image generation process. Diffusers are pre-trained models that use Stable Diffusion to use an existing image to generate new images based on a prompt. Combining Stable Diffusion with Diffusers like ControlNet can take existing brand-specific content and develop stunning versions of it. Key benefits of developing the solution within AWS along with Amazon SageMaker are:

  • Privacy – Storing the data in Amazon Simple Storage Service (Amazon S3) and using SageMaker to host models allows you to adhere to security best practices within your AWS account while not exposing assets publicly.
  • Scalability – The Stable Diffusion model, when deployed as a SageMaker endpoint, brings scalability by allowing you to configure instance sizes and number of instances. SageMaker endpoints also have auto scaling features and are highly available.
  • Flexibility – When creating and deploying endpoints, SageMaker provides the flexibility to choose GPU instance types. Also, instances behind SageMaker endpoints can be changed with minimum effort as business needs change. AWS has also developed hardware and chips using AWS Inferentia2 for high performance at the lowest cost for generative AI inference.
  • Rapid innovation – Generative AI is a rapidly evolving domain with new approaches, and models are being constantly developed and released. Amazon SageMaker JumpStart regularly onboards new models along with foundation models.
  • End-to-end integration – AWS allows you to integrate the creative process with any AWS service and develop an end-to-end process using fine-grained access control through AWS Identity and Access Management (IAM), notification through Amazon Simple Notification Service (Amazon SNS), and postprocessing with the event-driven compute service AWS Lambda.
  • Distribution – When the new creatives are generated, AWS allows distributing the content across global channels in multiple Regions using Amazon CloudFront.

For this post, we use the following GitHub sample, which uses Amazon SageMaker Studio with foundation models (Stable Diffusion), prompts, computer vision techniques, and a SageMaker endpoint to generate new images from existing images. The following diagram illustrates the solution architecture.

The workflow contains the following steps:

  1. We store the existing content (images, brand styles, and so on) securely in S3 buckets.
  2. Within SageMaker Studio notebooks, the original image data is transformed to images using computer vision techniques, which preserves the shape of the product (the car model), removes color and background, and generates monotone intermediate images.
  3. The intermediate image acts as a control image for Stable Diffusion with ControlNet.
  4. We deploy a SageMaker endpoint with the Stable Diffusion text-to-image foundation model from SageMaker Jumpstart and ControlNet on a preferred GPU-based instance size.
  5. Prompts describing new backgrounds and car colors along with the intermediate monotone image are used to invoke the SageMaker endpoint, yielding new images.
  6. New images are stored in S3 buckets as they’re generated.

Deploy ControlNet on SageMaker endpoints

To deploy the model to SageMaker endpoints, we must create a compressed file for each individual technique model artifact along with the Stable Diffusion weights, inference script, and NVIDIA Triton config file.

In the following code, we download the model weights for the different ControlNet techniques and Stable Diffusion 1.5 to the local directory as tar.gz files:

if ids =="runwayml/stable-diffusion-v1-5":
    snapshot_download(ids, local_dir=str(model_tar_dir), local_dir_use_symlinks=False,ignore_patterns=unwanted_files_sd)

elif ids =="lllyasviel/sd-controlnet-canny":
    snapshot_download(ids, local_dir=str(model_tar_dir), local_dir_use_symlinks=False)  

To create the model pipeline, we define an inference.py script that SageMaker real-time endpoints will use to load and host the Stable Diffusion and ControlNet tar.gz files. The following is a snippet from inference.py that shows how the models are loaded and how the Canny technique is called:

controlnet = ControlNetModel.from_pretrained(
        f"{model_dir}/{control_net}",
        torch_dtype=torch.float16 if torch.cuda.is_available() else torch.float32)

pipe = StableDiffusionControlNetPipeline.from_pretrained(
        f"{model_dir}/sd-v1-5",
        controlnet=controlnet,
        torch_dtype=torch.float16 if torch.cuda.is_available() else torch.float32)

# Define technique function for Canny 
image = cv2.Canny(image, low_threshold, high_threshold)

We deploy the SageMaker endpoint with the required instance size (GPU type) from the model URI:

huggingface_model = HuggingFaceModel(
        model_data=model_s3_uri,  # path to your trained sagemaker model
        role=role, # iam role with permissions to create an Endpoint  
        py_version="py39", # python version of the DLC  
        image_uri=image_uri,
)

# Deploy model as SageMaker Endpoint
predictor = huggingface_model.deploy(
        initial_instance_count=1,
        instance_type="ml.p3.2xlarge",
)

Generate new images

Now that the endpoint is deployed on SageMaker endpoints, we can pass in our prompts and the original image we want to use as our baseline.

To define the prompt, we create a positive prompt, p_p, for what we’re looking for in the new image, and the negative prompt, n_p, for what is to be avoided:

p_p="metal orange colored car, complete car, colour photo, outdoors in a pleasant landscape, realistic, high quality"

n_p="cropped, out of frame, worst quality, low quality, jpeg artifacts, ugly, blurry, bad anatomy, bad proportions"

Finally, we invoke our endpoint with the prompt and source image to generate our new image:

request={"prompt":p_p, 
        "negative_prompt":n_p, 
        "image_uri":'s3://<bucker>/sportscar.jpeg', #existing content
        "scale": 0.5,
        "steps":20, 
        "low_threshold":100, 
        "high_threshold":200, 
        "seed": 123, 
        "output":"output"}
response=predictor.predict(request)

Different ControlNet techniques

In this section, we compare the different ControlNet techniques and their effect on the resulting image. We use the following original image to generate new content using Stable Diffusion with Control-net in Amazon SageMaker.

The following table shows how the technique output dictates what, from the original image, to focus on.

Technique Name Technique Type Technique Output Prompt Stable Diffusion with ControlNet
canny A monochrome image with white edges on a black background. metal orange colored car, complete car, colour photo, outdoors in a pleasant landscape, realistic, high quality
depth A grayscale image with black representing deep areas and white representing shallow areas. metal red colored car, complete car, colour photo, outdoors in pleasant landscape on beach, realistic, high quality
hed A monochrome image with white soft edges on a black background. metal white colored car, complete car, colour photo, in a city, at night, realistic, high quality
scribble A hand-drawn monochrome image with white outlines on a black background. metal blue colored car, similar to original car, complete car, colour photo, outdoors, breath-taking view, realistic, high quality, different viewpoint

Clean up

After you generate new ad creatives with generative AI, clean up any resources that won’t be used. Delete the data in Amazon S3 and stop any SageMaker Studio notebook instances to not incur any further charges. If you used SageMaker JumpStart to deploy Stable Diffusion as a SageMaker real-time endpoint, delete the endpoint either through the SageMaker console or SageMaker Studio.

Conclusion

In this post, we used foundation models on SageMaker to create new content images from existing images stored in Amazon S3. With these techniques, marketing, advertisement, and other creative agencies can use generative AI tools to augment their ad creatives process. To dive deeper into the solution and code shown in this demo, check out the GitHub repo.

Also, refer to Amazon Bedrock for use cases on generative AI, foundation models, and text-to-image models.


About the Authors

Sovik Kumar Nath is an AI/ML solution architect with AWS. He has extensive experience designing end-to-end machine learning and business analytics solutions in finance, operations, marketing, healthcare, supply chain management, and IoT. Sovik has published articles and holds a patent in ML model monitoring. He has double masters degrees from the University of South Florida, University of Fribourg, Switzerland, and a bachelors degree from the Indian Institute of Technology, Kharagpur. Outside of work, Sovik enjoys traveling, taking ferry rides, and watching movies.

Sandeep Verma is a Sr. Prototyping Architect with AWS. He enjoys diving deep into customer challenges and building prototypes for customers to accelerate innovation. He has a background in AI/ML, founder of New Knowledge, and generally passionate about tech. In his free time, he loves traveling and skiing with his family.

Uchenna Egbe is an Associate Solutions Architect at AWS. He spends his free time researching about herbs, teas, superfoods, and how to incorporate them into his daily diet.

Mani Khanuja is an Artificial Intelligence and Machine Learning Specialist SA at Amazon Web Services (AWS). She helps customers using machine learning to solve their business challenges using the AWS. She spends most of her time diving deep and teaching customers on AI/ML projects related to computer vision, natural language processing, forecasting, ML at the edge, and more. She is passionate about ML at edge, therefore, she has created her own lab with self-driving kit and prototype manufacturing production line, where she spend lot of her free time.

Read More

Cuddly 3D Creature Comes to Life in Father-Son Collaboration This Week ‘In the NVIDIA Studio’

Cuddly 3D Creature Comes to Life in Father-Son Collaboration This Week ‘In the NVIDIA Studio’

Editor’s note: This post is part of our weekly In the NVIDIA Studio series, which celebrates featured artists, offers creative tips and tricks, and demonstrates how NVIDIA Studio technology improves creative workflows.

Principal NVIDIA artist and 3D expert Michael Johnson creates highly detailed art that’s both technically impressive and emotionally resonant. It’s evident in his latest piece, Father-Son Collaboration, which draws on inspiration from the vivid imagination of his son and is highlighted this week In the NVIDIA Studio.

“I love how art can bring joy and great memories to others — great work makes me feel special to be a human and an artist,” said Johnson. “Art can flip people’s perspectives and make them feel something completely different.”

Young minds inspire generations of artists.

“The story behind this piece is that I simply wanted to inspire my son and teach him how things can be perceived — how people can be inspired by others’ art,” said Johnson, who could tell that his son — a doodler himself — often considered his own artwork not good enough.

“I wanted to show him what I saw in his art and how it inspired me,” Johnson said.

Through this project, Johnson also aimed to demonstrate the NVIDIA Studio-powered workflows of art studios and concept artists across the world.

This creature is living its best life.

NVIDIA RTX GPU technology plays a pivotal role in accelerating Johnson’s creativity. “As an artist, I care about quick feedback and stability,” he said. “My NVIDIA A6000 RTX graphics card speeds up the rendering process so I can quickly iterate.”

For Father-Son Collaboration, Johnson first opened Autodesk Maya to model the creature’s basic 3D shapes. His GPU-accelerated viewport enabled fast, interactive 3D modeling.


Next, he imported models into ZBrush for further sculpting, freestyling and details. “After I had my final sculpt down, I took the model into Rizom-Lab IV software to lay out the UVs,” Johnson said. UV mapping is the process of projecting a 3D model’s surface to a 2D image for texture mapping. It makes the model easier to texture and shade later in the creative workflow.


Johnson then used Adobe Substance 3D Painter to apply standard and custom textures and shaders on the character.

“Substance 3D Painter is really great because it displays the final look of the textures without bringing it into an external renderer,” said Johnson.

His GPU unlocked RTX-accelerated light and ambient occlusion baking, optimizing assets in mere seconds.


With the textures complete, Johnson imported his models back into Autodesk Maya for hair, grooming, lighting and rendering. For the hair and fur, the artist used XGen, Autodesk Maya’s built-in instancing tool. Autodesk Maya also offers third-party support of GPU-accelerated renderers such as Chaos V-Ray, OTOY OctaneRender and Maxon Redshift.

“Redshift is great — and having a great GPU makes renders really quick,” Johnson added. Redshift’s RTX-accelerated final-frame rendering with AI-powered OptiX denoising exported files with plenty of time to spare.

Johnson put the final touches on Father-Son Collaboration in Adobe Photoshop. With access to over 30 GPU-accelerated features, such as blur gallery, object selection, perspective warp and more, he applied the background and added minor touch-ups to complete the piece.


The joy, awe and wonderment he’d hoped to invoke in his son came to fruition when Johnson finally shared the piece.

From a son’s concept to a father’s creation.

“Art is one of the rare things in life that really has no end goal — as it’s really about the process, rather than the result,” Johnson said. “Every day, you learn something new, grow and see things in different ways.”

Principal NVIDIA artist and 3D expert Michael Johnson.

Check out Johnson’s portfolio on Instagram.

Follow NVIDIA Studio on Instagram, Twitter and Facebook. Access tutorials on the Studio YouTube channel and get updates directly in your inbox by subscribing to the Studio newsletter. 

Learn about the latest with OpenUSD and Omniverse at SIGGRAPH, running August 6-10. Take advantage of showfloor experiences like hands-on labs, special events and demo booths — and don’t miss NVIDIA founder and CEO Jensen Huang’s keynote address on Tuesday, Aug. 8, at 8 a.m. PT. 

Read More

NVIDIA Helps Forge Forum to Set OpenUSD Standard for 3D Worlds

NVIDIA Helps Forge Forum to Set OpenUSD Standard for 3D Worlds

NVIDIA joined Pixar, Adobe, Apple and Autodesk today to found the Alliance for OpenUSD, a major leap toward unlocking the next era of 3D graphics, design and simulation.

The group will standardize and extend OpenUSD, the open-source Universal Scene Description framework that’s the foundation of interoperable 3D applications and projects ranging from visual effects to industrial digital twins.

Several leading companies in the 3D ecosystem already signed on as the alliance’s first general members — Cesium, Epic Games, Foundry, Hexagon, IKEA, SideFX and Unity.

Standardizing OpenUSD will accelerate its adoption, creating a foundational technology that will help today’s 2D internet evolve into a 3D web. Many companies are already working with NVIDIA to pioneer this future.

From Skyscrapers to Sports Cars

OpenUSD is the foundation of NVIDIA Omniverse, a development platform for connecting and building 3D tools and applications. Omniverse is helping companies like Heavy.AI, Kroger and Siemens build and test physically accurate simulations of factories, retail locations, skyscrapers, sports cars and more.

For IKEA, OpenUSD represents “a nonproprietary standard format to author and store 3D content to connect our value chain even closer, and develop home furnishing solutions to a lower price,” Martin Enthed, an innovation manager at IKEA, said in a press release the alliance issued today.

“By joining the alliance, we’re demonstrating our dedication to the advantages that OpenUSD provides our clients when linking with cloud-based platforms, including Nexus, Hexagon’s manufacturing platform, HxDR, Hexagon’s digital reality platform, and NVIDIA Omniverse to build innovative solutions in their industries,” said Burkhard Boeckem, CTO of Hexagon.

The Origins of OpenUSD

Pixar started work on USD in 2012 as a 3D foundation for its feature films, offering interoperability across data and workflows. The company made this powerful, multifaceted technology open source four years later, so anyone can use OpenUSD and contribute to its development.

Image from the Pixar film "Coco" that used USD
A breakdown of a scene from Pixar’s “Coco” contrasted with the final image. USD was instrumental in creating the film’s complex world. © Disney/Pixar

OpenUSD supports the requirements of building virtual worlds — like geometry, cameras, lights and materials. It also includes features necessary for scaling to large, complex datasets, and it’s tremendously extensible, enabling the technology to be adapted to workflows beyond visual effects.

OpenUSD enables real-time collaboration.
Diagram of OpenUSD that demonstrates it’s power as a technology for large scale, industrial workflows.

One unique capability of OpenUSD is its layering system, which lets users collaborate in real time without stepping on each other’s toes. For example, one artist can model a scene while others create the lighting for it.

Forging a Shared Standard

As its first priority, the alliance will develop a specification that describes the core functionality of OpenUSD. That’ll provide a recipe tool builders can implement, encouraging adoption of the open standard across the widest possible array of use cases.

The alliance will operate as part of the Joint Development Foundation (JDF), a branch of the Linux Foundation. The JDF provides a path to turn written specifications into industry standards suitable for adoption by globally respected groups like the International Organization for Standardization, or the ISO.

From OpenUSD to Omniverse

NVIDIA has a deep commitment to OpenUSD and working with ecosystem partners to accelerate the framework’s evolution and adoption across industries.

At last year’s SIGGRAPH, NVIDIA detailed a multiyear roadmap of contributions it’s making to enable OpenUSD use in architecture, engineering, manufacturing and more. An update on these plans will be presented by NVIDIA as part of the alliance at this year’s conference on computer graphics.

Help Build the 3D Future

Collaboration is key to the alliance and evolution of OpenUSD.

To get involved or learn more, attend NVIDIA’s keynote, OpenUSD day, hands-on labs and other showfloor activities at SIGGRAPH, running Aug. 6-10.

The Alliance for OpenUSD also will host a keynote panel session at the Academy Software Foundation’s Open Source Days 2023.

For a deeper dive on OpenUSD:

Read More

AMD’s Journey to Openness and Performance

AMD has gained progress in building a robust software stack that supports an open ecosystem of models, libraries, frameworks, and tools. With proven platforms gaining momentum, there is significance of a leadership software stack and an optimized ecosystem for achieving application performance. PyTorch is a key part of AMD’s AI journey, and AMD’s Victor Peng, AMD President and Soumith Chintala, founder of PyTorch discussed the latest progress at the DC & AI Keynote on June 12.

Building a Powerful SW Stack with ROCm

Victor introduced ROCm, AMD’s SW stack for Instinct Data Center GPUs. It offers a comprehensive set of open-source libraries, runtime, compilers, and tools for developing, running, and fine-tuning AI models. The fifth generation ROCm incorporates optimizations for AI and high-performance computing workloads, including tailored kernels for low-latency memory systems, support for new data types, and integration with OpenAI Triton. With tools for porting AI software to AMD Instinct platforms, ROCm ensures quality and robustness, tested extensively and compliant with PyTorch and TensorFlow frameworks.

Collaboration with PyTorch

To shed light on the partnership between AMD and PyTorch, Victor invited Soumith Chintala, the founder of PyTorch, to discuss the advancements and integration between the two. PyTorch, the industry’s most famous AI framework, boasts a vibrant developer community and is known for its continuous innovation and incorporation of cutting-edge research.

To highlight the AMD and PyTorch partnership, Victor hosted a discussion with Soumith Chintala, the founder of PyTorch. PyTorch, renowned for its innovation and community, is the industry’s leading AI framework. The latest version, PyTorch 2.0, integrates with hardware-agnostic software compilers like OpenAI Triton, enabling efficient training and deployment of AI models. With optimized techniques, PyTorch 2.0 enhances productivity and offers remarkable speed improvements. The collaboration between AMD and the PyTorch Foundation ensures seamless utilization of AMD GPUs, expanding AI accelerator accessibility worldwide and paving the way for future optimizations and broader hardware support.

Empowering the Developer Community

The partnership between AMD and PyTorch benefits the developer community by democratizing access to AI accelerators. Support for AMD GPUs in PyTorch allows developers to train and deploy models across various platforms, including CPUs like EPYC and Ryzen, GPUs like Instinct and Radeon, and embedded devices like Versal SoCs. By ensuring immediate compatibility of new models on AMD platforms, the collaboration streamlines the development process and empowers developers to leverage the full potential of AMD’s hardware. This increased accessibility and flexibility enable developers worldwide to push the boundaries of AI innovation.

Hugging Face and AI Model Innovation

Victor praised Hugging Face as the leading force behind open-source AI model innovation, empowering generative AI with transformative transformers. AMD’s optimized software enables a high-performing development stack, supporting groundbreaking AI advancements for customers and developers through scalable real-world deployments.

Conclusion

At the DC & AI Keynote, AMD demonstrated its dedication to openness, performance, and collaboration. The ROCm SW stack, PyTorch integration, and support for Hugging Face exemplify AMD’s commitment to empowering developers and researchers to achieve AI breakthroughs. By offering accessible, high-performing solutions, AMD fuels the future of AI as a leading GPU platform integrated with PyTorch.

To listen to the full keynote visit the AMD Youtube channel

To listen to Soumith Chintala’s section of the keynote

Read More