Learn how to assess the risk of AI systems

Learn how to assess the risk of AI systems

Artificial intelligence (AI) is a rapidly evolving field with the potential to improve and transform many aspects of society. In 2023, the pace of adoption of AI technologies has accelerated further with the development of powerful foundation models (FMs) and a resulting advancement in generative AI capabilities.

At Amazon, we have launched multiple generative AI services, such as Amazon Bedrock and Amazon CodeWhisperer, and have made a range of highly capable generative models available through Amazon SageMaker JumpStart. These services are designed to support our customers in unlocking the emerging capabilities of generative AI, including enhanced creativity, personalized and dynamic content creation, and innovative design. They can also enable AI practitioners to make sense of the world as never before—addressing language barriers, climate change, accelerating scientific discoveries, and more.

To realize the full potential of generative AI, however, it’s important to carefully reflect on any potential risks. First and foremost, this benefits the stakeholders of the AI system by promoting responsible and safe development and deployment, and by encouraging the adoption of proactive measures to address potential impact. Consequently, establishing mechanisms to assess and manage risk is an important process for AI practitioners to consider and has become a core component of many emerging AI industry standards (for example, ISO 42001, ISO 23894, and NIST RMF) and legislation (such as EU AI Act).

In this post, we discuss how to assess the potential risk of your AI system.

What are the different levels of risk?

While it might be easier to start looking at an individual machine learning (ML) model and the associated risks in isolation, it’s important to consider the details of the specific application of such a model and the corresponding use case as part of a complete AI system. In fact, a typical AI system is likely to be based on multiple different ML models working together, and an organization might be looking to build multiple different AI systems. Consequently, risks can be evaluated for each use case and at different levels, namely model risk, AI system risk, and enterprise risk.

Enterprise risk encompasses the broad spectrum of risks that an organization may face, including financial, operational, and strategic risks. AI system risk focuses on the impact associated with the implementation and operation of AI systems, whereas ML model risk pertains specifically to the vulnerabilities and uncertainties inherent in ML models.

In this post, we focus on AI system risk, primarily. However, it’s important to note that all different levels of risk management within an organization should be considered and aligned.

How is AI system risk defined?

Risk management in the context of an AI system can be a path to minimize the effect of uncertainty or potential negative impacts, while also providing opportunities to maximize positive impacts. Risk itself is not a potential harm but the effect of uncertainty on objectives. According to the NIST Risk Management Framework (NIST RMF), risk can be estimated as a multiplicative measure of an event’s probability of occurring timed by the magnitudes of the consequences of the corresponding event.

There are two aspects to risk: inherent risk and residual risk. Inherent risk represents the amount of risk the AI system exhibits in absence of mitigations or controls. Residual risk captures the remaining risks after factoring in mitigation strategies.

Always keep in mind that risk assessment is a human-centric activity that requires organization-wide efforts; these efforts range from ensuring all relevant stakeholders are included in the assessment process (such as product, engineering, science, sales, and security teams) to assessing how social perspectives and norms influence the perceived likelihood and consequences of certain events.

Why should your organization care about risk evaluation?

Establishing risk management frameworks for AI systems can benefit society at large by promoting the safe and responsible design, development and operation of AI systems. Risk management frameworks can also benefit organizations through the following:

  • Improved decision-making – By understanding the risks associated with AI systems, organizations can make better decisions about how to mitigate those risks and use AI systems in a safe and responsible manner
  • Increased compliance planning – A risk assessment framework can help organizations prepare for risk assessment requirements in relevant laws and regulations
  • Building trust – By demonstrating that they are taking steps to mitigate the risks of AI systems, organizations can show their customers and stakeholders that they are committed to using AI in a safe and responsible manner

How to assess risk?

As a first step, an organization should consider describing the AI use case that needs to be assessed and identify all relevant stakeholders. A use case is a specific scenario or situation that describes how users interact with an AI system to achieve a particular goal. When creating a use case description, it can be helpful to specify the business problem being solved, list the stakeholders involved, characterize the workflow, and provide details regarding key inputs and outputs of the system.

When it comes to stakeholders, it’s easy to overlook some. The following figure is a good starting point to map out AI stakeholder roles.

Source: “Information technology – Artificial intelligence – Artificial intelligence concepts and terminology”.

An important next step of the AI system risk assessment is to identify potentially harmful events associated with the use case. In considering these events, it can be helpful to reflect on different dimensions of responsible AI, such as fairness and robustness, for example. Different stakeholders might be affected to different degrees along different dimensions. For example, a low robustness risk for an end-user could be the result of an AI system exhibiting minor disruptions, whereas a low fairness risk could be caused by an AI system producing negligibly different outputs for different demographic groups.

To estimate the risk of an event, you can use a likelihood scale in combination with a severity scale to measure the probability of occurrence as well as the degree of consequences. A helpful starting point when developing these scales might be the NIST RMF, which suggests using qualitative nonnumerical categories ranging from very low to very high risk or semi-quantitative assessments principles, such as scales (such as 1–10), bins, or otherwise representative numbers. After you have defined the likelihood and severity scales for all relevant dimensions, you can use a risk matrix scheme to quantify the overall risk per stakeholders along each relevant dimension. The following figure shows an example risk matrix.

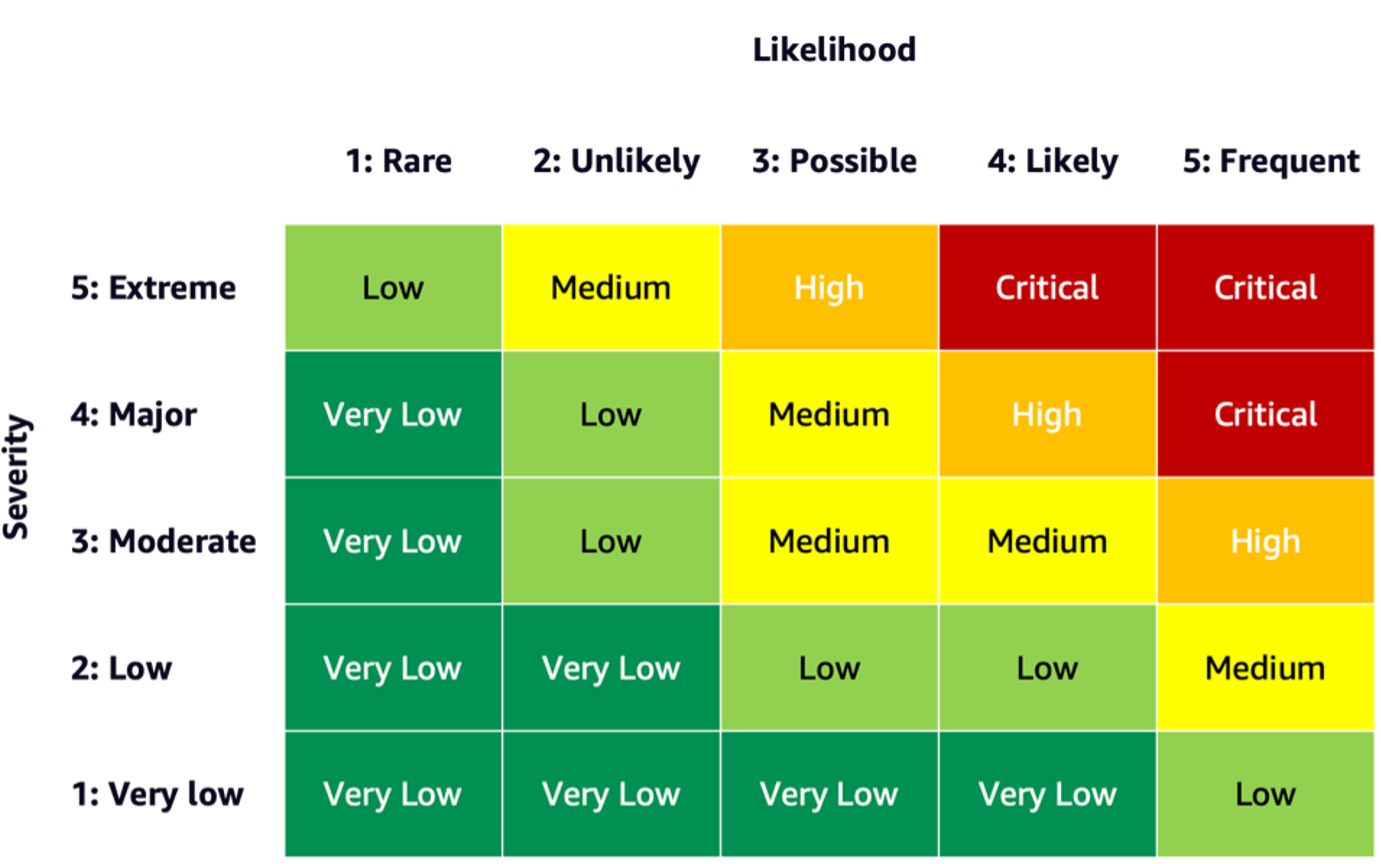
Using this risk matrix, we can consider an event with low severity and rare likelihood of occurring as very low risk. Keep in mind that the initial assessment will be an estimate of inherent risk, and risk mitigation strategies can help lower the risk levels further. The process can then be repeated to generate a rating for any remaining residual risk per event. If there are multiple events identified along the same dimension, it can be helpful to pick the highest risk level among all to create a final assessment summary.

Using the final assessment summary, organizations will have to define what risk levels are acceptable for their AI systems as well as consider relevant regulations and policies.

AWS commitment

Through engagements with the White House and UN, among others, we are committed to sharing our knowledge and expertise to advance the responsible and secure use of AI. Along these lines, Amazon’s Adam Selipsky recently represented AWS at the AI Safety Summit with heads of state and industry leaders in attendance, further demonstrating our dedication to collaborating on the responsible advancement of artificial intelligence.

Conclusion

As AI continues to advance, risk assessment is becoming increasingly important and useful for organizations looking to build and deploy AI responsibly. By establishing a risk assessment framework and risk mitigation plan, organizations can reduce the risk of potential AI-related incidents and earn trust with their customers, as well as reap benefits such as improved reliability, improved fairness for different demographics, and more.

Go ahead and get started on your journey of developing a risk assessment framework in your organization and share your thoughts in the comments.

Also check out an overview of generative AI risks published on Amazon Science: Responsible AI in the generative era, and explore the range of AWS services that can support you on your risk assessment and mitigation journey: Amazon SageMaker Clarify, Amazon SageMaker Model Monitor, AWS CloudTrail, as well as the model governance framework.


About the Authors

Mia C. Mayer is an Applied Scientist and ML educator at AWS Machine Learning University; where she researches and teaches safety, explainability and fairness of Machine Learning and AI systems. Throughout her career, Mia established several university outreach programs, acted as a guest lecturer and keynote speaker, and presented at numerous large learning conferences. She also helps internal teams and AWS customers get started on their responsible AI journey.

Denis V. Batalov is a 17-year Amazon veteran and a PhD in Machine Learning, Denis worked on such exciting projects as Search Inside the Book, Amazon Mobile apps and Kindle Direct Publishing. Since 2013 he has helped AWS customers adopt AI/ML technology as a Solutions Architect. Currently, Denis is a Worldwide Tech Leader for AI/ML responsible for the functioning of AWS ML Specialist Solutions Architects globally. Denis is a frequent public speaker, you can follow him on Twitter @dbatalov.

Dr. Sara Liu is a Senior Technical Program Manager with the AWS Responsible AI team. She works with a team of scientists, dataset leads, ML engineers, researchers, as well as other cross-functional teams to raise the responsible AI bar across AWS AI services. Her current projects involve developing AI service cards, conducting risk assessments for responsible AI, creating high-quality evaluation datasets, and implementing quality programs. She also helps internal teams and customers meet evolving AI industry standards.

Read More

Embracing Transformation: AWS and NVIDIA Forge Ahead in Generative AI and Cloud Innovation

Embracing Transformation: AWS and NVIDIA Forge Ahead in Generative AI and Cloud Innovation

Amazon Web Services and NVIDIA will bring the latest generative AI technologies to enterprises worldwide.

Combining AI and cloud computing, NVIDIA founder and CEO Jensen Huang joined AWS CEO Adam Selipsky Tuesday on stage at AWS re:Invent 2023 at the Venetian Expo Center in Las Vegas.

Selipsky said he was “thrilled” to announce the expansion of the partnership between AWS and NVIDIA with more offerings that will deliver advanced graphics, machine learning and generative AI infrastructure.

The two announced that AWS will be the first cloud provider to adopt the latest NVIDIA GH200 NVL32 Grace Hopper Superchip with new multi-node NVLink technology, that AWS is bringing NVIDIA DGX Cloud to AWS, and that AWS has integrated some of NVIDIA’s most popular software libraries.

Huang started the conversation by highlighting the integration of key NVIDIA libraries with AWS, encompassing a range from NVIDIA AI Enterprise to cuQuantum to BioNeMo, catering to domains like data processing, quantum computing and digital biology.

The partnership opens AWS to millions of developers and the nearly 40,000 companies who are using these libraries, Huang said, adding that it’s great to see AWS expand its cloud instance offerings to include NVIDIA’s new L4, L40S and, soon, H200 GPUs.

Selipsky then introduced the AWS debut of the NVIDIA GH200 Grace Hopper Superchip, a significant advancement in cloud computing, and prompted Huang for further details.

“Grace Hopper, which is GH200, connects two revolutionary processors together in a really unique way,” Huang said. He explained that the GH200 connects NVIDIA’s Grace Arm CPU with its H200 GPU using a chip-to-chip interconnect called NVLink, at an astonishing one terabyte per second.

Each processor has direct access to the high-performance HBM and efficient LPDDR5X memory. This configuration results in 4 petaflops of processing power and 600GB of memory for each superchip.

AWS and NVIDIA connect 32 Grace Hopper Superchips in each rack using a new NVLink switch. Each 32 GH200 NVLink-connected node can be a single Amazon EC2 instance. When these are integrated with AWS Nitro and EFA networking, customers can connect GH200 NVL32 instances to scale to thousands of GH200 Superchips

“With AWS Nitro, that becomes basically one giant virtual GPU instance,” Huang said.

The combination of AWS expertise in highly scalable cloud computing plus NVIDIA innovation with Grace Hopper will make this an amazing platform that delivers the highest performance for complex generative AI workloads, Huang said.

“It’s great to see the infrastructure, but it extends to the software, the services and all the other workflows that they have,” Selipsky said, introducing NVIDIA DGX Cloud on AWS.

This partnership will bring about the first DGX Cloud AI supercomputer powered by the GH200 Superchips, demonstrating the power of AWS’s cloud infrastructure and NVIDIA’s AI expertise.

Following up, Huang announced that this new DGX Cloud supercomputer design in AWS, codenamed Project Ceiba, will serve as NVIDIA’s newest AI supercomputer as well, for its own AI research and development.


Named after the majestic Amazonian Ceiba tree, the Project Ceiba DGX Cloud cluster incorporates 16,384 GH200 Superchips to achieve 65 exaflops of AI processing power, Huang said.

Ceiba will be the world’s first GH200 NVL32 AI supercomputer built and the newest AI supercomputer in NVIDIA DGX Cloud, Huang said.

Huang described Project Ceiba AI supercomputer as “utterly incredible,” saying it will be able to reduce the training time of the largest language models by half.

NVIDIA’s AI engineering teams will use this new supercomputer in DGX Cloud to advance AI for graphics, LLMs, image/video/3D generation, digital biology, robotics, self-driving cars, Earth-2 climate prediction and more, Huang said.

“DGX is NVIDIA’s cloud AI factory,” Huang said, noting that AI is now key to doing NVIDIA’s own work in everything from computer graphics to creating digital biology models to robotics to climate simulation and modeling.

“DGX Cloud is also our AI factory to work with enterprise customers to build custom AI models,” Huang said. “They bring data and domain expertise; we bring AI technology and infrastructure.”

In addition, Huang also announced that AWS will be bringing four Amazon EC2 instances based on the NVIDIA GH200 NVL, H200, L40S, L4 GPUs, coming to market early next year.

Selipsky wrapped up the conversation by announcing that GH200-based instances and DGX Cloud will be available on AWS in the coming year.

You can catch the discussion and Selipsky’s entire keynote on AWS’s YouTube channel. 

Read More

NVIDIA BioNeMo Enables Generative AI for Drug Discovery on AWS

NVIDIA BioNeMo Enables Generative AI for Drug Discovery on AWS

Researchers and developers at leading pharmaceutical and techbio companies can now easily deploy NVIDIA Clara software and services for accelerated healthcare through Amazon Web Services.

Announced today at AWS re:Invent, the initiative gives healthcare and life sciences developers using AWS cloud resources the flexibility to integrate NVIDIA-accelerated offerings such as NVIDIA BioNeMo — a generative AI platform for drug discovery — coming to NVIDIA DGX Cloud on AWS, and currently available via the AWS ParallelCluster cluster management tool for high performance computing and the Amazon SageMaker machine learning service.

Thousands of healthcare and life sciences companies globally use AWS. They will now be able to access BioNeMo to build or customize digital biology foundation models with proprietary data, scaling up model training and deployment using NVIDIA GPU-accelerated cloud servers on AWS.

Techbio innovators including Alchemab Therapeutics, Basecamp Research, Character Biosciences, Evozyne, Etcembly and LabGenius are among the AWS users already using BioNeMo for generative AI-accelerated drug discovery and development. This collaboration gives them more ways to rapidly scale up cloud computing resources for developing generative AI models trained on biomolecular data.

This announcement extends NVIDIA’s existing healthcare-focused offerings available on AWS — NVIDIA MONAI for medical imaging workflows and NVIDIA Parabricks for accelerated genomics.

New to AWS: NVIDIA BioNeMo Advances Generative AI for Drug Discovery

BioNeMo is a domain-specific framework for digital biology generative AI, including pretrained large language models (LLMs), data loaders and optimized training recipes that can help advance computer-aided drug discovery by speeding target identification, protein structure prediction and drug candidate screening.

Drug discovery teams can use their proprietary data to build or optimize models with BioNeMo and run them on cloud-based high performance computing clusters.

One of these models, ESM-2 — a powerful LLM that supports protein structure prediction —  achieves almost linear scaling on 256 NVIDIA H100 Tensor Core GPUs. Researchers can scale to 512 H100 GPUs to complete training in a few days instead of a month, the training time published in the original paper.

Developers can train ESM-2 at scale using checkpoints of 650 million or 3 billion parameters. Additional AI models supported in the BioNeMo training framework include small-molecule generative model MegaMolBART and protein sequence generation model ProtT5.

BioNeMo’s pretrained models and optimized training recipes — which are available using self-managed services like AWS ParallelCluster and Amazon ECS as well as integrated, managed services through NVIDIA DGX Cloud and Amazon SageMaker — can help R&D teams build foundation models that can explore more drug candidates, optimize wet lab experimentation and find promising clinical candidates faster.

Also Available on AWS: NVIDIA Clara for Medical Imaging and Genomics

Project MONAI, cofounded and enterprise-supported by NVIDIA to support medical imaging workflows, has been downloaded more than 1.8 million times and is available for deployment on AWS. Developers can harness their proprietary healthcare datasets already stored on AWS cloud resources to rapidly annotate and build AI models for medical imaging.

These models, trained on NVIDIA GPU-powered Amazon EC2 instances, can be used for interactive annotation and fine-tuning for segmentation, classification, registration and detection tasks in medical imaging. Developers can also harness MRI image synthesis models available in MONAI to augment training datasets.

To accelerate genomics pipelines, Parabricks enables variant calling on a whole human genome in around 15 minutes, compared to a day on a CPU-only system. On AWS, developers can quickly scale up to process large amounts of genomic data across multiple GPU nodes.

More than a dozen Parabricks workflows are available on AWS HealthOmics as Ready2Run workflows, which enable customers to easily run pre-built pipelines.

Get started with NVIDIA Clara on AWS to accelerate AI workflows for drug discovery, genomics and medical imaging.

Subscribe to NVIDIA healthcare news.

Read More

NVIDIA GPUs on AWS to Offer 2x Simulation Leap in Omniverse Isaac Sim, Accelerating Smarter Robots

NVIDIA GPUs on AWS to Offer 2x Simulation Leap in Omniverse Isaac Sim, Accelerating Smarter Robots

Developing more intelligent robots in the cloud is about to get a speed multiplier.

NVIDIA Isaac Sim and NVIDIA L40S GPUs are coming to Amazon Web Services, enabling developers to build and deploy accelerated robotics applications in the cloud. Isaac Sim, an extensible simulator for AI-enabled robots, is built on the NVIDIA Omniverse development platform for building and connecting OpenUSD applications.

Combining powerful AI compute with graphics and media acceleration, the L40S GPU is built to power the next generation of data center workloads. Based on the Ada Lovelace architecture, the L40S enables ultrafast real-time rendering delivering up to a 3.8x performance leap for Omniverse compared with the previous generation, boosting engineering and robotics teams.

The generational leap in acceleration results in 2x faster performance than the A40 GPU across a broad set of robotic simulations tasks when using Isaac Sim.

L40S GPUs can also be harnessed for generative AI workloads, from fine-tuning large language models within a matter of hours, to real-time inferencing for text-to-image and chat applications.

New Amazon Machine Images (AMIs) on the NVIDIA L40S in AWS Marketplace will enable roboticists to easily access preconfigured virtual machines to operate Isaac Sim workloads.

Robotics development in simulation is speeding the process of deploying applications, turbocharging industries such as retail, food processing, manufacturing, logistics and more.

Revenue from mobile robots in warehouses worldwide is expected to explode, more than tripling from $11.6 billion in 2023 to $42.2 billion by 2030, according to ABI Research.

Robotics systems have played an important role across fulfillment centers to help meet the demands of online shoppers and provide a better workplace for employees. Amazon Robotics has deployed more than 750,000 robots in its warehouses around the world to improve the experience for employees supporting package fulfillment and its customers.

“Simulation technology plays a critical role in how we develop, test and deploy our robots.” said Brian Basile, head of virtual systems at Amazon Robotics. “At Amazon Robotics we continue to increase the scale and complexity of our simulations. With the new AWS L40S offering we will push the boundaries of simulation, rendering and model training even further.”

Accelerated Robotics Development With Isaac Sim

Robotics systems can demand large datasets for precision operation in deployed applications. Gathering these datasets and testing them in the real world is time-consuming, costly and impractical.

Robotics simulation drives the training and testing of AI-based robotic applications. With synthetic data, simulations are enabling virtual advances like never before. Simulations can help verify, validate and optimize robot designs, systems and their algorithms before operation. It can also be used to optimize facility designs before construction or remodeling starts for maximum efficiencies, reducing costly manufacturing change orders.

Isaac Sim offers access to the latest robotics simulation tools and capabilities as well as cloud access, enabling teams to collaborate more effectively. Access to the Omniverse Replicator synthetic data generation engine in Isaac Sim allows machine learning engineers to build production-ready synthetic datasets for training robust deep learning perception models.

Customer Adoption of Isaac Sim on AWS

AWS early adopters tapping into the Isaac Sim platform include Amazon Robotics, Soft Robotics and Theory Studios.

Amazon Robotics has begun using Omniverse to build digital twins for automating, optimizing and planning its autonomous warehouses in virtual environments before deploying them into the real world.

Using Isaac Sim for sensor emulation, Amazon Robotics will accelerate development of its Proteus autonomous mobile robot, improving it to help the online retail giant efficiently manage fulfillment.

Learn more about Isaac Sim, powered by NVIDIA Omniverse.


Read More

NVIDIA Powers Training for Some of the Largest Amazon Titan Foundation Models

NVIDIA Powers Training for Some of the Largest Amazon Titan Foundation Models

Everything about large language models is big — giant models train on massive datasets across thousands of NVIDIA GPUs.

That can pose a lot of big challenges for companies pursuing generative AI. NVIDIA NeMo, a framework for building, customizing and running LLMs, helps overcome these challenges.

A team of experienced scientists and developers at Amazon Web Services creating Amazon Titan foundation models for Amazon Bedrock, a generative AI service for foundation models, has been using NVIDIA NeMo for over the past several months.

“One key reason for us to work with NeMo is that it is extensible, comes with optimizations that allow us to run with high GPU utilization while also enabling us to scale to larger clusters so we can train and deliver models to our customers faster,” said Leonard Lausen, a senior applied scientist at AWS.

Think Big, Really Big

Parallelism techniques in NeMo enable efficient LLM training at scale. When coupled with the Elastic Fabric Adapter from AWS, it allowed the team to spread its LLM across many GPUs to accelerate training.

EFA provides AWS customers with an UltraCluster Networking infrastructure that can directly connect more than 10,000 GPUs and bypass the operating system and CPU using NVIDIA GPUDirect.

The combination allowed the AWS scientists to deliver excellent model quality — something that’s not possible at scale when relying solely on data parallelism approaches.

Framework Fits All Sizes

“The flexibility of NeMo,” Lausen said, “allowed AWS to tailor the training software for the specifics of the new Titan model, datasets and infrastructure.”

AWS’s innovations include efficient streaming from Amazon Simple Storage Service (Amazon S3) to the GPU cluster. “It was easy to incorporate these improvements because NeMo builds upon popular libraries like PyTorch Lightning that standardize LLM training pipeline components,” Lausen said.

AWS and NVIDIA aim to infuse products like NVIDIA NeMo and services like Amazon Titan with lessons learned from their collaboration for the benefit of customers.

Read More

3D Artist Nourhan Ismail Brings Isometric Innovation ‘In the NVIDIA Studio’ With Adobe After Effects and Blender

3D Artist Nourhan Ismail Brings Isometric Innovation ‘In the NVIDIA Studio’ With Adobe After Effects and Blender

Editor’s note: This post is part of our weekly In the NVIDIA Studio series, which celebrates featured artists, offers creative tips and tricks, and demonstrates how NVIDIA Studio technology improves creative workflows. 

This week’s talented In the NVIDIA Studio artist, Nourhan Ismail, created a literal NVIDIA studio.

Her piece, called Creator by Day, Gamer by Night, was crafted with the isometric art style and impressive graphical fidelity Ismail’s known for, rich with vibrant colors and playful details. It also captures her “work hard, play hard” mentality as a 3D artist, interior designer and game level designer.

The same art style is featured in the NVIDIA Studio Sessions YouTube miniseries led by Ismail, which provides step-by-step tutorials on how to create a low-poly bedroom, from inception to final render.

Facial Animations Made Easier

Reallusion is the maker of Reallusion iClone, real-time 3D animation software built to produce professional animations for films and video games.

To expedite character animation workflows, the company recently launched its AccuFACE plug-in, which accurately captures facial expressions from webcams and conventional video files, without the need for expensive, specialized equipment.

The NVIDIA Maxine software development platform, the foundational technology behind the revolutionary NVIDIA Broadcast app, powers this incredible capability by weighing output and analyzing facial expressions and blendshapes to predict facial mesh animations.

From there, the AccuFACE plug-in converts this data into facial mesh assets for creators to apply seamlessly. It also fine-tunes lip and tongue articulation using proprietary AccuLIPS technology.

Download the plug-in today, available to creators with NVIDIA RTX GPUs.

Turning Pain Into Beauty

Ismail’s creative journey began at age four as a form of escape from the armed conflict occurring in Syria, her homeland. During that time, Ismail’s family faced many difficulties, including the loss of their home.

In the aftermath, she looked to her father, an accomplished artist and fashion designer, as a source of inspiration.

“His encouragement propelled me to showcase the pinnacle of my abilities, reminding me that art has the power to transform pain into beauty,” she said.

That encouragement has guided and fueled Ismail’s creative journey, eventually giving rise to her signature, single-room isometric style, an homage to the power of resilience and finding beauty in adversity.

Warm and homey.

“Starting with a single room, I delve into interior design, crafting spaces that reflect the comfort and joy I yearned for during challenging times,” she said. “To me, overcoming adversity proves that even from the harshest circumstances, beauty can emerge.”

Ismail started as a self-taught 3D artist, driven by a passion to learn the intricacies of creating digital masterpieces.

“Posting my works became a personal gauge of improvement — not for validation, but as a record of my learning curve,” she said.

Beautifully conceived, masterfully executed.

Each of Ismail’s pieces is a testament to her evolving skills, dedication and love for sharing her craft, especially with her father.

In fact, she dedicated her first isometric house to her father. “That was the happiest moment, to create something inspiring and make someone happy,” she said.

Isometric Art

Ismail first collects reference material on Adobe Behance to gain inspiration on ways to mix different art styles.

She then opens Blender and starts sketching in 3D. Blender Cycles’ RTX-accelerated OptiX ray tracing, powered by her GeForce RTX 3080 Ti GPU, ensured smooth viewport movement.

A gorgeous work in progress.

While the models are still fairly rudimentary, Ismail calculates the angles that light should be coming in from.

“Lighting is an emotional element,” she said. “The lighting of each piece evokes different emotions and a certain idiosyncratic introspectiveness, making the experience unique to each person.”

The NVIDIA Studio has NVIDIA Canvas!

Her trick is to regularly switch between rich, colorful scenes and plain color models to measure the emotional weight and visual impact. She either creates the custom textures herself or downloads premade ones online when on a time crunch.

Ismail’s incredible detail on full display.

Then, she plays with camera angles to analyze depth shadows and lighting, setting up animations and sequence shots in Blender. There, Blender Cycles’ RTX-accelerated OptiX ray tracing delivered seamless viewport movement.


Final touch-ups are done in post-production in Adobe After Effects. Over 30 GPU-accelerated effects sped the process, allowed Ismail to complete the project with time to spare.

“Creator by Day, Gamer by Night” in dark mode.

“There will always be hard times, so never give up and keep believing in yourself,” Ismail encourages content creators.

Digital 3D artist Nourhan Ismail.

Check out Ismail’s Instagram for more spectacular isometric art.

Follow NVIDIA Studio on Instagram, Twitter and Facebook. Access tutorials on the Studio YouTube channel and get updates directly in your inbox by subscribing to the Studio newsletter. 

Read More

Introducing three new NVIDIA GPU-based Amazon EC2 instances

Introducing three new NVIDIA GPU-based Amazon EC2 instances

Amazon Elastic Compute Cloud (Amazon EC2) accelerated computing portfolio offers the broadest choice of accelerators to power your artificial intelligence (AI), machine learning (ML), graphics, and high performance computing (HPC) workloads. We are excited to announce the expansion of this portfolio with three new instances featuring the latest NVIDIA GPUs: Amazon EC2 P5e instances powered by NVIDIA H200 GPUs, Amazon EC2 G6 instances featuring NVIDIA L4 GPUs, and Amazon EC2 G6e instances powered by NVIDIA L40S GPUs. All three instances will be available in 2024, and we look forward to seeing what you can do with them.

AWS and NVIDIA have collaborated for over 13 years and have pioneered large-scale, highly performant, and cost-effective GPU-based solutions for developers and enterprise across the spectrum. We have combined NVIDIA’s powerful GPUs with differentiated AWS technologies such as AWS Nitro System, 3,200 Gbps of Elastic Fabric Adapter (EFA) v2 networking, hundreds of GB/s of data throughput with Amazon FSx for Lustre, and exascale computing with Amazon EC2 UltraClusters to deliver the most performant infrastructure for AI/ML, graphics, and HPC. Coupled with other managed services such as Amazon Bedrock, Amazon SageMaker, and Amazon Elastic Kubernetes Service (Amazon EKS), these instances provide developers with the industry’s best platform for building and deploying generative AI, HPC, and graphics applications.

High-performance and cost-effective GPU-based instances for AI, HPC, and graphics workloads

To power the development, training, and inference of the largest large language models (LLMs), EC2 P5e instances will feature NVIDIA’s latest H200 GPUs, which offer 141 GBs of HBM3e GPU memory, which is 1.7 times larger and 1.4 times faster than H100 GPUs. This boost in GPU memory along with up to 3200 Gbps of EFA networking enabled by AWS Nitro System will enable you to continue to build, train, and deploy your cutting-edge models on AWS.

EC2 G6e instances, featuring NVIDIA L40S GPUs, are built to provide developers with a broadly available option for training and inference of publicly available LLMs, as well as support the increasing adoption of Small Language Models (SLM). They are also optimal for digital twin applications that use NVIDIA Omniverse for describing and simulating across 3D tools and applications, and for creating virtual worlds and advanced workflows for industrial digitalization.

EC2 G6 instances, featuring NVIDIA L4 GPUs, will deliver a lower-cost, energy-efficient solution for deploying ML models for natural language processing, language translation, video and image analysis, speech recognition, and personalization as well as graphics workloads, such as creating and rendering real-time, cinematic-quality graphics and game streaming.


About the Author

Chetan Kapoor is the Director of Product Management for the Amazon EC2 Accelerated Computing Portfolio.

Read More

Boost inference performance for LLMs with new Amazon SageMaker containers

Boost inference performance for LLMs with new Amazon SageMaker containers

Today, Amazon SageMaker launches a new version (0.25.0) of Large Model Inference (LMI) Deep Learning Containers (DLCs) and adds support for NVIDIA’s TensorRT-LLM Library. With these upgrades, you can effortlessly access state-of-the-art tooling to optimize large language models (LLMs) on SageMaker and achieve price-performance benefits – Amazon SageMaker LMI TensorRT-LLM DLC reduces latency by 33% on average and improves throughput by 60% on average for Llama2-70B, Falcon-40B and CodeLlama-34B models, compared to previous version.

LLMs have seen an unprecedented growth in popularity across a broad spectrum of applications. However, these models are often too large to fit on a single accelerator or GPU device, making it difficult to achieve low-latency inference and scale. SageMaker offers LMI DLCs to help you maximize the utilization of available resources and improve performance. The latest LMI DLCs offer continuous batching support for inference requests to improve throughput, efficient inference collective operations to improve latency, Paged Attention V2 (which improves the performance of workloads with longer sequence lengths), and the latest TensorRT-LLM library from NVIDIA to maximize performance on GPUs. LMI DLCs offer a low-code interface that simplifies compilation with TensorRT-LLM by just requiring the model ID and optional model parameters; all of the heavy lifting required with building a TensorRT-LLM optimized model and creating a model repo is managed by the LMI DLC. In addition, you can use the latest quantization techniques—GPTQ, AWQ, and SmoothQuant—that are available with LMI DLCs. As a result, with LMI DLCs on SageMaker, you can accelerate time-to-value for your generative AI applications and optimize LLMs for the hardware of your choice to achieve best-in-class price-performance.

In this post, we dive deep into the new features with the latest release of LMI DLCs, discuss performance benchmarks, and outline the steps required to deploy LLMs with LMI DLCs to maximize performance and reduce costs.

New features with SageMaker LMI DLCs

In this section, we discuss three new features with SageMaker LMI DLCs.

SageMaker LMI now supports TensorRT-LLM

SageMaker now offers NVIDIA’s TensorRT-LLM as part of the latest LMI DLC release (0.25.0), enabling state-of-the-art optimizations like SmoothQuant, FP8, and continuous batching for LLMs when using NVIDIA GPUs. TensorRT-LLM opens the door to ultra-low latency experiences that can greatly improve performance. The TensorRT-LLM SDK supports deployments ranging from single-GPU to multi-GPU configurations, with additional performance gains possible through techniques like tensor parallelism. To use the TensorRT-LLM library, choose the TensorRT-LLM DLC from the available LMI DLCs and set engine=MPI among other settings such as option.model_id. The following diagram illustrates the TensorRT-LLM tech stack.

Efficient inference collective operations

In a typical deployment of LLMs, model parameters are spread across multiple accelerators to accommodate the requirements of a large model that can’t fit on a single accelerator. This enhances inference speed by enabling each accelerator to carry out partial calculations in parallel. Afterwards, a collective operation is introduced to consolidate these partial results at the end of these processes, and redistribute them among the accelerators.

For P4D instance types, SageMaker implements a new collective operation that speeds up communication between GPUs. As a result, you get lower latency and higher throughput with the latest LMI DLCs compared to previous versions. Furthermore, this feature is supported out of the box with LMI DLCs, and you don’t need to configure anything to use this feature because it’s embedded in the SageMaker LMI DLCs and is exclusively available for Amazon SageMaker.

Quantization support

SageMaker LMI DLCs now support the latest quantization techniques, including pre-quantized models with GPTQ, Activation-aware Weight Quantization (AWQ), and just-in-time quantization like SmoothQuant.

GPTQ allows LMI to run popular INT3 and INT4 models from Hugging Face. It offers the smallest possible model weights that can fit on a single GPU/multi-GPU. LMI DLCs also support AWQ inference, which allows faster inference speed. Finally, LMI DLCs now support SmoothQuant, which allows INT8 quantization to reduce the memory footprint and computational cost of models with minimal loss in accuracy. Currently, we allow you to do just-in-time conversion for SmoothQuant models without any additional steps. GPTQ and AWQ need to be quantized with a dataset to be used with LMI DLCs. You can also pick up popular pre-quantized GPTQ and AWQ models to use on LMI DLCs. To use SmoothQuant, set option.quantize=smoothquant with engine=DeepSpeed in serving.properties. A sample notebook using SmoothQuant for hosting GPT-Neox on ml.g5.12xlarge is located on GitHub.

Using SageMaker LMI DLCs

You can deploy your LLMs on SageMaker using the new LMI DLCs 0.25.0 without any changes to your code. SageMaker LMI DLCs use DJL serving to serve your model for inference. To get started, you just need to create a configuration file that specifies settings like model parallelization and inference optimization libraries to use. For instructions and tutorials on using SageMaker LMI DLCs, refer to Model parallelism and large model inference and our list of available SageMaker LMI DLCs.

The DeepSpeed container includes a library called LMI Distributed Inference Library (LMI-Dist). LMI-Dist is an inference library used to run large model inference with the best optimization used in different open-source libraries, across vLLM, Text-Generation-Inference (up to version 0.9.4), FasterTransformer, and DeepSpeed frameworks. This library incorporates open-source popular technologies like FlashAttention, PagedAttention, FusedKernel, and efficient GPU communication kernels to accelerate the model and reduce memory consumption.

TensorRT LLM is an open-source library released by NVIDIA in October 2023. We optimized the TensorRT-LLM library for inference speedup and created a toolkit to simplify the user experience by supporting just-in-time model conversion. This toolkit enables users to provide a Hugging Face model ID and deploy the model end-to-end. It also supports continuous batching with streaming. You can expect approximately 1–2 minutes to compile the Llama-2 7B and 13B models, and around 7 minutes for the 70B model. If you want to avoid this compilation overhead during SageMaker endpoint setup and scaling of instances , we recommend using ahead of time (AOT) compilation with our tutorial to prepare the model. We also accept any TensorRT LLM model built for Triton Server that can be used with LMI DLCs.

Performance benchmarking results

We compared the performance of the latest SageMaker LMI DLCs version (0.25.0) to the previous version (0.23.0). We conducted experiments on the Llama-2 70B, Falcon 40B, and CodeLlama 34B models to demonstrate the performance gain with TensorRT-LLM and efficient inference collective operations (available on SageMaker).

SageMaker LMI containers come with a default handler script to load and host models, providing a low-code option. You also have the option to bring your own script if you need to do any customizations to the model loading steps. You need to pass the required parameters in a serving.properties file. This file contains the required configurations for the Deep Java Library (DJL) model server to download and host the model. The following code is the serving.properties used for our deployment and benchmarking:

engine=MPI
option.use_custom_all_reduce=true 
option.model_id={{s3url}}
option.tensor_parallel_degree=8
option.output_formatter=json
option.max_rolling_batch_size=64
option.model_loading_timeout=3600

The engine parameter is used to define the runtime engine for the DJL model server. We can specify the Hugging Face model ID or Amazon Simple Storage Service (Amazon S3) location of the model using the model_id parameter. The task parameter is used to define the natural language processing (NLP) task. The tensor_parallel_degree parameter sets the number of devices over which the tensor parallel modules are distributed. The use_custom_all_reduce parameter is set to true for GPU instances that have NVLink enabled to speed up model inference. You can set this for P4D, P4de, P5 and other GPUs that have NVLink connected. The output_formatter parameter sets the output format. The max_rolling_batch_size parameter sets the limit for the maximum number of concurrent requests. The model_loading_timeout sets the timeout value for downloading and loading the model to serve inference. For more details on the configuration options, refer to Configurations and settings.

Llama-2 70B

The following are the performance comparison results of Llama-2 70B. Latency reduced by 28% and throughput increased by 44% for concurrency of 16, with the new LMI TensorRT LLM DLC.

Falcon 40B

The following figures compare Falcon 40B. Latency reduced by 36% and throughput increased by 59% for concurrency of 16, with the new LMI TensorRT LLM DLC.

CodeLlama 34B

The following figures compare CodeLlama 34B. Latency reduced by 36% and throughput increased by 77% for concurrency of 16, with the new LMI TensorRT LLM DLC.

Recommended configuration and container for hosting LLMs

With the latest release, SageMaker is providing two containers: 0.25.0-deepspeed and 0.25.0-tensorrtllm. The DeepSpeed container contains DeepSpeed, the LMI Distributed Inference Library. The TensorRT-LLM container includes NVIDIA’s TensorRT-LLM Library to accelerate LLM inference.

We recommend the deployment configuration illustrated in the following diagram.

To get started, refer to the sample notebooks:

Conclusion

In this post, we showed how you can use SageMaker LMI DLCs to optimize LLMs for your business use case and achieve price-performance benefits. To learn more about LMI DLC capabilities, refer to Model parallelism and large model inference. We’re excited to see how you use these new capabilities from Amazon SageMaker.


About the authors

Michael Nguyen is a Senior Startup Solutions Architect at AWS, specializing in leveraging AI/ML to drive innovation and develop business solutions on AWS. Michael holds 12 AWS certifications and has a BS/MS in Electrical/Computer Engineering and an MBA from Penn State University, Binghamton University, and the University of Delaware.

Rishabh Ray Chaudhury is a Senior Product Manager with Amazon SageMaker, focusing on Machine Learning inference. He is passionate about innovating and building new experiences for Machine Learning customers on AWS to help scale their workloads. In his spare time, he enjoys traveling and cooking. You can find him on LinkedIn.

Qing Lan is a Software Development Engineer in AWS. He has been working on several challenging products in Amazon, including high performance ML inference solutions and high performance logging system. Qing’s team successfully launched the first Billion-parameter model in Amazon Advertising with very low latency required. Qing has in-depth knowledge on the infrastructure optimization and Deep Learning acceleration.

Jian Sheng is a Software Development Engineer at Amazon Web Services who has worked on several key aspects of machine learning systems. He has been a key contributor to the SageMaker Neo service, focusing on deep learning compilation and framework runtime optimization. Recently, he has directed his efforts and contributed to optimizing the machine learning system for large model inference.

Vivek Gangasani is a AI/ML Startup Solutions Architect for Generative AI startups at AWS. He helps emerging GenAI startups build innovative solutions using AWS services and accelerated compute. Currently, he is focused on developing strategies for fine-tuning and optimizing the inference performance of Large Language Models. In his free time, Vivek enjoys hiking, watching movies and trying different cuisines.

Harish Tummalacherla is Software Engineer with Deep Learning Performance team at SageMaker. He works on performance engineering for serving large language models efficiently on SageMaker. In his spare time, he enjoys running, cycling and ski mountaineering.

Read More

Simplify data prep for generative AI with Amazon SageMaker Data Wrangler

Simplify data prep for generative AI with Amazon SageMaker Data Wrangler

Generative artificial intelligence (generative AI) models have demonstrated impressive capabilities in generating high-quality text, images, and other content. However, these models require massive amounts of clean, structured training data to reach their full potential. Most real-world data exists in unstructured formats like PDFs, which requires preprocessing before it can be used effectively.

According to IDC, unstructured data accounts for over 80% of all business data today. This includes formats like emails, PDFs, scanned documents, images, audio, video, and more. While this data holds valuable insights, its unstructured nature makes it difficult for AI algorithms to interpret and learn from it. According to a 2019 survey by Deloitte, only 18% of businesses reported being able to take advantage of unstructured data.

As AI adoption continues to accelerate, developing efficient mechanisms for digesting and learning from unstructured data becomes even more critical in the future. This could involve better preprocessing tools, semi-supervised learning techniques, and advances in natural language processing. Companies that use their unstructured data most effectively will gain significant competitive advantages from AI. Clean data is important for good model performance. Extracted texts still have large amounts of gibberish and boilerplate text (e.g., read HTML). Scraped data from the internet often contains a lot of duplications. Data from social media, reviews, or any user generated contents can also contain toxic and biased contents, and you may need to filter them out using some pre-processing steps. There could also be a lot of low-quality contents or bot-generated texts, which can be filtered out using accompanying metadata (e.g., filter out customer service responses that received low customer ratings).

Data preparation is important at multiple stages in Retrieval Augmented Generation (RAG) models. The knowledge source documents need preprocessing, like cleaning text and generating semantic embeddings, so they can be efficiently indexed and retrieved. The user’s natural language query also requires preprocessing, so it can be encoded into a vector and compared to document embeddings. After retrieving relevant contexts, they may need additional preprocessing, like truncation, before being concatenated to the user’s query to create the final prompt for the foundation model.

Solution overview

In this post, we work with a PDF documentation dataset—Amazon Bedrock user guide. Further, we show how to preprocess a dataset for RAG. Specifically, we clean the data and create RAG artifacts to answer the questions about the content of the dataset. Consider the following machine learning (ML) problem: user asks a large language model (LLM) question: “How to filter and search models in Amazon Bedrock?”. LLM has not seen the documentation during the training or fine-tuning stage, thus wouldn’t be able to answer the question and most probably will hallucinate. Our goal with this post, is to find a relevant piece of text from the PDF (i.e., RAG) and attach it to the prompt, thus enabling LLM to answer questions specific to this document.

Below, we show how you can do all these main preprocessing steps from Amazon SageMaker Data Wrangler:

  1. Extracting text from a PDF document (powered by Textract)
  2. Remove sensitive information (powered by Comprehend)
  3. Chunk text into pieces.
  4. Create embeddings for each piece (powered by Bedrock).
  5. Upload embedding to a vector database (powered by OpenSearch)

Prerequisites

For this walkthrough, you should have the following:

Note: Create OpenSearch Service domains following the instructions here. For simplicity, let’s pick the option with a master username and password for fine-grained access control. Once the domain is created, create a vector index with the following mappings, and vector dimension 1536 aligns with Amazon Titan embeddings:

PUT knowledge-base-index
{
  "settings": {
    "index.knn": True
  },
  "mappings": {
    "properties": {
      "text_content": {
        "type": "text",
        "fields": {
          "keyword": {
            "type": "keyword"
          }
        }
      },
      "text_content_v": {
        "type": "knn_vector",
        "dimension": 1536
      },
      
    }
  }
} }

Walkthrough

Build a data flow

In this section, we cover how we can build a data flow to extract text and metadata from PDFs, clean and process the data, generate embeddings using Amazon Bedrock, and index the data in Amazon OpenSearch.

Launch SageMaker Canvas

To launch SageMaker Canvas, complete the following steps:

  1. On the Amazon SageMaker Console, choose Domains in the navigation pane.
  2. Choose your domain.
  3. On the launch menu, choose Canvas.

Create a dataflow

Complete the following steps to create a data flow in SageMaker Canvas:

  1. On the SageMaker Canvas home page, choose Data preparation.
  2. Choose Create on the right side of page, then give a data flow name and select Create.
  3. This will land on a data flow page.
  4. Choose Import data, select tabular data.

Now let’s import the data from Amazon S3 bucket:

  1. Choose Import data and select Tabular from the drop-down list.
  2. Data Source and select Amazon S3 from the drop-down list.
  3. Navigate to the meta data file with PDF file locations, and choose the file.
  4. Now the metadata file is loaded to the data preparation data flow, and we can proceed to add next steps to transform the data and index into Amazon OpenSearch. In this case the file has following metadata, with the location of each file in Amazon S3 directory.

To add a new transform, complete the following steps:

  1. Choose the plus sign and choose Add Transform.
  2. Choose Add Step and choose Custom Transform.
  3. You can create a custom transform using Pandas, PySpark, Python user-defined functions, and SQL PySpark. Choose Python (PySpark) for this use-case.
  4. Enter a name for the step. From the example code snippets, browse and select extract text from pdf. Make necessary changes to code snippet and select Add.

  5. Let’s add a step to redact Personal Identifiable Information (PII) data from the extracted data by leveraging Amazon Comprehend. Choose Add Step and choose Custom Transform. And select Python (PySpark).

From the example code snippets, browse and select mask PII. Make necessary changes to code snippet and select Add.

  1. The next step is to chunk the text content. Choose Add Step and choose Custom Transform. And select Python (PySpark).

From the example code snippets, browse and select Chunk text. Make necessary changes to code snippet and select Add.

  1. Let’s convert the text content to vector embeddings using the Amazon Bedrock Titan Embeddings model. Choose Add Step and choose Custom Transform. And select Python (PySpark).

From the example code snippets, browse and select Generate text embedding with Bedrock. Make necessary changes to code snippet and select Add.

  1. Now we have vector embeddings available for the PDF file contents. Let’s go ahead and index the data into Amazon OpenSearch. Choose Add Step and choose Custom Transform. And select Python (PySpark). You’re free to rewrite the following code to use your preferred vector database. For simplicity, we are using master username and password to access OpenSearch API’s, for production workloads select option according to your organization policies.
    from pyspark.sql.functions import col, udf
    from pyspark.sql.types import StringType
    import json
    import requests
    
    text_column = "text_redacted_chunks_embedding"
    output_column = text_column + "_response"
    
    headers = {"Content-Type": "application/json", "kbn-xsrf": "true", "osd-xsrf": "true", "security_tenant": "global"};
    index_name = 's3_vector_data_v1'
    
    
    def index_data(text_redacted_chunks, text_redacted_chunks_embedding):
        input_json = json.dumps({"text_content": text_redacted_chunks[-1], "text_content_v": text_redacted_chunks_embedding[-1]})
        response = requests.request(method="POST",
                                    url=f'https://search-canvas-vector-db-domain-dt3yq3b4cykwuvc6t7rnkvmnka.us-west-2.es.amazonaws.com/{index_name}/_doc',
                                    headers=headers,
                                    json=input_json,
                                    auth=(master_user, 'master_pass'),
                                    timeout=30)
        return response.content
    
    
    indexing_udf = udf(index_data, StringType())
    df = df.withColumn('index_response',
                       indexing_udf(col("text_redacted_chunks"), col("text_redacted_chunks_embedding")))

Finally, the dataflow created would be as follows:

With this dataflow, the data from the PDF file has been read and indexed with vector embeddings in Amazon OpenSearch. Now it’s time for us to create a file with queries to query the indexed data and save it to the Amazon S3 location. We’ll point our search data flow to the file and output a file with corresponding results in a new file in an Amazon S3 location.

Preparing a prompt

After we create a knowledge base out of our PDF, we can test it by searching the knowledge base for a few sample queries. We’ll process each query as follows:

  1. Generate embedding for the query (powered by Amazon Bedrock)
  2. Query vector database for the nearest neighbor context (powered by Amazon OpenSearch)
  3. Combine the query and the context into the prompt.
  4. Query LLM with a prompt (powered by Amazon Bedrock)
  5. On the SageMaker Canvas home page, choose Data preparation.
  6. Choose Create on the right side of page, then give a data flow name and select Create.

Now let’s load the user questions and then create a prompt by combining the question and the similar documents. This prompt is provided to the LLM for generating an answer to the user question.

  1. Let’s load a csv file with user questions. Choose Import Data and select Tabular from the drop-down list.
  2. Data Source, and select Amazon S3 from the drop-down list. Alternatively, you can choose to upload a file with user queries.
  3. Let’s add a custom transformation to convert the data into vector embeddings, followed by searching related embeddings from Amazon OpenSearch, before sending a prompt to Amazon Bedrock with the query and context from knowledge base. To generate embeddings for the query, you can use the same example code snippet Generate text embedding with Bedrock mentioned in Step #7 above.

Let’s invoke the Amazon OpenSearch API to search relevant documents for the generated vector embeddings. Add a custom transform with Python (PySpark).

from pyspark.sql.functions import col, udf
from pyspark.sql.types import StringType
import json
import requests

text_column = "Queries_embedding"
output_column = text_column + "_response"

headers = {"Content-Type": "application/json", "kbn-xsrf": "true", "osd-xsrf": "true", "security_tenant": "global"};
index_name = 's3_vector_data_v1'

def search_data(text_column_embedding):
    input_json={'size':20,'query':{'knn':{'text_content_v':{'vector':{text_column_embedding},'k':5,},},},'fields':['text_content']}
    response = requests.request(method="GET",
                                url=f'https://search-canvas-vector-db-domain-dt3yq3b4cykwuvc6t7rnkvmnka.us-west-2.es.amazonaws.com/{index_name}/_search',
                                headers=headers,
                                json=input_json,
                                auth=(master_user, master_pass'),
                                timeout=30)
    return response.content

search_udf = udf(search_data, types.ArrayType())
df = df.withColumn(output_column,search_udf(col(text_column)))

Let’s add a custom transform to call the Amazon Bedrock API for query response, passing the documents from the Amazon OpenSearch knowledge base. From the example code snippets, browse and select Query Bedrock with context. Make necessary changes to code snippet and select Add.

In summary, RAG based question answering dataflow is as follows:

ML practitioners spend a lot of time crafting feature engineering code, applying it to their initial datasets, training models on the engineered datasets, and evaluating model accuracy. Given the experimental nature of this work, even the smallest project leads to multiple iterations. The same feature engineering code is often run again and again, wasting time and compute resources on repeating the same operations. In large organizations, this can cause an even greater loss of productivity because different teams often run identical jobs or even write duplicate feature engineering code because they have no knowledge of prior work. To avoid the reprocessing of features, we’ll export our data flow to an Amazon SageMaker pipeline. Let’s select the + button to the right of the query. Select export data flow and choose Run SageMaker Pipeline (via Jupyter notebook).

Cleaning up

To avoid incurring future charges, delete or shut down the resources you created while following this post. Refer to Logging out of Amazon SageMaker Canvas for more details.

Conclusion

In this post, we showed you how Amazon SageMaker Canvas’s end-to-end capabilities by assuming the role of a data professional preparing data for an LLM. The interactive data preparation enabled quickly cleaning, transforming, and analyzing the data to engineer informative features. By removing coding complexities, SageMaker Canvas allowed rapid iteration to create a high-quality training dataset. This accelerated workflow led directly into building, training, and deploying a performant machine learning model for business impact. With its comprehensive data preparation and unified experience from data to insights, SageMaker Canvas empowers users to improve their ML outcomes.

We encourage you to learn more by exploring Amazon SageMaker Data Wrangler, Amazon SageMaker Canvas, Amazon Titan models, Amazon Bedrock, and Amazon OpenSearch Service to build a solution using the sample implementation provided in this post and a dataset relevant to your business. If you have questions or suggestions, then please leave a comment.


About the Authors

Ajjay Govindaram is a Senior Solutions Architect at AWS. He works with strategic customers who are using AI/ML to solve complex business problems. His experience lies in providing technical direction as well as design assistance for modest to large-scale AI/ML application deployments. His knowledge ranges from application architecture to big data, analytics, and machine learning. He enjoys listening to music while resting, experiencing the outdoors, and spending time with his loved ones.

Nikita Ivkin is a Senior Applied Scientist at Amazon SageMaker Data Wrangler with interests in machine learning and data cleaning algorithms.

Read More

Democratize ML on Salesforce Data Cloud with no-code Amazon SageMaker Canvas

Democratize ML on Salesforce Data Cloud with no-code Amazon SageMaker Canvas

This post is co-authored by Daryl Martis, Director of Product, Salesforce Einstein AI.

This is the third post in a series discussing the integration of Salesforce Data Cloud and Amazon SageMaker.

In Part 1 and Part 2, we show how the Salesforce Data Cloud and Einstein Studio integration with SageMaker allows businesses to access their Salesforce data securely using SageMaker and use its tools to build, train, and deploy models to endpoints hosted on SageMaker. SageMaker endpoints can be registered to the Salesforce Data Cloud to activate predictions in Salesforce.

In this post, we demonstrate how business analysts and citizen data scientists can create machine learning (ML) models, without any code, in Amazon SageMaker Canvas and deploy trained models for integration with Salesforce Einstein Studio to create powerful business applications. SageMaker Canvas provides a no-code experience to access data from Salesforce Data Cloud and build, test, and deploy models using just a few clicks. SageMaker Canvas also enables you to understand your predictions using feature importance and SHAP values, making it straightforward for you to explain predictions made by ML models.

SageMaker Canvas

SageMaker Canvas enables business analysts and data science teams to build and use ML and generative AI models without having to write a single line of code. SageMaker Canvas provides a visual point-and-click interface to generate accurate ML predictions for classification, regression, forecasting, natural language processing (NLP), and computer vision (CV). In addition, you can access and evaluate foundation models (FMs) from Amazon Bedrock or public FMs from Amazon SageMaker JumpStart for content generation, text extraction, and text summarization to support generative AI solutions. SageMaker Canvas allows you to bring ML models built anywhere and generate predictions directly in SageMaker Canvas.

Salesforce Data Cloud and Einstein Studio

Salesforce Data Cloud is a data platform that provides businesses with real-time updates of their customer data from any touch point.

Einstein Studio is a gateway to AI tools on Salesforce Data Cloud. With Einstein Studio, admins and data scientists can effortlessly create models with a few clicks or using code. Einstein Studio’s bring your own model (BYOM) experience provides the capability to connect custom or generative AI models from external platforms such as SageMaker to Salesforce Data Cloud.

Solution overview

To demonstrate how you can build ML models using data in Salesforce Data Cloud using SageMaker Canvas, we create a predictive model to recommend a product. This model uses the features stored in Salesforce Data Cloud such as customer demographics, marketing engagements, and purchase history. The product recommendation model is built and deployed using the SageMaker Canvas no-code user interface using data in Salesforce Data Cloud.

We use the following sample dataset stored in Amazon Simple Storage Service (Amazon S3). To use this dataset in Salesforce Data Cloud, refer to Create Amazon S3 Data Stream in Data Cloud. The following attributes are needed to create the model:

  • Club Member – If the customer is a club member
  • Campaign – The campaign the customer is a part of
  • State – The state or province the customer resides in
  • Month – The month of purchase
  • Case Count – The number of cases raised by the customer
  • Case Type Return – Whether the customer returned any product within the last year
  • Case Type Shipment Damaged – Whether the customer had any shipments damaged in the last year
  • Engagement Score – The level of engagement the customer has (response to mailing campaigns, logins to the online store, and so on)
  • Tenure – The tenure of the customer relationship with the company
  • Clicks – The average number of clicks the customer has made within a week prior to purchase
  • Pages Visited – The average number of pages the customer visited within a week prior to purchase
  • Product Purchased – The actual product purchased

The following steps give an overview of how to use the Salesforce Data Cloud connector launched in SageMaker Canvas to access your enterprise data and build a predictive model:

  1. Configure the Salesforce connected app to register the SageMaker Canvas domain.
  2. Set up OAuth for Salesforce Data Cloud in SageMaker Canvas.
  3. Connect to Salesforce Data Cloud data using the built-in SageMaker Canvas Salesforce Data Cloud connector and import the dataset.
  4. Build and train models in SageMaker Canvas.
  5. Deploy the model in SageMaker Canvas and make predictions.
  6. Deploy an Amazon API Gateway endpoint as a front-end connection to the SageMaker inference endpoint.
  7. Register the API Gateway endpoint in Einstein Studio. For instructions, refer to Bring Your Own AI Models to Data Cloud.

The following diagram illustrates the solution architecture.

Prerequisites

Before you get started, complete the following prerequisite steps to create a SageMaker domain and enable SageMaker Canvas:

  1. Create an Amazon SageMaker Studio domain. For instructions, refer to Onboard to Amazon SageMaker Domain.
  2. Note down the domain ID and execution role that is created and will be used by your user profile. You add permissions to this role in subsequent steps.

The following screenshot shows the domain we created for this post.

  1. Next, go to the user profile and choose Edit.
  2. Navigate to the Amazon SageMaker Canvas settings section and select Enable Canvas base permissions.
  3. Select Enable direct deployments of Canvas models and Enable model registry permissions for all users.

This allows SageMaker Canvas to deploy models to endpoints on the SageMaker console. These settings can be configured at the domain or user profile level. User profile settings take precedence over domain settings.

Create or update the Salesforce connected app

Next, we create a Salesforce connected app to enable the OAuth flow from SageMaker Canvas to Salesforce Data Cloud. Complete the following steps:

  1. Log in to Salesforce and navigate to Setup.
  2. Search for App Manager and create a new connected app.
  3. Provide the following inputs:
    1. For Connected App Name, enter a name.
    2. For API Name, leave as default (it’s automatically populated).
    3. For Contact Email, enter your contact email address.
    4. Select Enable OAuth Settings.
    5. For Callback URL, enter https://<domain-id>.studio.<region>.sagemaker.aws/canvas/default/lab, and provide the domain ID and Region from your SageMaker domain.
  4. Configure the following scopes on your connected app:
    1. Manage user data via APIs (api).
    2. Perform requests at any time (refresh_token, offline_access).
    3. Perform ANSI SQL queries on Salesforce Data Cloud data (Data Cloud_query_api).
    4. Manage Data Cloud profile data (Data Cloud_profile_api).
    5. Access the identity URL service (id, profile, email, address, phone).
    6. Access unique user identifiers (openid).
  5. Set your connected app IP Relaxation setting to Relax IP restrictions.

Configure OAuth settings for the Salesforce Data Cloud connector

SageMaker Canvas uses AWS Secrets Manager to securely store connection information from the Salesforce connected app. SageMaker Canvas allows administrators to configure OAuth settings for an individual user profile or at the domain level. Note that you can add a secret to both a domain and user profile, but SageMaker Canvas looks for secrets in the user profile first.

To configure your OAuth settings, complete the following steps:

  1. Navigate to edit Domain or User Profile Settings in SageMaker Console.
  2. Choose Canvas Settings in the navigation pane.
  3. Under OAuth settings, for Data Source, choose Salesforce Data Cloud.
  4. For Secret setup, you can create a new secret or use an existing secret. For this example, we create a new secret and input the client ID and client secret from the Salesforce connected app.

For more details on enabling OAuth in SageMaker Canvas, refer to Set up OAuth for Salesforce Data Cloud.

This completes the setup to enable data access from Salesforce Data Cloud to SageMaker Canvas to build AI and ML models.

Import data from Salesforce Data Cloud

To import your data, complete the following steps:

  1. From the user profile you created with your SageMaker domain, choose Launch and select Canvas.

The first time you access your Canvas app, it will take about 10 minutes to create.

  1. Choose Data Wrangler in the navigation pane.
  2. On the Create menu, choose Tabular to create a tabular dataset.
  3. Name the dataset and choose Create.
  4. For Data Source, choose Salesforce Data Cloud and Add Connection to import the data lake object.

If you’ve previously configured a connection to Salesforce Data Cloud, you will see an option to use that connection instead of creating a new one.

  1. Provide a name for a new Salesforce Data Cloud connection and choose Add connection.

It will take a few minutes to complete.

  1. You will be redirected to the Salesforce login page to authorize the connection.

After the login is successful, the request will be redirected back to SageMaker Canvas with the data Lake object listing.

  1. Select the dataset that contains the features for model training that was uploaded via Amazon S3.
  2. Drag and drop the file, then choose Edit in SQL.

Salesforce adds a “__c“ to all the Data Cloud object fields. As per SageMaker Canvas naming convention, ”__“ is not allowed in the field names.

  1. Edit the SQL to rename the columns and drop metadata that isn’t relevant for model training. Replace the table name with your object name.
    SELECT "state__c" as state, 
    "case_type_shipment_damaged__c" as case_type_shipment_damaged, 
    "campaign__c" as campaign, 
    "engagement_score__c" as engagement_score, 
    "case_count__c" as case_count, 
    "case_type_return__c" as case_type_return, 
    "club_member__c" as club_member, 
    "pages_visited__c" as pages_visited, 
    "product_purchased__c" as product_purchased, 
    "clicks__c" as clicks, 
    "tenure__c" as tenure, 
    "month__c" as month FROM product_recommendation__dlm;

  2. Choose Run SQL and then Create dataset.
  3. Select the dataset and choose Create a model.

  4. To create a model to predict a product recommendation, provide a model name, choose Predictive analysis for Problem type, and choose Create.

Build and train the model

Complete the following steps to build and train your model:

  1. After the model is launched, set the target column to product_purchased.

SageMaker Canvas displays key statistics and correlations of each column to the target column. SageMaker Canvas provides you with tools to preview your model and validate data before you begin building.

  1. Use the preview model feature to see the accuracy of your model and validate your dataset to prevent issues while building the model.
  2. After reviewing your data and making any changes to your dataset, choose your build type. The Quick build option may be faster, but it will only use a subset of your data to build a model. For the purpose of this post, we selected the Standard build option.

A standard build can take 2–4 hours to complete.

SageMaker Canvas automatically handles missing values in your dataset while it builds the model. It will also apply other data prep transformations for you to get the data ready for ML.

  1. After your model begins building, you can leave the page.

When the model shows as Ready on the My models page, it’s ready for analysis and predictions.

  1. After the model is built, navigate to My models, choose View to view the model you created, and choose the most recent version.
  2. Go to the Analyze tab to see the impact of each feature on the prediction.
  3. For additional information on the model’s predictions, navigate to the Scoring tab.
  4. Choose Predict to initiate a product prediction.

Deploy the model and make predictions

Complete the following steps to deploy your model and start making predictions:

  1. You can choose to make either batch or single predictions. For the purpose of this post, we choose Single prediction.

When you choose Single prediction, SageMaker Canvas displays the features that you can provide inputs for.

  1. You can change the values by choosing Update and view the real-time prediction.

The accuracy of the model as well as the impact of each feature for that specific prediction will be displayed.

  1. To deploy the model, provide a deployment name, select an instance type and instance count, and choose Deploy.

Model deployment will take a few minutes.

Model status is updated to In Service after the deployment is successful.

SageMaker Canvas provides an option to test the deployment.

  1. Choose View details.

The Details tab provides the model endpoint details. Instance type, count, input format, response content, and endpoint are some of key details displayed.

  1. Choose Test deployment to test the deployed endpoint.

Similar to single prediction, the view displays the input features and provides an option to update and test the endpoint in real time.

The new prediction along with the endpoint invocation result is returned to the user.

Create API to expose SageMaker Endpoint

To generate predictions that power business applications in Salesforce, you need to expose the SageMaker inference endpoint created by your SageMaker Canvas deployment via API Gateway and register it in Salesforce Einstein.

The request and response formats vary between Salesforce Einstein and SageMaker inference endpoint. You could either use API Gateway to perform the transformation or use AWS Lambda to transform the request and map the response. Refer to Call an Amazon SageMaker model endpoint using Amazon API Gateway and AWS Lambda to expose a SageMaker endpoint via Lambda and API Gateway.

The following code snippet is a Lambda function to transform the request and the response

import json
import boto3
import os
client = boto3.client("runtime.sagemaker")
endpoint = os.environ['SAGEMAKER_ENDPOINT_NAME']
prediction_label = 'product_purchased__c'

def lambda_handler(event, context):
        features=[]
        # Input Sample : {"instances": [{"features": ["Washington", 1, "New Colors", 1, 1, 1, 1, 1, 1, 1, 1]}, {"features": ["California", 1, "Web", 100, 1, 1, 100, 1, 10, 1, 1]}]}
        for instance in event["instances"]:
            features.append(','.join(map(str, instance["features"])))
        body='n'.join(features)
        response = client.invoke_endpoint(EndpointName=endpoint,ContentType="text/csv",Body=body,Accept="application/json")
        response =  json.loads(response['Body'].read().decode('utf-8'))
        prediction_response={"predictions":[]}
        for prediction in response.get('predictions'):
            prediction_response['predictions'].append({prediction_label:prediction['predicted_label']})
        return prediction_response

Update the endpoint and prediction_label values in the Lambda function based on your configuration.

  1. Add an environment variable SAGEMAKER_ENDPOINT_NAME to capture the SageMaker inference endpoint.
  2. Set the prediction label to match the model output JSON key that is registered in Einstein Studio.

The default timeout for a Lambda function is 3 seconds. Depending on the prediction request input size, the SageMaker real-time inference API may take more than 3 seconds to respond.

  1. Increase the Lambda function timeout but keep it below the API Gateway default integration timeout, which is 29 seconds.

Register the model in Salesforce Einstein Studio

To register the API Gateway endpoint in Einstein Studio, refer to Bring Your Own AI Models to Data Cloud.

Conclusion

In this post, we explained how you can use SageMaker Canvas to connect to Salesforce Data Cloud and generate predictions through automated ML features without writing a single line of code. We demonstrated the SageMaker Canvas model build capability to conduct an early preview of your model performance before running the standard build that trains the model with the full dataset. We also showcased post-model creation activities like using the single predictions interface within SageMaker Canvas and understanding your predictions using feature importance. Next, we used the SageMaker endpoint created in SageMaker Canvas and made it available as an API so you can integrate it with Salesforce Einstein Studio and create powerful Salesforce applications.

In an upcoming post, we will show you how to use data from Salesforce Data Cloud in SageMaker Canvas to make data insights and preparation even more straightforward by using a visual interface and simple natural language prompts.

To get started with SageMaker Canvas, see SageMaker Canvas immersion day and refer to Getting started with Amazon SageMaker Canvas.


About the authors

Daryl Martis is the Director of Product for Einstein Studio at Salesforce Data Cloud. He has over 10 years of experience in planning, building, launching, and managing world-class solutions for enterprise customers, including AI/ML and cloud solutions. He has previously worked in the financial services industry in New York City. Follow him on Linkedin.

Rachna Chadha is a Principal Solutions Architect AI/ML in Strategic Accounts at AWS. Rachna is an optimist who believes that ethical and responsible use of AI can improve society in the future and bring economic and social prosperity. In her spare time, Rachna likes spending time with her family, hiking, and listening to music.

Ife Stewart is a Principal Solutions Architect in the Strategic ISV segment at AWS. She has been engaged with Salesforce Data Cloud over the last 2 years to help build integrated customer experiences across Salesforce and AWS. Ife has over 10 years of experience in technology. She is an advocate for diversity and inclusion in the technology field.

 Ravi Bhattiprolu is a Sr. Partner Solutions Architect at AWS. Ravi works with strategic partners, Salesforce and Tableau, to deliver innovative and well-architected products and solutions that help joint customers realize their business objectives.

Miriam Lebowitz is a Solutions Architect in the Strategic ISV segment at AWS. She is engaged with teams across Salesforce, including Salesforce Data Cloud, and specializes in data analytics. Outside of work, she enjoys baking, traveling, and spending quality time with friends and family.

Read More