CECILY MORRISON: Thank you, Gretchen.
KAROLINA PAKĖNAITĖ: Yeah, thank you.
HUIZINGA: Before we hear more about Find My Things, let’s get to know the both of you. And, Cecily, I’ll start with you. Give us a brief overview of your background, including your training and expertise, and what you’re up to in general right now. We’ll get specific shortly, but I just want to have sort of the umbrella of your raison d’être, or your reason for research being, as it were.
MORRISON: Sure, I’m a researcher in human-computer interaction with a very specific focus on AI and inclusion. Now this for me brings together an undergraduate degree in anthropology—understanding people—a PhD in computer science—understanding computers and technology—as well as a life role as a parent of a disabled child. And I’m currently leading a team that’s really trying to push the boundaries of what’s possible in human-AI interaction and motivated by creating technologies that lead us to a more inclusive world.
HUIZINGA: As a quick follow-up, Cecily, for our non-UK listeners, tell us what MBE stands for and why you were awarded this honor.
MORRISON: Yes, MBE. I also had to look it up when I first received the, uh, the award. [LAUGHTER] It stands for Member of the British Empire, and it’s part of the UK honor system. My MBE was awarded in 2020 for services to inclusive design. Now much of my career at Microsoft Research has been dedicated to innovating inclusive technology and then ensuring that it gets into the hands for those whom we made it for.
HUIZINGA: Right. Was there a big ceremony?
MORRISON: Things were a little bit different during the, the COVID times, but I did have the honor of going to Buckingham Palace to receive the award. And it was a wonderful time bringing my mother and my manager, uh, the important women around me, who’ve made it possible for me to do this work.
HUIZINGA: That’s wonderful. Well, Karolina, let’s talk to you for a minute here. You’re one of the most unique guests we’ve ever had on this podcast. Tell us a bit about yourself. Obviously, we’d like to know where you’re studying and what you’re studying, but this would be a great opportunity to share a little bit about your life story, including the rare condition that brought you to this collaboration.
PAKĖNAITĖ: Thank you so much again for having me. What an amazing opportunity to be here on the podcast. So I’m a PhD student at the University of Bath looking into making visual photographs accessible through text. Maybe you can tell from my speech that I am deaf-blind. So I got diagnosed with Usher syndrome type 2A at the age of 19, which means that I was born hard of hearing but then started to lose sight just around my early 20s. It has been a journey accepting this condition, but it’s also brought me some opportunities like becoming part of this collaboration for Microsoft Research project.
HUIZINGA: Karolina, a quick follow-up for you. Because of the nature of your condition, you’ve encountered some unique challenges, um, one of which made the news a couple of years ago. Can you talk a little bit about how perceptions about people with varying degrees of disability can cause skepticism, both from others and in fact, as you’ve pointed out, yourself? What can we learn about this here?
PAKĖNAITĖ: Yeah, so I have experienced many misunderstandings, and I know I’m not alone. So I have tunnel vision, a progressive condition at the stage where my specialists have registered me as blind instead of partially sighted. My central sight is still excellent, so that means I can still make eye contact, read books, do photography. Some people even tell me that I don’t look blind, but what does that even mean? [LAUGHTER] So since my early 20s, I became very, very clumsy. I stepped over children, walked into elderly, stepped on cat tails, experienced too many near-miss car accidents. So my brain no longer processes the world in the same way as before. But, yeah, for the longest time in my sight-loss journey, I felt like I had imposter syndrome, being completely skeptical about my own diagnosis despite the clumsy experiences, extensive eye tests, and genetic confirmation. I think the major reason is because of a lack of representation of the blind community in the media. Blindness is not black and white. Statistically, most of us have some remaining vision. Disability is not about having a certain look. This also applies to people with some form of visual impairment. I love it, how I can … how there’s so many more new Instagrammers and YouTubers who are just like me, but I still think there is a long way to go before having disability representation becoming a norm for greater understanding and inclusivity.
HUIZINGA: You know, I have to say, this is a great reminder that there is a kind of a spectrum of ability, and that we should be gracious to people as opposed to critical of them. So, um, thank you so much for that understanding that you bring to this, Karolina. Before we get into specifics of this collaboration—and that’s what we’re here for on this podcast—I think the idea of Teachable AI warrants some explication. So, Cecily, what is Teachable AI, and why is it an important line of research, including its applications in things like Find My Things?
MORRISON: Gretchen, that’s a great question. Teachable AI enables users to provide examples or higher-level constraints to an AI model in order to personalize that AI system to meet their own needs. Now most people are familiar with personalization. Our favorite shopping site or entertainment service offers us personalized suggestions. But we don’t always have a way to shape those suggestions. So you can imagine it’s pretty annoying, for example, if you keep being offered nappies by your favorite shopping service because you’ve been buying them for a friend, but actually, you don’t have or even plan to have a baby. So now Teachable AI gives, us—the user—agency in personalizing that AI system to make a choice about what are the things you want to be reflected in yourself, your identity, when you work or interact with that AI system? Now this is really important for AI systems that enable inclusion. So if we consider disability to be a mismatch between a person’s capabilities and their environment, then AI has a really significant role to play in reducing that mismatch. However, as we were working on this, we soon discovered that the number of potential mismatches between a person and their environment is incredibly large. I mean, it’s like the number of stars, right.
HUIZINGA: Right, right.
MORRISON: Because disability is a really heterogeneous group. But then we say, oh, well, let’s just consider people who are blind. Well, as Karolina has just shown us, um, even people who are blind are very, very diverse. So there are people with different amounts of vision or different types of vision. People who have different … experience the world with vision or without. People can lose their vision later in life. They can be born blind. People have different personalities. Some people are happy to go with whatever. Some people not so much.
HUIZINGA: Right.
MORRISON: People are from different cultures. Maybe they, they are used to being in an interdependent context. Other people might have intersecting disabilities like deaf-blindness and have, again, its own set of needs. So as we got into building AI for accessibility and AI for inclusion more generally, we realized that we needed to figure out how can we make AI systems work for individuals, not quote-unquote “people with disabilities”? So we focused on Teachable AI so that each user could shape the AI system to work for their own needs as an individual in a way that they choose, not somebody else. So Find My Things is a simple but working example of a Teachable AI system. And in this example, people can personalize a object finder or object detector for the personal items that matter to them. And they can do this by taking four videos of that personal item that’s important to them and then training, on their phone, a little model that will then recognize those items and guide them to those items. So you might say, well, recognizing objects with phone, we can do that now for a couple of years. And that’s very true. But much of what’s been recognizable wasn’t necessarily very helpful for people who are blind and low vision. Now it’s great if you can recognize doors, chairs, but carnivores and sombrero hats? [LAUGHTER] You know, perhaps this is less handy on a day-to-day basis. But your own keys, your friend’s front door, your guide cane, maybe even the TV remote that somebody’s always putting somewhere else. I mean these are the things that people want to keep track of. And each person has their own set of things that they want. So the Find My Things research prototype allows people to choose what they want to train or to teach to their phone and then be able to teach it and to find those things.
HUIZINGA: OK, so just to clarify, I have my phone. I’ve trained it to find certain objects that I want to find. What’s the mechanism that I use to say, what, you know … do you just say, “Find my keys,” and your phone leads you there through beeps or, you know, Marco Polo? Closer? Warmer?
MORRISON: Sure, how, how does it work?
HUIZINGA: Yeah!
MORRISON: Well, that’s a great question. So you then have a list of things that you can find. So for most people, there’s five or 10 things that are pretty important to them. And then you would find that … then you would scan your phone around the room. And you need to be within sort of 4 to 6 meters of something that you want to find. So if, if it’s in your back studio in the garden, it’s not going to find it. It’s not telepathic in that regard. It’s a computer vision system using vision. If it’s underneath your sofa, you probably won’t find it either. But we found that with all things human-AI interaction, we, we rely on the interaction between the person and the AI to make things work. So most people know where things might be. So if you’re looking for a TV remote, it’s probably not in the bathtub, right? It’s probably going to be somewhere in the living room, but, you know, your, your daughter or your brother or your housemate might have dropped it on the floor; they might have accidentally taken it into the kitchen. But you probably have some good ideas of where that thing might be. So this is then going to help you find it a little bit faster so you don’t need to get on your hands and knees and feel around to where it is.
HUIZINGA: Gotcha. The only downside of this is “find my phone,” which would help me find my things! [LAUGHTER] Anyway, that’s all …
MORRISON: Well, well, I think Apple has solved that one.
HUIZINGA: They do! They have, they have an app. Find My phone. I don’t know how that works. Well, listen, let’s talk about the collaboration a bit and, and talk about the meetup, as I say, on how you started working together. I like to call this bit “how I met your mother” because I’m always interested to hear each side of the collaboration story. So, Karolina, why don’t you take the lead here and then Cecily can fill in the blanks from her side on how you got together.
PAKĖNAITĖ: Um, yeah, so I found this opportunity to join this collaboration for Microsoft Research project as a citizen designer through an email newsletter from a charity, VICTA. From the newsletter, it looked like it was organized in a way where you were way more than just a participant for another research project. It looked like an amazing opportunity to actually get some experiences and skills. So gaining just as much as giving. So, yeah, I thought that I shouldn’t miss out.
HUIZINGA: So you responded to the email, “Yeah, I’m in.”
PAKĖNAITĖ: Yeah.
HUIZINGA: Cecily, what, what was going on from your side? How did you put this out there with this charity and bring this thing together?
MORRISON: So VICTA is a fantastic charity in the UK that works with, uh, blind and low vision young people up to the age of 30. And they’re constantly trying to bring educational and meaningful experiences to the people that they serve. And we thought this would be a great moment of collaboration where we could bring an educational experience about learning how to do design and they could help us reach out to the people who might want to learn about design and might want to be part of this collaboration.
HUIZINGA: So Karolina was one of many? How many other citizen designers on this project did you end up with?
MORRISON: Oh, that’s a great question. We had a lot of interest, I do have to say, and from there, we selected eight citizen designers from around the UK who were willing to make the journey to Cambridge and work with us over a period of almost six months. People came up to us about monthly, although we did some virtual ones, as well.
HUIZINGA: Well, Cecily, let’s talk about this idea of citizen designers. I, I like that term very much. Inclusive design isn’t new in computer-human interaction circles—or human-computer interaction circles—and you already operate on the principle of “nothing about us without us,” so tell us how the concept of citizen designer is different and why you think citizen designers take user input to another level.
MORRISON: Sure, I think citizen designer is a really interesting concept and one that we, we need more of. But let me first start with inclusive design and how that brings us to think about citizen designers. So inclusive design has been a really productive innovation tool because it brings us unusual constraints to the design problem. Within the Microsoft Inclusive Design toolkit, we refer to this as “designing for one.” And once you’ve got this very novel design that emerges, we then optimize it to work for everyone, or we extend it to many. So this approach really jogs the mind to radical solutions. So let me give you just one example. In years past, we developed a physical coding language to support blind and sighted children to learn to code together. So we thought, ah, OK, sighted children have blocks on a screen, so we’re going to make blocks on a table. Well, our young design team lined up the blocks on the table, put their hands in their lap, and I looked at them and I thought, we failed! [LAUGHTER] So we started again, and we said, OK, show us. And we worked with them to show us what excites the hands. You know, here are kids who live through their hands. You know, what are the shapes? What are the interactions? What are the kinds of things they want to do with their hands? And through this, we developed a completely different base idea and design, and we found that it didn’t just excite the hands of children who are blind or low vision, but it excited the hands of all children. They had brought us their expertise in thinking about the world in a different way. And so now we have this product Code Jumper, which kids just can’t put down.
HUIZINGA: Right.
MORRISON: So that’s great. So we, we know that inclusive design is going to generate great ideas. We also know that diverse teams generate the best ideas because diverse life experience can prompt us to think out of the box. But how do we get diverse teams when it can be hard for people with disabilities to enter the field of design and technology? So design assumes often good visual skills; it assumes the ability to draw. And that can knock out a lot of people who might be great at designing technology experiences without those skills. So with our citizen design team, we wanted to open up the opportunity to young people who are blind and low vision to really set the stage for them to think about what would a career in technology design be like? Could I be part of this? Can I be that generation who’s going to design the next cohort of accessible, inclusive technologies? So we did this through teaching key design skills like the design process itself, prototyping, as well as having, uh, this team act as full members of our own R&D team, so in an apprenticeship style. So our citizen designers weren’t just giving feedback as, as participants might, but they were creating prototypes, running A/B tests, and it was our hope and I think we succeeded in making it a give-give situation. We were giving them a set of skills, and they were giving us their design knowledge that was really valuable to our innovation process.
HUIZINGA: That is so awesome. I’m, you know, just thinking of, of the sense of belonging that you might get instead of being, as Karolina kind of referred to, it’s not just another user-research study where you’ll go and be part of a project that someone else is doing. You’re actually integrally connected to the project. And on that note, Karolina, talk a little bit about what it’s like to be a citizen designer. What were some of your aha moments on the project, maybe the items that you wanted to be able to find and what surprises you encountered in the process of developing a technique to teach a personal item?
PAKĖNAITĖ: Yeah, so it was, uh, incredibly fascinating to play the role of a citizen designer and testing a Teachable AI for use and providing further comments. It took me a bit of time to really understand how this tool is different from existing ones, but then I realized it’s literally in the name, a Teachable AI. [LAUGHTER] So it’s a tool designed for teaching it about your very own personal items. Yeah, your items may, may not look like a typical standard item; maybe you personalized them with engravings or stickers, or maybe it’s a unique gadget or maybe, say, a medical device. So it’s not about teaching every single item that you own, but rather a tool, a tool that lets us identify what matters most to you. So, yeah, I have about five to 10 small personal items that I always carry with me, and most of them are like very, very, very important to me. Like losing a bus pass means I can’t get anywhere. Losing a key means I can’t get home. Because these items are small and I use them daily, that means they are also, uh, being lost most commonly. So now I have a tool that is able to locate my personal items if they happen to be lost.
HUIZINGA: Right. And as you said earlier, you do have some sight. It’s, it’s tunnel vision at this point, so the peripheral part, um, is more challenging for you. But having this tool helps you to focus in a broader spectrum of, of visual sight. Cecily, this would be a great time to get a bit more specific about your Teachable AI discovery process. Tell us some research stories. How did you go about optimizing this AI system, and what things did you learn from both your successes and your failures?
MORRISON: Ah, yes, lots of research stories with this system, I’m afraid, but I think the very first thing we did was, OK, a user wants to teach this system, so we need to tell the user what makes a good teaching example. Well, we don’t know. Actually, we assumed we did know because in machine learning, the idea is more data, better quote-unquote “quality data,” and the system will work better. So the first thing that really surprised us when we actually ran some experimental analysis was that more data was not better and higher-quality data, or data that has less blur or is perfectly framed, was also not better. So what we realized is that it wasn’t our aim to kind of squeeze as much data as we could from the users but really to get the data that was the right kind of data. So we did need the object in the image. It’s, it’s really hard to train a system to recognize an object that’s not there at all. But what we needed was data that looked exactly like what the user was going to use when they were finding the objects. So if the user moves the camera really fast and the image becomes blurry, then we need those teaching examples to have blur, too.
HUIZINGA: Right.
MORRISON: So it was in understanding this relationship between the teaching examples and the user that really helped us craft a process that was going to help the user get the best result from the system. One of the things about Teachable AI is that it’s not about the AI system. It’s about the relationship between the user and the AI system. And the key to that relationship is the mental model of the user. They need to make good judgments about how to give good teaching examples if we want that whole cycle between user and AI system to go well. So I remember watching Karolina taking her teaching frames, and she was moving very far away. And I was thinking, hmm, I don’t think that data is going to work very well because there’s just not going to be enough pixels of the object to make a good representation for the system. So I asked Karolina about her strategy, and she said, well, if I want it to work from far away, then I should take teaching examples from far away. And I thought, ah, that’s a very logical mental model.
HUIZINGA: Right.
MORRISON: But unfortunately, we’ve broken the user’s mental model because that’s not actually how the system works because we were cropping frames and taking pixels out and doing all kinds of fancy image manipulation to, actually, to improve the performance under the hood. So I think this was an experience where we thought, ah, we want the user to develop a good mental model, but to do that, we need to actually structure this teaching process so they don’t need to think so hard and we’re guiding them into the, the kinds of things that make the system work well as opposed to not, and then they don’t need to guess. So the other thing that we found was that teaching should be fast and easy. Otherwise, it’s just too much work. No matter how personalized something is, if you have to work too hard, it’s a no-go. So we thought, ah, we want this to be really fast. We want it to take as few frames as possible. And we want the users to be really confident that they’ve got the object in the frame because that’s the one thing we really need. So we’re going to tell them all the time if the object’s in the frame: it’s in frame; it’s in frame; it’s in frame; it’s in frame; it’s in frame; it’s in frame. Well, there’s … citizen designers [LAUGHTER], including Karolina, came back to us and said, you know, this is really stressful. You know, I’m constantly worrying, “Is it in frame? Is it in frame? Is it in frame?” And actually, the cognitive load of that, even though we were trying to make the process really, really easy, um, was, was really overwhelming. And one of them said to us, well, why don’t I just assume that I’m doing a good job unless you tell me otherwise? [LAUGHTER] And that really helped shift our mindset to say, well, OK, we can help the user by giving them a gentle nudge back on track, but we don’t need to grab all their cognitive attention to make the perfect video!
HUIZINGA: [LAUGHS] That’s, that’s so hilarious. Well, Cecily, I want to stay with you for a minute and discuss the broader benefits of what you call “designing outside the mean.” And despite the challenges of developing technologies, we’ve seen specialized research deliver the so-called curb-cut effect over and over. Now you’ve already alluded to this a bit earlier. But clearly people with blindness and low vision aren’t the only ones who can’t find their things. So might this research help other people? Could it, could it be something I could incorporate into my phone?
MORRISON: That’s a great question. And I think an important question when we do any research is how do we broaden this out to meet the, the widest need possible? So I’m going to think about rather than Find My Things specifically, I’m going to think about Teachable AI. And Teachable AI should benefit everybody who needs something specific to themselves. And who of us don’t think that we need things to be specific to ourselves in this day and age?
HUIZINGA: Right … [LAUGHS]
MORRISON: But it’s going to be particularly useful for people on the margins of technology design for many reasons. So it doesn’t matter—it could be where your home is different or the way you go about your daily lives or perhaps the intersection of your identities. By having Teachable AI, we make systems that are going to work for individuals. Regardless of the labels that you might have or the life experience you might have, we want an AI system that works for you. And this is an approach that’s moving us in that direction.
HUIZINGA: You know, I love … I, I remembered what you said earlier, and it was for individuals, not people with disabilities. And I just love that framing anyway because we’re all individuals, and everyone has some kind of a disability, whether you call it that or not. So I just love this work so much. Karolina, back to you for a minute. You have said you’re a very tactile person. What role does haptics, which is the touch/feel part of computer science, play for you in this research, and how do physical cues work for you in this technology?
PAKĖNAITĖ: Yeah, so because I’m deaf-blind, I think my brain naturally craves information through senses which I have full access to. For me, it’s touch. So I find it very stimulating when the tools are tactile, whether that’s vibrations or textures. Tactile feedback not only enhances the experiences, but I think it’s also a good accessibility cue, as well. For example, one big instance happened that as a citizen designer was when I was pointing my camera at an object and, being hard of hearing, that means I couldn’t hear what it was saying, so I had to bring it close to my, my ear, and that meant that the object was lost in the camera view. [LAUGHS]
HUIZINGA: Right … [LAUGHS]
PAKĖNAITĖ: So … yeah, yeah, I think having tactile cues could be very beneficial for people like me who are deaf-blind but also others. Like, for example, you don’t always want your phone to be on sound all the time. Maybe in a quiet train, in a quiet tube, you don’t want your phone to start talking; you might be feeling self-conscious. So, yeah, I think …
HUIZINGA: Right …
PAKĖNAITĖ: … always adding those tactile cues will benefit me and everyone else.
HUIZINGA: Yeah, so to clarify, is haptics or touch involved in any of this particular Teachable AI technology, Cecily? I know that Karolina has that as a, you know, a “want to have” kind of thing. Where does it stand here?
MORRISON: Yeah, no, I, I think Karolina’s participation, um, was actually fairly critical in us adding, um, vibration cues to the experience.
HUIZINGA: Yeah, so it does use the, the haptic …
MORRISON: Yeah, we use auditory, visual, and, and vibration as a means of interaction. And I think in general, we should be designing all of our experiences with technology to be multisensory because, as Karolina pointed out, in certain circumstances, you don’t really want your computer talking at you. In other circumstances, you need something else. And in our different individual needs, we might need something else. So this allows people to be as flexible as possible for their context and for their own needs to make an experience work for them.
HUIZINGA: Right. Yeah, and I feel like this is already kind of part of our lives when our phones buzz or, or, you know, vibrate or when you wear the watch that gives you a little tip on your wrist that you’ve got a notification or you need to turn left or [LAUGHTER] whatever you’re using it for. Cecily, I always like to know where a project is on the spectrum from lab to life, as we say on this show. What’s the status of Teachable AI in general and Find My Things in particular, and how close is it to being able to be used in real life by a broader audience than your citizen designers and your team?
MORRISON: So it’s really important for us that the technologies we research become available to the communities to whom they are valuable. And in the past, we’ve had a whole set of partners, including Seeing AI, American Printing House for the Blind, to help us take ideas, research prototypes, and make them into products that people can have. Now Teachable AI is a grand vision. I think we are … showed with this work in Find My Things that the machine learning is there. We can do this, and it’s coming. And as we move into this new era of machine learning with these very large models, we’re going to need it there, too, because the larger the model, the more personalized we’re probably going to need the experience. In terms of Find My Things, we are also on that journey to finding the right opportunity to bring it out to the blind community.
HUIZINGA: So this has been fascinating. I’m … there’s so many more questions I want to ask, but we don’t have a lot of time to ask them all. I’m sure that we’re going to be watching as this unfolds and probably becomes part of all of our lives at some point thanks to the wonderful people doing the research. I like to end the podcast with a little future casting from each of my guests, and, Karolina, I’d like you to go first. I have a very specific question for you. Aside from your studies and your research work, you’ve said you’re on a mission. What’s that mission, and what does Mount Everest have to do with it?
PAKĖNAITĖ: So firstly, I’m hoping to complete my PhD this year. That’s my big priority for, for this year. And then, uh, I will be on a mission, an ambitious one that I feel a little bit nervous to share but also very excited. As an adventurer at heart, my dream is to summit Mount Everest. So before it’s always seemed like a fantasy, but I recently came back from an Everest base camp trek just a few months ago, and I met some mountaineers who were on their way to the top, and I found myself quietly saying, what if? And then, as I was thinking how I’m slowly losing my sight, I realized that if I do want to summit Everest, I would want to go there while I still can see with my remaining vision, so I realized that it would have to be now or never.
HUIZINGA: Right!
PAKĖNAITĖ: So when I came back, I decided … I just made some actions. So I reached out to different organizations and surprisingly a film production team is eager to document this journey and … yeah, it seems like something might be happening. So this mission isn’t just about me potentially becoming the first deaf-blind person to summit Everest but also a commitment to raising awareness and providing representation for the blind and deaf-blind community. I hope to stay in the research field, and I believe this mission has some potential for research. So I think that, for example, I’m looking for accessibility tools for, for me to climb Everest so that I can be the best climber I can be as a deaf-blind person, being independent but part of the team, or maybe make a documentary film a multisensory experience, accessible to a wider community, including deaf-blind. So, yeah, I’m actively looking for collaborators and would love to be contacted by anyone.
HUIZINGA: I love the fact that you are bringing awareness to the fact, first of all, that the deaf-blind community or even the blind community isn’t a one-size-fits-all. So, um, yeah, I hope you get to summit Everest to be able to see the world from the tallest peak in the world before anything progresses that way. Well, Cecily, I’d like to close with you. Go with me on a little forward-thinking, backward-thinking journey. You’re at the end of your career looking back. What have you accomplished as a researcher, and how has your work disrupted the field of accessible technology and made the world a better place?
MORRISON: Where would I like to be? I would say more like where would we like to be. So in collaboration with colleagues, I hope we have brought a sense of individual’s agency in their experience with AI systems, which allow people to shape them for their own unique experience, whoever they might be and wherever they might be in the world. And I think this idea is no less important, or perhaps it’s even more important, as we move into a world of large foundation models that underpin many or perhaps all of our experiences as we, as we go forward. And I think particularly large foundation models will bring really significant change to accessibility, and I hope the approach of teachability will be a significantly positive influence in making those experiences just what we need them to be. And I have to say, in my life role, I’m personally really very hopeful for my own blind child’s opportunities in the world of work in 10 years’ time. At the moment, only 25 percent of people who are blind or low vision work. I think technology can play a huge role in getting rid of this mismatch between the environment and a person and allowing many more people with disabilities to enjoy being in the workplace.
HUIZINGA: This is exciting research and really a wonderful collaboration. I’m so grateful, Cecily Morrison and Karolina Pakėnaitė, for coming on the show and talking about it with us today. Thank you so much.
MORRISON: Thank you, Gretchen, and thank you, Karolina.
PAKĖNAITĖ: Thank you.


 Posted by the TensorFlow team


 Apoorv Gupta is a Software Development Engineer at AWS, focused on building optimal deep learning systems for AWS infrastructure and hardware. He is interested in distributed computing, deep learning systems, and ML accelerators. Outside of work, Apoorv enjoys traveling, hiking, and video games.
 Karan Dhiman is a Software Development Engineer at AWS, based in Toronto, Canada. He is very passionate about the machine learning space and building solutions for accelerating distributed computed workloads.
 Ruhan Prasad is a Software Development Engineer at AWS who is working on making distributed deep learning training faster, cheaper, and easier to use on SageMaker. Outside of work, Ruhan enjoys playing tennis, traveling, and cooking.
 Zhaoqi Zhu is a Senior Software Development Engineer at AWS, passionate about distributed systems and low level optimizations. He enjoys watching soccer matches while drinking (non-diet) soda.


 Amit Chaudhary is a Senior Solutions Architect at Amazon Web Services. His focus area is AI/ML, and he helps customers with generative AI, large language models, and prompt engineering. Outside of work, Amit enjoys spending time with his family.
 Yanyan Zhang is a Senior Data Scientist in the Energy Delivery team with AWS Professional Services. She is passionate about helping customers solve real problems with AI/ML knowledge. Recently, her focus has been on exploring the potential of Generative AI and LLM. Outside of work, she loves traveling, working out and exploring new things.
 Nikhil Jha is a Senior Technical Account Manager at Amazon Web Services. His focus areas include AI/ML, and analytics. In his spare time, he enjoys playing badminton with his daughter and exploring the outdoors.
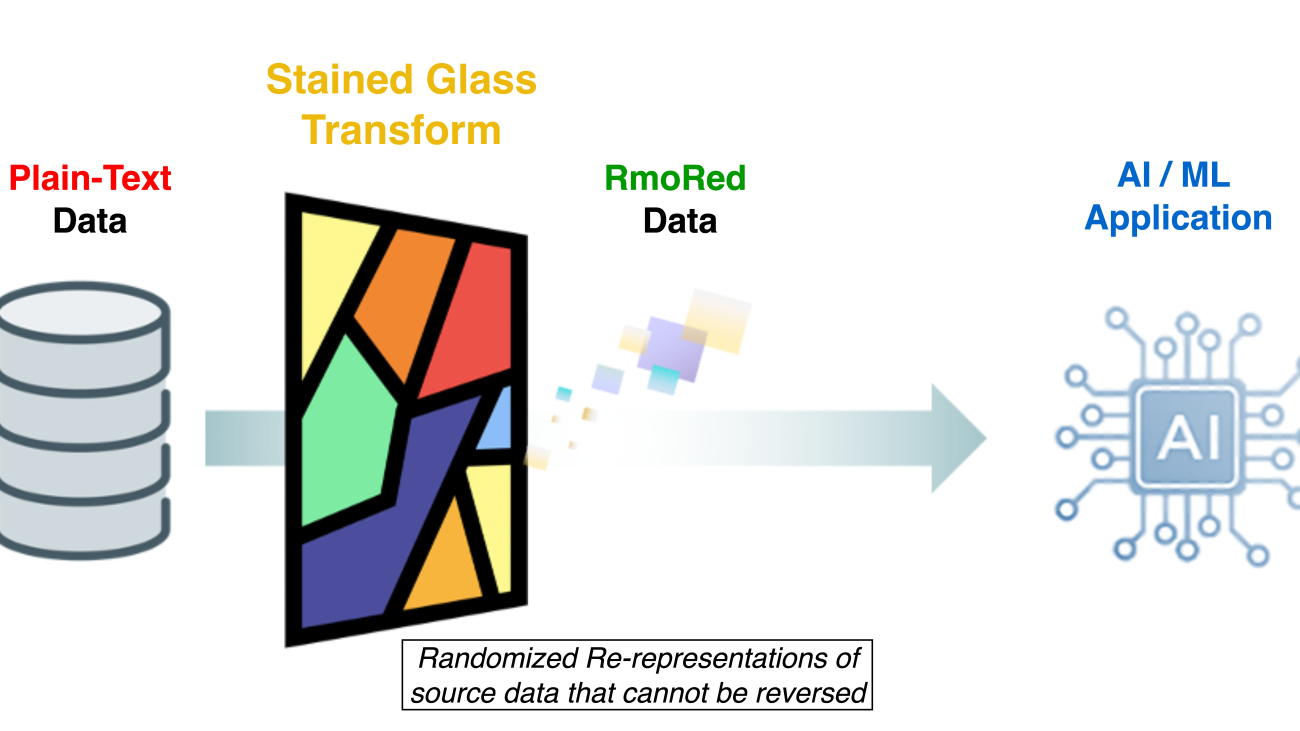


 Balaji Chandrasekaran is the VP for Go-to-Market & Customer Enablement at Protopia AI, works closely with clients to leverage AI in their business while prioritizing data protection and privacy. Prior to Protopia AI, Balaji was the Product Lead for AI Solutions at Infor, developing value-centric products while acting as a trusted partner for enterprise customers across diverse industries. Outside work, he enjoys music, hiking, and traveling with family.
 Jennifer Cwagenberg leads the engineering team at Protopia AI and works to ensure that the Stained Glass technology meets the needs of their customers to protect their data. Jennifer has prior experience with security working at Toyota in their Product Cybersecurity Group, managing Cloud workloads at N-able, and responsible for data at Match.com.
 Andrew Sansom is an AI Solutions Engineer at Protopia AI where he helps enterprises use AI while preserving private and sensitive information in their data. Prior to Protopia AI, he worked as a Technical Consultant focused on enabling AI solutions for clients across many industries including Finance, Manufacturing, Healthcare, and Education. He also taught Computer Science and Math to High School, University, and Professional students.
 Eiman Ebrahimi, PhD, is a co-founder and the Chief Executive Officer of Protopia AI. Dr. Ebrahimi is passionate about enabling AI to enrich the human experience across different societal and industry verticals. Protopia AI is a vision for enhancing the lens through which AI observes the necessary and quality data it needs while creating novel capabilities for safeguarding sensitive information. Prior to Protopia AI, he was a Senior Research Scientist at NVIDIA for 9 years. His work at NVIDIA research aimed to solve problems of accessing massive datasets in ML/AI. He also co-authored peer-reviewed publications on how to utilize the power of thousands of GPUs to make training large language models feasible.
 Rohit Talluri is a Generative AI GTM Specialist at Amazon Web Services (AWS). He is partnering with top generative AI model builders, strategic customers, key AI/ML partners, and AWS Service Teams to enable the next generation of artificial intelligence, machine learning, and accelerated computing on AWS. He was previously an Enterprise Solutions Architect, and the Global Solutions Lead for AWS Mergers & Acquisitions Advisory.


 THANK YOU FOR 500 RTX GAMES & APPS
  Comment