TensorFlow Model Optimization Toolkit — Collaborative Optimization API

A guest post by Mohamed Nour Abouelseoud and Elena Zhelezina at Arm.

This blog post introduces collaborative techniques for machine learning model optimization for edge devices, proposed and contributed by Arm to the TensorFlow Model Optimization Toolkit, available starting from release v0.7.0.

The main idea of the collaborative optimization pipeline is to apply the different optimization techniques in the TensorFlow Model Optimization Toolkit one after another while maintaining the balance between compression and accuracy required for deployment. This leads to significant reduction in the model size and could improve inference speed given framework and hardware-specific support such as that offered by the Arm Ethos-N and Ethos-U NPUs.

This work is a part of the toolkit’s roadmap to support the development of smaller and faster ML models. You can see previous posts on post-training quantization, quantization-aware training, sparsity, and clustering for more background on the toolkit and what it can do.

What is Collaborative Optimization? And why?

The motivation behind collaborative optimization remains the same as that behind the Model Optimization Toolkit (TFMOT) in general, which is to enable model conditioning and compression for improving deployment to edge devices. The push towards edge computing and endpoint-oriented AI creates high demand for such tools and techniques. The Collaborative Optimization API stacks all of the available techniques for model optimization to take advantage of their cumulative effect and achieve the best model compression while maintaining required accuracy.

Given the following optimization techniques, various combinations for deployment are possible:

In other words, it is possible to apply one or both of pruning and clustering, followed by post-training quantization or QAT before deployment.

The challenge in combining these techniques is that the APIs don’t consider previous ones, with each optimization and fine-tuning process not preserving the results of the preceding technique. This spoils the overall benefit of simultaneously applying them; i.e., clustering doesn’t preserve the sparsity introduced by the pruning process and the fine-tuning process of QAT loses both the pruning and clustering benefits. To overcome these problems, we introduce the following collaborative optimization techniques:

Considered together, along with the option of post-training quantization instead of QAT, these provide several paths for deployment, visualized in the following deployment tree, where the leaf nodes are deployment-ready models, meaning they are fully quantized and in TFLite format. The green fill indicates steps where retraining/fine-tuning is required and a dashed red border highlights the collaborative optimization steps. The technique used to obtain a model at a given node is indicated in the corresponding label.

Keras Model Flow Chart

The direct, quantization-only (post-training or QAT) deployment path is omitted in the figure above.

The idea is to reach the fully optimized model at the third level of the above deployment tree; however, any of the other levels of optimization could prove satisfactory and achieve the required inference latency, compression, and accuracy target, in which case no further optimization is needed. The recommended training process would be to iteratively go through the levels of the deployment tree applicable to the target deployment scenario and see if the model fulfils the optimization requirements and, if not, use the corresponding collaborative optimization technique to compress the model further and repeat until the model is fully optimized (pruned, clustered, and quantized), if needed.

To further unlock the improvements in memory usage and speed at inference time associated with collaborative optimization, specialized run-time or compiler software and dedicated machine learning hardware is required. Examples include the Arm ML Ethos-N driver stack for the Ethos-N processor and the Ethos-U Vela compiler for the Ethos-U processor. Both examples currently require quantizing and converting optimized Keras models to TensorFlow Lite first.

The figure below shows the density plots of a sample weight kernel going through the full collaborative optimization pipeline.

Quantized deployment model with reduced number of unique values

The result is a quantized deployment model with a reduced number of unique values as well as a significant number of sparse weights, depending on the target sparsity specified at training time. This results in substantial model compression advantages and significantly reduced inference latency on specialized hardware.

Compression and accuracy results

The tables below show the results of running several experiments on popular models, demonstrating the compression benefits vs. accuracy loss incurred by applying these techniques. More aggressive optimizations can be applied, but at the cost of accuracy. Though the table below includes measurements for TensorFlow Lite models, similar benefits are observed for other serialization formats.

Sparsity-preserving Quantization aware training (PQAT)

Model

Metric

Baseline

Pruned Model (50% sparsity)

QAT Model

PQAT Model

DS-CNN-L

FP32 Top-1 Accuracy

95.23%

94.80%

(Fake INT8) 94.721%

(Fake INT8) 94.128%

INT8 Top-1 Accuracy

94.48%

93.80%

94.72%

94.13%

Compression

528,128 → 434,879 (17.66%)

528,128 → 334,154 (36.73%)

512,224 → 403,261 (21.27%)

512,032 → 303,997 (40.63%)

MobileNet_v1 on ImageNet

FP32 Top-1 Accuracy

70.99%

70.11%

(Fake INT8) 70.67%

(Fake INT8) 70.29%

INT8 Top-1 Accuracy

69.37%    

67.82%

70.67%    

70.29%

Compression

4,665,520 → 3,880,331 (16.83%)

4,665,520 → 2,939,734 (37.00%)

4,569,416 → 3,808,781 (16.65%)

4,569,416 → 2,869,600 (37.20%)

Note: DS-CNN-L is a keyword spotting model designed for edge devices. More can be found in Arm’s ML Examples repository.

Cluster-preserving Quantization aware training (CQAT)

Model

Metric

Baseline

Clustered Model

QAT Model

CQAT Model

MobileNet_v1 on CIFAR-10

FP32 Top-1 Accuracy

94.88%

94.48% (16 clusters)    

(Fake INT8) 94.80%

(Fake INT8) 94.60%

INT8 Top-1 Accuracy

94.65%    

94.41% (16 clusters)    

94.77%

94.52%

Size

3,000,000

2,000,000

2,840,000

1,940,000

MobileNet_v1 on ImageNet

FP32 Top-1 Accuracy

71.07%

65.30% (32 clusters)

(Fake INT8) 70.39%

(Fake INT8) 65.35%

INT8 Top-1 Accuracy

69.34%    

60.60% (32 clusters)

70.35%

65.42%

Compression

4,665,568 → 3,886,277 (16.7%)

4,665,568 → 3,035,752 (34.9%)

4,569,416 → 3,804,871 (16.7%)

4,569,472 → 2,912,655 (36.25%)

Sparsity and cluster preserving quantization aware training (PCQAT)

Model

Metric

Baseline

Pruned Model (50% sparsity)

QAT Model

Pruned Clustered Model

PCQAT Model

DS-CNN-L

FP32 Top-1 Accuracy

95.06%

94.07%    

(Fake INT8) 94.85%

93.76% (8 clusters)    

(Fake INT8) 94.28%

INT8 Top-1 Accuracy

94.35%    

93.80%    

94.82%    

93.21% (8 clusters)

94.06%

Compression

506,400 → 425,006 (16.07%)

506,400 → 317,937 (37.22%)

507,296 → 424,368 (16.35%)

506,400 → 205,333

(59.45%)

507,296 → 201,744 (60.23%)

MobileNet_v1 on ImageNet

FP32 Top-1 Accuracy

70.98%

70.49%

(Fake INT8) 70.88%

67.64% (16 clusters)

(Fake INT8) 67.80%

INT8 Top-1 Accuracy

70.37%

69.85%    

70.87%    

66.89% (16 clusters)    

68.63%

Compression

4,665,552 →  3,886,236 (16.70%)

4,665,552 →  2,909,148 (37.65%)

4,569,416 → 3,808,781 (16.65%)

4,665,552 →  2,013,010 (56.85%)    

4,569472 →  1,943,957 (57.46%)

Applying PCQAT

To apply PCQAT, you will need to first use the pruning API to prune the model, then chain it with clustering using the sparsity-preserving clustering API. After that, the QAT API is used along with the custom collaborative optimization quantization scheme. An example is shown below.

import tensorflow_model_optimization as tfmot
model = build_your_model()

# prune model
model_for_pruning = tfmot.sparsity.keras.prune_low_magnitude(model, ...)

model_for_pruning.fit(...)

# pruning wrappers must be stripped before clustering
stripped_pruned_model = tfmot.sparsity.keras.strip_pruning(pruned_model)

After pruning the model, cluster and fit as below.

# Sparsity preserving clustering
from tensorflow_model_optimization.python.core.clustering.keras.experimental import (cluster)

# Specify your clustering parameters along
# with the `preserve_sparsity` flag
clustering_params = {
...,
'preserve_sparsity': True
}

# Cluster and fine-tune as usual
cluster_weights = cluster.cluster_weights
sparsity_clustered_model = cluster_weights(stripped_pruned_model_copy, **clustering_params)
sparsity_clustered_model.compile(...)
sparsity_clustered_model.fit(...)

# Strip clustering wrappers before the PCQAT step
stripped_sparsity_clustered_model = tfmot.clustering.keras.strip_clustering(sparsity_clustered_model)

Then apply PCQAT.

pcqat_annotate_model = quantize.quantize_annotate_model(stripped_sparsity_clustered_model )
pcqat_model = quantize.quantize_apply(quant_aware_annotate_model,scheme=default_8bit_cluster_preserve_quantize_scheme.Default8BitClusterPreserveQuantizeScheme(preserve_sparsity=True))
pcqat_model.compile(...)
pcqat_model.fit(...)

The example above shows the training process to achieve a fully optimized PCQAT model, for the other techniques, please refer to the CQAT, PQAT, and sparsity-preserving clustering example notebooks. Note that the API used for PCQAT is the same as that of CQAT, the only difference being the use of the preserve_sparsity flag to ensure that the zero cluster is preserved during training. The PQAT API usage is similar but uses a different, sparsity preserving, quantization scheme.

Acknowledgments

The features and results presented in this post are the work of many people including the Arm ML Tooling team and our collaborators in Google’s TensorFlow Model Optimization Toolkit team.

From Arm – Anton Kachatkou, Aron Virginas-Tar, Ruomei Yan, Saoirse Stewart, Peng Sun, Elena Zhelezina, Gergely Nagy, Les Bell, Matteo Martincigh, Benjamin Klimczak, Thibaut Goetghebuer-Planchon, Tamás Nyíri, Johan Gras.

From Google – David Rim, Frederic Rechtenstein, Alan Chiao, Pulkit Bhuwalka

Read More

What made me want to fight for fair AI

My life has always involved centering the voices of those historically marginalized in order to foster equitable communities. Growing up, I lived in a small suburb just outside of Cleveland, Ohio and I was fortunate enough to attend Laurel School, an all-girls school focused on encouraging young women to think critically and solve difficult world problems. But my lived experience at school was so different from kids who lived even on my same street. I was grappling with watching families around me contend with an economic recession, losing any financial security that they had and I wanted to do everything I could to change that. Even though my favorite courses at the time were engineering and African American literature, I was encouraged to pursue economics.

I was fortunate enough to continue my education at Princeton University, first starting in the economics department. Unfortunately, I struggled to find the connections between what I was learning and the challenges I saw my community and people of color in the United States facing through the economic crisis. Interestingly enough, it was through an art and social justice movements class in the School of Architecture that I found my fit. Everyday, I focused on building creative solutions to difficult community problems through qualitative research, received feedback and iterated. The deeper I went into my studies, the more I realized that my passion was working with locally-based researchers and organizations to center their voices in designing solutions to complex and large-scale problems. It wasn’t until I came to Google, that I realized this work directly translated to human-centered design and community-based participatory research. My undergraduate studies culminated in the creation of a social good startup focused on providing fresh produce to food deserts in central New Jersey, where our team interviewed over 100 community members and leaders, secured a $16,000 grant, and provided pounds of free fresh produce to local residents.

Already committed to a Ph.D. program in Social Policy at Brandeis University, I channeled my passion for social enterprise and solving complex problems into developing research skills. Knowing that I ultimately did not want to go into academia, I joked with my friends that the job I was searching for didn’t exist yet, but hopefully it would by the time I graduated. I knew that my heart was equal parts in understanding technology and in closing equity gaps, but I did not know how I would be able to do both.

Through Brandeis, I found language to the experiences of family and friends who had lost financial stability during the Great Recession and methodologies for how to research systematic inequalities across human identity. It was in this work that I witnessed Angela Glover-Blackwell, founder of PolicyLink speak for the first time. From her discussion on highlighting community-based equitable practices, I knew I had to support her work. Through their graduate internship program in Oakland, I was able to bridge the gap between research and application – I even found a research topic for my dissertation! And then Mike Brown was shot.

Mike was from the midwest, just like me. He reminded me of my cousins, friends from my block growing up. The experience of watching what happened to Mike Brown so publically, gave weight to the research and policies that I advocated for in my Ph.D. program and at work – it somehow made it more personal than my experience with the Great Recession. At Brandeis, I led a town hall interviewing the late Civil Rights activist and politician Julian Bond, where I still remember his admonishment to shift from talk to action, and to have clear and centralized values and priorities from which to guide equity. In the background of advocating for social justice, I used my work grading papers and teaching courses as a graduate teaching assistant to supplement my doctoral grant – including graduate courses on “Ethics, Rights, and Development” and “Critical Race Theory.”

The next summer I had the privilege of working at a think tank now known as Prosperity Now, supporting local practitioners and highlighting their findings at the national level. This amazing experience was coupled with meeting my now husband, who attended my aunt and uncle’s church. By the end of the summer, my work and personal experiences in DC had become so important that I decided to stay. Finished with my coursework at Brandeis, I wrote my dissertation in the evenings as I shifted to a more permanent position at the Center for Global Policy Solutions, led by Dr. Maya Rockeymoore. I managed national research projects and then brought the findings to the hill for policymakers to make a case for equitable policies like closing the racial wealth gap. Knocking on doors in Capitol buildings taught me the importance of finding shared language and translating research into measurable change.

By the end of 2016, I was a bit burned out by my work on the hill and welcomed the transition of marriage and moving to Los Angeles. The change of scenery allowed me to finally hone my technical skills as a Program Manager for the LA-based ed tech non profit, 9 Dots. I spent my days partnering with school districts, principals, teaching fellows and software developers to provide CS education to historically underserved students. The ability to be a part of a group that created a hybrid working space for new parents was icing on the cake. Soon after, I got a call from a recruiter at Google.

It had been almost a year since Google’s AI Principles had been publicly released and they were searching for candidates that had a deep understanding of socio-technical research and program management to operationalize the Principles. Every role and research pursuit that I’d followed led to my dream role – Senior Strategist focused on centering the voices of historically underrepresented and marginalized communities in machine learning through research and collaboration.

During my time at Google, I’ve had the opportunity to develop an internal workshop focused on equitable and inclusive language practices, which led to a collaboration with UC Berkeley’s Center for Equity, Gender, and Leadership; launch the Equitable AI Research Roundtable along with Jamila Smith-Loud and external experts focused on equitable cross-disciplinary research practices (including PolicyLink!); and present on Google’s work in Responsible AI at industry-wide conferences like MozFest. With all that I’ve learned, I’m still determined to bring more voices to the table. My work in Responsible AI has led me to building out globally-focused resources for machine learning engineers, analysts, and product decision makers. When we center the experiences of our users – the communities who faced the economic recession with grit and resilience, those who searched for insights from Civil Rights leaders, and developed shared language to inspire inclusion – all else will follow. I’m honored to be one of many at Google driving the future of responsible and equitable AI for all.

Read More

Enabling AI-driven health advances without sacrificing patient privacy

There’s a lot of excitement at the intersection of artificial intelligence and health care. AI has already been used to improve disease treatment and detection, discover promising new drugs, identify links between genes and diseases, and more.

By analyzing large datasets and finding patterns, virtually any new algorithm has the potential to help patients — AI researchers just need access to the right data to train and test those algorithms. Hospitals, understandably, are hesitant to share sensitive patient information with research teams. When they do share data, it’s difficult to verify that researchers are only using the data they need and deleting it after they’re done.

Secure AI Labs (SAIL) is addressing those problems with a technology that lets AI algorithms run on encrypted datasets that never leave the data owner’s system. Health care organizations can control how their datasets are used, while researchers can protect the confidentiality of their models and search queries. Neither party needs to see the data or the model to collaborate.

SAIL’s platform can also combine data from multiple sources, creating rich insights that fuel more effective algorithms.

“You shouldn’t have to schmooze with hospital executives for five years before you can run your machine learning algorithm,” says SAIL co-founder and MIT Professor Manolis Kellis, who co-founded the company with CEO Anne Kim ’16, SM ’17. “Our goal is to help patients, to help machine learning scientists, and to create new therapeutics. We want new algorithms — the best algorithms — to be applied to the biggest possible data set.”

SAIL has already partnered with hospitals and life science companies to unlock anonymized data for researchers. In the next year, the company hopes to be working with about half of the top 50 academic medical centers in the country.

Unleashing AI’s full potential

As an undergraduate at MIT studying computer science and molecular biology, Kim worked with researchers in the Computer Science and Artificial Intelligence Laboratory (CSAIL) to analyze data from clinical trials, gene association studies, hospital intensive care units, and more.

“I realized there is something severely broken in data sharing, whether it was hospitals using hard drives, ancient file transfer protocol, or even sending stuff in the mail,” Kim says. “It was all just not well-tracked.”

Kellis, who is also a member of the Broad Institute of MIT and Harvard, has spent years establishing partnerships with hospitals and consortia across a range of diseases including cancers, heart disease, schizophrenia, and obesity. He knew that smaller research teams would struggle to get access to the same data his lab was working with.

In 2017, Kellis and Kim decided to commercialize technology they were developing to allow AI algorithms to run on encrypted data.

In the summer of 2018, Kim participated in the delta v startup accelerator run by the Martin Trust Center for MIT Entrepreneurship. The founders also received support from the Sandbox Innovation Fund and the Venture Mentoring Service, and made various early connections through their MIT network.

To participate in SAIL’s program, hospitals and other health care organizations make parts of their data available to researchers by setting up a node behind their firewall. SAIL then sends encrypted algorithms to the servers where the datasets reside in a process called federated learning. The algorithms crunch the data locally in each server and transmit the results back to a central model, which updates itself. No one — not the researchers, the data owners, or even SAIL —has access to the models or the datasets.

The approach allows a much broader set of researchers to apply their models to large datasets. To further engage the research community, Kellis’ lab at MIT has begun holding competitions in which it gives access to datasets in areas like protein function and gene expression, and challenges researchers to predict results.

“We invite machine learning researchers to come and train on last year’s data and predict this year’s data,” says Kellis. “If we see there’s a new type of algorithm that is performing best in these community-level assessments, people can adopt it locally at many different institutions and level the playing field. So, the only thing that matters is the quality of your algorithm rather than the power of your connections.”

By enabling a large number of datasets to be anonymized into aggregate insights, SAIL’s technology also allows researchers to study rare diseases, in which small pools of relevant patient data are often spread out among many institutions. That has historically made the data difficult to apply AI models to.

“We’re hoping that all of these datasets will eventually be open,” Kellis says. “We can cut across all the silos and enable a new era where every patient with every rare disorder across the entire world can come together in a single keystroke to analyze data.”

Enabling the medicine of the future

To work with large amounts of data around specific diseases, SAIL has increasingly sought to partner with patient associations and consortia of health care groups, including an international health care consulting company and the Kidney Cancer Association. The partnerships also align SAIL with patients, the group they’re most trying to help.

Overall, the founders are happy to see SAIL solving problems they faced in their labs for researchers around the world.

“The right place to solve this is not an academic project. The right place to solve this is in industry, where we can provide a platform not just for my lab but for any researcher,” Kellis says. “It’s about creating an ecosystem of academia, researchers, pharma, biotech, and hospital partners. I think it’s the blending all of these different areas that will make that vision of medicine of the future become a reality.”

Read More

The ML Glossary: Five years of new language

Over guacamole and corn chips at a party, a friend mentions that her favorite phone game uses augmented reality. Another friend points her phone at the host and shouts, “Watch out—a t-rex is sneaking up behind you.” Eager to join the conversation, you blurt, “My blender has an augmented reality setting.

If only you had looked up augmented reality in Google’s Machine Learning Glossary, which defines over 460 terms related to artificial intelligence, you’d know what the heck your friends are talking about. If you’ve ever wondered what a neural network is, or if you chronically confuse the negative class with the positive class at the doctor’s office (“Wait, the negative class means I’m healthy?”), the Glossary has you covered.

AI is increasingly intertwined with our future, and as the language of AI sneaks its way into household conversation, learning AI’s specialized vocabulary could be helpful to understanding many key technological advances — or what’s being said at a guacamole party.

A team of technical writers and AI experts produces the definitions. Sure, the definitions have to be technically accurate, but they also have to be as clear as possible. Clarity is rare in a field as notoriously complicated as artificial intelligence, which is why we created Google’s Machine Learning glossary in 2016. Since then, we’ve published nine full revisions, providing almost 300 additional terms.

Good glossaries are quicksand for the curious. You’ll come for the accuracy, stay for the class-imbalanced datasets, and then find yourself an hour later embedded in overfitting. It’s fun, educational, and blessedly blender free.

Read More

End-to-end tinyML audio classification with the Raspberry Pi RP2040

A guest post by Sandeep Mistry, Arm

Image of tools you’ll need for the project
Some tools you’ll need for this project (learn more below!)

Introduction

Machine learning enables developers and engineers to unlock new capabilities in their applications. Instead of explicitly defining instructions and rules for a computer to execute, you can collect large amounts of data for a classification task that your application requires, and train an ML model to learn from the patterns in the data.

Training typically happens in the cloud on computers equipped with one or more GPUs. Once a model has been trained, depending on its size, it can be deployed for inference on a wide range of devices. These devices range from large computers in the cloud with gigabytes of memory, to tiny microcontrollers (or MCUs) which typically have just kilobytes of memory.

Microcontrollers are low-power, self-contained, cost-effective computer systems that are embedded in devices that you use everyday, such as your microwave, electric toothbrush, or smart door lock. Microcontroller based systems typically interact with their surrounding environment via one or more sensors (think buttons, microphones, motion sensors) and perform an action using one or more actuators (think LEDs, motors, speakers).

Microcontrollers also offer privacy advantages, and can perform inference locally on the device, without needing to send any data to the cloud. This can have power advantages too for devices running off batteries.

In this article, we will demonstrate how an Arm Cortex-M based microcontroller can be used for local on-device ML to detect audio events from its surrounding environment. This is a tutorial-style article, and we’ll guide you through training a TensorFlow based audio classification model to detect a fire alarm sound.

We’ll show you how to use TensorFlow Lite for Microcontrollers with Arm CMSIS-NN accelerated kernels to deploy the ML model to an Arm Cortex-M0+ based microcontroller board for local on-device ML inference. Arm’s CMSIS-DSP library, which provides optimized Digital Signal Processing (DSP) function implementations for Arm Cortex-M processors, will also be used to extract features from the real-time audio data before inference.

While this guide focuses on detecting a fire alarm sound, it can be adapted for other sound classification tasks. You may also need to adapt the feature extraction stages and/or adjust ML model architecture for your use case.

An interactive version of this tutorial is available on Google Colab and all technical assets for this guide can be found on GitHub.

What you need to to get started

Development Environment

Hardware

You’ll need one of the following development boards that are based on Raspberry Pi’s RP2040 MCU chip that was released early in 2021.

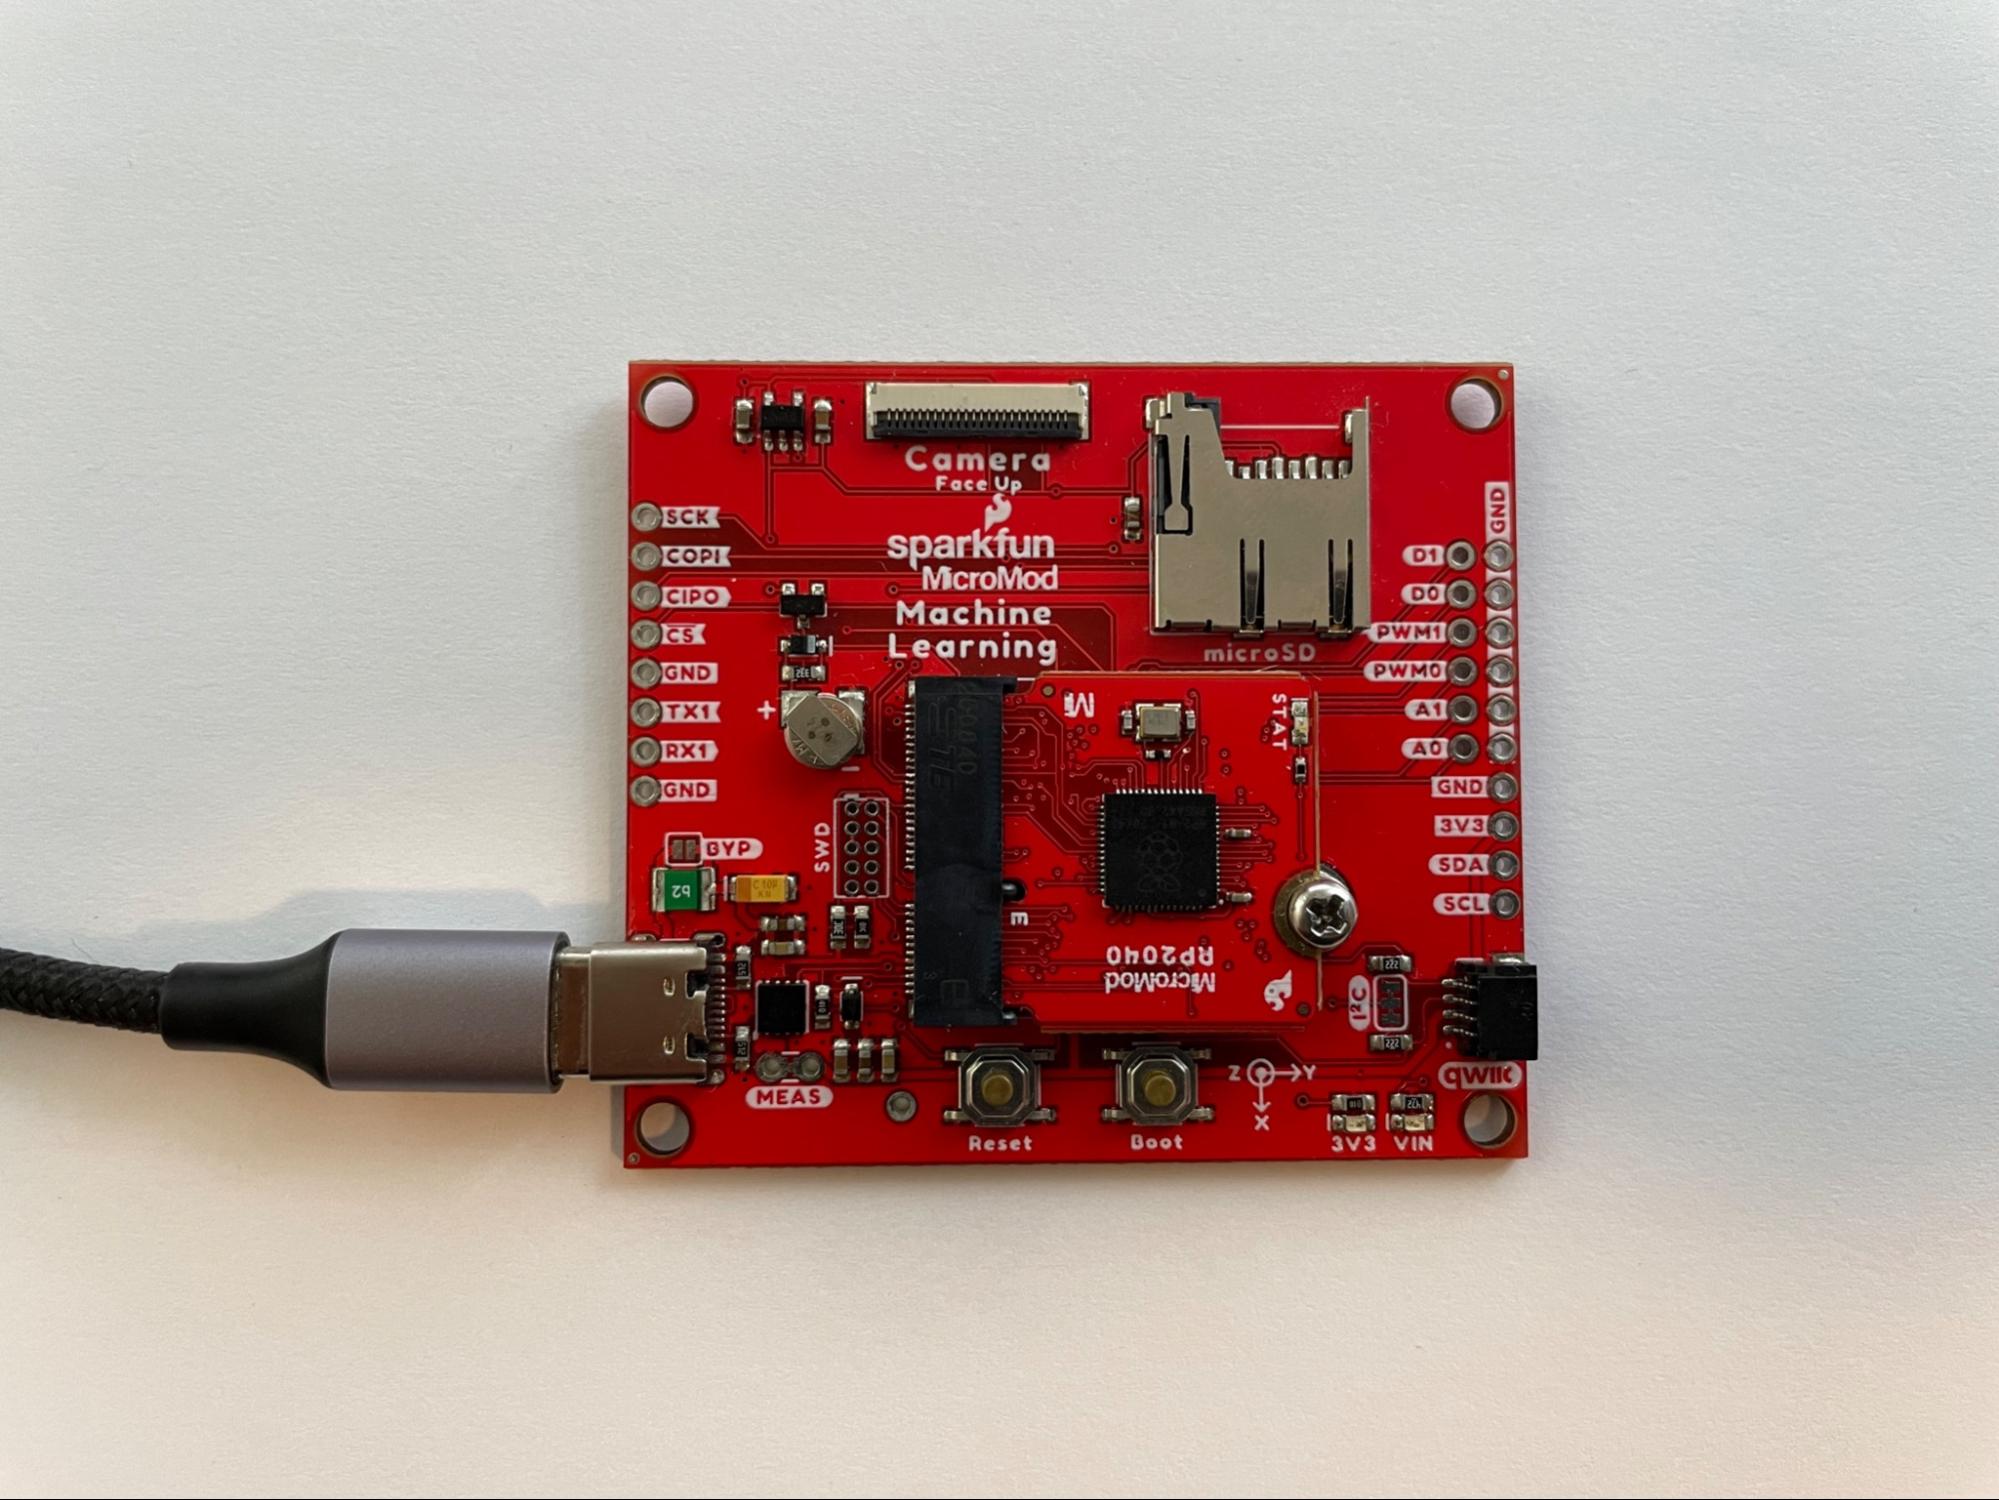
SparkFun RP2040 MicroMod and MicroMod ML Carrier

This board is great for folks new to electronics and microcontrollers. It does not require a soldering iron, knowing how to solder, or how to wire up breadboards.

Image of tools you’ll need for the project

Raspberry Pi Pico and PDM microphone board

This option is great if you know how to solder (or would like to learn). It requires a soldering iron and knowledge of how to wire a breadboard with electronic components. You’ll need:

Image of Raspberry Pi Pico and PDM microphone board

Both of the options above will allow you to collect real-time 16 kHz audio from a digital microphone and process the audio signal on the development board’s Arm Cortex-M0+ processor, which operates at 125 MHz. The application running on the Arm Cortex-M0+ will have a Digital Signal Processing (DSP) stage to extract features from the audio signal. The extracted features will then be fed into a neural network to perform a classification task to determine if a fire alarm sound is present in the board’s environment.

Dataset

We will start by training a sound classifier (for many events) with TensorFlow using the ESC-50: Dataset for Environmental Sound Classification. After training on this broad dataset, we will use Transfer Learning to fine tune it for our specific audio classification task.

This model will be trained on the ESC-50 dataset, which contains 50 types of sounds. Each sound category has 40 audio files that are 5 seconds each in length. Each audio file will be split into 1 second soundbites, and any soundbites that contain pure silence will be discarded.

Image shows a sample waveform from the data set of a dog barking
A sample waveform from the data set of a dog barking.

Spectrograms

Rather than passing in the time series data directly into our TensorFlow model, we will transform the audio data into an audio spectrogram representation. This will create a 2D representation of the audio signal’s frequency content over time.

The input audio signal we will use will have a sampling rate of 16kHz, this means one second of audio will contain 16,000 samples. Using TensorFlow’s tf.signal.stft(…) function we can transform a 1 second audio signal into a 2D tensor representation. We will choose a frame length of 256 and a frame step of 128, so the output of this feature extraction stage will be a Tensor that has a shape of (124, 129).

Image shows An audio spectrogram representation of a dog barking.
An audio spectrogram representation of a dog barking.

The ML model

Now that we have the features extracted from the audio signal, we can create a model using TensorFlow’s Keras API. You can find the complete code linked above. The model will consist of 8 layers:

  1. An input layer.
  2. A preprocessing layer, that will resize the input tensor from 124x129x1 to 32x32x1.
  3. A normalization layer, that will scale the input values between -1 and 1
  4. A 2D convolution layer with: 8 filters, a kernel size of 8×8, and stride of 2×2, and ReLU activation function.
  5. A 2D max pooling layer with size of 2×2
  6. A flatten layer to flatten the 2D data to 1D
  7. A dropout layer, that will help reduce overfitting during training
  8. A dense layer with 50 outputs and a softmax activation function, which outputs the likelihood of the sound category (between 0 and 1).

The model summary can be found below:

Image of model summary

Notice that this model only has about 15K parameters (this is quite small!)

Fine tuning

Now we will use transfer learning and change the classification head (the last Dense layer) of the model to train a binary classification model for fire alarm sounds. We have collected 10 fire alarm clips from freesound.org and BigSoundBank.com. Background noise clips from the SpeechCommands dataset will be used for non-fire alarm sounds. This dataset is small, and enough for us to get started. Data augmentation techniques will be used to supplement the training data we’ve collected.

For real-world applications, it’s important to collect a much larger dataset (you can learn more about best practices on TensorFlow’s Responsible AI website).

Data Augmentation

Data augmentation is a set of techniques used to increase the size of a dataset. This is done by slightly modifying samples from the dataset or by creating synthetic data. In this situation we are using audio and we will create a few functions to augment different samples. We will use three techniques:

  1. Adding white noise to the audio samples.
  2. Adding random silence to the audio.
  3. Mixing two audio samples together.

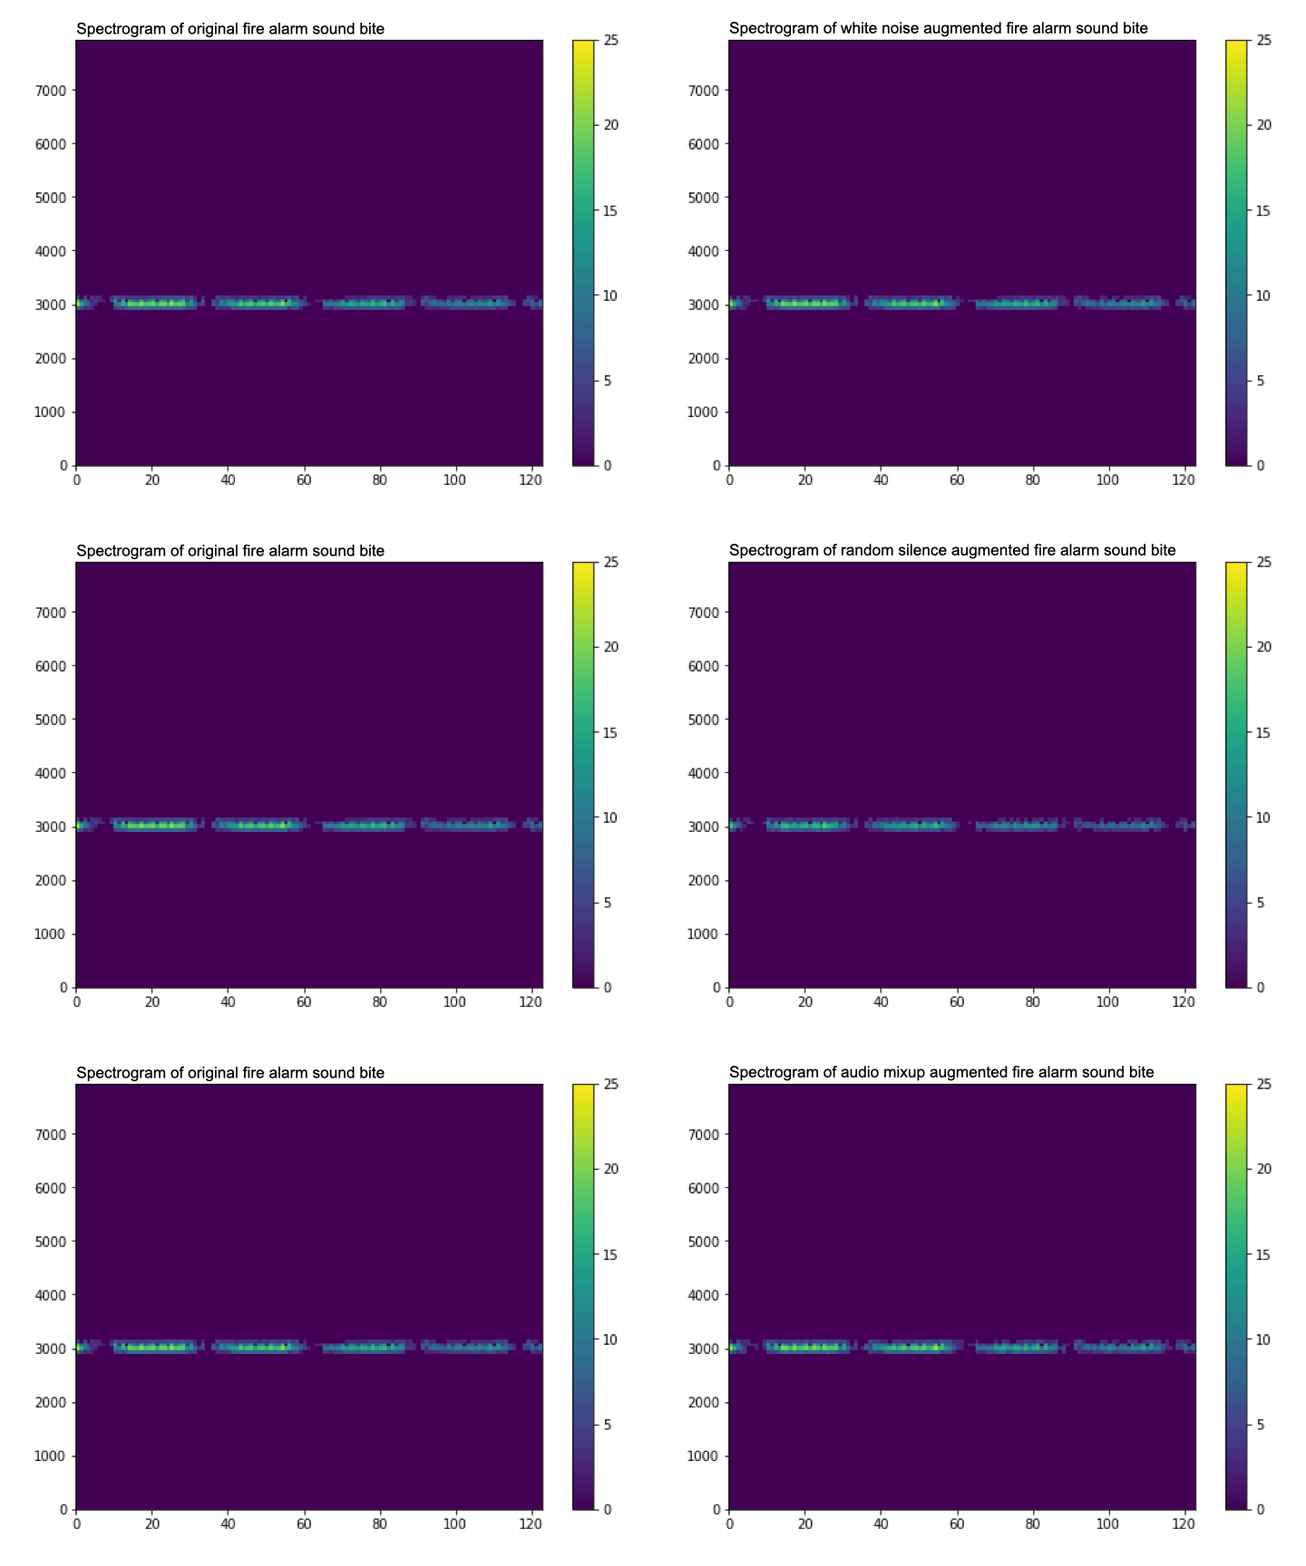
As well as increasing the size of the dataset, data augmentation also helps to reduce overfitting by training the model on different (not perfect) data samples. For example, on a microcontroller you are unlikely to have perfect high quality audio, and so a technique like adding white noise can help the model work in situations where your microphone might every so often have noise in there.

A gif showing how data augmentation slightly changes the spectrogram by adding noise
A gif showing how data augmentation slightly changes the spectrogram by adding noise (watch it closely, it can be a bit hard to see).

Feature Extraction

TensorFlow Lite for Microcontroller (TFLu) provides a subset of TensorFlow operations, so we are unable to use the tf.signal.sft(…) API we’ve used for feature extraction of the baseline model on our MCU. However, we can leverage Arm’s CMSIS-DSP library to generate spectrograms on the MCU. CMSIS-DSP contains support for both floating-point and fixed-point DSP operations which are optimized for Arm Cortex-M processors, including the Arm Cortex-M0+ that we will be deploying the ML model to. The Arm Cortex-M0+ does not contain a floating-point unit (FPU) so it would be better to leverage a 16-bit fixed-point DSP based feature extraction pipeline on the board.

We can leverage CMSIS-DSP’s Python Wrapper in the notebook to perform the same operations on our training pipeline using 16-bit fixed-point math. At a high level we can replicate the TensorFlow SFT API with the following CMSIS-DSP based operations:

  1. Manually creating a Hanning Window of length 256 using the Hanning Window formula along with CMSIS-DSP’s arm_cos_f32 API.
    Screenshot showing the Hanning Window formula
  2. Creating a CMSIS-DSP arm_rfft_instance_q15 instance and initializing it using CMSIS-DSP’s arm_rfft_init_q15 API.
  3. Looping through the audio data 256 samples at a time, with a stride of 128 (this matches the parameters we’ve passed into the TF sft API)
    1. Multiplying the 256 samples by the Hanning Window, using CMSIS-DSP’s arm_mult_q15 API
    2. Calculating the FFT of the output of the previous step, using CMSIS-DSP’s arm_rfft_q15 API
    3. Calculating the magnitude of the previous step, using CMSIS-DSP’s arm_cmplx_mag_q15 API
  4. Each audio soundbites’s FFT magnitude represents the one column of the spectrogram.
  5. Since our baseline model expects a floating point input, instead of the 16-bit quantized value we were using, the CMSIS-DSP arm_q15_to_float API can be used to convert the spectrogram data from a 16-bit fixed-point value to a floating-point value for training.

The complete Python code for this is a bit long, but can be found in the “Transfer Learning -> Load dataset” section of the Google Colab notebook.

Image of waveform and audio spectrogram of a smoke alarm sound.
Waveform and audio spectrogram of a smoke alarm sound.

For an in-depth description of how to create audio spectrograms using fixed-point operations with CMSIS-DSP, please see Towards Data Science “Fixed-point DSP for Data Scientists” guide.

Loading the baseline model and changing the classification head

The model we previously trained on the ESC-50 dataset, predicted the presence of 50 sound types, and which resulted in the final dense layer of the model having 50 outputs. The new model we would like to create is a binary classifier, and needs to have a single output value.

We will load the baseline model, and swap out the final dense layer to match our needs:

# We need a new head with one neuron.
model_body = tf.keras.Model(inputs=model.input, outputs=model.layers[-2].output)

classifier_head = tf.keras.layers.Dense(1, activation="sigmoid")(model_body.output)

fine_tune_model = tf.keras.Model(model_body.input, classifier_head)

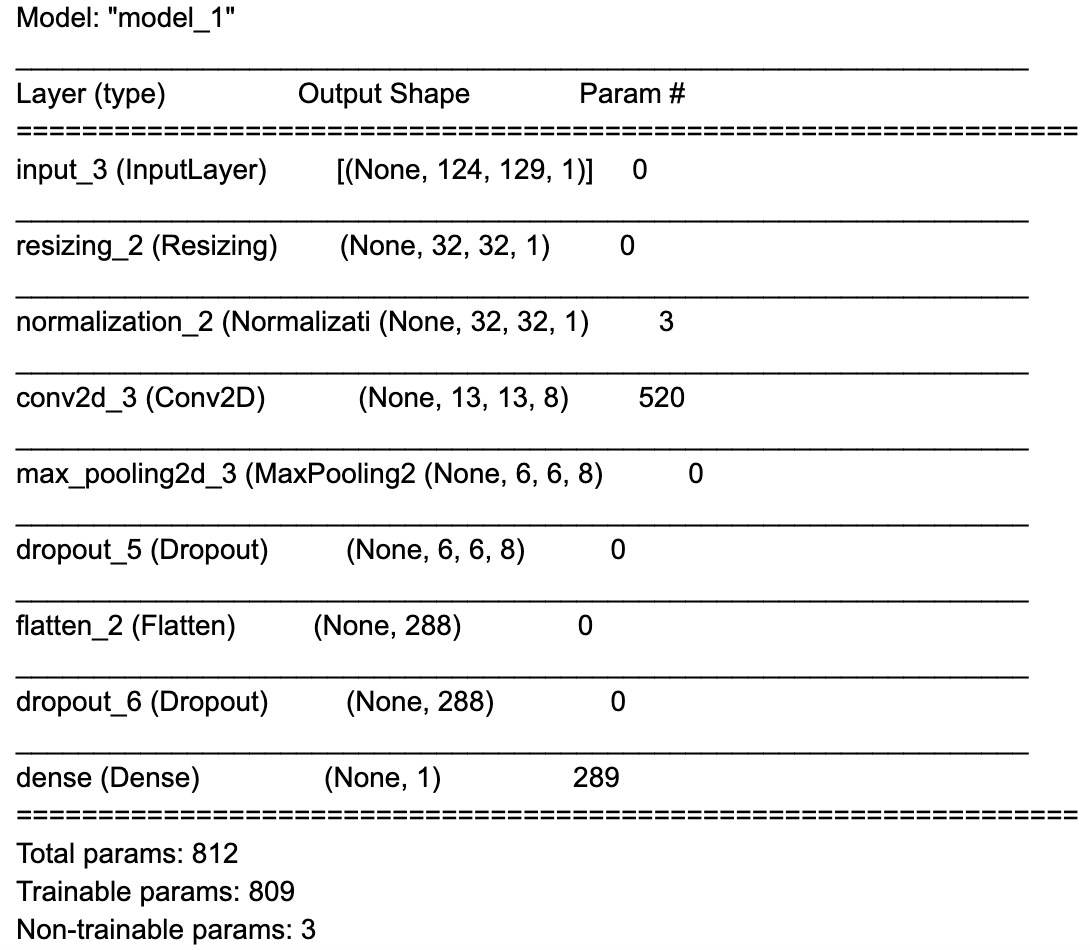
This results in the following model.summary():

Screenshot of model summary

Transfer Learning

Transfer Learning is the process of retraining a model that has been developed for a task to complete a new similar task. The idea is that the model has learned transferable “skills” and the weights and biases can be used in other models as a starting point.

As humans we use transfer learning too. The skills you developed to learn to walk could also be used to learn to run later on.

In a neural network, the first few layers of a model start to perform a “feature extraction” such as finding shapes, edges and colours. The layers later on are used as classifiers; they take the extracted features and classify them.

Because of this, we can assume the first few layers have learned quite general feature extraction techniques that can be applied to similar tasks, and so we can freeze all these layers and use them on a new task in the future. The classifier layer will need to be trained based on the new task.

To do this, we break the process into two steps:

  1. Freeze the “backbone” of the model and train the head with a fairly high learning rate. We slowly reduce the learning rate.
  2. Unfreeze the “backbone” and fine-tune the model with a low learning rate.

To freeze a layer in TensorFlow we can set layer.trainable=False. Let’s loop through all the layers and do this:

for layer in fine_tune_model.layers:
layer.trainable = False

and now unfreeze the last layer (the head):

fine_tune_model.layers[-1].trainable = True

We can now train the model using a binary crossentropy loss function. Keras callbacks for early stopping (to avoid overfitting) and a dynamic learning rate scheduler will also be used.

After we’ve trained with the frozen layers, we can unfreeze them:

for layer in fine_tune_model.layers:
layer.trainable = True

And train again for up to 10 epochs. You can find the complete code for this in the “Transfer Learning -> ”Train Model” section of Colab notebook.

Recording your own training data

We now have an ML model which can classify the presence of fire alarm sound. However this model was trained on publicly available sound recordings which might not match the sound characteristics of the hardware microphone we will use for inferencing.

The Raspberry Pi RP2040 MCU has a native USB feature that allows it to act like a custom USB device. We can flash an application to the board to enable it to act like a USB microphone to our PC. Then we can extend Google Colab’s capabilities with the Web Audio API on a modern Web browser like Google Chrome to collect live data samples (all from within Google Colab!)

Hardware Setup

SparkFun MicroMod RP2040

For assembly, remove the screw on the carrier board, at an angle, slide in the MicroMod RP2040 Processor board into the socket and secure it in place with the screw. See the MicroMod Machine Learning Carrier Board Hookup Guide for more details.

Image of removing the screw on the carrier board

Raspberry Pi Pico

Follow the instructions from the Hardware Setup section of the “Create a USB Microphone with the Raspberry Pi Pico” guide for assembly instructions.

Top: Fritzing wiring diagram Bottom: Assembled breadboard

Setting up the firmware applications toolchains

Rather than setting up the Raspberry Pi Pico’s SDK on your personal computer. We can leverage Colab’s built-in Linux shell command feature to set up the Pico SDK development environment with CMake and GNU Arm Embedded Toolchain.

The pico-sdk will also have to be downloaded to the Colab instance using git:

%%shell
git clone https://github.com/raspberrypi/pico-sdk.git
cd pico-sdk
git submodule init
git submodule update

Compiling and flashing the USB microphone application

Now we can use the USB microphone example from the Microphone Library for Pico. The example application can be compiled using cmake and make. Then we can flash the example application to the board over USB by putting the board into “boot ROM mode” which will allow us to upload an application to the board.

SparkFun

  • Plug the USB-C cable into the board and your PC to power the board.
  • While holding down the BOOT button on the board, tap the RESET button.

GIF shows holding down the BOOT button on the board, and tapping the RESET button

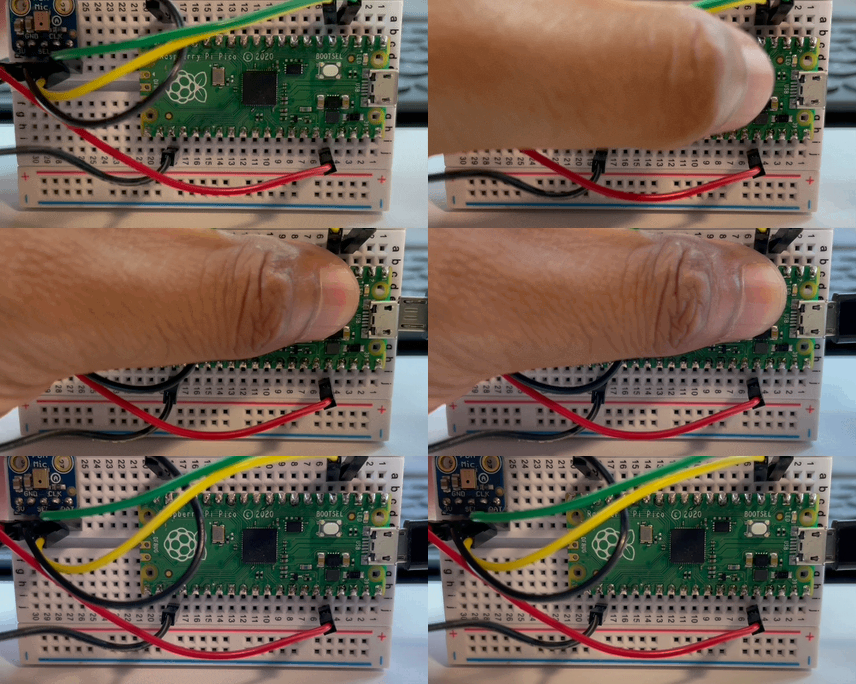
Raspberry Pi Pico

  • Plug the USB Micro cable into your PC, but do NOT plug in the Pico side.
  • While holding down the white BOOTSEL button, plug in the micro USB cable to the Pico.

GIF shows plugging in the micro USB cable to the Pico

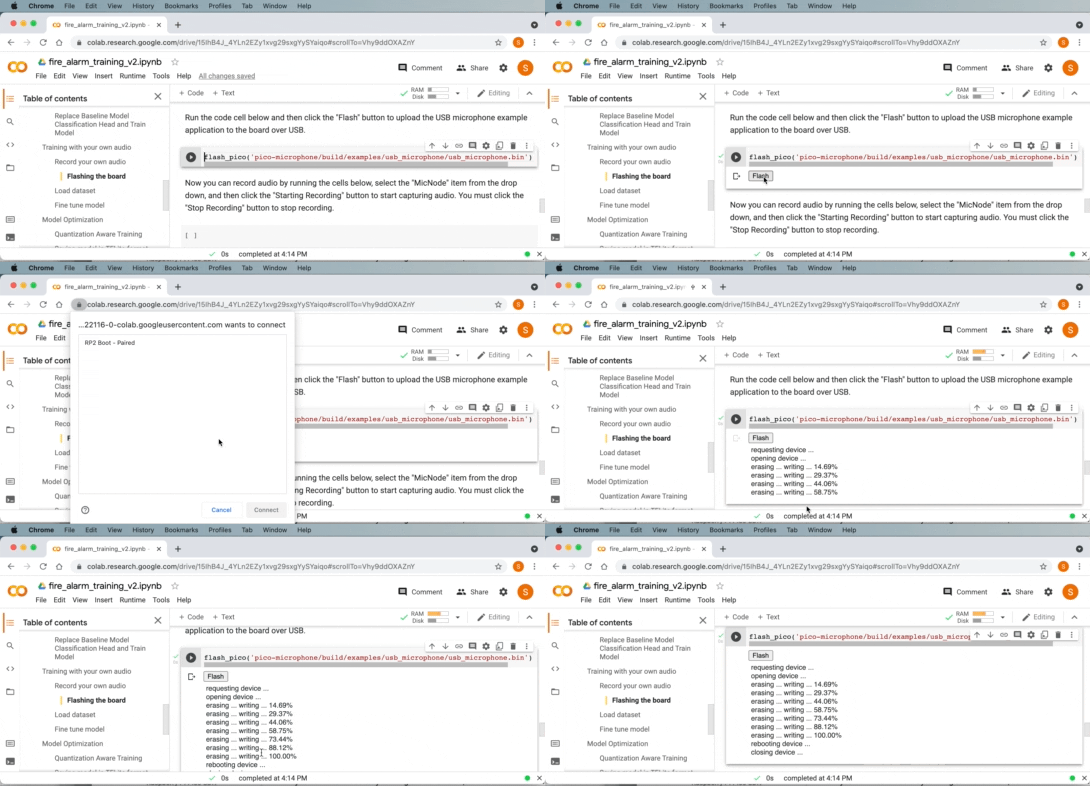
If you are using a WebUSB API enabled browser like Google Chrome, you can directly flash the image onto the board from within Google Collab!

GIF showing Downloading USB microphone application to the board from within Google Colab and WebUSB

Downloading USB microphone application to the board from within Google Colab and WebUSB.

Otherwise, you can manually download the .uf2 file to your computer and then drag it onto the USB disk for the RP2040 board.

Collecting training data

Now that you have flashed the USB microphone application to the board, it will appear as a USB audio input on your PC.

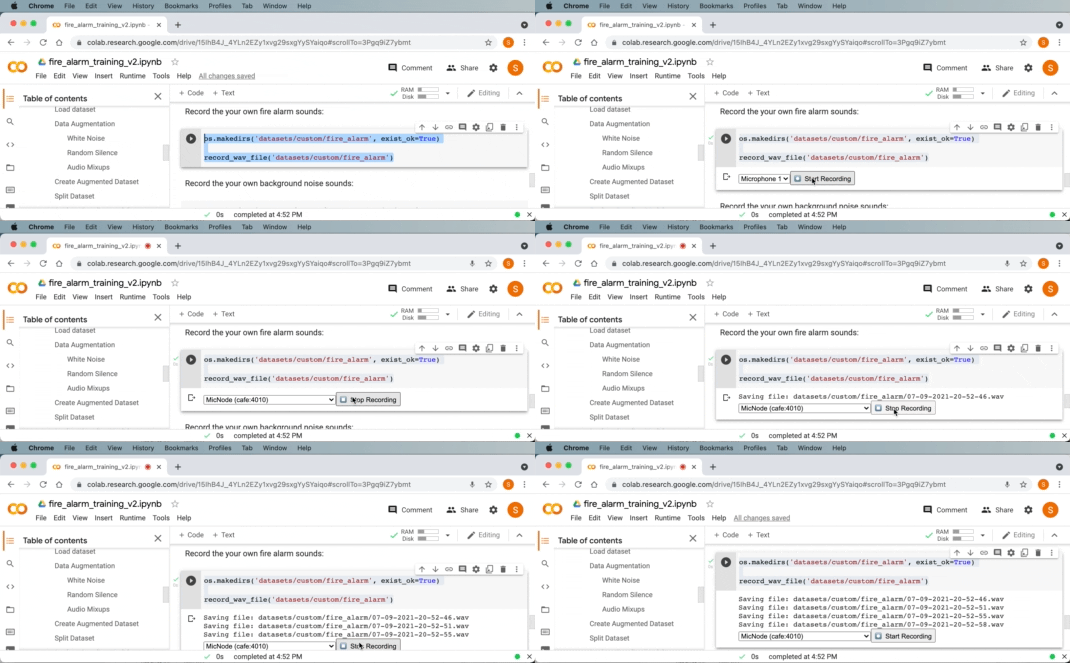
We can now use Google Colab to record a fire alarm sound, select “MicNode ” as the audio input source in the drop down. Then while pressing the test button on a smoke alarm, click the record button on Google Colab to record a 1 second audio clip. Repeat this process a few times.

Similarly, we can also do the same to collect background audio samples in the next code cell in Google Colab. Repeat this a few times for non-fire alarm sounds like silence, yourself talking, or any other normal sounds for the environment.

Final model training

Now that we’ve collected additional samples with the microphone that will be used during inference. We can tune the model again with the new data.

Converting the Model to run on the MCU

We will need to convert the Keras model we’ve used to TensorFlow Lite format so that we can use it for inference on the device.

Quantization

To optimize the model to run on the Arm Cortex-M0+ processor, we will use a process called model quantization. Model quantization converts the model’s weights and bias from 32-bit floating point values to 8-bit values. The pico-tflmicro library, which is a port of TFLu for the RP2040’s Pico SDK contains Arm’s CMSIS-NN library, which supports optimized kernel operations for quantized 8-bit weights on Arm Cortex-M processors.

We can use TensorFlow’s Quantization Aware Training (QAT) feature to easily convert the floating-point model to quantized.

Converting the model to TF Lite format

We will now use the tf.lite.TFLiteConverter.from_keras_model(…) API to convert the quantized Keras model to TF Lite format, and then save it to disk as a .tflite file.

converter = tf.lite.TFLiteConverter.from_keras_model(quant_aware_model)
converter.optimizations = [tf.lite.Optimize.DEFAULT]

train_ds = train_ds.unbatch()

def representative_data_gen():
for input_value, output_value in train_ds.batch(1).take(100):
# Model has only one input so each data point has one element.
yield [input_value]

converter.representative_dataset = representative_data_gen
# Ensure that if any ops can't be quantized, the converter throws an error
converter.target_spec.supported_ops = [tf.lite.OpsSet.TFLITE_BUILTINS_INT8]
# Set the input and output tensors to uint8 (APIs added in r2.3)
converter.inference_input_type = tf.int8
converter.inference_output_type = tf.int8
tflite_model_quant = converter.convert()

with open("tflite_model.tflite", "wb") as f:
f.write(tflite_model_quant)

Since TensorFlow also supports loading TF Lite models using tf.lite, we can also verify the functionality of the quantized model and compare its accuracy with the regular unquantized model inside Google Colab.

The RP2040 MCU on the boards we are deploying to, does not have a built-in file system, which means we cannot use the .tflite file directly on the board. However, we can use the Linux `xxd` command to convert the .tflite file to a .h file which can then be compiled in the inference application in the next step.

%%shell
echo "alignas(8) const unsigned char tflite_model[] = {" > tflite_model.h
cat tflite_model.tflite | xxd -i >> tflite_model.h
echo "};"

Deploy the model to the device

We now have a model that is ready to be deployed to the device. We’ve created an application template for inference which can be compiled with the .h file that we’ve generated for the model.

The C++ application uses the pico-sdk as the base, along with the CMSIS-DSP, pico-tflmicro, and Microphone Library for Pico libraries. It’s general structure is as follows:

  1. Initialization
    1. Configure the board’s built-in LED for output. The application will map the brightness of the LED to the output of the model. (0.0 LED off, 1.0 LED on with full brightness)
    2. Setup the TF Lite library and TF Lite model for inference
    3. Setup the CMSIS-DSP based DSP pipeline
    4. Setup and start the microphone for real-time audio
  2. Inference loop
    1. Wait for 128 * 4 = 512 new audio samples from the microphone
    2. Shift the spectrogram array over by 4 columns
    3. Shift the audio input buffer over by 128 * 4 = 512 samples and copy in the new samples
    4. Calculate 4 new spectrogram columns for the updated input buffer
    5. Perform inference on the spectrogram data
    6. Map the inference output value to the on-board LED’s brightness and output the status to the USB port

In-order to run in real-time each cycle of the inference loop must take under (512 / 16000) = 0.032 seconds or 32 milliseconds. The model we’ve trained and converted takes 24 ms for inference, which gives us ~8 ms for the other operations in the loop.

128 was used above to match the stride of 128 used in the training pipeline for the spectrogram. We used a shift of 4 in the spectrogram to fit within the real-time constraints we had.

Compiling the Firmware

Now we can use CMake to generate the build files required for compilation followed by make to compile.

The “cmake ..” line will have to be changed based on the board you are using:

  • SparkFun: cmake .. -DPICO_BOARD=sparkfun_micromod
  • Raspberry Pi Pico: cmake .. -DPICO_BOARD=pico

Flashing the Inference Application to the board

You’ll need to put the board into “boot ROM mode” again to load the new application to it.

SparkFun

  • Plug the USB-C cable into the board and your PC to power the board.
  • While holding down the BOOT button on the board, tap the RESET button.

Raspberry Pi Pico

  • Plug the USB Micro cable into your PC, but do NOT plug in the Pico side.
  • While holding down the white BOOTSEL button, plug in the micro USB cable to the Pico.

If you are using a WebUSB API enabled browser like Google Chrome, you can directly flash the image onto the board from within Google Colab. Otherwise, you can manually download the .uf2 file to your computer and then drag it onto the USB disk for the RP2040 board.

Monitoring the Inference on the board

Now that the inference application is running on the board you can observe it in action in two ways:

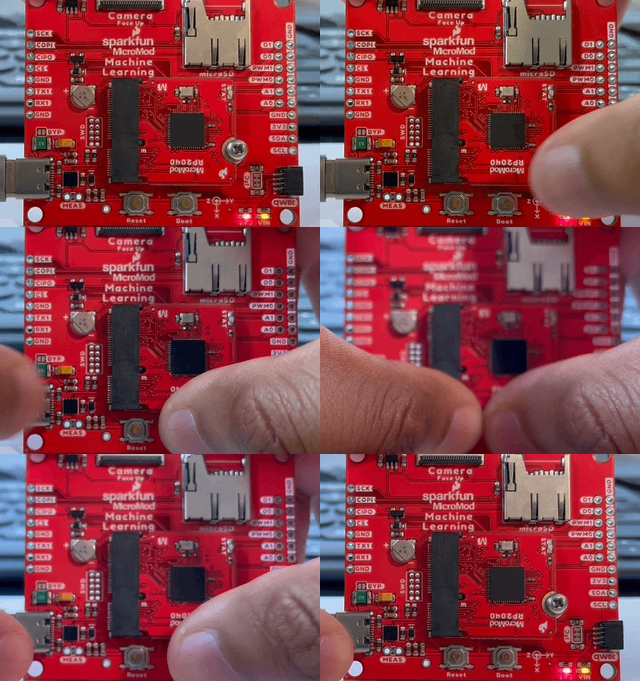
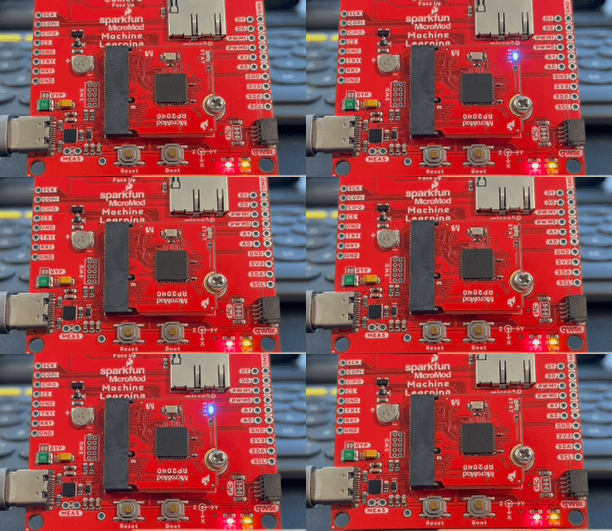
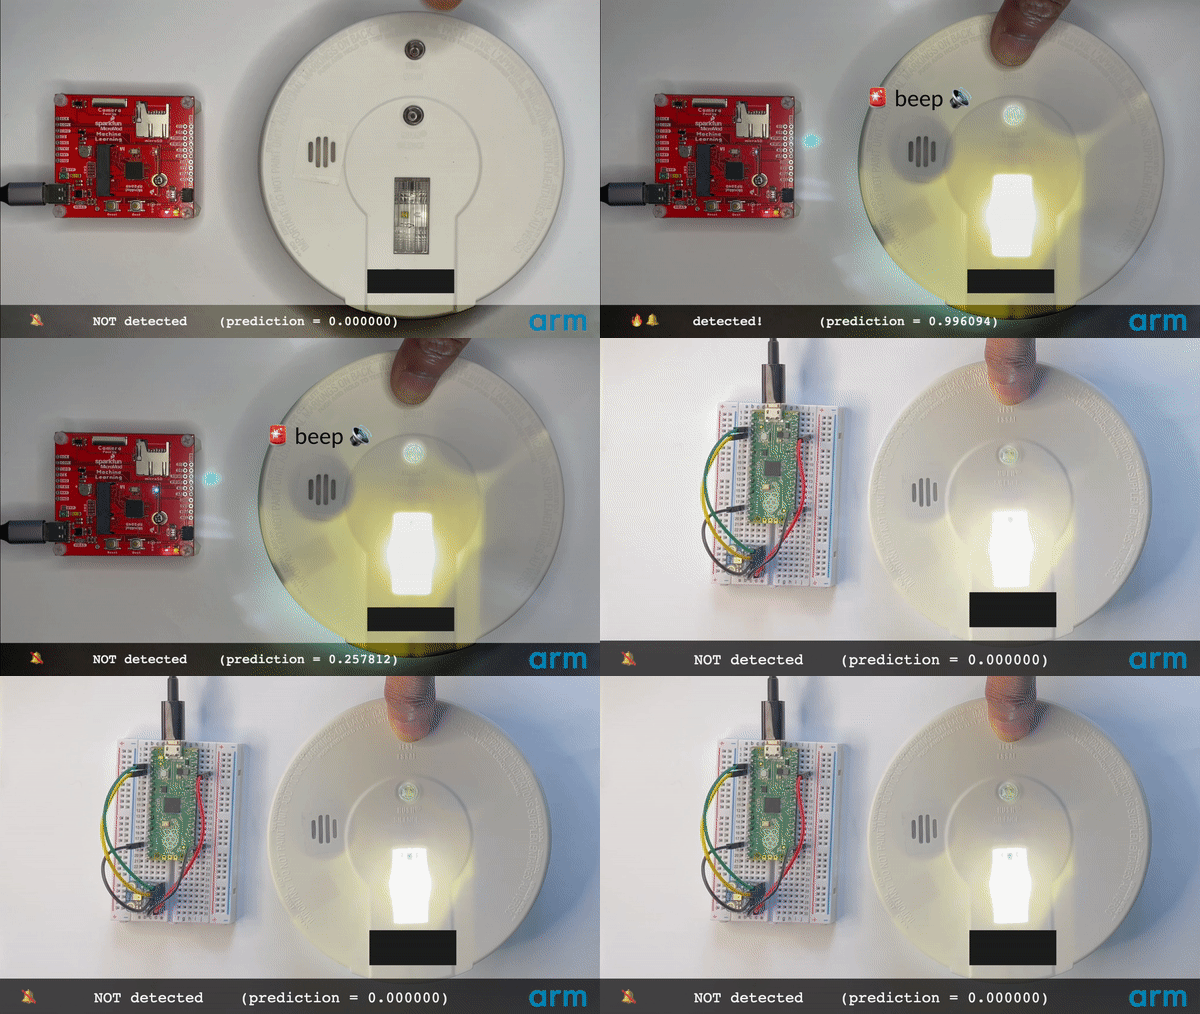
Visually by observing the brightness of the LED on the board. It should remain off or dim when no fire alarm sound is present – and be on when a fire alarm sound is present:

GIF shows LED on the board flashing

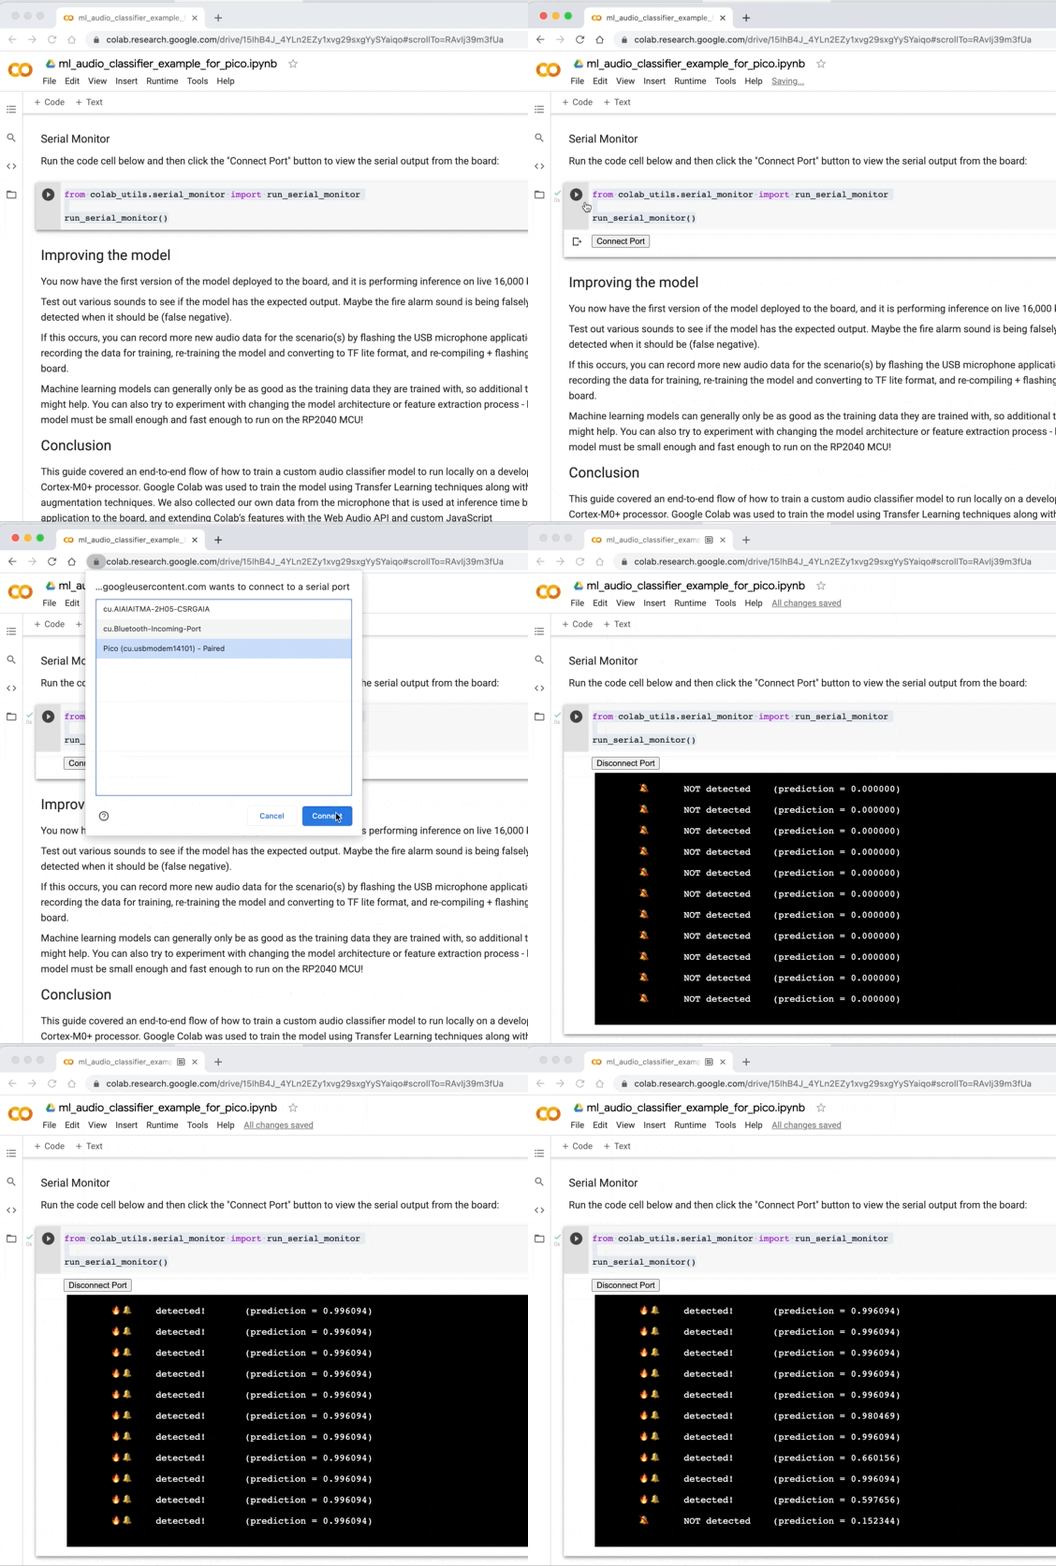
Connecting to the board’s USB serial port to view output from the inference application. If you are using a Web Serial API enabled browser like Google Chrome, this can be done directly from Google Colab:

GIF shows connecting to the board’s USB serial port to view output from the inference application

Improving the model

You now have the first version of the model deployed to the board, and it is performing inference on live 16,000 kHz audio data!

Test out various sounds to see if the model has the expected output. Maybe the fire alarm sound is being falsely detected (false positive) or not detected when it should be (false negative).

If this occurs, you can record more new audio data for the scenario(s) by flashing the USB microphone application firmware to the board, recording the data for training, re-training the model and converting to TF lite format, and re-compiling + flashing the inference application to the board.

Supervised machine learning models can generally only be as good as the training data they are trained with, so additional training data for these scenarios might help. You can also try to experiment with changing the model architecture or feature extraction process – but keep in mind that your model must be small enough and fast enough to run on the RP2040 MCU.

Conclusion

This article covered an end-to-end flow of how to train a custom audio classifier model to run locally on a development board that uses an Arm Cortex-M0+ processor. TensorFlow was used to train the model using transfer learning techniques along with a smaller dataset and data augmentation techniques. We also collected our own data from the microphone that is used at inference time by loading an USB microphone application to the board, and extending Colab’s features with the Web Audio API and JavaScript.

The training side of the project combined Google’s Colab service and Chrome browser, with the open source TensorFlow library. The inference application captured audio data from a digital microphone, used Arm’s CMSIS-DSP library for the feature extraction stage, then used TensorFlow Lite for Microcontrollers with Arm CMSIS-NN accelerated kernels to perform inference with a 8-bit quantized model that classified a real-time 16 kHz audio input on an Arm Cortex-M0+ processor.

The Web Audio API, Web USB API, and Web Serial API features of Google Chrome were used to extend Google Colab’s functionality to interact with the development board. This allowed us to experiment with and develop our application entirely with a web browser and deploy it to a constrained development board for on-device inference.

Since the ML processing was performed on the development boards RP2040 MCU, no audio data left the device at inference time.

Learn more

You can learn more and get hands-on experience using TinyML at the upcoming Arm DevSummit, a 3-day virtual event between October 19 – 21. The event includes workshops on tinyML computer vision for real-world embedded devices and building large vocabulary voice control with Arm Cortex-M based MCUs. We hope to see you there!

Read More

3 Questions: Kalyan Veeramachaneni on hurdles preventing fully automated machine learning

The proliferation of big data across domains, from banking to health care to environmental monitoring, has spurred increasing demand for machine learning tools that help organizations make decisions based on the data they gather.

That growing industry demand has driven researchers to explore the possibilities of automated machine learning (AutoML), which seeks to automate the development of machine learning solutions in order to make them accessible for nonexperts, improve their efficiency, and accelerate machine learning research. For example, an AutoML system might enable doctors to use their expertise interpreting electroencephalography (EEG) results to build a model that can predict which patients are at higher risk for epilepsy — without requiring the doctors to have a background in data science.

Yet, despite more than a decade of work, researchers have been unable to fully automate all steps in the machine learning development process. Even the most efficient commercial AutoML systems still require a prolonged back-and-forth between a domain expert, like a marketing manager or mechanical engineer, and a data scientist, making the process inefficient.

Kalyan Veeramachaneni, a principal research scientist in the MIT Laboratory for Information and Decision Systems who has been studying AutoML since 2010, has co-authored a paper in the journal ACM Computing Surveys that details a seven-tiered schematic to evaluate AutoML tools based on their level of autonomy.

A system at level zero has no automation and requires a data scientist to start from scratch and build models by hand, while a tool at level six is completely automated and can be easily and effectively used by a nonexpert. Most commercial systems fall somewhere in the middle.

Veeramachaneni spoke with MIT News about the current state of AutoML, the hurdles that prevent truly automatic machine learning systems, and the road ahead for AutoML researchers.

Q: How has automatic machine learning evolved over the past decade, and what is the current state of AutoML systems?

A: In 2010, we started to see a shift, with enterprises wanting to invest in getting value out of their data beyond just business intelligence. So then came the question, maybe there are certain things in the development of machine learning-based solutions that we can automate? The first iteration of AutoML was to make our own jobs as data scientists more efficient. Can we take away the grunt work that we do on a day-to-day basis and automate that by using a software system? That area of research ran its course until about 2015, when we realized we still weren’t able to speed up this development process.

Then another thread emerged. There are a lot of problems that could be solved with data, and they come from experts who know those problems, who live with them on a daily basis. These individuals have very little to do with machine learning or software engineering. How do we bring them into the fold? That is really the next frontier.

There are three areas where these domain experts have strong input in a machine learning system. The first is defining the problem itself and then helping to formulate it as a prediction task to be solved by a machine learning model. Second, they know how the data have been collected, so they also know intuitively how to process that data. And then third, at the end, machine learning models only give you a very tiny part of a solution — they just give you a prediction. The output of a machine learning model is just one input to help a domain expert get to a decision or action.

Q: What steps of the machine learning pipeline are the most difficult to automate, and why has automating them been so challenging?

A: The problem-formulation part is extremely difficult to automate. For example, if I am a researcher who wants to get more government funding, and I have a lot of data about the content of the research proposals that I write and whether or not I receive funding, can machine learning help there? We don’t know yet. In problem formulation, I use my domain expertise to translate the problem into something that is more tangible to predict, and that requires somebody who knows the domain very well. And he or she also knows how to use that information post-prediction. That problem is refusing to be automated.

There is one part of problem-formulation that could be automated. It turns out that we can look at the data and mathematically express several possible prediction tasks automatically. Then we can share those prediction tasks with the domain expert to see if any of them would help in the larger problem they are trying to tackle. Then once you pick the prediction task, there are a lot of intermediate steps you do, including feature engineering, modeling, etc., that are very mechanical steps and easy to automate.

But defining the prediction tasks has typically been a collaborative effort between data scientists and domain experts because, unless you know the domain, you can’t translate the domain problem into a prediction task. And then sometimes domain experts don’t know what is meant by “prediction.” That leads to the major, significant back and forth in the process. If you automate that step, then machine learning penetration and the use of data to create meaningful predictions will increase tremendously.

Then what happens after the machine learning model gives a prediction? We can automate the software and technology part of it, but at the end of the day, it is root cause analysis and human intuition and decision making. We can augment them with a lot of tools, but we can’t fully automate that.

Q: What do you hope to achieve with the seven-tiered framework for evaluating AutoML systems that you outlined in your paper?

A: My hope is that people start to recognize that some levels of automation have already been achieved and some still need to be tackled. In the research community, we tend to focus on what we are comfortable with. We have gotten used to automating certain steps, and then we just stick to it. Automating these other parts of the machine learning solution development is very important, and that is where the biggest bottlenecks remain.

My second hope is that researchers will very clearly understand what domain expertise means. A lot of this AutoML work is still being conducted by academics, and the problem is that we often don’t do applied work. There is not a crystal-clear definition of what a domain expert is and in itself, “domain expert,” is a very nebulous phrase. What we mean by domain expert is the expert in the problem you are trying to solve with machine learning. And I am hoping that everyone unifies around that because that would make things so much clearer.

I still believe that we are not able to build that many models for that many problems, but even for the ones that we are building, the majority of them are not getting deployed and used in day-to-day life. The output of machine learning is just going to be another data point, an augmented data point, in someone’s decision making. How they make those decisions, based on that input, how that will change their behavior, and how they will adapt their style of working, that is still a big, open question. Once we automate everything, that is what’s next.

We have to determine what has to fundamentally change in the day-to-day workflow of someone giving loans at a bank, or an educator trying to decide whether he or she should change the assignments in an online class. How are they going to use machine learning’s outputs? We need to focus on the fundamental things we have to build out to make machine learning more usable.

Read More

Join us at the Women in Machine Learning Symposium

Posted by Jeanine Banks, VP of 3P Core Developer Platforms

Join us for the Women in Machine Learning Symposium on October 19

At Google we believe that diversity and inclusion are core to innovation, and we know there’s work to be done in improving representation to achieve equity. That’s why we’re excited to announce a new event: The Women in Machine Learning Symposium.

Join us virtually from 9-12 PDT on October 19, 2021, to hear from leaders in the machine learning (ML) industry.

All journeys are different and this event aims to empower the next generation of women leaders in ML. By learning from each other’s stories we want to inspire the creation of a community of support, bringing together women and allies in technology.

We’ll have two keynotes discussing the importance of diversity in ML communities and Open Source Software. You can also hear first-hand the stories and experiences of women who are breaking down barriers and ask them questions live!

Lastly, I invite you to attend one of the breakout sessions tailored to what stage you’re at in your career. From learning how to get started in ML, how to switch from being a tech developer to becoming an ML developer, to learning tips for taking your career to the C-level, this event has a place for you.

RSVP today to reserve your spot and head on over to our website to view the live agenda. I hope to see you there!

Read More