How Digitec Galaxus trains and serves millions of personalized newsletters per week with TFX

Posted by Christian Sager (Product Owner, Digitec Galaxus) and Anant Nawalgaria (ML Specialist, Google)

gif from blog titled how Digitec Galaxus trains and serves millions of personalized newsletters per week with TFX showing an animation of a cloud and people

In the retail industry it is important to be able to engage and excite users by serving personalized content on newsletters at scale. It is important to do this in a manner which leverages existing trends, while exploring and unearthing potentially new trends with an even higher user engagement. This project was done as a collaboration between Digitec Galaxus and Google, by designing a system based on Contextual Bandits to personalize newsletters for more than 2 million users every week.

To accomplish this, we leveraged several products in the TensorFlow ecosystem and Google Cloud including TF Agents, TensorFlow Extended (TFX) running on Vertex AI , to build a system that personalizes newsletters in a scalable, modularized and cost effective manner with low latency. In this article, we’ll highlight a few of the pieces, and point you to resources you can use to learn more.

About Digitec Galaxus

Digitec Galaxus AG is the largest online retailer in Switzerland. It offers a wide range of products to its customers, from electronics to clothes. As an online retailer, we naturally make use of recommendation systems, not only on our home or product pages but also in our newsletters. We have multiple recommendation systems in place already for newsletters, and have been extensive early adopters of the Google Cloud recommendations AI. Because we have multiple recommendation systems and very large amounts of data, we are faced with the following complications.

1. Personalization

We have over 12 recommenders that it uses in the newsletters, however we would like to contextualize these by choosing different recommenders (which in turn select the items) for different users. Furthermore, we would like to exploit existing trends as well as experiment with new ones.

2. Latency

We would like to ensure that the ranked list of recommenders can be retrieved with sub 50 ms latency.

3. End-to-end easy to maintain and generalizable/modular architecture

We wanted the solution to be architected using an easy to maintain, platform invariant, complete with all MLops capabilities required to train and use contextual bandits models. It was also important to us that it is built in a modular fashion such that it can be adapted easily to other use cases which have in mind such as recommendations on the homepage, Smartags and more.

Before we get to the details of how we built a machine learning infrastructure capable of dealing with all requirements, we’ll dig a little deeper into how we got here and what problem we’re trying to solve.

Using contextual bandits

Digitec Galaxus has multiple recommendation systems in place already. Because we have multiple recommendation systems, it is sometimes difficult to choose between them in a personalized fashion. Hence we reached out to Google seeking assistance with implementing Contextual Bandit driven recommendations, which personalizes our homepage as well as our newsletter. Because we only send newsletters to registered users, we can incorporate features for every user.

We chose TFAgents to implement the contextual bandit model. Training and serving pipelines were orchestrated by Vertex AI pipelines running TFX, which in turn used TFAgents for the development of the contextual bandit models. Here’s an overview of our approach.

TFAgents to implement the contextual bandit model

Rewarding subscribes, and penalizing unsubscribes

Given some features (context) about the user, and each of the 12 available recommenders, we aim to suggest best recommender (action) which increases the chance (reward) of the user clicking (reward = 1) on at least one of the recommendations by the selected recommender, and minimizes the chance of incurring a click which leads to unsubscribe (reward = -1).

By formulating the problem and reward function in this manner, we hypothesized that the system would optimize for increasing clicks, while still showing relevant (and not click-baity) content to the user in order to sustain the potential increase in performance. This is because the reward functions penalizes an event when a user unsubscribes, which a click-baity content is likely to lead to. The problem was then tackled by using contextual bandits because of the fact that they excel at exploiting trends that work well, as well as exploring and uncovering potentially even better-performing trends.

Serving millions of users every week with low latency

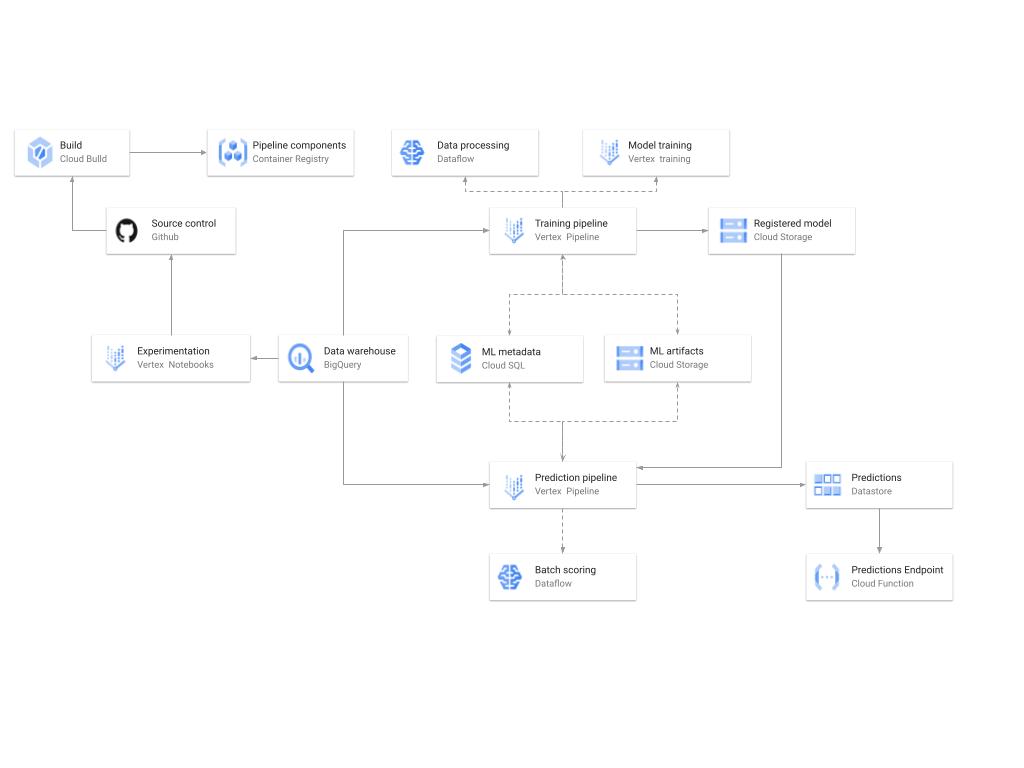
A diagram showing the high-level architecture of the recommendation training and prediction systems on GCP.

There’s a lot of detail here, as the architecture shown in the diagram covers three phases of ML development, training, and serving. Here are some of the key pieces.

Model development

Vertex Notebooks are used as data science environments for experimentation and prototyping, in addition to implementing model training and scoring components and pipelines. The source code is version controlled in GitHub. A continuous integration (CI) pipeline is set up to run unit tests, build pipeline components, and store the container images to Cloud Container Registry.

Training

The training pipeline is executed using TFX on Vertex Pipelines. In essence, the pipeline trains the model using new training data extracted from BigQuery, validates the produced model, and stores it in the model registry. In our system, the model registry is curated in Cloud Storage. The training pipeline uses Dataflow for large scale data extraction, validation, processing and model evaluation, as well as Vertex Training for large scale distributed training of the model. In addition, AI Platform Pipelines stores artifacts produced by the various pipeline steps to Cloud Storage, and information about these artifacts is stored in an ML metadata database in Cloud SQL.

Serving

Predictions are produced using a batch prediction pipeline, and stored in Cloud Datastore for consumption. The batch prediction pipeline is made using TFX and runs on Vertex Pipelines. The pipeline uses the most recent model in the model registry to score the serving queries from BigQuery. A Cloud Function is provided as a REST/HTTP endpoint to retrieve predictions from Datastore.

Continuous Training Pipeline

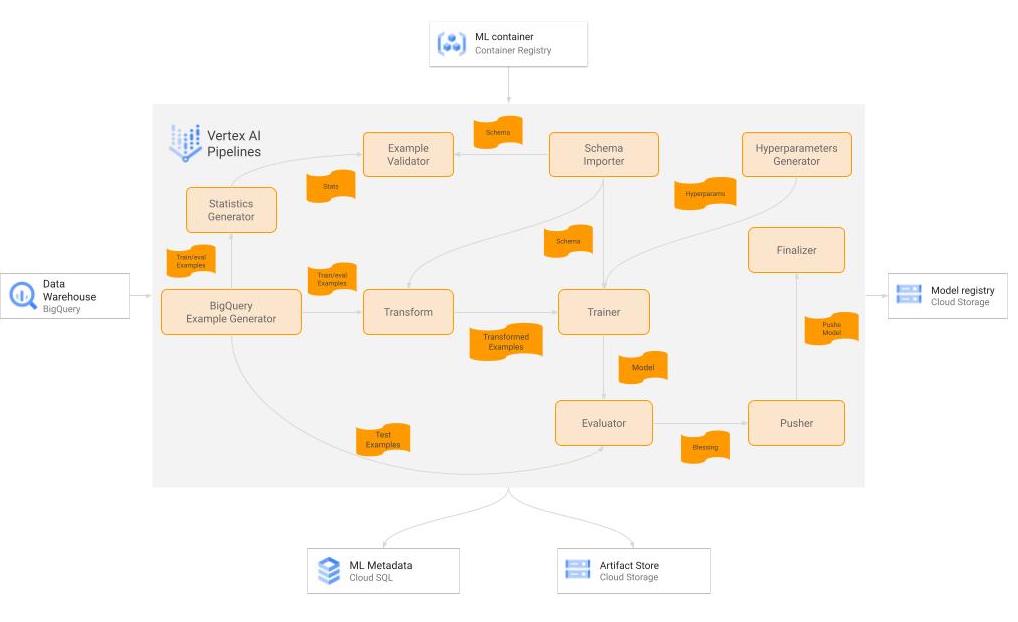
A diagram of the TFX pipeline for the training workflow.

There are many components used in our TFX-based Continuous training workflow, training is currently done on an on-demand basis, but later on it is planned to be executed on a bi-weekly cadence. Here is a little bit of detail on the important ones.

Raw Data

Our data consists of multiple datasets stored in heterogeneous formats across BigQuery tables and other formats, that are then joined in denormalized fashion by the customer into a single BigQuery table for training. To help avoid bias and drift in our model we train the model on a rolling window of 4 weeks cadence with one overlapping week per training cycle. This was a simple design choice as it was very straightforward to implement, as BigQuery has good compatibility as a source with TFX, and also allows the user to do some basic data preprocessing and cleaning during fetching.

BigQueryExampleGen

We first leverage BigQuery by leveraging built-in functions to preprocess the data. By embedding our own specific processes into the query calls made by the ExampleGen component, we were able to avoid building out a separate ETL that would exist outside the scope of a TFX pipeline. This ultimately proved to be a good way to get the model in production more quickly. This preprocessed data is then split into training and eval and converted to tf.Examples via the ExampleGen component.

Transform

This component does the necessary feature engineering and transformations necessary to handle strings, fill in missing values, log-normalize values, setup embeddings etc. The major benefit here is that the resulting transformation is ultimately prepended to the computational graph, so that the exact same code is used for training and serving. The Transform component runs on Cloud Dataflow in production.

Trainer

The Trainer component trains the model using TF-Agents. We leverage parallel training on Vertex Training to speed things up. The model is designed such that the user id passes in from the input to the output unaltered, so that it can be used as part of the downstream serving pipeline. The Trainer component runs on Vertex Training in production.

Evaluator

The Evaluator compares the existing production model to the model received by the Trainer and prepares the metrics required by the validator component to bless the “better” one for use in production. The model gating criteria is based on the AUC scores as well as counterfactual policy evaluation and possibly other metrics in the future. It is easy to implement custom metrics which meet the business requirements owing to the extensibility of the evaluator component. The Evaluator runs on Vertex AI.

Pusher

The Pusher’s primary function is to send the blessed model to our TFServing deployment for production. However, we added functionality to use the custom metrics produced in the Evaluator to determine decisioning criteria to be used in serving, and attach that to the computational graph. The level of abstraction available in TFX components made it easy to make this custom modification. Overall, the modification allows the pipeline to operate without a human in the loop so that we are able to make model updates frequently, while continuing to deliver consistent performance on metrics that are important to our business.

HyperparametersGen

This is a custom TFX component which creates a dictionary with hyperparameters (e.g., batch size, learning rate) and stores the dictionary as an artifact. The hyperparameters are passed as input to the trainer.

ServingModelResolver

This custom component takes a serving policy (which includes exploration) and a corresponding eval policy (without exploration), and resolves which policy will be used for serving.

Pushing_finalizer

This custom component copies the pushed/blessed model from the TFX artifacts directory to a curated destination.

The out-of-box components from TFX provided most of the functionality we require, and it is easy to create some new custom components to make the entire pipeline satisfy our requirements. There are also other components of the pipeline such as StatisticsGen (which also runs on Dataflow).

Batch Prediction Pipeline

A diagram showing the TFX pipeline for the batch prediction workflow.

Here are a few of the key pieces of our batch prediction system.

Inference Dataset

Our inference dataset has nearly identical format to the training dataset, except that it is emptied and repopulated with new data daily.

BigQueryExampleGen

Just like for the Training pipeline, we use this component to read data from BigQuery and convert it into tf.Examples.

Model Importer

This component imports the computation graph exported by the Pusher component of the training pipeline. As mentioned above, since it contains the whole computation graph generated by the training pipeline, including feature transformation and the tf.Agents model (including the exploration/exploitation aspect), this is very portable and prevents train/test skew.

BulkInferrer

As the name implies, this component uses the imported computation graph to perform mass inference on the inference dataset. It runs on Cloud Dataflow in production and makes it very easy to scale.

PredictionStorer

This is a custom Python Component which takes the inference results from Bulkinfererrer, post-processes them to format/filter the fields as required, and persists it to Cloud Datastore. This runs on Cloud Dataflow in production as well.

Serving is done via cloud functions which take the user ids as input, and returns the precomputed results for each userId stored in DataStore with sub 50 ms latency.

Extending the work so far

In the few months since implementation of the first version we have been making dozens of improvements to the pipeline, everything from changing the architecture/approach of the original model, to changing the way the model’s results are used in the downstream application to generate newsletters. Moreover, each of these improvements brings new value to us more quickly than we’ve been able to in the past.

Since our initial implementation of this reference architecture, we have released a simple Vertex AI pipeline based github code samples to implementing recommender systems using TF Agents here. By using this template and guide, it will help them build recommender systems using contextual bandits on GCP in a scalable, modularized, low latency and cost effective manner. It’s quite remarkable how many of the existing TFX components that we have in place carry over to new projects, and even more so how drastically we’ve reduced the time it takes to get a model in production. As a result, even the software engineers on our team without much ML expertise feel confident in being able to reuse this architecture and adapt it to more use cases. The data scientists are able to spend more of their time optimizing the parameters and architectures of the models they produce, understanding their impact on the business, and ultimately delivering more value to the users and the business.

Acknowledgements

None of this would have been possible without the joint collaboration of the following Googlers: Khalid Salama, Efi Kokiopoulou, Gábor Bartók and Digitec Galaxus’s team of engineers.

A Google Cloud blog on this project can be found here.

Read More

Run ML inference on AWS Snowball Edge with Amazon SageMaker Edge Manager and AWS IoT Greengrass

You can use AWS Snowball Edge devices in locations like cruise ships, oil rigs, and factory floors with limited to no network connectivity for a wide range of machine learning (ML) applications such as surveillance, facial recognition, and industrial inspection. However, given the remote and disconnected nature of these devices, deploying and managing ML models at the edge is often difficult. With AWS IoT Greengrass and Amazon SageMaker Edge Manager, you can perform ML inference on locally generated data on Snowball Edge devices using cloud-trained ML models. You not only benefit from the low latency and cost savings of running local inference, but also reduce the time and effort required to get ML models to production. You can do all this while continuously monitoring and improving model quality across your Snowball Edge device fleet.

In this post, we talk about how you can use AWS IoT Greengrass version 2.0 or higher and Edge Manager to optimize, secure, monitor, and maintain a simple TensorFlow classification model to classify shipping containers (connex) and people.

Getting started

To get started, order a Snowball Edge device (for more information, see Creating an AWS Snowball Edge Job). You can order a Snowball Edge device with an AWS IoT Greengrass validated AMI on it.

After you receive the device, you can use AWS OpsHub for Snow Family or the Snowball Edge client to unlock the device. You can start an Amazon Elastic Compute Cloud (Amazon EC2) instance with the latest AWS IoT Greengrass installed or use the commands on AWS OpsHub for Snow Family.

Launch and install an AMI with the following requirements, or provide an AMI reference on the Snowball console before ordering and it will be shipped with all libraries and data in the AMI:

  • The ML framework of your choice, such as TensorFlow, PyTorch, or MXNet
  • Docker (if you intend to use it)
  • AWS IoT Greengrass
  • Any other libraries you may need

Prepare the AMI at the time of ordering the Snowball Edge device on AWS Snow Family console. For instructions, see Using Amazon EC2 Compute Instances. You also have the option to update the AMI after Snowball is deployed to your edge location.

Install the latest AWS IoT Greengrass on Snowball Edge

To install AWS IoT Greengrass on your device, complete the following steps:

  1. Install the latest AWS IoT Greengrass on your Snowball Edge device. Make sure dev_tools=True is set to have ggv2 cli See the following code:
sudo -E java -Droot="/greengrass/v2" -Dlog.store=FILE  -jar ./MyGreengrassCore/lib/Greengrass.jar  --aws-region region  --thing-name MyGreengrassCore  --thing-group-name MyGreengrassCoreGroup  --tes-role-name GreengrassV2TokenExchangeRole  --tes-role-alias-name GreengrassCoreTokenExchangeRoleAlias  --component-default-user ggc_user:ggc_group  --provision true  --setup-system-service true  --deploy-dev-tools true

We reference the --thing-name you chose here when we set up Edge Manager.

  1. Run the following command to test your installation:
aws greegrassv2 help
  1. On the AWS IoT console, validate the successfully registered Snowball Edge device with your AWS IoT Greengrass account.

Optimize ML models with Edge Manager

We use Edge Manger to deploy and manage the model on Snowball Edge.

  1. Install the Edge Manager agent on Snowball Edge using the latest AWS IoT Greengrass.
  2. Train and store your ML model.

You can train your ML model using any framework of your choice and save it to an Amazon Simple Storage Service (Amazon S3) bucket. In the following screenshot, we use TensorFlow to train a multi-label model to classify connex and people in an image. The model used here is saved to an S3 bucket by first creating a .tar file.

After the model is saved (TensorFlow Lite in this case), you can start an Amazon SageMaker Neo compilation job of the model and optimize the ML model for Snowball Edge Compute (SBE_C).

  1. On the SageMaker console, under Inference in the navigation pane, choose Compilation jobs.
  2. Choose Create compilation job.

  1. Give your job a name and create or use an existing role.

 If you’re creating a new AWS Identity and Access Management (IAM) role, ensure that SageMaker has access to the bucket in which the model is saved.

  1. In the Input configuration section, for Location of model artifacts, enter the path to model.tar.gz where you saved the file (in this case, s3://feidemo/tfconnexmodel/connexmodel.tar.gz).
  2. For Data input configuration, enter the ML model’s input layer (its name and its shape). In this case, it’s called keras_layer_input and its shape is [1,224,224,3], so we enter {“keras_layer_input”:[1,224,224,3]}.

  1. For Machine learning framework, choose TFLite.

  1. For Target device, choose sbe_c.
  2. Leave Compiler options
  3. For S3 Output location, enter the same location as where your model is saved with the prefix (folder) output. For example, we enter s3://feidemo/tfconnexmodel/output.

  1. Choose Submit to start the compilation job.

Now you create a model deployment package to be used by Edge Manager.

  1. On the SageMaker console, under Edge Manager, choose Edge packaging jobs.
  2. Choose Create Edge packaging job.
  3. In the Job properties section, enter the job details.
  4. In the Model source section, for Compilation job name, enter the name you provided for the Neo compilation job.
  5. Choose Next.

  1. In the Output configuration section, for S3 bucket URI, enter where you want to store the package in Amazon S3.
  2. For Component name, enter a name for your AWS IoT Greengrass component.

This step creates an AWS IoT Greengrass model component where the model is downloaded from Amazon S3 and uncompressed to local storage on Snowball Edge.

  1. Create a device fleet to manage a group of devices, in this case, just one (SBE).
  2. For IAM role¸ enter the role generated by AWS IoT Greengrass earlier (–tes-role-name).

Make sure it has the required permissions by going to IAM console, searching for the role, and adding the required policies to it.

  1. Register the Snowball Edge device to the fleet you created.

  1. In the Device source section, enter the device name. The IoT name needs to match the name you used earlier—in this case, –thing-name MyGreengrassCore.

You can register additional Snowball devices on the SageMaker console to add them to the device fleet, which allows you to group and manage these devices together.

Deploy ML models to Snowball Edge using AWS IoT Greengrass

In the previous sections, you unlocked and configured your Snowball Edge device. The ML model is now compiled and optimized for performance on Snowball Edge. An Edge Manager package is created with the compiled model and the Snowball device is registered to a fleet. In this section, you look at the steps involved in deploying the ML model for inference to Snowball Edge with the latest AWS IoT Greengrass.

Components

AWS IoT Greengrass allows you to deploy to edge devices as a combination of components and associated artifacts. Components are JSON documents that contain the metadata, the lifecycle, what to deploy when, and what to install. Components also define what operating system to use and what artifacts to use when running on different OS options.

Artifacts

Artifacts can be code files, models, or container images. For example, a component can be defined to install a pandas Python library and run a code file that will transform the data, or to install a TensorFlow library and run the model for inference. The following are example artifacts needed for an inference application deployment:

  • gRPC proto and Python stubs (this can be different based on your model and framework)
  • Python code to load the model and perform inference

These two items are uploaded to an S3 bucket.

Deploy the components

The deployment needs the following components:

  • Edge Manager agent (available in public components at GA)
  • Model
  • Application

Complete the following steps to deploy the components:

  1. On the AWS IoT console, under Greengrass, choose Components, and create the application component.
  2. Find the Edge Manager agent component in the public components list and deploy it.
  3. Deploy a model component created by Edge Manager, which is used as a dependency in the application component.
  4. Deploy the application component to the edge device by going to the list of AWS IoT Greengrass deployments and creating a new deployment.

If you have an existing deployment, you can revise it to add the application component.

Now you can test your component.

  1. In your prediction or inference code deployed with application component, code in the logic to access files locally on the Snowball Edge device (for example, in the incoming folder) and have the predictions or processed files be moved to a processed folder.
  2. Log in to the device to see if the predictions have been made.
  3. Set up the code to run on a loop, checking the incoming folder for new files, processing the files, and moving them to the processed folder.

The following screenshot is an example setup of files before deployment inside the Snowball Edge.

After deployment, all the test images have classes of interest and therefore are moved to the processed folder.

Clean up

To clean up everything or reimplement this solution from scratch, stop all the EC2 instances by invoking the TerminateInstance API against EC2-compatible endpoints running on your Snowball Edge device. To return your Snowball Edge device, see Powering Off the Snowball Edge and Returning the Snowball Edge Device.

Conclusion

This post walked you through how to order a Snowball Edge device with an AMI of your choice. You then compile a model for the edge using SageMaker, package that model using Edge Manager, and create and run components with artifacts to perform ML inference on Snowball Edge using the latest AWS IoT Greengrass. With Edge Manager, you can deploy and update your ML models on a fleet of Snowball Edge devices, and monitor performance at the edge with saved input and prediction data on Amazon S3. You can also run these components as long-running AWS Lambda functions that can spin up a model and wait for data to do inference.

You combine several features of AWS IoT Greengrass to create an MQTT client and use a pub/sub model to invoke other services or microservices. The possibilities are endless.

By running ML inference on Snowball Edge with Edge Manager and AWS IoT Greengrass, you can optimize, secure, monitor, and maintain ML models on fleets of Snowball Edge devices. Thanks for reading and please do not hesitate to leave questions or comments in the comments section.

To learn more about AWS Snow Family, AWS IoT Greengrass, and Edge Manager, check out the following:


About the Authors

Raj Kadiyala is an AI/ML Tech Business Development Manager in AWS WWPS Partner Organization. Raj has over 12 years of experience in Machine Learning and likes to spend his free time exploring machine learning for practical every day solutions and staying active in the great outdoors of Colorado.


Nida Beig is a Sr. Product Manager – Tech at Amazon Web Services where she works on the AWS Snow Family team. She is passionate about understanding customer needs, and using technology as a conductor of transformative thinking to deliver consumer products. Besides work, she enjoys traveling, hiking, and running.

Read More

Q&A with Georgia Tech’s Amy Bruckman, research award recipient in online content governance

In this monthly interview series, we turn the spotlight on members of the academic community and the important research they do — as thought partners, collaborators, and independent contributors.

For August, we nominated Amy Bruckman, a professor at Georgia Tech. Bruckman is a winner of the 2019 Content Governance RFP, which sought proposals that helped expand research and advocacy work in the area of online content governance. In this Q&A, Bruckman shares more about her area of specialization, her winning research proposal, and her upcoming book. She also shares what inspires her in her academic work.

Q: Tell us about your role at Georgia Tech and the type of research you specialize in.

Amy Bruckman: I am professor and senior associate chair in the School of Interactive Computing at Georgia Tech. We are halfway between an I-school and a CS department — more technical than most I-schools and more interdisciplinary than most CS departments.

I founded my first online community in 1993, and I am endlessly fascinated by how the design features of an online environment shape human behavior. My students and I build new tools to support novel kinds of online interaction, and we also study existing systems using a mixed-methods approach. My specialty is qualitative methods. My students and I participate online and take field notes on what we observe (methods inspired by sociology and anthropology), and we also interview people about their experiences (building on clinical interview techniques from psychology). I partner with people who do big data and NLP research, and I’ve found that qualitative and quantitative methods are usually more powerful when used together.

Q: What have you been working on lately?

AB: Personally, lately I’ve been focused on my book Should You Believe Wikipedia? Online Communities and the Construction of Knowledge. It is coming out in January from Cambridge University Press. In the book, I try to explain how online communities are designed, with a particular focus on how people can collaboratively build knowledge.

Q: You were a winner of the 2019 Content Governance RFP. What was your winning proposal about?

AB: Our research asks the question, What happens after a controversial figure who regularly breaks platform rules is kicked off, or “deplatformed”? In particular, we studied what happened after Alex Jones, Milo Yiannopoulos, and Owen Benjamin were kicked off Twitter.

Q: What were the results of this research?

AB: My coauthors (Shagun Jhaver, Christian Boylston, and Diyi Yang) and I found that deplatforming significantly reduced the number of conversations about those individuals. More important, the overall activity and toxicity levels of supporters declined after deplatforming. For example, Milo encouraged his followers to attack actress Leslie Jones. After he was deplatformed, his supporters were better behaved. The full paper will appear at CSCW 2021.

Q: What inspires you in your academic work?

AB: I believe that our field is at a crossroads: The internet needs some redesign to support healthy communities and a working public sphere. The last chapter of my book is focused on how we can help the internet to bring out the best in us all. I try to work toward that goal in my research and in my teaching. Every fall, I teach our required ethics class “Computing, Society, and Professionalism,” and in spring, I teach “Design of Online Communities.” It’s a privilege to teach students about these issues, and the students have impact as they go on to design and build the information systems we all use every day.

Q: Where can people learn more about you and your work?

AB: My book Should You Believe Wikipedia? will be published in early 2022, and there is a sample chapter on my website.

The post Q&A with Georgia Tech’s Amy Bruckman, research award recipient in online content governance appeared first on Facebook Research.

Read More

Registration now open for the 2021 Instagram Workshop on Recommendation Systems at Scale

Instagram invites the academic community and industry peers to join the first Instagram Workshop on Recommendation Systems at Scale, taking place virtually on Thursday, September 23. Those interested may register at the link below.

Register

Production recommendation systems in large social and commerce platforms introduce complex and unprecedented challenges. The goal of this workshop is to bring together leading researchers and practitioners in related fields to share knowledge and explore research collaboration opportunities between academia and industry.

“Every day, we help over a billion people connect with their friends, interests, businesses, and creators they love on Instagram. To ensure that a community of this size finds new and inspiring content, we need to constantly evolve our recommendation systems technology. Collaborating with like-minded industry and academic experts allows us to do just that,” says Aameek Singh, Engineering Director, Instagram.

Confirmed speakers

Below is the list of confirmed speakers as of today.

  • Anoop Deoras (AWS, Amazon)
  • Diane Hu (Etsy)
  • Jonathan J Hunt (Twitter Cortex Applied Research)
  • Chris Wiggins (The New York Times)

As speakers are confirmed, they will be added to the registration page, along with their full bios and topics. View additional event details and register to attend at the link below.

Register

The post Registration now open for the 2021 Instagram Workshop on Recommendation Systems at Scale appeared first on Facebook Research.

Read More

Demonstrating the Fundamentals of Quantum Error Correction

Posted by Jimmy Chen, Quantum Research Scientist and Matt McEwen, Student Researcher, Google Quantum AI

The Google Quantum AI team has been building quantum processors made of superconducting quantum bits (qubits) that have achieved the first beyond-classical computation, as well as the largest quantum chemical simulations to date. However, current generation quantum processors still have high operational error rates — in the range of 10-3 per operation, compared to the 10-12 believed to be necessary for a variety of useful algorithms. Bridging this tremendous gap in error rates will require more than just making better qubits — quantum computers of the future will have to use quantum error correction (QEC).

The core idea of QEC is to make a logical qubit by distributing its quantum state across many physical data qubits. When a physical error occurs, one can detect it by repeatedly checking certain properties of the qubits, allowing it to be corrected, preventing any error from occurring on the logical qubit state. While logical errors may still occur if a series of physical qubits experience an error together, this error rate should exponentially decrease with the addition of more physical qubits (more physical qubits need to be involved to cause a logical error). This exponential scaling behavior relies on physical qubit errors being sufficiently rare and independent. In particular, it’s important to suppress correlated errors, where one physical error simultaneously affects many qubits at once or persists over many cycles of error correction. Such correlated errors produce more complex patterns of error detections that are more difficult to correct and more easily cause logical errors.

Our team has recently implemented the ideas of QEC in our Sycamore architecture using quantum repetition codes. These codes consist of one-dimensional chains of qubits that alternate between data qubits, which encode the logical qubit, and measure qubits, which we use to detect errors in the logical state. While these repetition codes can only correct for one kind of quantum error at a time1, they contain all of the same ingredients as more sophisticated error correction codes and require fewer physical qubits per logical qubit, allowing us to better explore how logical errors decrease as logical qubit size grows.

In “Removing leakage-induced correlated errors in superconducting quantum error correction”, published in Nature Communications, we use these repetition codes to demonstrate a new technique for reducing the amount of correlated errors in our physical qubits. Then, in “Exponential suppression of bit or phase flip errors with repetitive error correction”, published in Nature, we show that the logical errors of these repetition codes are exponentially suppressed as we add more and more physical qubits, consistent with expectations from QEC theory.

Layout of the repetition code (21 qubits, 1D chain) and distance-2 surface code (7 qubits) on the Sycamore device.

Leaky Qubits
The goal of the repetition code is to detect errors on the data qubits without measuring their states directly. It does so by entangling each pair of data qubits with their shared measure qubit in a way that tells us whether those data qubit states are the same or different (i.e., their parity) without telling us the states themselves. We repeat this process over and over in rounds that last only one microsecond. When the measured parities change between rounds, we’ve detected an error.

However, one key challenge stems from how we make qubits out of superconducting circuits. While a qubit needs only two energy states, which are usually labeled |0 and |1, our devices feature a ladder of energy states, |0, |1, |2, |3, and so on. We use the two lowest energy states to encode our qubit with information to be used for computation (we call these the computational states). We use the higher energy states (|2, |3 and higher) to help achieve high-fidelity entangling operations, but these entangling operations can sometimes allow the qubit to “leak” into these higher states, earning them the name leakage states.

Population in the leakage states builds up as operations are applied, which increases the error of subsequent operations and even causes other nearby qubits to leak as well — resulting in a particularly challenging source of correlated error. In our early 2015 experiments on error correction, we observed that as more rounds of error correction were applied, performance declined as leakage began to build.

Mitigating the impact of leakage required us to develop a new kind of qubit operation that could “empty out” leakage states, called multi-level reset. We manipulate the qubit to rapidly pump energy out into the structures used for readout, where it will quickly move off the chip, leaving the qubit cooled to the |0 state, even if it started in |2 or |3. Applying this operation to the data qubits would destroy the logical state we’re trying to protect, but we can apply it to the measure qubits without disturbing the data qubits. Resetting the measure qubits at the end of every round dynamically stabilizes the device so leakage doesn’t continue to grow and spread, allowing our devices to behave more like ideal qubits.

Applying the multi-level reset gate to the measure qubits almost totally removes leakage, while also reducing the growth of leakage on the data qubits.

Exponential Suppression
Having mitigated leakage as a significant source of correlated error, we next set out to test whether the repetition codes give us the predicted exponential reduction in error when increasing the number of qubits. Every time we run our repetition code, it produces a collection of error detections. Because the detections are linked to pairs of qubits rather than individual qubits, we have to look at all of the detections to try to piece together where the errors have occurred, a procedure known as decoding. Once we’ve decoded the errors, we then know which corrections we need to apply to the data qubits. However, decoding can fail if there are too many error detections for the number of data qubits used, resulting in a logical error.

To test our repetition codes, we run codes with sizes ranging from 5 to 21 qubits while also varying the number of error correction rounds. We also run two different types of repetition codes — either a phase-flip code or bit-flip code — that are sensitive to different kinds of quantum errors. By finding the logical error probability as a function of the number of rounds, we can fit a logical error rate for each code size and code type. In our data, we see that the logical error rate does in fact get suppressed exponentially as the code size is increased.

Probability of getting a logical error after decoding versus number of rounds run, shown for various sizes of phase-flip repetition code.

We can quantify the error suppression with the error scaling parameter Lambda (Λ), where a Lambda value of 2 means that we halve the logical error rate every time we add four data qubits to the repetition code. In our experiments, we find Lambda values of 3.18 for the phase-flip code and 2.99 for the bit-flip code. We can compare these experimental values to a numerical simulation of the expected Lambda based on a simple error model with no correlated errors, which predicts values of 3.34 and 3.78 for the bit- and phase-flip codes respectively.

Logical error rate per round versus number of qubits for the phase-flip (X) and bit-flip (Z) repetition codes. The line shows an exponential decay fit, and Λ is the scale factor for the exponential decay.

This is the first time Lambda has been measured in any platform while performing multiple rounds of error detection. We’re especially excited about how close the experimental and simulated Lambda values are, because it means that our system can be described with a fairly simple error model without many unexpected errors occurring. Nevertheless, the agreement is not perfect, indicating that there’s more research to be done in understanding the non-idealities of our QEC architecture, including additional sources of correlated errors.

What’s Next
This work demonstrates two important prerequisites for QEC: first, the Sycamore device can run many rounds of error correction without building up errors over time thanks to our new reset protocol, and second, we were able to validate QEC theory and error models by showing exponential suppression of error in a repetition code. These experiments were the largest stress test of a QEC system yet, using 1000 entangling gates and 500 qubit measurements in our largest test. We’re looking forward to taking what we learned from these experiments and applying it to our target QEC architecture, the 2D surface code, which will require even more qubits with even better performance.


1A true quantum error correcting code would require a two dimensional array of qubits in order to correct for all of the errors that could occur. 

Read More

From Our Kitchen to Yours: NVIDIA Omniverse Changes the Way Industries Collaborate

Talk about a magic trick. One moment, NVIDIA CEO Jensen Huang was holding forth from behind his sturdy kitchen counter.

The next, the kitchen and everything in it slid away, leaving Huang alone with the audience and NVIDIA’s DGX Station A100, a glimpse at an alternate digital reality.

For most, the metaverse is something seen in sci-fi movies. For entrepreneurs, it’s an opportunity. For gamers, a dream.

For NVIDIA artists, researchers and engineers on an extraordinarily tight deadline last spring, it was where they went to work — a shared virtual world they used to tell their story and a milestone for the entire company.

Designed to inform and entertain, NVIDIA’s GTC keynote is filled with cutting-edge demos highlighting advancements in supercomputing, deep learning and graphics.

“GTC is, first and foremost, our opportunity to highlight the amazing work that our engineers and other teams here at NVIDIA have done all year long,” said Rev Lebaredian, vice president of Omniverse engineering and simulation at NVIDIA.

With this short documentary, “Connecting in the Metaverse: The Making of the GTC Keynote,” viewers get the story behind the story. It’s a tale of how NVIDIA Omniverse, a tool for connecting to and describing the metaverse, brought it all together this year.

To be sure, you cant have a keynote without a flesh and blood person at the center. Through all but 14 seconds of the hour and 48 minute presentation from 1:02:41 to 1:02:55 — Huang himself spoke in the keynote.

Creating a Story in Omniverse

It starts with building a great narrative. Bringing forward a keynote-worthy presentation always takes intense collaboration. But this was unlike any other — packed not just with words and pictures — but with beautifully rendered 3D models and rich textures.

With Omniverse, NVIDIA’s team was able to collaborate using different industry content-creation tools like Autodesk Maya or Substance Painter while in different places.

Keynote slides were packed with beautifully rendered 3D models and rich textures.

“There are already great tools out there that people use every day in every industry that we want people to continue using,” said Lebaredian. “We want people to take these exciting tools and augment them with our technologies.”

These were enhanced by a new generation of tools, including Universal Scene Description (USD), Material Design Language (MDL) and NVIDIA RTX real-time ray-tracing technologies. Together, they allowed NVIDIA’s team to collaborate to create photorealistic scenes with physically accurate materials and lighting.

An NVIDIA DGX Station A100 Animation

Omniverse can create more than beautiful stills. The documentary shows how, accompanied by industry tools such as Autodesk Maya, Foundry Nuke, Adobe Photoshop, Adobe Premiere, and Adobe After Effects, it could stage and render some of the world’s most complex machines to create realistic cinematics.

With Omniverse, NVIDIA was able to turn a CAD model of the NVIDIA DGX Station A100 into a physically accurate virtual replica Huang used to give the audience a look inside.

Typically this type of project would take a team months to complete and weeks to render. But with Omniverse, the animation was chiefly completed by a single animator and rendered in less than a day.

Omniverse Physics Montage

More than just machines, though, Omniverse can model the way the world works by building on existing NVIDIA technologies. PhysX, for example, has been a staple in the NVIDIA gaming world for well over a decade. But its implementation in Omniverse brings it to a new level.

For a demo highlighting the current capabilities of PhysX 5 in Omniverse, plus a preview of advanced real-time physics simulation research, the Omniverse engineering and research teams re-rendered a collection of older PhysX demos in Omniverse.

The demo highlights key PhysX technologies such as Rigid Body, Soft Body Dynamics, Vehicle Dynamics, Fluid Dynamics, Blast’s Destruction and Fracture, and Flow’s combustible fluid, smoke and fire. As a result, viewers got a look at core Omniverse technologies that can do more than just show realistic-looking effects — they are true to reality, obeying the laws of physics in real-time.

DRIVE Sim, Now Built on Omniverse

Simulating the world around us is key to unlocking new technologies, and Omniverse is crucial to NVIDIA’s self-driving car initiative. With its PhysX and Photorealistic worlds, Omniverse creates the perfect environment for training autonomous machines of all kinds.

For this year’s DRIVE Sim on Omniverse demo, the team imported a map of the area surrounding a Mercedes plant in Germany. Then, using the same software stack that runs NVIDIA’s fleet of self-driving cars, they showed how the next generation of Mercedes cars would perform autonomous functions in the real world.

With DRIVE Sim, the team was able to test numerous lighting, weather and traffic conditions quickly — and show the world the results.

Creating the Factory of the Future with BMW Group

The idea of a “digital twin” has far-reaching consequences for almost every industry.

This year’s GTC featured a spectacular visionary display that exemplifies what the idea can do when unleashed in the auto industry.

The BMW Factory of the Future demo shows off the digital twin of a BMW assembly plant in Germany. Every detail, including layout, lighting and machinery, is digitally replicated with physical accuracy.

This “digital simulation” provides ultra-high fidelity and accurate, real-time simulation of the entire factory. With it, BMW can reconfigure assembly lines to optimize worker safety and efficiency, train factory robots to perform tasks, and optimize every aspect of plant operations.

Virtual Kitchen, Virtual CEO

The surprise highlight of GTC21 was a perfect virtual replica of Huang’s kitchen — the setting of the past three pandemic-era “kitchen keynotes” — complete with a digital clone of the CEO himself.

The demo is the epitome of what GTC represents: It combined the work of NVIDIA’s deep learning and graphics research teams with several engineering teams and the company’s incredible in-house creative team.

To create a virtual Jensen, teams did a full face and body scan to create a 3D model, then trained an AI to mimic his gestures and expressions and applied some AI magic to make his clone realistic.

Digital Jensen was then brought into a replica of his kitchen that was deconstructed to reveal the holodeck within Omniverse, surprising the audience and making them question how much of the keynote was real, or rendered.

“We built Omniverse first and foremost for ourselves here at NVIDIA,” Lebaredian said. “We started Omniverse with the idea of connecting existing tools that do 3D together for what we are now calling the metaverse.”

More and more of us will be able to do the same, accelerating more of what we do together. “If we do this right, we’ll be working in Omniverse 20 years from now,” Lebaredian said.

The post From Our Kitchen to Yours: NVIDIA Omniverse Changes the Way Industries Collaborate appeared first on The Official NVIDIA Blog.

Read More

Watch: Making Masterpieces in the Cloud With Virtual Reality

Immersive 3D design and character creation are going sky high this week at SIGGRAPH, in a demo showcasing NVIDIA CloudXR running on Google Cloud.

The clip shows an artist with an untethered VR headset creating a fully rigged character with Masterpiece Studio Pro, which is running remotely in Google Cloud and interactively streamed to the artist using CloudXR.

Bringing Characters to Life in XR

The demo focuses on an interactive technique known as digital sculpting, which uses software to create and refine a 3D model as if it were made of a real-life substance such as clay. But moving digital sculpting into a VR space creates a variety of challenges.

First, setting up the VR environment can be complicated and expensive. It typically requires dedicated physical space for wall-mounted sensors. If an artist wants to interact with the 3D model or move the character around, they can get tangled up in the cord that connects their VR headset to their workstation.

CloudXR, hosted from Google Cloud on a tetherless HMD, addresses these challenges by providing artists with the freedom to create from virtually anywhere. With a good internet connection, there’s no need for users to be physically tethered to an expensive workstation to have a seamless design session in an immersive environment.

Masterpiece Studio Pro is a fully immersive 3D creation pipeline that simplifies the character design process. From blocking in basic shapes to designing a fully textured and rigged character, artists can easily work on a character face-to-face in VR, providing a more intuitive experience.

In Masterpiece Studio Pro, artists can work on characters at any scale and use familiar tools and hand gestures to sculpt and pose models — just like they would with clay figures in real life. And drawing bones in position couldn’t be easier, because artists can reach right into the limbs of the creature to place them.

Getting Your Head in the Cloud

Built on NVIDIA RTX technology, CloudXR solves immersive design challenges by cutting the cord. Artists can work with a wireless, all-in-one headset, like the HTC VIVE Focus 3, without having to deal with the hassles of setting up a VR space.

And with CloudXR on Google Cloud, artists can rent an NVIDIA GPU on a Google Cloud Virtual Workstation, powered by NVIDIA RTX Virtual Workstation technology, and stream their work remotely. The VIVE Focus 3 is HTC’s latest standalone headset, which has 5K visuals and active cooling for long design sessions.

“We’re excited to show how complex creative workflows and high-quality graphics come together in the ultimate immersive experience — all running in the cloud,” said Daniel O’Brien, general manager at HTC Americas. “NVIDIA CloudXR and the VIVE Focus 3 provide a high quality experience to immerse artists in a seamless streaming experience.”

With Masterpiece Studio Pro running on Google Cloud, and streaming with NVIDIA CloudXR, users can enhance the workflow of creating characters in an immersive environment — one that’s more intuitive and productive than before.

Check out our other demos at SIGGRAPH, and learn more about NVIDIA CloudXR on Google Cloud.

The post Watch: Making Masterpieces in the Cloud With Virtual Reality appeared first on The Official NVIDIA Blog.

Read More

Lending a Helping Hand: Jules Anh Tuan Nguyen on Building a Neuroprosthetic

With deep learning, amputees can now control their prosthetics by simply thinking through the motion.

Jules Anh Tuan Nguyen spoke with NVIDIA AI Podcast host Noah Kravitz about his efforts to allow amputees to control their prosthetic limb — right down to the finger motions — with their minds.

Using neural decoders and deep learning, this system allows humans to control just about anything digital with their thoughts, including playing video games and a piano.

Nguyen is a postdoctoral researcher in the biomedical engineering department at the University of Minnesota. His work with his team is detailed in a paper titled “A Portable, Self-Contained Neuroprosthetic Hand with Deep Learning-Based Finger Control.”

Key Points From This Episode:

  • Nguyen and his team created an AI-based system using receptors implanted in the arm to translate the electrical information from the nerves into commands to execute the appropriate arm, hand and finger movements — all built into the arm.
  • The two main objectives of the system are to make the neural interface wireless and to optimize the AI engine and neural decoder to consume less power — enough for a person to use it for at least eight hours a day before having to recharge it.

Tweetables:

“To make the amputee move and feel just like a real hand, we have to establish a neural connection for the amputee to move their finger and feel it just like a missing hand.” — Jules Anh Tuan Nguyen [7:24]

“The idea behind it can extend to many things. You can control virtual reality. You can control a robot, a drone — the possibility is endless. With this nerve interface and AI neural decoder, suddenly you can manipulate things with your mind.” — Jules Anh Tuan Nguyen [22:07]

You Might Also Like:

AI for Hobbyists: DIYers Use Deep Learning to Shoo Cats, Harass Ants

Robots recklessly driving cheap electric kiddie cars. Autonomous machines shining lasers at ants — and spraying water at bewildered cats — for the amusement of cackling grandchildren. Listen in to hear NVIDIA engineer Bob Bond and Make: Magazine Executive Editor Mike Senese explain how they’re entertaining with deep learning.

A USB Port for Your Body? Startup Uses AI to Connect Medical Devices to Nervous System

Think of it as a USB port for your body. Emil Hewage is the co-founder and CEO at Cambridge Bio-Augmentation Systems, a neural engineering startup. The U.K. startup is building interfaces that use AI to help plug medical devices into our nervous systems.

Behind the Scenes at NeurIPS With NVIDIA and CalTech’s Anima Anandkumar

Anima Anandkumar, NVIDIA’s director of machine learning research and Bren professor at CalTech’s CMS Department, talks about NeurIPS and discusses the transition from supervised to unsupervised and self-supervised learning, which she views as the key to next-generation AI.

Tune in to the AI Podcast

Get the AI Podcast through iTunes, Google Podcasts, Google Play, Castbox, DoggCatcher, Overcast, PlayerFM, Pocket Casts, Podbay, PodBean, PodCruncher, PodKicker, Soundcloud, Spotify, Stitcher and TuneIn. If your favorite isn’t listed here, drop us a note.

Tune in to the Apple Podcast Tune in to the Google Podcast Tune in to the Spotify Podcast

Make the AI Podcast Better

Have a few minutes to spare? Fill out this listener survey. Your answers will help us make a better podcast.

The post Lending a Helping Hand: Jules Anh Tuan Nguyen on Building a Neuroprosthetic appeared first on The Official NVIDIA Blog.

Read More

All AI Do Is Win: NVIDIA Research Nabs ‘Best in Show’ with Digital Avatars at SIGGRAPH

In a turducken of a demo, NVIDIA researchers stuffed four AI models into a serving of digital avatar technology for SIGGRAPH 2021’s Real-Time Live showcase — winning the Best in Show award.

The showcase, one of the most anticipated events at the world’s largest computer graphics conference, held virtually this year, celebrates cutting-edge real-time projects spanning game technology, augmented reality and scientific visualization. It featured a lineup of jury-reviewed interactive projects, with presenters hailing from Unity Technologies, Rensselaer Polytechnic Institute, the NYU Future Reality Lab and more.

Broadcasting live from our Silicon Valley headquarters, the NVIDIA Research team presented a collection of AI models that can create lifelike virtual characters for projects such as bandwidth-efficient video conferencing and storytelling.

The demo featured tools to generate digital avatars from a single photo, animate avatars with natural 3D facial motion and convert text to speech.

“Making digital avatars is a notoriously difficult, tedious and expensive process,” said Bryan Catanzaro, vice president of applied deep learning research at NVIDIA, in the presentation. But with AI tools, “there is an easy way to create digital avatars for real people as well as cartoon characters. It can be used for video conferencing, storytelling, virtual assistants and many other applications.”

AI Aces the Interview

In the demo, two NVIDIA research scientists played the part of an interviewer and a prospective hire speaking over video conference. Over the course of the call, the interviewee showed off the capabilities of AI-driven digital avatar technology to communicate with the interviewer.

The researcher playing the part of interviewee relied on an NVIDIA RTX laptop throughout, while the other used a desktop workstation powered by RTX A6000 GPUs. The entire pipeline can also be run on GPUs in the cloud.

While sitting in a campus coffee shop, wearing a baseball cap and a face mask, the interviewee used the Vid2Vid Cameo model to appear clean-shaven in a collared shirt on the video call (seen in the image above). The AI model creates realistic digital avatars from a single photo of the subject — no 3D scan or specialized training images required.

“The digital avatar creation is instantaneous, so I can quickly create a different avatar by using a different photo,” he said, demonstrating the capability with another two images of himself.

Instead of transmitting a video stream, the researcher’s system sent only his voice — which was then fed into the NVIDIA Omniverse Audio2Face app. Audio2Face generates natural motion of the head, eyes and lips to match audio input in real time on a 3D head model. This facial animation went into Vid2Vid Cameo to synthesize natural-looking motion with the presenter’s digital avatar.

Not just for photorealistic digital avatars, the researcher fed his speech through Audio2Face and Vid2Vid Cameo to voice an animated character, too. Using NVIDIA StyleGAN, he explained, developers can create infinite digital avatars modeled after cartoon characters or paintings.

The models, optimized to run on NVIDIA RTX GPUs, easily deliver video at 30 frames per second. It’s also highly bandwidth efficient, since the presenter is sending only audio data over the network instead of transmitting a high-resolution video feed.

Taking it a step further, the researcher showed that when his coffee shop surroundings got too loud, the RAD-TTS model could convert typed messages into his voice — replacing the audio fed into Audio2Face. The breakthrough text-to-speech, deep learning-based tool can synthesize lifelike speech from arbitrary text inputs in milliseconds.

RAD-TTS can synthesize a variety of voices, helping developers bring book characters to life or even rap songs like “The Real Slim Shady” by Eminem, as the research team showed in the demo’s finale.

SIGGRAPH continues through Aug. 13. Check out the full lineup of NVIDIA events at the conference and catch the premiere of our documentary, “Connecting in the Metaverse: The Making of the GTC Keynote,” on Aug. 11.

The post All AI Do Is Win: NVIDIA Research Nabs ‘Best in Show’ with Digital Avatars at SIGGRAPH appeared first on The Official NVIDIA Blog.

Read More