Use machine learning to detect anomalies and predict downtime with Amazon Timestream and Amazon Lookout for Equipment

Use machine learning to detect anomalies and predict downtime with Amazon Timestream and Amazon Lookout for Equipment

The last decade of the Industry 4.0 revolution has shown the value and importance of machine learning (ML) across verticals and environments, with more impact on manufacturing than possibly any other application. Organizations implementing a more automated, reliable, and cost-effective Operational Technology (OT) strategy have led the way, recognizing the benefits of ML in predicting assembly line failures to avoid costly and unplanned downtime. Still, challenges remain for teams of all sizes to quickly, and with little effort, demonstrate the value of ML-based anomaly detection in order to persuade management and finance owners to allocate the budget required to implement these new technologies. Without access to data scientists for model training, or ML specialists to deploy solutions at the local level, adoption has seemed out of reach for teams on the factory floor.

Now, teams that collect sensor data signals from machines in the factory can unlock the power of services like Amazon Timestream, Amazon Lookout for Equipment, and AWS IoT Core to easily spin up and test a fully production-ready system at the local edge to help avoid catastrophic downtime events. Lookout for Equipment uses your unique ML model to analyze incoming sensor data in real time and accurately identify early warning signs that could lead to machine failures. This means you can detect equipment abnormalities with speed and precision, quickly diagnose issues, take action to reduce expensive downtime, and reduce false alerts. Response teams can be alerted with specific pinpoints to which sensors are indicating the issue, and the magnitude of impact on the detected event.

In this post, we show you how you can set up a system to simulate events on your factory floor with a trained model and detect abnormal behavior using Timestream, Lookout for Equipment, and AWS Lambda functions. The steps in this post emphasize the AWS Management Console UI, showing how technical people without a developer background or strong coding skills can build a prototype. Using simulated sensor signals will allow you to test your system and gain confidence before cutting over to production. Lastly, in this example, we use Amazon Simple Notification Service (Amazon SNS) to show how teams can receive notifications of predicted events and respond to avoid catastrophic effects of assembly line failures. Additionally, teams can use Amazon QuickSight for further analysis and dashboards for reporting.

Solution overview

To get started, we first collect a historical dataset from your factory sensor readings, ingest the data, and train the model. With the trained model, we then set up IoT Device Simulator to publish MQTT signals to a topic that will allow testing of the system to identify desired production settings before production data is used, keeping costs low.

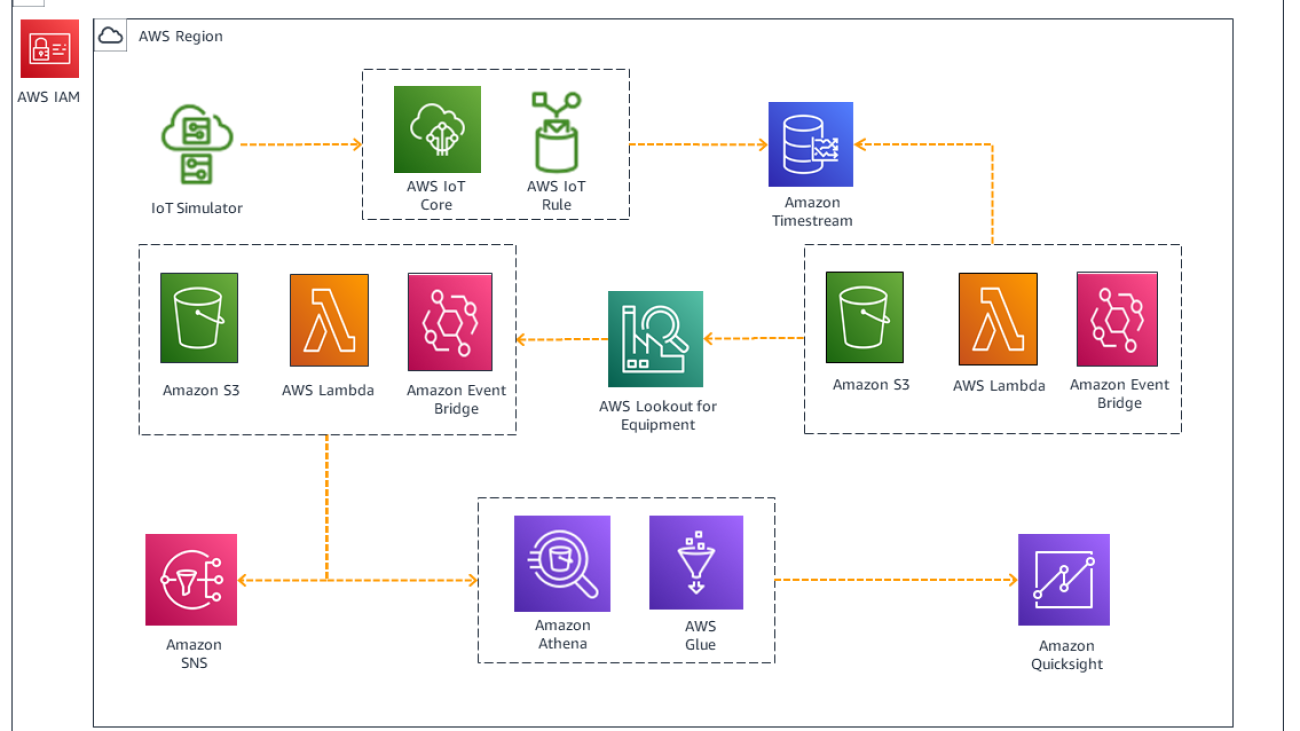
The following diagram illustrates our solution architecture.

The workflow contains the following steps:

  1. Use sample data to train the Lookout for Equipment model, and the provided labeled data to improve model accuracy. With a sample rate of 5 minutes, we can train the model in 20–30 minutes.
  2. Run an AWS CloudFormation template to enable IoT Simulator, and create a simulation to publish an MQTT topic in the format of the sensor data signals.
  3. Create an IoT rule action to read the MQTT topic an send the topic payload to Timestream for storage. These are the real-time datasets that will be used for inferencing with the ML model.
  4. Set up a Lambda function triggered by Amazon EventBridge to convert data into CSV format for Lookout for Equipment.
  5. Create a Lambda function to parse Lookout for Equipment model inferencing output file in Amazon Simple Storage Service (Amazon S3) and, if failure is predicted, send an email to the configured address. Additionally, use AWS Glue, Amazon Athena, and QuickSight to visualize the sensor data contributions to the predicted failure event.

Prerequisites

You need access to an AWS account to set up the environment for anomaly detection.

Simulate data and ingest it into the AWS Cloud

To set up your data and ingestion configuration, complete the following steps:

  1. Download the training file subsystem-08_multisensor_training.csv and the labels file labels_data.csv. Save the files locally.
  2. On the Amazon S3 console in your preferred Region, create a bucket with a unique name (for example, l4e-training-data), using the default configuration options.
  3. Open the bucket and choose Upload, then Add files.
  4. Upload the training data to a folder called /training-data and the label data to a folder called /labels.

Next, you create the ML model to be trained with the data from the S3 bucket. To do this, you first need to create a project.

  1. On the Lookout for Equipment console, choose Create project.
  2. Name the project and choose Create project.
  3. On the Add dataset page, specify your S3 bucket location.
  4. Use the defaults for Create a new role and Enable CloudWatch Logs.
  5. Choose By filename for Schema detection method.
  6. Choose Start ingestion.

Ingestion takes a few minutes to complete.

  1. When ingestion is complete, you can review the details of the dataset by choosing View Dataset.
  2. Scroll down the page and review the Details by sensor section.
  3. Scroll to the bottom of the page to see that the sensor grade for data from three of the sensors is labeled Low.
  4. Select all the sensor records except the three with Low grade.
  5. Choose Create model.
  6. On the Specify model details page, give the model a name and choose Next.
  7. On the Configure input data page, enter values for the training and evaluation settings and a sample rate (for this post, 1 minute).
  8. Skip the Off-time detection settings and choose Next.
  9. On the Provide data labels page, specify the S3 folder location where the label data is.
  10. Select Create a new role.
  11. Choose Next.
  12. On the Review and train page, choose Start training.

With a sample rate of 5 minutes, the model should take 20–30 minutes to build.

While the model is building, we can set up the rest of the architecture.

Simulate sensor data

  1. Choose Launch Stack to launch a CloudFormation template to set up the simulated sensor signals using IoT Simulator.
  2. After the template has launched, navigate to the CloudFormation console.
  3. On the Stacks page, choose IoTDeviceSimulator to see the stack details.
  4. On the Outputs tab, find the ConsoleURL key and the corresponding URL value.
  5. Choose the URL to open the IoT Device Simulator login page.
  6. Create a user name and password and choose SIGN IN.
  7. Save your credentials in case you need to sign in again later.
  8. From the IoT Device Simulator menu bar, choose Device Types.
  9. Enter a device type name, such as My_testing_device.
  10. Enter an MQTT topic, such as factory/line/station/simulated_testing.
  11. Choose Add attribute.
  12. Enter the values for the attribute signal5, as shown in the following screenshot.
  13. Choose Save.
  14. Choose Add attribute again and add the remaining attributes to match the sample signal data, as shown in the following table.
. signal5 signal6 signal7 signal8 signal48 signal49 signal78 signal109 signal120 signal121
Low 95 347 27 139 458 495 675 632 742 675
Hi 150 460 217 252 522 613 812 693 799 680
  1. On the Simulations tab, choose Add Simulation.
  2. Give the simulation a name.
  3. Specify Simulation type as User created, Device type as the recently created device, Data transmission interval as 60, and Data transmission duration as 3600.
  4. Finally, start the simulation you just created and see the payloads generated on the Simulation Details page by choosing View.

Now that signals are being generated, we can set up IoT Core to read the MQTT topics and direct the payloads to the Timestream database.

  1. On the IoT Core console, under Message Routing in the navigation pane, choose Rules.
  2. Choose Create rule.
  3. Enter a rule name and choose Next.
  4. Enter the following SQL statement to pull all the values from the published MQTT topic:
SELECT signal5, signal6, signal7, signal8, signal48, signal49, signal78, signal109, signal120, signal121 FROM 'factory/line/station/simulated_testing'

  1. Choose Next.
  2. For Rule actions, search for the Timestream table.
  3. Choose Create Timestream database.

A new tab opens with the Timestream console.

  1. Select Standard database.
  2. Name the database sampleDB and choose Create database.

You’re redirected to the Timestream console, where you can view the database you created.

  1. Return to the IoT Core tab and choose sampleDB for Database name.
  2. Choose Create Timestream table to add a table to the database where the sensor data signals will be stored.
  3. On the Timestream console Create table tab, choose sampleDB for Database name, enter signalTable for Table name, and choose Create table.
  4. Return to the IoT Core console tab to complete the IoT message routing rule.
  5. Enter Simulated_signal for Dimensions name and 1 for Dimensions value, then choose Create new role.

  1. Name the role TimestreamRole and choose Next.
  2. On the Review and create page, choose Create.

You have now added a rule action in IoT Core that directs the data published to the MQTT topic to a Timestream database.

Query Timestream for analysis

To query Timestream for analysis, complete the following steps:

  1. Validate the data is being stored in the database by navigating to the Timestream console and choosing Query Editor.
  2. Choose Select table, then choose the options menu and Preview data.
  3. Choose Run to query the table.

Now that data is being stored in the stream, you can use Lambda and EventBridge to pull data every 5 minutes from the table, format it, and send it to Lookout for Equipment for inference and prediction results.

  1. On the Lambda console, choose Create function.
  2. For Runtime, choose Python 3.9.
  3. For Layer source, select Specify an ARN.
  4. Enter the correct ARN for your Region from the aws pandas resource.
  5. Choose Add.

  1. Enter the following code into the function and edit it to match the S3 path to a bucket with the folder /input (create a bucket folder for these data stream files if not already present).

This code uses the awswrangler library to easily format the data in the required CSV form needed for Lookout for Equipment. The Lambda function also dynamically names the data files as required.

import json
import boto3
import awswrangler as wr
from datetime import datetime
import pytz

def lambda_handler(event, context):
    # TODO implement
    UTC = pytz.utc
    my_date = datetime.now(UTC).strftime('%Y-%m-%d-%H-%M-%S')
    print(my_date)
      
    df = wr.timestream.query('SELECT time as Timestamp, max(case when measure_name = 'signal5' then measure_value::double/1000 end) as "signal-005", max(case when measure_name = 'signal6' then measure_value::double/1000 end) as "signal-006", max(case when measure_name = 'signal7' then measure_value::double/1000 end) as "signal-007", max(case when measure_name = 'signal8' then measure_value::double/1000 end) as "signal-008", max(case when measure_name = 'signal48' then measure_value::double/1000 end) as "signal-048", max(case when measure_name = 'signal49' then measure_value::double/1000 end) as "signal-049", max(case when measure_name = 'signal78' then measure_value::double/1000 end) as "signal-078", max(case when measure_name = 'signal109' then measure_value::double/1000 end) as "signal-109", max(case when measure_name = 'signal120' then measure_value::double/1000 end) as "signal-120", max(case when measure_name = 'signal121' then measure_value::double/1000 end) as "signal-121" 
    FROM "<YOUR DB NAME>"."<YOUR TABLE NAME>" WHERE time > ago(5m) group by time order by time desc')
    print(df)
    
    s3path ="s3://<EDIT-PATH-HERE>/input/<YOUR FILE NAME>_%s.csv" % my_date
    
    wr.s3.to_csv(df, s3path, index=False)
    
    return {
        'statusCode': 200,
        'body': json.dumps('Hello from Lambda!')
    }
  1. Choose Deploy.
  2. On the Configuration tab, choose General configuration.
  3. For Timeout, choose 5 minutes.
  4. In the Function overview section, choose Add trigger with EventBridge as the source.
  5. Select Create a new rule.
  6. Name the rule eventbridge-cron-job-lambda-read-timestream and add rate(5 minutes) for Schedule expression.
  7. Choose Add.
  8. Add the following policy to your Lambda execution role:
    {
        "Version": "2012-10-17",
        "Statement": [
            {
                "Effect": "Allow",
                "Action": "s3:PutObject",
                "Resource": "arn:aws:s3:::<YOUR BUCKET HERE>/*"
            },
            {
                "Effect": "Allow",
                "Action": [
                    "timestream:DescribeEndpoints",
                    "timestream:ListTables",
                    "timestream:Select"
                ],
                "Resource": "*"
            }
        ]
    }

Predict anomalies and notify users

To set up anomaly prediction and notification, complete the following steps:

  1. Return to the Lookout for Equipment project page and choose Schedule inference.
  2. Name the schedule and specify the model created previously.
  3. For Input data, specify the S3 /input location where files are written using the Lambda function and EventBridge trigger.
  4. Set Data upload frequency to 5 minutes and leave Offset delay time at 0 minutes.
  5. Set an S3 path with /output as the folder and leave other default values.
  6. Choose Schedule inference.

After 5 minutes, check the S3 /output path to verify prediction files are created. For more information about the results, refer to Reviewing inference results.

Finally, you create a second Lambda function that triggers a notification using Amazon SNS when an anomaly is predicted.

  1. On the Amazon SNS console, choose Create topic.
  2. For Name, enter emailnoti.
  3. Choose Create.
  4. In the Details section, for Type, select Standard.
  5. Choose Create topic.
  6. On the Subscriptions tab, create a subscription with Email type as Protocol and an endpoint email address you can access.
  7. Choose Create subscription and confirm the subscription when the email arrives.
  8. On the Topic tab, copy the ARN.
  9. Create another Lambda function with the following code and enter the ARN topic in MY_SYS_ARN:
    import boto3
    import sys
    import logging
    import os
    import datetime
    import csv
    import json
    
    MY_SNS_TOPIC_ARN = 'MY_SNS_ARN'
    client = boto3.client('s3')
    logger = logging.getLogger()
    logger.setLevel(logging.DEBUG)
    sns_client = boto3.client('sns')
    lambda_tmp_dir = '/tmp'
    
    def lambda_handler(event, context):
        
        for r in event['Records']:
            s3 = r['s3']
            bucket = s3['bucket']['name']
            key = s3['object']['key']
        source = download_json(bucket, key)
        with open(source, 'r') as content_file:
            content = json.load(content_file)
            if content['prediction'] == 1 :
                Messages = 'Time: ' + str(content['timestamp']) + 'n' + 'Equipment is predicted failure.' + 'n' + 'Diagnostics: '
                # Send message to SNS
                for diag in content['diagnostics']:
                    Messages = Messages + str(diag) + 'n'
        
                sns_client.publish(
                    TopicArn = MY_SNS_TOPIC_ARN,
                    Subject = 'Equipment failure prediction',
                    Message = Messages
                )
    
    def download_json(bucket, key):
        local_source_json = lambda_tmp_dir + "/" + key.split('/')[-1]
        directory = os.path.dirname(local_source_json)
        if not os.path.exists(directory):
            os.makedirs(directory)
        client.download_file(bucket, key.replace("%3A", ":"), local_source_json)
        return local_source_json

  10. Choose Deploy to deploy the function.

When Lookout for Equipment detects an anomaly, the prediction value is 1 in the results. The Lambda code uses the JSONL file and sends an email notification to the address configured.

  1. Under Configuration, choose Permissions and Role name.
  2. Choose Attach policies and add AmazonS3FullAccess and AmazonSNSFullAccess to the role.
  3. Finally, add an S3 trigger to the function and specify the /output bucket.

After a few minutes, you will start to see emails arrive every 5 minutes.

Visualize inference results

After Amazon S3 stores the prediction results, we can use the AWS Glue Data Catalog with Athena and QuickSight to create reporting dashboards.

  1. On the AWS Glue console, choose Crawlers in the navigation pane.
  2. Choose Create crawler.
  3. Give the crawler a name, such as inference_crawler.
  4. Choose Add a data source and select the S3 bucket path with the results.jsonl files.
  5. Select Crawl all sub-folders.
  6. Choose Add an S3 data source.
  7. Choose Create new IAM role.
  8. Create a database and provide a name (for example, anycompanyinferenceresult).
  9. For Crawler schedule, choose On demand.
  10. Choose Next, then choose Create crawler.
  11. When the crawler is complete, choose Run crawler.

  1. On the Athena console, open the query editor.
  2. Choose Edit settings to set up a query result location in Amazon S3.
  3. If you don’t have a bucket created, create one now via the Amazon S3 console.
  4. Return to the Athena console, choose the bucket, and choose Save.
  5. Return to the Editor tab in the query editor and run a query to select * from the /output S3 folder.
  6. Review the results showing anomaly detection as expected.

  1. To visualize the prediction results, navigate to the QuickSight console.
  2. Choose New analysis and New dataset.
  3. For Dataset source, choose Athena.
  4. For Data source name, enter MyDataset.
  5. Choose Create data source.
  6. Choose the table you created, then choose Use custom SQL.
  7. Enter the following query:
    with dataset AS 
        (SELECT timestamp,prediction, names
        FROM "anycompanyinferenceresult"."output"
        CROSS JOIN UNNEST(diagnostics) AS t(names))
    SELECT  SPLIT_PART(timestamp,'.',1) AS timestamp, prediction,
        SPLIT_PART(names.name,'',1) AS subsystem,
        SPLIT_PART(names.name,'',2) AS sensor,
        names.value AS ScoreValue
    FROM dataset

  8. Confirm the query and choose Visualize.
  9. Choose Pivot table.
  10. Specify timestamp and sensor for Rows.
  11. Specify prediction and ScoreValue for Values.
  12. Choose Add Visual to add a visual object.
  13. Choose Vertical bar chart.
  14. Specify Timestamp for X axis, ScoreValue for Value, and Sensor for Group/Color.
  15. Change ScoreValue to Aggregate:Average.

Clean up

Failure to delete resources can result in additional charges. To clean up your resources, complete the following steps:

  1. On the QuickSight console, choose Recent in the navigation pane.
  2. Delete all the resources you created as part of this post.
  3. Navigate to the Datasets page and delete the datasets you created.
  4. On the Lookout for Equipment console, delete the projects, datasets, models, and inference schedules used in this post.
  5. On the Timestream console, delete the database and associated tables.
  6. On the Lambda console, delete the EventBridge and Amazon S3 triggers.
  7. Delete the S3 buckets, IoT Core rule, and IoT simulations and devices.

Conclusion

In this post, you learned how to implement machine learning for predictive maintenance using real-time streaming data with a low-code approach. You learned different tools that can help you in this process, using managed AWS services like Timestream, Lookout for Equipment, and Lambda, so operational teams see the value without adding additional workloads for overhead. Because the architecture uses serverless technology, it can scale up and down to meet your needs.

For more data-based learning resources, visit the AWS Blog home page.


About the author

Matt Reed is a Senior Solutions Architect in Automotive and Manufacturing at AWS. He is passionate about helping customers solve problems with cool technology to make everyone’s life better. Matt loves to mountain bike, ski, and hang out with friends, family, and dogs and cats.

Read More

2022H2 Amazon Textract launch summary

2022H2 Amazon Textract launch summary

Documents are a primary tool for record keeping, communication, collaboration, and transactions across many industries, including financial, medical, legal, and real estate. The millions of mortgage applications and hundreds of millions of W2 tax forms processed each year are just a few examples of such documents.

Critical business data remains unlocked in unstructured documents such as scanned images and PDFs, and trying to get humans to read this data or even legacy OCR is tedious, expensive, and error prone.

This is why we launched Amazon Textract in 2019 to help you automate your tedious document processing workflows powered by AI. Amazon Textract automatically extracts printed text, handwriting, and data from any document.

Amazon Textract continuously improves the service based on your feedback.

In this post, we share the features and improvements to the Amazon Textract service released each quarter.

2022 – Q4

Analyze Lending to accelerate loan document processing

The Analyze Lending feature in Amazon Textract is a managed API that helps you automate mortgage document processing to drive business efficiency, reduce costs, and scale quickly. Analyze Lending fully automates the classification and extraction of information from loan packages. You simply upload your mortgage loan documents to the Analyze Lending API, and its pre-trained machine learning models will automatically classify and split by document type, and extract critical fields of information from a mortgage loan packet. Learn more about this feature in the post Classifying and Extracting Mortgage Loan Data with Amazon Textract.

Ability to detect signatures on any document

With this feature, Amazon Textract provides the capability to detect handwritten signatures, e-signatures, and initials on documents such as loan application forms, checks, claim forms, and more. The Signatures feature is available as part of the AnalyzeDocument API. It reduces the need for human reviewers and helps you reduce costs, save time, and build scalable solutions for document processing. AnalyzeDocument Signatures provides the location and the confidence scores of the detected signatures. The feature can be used standalone or in combination with other AnalyzeDocument features. Signatures is pre-trained on a wide a variety of financial, insurance, and tax documents. Learn more about how to use this feature in our documentation for the AnalyzeDocument API.

AnalyzeDocument Forms enhancements for boxed forms and E13B font

Amazon Textract has made quality enhancements to the Text and Forms extraction features available as part of the AnalyzeDocument API.

These updates improve overall key-value pair extraction accuracy and specifically improve extraction of data captured in single-character boxed forms commonly found in tax, immigration, and other forms. Amazon Textract is now able to utilize its knowledge of these single-character boxed forms to provide higher accuracies in key-value pair extraction.

Additionally, we are pleased to announce support for E13B fonts commonly found in deposit checks, accuracy improvements to detect International Bank Account Numbers (IBAN) found in banking documents, and long words (such as email addresses) via the AnalyzeDocument API. Businesses across industries like insurance, healthcare, and banking utilize these documents in their business processes and will automatically see the benefits of this update when using the AnalyzeDocument API.

AnalyzeExpense API adds new fields and OCR output

The update to the AnalyzeExpense API increases the number of normalized fields to over 40. The newly supported normalized fields include summary fields such as vendor address and line-item fields such as product code. With this new capability, you can directly extract your desired information and save time writing and maintaining complex postprocessing code. Besides support for new fields, we have further improved the accuracy for fields such as vendor name and total that were already supported in the previous version.

Along with normalized key-value pairs and regular key value pairs, AnalyzeExpense now provides the entire OCR output in the API response. You can obtain both key-value pairs and the raw OCR extract through a single API request. Learn more about the AnalyzeExpense API in Analyzing Invoices and Receipts.

Analyze ID machine-readable zone code support and OCR output

Analyze ID adds support to extract the machine-readable zone (MRZ) code on US passports. This is in addition to the other fields you can extract on US passports, such as document number, date of birth, and date of issue, for a total of 10 fields. You can continue to extract 19 fields from US driver’s licenses, including inferred fields such as first name, last name, and address. Besides support for the new MRZ code field, we have further improved the accuracy for fields such as expiration date and place of birth that were already supported in the previous version.

Along with normalized key-value pairs, Analyze ID provides the entire OCR output in the API response with this release. You can obtain both key-value pairs and the raw OCR extract through a single API request. Learn more about our Analyze ID API in Analyzing Identity Documents.

2022 – Q3

Accuracy enhancements for Text (OCR) extraction

The latest Text (OCR) extraction models available via the DetectDocumentText API improve word and line extraction accuracy. Amazon Textract also added support for E13B font extraction, which is commonly found in checks, IBAN numbers found in banking documents, and improved accuracy on longer words such as email addresses. To learn more about the launch, see Amazon Textract announces updates to the text extraction feature.

Accuracy enhancements for Forms extraction

Amazon Textract now provides enhanced key-value pair extraction accuracy for standardized documents with consistent layouts like select CMS (Center for Medicare and Medicaid) healthcare, IRS tax, and ACORD insurance forms. These documents have traditionally been challenging to extract information from due to their dense and complex layouts. Amazon Textract is now able to utilize its knowledge of these standardized forms to provide higher accuracies in key-value pair extraction. Businesses across industries like insurance, healthcare, and banking will automatically see the benefits of this update when they use the Forms extraction feature. For more information, refer to Amazon Textract announces quality update to its Forms extraction feature.

Integration with AWS Service Quotas

You can now proactively manage all your Amazon Textract service quotas via the AWS Service Quotas console. With Service Quotas, your quota increase requests can now be processed automatically, speeding up approval times in most cases. In addition to viewing default quota values, you can now view the applied quota values for your accounts in a specific Region, the historical utilization metrics per quota, and set up alarms to notify you when the utilization of a given quota exceeds a configurable threshold.

Also, you can now use the Amazon Textract Quota Calculator to easily estimate the quota requirements for your workload prior to submitting a quota increase request directly from the AWS Service Quotas console. For more information, see Introducing self-service quota management and higher default service quotas for Amazon Textract.

Increased default service quotas for Amazon Textract

Amazon Textract now has higher default service quotas for several asynchronous and synchronous API operations in multiple major AWS Regions. Specifically, higher default service quotas are now available for AnalyzeDocument and DetectDocumentText API asynchronous and synchronous operations in US East (Ohio), US East (N. Virginia), US West (Oregon), Asia Pacific (Mumbai), and Europe (Ireland) Regions. For more details, refer to Introducing self-service quota management and higher default service quotas for Amazon Textract.

Job processing time reduction on Amazon Textract asynchronous APIs

Amazon Textract offers synchronous APIs like DetectDocumentText, AnalyzeDocument, AnalyzeExpense, and AnalyzeID, which return the actual document response, and asynchronous APIs like StartDocumentTextDetection, StartDocumentAnalysis, and StartExpenseAnalysis, which allow you to submit multi-page documents and receive a notification when the job processing is complete.

In the past, customers told us they often saw large variability in asynchronous job processing times depending on their use case. Based on your feedback, we have improved the experience such that you can expect to see tighter bounds on the asynchronous job processing time taken with lower variability.

Summary

Amazon Textract continuously improves based on customer feedback and releases new features and improvements to the service frequently.

The new features are available in all Regions, unless specific Regions are mentioned for a feature.

Explore Amazon Textract for yourself today on the Amazon Textract console or using the AWS Command Line Interface (AWS CLI) or the AWS Developer Tools!


About the Author

Martin Schade is a Senior ML Product SA with the Amazon Textract team. He has 20+ years of experience with internet-related technologies, engineering and architecting solutions and joined AWS in 2014, first guiding some of the largest AWS customers on most efficient and scalable use of AWS services and later focused on AI/ML with a focus on computer vision and at the moment is obsessed with extracting information from documents.

Read More

How to redact PII data in conversation transcripts

How to redact PII data in conversation transcripts

Customer service interactions often contain personally identifiable information (PII) such as names, phone numbers, and dates of birth. As organizations incorporate machine learning (ML) and analytics into their applications, using this data can provide insights on how to create more seamless customer experiences. However, the presence of PII information often restricts the use of this data. In this blog post, we will review a solution to automatically redact PII data from a customer service conversation transcript.

Let’s take an example conversation between a customer and a call center agent.

Agent: Hi, thank you for calling us today. Whom do I have the pleasure of speaking with today?

Caller: Hello, my name is John Stiles.

Agent: Hi John, how may I help you?

Caller: I haven’t received my W2 statement yet and wanted to check on its status.

Agent: Sure, I can help you with that. Can you please confirm the last four digits of your Social Security number?

Caller: Yes, it’s 1111.

Agent: Ok. I’m pulling up the status now. I see that it was sent out yesterday, and the estimated arrival is early next week. Would you like me to turn on automated alerts so you can be notified of any delays?

Caller: Yes, please.

Agent: The number we have on file for you is 555-456-7890. Is that still correct?

Caller: Yes, it is.

Agent: Great. I have turned on automated notifications. Is there anything else I can assist you with John?

Caller: No, that’s all. Thank you.

Agent: Thank you, John. Have a great day.

In this brief interaction, there are several pieces of data that would generally be considered PII, including the caller’s name, the last four digits of their Social Security number, and the phone number. Let’s review how we can redact this PII data in the transcript.

Solution overview

We will create an AWS Step Functions state machine, which orchestrates an Amazon Comprehend PII redaction job. Amazon Comprehend is a natural-language processing (NLP) service that uses machine learning to uncover valuable insights and connections in text, including the ability to detect and redact PII data.

You will provide the transcripts in the input Amazon S3 bucket. The transcripts are in the format used by Contact Lens for Amazon Connect. You will also specify an output S3 bucket, which stores the redaction output as well as intermediate data. The intermediate data are micro-batched versions of the input data. For example, if there are 10,000 conversations to be redacted, the workflow will split them into 10 batches of 1000 conversations each. Each batch is stored using a unique prefix, which is then used as the input source for Comprehend. The Step Functions map state is used to execute these redaction jobs in parallel by calling the StartPIIEntitiesDetectionJob API. This approach allows you to run multiple jobs in parallel rather than individual jobs in sequence. Since the job is implemented as a Step Functions state machine, it can be triggered to run manually or automatically as part of a daily process.

You can learn more about how Comprehend detects and redacts PII data in this blog post.

Deploy the sample solution

First, sign in to the AWS Management Console in your AWS account.

You will need an S3 bucket with some sample transcript data to redact and another bucket for output. If you don’t have existing sample transcript data, follow these steps:

  1. Navigate to the Amazon S3 console.
  2. Choose Create bucket.
  3. Enter a bucket name, such as text-redaction-data-<your-account-number>.
  4. Accept the defaults, and choose Create bucket.
  5. Open the bucket you created, and choose Create folder.
  6. Enter a folder name, such as “sample-data” and choose Create folder.
  7. Click on your new folder name to open it.
  8. Download the SampleData.zip file.
  9. Open the .zip file on your local computer and then drag the folder to the S3 bucket you created.
  10. Choose Upload.

Now click the following link to deploy the sample solution to US East (N. Virginia):

This will create a new AWS CloudFormation stack.

Enter the Stack name (e.g., pii-redaction-workflow), the name of the S3 input bucket containing the input transcript data, and the name of the S3 output bucket. Choose Next and add any tags that you want for your stack (optional). Choose Next again and review the stack details. Select the checkbox to acknowledge that AWS Identity and Access Management (IAM) resources will be created, and then choose Create stack.

The CloudFormation stack will create an IAM role with the ability to list and read the objects from the bucket. You can further customize the role per your requirements. It will also create a Step Functions state machine, several AWS Lambda functions used by the state machine, and an S3 bucket for storing the redacted output versions of the transcripts.

After a few minutes, your stack will be complete, and then you can examine the Step Functions state machine that was created as part of the CloudFormation template.

Run a redaction job

To run a job, navigate to Step Functions in the AWS console, select the state machine, and choose Start execution.

Next provide the input arguments to run the job. For the job input, you want to provide the name of your input S3 bucket as the S3InputDataBucket value, the folder name as the S3InputDataPrefix value, the name of your output S3 bucket as the S3OutputDataBucket value, and the folder to store the results as S3OutputDataPrefix value then click Start execution.

{
  "S3InputDataBucket": "<Name-of-input-bucket>",
  "S3InputDataPrefix": "<Prefix-of-input-data>",
  "S3OutputDataBucket": "<Name-of-output-bucket>", 
  "S3OutputDataPrefix": "<Prefix-of-output>" }

As the job executes, you can monitor its status in the Step Functions graph view. It will take a few minutes to run the job. Once the job is complete, you will see the output for each of the jobs in the Execution input and output section of the console. You can use the output URI to retrieve the output of a job. If multiple jobs were executed, you can copy the results of all jobs to a destination bucket for further analysis.

aws s3 cp s3://<name of output bucket>/<S3 Output data prefix value>/<job run id>-output/ s3://<destination bucket>/<destination prefix>/ --recursive --exclude "*/*" --include "*.out"

Let’s take a look at the redacted version of the conversation that we started with.

Agent: Hi, thank you for calling us today. Whom do I have the pleasure of speaking with today?

Caller: Hello, my name is [NAME].

Agent: Hi [NAME], how may I help you?

Caller: I haven’t received my W2 statement yet and wanted to check on its status.

Agent: Sure, I can help you with that. Can you please confirm the last four digits of your Social Security number?

Caller: Yes, it’s [SSN].

Agent: Ok. I’m pulling up the status now. I see that it was sent out yesterday, and the estimated arrival is early next week. Would you like me to turn on automated alerts so you can be notified of any delays?

Caller: Yes, please.

Agent: The number we have on file for you is [PHONE]. Is that still correct?

Caller: Yes, it is.

Agent: Great. I have turned on automated notifications. Is there anything else I can assist you with, [NAME]?

Caller: No, that’s all. Thank you.

Agent: Thank you, [NAME]. Have a great day.

Clean up

You may want to clean up the resources created as part of CloudFormation template after you are complete to avoid ongoing charges. To do so, delete the deployed CloudFormation stack and delete the S3 bucket with the sample transcript data if one was created.

Conclusion

With customers demanding seamless experiences across channels and also expecting security to be embedded at every point, the use of Step Functions and Amazon Comprehend to redact PII data in text conversation transcripts is a powerful tool at your disposal. Organizations can speed time to value by using the redacted transcripts to analyze customer service interactions and glean insights to improve the customer experience.

Try using this workflow to redact your data and leave us a comment!


About the author

Alex Emilcar is a Senior Solutions Architect in the Amazon Machine Learning Solutions Lab, where he helps customers build digital experiences with AWS AI technologies. Alex has over 10 years of technology experience working in different capacities from developer, infrastructure engineer, and Solutions Architecture. In his spare time, Alex likes to spend time reading and doing yard work.

Read More