Migrate your work to an Amazon SageMaker notebook instance with Amazon Linux 2

Amazon SageMaker notebook instances now support Amazon Linux 2, so you can now create a new Amazon SageMaker notebook instance to start developing your machine learning (ML) models with the latest updates. An obvious question is: what do I need to do to migrate my work from an existing notebook instance that runs on Amazon Linux to a new notebook instance with Amazon Linux 2? In this post, we describe an approach to migrate your work from an existing notebook instance to a new notebook instance.

Solution overview

The following diagram shows an overview of the components in a SageMaker notebook instance and how the migration takes place. Note that this solution isn’t limited to a particular version of an Amazon Linux image in the source and destination instance. Therefore, we denote the notebook instance that has existing work and data as an existing or source instance, and to refer the notebook instance that we migrate existing work and data to as a new or destination instance.

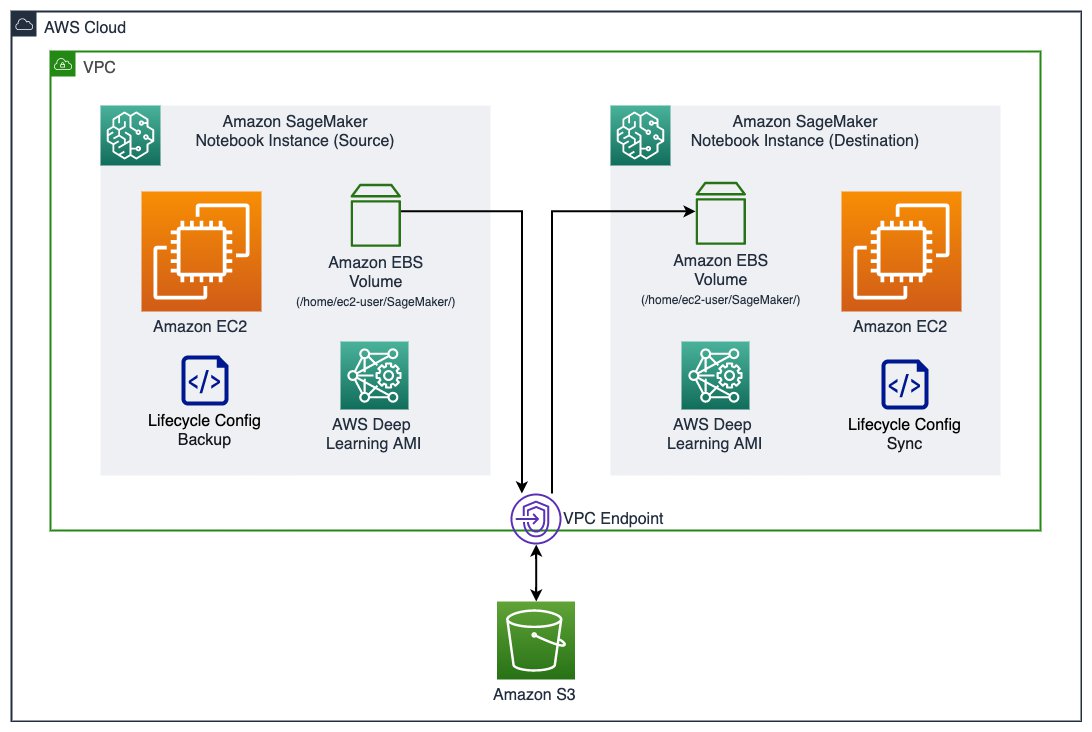
A SageMaker notebook instance consists of an Amazon Elastic Compute Cloud (Amazon EC2) instance with an Amazon Elastic Block Storage (Amazon EBS) volume attached, running an image built on top of the AWS Deep Learning AMI. The EBS volume (attached on /home/ec2-user/SageMaker/) is where you save any code, notebooks, or data persistently inside a notebook instance, and is subject to the migration to a new instance. In this solution, we use an Amazon Simple Storage Service (Amazon S3) bucket to store backup snapshots of an existing EBS volume. We then use lifecycle configurations to create a backup snapshot of the source EBS volume and synchronize a snapshot to the destination instance. You can easily indicate the S3 bucket name and the desired snapshot by tagging the instances.

When using the lifecycle configuration, you don’t need to open and be inside a notebook instance to initiate the backup or sync. It allows an administrator to script the migration process for all notebook instances for an organization.

In many cases, your notebook instance could run in an Amazon Virtual Private Cloud (Amazon VPC) and not have a direct internet access. The communication to the S3 bucket goes through an Amazon S3 VPC gateway endpoint.

Prerequisites

To get started with your migration, you need to set up the following prerequisites:

  • SageMaker execution roles – The AWS Identity and Access Management (IAM) execution role for the existing instance should have s3:CreateBucket, s3:GetObject, s3:PutObject, and s3:ListBucket to the bucket for backup. The execution role for the new instance should have s3:GetObject, s3:PutObject, and s3:ListBucket for the same bucket (required by aws s3 sync).
  • Networking – If your notebook instances don’t have direct internet access, and are in placed in a VPC, you need the following VPC endpoints attached to the VPC:
  • SageMaker notebook instance lifecycle configuration – You need the following lifecycle configuration scripts:
  • File system – If you have mounted a file system in /home/ec2-user/SageMaker/ in the source instance either from Amazon Elastic File System (Amazon EFS) or Amazon FSx for Lustre, make sure you unmount it before proceeding. The file system can be simply mounted again onto the new instance and should not be subject to migration, which helps avoid unnecessary overhead. Refer to the relevant instructions to unmount an Amazon EFS file system or FSx for Lustre file system).

Create lifecycle configurations

First, we need to create two lifecycle configurations: one to create backup from the source instance, and another to synchronize a specific backup to a destination instance.

  1. On the Lifecycle configurations page on the SageMaker console, choose Create configuration.
  2. For Name, enter a name for the backup.
  3. On the Start notebook tab in the Scripts section, enter the code from on-start.sh.
  4. Leave the Create notebook tab empty.
  5. Choose Create configuration.

You have just created one lifecycle configuration, and are redirected to the list of all your lifecycle configurations. Let’s create our second configuration.

  1. Choose Create configuration.
  2. For Name, enter a name for your sync.
  3. On the Create notebook tab in the Scripts section, enter the code from on-create.sh.
  4. Leave the Start notebook tab empty.
  5. Choose Create configuration.

We have created two lifecycle configurations: one for backing up your EBS volume to Amazon S3, and another to synchronize the backup from Amazon S3 to the EBS volume. We need to attach the former to an existing notebook instance, and the latter to a new notebook instance.

Back up an existing notebook instance

You can only attach a lifecycle configuration to an existing notebook instance when it’s stopped. If your instance is still running, stop it before completing the following steps. Also, it will be safer to perform the backup process when all your notebook kernels and processes on the instance are shut down.

  1. On the Notebook instances page on the SageMaker console, choose your instance to see its detailed information.
  2. Choose Stop to stop the instance.

The instance may take a minute or two to transition to the Stopped state.

  1. After the instance stops, choose Edit.
  2. In Additional configuration, for Lifecycle configuration, choose backup-ebs.
  3. Choose Update notebook instance.

You can monitor the instance details while it’s being updated.

We need to tag the instance to provide the lifecycle configuration script where the backup S3 bucket is.

  1. In the Tags section, choose Edit.
  2. Add a tag with the key ebs-backup-bucket, which matches what the lifecycle configuration script expects.
  3. The value is a bucket of your choice, for example sagemaker-ebs-backup-<region>-<account_id>.

Make sure the attached execution role allows sufficient permission to perform aws s3 sync to the bucket.

  1. Choose Save.

You should see the following tag details.

  1. Choose Start at the top of the page to start the instance.

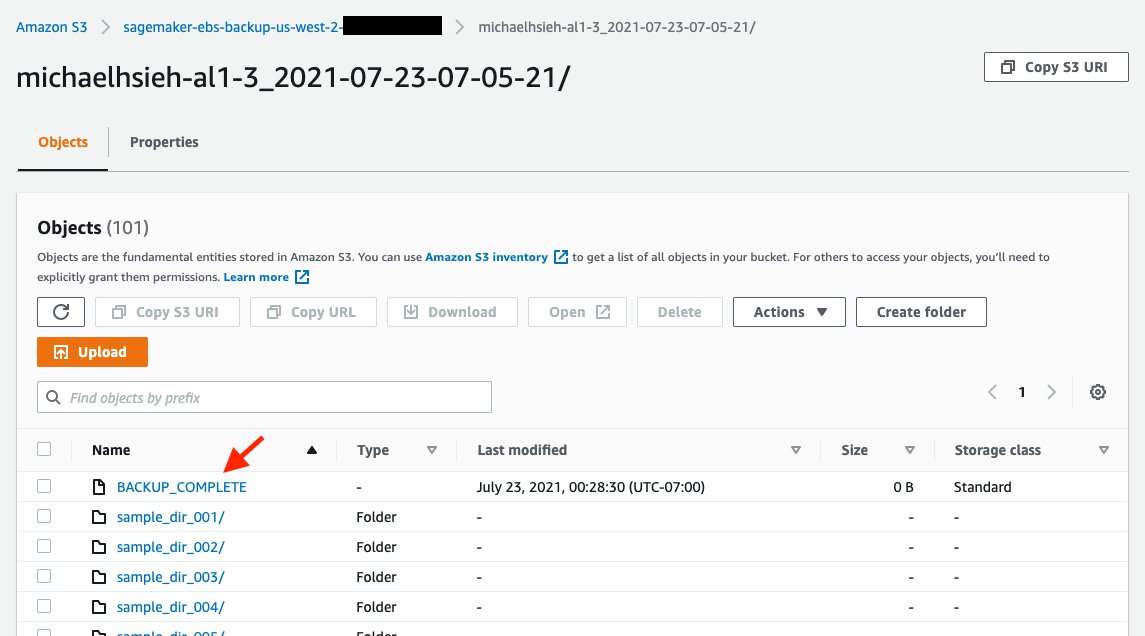
When the instance is starting, on-start.sh from the backup-ebs lifecycle configuration begins, and starts the backup process to create a complete snapshot of /home/ec2-user/SageMaker/ in s3://<ebs-backup-bucket>/<source-instance-name>_<snapshot-timestamp>/. The length of the backup process depends on the total size of your data in the volume.

The backup process is run with a nohup in the background during the instance startup. This means that there is no guarantee that when the instance becomes InService, the backup process is complete. To know when the backup is complete, you should see the file /home/ec2-user/SageMaker/BACKUP_COMPLETE created, and you should see the same in s3://<ebs-backup-bucket>/<source-instance-name>_<snapshot-timestamp>/.

Synchronize from a snapshot to a new instance

When the backup is complete, you can create a new instance and download the backup snapshot with the following steps:

  1. On the SageMaker console, on the Notebook instances page, create a new instance.
  2. In Additional configuration, for Lifecycle configuration, choose sync-from-s3.
  3. Make sure that Volume size in GB is equal to or greater than that of the source instance.
  4. For Platform identifier, choose notebook-al2-v1 if you’re migrating to an instance with Amazon Linux 2.
  5. Use an IAM execution role that has sufficient permission to perform aws s3 sync from the backup bucket ebs-backup-bucket.
  6. Choose the other options according to your needs or based on the source instance.
    1. If you need to host this instance in a VPC and with Direct internet access disabled, you need to follow the prerequisites to attach the S3 VPC endpoint and SageMaker API VPC endpoint to your VPC.
  7. Add the following two tags. The keys have to match what is expected in the lifecycle configuration script.
    1. Key: ebs-backup-bucket, value: <ebs-backup-bucket>.
    2. Key: backup-snapshot, value: <source-instance-name>_<snapshot-timestamp>.
  8. Choose Create notebook instance.

When your new instance starts, on-create.sh in the sync-from-s3 lifecycle configuration performs aws s3 sync to get the snapshot indicated in the tags from s3://<ebs-backup-bucket>/<source-instance-name>_<snapshot-timestamp>/ down to /home/ec2-user/SageMaker/. Again, the length of the sync process depends on the total size of your data in the volume.

The sync process is run with a nohup in the background during the instance creation. This means that there is no guarantee that when the instance becomes InService, the sync process is complete. To know when the backup is complete, you should see the file /home/ec2-user/SageMaker/SYNC_COMPLETE created in the new instance.

Considerations

Consider the following when performing the backup and sync operations:

  • You can expect the time to back up and sync to be approximately the same. The time for backup and sync depends on the size of /home/ec2-user/SageMaker/. If it takes 5 minutes for you to back up a source instance, you can expect 5 minutes for the sync.
  • If you no longer need to create a snapshot for a source instance, consider detaching the lifecycle configuration from the instance. Because the backup script is attached to the Start notebook tab in a lifecycle configuration, the script runs every time you start the source instance. You can detach a lifecycle configuration by following the same steps we showed to back up an existing notebook instance, but in Additional configuration, for Lifecycle configuration, choose No configuration.
  • For security purposes, you should limit the bucket access within the policy of the attached execution role. Because both the source and destination instances are dedicated to the same data scientist, you can allow access to a specific S3 bucket in the IAM execution role (see Add Additional Amazon S3 Permissions to an SageMaker Execution Role) and attach the role to both source and destination instances for a data scientist. For more about data protection see Data Protection in Amazon SageMaker.

When migrating from Amazon Linux to Amazon Linux 2 in a SageMaker notebook instance, there are significant conda kernel changes, as described in the announcement. You should take actions to adopt your code and notebooks that depend on kernels that are no longer supported in Amazon Linux 2.

Conclusion

In this post, we shared a solution to create an EBS volume backup from an existing SageMaker notebook instance and synchronize the backup to a new notebook instance. This helps you migrate your work on an existing notebook instance to a new instance with Amazon Linux 2, as we announced the support of Amazon Linux 2 in SageMaker notebook instances. We walked you through the steps on the SageMaker console, and also discussed some considerations when performing the steps in this post. Now you should be able to continue your ML development in a notebook instance with Amazon Linux 2 and regular updates and patches. Happy coding!


About the Author

Michael Hsieh is a Senior AI/ML Specialist Solutions Architect. He works with customers to advance their ML journey with a combination of AWS ML offerings and his ML domain knowledge. As a Seattle transplant, he loves exploring the great mother nature the region has to offer, such as the hiking trails, scenery kayaking in the SLU, and the sunset at the Shilshole Bay.

Read More

Amazon SageMaker notebook instances now support Amazon Linux 2

Today, we’re excited to announce that Amazon SageMaker notebook instances support Amazon Linux 2. You can now choose Amazon Linux 2 for your new SageMaker notebook instance to take advantage of the latest update and support provided by Amazon Linux 2.

SageMaker notebook instances are fully managed Jupyter Notebooks with pre-configured development environments for data science and machine learning. Data scientists and developers can spin up SageMaker Notebooks to interactively explore, visualize and prepare data, and build and deploy models on SageMaker.

Introduced in 2017, Amazon Linux 2 is the next generation of Amazon Linux, a Linux server operating system from AWS first launched in September 2010. Amazon Linux 2 provides a secure, stable, and high-performance runtime environment to develop and run cloud and enterprise applications. With Amazon Linux 2, you get an environment that offers long-term support with access to the latest innovations in the Linux offering. AWS provides long-term security and maintenance updates for the Amazon Linux 2 AMI while the Amazon Linux AMI ended its standard support on December 31, 2020 and has entered a maintenance support phase.

In this post, we show you what your new experience with an Amazon Linux 2 based SageMaker notebook instance looks like. We also share the support plan for Amazon Linux based notebook instances. To learn how to migrate your work from an Amazon Linux based notebook instance to a new Amazon Linux 2 based notebook instance, see our next post Migrate your work to an Amazon SageMaker notebook instance with Amazon Linux 2.

What’s new with Amazon Linux 2 based notebook instances

For a data scientist using SageMaker notebook instances, the major difference is the notebook kernels available in the instance. Because Python 2 has been sunset since January 1, 2020, the kernels with Python 2.x are no longer available in the Amazon Linux 2 based notebook instance. You need to port your code and notebooks from Python 2 to Python 3 before using the same code with python3.x kernels.

Another set of kernels that are no longer provided within the Amazon Linux 2 based instance are Chainer kernels (conda_chainer_p27 and conda_chainer_p36). Chainer has been in a maintenance phase since December 5, 2019, when the last major upgrade to v7 was released. Chainer users are encouraged to follow the migration guide provided by Chainer to port the Chainer code into PyTorch and use the conda_pytorch_p36 or conda_pytorch_latest_p37 in the notebook instance.

SageMaker notebook instances use AMIs that are built on top of the AWS Deep Learning AMI. Therefore, you can find detailed release notes and differences in the AWS Deep Learning AMI (Amazon Linux) and AWS Deep Learning AMI (Amazon Linux 2).

The Amazon Linux 2 option in SageMaker notebook instances is now available in AWS Regions in which SageMaker notebook instances are available.

Support plan for Amazon Linux on SageMaker notebook instances

On August 18, 2021, we’re rolling out the Amazon Linux 2 AMI option for users on SageMaker notebook instances. You have the option to launch a notebook instance with the Amazon Linux 2 AMI while the Amazon Linux AMI remains as the default during the setup.

Your existing notebook instances launched before August 18, 2021 will continue to run with Amazon Linux AMI. All notebook instances with either the Amazon Linux AMI or Amazon Linux 2 AMI will continue to receive version updates and security patches when instances are restarted.

On April 18, 2022, the default AMI option when creating a new notebook instance will switch to the Amazon Linux 2 AMI, but we’ll still keep the Amazon Linux AMI as an option. A new notebook instance with the Amazon Linux AMI will use the last snapshot of the Amazon Linux AMI created on April 18, 2022 and will no longer receive any version updates and security patches when restarted. An existing notebook instance with the Amazon Linux AMI, when restarted, will receive a one-time update to the last snapshot of the Amazon Linux AMI created on April 18, 2022 and will no longer receive any version updates and security patches afterwards.

Set up an Amazon Linux 2 based SageMaker notebook instance

You can set up a SageMaker notebook instance with the Amazon Linux 2 AMI using the SageMaker console (see Create a Notebook Instance) or the AWS Command Line Interface (AWS CLI).

When using the SageMaker console, you have a new option, Platform identifier, to choose the Amazon Linux AMI version. notebook-al2-v1 refers to the Amazon Linux 2 AMI, and notebook-al1-v1 refers to the Amazon Linux AMI. As described in the previous section, the default is notebook-al1-v1 until April 18, 2022, and will switch to notebook-al2-v1 on April 18, 2022.

If you prefer to create a notebook instance with the AWS CLI, you can use the new argument platform-identifier to indicate the choice for the Amazon Linux AMI version. Similarly, notebook-al2-v1 refers to the Amazon Linux 2 AMI, and notebook-al1-v1 refers to the Amazon Linux AMI. For example, a command to create an instance with the Amazon Linux 2 AMI looks like the following command:

aws sagemaker create-notebook-instance 
    --region region 
    --notebook-instance-name instance-name 
    --instance-type ml.t3.medium 
    --role-arn sagemaker-execution-role-arn 
    --platform-identifier notebook-al2-v1 

Next steps

If you want to move your existing work to a new notebook instance, see our next post, Migrate your work to an Amazon SageMaker notebook instance with Amazon Linux 2. You can learn how to migrate your work and data on an existing notebook instance to a new, Amazon Linux 2 based instance.

Conclusion

Today, we announced SageMaker notebook instance support for the Amazon Linux 2 AMI and showed you how to create a notebook instance with the Amazon Linux 2 AMI. We also showed you the major differences for developers when using an Amazon Linux 2 based notebook instance. You can start your new ML development on an Amazon Linux 2 based notebook instance or try out Amazon SageMaker Studio, the first integrated development environment (IDE) for ML.

If you have any questions and feedback regarding Amazon Linux 2, please speak to your AWS support contact or post a message in the Amazon Linux Discussion Forum and SageMaker Discussion Forum.


About the Authors

Michael Hsieh is a Senior AI/ML Specialist Solutions Architect. He works with customers to advance their ML journey with a combination of Amazon Machine Learning offerings and his ML domain knowledge. As a Seattle transplant, he loves exploring the great nature the region has to offer, such as the hiking trails, scenery kayaking in the SLU, and the sunset at the Shilshole Bay.


Sam Liu is a Product Manager at Amazon Web Services (AWS) focusing on AI/ML infrastructure and tooling. Beyond that, he has 10 years of experience building machine learning applications in various industries. In his spare time, he enjoys golf and international traveling.


Jun Lyu is a Software Engineer on the SageMaker Notebooks team. He has a Master’s degree in engineering from Duke University. He has been working for Amazon since 2015 and has contributed to AWS services like Amazon Machine Learning, Amazon SageMaker Notebooks, and Amazon SageMaker Studio. In his spare time, he enjoys spending time with his family, reading, cooking, and playing video games.

Read More

Secure multi-account model deployment with Amazon SageMaker: Part 2

In Part 1 of this series of posts, we offered step-by-step guidance for using Amazon SageMaker, SageMaker projects and Amazon SageMaker Pipelines, and AWS services such as Amazon Virtual Private Cloud (Amazon VPC), AWS CloudFormation, AWS Key Management Service (AWS KMS), and AWS Identity and Access Management (IAM) to implement secure architectures for multi-account enterprise machine learning (ML) environments.

In this second and final part, we provide instructions for deploying the solution from the source code GitHub repository to your account or accounts and experimenting with the delivered SageMaker notebooks.

This is Part 2 in a two-part series on secure multi-account deployment on Amazon SageMaker

Solution overview

The provided CloudFormation templates provision all the necessary infrastructure and security controls in your account. An Amazon SageMaker Studio domain is also created by the CloudFormation deployment process. The following diagram shows the resources and components that are created in your account.

The components are as follows:

  1. The network infrastructure with a VPC, route tables, and public and private subnets in each Availability Zone, NAT gateway, and internet gateway.
  2. A Studio domain deployed into the VPC, private subnets, and security group. Each elastic network interface used by Studio is created within a private designated subnet and attached to designated security groups.
  3. Security controls with two security groups: one for Studio, and one any SageMaker workloads and for VPC endpoints.
  4. VPC endpoints to enable a private connection between your VPC and AWS services by using private IP addresses.
  5. An S3 VPC endpoint to access your Amazon Simple Storage Service (Amazon S3) buckets via AWS PrivateLink and enable additional access control via an VPC endpoint policy.
  6. S3 buckets for storing your data and models. The access to the buckets is controlled by bucket policies. The data in the S3 buckets is encrypted using AWS KMS customer master keys.
  7. A set of AWS Identity and Access Management (IAM) roles for users and services. These roles enable segregation of responsibilities and serve as an additional security control layer.
  8. An AWS Service Catalog portfolio, which is used to deploy a data science environment and SageMaker MLOps project templates.

The source code and all AWS CloudFormation templates for the solution and MLOps projects are provided in the GitHub repository.

Prerequisites

To deploy the solution, you must have administrator (or power user) permissions for your AWS account to package the CloudFormation templates, upload templates in an S3 bucket, and run the deployment commands.

If you don’t have the AWS Command Line Interface (AWS CLI), see Installing, updating, and uninstalling the AWS CLI.

Deploy a CloudFormation template to package and upload the solution templates

Before you can deploy the delivered CloudFormation templates with the solution, they must be packaged and uploaded to an S3 bucket for deployment.

First, you deploy a simple CloudFormation template package-cfn.yaml. The template creates an AWS CodeBuild project, which packages and uploads the solution deployment templates into a specified S3 bucket.

To follow along with the deployment instructions, run the following commands in your CLI terminal (all commands have been tested for macOS 10.15.7)

  1. Clone the GitHub repository:
    git clone https://github.com/aws-samples/amazon-sagemaker-secure-mlops.git
    cd amazon-sagemaker-secure-mlops

  2. If you don’t have an S3 bucket, you must create a new one (skip this step if you already have an S3 bucket):
    S3_BUCKET_NAME=<your new S3 bucket name>
    aws s3 mb s3://${S3_BUCKET_NAME} --region $AWS_DEFAULT_REGION

  3. Upload the source code .zip file sagemaker-secure-mlops.zip to the S3 bucket:
    S3_BUCKET_NAME=<your existing or just created S3 bucket name>
    aws s3 cp sagemaker-secure-mlops.zip s3://${S3_BUCKET_NAME}/sagemaker-mlops/

  4. Deploy the CloudFormation template:
    STACK_NAME=sagemaker-mlops-package-cfn
    aws cloudformation deploy 
            --template-file package-cfn.yaml 
            --stack-name $STACK_NAME 
            --capabilities CAPABILITY_NAMED_IAM 
            --parameter-overrides 
            S3BucketName=$S3_BUCKET_NAME

  5. Wait until deployment is complete and check that the deployment templates are uploaded into the S3 bucket. You may have to wait a few minutes before the templates appear in the S3 bucket:
    aws s3 ls s3://${S3_BUCKET_NAME}/sagemaker-mlops/ --recursive


At this point, all the deployment CloudFormation templates are packaged and uploaded to your S3 bucket. You can proceed with the further deployment steps.

Deployment options

You have a choice of different independent deployment options using the delivered CloudFormation templates:

  • Data science environment quickstart – Deploy an end-to-end data science environment with the majority of options set to default values. This deployment type supports a single-account model deployment workflow only. You can change only a few deployment parameters.
  • Two-step deployment via AWS CloudFormation – Deploy the core infrastructure in the first step and then deploy a data science environment, both as CloudFormation templates. You can change any deployment parameter.
  • Two-step deployment via AWS CloudFormation and AWS Service Catalog – Deploy the core infrastructure in the first step and then deploy a data science environment via AWS Service Catalog. You can change any deployment parameter.

In this post, we use the latter deployment option to demonstrate using AWS Service Catalog product provisioning. To explore and try out other deployment options, refer to the instructions in the README.md.

Multi-account model deployment workflow prerequisites

Multi-account model deployment requires VPC infrastructure and specific execution roles to be provisioned in the target accounts. The provisioning of the infrastructure and the roles is done automatically during the deployment of the data science environment as a part of the overall deployment process. To enable a multi-account setup, you must provide the staging and production organizational unit (OU) IDs or the staging and production lists as CloudFormation parameters for the deployment.

The following diagram shows how we use the CloudFormation stack sets to deploy the required infrastructure to the target accounts.

Two stack sets—one for the VPC infrastructure and another for the IAM roles—are deployed into the target accounts for each environment type: staging and production.

A one-time setup is needed to enable a multi-account model deployment workflow with SageMaker MLOps projects. You don’t need to perform this setup if you’re going to use single-account deployment only.

  1. Provision the target account IAM roles
  2. Register a delegated administrator for AWS Organizations

Provision the target account IAM roles

Provisioning a data science environment uses a CloudFormation stack set to deploy the IAM roles and VPC infrastructure into the target accounts. The solution uses the SELF_MANAGED stack set permission model and needs two IAM roles:

  • AdministratorRole in the development account (main account)
  • SetupStackSetExecutionRole in each of the target accounts

The role AdministratorRole is automatically created during the solution deployment. You only need to provision the latter role before starting the deployment. You can use the delivered CloudFormation template env-iam-setup-stacksest-role.yaml or your own process for provision an IAM role. See the following code:

# STEP 1:
# SELF_MANAGED stack set permission model:
# Deploy a stack set execution role to _EACH_ of the target accounts in both staging and prod OUs or account lists
# This stack set execution role is used to deploy the target accounts stack sets in env-main.yaml
# !!!!!!!!!!!! RUN THIS COMMAND IN EACH OF THE TARGET ACCOUNTS !!!!!!!!!!!!
ENV_NAME=sm-mlops
ENV_TYPE=# use your own consistent environment stage names like "staging" and "prod"
STACK_NAME=$ENV_NAME-setup-stackset-role
ADMIN_ACCOUNT_ID=<DATA SCIENCE DEVELOPMENT ACCOUNT ID>
SETUP_STACKSET_ROLE_NAME=$ENV_NAME-setup-stackset-execution-role

# Delete stack if it exists
aws cloudformation delete-stack --stack-name $STACK_NAME

aws cloudformation deploy 
                --template-file cfn_templates/env-iam-setup-stackset-role.yaml 
                --stack-name $STACK_NAME 
                --capabilities CAPABILITY_NAMED_IAM 
                --parameter-overrides 
                EnvName=$ENV_NAME 
                EnvType=$ENV_TYPE 
                StackSetExecutionRoleName=$SETUP_STACKSET_ROLE_NAME 
                AdministratorAccountId=$ADMIN_ACCOUNT_ID

aws cloudformation describe-stacks 
    --stack-name $STACK_NAME 
    --output table 
    --query "Stacks[0].Outputs[*].[OutputKey, OutputValue]"

Note the name of the provisioned IAM role StackSetExecutionRoleName in the stack output. You use this name in the AWS Service Catalog-based deployment as the SetupStackSetExecutionRoleName parameter.

Register a delegated administrator for AWS Organizations

This step is only needed if you want to use an AWS Organizations-based OU setup.

A delegated administrator account must be registered in order to enable the ListAccountsForParent Organizations API call. If the data science account is already the management account in Organizations, you must skip this step. See the following code:

# STEP 2:
# Register a delegated administrator to enable AWS Organizations API permission for non-management account
# Must be run under administrator in the AWS Organizations _management account_
aws organizations register-delegated-administrator 
    --service-principal=member.org.stacksets.cloudformation.amazonaws.com 
    --account-id=$ADMIN_ACCOUNT_ID

aws organizations list-delegated-administrators  
    --service-principal=member.org.stacksets.cloudformation.amazonaws.com

Deployment via AWS CloudFormation and the AWS Service Catalog

This deployment option first deploys the core infrastructure including the AWS Service Catalog portfolio of data science products. In the second step, the data science administrator deploys a data science environment via the AWS Service Catalog.

The deployment process creates all the necessary resources for the data science platform, such as VPC, subnets, NAT gateways, route tables, and IAM roles.

Alternatively, you can select your existing network and IAM resources to be used for stack deployment. In this case, set the corresponding CloudFormation and AWS Service Catalog product parameters to the names and ARNs of your existing resources. You can find the detailed instructions for this use case in the code repository.

Deploy the base infrastructure

In this step, you deploy the shared core infrastructure into your AWS account. The stack (core-main.yaml) provisions the following:

  • Shared IAM roles for data science personas and services (optionally, you may provide your own IAM roles)
  • An AWS Service Catalog portfolio to provide a self-service deployment for the data science administrator user role

You must delete two pre-defined SageMaker roles – AmazonSageMakerServiceCatalogProductsLaunchRole and AmazonSageMakerServiceCatalogProductsUseRole – if they exist in your AWS account before deploying the base infrastructure.

The following command uses the default values for the deployment options. You can specify additional parameters via ParameterKey=<ParameterKey>, ParameterValue=<Value> pairs in the AWS CloudFormation create-stack call. Set the S3_BUCKET_NAME variable to the name of the S3 bucket where you uploaded the CloudFormation templates:

STACK_NAME="sm-mlops-core"
S3_BUCKET_NAME=<name of the S3 bucket with uploaded solution templates>
aws cloudformation create-stack 
    --template-url https://s3.$AWS_DEFAULT_REGION.amazonaws.com/$S3_BUCKET_NAME/sagemaker-mlops/core-main.yaml 
    --region $AWS_DEFAULT_REGION 
    --stack-name $STACK_NAME  
    --disable-rollback 
    --capabilities CAPABILITY_IAM CAPABILITY_NAMED_IAM 
    --parameters 
        ParameterKey=StackSetName,ParameterValue=$STACK_NAME

After a successful stack deployment, you print out the stack output:

aws cloudformation describe-stacks 
    --stack-name sm-mlops-core  
    --output table 
    --query "Stacks[0].Outputs[*].[OutputKey, OutputValue]"

Deploy a data science environment via AWS Service Catalog

After the base infrastructure is provisioned, the data science administrator user must assume the data science administrator IAM role (AssumeDSAdministratorRole) via the link in the CloudFormation stack output. In this role, users can browse the AWS Service Catalog and then provision a secure Studio environment.

  1. First, print the output from the stack deployment:
    aws cloudformation describe-stacks 
        --stack-name sm-mlops-core  
        --output table 
        --query "Stacks[0].Outputs[*].[OutputKey, OutputValue]"

  2. Copy and paste the AssumeDSAdministratorRole link to a web browser and switch your role to the data science administrator.
  3. On the AWS Service Catalog console, choose Products in the navigation pane.

You see the list of the available products for your user role.

  1. Choose the product name and then choose Launch product on the product page.
  2. Fill the product parameters with values specific for your environment.

You provide the values for OU IDs or staging and production account lists and the name for SetupStackSetExecutionRole if you want to enable multi-account model deployment; otherwise keep these parameters empty.

You must provide two required parameters:

  • S3 bucket name with MLOps seed code – Use the S3 bucket where you packaged the CloudFormation templates.
  • Availability Zones – You need at least two Availability Zones for your SageMaker model deployment workflow.

Wait until AWS Service Catalog finishes provisioning the data science environment stack and the product status becomes Available. The data science environment provisioning takes about 20 minutes to complete.

Now you have provisioned the data science environment and can start experimenting with it.

Launch Studio and experiment

To launch Studio, open the SageMaker console, choose Open SageMaker Studio, and choose Open Studio.

You can find some experimentation ideas and step-by-step instructions in the provided GitHub code repository:

Reference architectures on AWS

For further research, experimentation, and evaluation, you can look into the reference architectures available on AWS Solutions as vetted ready-to-use AWS MLOps Framework and on AWS Quick Starts as Amazon SageMaker with Guardrails on AWS delivered by one of the AWS Partners.

Clean up

Provisioning a data science environment with Studio, VPC, VPC endpoints, NAT gateways, and other resources creates billable components in your account. If you experiment with any delivered MLOps project templates, it may create additional billable resources such as SageMaker endpoints, inference compute instances, and data in S3 buckets. To avoid charges, you should clean up your account after you have finished experimenting with the solution.

The solution provides a cleanup notebook with a full cleanup script. This is the recommended way to clean up resources. You can also follow the step-by-step instructions in this section.

Clean up after working with MLOps project templates

The following resources should be removed:

  • CloudFormation stack sets with model deployment in case you run a model deploy pipeline. Stack set deletion removes provisioned SageMaker endpoints and associated resources from all involved accounts.
  • SageMaker projects and corresponding S3 buckets with project and pipeline artifacts.
  • Any data in the data and models S3 buckets.

The provided notebooks for MLOps projects—sagemaker-model-deploy and sagemaker-pipelines-project—include cleanup code to remove resources. Run the code cells in the cleanup section of the notebook after you have finished working with the project.

  1. Delete the CloudFormation stack sets with the following code:
    import time
    
    cf = boto3.client("cloudformation")
    
    for ss in [
            f"sagemaker-{project_name}-{project_id}-deploy-{env_data['EnvTypeStagingName']}",
            f"sagemaker-{project_name}-{project_id}-deploy-{env_data['EnvTypeProdName']}"
            ]:
        accounts = [a["Account"] for a in cf.list_stack_instances(StackSetName=ss)["Summaries"]]
        print(f"delete stack set instances for {ss} stack set for the accounts {accounts}")
        r = cf.delete_stack_instances(
            StackSetName=ss,
            Accounts=accounts,
            Regions=[boto3.session.Session().region_name],
            RetainStacks=False,
        )
        print(r)
    
        time.sleep(180)
    
        print(f"delete stack set {ss}")
        r = cf.delete_stack_set(
            StackSetName=ss
        )

  2. Delete the SageMaker project:
    print(f"Deleting project {project_name}:{sm.delete_project(ProjectName=project_name)}")

  3. Remove the project S3 bucket:
    !aws s3 rb s3://sm-mlops-cp-{project_name}-{project_id} --force

Remove the data science environment stack

After you clean up MLOps project resources, you can remove the data science stack.

The AWS CloudFormation delete-stack command doesn’t remove any non-empty S3 buckets. You must empty the data and models from the data science environment S3 buckets before you can delete the data science environment stack.

  1. Remove the VPC-only access policy from the data and model bucket in order to be able to delete objects from a CLI terminal:
    ENV_NAME=<use default name ‘sm-mlops’ or your data science environment name you chosen when you created the stack>
    aws s3api delete-bucket-policy --bucket $ENV_NAME-dev-${AWS_DEFAULT_REGION}-data
    aws s3api delete-bucket-policy --bucket $ENV_NAME-dev-${AWS_DEFAULT_REGION}-models

  2. Empty the S3 buckets. This is a destructive action. The following command deletes all files in the data and models S3 buckets:
    aws s3 rm s3://$ENV_NAME-dev-$AWS_DEFAULT_REGION-data --recursive
    aws s3 rm s3://$ENV_NAME-dev-$AWS_DEFAULT_REGION-models --recursive

Next, we stop the AWS Service Catalog product.

  1. Assume the DSAdministratorRole role via the link in the CloudFormation stack output.
  2. On the AWS Service Catalog, on the Provisioned products page, select your product and choose Terminate on the Actions menu.
  3. Delete the core infrastructure CloudFormation stacks:
aws cloudformation delete-stack --stack-name sm-mlops-core
aws cloudformation wait stack-delete-complete --stack-name sm-mlops-core
aws cloudformation delete-stack --stack-name sagemaker-mlops-package-cfn

Remove the SageMaker domain file system

The deployment of Studio creates a new Amazon Elastic File System (Amazon EFS) file system in your account. This file system is shared with all users of Studio and contains home directories for Studio users and may contain your data.

When you delete the data science environment stack, the Studio domain, user profile, and apps are also deleted. However, the file system isn’t deleted, and is kept as is in your account. Additional resources are created by Studio and retained upon deletion together with the file system:

  • Amazon EFS mounting points in each private subnet of your VPC
  • An elastic network interface for each mounting point
  • Security groups for Amazon EFS inbound and outbound traffic

To delete the file system and any Amazon EFS-related resources in your AWS account created by the deployment of this solution, perform the following steps after running the delete-stack commands (from the preceding step).

This is a destructive action. All data on the file system will be deleted (SageMaker home directories). You may want to back up the file system before deletion.

  1. On the Amazon EFS console, choose the SageMaker file system.
  2. On the Tags tab, locate the tag key ManagedByAmazonSageMakerResource. Its tab value contains the SageMaker domain ID.
  3. Choose Delete to delete the file system.
  4. On the Amazon VPC console, delete the data science environment VPC.

Alternatively, you can remove the file using the following AWS CLI commands. First, list the SageMaker domain IDs for all file systems with the SageMaker tag:

aws efs describe-file-systems 
  --query 'FileSystems[].Tags[?Key==`ManagedByAmazonSageMakerResource`].Value[]'

Then copy the SageMaker domain ID and run the following script from the solution directory:

SM_DOMAIN_ID=#SageMaker domain id
pipenv run python3 functions/pipeline/clean-up-efs-cli.py $SM_DOMAIN_ID

Conclusion

In this series of posts, we presented the main functional and infrastructure components, implementation guidance, and source code for an end-to-end enterprise-grade ML environment. This solution implements a secure development environment with multi-layer security controls, CI/CD MLOps automation pipelines, and the deployment of the production inference endpoints for model serving.

You can use the best practices, architectural solutions, and code samples to design and build your own secure ML environment. If you have any questions, please reach out to us in the comments!


About the Author

Yevgeniy Ilyin is a Solutions Architect at AWS. He has over 20 years of experience working at all levels of software development and solutions architecture and has used programming languages from COBOL and Assembler to .NET, Java, and Python. He develops and codes cloud native solutions with a focus on big data, analytics, and data engineering.

Read More

Secure multi-account model deployment with Amazon SageMaker: Part 1

Amazon SageMaker Studio is a web-based, integrated development environment (IDE) for machine learning (ML) that lets you build, train, debug, deploy, and monitor your ML models.

Although Studio provides all the tools you need to take your models from experimentation to production, you need a robust and secure model deployment process. This process must fulfill your organization’s operational and security requirements.

Amazon SageMaker and Studio provide a wide range of specialized functionality for building highly secure, scalable, and flexible MLOps platforms to cover your model deployment use cases and requirements. Three SageMaker services, SageMaker Pipelines, SageMaker Projects, and SageMaker Model Registry, build a foundation to implement enterprise-grade secure multi-account model deployment workflow.

In combination with other AWS services, such as Amazon Virtual Private Cloud (Amazon VPC), AWS CloudFormation, and AWS Identity and Access Management (IAM), SageMaker MLOps can deliver solutions for the most demanding security and governance requirements.

Using a multi-account data science environment to meet security, reliability, and operational needs is a good DevOps practice. A multi-account strategy is paramount to achieve strong workload and data isolation, support multiple unrelated teams and projects, ensure fine-grained security and compliance control, facilitate billing, and create cost transparency.

In this two-part post, we offer guidance for using AWS services and SageMaker functionalities, and recommend practices for implementing a production-grade ML platform and secure, automated, multi-account model deployment workflows.

Such ML platforms and workflows can fulfill stringent security requirements, even for regulated industries such as financial services. For example, customers in regulated industries often don’t allow any internet access in ML environments. They often use only VPC endpoints for AWS services. They implement end-to-end data encryption in transit and at rest, and enforce workload isolation for individual teams in a line of business in multi-account organizational structures.

Part 1 of this series focuses on providing a solution architecture overview, in which we explain the security controls employed and how they are implemented. We also look at MLOps automation workflows with SageMaker projects and Pipelines.

In Part 2, we walk through deploying the solution with hands-on SageMaker notebooks.

This is Part 1 in a two-part series on secure multi-account deployment on Amazon SageMaker

Solution overview

The post Multi-account model deployment with Amazon SageMaker Pipelines shows a conceptual setup of a multi-account MLOps environment based on Pipelines and SageMaker projects.

The solution presented in this post is built for an actual use case for an AWS customer in the financial services industry. It focuses on the security, automation, and governance aspects of multi-account ML environments. It provides a fully automated provisioning of Studio into your private VPC, subnets and security groups using CloudFormation templates, and stack sets. Compared to the previous post, this solution implements network traffic and access controls with VPC endpoints, security groups, and fine-grained permissions with designated IAM roles. To reflect the real-life ML environment requirements, the solution enforces end-to-end data encryption at rest and in transit.

The following diagram shows the overview of the solution architecture and the deployed components.

Let’s look at each group of components in more detail.

Component 1: AWS Service Catalog

The end-to-end deployment of the data science environment is delivered as an AWS Service Catalog self-provisioned product. One of the main advantages of using AWS Service Catalog for self-provisioning is that authorized users can configure and deploy available products and AWS resources on their own, without needing full privileges or access to AWS services. The deployment of all AWS Service Catalog products happens under a specified service role with the defined set of permissions, which are unrelated to the user’s permissions.

Component 2: Studio domain

The Data Science Environment product in the AWS Service Catalog creates a Studio domain. A Studio domain consists of a list of authorized users, configuration settings, and an Amazon Elastic File System (Amazon EFS) volume. The Amazon EFS volume contains data for the users, including notebooks, resources, and artifacts.

Components 3 and 4: SageMaker MLOps project templates

The solution delivers the customized versions of SageMaker MLOps project templates. Each MLOps template provides an automated model building and deployment pipeline using continuous integration and continuous delivery (CI/CD). The delivered templates are configured for the secure multi-account model deployment and are fully integrated in the provisioned data science environment. The project templates are provisioned in Studio via AWS Service Catalog. The templates include the seed code repository with Studio notebooks, which implements a secure setup of SageMaker workloads such as processing, training jobs, and pipelines.

Components 5 and 6: CI/CD workflows

The MLOps projects implement CI/CD using Pipelines and AWS CodePipeline, AWS CodeCommit, and AWS CodeBuild. SageMaker project templates also support a CI/CD workflow using Jenkins and GitHub as the source repository.

Pipelines is responsible for orchestrating workflows across each step of the ML process and task automation, including data loading, data transformation, training, tuning and validation, and deployment. Each model is tracked via SageMaker Model Registry, which stores the model metadata, such as training and validation metrics and data lineage, and retains model versions and the approval status of the model.

CodePipeline deploys the model to the designated target accounts with staging and production environments. The necessary resources are pre-created by CloudFormation templates during infrastructure creation.

This solution supports secure multi-account model deployment using AWS Organizations or via simple target account lists.

Component 7: Secure infrastructure

The Studio domain is deployed in a dedicated VPC. Each elastic network interface used by a SageMaker domain or workload is created within a private dedicated subnet and attached to the specified security groups. The data science environment VPC can be configured with internet access via an optional NAT gateway. You can also run this VPC in internet-free mode without any inbound or outbound internet access.

All access to the AWS public services is routed via AWS PrivateLink. Traffic between your VPC and the AWS services doesn’t leave the Amazon network and isn’t exposed to the public internet.

Component 8: Data security

All data in the data science environment, which is stored in Amazon Simple Storage Service (Amazon S3) buckets and Amazon Elastic Block Store (Amazon EBS) and EFS volumes, is encrypted at rest using customer managed CMKs. All data transfer between platform components, API calls, and inter-container communication is protected using the Transport Layer Security (TLS 1.2) protocol.

Data access from the Studio notebooks or any SageMaker workload to the environment’s S3 buckets is governed by the combination of the S3 bucket and user policies and S3 VPC endpoint policy.

Multi-account structure

With the goal of illustrating best practices, this solution implements the following three account groups:

  • Development – This account is used by data scientists and ML engineers to perform experimentation and development. Data science tools such as Studio are used in the development account. S3 buckets with data and models, code repositories, and CI/CD pipelines are hosted in this account. Models are built, trained, validated, and registered in the model repository in this account.
  • Testing/staging/UAT – Validated and approved models are first deployed to the staging account, where the automated unit and integration tests are run. Data scientists and ML engineers have read-only access to this account.
  • Production – Fully tested and approved models from the staging accounts are deployed to the production account for both online and batch inference.

Depending on your specific security and governance requirements and your development organization, for the production setup, we recommend using two additional account groups:

  • Shared services – This account hosts common resources like team code repositories, CI/CD pipelines for MLOps workflows, Docker image repositories, service catalog portfolios, model registries, and library package repositories.
  • Data management – A dedicated AWS account to store and manage all data for the ML process. We recommend implementing strong data security and governance practices using AWS Data Lake and AWS Lake Formation.

Each of these account groups can have multiple AWS accounts and environments for developing and testing services and storing different types of data.

Environment layers

In the following sections, we look at the whole data science environment in terms of layers:

  • Network and security infrastructure
  • IAM roles and cross-account permission setup
  • Application stack consisting of Studio and SageMaker MLOps projects

In Part 2 of this post, you deploy the solution into your AWS account for further experimentation.

Secure infrastructure

We use AWS foundational services such as VPC, security groups, subnets, and NAT gateways to create the secure infrastructure for the data science environment. The following diagram shows the deployment architecture for the solution.

VPC, subnets, routes, and internet access

Our Studio domain is deployed into a dedicated data science VPC using VPC Only mode (Step 1 in the preceding architecture). In this mode, you use your own control flow for the internet traffic, like a NAT gateway or AWS Network Firewall. You can also create an internet-free VPC for your highly secure workloads. Any SageMaker workload launched in the VPC creates an elastic network interface in the specified subnet. You can apply all available layers of security controls—security groups, network ACLs, VPC endpoints, AWS PrivateLink, or Network Firewall endpoints—to the internal network and internet traffic to exercise fine-grained control of network access in Studio. For a detailed description of network configurations and security controls, refer to Securing Amazon SageMaker Studio connectivity using a private VPC. If you must control ingress and egress network traffic or apply any filtering rules, you can use Network Firewall as described in Securing Amazon SageMaker Studio internet traffic using AWS Network Firewall.

All SageMaker workloads, like Studio notebooks, processing or training jobs, and inference endpoints, are placed in the private subnets within the dedicated security group (2). This security group doesn’t allow any ingress from any network interface outside the group except for intra-group communications.

VPC endpoints

All access to Amazon S3 is routed via the gateway-type S3 VPC endpoint (3). You control access to the resources behind a VPC endpoint with a VPC endpoint policy. The combination of the VPC endpoint policy and the S3 bucket policy ensures that only specified buckets can be accessed, and these buckets can be accessed only via the designated VPC endpoints. The solution provisions two buckets: Data and Models. You can extend the CloudFormation templates to accommodate your data storage requirements, create additional S3 buckets, or tighten the data access permissions.

Studio and Studio notebooks communicate with various AWS services, such as the SageMaker backend and APIs, Amazon SageMaker Runtime, AWS Security Token Service (AWS STS), Amazon CloudWatch, AWS Key Management Service (AWS KMS), and others.

The solution uses a private connection over interface-type VPC endpoints (4) to access these AWS services. All VPC endpoints are placed in the dedicated security group to control the inbound and outbound network access. You can find a list with the recommended VPC endpoints to be set up for Studio in the following AWS technical guide.

IAM roles and preventive security controls

The solution uses IAM to set up personas and service execution roles (5). You can assign fine-grained permissions policies on the least privilege principle to various SageMaker execution roles, used to run different workloads, such as processing or training jobs, pipelines, or inference. You can implement preventive security controls using SageMaker-specific IAM condition keys. For example, the solution enforces usage of VPC isolation with private subnets and usage of the security groups for SageMaker notebook instances, processing, training, and tuning jobs, as well as for models for the SageMaker execution role:

{
    "Action": [
        "sagemaker:CreateNotebookInstance",
        "sagemaker:CreateHyperParameterTuningJob",
        "sagemaker:CreateProcessingJob",
        "sagemaker:CreateTrainingJob",
        "sagemaker:CreateModel"
    ],
    "Resource": "*",
    "Effect": "Deny",
    "Condition": {
        "Null": {
            "sagemaker:VpcSubnets": "true",
	    "sagemaker:VpcSecurityGroupIds": "true"
        }
    }
}

For a detailed discussion of the security controls and best practices, refer to Building secure machine learning environments with Amazon SageMaker.

Cross-account permission and infrastructure setup

When using a multi-account setup for your data science platform, you must focus on setting up and configuring IAM roles, resource policies, and cross-account trust and permissions polices with special attention to the following topics:

  • How do you set up access to the resources in one account from authorized and authenticated roles and users from another accounts?
  • What roles in one (target) account must be assumed by a role in another (source) account to perform a specific action in the target account?
  • Does the assumed role in the target account have a trust policy for a role in the source account, and does the role in the source account have iam:AssumeRole permission in its permissions policy for the principal in the target account? For more information, see How to use trust policies with IAM roles.
  • Do your AWS CloudFormation deployment roles have iam:PassRole permission for the execution roles they assign to the created resources?
  • How do you configure access control and resource isolation for teams or groups within Studio? For an overview and recipes for the implementation, see Configuring Amazon SageMaker Studio for teams and groups with complete resource isolation.

The solution implements the following IAM roles in its multi-account setup, as shown in the diagram.

User persona IAM roles and various execution roles are created in the development account as we run Studio and perform development work there. We must create the following IAM roles in the staging and production accounts:

  • Stack set execution roles – Used to deploy various resources into target accounts during the initial environment provision and for multi-account CI/CD MLOps workflows
  • Model execution roles – Assumed by SageMaker to access model artifacts and the Docker image for deployment on ML compute instances (SageMaker inference)

These roles are assumed by the roles in the development account.

Configure permissions for multi-account model deployment

In this section, we look closer at the permission setup for multi-account model deployment.

First, we must understand how the multi-account CI/CD model pipeline deploys the model to SageMaker endpoints in the target accounts. The following diagram shows the model deployment process.

After model training and validation, the model is registered in the model registry. The model registry stores the model metadata, and all model artifacts are stored in an S3 bucket (Step 1 in the preceding diagram). The CI/CD pipeline uses CloudFormation stack sets (2) to deploy the model in the target accounts. The CloudFormation service assumes the role StackSetExecutionRole (3) in the target account to perform the deployment. SageMaker also assumes the role ModelExecutionRole (4) to access the model metadata and download the model artifacts from the S3 bucket. The StackSetExecutionRole role must have iam:PassRole permission (5) for ModelExecutionRole to be able to pass the role successfully at stack provisioning time. Finally, the model is deployed to a SageMaker endpoint (6).

For a successful deployment, ModelExecutionRole needs access to the model, which is saved in an S3 bucket, and to the corresponding AWS KMS encryption keys in the development account, because the data in the S3 bucket is encrypted.

Both the S3 bucket and AWS KMS key resource policies have an explicit deny statement if any access request doesn’t arrive via a designated VPC endpoint (following is AWS KMS key policy example):

        - Sid: DenyNoVPC
            Effect: Deny
            Principal: '*'
            Action:
              - kms:Encrypt
              - kms:Decrypt
              - kms:ReEncrypt*
              - kms:GenerateDataKey*
              - kms:DescribeKey
            Resource: '*'
            Condition:
              StringNotEquals:
                'aws:sourceVpce': !Ref VPCEndpointKMSId

To access the S3 bucket and AWS KMS key with ModelExecutionRole, the following conditions must be met:

  • ModelExecutionRole must have permissions to access the S3 bucket and AWS KMS key in the development account
  • Both S3 bucket and AWS KMS key policies must allow cross-account access from ModelExecutionRole in the corresponding target account
  • The S3 bucket and AWS KMS key must be accessed only via a designated VPC endpoint in the target account
  • The VPC endpoint ID must be explicitly allowed in both S3 bucket and AWS KMS key policies in the Condition statement

The following diagram shows the infrastructure and IAM configuration for a development, staging, and production account that fulfills these requirements.

All access to the model artifacts is made via the S3 VPC endpoint (Step 1 in the preceding architecture). This VPC endpoint allows access to the model and data in your S3 buckets. The bucket policy (2) for the bucket where the models are stored grants access to the ModelExecutionRole principals (5) in each of the target accounts:

"Sid": "AllowCrossAccount",
"Effect": "Allow",
"Principal": {
    "AWS": [
            "arn:aws:iam::<staging-account>:role/SageMakerModelExecutionRole",
            "arn:aws:iam::<prod-account>:role/SageMakerModelExecutionRole",
            "arn:aws:iam::<dev-account>:root"
        ]
}

We apply the same setup for the data encryption key (3), whose policy (4) grants access to the principals in the target accounts.

SageMaker model-hosting endpoints are placed in the VPC (6) in each of the target accounts. Any access to S3 buckets and AWS KMS keys is made via the corresponding VPC endpoints. The IDs of these VPC endpoints are added to the Condition statement of the bucket and the AWS KMS key’s resource policies:

"Sid": "DenyNoVPC",
"Effect": "Deny",
"Principal": "*",
"Action": [
    "s3:GetObject",
    "s3:PutObject",
    "s3:ListBucket",
    "s3:GetBucketAcl",
    "s3:GetObjectAcl",
    "s3:PutBucketAcl",
    "s3:PutObjectAcl"
    ],
    "Resource": [
        "arn:aws:s3:::sm-mlops-dev-us-east-1-models/*",
        "arn:aws:s3:::sm-mlops-dev-us-east-1-models"
    ],
    "Condition": {
         "StringNotEquals": {
              "aws:sourceVpce": [
                   "vpce-0b82e29a828790da2",
                   "vpce-07ef65869ca950e14",
                   "vpce-03d9ed0a1ba396ff5"
                    ]
         }
    }

SageMaker MLOps projects: Automation pipelines

This solution delivers two MLOps projects as SageMaker project templates:

  • Model build, train, and validate pipeline
  • Multi-account model deploy pipeline

These projects are fully functional examples that are integrated with the solution infrastructure and multi-layer security controls such as VPC, subnets, security groups, AWS account boundaries, and the dedicated IAM execution roles.

You can find a detailed description of the SageMaker MLOps projects in Building, automating, managing, and scaling ML workflows using Amazon SageMaker Pipelines.

MLOps project template to build, train, validate model

This project is based on the SageMaker project template but has been adapted for this particular solution infrastructure and security controls. The following diagram shows the functional setup of the CI/CD pipeline.

The project creates the following resources comprising the MLOps pipeline:

  1. An MLOps template, made available through SageMaker projects and provided via an AWS Service Catalog portfolio.
  2. A CodePipeline pipeline with two stages: Source to get the source code of the ML pipeline, and Build to build and run the pipeline.
  3. A pipeline to implement a repeatable DAG workflow with individual steps for processing, training, validation, and model registration.
  4. A seed code repository in CodeCommit.

The seed code repository contains code to create a multi-step model building pipeline that includes data processing, model training, model evaluation, and conditional model registration (depending on model accuracy) steps. The pipeline implementation in the pipeline.py file trains a linear regression model using the XGBoost algorithm on the well-known UCI Abalone dataset. This repository also includes a build specification file, used by CodePipeline and CodeBuild to run the pipeline automatically.

MLOps project template for multi-account model deployment

This project is based on the SageMaker MLOps template for model deployment, but implements secure multi-account deployment from SageMaker Model Registry to SageMaker hosted endpoints for real-time inference in the staging and production accounts.

The following diagram shows the functional components of the project.

The components are as follows:

  1. The MLOps project template, which is deployable as a SageMaker project in Studio.
  2. A CodeCommit repository with seed code.
  3. The model deployment multi-stage CI/CD CodePipeline pipeline.
  4. A staging AWS account or accounts where the model is deployed and tested.
  5. A production AWS account or accounts where the model is deployed for production serving.
  6. SageMaker endpoints with the approved model hosted in your private VPC.

You can use the delivered seed code to implement your own customized model deployment pipelines with additional tests or approval steps.

Multi-account ML development best practices

In addition to the already discussed MLOps approaches, security controls, and infrastructure setup, the following resources provide a detailed description and overview of the ML development and deployment best practices:

Conclusion

In this post, we presented the main building blocks and patterns for implementing a multi-account, secure, and governed ML environment. In Part 2 of this series, you deploy the solution from the source code GitHub repository into your account and experiment with the hands-on SageMaker notebooks.


About the Author

Yevgeniy Ilyin is a Solutions Architect at AWS. He has over 20 years of experience working at all levels of software development and solutions architecture and has used programming languages from COBOL and Assembler to .NET, Java, and Python. He develops and codes cloud native solutions with a focus on big data, analytics, and data engineering.

Read More