How SNCF Réseau and Olexya migrated a Caffe2 vision pipeline to Managed Spot Training in Amazon SageMaker

How SNCF Réseau and Olexya migrated a Caffe2 vision pipeline to Managed Spot Training in Amazon SageMaker

This blog post is co-written by guest authors from SNCF and Olexya.

Transportation and logistics are fertile ground for machine learning (ML). In this post, we show how the French state-owned railway company Société Nationale des Chemins de fer Français (SNCF) uses ML from AWS with the help of its technology partner Olexya to research, develop, and deploy innovative computer vision solutions.

SNCF was founded in 1938 and employs more than 270,000 people. SNCF Réseau is a subsidiary of SNCF that manages and operates the infrastructure for the rail network. SNCF Réseau and its technology partner Olexya deploy innovative solutions to assist the operations of the infrastructure and keep the bar high for infrastructure safety and quality. The field teams detect anomalies in the infrastructure by using computer vision.

SNCF Réseau researchers have been doing ML for a long time. An SNCF Réseau team developed a computer vision detection model on premises using the Caffe2 deep learning framework. The scientists then reached out to SNCF Réseau technology partner Olexya to assist with the provisioning of GPU to support iteration on the model. To keep operational overhead low and productivity high while retaining full flexibility on the scientific code, Olexya decided to use Amazon SageMaker to orchestrate the training and inference of the Caffe2 model. The process involved the following steps:

  1. Custom Docker creation.
  2. Training configuration ingestion via an Amazon Simple Storage Service (Amazon S3) data channel.
  3. Cost-efficient training via Amazon SageMaker Spot GPU training.
  4. Cost-efficient inference with the Amazon SageMaker training API.

Custom docker creation

The team created a Docker image wrapping the original Caffe2 code that respected the Amazon SageMaker Docker specification. Amazon SageMaker can accommodate multiple data sources, and has advanced integration with Amazon S3. Datasets stored in Amazon S3 can be automatically ingested in training containers running on Amazon SageMaker. To be able to process training data available in Amazon S3, Olexya had to direct the training code to read from the associated local path opt/ml/input/data/<channel name>. Similarly, the model artifact writing location had to be set to opt/ml/model. That way, Amazon SageMaker can automatically compress and ship the trained model artifact to Amazon S3 when training is complete.

Training configuration ingestion via an Amazon S3 data channel

The original Caffe2 training code was parametrized with an exhaustive and flexible YAML configuration file, so that researchers could change model settings without altering the scientific code. This external file was easy to keep external and ingest at training time in the container via the use of data channels. Data channels are Amazon S3 ARNs passed to the Amazon SageMaker SDK at training time and ingested in the Amazon SageMaker container when training starts. Olexya configured the data channels to read via a copy (copy mode), which is the default configuration. It is also possible to stream the data via Unix pipes (Pipe mode).

Cost-efficient training via Amazon SageMaker Spot GPU training

The team configured training infrastructure to be an ml.p3.2xlarge GPU-accelerated compute instance. The Amazon SageMaker ml.p3.2xlarge compute instance is specifically adapted to deep learning computer vision workloads: it’s equipped with an NVIDIA V100 GPU featuring 5,120 cores and 16 GB of High-Bandwidth Memory (HBM), which enables the fast training of large models.

Furthermore, Amazon SageMaker training API calls were set with Managed Spot Instance usage activated, which contributed to a reported savings of 71% compared to the on-demand Amazon SageMaker price. Amazon SageMaker Managed Spot Training is an Amazon SageMaker feature that enables the use of Amazon Elastic Compute Cloud (Amazon EC2) Spot Instance capacity for training. Amazon EC2 Spot Instances allow you to purchase unused Amazon EC2 computer capacity at a highly-reduced rate. In Amazon SageMaker, Spot Instance usage is fully managed by the service, and you can invoke it by setting two training SDK parameters:

  • train_use_spot_instances=True to request usage of Amazon SageMaker Spot Instances
  • train_max_wait set to the maximal acceptable waiting time in seconds

Cost-efficient inference with the Amazon SageMaker training API

In this research initiative, inference interruptions and delayed instantiation were acceptable to the end-user. Consequently, to further optimize costs, the team also used the Amazon SageMaker training API to run inference code, so that managed Amazon SageMaker Spot Instances could be used for inference too. Using the training API came with the additional benefit of a simpler learning curve because the same API is used for both steps of the model life cycle.

Time and cost savings

By applying those four steps, Olexya successfully ported an on-premises Caffe2 deep computer vision detection model to Amazon SageMaker for both training and inference. More impressively, the team completed that onboarding in about 3 weeks, and reported that the training time of the model was reduced from 3 days to 10 hours! The team further estimated that Amazon SageMaker allows a 71% total cost of ownership (TCO) reduction compared the locally available on-premises GPU fleet. A number of extra optimization techniques could reduce the costs even more, such as intelligent hyperparameter search with Amazon SageMaker automatic model tuning and mixed-precision training with the deep learning frameworks that support it.

In addition to SNCF Réseau, numerous AWS customers operating in transportation and logistics have improved their operations and delivered innovation by applying ML to their business. For example:

  • The Dubai-based logistics company Aramex uses ML for address parsing and transit time prediction. The company reports having 150 models in use, doing 450,000 predictions per day.
  • Transport for New South Wales uses the cloud to predict patronage numbers across the entire transport network, which enables the agency to better plan workforce and asset utilization and improve customer satisfaction.
  • Korean Air launched innovative projects with Amazon SageMaker to help predict and preempt maintenance for its aircraft fleet.

Conclusion

Amazon SageMaker supports the whole ML development cycle, from annotation to production deployment and monitoring. As illustrated by the work of Olexya and SNCF Réseau, Amazon SageMaker is framework-agnostic and accommodates a variety of deep learning workloads and frameworks. Although Docker images and SDK objects have been created to closely support Sklearn, TensorFlow, PyTorch, MXNet, XGBoost, and Chainer, you can bring custom Docker containers to onboard virtually any framework, such as PaddlePaddle, Catboost, R, or Caffe2. If you are an ML practitioner, don’t hesitate to test the service, and let us know what you build!


About the Authors

Olivier Cruchant is a Machine Learning Specialist Solution Architect at AWS, based in Lyon, France. Olivier helps French customers – from small startups to large enterprises – develop and deploy production-grade machine learning applications. In his spare time, he enjoys reading research papers and exploring the wilderness with friends and family.


Samuel Descroix is head manager of the Geographic and Analytic Data department at SNCF Réseau. He is in charge of all project teams and infrastructures. To be able to answer to all new use cases, he is constantly looking for most innovative and most relevant solutions to manage growing volumes and needs of complex analysis.


Alain Rivero is Project Manager in the Technology and Digital Transformation (TTD) department within the General Industrial and Engineering Department of SNCF Réseau. He manages projects implementing in-depth learning solutions to detect defects on rolling stock and tracks to increase traffic safety and guide decision-making within maintenance teams. His research focuses on image processing methods, supervised and unsupervised learning and their applications.


Pierre-Yves Bonnefoy is data architect at Olexya, currently working for SNCF Réseau IT department. One of his main assignments is to provide environments and sets of datas for Data Scientists and Data Analysts to work on complex analysis, and to help them with software solutions. Thanks to his large range of skills in development and system architecture, he accelerated the deployment of the project on Sagemaker instances, rationalization of costs and optimization of performance.


Emeric Chaize is certified Solution Architect in Olexya, currently working for SNCF Réseau IT department. He is in charge of Data Migration Project for IT Data Departement, with the responsabilty of covering all needs and usages of the company in data analysis. He defines and plans deployment of all the needed infrastructure for projects and Data Scientists.

Read More

Building a multilingual question and answer bot with Amazon Lex

Building a multilingual question and answer bot with Amazon Lex

You can use Amazon Lex to build a question and answer chatbot. However, if you live in a non-English-speaking country or your business has global reach, you will want a multilingual bot to cater to all your users. This post describes how to achieve that by using the multi-language functionality of your question and answer bot (QnABot).

The QnABot can detect the predominant language in an interaction by using Amazon Comprehend, a natural language processing (NLP) service that uses machine learning to find insights and relationships in text.

The bot then uses Amazon Translate, a neural machine translation service to translate the question to English. Then it can return a preconfigured answer in the end user’s language or translate it back from the default English text.

Although QnABot allows the end-user to interact with an Amazon Lex bot using text or voice, the multilingual feature primarily supports text interactions. Multilingual voice interactions are currently limited to use with Alexa skills.

The solution consists of three easy steps:

  1. Configure the multi-language functionality.
  2. Set up the alternate curated answers in a different language.
  3. Configure your Alexa skill with multiple languages.

For instructions on creating and customizing your bot, see Create a Question and Answer Bot with Amazon Lex and Amazon Alexa or the Q&A Self-Paced Guide. You can also see the following videos on YouTube:

Prerequisites

To implement this solution, you must have an AWS account. If you don’t have a professional account, the AWS Free Tier lets you gain experience with the AWS platform, products, and services.

You also need to deploy QnABot. If you have not already done so, launch the QnABot on an AWS CloudFormation stack in one of the available Regions.

When specifying your stack name, include QnA in the name, for example, MultiLangQnABot.

After you successfully deploy your CloudFormation stack, complete the following steps:

  1. Open the content designer page of your chatbot.

If this is the first time accessing the chatbot design console, you can find the correct URL on the AWS CloudFormation console on the Output tab of your bot stack. Look for the value for the ContentDesignerURL key. You should also receive an email with temporary credentials to access the QnABot designer.

  1. On the designer page, choose the menu icon.
  2. Under Tools, choose Import.
  3. Expand the Examples/Extensions
  4. Next to blog-samples, choose Load.

Configuring the multi-language functionality

You are now ready to configure the multi-language functionality. Complete the following steps:

  1. In the content designer page, under Tools, choose Settings.
  2. For the ENABLE_MULTI_LANGUAGE_SUPPORT parameter, change the value from false to true.
  3. Choose Save.
  4. To test the bot, open the client webpage.
  5. From the designer page, under Tools, choose QnABot Client.
  6. Enter the following questions (in English, Spanish, and French):
    • How do I modify Q and A Bot content ?
    • ¿Cómo modifico el contenido de Q y A Bot ?
    • Comment modifier le contenu Q et A Bot ?

The chatbot answers each time in the language you used, as shown in the following animation.

The QnABot is successfully using Amazon Translate to translate the answer automatically into the user’s native language.

Setting up alternate curated answers in a different language

You might need to provide a more natural experience and want to add a curated answer in the native language of your choice. To further customize the translation for each question, you can use the {{handlebar}} functionality. The QnABot provides the {{handlebar}} function ifLang, which takes the locale as a quoted parameter. You can use any of the languages that Amazon Translate supports. For more information, see What Is Amazon Translate?

For example, to customize the translation in Spanish, the ifLang function uses es as the locale parameter. See the following code:

{{#ifLang 'es'}}
          Su traducción al español
{{/ifLang}}

Additionally, if an unknown language is detected, you can support that with a default response by using the defaultLang function. See the following code:

{{#defaultLang}}
          Your default language answer
{{/defaultLang}}

As an example, modify the question you used earlier. Go back to the content designer and complete the following steps:

  1. Under Tools, choose Edit.
  2. Select 001 and choose the pencil icon on the right.
  3. Replace the text in the answer with the following code:
    {{#ifLang 'es'}}
    Use las herramientas de 'Question and Test' de 'Content Designer' para encontrar sus documentos existentes y editarlos directamente en la consola. También puede exportar documentos existentes como un archivo JSON, realizar cambios en el archivo y volver a importar.
    {{/ifLang}}
    {{#ifLang 'fr'}}
    Utilisez les outils 'Question and Test' de 'Content Designer' pour trouver vos documents existants et les modifier directement dans la console. Vous pouvez également exporter des documents existants sous forme de fichier JSON, apporter des modifications au fichier et réimporter.
    {{/ifLang}}
    {{#defaultLang}} 
    Use the Content Designer Question and Test tools to find your existing documents and edit them directly in the console. You can also export existing documents as a JSON file, make changes to the file, and re-import.
    {{/defaultLang}}
    

    Multi-language and handlebars, in general, also support markdown answers. For example, you could modify the preceding code to highlight the name of the interface that isn’t translated. See the following code:

    {{#ifLang 'es'}}
    Use las herramientas de ***'Question and Test'*** de ***'Content Designer'*** para encontrar sus documentos existentes y editarlos directamente en la consola. También puede exportar documentos existentes como un archivo JSON, realizar cambios en el archivo y volver a importar.
    {{/ifLang}}
    {{#ifLang 'fr'}}
    Utilisez les outils ***'Question and Test'*** de ***'Content Designer'*** pour trouver vos documents existants et les modifier directement dans la console. Vous pouvez également exporter des documents existants sous forme de fichier JSON, apporter des modifications au fichier et réimporter.
    {{/ifLang}}
    {{#defaultLang}} 
    Use the ***Content Designer Question and Test*** tools to find your existing documents and edit them directly in the console. You can also export existing documents as a JSON file, make changes to the file, and re-import.
    {{/defaultLang}}
    

  4. Choose Advanced and enter the new code in the Markdown Answer box.

  5. Choose Update.

If you try to ask your questions again, the answers are different because the chatbot is using your curated version.

You can also import the sample or extension named Language / Multiple Language Support.

This adds two questions to the system: Language.000 and Language.001. The first question allows the end-user to set their preferred language explicitly; the latter resets the preferred language and allow the QnABot to choose the locale based on the automatically detected predominant language.

Debugging the answers in a different language

You can use the ENABLE_DEBUG_RESPONSES setting to see how local language questions are translated to English by QnABot, and to tune the content as needed to ensure QnABot finds the best answer to a non-English question.

Complete the following steps to set up and test:

  1. In the content designer page, under Tools, choose Settings.
  2. For the ENABLE_DEBUG_RESPONSES parameter, change the value from false to true.
  3. Choose Save.
  4. To test the bot, open the client webpage.
  5. From the designer page, under Tools, choose QnABot Client.
  6. Try one of the question we used before, you can read the translation and use this information to tune your answer.

Configuring your Alexa skill with multiple languages

You first need to create your Alexa skill. For instructions, see Create a Question and Answer Bot with Amazon Lex and Amazon Alexa.

When your Alexa skill is working, add the additional languages by completing the following steps:

  1. On the Alexa developer console, open your skill.
  2. From the drop-down menu with your default language, choose Language settings.
  3. Add all the languages you want to support and choose Save.
  4. Under CUSTOM, choose JSON Editor.
  5. Copy the JSON from the editor, switch to the other language you want to support, and enter it in the editor pane (this overwrites the default).
  6. Choose Save Model.
  7. Choose Invocation and change the invocation name.
  8. Choose Save Model.
  9. Repeat these steps for any language you want to support.
  10. Build the model.

Testing your Alexa skill

You can now test your Alexa skill in other languages.

  1. On the Alexa developer console, select your skill.
  2. Choose Test.
  3. Change the language and type the invocation name of your skill for that language.
  4. After Alexa gives her initial greeting, ask the question you used before or any other question you added in the content designer.

Alexa answers you in the selected language.

Now your multilingual chatbot can be published on your website or as an Alexa skill. To integrate the QnABot in your website, you can use lex-web-ui. For instructions, see Deploy a Web UI for your Chatbot.

Conclusion

This post shows you how to configure and use the out-of-the-box feature of your QnABot to localize answers in any language Amazon Translate supports. It is an inexpensive way to deploy a multi-language chatbot, and you don’t need to adapt it to accommodate new Amazon Lex features.

As of this writing, this approach works for text-based interactions only; support for voice is limited to use with Alexa skills only.

For more information about experimenting with the capabilities of QnABot, see the Q&A Self-Paced Guide.


About the Authors

Fabrizio is a Specialist Solutions Architect for Database and Analytics in the AWS Canada Public Sector team. He has worked in the analytics field for the last 20 years, and has recently, and quite by surprise, become a Hockey Dad after moving to Canada.


As a Solutions Architect at AWS supporting our Public Sector customers, Raj excites customers by showing them the art of the possible of what they can build on AWS and helps accelerate their innovation. Raj loves solving puzzles, mentoring, and supporting hackathons and seeing amazing ideas come to life.

Read More

Enhancing your chatbot experience with web browsing

Enhancing your chatbot experience with web browsing

Chatbots are popping up everywhere. They are qualifying leads, assisting with sales, and automating customer service. However, conversational chatbot experiences have been limited to the space available within the chatbot window.

What if these web-based chatbots could provide an interactive experience that expanded beyond the chat window to include relevant web content based on user inputs? In a previous post we showed you how to deploy a web UI for your chatbot. In this post we will show you how to enhance that experience.

Here is an example of how we add an interactive web UI to the Order Flowers chatbot with the lex-web-ui customization.

Installing the chatbot UI

To install your chatbot, complete the following steps:

  1. Deploy the chatbot UI in your AWS account by launching the following AWS CloudFormation stack:
  2. Set EnableCognitoLogin to true in the parameters.
  3. To check if it’s working, on the AWS CloudFormation console, choose Stacks.
  4. Choose the stack you created.
  5. In the Outputs section, choose ParentPageURL.

You have now deployed the bot in the CloudFront distribution you created.

Installing the chatbot UI enhancer

After you install the chatbot UI, launch the following AWS CloudFormation stack:

There are two parameters for this stack:

  • BotName – The chatbot UI bot you deployed. The parameter value of WebUiOrderFlowers is populated by default.
  • lexwebuiStackName – The name of the deployed in the previous step. The parameter value of lex-web-ui is populated by default.

When the stack is complete, find the URL for the new demo site on the Outputs tab on the AWS CloudFormation console.

Enhancing the existing bot with AWS Lambda

To enhance the existing bot with AWS Lambda, complete the following steps:

  1. On the Amazon Lex console, choose Bots.
  2. Choose the bot you created.
  3. In the Lambda initialization and validation section, for Lambda function, choose the function you created as part of the CloudFormation stack (enhanced-orderflowers-<stackname>).

For production workloads, you should publish a new version of the bot. Amazon Lex takes a snapshot copy of the $LATEST version to publish a new version. For more information, see Exercise 3: Publish a Version and Create an Alias.

Enhancing authentication

You have now set up the enhanced chatbot UI. It’s recommended that you authenticate for a production environment. This post uses Amazon Cognito to add a social identity provider (Google) to your user pool. For instructions, see Adding Social Identity Providers to a User Pool.

This step allows your bot to display your Google calendar while you order your flowers. If you skip this step, the bot still functions normally.

Dynamically viewing content on your webpage

Having content appear and disappear on your website based on your interactions with the bot is a powerful feature.

For example, if you ask the bot to order flowers, the bot messaging interface and the webpage change. This example actively builds HTML on the fly with values that the bot sends back to the end-user.

Enhancing pages with external content to help with flower selection

When you ask the bot to buy roses, the result depends on if you’re in unauthenticated or authenticated mode.

In authenticated mode, the iframe changes from the default homepage to a Wikipedia page about roses. The Area chart also changes to a Roses Sold graph that shows the number of roses sold per year.

In authenticated (with Google) mode, the iframe changes to your Google calendar to help you schedule a delivery day. The Area chart still changes to the Roses Sold graph.

This powerful tool allows content from various parts of the website or the internet to appear by interacting with the bot. This also allows the bot to recognize if you’re authenticated or not and tailor your browsing experience.

Parent page, iframes, session attributes, and dynamic HTML tags

Four main components make up the Order Flowers bot page and how the various pieces interact with each other:

  • Parent page – This page houses all the various components, including the chatbot iframe, dynamically created HTML, and the navigation portal (an iframe that displays various HTML pages external and internal to the website).
  • Chatbot iframe – This is the chatbot UI that the end-user interacts with. The chatbot is loaded using a JavaScript snippet that mounts an iframe to the bottom right of the parent page and preloads it with an API to interact with the parent page.
  • Session attributes – These are arbitrary values that get sent back and forth from the chatbot UI backend to the parent page. You can manipulate these values in Lambda. On the parent page, the session attributes event data is made available in a variable called sessionAttributes.
  • Dynamic HTML <Div> tags – This appears on the top right of the page and displays various charts based on the question asked. You can populate it with any data, not just charts. You manipulate the data by returning the values through the session attributes fields. In the parent page, sessionAttributes.appContext houses this data.

The following diagram illustrates the solution architecture.

Chatbot UI user login with Amazon Cognito

When you’re authenticated through the integrated Amazon Cognito feature, the chatbot UI attaches a signed token as a session attribute. The enhanced Order Flowers webpage uses the token to make additional user attributes available, including fields such as given name, family name, and email address. These fields help return personalized information (for example, addressing you by your name).

Limitations

There are certain limitations to displaying outside webpages and content through the chatbot UI parent page.

If cross-origin resource sharing (CORS) is enabled on the external content that is being pulled into the parent page iframe navigation portal, the browser blocks the content. Browsers don’t block different webpages from the same domain or external webpages that don’t have CORS enabled (for example, Wikipedia). For more information, see Cross-Origin Resource Sharing (CORS) on the MDN web docs website.

In most use cases, you should use the navigation portal to pull in content from your own domain, due to the inherent limitations of iframes and CORS.

Additional Resources

The concepts discussed in this blogpost can be used with the QnaBot. The following README goes in detailed instructions on setting up the solution.

Conclusion

This post demonstrates how to enhance the Order Flowers bot with a Lambda function that parses your JWT token and extracts the relevant information. If you are authenticated through Google, the bot extracts information like your name and email address, and displays your Google calendar to help you schedule your delivery date. The function also verifies that the JWT token signature is valid.

The chatbot UI in this post is based on the aws-lex-web-ui open-source project. For more information, see the GitHub repo.


About the Authors

Mohamed Khalil is a Consultant for AWS Professional Services. Bob Strahan is a Principal Consultant for AWS Professional Services. Bob Potterveld is a Senior Consultant for AWS Professional Services. They help our customers and partners on a variety of projects.

Read More

Processing PDF documents with a human loop using Amazon Textract and Amazon Augmented AI

Processing PDF documents with a human loop using Amazon Textract and Amazon Augmented AI

Businesses across many industries, including financial, medical, legal, and real estate, process a large number of documents for different business operations. Healthcare and life science organizations, for example, need to access data within medical records and forms to fulfill medical claims and streamline administrative processes. Amazon Textract is a machine learning (ML) service that makes it easy to process documents at a large scale by automatically extracting text and data from virtually any type of document. For example, it can extract patient information from an insurance claim or values from a table in a scanned medical chart.

Depending on the business use case, you may want to have a human review of ML predictions. For example, extracting information from a scanned mortgage application or medical claim form might require human review of certain fields due to regulatory requirements or potentially low-quality scans. Amazon Augmented AI (Amazon A2I) allows you to build and manage such human review workflows. This allows human review of ML predictions when needed based on a confidence score threshold, and you can audit the predictions on an ongoing basis. For more information, see Using with Amazon Textract with Amazon Augmented AI for processing critical documents.

In this post, we show how you can use Amazon Textract and Amazon A2I to build a workflow that enables multi-page PDF document processing with a human reviewers loop.

Solution overview

The following architecture shows how you can have a serverless architecture to process multi-page PDF documents with a human review. Although Amazon Textract can process images (PNG and JPG) and PDF documents, Amazon A2I human reviewers need to have individual pages as images and process them individually using the AnalyzeDocument API of Amazon Textract.

To implement this architecture, we take advantage of Amazon Step Functions to build the overall workflow. As the workflow starts, it extracts individual pages from the multi-page PDF document. It then uses the Map state to process multiple pages concurrently using the AnalyzeDocument API. When we call Amazon Textract, we also specify the Amazon A2I workflow as part of the request. This workflow is configured to trigger when form fields are detected below a certain confidence threshold. If triggered, Amazon Textract returns the extracted text and data along with the details. When the human review is complete, the callback task token is used to resume the state machine, combine the pages’ results, and store them in an output Amazon Simple Storage Service (Amazon S3) bucket.

For more information about the demo solution, see the GitHub repo.

Prerequisites

Before you get started, you must install the following prerequisites:

  1. Node.js
  2. Python
  3. AWS Command Line Interface (AWS CLI)—for instructions, see Installing the AWS CLI)

Deploying the solution

The following steps deploy the reference implementation in your AWS account. The solution deploys different components, including an S3 bucket, a Step Function, an Amazon Simple Queue Service (Amazon SQS) queue, and AWS Lambda functions using the AWS Cloud Development Kit (AWS CDK), which is an open-source software development framework to model and provision your cloud application resources using familiar programming languages.

  1. Install AWS CDK:
    npm install -g aws-cdk

  2. Download the GitHub repo to your local machine:
    git clone https://github.com/aws-samples/amazon-textract-a2i-pdf

  3. Go to the folder multipagepdfa2i and enter the following:
    pip install -r requirements.txt

  4. Bootstrap AWS CDK:
    cdk bootstrap

  5. Deploy:
    cdk deploy

Creating a private work team

A work team is a group of people that you select to review your documents. You can create a work team from a workforce, which is made up of Amazon Mechanical Turk workers, vendor-managed workers, or your own private workers that you invite to work on your tasks. Whichever workforce type you choose, Amazon A2I takes care of sending tasks to workers. For this post, you create a work team using a private workforce and add yourself to the team to preview the Amazon A2I workflow.

To create and manage your private workforce, you can use the Labeling workforces page on the Amazon SageMaker console. On the console, you can create a private workforce by entering worker emails or importing a pre-existing workforce from an Amazon Cognito user pool.

If you already have a work team for Amazon SageMaker Ground Truth, you can use the same work team with Amazon A2I and skip to the following section.

To create your private work team, complete the following steps:

  1. On the Amazon SageMaker console, choose Labeling workforces.
  2. On the Private tab, choose Create private team.
  3. Choose Invite new workers by email.
  4. In the Email addresses box, enter the email addresses for your work team (for this post, enter your email address).

You can enter a list of up to 50 email addresses, separated by commas.

  1. Enter an organization name and contact email.
  2. Choose Create private team.

After you create the private team, you get an email invitation. The following screenshot shows an example email.

After you click the link and change your password, you are registered as a verified worker for this team. The following screenshot shows the updated information on the Private tab.

Your one-person team is now ready, and you can create a human review workflow.

Creating a human review workflow

You use a human review workflow to do the following:

  • Define the business conditions under which the Amazon Textract predictions of the document content go to a human for review. For example, you can set confidence thresholds for important words in the form that the model must meet. If inference confidence for that word (or form key) falls below your confidence threshold, the form and prediction go for human review.
  • Create instructions to help workers complete your document review task.
  1. On the Amazon SageMaker console, navigate to the Human review workflows page
  2. Choose Create human review workflow.
  3. In the Workflow settings section, for Name, enter a unique workflow name.
  4. For S3 bucket, enter the S3 bucket that was created in CDK deployment step. It should have a name format as multipagepdfa2i-multipagepdf-xxxxxxxxx. This S3 bucket is where A2I will store the human review results.
  5. For IAM role, choose Create a new role from the drop-down menu. Amazon A2I can create a role automatically for you.
  6. For S3 buckets you specify, select Specific S3 buckets.
  7. Enter the S3 bucket you specified earlier in Step 3; for example, multipagepdfa2i-multipagepdf-xxxxxxxxx.
  8. Choose Create.

You see a confirmation when role creation is complete, and your role is now pre-populated in the IAM role drop-down menu.

  1. For Task type, select Amazon Textract – Key-value pair extraction.

Defining the trigger conditions

For this post, you want to trigger a human review if the key Mail Address is identified with a confidence score of less than 99% or not identified by Amazon Textract in the document. For all other keys, a human review starts if a key is identified with a confidence score less than 90%.

  1. Select Trigger a human review for specific form keys based on the form key confidence score or when specific form keys are missing.
  2. For Key name, enter Mail Address.
  3. Set the identification confidence threshold between 0 and 99.
  4. Set the qualification confidence threshold between 0 and 99.
  5. Select Trigger a human review for all form keys identified by Amazon Textract with confidence scores in a specific range.
  6. Set Identification confidence threshold between 0 and 90.
  7. Set Qualification confidence threshold between 0 and 90.

For model-monitoring purposes, you can also randomly send a specific percent of pages for human review. This is the third option on the Conditions for invoking human review page: Randomly send a sample of forms to humans for review. This post doesn’t include this condition.

Creating a UI template

In the next steps, you create a UI template that the worker sees for document review. Amazon A2I provides pre-built templates that workers use to identify key-value pairs in documents.

  1. In the Worker task template creation section, select Create from a default template.
  2. For Template name, enter a name.

When you use the default template, you can provide task-specific instructions to help the worker complete your task. For this post, you can enter instructions similar to the default instructions you see in the console.

  1. Under Task Description, enter something similar to Please review the Key Value Pairs in this document.
  2. Under Instructions, review the default instructions provided and make modifications as needed.
  3. In the Workers section, select Private.
  4. For Private teams, choose the work team you created earlier.
  5. Choose Create.

You’re redirected to the Human review workflows page and see a confirmation message similar to the following screenshot.

Record your new human review workflow ARN, which you use to configure your human loop in the next section.

Updating the solution with the Human Review workflow

You’re now ready to add your human review workflow ARN.

  1. Within the code you downloaded from GitHub repo, open the file multipagepdfa2i/multipagepdfa2i_stack.py.

On line 23, you should see the following code:

SAGEMAKER_WORKFLOW_AUGMENTED_AI_ARN_EV = ""
  1. Within the quotes, enter the human review workflow ARN you copied at the end of the last section.

Line 23 should now look like the following code:

SAGEMAKER_WORKFLOW_AUGMENTED_AI_ARN_EV = "arn:aws:sagemaker: ...."
  1. Save the changes you made.
  2. Deploy by entering the following code:
    cdk deploy

Testing the workflow

To test your workflow, complete the following steps:

  1. Create a folder named uploads in the S3 bucket that was created by CDK deployment (Example: multipagepdfa2i-multipagepdf-xxxxxxxxx)
  2. Upload the sample PDF document to the uploads For example, uploads/Sampledoc.pdf.
  3. On the Amazon SageMaker console, choose Labeling workforces.
  4. On the Private tab, choose the link under Labeling portal sign-in URL.
  5. Sign in with the account you configured with Amazon Cognito.

If the document required a human review, a job appears under Jobs section .

  1. Select the job you want to complete and choose Start working.

In the reviewer UI, you see instructions and the first document to work on. You can use the toolbox to zoom in and out, fit image, and reposition document. See the following screenshot.

This UI is specifically designed for document-processing tasks. On the right side of the preceding screenshot, the key-value pairs are automatically pre-filled with the Amazon Textract response. As a worker, you can quickly refer to this sidebar to make sure the key-values are identified correctly (which is the case for this post).

When you select any field on the right, a corresponding bounding box appears, which highlights its location on the document. See the following screenshot.

In the following screenshot, Amazon Textract didn’t identify Mail Address. The human review workflow identified this as an important field. Even though Amazon Textract didn’t identify it, the worker task UI asks you to enter d details on the right side.

There may be a series of pages you need to submit based on the Amazon Textract confidence score ranges you configured. When you finish reviewing them, continue with steps below.

  1. When you complete the human review, go to the S3 bucket you used earlier (Example: multipagepdfa2i-multipagepdf-xxxxxxxxx)
  2. In the complete folder, choose the folder that has the name of input document (Example: uploads-Sampledoc.pdf-b5d54fdb75b143ee99f7524de56626a3).

That folder contains output.csv, which contains all your key-value pairs.

The following screenshot shows the content of an example output.csv file.

Conclusion

In this post, we showed you how to use Amazon Textract and Amazon A2I to automatically extract data from scanned multi-page PDF documents, and the human review of the pages for given business criteria. For more information about Amazon Textract and Amazon A2I, see Using Amazon Augmented AI with Amazon Textract.

For video presentations, sample Jupyter notebooks, or more information about use cases like document processing, content moderation, sentiment analysis, text translation, and more, see Amazon Augmented AI Resources.


About the Authors

Nicholas Nelson is an AWS Solutions Architect for Strategic Accounts based out of Seattle, Washington. His interests and experience include Computer Vision, Serverless Technology, and Construction Technology. Outside of work, you can find Nicholas out cycling, paddle boarding, or grilling!


Kashif Imran is a Principal Solutions Architect at Amazon Web Services. He works with some of the largest AWS customers who are taking advantage of AI/ML to solve complex business problems. He provides technical guidance and design advice to implement computer vision applications at scale. His expertise spans application architecture, serverless, containers, NoSQL and machine learning.


Anuj Gupta is Senior Product Manager for Amazon Augmented AI. He focuses on delivering products that make it easier for customers to adopt machine learning. In his spare time, he enjoys road trips and watching Formula 1.

Read More

Setting up human review of your NLP-based entity recognition models with Amazon SageMaker Ground Truth, Amazon Comprehend, and Amazon A2I

Setting up human review of your NLP-based entity recognition models with Amazon SageMaker Ground Truth, Amazon Comprehend, and Amazon A2I

Organizations across industries have a lot of unstructured data that you can evaluate to get entity-based insights. You may also want to add your own entity types unique to your business, like proprietary part codes or industry-specific terms. To create a natural language processing (NLP)-based model, you need to label this data based on your specific entities.

Amazon SageMaker Ground Truth makes it easy to build highly accurate training datasets for machine learning (ML), and Amazon Comprehend lets you train a model without worrying about selecting the right algorithms and parameters for model training. Amazon Augmented AI (Amazon A2I) lets you audit, review, and augment these predicted results.

In this post, we cover how to build a labeled dataset of custom entities using the Ground Truth named entity recognition (NER) labeling feature, train a custom entity recognizer using Amazon Comprehend, and review the predictions below a certain confidence threshold from Amazon Comprehend using human reviewers with Amazon A2I.

We walk you through the following steps using this Amazon SageMaker Jupyter notebook:

  1. Preprocess your input documents.
  2. Create a Ground Truth NER labeling Job.
  3. Train an Amazon Comprehend custom entity recognizer model.
  4. Set up a human review loop for low-confidence detection using Amazon A2I.

Prerequisites

Before you get started, complete the following steps to set up the Jupyter notebook:

  1. Create a notebook instance in Amazon SageMaker.

Make sure your Amazon SageMaker notebook has the necessary AWS Identity and Access Management (IAM) roles and permissions mentioned in the prerequisite section of the notebook.

  1. When the notebook is active, choose Open Jupyter.
  2. On the Jupyter dashboard, choose New, and choose Terminal.
  3. In the terminal, enter the following code:
    cd SageMaker
    git clone “https://github.com/aws-samples/augmentedai-comprehendner-groundtruth”

  4. Open the notebook by choosing SageMakerGT-ComprehendNER-A2I-Notebook.ipynb in the root folder.

You’re now ready to run the following steps through the notebook cells.

Preprocessing your input documents

For this use case, you’re reviewing at chat messages or several service tickets. You want to know if they’re related to an AWS offering. We use the NER labeling feature in Ground Truth to label a SERVICE or VERSION entity from the input messages. We then train an Amazon Comprehend custom entity recognizer to recognize the entities from text like tweets or ticket comments.

The sample dataset is provided at data/rawinput/aws-service-offerings.txt in the GitHub repo. The following screenshot shows an example of the content.

You preprocess this file to generate the following:

  • inputs.csv – You use this file to generate input manifest file for Ground Truth NER labeling.
  • Train.csv and test.csv – You use these files as input for training custom entities. You can find these files in the Amazon Simple Storage Service (Amazon S3) bucket.

Refer to Steps 1a and 1b in the notebook for dataset generation.

Creating a Ground Truth NER labeling job

The purpose is to annotate and label sentences within the input document as belonging to a custom entity that we define. In this section, you complete the following steps:

  1. Create the manifest file that Ground Truth needs.
  2. Set up a labeling workforce.
  3. Create your labeling job.
  4. Start your labeling job and verify its output.

Creating a manifest file

We use the inputs.csv file generated during prepossessing to create a manifest file that the NER labeling feature needs. We generate a manifest file named prefix+-text-input.manifest, which you use for data labeling while creating a Ground Truth job. See the following code:

# Create and upload the input manifest by appending a source tag to each of the lines in the input text file. 
# Ground Truth uses the manifest file to determine labeling tasks

manifest_name = prefix + '-text-input.manifest'
# remove existing file with the same name to avoid duplicate entries
!rm *.manifest
s3bucket = s3res.Bucket(BUCKET)

with open(manifest_name, 'w') as f:
    for fn in s3bucket.objects.filter(Prefix=prefix +'/input/'):
        fn_obj = s3res.Object(BUCKET, fn.key)
        for line in fn_obj.get()['Body'].read().splitlines():                
            f.write('{"source":"' + line.decode('utf-8') +'"}n')
f.close()
s3.upload_file(manifest_name, BUCKET, prefix + "/manifest/" + manifest_name)

The NER labeling job requires its input manifest in the {"source": "embedded text"}. The following screenshot shows the generated input.manifest file from inputs.csv.

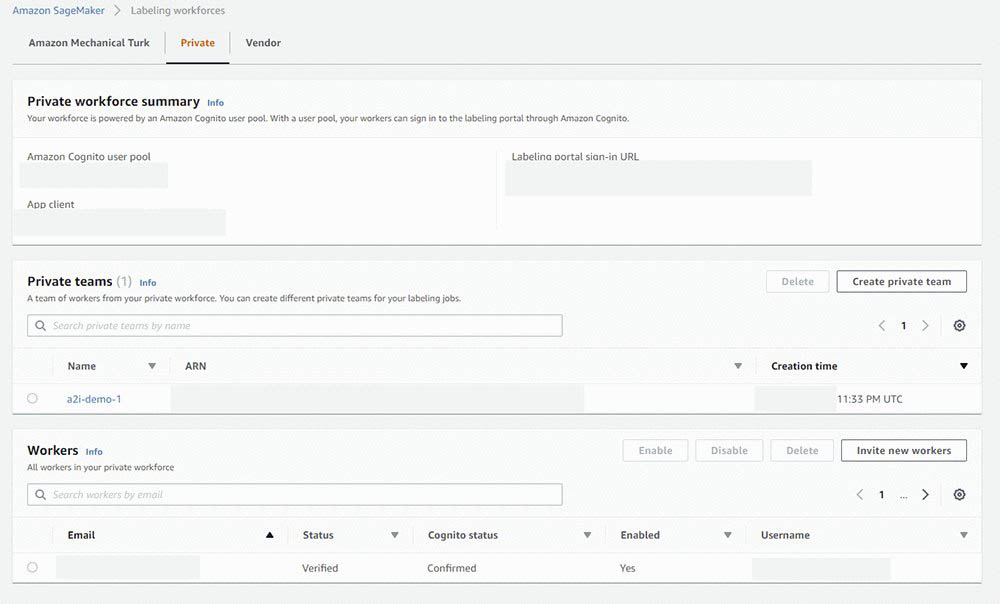
Creating a private labeling workforce

With Ground Truth, we use a private workforce to create a labeled dataset.

You create your private workforce on the Amazon SageMaker console. For instructions, see the section Creating a private work team in Developing NER models with Amazon SageMaker Ground Truth and Amazon Comprehend.

Alternatively, follow the steps in the notebook.

For this walkthrough, we use the same private workforce to label and augment low-confidence data using Amazon A2I after custom entity training.

Creating a labeling job

The next step is to create the NER labeling job. This post highlights the key steps. For more information, see Adding a data labeling workflow for named entity recognition with Amazon SageMaker Ground Truth.

  1. On the Amazon SageMaker console, under Ground Truth, choose Labeling jobs.
  2. Choose Create labeling job.
  3. For Job name, enter a job name.
  4. For Input dataset location, enter the Amazon S3 location of the input manifest file you created (s3://bucket//path-to-your-manifest.json).
  5. For Output Dataset Location, enter a S3 bucket with an output prefix (for example, s3://bucket-name/output).
  6. For IAM role, choose Create a new Role.
  7. Select Any S3 Bucket.
  8. Choose Create.
  9. For Task category, choose Text.
  10. Select Named entity recognition.
  11. Choose Next.
  12. For Worker type, select Private.
  13. In Private Teams, select the team you created.
  14. In the Named Entity Recognition Labeling Tool section, for Enter a brief description of the task, enter Highlight the word or group of words and select the corresponding most appropriate label from the right.
  15. In the Instructions box, enter Your labeling will be used to train an ML model for predictions. Please think carefully on the most appropriate label for the word selection. Remember to label at least 200 annotations per label type.
  16. Choose Bold Italics.
  17. In the Labels section, enter the label names you want to display to your workforce.
  18. Choose Create.

Starting your labeling job

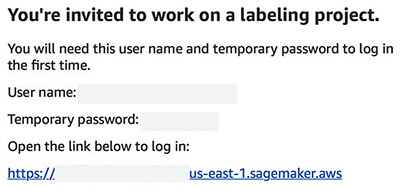
Your workforce (or you, if you chose yourself as your workforce) received an email with login instructions.

  1. Choose the URL provided and enter your user name and password.

You are directed to the labeling task UI.

  1. Complete the labeling task by choosing labels for groups of words.
  2. Choose Submit.
  3. After you label all the entries, the UI automatically exits.
  4. To check your job’s status, on the Amazon SageMaker console, under Ground Truth, choose Labeling jobs.
  5. Wait until the job status shows as Complete.

Verifying annotation outputs

To verify your annotation outputs, open your S3 bucket and locate <S3 Bucket Name>/output/<labeling-job-name>/manifests/output/output.manifest. You can review the manifest file that Ground Truth created. The following screenshot shows an example of the entries you see.

Training a custom entity model

We now use the annotated dataset or output.manifest Ground Truth created to train a custom entity recognizer. This section walks you through the steps in the notebook.

Processing the annotated dataset

You can provide labels for Amazon Comprehend custom entities through an entity list or annotations. In this post, we use annotations generated using Ground Truth labeling jobs. You need to convert the annotated output.manifest file to the following CSV format:

File, Line, Begin Offset, End Offset, Type
documents.txt, 0, 0, 11, VERSION

Run the following code in the notebook to generate the annotations.csv file:

# Read the output manifest json and convert into a csv format as expected by Amazon Comprehend Custom Entity Recognizer
import json
import csv

# this will be the file that will be written by the format conversion code block below
csvout = 'annotations.csv'

with open(csvout, 'w', encoding="utf-8") as nf:
    csv_writer = csv.writer(nf)
    csv_writer.writerow(["File", "Line", "Begin Offset", "End Offset", "Type"])
    with open("data/groundtruth/output.manifest", "r") as fr:
        for num, line in enumerate(fr.readlines()):
            lj = json.loads(line)
            #print(str(lj))
            if lj and labeling_job_name in lj:
                for ent in lj[labeling_job_name]['annotations']['entities']:
                    csv_writer.writerow([fntrain,num,ent['startOffset'],ent['endOffset'],ent['label'].upper()])
    fr.close()
nf.close()        

s3_annot_key = "output/" + labeling_job_name + "/comprehend/" + csvout

upload_to_s3(s3_annot_key, csvout)

The following screenshot shows the contents of the file.

Setting up a custom entity recognizer

This post uses the API, but you can optionally create the recognizer and batch analysis job on the Amazon Comprehend console. For instructions, see Build a custom entity recognizer using Amazon Comprehend.

  1. Enter the following code. For s3_train_channel, use the train.csv file you generated in preprocessing step for training the recognizer. For s3_annot_channel, use annotations.csv as a label to train your custom entity recognizer.
    custom_entity_request = {
    
          "Documents": { 
             "S3Uri": s3_train_channel
          },
          "Annotations": { 
             "S3Uri": s3_annot_channel
          },
          "EntityTypes": [
                    {
                        "Type": "SERVICE"
                    },
                    {
                        "Type": "VERSION"
                    }
          ]
    }

  2. Create the entity recognizer using CreateEntityRecognizer The entity recognizer is trained with the minimum required number of training samples to generate some low confidence predictions required for our Amazon A2I workflow. See the following code:
    import datetime
    
    id = str(datetime.datetime.now().strftime("%s"))
    create_custom_entity_response = comprehend.create_entity_recognizer(
            RecognizerName = prefix + "-CER", 
            DataAccessRoleArn = role,
            InputDataConfig = custom_entity_request,
            LanguageCode = "en"
    )
    

    When the entity recognizer job is complete, it creates a recognizer with a performance score. As mentioned earlier we trained the entity recognizer with a minimum number of training samples to generate low confidence predictions we need to trigger the Amazon A2I human loop. You can find these metrics on the Amazon Comprehend console. See the following screenshot.

  3. Create a batch entity detection analysis job to detect entities over a large number of documents.

Use the Amazon Comprehend StartEntitiesDetectionJob operation to detect custom entities in your documents. For instructions on creating an endpoint for real-time analysis using your custom entity recognizer, see Announcing the launch of Amazon Comprehend custom entity recognition real-time endpoints.

To use the EntityRecognizerArn for custom entity recognition, you must provide access to the recognizer to detect the custom entity. This ARN is supplied by the response to the CreateEntityRecognizer operation.

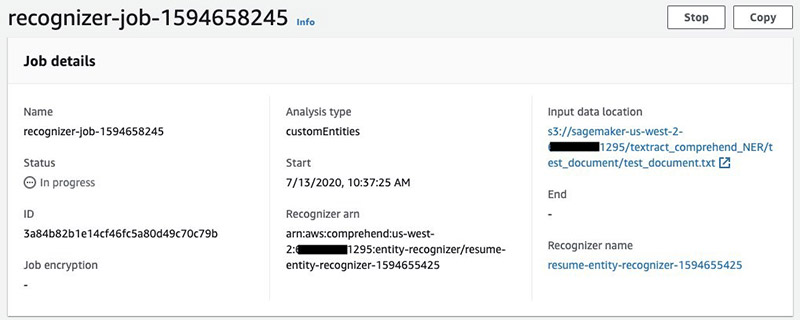
  1. Run the custom entity detection job to get predictions on the test dataset you created during the preprocessing step by running the following cell in the notebook:
    s3_test_channel = 's3://{}/{}'.format(BUCKET, s3_test_key) s3_output_test_data = 's3://{}/{}'.format(BUCKET, "output/testresults/") 
    test_response = comprehend.start_entities_detection_job(   InputDataConfig={ 
    'S3Uri': s3_test_channel, 
    'InputFormat': 'ONE_DOC_PER_LINE'
    }, 
    OutputDataConfig={'S3Uri': s3_output_test_data 
    }, 
    DataAccessRoleArn=role, 
    JobName='a2i-comprehend-gt-blog', 
    EntityRecognizerArn=jobArn, 
    LanguageCode='en')
    

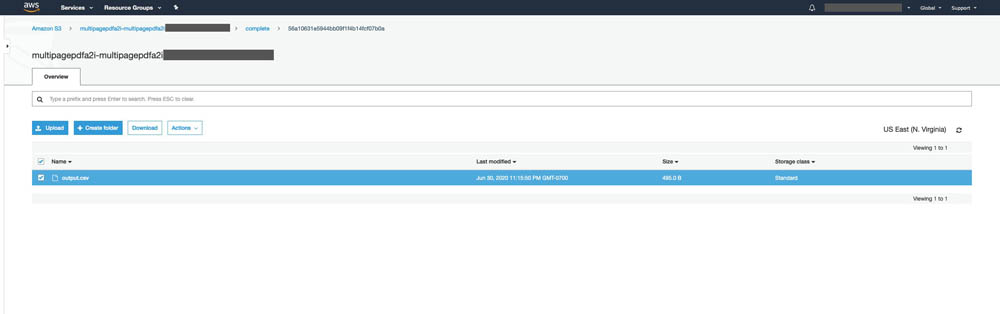
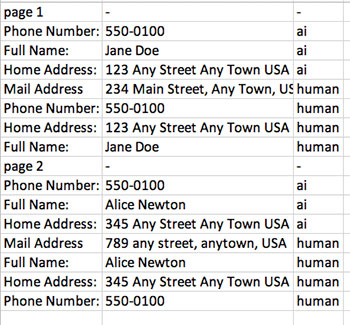
    The following screenshot shows the test results.

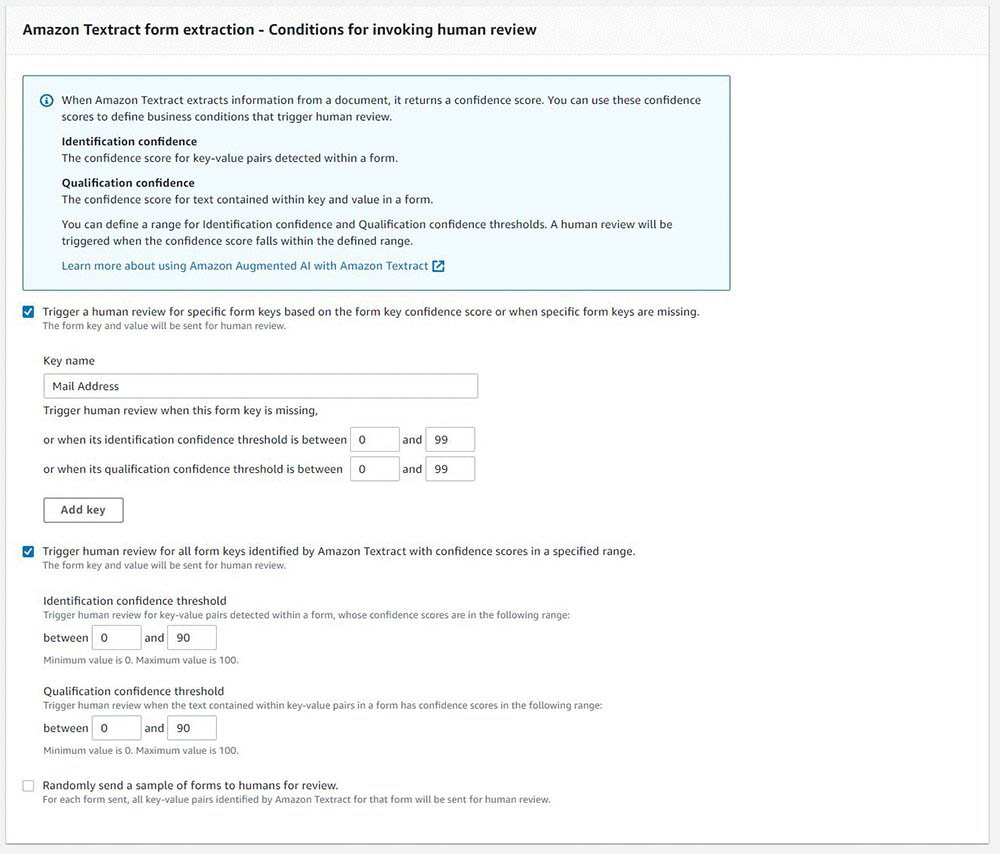
Setting up a human review loop

In this section, you set up a human review loop for low-confidence detections in Amazon A2I. It includes the following steps:

  1. Choose your workforce.
  2. Create a human task UI.
  3. Create a worker task template creator function.
  4. Create the flow definition.
  5. Check the human loop status and wait for reviewers to complete the task.

Choosing your workforce

For this post, we use the private workforce we created for the Ground Truth labeling jobs. Use the workforce ARN to set up the workforce for Amazon A2I.

Creating a human task UI

Create a human task UI resource with a UI template in liquid HTML. This template is used whenever a human loop is required.

The following example code is compatible with Amazon Comprehend entity detection:

template = """
<script src="https://assets.crowd.aws/crowd-html-elements.js"></script>

<style>
    .highlight {
        background-color: yellow;
    }
</style>

<crowd-entity-annotation
        name="crowd-entity-annotation"
        header="Highlight parts of the text below"
        labels="[{'label': 'service', 'fullDisplayName': 'Service'}, {'label': 'version', 'fullDisplayName': 'Version'}]"
        text="{{ task.input.originalText }}"
>
    <full-instructions header="Named entity recognition instructions">
        <ol>
            <li><strong>Read</strong> the text carefully.</li>
            <li><strong>Highlight</strong> words, phrases, or sections of the text.</li>
            <li><strong>Choose</strong> the label that best matches what you have highlighted.</li>
            <li>To <strong>change</strong> a label, choose highlighted text and select a new label.</li>
            <li>To <strong>remove</strong> a label from highlighted text, choose the X next to the abbreviated label name on the highlighted text.</li>
            <li>You can select all of a previously highlighted text, but not a portion of it.</li>
        </ol>
    </full-instructions>

    <short-instructions>
        Select the word or words in the displayed text corresponding to the entity, label it and click submit
    </short-instructions>

    <div id="recognizedEntities" style="margin-top: 20px">
                <h3>Label the Entity below in the text above</h3>
                <p>{{ task.input.entities }}</p>
    </div>
</crowd-entity-annotation>

<script>

    function highlight(text) {
        var inputText = document.getElementById("inputText");
        var innerHTML = inputText.innerHTML;
        var index = innerHTML.indexOf(text);
        if (index >= 0) {
            innerHTML = innerHTML.substring(0,index) + "<span class='highlight'>" + innerHTML.substring(index,index+text.length) + "</span>" + innerHTML.substring(index + text.length);
            inputText.innerHTML = innerHTML;
        }
    }

    document.addEventListener('all-crowd-elements-ready', () => {
        document
            .querySelector('crowd-entity-annotation')
            .shadowRoot
            .querySelector('crowd-form')
            .form
            .appendChild(recognizedEntities);
    });
</script>
"""

Creating a worker task template creator function

This function is a higher-level abstraction on the Amazon SageMaker package’s method to create the worker task template, which we use to create a human review workflow. See the following code:

def create_task_ui():
    '''
    Creates a Human Task UI resource.

    Returns:
    struct: HumanTaskUiArn
    '''
    response = sagemaker.create_human_task_ui(
        HumanTaskUiName=taskUIName,
        UiTemplate={'Content': template})
    return response
# Task UI name - this value is unique per account and region. You can also provide your own value here.
taskUIName = prefix + '-ui' 

# Create task UI
humanTaskUiResponse = create_task_ui()
humanTaskUiArn = humanTaskUiResponse['HumanTaskUiArn']
print(humanTaskUiArn)

Creating the flow definition

Flow definitions allow you to specify the following:

  • The workforce that your tasks are sent to
  • The instructions that your workforce receives

This post uses the API, but you can optionally create this workflow definition on the Amazon A2I console.

For more information, see Create a Flow Definition.

To set up the condition to trigger the human loop review, enter the following code (you can change the value of the CONFIDENCE_SCORE_THRESHOLD based on what confidence level you want to trigger the human review):

human_loops_started = []

import json

CONFIDENCE_SCORE_THRESHOLD = 90
for line in data:
    print("Line is: " + str(line))
    begin_offset=line['BEGIN_OFFSET']
    end_offset=line['END_OFFSET']
    if(line['CONFIDENCE_SCORE'] < CONFIDENCE_SCORE_THRESHOLD):
        humanLoopName = str(uuid.uuid4())
        human_loop_input = {}
        human_loop_input['labels'] = line['ENTITY']
        human_loop_input['entities']= line['ENTITY']
        human_loop_input['originalText'] = line['ORIGINAL_TEXT']
        start_loop_response = a2i_runtime_client.start_human_loop(
        HumanLoopName=humanLoopName,
        FlowDefinitionArn=flowDefinitionArn,
        HumanLoopInput={
                "InputContent": json.dumps(human_loop_input)
            }
        )
        print(human_loop_input)
        human_loops_started.append(humanLoopName)
        print(f'Score is less than the threshold of {CONFIDENCE_SCORE_THRESHOLD}')
        print(f'Starting human loop with name: {humanLoopName}  n')
    else:
         print('No human loop created. n')

Checking the human loop status and waiting for reviewers to complete the task

To define a function that allows you to check the human loop’s status, enter the following code:

completed_human_loops = []
for human_loop_name in human_loops_started:
    resp = a2i_runtime_client.describe_human_loop(HumanLoopName=human_loop_name)
    print(f'HumanLoop Name: {human_loop_name}')
    print(f'HumanLoop Status: {resp["HumanLoopStatus"]}')
    print(f'HumanLoop Output Destination: {resp["HumanLoopOutput"]}')
    print('n')
    
    if resp["HumanLoopStatus"] == "Completed":
        completed_human_loops.append(resp)

Navigate to the private workforce portal that’s provided as the output of cell 2 from the previous step in the notebook. See the following code:

workteamName = WORKTEAM_ARN[WORKTEAM_ARN.rfind('/') + 1:]
print("Navigate to the private worker portal and do the tasks. Make sure you've invited yourself to your workteam!")
print('https://' + sagemaker.describe_workteam(WorkteamName=workteamName)['Workteam']['SubDomain'])

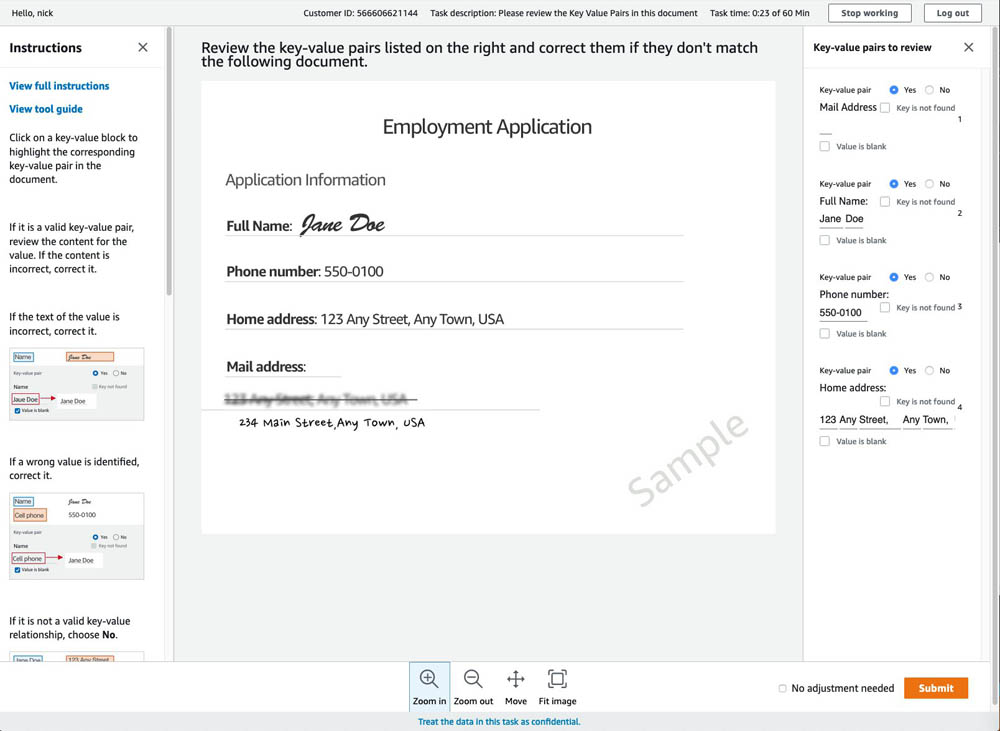
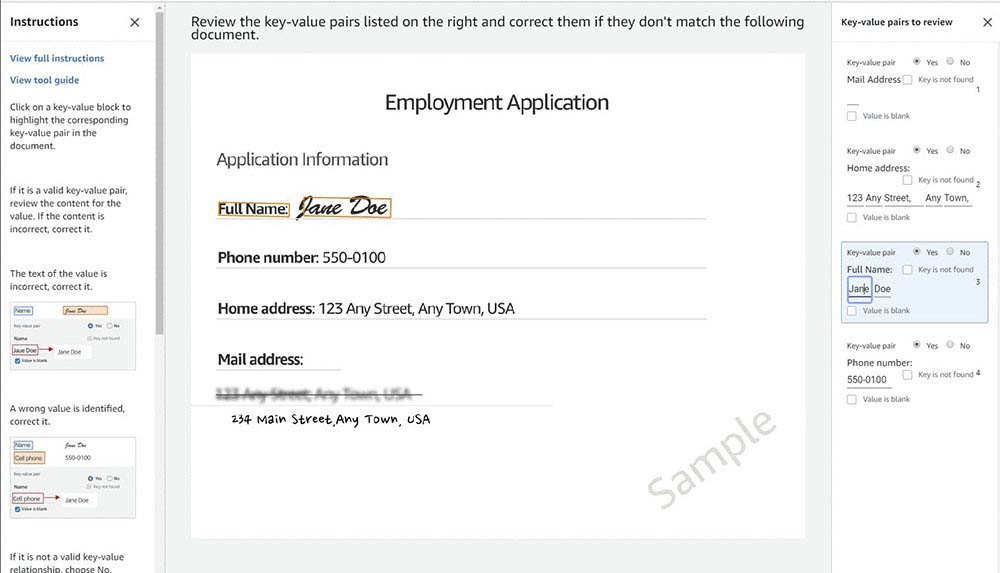
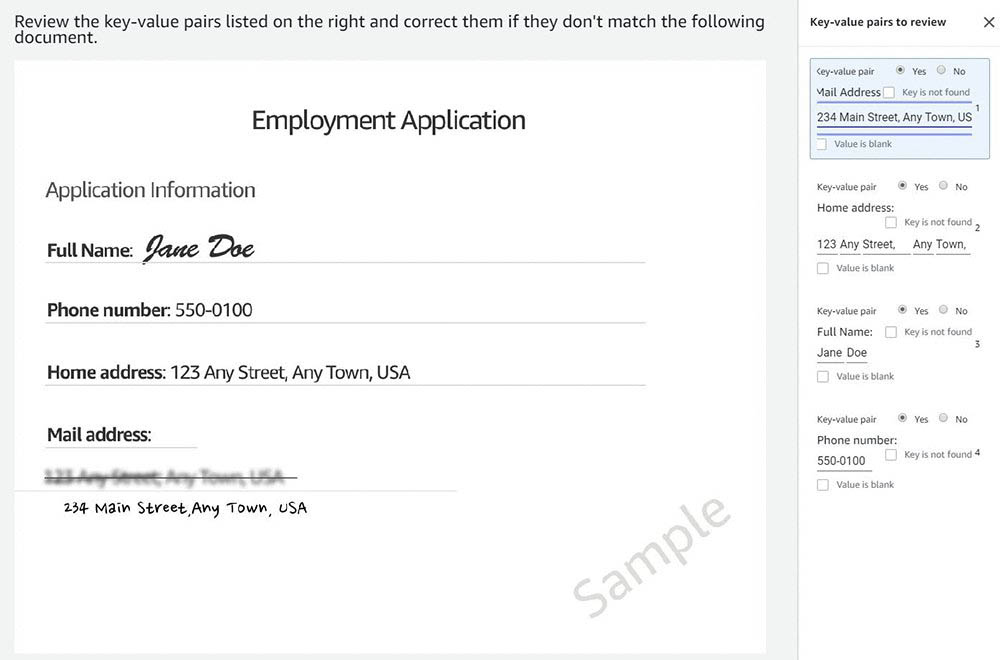
The UI template is similar to the Ground Truth NER labeling feature. Amazon A2I displays the entity identified from the input text (this is a low-confidence prediction). The human worker can then update or validate the entity labeling as required and choose Submit.

This action generates an updated annotation with offsets and entities as highlighted by the human reviewer.

Cleaning up

To avoid incurring future charges, stop and delete resources such as the Amazon SageMaker notebook instance, Amazon Comprehend custom entity recognizer, and the model artifacts in Amazon S3 when not in use.

Conclusion

This post demonstrated how to create annotations for an Amazon Comprehend custom entity recognition using Ground Truth NER. We used Amazon A2I to augment the low-confidence predictions from Amazon Comprehend.

You can use the annotations that Amazon A2I generated to update the annotations file you created and incrementally train the custom recognizer to improve the model’s accuracy.

For video presentations, sample Jupyter notebooks, or more information about use cases like document processing, content moderation, sentiment analysis, text translation, and more, see Amazon Augmented AI Resources. We’re interested in how you want to extend this solution for your use case and welcome your feedback.


About the Authors

Mona Mona is an AI/ML Specialist Solutions Architect based out of Arlington, VA. She works with World Wide Public Sector team and helps customers adopt machine learning on a large scale. She is passionate about NLP and ML Explainability areas in AI/ML.


Prem Ranga is an Enterprise Solutions Architect based out of Houston, Texas. He is part of the Machine Learning Technical Field Community and loves working with customers on their ML and AI journey. Prem is passionate about robotics, is an Autonomous Vehicles researcher, and also built the Alexa-controlled Beer Pours in Houston and other locations.


Read More

Extracting custom entities from documents with Amazon Textract and Amazon Comprehend

Extracting custom entities from documents with Amazon Textract and Amazon Comprehend

Amazon Textract is a machine learning (ML) service that makes it easy to extract text and data from scanned documents. Textract goes beyond simple optical character recognition (OCR) to identify the contents of fields in forms and information stored in tables. This allows you to use Amazon Textract to instantly “read” virtually any type of document and accurately extract text and data without needing any manual effort or custom code.

Amazon Textract has multiple applications in a variety of fields. For example, talent management companies can use Amazon Textract to automate the process of extracting a candidate’s skill set. Healthcare organizations can extract patient information from documents to fulfill medical claims.

When your organization processes a variety of documents, you sometimes need to extract entities from unstructured text in the documents. A contract document, for example, can have paragraphs of text where names and other contract terms are listed in the paragraph of text instead of as a key/value or form structure. Amazon Comprehend is a natural language processing (NLP) service that can extract key phrases, places, names, organizations, events, sentiment from unstructured text, and more. With custom entity recognition, you can to identify new entity types not supported as one of the preset generic entity types. This allows you to extract business-specific entities to address your needs.

In this post, we show how to extract custom entities from scanned documents using Amazon Textract and Amazon Comprehend.

Use case overview

For this post, we process resume documents from the Resume Entities for NER dataset to get insights such as candidates’ skills by automating this workflow. We use Amazon Textract to extract text from these resumes and Amazon Comprehend custom entity recognition to detect skills such as AWS, C, and C++ as custom entities. The following screenshot shows a sample input document.

The following screenshot shows the corresponding output generated using Amazon Textract and Amazon Comprehend.

Solution overview

The following diagram shows a serverless architecture that processes incoming documents for custom entity extraction using Amazon Textract and custom model trained using Amazon Comprehend. As documents are uploaded to an Amazon Simple Storage Service (Amazon S3) bucket, it triggers an AWS Lambda function. The function calls the Amazon Textract DetectDocumentText API to extract the text and calls Amazon Comprehend with the extracted text to detect custom entities.

The solution consists of two parts:

  1. Training:
    1. Extract text from PDF documents using Amazon Textract
    2. Label the resulting data using Amazon SageMaker Ground Truth
    3. Train custom entity recognition using Amazon Comprehend with the labeled data
  2. Inference:
    1. Send the document to Amazon Textract for data extraction
    2. Send the extracted data to the Amazon Comprehend custom model for entity extraction

Launching your AWS CloudFormation stack

For this post, we use an AWS CloudFormation stack to deploy the solution and create the resources it needs. These resources include an S3 bucket, Amazon SageMaker instance, and the necessary AWS Identity and Access Management (IAM) roles. For more information about stacks, see Walkthrough: Updating a stack.

  1. Download the following CloudFormation template and save to your local disk.
  2. Sign in to the AWS Management Console with your IAM user name and password.
  3. On the AWS CloudFormation console, choose Create Stack.

Alternatively, you can choose Launch Stack directly.

  1. On the Create Stack page, choose Upload a template file and upload the CloudFormation template you downloaded.
  2. Choose Next.
  3. On the next page, enter a name for the stack.
  4. Leave everything else at their default setting.
  5. On the Review page, select I acknowledge that AWS CloudFormation might create IAM resources with custom names.
  6. Choose Create stack.
  7. Wait for the stack to finish running.

You can examine various events from the stack creation process on the Events tab. After the stack creation is complete, look at the Resources tab to see all the resources the template created.

  1. On the Outputs tab of the CloudFormation stack, record the Amazon SageMaker instance URL.

Running the workflow on a Jupyter notebook

To run your workflow, complete the following steps:

  1. Open the Amazon SageMaker instance URL that you saved from the previous step.
  2. Under the New drop-down menu, choose Terminal.
  3. On the terminal, clone the GitHub cd Sagemaker; git clone URL.

You can check the folder structure (see the following screenshot).

  1. Open Textract_Comprehend_Custom_Entity_Recognition.ipynb.
  2. Run the cells.

Code walkthrough

Upload the documents to your S3 bucket.

The PDFs are now ready for Amazon Textract to perform OCR. Start the process with a StartDocumentTextDetection asynchronous API call.

For this post, we process two resumes in PDF format for demonstration, but you can process all 220 if needed. The results have all been processed and are ready for you to use.

Because we need to train a custom entity recognition model with Amazon Comprehend (as with any ML model), we need training data. In this post, we use Ground Truth to label our entities. By default, Amazon Comprehend can recognize entities like person, title, and organization. For more information, see Detect Entities. To demonstrate custom entity recognition capability, we focus on candidate skills as entities inside these resumes. We have the labeled data from Ground Truth. The data is available in the GitHub repo <(see: entity_list.csv)>. For instructions on labeling your data, see Developing NER models with Amazon SageMaker Ground Truth and Amazon Comprehend.

Now we have our raw and labeled data and are ready to train our model. To start the process, use the create_entity_recognizer API call. When the training job is submitted, you can see the recognizer being trained on the Amazon Comprehend console.

In the training, Amazon Comprehend sets aside some data for testing. When the recognizer is trained, you can see the performance of each entity and the recognizer overall.

We have prepared a small sample of text to test out the newly trained custom entity recognizer. We run the same step to perform OCR, then upload the Amazon Textract output to Amazon S3 and start a custom recognizer job.

When the job is submitted, you can see the progress on the Amazon Comprehend console under Analysis Jobs.

When the analysis job is complete, you can download the output and see the results. For this post, we converted the JSON result into table format for readability.

Conclusion

ML and artificial intelligence allow organizations to be agile. It can automate manual tasks to improve efficiency. In this post, we demonstrated an end-to-end architecture for extracting entities such as a candidate’s skills on their resume by using Amazon Textract and Amazon Comprehend. This post showed you how to use Amazon Textract to do data extraction and use Amazon Comprehend to train a custom entity recognizer from your own dataset and recognize custom entities. You can apply this process to a variety of industries, such as healthcare and financial services.

To learn more about different text and data extraction features of Amazon Textract, see How Amazon Textract Works.


About the Authors

Yuan Jiang is a Solution Architect with a focus on machine learning. He is a member of the Amazon Computer Vision Hero program.


Sonali Sahu is a Solution Architect and a member of Amazon Machine Learning Technical Field Community. She is also a member of the Amazon Computer Vision Hero program.


Kashif Imran is a Principal Solution Architect and the leader of Amazon Computer Vision Hero program.


Read More