From pandemic shutdowns to geopolitical tensions, recent years have thrown our global supply chains into unexpected chaos. This turbulent period has taught both governments and organizations a crucial lesson: supply chain excellence depends not just on efficiency but on the ability to navigate disruptions through strategic risk management. By leveraging the generative AI capabilities and tooling of Amazon Bedrock, you can create an intelligent nerve center that connects diverse data sources, converts data into actionable insights, and creates a comprehensive plan to mitigate supply chain risks.
Amazon Bedrock is a fully managed service that enables the development and deployment of generative AI applications using high-performance foundation models (FMs) from leading AI companies through a single API.
Amazon Bedrock Flows affords you the ability to use supported FMs to build workflows by linking prompts, FMs, data sources, and other Amazon Web Services (AWS) services to create end-to-end solutions. Its visual workflow builder and serverless infrastructure enables organizations to accelerate the development and deployment of AI-powered supply chain solutions, improving agility and resilience in the face of evolving challenges. The drag and drop capability of Amazon Bedrock Flows efficiently integrates with Amazon Bedrock Knowledge Bases, Amazon Bedrock Agents and other ever-growing AWS services such as Amazon Simple Storage Service (Amazon S3), AWS Lambda and Amazon Lex.
This post walks through how Amazon Bedrock Flows connects your business systems, monitors medical device shortages, and provides mitigation strategies based on knowledge from Amazon Bedrock Knowledge Bases or data stored in Amazon S3 directly. You’ll learn how to create a system that stays ahead of supply chain risks.
Business workflow
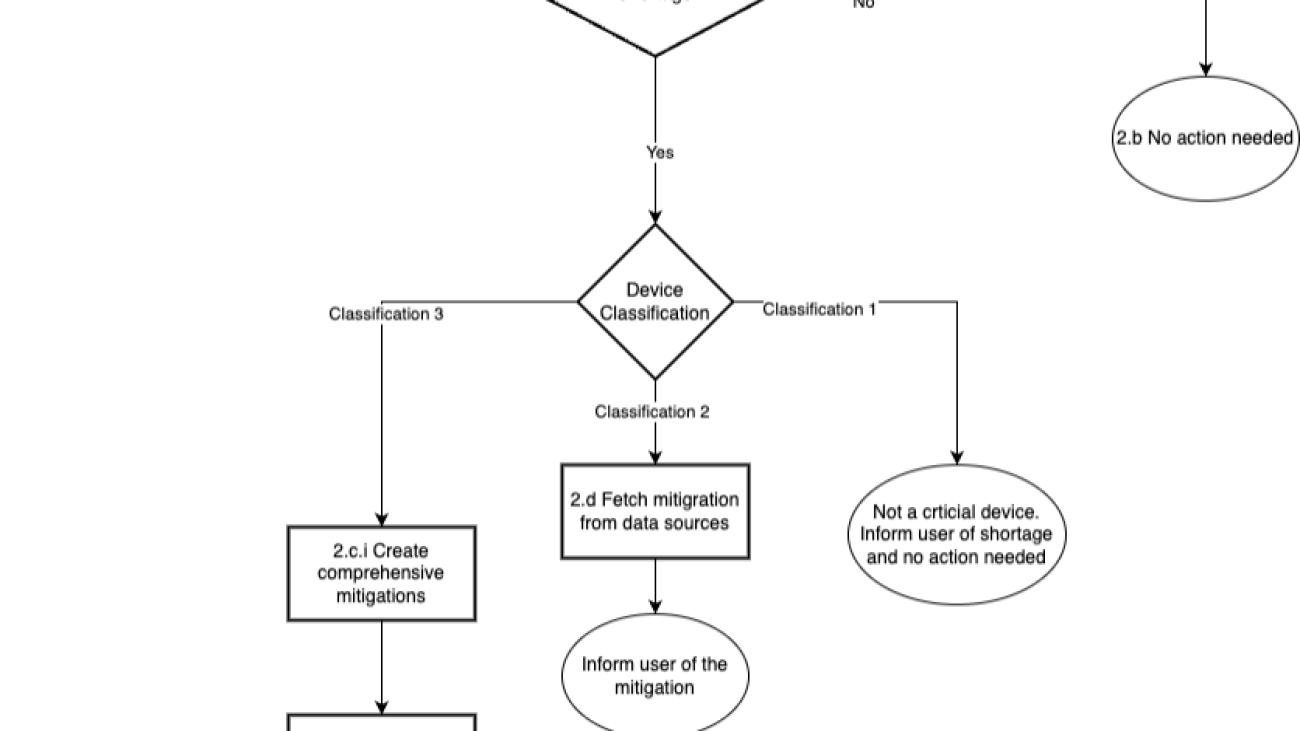
The following is the supply chain business workflow implemented as an Amazon Bedrock flow.

The following are the steps of the workflow in detail:
- The JSON request with the medical device name is submitted to the prompt flow.
- The workflow determines if the medical device needs review by following these steps:
-
- The assistant invokes a Lambda function to check the device classification and any shortages.
- If there is no shortage, the workflow informs the user that no action is required.
- If the device classification is 3 (high-risk medical devices that are essential for sustaining life or health) and there is a shortage, the assistant determines the necessary mitigation steps Devices with classification 3 are treated as high-risk devices and require a comprehensive mitigation strategy. The following steps are followed in this scenario.
- Amazon Bedrock Knowledge Bases RetrieveAndGenerate API creates a comprehensive strategy.
- The flow emails the mitigation to the given email address.
- If the device classification is 2 (medium-risk medical devices that can pose harm to patients) and there is a shortage, the flow lists the mitigation steps as output. Classification device 2 doesn’t require a comprehensive mitigation strategy. We recommend to use these when the information retrieved fits the context size of the model. Mitigation is fetched from Amazon S3 directly.
- If the device classification is 1(low-risk devices that don’t pose significant risk to patients) and there is a shortage, the flow outputs only the details of the shortage because no action is required.
Solution overview
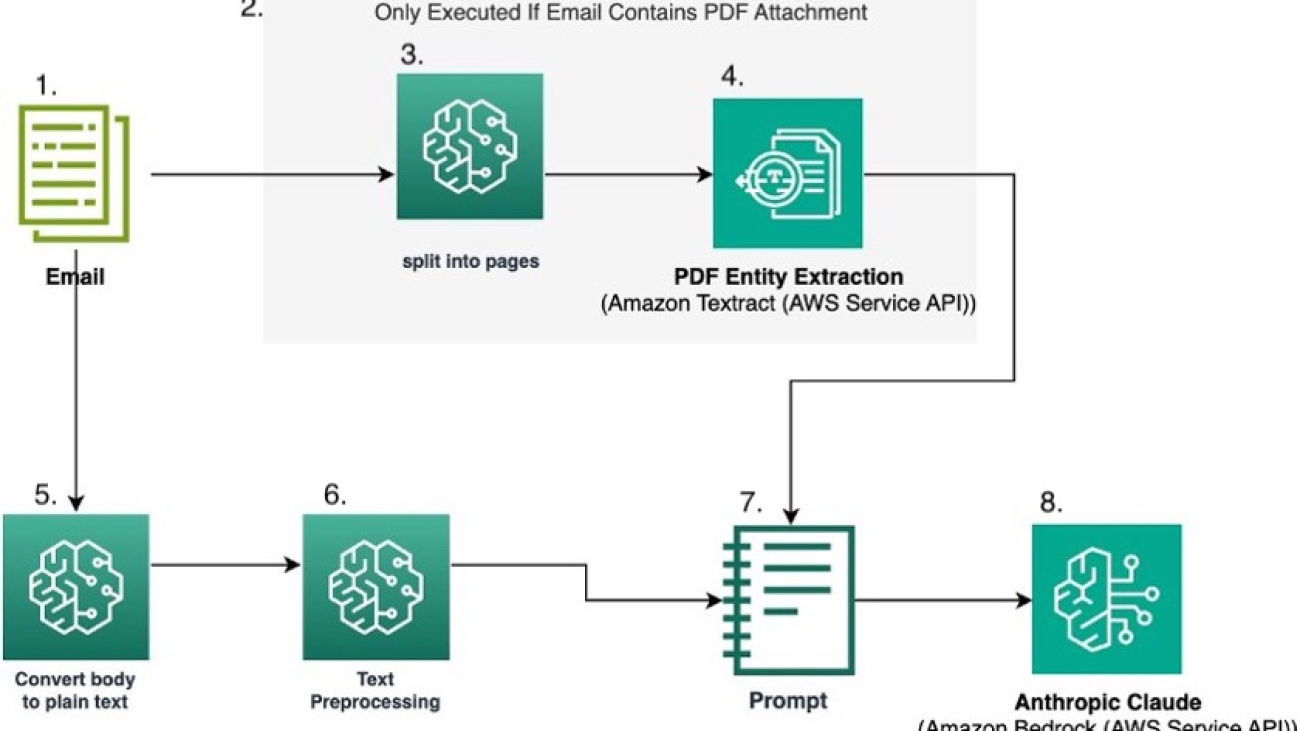
The following diagram illustrates the solution architecture. The solution uses Amazon Bedrock Flows to orchestrate the generative AI workflow. An Amazon Bedrock flow consists of nodes, which is a step in the flow and connections to connect to various data sources or to execute various conditions.

The system workflow includes the following steps:
- The user interacts with generative AI applications, which connect with Amazon Bedrock Flows. The user provides information about the device.
- A workflow in Amazon Bedrock Flows is a construct consisting of a name, description, permissions, a collection of nodes, and connections between nodes.
- A Lambda function node in Amazon Bedrock Flows is used to invoke AWS Lambda to get supply shortage and device classifications. AWS Lambda calculates this information based on the data from Amazon DynamoDB.
- If the device classification is 3, the flow queries the knowledge base node to find mitigations and create a comprehensive plan. Amazon Bedrock Guardrails can be applied in a knowledge base node.
- A Lambda function node in Amazon Bedrock Flows invokes another Lambda function to email the mitigation plan to the users. AWS Lambda uses Amazon Simple Email Service (Amazon SES) SDK to send emails to verified identities.
- Lambda functions are within the private subnet of Amazon Virtual Private Cloud (Amazon VPC) and provide least privilege access to the services using roles and permissions policies. AWS Lambda uses gateway endpoints or NAT gateways to connect to Amazon DynamoDB or Amazon SES, respectively
- If the device classification is 2, the flow queries Amazon S3 to fetch the mitigation. In this case, comprehensive mitigation isn’t needed, and it can fit in the model context. This reduces overall cost and simplifies maintenance.
Prerequisites
The following prerequisites need to be completed before you can build the solution.
- Have an AWS account.
- Have an Amazon VPC with private subnet and public subnet and egress internet access.
- This solution is supported only in US East (N. Virginia) us-east-1 AWS Region. You can make the necessary changes to your AWS CloudFormation template to deploy to other Regions.
- Have permission to create Lambda functions and configure AWS Identity and Access Management (IAM)
- Have permissions to create Amazon Bedrock prompts.
- Sign up for model access on the Amazon Bedrock console (for more information, refer to model access in the Amazon Bedrock documentation). For information about pricing for using Amazon Bedrock, refer to Amazon Bedrock pricing. For this post, we use Anthropic’s Claude 3.5 Sonnet, and all instructions pertain to that model.
- Enable AWS CloudTrail logging for operational and risk auditing.
- Enable budget policy notification to protect the customer from unwanted billing.
Deployment with AWS CloudFormation console
In this step, you deploy the CloudFormation template.
- Navigate to the CloudFormation console us-east-1
- Download the CloudFormation template and upload it in the Specify template Choose Next.
- Enter a name with the following details, as shown in the following screenshot:
- Stack name
- Fromemailaddress
- Toemailaddress
- VPCId
- VPCCecurityGroupIds
- VPCSubnets

- Keep the other values as default. Under Capabilities on the last page, select I acknowledge that AWS CloudFormation might create IAM resources. Choose Submit to create the CloudFormation stack.
- After the successful deployment of the whole stack, from the Resources tab, make a note of the following output key values. You’ll need them later.
- BedrockKBQDataSourceBucket
- Device2MitigationsBucket
- KMSKey

This is a sample code for nonproduction use. You should work with your security and legal teams to align with your organizational security, regulatory, and compliance requirements before deployment.
Upload mitigation documents to Amazon S3
In this step, you upload the mitigation documents to Amazon S3.
- Download the device 2 mitigation strategy documents
- On the Amazon S3 console, search for the Device2MitigationsBucket captured earlier
- Upload the downloaded file to the bucket
- Download the device 3 mitigation strategy documents
- On the Amazon S3 console, search for the BedrockKBQDataSourceBucket captured earlier
- Upload these documents to the S3 bucket
Configure Amazon Bedrock Knowledge Bases
In this section, you create an Amazon Bedrock knowledge base and sync it.
- Create a knowledge base in Amazon Bedrock Knowledge Bases with BedrockKBQDataSourceBucket as a data source.
- Add an inline policy to the service role for Amazon Bedrock Knowledge Bases to decrypt the AWS Key Management Service (AWS KMS) key.
- Sync the data with the knowledge base.
Create an Amazon Bedrock workflow
In this section, you create a workflow in Amazon Bedrock Flows.
- On the Amazon Bedrock console, select Amazon Bedrock Flows from the left navigation pane. Choose Create flow to create a flow, as shown in the following screenshot.

- Enter a Name for the flow and an optional Description.
- For the Service role name, choose Create and use a new service role to create a service role for you to use.
- Choose Create, as shown in the following screenshot. Your flow is created, and you’ll be taken to the flow builder where you can build your flow.

Amazon Bedrock Flow configurations
This section walks through the process of creating the flow. Using Amazon Bedrock Flows, you can quickly build complex generative AI workflows using a visual flow builder. The following steps walk through configuring different components of the business process.
- On the Amazon Bedrock console, select Flows from the left navigation pane.
- Choose a flow in the Amazon Bedrock Flows
- Choose Edit in flow builder.
- In the Flow builder section, the center pane displays a Flow input node and a Flow output These are the input and output nodes for your flow.

- Select the Flow Input
- In Configure in the left-hand menu, change the Type of the Output to Object, as shown in the following screenshot.

- In the Flow builder pane, select Nodes.
Add prompt node to process the incoming data
A prompt node defines a prompt to use in the flow. You use this node to refine the input for Lambda processing.
- Drag the Prompts node and drop it in the center pane.

- Select the node you just added.
- In the Configure section of the Flow builder pane, choose Define in node.
- Define the following values:
- Choose Select model and Anthropic Claude 3 Sonnet.
- In the Message section add the following prompt:
Given a supply chain issue description enclosed in description tag <desc> </desc>, classify the device and problem type. Respond only with a JSON object in the following format: { "device": "<device_name>", "problem_type": "<problem_type>" } Device types include but are not limited to: Oxygen Mask Ventilator Hospital Bed Surgical Gloves Defibrillator pacemaker Problem types include but are not limited to: scarcity malfunction quality_issue If an unknown device type is provided respond with unknown for any of the fields <desc> {{description}}</desc>
- In the Input section, change the Expression of the input variable description to the following, as shown in the following screenshot:
$.data.description
- The circles on the nodes are connection points. To connect the Prompt node to the input node, drag a line from the circle on the Flow input node to the circle in the Input section of the Prompt
- Delete the connection between the Flow Input node and the Flow Output node by double clicking on it. The following video illustrates steps 6 and 7.

Add Lambda node to fetch classifications from database
A Lambda node lets you call a Lambda function in which you can define code to carry out business logic. This solution uses a Lambda node to fetch the shortage information, classification of the device, Amazon S3 object key, and instructions for retrieving information from the knowledge base.
- Add the Lambda node by dragging to the center.
- From configuration of the node, choose the Lambda function with the name containing SupplyChainMgmt from the dropdown menu, as shown in the following screenshot.

- Update the Output type as Object, as shown in the following screenshot.

- Connect the Lambda node input to the Prompt node output.
Add condition node to determine the need for mitigation
A condition node sends data from the previous node to different nodes, depending on the conditions that are defined. A condition node can take multiple inputs. This node determines if there is a shortage and follows the appropriate path.
- Add the Condition node by dragging it to the center.

- From configuration of the Condition node, in the Input section, update the first input with the following details:
-
- Name: classification
- Type: Number
- Expression:
$.data.classification
- Choose Add input to add the new input with the following details:
- Name: shortage
- Type: Number
- Expression:
$.data.shortage
- Connect the output of the Lambda node to the two inputs of the Condition

- From configuration of the Condition node, in the Conditions section, add the following details:
- Name: Device2Condition
- Condition: (classification == 2) and (shortage >10)
- Choose Add condition and enter the following details:
- Name: Device3Condition
- Condition: (classification == 3) and (shortage >10)

- Connect the circle from If all conditions are false to input of default Flow output
- Connect output of Lambda node to default Flow output input node.

- In the configurations of the default Flow output node, update the expression to the following:
$.data.message
Fetch mitigation using the S3 Retrieval Node
An S3 retrieval node lets you retrieve data from an Amazon S3 location to introduce to the flow. This node will retrieve mitigations directly from Amazon S3 for type 2 devices.
- Add an S3 Retrieval node by dragging it to the center.
- In the configurations of the node, choose the newly created S3 bucket with a name containing device2mitigationsbucket.
- Update the Expression of the input to the following:
$.data.S3instruction
- Connect the circle from the Device2Condition condition of the Condition node to the S3 Retrieval.
- Connect the output of the Lambda node to the input of the S3 Retrieval.

- Add the Flow output node by dragging it to the center.
- In the configuration of the node, give the node the name
- Connect the output of the S3 Retrieval node to S3Output node.

Fetch mitigations using the Knowledge Base Node
A Knowledge Base node lets you send a query to a knowledge base from Amazon Bedrock Knowledge Bases. This node will fetch a comprehensive mitigation strategy from Amazon Bedrock Knowledge Bases for type 3 devices.
- Add the Knowledge Base node by dragging it to the center.
- From the configuration of the Knowledge Base node, select the knowledge base created earlier.
- Select Generate responses based on retrieved results and select Claude 3 Sonnet from the dropdown menu of Select model.

- In the Input section, update the input expression as the following:
- Expression:
$.data.retrievalQuery
- Expression:

- Connect the circle from the Device3Condition condition of the Condition node to the Knowledge base
- Connect the output of the Knowledge base node to the Lambda node input with the name codeHookInput.
- Add the Flow output node by dragging it to the center.
- In the configuration of the node, give the Node name KBOutput.
- Connect the output of the Knowledge Base node to KBOutput node

- Add the Lambda node by dragging it to the center.
- From the configuration of the node, choose the Lambda function with the name containing EmailReviewersFunction from the dropdown menu.

- Choose Add input to add the new input with the following details:
- Name: email
- Type: String
- Expression:
$.data.email
- Change output Type to Object.

- Connect the output of the Knowledge base to the new Lambda node input with the name codeHookInput.
- Connect the output of the Flow input node to the new Lambda node input with the name email.
- Add the Flow output node by dragging it to the center.
- In the configuration of the node, give the Node name
- In the configurations of the emailOutput Flow output node, update the expression to the following:
$.data.message
- Connect the output of the Lambda node node to emailOutput Flow Output node
- Choose Save to save the flow.
Testing
To test the agent, use the Amazon Bedrock flow builder console. You can embed the API calls into your applications.
- In the test window of the newly created flow, give the following prompt by replacing the “To email address” with Toemail provided in the CloudFormation template.
{"description": "Cochlear implants are in shortage ","retrievalQuery":"find the mitigation for device shortage", "email": "<To email address>"}
- SupplyChainManagement Lambda randomly generates shortages. If a shortage is detected, you’ll see an answer from Amazon Bedrock Knowledge Bases.
- An email is also sent to the email address provided in the context.

- Test the solution for classification 2 devices by giving the following prompt. Replace the To email address with Toemail provided in the CloudFormation template.
{"description": " oxygen mask are in shortage ","retrievalQuery":"find the mitigation for device shortage", "email": "<To email address>"}
- The flow will fetch the results from Amazon S3 directly.

Clean up
To avoid incurring future charges, delete the resources you created. To clean up the AWS environment, use the following steps:
- Empty the contents of the S3 bucket you created as part of the CloudFormation stack.
- Delete the flow from Amazon Bedrock.
- Delete the Amazon Bedrock knowledge base.
- Delete the CloudFormation stack you created.
Conclusion
As we navigate an increasingly unpredictable global business landscape, the ability to anticipate and respond to supply chain disruptions isn’t just a competitive advantage—it’s a necessity for survival. The Amazon Bedrock suite of generative AI–powered tools offers organizations the capability to transform their supply chain management from reactive to proactive, from fragmented to integrated, and from rigid to resilient.
By implementing the solutions outlined in this guide, organizations can:
- Build automated, intelligent monitoring systems
- Create predictive risk management frameworks
- Use AI-driven insights for faster decision-making
- Develop adaptive supply chain strategies that evolve with emerging challenges
Stay up to date with the latest advancements in generative AI and start building on AWS. If you’re seeking assistance on how to begin, check out the Generative AI Innovation Center.
About the Authors
 Marcelo Silva is a Principal Product Manager at Amazon Web Services, leading strategy and growth for Amazon Bedrock Knowledge Bases and Amazon Lex.
 Sujatha Dantuluri is a Senior Solutions Architect in the US federal civilian team at AWS. Her expertise lies in architecting mission-critical solutions and working closely with customers to ensure their success. Sujatha is an accomplished public speaker, frequently sharing her insights and knowledge at industry events and conferences.
 Ishan Gupta is a Software Engineer at Amazon Bedrock, where he focuses on developing cutting-edge generative AI applications. His interests lie in exploring the potential of large language models and creating innovative solutions that leverage the power of AI.

 Jordan Knight is a Senior Data Scientist working for Travelers in the Business Insurance Analytics & Research Department. His passion is for solving challenging real-world computer vision problems and exploring new state-of-the-art methods to do so. He has a particular interest in the social impact of ML models and how we can continue to improve modeling processes to develop ML solutions that are equitable for all. In his free time you can find him either rock climbing, hiking, or continuing to develop his somewhat rudimentary cooking skills.
 Sara Reynolds is a Product Owner at Travelers. As a member of the Enterprise AI team, she has advanced efforts to transform processing within Operations using AI and cloud-based technologies. She recently earned her MBA and PhD in Learning Technologies and is serving as an Adjunct Professor at the University of North Texas.
 George Lee is AVP, Data Science & Generative AI Lead for International at Travelers Insurance. He specializes in developing enterprise AI solutions, with expertise in Generative AI and Large Language Models. George has led several successful AI initiatives and holds two patents in AI-powered risk assessment. He received his Master’s in Computer Science from the University of Illinois at Urbana-Champaign.
 Francisco Calderon is a Data Scientist at the Generative AI Innovation Center (GAIIC). As a member of the GAIIC, he helps discover the art of the possible with AWS customers using generative AI technologies. In his spare time, Francisco likes playing music and guitar, playing soccer with his daughters, and enjoying time with his family.
 Isaac Privitera is a Principal Data Scientist with the AWS Generative AI Innovation Center, where he develops bespoke generative AI-based solutions to address customers’ business problems. His primary focus lies in building responsible AI systems, using techniques such as RAG, multi-agent systems, and model fine-tuning. When not immersed in the world of AI, Isaac can be found on the golf course, enjoying a football game, or hiking trails with his loyal canine companion, Barry.


 Pierre de Malliard is a Senior AI/ML Solutions Architect at Amazon Web Services and supports customers in the healthcare and life sciences industry. In his free time, Pierre enjoys skiing and exploring the New York food scene.
 Christopher is a senior partner account manager at Amazon Web Services (AWS), helping independent software vendors (ISVs) innovate, build, and co-sell cloud-based healthcare software-as-a-service (SaaS) solutions in public sector. Part of the Healthcare and Life Sciences Technical Field Community (TFC), Christopher aims to accelerate the digitization and utilization of healthcare data to drive improved outcomes and personalized care delivery.


 Vivek Gangasani is a Lead Specialist Solutions Architect for Inference at AWS. He helps emerging generative AI companies build innovative solutions using AWS services and accelerated compute. Currently, he is focused on developing strategies for fine-tuning and optimizing the inference performance of large language models. In his free time, Vivek enjoys hiking, watching movies, and trying different cuisines.
 Niithiyn Vijeaswaran is a Generative AI Specialist Solutions Architect with the Third-Party Model Science team at AWS. His area of focus is AWS AI accelerators (AWS Neuron). He holds a Bachelor’s degree in Computer Science and Bioinformatics.
 Jonathan Evans is a Specialist Solutions Architect working on generative AI with the Third-Party Model Science team at AWS.
 Banu Nagasundaram leads product, engineering, and strategic partnerships for Amazon SageMaker JumpStart, SageMaker’s machine learning and generative AI hub. She is passionate about building solutions that help customers accelerate their AI journey and unlock business value.


 Carolyn Vigil is a Global Lead for AWS Social Responsibility & Impact Customer Engagement. She drives strategic initiatives that leverage cloud computing for social impact worldwide. A passionate advocate for underserved communities, she has co-founded two non-profit organizations serving individuals with developmental disabilities and their families. Carolyn enjoys Mountain adventures with her family and friends in her free time.
 Lauren Hollis is a Program Manager for AWS Social Responsibility and Impact. She leverages her background in economics, healthcare research, and technology to support mission-driven organizations deliver social impact using AWS cloud technology. In her free time, Lauren enjoys reading an playing the piano and cello.
 Ben West is a hands-on builder with experience in machine learning, big data analytics, and full-stack software development. As a technical program manager on the AWS Social Responsibility & Impact team, Ben leverages a wide variety of cloud, edge, and Internet of Things (IoT) technologies to develop innovative prototypes and help public sector organizations make a positive impact in the world. Ben is an Army Veteran that enjoys cooking and being outdoors.
 Mike Haggerty is a Senior Systems Development Engineer (Sr. SysDE) at Amazon Web Services (AWS), working within the PACE-EDGE team. In this role, he contributes to AWS’s edge computing initiatives as part of the Worldwide Public Sector (WWPS) organization’s PACE (Prototyping and Customer Engineering) team. Beyond his professional duties, Mike is a pet therapy volunteer who, together with his dog Gnocchi, provides support services at local community facilities.


 Javier Beltrán is a Senior Machine Learning Engineer at Aetion. His career has focused on natural language processing, and he has experience applying machine learning solutions to various domains, from healthcare to social media.
 Ornela Xhelili is a Staff Machine Learning Architect at Aetion. Ornela specializes in natural language processing, predictive analytics, and MLOps, and holds a Master’s of Science in Statistics. Ornela has spent the past 8 years building AI/ML products for tech startups across various domains, including healthcare, finance, analytics, and ecommerce.
 Prasidh Chhabri is a Product Manager at Aetion, leading the Aetion Evidence Platform, core analytics, and AI/ML capabilities. He has extensive experience building quantitative and statistical methods to solve problems in human health.
 Mikhail Vaynshteyn is a Solutions Architect with Amazon Web Services. Mikhail works with healthcare life sciences customers and specializes in data analytics services. Mikhail has more than 20 years of industry experience covering a wide range of technologies and sectors.


 Raj Pathak is a Principal Solutions Architect and Technical advisor to Fortune 50 and Mid-Sized FSI (Banking, Insurance, Capital Markets) customers across Canada and the United States. Raj specializes in Machine Learning with applications in Generative AI, Natural Language Processing, Intelligent Document Processing, and MLOps.
 Yanyan Zhang is a Senior Generative AI Data Scientist at Amazon Web Services, where she has been working on cutting-edge AI/ML technologies as a Generative AI Specialist, helping customers use generative AI to achieve their desired outcomes. Yanyan graduated from Texas A&M University with a PhD in Electrical Engineering. Outside of work, she loves traveling, working out, and exploring new things.
 Ishan Singh is a Generative AI Data Scientist at Amazon Web Services, where he helps customers build innovative and responsible generative AI solutions and products. With a strong background in AI/ML, Ishan specializes in building Generative AI solutions that drive business value. Outside of work, he enjoys playing volleyball, exploring local bike trails, and spending time with his wife and dog, Beau.
 Morgan Rankey is a Solutions Architect based in New York City, specializing in Hedge Funds. He excels in assisting customers to build resilient workloads within the AWS ecosystem. Prior to joining AWS, Morgan led the Sales Engineering team at Riskified through its IPO. He began his career by focusing on AI/ML solutions for machine asset management, serving some of the largest automotive companies globally.
 Harsh Patel is an AWS Solutions Architect supporting 200+ SMB customers across the United States to drive digital transformation through cloud-native solutions. As an AI&ML Specialist, he focuses on Generative AI, Computer Vision, Reinforcement Learning and Anomaly Detection. Outside the tech world, he recharges by hitting the golf course and embarking on scenic hikes with his dog.


 Martin Tunstall is a Principal Solutions Architect at AWS. With over three decades of experience in the finance sector, he helps global finance and insurance customers unlock the full potential of Amazon Web Services (AWS).
 Yashar Araghi is a Senior Solutions Architect at AWS. He has over 20 years of experience designing and building infrastructure and application security solutions. He has worked with customers across various industries such as government, education, finance, energy, and utilities. In the last 6 years at AWS, Yashar has helped customers design, build, and operate their cloud solutions that are secure, reliable, performant and cost optimized in the AWS Cloud.
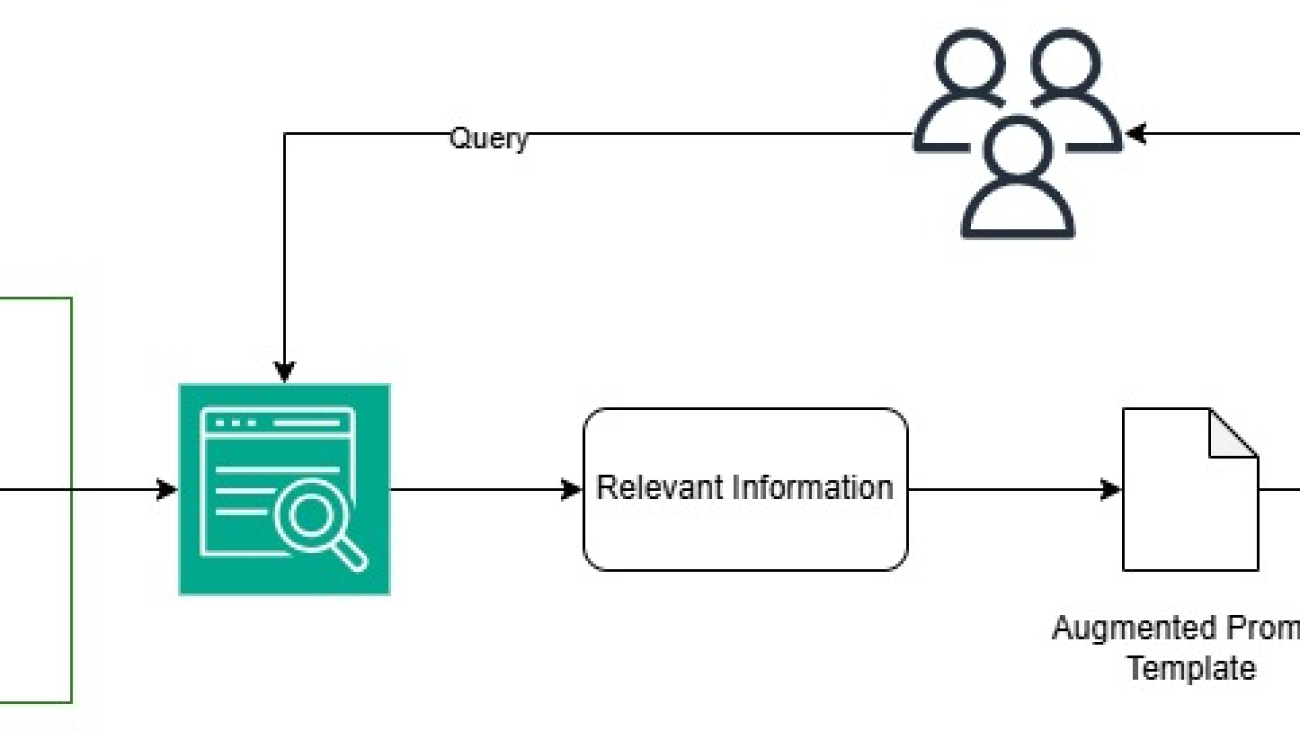


 Vivek Singh is a Senior Manager, Product Management at AWS AI Language Services team. He leads the Amazon Transcribe product team. Prior to joining AWS, he held product management roles across various other Amazon organizations such as consumer payments and retail. Vivek lives in Seattle, WA and enjoys running, and hiking.