Facebook at CSCW 2020: Understanding social comparison by country

The ACM Conference on Computer-Supported Cooperative Work and Social Computing (CSCW) is an important venue where Facebook researchers can share their work and engage with others in the community. Previous Facebook submissions to the conference have explored diverse topics such as how social ties can relate to disaster response and how automatic photo tagging can affect the visually impaired. This year, our contribution includes a paper that explores how social comparison on social media differs between countries, published by Facebook’s Justin Cheng, Moira Burke, and Bethany de Gant.

Earlier this year, the team published a paper on social comparison at the Conference on Human Factors in Computing Systems. In that paper, Cheng, Burke, and de Gant conducted a large, rigorous international study to learn how using social media relates to social comparison. Through a survey conducted with over 37,000 participants in 18 countries, they discovered that country was the strongest predictor of how often a person experienced social comparison, making it a stronger predictor than age, gender, or what they saw on Facebook. Their present work at CSCW delves deeper into this topic.

About the study

In order to build better and more inclusive products, we need to understand how people use them all around the world. When it comes to digital well-being, social comparison on social media is a common concern. “Social comparison, or the act of comparing yourself to others, is something that everyone does,” says Cheng. “To better understand global variation in social comparison, we conducted a survey in 18 countries and interviewed people in three countries: India, Mexico, and the U.S. Our goal is to use this knowledge to influence product design that better supports people’s well-being.”

These in-person interviews confirmed that social comparison varied substantially by country. “Overall, we do find country differences in the frequency, causes, and outcomes of social comparison, suggesting that it’s important to take these differences into account when we do research or are identifying ways to better support people’s well-being,” Cheng explains.

Insights

According to Cheng, there are substantial differences in how often people feel social comparison in different countries. “Many previous studies compare the U.S. to Korea or Japan, but this actually only captures a small amount of the global variation in social comparison,” he says. “Social comparison is actually most frequent in countries such as Vietnam and India and least frequent in countries such as Germany and Mexico.”

The study also shows gender differences between countries when it comes to social comparison. “We often hear that women experience social comparison more than men — that this is something that only affects women,” says Burke. “But our study shows that this is a mindset based in globally western countries.

“The story is very different in India: Men feel more social comparison than women there. Our interviews suggest that it has to do with men feeling pressure both at work and at home, and our data suggest that in countries like India, where men comprise a much greater fraction of the labor force, social comparison is higher among men. In countries such as the U.S. and U.K., where women make up a more equal proportion of the labor force, women experience more social comparison than men.”

“If you remember only one thing from this research, it would be that country differences matter,” says Cheng. “And because they matter, designs that are effective in one country may not work as well in a different country.”

Opportunities

Cheng and Burke are Research Scientists on Core Data Science, a research and development team that works to improve Facebook’s products, infrastructure, and processes. De Gant is a UX Researcher within Social Impact. Together, their work on social comparison provides design opportunities for the Facebook and Instagram platforms within the realm of digital well-being.

“One design opportunity could be to encourage people [on our platforms] to share a broader range of experiences in their life, including the negative ones,” says Cheng. “This could reduce the feeling of social media being a ‘highlight reel.’ However, when asked, people in different countries had different reactions to this idea. In Mexico, for example, people said that they visited Facebook to be motivated, not to be brought down, suggesting that more of these posts might make people in Mexico feel worse. In the U.S., people were more receptive to sharing these broader experiences but also did not want to feel compelled to open up.”

Cheng says another opportunity is making changes to how Like counts are shown: “Our research suggests that people around the world may experience less social comparison if Like counts were made less salient. This may be more effective in countries such as the U.S. and India, and less effective in countries such as the Philippines. Still, feelings about hiding Like counts were mixed. Several people we interviewed talked about how they were valuable as a signal for what to pay attention to.”

“Technology developments may impact digital well-being differently in different parts of the world,” says de Gant. “As such, we hope this paper serves as motivation for both researchers and technologists to deeply understand how new developments impact digital well-being in different places before implementing large-scale changes.”

What’s next

Through their work, Cheng, Burke, and de Gant plan to pursue similar research topics to inform Facebook’s apps, infrastructure, and services. “There are many open questions around digital well-being and social media’s impact on people, and there’s continuing interest in it,” says Cheng. “We’re always conducting and planning additional research to understand the different ways that platforms such as Facebook and Instagram affect well-being, both positively and negatively, and we hope to share more findings in the future as well.”

To learn more about Facebook’s presence at CSCW 2020, visit our event page.

The post Facebook at CSCW 2020: Understanding social comparison by country appeared first on Facebook Research.

Read More

Automatically detecting personal protective equipment on persons in images using Amazon Rekognition

Automatically detecting personal protective equipment on persons in images using Amazon Rekognition

Workplace safety hazards can exist in many different forms: sharp edges, falling objects, flying sparks, chemicals, noise, and a myriad of other potentially dangerous situations. Safety regulators such as Occupational Safety and Health Administration (OSHA) and European Commission often require that businesses protect their employees and customers from hazards that can cause injury by providing personal protective equipment (PPE) and ensuring their use. Across many industries, such as manufacturing, construction, food processing, chemical, healthcare, and logistics, workplace safety is usually a top priority. In addition, due to the COVID-19 pandemic, wearing PPE in public places has become important to reduce the spread of the virus. In this post, we show you how you can use Amazon Rekognition PPE detection to improve safety processes by automatically detecting if persons in images are wearing PPE. We start with an overview of the PPE detection feature, explain how it works, and then discuss the different ways to deploy a PPE detection solution based on your camera and networking requirements.

Amazon Rekognition PPE detection overview

Even when people do their best to follow PPE guidelines, sometimes they inadvertently forget to wear PPE or don’t realize it’s required in the area they’re in. This puts their safety at potential risk and opens the business to possible regulatory compliance issues. Businesses usually rely on site supervisors or superintendents to individually check and remind all people present in the designated areas to wear PPE, which isn’t reliable, effective, or cost-efficient at scale. With Amazon Rekognition PPE detection, businesses can augment manual checks with automated PPE detection.

With Amazon Rekognition PPE detection, you can analyze images from your on-premises cameras at scale to automatically detect if people are wearing the required protective equipment, such as face covers (surgical masks, N95 masks, cloth masks), head covers (hard hats or helmets), and hand covers (surgical gloves, safety gloves, cloth gloves). Using these results, you can trigger timely alarms or notifications to remind people to wear PPE before or during their presence in a hazardous area to help improve or maintain everyone’s safety.

You can also aggregate the PPE detection results and analyze them by time and place to identify how safety warnings or training practices can be improved or generate reports for use during regulatory audits. For example, a construction company can check if construction workers are wearing head covers and hand covers when they’re on the construction site and remind them if one or more PPE isn’t detected to support their safety in case of accidents. A food processing company can check for PPE such as face covers and hand covers on employees working in non-contamination zones to comply with food safety regulations. Or a manufacturing company can analyze PPE detection results across different sites and plants to determine where they should add more hazard warning signage and conduct additional safety training.

With Amazon Rekognition PPE detection, you receive a detailed analysis of an image, which includes bounding boxes and confidence scores for persons (up to 15 per image) and PPE detected, confidence scores for the body parts detected, and Boolean values and confidence scores for whether the PPE covers the corresponding body part. The following image shows an example of PPE bounding boxes for head cover, hand covers, and face cover annotated using the analysis provided by the Amazon Rekognition PPE detection feature.

Often just detecting the presence of PPE in an image isn’t very useful. It’s important to detect if the PPE is worn by the customer or employee. Amazon Rekognition PPE detection also predicts a confidence score for whether the protective equipment is covering the corresponding body part of the person. For example, if a person’s nose is covered by face cover, head is covered by head cover, and hands are covered by hand covers. This prediction helps filter out cases where the PPE is in the image but not actually on the person.

You can also supply a list of required PPE (such as face cover or face cover and head cover) and a minimum confidence threshold (such as 80%) to receive a consolidated list of persons on the image that are wearing the required PPE, not wearing the required PPE, and when PPE can not be determined (such as when a body part isn’t visible). This reduces the amount of code developers need to write to high level counts or reference a person’s information in the image to further drill down.

Now, let’s take a closer look at how Amazon Rekognition PPE detection works.

How it works

To detect PPE in an image, you call the DetectProtectiveEquipment API and pass an input image. You can provide the input image (in JPG or PNG format) either as raw bytes or as an object stored in an Amazon Simple Storage Service (Amazon S3) bucket. You can optionally use the SummarizationAttributes (ProtectiveEquipmentSummarizationAttributes) input parameter to request summary information about persons that are wearing the required PPE, not wearing the required PPE, or are indeterminate.

The following image shows an example input image and its corresponding output from the DetectProtectiveEquipment as seen on the Amazon Rekognition PPE detection console. In this example, we supply face cover as the required PPE and 80% as the required minimum confidence threshold as part of summarizationattributes. We receive a summarization result that indicates that there are four persons in the image that are wearing face covers at a confidence score of over 80% [person identifiers 0, 1,2, 3]. It also provides the full fidelity API response in the per-person results. Note that this feature doesn’t perform facial recognition or facial comparison and can’t identify the detected persons.

Following is the DetectProtectiveEquipment API request JSON for this sample image in the console:

{
    "Image": {
        "S3Object": {
            "Bucket": "console-sample-images",
            "Name": "ppe_group_updated.jpg"
        }
    },
    "SummarizationAttributes": {
        "MinConfidence": 80,
        "RequiredEquipmentTypes": [
            "FACE_COVER"
        ]
    }
}

The response of the DetectProtectiveEquipment API is a JSON structure that includes up to 15 persons detected per image and for each person, the body parts detected (face, head, left hand, and right hand), the types of PPE detected, and if the PPE covers the corresponding body part. The full JSON response from DetectProtectiveEquipment API for this image is as follows:

    "ProtectiveEquipmentModelVersion": "1.0",
    "Persons": [
        {
            "BodyParts": [
                {
                    "Name": "FACE",
                    "Confidence": 99.07738494873047,
                    "EquipmentDetections": [
                        {
                            "BoundingBox": {
                                "Width": 0.06805413216352463,
                                "Height": 0.09381836652755737,
                                "Left": 0.7537466287612915,
                                "Top": 0.26088595390319824
                            },
                            "Confidence": 99.98419189453125,
                            "Type": "FACE_COVER",
                            "CoversBodyPart": {
                                "Confidence": 99.76295471191406,
                                "Value": true
                            }
                        }
                    ]
                },
                {
                    "Name": "LEFT_HAND",
                    "Confidence": 99.25702667236328,
                    "EquipmentDetections": []
                },
                {
                    "Name": "RIGHT_HAND",
                    "Confidence": 80.11490631103516,
                    "EquipmentDetections": []
                },
                {
                    "Name": "HEAD",
                    "Confidence": 99.9693374633789,
                    "EquipmentDetections": [
                        {
                            "BoundingBox": {
                                "Width": 0.09358207136392593,
                                "Height": 0.10753925144672394,
                                "Left": 0.7455776929855347,
                                "Top": 0.16204142570495605
                            },
                            "Confidence": 98.4826889038086,
                            "Type": "HEAD_COVER",
                            "CoversBodyPart": {
                                "Confidence": 99.99744415283203,
                                "Value": true
                            }
                        }
                    ]
                }
            ],
            "BoundingBox": {
                "Width": 0.22291666269302368,
                "Height": 0.82421875,
                "Left": 0.7026041746139526,
                "Top": 0.15703125298023224
            },
            "Confidence": 99.97362518310547,
            "Id": 0
        },
        {
            "BodyParts": [
                {
                    "Name": "FACE",
                    "Confidence": 99.71298217773438,
                    "EquipmentDetections": [
                        {
                            "BoundingBox": {
                                "Width": 0.05732834339141846,
                                "Height": 0.07323434203863144,
                                "Left": 0.5775181651115417,
                                "Top": 0.33671364188194275
                            },
                            "Confidence": 99.96135711669922,
                            "Type": "FACE_COVER",
                            "CoversBodyPart": {
                                "Confidence": 96.60395050048828,
                                "Value": true
                            }
                        }
                    ]
                },
                {
                    "Name": "LEFT_HAND",
                    "Confidence": 98.09618377685547,
                    "EquipmentDetections": []
                },
                {
                    "Name": "RIGHT_HAND",
                    "Confidence": 95.69132995605469,
                    "EquipmentDetections": []
                },
                {
                    "Name": "HEAD",
                    "Confidence": 99.997314453125,
                    "EquipmentDetections": [
                        {
                            "BoundingBox": {
                                "Width": 0.07994530349969864,
                                "Height": 0.08479492366313934,
                                "Left": 0.5641391277313232,
                                "Top": 0.2394576370716095
                            },
                            "Confidence": 97.718017578125,
                            "Type": "HEAD_COVER",
                            "CoversBodyPart": {
                                "Confidence": 99.9454345703125,
                                "Value": true
                            }
                        }
                    ]
                }
            ],
            "BoundingBox": {
                "Width": 0.21979166567325592,
                "Height": 0.742968738079071,
                "Left": 0.49427083134651184,
                "Top": 0.24296875298023224
            },
            "Confidence": 99.99588012695312,
            "Id": 1
        },
        {
            "BodyParts": [
                {
                    "Name": "FACE",
                    "Confidence": 98.42090606689453,
                    "EquipmentDetections": [
                        {
                            "BoundingBox": {
                                "Width": 0.05756797641515732,
                                "Height": 0.07883334159851074,
                                "Left": 0.22534936666488647,
                                "Top": 0.35751715302467346
                            },
                            "Confidence": 99.97816467285156,
                            "Type": "FACE_COVER",
                            "CoversBodyPart": {
                                "Confidence": 95.9388656616211,
                                "Value": true
                            }
                        }
                    ]
                },
                {
                    "Name": "LEFT_HAND",
                    "Confidence": 92.42487335205078,
                    "EquipmentDetections": []
                },
                {
                    "Name": "RIGHT_HAND",
                    "Confidence": 96.88029479980469,
                    "EquipmentDetections": []
                },
                {
                    "Name": "HEAD",
                    "Confidence": 99.98686218261719,
                    "EquipmentDetections": [
                        {
                            "BoundingBox": {
                                "Width": 0.0872764065861702,
                                "Height": 0.09496871381998062,
                                "Left": 0.20529428124427795,
                                "Top": 0.2652358412742615
                            },
                            "Confidence": 90.25578308105469,
                            "Type": "HEAD_COVER",
                            "CoversBodyPart": {
                                "Confidence": 99.99089813232422,
                                "Value": true
                            }
                        }
                    ]
                }
            ],
            "BoundingBox": {
                "Width": 0.19479165971279144,
                "Height": 0.72265625,
                "Left": 0.12187500298023224,
                "Top": 0.2679687440395355
            },
            "Confidence": 99.98648071289062,
            "Id": 2
        },
        {
            "BodyParts": [
                {
                    "Name": "FACE",
                    "Confidence": 99.32310485839844,
                    "EquipmentDetections": [
                        {
                            "BoundingBox": {
                                "Width": 0.055801939219236374,
                                "Height": 0.06405147165060043,
                                "Left": 0.38087061047554016,
                                "Top": 0.393160879611969
                            },
                            "Confidence": 99.98370361328125,
                            "Type": "FACE_COVER",
                            "CoversBodyPart": {
                                "Confidence": 98.56526184082031,
                                "Value": true
                            }
                        }
                    ]
                },
                {
                    "Name": "LEFT_HAND",
                    "Confidence": 96.11709594726562,
                    "EquipmentDetections": []
                },
                {
                    "Name": "RIGHT_HAND",
                    "Confidence": 80.49284362792969,
                    "EquipmentDetections": []
                },
                {
                    "Name": "HEAD",
                    "Confidence": 99.91870880126953,
                    "EquipmentDetections": [
                        {
                            "BoundingBox": {
                                "Width": 0.08105235546827316,
                                "Height": 0.07952981442213058,
                                "Left": 0.36679577827453613,
                                "Top": 0.2875025272369385
                            },
                            "Confidence": 98.80988311767578,
                            "Type": "HEAD_COVER",
                            "CoversBodyPart": {
                                "Confidence": 99.6932144165039,
                                "Value": true
                            }
                        }
                    ]
                }
            ],
            "BoundingBox": {
                "Width": 0.18541666865348816,
                "Height": 0.6875,
                "Left": 0.3187499940395355,
                "Top": 0.29218751192092896
            },
            "Confidence": 99.98927307128906,
            "Id": 3
        }
    ],
    "Summary": {
        "PersonsWithRequiredEquipment": [
            0,
            1,
            2,
            3
        ],
        "PersonsWithoutRequiredEquipment": [],
        "PersonsIndeterminate": []
    }
}

Deploying Amazon Rekognition PPE detection

Depending on your use case, cameras, and environment setup, you can use different approaches to analyze your on-premises camera feeds for PPE detection. Because DetectProtectiveEquipment API only accepts images as input, you can extract frames from streaming or stored videos at the desired frequency (such as every 1, 2 or 5 seconds or every time motion is detected) and analyze those frames using the DetectProtectiveEquipment API. You can also set different frequencies of frame ingestion for cameras covering different areas. For example, you can set a higher frequency for busy or important locations and a lower frequency for areas that see light activity. This allows you to control the network bandwidth requirements because you only send images to the AWS cloud for processing.

The following architecture shows how you can design a serverless workflow to process frames from camera feeds for PPE detection.

We have included a demo web application that implements this reference architecture in the Amazon Rekognition PPE detection GitHub repo. This web app extracts frames from a webcam video feed and sends them to the solution deployed in the AWS Cloud. As images get analyzed with the DetectProtectiveEquipment API, a summary output is displayed in the web app in near-real time. Following are a few example GIFs showing the detection of face cover, head cover, and hand covers as they are worn by a person in front of the webcam that is sampling a frame every two seconds. Depending on your use case, you can adjust the sampling rate to a higher or lower frequency. A screenshot showing the full demo application output, including the PPE and PPE worn or not predictions is also shown below.

Face cover detection

Hand cover detection

Head cover detection

Full demo web application output

Using this application and solution, you can generate notifications with Amazon Simple Notification Service. Although not implemented in the demo solution (but shown in the reference architecture), you can store the PPE detection results to create anonymized reports of PPE detection events using AWS services such as AWS Glue, Amazon Athena, and Amazon QuickSight. You can also optionally store ingested images in Amazon S3 for a limited time for regulatory auditing purposes. For instructions on deploying the demo web application and solution, see the Amazon Rekognition PPE detection GitHub repo.

Instead of sending images via Amazon API Gateway, you can also send images directly to an S3 bucket. This allows you to store additional metadata, including camera location, time, and other camera information, as Amazon S3 object metadata. As images get processed, you can delete them immediately or set them to expire within a time window using a lifecycle policy for an S3 bucket as required by your organization’s data retention policy. You can use the following reference architecture diagram to design this alternate workflow.

Extracting frames from your video systems

Depending on your camera setup and video management system, you can use the SDK provided by the manufacturer to extract frames. For cameras that support HTTP(s) or RTSP streams, the following code sample shows how you can extract frames at a desired frequency from the camera feed and process them using DetectProtectiveEquipment API.

import cv2
import boto3
import time
from datetime import datetime
import json

def processFrame(videoStreamUrl):
    cap = cv2.VideoCapture(videoStreamUrl)
    ret, frame = cap.read()
    if ret:
        hasFrame, imageBytes = cv2.imencode(".jpg", frame)
        if hasFrame:
            session = boto3.session.Session()
            rekognition = session.client('rekognition')
            response = rekognition. detect_protective_equipment(
                    Image={
                        'Bytes': imageBytes.tobytes(),
                    }
                )
            print(response)
    cap.release()

# Video stream
videoStreamUrl = "rtsp://@192.168.10.100"
frameCaptureThreshold = 300

while (True):
    try:
        processFrame(videoStreamUrl)
    except Exception as e:
        print("Error: {}.".format(e))

    time.sleep(frameCaptureThreshold)

To extract frames from stored videos, you can use AWS Elemental MediaConvert or other tools such as FFmpeg or OpenCV. The following code shows you how to extract frames from stored video and process them using the DetectProtectiveEquipment API:

import json
import boto3
import cv2
import math
import io

videoFile = "video file"
rekognition = boto3.client('rekognition')        
ppeLabels = []    
cap = cv2.VideoCapture(videoFile)
frameRate = cap.get(5) #frame rate
while(cap.isOpened()):
    frameId = cap.get(1) #current frame number
    print("Processing frame id: {}".format(frameId))
    ret, frame = cap.read()
    if (ret != True):
        break
    if (frameId % math.floor(frameRate) == 0):
        hasFrame, imageBytes = cv2.imencode(".jpg", frame)

        if(hasFrame):
            response = rekognition. detect_protective_equipment(
                Image={
                    'Bytes': imageBytes.tobytes(),
                }
            )
        
        for person in response["Persons"]:
            person["Timestamp"] = (frameId/frameRate)*1000
            ppeLabels.append(person)

print(ppeLabels)

with open(videoFile + ".json", "w") as f:
    f.write(json.dumps(ppeLabels)) 

cap.release()

Detecting other and custom PPE

Although the DetectProtectiveEquipment API covers the most common PPE, if your use case requires identifying additional equipment specific to your business needs, you can use Amazon Rekognition Custom Labels. For example, you can use Amazon Rekognition Custom Labels to quickly train a custom model to detect safety goggles, high visibility vests, or other custom PPE by simply supplying some labelled images of what to detect. No machine learning expertise is required to use Amazon Rekognition Custom Labels. When you have a custom model trained and ready for inference, you can then make parallel calls to DetectProtectiveEquipment and to the Amazon Rekognition Custom Labels model to detect all the required PPE and combine the results for further processing. For more information about using Amazon Rekognition Custom Labels to detect high-visibility vests including a sample solution with instructions, please visit the Custom PPE detection GitHub repository. You can use the following reference architecture diagram to design a combined DetectProtectiveEquipment and Amazon Rekognition Custom Labels PPE detection solution.

Conclusion

In this post, we showed how to use Amazon Rekognition PPE detection (the DetectProtectiveEquipment API) to automatically analyze images and video frames to check if employees and customers are wearing PPE such as face covers, hand covers, and head covers. We covered different implementation approaches, including frame extraction from cameras, stored video, and streaming videos. Finally, we covered how you can use Amazon Rekognition Custom Labels to identify additional equipment that is specific to your business needs.

To test PPE detection with your own images, sign in to the Amazon Rekognition console and upload your images in the Amazon Rekognition PPE detection console demo. For more information about the API inputs, outputs, limits, and recommendations, see Amazon Rekognition PPE detection documentation. To find out what our customers think about the feature or if you need a partner to help build an end-to-end PPE detection solution for your organization, see the Amazon Rekognition workplace safety web-page.


About the Authors

Tushar Agrawal leads Outbound Product Management for Amazon Rekognition. In this role, he focuses on making customers successful by solving their business challenges with the right solution and go-to-market capabilities. In his spare time, he loves listening to music and re-living his childhood with his kindergartener.


Kashif Imran is a Principal Solutions Architect at Amazon Web Services. He works with some of the largest AWS customers who are taking advantage of AI/ML to solve complex business problems. He provides technical guidance and design advice to implement computer vision applications at scale. His expertise spans application architecture, serverless, containers, NoSQL and machine learning.


Matteo Figus is an AWS Solution Engineer based in the UK. Matteo works with the AWS Solution Architects to create standardized tools, code samples, demonstrations and quickstarts. He is passionate about open-source software and in his spare time he likes to cook and play the piano.


Connor Kirkpatrick is an AWS Solution Engineer based in the UK. Connor works with the AWS Solution Architects to create standardised tools, code samples, demonstrations and quickstarts. He is an enthusiastic squash player, wobbly cyclist, and occasional baker.

Read More

The real promise of synthetic data

Each year, the world generates more data than the previous year. In 2020 alone, an estimated 59 zettabytes of data will be “created, captured, copied, and consumed,” according to the International Data Corporation — enough to fill about a trillion 64-gigabyte hard drives.

But just because data are proliferating doesn’t mean everyone can actually use them. Companies and institutions, rightfully concerned with their users’ privacy, often restrict access to datasets — sometimes within their own teams. And now that the Covid-19 pandemic has shut down labs and offices, preventing people from visiting centralized data stores, sharing information safely is even more difficult.

Without access to data, it’s hard to make tools that actually work. Enter synthetic data: artificial information developers and engineers can use as a stand-in for real data.

Synthetic data is a bit like diet soda. To be effective, it has to resemble the “real thing” in certain ways. Diet soda should look, taste, and fizz like regular soda. Similarly, a synthetic dataset must have the same mathematical and statistical properties as the real-world dataset it’s standing in for. “It looks like it, and has formatting like it,” says Kalyan Veeramachaneni, principal investigator of the Data to AI (DAI) Lab and a principal research scientist in MIT’s Laboratory for Information and Decision Systems. If it’s run through a model, or used to build or test an application, it performs like that real-world data would.

But — just as diet soda should have fewer calories than the regular variety — a synthetic dataset must also differ from a real one in crucial aspects. If it’s based on a real dataset, for example, it shouldn’t contain or even hint at any of the information from that dataset.

Threading this needle is tricky. After years of work, Veeramachaneni and his collaborators recently unveiled a set of open-source data generation tools — a one-stop shop where users can get as much data as they need for their projects, in formats from tables to time series. They call it the Synthetic Data Vault.

Maximizing access while maintaining privacy

Veeramachaneni and his team first tried to create synthetic data in 2013. They had been tasked with analyzing a large amount of information from the online learning program edX, and wanted to bring in some MIT students to help. The data were sensitive, and couldn’t be shared with these new hires, so the team decided to create artificial data that the students could work with instead — figuring that “once they wrote the processing software, we could use it on the real data,” Veeramachaneni says.

This is a common scenario. Imagine you’re a software developer contracted by a hospital. You’ve been asked to build a dashboard that lets patients access their test results, prescriptions, and other health information. But you aren’t allowed to see any real patient data, because it’s private.

Most developers in this situation will make “a very simplistic version” of the data they need, and do their best, says Carles Sala, a researcher in the DAI lab. But when the dashboard goes live, there’s a good chance that “everything crashes,” he says, “because there are some edge cases they weren’t taking into account.”

High-quality synthetic data — as complex as what it’s meant to replace — would help to solve this problem. Companies and institutions could share it freely, allowing teams to work more collaboratively and efficiently. Developers could even carry it around on their laptops, knowing they weren’t putting any sensitive information at risk.

Perfecting the formula — and handling constraints

Back in 2013, Veeramachaneni’s team gave themselves two weeks to create a data pool they could use for that edX project. The timeline “seemed really reasonable,” Veeramachaneni says. “But we failed completely.” They soon realized that if they built a series of synthetic data generators, they could make the process quicker for everyone else.

In 2016, the team completed an algorithm that accurately captures correlations between the different fields in a real dataset — think a patient’s age, blood pressure, and heart rate — and creates a synthetic dataset that preserves those relationships, without any identifying information. When data scientists were asked to solve problems using this synthetic data, their solutions were as effective as those made with real data 70 percent of the time. The team presented this research at the 2016 IEEE International Conference on Data Science and Advanced Analytics.

For the next go-around, the team reached deep into the machine learning toolbox. In 2019, PhD student Lei Xu presented his new algorithm, CTGAN, at the 33rd Conference on Neural Information Processing Systems in Vancouver. CTGAN (for “conditional tabular generative adversarial networks) uses GANs to build and perfect synthetic data tables. GANs are pairs of neural networks that “play against each other,” Xu says. The first network, called a generator, creates something — in this case, a row of synthetic data — and the second, called the discriminator, tries to tell if it’s real or not.

“Eventually, the generator can generate perfect [data], and the discriminator cannot tell the difference,” says Xu. GANs are more often used in artificial image generation, but they work well for synthetic data, too: CTGAN outperformed classic synthetic data creation techniques in 85 percent of the cases tested in Xu’s study.

Statistical similarity is crucial. But depending on what they represent, datasets also come with their own vital context and constraints, which must be preserved in synthetic data. DAI lab researcher Sala gives the example of a hotel ledger: a guest always checks out after he or she checks in. The dates in a synthetic hotel reservation dataset must follow this rule, too: “They need to be in the right order,” he says.

Large datasets may contain a number of different relationships like this, each strictly defined. “Models cannot learn the constraints, because those are very context-dependent,” says Veeramachaneni. So the team recently finalized an interface that allows people to tell a synthetic data generator where those bounds are. “The data is generated within those constraints,” Veeramachaneni says.

Such precise data could aid companies and organizations in many different sectors. One example is banking, where increased digitization, along with new data privacy rules, have “triggered a growing interest in ways to generate synthetic data,” says Wim Blommaert, a team leader at ING financial services. Current solutions, like data-masking, often destroy valuable information that banks could otherwise use to make decisions, he said. A tool like SDV has the potential to sidestep the sensitive aspects of data while preserving these important constraints and relationships.

One vault to rule them all

The Synthetic Data Vault combines everything the group has built so far into “a whole ecosystem,” says Veeramachaneni. The idea is that stakeholders — from students to professional software developers — can come to the vault and get what they need, whether that’s a large table, a small amount of time-series data, or a mix of many different data types.

The vault is open-source and expandable. “There are a whole lot of different areas where we are realizing synthetic data can be used as well,” says Sala. For example, if a particular group is underrepresented in a sample dataset, synthetic data can be used to fill in those gaps — a sensitive endeavor that requires a lot of finesse. Or companies might also want to use synthetic data to plan for scenarios they haven’t yet experienced, like a huge bump in user traffic.

As use cases continue to come up, more tools will be developed and added to the vault, Veeramachaneni says. It may occupy the team for another seven years at least, but they are ready: “We’re just touching the tip of the iceberg.”

Read More

How CEVA uses TensorFlow Lite for Always-On Speech Recognition on the Edge

How CEVA uses TensorFlow Lite for Always-On Speech Recognition on the Edge

A guest article by Ido Gus of CEVA

CEVA is a leading licensor of wireless connectivity and smart sensing technologies. Our products help OEMs design power-efficient, intelligent and connected devices for a range of end markets, including mobile, consumer, automotive, robotics, industrial and IoT.

In this article, we’ll describe how we used TensorFlow Lite for Microcontrollers (TFLM) to deploy a speech recognition engine and frontend, called WhisPro, on a bare-metal development board based on our CEVA-BX DSP core. WhisPro detects always-on wake words and speech commands efficiently, on-device.

Figure 1 CEVA Multi-microphone DSP Development Board

About WhisPro

WhisPro is a speech recognition engine and frontend targeted to run on low power, resource constrained edge devices. It is designed to handle the entire data flow from processing audio samples to detection.

WhisPro supports two use cases for edge devices:

  • Always-on wake word detection engine. In this use case, WhisPro’s role is to wake a device in sleep mode when a predefined phrase is detected.
  • Speech commands. In this use case, WhisPro’s role is to enable a voice-based interface. Users can control the device using their voice. Typical commands can be: volume up, volume down, play, stop, etc.

WhisPro enables voice interface on any SoC that has a CEVA BX DSP core integrated into it, lowering entry barriers to OEMs and ODM interested in joining the voice interface revolution.

Our Motivation

Originally, WhisPro was implemented using an in-house neural network library called CEVA NN Lib. Although that implementation achieved excellent performance, the development process was quite involved. We realized that, if we ported the TFLM runtime library and optimized it for our target hardware, the entire model porting process would become transparent and more reliable (far fewer lines of code would need to be written, modified, and maintained).

Building TFLM for CEVA-BX DSP Family

The first thing we had to do is to figure out how to port TFLM to our own platform. We found that following this porting to a new platform guide to be quite useful.
Following the guide, we:

  • Verified DebugLog() implementation is supported by our platform.
  • Created a TFLM runtime library project in CEVA’s Eclipse-based IDE:
    • Created a new CEVA-BX project in CEVA’s IDE
    • Added all the required source files to the project
  • Built the TFLM runtime library for the CEVA-BX core.
    This required the usual fiddling with compiler flags, including paths (not all required files are under the “micro” directory), linker script, and so on.

Model Porting Process

Our starting point is a Keras implementation of our model. Let’s look at the steps we took to deploy our model on our bare-metal target hardware:

Converted theTensorFlow model to TensorFlow Lite using the TF built-in converter:

$ python3 -m tensorflow_docs.tools.nbfmt [options] notebook.ipynb


```
converter = tf.lite.TFLiteConverter.from_keras_model(keras_model)
converter.experimental_new_converter = True
tflite_model = converter.convert()
open("converted_to_tflite_model.tflite", "wb").write(tflite_model)
```

Used quantization:

$ python3 -m tensorflow_docs.tools.nbfmt [options] notebook.ipynb


```
converter.optimizations = [tf.lite.Optimize.OPTIMIZE_FOR_SIZE]
converter.target_spec.supported_ops = [tf.lite.OpsSet.TFLITE_BUILTINS_INT8]
converter.representative_dataset = representative_data_gen
```

Converted the TensorFlow Lite model to TFLM using xxd:

$ python3 -m tensorflow_docs.tools.nbfmt [options] notebook.ipynb


```
$> xxd –I model.tflite > model.cc
```

Here we found that some of the model layers (for example, GRU) were not properly supported (at the time) by TFLM. It is very reasonable to assume that, as TFLM continues to mature and Google and the TFLM community invest more in it, issues like this will become rarer.
In our case, though, we opted to re-implement the GRU layers in terms of Fully Connected layers, which was surprisingly easy.

Integration

The next step was to integrate the TFLM runtime library and the converted model into our existing embedded C frontend, which handles audio preprocessing and feature extraction.

Even though our frontend was not written with TFLM in mind, it was modular enough to allow easy integration by implementation of a single simple wrapper function, as follows:

  1. Linked the TFLM runtime library into our embedded C application (WhisPro frontend)
  2. Implemented a wrapper-over-setup function for mapping the model into a usable data structure, allocating the interpreter and tensors
  3. Implemented a wrapper-over-execute function for mapping data passed from the WhisPro frontend into tflite tensors used by the actual execute function
  4. Replaced the call to the original model execute function with a call to the TFLM implementation

Process Visualization

The process we described is performed by two components:

  • The microcontroller supplier, in this case, CEVA – is responsible for optimizing TFLM for its hardware architecture.
  • The microcontroller user, in this case, CEVA WhisPro developer – is responsible for deploying a neural network based model, using an optimized TFLM runtime library, on the target microcontroller.

What’s Next

This work has proven the importance of the TFLM platform to us, and the significant value supporting TFLM can add to our customers and partners by enabling easy neural network model deployment on edge devices. We are committed to further support TFLM on the CEVA-BX DSP family by:

  • Active contribution to the TFLM project, with the goal of improving layer coverage and overall platform maturity.
  • Investing in TFLM operator optimization for execution on CEVA-BX cores, aiming for full coverage.

Final Thoughts

While the porting process had some bumps along the way, at the end it was a great success, and took about 4-5 days’ worth of work. Implementing a model in C from scratch, and handcrafting model conversion scripts from Python to C, could take 2-3 weeks (and lots of debugging).

CEVA Technology Virtual Seminar

To learn more, you are welcome to watch CEVA’s virtual seminar – Wireless Audio session, covering TFLM, amongst other topics.

Read More

Detecting playful animal behavior in videos using Amazon Rekognition Custom Labels

Detecting playful animal behavior in videos using Amazon Rekognition Custom Labels

Historically, humans have observed animal behaviors and applied them for different purposes. For example, behavioral observation is important in animal ecology, such as how often the behaviors are, when the behaviors occur, or whether there is individual difference or not. However, identifying and monitoring these behaviors and movements can be hard and can take a long time. To provide an automation for this workflow, a team from the agile members of pharmaceutical customer (Sumitomo Dainippon Pharma Co., Ltd.) and AWS Solutions Architects created a solution with Amazon Rekognition Custom Labels. Amazon Rekognition Custom Labels makes it easy to label specific movements in images, and train and build a model that detects these movements.

In this post, we show you how machine learning (ML) can help automate this workflow in a fun and simple way. We trained a custom model that detects playful behaviors of cats in a video using Amazon Rekognition Custom Labels. We hope to contribute to the afore-mentioned fields, biology and others by publicizing the architecture, our building process, and the source code for this solution.

About Amazon Rekognition Custom Labels

Amazon Rekognition Custom Labels is an automated ML feature that enables you to quickly train your own custom models for detecting business-specific objects and scenes from images—no ML experience required. For example, you can train a custom model to find your company logos in social media posts, identify your products on store shelves, or classify unique machine parts in an assembly line.

Amazon Rekognition Custom Labels builds off the existing capabilities of Amazon Rekognition, which is already trained on tens of millions of images across many categories. Instead of thousands of images, you simply need to upload a small set of training images (typically a few hundred images or less) that are specific to your use case. If your images are already labeled, Amazon Rekognition Custom Labels can begin training in just a few clicks. If not, you can label them directly within the Amazon Rekognition Custom Labels labeling interface, or use Amazon SageMaker Ground Truth to label them for you.

After Amazon Rekognition begins training from your image set, it can produce a custom image analysis model for you in just a few hours. Amazon Rekognition Custom Labels automatically loads and inspects the training data, selects the right ML algorithms, trains a model, and provides model performance metrics. You can then use your custom model via the Amazon Rekognition Custom Labels API and integrate it into your applications.

Solution overview

The following diagram shows the architecture of the solution. When you have model in place, the whole process of detecting specific behaviors in a video is automated; all you need to do is upload a video file (.mp4).

The workflow contains the following steps:

  1. You upload a video file (.mp4) to Amazon Simple Storage Service (Amazon S3), which invokes AWS Lambda, which in turn calls an Amazon Rekognition Custom Labels inference endpoint and Amazon Simple Queue Service (Amazon SQS). It takes about 10 minutes to launch the inference endpoint, so we use a deferred run of Amazon SQS.
  2. Amazon SQS invokes a Lambda function to do a status check of the inference endpoint, and launches Amazon Elastic Compute Cloud (Amazon EC2) if the status is Running.
  3. Amazon CloudWatch Events detects the Running status of Amazon EC2 and invokes a Lambda function, which runs a script on Amazon EC2 using the AWS Systems Manager Run
  4. On Amazon EC2, the script calls the inference endpoint of Amazon Rekognition Custom Labels to detect specific behaviors in the video uploaded to Amazon S3 and writes the inferred results to the video on Amazon S3.
  5. When the inferred result file is uploaded to Amazon S3, a Lambda function launches to stop Amazon EC2 and the Amazon Rekognition Custom Labels inference endpoint.

Prerequisites

For this walkthrough, you should have the following prerequisites:

  • An AWS account – You can create a new account if you don’t have one yet.
  • A key pair – You need a key pair to log in to the EC2 instance that uses Amazon Rekognition Custom Labels to detect specific behaviors. You can either use an existing key pair or create a new key pair. For more information, see Amazon EC2 key pairs and Linux instances.
  • A video for inference – This solution uses a video (.mp4 format) for inference. You can use your own video or the one we provide in this post.

Launching your AWS CloudFormation stack

Launch the provided AWS CloudFormation

After you launch the template, you’re prompted to enter the following parameters:

  • KeyPair – The name of the key pair used to connect to the EC2 instance
  • ModelName – The model name used for Amazon Rekognition Custom Labels
  • ProjectARN – The project ARN used for Amazon Rekognition Custom Labels
  • ProjectVersionARN – The model version name used for Amazon Rekognition Custom Labels
  • YourCIDR – The CIDR including your public IP address

For this post, we use the following video to detect whether a cat is punching or not. For our object detection model, we prepared an annotated dataset and trained it in advance, as shown in the following section.

This solution uses the US East (N. Virginia) Region, so make sure to work in that Region when following along with this post.

Adding annotations to images from the video

To annotate your images, complete the following steps:

  1. To create images that the model uses for learning, you need to split the video into a series of still images. For this post, we prepared 377 images (the ratio of normal videos to punching videos is about 2:1) and annotated them.
  2. Store the series of still images in Amazon S3 and annotate them. You can use Ground Truth to annotate them.
  3. Because we’re creating an object detection model, select Bounding box for the Task type.
  4. For our use case, we want to tell if a cat is punching or not in the video, so we create a labeling job using two labels: normal to define basic sitting behavior, and punch to define playful behavior.
  5. For annotation, you should surround the cat with the normal label bounding box when the cat isn’t punching, and surround the cat with the punch label bounding box when the cat is punching.

When the cat is punching, the image of the cat’s paws should look blurred, so based on how blurred the image is, you can determine whether the cat is punching or not and annotate the image.

Training a custom ML model

To start training your model, complete the following steps:

  1. Create an object detection model using Amazon Rekognition Custom Labels. For instructions, see Getting Started with Amazon Rekognition Custom Labels.
  2. When you create a dataset, choose Import images labeled by SageMaker Ground Truth for Image location
  3. Set the output.manifest file path that was output by the Ground Truth labeling job.

To find the path out the output.manifest file, on the Amazon SageMaker console, on the Labeling jobs page, choose your video. The information is located on the Labeling job summary page.

  1. When the model has finished learning, save the ARN listed in the Use your model section at the bottom of the model details page. We use this ARN later on.

For reference, the F1 score for normal and punch was above 0.9 in our use case.

Uploading a video for inference on Amazon S3

You can now upload your video for inference.

  1. On the Amazon S3 console, navigate to the bucket you created with the CloudFormation stack (it should include rekognition in the name).
  2. Choose Create folder.
  3. Create the folder inputMovie.
  4. Upload the file you want to infer.

Setting up a script on Amazon EC2

This solution calls the Amazon Rekognition API to infer the video on Amazon EC2, so you need to set up a script on Amazon EC2.

  1. Log in to Amazon EC2 via SSH with the following code and the key pair you created:
ssh -i <Your key Pair> ubuntu@<EC2 IPv4 Public IP>
Are you sure you want to continue connecting (yes/no)? yes
Welcome to Ubuntu 18.04.4 LTS (GNU/Linux 4.15.0-1065-aws x86_64)
ubuntu@ip-10-0-0-207:~$ cd code/
ubuntu@ip-10-0-0-207:~/code$ vi rekognition.py

It takes approximately 30 minutes to install and build the necessary libraries.

  1. Copy the following code to rekognition.py and replace <BucketName> with your S3 bucket name created by AWS CloudFormation. This code uses OpenCV to split the video into frames and throws each frame to the inference endpoint of Amazon Rekognition Custom Labels to perform behavior detection. It merges the inferred behavior detection result with each frame and puts the frames together to reconstruct a video.
import boto3
import cv2
import json
from decimal import *
import os
import ffmpeg

def get_parameters(param_key):
    ssm = boto3.client('ssm', region_name='us-east-1')
    response = ssm.get_parameters(
        Names=[
            param_key,
        ]
    )
    return response['Parameters'][0]['Value']

def analyzeVideo():
    ssm = boto3.client('ssm',region_name='us-east-1')
    s3 = boto3.resource('s3')
    rekognition = boto3.client('rekognition','us-east-1')
   
    parameter_value = get_parameters('/Movie/<BucketName>')
    dirname, video = os.path.split(parameter_value)
    bucket = s3.Bucket('<BucketName>')
    bucket.download_file(parameter_value, video)

    customLabels = []
    cap = cv2.VideoCapture(video)
    frameRate = cap.get(cv2.CAP_PROP_FPS)
    width = cap.get(cv2.CAP_PROP_FRAME_WIDTH)
    height = cap.get(cv2.CAP_PROP_FRAME_HEIGHT)
    fourcc = cv2.VideoWriter_fourcc(*'XVID')
    writer = cv2.VideoWriter( video + '-output.avi', fourcc, 18, (int(width), int(height)))

    while(cap.isOpened()):
        frameId = cap.get(cv2.CAP_PROP_POS_FRAMES)
        print(frameId)
        print("Processing frame id: {}".format(frameId))
        ret, frame = cap.read()
        if (ret != True):
            break
        hasFrame, imageBytes = cv2.imencode(".jpg", frame)

        if(hasFrame):
            response = rekognition.detect_custom_labels(
                Image={
                    'Bytes': imageBytes.tobytes(),
                },
                ProjectVersionArn = get_parameters('ProjectVersionArn')
            )

            for output in response["CustomLabels"]:
                Name = output['Name']
                Confidence = str(output['Confidence'])
                w = output['Geometry']['BoundingBox']['Width']
                h = output['Geometry']['BoundingBox']['Height']
                left = output['Geometry']['BoundingBox']['Left']
                top = output['Geometry']['BoundingBox']['Top']
                w = int(w * width)
                h = int(h * height)
                left = int(left*width)
                top = int(top*height)

                output["Timestamp"] = (frameId/frameRate)*1000
                customLabels.append(output)
                if Name == 'Moving':
                    cv2.rectangle(frame,(left,top),(left+w,top+h),(0,0,255),2)
                    cv2.putText(frame,Name + ":" +Confidence +"%",(left,top),cv2.FONT_HERSHEY_SIMPLEX,0.5,(0, 0, 255), 1, cv2.LINE_AA)
                else:
                    cv2.rectangle(frame,(left,top),(left+w,top+h),(0,255,0),2)
                    cv2.putText(frame,Name + ":" +Confidence +"%",(left,top),cv2.FONT_HERSHEY_SIMPLEX,0.5,(0, 255, 0), 1, cv2.LINE_AA)

        writer.write(frame)
    print(customLabels)

    with open(video + ".json", "w") as f:
        f.write(json.dumps(customLabels))
    bucket.upload_file(video + ".json",'output-json/ec2-output.json')
    stream = ffmpeg.input(video + '-output.avi')
    stream = ffmpeg.output(stream, video + '-output.mp4', pix_fmt='yuv420p', vcodec='libx264')
    stream = ffmpeg.overwrite_output(stream)
    ffmpeg.run(stream)
    bucket.upload_file( video + '-output.mp4','output/' +video + '-output.mp4')

    writer.release()
    cap.release()

analyzeVideo()

Stopping the EC2 instance

Stop the EC2 instance after you create the script in it. The EC2 instance is automatically launched when a video file is uploaded to Amazon S3.

The solution is now ready for use.

Detecting movement in the video

To implement your solution, upload a video file (.mp4) to the inputMovie folder you created. This launches the endpoint for Amazon Rekognition Custom Labels.

When the status of the endpoint changes to Running, Amazon EC2 launches and performs behavior detection. A video containing behavior detection data is uploaded to the output folder in Amazon S3.

When you log in to Amazon EC2, you can see that a video file that merged the inferred results was created under the code folder.

The video file is stored in the output folder created in Amazon S3. This causes the endpoint for Amazon Rekognition Custom Labels and Amazon EC2 to stop.

The following video is the result of detecting a specific movement (punch) of the cat:

Cleaning Up

To avoid incurring future charges, delete the resources you created.

Conclusion and next steps

This solution automates detecting specific actions in a video. In this post, we created a model to detect specific cat behaviors using Amazon Rekognition Custom Labels, but you can also use custom labels to identify cell images (such data is abundant in the research field). For example, the following screenshot shows the inferred results of a model that learned leukocytes, erythrocytes, and platelets. We had the model learn from 20 datasets, and it can now detect cells with distinctive features that are identifiable with human eyes. Its accuracy can increase as more high-resolution data is added and as annotations are done more carefully.

Amazon Rekognition Custom Labels has a wide range of use cases in the research field. If you want to try this in your organization and have any questions, please reach out to us or your Solutions Architects team and they will be excited to assist you.


About the Authors

Hidenori Koizumi is a Solutions Architect in Japan’s Healthcare and Life Sciences team. He is good at developing solutions in the research field based on his scientific background (biology, chemistry, and more). His specialty is machine learning, and he has recently been developing applications using React and TypeScript. His hobbies are traveling and photography.


Mari Ohbuchi is a Machine Learning Solutions Architect at Amazon Web Services Japan. She worked on developing image processing algorithms for about 10 years at a manufacturing company before joining AWS. In her current role, she supports the implementation of machine learning solutions and creating prototypes for manufacturing and ISV/SaaS customers. She is a cat lover and has published blog posts, hands-on content, and other content that involves both AWS AI/ML services and cats.


Read More

Processing auto insurance claims at scale using Amazon Rekognition Custom Labels and Amazon SageMaker Ground Truth

Processing auto insurance claims at scale using Amazon Rekognition Custom Labels and Amazon SageMaker Ground Truth

Computer vision uses machine learning (ML) to build applications that process images or videos. With Amazon Rekognition, you can use pre-trained computer vision models to identify objects, people, text, activities, or inappropriate content. Our customers have use cases that span every industry, including media, finance, manufacturing, sports, and technology. Some of these use cases require training custom computer vision models to detect business-specific objects. When building custom computer vision models, customers tell us they face two main challenges: availability of labeled training data, and accessibility to resources with ML expertise.

In this post, I show you how to mitigate these challenges by using Amazon SageMaker Ground Truth to easily build a training dataset from unlabeled data, followed by Amazon Rekognition Custom Labels to train a custom computer vision model without requiring ML expertise.

For this use case, we want to build a claims processing application for motor vehicle insurance that allows customers to submit an image of their vehicle with their insurance claim. Customers might accidentally submit a wrong picture, and some may try to commit fraud by submitting false pictures. Various ML models can fully or partially automate the processing of these images and the rest of the claim contents. This post walks through the steps required to train a simple computer vision model that detects if images are relevant to vehicle insurance claims or not.

Services overview

Amazon Rekognition Custom Labels is an automated machine learning (AutoML) feature that enables you to train custom ML models for image analysis without requiring ML expertise. Upload a small dataset of labeled images specific to your business use case, and Amazon Rekognition Custom Labels takes care of the heavy lifting of inspecting the data, selecting an ML algorithm, training a model, and calculating performance metrics.

Amazon Rekognition Custom Labels provides a UI for viewing and labeling a dataset on the Amazon Rekognition console, suitable for small datasets. It also supports auto-labeling based on the folder structure of an Amazon Simple Storage Service (Amazon S3) bucket, and importing labels from a Ground Truth output file. Ground Truth is the recommended labeling tool when you have a distributed labeling workforce, need to implement a complex labeling pipeline, or have a large dataset.

Ground Truth is a fully managed data labeling service used to easily and efficiently build accurate datasets for ML. It provides built-in workflows to label image, text, and 3D point cloud data, and supports custom workflows for other types of data. You can set up a public or private workforce, and take advantage of automatic data labeling to reduce the time required to label the dataset.

Solution overview

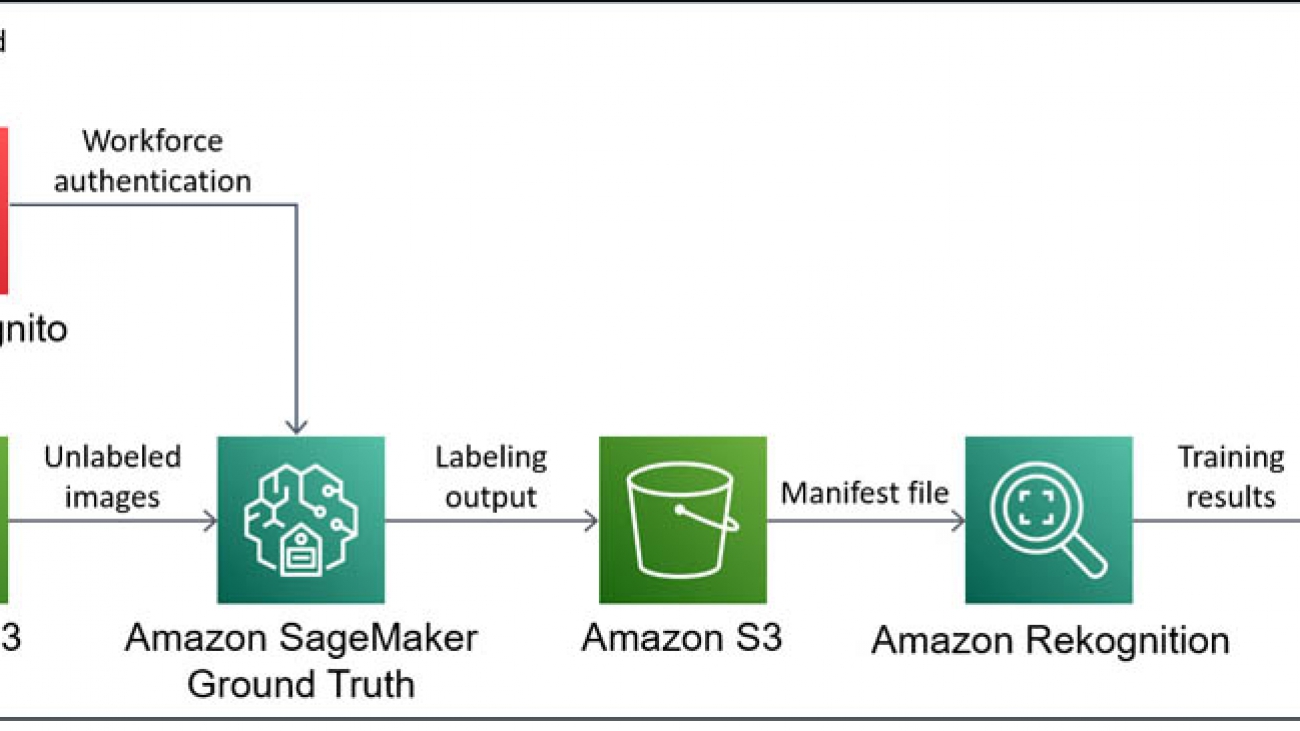
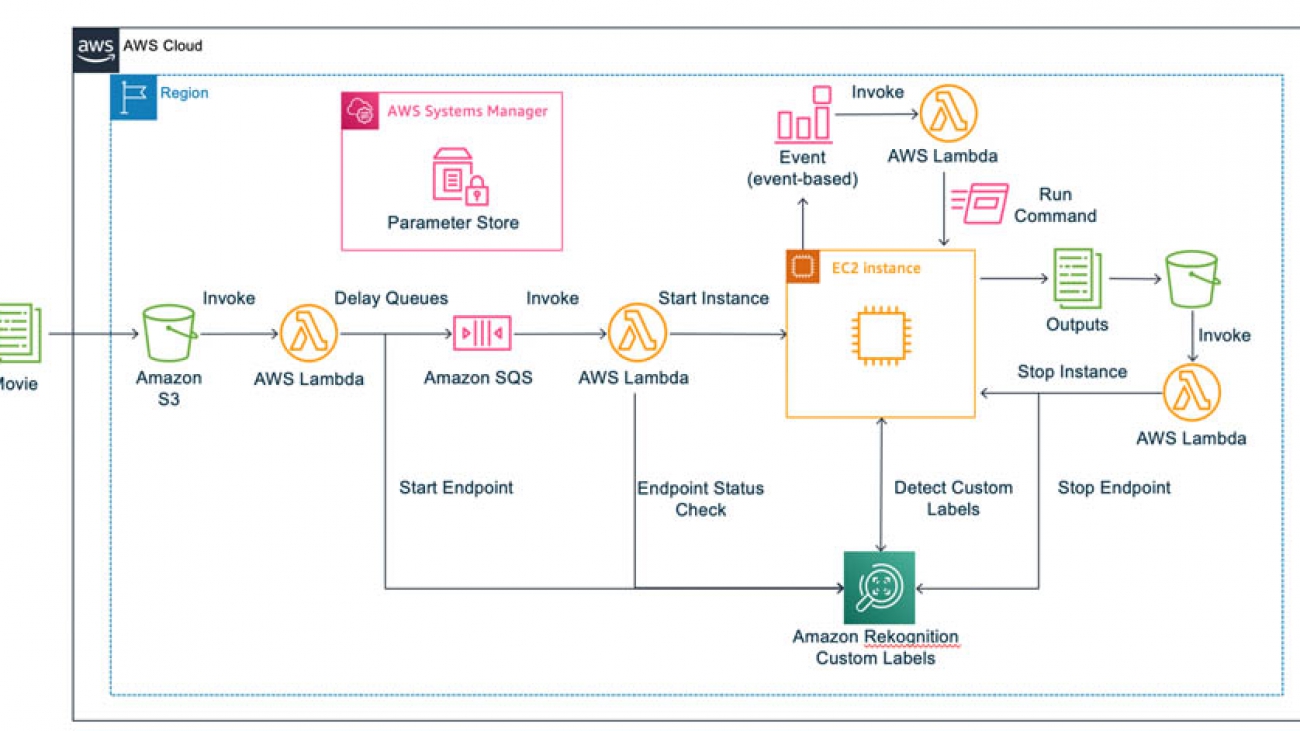
The core of the solution is Ground Truth and Amazon Rekognition Custom Labels, but you also use S3 buckets to store data between each step. You first need an S3 bucket to store unlabeled images. Then, you set up a labeling job in Ground Truth for the image data in the bucket, using Amazon Cognito to authenticate users for your private workforce. Ground Truth saves the labeling results in another S3 bucket as a manifest file, which is used to build training and test datasets in Amazon Rekognition Custom Labels. Finally, you can train a custom model using your new dataset in Amazon Rekognition Custom Labels, the results of which are saved in another S3 bucket.

The following diagram illustrates the architecture of this solution.

Detailed walkthrough

In this post, I show you how to train a custom computer vision model to detect if images are relevant to vehicle insurance claims. These steps are as follows:

  1. Collect data
  2. Label the data
  3. Train the computer vision model
  4. Evaluate the computer vision model

Before you start collecting data, you need decide which type of computer vision model to use. At the time of writing, Amazon Rekognition Custom Labels supports two computer vision models:

  • Image classification – Assigns labels to an image as a whole
  • Object detection – Draws bounding boxes around objects of interest in an image

Object detection is more specific than image classification, but labeling images for object detection also requires more time and effort, so it’s important to consider the requirements of the use case.

For this use case, I start by building a model to detect the difference between images with a vehicle and images without a vehicle. At this point, I’m not interested in knowing exactly where the vehicle is located on the image, so I can start with image classification.

Prerequisites

To successfully follow the steps in this walkthrough, you need to complete the following prerequisites:

In this post, I demonstrate how to build the full solution using the AWS CLI, which allows you to programmatically create, manage, and monitor AWS resources from a terminal. The AWS CLI supports all AWS services and can be used to automate your cloud infrastructure. If you prefer to use the console, I provide links to console instructions in each section.

Collecting data

First, you need to collect relevant images. Ideally, I would source these images from actual images submitted by insurance customers, which are representative of what the model sees in production. However, for this post, I use images from the COCO (Common Objects in Context) dataset. This is a large dataset of everyday images where common objects have been labeled with semantic segmentation, captions, and keypoints.

The original COCO dataset from 2017 is up to 26 GB in size and can take a long time to download. This walkthrough only relies on a small subset of images from the dataset, so you can download the COCO subset (3 GB) provided by the fast.ai research group instead. You can complete the data collection steps on your local machine, an Amazon Elastic Compute Cloud (Amazon EC2) instance, an Amazon SageMaker Jupyter notebook, or any other compute resource.

  1. Enter the following code to download the dataset:
wget https://s3.amazonaws.com/fast-ai-coco/coco_sample.tgz
  1. When the download is complete, extract the .tgz file:
tar -xvzf coco_sample.tgz

You now have a directory called coco_sample, with two sub-directories: annotations and train_sample. The COCO dataset already provides labels for various vehicles and other objects in the images, but you can ignore these for this use case, because you want to use Ground Truth for labeling.

  1. Navigate to the directory that contains only the images:
cd ./coco_sample/train_sample

Even though this is only a subset of the COCO dataset, this directory still contains 21,837 images. For this use case, I spent some time looking through the images in this dataset to collect the file names of images that contain vehicles. I then took a random sample of file names from the remaining images to create a dataset of images without vehicles.

  1. To use the same images, copy the file names into a text file using the following code:
echo "000000000723.jpg 000000057387.jpg 000000121555.jpg 000000175523.jpg 000000280926.jpg 000000482049.jpg 000000000985.jpg 000000060548.jpg 000000128015.jpg 000000179251.jpg 000000296696.jpg 000000498570.jpg 000000004764.jpg 000000067222.jpg 000000131465.jpg 000000184543.jpg 000000302415.jpg 000000509657.jpg 000000005965.jpg 000000068668.jpg 000000135438.jpg 000000185262.jpg 000000303590.jpg 000000515020.jpg 000000007713.jpg 000000068801.jpg 000000136185.jpg 000000188440.jpg 000000306415.jpg 000000517921.jpg 000000016593.jpg 000000069577.jpg 000000137475.jpg 000000190026.jpg 000000318496.jpg 000000540547.jpg 000000020289.jpg 000000077837.jpg 000000140332.jpg 000000190447.jpg 000000318672.jpg 000000543058.jpg 000000024396.jpg 000000078407.jpg 000000142847.jpg 000000195538.jpg 000000337265.jpg 000000547345.jpg 000000025453.jpg 000000079481.jpg 000000144992.jpg 000000197792.jpg 000000337638.jpg 000000553862.jpg 000000026992.jpg 000000079873.jpg 000000146907.jpg 000000206539.jpg 000000341429.jpg 000000557155.jpg 000000028333.jpg 000000081315.jpg 000000148165.jpg 000000213342.jpg 000000341902.jpg 000000557819.jpg 000000030001.jpg 000000084171.jpg 000000158130.jpg 000000217043.jpg 000000361140.jpg 000000560123.jpg 000000033505.jpg 000000093070.jpg 000000159280.jpg 000000219762.jpg 000000361255.jpg 000000561126.jpg 000000035382.jpg 000000099453.jpg 000000164178.jpg 000000237031.jpg 000000375500.jpg 000000566364.jpg 000000039100.jpg 000000104844.jpg 000000168817.jpg 000000241279.jpg 000000375654.jpg 000000571584.jpg 000000043270.jpg 000000109738.jpg 000000170784.jpg 000000247473.jpg 000000457725.jpg 000000573286.jpg 000000047425.jpg 000000111889.jpg 000000171970.jpg 000000250955.jpg 000000466451.jpg 000000576449.jpg 000000049006.jpg 000000120021.jpg 000000173001.jpg 000000261479.jpg 000000468652.jpg 000000053580.jpg 000000121162.jpg 000000174911.jpg 000000264016.jpg 000000479219.jpg" > vehicle-images.txt

The dataset contains many more images featuring vehicles, but this subset of 56 images (plus 56 non-vehicle images) should be sufficient to demonstrate the full pipeline for training a custom computer vision model.

  1. To store this subset of images, create a new directory:
mkdir vehicle_dataset
  1. Using the text file containing the image file names, copy the relevant images into the new directory:
xargs -a ./vehicle-images.txt cp -t ./vehicle_dataset

You now have an unlabeled dataset on your local computer that you can use to build your model.

You can now create a new S3 bucket in your AWS account and upload your images into this bucket. At this point, it’s important to choose the Region where you want to deploy the resources. Use the Region Table to choose a Region that supports Amazon Rekognition Custom Labels and Ground Truth. I use us-west-2, but if you want to use a different Region, adjust the --region flag in the following CLI commands. You can also create a bucket and upload the dataset on the console.

  1. First, create an S3 bucket with a unique name. Replace <BUCKET_NAME> with a bucket name of your choice:
aws s3 mb s3://<BUCKET_NAME> --region us-west-2
  1. Copy the data from your local computer into your new S3 bucket:
aws s3 cp ./vehicle_dataset s3://<BUCKET_NAME>/imgs/ --recursive

Labeling the data

After you successfully upload the unlabeled images to your S3 bucket, you use Ground Truth to label the data. This service is designed to help you build highly accurate training datasets for ML. For more information, see Use Amazon SageMaker Ground Truth to Label Data or the AWS Blog.

To create your dataset of labeled vehicle images, you complete three steps:

  1. Create a workforce
  2. Set up a labeling job
  3. Complete the labeling task

Creating a workforce

There are several options for setting up a workforce of annotators in Ground Truth:

  • A crowdsourced workforce using Amazon Mechanical Turk
  • A private workforce of your own internal resources
  • A workforce provided by one of the curated third-party vendors on AWS Marketplace

Because this use case is small (only 112 images), you can complete the task yourself by setting up a private workforce. In this post, I show you how to set up a private workforce using the AWS CLI. For instructions on setting up your workforce on the console, see the section Creating a labeling workforce in the post Amazon SageMaker Ground Truth – Build Highly Accurate Datasets and Reduce Labeling Costs by up to 70%. Alternatively, see Create a Private Workforce (Amazon SageMaker Console).

For more information about using the AWS CLI and the commands in this section, see the following:

  1. First, create an Amazon Cognito user pool:
aws cognito-idp create-user-pool 
--pool-name vehicle-experts-user-pool 
--region us-west-2
  1. Record the Id value in the output. This should have a format similar to us-west-2_XXXXXXXXX.
  2. Create a user group in the user pool. Replace the value for <USER_POOL_ID> with the ID value you recorded in the previous step:
aws cognito-idp create-group 
--group-name vehicle-experts-user-group 
--user-pool-id <USER_POOL_ID> 
--region us-west-2
  1. Create a user pool client:
aws cognito-idp create-user-pool-client 
--user-pool-id <USER_POOL_ID> 
--client-name vehicle-experts-user-pool-client 
--generate-secret 
--explicit-auth-flows ALLOW_CUSTOM_AUTH ALLOW_USER_PASSWORD_AUTH ALLOW_USER_SRP_AUTH ALLOW_REFRESH_TOKEN_AUTH 
--supported-identity-providers COGNITO 
--region us-west-2
  1. Record the ClientId value in the output.
  2. Create a user pool domain:
aws cognito-idp create-user-pool-domain 
--domain vehicle-experts-user-pool-domain 
--user-pool-id <USER_POOL_ID> 
--region us-west-2
  1. Create a work team for Ground Truth. Replace the values for <USER_POOL_ID> and <USER_POOL_CLIENT_ID> with the user pool ID and the user pool client ID, respectively. If you used a different name for your user group than vehicle-experts-user-group, replace this value as well.
aws sagemaker create-workteam 
--workteam-name vehicle-experts-workteam 
--member-definitions '{"CognitoMemberDefinition": {"UserPool": "<USER_POOL_ID>", "UserGroup": "vehicle-experts-user-group", "ClientId": "<USER_POOL_CLIENT_ID>"}}' 
--description "A team of vehicle experts" 
--region us-west-2
  1. Record the WorkteamARN value in the output.

After you create a work team in Amazon SageMaker, update the user pool client to allow for OAuth flows and scopes. To complete this step, you need to find the callback URL and the logout URL generated during the creation of the work team.

  1. Find the URLs with the following code:
aws cognito-idp describe-user-pool-client 
--user-pool-id <USER_POOL_ID> 
--client-id <USER_POOL_CLIENT_ID> 
--region us-west-2
  1. Make a note of the URL in the CallbackURLs list, which should look similar to https://XXXXXXXXXX.labeling.us-west-2.sagemaker.aws/oauth2/idpresponse.
  2. Also make a note of the URL in the LogoutURLs list, which should look similar to https://XXXXXXXXXX.labeling.us-west-2.sagemaker.aws/logout.
  3. Use these URLs to update the user pool client:
aws cognito-idp update-user-pool-client 
--user-pool-id <USER_POOL_ID> 
--client-id <USER_POOL_CLIENT_ID> 
--allowed-o-auth-flows-user-pool-client 
--allowed-o-auth-scopes email openid profile 
--allowed-o-auth-flows code implicit 
--callback-urls '["<CALLBACK_URL>"]' 
--logout-urls '["<LOGOUT_URL>"]' 
--supported-identity-providers COGNITO 
--region us-west-2

You should now be able to access the labeling portal sign-in screen by navigating to the root of the callback and logout URLs (http://XXXXXXXXXX.labeling.us-west-2.sagemaker.aws). If you want to create any more Amazon SageMaker work teams in this Region in the future, you only need to create a new user pool group and a new work team.

You now have a work team without any workers, and need to add some.

  1. Add yourself as a worker using the following code:
aws cognito-idp admin-create-user 
--user-pool-id <USER_POOL_ID> 
--username the_vehicle_expert 
--user-attributes '[{"Name": "email", "Value": "<EMAIL_ADDRESS>"}]' 
--region us-west-2

It’s important to provide a valid email address because Amazon Cognito sends an email with your username and temporary password. You use these credentials to log in to the labeling portal, and you must change your password when you log in for the first time.

  1. Add your user to the user group created within the user pool, because labeling jobs in Ground Truth are assigned to user pool groups. Replace the value of <USER_POOL_ID> with the ID of your user pool. If you used a different name for your user group than vehicle-experts-user-group, replace this value as well.
aws cognito-idp admin-add-user-to-group 
--user-pool-id <USER_POOL_ID> 
--username the_vehicle_expert 
--group-name vehicle-experts-user-group 
--region us-west-2

If you forget this step, you can log in to the labeling portal, but you aren’t assigned any labeling tasks.

Setting up a labeling job

You can now set up the labeling job in Ground Truth. In this post, I demonstrate how to set up a labeling job using the AWS CLI. For instructions on setting up your workforce on the console, see the section Creating a labeling job in the post Amazon SageMaker Ground Truth – Build Highly Accurate Datasets and Reduce Labeling Costs by up to 70%. Be careful to choose the image classification task type instead of the bounding box task type. Alternatively, see Create a Labeling Job.

For more information about using the AWS CLI and the commands in this section, see the following:

To create a labeling job in Ground Truth, you need to create a manifest file that points to the location of your unlabeled images. After labeling is complete, Ground Truth generates a new version of this manifest file with the labeling results added. A manifest file is a JSON lines file with a well-defined structure. For the input manifest file for Ground Truth, each JSON object only requires the source-ref key. The console has an option to have Ground Truth generate the manifest file for you. However, you can generate the manifest file with one piece of code, using the images.txt file created earlier.

  1. Generate the manifest file with the following code:
cat vehicle-images.txt | tr ' ' 'n' | awk '{print "{"source-ref":"s3://<BUCKET_NAME>/imgs/" $0 ""}"}' > vehicle-dataset.manifest
  1. Upload this manifest file to a new directory in your S3 bucket:
aws s3 cp ./vehicle-dataset.manifest s3://<BUCKET_NAME>/groundtruth-input/

You need to create a template for the labeling UI that the annotators (for this use case, you) use to label the data. To create this UI template, I use the image classification UI sample from the Amazon SageMaker Ground Truth Sample Task UIs GitHub repo, and edit the text to represent this use case. You can save the following template in a file called template.liquid on your local machine.

  1. Create and save the template with the following code:
<script src="https://assets.crowd.aws/crowd-html-elements.js"></script>

<crowd-form>
  <crowd-image-classifier
    name="crowd-image-classifier"
    src="{{ task.input.taskObject | grant_read_access }}"
    header="If the image contains a vehicle in plain sight, assign the 'vehicle' label. Otherwise, assign the 'other' label."
    categories="{{ task.input.labels | to_json | escape }}"
  >
    <full-instructions header="Classification Instructions">
      <p>Read the task carefully and inspect the image.</p>
      <p>Choose the appropriate label that best suits the image.</p>
    </full-instructions>

    <short-instructions>
      <p>Read the task carefully and inspect the image.</p>
      <p>Choose the appropriate label that best suits the image.</p>
    </short-instructions>
  </crowd-image-classifier>
</crowd-form>
  1. Upload this UI template to your S3 bucket:
aws s3 cp ./template.liquid s3://<BUCKET_NAME>/groundtruth-input/

Ground Truth expects a file that specifies the labels the annotators can assign to objects in the images. For this use case, you define two labels: vehicle and other. This label category configuration file is a JSON file with a simple structure as shown in the following code. You can save the template in a file called data.json on your local machine.

  1. Define the labels with the following code:
{"document-version":"2018-11-28","labels":[{"label":"vehicle"},{"label":"other"}]}
  1. As with the manifest file before, upload the label category configuration to the S3 bucket:
aws s3 cp ./data.json s3://<BUCKET_NAME>/groundtruth-input/

For certain image tasks, the S3 bucket where the data is stored must have CORS settings enabled. You can do this with the following CLI command:

aws s3api put-bucket-cors 
--bucket <BUCKET_NAME>  
--cors-configuration '{"CORSRules": [{"AllowedMethods": ["GET"], "AllowedOrigins": ["*"]}]}'

Ground Truth needs to be assigned an IAM role that allows it to perform necessary actions and access the S3 bucket containing the data. Create a new IAM service role for Amazon SageMaker with a maximum session duration longer than the default value. You set a task time limit for the labeling job later, and the maximum session duration for the IAM role needs to be larger than or equal to this task time limit.

  1. Create the role with the following code:
aws iam create-role 
--role-name SageMakerGroundTruthRole 
--assume-role-policy-document '{"Version": "2012-10-17", "Statement": {"Effect": "Allow", "Principal": {"Service": "sagemaker.amazonaws.com"}, "Action": "sts:AssumeRole"}}' 
--max-session-duration 36000
  1. Make a note of the Arn value in the output.
  2. Attach the AmazonSageMakerFullAccess managed policy to this role:
aws iam attach-role-policy 
--role-name SageMakerGroundTruthRole 
--policy-arn arn:aws:iam::aws:policy/AmazonSageMakerFullAccess
  1. Create a new IAM policy that allows read and write access to the S3 bucket containing the data input for Ground Truth:
aws iam create-policy 
--policy-name AccessVehicleDatasetBucket 
--policy-document '{"Version": "2012-10-17", "Statement": [{"Effect": "Allow", "Action": ["s3:GetObject", "s3:PutObject", "s3:GetBucketLocation", "s3:ListBucket"], "Resource": ["arn:aws:s3:::<BUCKET_NAME>/*"]}]}'
  1. Make a note of the Arn value in the output.
  2. Attach your new policy to the IAM role. Replace <POLICY_ARN> with the ARN value copied from the output of the previous command:
aws iam attach-role-policy 
--role-name SageMakerGroundTruthRole 
--policy-arn <POLICY_ARN> 

You can now create the labeling job. This is a large CLI command compared to the earlier ones. You need to provide the Amazon S3 URIs for the manifest file, the output directory, the label category configuration file, and the UI template. Replace <BUCKET_NAME> with your chosen bucket name in each URI. Replace <ROLE_ARN> with the ARN value copied from the output of the create-role command, and replace <WORKTEAM_ARN> with the ARN value copied from the output of the create-workteam command.

  1. Create the labeling job with the following code:
aws sagemaker create-labeling-job 
--labeling-job-name vehicle-labeling-job 
--label-attribute-name vehicle 
--input-config '{"DataSource": {"S3DataSource": {"ManifestS3Uri": "s3://<BUCKET_NAME>/groundtruth-input/vehicle-dataset.manifest"}}}' 
--output-config '{"S3OutputPath": "s3://<BUCKET_NAME>/groundtruth-output/"}' 
--role-arn <ROLE_ARN> 
--label-category-config-s3-uri s3://<BUCKET_NAME>/groundtruth-input/data.json 
--human-task-config '{"WorkteamArn": "<WORKTEAM_ARN>", "UiConfig": {"UiTemplateS3Uri": "s3://<BUCKET_NAME>/groundtruth-input/template.liquid"}, "PreHumanTaskLambdaArn": "arn:aws:lambda:us-west-2:081040173940:function:PRE-ImageMultiClass", "TaskTitle": "Vehicle labeling task", "TaskDescription": "Assign a label to each image based on the presence of vehicles in the image.", "NumberOfHumanWorkersPerDataObject": 1, "TaskTimeLimitInSeconds": 600, "AnnotationConsolidationConfig": {"AnnotationConsolidationLambdaArn": "arn:aws:lambda:us-west-2:081040173940:function:ACS-ImageMultiClass"}}' 
--region us-west-2

For this use case, because you’re the only annotator in the work team, each image is labeled by only one worker, which is specified through NumberOfHumanWorkersPerDataObject. PreHumanTaskLambdaArn and AnnotationConsolidationLambdaArn determine how Ground Truth processes the data and labels. There are default ARNs available for each type of labeling task and each Region, both for the pre-human tasks and the annotation consolidation.

Completing the labeling task

In a browser, navigate to the labeling sign-in portal that you created when you set up the work team. It should have a format similar to http://XXXXXXXXXX.labeling.us-west-2.sagemaker.aws. Log in with the credentials for your user and start the labeling task that appears in the UI.

Follow the instructions in the UI to label each of the 112 images with a vehicle or other label. The following screenshot shows an image labeled vehicle.

I label buses, motorcycles, cars, trucks, and bicycles as vehicles. I also assume that for the insurance use case, the image should show an external view of the vehicle, meaning images of vehicle interiors are labeled as other.

The following screenshot shows an image labeled other.

After you label all the images, Ground Truth processes your labeling work and generates a manifest file with the output. This process can take a few minutes. To check on the status of your labeling job, use the following code and check the LabelingJobStatus in the output:

aws sagemaker describe-labeling-job 
--labeling-job-name vehicle-labeling-job 
--region us-west-2

When the LabelingJobStatus is Completed, make a note of the OutputDatasetS3Uri value under LabelingJobOutput in the output.

Training the computer vision model

If you have followed all the steps in the post so far, well done! It’s finally time to train the custom computer vision model using Amazon Rekognition Custom Labels. Again, I show you how to use the AWS CLI to complete these steps. For instructions on completing these steps on the console, see Getting Started with Amazon Recognition Custom Labels and Training a custom single class object detection model with Amazon Rekognition Custom Labels.

Before continuing with the CLI, I recommend navigating to Amazon Rekognition Custom Labels on the console to set up a default S3 bucket. This request appears the first time you access Amazon Rekognition Custom Labels in a Region, and ensures that future datasets are visible on the console. If you want to take advantage of the Rekognition interface to view and edit your dataset before training a model, I recommend using the console to upload your dataset, with the manifest file generated by Ground Truth. If you choose to follow the steps in this post, you see your dataset on the Amazon Rekognition console only after a model has been trained.

For more information about using the AWS CLI and the commands in this section, see the following:

Before you can train a computer vision model with Amazon Rekognition, you need to allow Amazon Rekognition Custom Labels to access the data from the S3 bucket by changing the bucket policy.

  1. Grant permissions with the following code:
{
    "Version": "2012-10-17",
    "Statement": [
        {
            "Sid": "AWSRekognitionS3AclBucketRead20191011",
            "Effect": "Allow",
            "Principal": {
                "Service": "rekognition.amazonaws.com"
            },
            "Action": ["s3:GetBucketAcl",
                      "s3:GetBucketLocation"],
            "Resource": "arn:aws:s3:::<BUCKET_NAME>"
        },
        {
            "Sid": "AWSRekognitionS3GetBucket20191011",
            "Effect": "Allow",
            "Principal": {
                "Service": "rekognition.amazonaws.com"
            },
            "Action": ["s3:GetObject",
                       "s3:GetObjectAcl",
                       "s3:GetObjectVersion",
                       "s3:GetObjectTagging"],
            "Resource": "arn:aws:s3:::<BUCKET_NAME>/*"
        },
		{
            "Sid": "AWSRekognitionS3ACLBucketWrite20191011",
            "Effect": "Allow",
            "Principal": {
                "Service": "rekognition.amazonaws.com"
            },
            "Action": "s3:GetBucketAcl",
            "Resource": "arn:aws:s3:::<BUCKET_NAME>"
        },
        {
            "Sid": "AWSRekognitionS3PutObject20191011",
            "Effect": "Allow",
            "Principal": {
                "Service": "rekognition.amazonaws.com"
            },
            "Action": "s3:PutObject",
            "Resource": "arn:aws:s3:::<BUCKET_NAME>/rekognition-output/*",
            "Condition": {
                "StringEquals": {
                    "s3:x-amz-acl": "bucket-owner-full-control"
                }
            }
        }
    ]
}
  1. Save the bucket policy in a new file called bucket-policy.json.
  2. Enter the following code to set this policy for your S3 bucket:
aws s3api put-bucket-policy --bucket <BUCKET_NAME> --policy file://bucket-policy.json

Amazon Rekognition Custom Labels uses the concept of projects to differentiate between different computer vision models you may want to build.

  1. Create a new project within Amazon Rekognition Custom Labels:
aws rekognition create-project 
--project-name vehicle-detector 
--region us-west-2
  1. Make a note of the value for ProjectArn in the output to use in the next step.

An Amazon Rekognition Custom Labels project can contain multiple models; each trained model is called a project version. To train a new model, you must give it a name and provide training data, test data, and an output directory. Instead of splitting the dataset into a training and test set yourself, you can tell Amazon Rekognition Custom Labels to automatically split off 20% of the data and use this as a test set.

  1. Enter the following code. Replace <BUCKET_NAME> with your chosen bucket name, and replace <PROJECT_ARN> with the ARN from the output of the create-project command.
aws rekognition create-project-version 
--project-arn <PROJECT_ARN> 
--version-name vehicle-detector-v1 
--output-config '{"S3Bucket": "<BUCKET_NAME>", "S3KeyPrefix": "rekognition-output"}' 
--training-data '{"Assets": [{"GroundTruthManifest": {"S3Object": {"Bucket": "<BUCKET_NAME>", "Name": " groundtruth-output/vehicle-labeling-job/manifests/output/output.manifest"}}}]}' 
--testing-data '{"AutoCreate": true}' 
--region us-west-2

Amazon Rekognition Custom Labels spends some time training a computer vision model based on your data. In my case, this process took up to 2 hours. To check the status of your training, enter the following code:

aws rekognition describe-project-versions 
--project-arn <PROJECT_ARN> 
--region us-west-2

When the training process is complete, you see the status TRAINING_COMPLETED in the output. You should also navigate to Amazon Rekognition Custom Labels on the console to check on the training status of your project version.

Evaluating the computer vision model

When Amazon Rekognition Custom Labels is finished training the model, you can view various evaluation metrics to determine how well the model is performing on the test set. The easiest way to view these metrics is to look on the console. The following screenshot shows the macro average metrics.

The following screenshot shows results for individual test images.


If you prefer to fetch these results programmatically, you first need to identify the output files that Amazon Rekognition Custom Labels has saved in the S3 bucket, so you can fetch the results stored in these files:

aws rekognition describe-project-versions 
--project-arn <PROJECT_ARN> 
--region us-west-2

Assuming the training process is complete, the output of this command provides the location of the output files. Amazon Rekognition Custom Labels saves the detailed results for each test image in a JSON file stored in Amazon S3. You can find the file details under TestingDataResult -> Output -> Assets -> GroundTruthManifest. The file name has the format TestingGroundTruth-<PROJECT_NAME>-<PROJECT_VERSION_NAME>.json. I recommend downloading this file to view it in an IDE, but you can also view the contents of the file without downloading it by using the following code (replace <S3_URI> with the URI of the file you want to view):

aws s3 cp <S3_URI> - | head

Similarly, Amazon Rekognition Custom Labels stores the macro average precision, recall, and F1 score in a JSON file, which you can find under EvaluationResults -> Summary. Again, you can view the contents of this file without downloading it by using the preceding command.

For this use case, the test set results in a precision and recall of 1, which means the model identified all the vehicle and non-vehicle images correctly. The assumed threshold used to generate the F1 score, precision, and recall metrics for vehicles is 0.99. By default, the model returns predictions above this assumed threshold. Examining the individual test images confirms that the model identifies vehicles with a consistently high confidence score. In addition to analyzing the test set results on the console, you can set up Custom Labels Demonstration UI to apply the model to images from your local computer.

Cleaning up

To avoid incurring future charges, clean up the following resources:

  • Amazon Rekognition Custom Labels project
  • Amazon SageMaker work team
  • Amazon Cognito user pool
  • S3 bucket

Conclusion

In this post, you learned how to create a labeled dataset and use it to train a custom computer vision model without any prior ML expertise. In addition, you learned how to accomplish all of this programmatically using the AWS CLI.

After gathering a collection of unlabeled images and storing these images in an S3 bucket, you set up a labeling job in Ground Truth and used the output of the labeling job to train a model in Amazon Rekognition Custom Labels. I hope you can apply this combination of AWS services to quickly create computer vision models for use cases in your own industry and domain.

To learn more, see the following resources:


About the Author

Sara van de Moosdijk, simply known as Moose, is a Machine Learning Partner Solutions Architect at AWS Australia. She helps AWS partners build and scale AI/ML solutions through technical enablement, support, and architectural guidance. Moose spends her free time figuring out how to fit more books in her overflowing bookcase.

Read More