Bickey Russell finds inspiration from his native Bangladesh

Bickey Russell finds inspiration from his native Bangladesh

Welcome to the latest edition of “My Path to Google,” where we talk to Googlers, interns and alumni about how they got to Google, what their roles are like and even some tips on how to prepare for interviews.

Having spent his childhood between London, Milan and Dhaka, Bangladesh, Bickey Russell began his career at Google in sales before pursuing his passion for developing technology to serve under-resourced communities. Today, he’s the founder and leader of Kormo Jobs. Guided by Google’s commitment to our AI Principles, Bickey and his team are helping job seekers across Bangladesh, Indonesia, and India find meaningful work. 

What’s your role at Google?

I founded the Kormo Jobs app and currently lead global product operations for it as well as some other new projects in the Next Billion Users initiative at Google.

I drive Kormo Jobs’ go-to-market approach. This involves things like working with employers to use Kormo Jobs to post openings on our platform and building up a community of job seekers who get value from Kormo Jobs as they look for work and grow their careers.

Students holding up pamphlets about Kormo

Participants at a vocational training institute in Jakarta learning about Kormo Jobs.

You’ve held a few different roles in multiple offices. How did you end up working on Kormo Jobs? 

I’m super passionate about the positive impact technology can have on society in countries like my native Bangladesh. Throughout my career at Google I have moved from business analysis to sales, partnerships management and leadership roles, and worked in London, Mountain View and currently, Singapore. Despite all that change, I have always been involved with initiatives to make Google products work better in Bangladesh—ranging from Maps to Bangla language capabilities. 

In 2016, I was fortunate to be able to collaborate with colleagues and pitch an app idea I had to Google’s internal innovation incubator, Area 120. We were hoping to use machine learning to build a better way to help people in Bangladesh get jobs in more blue-collar sectors. Our small team was fortunate to join the Area 120 program, and after just three years, our app became a Google product. Kormo Jobs is live in Bangladesh, India and Indonesia. 

And what were you up to before joining Google?

I grew up in London, Milan and Dhaka, spending middle school and high school  in Dhaka before returning to London for university where I did a degree in geography.

I worked in retail throughout my time in university. The highlight was probably selling band t-shirts in Camden Market! My first full-time job was working as a researcher, and then as a business analyst. 

Can you tell us about your decision to apply to Google?

I was fascinated by the Internet, and I wanted to join a fast-paced company that has an entrepreneurial and open working culture. Google’s vision was majorly inspiring and so attractive to me at the time, and it still is. I felt that if I could join a company like that, I could make an impact.

I applied via the Google careers page. The interview day was quite nerve-wracking, but actually a lot of fun. I remember talking a lot about my interest in cricket, plus my favorite websites and Google products. I was also asked to propose a plan on how we might develop the market for Google AdWords in the UK for a particular industry. That was a challenge, but I guess I did okay!

Bickey presenting on a large stage with a display of the Kormo Jobs app on a screen behind him.

Bickey presenting the Kormo Jobs app at a Google India event.

Can you tell us about the resources you used to prepare for your interview or role?

I didn’t know anyone who worked at Google at the time, but since I knew the job was to join the advertising business in the UK, I reached out and talked to a lot of my network in the advertising and media space to prepare. Plus, I used Search to do research!

Do you have any tips you’d like to share with aspiring Googlers?

I would say that aspiring Googlers should really think about why they are interested in the specific role they are applying for. I often interview candidates who are keen to work at Google but haven’t done enough preparation on why they would be a good fit for the role and team that they have applied to join.

Bickey working with an employer using Kormo Jobs.

Bickey working with an employer using Kormo Jobs.

What inspires you to log in every day?

Having been at the company a long time, I’ve seen firsthand countless times the impact technology can have on people and society at large.

I am inspired by the fact that Google’s AI Principles guide us to make socially beneficial AI systems—and that I get to work with an amazing team at Kormo Jobs to put this principle into practice every day. We invest in applying our tech capability to solving important problems—finding work, earning money, building a career—to people in places like my home town of Dhaka.

Every day I get excited when I see that we’ve helped more people get a job than we did the day before.

Read More

Bootleg: Chasing the Tail with Self-Supervised Named Entity Disambiguation

Bootleg: Chasing the Tail with Self-Supervised Named Entity Disambiguation


Named entity disambiguation (NED) is the process of mapping “strings” to “things” in a knowledge base. You have likely already used a system that requires NED multiple times today. Every time you ask a question to your personal assistant or issue a search query on your favorite browser, these systems use NED to understand what people, places, and things (entities) are being talked about.

Named entity disambiguation example. The ambiguous “Lincoln” refers to the car, not the person or location.

Take the example shown above. You ask your personal assistant “What is the average gas mileage of a Lincoln?”. The assistant would need NED to know that “Lincoln” refers to Lincoln Motors (the car company)—not the former president or city in Nebraska. The ambiguity of mentions in text is what makes NED so challenging as it requires the use of subtle cues.

The spectrum of entities. Popular (head) entities occur frequently in data while rare (tail) entities are infrequent.

NED gets more interesting when we examine the full spectrum of entities shown above, specifically the more rare tail and unseen entities. These are entities that occur infrequently or not at all in data. Performance over the tail is critical because the majority of entities are rare. In Wikidata, only 13% of entities even have Wikipedia pages as a source of textual information.

Bootleg compared to a BERT-based baseline model Févry et el. 2020 showing average F1 versus number of times an entity occurred in the training data. As there are 15x the number of entities in Wikidata than in Wikipedia (most of them are rare) and the baseline model needs to see an entity on average 100x for it to achieve 60 F1, it follows that the baseline model would need to train on data 1,500x the size of Wikipedia to achieve 60 F1 over all entities.

Prior approaches to NED use BERT-based systems to memorize textual patterns associated with an entity (e.g., Abraham Lincoln is associated with “president”). As shown above, the SotA BERT-based baseline from Févry does a great job at memorizing patterns over popular entities (it achieves 86 F1 points over all entities). For the rare entities, it does much worse (58 F1 points lower on the tail). One possible solution to better tail performance is to simply train over more data, but this would likely require training over data 1,500x the size of Wikipedia for the model to achieve 60 F1 points over all entities!

In this blog post, we present Bootleg, a self-supervised approach to NED that is better able to handle rare entities.

Tail Disambiguation through NED Reasoning Patterns

The question we are left with is how to disambiguate these rare entities? Our insight is that humans disambiguate entities, including rare entities, by using signals from text as well as from entity relations and types. For example, the sentence “What is the gas mileage of a Lincoln?” requires reasoning that cars have a gas mileage, not people or locations. This can be used to reason that the mention of “Bluebird” in “What is the average gas mileage of a Bluebird?” refers to the car, a Nissan Bluebird, not the animal. Our goal in Bootleg is to train a model to reason over entity types and relations and better identify these tail entities.

Through empirical analysis, we found four reasoning patterns for NED, shown and defined in the figure below.

Four reasoning patterns of NED. Each pattern uses some combination of entity, type, and relation information.

These patterns rely on signals from entities, types, and relations. Luckily, tail entities do not have equally rare types and relations. This means we should be able to learn type and relation patterns from our data that can apply to tail entities.

Bootleg: A Model for Tail NED

Bootleg takes as input a sentence, determines the possible entity candidates that could be mentioned in the sentence, and outputs the most likely candidates. The core insight that enables Bootleg to better identify rare entities is in how it internally represents entities.

The creation of an entity candidate representation. Each candidate is a combination of an entity, type, and relation learned embedding.

Similar to how words are often represented by continuous word embeddings (e.g., BERT or ELMo), Bootleg represents entity candidates as a combination of a unique entity embedding, a type embedding, and a relation embedding, as shown above. For example, each car entity will get the same car type embedding (likewise for relations) which will encode patterns learned over all cars in the training data. A rare car can then use this global “car type” knowledge for disambiguation, as it will have the car embedding as part of its representation.

To output the correct entities, Bootleg uses these representations in a stacked Transformer module to allow the model to naturally learn the useful patterns for disambiguation without hard-coded rules. Bootleg then scores the output candidate representations and returns the most likely candidates.

There are other exciting techniques we present in our paper regarding regularization and weak labeling to improve tail performance.

Bootleg Improves Tail Performance and Allows for Knowledge Transfer

Our simple insight of training a model to reason over types and relations provides state-of-the-art performance on three standard NED benchmarks – matching or exceeding SotA by up to 5.6 F1 points – and outperforms a BERT-based NED baseline by 5.4 F1 points over all entities and 40 F1 points over tail entities (see F1 versus entity occurrence plot above).

Benchmark System Precision Recall F1
KORE50 Hu et al., 2019 80.0 79.8 79.9
Bootleg 86.0 85.4 85.7
RSS500 Phan et al., 2019 82.3 82.3 82.3
Bootleg 82.5 82.5 82.5
AIDA CoNLL YAGO Févry et al., 2020 96.7
Bootleg 96.9 96.7 96.8

We’ll now show how the entity knowledge encoded in Bootleg’s entity representations can transfer to non-NED tasks. We extract our entity representations and use them in both a production task at a major technology company and relation extraction task. We find that the use of Bootleg embeddings in the production task provides a 8% lift in performance and even improves quality over Spanish, French, and German languages. We repeat this experiment by adding Bootleg representations to a SotA model for the TACRED relation extraction task (see tutorial). We find this Bootleg-enhanced model sets a new SotA by 1 F1 point.

Model TACRED F1
Bootleg-Enhanced 80.3
KnowBERT 79.3
SpanBERT 78.0

These results suggest that Bootleg entity representations can transfer entity knowledge to other language tasks!

Recap

To recap, we described the problem of the tail of NED and showed that existing NED systems fall short at disambiguating these rare, yet important entities. We then introduced four reasoning patterns for NED and described how we trained Bootleg to learn these patterns through the use of embeddings and Transformer modules. We finally showed that Bootleg is a SotA NED system that better disambiguates rare entities than prior methods. Further, Bootleg learns representations that can transfer entity knowledge to non-NED tasks.

We are actively developing Bootleg and would love to hear your thoughts. See our website, source code, and paper.

Read More

Prototype Features Now Available – APIs for Hardware Accelerated Mobile and ARM64 Builds

Today, we are announcing four PyTorch prototype features. The first three of these will enable Mobile machine-learning developers to execute models on the full set of hardware (HW) engines making up a system-on-chip (SOC). This gives developers options to optimize their model execution for unique performance, power, and system-level concurrency.

These features include enabling execution on the following on-device HW engines:

  • DSP and NPUs using the Android Neural Networks API (NNAPI), developed in collaboration with Google
  • GPU execution on Android via Vulkan
  • GPU execution on iOS via Metal

This release also includes developer efficiency benefits with newly introduced support for ARM64 builds for Linux.

Below, you’ll find brief descriptions of each feature with the links to get you started. These features are available through our nightly builds. Reach out to us on the PyTorch Forums for any comment or feedback. We would love to get your feedback on those and hear how you are using them!

NNAPI Support with Google Android

The Google Android and PyTorch teams collaborated to enable support for Android’s Neural Networks API (NNAPI) via PyTorch Mobile. Developers can now unlock high-performance execution on Android phones as their machine-learning models will be able to access additional hardware blocks on the phone’s system-on-chip. NNAPI allows Android apps to run computationally intensive neural networks on the most powerful and efficient parts of the chips that power mobile phones, including DSPs (Digital Signal Processors) and NPUs (specialized Neural Processing Units). The API was introduced in Android 8 (Oreo) and significantly expanded in Android 10 and 11 to support a richer set of AI models. With this integration, developers can now seamlessly access NNAPI directly from PyTorch Mobile. This initial release includes fully-functional support for a core set of features and operators, and Google and Facebook will be working to expand capabilities in the coming months.

Links

PyTorch Mobile GPU support

Inferencing on GPU can provide great performance on many models types, especially those utilizing high-precision floating-point math. Leveraging the GPU for ML model execution as those found in SOCs from Qualcomm, Mediatek, and Apple allows for CPU-offload, freeing up the Mobile CPU for non-ML use cases. This initial prototype level support provided for on device GPUs is via the Metal API specification for iOS, and the Vulkan API specification for Android. As this feature is in an early stage: performance is not optimized and model coverage is limited. We expect this to improve significantly over the course of 2021 and would like to hear from you which models and devices you would like to see performance improvements on.

Links

ARM64 Builds for Linux

We will now provide prototype level PyTorch builds for ARM64 devices on Linux. As we see more ARM usage in our community with platforms such as Raspberry Pis and Graviton(2) instances spanning both at the edge and on servers respectively. This feature is available through our nightly builds.

We value your feedback on these features and look forward to collaborating with you to continuously improve them further!

Thank you,

Team PyTorch

Read More

Improving On-Device Speech Recognition with VoiceFilter-Lite

Improving On-Device Speech Recognition with VoiceFilter-Lite

Posted by Quan Wang, Software Engineer, Google Research

Voice assistive technologies, which enable users to employ voice commands to interact with their devices, rely on accurate speech recognition to ensure responsiveness to a specific user. But in many real-world use cases, the input to such technologies often consists of overlapping speech, which poses great challenges to many speech recognition algorithms. In 2018, we published a VoiceFilter system, which leverages Google’s Voice Match to personalize interaction with assistive technology by allowing people to enroll their voices.


While the VoiceFilter approach is highly successful, achieving a better source to distortion ratio (SDR) than conventional approaches, efficient on-device streaming speech recognition requires addressing restrictions such as model size, CPU and memory limitations, as well as battery usage considerations and latency minimization.

In “VoiceFilter-Lite: Streaming Targeted Voice Separation for On-Device Speech Recognition”, we present an update to VoiceFilter for on-device use that can significantly improve speech recognition in overlapping speech by leveraging the enrolled voice of a selected speaker. Importantly, this model can be easily integrated with existing on-device speech recognition applications, allowing the user to access voice assistive features under extremely noisy conditions even if an internet connection is unavailable. Our experiments show that a 2.2MB VoiceFilter-Lite model provides a 25.1% improvement to the word error rate (WER) on overlapping speech.


Improving On-Device Speech Recognition
While the original VoiceFilter system was very successful at separating a target speaker’s speech signal from other overlapping sources, its model size, computational cost and latency are not feasible for speech recognition on mobile devices.

The new VoiceFilter-Lite system has been carefully designed to fit on-device applications. Instead of processing audio waveforms, VoiceFilter-Lite takes exactly the same input features as the speech recognition model (stacked log Mel-filterbanks), and directly enhances these features by filtering out components not belonging to the target speaker in real time. Together with several optimizations on network topologies, the number of runtime operations is drastically reduced. After quantizing the neural network with the TensorFlow Lite library, the model size is only 2.2 MB, which fits most on-device applications.

To train the VoiceFilter-Lite model, the filterbanks of the noisy speech are fed as input to the network together with an embedding vector that represents the identity of the target speaker (i.e., a d-vector). The network predicts a mask that is element-wise multiplied to the input to produce enhanced filterbanks. A loss function is defined to minimize the difference between the enhanced filterbanks and the filterbanks from the clean speech during training.

Model architecture of the VoiceFilter-Lite system.

VoiceFilter-Lite is a plug-and-play model, which allows the application in which it’s implemented to easily bypass it if the speaker did not enroll their voice. This also means that the speech recognition model and the VoiceFilter-Lite model can be separately trained and updated, which largely reduces engineering complexity in the deployment process.

As a plug-and-play model, VoiceFilter-Lite can be easily bypassed if the speaker did not enroll their voice.

Addressing the Challenge of Over-Suppression
When speech separation models are used for improving speech recognition, two types of error could occur: under-suppression, when the model fails to filter out noisy components from the signal; and over-suppression, when the model fails to preserve useful signal, resulting in some words being dropped from the recognized text. Over-suppression is especially problematic since modern speech recognition models are usually already trained with extensively augmented data (such as room simulation and SpecAugment), and thus are more robust to under-suppression.

VoiceFilter-Lite addresses the over-suppression issue with two novel approaches. First, it uses an asymmetric loss during the training process, such that the model is less tolerant to over-suppression than under-suppression. Second, it predicts the type of noise at runtime, and adaptively adjusts the suppression strength according to this prediction.

VoiceFilter-Lite adaptively applies stronger suppression strength when overlapping speech is detected.

With these two solutions, the VoiceFilter-Lite model retains great performance on streaming speech recognition for other scenarios, such as single-speaker speech under quiet or various noise conditions, while still providing significant improvement on overlapping speech. From our experiments, we observed a 25.1% improvement of word error rate after the 2.2MB VoiceFilter-Lite model is applied on additive overlapping speech. For reverberant overlapping speech, which is a more challenging task to simulate far-field devices such as smart home speakers, we also observed a 14.7% improvement of word error rate with VoiceFilter-Lite.

Future Work
While VoiceFilter-Lite has shown great promise for various on-device speech applications, we are also exploring several other directions to make VoiceFilter-Lite more useful. First, our current model is trained and evaluated with English speech only. We are excited about adopting the same technology to improve speech recognition for more languages. Second, we would like to directly optimize the speech recognition loss during the training of VoiceFilter-Lite, which can potentially further improve speech recognition beyond overlapping speech.

Acknowledgements
The research described in this post represents joint efforts from multiple teams within Google. Contributors include Quan Wang, Ignacio Lopez Moreno, Mert Saglam, Kevin Wilson, Alan Chiao, Renjie Liu, Yanzhang He, Wei Li, Jason Pelecanos, Philip Chao, Sinan Akay, John Han, Stephen Wu, Hannah Muckenhirn, Ye Jia, Zelin Wu, Yiteng Huang, Marily Nika, Jaclyn Konzelmann, Nino Tasca, and Alexander Gruenstein.

Read More

Measuring Bias in NLP (with Confidence!)

Measuring Bias in NLP (with Confidence!)

Countless studies have found that “bias” – typically with respect to race and gender – pervades the embeddings and predictions of the black-box models that dominate natural language processing (NLP). For example, the language model GPT-3, of OpenAI fame, can generate racist rants when given the right prompt. Attempts to detect hate speech can itself harm minority populations, whose dialect is more likely to be flagged as hateful.

This, in turn, has led to a wave of work on how to “debias” models, only for others to find ways in which debiased models are still biased, and so on.

But are these claims of NLP models being biased (or unbiased) being made with enough evidence?

Consider the sentence “The doctor gave instructions to the nurse before she left.” A co-reference resolution system, tasked with finding which person the pronoun “she” is referring to1, may incorrectly predict that it’s the nurse. Does this incorrect prediction – which conforms to gender stereotypes that doctors are usually male – mean that the system is gender-biased? Possibly – but it may also make mistakes in the other direction with equal frequency (e.g., thinking “he” refers to a nurse when it doesn’t). What if the system makes gender-stereotypical mistakes on not one sentence, but 100, or 1000? Then we could be more confident in claiming that it’s biased.

In my ACL 2020 paper, “Measuring Fairness under Uncertainty with Bernstein Bounds”, I go over how, in the haste to claim the presence or absence of bias, the inherent uncertainty in measuring bias is often overlooked in the literature:

  • Bias is not a single number. When we test how biased a model is, we are estimating its bias on a sample of the data; our estimate may suggest that the model is biased or unbiased, but the opposite could still be true.

  • This uncertainty can be captured using confidence intervals. Instead of reporting a single number for bias, practitioners should report an interval, based on factors such as the desired confidence and the proposed definition of “bias”.

  • Existing datasets are too small to conclusively identify bias. Existing datasets for measuring specific biases can only be used to make 95% confidence claims when the bias estimate is egregiously high; to catch more subtle bias, the NLP community needs bigger datasets.

Although this problem can exist with any kind of model, we focus on a remedy for classification models in particular.

Bernstein-Bounded Unfairness

A bias estimate, made using a small sample of data, likely differs from the true bias (i.e., at the population-level). How can we express our uncertainty about the estimate? We propose a method called Bernstein-bounded unfairness that translates this uncertainty into a confidence interval2.

Let’s say we want to measure whether some protected group – that is legally protected due to an attribute such as race or gender – is being discriminated against by some classifier, relative to some unprotected group . They occur in the population with frequency respectively. We need

  • An annotation function that maps each example to or neither. Note that the annotation function maps inputs to the protected/unprotected groups, not to the output space . For example, if we wanted to study how a sentiment classifier performed across different racial groups, then the inputs would be sentences, labels would be the sentiment, and the annotation function might map to {white, non-white} depending on the racial group of the sentence author.

  • A cost function that describes the cost of incorrectly predicting when the true label is , where is the maximum possible cost. Since a model making an incorrect prediction for is an undesirable outcome for the group that belongs to, we frame this as a cost that must be borne by the group.

We want to choose these functions such that our bias metric of choice – which we call the groupwise disparity – can be expressed as the difference in expected cost borne by the protected and unprotected groups. Given a model that makes predictions for protected and for unprotected , we want to express the bias as:

If the protected group is incurring higher costs in expectation, it is being biased against. For example, if we want to determine whether a classifier is more accurate on the unprotected group , then we would set the cost function to be the 1-0 loss (1 for an incorrect prediction, 0 for a correct one). If has a lower cost on average then , then it would mean that the classifier is more accurate on .

For a desired confidence level , a dataset of examples, and the variance of the amortized groupwise disparity across examples, the confidence interval would be

If we set , we could claim with 95% confidence that the true bias experienced by the protected group lies in the interval , where is our bias estimate.

Why We Need Bigger Datasets

If we want to say with 95% confidence that a classifier is biased to some extent – but want to spend as little time annotating data as possible – we need to find the smallest such that . We can do this by working backwards from the formula for given above (see paper for details).

Let’s go back to our original example. Say we want to figure out whether a co-reference resolution system, tasked with matching pronouns to the nouns they refer to, is gender-biased or not. We have a dataset of 500 examples to test whether the model does better on gender-stereotypical examples (e.g., a female nurse) than non-gender-stereotypical examples (e.g., a male nurse). Since we are measuring the difference in accuracy, we set the cost function to be the 1-0 loss.

On this dataset, our bias estimate for a model we’re evaluating is . Is this enough to claim with 95% confidence that the model is gender-biased?

In this scenario . We assume that there are equally many stereotypical and non-stereotypical examples and that the variance is maximal, so .

With these settings, ; we would need a dataset of more than 11903 examples to claim with 95% confidence that the co-reference resolution system is gender-biased. This is roughly 3.8 times larger than WinoBias, the largest dataset currently available for this purpose. We could only use WinoBias if – that is, if the sample bias were almost twice as high.

As seen above, the WinoBias dataset cannot be used to make claims of bias with 95% confidence unless the sample bias is egregiously high.

Conclusion

In the haste to claim the presence or absence of bias in models, the uncertainty in estimating bias is often overlooked in the literature. A model’s bias is often thought of as a single number, even though this number is ultimately an estimate and not the final word on whether the model is or is not biased.

We proposed a method called Bernstein-bounded unfairness for capturing this uncertainty using confidence intervals. To faithfully reflect the range of possible conclusions, we recommend that NLP practitioners measuring bias not only report their bias estimate but also this confidence interval.

What if we want to catch more subtle bias? Although it may be possible to derive tighter confidence intervals, what we really need are larger bias-specific datasets. The datasets we currently have are undoubtedly helpful, but they need to be much larger in order to diagnose biases with confidence.

Acknowledgements

Many thanks to Krishnapriya Vishnubhotla, Michelle Lee, and Kaitlyn Zhou for their feedback on this blog post.

  1. The goal of coreference resolution more broadly is to find all expressions that refer to the same entity in a text. For example, in “I gave my mother Sally a gift for her birthday.”, the terms “my mother”, “Sally”, and “her” all refer to the same entity. 

  2. We use Bernstein’s inequality to derive the confidence intervals, hence the name Bernstein-bounded unfairness. This inequality tells us with what probability the average of independent random variables will be within a constant $t$ of their true mean $mu$. 

Read More

Configuring Amazon SageMaker Studio for teams and groups with complete resource isolation

Configuring Amazon SageMaker Studio for teams and groups with complete resource isolation

Amazon SageMaker is a fully managed service that provides every machine learning (ML) developer and data scientist with the ability to build, train, and deploy ML models quickly. Amazon SageMaker Studio is a web-based, integrated development environment (IDE) for ML that lets you build, train, debug, deploy, and monitor your ML models. Amazon SageMaker Studio provides all the tools you need to take your models from experimentation to production while boosting your productivity. You can write code, track experiments, visualize data, and perform debugging and monitoring within a single, integrated visual interface.

This post outlines how to configure access control for teams or groups within Amazon SageMaker Studio using attribute-based access control (ABAC). ABAC is a powerful approach that you can utilize to configure Studio so that different ML and data science teams have complete isolation of team resources.

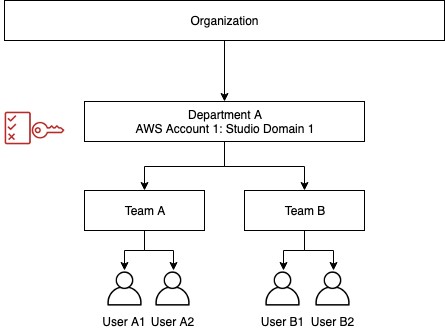
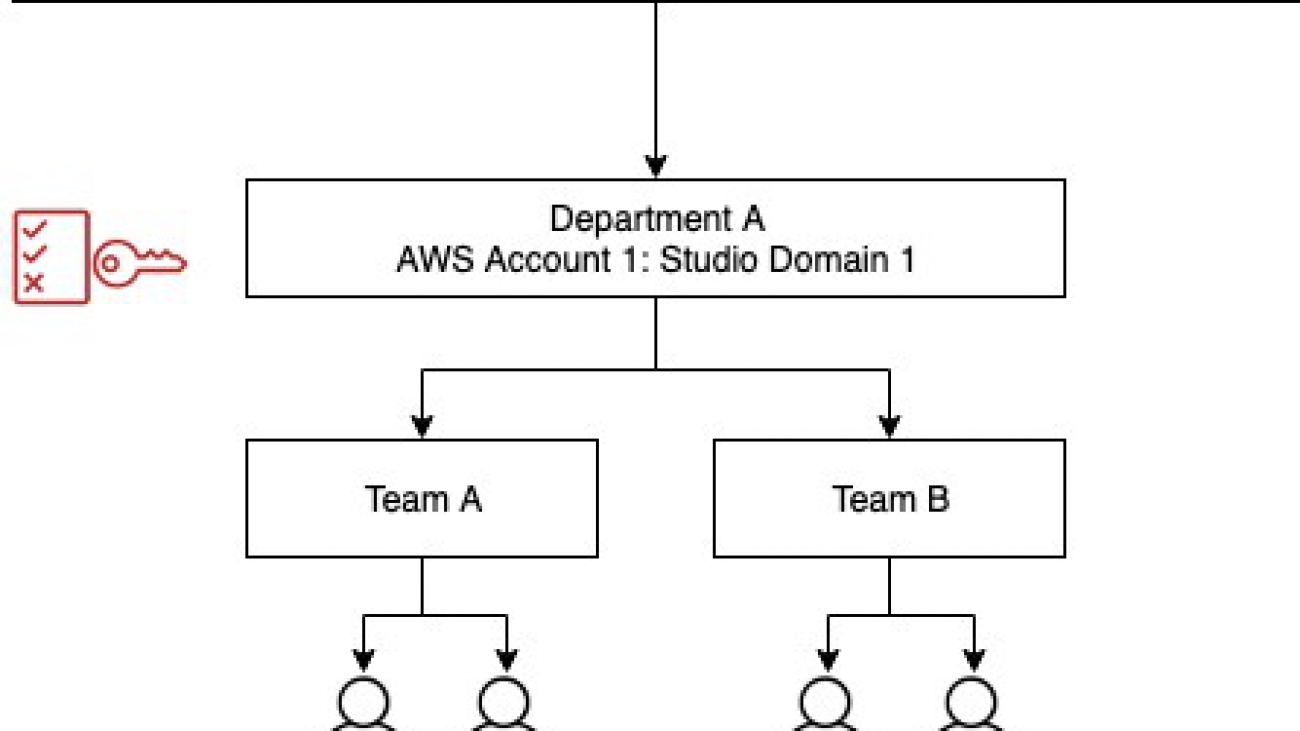
We provide guidance on how to configure Amazon SageMaker Studio access for both AWS Identity and Access Management (IAM) and AWS Single Sign-On (AWS SSO) authentication methods. This post helps you set up IAM policies for users and roles using ABAC principals. To demonstrate the configuration, we set up two teams as shown in the following diagram and showcase two use cases:

  • Use case 1 – Only User A1 can access their studio environment; User A2 can’t access User A1’s environment, and vice versa
  • Use case 2 – Team B users cannot access artifacts (experiments, etc.) created by Team A members

You can configure policies according to your needs. You can even include a project tag in case you want to further restrict user access by projects within a team. The approach is very flexible and scalable.

Authentication

Amazon SageMaker Studio supports the following authentication methods for onboarding users. When setting up Studio, you can pick an authentication method that you use for all your users:

  • IAM – Includes the following:
    • IAM users – Users managed in IAM
    • AWS account federation – Users managed in an external identity provider (IdP)
  • AWS SSO – Users managed in an external IdP federated using AWS SSO

Data science user personas

The following table describes two different personas that interact with Amazon SageMaker Studio resources and the level of access they need to fulfill their duties. We use this table as a high-level requirement to model IAM roles and policies to establish desired controls based on resource ownership at the team and user level.

User Personas Permissions
Admin User

Create, modify, delete any IAM resource.

Create Amazon SageMaker Studio user profiles with a tag.

Sign in to the Amazon SageMaker console.

Read and describe Amazon SageMaker resources.

Data Scientists or Developers

Launch an Amazon SageMaker Studio IDE assigned to a specific IAM or AWS SSO user.

Create Amazon SageMaker resources with necessary tags. For this post, we use the team tag.

Update, delete, and run resources created with a specific tag.

Sign in to the Amazon SageMaker console if an IAM user.

Read and describe Amazon SageMaker resources.

Solution overview

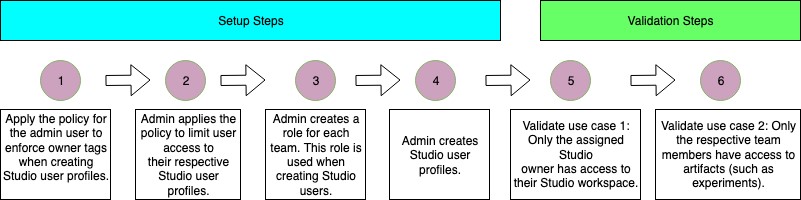
We use the preceding requirements to model roles and permissions required to establish controls. The following flow diagram outlines the different configuration steps:

Applying your policy to the admin user

You should apply the following policy to the admin user who creates Studio user profiles. This policy requires the admin to include the studiouserid tag. You could use a different name for the tag if need be. The Studio console doesn’t allow you to add tags when creating user profiles, so we use the AWS Command Line Interface (AWS CLI).

For admin users managed in IAM, attach the following policy to the user. For admin users managed in an external IdP, add the following policy to the rule that the user assumes upon federation. The following policy enforces the studiouserid tag to be present when the sagemaker:CreateUserProfile action is invoked.

{
    "Version": "2012-10-17",
    "Statement": [
        {
            "Sid": "CreateSageMakerStudioUserProfilePolicy",
            "Effect": "Allow",
            "Action": "sagemaker:CreateUserProfile",
            "Resource": "*",
            "Condition": {
                "ForAnyValue:StringEquals": {
                    "aws:TagKeys": [
                        "studiouserid"
                    ]
                }
            }
        }
    ]
}

AWS SSO doesn’t require this policy; it performs the identity check.

Assigning the policy to Studio users

The following policy limits Studio access to the respective users by requiring the resource tag to match the user name for the sagemaker:CreatePresignedDomainUrl action. When a user tries to access the Amazon SageMaker Studio launch URL, this check is performed.

For IAM users, attach the following policy to the user. Use the user name for the studiouserid tag value.

{
    "Version": "2012-10-17",
    "Statement": [
        {
            "Sid": "AmazonSageMakerPresignedUrlPolicy",
            "Effect": "Allow",
            "Action": [
                "sagemaker:CreatePresignedDomainUrl"
            ],
            "Resource": "*",
            "Condition": {
                "StringEquals": {
                    "sagemaker:ResourceTag/studiouserid": "${aws:username}" 
                }
            }
        }
    ]
}

For AWS account federation, attach the following policy to role that the user assumes after federation:

{
   "Version": "2012-10-17",
   "Statement": [
       {
           "Sid": "AmazonSageMakerPresignedUrlPolicy",
           "Effect": "Allow",
           "Action": [
                "sagemaker:CreatePresignedDomainUrl"
           ],
           "Resource": "*",
           "Condition": {
                  "StringEquals": {
                      "sagemaker:ResourceTag/studiouserid": "${aws:PrincipalTag/studiouserid}"
                 }
            }
      }
  ]
}

Add the following statement to this policy in the Trust Relationship section. This statement defines the allowed transitive tag.

"Statement": [
     {
        --Existing statements
      },
      {
      "Sid": "IdentifyTransitiveTags",
      "Effect": "Allow",
      "Principal": {
        "Federated": "arn:aws:iam::<account id>:saml-provider/<identity provider>"
      },
      "Action": "sts:TagSession",
      "Condition": {
        "ForAllValues:StringEquals": {
          "sts:TransitiveTagKeys": [
            "studiouserid"
          ]
        }
      }
  ]

For users managed in AWS SSO, this policy is not required. AWS SSO performs the identity check.

Creating roles for the teams

To create roles for your teams, you must first create the policies. For simplicity, we use the same policies for both teams. In most cases, you just need one set of policies for all teams, but you have the flexibility to create different policies for different teams. In the second step, you create a role for each team, attach the policies, and tag the roles with appropriate team tags.

Creating the policies

Create the following policies. For this post, we split them into three policies for more readability, but you can create them according to your needs.

Policy 1: Amazon SageMaker read-only access

The following policy gives privileges to List and Describe Amazon SageMaker resources. You can customize this policy according to your needs.

{
    "Version": "2012-10-17",
    "Statement": [
        {
            "Sid": "AmazonSageMakerDescribeReadyOnlyPolicy",
            "Effect": "Allow",
            "Action": [
                "sagemaker:Describe*",
                "sagemaker:GetSearchSuggestions"
            ],
            "Resource": "*"
        },
        {
            "Sid": "AmazonSageMakerListOnlyPolicy",
            "Effect": "Allow",
            "Action": [
                "sagemaker:List*"
            ],
            "Resource": "*"
        },
        {
            "Sid": "AmazonSageMakerUIandMetricsOnlyPolicy",
            "Effect": "Allow",
            "Action": [
                "sagemaker:*App",
                "sagemaker:Search",
                "sagemaker:RenderUiTemplate",
                "sagemaker:BatchGetMetrics"
            ],
            "Resource": "*"
        },
        {
            "Sid": "AmazonSageMakerEC2ReadOnlyPolicy",
            "Effect": "Allow",
            "Action": [
                "ec2:DescribeDhcpOptions",
                "ec2:DescribeNetworkInterfaces",
                "ec2:DescribeRouteTables",
                "ec2:DescribeSecurityGroups",
                "ec2:DescribeSubnets",
                "ec2:DescribeVpcEndpoints",
                "ec2:DescribeVpcs"
            ],
            "Resource": "*"
        },
        {
            "Sid": "AmazonSageMakerIAMReadOnlyPolicy",
            "Effect": "Allow",
            "Action": [
                "iam:ListRoles"
            ],
            "Resource": "*"
        }
    ]
}

Policy 2: Amazon SageMaker access for supporting services

The following policy gives privileges to create, read, update, and delete access to Amazon Simple Storage Service (Amazon S3), Amazon Elastic Container Registry (Amazon ECR), and Amazon CloudWatch, and read access to AWS Key Management Service (AWS KMS). You can customize this policy according to your needs.

{
    "Version": "2012-10-17",
    "Statement": [
        {
            "Sid": "AmazonSageMakerCRUDAccessS3Policy",
            "Effect": "Allow",
            "Action": [
"s3:PutObject",
"s3:GetObject",
"s3:AbortMultipartUpload",
"s3:DeleteObject",
"s3:CreateBucket",
"s3:ListBucket",
"s3:PutBucketCORS",
"s3:ListAllMyBuckets",
"s3:GetBucketCORS",
               	"s3:GetBucketLocation"         
              ],
            "Resource": "<S3 BucketName>"
        },
        {
            "Sid": "AmazonSageMakerReadOnlyAccessKMSPolicy",
            "Effect": "Allow",
            "Action": [
                "kms:DescribeKey",
                "kms:ListAliases"
            ],
            "Resource": "*"
        },
        {
            "Sid": "AmazonSageMakerCRUDAccessECRPolicy",
            "Effect": "Allow",
            "Action": [
"ecr:Set*",
"ecr:CompleteLayerUpload",
"ecr:Batch*",
"ecr:Upload*",
"ecr:InitiateLayerUpload",
"ecr:Put*",
"ecr:Describe*",
"ecr:CreateRepository",
"ecr:Get*",
                 	"ecr:StartImageScan"
            ],
            "Resource": "*"
        },
        {
            "Sid": "AmazonSageMakerCRUDAccessCloudWatchPolicy",
            "Effect": "Allow",
            "Action": [
"cloudwatch:Put*",
"cloudwatch:Get*",
"cloudwatch:List*",
"cloudwatch:DescribeAlarms",
"logs:Put*",
"logs:Get*",
"logs:List*",
"logs:CreateLogGroup",
"logs:CreateLogStream",
"logs:ListLogDeliveries",
"logs:Describe*",
"logs:CreateLogDelivery",
"logs:PutResourcePolicy",
                 	"logs:UpdateLogDelivery"
            ],
            "Resource": "*"
        }
    ]
} 

Policy 3: Amazon SageMaker Studio developer access

The following policy gives privileges to create, update, and delete Amazon SageMaker Studio resources.
It also enforces the team tag requirement during creation. In addition, it enforces start, stop, update, and delete actions on resources restricted only to the respective team members.

The team tag validation condition in the following code makes sure that the team tag value matches the principal’s team. Refer to the bolded code for specifcs.

{
    "Version": "2012-10-17",
    "Statement": [
        {
            "Sid": "AmazonSageMakerStudioCreateApp",
            "Effect": "Allow",
            "Action": [
                "sagemaker:CreateApp"
            ],
            "Resource": "*"
        },
        {
            "Sid": "AmazonSageMakerStudioIAMPassRole",
            "Effect": "Allow",
            "Action": [
                "iam:PassRole"
            ],
            "Resource": "*"
        },
        {
            "Sid": "AmazonSageMakerInvokeEndPointRole",
            "Effect": "Allow",
            "Action": [
                "sagemaker:InvokeEndpoint"
            ],
            "Resource": "*"
        },
        {
            "Sid": "AmazonSageMakerAddTags",
            "Effect": "Allow",
            "Action": [
                "sagemaker:AddTags"
            ],
            "Resource": "*"
        },
        {
            "Sid": "AmazonSageMakerCreate",
            "Effect": "Allow",
            "Action": [
                "sagemaker:Create*"
            ],
            "Resource": "*",
            "Condition": { "ForAnyValue:StringEquals": { "aws:TagKeys": [ "team" ] }, "StringEqualsIfExists": { "aws:RequestTag/team": "${aws:PrincipalTag/team}" } }
        },
        {
            "Sid": "AmazonSageMakerUpdateDeleteExecutePolicy",
            "Effect": "Allow",
            "Action": [
                "sagemaker:Delete*",
                "sagemaker:Stop*",
                "sagemaker:Update*",
                "sagemaker:Start*",
                "sagemaker:DisassociateTrialComponent",
                "sagemaker:AssociateTrialComponent",
                "sagemaker:BatchPutMetrics"
            ],
            "Resource": "*",
            "Condition": { "StringEquals": { "aws:PrincipalTag/team": "${sagemaker:ResourceTag/team}" } }
        }
    ]
}

Creating and configuring the roles

You can now create a role for each team with these policies. Tag the roles on the IAM console or with the CLI command. The steps are the same for all three authentication types. For example, tag the role for Team A with the tag key= team and value = “<Team Name>”.

Creating the Amazon SageMaker Studio user profile

In this step, we add the studiouserid tag when creating Studio user profiles. The steps are slightly different for each authentication type.

IAM users

For IAM users, you create Studio user profiles for each user by including the role that was created for the team the user belongs to. The following code is a sample CLI command. As of this writing, including a tag when creating a user profile is available only through AWS CLI.

aws sagemaker create-user-profile --domain-id <domain id> --user-profile-name <unique profile name> --tags Key=studiouserid,Value=<aws user name> --user-settings ExecutionRole=arn:aws:iam::<account id>:role/<Team Role Name>

AWS account federation

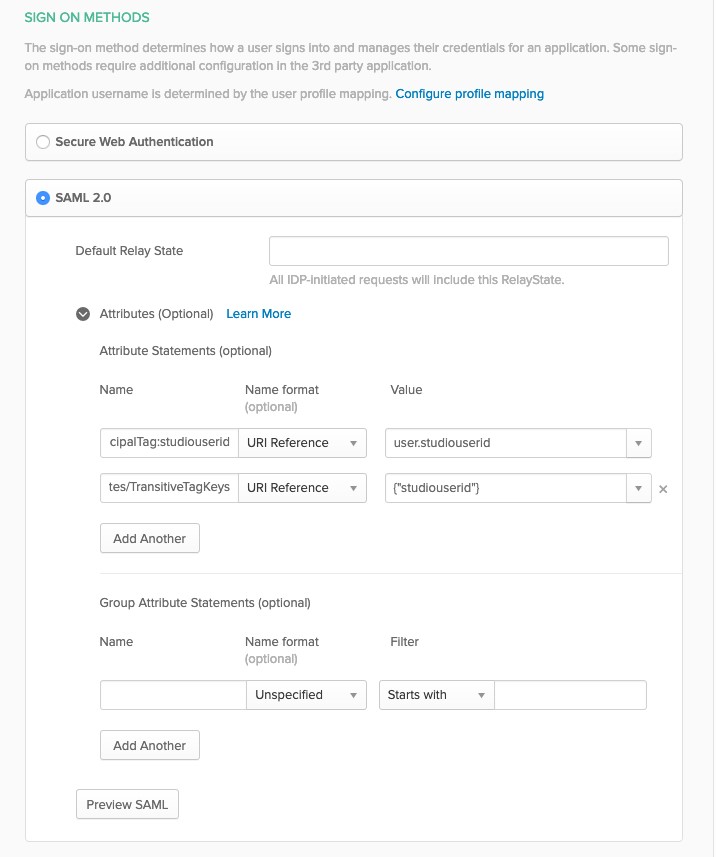
For AWS account federation, you create a user attribute (studiouserid) in an external IdP with a unique value for each user. The following code shows how to configure the attribute in Okta:

Example below shows how to add “studiouserid” attribute in OKTA. In OKTA’s SIGN ON METHODS screen, configure following SAML 2.0 attributes, as shown in the image below. 

Attribute 1:
Name: https://aws.amazon.com/SAML/Attributes/PrincipalTag:studiouserid 
Value: user.studiouserid

Attribute 2:
Name: https://aws.amazon.com/SAML/Attributes/TransitiveTagKeys
Value: {"studiouserid"}

The following screenshot shows the attributes on the Okta console.

Next, create the user profile using the following command. Use the user attribute value in the preceding step for the studiouserid tag value.

aws sagemaker create-user-profile --domain-id <domain id> --user-profile-name <unique profile name> --tags Key=studiouserid,Value=<user attribute value> --user-settings ExecutionRole=arn:aws:iam::<account id>:role/<Team Role Name>

AWS SSO

For instructions on assigning users in AWS SSO, see Onboarding Amazon SageMaker Studio with AWS SSO and Okta Universal Directory.

Update the Studio user profile to include the appropriate execution role that was created for the team that the user belongs to. See the following CLI command:

aws sagemaker update-user-profile --domain-id <domain id> --user-profile-name <user profile name> --user-settings ExecutionRole=arn:aws:iam::<account id>:role/<Team Role Name> --region us-west-2

Validating that only assigned Studio users can access their profiles

When a user tries to access a Studio profile that doesn’t have studiouserid tag value matching their user name, an AccessDeniedException error occurs. You can test this by copying the link for Launch Studio on the Amazon SageMaker console and accessing it when logged in as a different user. The following screenshot shows the error message.

Validating that only respective team members can access certain artifacts

In this step, we show how to configure Studio so that members of a given team can’t access artifacts that another team creates.

In our use case, a Team A user creates an experiment and tags that experiment with the team tag. This limits access to this experiment to Team A users only. See the following code:

import sys
!{sys.executable} -m pip install sagemaker
!{sys.executable} -m pip install sagemaker-experiments

import time
import sagemaker
from smexperiments.experiment import Experiment

demo_experiment = Experiment.create(experiment_name = "USERA1TEAMAEXPERIMENT1",
                                    description = "UserA1 experiment",
                                    tags = [{'Key': 'team', 'Value': 'TeamA'}])

If a user who is not in Team A tries to delete the experiment, Studio denies the delete action. See the following code:

#command run from TeamB User Studio Instance
import time
from smexperiments.experiment import Experiment
experiment_to_cleanup = Experiment.load(experiment_name="USERA1TEAMAEXPERIMENT1")
experiment_to_cleanup.delete()

[Client Error]
An error occurred (AccessDeniedException) when calling the DeleteExperiment operation: User: arn:aws:sts:: :<AWS Account ID>::assumed-role/ SageMakerStudioDeveloperTeamBRole/SageMaker is not authorized to perform: sagemaker:DeleteExperiment on resource: arn:aws:sagemaker:us-east-1:<AWS Account ID>:experiment/usera1teamaexperiment1

Conclusion

In this post, we demonstrated how to isolate Amazon SageMaker Studio access using the ABAC technique. We showcased two use cases: restricting access to a Studio profile to only the assigned user (using the studiouserid tag) and restricting access to Studio artifacts to team members only. We also showed how to limit access to experiments to only the members of the team using the team tag. You can further customize policies by applying more tags to create more complex hierarchical controls.

Try out this solution for isolating resources by teams or groups in Amazon SageMaker Studio. For more information about using ABAC as an authorization strategy, see What is ABAC for AWS?


About the Authors

Vikrant Kahlir is Senior Solutions Architect in the Solutions Architecture team. He works with AWS strategic customers product and engineering teams to help them with technology solutions using AWS services for Managed Databases, AI/ML, HPC, Autonomous Computing, and IoT.


Rakesh Ramadas is an ISV Solution Architect at Amazon Web Services. His focus areas include AI/ML and Big Data.


Rama Thamman is a Software Development Manager with the AI Platforms team, leading the ML Migrations team.

Read More

British Newscaster speaking style now available in Amazon Polly

British Newscaster speaking style now available in Amazon Polly

Amazon Polly turns text into lifelike speech, allowing you to create applications that talk and build entirely new categories of speech-enabled products. We’re thrilled to announce the launch of a brand-new, British Newscaster speaking style voice: Amy. The speaking style mimics a formal and authoritative British newsreader. This Newscaster voice is the result of our latest achievements in Neural Text-to-Speech (NTTS) technology, making it possible to release new voices with only a few hours of recordings.

Amy’s British English Newscaster voice offers an alternative to the existing Newscaster speaking styles in US English (Matthew and Joanna, launched in July 2019) and US Spanish (Lupe, launched in April 2020). The style is suitable for a multitude of sectors, such as publishing and media. The high quality of the voice and its broadcaster-like style contribute to a more pleasant listening experience to relay news content.

Don’t just take our word for it! Our customer SpeechKit is a text-to-audio service that utilizes Amazon Polly as a core component of their toolkit. Here’s what their co-founder and COO, James MacLeod, has to say about this exciting new style: “News publishers use SpeechKit to publish their articles and newsletters in audio. The Amy Newscaster style is another great improvement from the Polly team, the pitch and clarity of intonation of this style fits well with this type of short-to-mid form news publishing. It provides listeners with a direct and informative style they’re used to hearing from human-read audio articles. As these voices advance, and new listening habits develop, publishers continue to observe improvements in audio engagement. News publishers can now start using the Amy Newscaster style through SpeechKit to make their articles available in audio, at scale, and track audio engagement.

You can listen to the following samples to hear how this brand-new British Newscaster speaking style sounds:

Amy: 

The following samples are the other Newscaster speaking styles in US English and US Spanish: 

Matthew:

Joanna:

Lupe: 

You can use Amy’s British Newscaster speaking style via the Amazon Polly console, the AWS Command Line Interface (AWS CLI), or AWS SDK. The feature is available in all AWS Regions supporting NTTS. For more information, see What Is Amazon Polly? For the full list of available voices, see Voices in Amazon Polly. Or log in to the Amazon Polly console to try it out for yourself! Additionally, Amy Newscaster and other selected Polly voices are now available to Alexa skill developers.


About the Author

Goeric Huybrechts is a Software Development Engineer in the Amazon Text-to-Speech Research team. At work, he is passionate about everything that touches AI. Outside of work, he loves sports, football in particular, and loves to travel.

Read More