Using the AWS DeepRacer new Soft Actor Critic algorithm with continuous action spaces

AWS DeepRacer is the fastest way to get started with machine learning (ML). You can train reinforcement learning (RL) models by using a 1/18th scale autonomous vehicle in a cloud-based virtual simulator and compete for prizes and glory in the global AWS DeepRacer League.

We’re excited to bring you two new features available on the AWS DeepRacer console: a new RL algorithm called Soft Actor Critic (SAC) and a new way of defining your action space called continuous action space. Understanding how SAC and continuous action space work will let you come up with new strategies to top the AWS DeepRacer League. This post walks you through the unique features of the SAC algorithm and how to use it with continuous action space. By the end, you will learn how to use continuous action space and be ready to train your first SAC RL model on the AWS DeepRacer console.

Reviewing the fundamentals

Let’s first review some fundamental RL concepts that give us a foundation to dive deeper into SAC. The objective of RL models is to maximize total reward, which is done by exploring the environment. In the case of the AWS DeepRacer, the environment is the track that you choose to train your model on. The agent, which for AWS DeepRacer is the car, explores the environment by following a policy. A policy determines the action the agent takes after observing the environment (for example turning left, forward, or right). AWS DeepRacer observes the environment by using image data or a combination of image and LIDAR data.

As the agent explores the environment, the agent learns a value function. We can think of the value function as a way to judge how good an action taken is, after observing the environment. The value function uses the reward function that you write in the AWS DeepRacer console to score the action. For example, if we choose the “follow the center line” sample reward function in the AWS DeepRacer console, a good action keeps the agent near the center of the track and is scored higher than a bad action, which moves the agent away from the center of the track.

Over time, the value function helps us learn policies that increase the total reward. To learn the optimal or best policy, we balance the amount of time we spend exploring the environment versus the amount of time we spend exploiting what our policy has learned over time. For example, if we consider the “follow the center line” sample reward function, we first take random actions to explore the environment, meaning that our agent doesn’t do a very good job at staying in the center of the track. Over time, the agent learns which actions keep it near the center of the track, but if we keep taking random actions, it takes a long time to learn how to stay at the center of the track for the entire lap. So as the policy begins to learn the good actions, we begin to use those actions instead of taking random actions. However, if we always use or exploit the good actions, we never learn anything new because we fail to explore the environment. This trade-off is often referred to as the “exploration vs. exploitation” problem in RL.

What’s new with SAC?

Now that we have the fundamental RL concepts down, let’s look at how SAC works and how it compares to the other algorithm available on the AWS DeepRacer console, Proximal Policy Optimization (PPO). 

There are three main differences between PPO and SAC. The first is that the implementation of SAC on the AWS DeepRacer console only allows you to select continuous action space (covered later in this post).

The second and sharper contrast between PPO and SAC is in how they leverage the information learned by the policy while exploring the environment between training iterations. PPO uses on-policy learning, which means that we learn the value function from observations made by the current policy exploring the environment. SAC, on the other hand, uses off-policy learning, which means it can use observations made by previous policies exploring the environment.

The trade-off between off-policy and on-policy learning tends to be stability vs. data efficiency. On-policy algorithms tend to be more stable but are more data-hungry, whereas off-policy algorithms tend to be more unstable but more data efficient, where stability in this context refers to how the model performs in between training iterations. A stable model tends to have consistent performance between training iterations, meaning that if we’re training our model to follow the center of the track, we see it get better and better at staying in the center of the track with each training iteration. Because of the consistent performance, we tend to see the total reward consistently increase between training iterations.

Unstable models tend to have more random performance between training iterations, which means that our model may come closer to following the middle of the track in one training iteration and then be completely unable to stay on the track the next training iteration. This leads to total reward between training iterations that looks noisier than on-policy methods, particularly at the start of training.

The third and final difference is how PPO and SAC use entropy. In this case, entropy is a measure of the uncertainty in the policy, so it can be interpreted as a measure of how confident a policy is at choosing an action for a given observation. A policy with low entropy is very confident at choosing an action, whereas a policy with high entropy is unsure of which action to choose.

As mentioned earlier, exploration vs. exploitation is a key challenge in RL. To confront this issue, the PPO algorithm uses entropy regularization. Entropy regularization encourages the agent to explore by preventing it from settling on a specific policy.

Let’s once again use the “follow the center line” sample reward function. If we don’t have entropy regularization, after various training iterations we may end up with a policy that causes the agent to jitter around the center line. The jitter behavior occurs because the policy has a hard time deciding whether the best action is to stay forward or turn slightly left or right after making an observation of the environment. This behavior keeps us close to the center line, we just jitter around the center line by slightly turning left and right as the agent moves around the track. This means that this jitter policy has a high total reward because it keeps us close to the center line. The entropy of this policy is also relatively high, because the policy is unsure of what the best action is for a given observation of the environment.

At this point, without using entropy as a regularizer and the total reward being high, the algorithm starts producing policies with the same jitter behavior on every training iteration, effectively meaning that the algorithm has converged. By adding entropy as a regularizer on each training iteration, the algorithm requires the total reward to be high and the entropy to be low. If we end up in a training iteration where the total reward and entropy are both high, the algorithm produces a new policy with new behavior as opposed to producing another “jitter” policy. Because entropy regularization causes a new policy to be produced, we say that it encourages exploration, because the new policy likely takes different actions than the previous “jitter” policy when observing the environment.

For SAC, instead of using entropy as a regularizer, we change the objective of the RL model to maximize not only total reward but also entropy. This entropy maximization makes SAC a unique RL algorithm. Entropy maximization has similar benefits to using the entropy as a regularizer, such as incentivizing wider exploration and avoiding convergence to a bad policy.

Entropy maximization has one unique advantage: the algorithm tends to give up on policies that choose unpromising behavior. This happens because the polices produced by SAC for each training iteration choose actions that maximize total reward and entropy when observing the environment. This means that SAC policies tend to explore the environment more because high entropy means that we’re unsure which action to take. However, because we also maximize for total reward, we’re taking unsure actions as we observe the environment close to our desired behavior. SAC is an off-policy algorithm, which means we can use observations from policies produced from different training iterations. When we look at the observations of the previous policies, which have high entropy and therefore explore the environment more, the algorithm can pick out the promising behavior and give up on the unpromising behavior.

You can tune the amount of entropy to use in SAC with the hyperparameter SAC alpha, with a value between 0.0 and 1.0. The maximum value of the SAC alpha uses the whole entropy value of the policy and favors exploration. The minimum value of SAC alpha recovers the standard RL objective and there is no entropy bonus to incentivize the exploration. A good SAC alpha value to kick off your first model is 0.5. Then you can tune this hyperparameter accordingly as you iterate on your models.

The ins and outs of action spaces

Now let’s look at how action spaces work on the AWS DeepRacer console and introduce the new continuous action space, which allows you to define a range of actions instead of a discrete set of actions. To begin, let’s review how discrete action spaces work in AWS DeepRacer.

The AWS DeepRacer console uses a neural network to model the policy learned by both PPO and SAC. The output of the policy is a discrete set of values. For discrete action spaces, which is what the PPO algorithm available on the AWS console has traditionally used, the discrete values returned from the neural network are interpreted as a probability distribution and are mapped to a set of actions. The set of actions is defined by the user by specifying the maximum steering angle, speed values, and their respective granularities to generate the corresponding combinations of speed and steering actions. Therefore, the policy returns a discrete distribution of actions.

For example, if we select a maximum steering angle of 15 degrees, a maximum speed of 1 m/s, and corresponding granularities of 3 and 1, our discrete action space has three values mapped to the following steering angle and speed pairs: (-15 degrees, 1 m/s), (0 degrees, 1m/s), and (15 degrees, 1m/s). A policy may return the following discrete distribution [0.50, 0.25, 0.25] for a given observation in the environment, which can loosely be interpreted as the policy being 50% certain that action 1, (-15 degrees, 1 m/s), is the action most likely to maximize total reward for a given observed state.

During training, we sample the action space distribution to encourage exploration, meaning that if we have this discrete distribution, we have a 50% chance of picking action 1, a 25% chance of picking action 2, and a 25% chance of picking action 3. This means that during training, until our policy is very sure about which action to take for a given observed state, we always have the chance to explore the benefits of a new action.

For continuous action space, the policy only outputs two discrete values. These values are interpreted to be the mean and standard deviation of a continuous normal distribution. You define a range for speed and steering angle. The action for an observed state is chosen from this user-defined range of speed and steering by sampling the normal distribution, defined by the mean and standard deviation returned from the policy.

For example, we can define the following ranges for steering angel and speed, [-20 degrees, 20 degrees] and [0.75m/s, 4m/s]. This means that the policy can explore all combinations specified in this range, as opposed to the discrete action space case where it could only explore three combinations. Continuous action spaces tend to produce agents that exhibit less zig-zag motion when navigating the environment. This is because policies tend to learn smooth changes in steering angle and speed as opposed to discrete changes. The trade-off is that continuous action spaces are more sensitive to choices in reward function and steering angle and speed ranges. Depending on these choices, continuous action spaces may increase the amount of time it takes to train.

Although continuous action spaces are required for SAC, you can also use them for PPO. The AWS DeepRacer console now supports training PPO models that can use either continuous or discrete action spaces. Let’s look at how to set up a continuous action space on the AWS DeepRacer console.

Creating a new vehicle using continuous action space

In this section, we walk you through the steps to create a new vehicle in the My Garage section of the console with continuous action space. All you need to do is sign up for an AWS account (if you don’t already have one) and go to the AWS DeepRacer console:

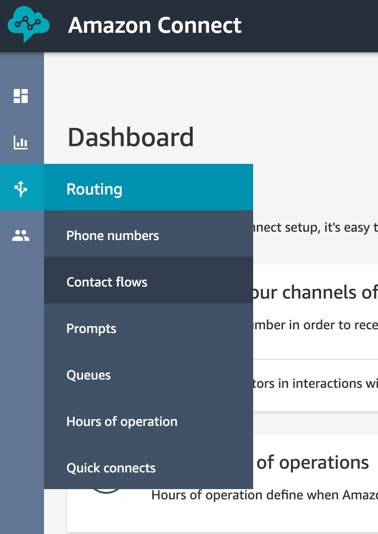
  1. On the AWS DeepRacer console, choose Your garage.

In the list of vehicles, you should see a new vehicle The Original DeepRacer (continuous action space) added. This is provided by default to all users to train their models using continuous action space. The vehicle uses a single camera and has a speed range of [0.5 : 1] m/s and steering angle range of [-30 : 30 ] degrees.

The vehicle uses a single camera and has a speed range of [0.5 : 1] m/s and steering angle range of [-30 : 30 ] degrees.

  1. Choose Build new vehicle to build your own vehicle with a new configuration.

In this example, we build a vehicle with stereo cameras.

  1. For Sensor modifications, select Stereo camera.
  2. Choose Next.

  1. For Choose your action space type, select Continuous.

For this post, we choose the action space range [0.5 : 2 ] m/s and [-30 : 30 ] degrees.

  1. For Right steering angle range, enter -30.
  2. For Left steering angle range, enter 30.
  3. For Minimum speed, enter 5.
  4. For Maximum speed, enter 2.
  5. Choose Next.

  1. Customize your vehicle appearance and name your vehicle.
  2. Choose Done.

The vehicle is now available to choose when creating a model.

Training a Soft Actor Critic model on the console

In this section, we walk you through how to create new Soft Actor Critic model:

  1. On the AWS DeepRacer console, choose Your models.
  2. Choose Create model.
  3. For Model name, enter the name of one of your models.
  4. Optionally, for Training job description, enter a description.

Optionally, for Training job description, enter a description

  1. For Choose a track, select your track (for this post, we select European Seaside Circuit (Buildings)).

For Choose a track, select your track (for this post, we select European Seaside Circuit (Buildings)).

  1. Choose Next.

The next section allows you to customize the desired training environment, select an algorithm along with its hyperparameters, and choose the virtual car that contains your desired action spaces.

  1. For Race type, select the type (for this post, we select Time trial).

For Race type, select the type (for this post, we select Time trial).

  1. For Training algorithm and hyperparameters, select SAC.
  2. Under Hyperparameters, configure your hyperparameters. 

SAC Alpha is the hyperparameter that determines the relative importance of the entropy term against the reward.

  1. Lastly, choose your virtual car to use, which contains your desired action spaces. For this post, we chose My_DeepRacer_Continuous.

Lastly, choose your virtual car to use, which contains your desired action spaces. For this post, we chose My_DeepRacer_Continuous.

  1. Choose Next.

Lastly, you can write a reward function to guide the agent to your desired behavior and configure your desired time of training.

  1. In Code editor, write your reward function.

SAC is sensitive to the scaling of the reward signal, so it’s important to carefully tune the appropriate reward value. For small reward magnitudes, the policy may perform poorly because it’s likely to become uniform and fail to exploit the reward signal. For large reward magnitudes, the model learns quickly at first, but the policy quickly converges to poor local minima due to lack of exploration. So carefully tuning the right reward scaling is the key to training a successful SAC model.

  1. After writing your reward function, choose Validate to verify your reward function is compatible with AWS DeepRacer.
  2. Under Stop conditions, for Maximum time, set the desired duration of training time in minutes.
  3. Choose Create model to start training.

When the training starts, the model dashboard shows the progress of training along with the live streaming of the simulator.

When the training starts, the model dashboard shows the progress of training along with the live streaming of the simulator.

Conclusion

With AWS DeepRacer, you can now get hands-on experience with the Soft Actor Critic algorithm. Finding the right hyperparameters values, choosing appropriate action spaces, and writing your custom reward function are the keys to improving your SAC models.

You’re now ready to train your first SAC model. Sign in to the AWS DeepRacer console to get started.


About the Author

Eddie Calleja is an SDM for AWS DeepRacer. He is the manager of the AWS DeepRacer simulation application and device software stacks. As a former physicist he spends his spare time thinking about applying AI techniques to modern day physics problems.

Read More

Scheduling work meetings in Slack with Amazon Lex

Imagine being able to schedule a meeting or get notified about updates in your code repositories without leaving your preferred messaging platform. This could save you time and increase productivity. With the advent of chatbots, these mundane tasks are now easier than ever. Amazon Lex, a service for building chatbots, offers native integration with popular messaging applications such as Slack to offer a simple, yet powerful user experience. In a previous post, we explored how to schedule an appointment in Office 365 using an Amazon Lex bot and a custom web application to book meetings with a single user via email. In this post, we take advantage of Slack APIs to schedule meetings with multiple users by referencing their information in the Slack workspace. The Meeting Scheduler Slack Bot takes care of comparing calendars, finding open timeslots, and scheduling the actual meeting all without leaving the Slack workspace.

To accomplish this integration, we use a combination of AWS services (specifically Amazon Lex and AWS Lambda), and schedule actual meetings in Outlook. We use the chatbot to get the information needed to schedule a meeting, because these users also exist in Slack workspaces.

The following diagram illustrates the architecture of our solution.

Prerequisites

Before getting started, make sure you have the following prerequisites:

  • An Office 365 account. If you don’t have an existing account, you can use the free trial of Office 365 Business Premium.
  • Approval from your Azure Active Directory administrator for the Office 365 application registration.

Estimated cost

You incur AWS usage charges when deploying resources and interacting with the Amazon Lex bot. For more information, see Amazon Lex pricing and AWS Lambda Pricing. Depending on the configured deployments for the Office 365 account and Slack account, additional charges may be incurred depending on the selected licenses.

Deployment steps

In the following sections, we walk you through the deployment for the Meeting Scheduler Slack Bot. The steps are as follows:

  1. Register an application within your Microsoft account. This generates the keys that are required to call the Office 365 APIs.
  2. Configure the Slack application. This creates the keys that the Amazon Lex bot and fulfillment Lambda function use to call Slack APIs.
  3. Launch the AWS CloudFormation template to generate AWS resources. You need the keys and URLs from the previous two steps.
  4. Connect Amazon Lex to the Slack channel.
  5. Test your Meeting Scheduler Slack Bot by typing a message into your Slack application.

Registering an application within your Microsoft account

To register your application in your Microsoft account, complete the following steps:

  1. Log in to your Azure portal and navigate to App registrations.
  2. Choose New registration.

  1. For Name, enter a name for your application.
  2. For Redirect URL, enter http://localhost/myapp.

The redirect URL is required to make Microsoft Graph API calls. You also use this as the value for RedirectURL for your CloudFormation stack.

The redirect URL is required to make Microsoft Graph API calls.

  1. Choose Create.
  2. Choose Certificates & secrets.

  1. Choose New client secret.

  1. Enter a name for your secret.
  2. Choose Save.

Before navigating away from this page, take note of the secret value (which you use as the ApplicationPassword parameter from the CloudFormation stack). This is the only time you can view the secret.

  1. Choose API permissions.

  1. Choose Add permission.
  2. Choose Microsoft Graph.

  1. For Select permissions, under Calendars, select Calendars.ReadWrite.

You need your Active Directory administrator to grant access to these permissions in order for the bot to be successful. These permissions give the application the ability to use service credentials to run certain actions, such as reading a calendar (to find available times) and writing (to schedule the meetings).

  1. In addition to the application secret you captured earlier, you also need the following information from your registered app:
    1. Application (client) ID – For the CloudFormation stack parameter Client ID
    2. Directory (tenant) ID – For the CloudFormation stack parameter ActiveDirectoryID

Configuring the Slack application

To configure your Slack application, complete the following steps:

  1. Sign up for a Slack account and create a Slack team. For instructions, see Using Slack.

In the next step, you create a Slack application, which any Slack team can install. If you already have a Slack team set up, you may move on to the next step.

  1. Create a Slack application.
  2. Under OAuth and Permissions, for Bot Token Scopes, add the following:
    1. chat:write – Allows the bot to send messages with the given user handle
    2. team:read – Allows the bot to view the name, email domain, and icons for Slack workspaces the chatbot is connected to
    3. users:read – Allows the bot to see people in the Slack workspace
    4. users:read.email – Allows the bot to see the emails of people in the Slack workspace
  3. Choose Install App to Workspace.
  4. Choose Allow when prompted.
  5. Copy the Bot OAuth User Token, which you need when deploying the CloudFormation template in the next steps (for the parameter SlackBotToken).
  6. Save the information found in the Basic Information section for a later step.

Deploying the CloudFormation template

The following CloudFormation template creates the necessary chatbot resources into your AWS account. The resources consist of the following:

  • BotFulfillmentLambdaLayer – The Lambda layer that contains the libraries necessary to run the function
  • LambdaExecutionRole – A basic Lambda execution role that allows the fulfillment function to get secrets from AWS Secrets Manager
  • HelperLambdaExecutionRole – The Lambda execution role that allows the helper function to create Amazon Lex bots
  • BotFulfillmentLambda – The Lambda function that handles fulfillment of the bot
  • HelperLambda – The Lambda function that generates the bot
  • SlackAppTokens – Secrets in Secrets Manager for using Slack APIs
  • O365Secretes – Secrets in Secrets Manager for using Office 365 APIs
  • HelperLambdaExecute – A custom CloudFormation resource to run the HelperLambda and generate the bot upon complete deployment of the template

The HelperLambda function runs automatically after the CloudFormation template has finished deploying. This function generates a bot definition, slot types, utterances, and Lambda fulfillment connections in the Amazon Lex bot. The template takes approximately 10 minutes to deploy.

To deploy your resources, complete the following steps:

  1. On the AWS CloudFormation console, choose Create stack.
  2. For Upload a template file, upload the template.
  3. Choose Next.

Choose Next.

  1. For Stack name, enter a name (for example, MeetingScheduler).

For Stack name, enter a name (for example, MeetingScheduler).

  1. Under Parameters, provide the parameters that you recorded in the previous steps:
    1. ApplicationId – Client ID
    2. ApplicationPassword – Client secret
    3. AzureActiveDirectoryId – Directory ID
    4. CodeBucket – S3 bucket created to store the .zip files
    5. RedirectUri – Redirect URI; if not changed from the example (http://localhost/myapp), leave this section as is
    6. SlackBotToken – Bot OAuth user token
  2. Choose Next.

Choose Next.

  1. Choose Next
  2. Select the I acknowledge that AWS CloudFormation might create IAM resources

This allows AWS CloudFormation to create the AWS Identity and Access Management (IAM) resources necessary to run our application. This includes the Lambda function execution roles and giving Amazon Lex the permissions to call those functions.

  1. Choose Create stack.

Choose Create stack.

  1. Wait for the stack creation to complete.

You can monitor the status on the AWS CloudFormation console. Stack creation should take approximately 5 minutes.

Connecting the Amazon Lex bot to the Slack channel

To connect your bot to Slack, complete the following steps:

  1. On the Amazon Lex console, choose your newly deployed bot.
  2. On the Settings tab, create a dev alias and select Latest as the version.
  3. Click the + button to create the alias.
  4. On the Channels tab, choose Slack.
  5. For Channel Name, enter a name.
  6. For Alias, choose dev.
  7. Enter values for Client Id, Client Secret, Verification Token, and Success Page URL from the Basic Information page in your Slack app.

Enter values for Client Id, Client Secret, Verification Token, and Success Page URL

  1. Choose Activate.
  2. Complete your Slack integration. (You can skip step 2C, because we already completed it).
  3. Under Settings, choose Manage distribution.
  4. Choose Add to Slack.
  5. Authorize the bot to respond to messages.

Testing the Meeting Scheduler Slack Bot

To test your bot, complete the following steps:

  1. Navigate to the Slack workspace where you installed your application.

You should see the application under Apps.

You should see the application under Apps.

  1. To schedule a meeting with your bot, try entering Schedule a meeting.

The following screenshot shows the bot’s response. You’re presented with the next five available work days to choose from.

The following screenshot shows the bot’s response.

  1. Choose your desired date for the meeting.

If there are no times available on the day you selected, you can choose a different date.

  1. Enter how long you want the meeting to last.
  2. When asked who to invite to the meeting, enter your team member’s Slack handle.

The user must have their Active Directory email address associated with their Slack profile.

  1. Choose your desired time of day for the meeting.

Choose your desired time of day for the meeting.

  1. Confirm the details of your scheduled meeting.

Confirm the details of your scheduled meeting.

Success! You’ve just scheduled your first meeting using your Slack bot!

Success! You’ve just scheduled your first meeting using your Slack bot!

Cleaning up

To avoid incurring future charges, delete the resources by deleting the CloudFormation stack. Upon completion, delete the files uploaded to the S3 bucket, then delete the bucket itself.

Conclusion

Using Amazon Lex with Slack can help improve efficiency for daily tasks. This post shows how you can combine AWS services to create a chatbot that assists in scheduling meetings. It shows how to grant permissions, interact with Amazon Lex, and use external APIs to deliver powerful functionality and further boost productivity. The contents of this post and solution can be applied to other common workloads such as querying a database, maintaining a Git repo, or even interacting with other AWS services.

By integrating AWS with APIs like Office 365 and Slack, you can achieve even more automated functionality and improve the user experience. To get more hands on with building and deploying chatbots with Amazon Lex, check out these tutorials:


About the Authors

Kevin Wang is a Solutions Architect for AWS, and passionate about building new applications on the latest AWS services. With a background in investment finance, Kevin loves to blend financial analysis with new technologies to find innovative ways to help customers. An inquisitive and pragmatic developer at heart, he loves community-driven learning and sharing of technology.


Kim Wendt is a Solutions Architect at AWS, responsible for helping global media & entertainment companies on their journey to the cloud. Prior to AWS, she was a Software Developer for the US Navy, and uses her development skills to build solutions for customers. She has a passion for continuous learning and is currently pursuing a masters in Computer Science with a focus in Machine Learning.


Read More

Evaluating Design Trade-offs in Visual Model-Based Reinforcement Learning

Posted by Mohammad Babaeizadeh, Research Engineer and Dumitru Erhan, Research Scientist, Google Research

Model-free reinforcement learning has been successfully demonstrated across a range of domains, including robotics, control, playing games and autonomous vehicles. These systems learn by simple trial and error and thus require a vast number of attempts at a given task before solving it. In contrast, model-based reinforcement learning (MBRL) learns a model of the environment (often referred to as a world model or a dynamics model) that enables the agent to predict the outcomes of potential actions, which reduces the amount of environment interaction needed to solve a task.

In principle, all that is strictly necessary for planning is to predict future rewards, which could then be used to select near-optimal future actions. Nevertheless, many recent methods, such as Dreamer, PlaNet, and SimPLe, additionally leverage the training signal of predicting future images. But is predicting future images actually necessary, or helpful? What benefit do visual MBRL algorithms actually derive from also predicting future images? The computational and representational cost of predicting entire images is considerable, so understanding whether this is actually useful is of profound importance for MBRL research.

In “Models, Pixels, and Rewards: Evaluating Design Trade-offs in Visual Model-Based Reinforcement Learning”, we demonstrate that predicting future images provides a substantial benefit, and is in fact a key ingredient in training successful visual MBRL agents. We developed a new open-source library, called the World Models Library, which enabled us to rigorously evaluate various world model designs to determine the relative impact of image prediction on returned rewards for each.

World Models Library
The World Models Library, designed specifically for visual MBRL training and evaluation, enables the empirical study of the effects of each design decision on the final performance of an agent across multiple tasks on a large scale. The library introduces a platform-agnostic visual MBRL simulation loop and the APIs to seamlessly define new world-models, planners and tasks or to pick and choose from the existing catalog, which includes agents (e.g., PlaNet), video models (e.g., SV2P), and a variety of DeepMind Control tasks and planners, such as CEM and MPPI.

Using the library, developers can study the effect of a varying factor in MBRL, such as the model design or representation space, on the performance of the agent on a suite of tasks. The library supports the training of the agents from scratch, or on a pre-collected set of trajectories, as well as evaluation of a pre-trained agent on a given task. The models, planning algorithms and the tasks can be easily mixed and matched to any desired combination.

To provide the greatest flexibility for users, the library is built using the NumPy interface, which enables different components to be implemented in either TensorFlow, Pytorch or JAX. Please look at this colab for a quick introduction.

Impact of Image Prediction
Using the World Models Library, we trained multiple world models with different levels of image prediction. All of these models use the same input (previously observed images) to predict an image and a reward, but they differ on what percentage of the image they predict. As the number of image pixels predicted by the agent increases, the agent performance as measured by the true reward generally improves.

The input to the model is fixed (previous observed images), but the fraction of the image predicted varies. As can be seen in the graph on the right, increasing the number of predicted pixels significantly improves the performance of the model.

Interestingly, the correlation between reward prediction accuracy and agent performance is not as strong, and in some cases a more accurate reward prediction can even result in lower agent performance. At the same time, there is a strong correlation between image reconstruction error and the performance of the agent.

Correlation between accuracy of image/reward prediction (x-axis) and task performance (y-axis). This graph clearly demonstrates a stronger correlation between image prediction accuracy and task performance.

This phenomenon is directly related to exploration, i.e., when the agent attempts more risky and potentially less rewarding actions in order to collect more information about the unknown options in the environment. This can be shown by testing and comparing models in an offline setup (i.e., learning policies from pre-collected datasets, as opposed to online RL, which learns policies by interacting with an environment). An offline setup ensures that there is no exploration and all of the models are trained on the same data. We observed that models that fit the data better usually perform better in the offline setup, and surprisingly, these may not be the same models that perform the best when learning and exploring from scratch.

Scores achieved by different visual MBRL models across different tasks. The top and bottom half of the graph visualizes the achieved score when trained in the online and offline settings for each task, respectively. Each color is a different model. It is common for a poorly-performing model in the online setting to achieve high scores when trained on pre-collected data (the offline setting) and vice versa.

Conclusion
We have empirically demonstrated that predicting images can substantially improve task performance over models that only predict the expected reward. We have also shown that the accuracy of image prediction strongly correlates with the final task performance of these models. These findings can be used for better model design and can be particularly useful for any future setting where the input space is high-dimensional and collecting data is expensive.

If you’d like to develop your own models and experiments, head to our repository and colab where you’ll find instructions on how to reproduce this work and use or extend the World Models Library.

Acknowledgement:
We would like to give special recognition to multiple researchers in the Google Brain team and co-authors of the paper: Mohammad Taghi Saffar, Danijar Hafner, Harini Kannan, Chelsea Finn and Sergey Levine.

Read More

Making Machines More Human: Author Brian Christian Talks the Alignment Problem

Not many can claim to be a computer programmer, nonfiction author and poet, but Brian Christian has established himself as all three.

Christian has just released his newest book, The Alignment Problem, which delves into the disparity that occurs when AI models don’t do exactly what they’re intended to do.

The book follows on the success of Christian’s previous work, The Most Human Human and Algorithms to Live By. Now a visiting scholar at UC Berkeley, Christian joined AI Podcast host Noah Kravitz to talk about the alignment problem and some new techniques being used to address the issue.

The alignment problem can be caused by a range of reasons — such as data bias, or datasets used incorrectly and out of context. As AI takes on a variety of tasks, from medical diagnostics to parole sentencing decisions, machine learning researchers are expressing concern over the problem.

Listen to the full podcast to hear about this and more — including Christian’s book club experience with Elon Musk and why he chose to double major in philosophy and computer science.

Key Points From This Episode:

  • The Alignment Problem features insights from hundreds of interviews Christian did with those he calls “first responders” to the ethical and scientific concerns surrounding the issue. He believes this group is evolving into a new interdisciplinary field.
  • Christian is also director of technology at McSweeney’s Publishing and scientific communicator in residence at Simon’s Institute for the Theory of Computing. He talks to Kravitz about how he managed to combine his love for both computer science and creative writing in his current career.

Tweetables:

“Philosophy and computer science are really on a collision course.” — Brian Christian [20:23]

“This new interdisciplinary field, thinking about … how exactly are we going to get human norms into these ML systems.” — Brian Christian [26:25]

You Might Also Like:

Keeping an Eye on AI: Building Ethical Technology at Salesforce

Kathy Baxter, the architect of ethical AI practice at Salesforce, is helping her team and clients create more responsible technology. To do so, she supports employee education, the inclusion of safeguards in Salesforce technology and collaboration with other companies to improve ethical AI across industries.

Teaching Families to Embrace AI

Tara Chklovski is CEO and founder of Iridescent, a nonprofit that provides access to hands-on learning opportunities to prepare underrepresented children and adults for the future of work. She talks about everything from the UN’s AI for Good Global summit and the AI World Championship.

When AI Meets Sci-Fi — A Talk with Award-Winning Author Ken MacLeod

Ken MacLeod, an award-winning science fiction author whose work dives into the relationship between man and machine, discusses his latest book The Corporation Wars: Emergence. The final volume in an acclaimed trilogy, it features sentient robots, computer AIs that oversee Earth, and human minds running in digital simulations.

Tune in to the AI Podcast

Get the AI Podcast through iTunes, Google Podcasts, Google Play, Castbox, DoggCatcher, Overcast, PlayerFM, Pocket Casts, Podbay, PodBean, PodCruncher, PodKicker, Soundcloud, Spotify, Stitcher and TuneIn. If your favorite isn’t listed here, drop us a note.

Tune in to the Apple Podcast Tune in to the Google Podcast Tune in to the Spotify Podcast

Make the AI Podcast Better

Have a few minutes to spare? Fill out this listener survey. Your answers will help us make a better podcast.

The post Making Machines More Human: Author Brian Christian Talks the Alignment Problem appeared first on The Official NVIDIA Blog.

Read More

Automating complex deep learning model training using Amazon SageMaker Debugger and AWS Step Functions

Amazon SageMaker Debugger can monitor ML model parameters, metrics, and computation resources as the model optimization is in progress. You can use it to identify issues during training, gain insights, and take actions like stopping the training or sending notifications through built-in or custom actions. Debugger is particularly useful in training challenging deep learning model architectures, which often require multiple rounds of manual tweaks to model architecture or training parameters to rectify training issues. You can also use AWS Step Functions, our powerful event-driven function orchestrator, to automate manual workflows with pre-planned steps in reaction to anticipated events.

In this post, we show how we can use Debugger with Step Functions to automate monitoring, training, and tweaking deep learning models with complex architecture and challenging training convergence characteristics. Designing deep neural networks often involves manual trials where the model is modified based on training convergence behavior to arrive at a baseline architecture. In these trials, new layers may get added or existing layers removed to stabilize unwanted behaviors like the gradients becoming too large (explode) or too small (vanish), or different learning methods or parameters may be tried to speed up training or improve performance. This manual monitoring and adjusting is a time-consuming part of model development workflow, exacerbated by the typically long deep learning training computation duration.

Instead of manually inspecting the training trajectory, you can configure Debugger to monitor convergence, and the new Debugger built-in actions can, for example, stop training if any of the specified set of rules are triggered. Furthermore, we can use Debugger as part of an iterative Step Functions workflow that modifies the model architecture and training strategy at a successfully-trained model. In such an architecture, we use Debugger to identify potential issues like misbehaving gradients or activation units, and Step Functions orchestrates modifying the model in response to events produced by Debugger.

Overview of the solution

A common challenge in training very deep convolutional neural networks is exploding or vanishing gradients, where gradients grow too large or too small during training, respectively. Debugger supports a number of useful built-in rules to monitor training issues like exploding gradients, dead activation units, or overfitting, and even take actions through built-in or custom actions. Debugger allows for custom rules also, although the built-in rules are quite comprehensive and insightful on what to look for when training doesn’t yield desired results.

We build this post’s example around the seminal 2016 paper “Deep Residual Networks with Exponential Linear Unit” by Shah et al. investigating exponential linear unit (ELU) activation, instead of the combination of ReLU activation with batch normalization layers, for the challenging ResNet family of very deep residual network models. Several architectures are explored in their paper, and in particular, the ELU-Conv-ELU-Conv architecture (Section 3.2.2 and Figure 3b in the paper) is reported to be among the more challenging constructs suffering from exploding gradients. To stabilize gradients, the paper modifies the architecture by adding batch normalization before the addition layers to stabilize training.

For this post, we use Debugger to monitor the training process for exploding gradients, and use SageMaker built-in stop training and notification actions to automatically stop the training and notify us if issues occur. As the next step, we devise a Step Functions workflow to address training issues on the fly with pre-planned strategies that we can try each time training fails through model development process. Our workflow attempts to stabilize the training first by trying different training warmup parameters to stabilize the starting training point, and if that fails, resorts to Shah et al.’s approach of adding batch normalization before addition layers. You can use the workflow and model code as a template to add in other strategies, for example, swapping the activation units, or try different flavors of the gradient-descent optimizers like Adam or RMSprop.

The workflow

The following diagram shows a schematic of the workflow.

The following diagram shows a schematic of the workflow.

The main components are state, model, train, and monitor, which we discuss in more detail in this section.

State component

The state component is a JSON collection that keeps track of the history of models or training parameters tried, current training status, and what to try next when an issue is observed. Each step of the workflow receives this state payload, possibly modifies it, and passes it to the next step. See the following code:

{
    "state": {
        "history": {
            "num_warmup_adjustments": int,
            "num_batch_layer_adjustments": int,
            "num_retraining": int,
            "latest_job_name": str,
            "num_learning_rate_adjustments": int,
            "num_monitor_transitions": int
        },
        "next_action": "<launch_new|monitor|end>",
        "job_status": str,
        "run_spec": {
            "warmup_learning_rate": float,
            "learning_rate": float,
            "add_batch_norm": int,
            "bucket": str,
            "base_job_name": str,
            "instance_type": str,
            "region": str,
            "sm_role": str,
            "num_epochs": int,
            "debugger_save_interval": int
        }
    }
}

Model component

Faithful to Shah et al.’s paper, the model is a residual network of (configurable) depth 20, with additional hooks to insert additional layers, change activation units, or change the learning behavior via input configuration parameters. See the following code:

def generate_model(input_shape=(32, 32, 3), activation='elu',
    add_batch_norm=False, depth=20, num_classes=10, num_filters_layer0=16):

Train component

The train step reads the model and training parameters that the monitor step specified to be tried next, and uses an AWS Lambda step to launch the training job using the SageMaker API. See the following code:

def lambda_handler(event, context):
    try:
        state = event['state']
        params = state['run_spec']
    except KeyError as e:
        ...
        ...
        ... 

    try:
        job_name = params['base_job_name'] + '-' + 
                      datetime.datetime.now().strftime('%Y-%b-%d-%Hh-%Mm-%S')
        sm_client.create_training_job(
            TrainingJobName=job_name,
            RoleArn=params['sm_role'],
            AlgorithmSpecification={
                'TrainingImage': sm_tensorflow_image,
                'TrainingInputMode': 'File',
                'EnableSageMakerMetricsTimeSeries': True,
                'MetricDefinitions': [{'Name': 'loss', 'Regex': 'loss: (.+?)'}]
            },
        ...

Monitor component

The monitor step uses another Lambda step that queries the status of the latest training job and plans the next steps of the workflow: Wait if there are no changes, or stop and relaunch with new parameters if training issues are found. See the following code:

if rule['RuleEvaluationStatus'] == "IssuesFound":
    logging.info(
        'Evaluation of rule configuration {} resulted in "IssuesFound". '
        'Attempting to stop training job {}'.format(
            rule.get("RuleConfigurationName"), job_name
        )
    )
    stop_job(job_name)
    logger.info('Planning a new launch')
    state = plan_launch_spec(state)
    logger.info(f'New training spec {json.dumps(state["run_spec"])}')
    state["rule_status"] = "ExplodingTensors"

The monitor step is also responsible for publishing updates about the status of the workflow to an Amazon Simple Notification Service (Amazon SNS) topic:

if state["next_action"] == "launch_new":
    sns.publish(TopicArn=topic_arn, Message=f'Retraining. n'
                                            f='State: {json.dumps(state)}')

Prerequisites

To launch this walkthrough, you only need to have an AWS account and basic familiarity with SageMaker notebooks.

Solution code

The entire code for this solution can be found in the following GitHub repository. This notebook serves as the entry point to the repository, and includes all necessary code to deploy and run the workflow. Use this AWS CloudFormation Stack to create a SageMaker notebook linked to the repository, together with the required AWS Identity and Access Management (IAM) roles to run the notebook. Besides the notebook and the IAM roles, the other resources like the Step Functions workflow are created inside the notebook itself.

In summary, to run the workflow, complete the following steps:

  1. Launch this CloudFormation stack. This stack creates a Sagemaker Notebook with necessary IAM roles, and clones the solution’s repository.
  2. Follow the steps in the notebook to create the resources and step through the workflow.

Creating the required resources manually without using the above CloudFormation stack

To manually create and run our workflow through a SageMaker notebook, we need to be able to create and run Step Functions, and create Lambda functions and SNS topics. The Step Functions workflow also needs an IAM policy to invoke Lambda functions. We also define a role for our Lambda functions to be able to access SageMaker. If you do not have permission to use the CloudFormation stack, you can create the roles on the IAM console.

The IAM policy for our notebook can be found in the solution’s repository here. Create an IAM role named sagemaker-debugger-notebook-execution and attach this policy to it.  Our Lambda functions need permissions to create or stop training jobs and check their status. Create an IAM role for Lambda, name it lambda-sagemaker-train, and attach the policy provided here to it. We also need to add sagemaker.amazonaws.com as a trusted principal in additional to lambda.amazonaws.com for this role.

Finally, the Step Functions workflow only requires access to invoke Lambda functions. Create an IAM role for workflow, name it step-function-basic-role, and attach the default AWS managed policy AWSLambdaRole. The following screenshot shows the policy on the IAM console.

The following screenshot shows the policy on the IAM console.

Next, launch a SageMaker notebook. Use the SageMaker console to create a SageMaker notebook. Use default settings except for what we specify in this post. For the IAM role, use the sagemaker-debugger-notebook-execution role we created earlier. This role allows our notebook to create the services we need, run our workflow, and clean up the resources at the end. You can link the project’s Github repository to the notebook, or alternatively, you can clone the repository using a terminal inside the notebook into the /home/ec2-user/SageMaker folder.

Final results

Step through the notebook. At the end, you will get a link to the Step Functions workflow. Follow the link to navigate to the AWS Step Function workflow dashboard.

Follow the link to navigate to the AWS Step Function workflow dashboard.

The following diagram shows the workflow’s state machine schematic diagram.

As the workflow runs through its steps, it sends SNS notifications with latest training parameters. When the workflow is complete, we receive a final notification that includes the final training parameters and the final status of the training job. The output of the workflow shows the final state of the state payload, where we can see the workflow completed seven retraining iterations, and settled at the end with lowering the warmup learning rate to 0.003125 and adding a batch normalization layer to the model (“add_batch_norm”: 1). See the following code:

{
  "state": {
    "history": {
      "num_warmup_adjustments": 5,
      "num_batch_layer_adjustments": 1,
      "num_retraining": 7,
      "latest_job_name": "complex-resnet-model-2021-Jan-27-06h-45m-19",
      "num_learning_rate_adjustments": 0,
      "num_monitor_transitions": 16
    },
    "next_action": "end",
    "job_status": "Completed",
    "run_spec": {
      "sm_role": "arn:aws:iam::xxxxxxx:role/lambda-sagemaker-train",
      "bucket": "xxxxxxx-sagemaker-debugger-model-automation",
      "add_batch_norm": 1,
      "warmup_learning_rate": 0.003125,
      "base_job_name": "complex-resnet-model",
      "region": "us-west-2",
      "learning_rate": 0.1,
      "instance_type": "ml.m5.xlarge",
      "num_epochs": 5,
      "debugger_save_interval": 100
    },
    "rule_status": "InProgress"
  }
}

Cleaning up

Follow the steps in the notebook under the Clean Up section to delete the resources created. The notebook’s final step deletes the notebook itself as a consequence of deleting the CloudFormation stack. Alternatively, you can delete the SageMaker notebook via the SageMaker console.

Conclusion

Debugger provides a comprehensive set of tools to develop and train challenging deep learning models. Debugger can monitor the training process for hardware resource usage and training problems like dead activation units, misbehaving gradients, or stalling performance, and through its built-in and custom actions, take automatic actions like stopping the training job or sending notifications. Furthermore, you can easily devise Step Functions workflows around Debugger events to change model architecture, try different training strategies, or tweak optimizer parameters and algorithms, while tracking the history of recipes tried, together with detailed notification messaging to keep data scientists in full control. The combination of Debugger and Step Functions toolchains significantly reduces experimentation turnaround and saves on development and infrastructure costs.


About the Authors

Peyman Razaghi is a data scientist at AWS. He holds a PhD in information theory from the University of Toronto and was a post-doctoral research scientist at the University of Southern California (USC), Los Angeles. Before joining AWS, Peyman was a staff systems engineer at Qualcomm contributing to a number of notable international telecommunication standards. He has authored several scientific research articles peer-reviewed in statistics and systems-engineering area, and enjoys parenting and road cycling outside work.


Ross Claytor is a Sr Data Scientist on the ProServe Intelligence team at AWS. He works on the application of machine learning and orchestration to real world problems across industries including media and entertainment, life sciences, and financial services.

Read More

Setting up an IVR to collect customer feedback via phone using Amazon Connect and AWS AI Services

As many companies place their focus on customer centricity, customer feedback becomes a top priority. However, as new laws are formed, for instance GDPR in Europe, collecting feedback from customers can become increasingly difficult. One means of collecting this feedback is via phone. When a customer calls an agency or call center, feedback may be obtained by forwarding them to an Interactive Voice Response (IVR) system that records their review star rating with open text feedback. If the customer is willing to stay on the line for this, valuable feedback is captured automatically, quickly, and conveniently while complying with modern regulations.

In this post, we share a solution that can be implemented very quickly and leverages AWS artificial intelligence (AI) services, such as Amazon Transcribe or Amazon Comprehend, to further analyze spoken customer feedback. These services provide insights to the sentiment and key phrases used by the caller, redact PII and automate call analysis. Amazon Comprehend extracts the sentiment and key phrases from the open feedback quickly and automatically. It also ensures that PII is redacted before data is stored.

Solution overview

We guide you through the following steps, all of which may be done in only a few minutes:

  1. Upload the content to an Amazon Simple Storage Service (Amazon S3) bucket in your account.
  2. Run an AWS CloudFormation template.
  3. Set up your Amazon Connect contact center.
  4. Generate a phone number.
  5. Attach a contact flow to this number.
  6. Publish your first IVR phone feedback system.

The following diagram shows the serverless architecture that you build.

The following diagram shows the serverless architecture that you build.

This post makes use of the following services:

  • Amazon Connect is your contact center in the cloud. It allows you to set up contact centers and contact flows. We use a template that you can upload that helps you create your first contact flow easily.
  • Amazon Kinesis Video Streams records the spoken feedback of your customers.
  • Amazon Simple Queue Service (Amazon SQS) queues the video streams and triggers an AWS Lambda function that extracts the audio stream from the video stream.
  • Amazon Transcribe translates the spoken feedback into written text.
  • Amazon Comprehend extracts the sentiment and key phrases from the open feedback quickly and automatically.
  • Amazon DynamoDB is the NoSQL data storage for your feedback.
  • Amazon S3 stores the WAV files generated by Amazon Transcribe and the JSON files generated by Amazon Comprehend.
  • Lambda extracts audio streams from video streams, loads feedback data to DynamoDB, and orchestrates usage of the AI services. One of AWS Lambda functions is a modification of the following code on GitHub.

Download Github repository

As a first step, download the GitHub repository for this post. It contains the following folder structure:

  • cloudformation – Contains the CloudFormation template
  • contactflow – The 30 seconds of silence WAV file and the Amazon Connect contact flow
  • src – The source code of the Lambda functions

You also have a file named build.sh. We use this file to deploy all the resources in your account. You need the AWS Command Line Interface (AWS CLI) and Gradle to compile, upload, and deploy your resources.

Running the build script

Before we can run the build, we need to open the build.sh file and set a Region, S3 bucket name, and other information. The script performs the following steps for you:

  • Creates a S3 bucket that hosts your CloudFormation template and Lambda source code
  • Builds the Gradle project (a Java-based Lambda function) to extract voice from a video stream (see also the following GitHub repository)
  • Zip all Lambda functions from the src folder
  • Upload the CloudFormation template and the zipped Lambda functions
  • Create a CloudFormation stack

The top of this script looks like the following screenshot.

The top of this script looks like the following screenshot.

Provide your preferred setup parameters and make sure you comply with the allowed pattern. You fill out the following fields:

  • ApplicationRegion – The Region in which your IVR is deployed.
  • S3SourceBucket – The name of the S3 bucket that is created during the build phase. Your CloudFormation template and Lambda code resources are uploaded to this bucket as part of this script.
  • S3RecordingsBucketName – This is where the open feedback field (WAV recordings) are stored in your IVR feedback channel.
  • S3TranscriptionBucketName – After the WAV files are transcribed, the JSON output is saved here and a Lambda function—as part of your CloudFormation stack—is triggered.
  • DynamoDBTableName – The name of your DynamoDB table where the feedback data is stored.
  • SQSQueueName – The SQS queue that orchestrates the extraction of the customer open feedback.
  • CloudFormationStack– The name of the CloudFormation stack that is created to deploy all the resources.

After you fill in the variables with the proper values, you can run the script. Open your bash terminal on your laptop or computer and navigate to the downloaded folder. Then run the following code:

> ./build.sh

After performing this step, all the necessary resources are deployed and you’re ready to set up your Amazon Connect instance.

Creating an Amazon Connect instance

In our next step, we create an Amazon Connect instance.

  1. First, we need to give it a name.

You can also link the Amazon Connect instance to an existing account or use SAML for authentication. We named our application ivr-phone-feedback-system. This name appears in the login as Amazon Connect and is not managed from within the AWS Management Console.

This name appears in the login as Amazon Connect and is not managed from within the AWS Management Console.

  1. For the rest of the setup, you can leave the default values, but don’t forget to create an administrator login.
  2. After the instance is created (it takes just a few moments), go back to the Amazon Connect console.
  3. Choose your instance alias and choose Data Storage.
  4. Choose Enable live media streaming.
  5. For Prefix, enter a prefix.
  6. For Encryption, select Select KMS key by name.
  7. For KMS master key, choose aws/kinesisvideo.
  8. Choose Save.

Choose Save.

  1. In the navigation pane, choose Contact Flows.
  2. In the AWS Lambda section, add two of the functions created by the CloudFormation stack.

In the AWS Lambda section, add two of the functions created by the CloudFormation stack.

Setting up the contact flow

In this section, we use the files from the contactflow folder, also downloaded from the Knowledge Mine repository in our very first step.

  1. In the Amazon Connect contact center, on the Routing menu, choose Prompts.

In the Amazon Connect contact center, on the Routing menu, choose Prompts.

  1. Choose Create new prompt.
  2. Upload the 30_seconds_silence.wav file.

You also use this for the open feedback section that your customers can interact with to provide verbal feedback.

  1. On the Routing menu, choose Contact flows.
  2. Choose Create contact flow.
  3. On the drop-down menu, choose Import flow.

On the drop-down menu, choose Import flow.

  1. Upload the contact flow from the contactflow folder (ivr-feedback-flow.json, included in the Knowledge Mine repo).

After you import the contact flow, you have the architecture as shown in the following screenshot.

After you import the contact flow, you have the architecture as shown in the following screenshot.

For more information about this functionality, see Amazon Connect resources.

To make this contact flow work with your account, you only need to set the Lambda functions that are invoked. You can ignore the warning icons when adding them; they disappear after you save your settings.

  1. Choose your respective contact flow box.
  2. In the pop-up window, for Function ARN, select Select a function.
    1. For box 1, choose IVR-AddRating2DynamoDB.
    2. For box 2, choose IVR-SendStream2SQS.
  3. Choose Save.

Choose Save.

  1. Choose Publish.

Your contact flow is now ready to use.

Creating your phone number

Your IVR phone feedback system is now ready. You only need to claim a phone number and associate your contact flow with that number before you’re done.

  1. On the Routing menu, choose Phone Numbers.
  2. Choose Claim a number.
  3. Select a number to associate.
  4. For Contact flow/IVR, choose your contact flow.
  5. Choose Save.

Choose Save.

Congratulations! You can now call the number you claimed and test your system. Results end up in the DynamoDB table that you created earlier.

You can now call the number you claimed and test your system. Results end up in the DynamoDB table that you created earlier.

Every time open feedback is provided, it’s stored in DynamoDB and analyzed by our AWS AI services. You can extend this system to ask for more ratings as well (such as service dimensions). You can also encrypt customer feedback. For more information, see Creating a secure IVR solution with Amazon Connect.

Conclusion

Gathering customer feedback is an important step in improving the customer experience, but can be difficult to implement in a rapidly changing legal landscape.

In this post, we described how to not only collect feedback but process it, with the customer’s consent, via automation on the AWS platform. We used a CloudFormation template to generate all the serverless backend services necessary, created an Amazon Connect instance, and created a contact flow therein that was associated with a phone number.

With this setup, we’re ready to collect critical customer feedback ratings and identify areas for improvement. This solution is meant to serve as only a basic example; we encourage you to customize your contact flow to best serve your business needs. For more information, see Create Amazon Connect contact flows.

The AI services used in this post have countless applications. For more information, see AI Services.


About the Authors

Michael WallnerMichael Wallner is a Global Data Scientist with AWS Professional Services and is passionate about enabling customers on their AI/ML journey in the cloud to become AWSome. Besides having a deep interest in Amazon Connect he likes sports and enjoys cooking.


Chris Boomhower is a Machine Learning Engineer for AWS Professional Services. He loves helping enterprise customers around the world develop and automate impactful AI/ML solutions to their most challenging business problems. When he’s not tackling customers’ problems head-on, you’ll likely find him tending to his hobby farm with his family or barbecuing something delicious.

Read More