Amazon Scholar Heng Ji says that deep learning could benefit from the addition of a little linguistic intuition.Read More
Interact with an Amazon Lex V2 bot with the AWS CLI, AWS SDK for Python (Boto3), and AWS SDK for DotNet
Amazon Lex is a service for building conversational interfaces into any application. The new Amazon Lex V2 console and APIs make it easier to build, deploy, and manage bots. The Amazon Lex V2 console and APIs provide a simple information architecture in which the bot intents and slot types are scoped to a specific language. Versioning is performed at the bot level so that resources such as intents and slot types don’t have to be versioned individually. All the resources associated with the bot (language, intents, and slot types) are archived as part of the created bot version. This new methodology makes it easier to manage your bots. You can find more information in the Amazon Lex V2 API reference.
The Amazon Lex V2 console and APIs introduce a new method to build and interact with your bots. This post illustrates different methods to interact with a Amazon Lex V2 chatbot programmatically using the:
- AWS Command Line Interface, (AWS CLI),
- AWS SDK for Python (Boto3), and the
- AWS SDK for DotNet.
For this post, we use the MakeAppointment bot, which simulates the workflow of setting up an appointment with a dentist.
Obtain ID values for your bot
To get started, you must collect the following information:
- Your bot ID
- Your alias ID
- Your locale ID (language code)
Obtain your bot ID
You can find your bot ID on the Amazon Lex V2 console.
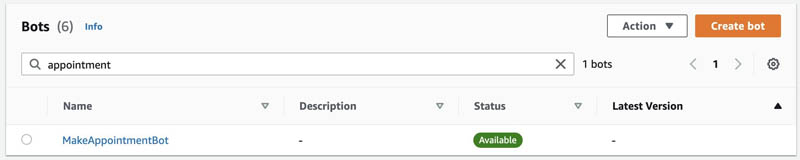
- On the Amazon Lex V2 console, on the Bots page, choose the bot you want to interact with.
For this post, we use MakeAppointmentBot.
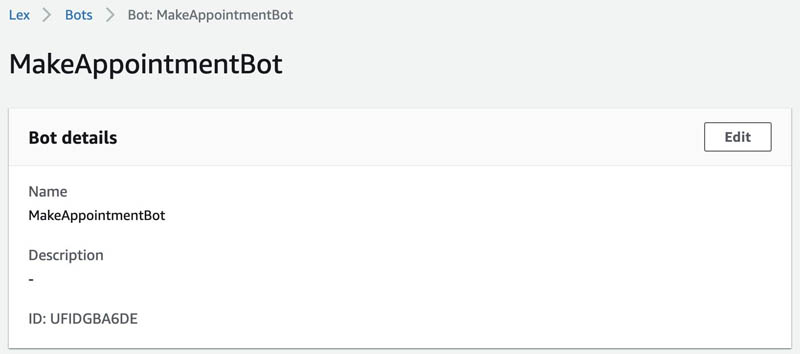
- Choose the bot and in the Bot details section, you can find the ID.
For this post, our ID is UFIDGBA6DE.
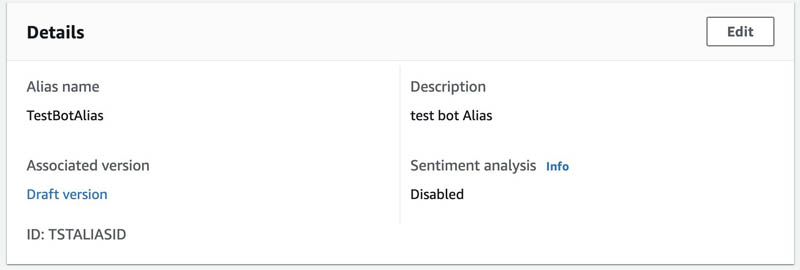
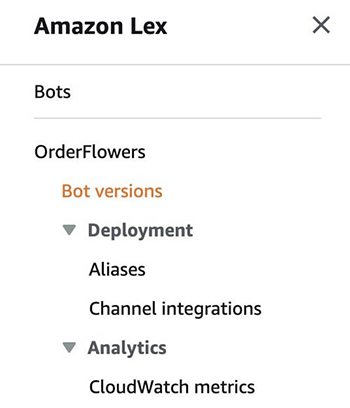
Obtain your alias ID
To obtain your bot’s alias ID, complete the following steps:
- On the Amazon Lex V2 console, navigate to your bot.
- In the navigation pane, under Bot versions, under Deployment, choose Aliases.
- Choose your alias.
For this post, we use TestBotAlias.
- In the Details section, you can find the alias ID.
For this post, our alias ID is TSTALIASID.
Obtain your locale ID
Your locale ID indicates which language your bot uses.
- On the Amazon Lex V2 console, in the navigation pane, choose Bot versions.
- Choose the version of your bot you want to use.
For this post, we use the version called Draft version.

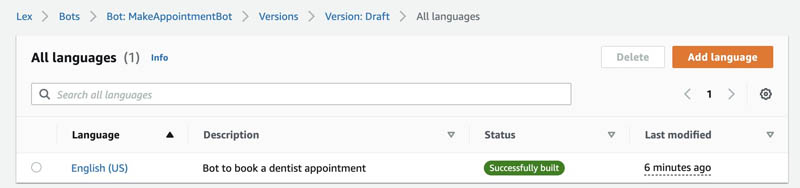
- In the navigation pane, under your bot version, choose All languages.
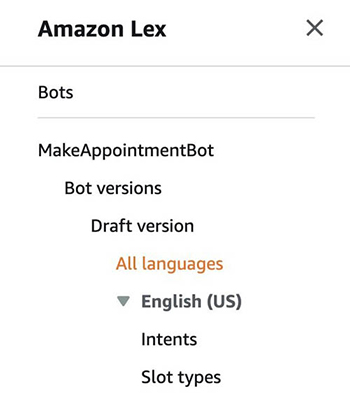
You can see a list of the available languages for your chatbot.
- Choose your preferred language.
For this post, we use English (US), which is en_US.
Interacting via the AWS CLI
The AWS Command Line Interface (CLI) is a unified tool to manage your AWS services. With just one tool to download and configure, you can control multiple AWS services from the command line and automate them through scripts.
To demonstrate the AWS CLI, you can use AWS CloudShell. AWS CloudShell is a browser-based shell that makes it easy to securely manage, explore, and interact with your AWS resources. CloudShell is pre-authenticated with your console credentials.
There are some cases where AWS CloudShell don’t have the latest version of the AWS CLI installed. If you receive an error “Invalid choice: ‘lexv2-runtime’”, follow the instructions contained in this guide to update the AWS CLI on AWS CloudShell.
Invalid choice: 'lexv2-runtime', maybe you meant:

  * lex-runtime
[cloudshell-user@ip-10-1-148-180 ~]$ aws --version
aws-cli/2.1.16 Python/3.7.3 Linux/4.14.209-160.339.amzn2.x86_64 exec-env/CloudShell exe/x86_64.amzn.2 prompt/off
In my case after updating, I got the following version:
[cloudshell-user@ip-10-1-148-180 ~]$ aws --version
aws-cli/2.1.28 Python/3.8.8 Linux/4.14.209-160.339.amzn2.x86_64 exec-env/CloudShell exe/x86_64.amzn.2 prompt/off
And this time when I run the “aws lexv2-runtime” command it is recognized:
[cloudshell-user@ip-10-1-148-180 ~]$ aws lexv2-runtime

usage: aws [options] <command> <subcommand> [<subcommand> ...] [parameters]
To see help text, you can run:

  aws help
  aws <command> help
  aws <command> <subcommand> help

aws: error: the following arguments are required: operation
After collecting the required information, enter your bot’s parameters (please keep in mind your IDs will be different):
bot-id='UFIDGBA6DE'
bot-alias-id='TSTALIASID'
localeId='en_US'
session-id='test-session'
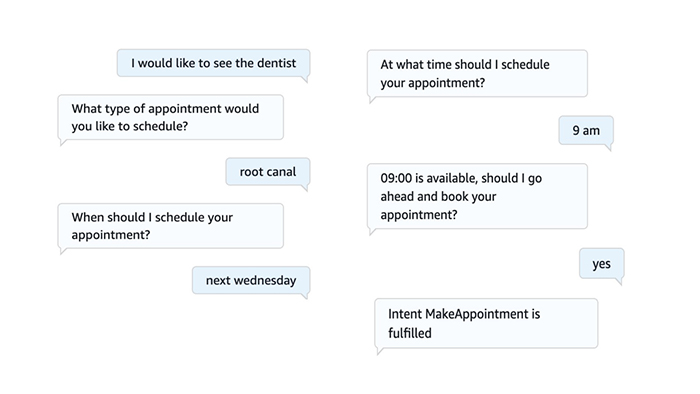
To get started, you will submit the text “I would like to see the dentist” by using the following command:
aws lexv2-runtime recognize-text --bot-id 'UFIDGBA6DE' --bot-alias-id 'TSTALIASID' --locale-id 'en_US' --session-id 'test_session' --text 'I would like to see the dentist'You will receive the following response:
{
    "messages": [
        {
            "content": "What type of appointment would you like to schedule?",
            "contentType": "PlainText"
        }
    ],
    "sessionState": {
        "dialogAction": {
            "type": "ElicitSlot",
            "slotToElicit": "AppointmentType"
        },
        "intent": {
            "name": "MakeAppointment",
            "slots": {
                "AppointmentType": null,
                "Date": null,
                "Time": null
            },
            "state": "InProgress",
            "confirmationState": "None"
        },
        "originatingRequestId": "85f22c97-b5d3-4a74-9e3d-95446768ecaa"
    },
    "interpretations": [
        {
            "nluConfidence": {
                "score": 0.84
            },
            "intent": {
                "name": "MakeAppointment",
                "slots": {
                    "AppointmentType": null,
                    "Date": null,
                    "Time": null
                },
                "state": "InProgress",
                "confirmationState": "None"
            }
        },
        {
            "intent": {
                "name": "FallbackIntent",
                "slots": {}
            }
        }
    ],
    "sessionId": "test_session"
}
Diving deep into the response you will notice the dialog state is ElicitSlot, or in other words, the chatbot is requiring the user to provide a value for the slot type ‘AppointmentType’.
 "sessionState": {
        "dialogAction": {
            "type": "ElicitSlot",
            "slotToElicit": "AppointmentType"
        }
Also, you will notice the messages:
 "messages": [
        {
            "content": "What type of appointment would you like to schedule?",
            "contentType": "PlainText"
        }
In this case you will state “Root canal” as the appointment type:
aws lexv2-runtime recognize-text --bot-id 'UFIDGBA6DE' --bot-alias-id 'TSTALIASID' --locale-id 'en_US' --session-id 'test_session' --text 'Root canal'The response you will receive will look similar to this:
{
    "messages": [
        {
            "content": "When should I schedule your appointment?",
            "contentType": "PlainText"
        }
    ],
    "sessionState": {
        "dialogAction": {
            "type": "ElicitSlot",
            "slotToElicit": "Date"
        },
        "intent": {
            "name": "MakeAppointment",
            "slots": {
                "AppointmentType": {
                    "value": {
                        "originalValue": "Root canal",
                        "interpretedValue": "Root canal",
                        "resolvedValues": [
                            "root canal"
                        ]
                    }
                },
                "Date": null,
                "Time": null
            },
            "state": "InProgress",
            "confirmationState": "None"
        },
        "originatingRequestId": "85f22c97-b5d3-4a74-9e3d-95446768ecaa"
    },
    "interpretations": [
        {
            "nluConfidence": {
                "score": 1.0
            },
            "intent": {
                "name": "MakeAppointment",
                "slots": {
                    "AppointmentType": {
                        "value": {
                            "originalValue": "Root canal",
                            "interpretedValue": "Root canal",
                            "resolvedValues": [
                                "root canal"
                            ]
                        }
                    },
                    "Date": null,
                    "Time": null
                },
                "state": "InProgress",
                "confirmationState": "None"
            }
        },
        {
            "intent": {
                "name": "FallbackIntent",
                "slots": {}
            }
        }
    ],
    "sessionId": "test_session"
}
Check the current dialogAction:
"sessionState": {
        "dialogAction": {
            "type": "ElicitSlot",
            "slotToElicit": "Date"
        }
Also, the messages:
"messages": [
        {
            "content": "When should I schedule your appointment?",
            "contentType": "PlainText"
        }
This time you will provide the pickup date:
aws lexv2-runtime recognize-text --bot-id 'UFIDGBA6DE' --bot-alias-id 'TSTALIASID' --locale-id 'en_US' --session-id 'test_session' --text 'Next Wednesday'This time the response will look similar to this:
{
    "messages": [
        {
            "content": "At what time should I schedule your appointment?",
            "contentType": "PlainText"
        }
    ],
    "sessionState": {
        "dialogAction": {
            "type": "ElicitSlot",
            "slotToElicit": "Time"
        },
        "intent": {
            "name": "MakeAppointment",
            "slots": {
                "AppointmentType": {
                    "value": {
                        "originalValue": "Root canal",
                        "interpretedValue": "Root canal",
                        "resolvedValues": [
                            "root canal"
                        ]
                    }
                },
                "Date": {
                    "value": {
                        "originalValue": "Next Wednesday",
                        "interpretedValue": "2021-03-17",
                        "resolvedValues": [
                            "2021-03-17"
                        ]
                    }
                },
                "Time": null
            },
            "state": "InProgress",
            "confirmationState": "None"
        },
        "originatingRequestId": "85f22c97-b5d3-4a74-9e3d-95446768ecaa"
    },
    "interpretations": [
        {
            "nluConfidence": {
                "score": 1.0
            },
            "intent": {
                "name": "MakeAppointment",
                "slots": {
                    "AppointmentType": {
                        "value": {
                            "originalValue": "Root canal",
                            "interpretedValue": "Root canal",
                            "resolvedValues": [
                                "root canal"
                            ]
                        }
                    },
                    "Date": {
                        "value": {
                            "originalValue": "Next Wednesday",
                            "interpretedValue": "2021-03-17",
                            "resolvedValues": [
                                "2021-03-17"
                            ]
                        }
                    },
                    "Time": null
                },
                "state": "InProgress",
                "confirmationState": "None"
            }
        },
        {
            "intent": {
                "name": "FallbackIntent",
                "slots": {}
            }
        }
    ],
    "sessionId": "test_session"
}
At time of writing this blog “next Wednesday” is March 17, 2021, which is what your chatbot interpreted:
chatbot interpreted:
 "Date": {
                        "value": {
                            "originalValue": "Next Wednesday",
                            "interpretedValue": "2021-03-17",
                            "resolvedValues": [
                                "2021-03-17"
                            ]
                        }
And the messages:
    "messages": [
        {
            "content": "At what time should I schedule your appointment?",
            "contentType": "PlainText"
        }
Next step is to define the Time:
aws lexv2-runtime recognize-text --bot-id 'UFIDGBA6DE' --bot-alias-id 'TSTALIASID' --locale-id 'en_US' --session-id 'test_session' --text '9 am'The response will be similar to this:
{
    "messages": [
        {
            "content": "09:00 is available, should I go ahead and book your appointment?",
            "contentType": "PlainText"
        }
    ],
    "sessionState": {
        "dialogAction": {
            "type": "ConfirmIntent"
        },
        "intent": {
            "name": "MakeAppointment",
            "slots": {
                "AppointmentType": {
                    "value": {
                        "originalValue": "Root canal",
                        "interpretedValue": "Root canal",
                        "resolvedValues": [
                            "root canal"
                        ]
                    }
                },
                "Date": {
                    "value": {
                        "originalValue": "Next Wednesday",
                        "interpretedValue": "2021-03-17",
                        "resolvedValues": [
                            "2021-03-17"
                        ]
                    }
                },
                "Time": {
                    "value": {
                        "originalValue": "9 am",
                        "interpretedValue": "09:00",
                        "resolvedValues": [
                            "09:00"
                        ]
                    }
                }
            },
            "state": "InProgress",
            "confirmationState": "None"
        },
        "originatingRequestId": "85f22c97-b5d3-4a74-9e3d-95446768ecaa"
    },
    "interpretations": [
        {
            "nluConfidence": {
                "score": 1.0
            },
            "intent": {
                "name": "MakeAppointment",
                "slots": {
                    "AppointmentType": {
                        "value": {
                            "originalValue": "Root canal",
                            "interpretedValue": "Root canal",
                            "resolvedValues": [
                                "root canal"
                            ]
                        }
                    },
                    "Date": {
                        "value": {
                            "originalValue": "Next Wednesday",
                            "interpretedValue": "2021-03-17",
                            "resolvedValues": [
                                "2021-03-17"
                            ]
                        }
                    },
                    "Time": {
                        "value": {
                            "originalValue": "9 am",
                            "interpretedValue": "09:00",
                            "resolvedValues": [
                                "09:00"
                            ]
                        }
                    }
                },
                "state": "InProgress",
                "confirmationState": "None"
            }
        },
        {
            "intent": {
                "name": "FallbackIntent",
                "slots": {}
            }
        }
    ],
    "sessionId": "test_session"
}
This time your chatbot interpreted the value as 09:00 and used it as the value for the slot Time:
 "Time": {
                    "value": {
                        "originalValue": "9 am",
                        "interpretedValue": "09:00",
                        "resolvedValues": [
                            "09:00"
                        ]
                    }
                }
Because the slots have been set now, the sessionState dialogAction is ConfirmIntent.
'sessionState': {
        'dialogAction': {
            'type': 'ConfirmIntent'
        }
This time, messages contains the details contained in the slots.
    "messages": [
        {
            "content": "09:00 is available, should I go ahead and book your appointment?",
            "contentType": "PlainText"
        }
    ]
You will submit the confirmation:
aws lexv2-runtime recognize-text --bot-id 'UFIDGBA6DE' --bot-alias-id 'TSTALIASID' --locale-id 'en_US' --session-id 'test_session' --text 'yes'Response will be similar to:
{
    "sessionState": {
        "dialogAction": {
            "type": "Close"
        },
        "intent": {
            "name": "MakeAppointment",
            "slots": {
                "AppointmentType": {
                    "value": {
                        "originalValue": "Root canal",
                        "interpretedValue": "Root canal",
                        "resolvedValues": [
                            "root canal"
                        ]
                    }
                },
                "Date": {
                    "value": {
                        "originalValue": "Next Wednesday",
                        "interpretedValue": "2021-03-17",
                        "resolvedValues": [
                            "2021-03-17"
                        ]
                    }
                },
                "Time": {
                    "value": {
                        "originalValue": "9 am",
                        "interpretedValue": "09:00",
                        "resolvedValues": [
                            "09:00"
                        ]
                    }
                }
            },
            "state": "ReadyForFulfillment",
            "confirmationState": "Confirmed"
        },
        "originatingRequestId": "85f22c97-b5d3-4a74-9e3d-95446768ecaa"
    },
    "interpretations": [
        {
            "nluConfidence": {
                "score": 1.0
            },
            "intent": {
                "name": "MakeAppointment",
                "slots": {
                    "AppointmentType": {
                        "value": {
                            "originalValue": "Root canal",
                            "interpretedValue": "Root canal",
                            "resolvedValues": [
                                "root canal"
                            ]
                        }
                    },
                    "Date": {
                        "value": {
                            "originalValue": "Next Wednesday",
                            "interpretedValue": "2021-03-17",
                            "resolvedValues": [
                                "2021-03-17"
                            ]
                        }
                    },
                    "Time": {
                        "value": {
                            "originalValue": "9 am",
                            "interpretedValue": "09:00",
                            "resolvedValues": [
                                "09:00"
                            ]
                        }
                    }
                },
                "state": "ReadyForFulfillment",
                "confirmationState": "Confirmed"
            }
        },
        {
            "intent": {
                "name": "FallbackIntent",
                "slots": {}
            }
        }
    ],
    "sessionId": "test_session"
}
Also the intent sate is “ReadyForFulfillment” and “Confirmed”
'state': 'ReadyForFulfillment',
'confirmationState': 'Confirmed'
Interact programmatically with Amazon Lex V2 via Boto3
Boto is the AWS SDK for Python. It enables Python developers to create, configure, and manage AWS services, such as Amazon Elastic Compute Cloud (Amazon EC2) and Amazon Simple Storage Service (Amazon S3). Boto provides an easy-to-use, object-oriented API, as well as low-level access to AWS services.
Support for Amazon Lex V2 APIs is introduced in version 1.16.59.
To interact with your Amazon Lex bot using the Boto3 lexv2-runtime, you need to use the values that you collected earlier for botID, AliasId, and localeID.
Boto3 code example
After I collected the required information, I have the following parameters (these will be different for your account):
botId='UFIDGBA6DE'
botAliasId='TSTALIASID'
localeId='en_US'
The first message you send to your bot is “I would like to see the dentist “:
import boto3
# LexV2 client uses 'lexv2-runtime'
client = boto3.client('lexv2-runtime')

# Submit the text 'I would like to see a dentist'
response = client.recognize_text(
    botId='UFIDGBA6DE',
    botAliasId='TSTALIASID',
    localeId='en_US',
    sessionId="test_session",
    text='I would like to see the dentist')
You get a response similar to the following:
{
    'ResponseMetadata': {
        'RequestId': 'e998ce7f-3381-4501-9973-970b221504a5',
        'HTTPStatusCode': 200,
        'HTTPHeaders': {
            'x-amzn-requestid': 'e998ce7f-3381-4501-9973-970b221504a5',
            'date': 'Tue,
            9Mar202123: 38: 01GMT',
            'content-type': 'application/json',
            'content-length': '666'
        },
        'RetryAttempts': 0
    },
    'messages': [
        {
            'content': 'What type of appointment would you like to schedule?',
            'contentType': 'PlainText'
        }
    ],
    'sessionState': {
        'dialogAction': {
            'type': 'ElicitSlot',
            'slotToElicit': 'AppointmentType'
        },
        'intent': {
            'name': 'MakeAppointment',
            'slots': {
                'AppointmentType': None,
                'Date': None,
                'Time': None
            },
            'state': 'InProgress',
            'confirmationState': 'None'
        },
        'originatingRequestId': '85f22c97-b5d3-4a74-9e3d-95446768ecaa'
    },
    'interpretations': [
        {
            'nluConfidence': {
                'score': 0.82
            },
            'intent': {
                'name': 'MakeAppointment',
                'slots': {
                    'AppointmentType': None,
                    'Date': None,
                    'Time': None
                },
                'state': 'InProgress',
                'confirmationState': 'None'
            }
        },
        {
            'intent': {
                'name': 'FallbackIntent',
                'slots': {

                }
            }
        }
    ],
    'sessionId': 'test_session'
}
We can dive deeper into the response to see the dialog state is ElicitSlot, meaning the chatbot is requiring the user to provide a value for the slot type AppointmentType:
'sessionState': {
        'dialogAction': {
            'type': 'ElicitSlot',
            'slotToElicit': 'AppointmentType'
        }
In this case, you enter Root Canal:
response = client.recognize_text(
    botId='UFIDGBA6DE',
    botAliasId='TSTALIASID',
    localeId='en_US',
    sessionId="test_session",
    text='Root Canal')
This time, your response is the following:
{
    'ResponseMetadata': {
        'RequestId': 'fae988d3-c956-4ea4-b5f8-2646d914adf4',
        'HTTPStatusCode': 200,
        'HTTPHeaders': {
            'x-amzn-requestid': 'fae988d3-c956-4ea4-b5f8-2646d914adf4',
            'date': 'Tue,
            9Mar202123: 40: 03GMT',
            'content-type': 'application/json',
            'content-length': '842'
        },
        'RetryAttempts': 0
    },
    'messages': [
        {
            'content': 'When should I schedule your appointment?',
            'contentType': 'PlainText'
        }
    ],
    'sessionState': {
        'dialogAction': {
            'type': 'ElicitSlot',
            'slotToElicit': 'Date'
        },
        'intent': {
            'name': 'MakeAppointment',
            'slots': {
                'AppointmentType': {
                    'value': {
                        'originalValue': 'RootCanal',
                        'interpretedValue': 'RootCanal',
                        'resolvedValues': [
                            'rootcanal'
                        ]
                    }
                },
                'Date': None,
                'Time': None
            },
            'state': 'InProgress',
            'confirmationState': 'None'
        },
        'originatingRequestId': '85f22c97-b5d3-4a74-9e3d-95446768ecaa'
    },
    'interpretations': [
        {
            'nluConfidence': {
                'score': 1.0
            },
            'intent': {
                'name': 'MakeAppointment',
                'slots': {
                    'AppointmentType': {
                        'value': {
                            'originalValue': 'RootCanal',
                            'interpretedValue': 'RootCanal',
                            'resolvedValues': [
                                'rootcanal'
                            ]
                        }
                    },
                    'Date': None,
                    'Time': None
                },
                'state': 'InProgress',
                'confirmationState': 'None'
            }
        },
        {
            'intent': {
                'name': 'FallbackIntent',
                'slots': {

                }
            }
        }
    ],
    'sessionId': 'test_session'
}
The chatbot interpreted that the value for the slot AppointmentType is root canal:
'slots': {
                'AppointmentType': {
                    'value': {
                        'originalValue': 'Root Canal',
                        'interpretedValue': 'Root Canal',
                        'resolvedValues': [
                            'root canal'
                        ]
                    }
                },
                'Date': None,
                'Time': None
            }
You can also check the current dialogAction:
'sessionState': {
        'dialogAction': {
            'type': 'ElicitSlot',
            'slotToElicit': 'Date'
        }
In the messages section, you can see the following:
    'messages': [
        {
            'content': 'When should I schedule your appointment?',
            'contentType': 'PlainText'
        }
    ]
Provide appointment date:
response = client.recognize_text(
    botId='UFIDGBA6DE',
    botAliasId='TSTALIASID',
    localeId='en_US',
    sessionId="test_session",
    text='Next Wednesday')
You get a response similar to the following:
{
    'ResponseMetadata': {
        'RequestId': '8639e4dd-bbfe-42a3-aa9e-96391fd821fd',
        'HTTPStatusCode': 200,
        'HTTPHeaders': {
            'x-amzn-requestid': '8639e4dd-bbfe-42a3-aa9e-96391fd821fd',
            'date': 'Tue,
            9Mar202123: 41: 51GMT',
            'content-type': 'application/json',
            'content-length': '1058'
        },
        'RetryAttempts': 0
    },
    'messages': [
        {
            'content': 'At what time should I schedule your appointment?',
            'contentType': 'PlainText'
        }
    ],
    'sessionState': {
        'dialogAction': {
            'type': 'ElicitSlot',
            'slotToElicit': 'Time'
        },
        'intent': {
            'name': 'MakeAppointment',
            'slots': {
                'AppointmentType': {
                    'value': {
                        'originalValue': 'Root Canal',
                        'interpretedValue': 'Root Canal',
                        'resolvedValues': [
                            'root canal'
                        ]
                    }
                },
                'Date': {
                    'value': {
                        'originalValue': 'Next Wednesday',
                        'interpretedValue': '2021-03-17',
                        'resolvedValues': [
                            '2021-03-17'
                        ]
                    }
                },
                'Time': None
            },
            'state': 'InProgress',
            'confirmationState': 'None'
        },
        'originatingRequestId': '85f22c97-b5d3-4a74-9e3d-95446768ecaa'
    },
    'interpretations': [
        {
            'nluConfidence': {
                'score': 1.0
            },
            'intent': {
                'name': 'MakeAppointment',
                'slots': {
                    'AppointmentType': {
                        'value': {
                            'originalValue': 'RootCanal',
                            'interpretedValue': 'RootCanal',
                            'resolvedValues': [
                                'rootcanal'
                            ]
                        }
                    },
                    'Date': {
                        'value': {
                            'originalValue': 'Next Wednesday',
                            'interpretedValue': '2021-03-17',
                            'resolvedValues': [
                                '2021-03-17'
                            ]
                        }
                    },
                    'Time': None
                },
                'state': 'InProgress',
                'confirmationState': 'None'
            }
        },
        {
            'intent': {
                'name': 'FallbackIntent',
                'slots': {

                }
            }
        }
    ],
    'sessionId': 'test_session'
}
At the time of this writing, “next Wednesday” is March 17, 2021, which is exactly what your chatbot interpreted:
 'Date': {
                        'value': {
                            'originalValue': 'Next Wednesday',
                            'interpretedValue': '2021-03-17',
                            'resolvedValues': [
                                '2021-03-17'
                            ]
                        }
You can see the following in the messages section:
'messages': [
        {
            'content': 'At what time should I schedule your appointment?',
            'contentType': 'PlainText'
        }
    ]
The next step is to define the PickupTime:
'sessionState': {
        'dialogAction': {
            'type': 'ElicitSlot',
            'slotToElicit': 'Time'
        }
Use the following code:
response = client.recognize_text(
    botId='UFIDGBA6DE',
    botAliasId='TSTALIASID',
    localeId='en_US',
    sessionId="test_session",
    text='9 am')
You receive a response similar to the following:
{
    'ResponseMetadata': {
        'RequestId': 'e8c06004-960b-442f-bf0d-0d995ec366bf',
        'HTTPStatusCode': 200,
        'HTTPHeaders': {
            'x-amzn-requestid': 'e8c06004-960b-442f-bf0d-0d995ec366bf',
            'date': 'Tue,
            9Mar202123: 44: 39GMT',
            'content-type': 'application/json',
            'content-length': '1223'
        },
        'RetryAttempts': 0
    },
    'messages': [
        {
            'content': '09:00 is available, should I go ahead and book your appointment?',
            'contentType': 'PlainText'
        }
    ],
    'sessionState': {
        'dialogAction': {
            'type': 'ConfirmIntent'
        },
        'intent': {
            'name': 'MakeAppointment',
            'slots': {
                'AppointmentType': {
                    'value': {
                        'originalValue': 'Root Canal',
                        'interpretedValue': 'Root Canal',
                        'resolvedValues': [
                            'root canal'
                        ]
                    }
                },
                'Date': {
                    'value': {
                        'originalValue': 'Next Wednesday',
                        'interpretedValue': '2021-03-17',
                        'resolvedValues': [
                            '2021-03-17'
                        ]
                    }
                },
                'Time': {
                    'value': {
                        'originalValue': '9 am',
                        'interpretedValue': '09:00',
                        'resolvedValues': [
                            '09:00'
                        ]
                    }
                }
            },
            'state': 'InProgress',
            'confirmationState': 'None'
        },
        'originatingRequestId': '85f22c97-b5d3-4a74-9e3d-95446768ecaa'
    },
    'interpretations': [
        {
            'nluConfidence': {
                'score': 1.0
            },
            'intent': {
                'name': 'MakeAppointment',
                'slots': {
                    'AppointmentType': {
                        'value': {
                            'originalValue': 'Root Canal',
                            'interpretedValue': 'Root Canal',
                            'resolvedValues': [
                                'rootcanal'
                            ]
                        }
                    },
                    'Date': {
                        'value': {
                            'originalValue': 'Next Wednesday',
                            'interpretedValue': '2021-03-17',
                            'resolvedValues': [
                                '2021-03-17'
                            ]
                        }
                    },
                    'Time': {
                        'value': {
                            'originalValue': '9 am',
                            'interpretedValue': '09:00',
                            'resolvedValues': [
                                '09:00'
                            ]
                        }
                    }
                },
                'state': 'InProgress',
                'confirmationState': 'None'
            }
        },
        {
            'intent': {
                'name': 'FallbackIntent',
                'slots': {

                }
            }
        }
    ],
    'sessionId': 'test_session'
}
The chatbot set your appointment Time for 9:00 AM:
 'Time': {
                        'value': {
                            'originalValue': '9 am',
                            'interpretedValue': '09:00',
                            'resolvedValues': [
                                '09:00'
                            ]
                        }
Because the slots have been set, the sessionState dialogAction is now ConfirmIntent:
'sessionState': {
        'dialogAction': {
            'type': 'ConfirmIntent'
        }
This time, the messages section contains the details contained in the slots:
'messages': [
        {
            'content': '09:00 is available, should I go ahead and book your appointment?',
            'contentType': 'PlainText'
        }
You submit the confirmation:
response = client.recognize_text(
    botId='4HKK09CVHD',
    botAliasId='TSTALIASID',
    localeId='en_US',
    sessionId="test_session",
    text='yes')
The response looks like the following:
{
    'ResponseMetadata': {
        'RequestId': '362d4478-caea-49cf-8b1b-b0ab035e324f',
        'HTTPStatusCode': 200,
        'HTTPHeaders': {
            'x-amzn-requestid': '362d4478-caea-49cf-8b1b-b0ab035e324f',
            'date': 'Tue,
            9Mar202123: 46: 48GMT',
            'content-type': 'application/json',
            'content-length': '1125'
        },
        'RetryAttempts': 0
    },
    'sessionState': {
        'dialogAction': {
            'type': 'Close'
        },
        'intent': {
            'name': 'MakeAppointment',
            'slots': {
                'AppointmentType': {
                    'value': {
                        'originalValue': 'Root Canal',
                        'interpretedValue': 'Root Canal',
                        'resolvedValues': [
                            'root canal'
                        ]
                    }
                },
                'Date': {
                    'value': {
                        'originalValue': 'Next Wednesday',
                        'interpretedValue': '2021-03-17',
                        'resolvedValues': [
                            '2021-03-17'
                        ]
                    }
                },
                'Time': {
                    'value': {
                        'originalValue': '9 am',
                        'interpretedValue': '09:00',
                        'resolvedValues': [
                            '09:00'
                        ]
                    }
                }
            },
            'state': 'ReadyForFulfillment',
            'confirmationState': 'Confirmed'
        },
        'originatingRequestId': '85f22c97-b5d3-4a74-9e3d-95446768ecaa'
    },
    'interpretations': [
        {
            'nluConfidence': {
                'score': 1.0
            },
            'intent': {
                'name': 'MakeAppointment',
                'slots': {
                    'AppointmentType': {
                        'value': {
                            'originalValue': 'Root Canal',
                            'interpretedValue': 'Root Canal',
                            'resolvedValues': [
                                'root canal'
                            ]
                        }
                    },
                    'Date': {
                        'value': {
                            'originalValue': 'Next Wednesday',
                            'interpretedValue': '2021-03-17',
                            'resolvedValues': [
                                '2021-03-17'
                            ]
                        }
                    },
                    'Time': {
                        'value': {
                            'originalValue': '9 am',
                            'interpretedValue': '09:00',
                            'resolvedValues': [
                                '09:00'
                            ]
                        }
                    }
                },
                'state': 'ReadyForFulfillment',
                'confirmationState': 'Confirmed'
            }
        },
        {
            'intent': {
                'name': 'FallbackIntent',
                'slots': {

                }
            }
        }
    ],
    'sessionId': 'test_session'
}
The sessionState dialogAction this time is Close:
'sessionState': {
        'dialogAction': {
            'type': 'Close'
        }
Also, the intent state is ReadyForFulfillment and Confirmed:
'state': 'ReadyForFulfillment',
'confirmationState': 'Confirmed'
About DotNet SDK
The AWS SDK for DotNet provides an interface that you can use from your DotNet applications to interact with your bots. You can use the SDK for DotNet to build client applications for users.
The following application interacts with the . It uses the AmazonLexRuntimeV2Client from the SDK for DotNet to call the RecognizeText operation to conduct a conversation with the bot.
To run the application, you need the following values:
- botId –The identifier assigned to the bot when you created it. You can see the bot ID on the Amazon Lex console on the Bot details
- botAliasId – The identifier assigned to the bot alias when you created it. You can see the bot alias ID on the Amazon Lex console on the Aliases If you can’t see the alias ID in the list, choose the gear icon on the upper right and turn on Alias ID.
- localeId – The identifier of the locale that you used for your bot. For a list of locales and language codes, see Languages and locales supported by Amazon Lex.
- accessKey and secretKey – The authentication keys for your account. If you don’t have a set of keys, create them using the AWS Identity and Access Management (IAM) console.
- sessionId – An identifier for the session with the Amazon Lex bot. In this case, the code uses a random UUID.
Additionally, if your bot isn’t in the US East (N. Virginia) AWS Region, make sure that you change the region value.
Let’s look at the following sample code to understand how we can easily interact with Amazon Lex V2 from the DotNet framework.
First, we create an AmazonLexRuntimeV2Client object with the access key and secret:
            // create a LexV2 runtime client
            AmazonLexRuntimeV2Client client =
            new AmazonLexRuntimeV2Client(access_key
                                        , secret_key
                                        , Amazon.RegionEndpoint.GetBySystemName(preferred_region));
Provide the following information:
// provide the parameters
// Randomly generated GUID unique per session
string sessionId = Guid.NewGuid().ToString();

// provide the unique BotId
string botId = "XXXXX";
//provide the unique BotAliasId
string botAliasId = "XXXXX";
// refer to the list of supported locales
string localeId = "en_US";
The request uses the required URI parameters botAliasId, botId, localeId, and sessionId.
The user initiates the conversation by providing the intent:
string userInput1 = ""Next, we call the GetRecongizeTextV2Response method by passing the required parameters and the AmazonLexRuntimeV2Client client object:
var response1 = GetRecongizeTextV2Response(client, botId, botAliasId, localeId, sessionId, userInput1)Inside the GetRecongizeTextV2Response method, we create a RecognizeTextRequest object, containing the parameters to the RecognizeText operation:
RecognizeTextRequest request = new RecognizeTextRequest
{
    BotAliasId = botAliasId,
    BotId = botId,
    LocaleId = localeId,
    SessionId = sessionId,
    Text = userInput
};
The RecognizeTextRequest in JSON format looks like the following:
{
    "BotAliasId": "YOURBOTALIASID",
    "BotId": "YOURBOTID",
    "LocaleId": "en_US",
    "RequestAttributes": {

    },
    "SessionId": "cb447544-1920-432d-aa41-4ff2237a0a62",
    "SessionStateValue": null,
    "Text": "I would like to see the dentist"
}
Then we send the user input to Amazon Lex. Client applications can use this API to send requests to Amazon Lex at runtime. You can send requests synchronously or asynchronously. For this post, we send the request using the RecognizeTextAsync method asynchronously. Amazon Lex interprets the user input using the machine learning model that it built for the bot. See the following code:
response = client.RecognizeTextAsync(request).GetAwaiter().GetResult();In response, Amazon Lex returns the next message to convey to the user and an optional response card to display:
{
    "Interpretations": [
        {
            "Intent": {
                "ConfirmationState": {
                    "Value": "None"
                },
                "Name": "MakeAppointment",
                "Slots": {
                    "AppointmentType": null,
                    "Date": null,
                    "Time": null
                },
                "State": {
                    "Value": "InProgress"
                }
            },
            "NluConfidence": {
                "Score": 0.84
            },
            "SentimentResponse": null
        },
        {
            "Intent": {
                "ConfirmationState": null,
                "Name": "FallbackIntent",
                "Slots": {

                },
                "State": null
            },
            "NluConfidence": null,
            "SentimentResponse": null
        }
    ],
    "Messages": [
        {
            "Content": "What type of appointment would you like to schedule?",
            "ContentType": {
                "Value": "PlainText"
            },
            "ImageResponseCard": null
        }
    ],
    "RequestAttributes": {

    },
    "SessionId": "cb447544-1920-432d-aa41-4ff2237a0a62",
    "SessionStateValue": {
        "ActiveContexts": [

        ],
        "DialogAction": {
            "SlotToElicit": "AppointmentType",
            "Type": {
                "Value": "ElicitSlot"
            }
        },
        "Intent": {
            "ConfirmationState": {
                "Value": "None"
            },
            "Name": "MakeAppointment",
            "Slots": {
                "AppointmentType": null,
                "Date": null,
                "Time": null
            },
            "State": {
                "Value": "InProgress"
            }
        },
        "OriginatingRequestId": "36e1cb54-1861-45c9-8d67-898e632daf31",
        "SessionAttributes": {

        }
    },
    "ResponseMetadata": {
        "RequestId": "36e1cb54-1861-45c9-8d67-898e632daf31",
        "Metadata": {

        }
    },
    "ContentLength": 690,
    "HttpStatusCode": 200
}
As you can see, Amazon Lex returns the next message inside the Content as a plain text, with HttpStatusCode as 200.
DotNet SDK code example
The following is the full source code:
using System;
using Amazon.LexModelsV2;
using Amazon.LexRuntimeV2;
using Amazon.LexRuntimeV2.Model;

// This is a sample application to interact with a bot using RecognizeText API using DotNet.
namespace OrderFlowerV2
{
    class OrderFlowers
    {

        const string access_key = "XXXXXXXXXX"; // provide you access key
        const string secret_key = "XXXXXXXXXX"; // provide the secret
        const string preferred_region = "XXXXX"; // provide an appropriate region


        static void Main(string[] args)
        {

            // create a LexV2 runtime client
            AmazonLexRuntimeV2Client client = new AmazonLexRuntimeV2Client(access_key,
            secret_key, Amazon.RegionEndpoint.GetBySystemName(preferred_region));

            string sessionId = Guid.NewGuid().ToString(); // Randomly generated GUID unique per session.
            string botId = "XXXXX"; // provide the unique BotId
            string botAliasId = "XXXXX"; //provide the unique BotAliasId
            string localeId = "en_US"; // refer to the list of supported locales

            // utterance 1
            string userInput1 = "I would like to order flowers";
            var response1 = GetRecongizeTextV2Response(client
                                                        , botId, botAliasId, localeId, sessionId, userInput1);

            Console.WriteLine("User - "+userInput1);
            foreach (var message in response1.Messages)
            {
                Console.WriteLine("Bot - "+message.Content);
            }

            // utterance 2
            string userInput2 = "1 rose";
            var response2 = GetRecongizeTextV2Response(client
                                                       , botId, botAliasId, localeId, sessionId, userInput2);

            Console.WriteLine("User - "+userInput2);
            foreach (var message in response2.Messages)
            {
                Console.WriteLine("Bot - "+message.Content);
            }

            // utterance 3
            string userInput3 = "next Monday";
            var response3 = GetRecongizeTextV2Response(client, botId, botAliasId, localeId, sessionId, userInput3);

            Console.WriteLine("User - "+userInput3);
            foreach (var message in response3.Messages)
            {
                Console.WriteLine("Bot - "+message.Content);
            }

            // utterance 4
            string userInput4 = "7 in the evening";
            var response4 = GetRecongizeTextV2Response(client, botId, botAliasId, localeId, sessionId, userInput4);

            Console.WriteLine("User - "+userInput4);
            foreach (var message in response4.Messages)
            {
                Console.WriteLine("Bot - "+message.Content);
            }

            // utterance 5
            string userInput5 = "Yes";
            var response5 = GetRecongizeTextV2Response(client, botId, botAliasId, localeId, sessionId, userInput5);

            Console.WriteLine("User - "+userInput5);
            foreach (var message in response5.Messages)
            {
                Console.WriteLine("Bot - "+message.Content);
            }
        }
        /// <summary>
        /// Call Amazon LexV2 RecognizeTextAsync method to get the response from the Bot
        /// </summary>
         /// <param name="client"></param>
        /// <param name="botId"></param>
        /// <param name="botAliasId"></param>
        /// <param name="localeId"></param>
        /// <param name="sessionId"></param>
        /// <param name="userInput"></param>
        /// <returns></returns>
        private static RecognizeTextResponse GetRecongizeTextV2Response(AmazonLexRuntimeV2Client client, string botId, string botAliasId, string localeId, string sessionId, string userInput)
        {
            // create a RecognizeTextResponse object
            RecognizeTextResponse response = new RecognizeTextResponse();
            try
            {
                // create RecognizeTextRequest object with the required parameters
                RecognizeTextRequest request = new RecognizeTextRequest
                {
                    BotAliasId = botAliasId,
                    BotId = botId,
                    LocaleId = localeId,
                    SessionId = sessionId,
                    Text = userInput
                };
                // call the RecognizeText async method to get the response
                response = client.RecognizeTextAsync(request).GetAwaiter().GetResult();

            }catch(AmazonLexModelsV2Exception exception)
            {
                Console.WriteLine("AmazonLexModelsV2Exception - "+exception.Message);
            }
            catch(AmazonLexRuntimeV2Exception exception)
            {
                Console.WriteLine("AmazonLexRuntimeV2Exception - "+exception.Message);
            }
            catch(Exception exception)
            {
                Console.WriteLine("Exception - "+exception.Message);
            }
            return response;
        }
    }
}
Conclusion
Now that you have learned how to interact with your Amazon Lex v2 chatbot programmatically with the AWS CLI, Boto3, and, the AWS SDK for DotNet, you can integrate your bots with your applications or with different platforms. If you want to learn more about Amazon Lex v2, you can explore building a banking bot with support for English and Spanish. You can also dive deep into Amazon Lex through the Developer Guide.
About the Authors
 Juan Bustos is an AI Services Specialist Solutions Architect at Amazon Web Services, based in Dallas, TX. Outside of work, he loves spending time writing and playing music as well as trying random restaurants with his family.
 Wrick Talukdar is a Senior Solutions Architect with Amazon Web Services and is based in Calgary, Canada. Wrick works with enterprise AWS customers to transform their business through innovative use of cloud technologies. Outside work he enjoys reading and photography.
 Esther Lee is a Product Manager for AWS Language AI Services. She is passionate about the intersection of technology and education. Out of the office, Esther enjoys long walks along the beach, dinners with friends and friendly rounds of Mahjong.
How TensorFlow helps Edge Impulse make ML accessible to embedded engineers
Posted by Daniel Situnayake, Founding TinyML Engineer, Edge Impulse.
Microcontrollers that run our world
No matter where you are reading this right now—your home, your office, or sitting in a vehicle—you are likely surrounded by microcontrollers. They are the tiny, low-power computers that animate our modern world: from smart watches and kitchen appliances to industrial equipment and public transportation. Mostly hidden inside other products, microcontrollers are actually the most numerous type of computer, with more than 28 billion of them shipped in 2020.
The software that powers all these devices is written by embedded software engineers. They’re some of the most talented, detail-oriented programmers in the industry, tasked with squeezing every last drop of efficiency from tiny, inexpensive processors. A typical mid-range microcontroller—based around Arm’s popular Cortex-M4 architecture—might have a 32-bit processor running at just 64Mhz, with 256KB of RAM and 1MB of flash memory for storing a program. That doesn’t leave a lot of room for waste.
Since microcontrollers interface directly with sensors and hardware, embedded engineers are often experts in signal processing and electrical engineering—and they tend to have a lot of domain knowledge in their area of focus. One engineer might be an expert on the niche sensors used for medical applications, while another might focus on analyzing audio signals.
Embedded machine learning
In the past few years, a set of technologies have been developed that make it possible to run miniature, highly optimized machine learning models on low-power microcontrollers like the one described above. By using machine learning to interpret sensor data right at the source, embedded applications can become smarter, faster, and more energy efficient, making their own decisions rather than having to stream data to the cloud and wait for a response. This concept is known as embedded machine learning, or TinyML.
With their deep signal processing and domain expertise, embedded engineers are ideally placed to design this new generation of smart applications. However, embedded engineers tend to have highly specialized skill sets and use development toolchains that are often far removed from the Python-heavy stack preferred by data scientists and machine learning engineers.
It isn’t reasonable to expect domain experts to retrain as data scientists, or for data scientists to learn the embedded development skills required to work with microcontrollers. Instead, a new generation of tooling is required that will allow those with domain expertise to capture their knowledge and insight as machine learning models and deploy them to embedded devices—with help from machine learning experts an optional extra.
The TinyML development process is similar to the traditional machine learning workflow. It starts with collecting, exploring, and evaluating a dataset. Next up, feature engineering takes the form of sophisticated digital signal processing, often using the types of algorithms that embedded engineers are already familiar with. Once features have been extracted from the data, a machine learning model is trained and evaluated—with a critical eye on its size, to make sure it will fit on a tiny microcontroller and run fast enough to be useful.
After the training, the model is optimized for size and efficiency. This often involves quantization, reducing the precision of the model’s weights so that they take up less precious memory. Once the model is ready, it must be deployed as a C++ library (the language of choice for the majority of embedded platforms) that includes all of the operator kernels required to run it. The embedded engineer can then write and tune an application that interprets the model’s output and uses it to make decisions.
Throughout this process, it’s important to carefully evaluate the model and application to ensure that it functions in the way that it is intended to when used in a real world environment. Without adequate monitoring and review, it’s possible to create models that seem superficially accurate but that fail in harmful ways when exposed to real world data.
Edge Impulse and TensorFlow
The Edge Impulse team has created an end-to-end suite of tooling that helps embedded engineers and domain experts build and test machine learning applications. Edge Impulse is designed to integrate beautifully with the tools that embedded engineers use every day, providing a high-level interface for incorporating machine learning into projects.
Edge Impulse makes use of the TensorFlow ecosystem for training, optimizing, and deploying deep learning models to embedded devices. While it was designed with non-ML engineers in mind, the philosophy behind Edge Impulse is that it should be extensible by machine learning experts and flexible enough to incorporate their insights and additions—from hand-tuned model architectures and loss functions to custom operator kernels.
This extensibility is made possible by the TensorFlow ecosystem, which provides a set of standards and integration points that experts can use to make their own improvements.
Training a tiny model
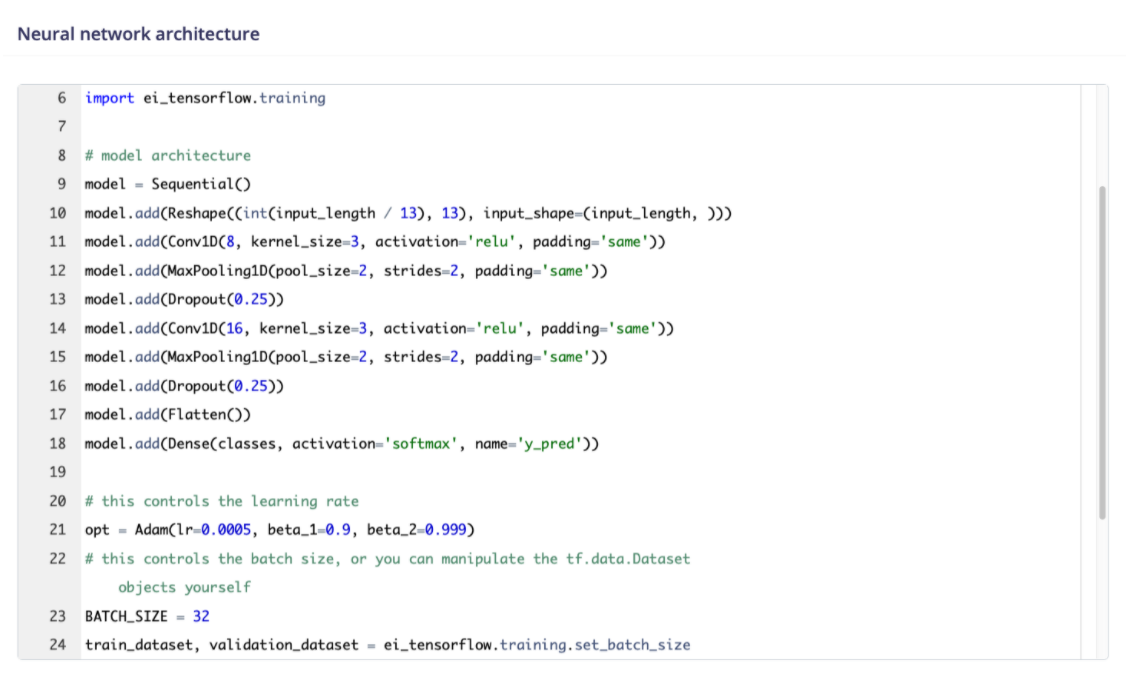
This process starts during training. Novice ML developers using Edge Impulse can use a library of preset deep learning model architectures designed to work well with embedded devices. For example, this simple convolutional model is intended for classifying ambient noise:

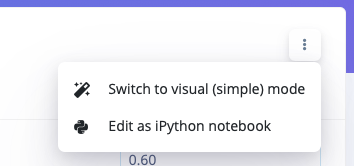
Under the hood, Edge Impulse generates a Python implementation of the model using TensorFlow’s Keras APIs. More experienced developers can customize the layers of the deep learning network, tweaking parameters and adding new layers that are reflected in the underlying Keras model. And expert developers have access to edit the training code itself, directly within the UI:
Since Edge Impulse uses TensorFlow libraries and APIs, it’s incredibly simple to extend the built-in training code with your own logic. For example, the tf.data.Dataset class is used to provide an efficient pipeline to the training and validation datasets. This pipeline can easily be extended to add transformations, such as the data augmentation function seen in the following screenshot from an image classification project:

For in-depth experiments, developers can download a Jupyter Notebook containing all of the dependencies required to run their training script locally.
Any custom model code using the TensorFlow APIs fits seamlessly into the end-to-end pipeline hosted by Edge Impulse. Training is run in the cloud, and trained models are automatically optimized for embedded deployment using a combination of TensorFlow utilities and Edge Impulse’s own open source technologies.
Model optimization
Quantization is the most common form of optimization used when deploying deep learning models to embedded devices. Edge Impulse uses TensorFlow’s Model Optimization Toolkit to quantize models, reducing their weights’ precision from float32 to int8 with minimal impact on accuracy.
Using TensorFlow Lite for Microcontrollers along with the emulation software Renode, Edge Impulse provides developers with an accurate estimate of the latency and memory usage of their model once it is deployed to the target embedded device. This makes it easy to determine the impact of optimizations such as quantization across different slices of the dataset:
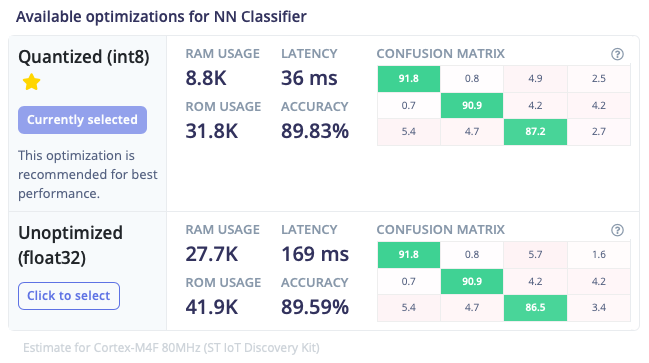 |
| A comparison between int8 quantized and unoptimized versions of the same mode, showing the difference in performance and results. |
For maximum flexibility and compatibility with developers’ existing workflows, the trained model is available for download in multiple formats. Developers can choose to export the original model as a TensorFlow SavedModel, or download one of several optimized models using the portable TensorFlow Lite flatbuffer format:
 |
| Download links for models serialized using TensorFlow’s SavedModel and TensorFlow Lite formats. |
Deployment
Once a model has been trained and tested there are multiple ways to deploy it to the target device. Embedded engineers work heavily with C++, so the standard option is to export a C++ SDK: a library of optimized source code that implements both the signal processing pipeline and the deep learning model. The SDK has a permissive open source license, so developers are free to use it in any project or share it with others.
There are two main options for running deep learning models, both of which make use of TensorFlow technologies. The first, Edge Impulse’s EON Compiler, is a code generation tool that converts TensorFlow Lite models into human readable C++ programs.
 |
| Enabling EON Compiler can reduce memory usage by up to 50% with no impact on model accuracy. |
EON Compiler makes use of the operator kernels implemented in TensorFlow Lite for Microcontrollers, invoking them in an efficient manner that doesn’t require the use of an interpreter. This results in memory savings of up to 50%. It automatically applies any available optimized kernels for the target device, meaning libraries such as Arm’s CMSIS-NN will be used where appropriate.
Some projects benefit from additional flexibility. In these cases, developers can choose to export a library that uses the TensorFlow Lite for Microcontrollers interpreter to run the model. This can be useful for developers who wish to experiment with custom kernel implementations for their specific hardware, or who are working within an environment that has TensorFlow Lite for Microcontrollers built in.
In addition to the C++ SDK, developers can choose to target specific environments. For example, a TensorRT library provides optimized support for NVidia’s Jetson Nano embedded Linux developer kit. This interoperability is enabled by the extensive TensorFlow ecosystem and open source community, which has tooling for numerous platforms and targets.
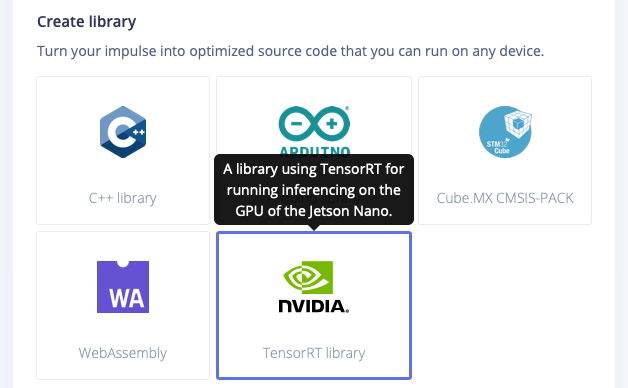 |
| Models can be optimized and exported for targets in the broader TensorFlow ecosystem, such as NVidia’s Jetson Nano. |
Enabling new technologies
TensorFlow is unique amongst deep learning frameworks due to its broad, mature, and extensible set of technologies for training and deploying models to embedded devices. TensorFlow formats, such as the TensorFlow Lite flatbuffer, have become de-facto standards amongst companies bringing deep learning models to the edge.
The TensorFlow ecosystem has been key to enabling the growth of embedded machine learning, enabling companies like Edge Impulse to put artificial intelligence in the hands of domain experts who are building the next generation of consumer and industrial technologies.
If you’d like to learn more about embedded machine learning using Edge Impulse and TensorFlow, there are many options. Take a look at the Introduction to Embedded Machine Learning course on Coursera, or jump right in with the Getting Started guide or Recognize sounds from audio tutorial. You can even check out a public Edge Impulse project that you can clone and customize with a single click.
Daniel Situnayake
Founding TinyML Engineer, Edge Impulse.
DeepLearning.AI, Coursera, and AWS launch the new Practical Data Science Specialization with Amazon SageMaker
Amazon Web Services (AWS), Coursera, and DeepLearning.AI are excited to announce Practical Data Science, a three-course, 10-week, hands-on specialization designed for data professionals to quickly learn the essentials of machine learning (ML) in the AWS Cloud. DeepLearning.AI was founded in 2017 by Andrew Ng, an ML and education pioneer, to fill a need for world-class AI education. DeepLearning.AI teamed up with an all-female team of instructors including Amazon ML Solutions Architects and Developer Advocates to develop and deliver the three-course specialization on Coursera’s education platform. Sign up for the Practical Data Science Specialization today on Coursera.
Moving data science projects from idea to production requires a new set of skills to address the scale and operational efficiencies required by today’s ML problems. This specialization addresses common challenges we hear from our customers and teaches you the practical knowledge needed to efficiently deploy your data science projects at scale in the AWS Cloud.
Specialization overview
The Practical Data Science Specialization is designed for data-focused developers, scientists, and analysts familiar with Python to learn how to build, train, and deploy scalable, end-to-end ML pipelines—both automated and human-in-the-loop—in the AWS Cloud. Each of the 10 weeks features a comprehensive, hands-on lab developed specifically for this specialization and hosted by AWS Partner Vocareum. The labs provide hands-on experience with state-of-the-art algorithms for natural language processing (NLP) and natural language understanding (NLU) using Amazon SageMaker and Hugging Face’s highly-optimized implementation of the BERT algorithm.
In the first course, you learn foundational concepts for exploratory data analysis (EDA), automated machine learning (AutoML), and text classification algorithms. With Amazon SageMaker Clarify and Amazon SageMaker Data Wrangler, you analyze a dataset for statistical bias, transform the dataset into machine-readable features, and select the most important features to train a multi-class text classifier. You then perform AutoML to automatically train, tune, and deploy the best text classification algorithm for the given dataset using Amazon SageMaker Autopilot. Next, you work with Amazon SageMaker BlazingText, a highly optimized and scalable implementation of the popular FastText algorithm, to train a text classifier with very little code.
In the second course, you learn to automate an NLP task by building an end-to-end ML pipeline using BERT with Amazon SageMaker Pipelines. Your pipeline first transforms the dataset into BERT-readable features and stores the features in the Amazon SageMaker Feature Store. It then fine-tunes a text classification model to the dataset using a Hugging Face pre-trained model that has learned to understand human language from millions of Wikipedia documents. Finally, your pipeline evaluates the model’s accuracy and only deploys the model if the accuracy exceeds a given threshold.
In the third course, you learn a series of performance-improvement and cost-reduction techniques to automatically tune model accuracy, compare prediction performance, and generate new training data with human intelligence. After tuning your text classifier using hyperparameter tuning, you deploy two model candidates into an A/B test to compare their real-time prediction performance and automatically scale the winning model using Amazon SageMaker Hosting. Lastly, you set up a human-in-the-loop pipeline to fix misclassified predictions and generate new training data using Amazon Augmented AI (Amazon A2I) and Amazon SageMaker Ground Truth.
“The field of data science is constantly evolving with new tools, technologies, and methods,” says Betty Vandenbosch, Chief Content Officer at Coursera. “We’re excited to expand our collaboration with DeepLearning.AI and AWS to help data scientists around the world keep up with the many tools at their disposal. Through hands-on learning, cutting-edge technology, and expert instruction, this new content will help learners acquire the latest job-relevant data science skills.”
Register today
The Practical Data Science Specialization from DeepLearning.AI, AWS, and Coursera is a great way to learn AI and ML essentials in the cloud. The three-course specialization is a great resource to start building and operationalizing data science projects efficiently with the depth and breadth of Amazon ML services. Improve your data science skills by signing up for the Practical Data Science Specialization today at Coursera!
About the Authors
 Antje Barth is a Senior Developer Advocate for AI and Machine Learning at Amazon Web Services (AWS). She is co-author of the O’Reilly book – Data Science on AWS. Antje frequently speaks at AI / ML conferences, events, and meetups around the world. Previously, Antje worked in technical evangelism and solutions engineering at Cisco and MapR, focused on data center technologies, big data, and AI applications. Antje co-founded the Düsseldorf chapter of Women in Big Data.
 Chris Fregly is a Principal Developer Advocate for AI and Machine Learning at Amazon Web Services (AWS). He is a co-author of the O’Reilly book – Data Science on AWS. Chris has founded multiple global meetups focused on Apache Spark, TensorFlow, and Kubeflow. He regularly speaks at AI / ML conferences worldwide, including O’Reilly AI & Strata, Open Data Science Conference (ODSC), and GPU Technology Conference (GTC). Previously, Chris founded PipelineAI, where he worked with many AI-first startups and enterprises to continuously deploy ML/AI Pipelines using Apache Spark ML, Kubernetes, TensorFlow, Kubeflow, Amazon EKS, and Amazon SageMaker.
 Shelbee Eigenbrode is a Principal AI and Machine Learning Specialist Solutions Architect at Amazon Web Services (AWS). She holds 6 AWS certifications and has been in technology for 23 years spanning multiple industries, technologies, and roles. She is currently focusing on combining her DevOps and ML background to deliver and manage ML workloads at scale. With over 35 patents granted across various technology domains, she has a passion for continuous innovation and using data to drive business outcomes. Shelbee co-founded the Denver chapter of Women in Big Data.
 Sireesha Muppala is an Enterprise Principal SA, AI/ML at Amazon Web Services (AWS) who guides customers on architecting and implementing machine learning solutions at scale. She received her Ph.D. in Computer Science from the University of Colorado, Colorado Springs, and has authored several research papers, whitepapers, blog articles. Sireesha frequently speaks at industry conferences, events, and meetups. She co-founded the Denver chapter of Women in Big Data.
Alexa enters the “age of self”
More-autonomous machine learning systems will make Alexa more self-aware, self-learning, and self-service.Read More
NVIDIA Spotlights GeForce Partners at COMPUTEX
Highlighting deep support from a flourishing roster of GeForce partners, NVIDIA’s Jeff Fisher delivered a virtual keynote at COMPUTEX 2021 in Taipei Tuesday.
Fisher, senior vice president of NVIDIA’s GeForce business, announced a pair of powerful new gaming GPUs — the GeForce RTX 3080 Ti and GeForce RTX 3070 Ti — and detailed the fast-growing adoption of NVIDIA RTX technologies.
The virtual keynote, which led with Fisher talking about gaming and then NVIDIA’s Manuvir Das, head of enterprise computing, talking about AI and enterprise platforms (see wrapup, here), began by highlighting NVIDIA’s deep ties to Taiwan.
Deep Roots in Taiwan
Fisher announced the release of a mod — one of thousands for the hyperrealistic flight simulator — paying tribute to Taipei.
“We miss Taipei and wish we could be there in person for COMPUTEX,” Fisher said. “So we created Taipei City in Microsoft Flight Sim and flew in virtually on a GeForce RTX 3080.”
The callout was a tribute to NVIDIA’s many close partners in Taiwan, including Acer, AOC, ASUS, GIGABYTE, MSI and Palit.
COMPUTEX is also a key gathering point for partners from around the world, including Alienware, Colorful, Dell, EVGA, Gainward, Galax, HP, Inno3D, Lenovo, PNY, Razer, ViewSonic and Zotac.
“It’s always great to talk directly to our partners, and this year we have a lot to talk about,” Fisher said.
GeForce Partners in Every Category
Throughout his talk, Fisher highlighted NVIDIA’s close ties to partners in Taiwan — and throughout the world — in gaming laptops, desktop GPUs, studio laptops and G-SYNC displays.
Thanks to decades of work with partners, gaming laptops are thriving, and Fisher spotlighted six GeForce RTX laptops from Acer, Dell and HP.
This year brought a record launch for RTX laptops, with over 140 models from every manufacturer.
Starting at $799 and featuring Max-Q, a collection of NVIDIA technologies for making gaming laptops thinner, lighter and more powerful, “there is now an RTX laptop for every gamer,” Fisher said.
Highlighting one example, Fisher announced the Alienware x15, an ultra-thin, GeForce RTX 3080 laptop.
Powered by Max-Q technologies including Dynamic Boost 2.0, WhisperMode 2.0 and Advanced Optimus, and featuring a 1440p display, “it is the world’s most powerful sub-16mm 15-inch gaming laptop,” Fisher said.
In the desktop category, the RTX family of desktop GPUs gets a new flagship gaming GPU, the GeForce RTX 3080 Ti, and the GeForce RTX 3070 Ti.
NVIDIA partners announced 98 new desktop GPU products, with 11 key partners announcing new RTX 3080 Ti and 3070 Ti desktop graphics cards.
With second-generation RT Cores and third-generation Tensor Cores, the NVIDIA Ampere architecture is “our greatest generational leap ever,” Fisher said. “The 80 Ti class of GPUs represents the best of our gaming lineup.”
For 3D designers, video editors and photographers, NVIDIA developed NVIDIA Studio. These are specially configured systems, optimized and tested for creator workflows, and supported with a monthly cadence of Studio drivers, Fisher said.
NVIDIA partners announced 8 new Studio products, including six ConceptD laptops from Acer and two laptops from HP.
The 14-inch HP Envy brings the capabilities of RTX to an ultra-portable laptop that’s “great for students and creators on the go,” Fisher said.
The new Acer ConceptD offers a variety of traditional clamshell options and an Ezel sketch board design to give creators even more flexibility, Fisher said.
In displays, NVIDIA partners announced five new G-SYNC products. They included two G-SYNC ULTIMATE displays and three G-SYNC displays from Acer, MSI and ViewSonic.
“G-SYNC introduced stutter-free gaming,” Fisher said. “With over 20 trillion buttery-smooth pixels now shipped once you game with G-SYNC, there is no turning back.”
The spate of announcements — highlighted in Fisher’s keynote — are being celebrated throughout the week at COMPUTEX.
Acer, Alienware, and MSI all had special digital activations to support their new products.
“Thanks to all our partners who are just as excited as we are about reinventing this market, and are joining us in the next major leap forward,” Fisher said.
The post NVIDIA Spotlights GeForce Partners at COMPUTEX appeared first on The Official NVIDIA Blog.
Use Amazon Translate in Amazon SageMaker Notebooks
Amazon Translate is a neural machine translation service that delivers fast, high-quality, and affordable language translation in 71 languages and 4,970 language pairs. Amazon Translate is great for performing batch translation when you have large quantities of pre-existing text to translate and real-time translation when you want to deliver on-demand translations of content as a feature of your applications. It can also handle documents that are written in multiple languages.
Document automation is a common use case where machine learning (ML) can be applied to simplify storing, managing, and extracting insights from documents. In this post, we look at how to run batch translation jobs using the Boto3 Python library as run from an Amazon SageMaker notebook instance. You can also generalize this process to run batch translation jobs from other AWS compute services.
Roles and permissions
We start by creating an AWS Identity and Access Management (IAM) role and access policy to allow SageMaker to run batch translation jobs. If you’re using a simple text translation (such as under 5,000 bytes), the job is synchronous and the data is passed to Amazon Translate as bytes, However, when run as a batch translation job where files are accessed from an Amazon Simple Storage Service (Amazon S3) bucket, the data is read directly by Amazon Translate instead of being passed as bytes by the code run in the SageMaker notebook (in case of shorter text strings).
This section creates the permissions need to allow Amazon Translate access the S3 files.
- On the IAM console, choose Roles.
- Choose Create a role.
- Choose AWS service as your trusted entity.
- For Common use cases, choose EC2 or Lambda (for this post, we choose Lambda).

- Choose Next: Permissions.
For this post, we create a policy that’s not too open.
- Choose Create policy.

- On the JSON tab, enter the following policy code, which for this post is named
policy-rk-read-write(also provide the name of the bucket containing the translated files):
{
    "Version": "2012-10-17",
    "Statement": [
        {
            "Effect": "Allow",
            "Action": [
                "s3:ListBucket"
            ],
            "Resource": [
                "arn:aws:s3:::your-bucket"
            ]
        },
        {
            "Effect": "Allow",
            "Action": [
                "s3:PutObject",
                "s3:GetObject",
                "s3:DeleteObject"
            ],
            "Resource": [
                "arn:aws:s3:::your-bucket/*"
            ]
        }
    ]
}

- On the Create role page, attach your new policy to the role.

- For Role name, enter a name (for this post, we name it
translates3access2). - Choose Create role.

So far everything you have done is a common workflow; now we make a change that allows Amazon Translate to have that trust relationship.
- On the IAM console, choose the role you just created.
![]()
- On the Trust relationships tab, choose Edit trust relationship.

- In the
Servicesection, replace the service name withtranslate.
For example, the following screenshot shows the code with Service defined as lambda.amazonaws.com.

The following screenshot shows the updated code as translate.amazonaws.com.

- Choose Update Trust Policy.
Use a SageMaker notebook with Boto3
We can now run a Jupyter notebook on SageMaker. Every notebook instance has an execution role, which we use to grant permissions for Amazon Translate. If you’re performing a synchronous translation with a short text, all you need to do is provide TranslateFullAccess to this role. In production, you can narrow down the permissions with granular Amazon Translate access.
- On the SageMaker console, choose the notebook instance you created.
- In the Permissions and encryption section, choose the role.

- Choose Attach policies.

- Search for and choose TranslateFullAccess.
![]()
If you haven’t already configured this role to have access to Amazon S3, you can do so following the same steps.
You can also choose to give access to all S3 buckets or specific S3 buckets when you create a SageMaker notebook instance and create a new role.
For this post, we attach the AmazonS3FullAccess policy to the role.
![]()
Run an Amazon Translate synchronous call
You can now run a simple synchronous Amazon Translation job on your SageMaker notebook.

Run an Amazon Translate asynchronous call
If you try to run a batch translation job using Boto3 as in the following screenshot, you have a parameter called DataAccessRoleArn. This is the SageMaker execution role we identified earlier; we need to be able to pass this role to Amazon Translate, thereby allowing Amazon Translate to access data in the S3 bucket. We can configure this on the console, wherein the role is directly passed to Amazon Translate instead of through code run from a SageMaker notebook.

You first need to locate your role ARN.
- On the IAM console, choose the role you created (
translates3access2). - On the Summary page, copy the role ARN.

- Create a new policy (for this post, we call it
IAMPassPolicyTranslate). - Enter the following JSON code (provide your role ARN):
{ "Version": "2012-10-17", "Statement": [ { "Sid": "TranslateAsyncPass", "Effect": "Allow", "Action": "iam:PassRole", "Resource": "arn:aws:iam::XXXXXXXXXX:role/translates3access2" } ] } - Choose Next.
- You can skip the tags section and choose Next
- Provide a name for the policy (for this post, we name it
IAMPassPolicyTranslate).
This policy can now pass the translates3access2 role.
The next step is to attach this policy to the SageMaker execution role.
- Choose the execution role.
- Choose Attach policies.

- Attach the policy you just created (
IAMPassPolicyTranslate).
You can now run the code in the SageMaker notebook instance.

Conclusion
You have seen how to run batch jobs using Amazon Translate in a SageMaker notebook. You can easily apply the same process to running the code using Amazon Elastic Container Service (Amazon ECS), Amazon Elastic Kubernetes Service (Amazon EKS), Amazon Elastic Compute Cloud (Amazon EC2), or other services. You can also as a next step combine services like Amazon Comprehend, Amazon Transcribe, or Amazon Kendra to automate managing, searching, and adding metadata to your documents or textual data.
For more information about Amazon Translate, see Amazon Translate resources.
About the Authors
 Raj Kadiyala is an AI/ML Tech Business Development Manager in AWS WWPS Partner Organization. Raj has over 12 years of experience in Machine Learning and likes to spend his free time exploring machine learning for practical every day solutions and staying active in the great outdoors of Colorado.
 Watson G. Srivathsan is the Sr. Product Manager for Amazon Translate, the AWS natural language processing service. On weekends you will find him exploring the outdoors in the Pacific Northwest.
Build reusable, serverless inference functions for your Amazon SageMaker models using AWS Lambda layers and containers
In AWS, you can host a trained model multiple ways, such as via Amazon SageMaker deployment, deploying to an Amazon Elastic Compute Cloud (Amazon EC2) instance (running a Flask + NGINX, for example), AWS Fargate, Amazon Elastic Kubernetes Service (Amazon EKS), or AWS Lambda.
SageMaker provides convenient model hosting services for model deployment, and provides an HTTPS endpoint where your machine learning (ML) model is available to provide inferences. This lets you focus on your deployment options such as instance type, automatic scaling policies, model versions, inference pipelines, and other features that make deployment easy and effective for handling production workloads. The other deployment options we mentioned require additional heavy lifting, such as launching a cluster or an instance, maintaining Docker containers with the inference code, or even creating your own APIs to simplify operations.
This post shows you how to use AWS Lambda to host an ML model for inference and explores several options to build layers and containers, including manually packaging and uploading a layer, and using AWS CloudFormation, AWS Serverless Application Model (AWS SAM), and containers.
Using Lambda for ML inference is an excellent alternative for some use cases for the following reasons:
- Lambda lets you run code without provisioning or managing servers.
- You pay only for the compute time you consume—there is no charge when you’re not doing inference.
- Lambda automatically scales by running code in response to each trigger (or in this case, an inference call from a client application for making a prediction using the trained model). Your code runs in parallel and processes each trigger individually, scaling with the size of the workload.
- You can limit the number of concurrent calls to an account-level default of 1,000, or request an appropriate limit increase.
- The inference code in this case is just the Lambda code, which you can edit directly on the Lambda console or using AWS Cloud9.
- You can store the model in the Lambda package or container, or pulled down from Amazon Simple Storage Service (Amazon S3). The latter method introduces additional latency, but it’s very low for small models.
- You can trigger Lambda via various services internally, or via Amazon API Gateway.
One limitation of this approach when using Lambda layers is that only small models can be accommodated (50 MB zipped layer size limit for Lambda), but with SageMaker Neo, you can potentially obtain a 10x reduction in the amount of memory required by the framework to run a model. The model and framework are compiled into a single executable that can be deployed in production to make fast, low-latency predictions. Additionally, the recently launched container image support allows you to use up to a 10 GB size container for Lambda tasks. Later in this post, we discuss how to overcome some of the limitations on size. Let’s get started by looking at Lambda layers first!
Inference using Lambda layers
A Lambda layer is a .zip archive that contains libraries, a custom runtime, or other dependencies. With layers, you can use libraries in your function without needing to include them in your deployment package.
Layers let you keep your deployment package small, which makes development easier. You can avoid errors that can occur when you install and package dependencies with your function code. For Node.js, Python, and Ruby functions, you can develop your function code on the Lambda console as long as you keep your deployment package under 3 MB. A function can use up to five layers at a time. The total unzipped size of the function and all layers can’t exceed the unzipped deployment package size limit of 250 MB. For more information, see Lambda quotas.
Building a common ML Lambda layer that can be used with multiple inference functions reduces effort and streamlines the process of deployment. In the next section, we describe how to build a layer for scikit-learn, a small yet powerful ML framework.
Build a scikit-learn ML layer
The purpose of this section is to explore the process of manually building a layer step by step. In production, you will likely use AWS SAM or another option such as AWS Cloud Development Kit (AWS CDK), AWS CloudFormation, or your own container build pipeline to do the same. After we go through these steps manually, you may be able to appreciate how some of the other tools like AWS SAM simplify and automate these steps.
To ensure that you have a smooth and reliable experience building a custom layer, we recommend that you log in to an EC2 instance running Amazon Linux to build this layer. For instructions, see Connect to your Linux instance.
When you’re are logged in to your EC2 instance, follow these steps to build a sklearn layer:
Step 1 – Upgrade pip and awscli
Enter the following code to upgrade pip and awscli:
pip install --upgrade pip
pip install awscli --upgrade
Step 2 – Install pipenv and create a new Python environment
Install pipnv and create a new Python environment with the following code:
pip install pipenv
pipenv --python 3.6
Step 3 – Install your ML framework
To install your preferred ML framework (for this post, sklearn), enter the following code:
pipenv install sklearnStep 4 – Create a build folder with the installed package and dependencies
Create a build folder with the installed package and dependencies with the following code:
ls $VIRTUAL_ENV
PY_DIR='build/python/lib/python3.6/site-packages'
mkdir -p $PY_DIR
pipenv lock -r > requirements.txt
pip install -r requirements.txt -t $PY_DIR
Step 5 – Reduce the size of the deployment package
You reduce the size of the deployment package by stripping symbols from compiled binaries and removing data files required only for training:
cd build/
find . -name "*.so" | xargs strip
find . -name '*.dat' -delete
find . -name '*.npz' -delete
Step 6 – Add a model file to the layer
If applicable, add your model file (usually a pickle (.pkl) file, joblib file, or model.tar.gz file) to the build folder. As mentioned earlier, you can also pull your model down from Amazon S3 within the Lambda function before performing inference.
Step 7 – Use 7z or zip to compress the build folder
You have two options for compressing your folder. One option is the following code:
7z a -mm=Deflate -mfb=258 -mpass=15 -r ../sklearn_layer.zip *Alternatively, enter the following:
7z a -tzip -mx=9 -mfb=258 -mpass=20 -r ../sklearn_layer.zip *Step 8 – Push the newly created layer to Lambda
Push your new layer to Lambda with the following code:
cd ..
rm -r build/


aws lambda publish-layer-version --layer-name sklearn_layer --zip-file fileb://sklearn_layer.zip
Step 9 – Use the newly created layer for inference
To use your new layer for inference, complete the following steps:
- On the Lambda console, navigate to an existing function.
- In the Layers section, choose Add a layer.

- Select Select from list of runtime compatible layers.
- Choose the layer you just uploaded (the sklearn layer).
You can also provide the layer’s ARN.
- Choose Add.

Step 10 – Add inference code to load the model and make predictions
Within the Lambda function, add some code to import the sklearn library and perform inference. We provide two examples: one using a model stored in Amazon S3 and the pickle library, and another using a locally stored model and the joblib library.
1.	from sklearn.externals import joblib
2.	import boto3
3.	import json
4.	import pickle
5.
6.	s3_client = boto3.client("s3")
7.
8.	def lambda_handler(event, context):
9.
10.	     #Using Pickle + load model from s3
11.	     filename = "pickled_model.pkl"
12.	     s3_client.download_file('bucket-withmodels', filename, '/tmp/' + filename)
13.	       loaded_model = pickle.load(open('/tmp/' + filename, 'rb'))
14.	       result = loaded_model.predict(X_test)
15.
16.	       # Using Joblib + load the model from local storage
17.	       loaded_model = joblib.load(“filename.joblib”)
18.	       result = loaded_model.score(X_test, Y_test)
19.	       print(result)
20.	       return {'statusCode': 200, 'body': json.dumps(result)}
Package the ML Lambda layer code as a shell script
Alternatively, you can run a shell script with only 10 lines of code to create your Lambda layer .zip file (without all the manual steps we described).
- Create a shell script (.sh file) with the following code:
createlayer.sh
#!/bin/bash

if [ "$1" != "" ] || [$# -gt 1]; then
	echo "Creating layer compatible with python version $1"
	docker run -v "$PWD":/var/task "lambci/lambda:build-python$1" /bin/sh -c "pip install -r requirements.txt -t python/lib/python$1/site-packages/; exit"
	zip -r layer.zip python > /dev/null
	rm -r python
	echo "Done creating layer!"
	ls -lah layer.zip

else
	echo "Enter python version as argument - ./createlayer.sh 3.6"
fi
- Name the file
createlayer.shand save it.
The script requires an argument for the Python version that you want to use for the layer; the script checks for this argument and requires the following:
- If you’re using a local machine, EC2 instance, or a laptop, you need to install Docker. When using an SageMaker notebook instance terminal window or an AWS Cloud9 terminal, Docker is already installed.
- You need a requirements.txt file that is in the same path as the
createlayer.shscript that you created and has the packages that you need to install. For more information about creating this file, see https://pip.pypa.io/en/stable/user_guide/#requirements-files.
For this example, our requirements.txt file has a single line, and looks like the following:
scikit-learn- Add any other packages you may need, with version numbers with one package name per line.
- Make sure that your
createlayer.shscript is executable; on Linux or macOS terminal window, navigate to where you saved thecreatelayer.shfile and enter the following:
chmod +x createlayer.shNow you’re ready to create a layer.
- In the terminal, enter the following:
./createlayer.sh 3.6This command pulls the container that matches the Lambda runtime (which ensures that your layer is compatible by default), creates the layer using packages specified in the requirements.txt file, and saves a layer.zip that you can upload to a Lambda function.
The following code shows example logs when running this script to create a Lambda-compatible sklearn layer:
./createlayer.sh 3.6
Creating layer compatible with python version 3.6
Unable to find image 'lambci/lambda:build-python3.6' locally
build-python3.6: Pulling from lambci/lambda
d7ca5f5e6604: Pull complete
5e23dc432ea7: Pull complete
fd755da454b3: Pull complete
c81981d73e17: Pull complete
Digest: sha256:059229f10b177349539cd14d4e148b45becf01070afbba8b3a8647a8bd57371e
Status: Downloaded newer image for lambci/lambda:build-python3.6
Collecting scikit-learn
  Downloading scikit_learn-0.22.1-cp36-cp36m-manylinux1_x86_64.whl (7.0 MB)
Collecting joblib>=0.11
  Downloading joblib-0.14.1-py2.py3-none-any.whl (294 kB)
Collecting scipy>=0.17.0
  Downloading scipy-1.4.1-cp36-cp36m-manylinux1_x86_64.whl (26.1 MB)
Collecting numpy>=1.11.0
  Downloading numpy-1.18.1-cp36-cp36m-manylinux1_x86_64.whl (20.1 MB)
Installing collected packages: joblib, numpy, scipy, scikit-learn
Successfully installed joblib-0.14.1 numpy-1.18.1 scikit-learn-0.22.1 scipy-1.4.1
Done creating layer!
-rw-r--r--  1 user  ANTDomain Users    60M Feb 23 21:53 layer.zip
Managing ML Lambda layers using the AWS SAM CLI
AWS SAM is an open-source framework that you can use to build serverless applications on AWS, including Lambda functions, event sources, and other resources that work together to perform tasks. Because AWS SAM is an extension of AWS CloudFormation, you get the reliable deployment capabilities of AWS CloudFormation. In this post, we focus on how to use AWS SAM to build layers for your Python functions. For more information about getting started with AWS SAM, see the AWS SAM Developer Guide.
- Make sure you have the AWS SAM CLI installed by running the following code:
sam --version
SAM CLI, version 1.20.0
- Then, assume you have the following file structure:
./
├── my_layer
│   ├── makefile
│   └── requirements.txt
└── template.yml
Let’s look at files inside the my_layer folder individually:
template.yml– Defines the layer resource and compatible runtimes, and points to a makefile:
AWSTemplateFormatVersion: '2010-09-09'
Transform: 'AWS::Serverless-2016-10-31'
Resources:
  MyLayer:
    Type: AWS::Serverless::LayerVersion
    Properties:
      ContentUri: my_layer
      CompatibleRuntimes:
        - python3.8
    Metadata:
      BuildMethod: makefile
- makefile – Defines build instructions (uses the requirements.txt file to install specific libraries in the layer):
build-MyLayer:
    mkdir -p "$(ARTIFACTS_DIR)/python"
python -m pip install -r requirements.txt -t "$(ARTIFACTS_DIR)/python"requirements.txt– Contains packages (with optional version numbers):
sklearnYou can also clone this example and modify as required. For more information, see https://github.com/aws-samples/aws-lambda-layer-create-script
- Run
sam build:
sam build
Building layer 'MyLayer'
Running CustomMakeBuilder:CopySource
Running CustomMakeBuilder:MakeBuild
Current Artifacts Directory : /Users/path/to/samexample/.aws-sam/build/MyLayer

Build Succeeded

Built Artifacts  : .aws-sam/build
Built Template   : .aws-sam/build/template.yaml

Commands you can use next
=========================
[*] Invoke Function: sam local invoke
[*] Deploy: sam deploy --guided
- Run
sam deploy –guided:
sam deploy --guided
Configuring SAM deploy
======================

	Looking for config file [samconfig.toml] :  Not found

	Setting default arguments for 'sam deploy'
	=========================================
	Stack Name [sam-app]:
	AWS Region [us-east-1]:
	#Shows you resources changes to be deployed and require a 'Y' to initiate deploy
	Confirm changes before deploy [y/N]: y
	#SAM needs permission to be able to create roles to connect to the resources in your template
	Allow SAM CLI IAM role creation [Y/n]: y
	Save arguments to configuration file [Y/n]: y
	SAM configuration file [samconfig.toml]:
	SAM configuration environment [default]:

	Looking for resources needed for deployment: Not found.
	Creating the required resources...
	Successfully created!

		Managed S3 bucket: aws-sam-cli-managed-default-samclisourcebucket-18scin0trolbw
		A different default S3 bucket can be set in samconfig.toml

	Saved arguments to config file
	Running 'sam deploy' for future deployments will use the parameters saved above.
	The above parameters can be changed by modifying samconfig.toml
	Learn more about samconfig.toml syntax at
	https://docs.aws.amazon.com/serverless-application-model/latest/developerguide/serverless-sam-cli-config.html
Initiating deployment
=====================
Uploading to sam-app/1061dc436524b10ad192d1306d2ab001.template  366 / 366  (100.00%)

Waiting for changeset to be created..

CloudFormation stack changeset
-----------------------------------------------------------------------------------------------------------------------------------------
Operation                          LogicalResourceId                  ResourceType                       Replacement
-----------------------------------------------------------------------------------------------------------------------------------------
+ Add                              MyLayer3fa5e96c85                  AWS::Lambda::LayerVersion          N/A
-----------------------------------------------------------------------------------------------------------------------------------------

Changeset created successfully. arn:aws:cloudformation:us-east-1:497456752804:changeSet/samcli-deploy1615226109/ec665854-7440-42b7-8a9c-4c604ff565cb


Previewing CloudFormation changeset before deployment
======================================================
Deploy this changeset? [y/N]: y

2021-03-08 12:55:49 - Waiting for stack create/update to complete

CloudFormation events from changeset
-----------------------------------------------------------------------------------------------------------------------------------------
ResourceStatus                     ResourceType                       LogicalResourceId                  ResourceStatusReason
-----------------------------------------------------------------------------------------------------------------------------------------
CREATE_IN_PROGRESS                 AWS::Lambda::LayerVersion          MyLayer3fa5e96c85                  -
CREATE_COMPLETE                    AWS::Lambda::LayerVersion          MyLayer3fa5e96c85                  -
CREATE_IN_PROGRESS                 AWS::Lambda::LayerVersion          MyLayer3fa5e96c85                  Resource creation Initiated
CREATE_COMPLETE                    AWS::CloudFormation::Stack         sam-app                            -
-----------------------------------------------------------------------------------------------------------------------------------------
Now you can view these updates to your stack on the AWS CloudFormation console.
You can also view the created Lambda layer on the Lambda console.
Package the ML Lambda layer and Lambda function creation as CloudFormation templates
To automate and reuse already built layers, it’s useful to have a set of CloudFormation templates. In this section, we describe two templates that build several different ML Lambda layers and launch a Lambda function within a selected layer.
Build multiple ML layers for Lambda
When building and maintaining a standard set of layers, and when the preferred route is to work directly with AWS CloudFormation, this section may be interesting to you. We present two stacks to do the following:
- Build all layers specified in the yaml file using AWS CodeBuild
- Create a new Lambda function with an appropriate layer attached
Typically, you run the first stack infrequently and run the second stack whenever you need to create a new Lambda function with a layer attached.
Make sure you either use Serverless-ML-1 (default name) in Step 1, or change the stack name to be used from Step 1 within the CloudFormation stack in Step 2.
Step 1 – Launch the first stack
To launch the first CloudFormation stack, choose Launch Stack:
![]()
The following diagram shows the architecture of the resources that the stack builds. We can see that multiple layers (MXNet, GluonNLP, GuonCV, Pillow, SciPy and SkLearn) are being built and created as versions. In general, you would use only one of these layers in your ML inference function. If you have a layer that uses multiple libraries, consider building a single layer that contains all the libraries you need.

Step 2 – Create a Lambda function with an existing layer
Every time you want to set up a Lambda function with the appropriate ML layer attached, you can launch the following CloudFormation stack:
![]()
The following diagram shows the new resources that the stack builds.
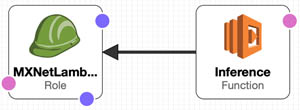
Inference using containers on Lambda
When dealing with the limitations introduced while using layers, such as size limitations, and when you’re invested in container-based tooling, it may be useful to use containers for building Lambda functions. Lambda functions built as container images can be as large as 10 GB, and can comfortably fit most, if not all, popular ML frameworks. Lambda functions deployed as container images benefit from the same operational simplicity, automatic scaling, high availability, and native integrations with many services. For ML frameworks to work with Lambda, these images must implement the Lambda runtime API. However, it’s still important to keep your inference container size small, so that overall latency is minimized; using large ML frameworks such as PyTorch and TensorFlow may result in larger container sizes and higher overall latencies. To make it easier to build your own base images, the Lambda team released Lambda runtime interface clients, which we use to create a sample TensorFlow container for inference. You can also follow these steps using the accompanying notebook.
Step 1 – Train your model using TensorFlow
Train your model with the following code:
model.fit(train_set,
                    steps_per_epoch=int(0.75 * dataset_size / batch_size),
                    validation_data=valid_set,
                    validation_steps=int(0.15 * dataset_size / batch_size),
                    epochs=5)
Step 2 – Save your model as a H5 file
Save the model as an H5 file with the following code:
model.save('model/1/model.h5') #saving the modelStep 3 – Build and push the Dockerfile to Amazon ECR
We start with a base TensorFlow image, enter the inference code and model file, and add the runtime interface client and emulator:
FROM tensorflow/tensorflow

ARG FUNCTION_DIR="/function"
# Set working directory to function root directory
WORKDIR ${FUNCTION_DIR}
COPY app/* ${FUNCTION_DIR}

# Copy our model folder to the container
COPY model/1 /opt/ml/model/1

RUN pip3 install --target ${FUNCTION_DIR} awslambdaric

ADD https://github.com/aws/aws-lambda-runtime-interface-emulator/releases/latest/download/aws-lambda-rie /usr/bin/aws-lambda-rie
RUN chmod 755 /usr/bin/aws-lambda-rie
COPY entry.sh /
ENTRYPOINT [ "/entry.sh" ]
CMD [ "app.handler" ]
You can use the script included in the notebook to build and push the container to Amazon Elastic Container Registry (Amazon ECR). For this post, we add the model directly to the container. For production use cases, consider downloading the latest model you want to use from Amazon S3, from within the handler function.
Step 4 – Create a function using the container on Lambda
To create a new Lambda function using the container, complete the following steps:
- On the Lambda console, choose Functions.
- Choose Create function.
- Select Container image.
- For Function name, enter a name for your function.
- For Container image URI, enter the URI of your container image.
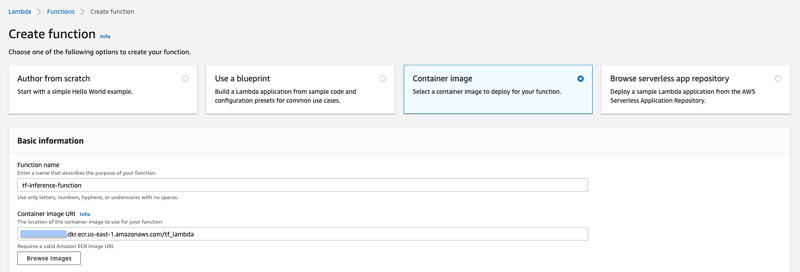
Step 5 – Create a test event and test your Lambda function
On the Test tab of the function, choose Invoke to create a test event and test your function. Use the sample payload provided in the notebook.
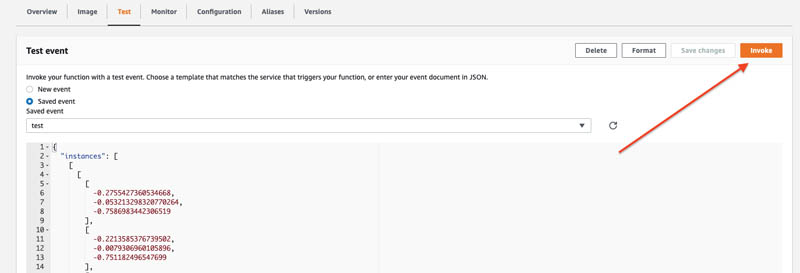
Conclusion
In this post, we showed how to use Lambda layers and containers to load an ML framework like scikit-learn and TensorFlow for inference. You can use the same procedure to create functions for other frameworks like PyTorch and MXNet. Larger frameworks like TensorFlow and PyTorch may not fit into the current size limit for a Lambda deployment package, so it’s beneficial to use the newly launched container options for Lambda. Another workaround is to use a model format exchange framework like ONNX to convert your model to another format before using it in a layer or in a deployment package.
Now that you know how to create an ML Lambda layer and container, you can, for example, build a serverless model exchange function using ONNX in a layer. Also consider using the Amazon SageMaker Neo runtime, treelite, or similar light versions of ML runtimes to place in your Lambda layer. Consider using a framework like SageMaker Neo to help compress your models for use with specific instance types with a dedicated runtime (called deep learning runtime or DLR).
Cost is also an important consideration when deciding what option to use (layers or containers), and this is related to the overall latency. For example, the cost of running inferences at 1 TPS for an entire month on Lambda at an average latency per inference of 50 milliseconds is about $7 [(0.0000000500*50 + 0.20/1e6) *60*60*24*30* TPS ~ $7)]. Latency depends on various factors, such as function configuration (memory, vCPUs, layers, containers used), model size, framework size, input size, additional pre- and postprocessing, and more. To save on costs and have an end-to-end ML training, tuning, monitoring and deployment solution, check out other SageMaker features, including multi-model endpoints to host and dynamically load and unload multiple models within a single endpoint.
Additionally, consider disabling the model cache in multi-model endpoints on Amazon SageMaker when you have a large number of models that are called infrequently—this allows for a higher TPS than the default mode. For a fully managed set of APIs around model deployment, see Deploy a Model in Amazon SageMaker.
Finally, the ability to work with and load larger models and frameworks from Amazon Elastic File System (Amazon EFS) volumes attached to your Lambda function can help certain use cases. For more information, see Using Amazon EFS for AWS Lambda in your serverless applications.
About the Authors
 Shreyas Subramanian is a AI/ML specialist Solutions Architect, and helps customers by using Machine Learning to solve their business challenges on the AWS platform.
 Andrea Morandi is an AI/ML specialist solutions architect in the Strategic Specialist team. He helps customers to deliver and optimize ML applications on AWS. Andrea holds a Ph.D. in Astrophysics from the University of Bologna (Italy), he lives with his wife in the Bay area, and in his free time he likes hiking.
A Browsable Petascale Reconstruction of the Human Cortex
Posted by Tim Blakely, Software Engineer and Michał Januszewski, Research Scientist, Connectomics at Google
In January 2020 we released the fly “hemibrain” connectome — an online database providing the morphological structure and synaptic connectivity of roughly half of the brain of a fruit fly (Drosophila melanogaster). This database and its supporting visualization has reframed the way that neural circuits are studied and understood in the fly brain. While the fruit fly brain is small enough to attain a relatively complete map using modern mapping techniques, the insights gained are, at best, only partially informative to understanding the most interesting object in neuroscience — the human brain.
Today, in collaboration with the Lichtman Laboratory at Harvard University, we are releasing the “H01” dataset, a 1.4 petabyte rendering of a small sample of human brain tissue, along with a companion paper, “A connectomic study of a petascale fragment of human cerebral cortex.” The H01 sample was imaged at 4nm-resolution by serial section electron microscopy, reconstructed and annotated by automated computational techniques, and analyzed for preliminary insights into the structure of the human cortex. The dataset comprises imaging data that covers roughly one cubic millimeter of brain tissue, and includes tens of thousands of reconstructed neurons, millions of neuron fragments, 130 million annotated synapses, 104 proofread cells, and many additional subcellular annotations and structures — all easily accessible with the Neuroglancer browser interface. H01 is thus far the largest sample of brain tissue imaged and reconstructed in this level of detail, in any species, and the first large-scale study of synaptic connectivity in the human cortex that spans multiple cell types across all layers of the cortex. The primary goals of this project are to produce a novel resource for studying the human brain and to improve and scale the underlying connectomics technologies.
 |
| Petabyte connectomic reconstruction of a volume of human neocortex. Left: Small subvolume of the dataset. Right: A subgraph of 5000 neurons and excitatory (green) and inhibitory (red) connections in the dataset. The full graph (connectome) would be far too dense to visualize. |
What is the Human Cortex?
The cerebral cortex is the thin surface layer of the brain found in vertebrate animals that has evolved most recently, showing the greatest variation in size among different mammals (it is especially large in humans). Each part of the cerebral cortex is six layered (e.g., L2), with different kinds of nerve cells (e.g., spiny stellate) in each layer. The cerebral cortex plays a crucial role in most higher level cognitive functions, such as thinking, memory, planning, perception, language, and attention. Although there has been some progress in understanding the macroscopic organization of this very complicated tissue, its organization at the level of individual nerve cells and their interconnecting synapses is largely unknown.
Human Brain Connectomics: From Surgical Biopsy to a 3D Database
Mapping the structure of the brain at the resolution of individual synapses requires high-resolution microscopy techniques that can image biochemically stabilized (fixed) tissue. We collaborated with brain surgeons at Massachusetts General Hospital in Boston (MGH) who sometimes remove pieces of normal human cerebral cortex when performing a surgery to cure epilepsy in order to gain access to a site in the deeper brain where an epileptic seizure is being initiated. Patients anonymously donated this tissue, which is normally discarded, to our colleagues in the Lichtman lab. The Harvard researchers cut the tissue into ~5300 individual 30 nanometer sections using an automated tape collecting ultra-microtome, mounted those sections onto silicon wafers, and then imaged the brain tissue at 4 nm resolution in a customized 61-beam parallelized scanning electron microscope for rapid image acquisition.
Imaging the ~5300 physical sections produced 225 million individual 2D images. Our team then computationally stitched and aligned this data to produce a single 3D volume. While the quality of the data was generally excellent, these alignment pipelines had to robustly handle a number of challenges, including imaging artifacts, missing sections, variation in microscope parameters, and physical stretching and compression of the tissue. Once aligned, a multiscale flood-filling network pipeline was applied (using thousands of Google Cloud TPUs) to produce a 3D segmentation of each individual cell in the tissue. Additional machine learning pipelines were applied to identify and characterize 130 million synapses, classify each 3D fragment into various “subcompartments” (e.g., axon, dendrite, or cell body), and identify other structures of interest such as myelin and cilia. Automated reconstruction results were imperfect, so manual efforts were used to “proofread” roughly one hundred cells in the data. Over time, we expect to add additional cells to this verified set through additional manual efforts and further advances in automation.
| The H01 volume: roughly one cubic millimeter of human brain tissue captured in 1.4 petabytes of images. |
The imaging data, reconstruction results, and annotations are viewable through an interactive web-based 3D visualization interface, called Neuroglancer, that was originally developed to visualize the fruit fly brain. Neuroglancer is available as open-source software, and widely used in the broader connectomics community. Several new features were introduced to support analysis of the H01 dataset, in particular support for searching for specific neurons in the dataset based on their type or other properties.
 |
 |
 |
||
| The volume spans all six cortical layers | Highlighting Layer 2 interneurons | Excitatory and inhibitory incoming synapses |
 |
 |
 |
||
| Neuronal subcompartments classified | A Chandelier cell and some of the Pyramidal neurons it inhibits | Blood vessels traced throughout the volume |
 |
 |
 |
||
| Serial contact between a pair of neurons | An axon with elaborate whorl structures | A neuron with unusual propensity for self-contact (Credit: Rachael Han) |
| The Neuroglancer interface to the H01 volume and annotations. The user can select specific cells on the basis of their layer and type, can view incoming and outgoing synapses for the cell, and much more. (Click on the images above to take you to the Neuroglancer view shown.) |
Analysis of the Human Cortex
In a companion preprint, we show how H01 has already been used to study several interesting aspects of the organization of the human cortex. In particular, new cell types have been discovered, as well as the presence of “outlier” axonal inputs, which establish powerful synaptic connections with target dendrites. While these findings are a promising start, the vastness of the H01 dataset will provide a basis for many years of further study by researchers interested in the human cortex.
In order to accelerate the analysis of H01, we also provide embeddings of the H01 data that were generated by a neural network trained using a variant of the SimCLR self-supervised learning technique. These embeddings provide highly informative representations of local parts of the dataset that can be used to rapidly annotate new structures and develop new ways of clustering and categorizing brain structures according to purely data-driven criteria. We trained these embeddings using Google Cloud TPU pods and then performed inference at roughly four billion data locations spread throughout the volume.
Managing Dataset Size with Improved Compression
H01 is a petabyte-scale dataset, but is only one-millionth the volume of an entire human brain. Serious technical challenges remain in scaling up synapse-level brain mapping to an entire mouse brain (500x bigger than H01), let alone an entire human brain. One of these challenges is data storage: a mouse brain could generate an exabyte worth of data, which is costly to store. To address this, we are today also releasing a paper, “Denoising-based Image Compression for Connectomics”, that details how a machine learning-based denoising strategy can be used to compress data, such as H01, at least 17-fold (dashed line in the figure below), with negligible loss of accuracy in the automated reconstruction.
 |
| Reconstruction quality of noisy and denoised images as a function of compression rate for JPEG XL (JXL) and AV Image Format (AVIF) codecs. Points and lines show the means, and the shaded area covers ±1 standard deviation around the mean. |
Random variations in the electron microscopy imaging process lead to image noise that is difficult to compress even in principle, as the noise lacks spatial correlations or other structure that could be described with fewer bytes. Therefore we acquired images of the same piece of tissue in both a “fast” acquisition regime (resulting in high amounts of noise) and a “slow” acquisition regime (resulting in low amounts of noise) and then trained a neural network to infer “slow” scans from “fast” scans. Standard image compression codecs were then able to (lossily) compress the “virtual” slow scans with fewer artifacts compared to the raw data. We believe this advance has the potential to significantly mitigate the costs associated with future large scale connectomics projects.
Next Steps
But storage is not the only problem. The sheer size of future data sets will require developing new strategies for researchers to organize and access the rich information inherent in connectomic data. These are challenges that will require new modes of interaction between humans and the brain mapping data that will be forthcoming.

Microsoft, GPT-3, and the future of OpenAI
The post Microsoft, GPT-3, and the future of OpenAI appeared first on The AI Blog.