The post Open sourcing Winterfell: A STARK prover and verifier appeared first on Facebook Research.
Zero Waste with Taste: Startup Uses AI to Drive Sustainable Fashion
Sustainability isn’t just a choice for consumers to make. It’s an opportunity for companies to lead.
AI startup Heartdub seams together fashion and technology to let designers and creators display physical fabrics and garments virtually — and help clothing companies achieve zero-waste manufacturing.
The company’s software digitizes textiles and then simulates how clothes look on the human body. This virtual design verification lessens the amount of physical samples needed, reducing waste from excess fabric, and helps minimize unsold inventory.
Based in Beijing, Heartdub is a member of NVIDIA Inception, a program designed to nurture startups revolutionizing industries with advancements in AI and data sciences. NVIDIA Inception helps startups during critical stages of product development, prototyping and deployment by providing free benefits such as go-to-market support and access to technology expertise.
“As a member of NVIDIA Inception, Heartdub hopes to leverage the resources, support and platform provided by NVIDIA to accelerate the implementation and extension of design verification and virtual showrooms,” said Li Ruohao, chief technology officer at Heartdub.
Zipping Up a Solution to Fabric Waste
Sampling fabrics and other materials is a costly, involved process for brand owners. It can slow the distribution of fashion information throughout the supply chain. And finished products may not look or perform the way consumers want, or may arrive too late to meet the latest trends.
Heartdub offers its customers Heartdub Materials, a physics engine comprising a large set of laboratory-grade textiles data which replicates the physical properties of materials. Inside the application, digitized material behaves as it would in the real world by accounting for texture, weight and movement.
The engine can reduce R&D costs by half, marketing costs by 70 percent and lead times by 90 percent for fabric manufacturers and brand owners, according to Li.
By verifying designs at near zero cost, Heartdub Materials can produce digital, ready-to-wear garments based on clothing patterns. Designers are able to select the texture, pattern and design online, allowing fabric manufacturers to complete preorder presentations at no cost.
These pieces can be showcased and purchased directly through virtual demos and fashion shows hosted by Heartdub One, the company’s database of clothing and avatars.
With Heartdub One, consumers can see how clothes fit on their specific size and shape by building their own digital human based on their particular measurements.

Fashionably Early
Powered by NVIDIA HDR InfiniBand networking, the Heartdub Materials physics engine boasts a speed of 200 Gbps, improving data transmission efficiency nearly 100-fold.
Taking advantage of NVIDIA Quadro RTX 8000 GPUs and high-speed interconnect technology, Heartdub Materials can easily simulate complex virtual world environments and efficiently process complex ray-tracing and visual computing workloads.
This enables collaboration across the industry, making it possible to complete the process from fabric selection, ready-to-wear design and review to pattern making and production, all virtually.
“AI will revolutionize the fashion industry, and Heartdub Materials is just the beginning,” said Li. “NVIDIA solutions have solved the technical challenges in graphics, allowing us to continue to provide new experiences and create more application scenarios for the fashion industry and its customers.”
Apply to join NVIDIA Inception.
The post Zero Waste with Taste: Startup Uses AI to Drive Sustainable Fashion appeared first on The Official NVIDIA Blog.
Ensuring that new language-processing models don’t backslide
New approach corrects for cases when average improvements are accompanied by specific regressions.Read More
Enghouse EspialTV enables TV accessibility with Amazon Polly
This is a guest post by Mick McCluskey, the VP of Product Management at Enghouse EspialTV. Enghouse provides software solutions that power digital transformation for communications service operators. EspialTV is an Enghouse SaaS solution that transforms the delivery of TV services for these operators across Set Top Boxes (STBs), media players, and mobile devices.
A large audience of consumers use TV services, and several of these groups may have disabilities that make it more difficult for them to access these services. To ensure that TV services are accessible to the broadest possible audience, we need to consider accessibility as a key element of the user experience (UX) for the service. Additionally, because TV is viewed as a key service by governments, it’s often subject to regulatory requirements for accessibility, including talking interfaces for the visually impaired. In the US, the Twenty-First Century Communications and Video Accessibility Act (CVAA) mandates improved accessibility for visual interfaces for users with limited hearing and vision in the US. The CVAA ensures accessibility laws from the 1980s and 1990s are brought up to date with modern technologies, including new digital, broadband, and mobile innovations.
This post describes how Enghouse uses Amazon Polly to significantly improve accessibility for EspialTV through talking interactive menu guides for visually impaired users while meeting regulatory requirements.
Challenges
A key challenge for visually impaired users is navigating TV menus to find the content they want to view. Most TV menus are designed for a 10-foot viewing experience, meaning that a consumer sitting 10 feet from the screen can easily see the menu items. For the visually impaired, these menu items aren’t easy to see and are therefore hard to navigate. To improve our UX for subscribers with limited vision, we sought to develop a mechanism to provide audible descriptions of the menu, allowing easier navigation of key functions such as the following:
- Channel and program selection
- Channel and program information
- Setup configuration, closed-caption control and options, and video description control
- Configuration information
- Playback
Overview of the AWS talking menu solution
Hosted on AWS, EspialTV is offered to communications service providers in a software as a service (SaaS) model. It was important for Enghouse to have a solution that not only supported the navigation currently offered at the time of launch, but was highly flexible to support changes and enhancements over time. This way, the voice assistance continuously evolved and improved to accommodate new capabilities as new services and features were added to the menu. For this reason, the solution had to be driven by real-time APIs calls as opposed to hardcoded text-to-speech menu configurations.
To ensure CVAA compliance and accelerate deployment, Enghouse chose to use Amazon Polly to implement this talking menu solution for the following reasons:
- We wanted a reliable and robust solution within minimal operational and management overhead
- It permitted faster time to market by using ready-made text-to-speech APIs
- The real-time API approach offered greater flexibility as we evolved the service over time
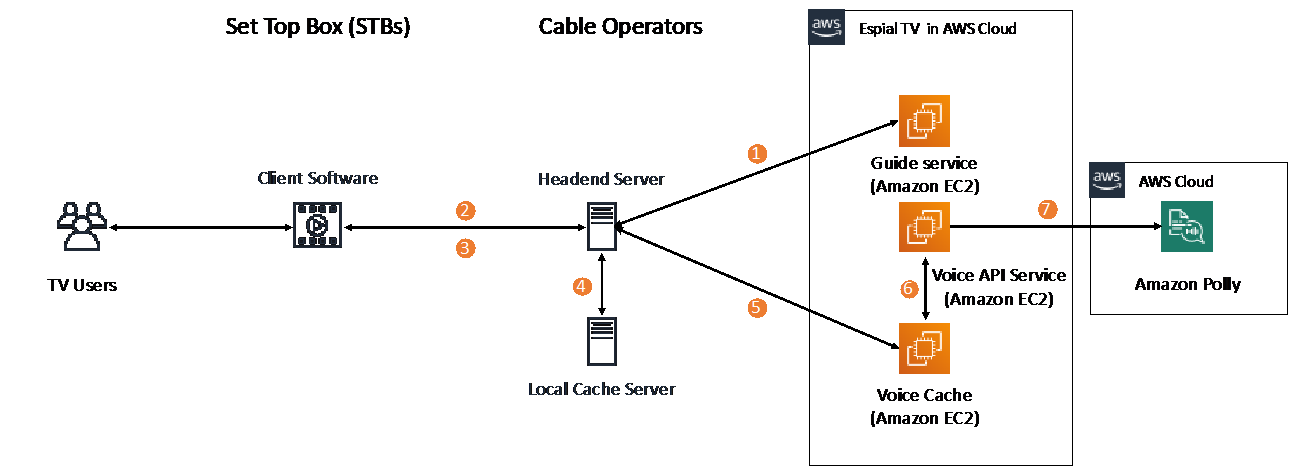
The following diagram illustrates the architecture of the talking menu solution.
Using the Amazon Polly text-to-speech API allowed us to build a simple solution that integrated with our current infrastructure and followed this flow:
- Steps 1 and 2 – When TV users open the menu guide service, the client software running on the Set Top Box (STB) makes a call via the internet or Data Over Cable Service Interface Specification (DOCSIS) cable modem, which is routed through the cable operators headend server to the Espial Guide service running on the AWS Cloud.
- Step 3 – As TV users interact with the menu guide on the STBs, the client software running on the STBs sends the string containing the specific menu description highlighted by the customer.
- Step 4 – The cable operators headend server routes the request to a local cache to verify whether the requested string’s text-to-speech is cached locally. If it is, the corresponding text-to-speech is sent back to the STB to be read out loud to the TV user.
- Step 5 – Each unique cable operator has a local cache. If the requested string isn’t cached locally in the cable operator’s environment, the requested string is sent to the EspialTV service in AWS, where it’s met by a secondary caching server to respond to the request. This secondary layer of caching hosted in the Espial environment ensures high availability and increases cache hit rates. For example, if the caching servers on the cable operator environment is unavailable, the cache request can be resolved by the secondary caching system hosted in the Espial environment.
- Steps 6 and 7 – If the requested string isn’t found in the caching server in the EspialTV service, it’s routed to the Amazon Polly API to be converted to text-to-speech, which is routed back to the cable operator headend server and then to the TV user’s STB to be read out loud to the user.
This architecture has several key considerations. Firstly, there are several layers of caching implemented to minimize latency for the end user. This also supports the spikey nature of this workload to ensure that only requests not found in the respective caches are made to Amazon Polly.
The ready-made text-to-speech APIs provided by Amazon Polly enables us able to implement the service with just one engineer. We also reduced the expected delivery time by 75% compared to our estimates for building an in-house custom solution. The Amazon Polly documentation was very clear, and the ramp-up time was limited. Since implementation, this solution is reliably supporting 40 cable operators, which each have between 1,000–100,000 STBs.
Conclusion
EspialTV offers operators a TV solution that provides fast time to revenue, low startup costs, and scalability from small to very large operators. EspialTV offers providers and consumers a compelling and always relevant experience for their TV services. With Amazon Polly, we have ensured operators can offer a TV service to the broadest possible range of consumers and align with regulatory requirements for accessibility. To learn more about Amazon Polly, visit the product page.
The content and opinions in this post are those of the third-party author and AWS is not responsible for the content or accuracy of this post.
About the Author
 Mick McCluskey is VP of Product Management at Enghouse, a leading provider of software solutions helping operators use digital transformation to drive profitability in fast-changing and emerging markets. In the area of video solutions, Mick has been pivotal in creating the EspialTV solution—a truly disruptive TVaaS solution run on the AWS Cloud that permits pay TV operators to manage transition while maintaining profitability in a rapidly changing market. He is currently working on solutions that help operators take advantage of key technology and industry trends like OTT video, IoT, and 5G. In addition to delivering cloud-based solutions, he continues his journey of learning how to play golf.
Soar into the Hybrid-Cloud: Project Monterey Early Access Program Now Available to Enterprises
Modern workloads such as AI and machine learning are putting tremendous pressure on traditional IT infrastructure.
Enterprises that want to stay ahead of these changes can now register to participate in an early access of Project Monterey, an initiative to dramatically improve the performance, manageability and security of their environments.
VMware, Dell Technologies and NVIDIA are collaborating on this project to evolve the architecture for the data center, cloud and edge to one that is software-defined and hardware-accelerated to address the changing application requirements.
AI and other compute-intensive workloads require real-time data streaming analysis, which, along with growing security threats, puts a heavy load on server CPUs. The increased load significantly increases the percentage of processing power required to run tasks that aren’t an integral part of application workloads. This reduces data center efficiency and can prevent IT from meeting its service-level agreements.
Project Monterey is leading the shift to advanced hybrid-cloud data center architectures, which benefit from hypervisor and accelerated software-defined networking, security and storage.
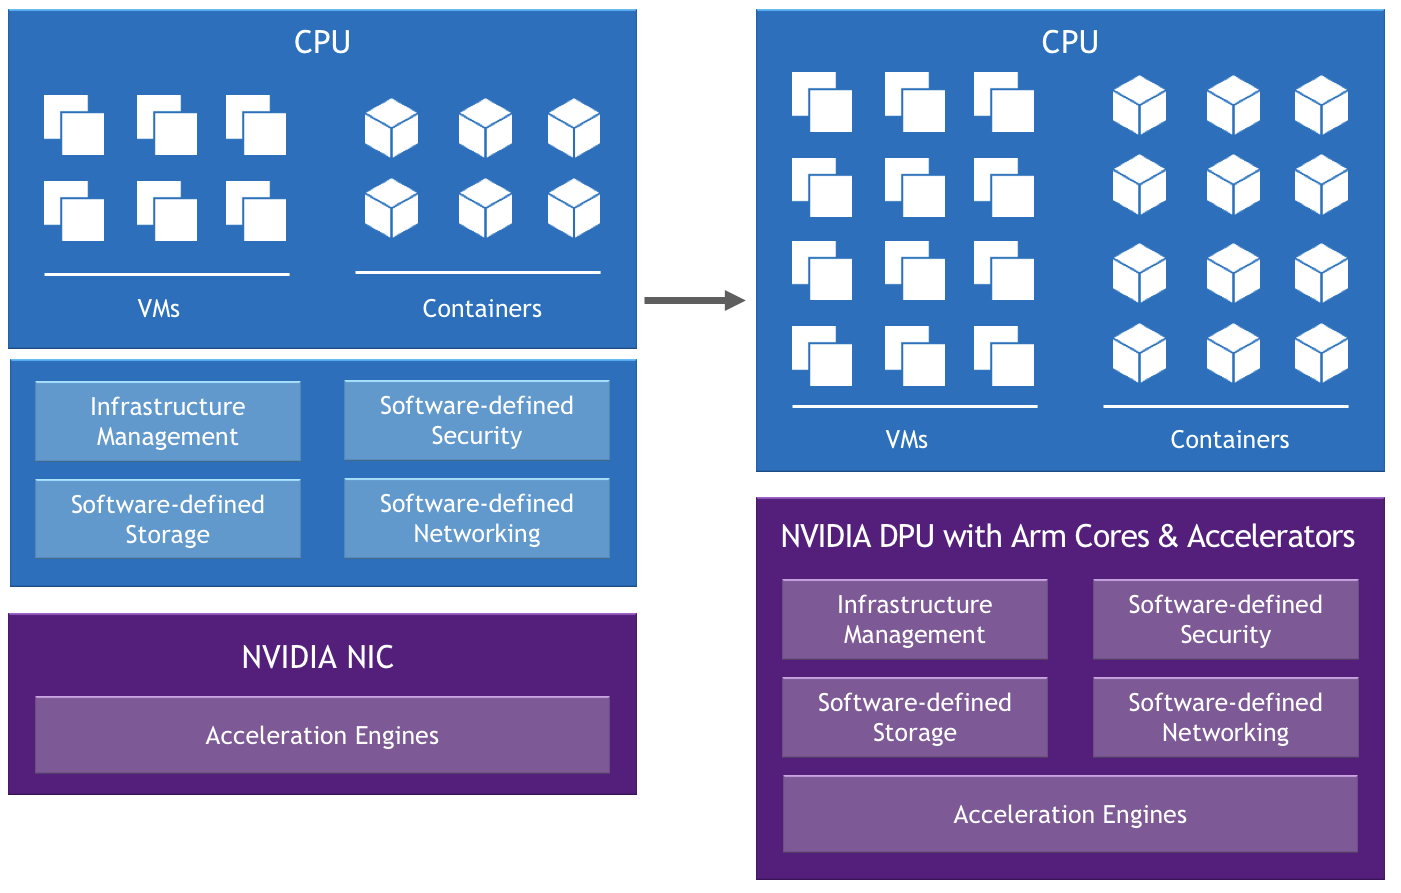
With access to Project Monterey’s preconfigured clusters, enterprises can explore the evolution of VMware Cloud Foundation and take advantage of the disruptive hardware capabilities of the Dell EMC PowerEdge R750 server equipped with NVIDIA BlueField-2 DPU (data processing unit).
Selected functions that used to run on the core CPU are offloaded, isolated and accelerated on the DPU to support new possibilities, including:
- Improved performance for application and infrastructure services
- Enhanced visibility, application security and observability
- Offloaded firewall capabilities
- Improved data center efficiency and cost for enterprise, edge and cloud.
Interested organizations can register for the NVIDIA Project Monterey early access program. Learn more about NVIDIA and VMware’s collaboration to modernize the data center.
The post Soar into the Hybrid-Cloud: Project Monterey Early Access Program Now Available to Enterprises appeared first on The Official NVIDIA Blog.
Upgrade your Amazon Polly voices to neural with one line of code
In 2019, Amazon Polly launched neural text-to-speech (NTTS) voices in US English and UK English. Neural voices use machine learning and provide a richer, more lifelike speech quality. Since the initial launch of NTTS, Amazon Polly has extended its neural offering by adding new voices in US Spanish, Brazilian Portuguese, Australian English, Canadian French, German and Korean. Some of them also are available in a Newscaster speaking style tailored to the specific needs of publishers.
If you’ve been using the standard voices in Amazon Polly, upgrading to neural voices is easy. No matter which programming language you use, the upgrade process only requires a simple addition or modification of the Engine parameter wherever you use the SynthesizeSpeech and StartSynthesizeSpeechTask method in your code. In this post, you’ll learn about the benefits of neural voices and how to migrate your voices to NTTS.
Benefits of neural vs. standard
Because neural voices provide a more expressive, natural-sounding quality than standard, migrating to neural improves the user experience and boosts engagement.
“We rely on speech synthesis to drive dynamic narrations for our educational content,” says Paul S. Ziegler, Chief Executive Officer at Reflare. “The switch from Amazon Polly’s standard to neural voices has allowed us to create narrations that are so good as to consistently be indistinguishable from human speech to non-native speakers and to occasionally even fool native speakers.”
The following is an example of Joanna’s standard voice.
The following is an example of the same words, but using Joanna’s neural voice.
“Switching to neural voices is as easy as switching to other non-neural voices,” Ziegler says. “Since our systems were already set up to automatically generate voiceovers on the fly, implementing the changes took less than 5 minutes.”
Quick migration checklist
Not all SSML tags, Regions, and languages support neural voices. Before making the switch, use this checklist to verify that NTTS is available for your specific business needs:
- Regional support – Verify that you’re making requests in Regions that support NTTS
- Language and voice support – Verify that you’re making requests to voices and languages that support NTTS by checking the current list of voices and languages
- SSML tag support – Verify that the SSML tags in your requests are supported by NTTS by checking SSML tag compatibility
Additional considerations
The following table summarizes additional considerations before you switch to NTTS.
| Standard | Neural | |
| Cost | $4 per million characters | $16 per million characters |
| Free Tier | 5 million characters per month | 1 million characters per month |
| Default Sample Rate | 22 kHz | 24 kHz |
| Usage Quota | Quotas in Amazon Polly | |
Code samples
If you’re already using Amazon Polly standard, the following samples demonstrate how to switch to neural for all SDKs. The required change is highlighted in bold.
Go:
input := &polly.SynthesizeSpeechInput{
    OutputFormat: aws.String("mp3"),
    Text: aws.String(“Hello World!”),
    VoiceId: aws.String("Joanna"),
    Engine: “neural”}
Java:
SynthesizeSpeechRequest synthReq = SynthesizeSpeechRequest.builder()
    .text('Hello World!')
    .voiceId('Joanna')
    .outputFormat('mp3')
    .engine('neural')
    .build();
ResponseInputStream<SynthesizeSpeechResponse> synthRes = polly.synthesizeSpeech(synthReq);
Javascript:
polly.synthesizeSpeech({
    Text: “Hello World!”,
    OutputFormat: "mp3",
    VoiceId: "Joanna",
    TextType: "text",
    Engine: “neural”});
.NET:
var response = client.SynthesizeSpeech(new SynthesizeSpeechRequest
{
    Text = "Hello World!",
    OutputFormat = "mp3",
    VoiceId = "Joanna"
    Engine = “neural”
});
PHP:
$result = $client->synthesizeSpeech([
    'Text' => ‘Hello world!’,
    'OutputFormat' => ‘mp3,
    'VoiceId' => ‘Joanna’,
    'Engine' => ‘neural’]);
Python:
polly.synthesize_speech(
    Text="Hello world!",
    OutputFormat="mp3",
    VoiceId="Joanna",
    Engine=”neural”)
Ruby:
resp = polly.synthesize_speech({
    text: “Hello World!”,
    output_format: "mp3",
    voice_id: "Joanna",
    engine: “neural”
  })
Conclusion
You can start playing with neural voices immediately on the Amazon Polly console. If you have any questions or concerns, please post it to the AWS Forum for Amazon Polly, or contact your AWS Support team.
About the Author
 Marta Smolarek is a Senior Program Manager in the Amazon Text-to-Speech team. Outside of work, she loves to go camping with her family
Extend Amazon SageMaker Pipelines to include custom steps using callback steps
Launched at AWS re:Invent 2020, Amazon SageMaker Pipelines is the first purpose-built, easy-to-use continuous integration and continuous delivery (CI/CD) service for machine learning (ML). With Pipelines, you can create, automate, and manage end-to-end ML workflows at scale.
You can extend your pipelines to include steps for tasks performed outside of Amazon SageMaker by taking advantage of custom callback steps. This feature lets you include tasks that are performed using other AWS services, third parties, or tasks run outside AWS. Before the launch of this feature, steps within a pipeline were limited to the supported native SageMaker steps. With the launch of this new feature, you can use the new CallbackStep to generate a token and add a message to an Amazon Simple Queue Service (Amazon SQS) queue. The message on the SQS queue triggers a task outside of the currently supported native steps. When that task is complete, you can call the new SendStepSuccess API with the generated token to signal that the callback step and corresponding tasks are finished and the pipeline run can continue.
In this post, we demonstrate how to use CallbackStep to perform data preprocessing using AWS Glue. We use an Apache Spark job to prepare NYC taxi data for ML training. The raw data has one row per taxi trip, and shows information like the trip duration, number of passengers, and trip cost. To train an anomaly detection model, we want to transform the raw data into a count of the number of passengers that took taxi rides over 30-minute intervals.
Although we could run this specific Spark job in SageMaker Processing, we use AWS Glue for this post. In some cases, we may need capabilities that Amazon EMR or AWS Glue offer, like support for Hive queries or integration with the AWS Glue metadata catalog, so we demonstrate how to invoke AWS Glue from the pipeline.
Solution overview
The pipeline step that launches the AWS Glue job sends a message to an SQS queue. The message contains the callback token we need to send success or failure information back to the pipeline. This callback token triggers the next step in the pipeline. When handling this message, we need a handler that can launch the AWS Glue job and reliably check for job status until the job completes. We have to keep in mind that a Spark job can easily take longer than 15 minutes (the maximum duration of a single AWS Lambda function invocation), and the Spark job itself could fail for a number of reasons. That last point is worth emphasizing: in most Apache Spark runtimes, the job code itself runs in transient containers under the control of a coordinator like Apache YARN. We can’t add custom code to YARN, so we need something outside the job to check for completion.
We can accomplish this task several ways:
- Have a Lambda function launch a container task that creates the AWS Glue job and polls for job completion, then sends the callback back to the pipeline
- Have a Lambda function send a work notification to another SQS queue, with a separate Lambda function that picks up the message, checks for job status, and requeues the message if the job isn’t complete
- Use AWS Glue job event notifications to respond to job status events sent by AWS Glue
For this post, we use the first technique because it’s the simplest (but likely not the most efficient). For this, we build out the solution as shown in the following diagram.

The solution is one example of how to use the new CallbackStep to extend your pipeline to steps outside SageMaker (such as AWS Glue). You can apply the same general steps and architectural guidance to extend pipelines to other custom processes or tasks. In our solution, the pipeline runs the following tasks:
Data preprocessing –
- This step (Step 1 in the preceding diagram) uses
CallbackStepto send a generated token and defined input payload to the configured SQS queue (2). In this example, the input sent to the SQS queue is the Amazon Simple Storage Service (Amazon S3) locations of the input data and the step output training data.- The new message in the SQS queue triggers a Lambda function (3) that is responsible for running an AWS Fargate task with Amazon Elastic Container Service (Amazon ECS) (4).
- The Fargate task runs using a container image that is configured to run a task. The task in this case is an AWS Glue job (5) used to transform your raw data into training data stored in Amazon S3 (6). This task is also responsible for sending a callback message that signals either the job’s success or failure.
- Model training – This step (7) runs when the previous callback step has completed successfully. It uses the generated training data to train a model using a SageMaker training job and the Random Cut Forest algorithm.
- Package model – After the model is successfully trained, the model is packaged for deployment (8).
- Deploy model – In this final step (9), the model is deployed using a batch transform job.
These pipeline steps are just examples; you can modify the pipeline to meet your use case, such as adding steps to register the model in the SageMaker Model Registry.
In the next sections, we discuss how to set up this solution.
Prerequisites
For the preceding pipeline, you need the prerequisites outlined in this section. The detailed setup of each of these prerequisites is available in the supporting notebook.
Notebook dependencies
To run the provided notebook, you need the following:
- Studio environment – Callback steps were introduced in the SageMaker Python SDK v2.45.0 and Amazon SageMaker Studio v3.6.2. Update Studio if needed before you run the sample notebook.
- Studio Image Build CLI – Because we build a container image for the Fargate task from within the notebook, a step is included to install the Studio Image Build CLI. For more information about the CLI dependencies, see Using the Amazon SageMaker Studio Image Build CLI to build container images from your Studio notebooks.
Pipeline dependencies
Your pipeline uses the following services:
- SQS message queue – The callback step requires an SQS queue to trigger a task. For this, you need to create an SQS queue and ensure that AWS Identity and Access Management (IAM) permissions are in place that allow SageMaker to put a message in the queue and allow Lambda to poll the queue for new messages. See the following code:
sqs_client = boto3.client('sqs')
queue_url = ''
queue_name = 'pipeline_callbacks_glue_prep'
try:
    response = sqs_client.create_queue(QueueName=queue_name)
except:
print(f"Failed to create queue")- Lambda function: The function is triggered by new messages put to the SQS queue. The function consumes these new messages and starts the ECS Fargate task. In this case, the Lambda execution IAM role needs permissions to pull messages from Amazon SQS, notify SageMaker of potential failures, and run the Amazon ECS task. For this solution, the function starts a task on ECS Fargate using the following code:
%%writefile queue_handler.py
import json
import boto3
import os
import traceback

ecs = boto3.client('ecs')
sagemaker = boto3.client('sagemaker')

def handler(event, context):
    print(f"Got event: {json.dumps(event)}")

    cluster_arn = os.environ["cluster_arn"]
    task_arn = os.environ["task_arn"]
    task_subnets = os.environ["task_subnets"]
    task_sgs = os.environ["task_sgs"]
    glue_job_name = os.environ["glue_job_name"]
    print(f"Cluster ARN: {cluster_arn}")
    print(f"Task ARN: {task_arn}")
    print(f"Task Subnets: {task_subnets}")
    print(f"Task SG: {task_sgs}")
    print(f"Glue job name: {glue_job_name}")

    for record in event['Records']:
        payload = json.loads(record["body"])
        print(f"Processing record {payload}")

        token = payload["token"]
        print(f"Got token {token}")

        try:
            input_data_s3_uri = payload["arguments"]["input_location"]
            output_data_s3_uri = payload["arguments"]["output_location"]
            print(f"Got input_data_s3_uri {input_data_s3_uri}")
            print(f"Got output_data_s3_uri {output_data_s3_uri}")

            response = ecs.run_task(
                cluster = cluster_arn,
                count=1,
                launchType='FARGATE',
                taskDefinition=task_arn,
                networkConfiguration={
                    'awsvpcConfiguration': {
                        'subnets': task_subnets.split(','),
                        'securityGroups': task_sgs.split(','),
                        'assignPublicIp': 'ENABLED'
                    }
                },
                overrides={
                    'containerOverrides': [
                        {
                            'name': 'FargateTask',
                            'environment': [
                                {
                                    'name': 'inputLocation',
                                    'value': input_data_s3_uri
                                },
                                {
                                    'name': 'outputLocation',
                                    'value': output_data_s3_uri
                                },
                                {
                                    'name': 'token',
                                    'value': token
                                },
                                {
                                    'name': 'glue_job_name',
                                    'value': glue_job_name
                                }

                            ]
                        }
                    ]
                }
            )
            if 'failures' in response and len(response['failures']) > 0:
                f = response['failures'][0]
                print(f"Failed to launch task for token {token}: {f['reason']}")
                sagemaker.send_step_failure(
                    CallbackToken=token,
                    FailureReason = f['reason']
                )
            else:
                print(f"Launched task {response['tasks'][0]['taskArn']}")
        except Exception as e:
            trc = traceback.format_exc()
            print(f"Error handling record: {str(e)}:m {trc}")
            sagemaker.send_step_failure(
                CallbackToken=token,
                FailureReason = e
)- After we create the SQS queue and Lambda function, we need to set up the function as an SQS target so that when new messages are placed in the queue, the function is automatically triggered:
lambda_client.create_event_source_mapping(
    EventSourceArn=f'arn:aws:sqs:{region}:{account}:{queue_name}',
    FunctionName='SMPipelineQueueHandler',
    Enabled=True,
    BatchSize=10
) - Fargate cluster – Because we use Amazon ECS to run and monitor the status of the AWS Glue job, we need to ensure we have an ECS Fargate cluster running:
import boto3
ecs = boto3.client('ecs')
response = ecs.create_cluster(clusterName='FargateTaskRunner')- Fargate task: We also need to create a container image with the code (task.py) that starts the data preprocessing job on AWS Glue and reports the status back to the pipeline upon the success or failure of that task. The IAM role attached to the task must include permissions that allow the task to pull images from Amazon ECR, create logs in Amazon CloudWatch, start and monitor an AWS Glue job, and send the callback token when the task is complete. When we issue
send_pipeline_execution_step_successback to the pipeline, we also indicate the output file with the prepared training data. We use the output parameter in the model training step in the pipeline. The following is the code fortask.py:
import boto3
import os
import sys
import traceback
import time

if 'inputLocation' in os.environ:
    input_uri = os.environ['inputLocation']
else:
    print("inputLocation not found in environment")
    sys.exit(1)
if 'outputLocation' in os.environ:
    output_uri = os.environ['outputLocation']
else:
    print("outputLocation not found in environment")
    sys.exit(1)
if 'token' in os.environ:
    token = os.environ['token']
else:
    print("token not found in environment")
    sys.exit(1)
if 'glue_job_name' in os.environ:
    glue_job_name = os.environ['glue_job_name']
else:
    print("glue_job_name not found in environment")
    sys.exit(1)

print(f"Processing from {input_uri} to {output_uri} using callback token {token}")
sagemaker = boto3.client('sagemaker')
glue = boto3.client('glue')

poll_interval = 60

try:

    t1 = time.time()
    response = glue.start_job_run(
        JobName=glue_job_name,
        Arguments={
            '--output_uri': output_uri,
            '--input_uri': input_uri
        }
    )
    job_run_id = response['JobRunId']
    print(f"Starting job {job_run_id}")

    job_status = 'STARTING'
    job_error = ''
    while job_status in ['STARTING','RUNNING','STOPPING']:
        time.sleep(poll_interval)
        response = glue.get_job_run(
            JobName=glue_job_name,
            RunId=job_run_id,
            PredecessorsIncluded=False
        )
        job_status = response['JobRun']['JobRunState']
        if 'ErrorMessage' in response['JobRun']:
            job_error = response['JobRun']['ErrorMessage']
        print(f"Job is in state {job_status}")

    t2 = time.time()
    total_time = (t2 - t1) / 60.0
    if job_status == 'SUCCEEDED':
        print("Job succeeded")
        sagemaker.send_pipeline_execution_step_success(
            CallbackToken=token,
            OutputParameters=[
                {
                    'Name': 'minutes',
                    'Value': str(total_time)
                },
                {
                    'Name': 's3_data_out',
                    'Value': str(output_uri),
                }
            ]
        )
    else:
        print(f"Job failed: {job_error}")
        sagemaker.send_pipeline_execution_step_failure(
            CallbackToken=token,
            FailureReason = job_error
        )
except Exception as e:
    trc = traceback.format_exc()
    print(f"Error running ETL job: {str(e)}:m {trc}")
    sagemaker.send_pipeline_execution_step_failure(
        CallbackToken=token,
        FailureReason = str(e)
)- Data preprocessing code – The pipeline callback step does the actual data preprocessing using a PySpark job running in AWS Glue, so we need to create the code that is used to transform the data:
import sys
from awsglue.transforms import *
from awsglue.utils import getResolvedOptions
from pyspark.context import SparkContext
from awsglue.context import GlueContext
from awsglue.job import Job
from pyspark.sql.types import IntegerType
from pyspark.sql import functions as F

## @params: [JOB_NAME]
args = getResolvedOptions(sys.argv, ['JOB_NAME', 'input_uri', 'output_uri'])

sc = SparkContext()
glueContext = GlueContext(sc)
spark = glueContext.spark_session
job = Job(glueContext)
job.init(args['JOB_NAME'], args)

df = spark.read.format("csv").option("header", "true").load("{0}*.csv".format(args['input_uri']))
df = df.withColumn("Passengers", df["passenger_count"].cast(IntegerType()))
df = df.withColumn(
  'pickup_time',
  F.to_timestamp(
  F.unix_timestamp('tpep_pickup_datetime', 'yyyy-MM-dd HH:mm:ss').cast('timestamp')))

dfW = df.groupBy(F.window("pickup_time", "30 minutes")).agg(F.sum("Passengers").alias("passenger"))
dfOut = dfW.drop('window')
dfOut.repartition(1).write.option("timestampFormat", "yyyy-MM-dd HH:mm:ss").csv(args['output_uri'])

job.commit()- Data preprocessing job – We need to also configure the AWS Glue job that runs the preceding code when triggered by your Fargate task. The IAM role used must have permissions to read and write from the S3 bucket. See the following code:
glue = boto3.client('glue')
response = glue.create_job(
    Name='GlueDataPrepForPipeline',
    Description='Prepare data for SageMaker training',
    Role=glue_role_arn,
    ExecutionProperty={
        'MaxConcurrentRuns': 1
    },
    Command={
        'Name': 'glueetl',
        'ScriptLocation': glue_script_location,
    },
    MaxRetries=0,
    Timeout=60,
    MaxCapacity=10.0,
    GlueVersion='2.0'
)
glue_job_name = response['Name']
After these prerequisites are in place, including the necessary IAM permissions outlined in the example notebook, we’re ready to configure and run the pipeline.
Configure the pipeline
To build out the pipeline, we rely on the preceding prerequisites in the callback step that perform data processing. We also combine that with steps native to SageMaker for model training and deployment to create an end-to-end pipeline.
To configure the pipeline, complete the following steps:
- Initialize the pipeline parameters:
from sagemaker.workflow.parameters import (
    ParameterInteger,
    ParameterString,
)

input_data = ParameterString(
    name="InputData",
    default_value=f"s3://{default_bucket}/{taxi_prefix}/"
)
id_out = ParameterString(
    name="IdOut",
    default_value="taxiout"+ str(timestamp)
)
output_data = ParameterString(
    name="OutputData",
    default_value=f"s3://{default_bucket}/{taxi_prefix}_output/"
)
training_instance_count = ParameterInteger(
    name="TrainingInstanceCount",
    default_value=1
)
training_instance_type = ParameterString(
    name="TrainingInstanceType",
    default_value="ml.c5.xlarge"
)- Configure the first step in the pipeline, which is
CallbackStep.
This step uses the SQS queue created in the prerequisites in combination with arguments that are used by tasks in this step. These arguments include the inputs of the Amazon S3 location of the input (raw taxi data) and output training data. The step also defines the outputs, which in this case includes the callback output and Amazon S3 location of the training data. The outputs become the inputs to the next step in the pipeline. See the following code:
from sagemaker.workflow.callback_step import CallbackStep,CallbackOutput,CallbackOutputTypeEnum

callback1_output=CallbackOutput(output_name="s3_data_out", output_type=CallbackOutputTypeEnum.String)

step_callback_data = CallbackStep(
                    name="GluePrepCallbackStep",
                    sqs_queue_url=queue_url,
                    inputs={
                        "input_location": f"s3://{default_bucket}/{taxi_prefix}/",
                        "output_location": f"s3://{default_bucket}/{taxi_prefix}_{id_out}/"
                    },
                    outputs=[
                        callback1_output
                    ],
)- We use
TrainingStepto train a model using the Random Cut Forest algorithm.
We first need to configure an estimator, then we configure the actual pipeline step. This step takes the output of the previous step and Amazon S3 location of the training data created by AWS Glue as input to train the model. See the following code:
containers = {
    'us-west-2': '174872318107.dkr.ecr.us-west-2.amazonaws.com/randomcutforest:latest',
    'us-east-1': '382416733822.dkr.ecr.us-east-1.amazonaws.com/randomcutforest:latest',
    'us-east-2': '404615174143.dkr.ecr.us-east-2.amazonaws.com/randomcutforest:latest',
    'eu-west-1': '438346466558.dkr.ecr.eu-west-1.amazonaws.com/randomcutforest:latest'}
region_name = boto3.Session().region_name
container = containers[region_name]
model_prefix = 'model'

session = sagemaker.Session()

rcf = sagemaker.estimator.Estimator(
    container,
    sagemaker.get_execution_role(),
    output_path='s3://{}/{}/output'.format(default_bucket, model_prefix),
    instance_count=training_instance_count,
    instance_type=training_instance_type,
    sagemaker_session=session)

rcf.set_hyperparameters(
    num_samples_per_tree=200,
    num_trees=50,
    feature_dim=1)
from sagemaker.inputs import TrainingInput
from sagemaker.workflow.steps import TrainingStep

step_train = TrainingStep(
    name="TrainModel",
    estimator=rcf,
    inputs={
        "train": TrainingInput(
        #s3_data = Output of the previous call back
        steps3_data=step_callback_data.properties.Outputs['s3_data_out'],
        content_type="text/csv;label_size=0",
        distribution='ShardedByS3Key'
        ),
    },
)- We use
CreateModelStepto package the model for SageMaker deployment:
from sagemaker.model import Model
from sagemaker import get_execution_role
role = get_execution_role()

image_uri = sagemaker.image_uris.retrieve("randomcutforest", region)

model = Model(
    image_uri=image_uri,
    model_data=step_train.properties.ModelArtifacts.S3ModelArtifacts,
    sagemaker_session=sagemaker_session,
    role=role,
    )
from sagemaker.inputs import CreateModelInput
from sagemaker.workflow.steps import CreateModelStep

inputs = CreateModelInput(
    instance_type="ml.m5.large",
)

create_model = CreateModelStep(
    name="TaxiModel",
    model=model,
    inputs=inputs,
)- We deploy the trained model using a SageMaker batch transform job using
TransformStep.
This step loads the trained model and processes the prediction request data stored in Amazon S3, then outputs the results (anomaly scores in this case) to the specified Amazon S3 location. See the following code:
base_uri = step_callback_data.properties.Outputs['s3_data_out']
output_prefix = 'batch-out'

from sagemaker.transformer import Transformer

transformer = Transformer(
    model_name=create_model.properties.ModelName,
    instance_type="ml.m5.xlarge",
    assemble_with = "Line",
    accept = 'text/csv',
    instance_count=1,
    output_path=f"s3://{default_bucket}/{output_prefix}/",
)
from sagemaker.inputs import TransformInput
from sagemaker.workflow.steps import TransformStep

batch_data=step_callback_data.properties.Outputs['s3_data_out']

step_transform = TransformStep(
    name="TaxiTransform",
    transformer=transformer,
    inputs=TransformInput(data=batch_data,content_type="text/csv",split_type="Line",input_filter="$[0]",join_source='Input',output_filter='$[0,-1]')
)
Create and run the pipeline
You’re now ready to create and run the pipeline. To do this, complete the following steps:
- Define the pipeline including the parameters accepted and steps:
from sagemaker.workflow.pipeline import Pipeline

pipeline_name = f"GluePipeline-{id_out}"
pipeline = Pipeline(
    name=pipeline_name,
    parameters=[
        input_data,
        training_instance_type,
        training_instance_count,
        id_out,
    ],
    steps=[step_callback_data, step_train,create_model,step_transform],
)- Submit the pipeline definition to create the pipeline using the role that is used to create all the jobs defined in each step:
from sagemaker import get_execution_role
pipeline.upsert(role_arn = get_execution_role())- Run the pipeline:
execution = pipeline.start()You can monitor your pipeline using the SageMaker SDK, execution.list_steps(), or via the Studio console, as shown in the following screenshot.

Use CallbackStep to integrate other tasks outside of SageMaker
You can follow the same pattern to integrate any long-running tasks or jobs with Pipelines. This may include running AWS Batch jobs, Amazon EMR job flows, or Amazon ECS or Fargate tasks.
You can also implement an email approval step for your models as part of your ML pipeline.
CallbackStep runs after the model EvaluationStep and sends an email containing approve or reject links with model metrics to a user. The workflow progresses to the next state after the user approves the task to proceed.
You can implement this pattern using a Lambda function and Amazon Simple Notification Service (Amazon SNS).
Conclusion
In this post, we showed you an example of how to use CallbackStep in Pipelines to extend your pipelines to integrate an AWS Glue job for data preprocessing. You can follow the same process to integrate any task or job outside of SageMaker. You can walk through the full solution explained in the example notebook.
About the Author
 Shelbee Eigenbrode is a Principal AI and Machine Learning Specialist Solutions Architect at Amazon Web Services (AWS). She holds 6 AWS certifications and has been in technology for 23 years spanning multiple industries, technologies, and roles. She is currently focusing on combining her DevOps and ML background to deliver and manage ML workloads at scale. With over 35 patents granted across various technology domains, she has a passion for continuous innovation and using data to drive business outcomes. Shelbee co-founded the Denver chapter of Women in Big Data.
 Sofian Hamiti is an AI/ML specialist Solutions Architect at AWS. He helps customers across industries accelerate their AI/ML journey by helping them build and operationalize end-to-end machine learning solutions.
 Randy DeFauw is a principal solutions architect at Amazon Web Services. He works with the AWS customers to provide guidance and technical assistance on database projects, helping them improve the value of their solutions when using AWS.
 Payton Staub is a senior engineer with Amazon SageMaker. His current focus includes model building pipelines, experiment management, image management and other tools to help customers productionize and automate machine learning at scale.
Enhancing customer service experiences using Conversational AI: Power your contact center with Amazon Lex and Genesys Cloud
Customers expect personalized contact center experiences. They want easy access to customer support and quick resolution of their issues. Delighting callers with a quick and easy interaction remains central to the customer experience (CX) strategy for support organizations. Enterprises often deploy omni-channel contact centers so that they can provide simple mechanisms for their customers to access customer support. But even with these efforts, callers face long wait times, especially during peak hours, which can lead to lower CSAT scores. In addition, organizations have to manage support costs as their footprint expands. As the customer base grows, operational costs for managing a contact center can rapidly increase.
With Amazon Lex bots, you can use conversational AI capabilities to provide highly engaging and lifelike conversational experiences. Organizations can use Amazon Lex to automate customer service interactions and deliver faster responses to queries. As a result, customer issues are resolved in real time, reducing wait times and driving higher satisfaction. You can use Amazon Lex to handle the most common problems encountered by customers. Furthermore, complex issues that require human intervention can be seamlessly handed over from the Amazon Lex bot to a human agent. Augmenting your contact center operations with Amazon Lex bots provides an enhanced caller experience, while optimizing your operational costs with self-service automation. In addition, you can seamlessly scale your contact center operations on the AWS Cloud as your user base grows.
We’re excited to announce Amazon Lex V2 bot support on the Genesys Cloud platform. With this launch, you can build an Amazon Lex bot and set up your contact center in minutes.
About Amazon Lex V2 APIs and Genesys Cloud
Amazon Lex launched V2 APIs and a new console interface that makes it easier to build, deploy, and manage conversational experiences. The Lex V2 console and API enhancements provide support for multiple languages in a single bot, enables simplified versioning, and provides builder productivity tools. These features provide you more control over the bot building and deployment processes.
Genesys Cloud (an omni-channel orchestration and customer relationship platform) provides a contact center platform in a public cloud model that enables quick and simple integration of AWS Contact Center Intelligence (AWS CCI) to transform the modern contact center from a cost center into a profit center. As part of AWS CCI, Genesys cloud integrates with Amazon Lex, Amazon Polly (text to speech) and Amazon Kendra (intelligent search) to offer self-service conversational AI capabilities.
Key features
Genesys Cloud uses the continuous streaming capability with Amazon Lex V2 APIs to enable advanced IVR conversations. With this integration, you can now enable the following:
- Interruptions (“barge-in”) – Callers can now interrupt the bot and answer a question before the prompt is completed
- Wait and Continue – Callers can instruct the bot to wait if they need time for retrieving additional information during the call (such as a credit card number or booking ID)
- DTMF support – Callers can provide information via speech or DTMF interchangeably
- SSML support – You can configure prompts within the Amazon Lex bot using SSML tags, enabling greater control over speech generation from text
- Configurable timeouts – You can configure how long to wait for the customer to finish speaking before Amazon Lex collects speech input from callers, such as answering a yes/no question, or providing a date or credit card number
Creating the bot
Let’s create a banking bot as an example and integrate with Genesys Cloud for IVR-based interactions. For a step-by-step process to build an Amazon Lex bot, refer to banker bot workshop. You can also download the bot and import it using the Amazon Lex V2 console.
In addition to the intents presented in the workshop, we add a SpeakToAgent intent to enable handing over the conversation to a human agent based on user requests.
Enabling the integrations
The Amazon Lex V2 integration is available for installation via Genesys AppFoundry. You need an active subscription for premium applications to access the Integration page from the Genesys Cloud Admin dashboard. Genesys also offers a free trial for validation purposes.

1. Configure the IAM role
As invocations for Amazon Lex take place in your AWS environment, you configure an AWS Identity and Access Management (IAM) role with proper permission for Genesys Cloud to assume the role and use resources.
- Create an IAM role and select trusted entity to be Another AWS account.
- Enter the Genesys Cloud production ID
765628985471in the Account ID field. - As part of the AWS best practices, you should select Require external ID and enter your organization’s ID to prevent the confused deputy problem and enhance integration security.
By default, IAM roles don’t have permission to create or modify AWS resources. For Genesys Cloud to successfully access Amazon Lex bots, a few permissions are required.
- Choose Create Policy and enter the following JSON blob into the policy editor.
{
     "Version": "2012-10-17",
     "Statement": [
          {
               "Sid": "GenesysLexPolicy",
               "Effect": "Allow",
               "Action": [
                    "lex:List*",
                    "lex:Describe*",
                    "lex:StartConversation",
             		"lex:Recognize*",
 					"lex:DeleteSession",
             		"lex:GetSession",
  			  		"lex:PutSession"
              		  ],
                "Resource": "*"
          }
     ]
}- Attach the policy to the role created previously.
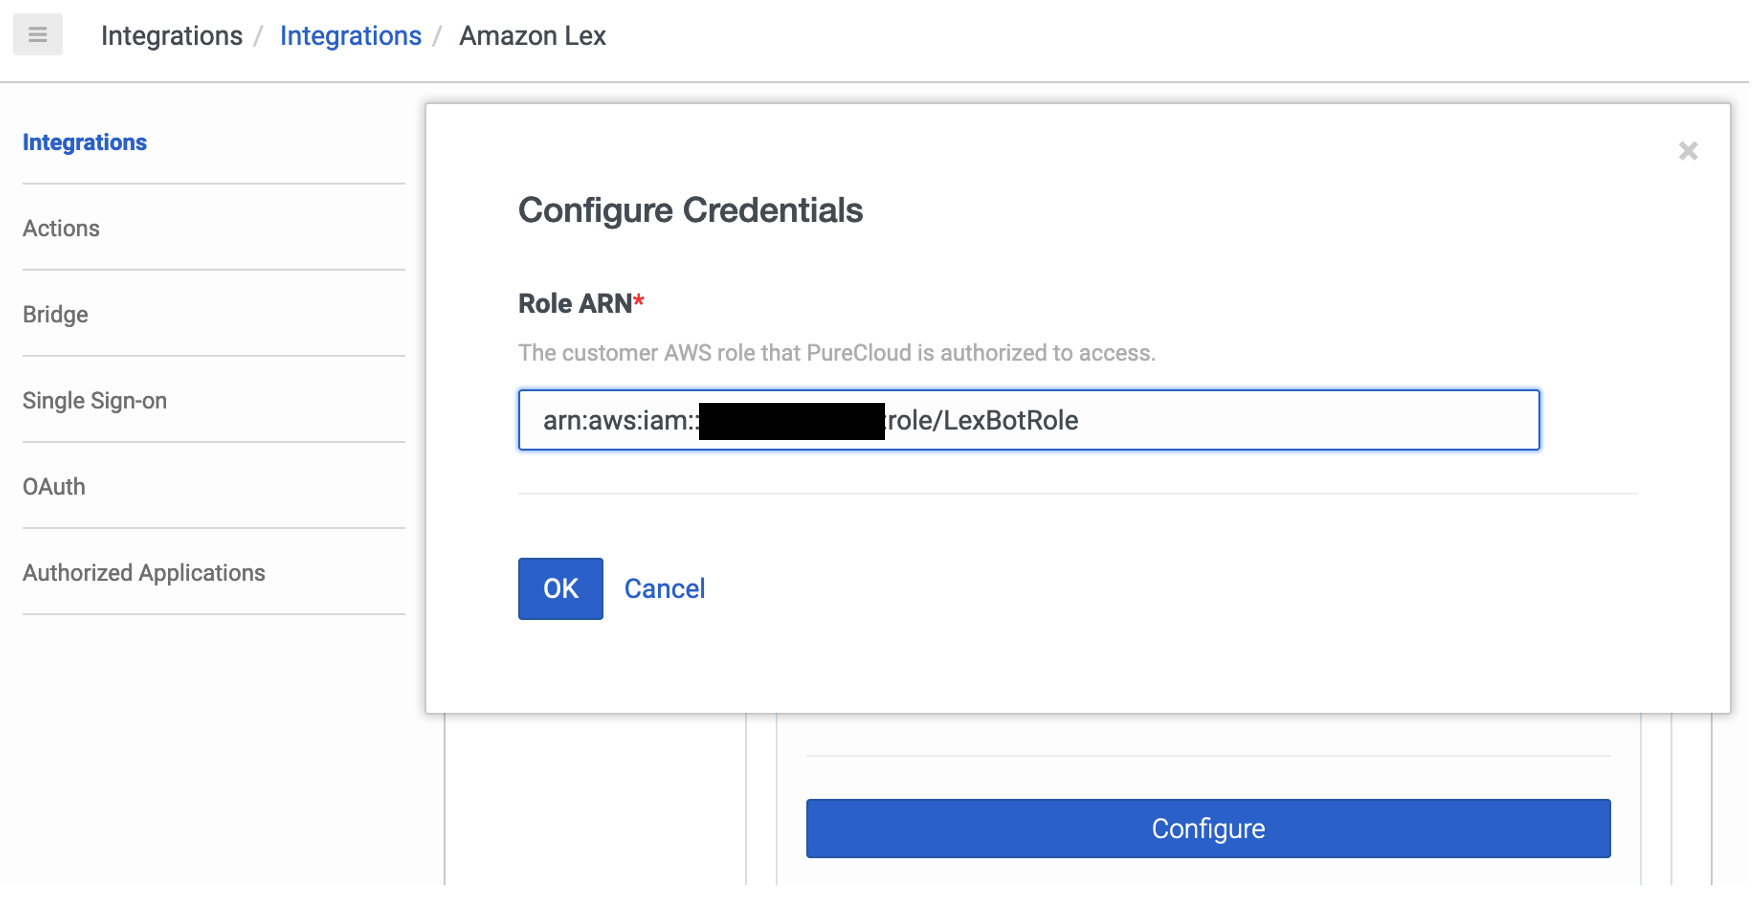
- Copy the role ARN and configure it within Genesys Cloud.
- Save and set the integration status to activate the bot.
2. Configure Amazon Polly
To use Amazon Lex for a voice bot, you set up the text to speech (TTS) capability. Genesys Cloud supports several TTS engines, including Amazon Polly. You can install and configure the Amazon Polly integration following the Genesys documentation. You can then select Amazon Polly as the engine and configure the voice you prefer. To keep the IVR voice consistent in the call flow, the Amazon Polly voice selected in Genesys Cloud should be the same voice configured in your Lex bot. For additional details, see a list of available voices and the associated characteristics.
3. Configure the Genesys Cloud Architect flow
Create an Inbound Call Flow in Architect to orchestrate your bot interaction. You add a Reusable Tasks and use Call Lex V2 bot action to bring in the Amazon Lex bot and design various actions in the call flow.
The integration also allows Genesys Cloud to capture the preconfigured slots as Architect variables. These variables can be used outside of the bot for use-cases such as application of business rules. For example, if a customer provides an account ID that matches with the VIP customer segment, the call can be routed to the priority support queue when transferring to an agent.
4. Configure graceful escalation
When the automated solution can’t fulfill a customer’s request, the interaction should be escalated gracefully. This fallback process allows a human agent to take over the interaction for more complex tasks.
You can save key information from the prior exchange (such as intents, slots, and conversation transcripts) into a script to provide historical context to the agent so that conversations can be picked up seamlessly. This prevents customers from wasting valuable time to repeat the information provided previously.
In the following example, the call is transferred to an available Tier 1 support agent when a customer asks for more help or to be connected to an agent. You can also collect additional context from the customer and hand off to either another bot or human based on specialty.

5. Test the integrations
You can use the native soft phone in Genesys Cloud to make calls as you would with a desktop phone and validate the integration. Enter the bot’s name in the Enter Names and Numbers field and choose Call to follow the prompts.

Summary
Enterprises increasingly invest in automated solutions such as IVR and chatbots as a part of their customer service strategy in contact centers. Automation provides highly available support that handles common tasks without the presence of a live agent, while reducing operational cost.
With the adoption of the Amazon Lex V2 APIs, Genesys Cloud provides an overall improved user experience using the continuous streaming architecture, and enables a more natural customer-bot interaction.
This post outlines the key steps to enable the Amazon Lex V2 integration in your Genesys Cloud environment, and should give you a jump start to create and customize your own chatbot initiative. Check out the following resources for additional information:
- Navigate to the Amazon Lex V2 console and learn more at Amazon Lex V2 Developer Guide
- Get started with Amazon Lex V2 integration on Genesys Cloud AppFoundry
- Learn more about Genesys Lex V2 integration
- Acquire Genesys Cloud from AWS Marketplace
About the Author
 Anubhav Mishra is a Product Manager with AWS. He spends his time understanding customers and designing product experiences to address their business challenges.
 Jessica Ho is a Solutions Architect at Amazon Web Services supporting ISV partners who build business applications on AWS. She is passionate about creating differentiated solutions that unlock customers for cloud adoption. Outside of work, she enjoys spoiling her garden into a mini jungle.
Application now open for the 2022 Facebook Fellowship program
Application for the 2022 Facebook Fellowship program is now open and closes on September 20, 2021. The program supports promising PhD students conducting research in areas related to computer science and engineering, from AR/VR to security and privacy. Head to the Facebook Fellowship page to see all the fellowships available for 2022 and to read descriptions from research teams. Those eligible can apply at the link below.
ApplyEach year, thousands of bright and passionate PhD students from all over the world apply to become a Facebook Fellow. The Fellowship program is highly competitive, with only a handful of applicants selected each cycle. To help prepare potential applicants, we’ve put together a list of resources. Check out the following blog posts for tips and advice from Facebook Fellowship alumni as well as application reviewers.
Resources for applicants
The six most common Fellowship questions, answered by Facebook Fellow Moses Namara
As a former Emerging Scholar, 2020 Fellow Moses Namara knows the Fellowship program like the back of his hand. In this Q&A, Moses offers advice about writing a research statement, navigating the application process, being a Facebook Fellow, and knowing whether you’re qualified to apply.
Fellowship 101: Facebook Fellow Daricia Wilkinson outlines the basics for PhDs
In this Q&A, 2019 Fellow Daricia Wilkinson breaks down the basics for PhD students looking to get their research funded. Inspired by Wilkinson’s Medium post about how to make a successful PhD fellowship application, this Q&A outlines the most common questions Wilkinson receives about fellowships, research statements, and the application process.
Five tips for a successful Facebook Fellowship application from the people who review them
Last year, we connected with some reviewers to discuss what they look for in an application and what advice they would give to prospective applicants. Drawing from their experience reading hundreds of research statements, CVs, and letters of recommendation, they came up with five tips for a successful application.
Applying twice: How Facebook Fellow David Pujol adjusted his application for success
It’s pretty common for PhD students to apply for the Fellowship program the following year if they didn’t get selected the first time they applied. In this Q&A, 2020 Fellow David Pujol tells us about his first approach to his Fellowship application, what changed the second time, what he spent the most time on in his applications, and more.
Fellow spotlights, career advice, and more
We frequently reach out to Facebook Fellowship alumni to highlight them on our blog. Browse the Fellowship section of our blog to read more about the bright and talented PhD students that we see in the program.
—
Application for the 2021 Facebook Fellowship program closes September 20, 2021. Apply and learn more about eligibility criteria, application requirements, available fellowships, and more on the Facebook Fellowship page.
The post Application now open for the 2022 Facebook Fellowship program appeared first on Facebook Research.
Find Your Groove: Add NVIDIA AI Essentials Series to Your Summer Playlist
If AI, data science, graphics or robotics is your jam, stream the NVIDIA AI Essentials Learning Series this summer.
These intro-level courses provide foundational knowledge to students and early-career developers looking to broaden their areas of expertise. The free series includes over a dozen sessions — each less than an hour long — on topics including conversational AI, ray tracing and robotics fundamentals.
For a deeper dive, register for daylong hands-on courses from the NVIDIA Deep Learning Institute and earn a certificate of competency to boost your resume. To date, DLI has trained more than 300,000 developers through an extensive catalog of self-paced and instructor-led courses and workshops.
Besides picking up new skills to boost your career journey, there are summer sweepstakes at stake: For every 30 minutes a participant watches the learning series, they earn an entry to win a DLI book and free registration codes for self-paced courses.
For those who register for DLI courses on deep learning, accelerated data science and AI on the NVIDIA Jetson Nano, we’re upping the game. Upon successful completion of one or more of these courses, participants will be entered to win an NVIDIA GeForce RTX 3090 GPU in addition to three DLI registration codes and the book.
Here’s a taste of what students, educators and early-career technologists will find in the learning series.
Deep Learning Demystified
This talk covers what deep learning is, what it’s good for and why it’s such a powerful technology. Will Ramey, senior director and global head of developer programs at NVIDIA, talks through the different types of neural networks and explains how they’re trained, optimized and deployed in industries like healthcare and energy. He also discusses some of the challenges organizations face when adopting deep learning.
Ray Tracing in One Weekend
Ray tracing brings stunning, realistic visuals to the movie and gaming industries — but how does it work? In this session, NVIDIA researcher Pete Shirley guides viewers through the process of writing code to generate a ray-traced image of a 3D scene. As he goes, Shirley explains key concepts that form the foundation of ray tracing.
Conversational AI Demystified
Building a conversational AI model requires developers to achieve two key features: high accuracy and low latency. This session provides an overview of conversionational AI models for automatic speech recognition, natural language processing and text-to-speech. Meriem Bendris, a solution architect at NVIDIA, shares how to train and fine-tune these models using NVIDIA NeMo, the Transfer Learning Toolkit and the NVIDIA Riva application framework.
Jetson Nano: From Zero to Hero in 20 Minutes
Learn how to get started from scratch with the NVIDIA Jetson Nano 2GB developer kit — even if you’re not a developer. This crash course, led by NVIDIA’s Asier Arranz Jiminez, walks through the process from installation to inference with an AI model that detects vehicles, roads and pedestrians.
To get started, visit the NVIDIA AI Essentials Learning Series homepage. Thousands more talks are available to stream free through NVIDIA On-Demand.
The post Find Your Groove: Add NVIDIA AI Essentials Series to Your Summer Playlist appeared first on The Official NVIDIA Blog.