Seventy-four percent of surveyed undergraduates in Columbia-Amazon program say it exceeded or far exceeded expectations.Read More
Bring Your Amazon SageMaker model into Amazon Redshift for remote inference
Amazon Redshift, a fast, fully managed, widely used cloud data warehouse, natively integrates with Amazon SageMaker for machine learning (ML). Tens of thousands of customers use Amazon Redshift to process exabytes of data every day to power their analytics workloads. Data analysts and database developers want to use this data to train ML models, which can then be used to generate insights for use cases such as forecasting revenue, predicting customer churn, and detecting anomalies.
Amazon Redshift ML makes it easy for SQL users to create, train, and deploy ML models using familiar SQL commands. In a previous post, we covered how Amazon Redshift ML allows you to use your data in Amazon Redshift with SageMaker, a fully managed ML service, without requiring you to become an expert in ML. We also discussed how Amazon Redshift ML enables ML experts to create XGBoost or MLP models in an earlier post. Additionally, Amazon Redshift ML allows data scientists to either import existing SageMaker models into Amazon Redshift for in-database inference or remotely invoke a SageMaker endpoint.
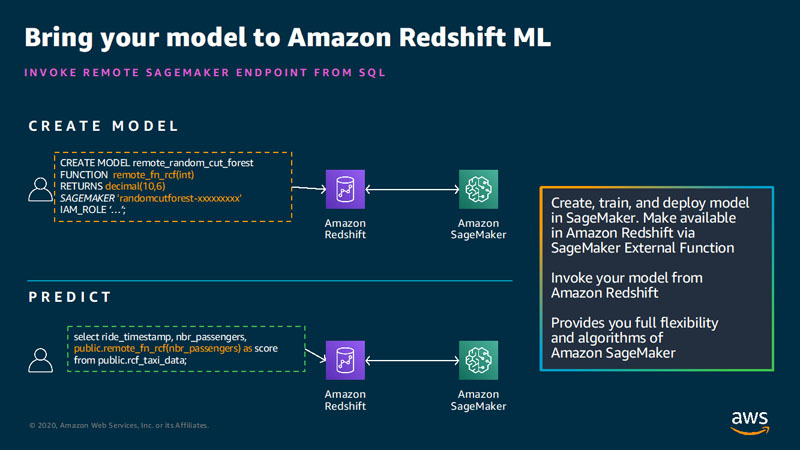
This post shows how you can enable your data warehouse users to use SQL to invoke a remote SageMaker endpoint for prediction. We first train and deploy a Random Cut Forest model in SageMaker, and demonstrate how you can create a model with SQL to invoke that SageMaker predictions remotely. Then, we show how end users can invoke the model.
Prerequisites
To get started, we need an Amazon Redshift cluster with the Amazon Redshift ML feature enabled. For an introduction to Amazon Redshift ML and instructions on setting it up, see Create, train, and deploy machine learning models in Amazon Redshift using SQL with Amazon Redshift ML.
You also have to make sure that the SageMaker model is deployed and you have the endpoint. You can use the following AWS CloudFormation template to provision all the required resources in your AWS accounts automatically.
Solution overview
Amazon Redshift ML supports text and CSV inference formats. For more information about various SageMaker algorithms and their inference formats, see Random Cut Forest (RCF) Algorithm.
Amazon SageMaker Random Cut Forest (RCF) is an algorithm designed to detect anomalous data points within a dataset. Examples of anomalies that are important to detect include when website activity uncharacteristically spikes, when temperature data diverges from a periodic behavior, or when changes to public transit ridership reflect the occurrence of a special event.
In this post, we use the SageMaker RCF algorithm to train an RCF model using the Notebook generated by the CloudFormation template on the Numenta Anomaly Benchmark (NAB) NYC Taxi dataset.
We downloaded the data and stored it in an Amazon Simple Storage Service (Amazon S3) bucket. The data consists of the number of New York City taxi passengers over the course of 6 months aggregated into 30-minute buckets. We naturally expect to find anomalous events occurring during the NYC marathon, Thanksgiving, Christmas, New Year’s Day, and on the day of a snowstorm.
We then use this model to predict anomalous events by generating an anomaly score for each data point.
The following figure illustrates how we use Amazon Redshift ML to create a model using the SageMaker endpoint.
Deploy the model
To deploy the model, go to the SageMaker console and open the notebook that was created by the CloudFormation template.

Then choose bring-your-own-model-remote-inference.ipynb.

Set up parameters as shown in the following screenshot and then run all cells.

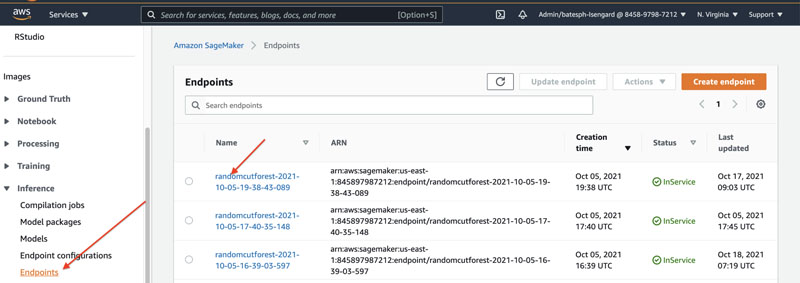
Get the SageMaker model endpoint
On the Amazon SageMaker console, under Inference in the navigation pane, choose Endpoints to find your model name. You use this when you create the remote inference model in Amazon Redshift.
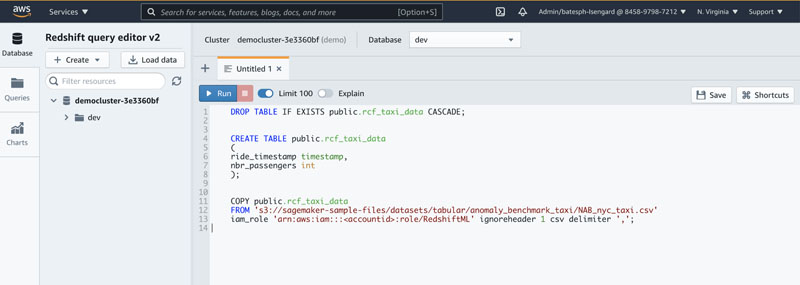
Prepare data to create a remote inference model using Amazon Redshift ML
Create the schema and load the data in Amazon Redshift using the following SQL:
DROP TABLE IF EXISTS public.rcf_taxi_data CASCADE;
CREATE TABLE public.rcf_taxi_data
(
ride_timestamp timestamp,
nbr_passengers int
);
COPY public.rcf_taxi_data
FROM 's3://sagemaker-sample-files/datasets/tabular/anomaly_benchmark_taxi/NAB_nyc_taxi.csv'
iam_role 'arn:aws:iam:::<accountid>:role/RedshiftML' ignoreheader 1 csv delimiter ',';
Amazon Redshift now supports attaching the default IAM role. If you have enabled the default IAM role in your cluster, you can use the default IAM role as follows.
COPY public.rcf_taxi_data
FROM 's3://sagemaker-sample-files/datasets/tabular/anomaly_benchmark_taxi/NAB_nyc_taxi.csv'
iam_role default ignoreheader 1 csv delimiter ',';
You can use the Amazon Redshift query editor v2 to run these commands.
Create a model
Create a model in Amazon Redshift ML using the SageMaker endpoint you previously captured:
CREATE MODEL public.remote_random_cut_forest
FUNCTION remote_fn_rcf(int)
RETURNS decimal(10,6)
SAGEMAKER 'randomcutforest-xxxxxxxxx'
IAM_ROLE 'arn:aws:iam::<accountid>:role/RedshiftML';
You can also use the default IAM role with your CREATE MODEL command as follows:
CREATE MODEL public.remote_random_cut_forest
FUNCTION remote_fn_rcf(int)
RETURNS decimal(10,6)
SAGEMAKER 'randomcutforest-xxxxxxxxx'
IAM_ROLE  default;
Check model status
You can use the show model command to view the status of the model:
show model public.remote_random_cut_forestYou get output like the following screenshot, which shows the endpoint and function name.

Compute anomaly scores across the entire taxi dataset
Now, run the inference query using the function name from the create model statement:
select ride_timestamp, nbr_passengers, public.remote_fn_rcf(nbr_passengers) as score
from public.rcf_taxi_data;
The following screenshot shows our results.

Now that we have our anomaly scores, we need to check for higher-than-normal anomalies.
Amazon Redshift ML has batching optimizations to minimize the communication cost with SageMaker and offers high-performance remote inference.
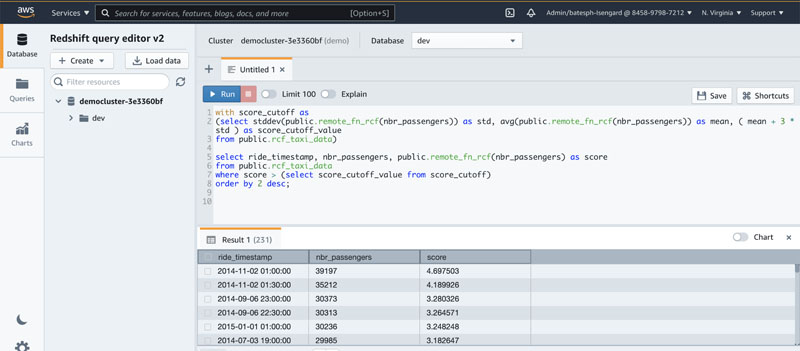
Check for high anomalies
The following code runs a query for any data points with scores greater than three standard deviations (approximately 99.9th percentile) from the mean score:
with score_cutoff as
(select stddev(public.remote_fn_rcf(nbr_passengers)) as std, avg(public.remote_fn_rcf(nbr_passengers)) as mean, ( mean + 3 * std ) as score_cutoff_value
from public.rcf_taxi_data)

select ride_timestamp, nbr_passengers, public.remote_fn_rcf(nbr_passengers) as score
from public.rcf_taxi_data
where score > (select score_cutoff_value from score_cutoff)
order by 2 desc;
The data in the following screenshot shows that the biggest spike in ridership occurs on November 2, 2014, which was the annual NYC marathon. We also see spikes on Labor Day weekend, New Year’s Day and the July 4th holiday weekend.
Conclusion
In this post, we used SageMaker Random Cut Forest to detect anomalous data points in a taxi ridership dataset. In this data, the anomalies occurred when ridership was uncharacteristically high or low. However, the RCF algorithm is also capable of detecting when, for example, data breaks periodicity or uncharacteristically changes global behavior.
We then used Amazon Redshift ML to demonstrate how you can make inferences on unsupervised algorithms (such as Random Cut Forest). This allows you to democratize ML by making predictions with Amazon Redshift SQL commands.
For more information about building different models with Amazon Redshift ML see the Amazon Redshift ML documentation.
About the Authors
 Phil Bates is a Senior Analytics Specialist Solutions Architect at AWS with over 25 years of data warehouse experience.
 Debu Panda, a principal product manager at AWS, is an industry leader in analytics, application platform, and database technologies and has more than 25 years of experience in the IT world.
 Nikos Koulouris is a Software Development Engineer at AWS. He received his PhD from University of California, San Diego and he has been working in the areas of databases and analytics.
 Murali Narayanaswamy is a principal machine learning scientist in AWS. He received his PhD from Carnegie Mellon University and works at the intersection of ML, AI, optimization, learning and inference to combat uncertainty in real-world applications including personalization, forecasting, supply chains and large scale systems.
Announcing TensorFlow’s Kaggle Challenge to Help Protect Coral Reefs
Posted by Megha Malpani & Tim Davis, Google Product Managers
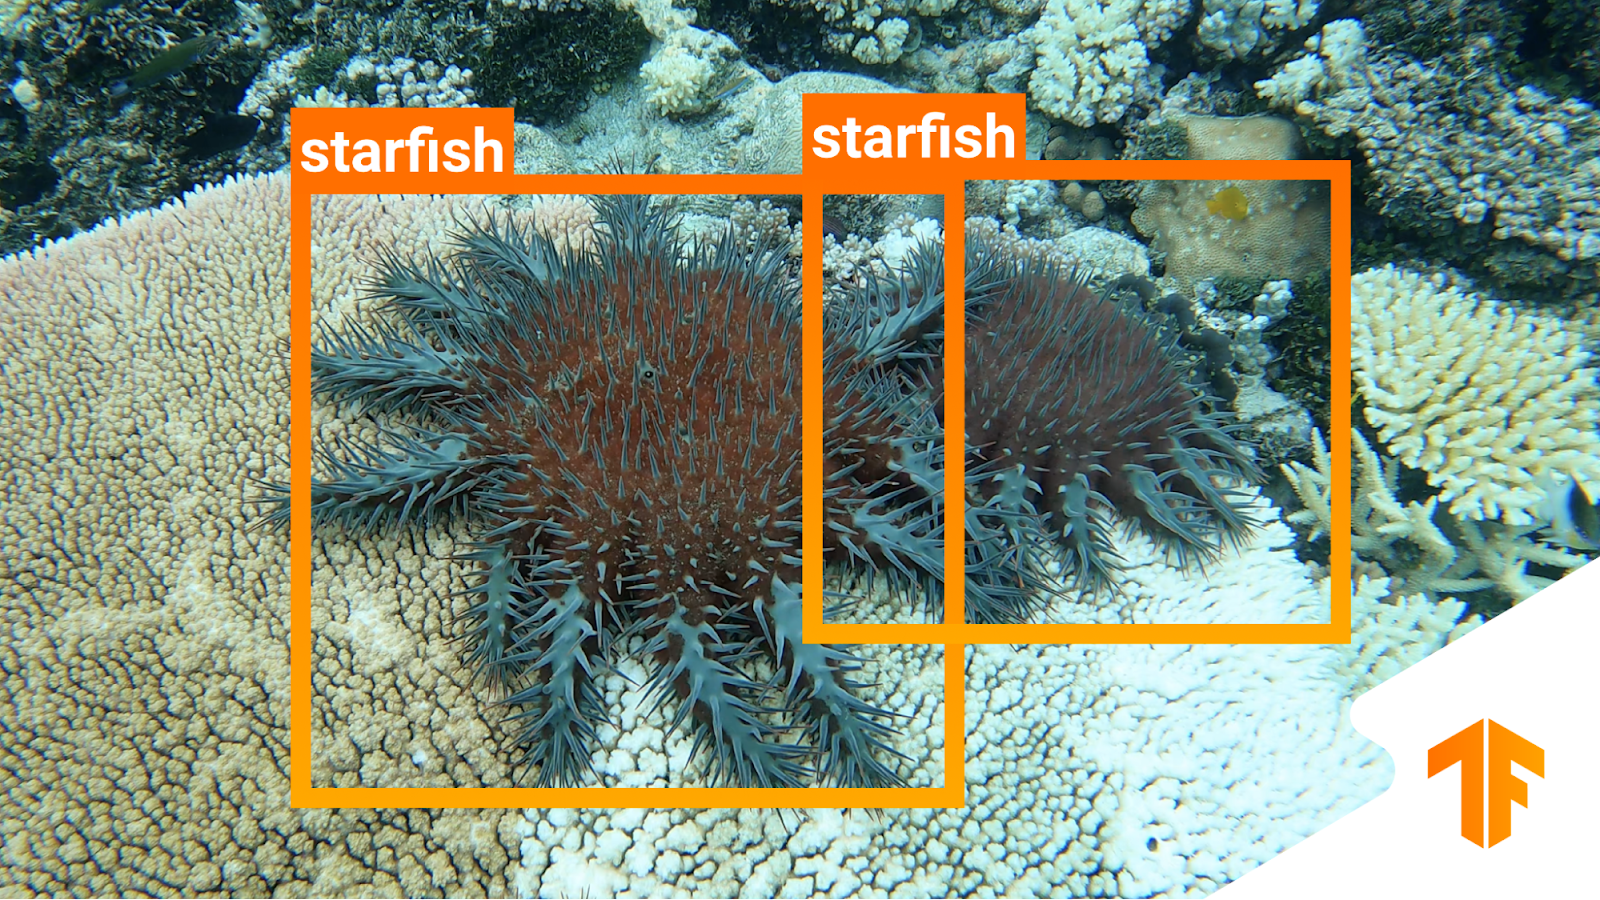
We are excited to announce a TensorFlow-sponsored Kaggle challenge to locate and identify harmful crown-of-thorns starfish (COTS), as part of a broader partnership between the Commonwealth Scientific and Industrial Research Organization (CSIRO) and Google, to help protect coral reefs everywhere.
Coral reefs are some of the most diverse and important ecosystems in the world – both for marine life and society more broadly. Not only are healthy reefs critical to fisheries and food security, they provide countless additional benefits: protecting coastlines from storm surge, supporting tourism-based economies and sustainable livelihoods, and pushing forward drug discovery research.
Reefs around the world face a number of rising threats, most notably climate change, pollution, and overfishing. In the past 30 years alone, there have been dramatic losses in coral cover and habitat in the Great Barrier Reef (GBR), with other reefs experiencing similar declines. In Australia, outbreaks of the coral-eating COTS have been shown to cause major coral loss. These outbreaks can strip a reef of 90% of its coral tissue. While COTS naturally exist in the Indo-Pacific ocean, overfishing and excess run-off nutrients have led to massive outbreaks that are devastating already vulnerable coral communities.
Controlling COTS populations is critical to reducing coral mortality from outbreaks. Google has teamed up with CSIRO to supercharge efforts in monitoring COTS using artificial intelligence. This is just the beginning of a much deeper collaboration and we, along with the Great Barrier Reef Foundation, are extremely excited to invite you, our global ML community, to help protect the world’s reefs.
We are challenging the Kaggle community to build the most accurate and performant (in terms of runtime and memory usage) crown-of-thorns starfish object detection models for image sequences. For this challenge, we are offering $150,000 in prizes to the best solutions.
We have two tiers of prizes – the first, in standard Kaggle fashion, for the most accurate models. Since we will be deploying these models on the edge, we are offering an additional prize for the most performant models (that fall in the top 10% of the accuracy leaderboard). We are looking for creative ideas on how to maximize performance while working effectively with underwater image sequences. We intend to ultimately bring the most innovative ideas together in a single model that we deploy on the Great Barrier Reef. We plan to open-source the winning model for other scientific organizations and agencies around the world to use.
This is an amazing opportunity to have a real impact protecting coral reefs everywhere! The competition is now live, so please join the challenge today and get started with this notebook. We look forward to seeing what you come up with, good luck!
Acknowledgements: Thanks to everyone whose hard work made this collaboration possible!
Google: Martin Wicke, Kemal El Moujahid, Sarah Sirajudddin, Scott Riddle, Glenn Cameron, Addison Howard, Will Cukierski, Sohier Dane, Ryan Holbrook, Khanh LeViet, Sachin Joglekar, Tei Jeong, Rachel Stiegler, Daniel Formoso, Tom Small, Ana Nieto, Arun Venkatesan
CSIRO: Jiajun Liu, Brano Kusy, Ross Marchant, David Ahmedt, Lachlan Tychsen-Smith, Joey Crosswell, Geoffrey Carlin, Russ Babcock
Predicting Text Selections with Federated Learning
Posted by Florian Hartmann, Software Engineer, Google Research
Smart Text Selection, launched in 2017 as part of Android O, is one of Android’s most frequently used features, helping users select, copy, and use text easily and quickly by predicting the desired word or set of words around a user’s tap, and automatically expanding the selection appropriately. Through this feature, selections are automatically expanded, and for selections with defined classification types, e.g., addresses and phone numbers, users are offered an app with which to open the selection, saving users even more time.
Today we describe how we have improved the performance of Smart Text Selection by using federated learning to train the neural network model on user interactions responsibly while preserving user privacy. This work, which is part of Android’s new Private Compute Core secure environment, enabled us to improve the model’s selection accuracy by up to 20% on some types of entities.
Server-Side Proxy Data for Entity Selections
Smart Text Selection, which is the same technology behind Smart Linkify, does not predict arbitrary selections, but focuses on well-defined entities, such as addresses or phone numbers, and tries to predict the selection bounds for those categories. In the absence of multi-word entities, the model is trained to only select a single word in order to minimize the frequency of making multi-word selections in error.
The Smart Text Selection feature was originally trained using proxy data sourced from web pages to which schema.org annotations had been applied. These entities were then embedded in a selection of random text, and the model was trained to select just the entity, without spilling over into the random text surrounding it.
While this approach of training on schema.org-annotations worked, it had several limitations. The data was quite different from text that we expect users see on-device. For example, websites with schema.org annotations typically have entities with more proper formatting than what users might type on their phones. In addition, the text samples in which the entities were embedded for training were random and did not reflect realistic context on-device.
On-Device Feedback Signal for Federated Learning
With this new launch, the model no longer uses proxy data for span prediction, but is instead trained on-device on real interactions using federated learning. This is a training approach for machine learning models in which a central server coordinates model training that is split among many devices, while the raw data used stays on the local device. A standard federated learning training process works as follows: The server starts by initializing the model. Then, an iterative process begins in which (a) devices get sampled, (b) selected devices improve the model using their local data, and (c) then send back only the improved model, not the data used for training. The server then averages the updates it received to create the model that is sent out in the next iteration.
For Smart Text Selection, each time a user taps to select text and corrects the model’s suggestion, Android gets precise feedback for what selection span the model should have predicted. In order to preserve user privacy, the selections are temporarily kept on the device, without being visible server-side, and are then used to improve the model by applying federated learning techniques. This technique has the advantage of training the model on the same kind of data that it sees during inference.
Federated Learning & Privacy
One of the advantages of the federated learning approach is that it enables user privacy, because raw data is not exposed to a server. Instead, the server only receives updated model weights. Still, to protect against various threats, we explored ways to protect the on-device data, securely aggregate gradients, and reduce the risk of model memorization.
The on-device code for training Federated Smart Text Selection models is part of Android’s Private Compute Core secure environment, which makes it particularly well situated to securely handle user data. This is because the training environment in Private Compute Core is isolated from the network and data egress is only allowed when federated and other privacy-preserving techniques are applied. In addition to network isolation, data in Private Compute Core is protected by policies that restrict how it can be used, thus protecting from malicious code that may have found its way onto the device.
To aggregate model updates produced by the on-device training code, we use Secure Aggregation, a cryptographic protocol that allows servers to compute the mean update for federated learning model training without reading the updates provided by individual devices. In addition to being individually protected by Secure Aggregation, the updates are also protected by transport encryption, creating two layers of defense against attackers on the network.
Finally, we looked into model memorization. In principle, it is possible for characteristics of the training data to be encoded in the updates sent to the server, survive the aggregation process, and end up being memorized by the global model. This could make it possible for an attacker to attempt to reconstruct the training data from the model. We used methods from Secret Sharer, an analysis technique that quantifies to what degree a model unintentionally memorizes its training data, to empirically verify that the model was not memorizing sensitive information. Further, we employed data masking techniques to prevent certain kinds of sensitive data from ever being seen by the model
In combination, these techniques help ensure that Federated Smart Text Selection is trained in a way that preserves user privacy.
Achieving Superior Model Quality
Initial attempts to train the model using federated learning were unsuccessful. The loss did not converge and predictions were essentially random. Debugging the training process was difficult, because the training data was on-device and not centrally collected, and so, it could not be examined or verified. In fact, in such a case, it’s not even possible to determine if the data looks as expected, which is often the first step in debugging machine learning pipelines.
To overcome this challenge, we carefully designed high-level metrics that gave us an understanding of how the model behaved during training. Such metrics included the number of training examples, selection accuracy, and recall and precision metrics for each entity type. These metrics are collected during federated training via federated analytics, a similar process as the collection of the model weights. Through these metrics and many analyses, we were able to better understand which aspects of the system worked well and where bugs could exist.
After fixing these bugs and making additional improvements, such as implementing on-device filters for data, using better federated optimization methods and applying more robust gradient aggregators, the model trained nicely.
Results
Using this new federated approach, we were able to significantly improve Smart Text Selection models, with the degree depending on the language being used. Typical improvements ranged between 5% and 7% for multi-word selection accuracy, with no drop in single-word performance. The accuracy of correctly selecting addresses (the most complex type of entity supported) increased by between 8% and 20%, again, depending on the language being used. These improvements lead to millions of additional selections being automatically expanded for users every day.
Internationalization
An additional advantage of this federated learning approach for Smart Text Selection is its ability to scale to additional languages. Server-side training required manual tweaking of the proxy data for each language in order to make it more similar to on-device data. While this only works to some degree, it takes a tremendous amount of effort for each additional language.
The federated learning pipeline, however, trains on user interactions, without the need for such manual adjustments. Once the model achieved good results for English, we applied the same pipeline to Japanese and saw even greater improvements, without needing to tune the system specifically for Japanese selections.
We hope that this new federated approach lets us scale Smart Text Selection to many more languages. Ideally this will also work without manual tuning of the system, making it possible to support even low-resource languages.
Conclusion
We developed a federated way of learning to predict text selections based on user interactions, resulting in much improved Smart Text Selection models deployed to Android users. This approach required the use of federated learning, since it works without collecting user data on the server. Additionally, we used many state-of-the-art privacy approaches, such as Android’s new Private Compute Core, Secure Aggregation and the Secret Sharer method. The results show that privacy does not have to be a limiting factor when training models. Instead, we managed to obtain a significantly better model, while ensuring that users’ data stays private.
Acknowledgements
Many people contributed to this work. We would like to thank Lukas Zilka, Asela Gunawardana, Silvano Bonacina, Seth Welna, Tony Mak, Chang Li, Abodunrinwa Toki, Sergey Volnov, Matt Sharifi, Abhanshu Sharma, Eugenio Marchiori, Jacek Jurewicz, Nicholas Carlini, Jordan McClead, Sophia Kovaleva, Evelyn Kao, Tom Hume, Alex Ingerman, Brendan McMahan, Fei Zheng, Zachary Charles, Sean Augenstein, Zachary Garrett, Stefan Dierauf, David Petrou, Vishwath Mohan, Hunter King, Emily Glanz, Hubert Eichner, Krzysztof Ostrowski, Jakub Konecny, Shanshan Wu, Janel Thamkul, Elizabeth Kemp, and everyone else involved in the project.

In MIT visit, Dropbox CEO Drew Houston ’05 explores the accelerated shift to distributed work
When the cloud storage firm Dropbox decided to shut down its offices with the outbreak of the Covid-19 pandemic, co-founder and CEO Drew Houston ’05 had to send the company’s nearly 3,000 employees home and tell them they were not coming back to work anytime soon. “It felt like I was announcing a snow day or something.”
In the early days of the pandemic, Houston says that Dropbox reacted as many others did to ensure that employees were safe and customers were taken care of. “It’s surreal, there’s no playbook for running a global company in a pandemic over Zoom. For a lot of it we were just taking it as we go.”
Houston talked about his experience leading Dropbox through a public health crisis and how Covid-19 has accelerated a shift to distributed work in a fireside chat on Oct. 14 with Dan Huttenlocher, dean of the MIT Stephen A. Schwarzman College of Computing.
During the discussion, Houston also spoke about his $10 million gift to MIT, which will endow the first shared professorship between the MIT Schwarzman College of Computing and the MIT Sloan School of Management, as well as provide a catalyst startup fund for the college.
“The goal is to find ways to unlock more of our brainpower through a multidisciplinary approach between computing and management,” says Houston. “It’s often at the intersection of these disciplines where you can bring people together from different perspectives, where you can have really big unlocks. I think academia has a huge role to play [here], and I think MIT is super well-positioned to lead. So, I want to do anything I can to help with that.”
Virtual first
While the abrupt swing to remote work was unexpected, Houston says it was pretty clear that the entire way of working as we knew it was going to change indefinitely for knowledge workers. “There’s a silver lining in every crisis,” says Houston, noting that people have been using Dropbox for years to work more flexibly so it made sense for the company to lean in and become early adopters of a distributed work paradigm in which employees work in different physical locations.
Dropbox proceeded to redesign the work experience throughout the company, unveiling a “virtual first” working model in October 2020 in which remote work is the primary experience for all employees. Individual work spaces went by the wayside and offices located in areas with a high concentration of employees were converted into convening and collaborative spaces called Dropbox Studios for in-person work with teammates.
“There’s a lot we could say about Covid, but for me, the most significant thing is that we’ll look back at 2020 as the year we shifted permanently from working out of offices to primarily working out of screens. It’s a transition that’s been underway for a while, but Covid completely finished the swing,” says Houston.
Designing for the future workplace
Houston says the pandemic also prompted Dropbox to reevaluate its product line and begin thinking of ways to make improvements. “We’ve had this whole new way of working sort of forced on us. No one designed it; it just happened. Even tools like Zoom, Slack, and Dropbox were designed in and for the old world.”
Undergoing that process helped Dropbox gain clarity on where they could add value and led to the realization that they needed to get back to their roots. “In a lot of ways, what people need today in principle is the same thing they needed in the beginning — one place for all their stuff,” says Houston.
Dropbox reoriented its product roadmap to refocus efforts from syncing files to organizing cloud content. The company is focused on building toward this new direction with the release of new automation features that users can easily implement to better organize their uploaded content and find it quickly. Dropbox also recently announced the acquisition of Command E, a universal search and productivity company, to help accelerate its efforts in this space.
Houston views Dropbox as still evolving and sees many opportunities ahead in this new era of distributed work. “We need to design better tools and smarter systems. It’s not just the individual parts, but how they’re woven together.” He’s surprised by how little intelligence is actually integrated into current systems and believes that rapid advances in AI and machine learning will soon lead to a new generation of smart tools that will ultimately reshape the nature of work — “in the same way that we had a new generation of cloud tools revolutionize how we work and had all these advantages that we couldn’t imagine not having now.”
Founding roots
Houston famously turned his frustration with carrying USB drives and emailing files to himself into a demo for what became Dropbox.
After graduating from MIT in 2005 with a bachelor’s degree in electrical engineering and computer science, he teamed up with fellow classmate Arash Ferdowsi to found Dropbox in 2007 and led the company’s growth from a simple idea to a service used by 700 million people around the world today.
Houston credits MIT for preparing him well for his entrepreneurial journey, recalling that what surprised him most about his student experience was how much he learned outside the classroom. At the event, he stressed the importance of developing both sides of the brain to a select group of computer science and management students who were in attendance, and a broader live stream audience. “One thing you learn about starting a company is that the hardest problems are usually not technical problems; they’re people problems.” He says that he didn’t realize it at the time, but some of his first lessons in management were gained by taking on responsibilities in his fraternity and in various student organizations that evoked a sense of being “on the hook.”
As CEO, Houston has had a chance to look behind the curtain at how things happen and has come to appreciate that problems don’t solve themselves. While individual people can make a huge difference, he explains that many of the challenges the world faces right now are inherently multidisciplinary ones, which sparked his interest in the MIT Schwarzman College of Computing.
He says that the mindset embodied by the college to connect computing with other disciplines resonated and inspired him to initiate his biggest philanthropic effort to date sooner rather than later because “we don’t have that much time to address these problems.”
‘Paint Me a Picture’: NVIDIA Research Shows GauGAN AI Art Demo Now Responds to Words
A picture worth a thousand words now takes just three or four words to create, thanks to GauGAN2, the latest version of NVIDIA Research’s wildly popular AI painting demo.
The deep learning model behind GauGAN allows anyone to channel their imagination into photorealistic masterpieces — and it’s easier than ever. Simply type a phrase like “sunset at a beach” and AI generates the scene in real time. Add an additional adjective like “sunset at a rocky beach,” or swap “sunset” to “afternoon” or “rainy day” and the model, based on generative adversarial networks, instantly modifies the picture.
With the press of a button, users can generate a segmentation map, a high-level outline that shows the location of objects in the scene. From there, they can switch to drawing, tweaking the scene with rough sketches using labels like sky, tree, rock and river, allowing the smart paintbrush to incorporate these doodles into stunning images.
The new GauGAN2 text-to-image feature can now be experienced on NVIDIA AI Demos, where visitors to the site can experience AI through the latest demos from NVIDIA Research. With the versatility of text prompts and sketches, GauGAN2 lets users create and customize scenes more quickly and with finer control.
An AI of Few Words
GauGAN2 combines segmentation mapping, inpainting and text-to-image generation in a single model, making it a powerful tool to create photorealistic art with a mix of words and drawings.
The demo is one of the first to combine multiple modalities — text, semantic segmentation, sketch and style — within a single GAN framework. This makes it faster and easier to turn an artist’s vision into a high-quality AI-generated image.
Rather than needing to draw out every element of an imagined scene, users can enter a brief phrase to quickly generate the key features and theme of an image, such as a snow-capped mountain range. This starting point can then be customized with sketches to make a specific mountain taller or add a couple trees in the foreground, or clouds in the sky.
It doesn’t just create realistic images — artists can also use the demo to depict otherworldly landscapes.
Imagine for instance, recreating a landscape from the iconic planet of Tatooine in the Star Wars franchise, which has two suns. All that’s needed is the text “desert hills sun” to create a starting point, after which users can quickly sketch in a second sun.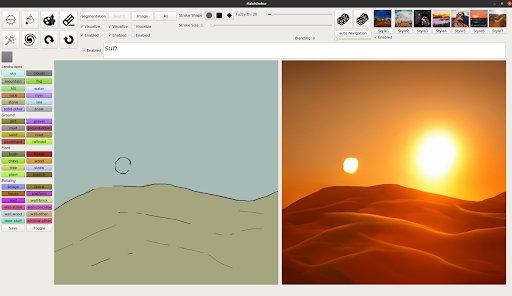
It’s an iterative process, where every word the user types into the text box adds more to the AI-created image.
The AI model behind GauGAN2 was trained on 10 million high-quality landscape images using the NVIDIA Selene supercomputer, an NVIDIA DGX SuperPOD system that’s among the world’s 10 most powerful supercomputers. The researchers used a neural network that learns the connection between words and the visuals they correspond to like “winter,” “foggy” or “rainbow.”
Compared to state-of-the-art models specifically for text-to-image or segmentation map-to-image applications, the neural network behind GauGAN2 produces a greater variety and higher quality of images.
The GauGAN2 research demo illustrates the future possibilities for powerful image-generation tools for artists. One example is the NVIDIA Canvas app, which is based on GauGAN technology and available to download for anyone with an NVIDIA RTX GPU.
NVIDIA Research has more than 200 scientists around the globe, focused on areas including AI, computer vision, self-driving cars, robotics and graphics. Learn more about their work.
The post ‘Paint Me a Picture’: NVIDIA Research Shows GauGAN AI Art Demo Now Responds to Words appeared first on The Official NVIDIA Blog.
Finding critical information during disasters
Lise St. Denis, a research scientist at the University of Colorado, says social media can be useful for responders. Now she’s helping them separate truly useful info from the noise.Read More
Run distributed hyperparameter and neural architecture tuning jobs with Syne Tune
Today we announce the general availability of Syne Tune, an open-source Python library for large-scale distributed hyperparameter and neural architecture optimization. It provides implementations of several state-of-the-art global optimizers, such as Bayesian optimization, Hyperband, and population-based training. Additionally, it supports constrained and multi-objective optimization, and allows you to bring your own global optimization algorithm.
With Syne Tune, you can run hyperparameter and neural architecture tuning jobs locally on your machine or remotely on Amazon SageMaker by changing just one line of code. The former is a well-suited backend for smaller workloads and fast experimentation on local CPUs or GPUs. The latter is well-suited for larger workloads, which come with a substantial amount of implementation overhead. Syne Tune makes it easy to use SageMaker as a backend to reduce wall clock time by evaluating a large number of configurations on parallel Amazon Elastic Compute Cloud (Amazon EC2) instances, while taking advantage of SageMaker’s rich set of functionalities (including pre-built Docker deep learning framework images, EC2 Spot Instances, experiment tracking, and virtual private networks).
By open-sourcing Syne Tune, we hope to create a community that brings together academic and industrial researchers in machine learning (ML). Our goal is to create synergies between these two groups by enabling academics to easily validate small-scale experiments at larger scale and industrials to use a broader set of state-of-the-art optimizers.
In this post, we discuss hyperparameter and architecture optimization in ML, and show you how to launch tuning experiments on your local machine and also on SageMaker for large-scale experiments.
Hyperparameter and architecture optimization in machine learning
Every ML algorithm comes with a set of hyperparameters that control the training algorithm or the architecture of the underlying statistical model. Typical examples of such hyperparameters for deep neural networks are the learning rate or the number of units per layer. Setting these hyperparameters correctly is crucial to obtain top-notch predictive performances.
To overcome the daunting process of trial and error, hyperparameter and architecture optimization aims to automatically find the specific configuration that maximizes the validation performance of our ML algorithm. Arguably, the easiest method to solve this global optimization problem is random search, where configurations are sampled from a predefined probability distribution. A more sample-efficient technique is Bayesian optimization, which maintains a probabilistic model of the objective function (here, the validation performance) to guide the search toward the global optimum in a sequential manner.
Unfortunately, with ever-increasing dataset sizes and ever-deeper models, training deep neural networks can be prohibitively slow to tune. Recent advances in hyperparameter optimization, such as Hyperband or MoBster, early stop the evaluation of configurations that are unlikely to achieve a good performance and reallocate the resources that would have been consumed to the evaluation of other candidate configurations. You can obtain further gains by using distributed resources to parallelize the tuning process. Because the time to train a deep neural network can vary widely across hyperparameter and architecture configurations, optimal resource allocation requires our optimizer to asynchronously decide which configuration to run next by taking the pending evaluation of other configurations into account. Next, we see how this works in practice and how we can run this either on a local machine or on SageMaker.
Tune hyperparameters with Syne Tune
We now detail how to tune hyperparameters with Syne Tune. First, you need a script that takes hyperparameters as arguments and reports results as soon as they are observed. Let’s look at a simplified example of a script that exposes the learning rate, dropout rate, and momentum as hyperparameters, and reports the validation accuracy after each training epoch:
from argparse import ArgumentParser
from syne_tune.report import Reporter

if __name__ == '__main__':
    parser = ArgumentParser()
    parser.add_argument('--lr', type=float)
    parser.add_argument('--dropout_rate', type=float)
    parser.add_argument('--momentum', type=float)

    args, _ = parser.parse_known_args()
    report = Reporter()

    for epoch in range(1, args.epochs + 1):
        # ... train model and get validation accuracy
        val_acc = compute_accuracy()

        # Feed the score back to Syne Tune.
        report(epoch=epoch, val_acc=val_acc)
The important part is the call to report. It enables you to transmit results to a scheduler that decides whether to continue the evaluation of a configuration, or trial, and later potentially uses this data to select new configurations. In our case, we use a common use case that trains a computer vision model adapted from SageMaker examples on GitHub.
We define the search space for the hyperparameters (dropout, learning rate, momentum) that we want to optimize by specifying the ranges:
from syne_tune.search_space import loguniform, uniform

max_epochs = 27
config_space = {
    "epochs": max_epochs,
    "lr": loguniform(1e-5, 1e-1),
    "momentum": uniform(0.8, 1.0),
    "dropout_rate": loguniform(1e-5, 1.0),
}
We also specify the scheduler we want to use, Hyperband in our case:
from syne_tune.optimizer.schedulers.hyperband import HyperbandScheduler

scheduler = HyperbandScheduler(
    config_space,
    max_t=max_epochs,
    resource_attr='epoch',
    searcher='random',
    metric="val_acc",
    mode="max",
)
Hyperband is a method that randomly samples configurations and early stops evaluation trials if they’re not performing well enough after a few epochs. We use this particular scheduler for our example, but many others are available; for example, switching searcher=bayesopt enables us to use MoBster, which uses a surrogate model to sample new configurations to evaluate.
We’re now ready to define and launch a hyperparameter tuning job. First, we define the number of workers that evaluate trials concurrently and how long the optimization should run in seconds. Importantly, we use the local backend to evaluate our training script “train_cifar100.py” (see the full code). This means that the tuning happens on the local machine with one Python subprocess per worker. See the following code:
from syne_tune.backend.local_backend import LocalBackend
from syne_tune.tuner import Tuner
from syne_tune.stopping_criterion import StoppingCriterion

tuner = Tuner(
    backend=LocalBackend(entry_point="train_cifar100.py"),
    scheduler=scheduler,
    stop_criterion=StoppingCriterion(max_wallclock_time=7200),
    n_workers=4,
)

tuner.run()
As soon as the tuning starts, Syne Tune outputs the following line:
INFO:syne_tune.tuner:results of trials will be saved on /home/ec2-user/syne-tune/train-cifar100-2021-11-05-13-29-01-468The log of the trials is stored in the aforementioned folder for further analysis. At any time during the tuning job, we can easily get the results obtained so far by calling load_experiment(“train-cifar100-2021-11-05-15-22-27-531”) and plotting the best result obtained since the start of the tuning job:
from syne_tune.experiments import load_experiment
tuning_experiment = load_experiment("train-cifar100-2021-11-05-15-22-27-531")
tuning_experiment.plot()
The following graph shows our results.

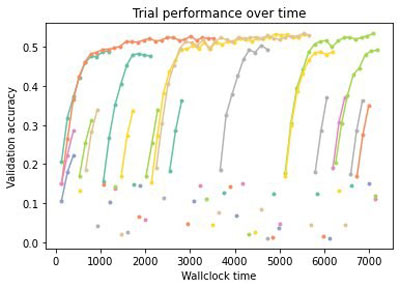
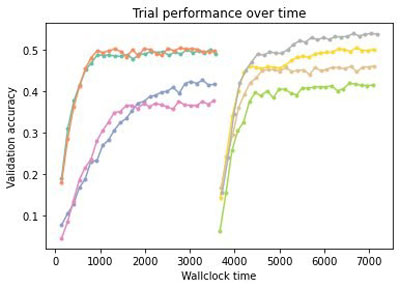
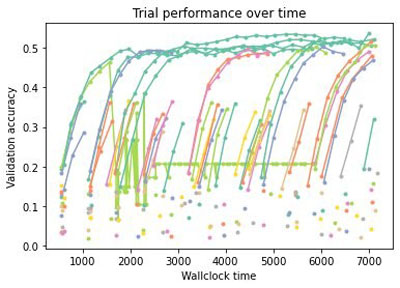
More fine-grained information is available if desired; the results obtained during tuning are stored as well as the scheduler and tuner state—namely, the state of the optimization process. For instance, we can plot the metric obtained for each trial over time (recall that we run four trials asynchronously). In the following figure, each trace represents the evaluation of a configuration as a function of the wall clock time; a dot is a trial stopped after one epoch.

We clearly see the effect of early stopping—only the most promising configurations are evaluated fully and poor performing configurations are stopped early, often after just evaluating a single epoch.
We can also easily switch to another scheduler, for example, random search or MoBster:
from syne_tune.optimizer.schedulers.fifo import FIFOScheduler

scheduler = FIFOScheduler(
    config_space,
    searcher='random',
    metric="val_acc",
    mode="max",
)
scheduler = HyperbandScheduler(
    config_space,
    max_t=max_epochs,
    resource_attr='epoch',
    searcher='bayesopt',
    metric="val_acc",
    mode="max",
)
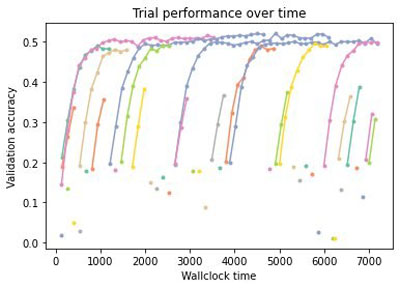
If we then run the same code with the new schedulers, we can compare all three methods. We see in the following figure that Hyperband only continues well-performing trials, and early stops poorly performing configurations.
Therefore, Hyperband evaluates many more configurations than random search (see the following figure), which uses resources to evaluate every configuration until the end. This can lead to drastic speedups of the tuning process in practice.
MoBster further improves over Hyperband by using a probabilistic surrogate model of the objective function.
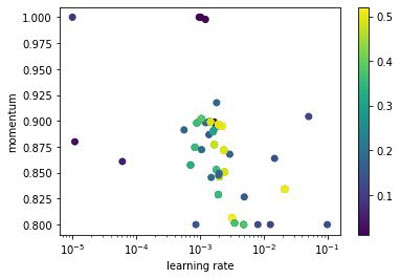
The following figure show all configurations that Hyperband samples during the tuning job.

In comparison, MoBster samples more promising configurations around the well-performing range (brighter color being better) of the search space instead of sampling them uniformly at random like Hyperband.
Run large-scale tuning jobs with Syne Tune and SageMaker
The previous example showed how to tune hyperparameters on a local machine. Sometimes, we need more powerful machines or a large number or workers, which motivates the use of a cloud infrastructure. Syne Tune provides a very simple way to run tuning jobs on SageMaker. Let’s look at how this can be achieved with Syne Tune.
We first upload the cifar100 dataset to Amazon Simple Storage Service (Amazon S3) so that it’s available on EC2 instances:
import sagemaker

sagemaker_session = sagemaker.Session()
bucket = sagemaker_session.default_bucket()
prefix = "sagemaker/DEMO-pytorch-cnn-cifar100"
role = sagemaker.get_execution_role()
inputs = sagemaker_session.upload_data(path="data", bucket=bucket, key_prefix="data/cifar100")
Next, we specify that we want trials to be run on the SageMaker backend. We use the SageMaker framework (PyTorch) in this particular example because we have a PyTorch training script, but you can use any SageMaker framework (such as XGBoost, TensorFlow, Scikit-learn, or Hugging Face).
A SageMaker framework is a Python wrapper that allows you to run ML code easily by providing a pre-made Docker image that works seamlessly on CPU and GPU for many framework versions. In this particular example, all we need to do is to instantiate the wrapper PyTorch with our training script:
from sagemaker.pytorch import PyTorch
from syne_tune.backend.sagemaker_backend.sagemaker_utils import get_execution_role
from syne_tune.backend.sagemaker_backend.sagemaker_backend import SagemakerBackend

backend = SagemakerBackend(
    sm_estimator=PyTorch(
        entry_point="./train_cifar100.py",
        instance_type="ml.g4dn.xlarge",
        instance_count=1,
        role=get_execution_role(),
        framework_version='1.7.1',
        py_version='py3',
    ),
    inputs=inputs,
)
We can now run our tuning job again, but this time we use 20 workers, each having their own GPU:
tuner = Tuner(
    backend=backend,
    scheduler=scheduler,
    stop_criterion=StoppingCriterion(max_wallclock_time=7200, max_cost=20.0),
    n_workers=20,
    tuner_name="cifar100-on-sagemaker"
)

tuner.run()
After each instance initiates a training job, you see the status update as in the local case. An important difference to the local backend is that the total estimated dollar cost is displayed as well the cost of workers.
trial_id      status  iter  dropout_rate  epochs        lr  momentum  epoch  val_acc  worker-time  worker-cost
        0  InProgress     1      0.003162      30  0.001000  0.900000    1.0   0.4518         50.0     0.010222
        1  InProgress     1      0.037723      30  0.000062  0.843500    1.0   0.1202         50.0     0.010222
        2  InProgress     1      0.000015      30  0.000865  0.821807    1.0   0.4121         50.0     0.010222
        3  InProgress     1      0.298864      30  0.006991  0.942469    1.0   0.2283         49.0     0.010018
        4  InProgress     0      0.000017      30  0.028001  0.911238      -        -                  -
        5  InProgress     0      0.000144      30  0.000080  0.870546      -        -            -            -
6 trials running, 0 finished (0 until the end), 387.53s wallclock-time, 0.04068444444444444$ estimated cost
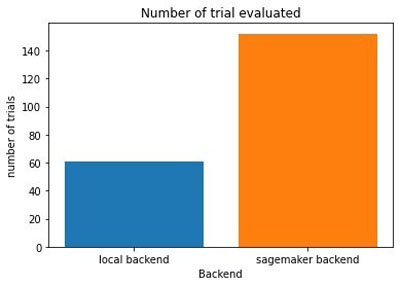
Because we specified max_wallclock_time=7200 and max_cost=20.0, the tuning job stops when the wall clock time or the estimated cost goes above the specified bound. In addition to providing an estimate of the cost, it can be optimized with our multi-objective optimizers (see the GitHub repo for an example). As shown in the following figures, the SageMaker backend allows you to evaluate many more configurations of hyperparameters and architectures in the same wall clock time than the local one and, as a result, increases the likelihood of finding a better configuration.
Conclusion
In this post, we saw how to use Syne Tune to launch tuning experiments on your local machine and also on SageMaker for large-scale experiments. To learn more about the library, check out our GitHub repo for documentation and examples that show, for instance, how to run model-based Hyperband, tune multiple objectives, or run with your own scheduler. We look forward to your contributions and seeing how this solution can address everyday tuning of ML pipelines and models.
About the Author
 David Salinas is a Sr Applied Scientist at AWS.
 Aaron Klein is an Applied Scientist at AWS.
 Matthias Seeger is a Principal Applied Scientist at AWS.
 Cedric Archambeau is a Principal Applied Scientist at AWS and Fellow of the European Lab for Learning and Intelligent Systems.