GFN Thursday: Dashing Into December With RTX 3080 Memberships and 20 New Games

With the holiday season comes many joys for GeForce NOW members.

This month, RTX 3080 membership preorders are activating in Europe.

Plus, we’ve made a list — and checked it twice. In total, 20 new games are joining the GeForce NOW library in December. This week, the list of nine games streaming on GFN Thursday includes new releases like Chorus, Icarus and Ruined King: A League of Legends Story.

The Next Generation of Cloud Gaming Arrives in Europe

The future is NOW, with RTX 3080 memberships delivering faster frame rates, lower latency and the longest session lengths.

Starting today, gamers in Europe who preordered a six-month GeForce NOW RTX 3080 membership will have their accounts enabled with the new tier of service. Rollouts for accounts will continue until all requests have been fulfilled.

A GeForce NOW RTX 3080 membership means streaming from the world’s most powerful gaming supercomputer, the GeForce NOW SuperPOD. RTX 3080 members enjoy a dedicated, high-performance cloud gaming rig, streaming at up to 1440p resolution and 120 frames per second on PCs and Macs, and 4K HDR at 60 FPS on SHIELD TV, with ultra-low latency rivaling many local gaming experiences.

Players can power up their gaming experience with a six-month RTX 3080 membership for $99.99, pending availability. The membership comes with higher resolutions, lower latency and the longest gaming session length — clocking in at eight hours — on top of the most control over in-game settings.

Enjoy the GeForce NOW library of over 1,100 games and 100 free-to-play titles with the kick of RTX 3080 streaming across your devices. For more information about RTX 3080 memberships, check out our membership FAQ.

Preorders are still available in Europe and North America.

Decked Out in December

December kicks off with 20 great games joining GeForce NOW this month, including some out-of-this-world additions.

Enter a dark new universe, teeming with mystery and conflict in Chorus. Join Nara, once the Circle’s deadliest warrior, now their most wanted fugitive, on her mission to destroy the dark cult that created her. Take her sentient ship, Forsaken, on a quest for redemption across the galaxy and beyond the boundaries of reality as they fight to unite resistance forces against the Circle.

Icarus on GeForce NOW
Meet your deadline or be left behind forever. So much for working from home.

Survive the savage alien wilderness of Icarus, a planet once destined to be a second Earth, now humanity’s greatest mistake. Drop from the safety of the orbital space station to explore, harvest, craft and hunt while seeking your fortune from exotic matter that can be found on the abandoned, deadly planet. Make sure to return to orbit before time runs out — those that get left behind are lost forever.

Ruined King: A League of Legends Story on GeForce NOW
Need more from the world of League of Legends? Ruined King: A League of Legends Story has you covered.

Rise against ruin in Ruined King: A League of Legends Story. Unite a party of League of Legends Champions, explore the port city of Bilgewater and set sail for the Shadow Isles to uncover the secrets of the deadly Black Mist in this turn-based RPG.

Brave the far corners of space in Chorus and Icarus, and lead legends in Ruined King: A League of Legends Story alongside the nine new games ready to stream this GFN Thursday.

Releasing this week:

Also coming in December:

We make every effort to launch games on GeForce NOW as close to their release as possible, but, in some instances, games may not be available immediately.

More Fun From November

Jurassic World Evolution 2 on GeForce NOW
Explore a bold new era and build your park full of dinosaurs, complete with DLSS, in Jurassic World Evolution 2.

In addition to the 17 games announced to arrive in November, members can check out the following extra games that made it to the cloud last month:

Unfortunately, a few games that we planned to release last month did not make it:

  • Bakery Simulator (Steam), new launch date
  • STORY OF SEASON: Pioneers of Olive Town (Steam), coming to GeForce NOW in the near future

With these new additions arriving just in time for the holidays, we’ve got a question for you about your gaming wish list:

your holiday wish list, but there’s only room for 1 game you can stream in the cloud

which one would it be? 🎁

🌩 NVIDIA GeForce NOW (@NVIDIAGFN) December 1, 2021

Share your answers on Twitter or in the comments below.

The post GFN Thursday: Dashing Into December With RTX 3080 Memberships and 20 New Games appeared first on The Official NVIDIA Blog.

Read More

Fotokite’s Autonomous Drone Gives Firefighters an Eye in the Sky

First responders don’t have time on their side.

Whether fires, search-and-rescue missions or medical emergencies, their challenges are usually dangerous and time-sensitive.

Using autonomous technology, Zurich-based Fotokite is developing a system to help first responders save lives and increase public safety.

Fotokite Sigma is a fully autonomous tethered drone, built with the NVIDIA Jetson platform, that drastically improves the situational awareness for first responders, who would otherwise have to rely on manned helicopters to get an aerial perspective.

Tethered to a ground station, either in a transportable case or attached to an emergency vehicle, Fotokite Sigma requires no skilled drone pilot, taking no one away from the scene.

Supported by the compute power of the NVIDIA Jetson platform in the grounded base, Fotokite Sigma covers the vast majority of situations where first responders need an aerial perspective during an emergency. Whether it’s an aerial search for someone off the side of a road, a quick look at a rooftop for hotspots or getting eyes above an active fire to track progress and plan resources, Sigma employs computer vision to send information directly to a tablet, with photogrammetry capabilities and real-time situational awareness.

Fotokite is a member of NVIDIA Inception, a program that offers go-to-market support, expertise and technology assistance for startups working in AI, data science and high performance computing.

Fighting Fire With Data

Firefighters depend on accurate, timely information to help them make important situational decisions.

Fotokite Sigma’s thermal camera can determine where a fire is, as well as where the safest location to enter or exit a structure would be. It can highlight hotspots that need attention and guide firefighters on whether their water is hitting the right areas, even through heavy smoke or with limited visibility at night.

Once the fire is under control, Sigma can monitor the area for potential flare-ups, so firefighters can prioritize resources to act quickly and efficiently.

“Everything from autonomous flight and real-time data delivery to the user interface and real-time streaming is made as simple as pushing a button, which means first responders can focus on saving lives and keeping people safe,” said Chris McCall, CEO of Fotokite.

Fire departments across the U.S. and Europe are using Fotokite Sigma, in both major cities and rural areas.

“The next area of focus for us is increasing the situational awareness and decision-making power in an emergency situation,” said McCall. “Using NVIDIA technology, we can easily introduce new capabilities to our systems.”

In addition to rolling out availability of Sigma across more geographies, Fotokite is working with partners to deliver data in real time, something that might have previously taken several hours to accomplish.

Providing a 3D render of an active emergency situation, tracking first responders, and supplying other intelligent data layers, for example, could be invaluable to first responders, helping them visualize a scene as it unfolds.

Learn more about how NVIDIA partners Lockheed Martin and OroraTech are using accelerated computing technology to fight wildfires.  

Learn more about NVIDIA Inception and the NVIDIA Jetson platform. Watch public sector sessions from GTC on demand. 

The post Fotokite’s Autonomous Drone Gives Firefighters an Eye in the Sky appeared first on The Official NVIDIA Blog.

Read More

Announcing support for extracting data from identity documents using Amazon Textract

Creating efficiencies in your business is at the top of your list. You want your employees to be more productive, have them focus on high impact tasks, or find ways to implement better processes to improve the outcomes to your customers. There are various ways to solve this problem, and more companies are turning to artificial intelligence (AI) and machine learning (ML) to help. In the financial services sector, there is the creation of new accounts online, or in healthcare there are new digital platforms to schedule and manage appointments, which require users to fill out forms. These can be error prone, time consuming, and certainly improved upon. Some businesses (or organizations) have attempted to simplify and automate this process by including identity document uploads, such as a drivers’ license or passport. However, the technology available is template-based and doesn’t scale well. You need a solution to help automate the extraction of information from identity documents to enable your customers to open bank accounts with ease, or schedule and manage appointments online using accurate information.

Today, we are excited to announce a new API to Amazon Textract called Analyze ID that will help you automatically extract information from identification documents, such as driver’s licenses and passports. Amazon Textract uses AI and ML technologies to extract information from identity documents, such as U.S. passports and driver’s licenses, without the need for templates or configuration. You can automatically extract specific information, such as date of expiry and date of birth, as well as intelligently identify and extract implied information, such as name and address.

We will cover the following topics in this post:

  • How Amazon Textract processes identity documents
  • A walkthrough of the Amazon Textract console
  • Structure of the Amazon Textract AnalyzeID API response
  • How to process the response with the Amazon Textract parser library

Identity Document processing using Amazon Textract

Companies have accelerated the adoption of digital platforms, especially in light of the COVID-19 pandemic. Organizations are now offering their users the flexibility to use smartphones and other mobile devices for everyday tasks—such as signing up for new accounts, scheduling appointments, completing employment applications online, and many more. Even though your users fill out an online form with personal and demographic information, the process is manual and error-prone, and it can affect the application decision if submitted incorrectly. Some of you have simplified and automated the online application process by asking your users to upload a picture of their ID, and then use market solutions to extract data and prefill the applications automatically. This automation can help you minimize data entry errors and potentially reduce end user abandonments in application completions. However, even the current market solutions are limited in what they can achieve. They often fall short when extracting all of the required fields accurately due to the rich background image on IDs or the inability to recognize names and addresses and the fields associated with them. For example, the Washington State driver license lists home addresses with the key “8”. Another major challenge with the current market solutions is that IDs have a different template or format depending on the issuing country and state, and even those can change from time-to-time. Therefore, the traditional template-based solutions do not work at scale. Even traditional OCR solutions are expensive and slow, especially when combined with human reviews, and they don’t move the needle in digital automation. These approaches provide poor results, thereby inhibiting your organization from scaling and becoming efficient. You need a solution to help automate the extraction of information from identity documents to enable your customers to open bank accounts with ease, or schedule and manage appointments online with accurate information.

To solve this problem, you can now use Amazon Textract’s newly launched Analyze ID API, powered by ML instead of a traditional template matching solution, to process identity documents at scale. It works with U.S. driver’s licenses and passports to extract relevant data, such as name, address, date of birth, date of expiry, place of issue, etc. Analyze ID API returns two categories of data types: (A) Key-value pairs available on IDs, such as Date of Birth, Date of Issue, ID #, Class, Height, and Restrictions. (B) Implied fields on the document that may not have explicit keys, such as Name, Address, and Issued By. The key-value pairs are also normalized into a common taxonomy (for example, Document ID number = LIC# or Passport No.). This lets you easily combine information across many IDs that use different terms for the same concept.

Amazon Textract console walkthrough

Before we get started with the API and code samples, let’s review the Amazon Textract console. The following images show examples of a passport and a drivers’ license document on the Analyze Document output tab of the Amazon Textract console. Amazon Textract automatically and easily extracts key-value elements, such as the type, code, passport number, surname, given name, nationality, date of birth, place of birth, and more fields, from the sample image.

The following is another example with a sample drivers’ license. Analyze ID extracts key-value elements such as class, as well as implied fields such as first name, last name, and address. It also normalizes keys, such as “Document number” from “4d NUMBER” as “820BAC729CBAC”, and “Date of birth” from “DOB” as “03/18/1978”, so that it is standardized across IDs.

AnalyzeID API request

In this section, we explain how to pass the ID image in the request and how to invoke the Analyze ID API. The input document is either in a byte array format or present on an Amazon Simple Storage Service (Amazon S3) object. You pass image bytes to an Amazon Textract API operation by using the Bytes property. For example, you can use the Bytes property to pass a document loaded from a local file system. Image bytes passed by using the Bytes property must be base64 encoded. Your code might not need to encode document file bytes if you’re using an AWS SDK to call Amazon Textract API operations. Alternatively, you can pass images stored in an S3 bucket to an Amazon Textract API operation by using the S3Object property. Documents stored in an S3 bucket don’t need to be base64 encoded.

The following examples show how to call the Amazon Textract AnalyzeID function in Python and use the CLI command.

Sample Python code:

import boto3

textract = boto3.client('textract')

# Call textract AnalyzeId by passing photo on local disk
documentName = "us-driver-license.jpeg"
with open(documentName, 'rb') as document:
    imageBytes = bytearray(document.read())

response = textract.analyze_id(
    DocumentPages=[{"Bytes":imageBytes}]
)

# Call textract AnalyzeId by passing photo on S3
response= textract.analyze_id(
    DocumentPages=[
        {
            "S3Object":{
                "Bucket":"BUCKET_NAME",
                "Name":"PREFIX_AND_FILE_NAME"
            }
        }
    ]
)

Sample CLI command:

aws textract analyze-id --document-pages '[{"S3Object":{"Bucket":"BUCKET_NAME","Name":"PREFIX_AND_FILE_NAME1"}},{"S3Object":{"Bucket":"BUCKET_NAME","Name":"PREFIX_AND_FILE_NAME2"}}]' --region us-east-1

Analyze ID API response

In this section, we explain the Analyze ID response structure using the sample passport image. The following is the sample passport image and the corresponding AnalyzeID response JSON.

Sample abbreviated response

{
  "IdentityDocuments": [
    {
      "DocumentIndex": 1,
      "IdentityDocumentFields": [
        {
          "Type": {
            "Text": "FIRST_NAME"
          },
          "ValueDetection": {
            "Text": "LI",
            "Confidence": 98.9061508178711
          }
        },
        {
          "Type": {
            "Text": "LAST_NAME"
          },
          "ValueDetection": {
            "Text": "JUAN",
            "Confidence": 99.0864486694336
          }
        },
        {
          "Type": {
            "Text": "DATE_OF_ISSUE"
          },
          "ValueDetection": {
            "Text": "09 MAY 2019",
            "NormalizedValue": {
              "Value": "2019-05-09T00:00:00",
              "ValueType": "Date"
            },
            "Confidence": 98.68514251708984
          }
        },
        {
          "Type": {
            "Text": "ID_TYPE"
          },
          "ValueDetection": {
            "Text": "PASSPORT",
            "Confidence": 99.3958740234375
          }
        },
        {
          "Type": {
            "Text": "ADDRESS"
          },
          "ValueDetection": {
            "Text": "",
            "Confidence": 99.62577819824219
          }
        },
        {
          "Type": {
            "Text": "COUNTY"
          },
          "ValueDetection": {
            "Text": "",
            "Confidence": 99.6469955444336
          }
        },
        {
          "Type": {
            "Text": "PLACE_OF_BIRTH"
          },
          "ValueDetection": {
            "Text": "NEW YORK CITY",
            "Confidence": 98.29044342041016
          }
        }
      ]
    }
  ],
  "DocumentMetadata": {
    "Pages": 1
  },
  "AnalyzeIDModelVersion": "1.0"
}

The AnalyzeID JSON output contains AnalyzeIDModelVersionDocumentMetadata and IdentityDocuments, and each IdentityDocument item contains IdentityDocumentFields.

The most granular level of data in the IdentityDocumentFields response consists of Type and ValueDetection.

Let’s call this set of data an IdentityDocumentField element. The preceding example illustrates an AnalyzeDocument containing the Type with the Text and Confidence, and the ValueDetection which includes the Text, the Confidence, and the optional field NormalizedValue.

In the preceding example, Amazon Textract detected 44 key-value pairs, including PLACE_OF_BIRTH: New York City For the list of fields extracted from identity documents, refer to the Amazon Textract Developer Guide.

In addition to the detected content, the Analyze ID API provides information such as confidence scores for detected elements. It gives you control over how you consume extracted content and integrate it into your applications. For example, you can flag any elements that have a confidence score under a certain threshold for manual review.

The following is the Analyze ID response structure using the sample driving license image:

Sample abbreviated response

{
  "IdentityDocuments": [
    {
      "DocumentIndex": 1,
      "IdentityDocumentFields": [
        {
          "Type": {
            "Text": "FIRST_NAME"
          },
          "ValueDetection": {
            "Text": "GARCIA",
            "Confidence": 99.48689270019531
          }
        },
        {
          "Type": {
            "Text": "LAST_NAME"
          },
          "ValueDetection": {
            "Text": "MARIA",
            "Confidence": 98.49578857421875
          }
        },
        {
          "Type": {
            "Text": "STATE_NAME"
          },
          "ValueDetection": {
            "Text": "MASSACHUSETTS",
            "Confidence": 98.30329132080078
          }
        },
        {
          "Type": {
            "Text": "DOCUMENT_NUMBER"
          },
          "ValueDetection": {
            "Text": "736HDV7874JSB",
            "Confidence": 95.6583251953125
          }
        },
        {
          "Type": {
            "Text": "EXPIRATION_DATE"
          },
          "ValueDetection": {
            "Text": "01/20/2028",
            "NormalizedValue": {
              "Value": "2028-01-20T00:00:00",
              "ValueType": "Date"
            },
            "Confidence": 98.64090728759766
          }
        },
        {
          "Type": {
            "Text": "DATE_OF_ISSUE"
          },
          "ValueDetection": {
            "Text": "03/18/2018",
            "NormalizedValue": {
              "Value": "2018-03-18T00:00:00",
              "ValueType": "Date"
            },
            "Confidence": 98.7216567993164
          }
        },
        {
          "Type": {
            "Text": "ID_TYPE"
          },
          "ValueDetection": {
            "Text": "DRIVER LICENSE FRONT",
            "Confidence": 98.71986389160156
          }
        },
        {
          "Type": {
            "Text": "PLACE_OF_BIRTH"
          },
          "ValueDetection": {
            "Text": "",
            "Confidence": 99.62541198730469
          }
        }
      ]
    }
  ],
  "DocumentMetadata": {
    "Pages": 1
  },
  "AnalyzeIDModelVersion": "1.0"
}

Process Analyze ID response with the Amazon Textract parser library

You can use the Amazon Textract response parser library to easily parse the JSON returned by Amazon Textract AnalyzeID. The library parses JSON and provides programming language specific constructs to work with different parts of the document.

Install the Amazon Textract Response Parser library:

python -m pip install amazon-textract-response-parser

The following example shows how to deserialize Textract AnalyzeID JSON response to an object:

# j holds the Textract response JSON
from trp.trp2_analyzeid import TAnalyzeIdDocumentSchema
t_doc = TAnalyzeIdDocumentSchema().load(json.loads(j))

The following example shows how to serialize a Textract AnalyzeId object to dictionary:

from trp.trp2_analyzeid import TAnalyzeIdDocumentSchema
t_doc = TAnalyzeIdDocumentSchema().dump(t_doc)

Summary

In this post, we provided an overview of the new Amazon Textract AnalyzeID API to quickly and easily retrieve structured data from U.S. government-issued drivers’ licenses and passports. We also described how you can parse the Analyze ID response JSON. For more information, see the Amazon Textract Developer Guide, or check out the developer console and try out Analyze ID API.


About the Authors

Wrick Talukdar is a Senior Solutions Architect with AWS and is based in Calgary, Canada. Wrick works with enterprise AWS customers to transform their business through innovative use of cloud technologies. Outside of work, he enjoys reading and photography.

Lana Zhang is a Sr. Solutions Architect at AWS with expertise in Machine Learning. She is responsible for helping customers architect scalable, secure, and cost-effective workloads on AWS.

Read More

Evolution of Cresta’s machine learning architecture: Migration to AWS and PyTorch

Cresta Intelligence, a California-based AI startup, makes businesses radically more productive by using Expertise AI to help sales and service teams unlock their full potential. Cresta is bringing together world-renowned AI thought-leaders, engineers, and investors to create a real-time coaching and management solution that transforms sales and increases service productivity, weeks after application deployment. Cresta enables customers such as Intuit, Cox Communications, and Porsche to realize a 20% improvement in sales conversion rate, 25% greater average order value, and millions of dollars in additional annual revenue.

This post discusses Cresta’s journey as they moved from a multi-cloud environment to consolidating their machine learning (ML) workloads on AWS. It also gives a high-level view of their legacy and current training and inference architectures. Cresta chose to migrate to using Meta’s PyTorch ML framework due to its ease of use, efficiency, and enterprise adoption. This includes their use of TorchServe for ML inference in production.

Machine learning at Cresta

Cresta uses multiple natural language processing (NLP) models in their production applications. The Suggestions model monitors the conversation between the call center agent and the customer and generates a full form response, which the agent can use to respond to the customer. A second model called Smart Compose predicts the next few words to auto-complete the agent’s response while typing. Cresta also uses other ML models for intent classification and named entity recognition.

Cresta was born in the cloud and initially used multiple public clouds to build architectures to store, manage, and process datasets, and to train and deploy ML models. As Cresta’s development and production workloads grew in size, managing resources, moving data, and maintaining ML pipelines across multiple clouds became increasingly tedious, time-consuming to manage, and added to operational costs. As a result, Cresta took a holistic view of their siloed ML pipelines and chose AWS to host all their ML training and inference workloads.

“Using multiple cloud providers required us to effectively double our efforts on security and compliance, as each cloud provider needed similar effort to ensure strict security limitations,” says Jack Lindamood, Head of Infrastructure at Cresta. “It also split our infrastructure expertise as we needed to become experts in services provided by multiple clouds. We chose to consolidate ML workloads on AWS because of our trust in their commitment to backward-compatibility, history of service availability, and strong customer support on both the account and technical side.”

Multi-cloud environments and workload consolidation

At a high level, the following diagram captures Cresta’s previous architecture spanning two public cloud service providers. The main datasets were hosted and maintained on Amazon Aurora, and training was performed outside AWS, on another cloud service provider, using custom chips. Based on training requirements, a subset of the data would be curated from Aurora, copied to Amazon Simple Storage Service (Amazon S3), then exported out of AWS into the other cloud where Cresta trained their NLP models. The size of data moved each time ranged from 1–100 GB. The ML training pipeline was built around Argo Workflows, which is an open-source workflow engine where each step in a workflow is implemented in a container. Once trained, the models were automatically evaluated for accuracy before manual checks. The models that passed this validation were imported back to AWS, containerized, and deployed into production using Amazon Elastic Kubernetes Service (Amazon EKS). Cresta’s production inference was hosted on AWS.

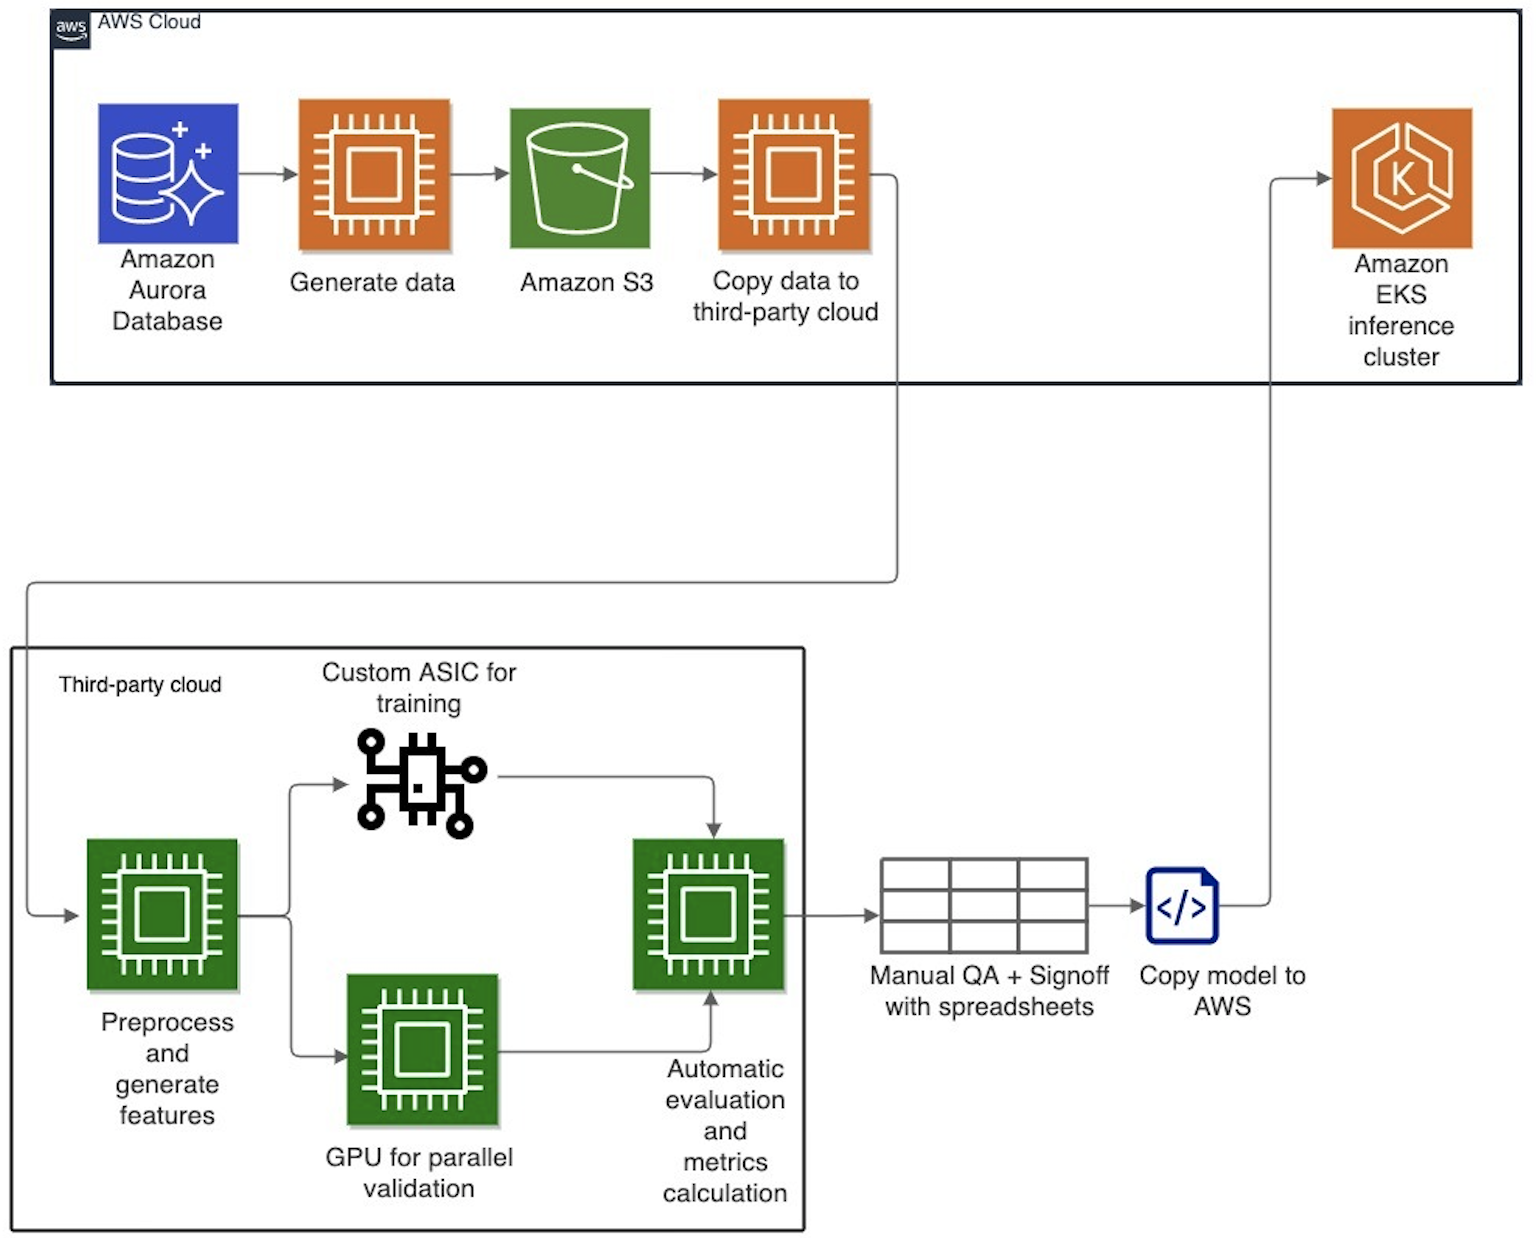
This approach initially worked well for Cresta when the number of datasets and models were limited and performance requirements were low. As the complexity of their applications grew over time, Cresta faced multiple challenges in managing environments on two cloud providers. Security audits had to be performed on both cloud environments, which prolonged release cycles. Keeping the datasets current while moving large amounts of data and trained models between environments was challenging. It also became increasingly difficult to maintain the system’s architecture—the workflow often broke at the cloud boundaries, and resource partitioning between clouds was difficult to optimize. This multi-cloud complexity prevented Cresta from scaling faster and cost-effectively.

To overcome these challenges, Cresta decided to consolidate all their ML workloads on AWS. The key drivers to choosing AWS for all development and production ML workloads were AWS’s breadth of feature-rich services like Amazon Elastic Compute Cloud (Amazon EC2), Amazon S3, Amazon EKS, EC2 Spot Instances, and databases, the built-in cost-optimization features in these services, native support for ML frameworks like PyTorch, and superior technical support. The AWS team worked closely with Cresta to architect the ML training pipeline with Amazon EKS and Spot Instances, and optimized the model training and inference performance. In addition to developing custom ML models, Cresta uses NLP models from Hugging Face, which are supported on AWS GPU instances out of the box for training and inference. To train these models on AWS, Cresta used P3 instances (based on NVIDIA V100 GPUs) of varying sizes.

As a result of this migration, the teams at Cresta no longer had to worry about managing ML pipelines across separate clouds, thereby significantly improving productivity. The Amazon Aurora PostgreSQL database was integrated into the development pipeline, removing the need to use an intermediate storage system to save results or to export datasets externally. Dataset generation, model training, and inferencing are now all performed on the same cloud environment, which has simplified operations, improved reliability, and reduced the complexity of the build and deploy toolchain.

Model training and validation on AWS

The following figure represents the development and training pipeline after the migration to AWS. The pipeline uses Argo Workflows, an open-source container-native workflow engine for orchestrating parallel jobs in Kubernetes. Argo Workflows is deployed on Amazon EKS in a Multi-AZ model.

For the Suggestions model use case, Cresta uses chat data for training, and these datasets are stored in the Aurora database. When a model is ready to be trained, data generation scripts query the database, identify the datasets, and develop a snapshot of the dataset for training. C5.4xlarge instances are used to handle these operations. The preprocessing step converts the dataset to a low level where it is ready to be fed to the model. Training language models requires two preprocessing steps: serialization and tokenization. Structured data is converted to a single stream of characters, finalizing the string representation of the data. This is followed by the tokenization step, where the serial string representation is converted to a vector of integers. Preprocessing data helps accelerate the training process and hyperparameter sweeps. To train the Suggestions models, Cresta serializes data during preprocessing. Tokenization is handled during the training phase.

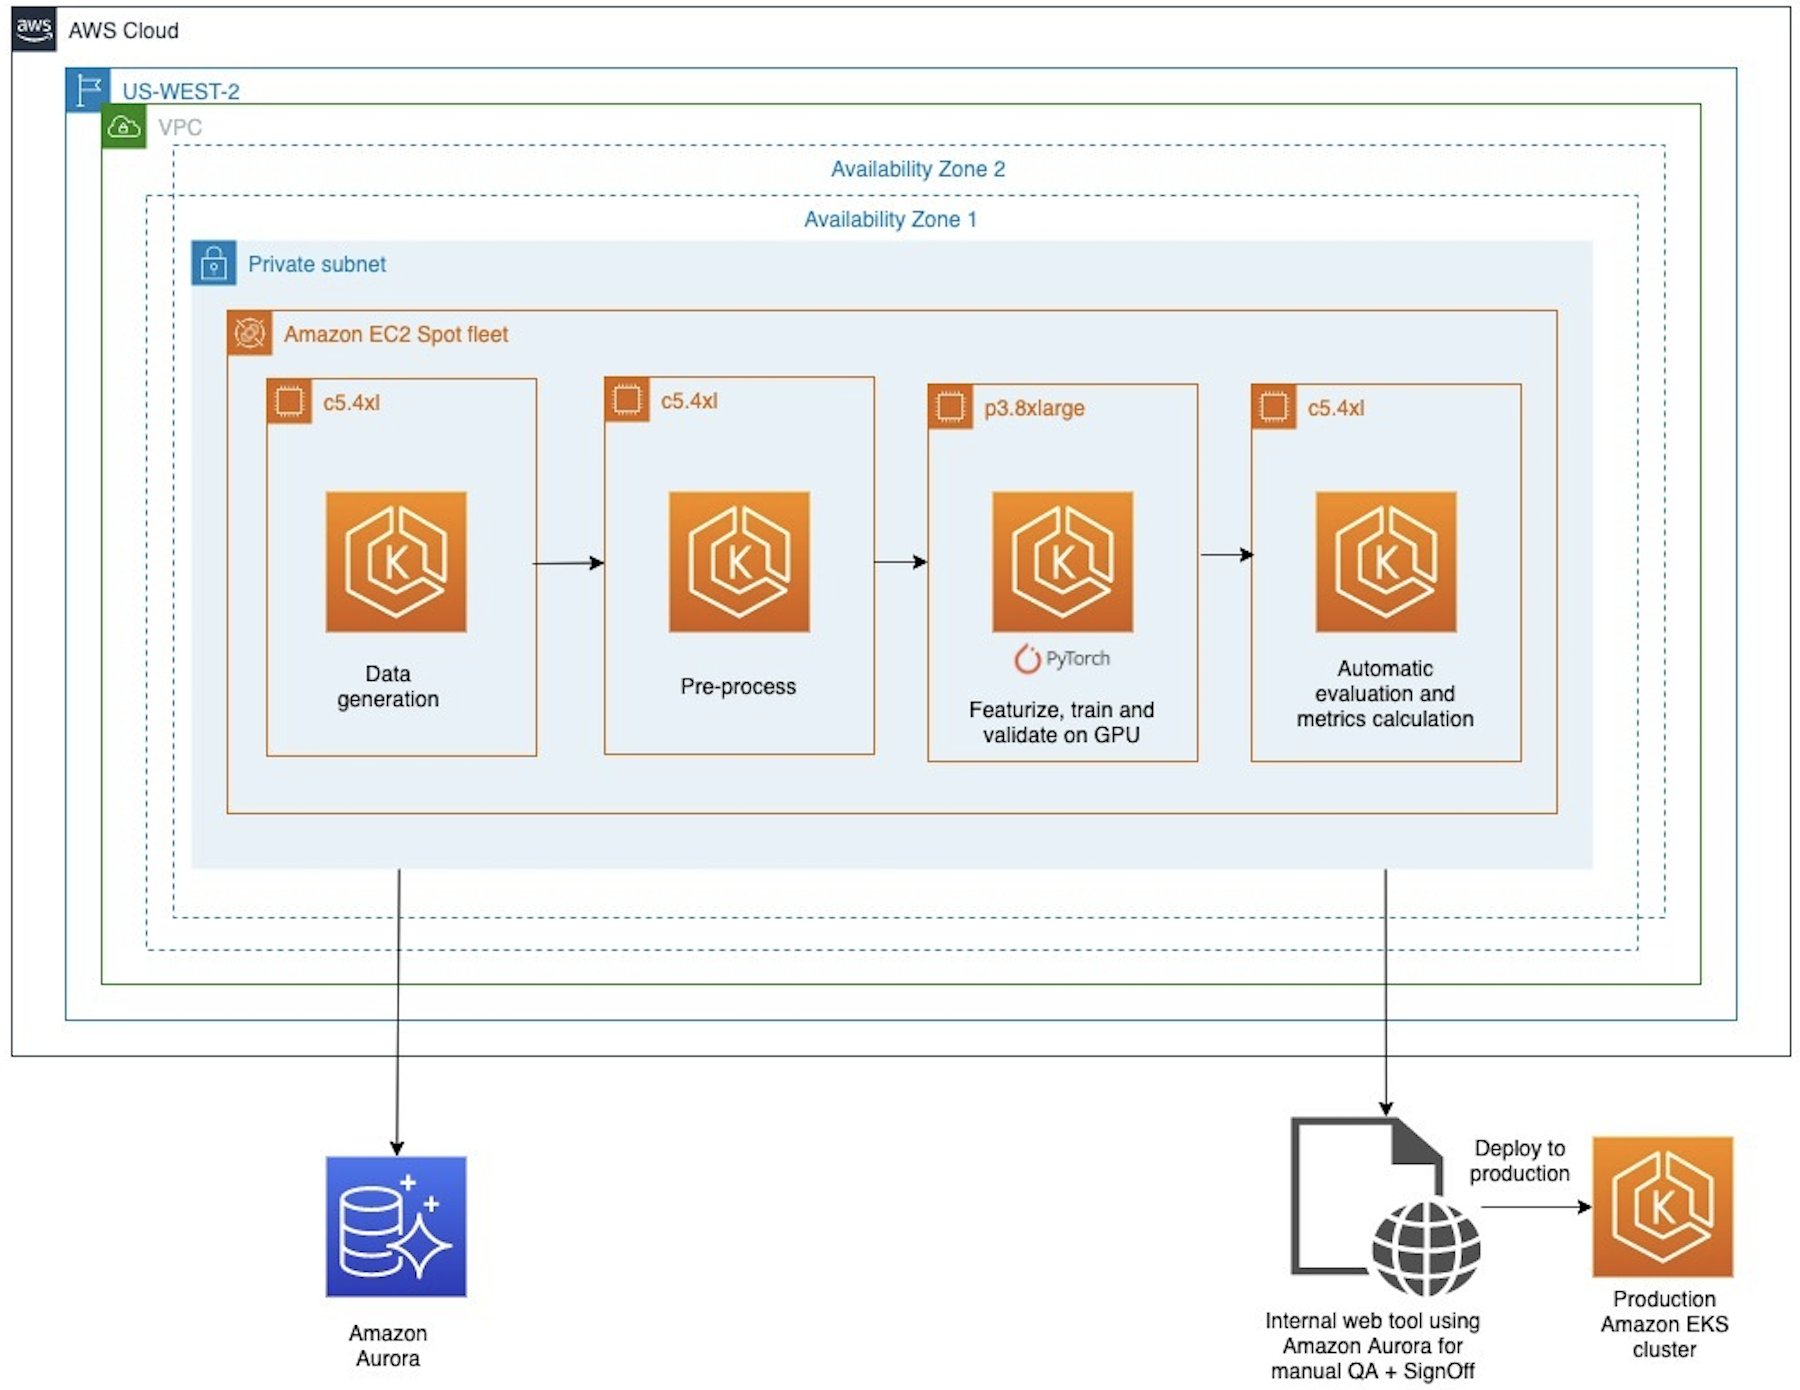
During training, a blind validation of the model is performed over a huge dataset of past chats during the epochal training. The epochal training continues only when the model shows improvement, otherwise the training step is stopped early, thereby preserving compute resources.

In the legacy architecture, model training was performed on a custom training chip followed by a large model validation step to check for accuracy improvement at the end of each epoch. Because the validation dataset was large, model validation couldn’t be performed on the same custom training chip, and had to be performed across multiple GPUs. This approach had single points of failure that could stall the training job. This was because the process required the launch of asynchronous threads to monitor the validation process and periodically poll to check for completion. Using the same hardware accelerator for both training and validation allows for seamless management of this process. After the training and validation steps are performed, manual verification of the training results is performed before deploying the model to the production environment.

To optimize for compute costs for the training process, Cresta used EC2 Spot Instances, which is spare Amazon EC2 capacity available at up to 90% discount compared to On-Demand pricing. For production inference workloads, Cresta uses G4dn instances, which are the industry’s most cost-effective and versatile GPU instances for deploying ML models such as image classification, object detection, and speech recognition. To minimize interruptions, Cresta uses a launch template that specifies multiple instance sizes, including g4dn.xlarge and g4dn.2xlarge. Cresta uses checkpoints and dataset loading from Amazon S3 to allow for model training to be restarted from the point of interruption. This makes it possible to train models efficiently with EC2 Spot Instances, which can be reclaimed with a 2-minute notice.

Model inference on AWS

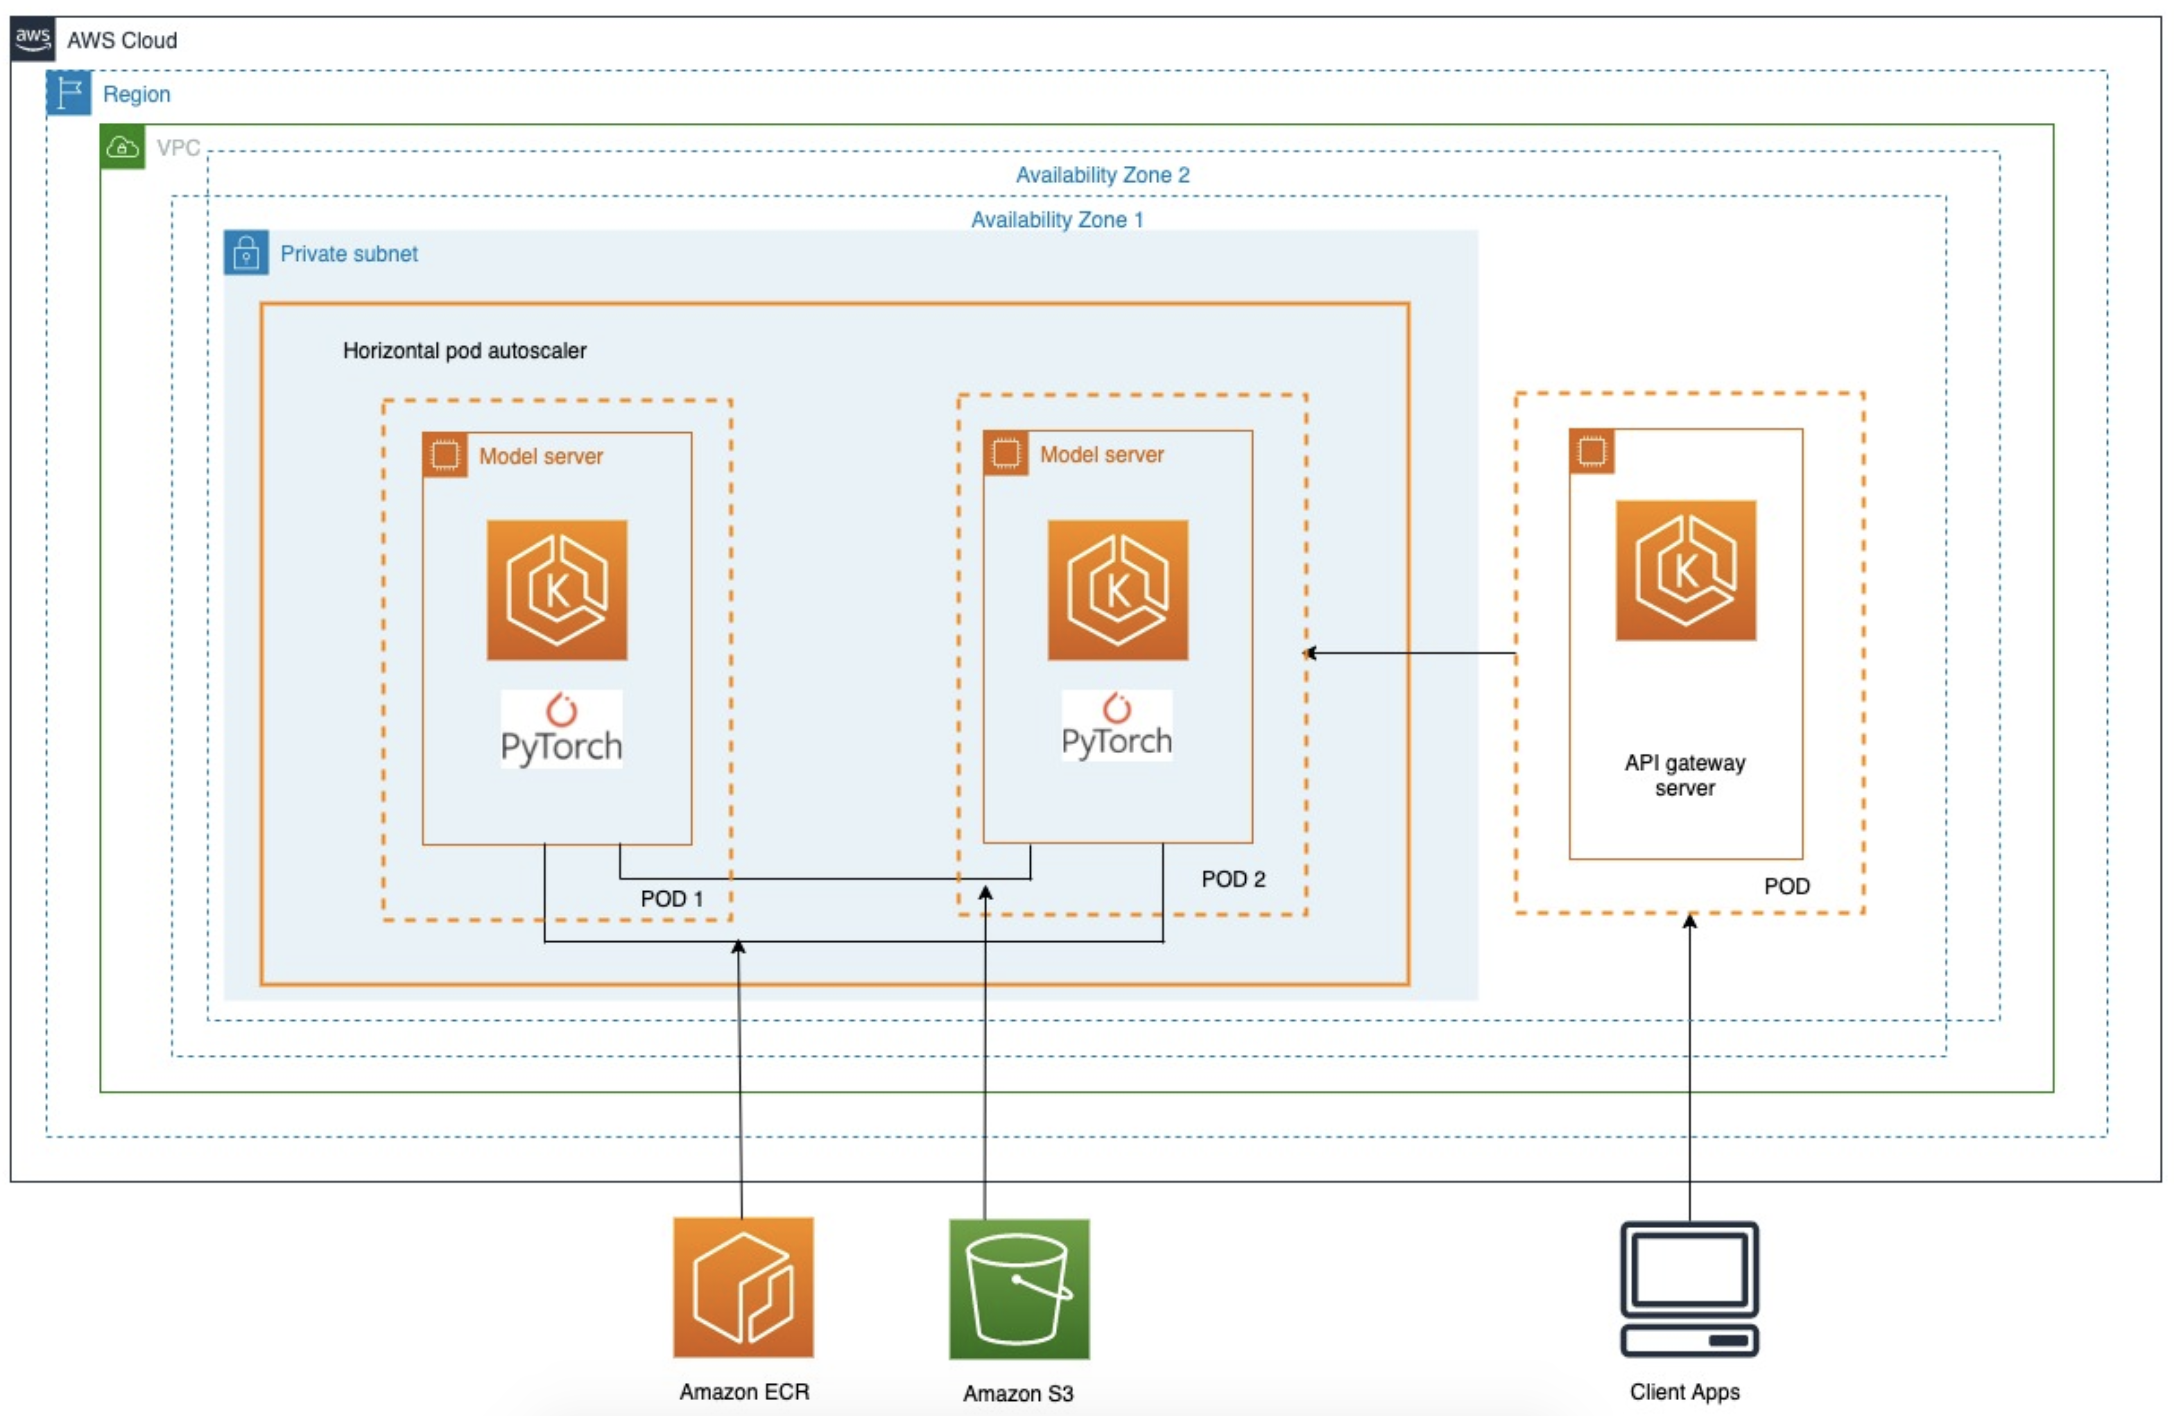
The trained models are stored on Amazon S3 and are served using PyTorch TorchServe on an Amazon EKS cluster using G4dn instances (NVIDIA T4 GPUs) instances. The cluster is deployed across multiple Availability Zones, and the node groups include GPUs to enable high throughput and low-latency inferences. The model server pods are deployed on these nodes and are horizontally scaled to meet the throughput requirements of any given customer. As the models get retrained, the pods are restarted to pick up and serve the latest models. One Amazon EKS cluster serves all the customers, and customers are logically separated based on the Kubernetes namespace.

Migration to PyTorch

To support the growing capabilities of their products, Cresta needed to use and fine-tune newer NLP models faster. PyTorch, being popular among the research community, drives much of the innovation in NLP and natural language understanding (NLU) areas. Cresta handpicks NLP models from Hugging Face to retool and fine-tune for reuse, and most models available are based on PyTorch. Lastly, Cresta’s ML teams found PyTorch to be simpler than other frameworks to learn, ramp up, and build on.

“We are moving to PyTorch because most research in the NLP world is migrating to PyTorch,” says Saurabh Misra, AI Lead at Cresta. “A large ecosystem around PyTorch, like the Hugging Face library, enables us to quickly utilize the latest advancements in NLP without rewriting code. PyTorch is also very developer friendly and allows us to develop new models quickly with its ease of use, model debuggability, and support for efficient deployments.”

Because of these reasons, Cresta has chosen to migrate all their ML workloads to use PyTorch for model training and inference, aligning with the ongoing industry trend. Specifically, Cresta uses parallel training on 4 GPUs using torch.nn.DataParallel provided with the Hugging Face Trainer. Before using PyTorch, Cresta had to develop custom implementations of parallel training. This requirement was eliminated with the use of PyTorch, because PyTorch enables the implementation of a variety of training backends and methods, essentially for free. For large-scale inference in production, Cresta uses TorchServe as a model server because of its ease of use and out-of-the-box monitoring of the model, which helps with auto scaling the deployment according to the traffic.

Conclusion and next steps

In this post, we discussed how Cresta moved from a multi-cloud environment to consolidating their ML workloads on AWS. By moving all development and production ML workloads to AWS, Cresta is able to streamline efforts, better optimize for cost, and take advantage of the breadth and depth of AWS services. To further improve performance and cost-effectiveness, Cresta is investigating the following topics:

  • Pack multiple models into a single chip using bin-packing for optimal use of resources (memory and compute). This also helps with A/B tests on model performance.
  • Deploy models for inference using AWS Inferentia as a way to improve inference performance while keeping costs low.
  • Investigate different ways of static compilation of model graphs to reduce the compute required during inference. This will further improve the cost-effectiveness of Cresta’s deployments.

To dive deeper into developing scalable ML architectures with EKS, please refer these two reference architectures – distributed training with TorchElastic and serving 3000 models on EKS with AWS Inferentia.

The content and opinions in this post are those of the third-party author and AWS is not responsible for the content or accuracy of this post.


About the Authors

Jaganath Achari is a Sr. Startup Solutions Architect at Amazon Web Services based out of San Francisco. He focuses on providing technical guidance to startup customers, helping them architect and build secure and scalable solutions on AWS. Outside of work, Jaganath is an amateur astronomer with an interest in deep sky astrophotography.

Sundar Ranganathan is the Head of Business Development, ML Frameworks on the Amazon EC2 team. He focuses on large-scale ML workloads across AWS services like Amazon EKS, Amazon ECS, Elastic Fabric Adapter, AWS Batch, and Amazon SageMaker. His experience includes leadership roles in product management and product development at NetApp, Micron Technology, Qualcomm, and Mentor Graphics.

Mahadevan Balasubramaniam is a Principal Solutions Architect for Autonomous Computing with nearly 20 years of experience in the area of physics-infused deep learning, building, and deploying digital twins for industrial systems at scale. Mahadevan obtained his PhD in Mechanical Engineering from the Massachusetts Institute of Technology and has over 25 patents and publications to his credit.

Saurabh Misra is a Staff Machine Learning Engineer at Cresta. He currently works on creating conversational technologies to make customer care organizations highly effective and efficient. Outside of work, he loves to play the drums and read books.

Jack Lindamood is the Head of Infrastructure at Cresta. In his spare time, he enjoys basketball and watching Esports.

Read More

RLDS: An Ecosystem to Generate, Share, and Use Datasets in Reinforcement Learning

Posted by Sabela Ramos, Software Engineer and Léonard Hussenot, Student Researcher, Google Research, Brain Team

Most reinforcement learning (RL) and sequential decision making algorithms require an agent to generate training data through large amounts of interactions with their environment to achieve optimal performance. This is highly inefficient, especially when generating those interactions is difficult, such as collecting data with a real robot or by interacting with a human expert. This issue can be mitigated by reusing external sources of knowledge, for example, the RL Unplugged Atari dataset, which includes data of a synthetic agent playing Atari games.

However, there are very few of these datasets and a variety of tasks and ways of generating data in sequential decision making (e.g., expert data or noisy demonstrations, human or synthetic interactions, etc.), making it unrealistic and not even desirable for the whole community to work on a small number of representative datasets because these will never be representative enough. Moreover, some of these datasets are released in a form that only works with certain algorithms, which prevents researchers from reusing this data. For example, rather than including the sequence of interactions with the environment, some datasets provide a set of random interactions, making it impossible to reconstruct the temporal relation between them, while others are released in slightly different formats, which can introduce subtle bugs that are very difficult to identify.

In this context, we introduce Reinforcement Learning Datasets (RLDS), and release a suite of tools for recording, replaying, manipulating, annotating and sharing data for sequential decision making, including offline RL, learning from demonstrations, or imitation learning. RLDS makes it easy to share datasets without any loss of information (e.g., keeping the sequence of interactions instead of randomizing them) and to be agnostic to the underlying original format, enabling users to quickly test new algorithms on a wider range of tasks. Additionally, RLDS provides tools for collecting data generated by either synthetic agents (EnvLogger) or humans (RLDS Creator), as well as for inspecting and manipulating the collected data. Ultimately, integration with TensorFlow Datasets (TFDS) facilitates the sharing of RL datasets with the research community.

With RLDS, users can record interactions between an agent and an environment in a lossless and standard format. Then, they can use and transform this data to feed different RL or Sequential Decision Making algorithms, or to perform data analysis.

Dataset Structure
Algorithms in RL, offline RL, or imitation learning may consume data in very different formats, and, if the format of the dataset is unclear, it’s easy to introduce bugs caused by misinterpretations of the underlying data. RLDS makes the data format explicit by defining the contents and the meaning of each of the fields of the dataset, and provides tools to re-align and transform this data to fit the format required by any algorithm implementation. In order to define the data format, RLDS takes advantage of the inherently standard structure of RL datasets — i.e., sequences (episodes) of interactions (steps) between agents and environments, where agents can be, for example, rule-based/automation controllers, formal planners, humans, animals, or a combination of these. Each of these steps contains the current observation, the action applied to the current observation, the reward obtained as a result of applying action, and the discount obtained together with reward. Steps also include additional information to indicate whether the step is the first or last of the episode, or if the observation corresponds to a terminal state. Each step and episode may also contain custom metadata that can be used to store environment-related or model-related data.

Producing the Data
Researchers produce datasets by recording the interactions with an environment made by any kind of agent. To maintain its usefulness, raw data is ideally stored in a lossless format by recording all the information that is produced, keeping the temporal relation between the data items (e.g., ordering of steps and episodes), and without making any assumption on how the dataset is going to be used in the future. For this, we release EnvLogger, a software library to log agent-environment interactions in an open format.

EnvLogger is an environment wrapper that records agent–environment interactions and saves them in long-term storage. Although EnvLogger is seamlessly integrated in the RLDS ecosystem, we designed it to be usable as a stand-alone library for greater modularity.

As in most machine learning settings, collecting human data for RL is a time consuming and labor intensive process. The common approach to address this is to use crowd-sourcing, which requires user-friendly access to environments that may be difficult to scale to large numbers of participants. Within the RLDS ecosystem, we release a web-based tool called RLDS Creator, which provides a universal interface to any human-controllable environment through a browser. Users can interact with the environments, e.g., play the Atari games online, and the interactions are recorded and stored such that they can be loaded back later using RLDS for analysis or to train agents.

Sharing the Data
Datasets are often onerous to produce, and sharing with the wider research community not only enables reproducibility of former experiments, but also accelerates research as it makes it easier to run and validate new algorithms on a range of scenarios. For that purpose, RLDS is integrated with TensorFlow Datasets (TFDS), an existing library for sharing datasets within the machine learning community. Once a dataset is part of TFDS, it is indexed in the global TFDS catalog, making it accessible to any researcher by using tfds.load(name_of_dataset), which loads the data either in Tensorflow or in Numpy formats.

TFDS is independent of the underlying format of the original dataset, so any existing dataset with RLDS-compatible format can be used with RLDS, even if it was not originally generated with EnvLogger or RLDS Creator. Also, with TFDS, users keep ownership and full control over their data and all datasets include a citation to credit the dataset authors.

Consuming the Data
Researchers can use the datasets in order to analyze, visualize or train a variety of machine learning algorithms, which, as noted above, may consume data in different formats than how it has been stored. For example, some algorithms, like R2D2 or R2D3, consume full episodes; others, like Behavioral Cloning or ValueDice, consume batches of randomized steps. To enable this, RLDS provides a library of transformations for RL scenarios. These transformations have been optimized, taking into account the nested structure of the RL datasets, and they include auto-batching to accelerate some of these operations. Using those optimized transformations, RLDS users have full flexibility to easily implement some high level functionalities, and the pipelines developed are reusable across RLDS datasets. Example transformations include statistics across the full dataset for selected step fields (or sub-fields) or flexible batching respecting episode boundaries. You can explore the existing transformations in this tutorial and see more complex real examples in this Colab.

Available Datasets
At the moment, the following datasets (compatible with RLDS) are in TFDS:

Our team is committed to quickly expanding this list in the near future and external contributions of new datasets to RLDS and TFDS are welcomed.

Conclusion
The RLDS ecosystem not only improves reproducibility of research in RL and sequential decision making problems, but also enables new research by making it easier to share and reuse data. We hope the capabilities offered by RLDS will initiate a trend of releasing structured RL datasets, holding all the information and covering a wider range of agents and tasks.

Acknowledgements
Besides the authors of this post, this work has been done by Google Research teams in Paris and Zurich in Collaboration with Deepmind. In particular by Sertan Girgin, Damien Vincent, Hanna Yakubovich, Daniel Kenji Toyama, Anita Gergely, Piotr Stanczyk, Raphaël Marinier, Jeremiah Harmsen, Olivier Pietquin and Nikola Momchev. We also want to thank the collaboration of other engineers and researchers who provided feedback and contributed to the project. In particular, George Tucker, Sergio Gomez, Jerry Li, Caglar Gulcehre, Pierre Ruyssen, Etienne Pot, Anton Raichuk, Gabriel Dulac-Arnold, Nino Vieillard, Matthieu Geist, Alexandra Faust, Eugene Brevdo, Tom Granger, Zhitao Gong, Toby Boyd and Tom Small.

Read More

Roundup of re:Invent 2021 Amazon SageMaker announcements

At re:Invent 2021, AWS announced several new Amazon SageMaker features that make machine learning (ML) accessible to new types of users while continuing to increase performance and reduce cost for data scientists and ML experts. In this post, we provide a summary of these announcements, along with resources for you to get more details on each one.

ML for all

As ML adoption grows, ML skills are in higher demand. To help meet this growing demand, AWS is expanding the reach of ML beyond data scientists and developers to the broader business user community, including line-of-business analysts supporting finance, marketing, operations, and HR teams. AWS announced that Amazon SageMaker Canvas is expanding access to ML by providing business analysts with a visual point-and-click interface that lets them generate accurate ML predictions on their own—without requiring any ML experience or having to write a single line of code. Get started on a two-month free trial including up to 10 ML models with up to 1 million cells of data free.

Processing structured and unstructured data at scale

As more people start using ML in their daily work, the need to label datasets for training grows and data science teams can’t keep up with the growing demand. AWS announced Amazon SageMaker Ground Truth Plus to make it easy to create high-quality training datasets without having to build labeling applications or manage labeling workforces on your own. SageMaker Ground Truth Plus provides an expert workforce that is trained on ML tasks and can help meet your data security, privacy, and compliance requirements. Simply upload your data, and Amazon SageMaker Ground Truth Plus creates data labeling workflows and manages workflows on your behalf. Request a pilot to get started.

Optimize the performance and cost of building, training, and deploying ML models

AWS is also continuing to make it easier and cheaper for data scientists and developers to prepare data and build, train, and deploy ML models.

First, for building ML models, AWS released enhancements to Amazon SageMaker Studio so that you can now do data processing, analytics, and ML workflows in one unified notebook. From this universal notebook, you can access a wide range of data sources and write code for any transformation for a variety of data workloads.

In addition to making training faster, AWS launched a new compiler, Amazon SageMaker Training Compiler, which can accelerate training by up to 50% through graph- and kernel-level optimizations to use GPUs more efficiently. SageMaker Training Compiler is integrated with versions of TensorFlow and PyTorch in SageMaker. Therefore, you can speed up training in these popular frameworks with minimal code changes.

And lastly, for inference, AWS announced two features to reduce inference costs. Amazon SageMaker Serverless Inference (preview) lets you deploy ML models on pay-per-use pricing without worrying about servers or clusters for use cases with intermittent traffic patterns. In addition, Amazon SageMaker Inference Recommender helps you choose the best available compute instance and configuration to deploy ML models for optimal inference performance and cost.

Learn ML for free

Amazon SageMaker Studio Lab (preview) is a free ML notebook environment that makes it easy for anyone to experiment with building and training ML models without needing to configure infrastructure or manage identity and access. SageMaker Studio Lab accelerates model building through GitHub integration, and it comes preconfigured with the most popular ML tools, frameworks, and libraries to get you started immediately. SageMaker Studio Lab offers 15 GB of dedicated storage for your ML projects and automatically saves your work so that you don’t need to restart in between sessions. It’s as easy as closing your laptop and coming back later. All you need is a valid email ID to get started with SageMaker Studio Lab.

To learn more about these features, visit the Amazon SageMaker website.


About the Author

Kimberly Madia is the Sr. Manager of Product Marketing, AWS, heading up product marketing for AWS Machine Learning services. Her goal is to make it easy for customers to build, train, and deploy ML models using Amazon SageMaker. For fun outside of work, Kimberly likes to cook, read, and run on the San Francisco Bay Trail.

Read More

Enrich your content and metadata to enhance your search experience with custom document enrichment in Amazon Kendra

Amazon Kendra customers can now enrich document metadata and content during the document ingestion process using custom document enrichment (CDE). Amazon Kendra is an intelligent search service powered by machine learning (ML). Amazon Kendra reimagines search for your websites and applications so your employees and customers can easily find the content they’re looking for, even when it’s scattered across multiple locations and content repositories within your organization.

You can further enhance the accuracy and search experience of Amazon Kendra by improving the quality of documents indexed in it. Documents with precise content and rich metadata are more searchable and yield more accurate results. Organizations often have large repositories of raw documents that can be improved for search by modifying content or adding metadata before indexing. So how does CDE help? By simplifying the process of creating, modifying, or deleting document metadata and content before they’re ingested into Amazon Kendra. This can include detecting entities from text, extracting text from images, transcribing audio and video, and more by creating custom logic or using services like Amazon Comprehend, Amazon Textract, Amazon Transcribe, Amazon Rekognition, and others.

In this post, we show you how to use CDE in Amazon Kendra using custom logic or with AWS services like Amazon Textract, Amazon Transcribe, and Amazon Comprehend. We demonstrate CDE using simple examples and provide a step-by-step guide for you to experience CDE in an Amazon Kendra index in your own AWS account.

CDE overview

CDE enables you to create, modify, or delete document metadata and content when you ingest your documents into Amazon Kendra. Let’s understand the Amazon Kendra document ingestion workflow in the context of CDE.

The following diagram illustrates the CDE workflow.

The path a document takes depends on the presence of different CDE components:

  • Path taken when no CDE is present – Steps 1 and 2
  • Path taken with only CDE basic operations – Steps 3, 4, and 2
  • Path taken with only CDE advanced operations – Steps 6, 7, 8, and 9
  • Path taken when CDE basic operations and advanced operations are present – Steps, 3, 5, 7, 8, and 9

The CDE basic operations and advanced operations components are optional. For more information on the CDE basic operations and advanced operations with the preExtraction and postExtraction AWS Lambda functions, refer to the Custom Document Enrichment section in the Amazon Kendra Developer Guide.

In this post, we walk you through four use cases:

  • Automatically assign category attributes based on the subdirectory of the document being ingested
  • Automatically extract text while ingesting scanned image documents to make them searchable
  • Automatically create a transcription while ingesting audio and video files to make them searchable
  • Automatically generate facets based on entities in a document to enhance the search experience

Prerequisites

You can follow the step-by-step guide in your AWS account to get a first-hand experience of using CDE. Before getting started, complete the following prerequisites:

  1. Download the sample data files AWS_Whitepapers.zip, GenMeta.zip, and Media.zip to a local drive on your computer.
  2. In your AWS account, create a new Amazon Kendra index, Developer Edition. For more information and instructions, refer to the Getting Started chapter in the Amazon Kendra Essentials workshop and Creating an index.
  3. Open the AWS Management Console, and make sure that you’re logged in to your AWS account
  4. Create an Amazon Simple Storage Service (Amazon S3) bucket to use as a data source. Refer to Amazon S3 User Guide for more information.
  5. Click on to launch the AWS CloudFormation to deploy the preExtraction and postExtraction Lambda functions and the required AWS Identity and Access Management (IAM) roles. It will open the AWS CloudFormation Management Console.
    1. Provide a unique name for your CloudFormation stack and the name of the bucket you just created as a parameter.
    2. Choose Next, select the acknowledgement check boxes, and choose Create stack.
    3. After the stack creation is complete, note the contents of the Outputs. We use these values later.
  6. Configure the S3 bucket as a data source using the S3 data source connector in the Amazon Kendra index you created. When configuring the data source, in the Additional configurations section, define the Include pattern to be Data/. For more information and instructions, refer to the Using Amazon Kendra S3 Connector subsection of the Ingesting Documents section in the Amazon Kendra Essentials workshop and Getting Started with an Amazon S3 data source (console).
  7. Extract the contents of the data file AWS_Whitepapers.zip to your local machine and upload them to the S3 bucket you created at the path s3://<YOUR-DATASOURCE-BUCKET>/Data/ while preserving the subdirectory structure.

Automatically assign category attributes based on the subdirectory of the document being ingested

The documents in the sample data are stored in subdirectories Best_Practices, Databases, General, Machine_Learning, Security, and Well_Architected. The S3 bucket used as the data source looks like the following screenshot.

We use CDE basic operations to automatically set the category attribute based on the subdirectory a document belongs to while the document is being ingested.

  1. On the Amazon Kendra console, open the index you created.
  2. Choose Data sources in the navigation pane.
  3. Choose the data source used in this example.
  4. Copy the data source ID.
  5. Choose Document enrichment in the navigation pane.
  6. Choose Add document enrichment.
  7. For Data Source ID, enter the ID you copied.
  8. Enter six basic operations, one corresponding to each subdirectory.

  1. Choose Next.
  2. Leave the configuration for both Lambda functions blank.
  3. For Service permissions, choose Enter custom role ARN and enter the CDERoleARN value (available on the stack’s Outputs tab).

  1. Choose Next.

  1. Review all the information and choose Add document enrichment.
  2. Browse back to the data source we’re using by choosing Data sources in the navigation pane and choose the data source.
  3. Choose Sync now to start data source sync.

The data source sync can take up to 10–15 minutes to complete.

  1. While waiting for the data source sync to complete, choose Facet definition in the navigation pane.
  2. For the Index field of _category, select Facetable, Searchable, and Displayable to enable these properties.
  3. Choose Save.
  4. Browse back to the data source page and wait for the sync to complete.
  5. When the data source sync is complete, choose Search indexed content in the navigation pane.
  6. Enter the query Which service provides 11 9s of durability?.
  7. After you get the search results, choose Filter search results.

The following screenshot shows the results.

For each of the documents that were ingested, the category attribute values set by the CDE basic operations are seen as selectable facets.

Note Document fields for each of the results. When you click on it, it shows the fields or attributes of the document included in that result as seen in the screenshot below.

From the selectable facets, you can select a category, such as Best Practices, to filter your search results to be only from the Best Practices category, as shown in the following screenshot. The search experience improved significantly without requiring additional manual steps during document ingestion.

Automatically extract text while ingesting scanned image documents to make them searchable

In order for documents that are scanned as images to be searchable, you first need to extract the text from such documents and ingest that text in an Amazon Kendra index. The pre-extraction Lambda function from the CDE advanced operations provides a place to implement text extraction and modification logic. The pre-extraction function we configure has the code to extract the text from images using Amazon Textract. The function code is embedded in the CloudFormation template we used earlier. You can choose the Template tab of the template on the AWS CloudFormation console and review the code for PreExtractionLambda.

We now configure CDE advanced operations to try out this and additional examples.

  1. On the Amazon Kendra console, choose Document enrichments in the navigation pane.
  2. Select the CDE we configured.
  3. On the Actions menu, choose Edit.
  4. Choose Add basic operations.

You can view all the basic operations you added.

  1. Add two more operations: one for Media and one for GEN_META.

  1. Choose Next.

In this step, you need the ARNs of the preExtraction and postExtraction functions (available on the Outputs tab of the CloudFormation stack). We use the same bucket that you’re using as the data source bucket.

  1. Enter the conditions, ARN, and bucket details for the pre-extraction and post-extraction functions.
  2. For Service permissions, choose Enter custom role ARN and enter the CDERoleARN value (available on the stack’s Outputs tab).

  1. Choose Next. 
  2. Choose Add document enrichment.

Now we’re ready to ingest scanned images into our index. The sample data file Media.zip you downloaded earlier contains two image files: Yosemite.png and Yellowstone.png. These are scanned pictures of the Wikipedia pages of Yosemite National Park and Yellowstone National Park, respectively.

  1. Upload these to the S3 bucket being used as the data source in the folder s3://<YOUR-DATASOURCE-BUCKET>/Data/Media/.
  2. Open the data source on the Amazon Kendra console start a data source sync.
  3. When the data source sync is complete, browse to Search indexed content and enter the query Where is Yosemite National Park?.

The following screenshot shows the search results.

  1. Choose the link from the top search result.

The scanned image pops up, as in the following screenshot.

You can experiment with similar questions related to Yellowstone.

Automatically create a transcription while ingesting audio or video files to make them searchable

Similar to images, audio and video content needs to be transcribed in order to be searchable. The pre-extraction Lambda function also contains the code to call Amazon Transcribe for audio and video files to transcribe them and extract a time-marked transcript. Let’s try it out.

The maximum runtime allowed for a CDE pre-extraction Lambda function is 5 minutes (300 seconds), so you can only use it to transcribe audio or video files of short duration, about 10 minutes or less. For longer files, you can use the approach described in Make your audio and video files searchable using Amazon Transcribe and Amazon Kendra.

The sample data file Media.zip contains a video file How_do_I_configure_a_VPN_over_AWS_Direct_Connect_.mp4, which has a video tutorial.

  1. Upload this file to the S3 bucket being used as the data source in the folder s3://<YOUR-DATASOURCE-BUCKET>/Data/Media/.
  2. On the Amazon Kendra console, open the data source and start a data source sync.
  3. When the data source sync is complete, browse to Search indexed content and enter the query What is the process to configure VPN over AWS Direct Connect?.

The following screenshot shows the search results.

  1. Choose link in the answer to start the video.

If you seek to an offset of 84.44 seconds (1 minute, 24 seconds), you’ll hear exactly what the excerpt shows.

Automatically generate facets based on entities in a document to enhance the search experience

Relevant facets such as the entities in documents like places, people, and events, when presented as as part of search results, provide an interactive way for a user to filter search results and find what they’re looking for. Amazon Kendra metadata, when populated correctly, can provide these facets, and enhances the user experience.

The post-extraction Lambda function allows you to implement the logic to process the text extracted by Amazon Kendra from the ingested document, then create and update the metadata. The post-extraction function we configured implements the code to invoke Amazon Comprehend to detect entities from the text extracted by Amazon Kendra, and uses them to update the document metadata, which is presented as facets in an Amazon Kendra search. The function code is embedded in the CloudFormation template we used earlier. You can choose the Template tab of the stack on the CloudFormation console and review the code for PostExtractionLambda.

The maximum runtime allowed for a CDE post-extraction function is 60 seconds, so you can only use it to implement tasks that can be completed in that time.

Before we can try out this example, we need to define the entity types that we detect using Amazon Comprehend as facets in our Amazon Kendra index.

  1. On the Amazon Kendra console, choose the index we’re working on.
  2. Choose Facet definition in the navigation pane.
  3. Choose Add field and add fields for COMMERCIAL_ITEM, DATE, EVENT, LOCATION, ORGANIZATION, OTHER, PERSON, QUANTITY, and TITLE of type StringList.
  4. Make LOCATION, ORGANIZATION and PERSON facetable by selecting Facetable.

  1. Extract the contents of the GenMeta.zip data file and upload the files United_Nations_Climate_Change_conference_Wikipedia.pdf, United_Nations_General_Assembly_Wikipedia.pdf, United_Nations_Security_Council_Wikipedia.pdf, and United_Nations_Wikipedia.pdf to the S3 bucket being used as the data source in the folder s3://<YOUR-DATASOURCE-BUCKET>/Data/GEN_META/.
  2. Open the data source on the Amazon Kendra console and start a data source sync.
  3. When the data source sync is complete, browse to Search indexed content and enter the query What is Paris agreement?.
  4. After you get the results, choose Filter search results in the navigation pane.

The following screenshot shows the faceted search results.

All the facets of the type ORGANIZATION, LOCATION, and PERSON are automatically generated by the post-extraction Lambda function with the detected entities using Amazon Comprehend. You can use these facets to interactively filter the search results. You can also try a few more queries and experiment with the facets.

Clean up

After you have experimented with the Amazon Kendra index and the features of CDE, delete the infrastructure you provisioned in your AWS account while working on the examples in this post:

  • CloudFormation stack
  • Amazon Kendra index
  • S3 bucket

Conclusion

Enhancing data and metadata can improve the effectiveness of search results and improve the search experience. You can use the custom data enrichment (CDE) feature of Amazon Kendra to easily automate the CDE process by creating, modifying, or deleting the metadata using the basic operations. You can also use the advanced operations with pre-extraction and post-extraction Lambda functions to implement the logic to manipulate the data and metadata.

We demonstrated using subdirectories to assign categories, using Amazon Textract to extract text from scanned images, using Amazon Transcribe to generate a transcript of audio and video files, and using Amazon Comprehend to detect entities that are added as metadata and later available as facets to interact with the search results. This is just an illustration of how you can use CDE to create a differentiated search experience for your users.

For a deeper dive into what you can achieve by combining other AWS services with Amazon Kendra, refer to Make your audio and video files searchable using Amazon Transcribe and Amazon Kendra, Build an intelligent search solution with automated content enrichment, and other posts on the Amazon Kendra blog.


About the Authors

Abhinav JawadekarAbhinav Jawadekar is a Senior Partner Solutions Architect at Amazon Web Services. Abhinav works with AWS Partners to help them in their cloud journey.

Read More

Continuously improve search application effectiveness with Amazon Kendra Analytics Dashboard

Unstructured data belonging to enterprises continues to grow, making it a challenge for customers and employees to get the information they need. Amazon Kendra is a highly accurate intelligent search service powered by machine learning (ML). It helps you easily find the content you’re looking for, even when it’s scattered across multiple locations and content repositories.

Amazon Kendra provides mechanisms such as relevance tuning, filtering, and submitting feedback for incremental learning to improve the effectiveness of the search solution based on specific use cases. As the data, users, and user expectations evolve, there is a need to continuously measure and recalibrate the search effectiveness, by adjusting the search configuration.

Amazon Kendra analytics provides a snapshot of how your users interact with your Amazon Kendra-powered search application in the form of key metrics. You can view the analytics data in a visual dashboard on the Amazon Kendra console or via Application Programming Interface (API) or using the AWS Command Line Interface (AWS CLI). These metrics enable administrators and content creators to better understand the ease of finding relevant information, the quality of the search results, gaps in the content, and the role of instant answers in providing answers to a user’s questions.

This post illustrates how you can dive deep into search trends and user behavior to identify insights and bring clarity to potential areas of improvement and the specific actions to take.

Overview of the Amazon Kendra analytics dashboard

Let’s start with reviewing the Search Analytics Dashboard of the Amazon Kendra index we use during this post. To view the Amazon Kendra analytics dashboard, open the Amazon Kendra management console, choose your index, and then choose Analytics in the navigation pane.

Just by looking at the top, there is a trend of an increasing number of queries, implying an increase in application adoption. There is little change since the last period in the clickthrough rate, zero click rate, zero search result rate, and the instant answer rate, signifying that the new queries and potentially new users’ usage pattern is consistent with that of the previous period.

Let’s look at the other macro trend charts available on the dashboard (see the following screenshots).

All the charts show a flat trend, meaning that the usage pattern is steady.

The clickthrough rate is at single digits with a slight downward trend. This either means that the users are finding the information through instant answers, FAQs, or document excerpts, or this could indicate that the results are totally uninteresting to the users.

The top zero click queries hover a little below 10%, which also means that the users are finding the information through instant answers, FAQs, or document excerpts, or the results are uninteresting to the users.

The instant answer rate is above 90%, which means that the overall quality of content is good and contains the information users are looking for.

The top zero result queries is lower than 5%, which is a good indicator that for the most part the users are finding the information they’re looking for.

Now let’s look at the drill-down charts starting with top queries, sorted high to low by Count.

The most important insight here is that the top queried items matter most to the users. The organization can use this information to potentially change their business priorities to focus more on these items of interest. It can also be an indicator to add more content on these topics.

When looking at the top queries sorted low to high on the Instant answer (%) column, we get the following results.

This provides insights into the items that the users are looking for but can’t find the answers. Depending on the query count, this may be a good indicator to add more content with specific information that answers the queries.

Now let’s look at the top clicked documents, sorted on the Count column from high to low.

These items indicate topics of interest to the users, not just for answers but also for detailed information. It could be an indicator to possibly add more content on these topics, but might be a business indicator to arrange training on these topics.

Let’s continue with the top zero click queries, sorted on 0 click count high to low.

This shows items of high interest that coincide with a high instant answer rate, implying that the users quickly find the answers through instance answers.

Now let’s look at the same chart sorted on Instant answer rate, low to high.

This indicates that there is lack of information on these topics that are of interest to users, and that the content owners need to add more content on these topics.

Now let’s look at the top zero result queries, sorted on the 0 result count column from high to low.

This is an indicator of a gap in content, because the users are looking for information that can’t be found. The content owners can fix this by adding content on these topics.

Using AWS CLI and API to get the Amazon Kendra analytics dashboard

So far we have used the visual dashboard in the Amazon Kendra management console to view all the available charts. The same dashboards are also available via API or the AWS CLI, which you can use to integrate this information in your applications as well as the tools of your choice for analytics and dashboards. You can use the following AWS CLI command to get the top queries this week based on their count:

aws kendra get-snapshots --index-id <YOUR-INDEX-ID> --interval "THIS_WEEK" --metric-type "QUERIES_BY_COUNT"

The output looks similar to the following:

{
  "SnapShotTimeFilter": {
    "StartTime": "2021-11-14T08:00:00+00:00",
    "EndTime": "2021-11-20T07:00:00+00:00" 
  },
  "SnapshotsDataHeader": [ 
    "query_content", "count", "ctr", "zero_click_rate", "click_depth", "instant_answer",     "confidence"
    ],
  "SnapshotsData": [
    [
      "what is Kendra", 3216, 3.70, 96.30, 27.71, 97.01, HIGH,
      "NBA game schedule", 1632, 4.47, 95.53, 24.19, 95.47, MEDIUM,
      "Most popular search", 1603, 3.49, 96.51, 29.43, 94.14, MEDIUM,
      "New York City", 1551, 3.68, 96.32, 33.40, 94.58, MEDIUM,
      "how many weeks in a year", 1310, 2.21, 97.79, 42.10, 96.03, LOW,
      "what is my ip address", 859, 2.56, 97.44, 48.45, 96.97, MEDIUM,
      "how to draw", 857, 2.80, 97.20, 36.33, 96.38, HIGH,
      "what is love", 855, 2.46, 97.54, 27.33, 96.73, MEDIUM,
      "equal opportunity bill", 855, 5.26, 94.74, 23.62, 94.62, MEDIUM,
      "when are the nba playoffs", 836, 3.35, 96.65, 32.32, 92.34, LOW
    ]
  ],
  "NextToken":    "uVu4IDozCVdFz5klt0h9+YPTTNcCGGwGujsYChp1/vPp5nPdC+reHO8TRvg5ANhWQu10jvKltuM8KzUvYCvBGi7mWJdpOF7LFiBjFcIuY6cabYI9nb2b0u3AU3565RC9kCytG6RjeVcU/NjBAxLMyB96+WdEYv+jFCbejnM6YjWa0LRL+MmvlnXEkFMWvmgyrdF22JXWklTZc77NJILR+BTsCB5Xg34OJ4149968kDdb2CNhH4Bzk+qOGph+KoFDW/CpmQ=="
}

You can also get similar output using the following Python code:

import boto3
kendra = boto3.client('kendra')

index_ID = '${indexID}'
interval = 'THIS_WEEK'
metric_type = 'QUERIES_BY_COUNT'

snapshots_response = kendra.get_snapshots(
    IndexId = index_id,
    Interval = interval,
    MetricType = metric_type,
print("Top queries data: " + snapshots_response['snapshotsData'])

Conclusion

Growth of data and information along with evolving user needs make it imperative that the effectiveness of the search application also evolves. The metrics provided by the Amazon Kendra analytics empower you to dive deep into search trends and user behavior to identify insights. They help bring clarity to potential areas of improvement for Amazon Kendra-powered search applications. If you already implement an Amazon Kendra index-powered search solution, start looking at the Analytics Dashboard with the usage metrics for the last few weeks and get insights on how you can improve the search effectiveness. For new Amazon Kendra-powered search applications, the Analytics Dashboard is a great place to get immediate feedback with actionable insights on the search effectiveness. For a hands-on experience with Amazon Kendra, see the Kendra Essentials workshop. For a deeper dive into Amazon Kendra use cases, see the Amazon Kendra blog.


About the Author

Abhinav JawadekarAbhinav Jawadekar is a Senior Partner Solutions Architect at Amazon Web Services. Abhinav works with AWS Partners to help them in their cloud journey.

Read More

Expedite conversation design with the automated chatbot designer in Amazon Lex

Today, we’re launching the Amazon Lex automated chatbot designer (preview), which reduces the time and effort it takes for customers to design a chatbot by automating the process using existing conversation transcripts. Amazon Lex helps you build, test, and deploy chatbots and virtual assistants on contact center services (such as Amazon Connect), websites, and messaging channels (such as Facebook Messenger). The automated chatbot designer expands the usability of Amazon Lex to the design phase. It uses machine learning (ML) to provide an initial bot design that you can then refine and launch conversational experiences faster. With the automated chatbot designer, Amazon Lex customers and partners get an easy and intuitive way of designing chatbots and can reduce bot design time from weeks to hours.

Conversation design

Organizations are rapidly adopting chatbots to increase self-service and improve customer experience at scale. Contact center chatbots automate common user queries and free up human agents to focus on solving more complex issues. You can use Amazon Lex to build chatbots that deliver engaging user experiences and lifelike conversations. Amazon Lex provides automatic speech recognition and language understanding technologies to build effective chatbots through an easy-to-use console. But before you can build a chatbot, you have to design it. The design phase of the chatbot building process is still manual, time-consuming, and one that requires conversational design expertise.

Conversation design is the discipline of designing conversational interfaces, including the purpose, experience, and interactions. The discipline is still evolving and requires a deep understanding of spoken language and human interactions.

Creating a chatbot needs equal parts technology and business knowledge. The first step of designing a bot is conducting user research based on business needs and identifying the user requests or intents to focus on. Customers often start with analyzing transcripts of conversations between agents and users to discover and track the most frequently occurring intents. An intent signifies the key reason for customer contact or a goal the customer is trying to achieve. For example, a person contacting an insurance company to file a claim might say, “My basement is flooded, I need to start a new claim.” The intent in this case is “file a new claim.” It can take a team of business analysts, product owners, and developers multiple weeks to analyze thousands of lines of transcripts and find the right intents while designing chatbots for their contact center flows. This is time-consuming and may lead to missing intents. The second step is to remove ambiguity among intents. For example, if a user says “I want to file a claim,” it is important to distinguish if the user is trying to file a home or auto claim. The typical trial-and-error approach to identify such overlaps across intents can be error-prone. The third and final step is compiling a list of valid values of information required to fulfill different intents. For example, to fulfill the intent “file a new claim,” developers need a list of different policy types (auto, home, and travel). A chatbot with missing, incomplete, or overlapping intents will fail to resolve user requests accurately, resulting in frustrated customers.

Automated chatbot designer simplifies the design process

The automated chatbot designer builds on the simplicity and ease of use of Amazon Lex by automatically surfacing an initial bot design. It uses ML to analyze conversation transcripts between callers and agents, and semantically clusters them around the most common intents and related information. Instead of starting your design from scratch, you can use the intents surfaced by the chatbot designer, iterate on the design, and achieve your target experience faster.

In the example of an insurance chatbot, the automated chatbot designer first analyzes transcripts to identify intents such as “file a new claim” automatically from phrases, such as “My basement is flooded, I need to start a new claim” or “I want to file a roof damage claim.” The automated chatbot designer can analyze thousands of lines of transcripts within a few hours, minimizing effort and reducing chatbot design time. This helps make sure that the intents are well defined and well separated by automatically removing any overlaps between them. This way, the bot can understand the user better and avoid frustration. Finally, the automated chatbot designer compiles information, such as policy ID or claim type, needed to fulfill all identified intents.

By reducing manual effort and human error from every step of chatbot design, the automated chatbot designer helps create bots that understand user requests without confusion, improving the end user experience.

NeuraFlash, a certified Amazon Services Delivery Partner, provides a full range of professional services to companies worldwide. “We specialize in building solutions grounded in data that transform and improve the customer journey across any use case in the contact center. We often analyze large amounts of conversational data to chart the optimal conversational experience for our clients,” says Dennis Thomas, CTO at NeuraFlash. “With the automated chatbot designer, we can identify different paths in calls quickly based on the conversational data. The automated discovery accelerates our time to market across our client engagements and helps us deliver better customer experiences. We are excited to partner with AWS and help organizations transform their businesses with AI-powered experiences.”

Create a bot with the automated chatbot designer

Getting started with the automated chatbot designer is very easy. Developers can access it on the Amazon Lex console and upload transcripts to automatically create the bot design.

  1. On the Amazon Lex V2 console, choose Bots.
  2. Choose Create bot.
  3. Select Start with transcripts as the creation method.
  4. Give the bot a name (for this example, InsuranceBot) and provide a description.
  5. Select Create a role with basic Amazon Lex permissions and use this as your runtime role.
  6. After you fill out the other fields, choose Next to proceed to the language configuration.

As of this writing, the automated chatbot designer is only available in US English.

  1. Choose the language and voice for your interaction.

Next, you specify the Amazon Simple Storage Service (Amazon S3) location of the transcripts. Amazon Connect customers using Contact Lens can use the transcripts in their original format. Conversation transcripts from other transcription services may require a simple conversion.

  1. Choose the S3 bucket and the path where the transcripts are located.

In case of Contact Lens for Amazon Connect format, the files should be located at /Analysis/Voice. If you have redacted transcripts, you can provide /Analysis/Voice/Redacted as well. For this post, you can use the following sample transcripts. Note that fields like names and phone numbers included in these sample transcripts or in our examples are comprised of synthetic (or ‘fake’) data.

If you plan to use the sample transcripts, you will have to first upload the transcripts to an S3 bucket:  Unzip the files to a local folder. Next, navigate to the S3 console, provide a bucket name, and click on Create Bucket. Once the bucket is created, click on the bucket name and click on Add Folder to provide the location of the unzipped files. Finally, click on Upload to upload the conversation transcripts.

  1. Choose your AWS Key Management Service (AWS KMS) key for access permissions.
  2. Apply a filter (date range) for your input transcripts.
  3. Choose Done.

You can use the status bar on the console to track the analysis. Within a few hours, the automated chatbot designer surfaces a chatbot design that includes user intents, sample phrases associated with those intents, and a list of all the information required to fulfill them. The amount of time it takes to complete training depends on several factors, including the volume of transcripts and the complexity of the conversations. Typically, 600 lines of transcript are analyzed every minute.

  1. Choose Review to view the intents and slot types discovered by the automated chatbot designer.

The Intents tab lists all the intents along with sample phrases and slots, and the Slot types tab provides a list of all the slot types along with slot type values.

You can choose any of the intents to review the sample utterances and slots. For example, in the following screenshot, we choose ChangePassword to view the utterances.

  1. You can click on the associated transcripts to review the conversations used to identify the intents.
  2. After you review the results, you can select the intents and slot types relevant to your use case and choose Add.

This adds the selected intents and slot types to the bot. You can now iterate on this design by making changes such as adding prompts, merging intents or slot types, and renaming slots.

In summary, the chatbot designer analyzes a conversation transcript to surface common intents, associated phrases, and information the chatbot needs to capture to resolve issues (such as customer policy number, claim type, and so on). You still have to iterate on the design to fit your business needs, add chatbot prompts and responses, integrate business logic to fulfill user requests,  and then build, test, and deploy the chatbot in Amazon Lex. The automated chatbot designer automates a significant portion of the bot design, minimizing effort and reducing the overall time it takes to design a chatbot.

Things to know

The automated chatbot designer is launching today as a preview, and you can get started with it right away for free.  After the preview, you pay the prices listed on the Amazon Lex pricing page. Pricing is based on the time it takes to analyze the transcripts and discover intents.

The automated chatbot designer is available on English (US) in all the AWS Regions where Amazon Lex V2 operates. With the automated chatbot designer in Amazon Lex, you can streamline the lengthy design process and create chatbots that understand customer requests and improve customer experiences. For more information, please check out our documentation here.


About the Authors

Priyanka Tiwari is a product marketing lead for AWS data and machine learning where she focuses on educating decision makers on the impact of data, analytics, and machine learning. In her spare time, she enjoys reading and exploring the beautiful New England area with her family.

As a Product Manager on the Amazon Lex team, Harshal Pimpalkhute spends his time trying to get machines to engage (nicely) with humans.

Read More

Quickly build custom search applications without writing code using Amazon Kendra Experience Builder

Amazon Kendra is an intelligent search service powered by machine learning (ML). Amazon Kendra reimagines search for your websites and applications so your employees and customers can easily find the content they’re looking for, even when it’s scattered across multiple locations and content repositories within your organization. With Amazon Kendra, you don’t need to click through multiple documents to find the answer you’re looking for. It gives you the exact answer to your query.

Getting started with Amazon Kendra is quick and simple; you can index and start searching your content from the Amazon Kendra console in less than 10 minutes. You now have multiple ways to deploy your search application. You can use APIs to integrate with an existing search application. You can also use the downloadable React code snippets to build your own experience. Or you can use the out-of-the-box search interface with the Amazon Kendra Experience Builder to quickly configure your own custom search experience and make it available to your users.

With the new Experience Builder, you can deploy a fully functional and customizable search experience with Amazon Kendra in a few clicks, without any coding or ML experience. Experience Builder delivers an intuitive visual workflow to quickly build, customize, and launch your Amazon Kendra-powered search application, securely on the cloud. You can start with the ready-to-use search experience template in the builder, which you can customize by simply dragging and dropping the components you want, such as filters or sorting. You can invite others to collaborate or test your application for feedback, and then share the project with all users when you’re ready to deploy the experience. The Experience Builder comes with AWS Single Sign-On (AWS SSO) integration, which supports popular identity providers (IdPs) such as Azure AD and Okta, so you can deliver secure end user SSO authentication while accessing the search experience.

In this post, we discuss how to build a custom search application quickly with the Amazon Kendra Experience Builder.

Solution overview

Below are the steps to build your own custom search interface using Experience builder.

Configure your index

To build your custom search application using Amazon Kendra Experience Builder, first sign in to the Amazon Kendra console and create an index. After you create an index, add data sources to your index, such as Amazon Simple Storage Service (Amazon S3), SharePoint, or Confluence. You can skip these steps if you already have an index and data sources set up.

Create your experience

To create your experience, complete the following steps:

  1. On the Amazon Kendra console, navigate to your index.
  2. Choose Create experience.

  1. For Experience name, enter a name.
  2. Under Content sources, select the data sources you want to search.
  3. For IAM role, choose your AWS Identity and Access Management (IAM) role to grant Amazon Kendra access permissions.
  4. Choose Next.

The Experience Builder comes with AWS SSO integration, supporting popular IdPs such as Azure AD and Okta, and automatically detects AWS SSO directories in your account.

  1. In the Confirm your identity from an AWS SSO directory section, select your identity.
  2. Choose Next.

If you don’t have AWS SSO, Amazon Kendra provides an easy step to enable it and add yourself as an owner. You can then add additional lists of users or groups to your directory and assign access permissions. For example, you can assign owner or viewer permissions to users and groups as you add them to your experience. Users with viewer permissions are your end users; they’re authorized to load your search application and perform searches. Users with owner permissions are authorized to configure, design, tune, manage access, and share search experiences.

  1. After you configure your SSO and assign yourself as owner, review the settings, and choose Create experience and open Experience Builder.

After you launch the Experience Builder, you’re redirected to the URL that was generated for your experience. Here, the experience verifies if you have a valid authenticated session. If you do, you’re redirected to the Experience Builder; if not, you’re redirected to your IdP via AWS SSO to authenticate you. After authentication is successful, the IdP redirects you back to the Experience Builder.

Customize, tune, and share your experience

Now, inside the Experience Builder, you can start customizing the default template, which already comes preconfigured with most key features, such as the search box, Amazon Kendra suggested answers, FAQ matches, and recommended documents. You can customize the experience by dragging and dropping these components from the components panel onto your page canvas. You can also configure the content rendered inside each component.

For example, if you want to customize filters, choose Filter in the Design pane.

You can customize which fields you want your application to facet search results on, and assign display labels if needed.

Similarly, you can customize other UI components, including the search bar, sort, suggested answers, FAQ, and document ranking.

Optionally, you can further improve relevancy by boosting the search results using relevancy tuning.

Choose Preview to visualize your search experience without any editor tool distractions. When you’re happy with the changes, choose Publish to push the changes you made to the live or production version of the search experience.

You have successfully built and deployed a custom search application. Users with viewers permissions can now start searching by going to the search experience URL that was generated when you first created the search experience.

Conclusion

The Amazon Kendra Experience Builder enables you to configure your own custom search experience and make it available to your users in a few clicks, without any coding or ML experience.

You can use Experience Builder today in the following Regions: US East (Ohio), US East (N. Virginia), US West (Oregon), Asia Pacific (Singapore), Asia Pacific (Sydney), Europe (Ireland), and Canada (Central). For the most up-to-date information about Amazon Kendra Region availability, see AWS Regional Services.  You can configure Experience Builder using the AWS Command Line Interface (AWS CLI), AWS SDKs, and the AWS Management Console. There is no additional charge for using Experience Builder. For more information about pricing, see Amazon Kendra pricing.

To learn more about Experience Builder, visit Amazon Kendra Developer Guide


About the Authors

Jean-Pierre Dodel leads product management for Amazon Kendra, a new ML-powered enterprise search service from AWS. He brings 15 years of Enterprise Search and ML solutions experience to the team, having worked at Autonomy, HP, and search startups for many years prior to joining Amazon four years ago. JP has led the Amazon Kendra team from its inception, defining vision, roadmaps, and delivering transformative semantic search capabilities to customers like Dow Jones, Liberty Mutual, 3M, and PwC.

Read More