The benefits of peripheral vision for machines

Perhaps computer vision and human vision have more in common than meets the eye?

Research from MIT suggests that a certain type of robust computer-vision model perceives visual representations similarly to the way humans do using peripheral vision. These models, known as adversarially robust models, are designed to overcome subtle bits of noise that have been added to image data.

The way these models learn to transform images is similar to some elements involved in human peripheral processing, the researchers found. But because machines do not have a visual periphery, little work on computer vision models has focused on peripheral processing, says senior author Arturo Deza, a postdoc in the Center for Brains, Minds, and Machines.

“It seems like peripheral vision, and the textural representations that are going on there, have been shown to be pretty useful for human vision. So, our thought was, OK, maybe there might be some uses in machines, too,” says lead author Anne Harrington, a graduate student in the Department of Electrical Engineering and Computer Science.

The results suggest that designing a machine-learning model to include some form of peripheral processing could enable the model to automatically learn visual representations that are robust to some subtle manipulations in image data. This work could also help shed some light on the goals of peripheral processing in humans, which are still not well-understood, Deza adds.

The research will be presented at the International Conference on Learning Representations.

Double vision

Humans and computer vision systems both have what is known as foveal vision, which is used for scrutinizing highly detailed objects. Humans also possess peripheral vision, which is used to organize a broad, spatial scene. Typical computer vision approaches attempt to model foveal vision — which is how a machine recognizes objects — and tend to ignore peripheral vision, Deza says.

But foveal computer vision systems are vulnerable to adversarial noise, which is added to image data by an attacker. In an adversarial attack, a malicious agent subtly modifies images so each pixel has been changed very slightly — a human wouldn’t notice the difference, but the noise is enough to fool a machine. For example, an image might look like a car to a human, but if it has been affected by adversarial noise, a computer vision model may confidently misclassify it as, say, a cake, which could have serious implications in an autonomous vehicle.

To overcome this vulnerability, researchers conduct what is known as adversarial training, where they create images that have been manipulated with adversarial noise, feed them to the neural network, and then correct its mistakes by relabeling the data and then retraining the model.

“Just doing that additional relabeling and training process seems to give a lot of perceptual alignment with human processing,” Deza says.

He and Harrington wondered if these adversarially trained networks are robust because they encode object representations that are similar to human peripheral vision. So, they designed a series of psychophysical human experiments to test their hypothesis.

Screen time

They started with a set of images and used three different computer vision models to synthesize representations of those images from noise: a “normal” machine-learning model, one that had been trained to be adversarially robust, and one that had been specifically designed to account for some aspects of human peripheral processing, called Texforms. 

The team used these generated images in a series of experiments where participants were asked to distinguish between the original images and the representations synthesized by each model. Some experiments also had humans differentiate between different pairs of randomly synthesized images from the same models.

Participants kept their eyes focused on the center of a screen while images were flashed on the far sides of the screen, at different locations in their periphery. In one experiment, participants had to identify the oddball image in a series of images that were flashed for only milliseconds at a time, while in the other they had to match an image presented at their fovea, with two candidate template images placed in their periphery.

demo of systemexample of experiment

When the synthesized images were shown in the far periphery, the participants were largely unable to tell the difference between the original for the adversarially robust model or the Texform model. This was not the case for the standard machine-learning model.

However, what is perhaps the most striking result is that the pattern of mistakes that humans make (as a function of where the stimuli land in the periphery) is heavily aligned across all experimental conditions that use the stimuli derived from the Texform model and the adversarially robust model. These results suggest that adversarially robust models do capture some aspects of human peripheral processing, Deza explains.

The researchers also computed specific machine-learning experiments and image-quality assessment metrics to study the similarity between images synthesized by each model. They found that those generated by the adversarially robust model and the Texforms model were the most similar, which suggests that these models compute similar image transformations.

“We are shedding light into this alignment of how humans and machines make the same kinds of mistakes, and why,” Deza says. Why does adversarial robustness happen? Is there a biological equivalent for adversarial robustness in machines that we haven’t uncovered yet in the brain?”

Deza is hoping these results inspire additional work in this area and encourage computer vision researchers to consider building more biologically inspired models.

These results could be used to design a computer vision system with some sort of emulated visual periphery that could make it automatically robust to adversarial noise. The work could also inform the development of machines that are able to create more accurate visual representations by using some aspects of human peripheral processing.

“We could even learn about human vision by trying to get certain properties out of artificial neural networks,” Harrington adds.

Previous work had shown how to isolate “robust” parts of images, where training models on these images caused them to be less susceptible to adversarial failures. These robust images look like scrambled versions of the real images, explains Thomas Wallis, a professor for perception at the Institute of Psychology and Centre for Cognitive Science at the Technical University of Darmstadt.

“Why do these robust images look the way that they do? Harrington and Deza use careful human behavioral experiments to show that peoples’ ability to see the difference between these images and original photographs in the periphery is qualitatively similar to that of images generated from biologically inspired models of peripheral information processing in humans,” says Wallis, who was not involved with this research. “Harrington and Deza propose that the same mechanism of learning to ignore some visual input changes in the periphery may be why robust images look the way they do, and why training on robust images reduces adversarial susceptibility. This intriguing hypothesis is worth further investigation, and could represent another example of a synergy between research in biological and machine intelligence.”

This work was supported, in part, by the MIT Center for Brains, Minds, and Machines and Lockheed Martin Corporation.

Read More

Announcing the AWS DeepRacer League 2022

Unleash the power of machine learning (ML) through hands-on learning and compete for prizes and glory. The AWS DeepRacer League is the world’s first global autonomous racing competition driven by reinforcement learning; bringing together students, professionals, and enthusiasts from almost every continent.

I’m Tomasz Ptak, a senior software engineer at Duco, an AWS Machine Learning Hero, an AWS DeepRacer competitor (named Breadcentric), a hobbyist baker, and a leader of the AWS Machine Learning Community on Slack, where we learn, race, and help each other start and grow our adventures in the cloud. It’s my pleasure to unveil the exciting details of the upcoming 2022 AWS DeepRacer League season.

What is AWS DeepRacer?

AWS DeepRacer is a 1/18th scale autonomous race car—but also much more. It’s a complete program that has helped over 175,000 individuals from over 700 businesses, educational institutions, and organizations begin their educational journey into machine learning through fun and rivalry.

AWS DeepRacer League 2022

Over 100,000 developers took part in the 2021 season of the AWS DeepRacer League. They got hands-on with reinforcement learning by participating in a workshop or training a model to achieve the fastest lap on the eight monthly global leaderboards. The monthly winners from these races joined us for the fully virtual 2021 Championship during the month of November, with the head-to head live finale taking place on November 23, 2021.

Due to restrictions on global travel in 2021, the entire AWS DeepRacer League was hosted within the Virtual Circuit. Although it made for entertaining livestream events that brought racers together each month from around the globe, it’s my opinion that nothing compares to the excitement of bringing the community together to race in person in the same room. That’s why I’m so thrilled that in 2022, the AWS DeepRacer League Summit Circuit will be back with 17 stops across five continents. We will learn the exact number of races after the AWS Summits dates are announced.

New in 2022, the AWS Summit Circuit structure is fully revamped, adding new regional playoffs coming this fall on the AWS Twitch channel. The top two competitors of each AWS Summit event will advance to the regional playoff round, where they will compete with other developers from their region for a chance to win a trip to Las Vegas to compete in the Championship Cup at AWS re:Invent 2022. In total, 15 participants from the AWS Summit Circuit regional playoffs will advance to the AWS DeepRacer League Championships. More on that later in this post.

That’s not all—anyone can participate in the AWS DeepRacer League Virtual Circuit races, the first of which is starting today, March 1, 2022. The Virtual Circuit consists of 8 months of racing in two divisions: Open and Pro. All racers start in the Open Division (except for the top three champions from 2021), competing in time trial races. At the end of each month, the top 10% of racers in the Open Division will advance to the pros and win a Pro Division welcome kit including swag, stickers, and a “Pro Driver’s License” certificate. Once in the Pro Division, racers will take part in car-to-bot racing to qualify for the Pro Finale, an entertaining live virtual race that you can tune in to watch, hear from the pros as they compete, and get exclusive offers and prizes. The top three each month advance to the AWS DeepRacer League Championships. Each Pro Finale race is recapped in an AWS DeepRacer community blog post and streamed live on Twitch.

The 10 best racers each month win an AWS DeepRacer car or cash equivalent in countries where the car is unavailable for shipping. Also, every month participants receive new digital rewards such as a new car shell revealed on the AWS DeepRacer console.

In March, Open Division racers will take on the Rogue Circuit, named in honor of the 2021 DeepRacer Championship Cup winner Sairam Naragoni (a.k.a. JPMC-Rogue-Hyderabad), the Rogue Circuit is a moderately short loop (48.06m) featuring a classic kidney style shape reminiscent of the AWS re:Invent 2019 track. Meanwhile the Pros will attempt to navigate the more challenging Rogue Raceway this month based on a brand new real world track near Sairam’s hometown of Hyderabad in India.

Also new for 2022, the AWS DeepRacer Student League is launching AWS DeepRacer Student. Over the last two seasons, participation by students such as the Canberra Grammar School in Australia, NYCU Taiwan, and Hong Kong Institute of Vocational Education (IVE) have catapulted students to the top of the global league. This year, in addition to being able to race in the Open and Pro divisions, students will get a league of their own with AWS DeepRacer Student. Students can access 10 hours of free training and compete each month for a chance to win prizes, scholarships, and even place as one of three wildcards in the global championships.

The 15 AWS Summit Circuit, 24 Virtual Circuit, and 3 student racers will be joined by the 2021 AWS DeepRacer League Champion Sairam Naragoni (racing as JPMC-Rogue-Hyderabad), 2021 AWS DeepRacer re:Invent Live Stream Champion Eric Morrison, and six enterprise wildcards to form a group of 50 finalists.

For the first time since 2019, the qualification will include a trip to re:Invent in Las Vegas, where racers can compete for the title of 2022 AWS DeepRacer League Champion, which comes with bragging rights, prizes, and glory.

So join the competition virtually now in either the Student League or Open League, join the AWS DeepRacer community, and plan a trip to a nearby AWS Summit to start your adventure.You can also learn more about how to create AWS DeepRacer events for your organization on the AWS DeepRacer enterprise events page. I hope to see you on the track and in the community.


About the Author

Tomasz Ptak is a senior software engineer at Duco, an AWS Machine Learning Hero,  an AWS DeepRacer competitor (named Breadcentric), a hobbyist baker, and a leader of the AWS Machine Learning Community on Slack, where we learn, race, and help each other start and grow our adventures in the cloud.

Read More

Train 175+ billion parameter NLP models with model parallel additions and Hugging Face on Amazon SageMaker

The last few years have seen rapid development in the field of natural language processing (NLP). While hardware has improved, such as with the latest generation of accelerators from NVIDIA and Amazon, advanced machine learning (ML) practitioners still regularly run into issues scaling their large language models across multiple GPU’s.

In this blog post, we briefly summarize the rise of large- and small- scale NLP models, primarily through the abstraction provided by Hugging Face and with the modular backend of Amazon SageMaker. In particular we highlight the launch of four additional features within the SageMaker model parallel library that unlock 175 billion parameter NLP model pretraining and fine-tuning for customers.

We used this library on the SageMaker training platform and achieved a throughput of 32 samples per second on 120 ml.p4d.24xlarge instances and 175 billion parameters. We anticipate that if we increased this up to 240 instances, the full model would take 25 days to train.

For more information about model parallelism, see the paper Amazon SageMaker Model Parallelism: A General and Flexible Framework for Large Model Training.

You can also see the GPT2 notebook we used to generate these performance numbers on our GitHub repository.

To learn more about how to use the new features within SageMaker model parallel, refer to Extended Features of the SageMaker Model Parallel Library for PyTorch, and Use with the SageMaker Python SDK.

NLP on Amazon SageMaker – Hugging Face and model parallelism

If you’re new to Hugging Face and NLP, the biggest highlight you need to know is that applications using natural language processing (NLP) are starting to achieve human level performance. This is largely driven by a learning mechanism, called attention,  which gave rise to a deep learning model, called the transformer, that is much more scalable than previous deep learning sequential methods. The now-famous BERT model was developed to capitalize on the transformer, and developed several useful NLP tactics along the way. Transformers and the suite of models, both within and outside of NLP, which have all been inspired by BERT, are the primary engine behind your Google search results, in your Google translate results, and a host of new startups.

SageMaker and Hugging Face partnered to make this easier for customers than ever before. We’ve launched Hugging Face deep learning containers (DLC’s) for you to train and host pre-trained models directly from Hugging Face’s repository of over 26,000 models. We’ve launched the SageMaker Training Compiler for you to speed up the runtime of your Hugging Face training loops by up to 50%. We’ve also integrated the Hugging Face flagship Transformers SDK with our distributed training libraries to make scaling out your NLP models easier than ever before.

For more information about Hugging Face Transformer models on Amazon SageMaker, see Support for Hugging Face Transformer Models.

New features for large-scale NLP model training with the SageMaker model parallel library 

At AWS re:Invent 2020, SageMaker launched distributed libraries that provide the best performance on the cloud for training computer vision models like Mask-RCNN and NLP models like T5-3B. This is possible through enhanced communication primitives that are 20-40% faster than NCCL on AWS, and model distribution techniques that enable extremely large language models to scale across tens to hundreds to thousands of GPUs.

The SageMaker model parallel library (SMP) has always given you the ability to take your predefined NLP model in PyTorch, be that through Hugging Face or elsewhere, and partition that model onto multiple GPUs in your cluster. Said another way, SMP breaks up your model into smaller chunks so you don’t experience out of memory (OOM) errors. We’re pleased to add additional memory-saving techniques that are critical for large scale models, namely:

  • Tensor parallelism
  • Optimizer state sharding
  • Activation checkpointing
  • Activation offloading

You can combine these four features can be combined to utilize memory more efficiently and train the next generation of extreme scale NLP models.

Distributed training and tensor parallelism

To understand tensor parallelism, it’s helpful to know that there are many kinds of distributed training, or parallelism. You’re probably already familiar with the most common type, data parallelism. The core of data parallelism works like this: you add an extra node to your cluster, such as going from one to two ml.EC2 instances in your SageMaker estimator. Then, you use a data parallel framework like Horovod, PyTorch Distributed Data Parallel, or SageMaker Distributed. This creates replicas of your model, one per accelerator, and handles sharding out the data to each node, along with bringing all the results together during the back propagation step of your neural network. Think distributed gradient descent. Data parallelism is also popular within servers; you’re sharding data into all the GPUs, and occasionally CPUs, on all of your nodes. The following diagram illustrates data parallelism.

Model parallelism is slightly different. Instead of making copies of the same model, we split your model into pieces. Then we manage the running it, so your data is still flowing through your neural network in exactly the same way mathematically, but different pieces of your model are sitting on different GPUs. If you’re using an ml.p3.8xlarge, you’ve got four NVIDIA V100’s, so you’d probably want to shard your model into 4 pieces, one piece per GPU. If you jump up to two ml.p4d.24xlarge’s, that’s 16 A100’s total in your cluster, so you might break your model into 16 pieces. This is also sometimes called pipeline parallelism. That’s because the set of layers in the network are partitioned across GPUs, and run in a pipelined manner to maximize the GPU utilization. The following diagram illustrates model parallelism.

To make model parallelism happen at scale, we need a third type of distribution: tensor parallelism. Tensor parallelism applies the same concepts at one step further—we break apart the largest layers of your neural network and place parts of the layers themselves on different devices. This is relevant when you’re working with 175 billion parameters or more, and trying to fit even a few records into RAM, along with parts of your model, to train that transformer. The following diagram illustrates tensor parallelism.

To enable tensor parallelism, set it within the smp options you pass to your estimator.

In the preceding code, pipeline_parallel_degree describes into how many segments your model should be sharded, based on the pipeline parallelism we discussed above. Another word for this is partitions.

To enable tensor parallelism, set tensor_parallel_degree  to your desired level. Make sure you’re picking a number equal to or smaller than the number of GPU’s per instance, so no greater than 8 for the ml.p4d.24xlarge machines. For additional script changes, refer to Run a SageMaker Distributed Model Parallel Training Job with Tensor Parallelism.

The ddp parameter refers to distributed data parallel. You typically enable this if you’re using data parallelism or tensor parallelism, because the model parallelism library relies on DDP for these features.

Optimizer state sharding, activation offloading and checkpoints

If you have an extremely large model, you also need an extremely large optimizer state. Prepping your optimizer for SMP is straightforward: simply pick it up from disk in your script and load it into the smp.DistributedOptimizer() object.

Make sure you enable this at the estimator by setting shard_optimizer_state to True in the smp_options you use to configure SMP:

Similar to tensor and pipeline parallelism, SMP profiles your model and your world size (the total number of GPUs in all of your training nodes), to find the best placement strategies.

In deep learning the intermediate layer outputs are also called activations, and these need to be stored during forward pass. This is because they need to be used for gradient computation in the backward pass. In a large model, storing all these activations simultaneously in memory can create significant memory bottlenecks. To address this bottleneck, you can use activation checkpointing, the third new feature in the SageMaker model parallelism library. Activation checkpointing, or gradient checkpointing, is a technique to reduce memory usage by clearing activations of certain layers and recomputing them during a backward pass. This effectively trades extra computation time for reduced memory usage.

Lastly, activation offloading directly uses activation checkpointing. It’s a strategy to keep only a few tensor activations on the GPU RAM during the model training. Specifically, we move the checkpointed activations to CPU memory during the forward pass and load them back to GPU for the backward pass of a specific micro-batch.

 Micro-batches and placement strategies

Other topics that sometimes cause customers confusion are micro-batches and placement strategies. Both of these are hyperparameters you can supply to the SageMaker model parallel library. Specifically micro-batches are relevant when implementing models that rely on pipeline parallelism, such as those at least 30 billion parameters in size or more.

Micro-batches are subsets of minibatches. When your model is in its training loop, you define a certain number of records to pick up and pass forward and backward through the layers–this is called a minibatch, or sometimes just a batch. A full pass through your dataset is called an epoch. To run forward and backward passes with pipeline parallelism, SageMaker model parallel library shards the batches into smaller subsets called micro-batches, which are run one at a time to maximize GPU utilization. The resultant, much smaller set of examples per-GPU, is called a micro-batch. In our GPT-2 example, we added a default of 1 microbatch directly to the training script.

As you scale up your training configuration, you are strongly recommended to change your batch size and micro-batch size accordingly. This is the only way to ensure good performance: you must consider batch size and micro-batch sizes as a function of your overall world size when relying on pipeline parallelism.

Placement strategies are how to tell SageMaker physically where to place your model partitions. If you’re using both model parallel and data parallel, setting placement_strategy to “cluster” places model replicas in device ID’s (GPUs) that are physically close to each other. However, if you really want to be more prescriptive about your parallelism strategy, you can break it down into a single string with different combinations of three letters: D for data parallelism, P indicates pipeline parallelism, and T for tensor parallelism. We generally recommend keeping the default placement of "cluster", because this is most appropriate for large scale model training. The “cluster” placement corresponds to “DPT“.

For more information about placement strategies, see Placement Strategy with Tensor Parallelism.

Example use case

Let’s imagine you have one ml.p3.16xlarge in your training job. That gives you 8 NVIDIA V100’s per node. Remember, every time you add an extra instance, you experience additional bandwidth overhead, so it’s always better to have more GP’Us on a single node. In this case, you’re better off with one ml.p3.16xlarge than, for example, two ml.p3.8xlarges. Even though the number of GPUs is the same, the extra bandwidth overhead of the extra node slows down your throughput.

The following diagram illustrates four-way model parallelism, combined with two-way data parallelism. This means you actually have two replicas of your model (think data parallel), with each of them partitioned across four GPU’s (model parallel).

If any of those model partitions are too large to fit onto a single GPU, you can add an extra type of distribution–tensor parallelism–to spit it and utilize both devices.

Conclusion

In this blog post we discussed SageMaker distributed training libraries, especially focusing on model parallelism. We shared performance benchmarks from our latest test, achieving 32 samples per second  across 120 ml.p4d.24xlarge instances and 175B parameters on Amazon SageMaker. We anticipate that if we increased this to 240 p4 instances we could train a 175B parameter model in 25 days.

We also discussed the newest features the enable large-scale training, namely tensor parallelism, optimizer state sharding, activation checkpointing, and activation offloading. We shared some tips and tricks for enabling this through training on Amazon SageMaker.

Try it out yourself using the same notebook that generated our numbers, which is available on GitHub here. You can also request more GPUs for your AWS account through requesting a service limit approval right here.


About the Authors

Emily Webber joined AWS just after SageMaker launched, and has been trying to tell the world about it ever since! Outside of building new ML experiences for customers, Emily enjoys meditating and studying Tibetan Buddhism.

Aditya Bindal is a Senior Product Manager for AWS Deep Learning. He works on products that make it easier for customers to train deep learning models on AWS. In his spare time, he enjoys spending time with his daughter, playing tennis, reading historical fiction, and traveling.

Luis Quintela is the Software Developer Manager for the AWS SageMaker model parallel library. In his spare time, he can be found riding his Harley in the SF Bay Area.

Read More

Co-training Transformer with Videos and Images Improves Action Recognition

Action recognition has become a major focus area for the research community because many applications can benefit from improved modeling, such as video retrieval, video captioning, video question-answering, etc. Transformer-based approaches have recently demonstrated state-of-the-art performance on several benchmarks. While Transformer models require data to learn better visual priors compared to ConvNets, action recognition datasets are relatively small in scale. Large Transformer models are typically first trained on image datasets and later fine-tuned on a target action recognition dataset.

While the current pre-training and fine-tuning action recognition paradigm is straightforward and manifests strong empirical results, it may be overly restrictive for building general-purpose action-recognition models. Compared to a dataset like ImageNet that covers a large range of object recognition classes, action recognition datasets like Kinetics and Something-Something-v2 (SSv2) pertain to limited topics. For example, Kinetics include object-centric actions like “cliff diving” and “ice climbing’ while SSv2 contains object-agnostic activities like ’pretending to put something onto something else.’ As a result, we observed poor performance adapting an action recognition model that has been fine-tuned on one dataset to another disparate dataset.

Differences in objects and video backgrounds among datasets further exacerbate learning a general-purpose action recognition classification model. Despite the fact that video datasets may be increasing in size, prior work suggests significant data augmentation and regularization is necessary to achieve strong performance. This latter finding may indicate the model quickly overfits on the target dataset, and as a result, hinders its capacity to generalize to other action recognition tasks.

In “Co-training Transformer with Videos and Images Improves Action Recognition”, we propose a training strategy, named CoVeR, that leverages both image and video data to jointly learn a single general-purpose action recognition model. Our approach is buttressed by two main findings. First, disparate video datasets cover a diverse set of activities, and training them together in a single model could lead to a model that excels at a wide range of activities. Second, video is a perfect source for learning motion information, while images are great for exploiting structural appearance. Leveraging a diverse distribution of image examples may be beneficial in building robust spatial representations in video models. Concretely, CoVeR first pre-trains the model on an image dataset, and during fine-tuning, it simultaneously trains a single model on multiple video and image datasets to build robust spatial and temporal representations for a general-purpose video understanding model.

Architecture and Training Strategy
We applied the CoVeR approach to the recently proposed spatial-temporal video transformer, called TimeSFormer, that contains 24 layers of transformer blocks. Each block contains one temporal attention, one spatial attention, and one multilayer perceptron (MLP) layer. To learn from multiple video and image datasets, we adopt a multi-task learning paradigm and equip the action recognition model with multiple classification heads. We pre-train all non-temporal parameters on the large-scale JFT dataset. During fine-tuning, a batch of videos and images are sampled from multiple video and image datasets. The sampling rate is proportional to the size of the datasets. Each sample within the batch is processed by the TimeSFormer and then distributed to the corresponding classifier to get the predictions.

Compared with the standard training strategy, CoVeR has two advantages. First, as the model is directly trained on multiple datasets, the learned video representations are more general and can be directly evaluated on those datasets without additional fine-tuning. Second, Transformer-based models may easily overfit to a smaller video distribution, thus degrading the generalization of the learned representations. Training on multiple datasets mitigates this challenge by reducing the risk of overfitting.

CoVeR adopts a multi-task learning strategy trained on multiple datasets, each with their own classifier.

Benchmark Results
We evaluate the CoVeR approach to train on Kinetics-400 (K400), Kinetics-600 (K600), Kinetics-700 (K700), SomethingSomething-V2 (SSv2), and Moments-in-Time (MiT) datasets. Compared with other approaches — such as TimeSFormer, Video SwinTransformer, TokenLearner, ViViT, MoViNet, VATT, VidTr, and OmniSource — CoVeR established the new state-of-the-art on multiple datasets (shown below). Unlike previous approaches that train a dedicated model for one single dataset, a model trained by CoVeR can be directly applied to multiple datasets without further fine-tuning.

Model Pretrain Finetune K400 Accuracy
VATT AudioSet+Videos K400 82.1
Omnisource IG-Kinetics-65M K400 83.6
ViViT JFT-300M K400 85.4
Video SwinTrans   ImageNet21K+external   K400 86.8
CoVeR JFT-3B K400+SSv2+MiT+ImNet 87.2
Accuracy comparison on Kinetics-400 (K400) dataset.
Model Pretrain Finetune SSv2 Accuracy
TimeSFormer ImageNet21k SSv2 62.4
VidTr ImageNet21k SSv2 63.0
ViViT ImageNet21k SSv2 65.9
Video SwinTrans   ImageNet21K+external   SSv2 69.6
CoVeR JFT-3B K400+SSv2+MiT+ImNet 70.9
Accuracy comparison on SomethingSomething-V2 (SSv2) dataset.
Model Pretrain Finetune MiT Accuracy
ViViT ImageNet21k MiT 38.5
VidTr ImageNet21k SSv2 41.1
CoVeR JFT-3B K400+SSv2+MiT+ImNet 46.1
Accuracy comparison on Moments-in-Time (MiT) dataset.

Transfer Learning
We use transfer learning to further verify the video action recognition performance and compare with co-training on multiple datasets, results are summarized below. Specifically, we train on the source datasets, then fine-tune and evaluate on the target dataset.

We first consider K400 as the target dataset. CoVeR co-trained on SSv2 and MiT improves the top-1 accuracy on K400→K400 (where the model is trained on K400 and then fine-tuned on K400) by 1.3%, SSv2→K400 by 1.7%, and MiT→K400 by 0.4%. Similarly, we observe that by transferring to SSv2, CoVeR achieves 2%, 1.8%, and 1.1% improvement over SSv2→SSv2, K400→SSv2, and MiT→SSv2, respectively. The 1.2% and 2% performance improvement on K400 and SSv2 indicates that CoVeR co-trained on multiple datasets could learn better visual representations than the standard training paradigm, which is useful for downstream tasks.

Comparison of transfer learning the representation learned by CoVeR and standard training paradigm. A→B means the model is trained on dataset A and then fine-tuned on dataset B.

Conclusion
In this work, we present CoVeR, a training paradigm that jointly learns action recognition and object recognition tasks in a single model for the purpose of constructing a general-purpose action recognition framework. Our analysis indicates that it may be beneficial to integrate many video datasets into one multi-task learning paradigm. We highlight the importance of continuing to learn on image data during fine-tuning to maintain robust spatial representations. Our empirical findings suggest CoVeR can learn a single general-purpose video understanding model which achieves impressive performance across many action recognition datasets without an additional stage of fine-tuning on each downstream application.

Acknowledgements
We would like to thank Christopher Fifty, Wei Han, Andrew M. Dai, Ruoming Pang, and Fei Sha for preparation of the CoVeR paper, Yue Zhao, Hexiang Hu, Zirui Wang, Zitian Chen, Qingqing Huang, Claire Cui and Yonghui Wu for helpful discussions and feedbacks, and others on the Brain Team for support throughout this project.

Read More

ML inferencing at the edge with Amazon SageMaker Edge and Ambarella CV25

Ambarella builds computer vision SoCs (system on chips) based on a very efficient AI chip architecture and CVflow that provides the Deep Neural Network (DNN) processing required for edge inferencing use cases like intelligent home monitoring and smart surveillance cameras. Developers convert models trained with frameworks (such as TensorFlow or MXNET) to Ambarella CVflow format to be able to run these models on edge devices. Amazon SageMaker Edge has integrated the Ambarella toolchain into its workflow, allowing you to easily convert and optimize your models for the platform.

In this post, we show how to set up model optimization and conversion with SageMaker Edge, add the model to your edge application, and deploy and test your new model in an Ambarella CV25 device to build a smart surveillance camera application running on the edge.

Smart camera use case

Smart security cameras have use case-specific machine learning (ML) enabled features like detecting vehicles and animals, or identifying possible suspicious behavior, parking, or zone violations. These scenarios require ML models run on the edge computing unit in the camera with the highest possible performance.

Ambarella’s CVx processors, based on the company’s proprietary CVflow architecture, provide high DNN inference performance at very low power. This combination of high performance and low power makes them ideal for devices that require intelligence at the edge. ML models need to be optimized and compiled for the target platform to run on the edge. SageMaker Edge plays a key role in optimizing and converting ML models to the most popular frameworks to be able to run on the edge device.

Solution overview

Our smart security camera solution implements ML model optimization and compilation configuration, runtime operation, inference testing, and evaluation on the edge device. SageMaker Edge provides model optimization and conversion for edge devices to run faster with no loss in accuracy. The ML model can be in any framework that SageMaker Edge supports. For more information, see Supported Frameworks, Devices, Systems, and Architectures.

The SageMaker Edge integration of Ambarella CVflow tools provides additional advantages to developers using Ambarella SoCs:

  • Developers don’t need to deal with updates and maintenance of the compiler toolchain, because the toolchain is integrated and opaque to the user
  • Layers that CVflow doesn’t support are automatically compiled to run on the ARM by the SageMaker Edge compiler

The following diagram illustrates the solution architecture:

The steps to implement the solution are as follows:

  1. Prepare the model package.
  2. Configure and start the model’s compilation job for Ambarella CV25.
  3. Place the packaged model artifacts on the device.
  4. Test the inference on the device.

Prepare the model package

For Ambarella targets, SageMaker Edge requires a model package that contains a model configuration file called amba_config.json, calibration images, and a trained ML model file. This model package file is a compressed TAR file (*.tar.gz). You can use an Amazon Sagemaker notebook instance to train and test ML models and to prepare the model package file. To create a notebook instance, complete the following steps:

  1. On the SageMaker console, under Notebook in the navigation pane, choose Notebook instances.
  2. Choose Create notebook instance.
  3. Enter a name for your instance and choose ml.t2.medium as the instance type.

This instance is enough for testing and model preparation purposes.

  1. For IAM role, create a new AWS Identity and Access Management (IAM) role to allow access to Amazon Simple Storage Service (Amazon S3) buckets, or choose an existing role.
  2. Keep other configurations as default and choose Create notebook instance.

When the status is InService, you can start using your new Sagemaker notebook instance.

  1. Choose Open JupyterLab to access your workspace.

For this post, we use a pre-trained TFLite model to compile and deploy to the edge device. The chosen model is a pre-trained SSD object detection model from the TensorFlow model zoo on the COCO dataset.

  1. Download the converted TFLite model.

Now you’re ready to download, test, and prepare the model package.

  1. Create a new notebook with kernel conda_tensorflow2_p36 on the launcher view.
  2. Import the required libraries as follows:
    import cv2
    import numpy as np
    from tensorflow.lite.python.interpreter import Interpreter

  3. Save the following example image as street-frame.jpg, create a folder called calib_img in the workspace folder, and upload the image to the current folder.
  4. Upload the downloaded model package contents to the current folder.
  5. Run the following command to load your pre-trained TFLite model and print its parameters, which we need to configure our model for compilation:
    interpreter = Interpreter(model_path='ssd_mobilenet_v1_coco_2018_01_28.tflite')
    interpreter.allocate_tensors()
    
    input_details = interpreter.get_input_details()
    output_details = interpreter.get_output_details()
    height = input_details[0]['shape'][1]
    width = input_details[0]['shape'][2]
    
    print("Input name: '{}'".format(input_details[0]['name']))
    print("Input Shape: {}".format(input_details[0]['shape'].tolist()))

    The output contains the input name and input shape:

    Input name: 'normalized_input_image_tensor'
    Input Shape: [1, 300, 300, 3]

  6. Use following code to load the test image and run inference:
    image = cv2.imread("calib_img/street-frame.jpg")
    image_rgb = cv2.cvtColor(image, cv2.COLOR_BGR2RGB)
    imH, imW, _ = image.shape
    image_resized = cv2.resize(image_rgb, (width, height))
    input_data = np.expand_dims(image_resized, axis=0)
    
    input_data = (np.float32(input_data) - 127.5) / 127.5
    
    interpreter.set_tensor(input_details[0]['index'], input_data)
    interpreter.invoke()
    
    boxes = interpreter.get_tensor(output_details[0]['index'])[0]
    classes = interpreter.get_tensor(output_details[1]['index'])[0]
    scores = interpreter.get_tensor(output_details[2]['index'])[0]
    num = interpreter.get_tensor(output_details[3]['index'])[0]

  7. Use the following code to visualize the detected bounding boxes on the image and save the result image as street-frame_results.jpg:
    with open('labelmap.txt', 'r') as f:
        labels = [line.strip() for line in f.readlines()]
    
    for i in range(len(scores)):
        if ((scores[i] > 0.1) and (scores[i] <= 1.0)):
            ymin = int(max(1, (boxes[i][0] * imH)))
            xmin = int(max(1, (boxes[i][1] * imW)))
            ymax = int(min(imH, (boxes[i][2] * imH)))
            xmax = int(min(imW, (boxes[i][3] * imW)))
    
            cv2.rectangle(image, (xmin, ymin), (xmax, ymax), (10, 255, 0), 2)
    
            object_name = labels[int(classes[i])]
            label = '%s: %d%%' % (object_name, int(scores[i]*100))
            labelSize, baseLine = cv2.getTextSize(label, cv2.FONT_HERSHEY_SIMPLEX, 0.7, 2)
            label_ymin = max(ymin, labelSize[1] + 10)
            cv2.rectangle(image, (xmin, label_ymin-labelSize[1]-10), (xmin + labelSize[0], label_ymin+baseLine-10), (255, 255, 255), cv2.FILLED)
            cv2.putText(image, label, (xmin, label_ymin-7), cv2.FONT_HERSHEY_SIMPLEX, 0.7, (0, 0, 0), 2)
    
    cv2.imwrite('street-frame_results.jpg', image)

  8. Use following command to show the result image:
    Image(filename='street-frame_results.jpg') 

You get an inference result like the following image.

Our pre-trained TFLite model detects the car object from a security camera frame.

We’re done with testing the model; now let’s package the model and configuration files that Amazon Sagemaker Neo requires for Ambarella targets.

  1. Create an empty text file called amba_config.json and use the following content for it:
    {
        "inputs": {
            "normalized_input_image_tensor": {
                "shape": "1, 300, 300, 3",
                "filepath": "calib_img/"
            }
        }
    }

This file is the compilation configuration file for Ambarella CV25. The filepath value inside amba_config.json should match the calib_img folder name; a mismatch may cause a failure.

The model package contents are now ready.

  1. Use the following commands to compress the package as a .tar.gz file:
    import tarfile
    with tarfile.open('ssd_mobilenet_v1_coco_2018_01_28.tar.gz', 'w:gz') as f:
        f.add('calib_img/')
        f.add('amba_config.json')
        f.add('ssd_mobilenet_v1_coco_2018_01_28.tflite')

  2. Upload the file to the SageMaker auto-created S3 bucket to use in the compilation job (or your designated S3 bucket):
    import sagemaker
    sess = sagemaker.Session()
    bucket = sess.default_bucket() 
    print("S3 bucket: "+bucket)
    prefix = 'raw-models'
    model_path = sess.upload_data(path='ssd_mobilenet_v1_coco_2018_01_28.tar.gz', key_prefix=prefix)
    print("S3 uploaded model path: "+model_path)

The model package file contains calibration images, the compilation config file, and model files. After you upload the file to Amazon S3, you’re ready to start the compilation job.

Compile the model for Ambarella CV25

To start the compilation job, complete the following steps:

  1. On the SageMaker console, under Inference in the navigation pane, choose Compilation jobs.
  2. Choose Create compilation job.
  3. For Job name, enter a name.
  4. For IAM role, create a role or choose an existing role to give Amazon S3 read and write permission for the model files.
  5. In the Input configuration section, for Location of model artifacts, enter the S3 path of your uploaded model package file.
  6. For Data input configuration, enter {"normalized_input_image_tensor":[1, 300, 300, 3]}, which is the model’s input data shape obtained in previous steps.
  7. For Machine learning framework, choose TFLite.
  8. In the Output configuration section, for Target device, choose your device (amba_cv25).
  9. For S3 Output location, enter a folder in your S3 bucket for the compiled model to be saved in.
  10. Choose Submit to start the compilation process.

The compilation time depends on your model size and architecture. When your compiled model is ready in Amazon S3, the Status column shows as COMPLETED.

If the compilation status shows FAILED, refer to Troubleshoot Ambarella Errors to debug compilation errors.

Place the model artifacts on the device

When the compilation job is complete, Neo saves the compiled package to the provided output location in the S3 bucket. The compiled model package file contains the converted and optimized model files, their configuration, and runtime files.

On the Amazon S3 console, download the compiled model package, then extract and transfer the model artifacts to your device to start using it with your edge ML inferencing app.

Test the ML inference on the device

Navigate to your Ambarella device’s terminal and run the inferencing application binary on the device. The compiled and optimized ML model runs for the specified video source. You can observe detected bounding boxes on the output stream, as shown in the following screenshot.

Conclusion

In this post, we accomplished ML model preparation and conversion to Ambarella targets with SageMaker Edge, which has integrated the Ambarella toolchain. Optimizing and deploying high-performance ML models to Ambarella’s low-power edge devices unlocks intelligent edge solutions like smart security cameras.

As a next step, you can get started with SageMaker Edge and Ambarella CV25 to enable ML for edge devices. You can extend this use case with Sagemaker ML development features to build an end-to-end pipeline that includes edge processing and deployment.


About the Authors

Emir Ayar is an Edge Prototyping Lead Architect on the AWS Prototyping team. He specializes in helping customers build IoT, Edge AI, and Industry 4.0 solutions and implement architectural best practices. He lives in Luxembourg and enjoys playing synthesizers.

Dinesh Balasubramaniam is responsible for marketing and customer support for Ambarella’s family of security SoCs, with expertise in systems engineering, software development, video compression, and product design. Dinesh He earned an MS EE degree from the University of Texas at Dallas with a focus on signal processing.

Read More

Anomaly detection with Amazon SageMaker Edge Manager using AWS IoT Greengrass V2

Deploying and managing machine learning (ML) models at the edge requires a different set of tools and skillsets as compared to the cloud. This is primarily due to the hardware, software, and networking restrictions at the edge sites. This makes deploying and managing these models more complex. An increasing number of applications, such as industrial automation, autonomous vehicles, and automated checkouts, require ML models that run on devices at the edge so predictions can be made in real time when new data is available.

Another common challenge you may face when dealing with computing applications at the edge is how to efficiently manage the fleet of devices at scale. This includes installing applications, deploying application updates, deploying new configurations, monitoring device performance, troubleshooting devices, authenticating and authorizing devices, and securing the data transmission. These are foundational features for any edge application, but creating the infrastructure needed to achieve a secure and scalable solution requires a lot of effort and time.

On a smaller scale, you can adopt solutions such as manually logging in to each device to run scripts, use automated solutions such as Ansible, or build custom applications that rely on services such as AWS IoT Core. Although it can provide the necessary scalability and reliability, building such custom solutions comes at the cost of additional maintenance and requires specialized skills.

Amazon SageMaker, together with AWS IoT Greengrass, can help you overcome these challenges.

SageMaker provides Amazon SageMaker Neo, which is the easiest way to optimize ML models for edge devices, enabling you to train ML models one time in the cloud and run them on any device. As devices proliferate, you may have thousands of deployed models running across your fleets. Amazon SageMaker Edge Manager allows you to optimize, secure, monitor, and maintain ML models on fleets of smart cameras, robots, personal computers, and mobile devices.

This post shows how to train and deploy an anomaly detection ML model to a simulated fleet of wind turbines at the edge using features of SageMaker and AWS IoT Greengrass V2. It takes inspiration from Monitor and Manage Anomaly Detection Models on a fleet of Wind Turbines with Amazon SageMaker Edge Manager by introducing AWS IoT Greengrass for deploying and managing inference application and the model on the edge devices.

In the previous post, the author used custom code relying on AWS IoT services, such as AWS IoT Core and AWS IoT Device Management, to provide the remote management capabilities to the fleet of devices. Although that is a valid approach, developers need to spend a lot of time and effort to implement and maintain such solutions, which they could spend on solving the business problem of providing efficient, performant, and accurate anomaly detection logic for the wind turbines.

The previous post also used a real 3D printed mini wind turbine and Jetson Nano to act as the edge device running the application. Here, we use virtual wind turbines that run as Python threads within a SageMaker notebook. Also, instead of Jetson Nano, we use Amazon Elastic Compute Cloud (Amazon EC2) instances to act as edge devices, running AWS IoT Greengrass software and the application. We also run a simulator to generate measurements for the wind turbines, which are sent to the edge devices using MQTT. We also use the simulator for visualizations and stopping or starting the turbines.

The previous post goes more in detail about the ML aspects of the solution, such as how to build and train the model, which we don’t cover here. We focus primarily on the integration of Edge Manager and AWS IoT Greengrass V2.

Before we go any further, let’s review what AWS IoT Greengrass is and the benefits of using it with Edge Manager.

What is AWS IoT Greengrass V2?

AWS IoT Greengrass is an Internet of Things (IoT) open-source edge runtime and cloud service that helps build, deploy, and manage device software. You can use AWS IoT Greengrass for your IoT applications on millions of devices in homes, factories, vehicles, and businesses. AWS IoT Greengrass V2 offers an open-source edge runtime, improved modularity, new local development tools, and improved fleet deployment features. It provides a component framework that manages dependencies, and allows you to reduce the size of deployments because you can choose to only deploy the components required for the application.

Let’s go through some of the concepts of AWS IoT Greengrass to understand how it works:

  • AWS IoT Greengrass core device – A device that runs the AWS IoT Greengrass Core software. The device is registered into the AWS IoT Core registry as an AWS IoT thing.
  • AWS IoT Greengrass component – A software module that is deployed to and runs on a core device. All software that is developed and deployed with AWS IoT Greengrass is modeled as a component.
  • Deployment – The process to send components and apply the desired component configuration to a destination target device, which can be a single core device or a group of core devices.
  • AWS IoT Greengrass core software – The set of all AWS IoT Greengrass software that you install on a core device.

To enable remote application management on a device (or thousands of them), we first install the core software. This software runs as a background process and listens to deployments configurations sent from the cloud.

To run specific applications on the devices, we model the application as one or more components. For example, we can have a component providing a database feature, another component providing a local UX, or we can use public components provided by AWS, such as LogManager to push the components logs to Amazon CloudWatch.

We then create a deployment containing the necessary components and their specific configuration and send it to the target devices, either on a device-by-device basis or as a fleet.

To learn more, refer to What is AWS IoT Greengrass?

Why use AWS IoT Greengrass with Edge Manager?

The post Monitor and Manage Anomaly Detection Models on a fleet of Wind Turbines with Amazon SageMaker Edge Manager already explains why we use Edge Manager to provide the ML model runtime for the application. But let’s understand why we should use AWS IoT Greengrass to deploy applications to edge devices:

  • With AWS IoT Greengrass, you can automate the tasks needed to deploy the Edge Manager software onto the devices and manage the ML models. AWS IoT Greengrass provides a SageMaker Edge Agent as an AWS IoT Greengrass component, which provides model management and data capture APIs on the edge. Without AWS IoT Greengrass, setting up devices and fleets to use Edge Manager requires you to manually copy the Edge Manager agent from an Amazon Simple Storage Service (Amazon S3) release bucket. The agent is used to make predictions with models loaded onto edge devices.
  • With AWS IoT Greengrass and Edge Manager integration, you use AWS IoT Greengrass components. Components are pre-built software modules that can connect edge devices to AWS services or third-party services via AWS IoT Greengrass.
  • The solution takes a modular approach in which the inference application, model, and any other business logic can be packaged as a component where the dependencies can also be specified. You can manage the lifecycle, updates, and reinstalls of each of the components independently rather than treat everything as a monolith.
  • To make it easier to maintain AWS Identity and Access Management (IAM) roles, Edge Manager allows you to reuse the existing AWS IoT Core role alias. If it doesn’t exist, Edge Manager generates a role alias as part of the Edge Manager packaging job. You no longer need to associate a role alias generated from the Edge Manager packaging job with an AWS IoT Core role. This simplifies the deployment process for existing AWS IoT Greengrass customers.
  • You can manage the models and other components with less code and configurations because AWS IoT Greengrass takes care of provisioning, updating, and stopping the components.

Solution overview

The following diagram is the architecture implemented for the solution:

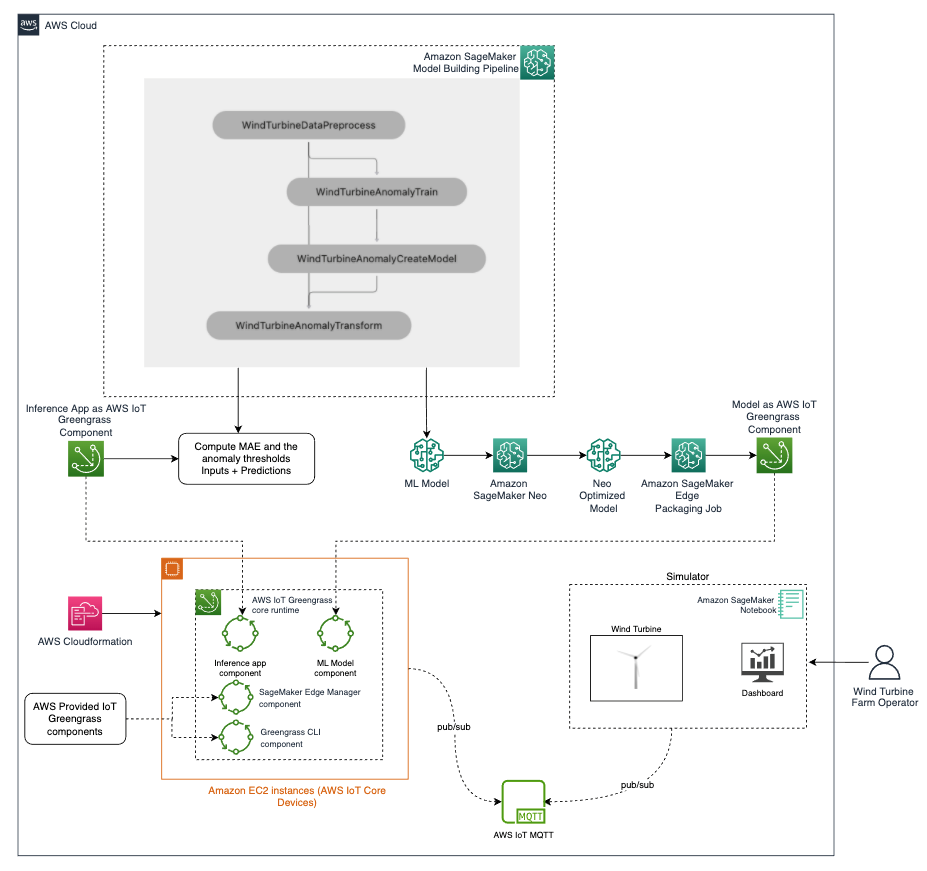
We can broadly divide the architecture into the following phases:

  • Model training

    • Prepare the data and train an anomaly detection model using Amazon SageMaker Pipelines. SageMaker Pipelines helps orchestrate your training pipeline with your own custom code. It also outputs the Mean Absolute Error (MAE) and other threshold values used to calculate anomalies.
  • Compile and package the model

    • Compile the model using Neo, so that it can be optimized for the target hardware (in this case, an EC2 instance).
    • Use the SageMaker Edge packaging job API to package the model as an AWS IoT Greengrass component. The Edge Manager API has a native integration with AWS IoT Greengrass APIs.
  • Build and package the inference application

    • Build and package the inference application as an AWS IoT Greengrass component. This application uses the computed threshold, the model, and some custom code to accept the data coming from turbines, perform anomaly detection, and return results.
  • Set up AWS IoT Greengrass on edge devices

  • Deploy to edge devices

    • Deploy the following on each edge device:
      • An ML model packaged as an AWS IoT Greengrass component.
      • An inference application packaged an AWS IoT Greengrass component. This also sets up the connection to AWS IoT Core MQTT.
      • The AWS-provided Edge Manager Greengrass component.
      • The AWS-provided AWS IoT Greengrass CLI component (only needed for development and debugging purposes).
  • Run the end-to-end solution

    • Run the simulator, which generates measurements for the wind turbines, which are sent to the edge devices using MQTT.
    • Because the notebook and the EC2 instances running AWS IoT Greengrass are on different networks, we use AWS IoT Core to relay MQTT messages between them. In a real scenario, the wind turbine would send the data to the anomaly detection device using a local communication, for example, an AWS IoT Greengrass MQTT broker component.
    • The inference app and model running in the anomaly detection device predicts if the received data is anomalous or not, and sends the result to the monitoring application via MQTT through AWS IoT Core.
    • The application displays the data and anomaly signal on the simulator dashboard.

To know more on how to deploy this solution architecture, please refer to the GitHub Repository related to this post.

In the following sections, we go deeper into the details of how to implement this solution.

Dataset

The solution uses raw turbine data collected from real wind turbines. The dataset is provided as part of the solution. It has the following features:

  • nanoId – ID of the edge device that collected the data
  • turbineId – ID of the turbine that produced this data
  • arduino_timestamp – Timestamp of the Arduino that was operating this turbine
  • nanoFreemem: Amount of free memory in bytes
  • eventTime – Timestamp of the row
  • rps – Rotation of the rotor in rotations per second
  • voltage – Voltage produced by the generator in milivolts
  • qw, qx, qy, qz – Quaternion angular acceleration
  • gx, gy, gz – Gravity acceleration
  • ax, ay, az – Linear acceleration
  • gearboxtemp – Internal temperature
  • ambtemp – External temperature
  • humidity – Air humidity
  • pressure – Air pressure
  • gas – Air quality
  • wind_speed_rps – Wind speed in rotations per second

For more information, refer to Monitor and Manage Anomaly Detection Models on a fleet of Wind Turbines with Amazon SageMaker Edge Manager.

Data preparation and training

The data preparation and training are performed using SageMaker Pipelines. Pipelines is the first purpose-built, easy-to-use continuous integration and continuous delivery (CI/CD) service for ML. With Pipelines, you can create, automate, and manage end-to-end ML workflows at scale. Because it’s purpose-built for ML, Pipelines helps automate different steps of the ML workflow, including data loading, data transformation, training and tuning, and deployment. For more information, refer to Amazon SageMaker Model Building Pipelines.

Model compilation

We use Neo for model compilation. It automatically optimizes ML models for inference on cloud instances and edge devices to run faster with no loss in accuracy. ML models are optimized for a target hardware platform, which can be a SageMaker hosting instance or an edge device based on processor type and capabilities, for example if there is a GPU or not. The compiler uses ML to apply the performance optimizations that extract the best available performance for your model on the cloud instance or edge device. For more information, see Compile and Deploy Models with Neo.

Model packaging

To use a compiled model with Edge Manager, you first need to package it. In this step, SageMaker creates an archive consisting of the compiled model and the Neo DLR runtime required to run it. It also signs the model for integrity verification. When you deploy the model via AWS IoT Greengrass, the create_edge_packaging_job API automatically creates an AWS IoT Greengrass component containing the model package, which is ready to be deployed to the devices.

The following code snippet shows how to invoke this API:

model_version = '1.0.0' # use this for semantic versioning the model. Must increment for every new model

model_name = 'WindTurbineAnomalyDetection'
edge_packaging_job_name='wind-turbine-anomaly-%d' % int(time.time()*1000)
component_name = 'aws.samples.windturbine.model'
component_version = model_version  

resp = sm_client.create_edge_packaging_job(
    EdgePackagingJobName=edge_packaging_job_name,
    CompilationJobName=compilation_job_name,
    ModelName=model_name,
    ModelVersion=model_version,
    RoleArn=role,
    OutputConfig={
        'S3OutputLocation': 's3://%s/%s/model/' % (bucket_name, prefix),
        "PresetDeploymentType": "GreengrassV2Component",
        "PresetDeploymentConfig": json.dumps(
            {"ComponentName": component_name, "ComponentVersion": component_version}
        ),
    }
)

To allow the API to create an AWS IoT Greengrass component, you must provide the following additional parameters under OutputConfig:

  • The PresetDeploymentType as GreengrassV2Component
  • PresetDeploymentConfig to provide the ComponentName and ComponentVersion that AWS IoT Greengrass uses to publish the component
  • The ComponentVersion and ModelVersion must be in major.minor.patch format

The model is then published as an AWS IoT Greengrass component.

Create the inference application as an AWS IoT Greengrass component

Now we create an inference application component that we can deploy to the device. This application component loads the ML model, receives data from wind turbines, performs anomaly detections, and sends the result back to the simulator. This application can be a native application that receives the data locally on the edge devices from the turbines or any other client application over a gRPC interface.

To create a custom AWS IoT Greengrass component, perform the following steps:

  1. Provide the code for the application as single files or as an archive. The code needs to be uploaded to an S3 bucket in the same Region where we registered the AWS IoT Greengrass devices.
  2. Create a recipe file, which specifies the component’s configuration parameters, component dependencies, lifecycle, and platform compatibility.

The component lifecycle defines the commands that install, run, and shut down the component. For more information, see AWS IoT Greengrass component recipe reference. We can define the recipe either in JSON or YAML format. Because the inference application requires the model and Edge Manager agent to be available on the device, we need to specify dependencies to the ML model packaged as an AWS IoT Greengrass component and the Edge Manager Greengrass component.

  1. When the recipe file is ready, create the inference component by invoking the create_component_version API. See the following code:
    ggv2_client = boto3.client('greengrassv2')
    with open('recipes/aws.samples.windturbine.detector-recipe.json') as f:
        recipe = f.read()
    recipe = recipe.replace('_BUCKET_', bucket_name)
    ggv2_client.create_component_version(inlineRecipe=recipe
    )

Inference application

The inference application connects to AWS IoT Core to receive messages from the simulated wind turbine and send the prediction results to the simulator dashboard.

It publishes to the following topics:

  • wind-turbine/{turbine_id}/dashboard/update – Updates the simulator dashboard
  • wind-turbine/{turbine_id}/label/update – Updates the model loaded status on simulator
  • wind-turbine/{turbine_id}/anomalies – Publishes anomaly results to the simulator dashboard

It subscribes to the following topic:

  • wind-turbine/{turbine_id}/raw-data – Receives raw data from the turbine

Set up AWS IoT Core devices

Next, we need to set up the devices that run the anomaly detection application by installing the AWS IoT Greengrass core software. For this post, we use five EC2 instances that act as the anomaly detection devices. We use AWS CloudFormation to launch the instances. To install the AWS IoT Greengrass core software, we provide a script in the instance UserData as shown in the following code:

      UserData:
        Fn::Base64: !Sub "#!/bin/bash
          
          wget -O- https://apt.corretto.aws/corretto.key | apt-key add - 
          add-apt-repository 'deb https://apt.corretto.aws stable main'
           
          apt-get update; apt-get install -y java-11-amazon-corretto-jdk
         
          apt install unzip -y
          apt install python3-pip -y
          apt-get install python3.8-venv -y

          ec2_region=$(curl http://169.254.169.254/latest/meta-data/placement/region)

          curl -s https://d2s8p88vqu9w66.cloudfront.net/releases/greengrass-nucleus-latest.zip > greengrass-nucleus-latest.zip  && unzip greengrass-nucleus-latest.zip -d GreengrassCore
          java -Droot="/greengrass/v2" -Dlog.store=FILE -jar ./GreengrassCore/lib/Greengrass.jar --aws-region $ec2_region  --thing-name edge-device-0 --thing-group-name ${ThingGroupName}  --tes-role-name SageMaker-WindturbinesStackTESRole --tes-role-alias-name SageMaker-WindturbinesStackTESRoleAlias  --component-default-user ggc_user:ggc_group --provision true --setup-system-service true --deploy-dev-tools true

                  "

Each EC2 instance is associated to a single virtual wind turbine. In a real scenario, multiple wind turbines could also communicate to a single device in order to reduce the solution costs.

To learn more about how to set up AWS IoT Greengrass software on a core device, refer to Install the AWS IoT Greengrass Core software. The complete CloudFormation template is available in the GitHub repository.

Create an AWS IoT Greengrass deployment

When the devices are up and running, we can deploy the application. We create a deployment with a configuration containing the following components:

  • ML model
  • Inference application
  • Edge Manager
  • AWS IoT Greengrass CLI (only needed for debugging purposes)

For each component, we must specify the component version. We can also provide additional configuration data, if necessary. We create the deployment by invoking the create_deployment API. See the following code:

ggv2_deployment = ggv2_client.create_deployment(
    targetArn=wind_turbine_thing_group_arn,
    deploymentName="Deployment for " + project_id,
    components={
        "aws.greengrass.Cli": {
            "componentVersion": "2.5.3"
            },
        "aws.greengrass.SageMakerEdgeManager": {
            "componentVersion": "1.1.0",
            "configurationUpdate": {
                "merge": json.dumps({"DeviceFleetName":wind_turbine_device_fleet_name,"BucketName":bucket_name})
            },
            "runWith": {}
        },
        "aws.samples.windturbine.detector": {
            "componentVersion": component_version
        },
        "aws.samples.windturbine.model": {
            "componentVersion": component_version
        }
        })

The targetArn argument defines where to run the deployment. The thing group ARN is specified to deploy this configuration to all devices belonging to the thing group. The thing group is created already as part of the setup of the solution architecture.

The aws.greengrass.SageMakerEdgeManager component is an AWS-provided component by AWS IoT Greengrass. At the time of writing, the latest version is 1.1.0. You need to configure this component with the SageMaker edge device fleet name and S3 bucket location. You can find these parameters on the Edge Manager console, where the fleet was created during the setup of the solution architecture.

aws.samples.windturbine.detector is the inference application component created earlier.

aws.samples.windturbine.model is the anomaly detection ML model component created earlier.

Run the simulator

Now that everything is in place, we can start the simulator. The simulator is run from a Python notebook and performs two tasks:

  1. Simulate the physical wind turbine and display a dashboard for each wind turbine.
  2. Exchange data with the devices via AWS IoT MQTT using the following topics:
    1. wind-turbine/{turbine_id}/raw-data – Publishes the raw turbine data.
    2. wind-turbine/{turbine_id}/label/update – Receives model loaded or not loaded status from the inference application.
    3. wind-turbine/{turbine_id}/anomalies – Receives anomalies published by inference application.
    4. wind-turbine/{turbine_id}/dashboard/update – Receives recent buffered data by the turbines.

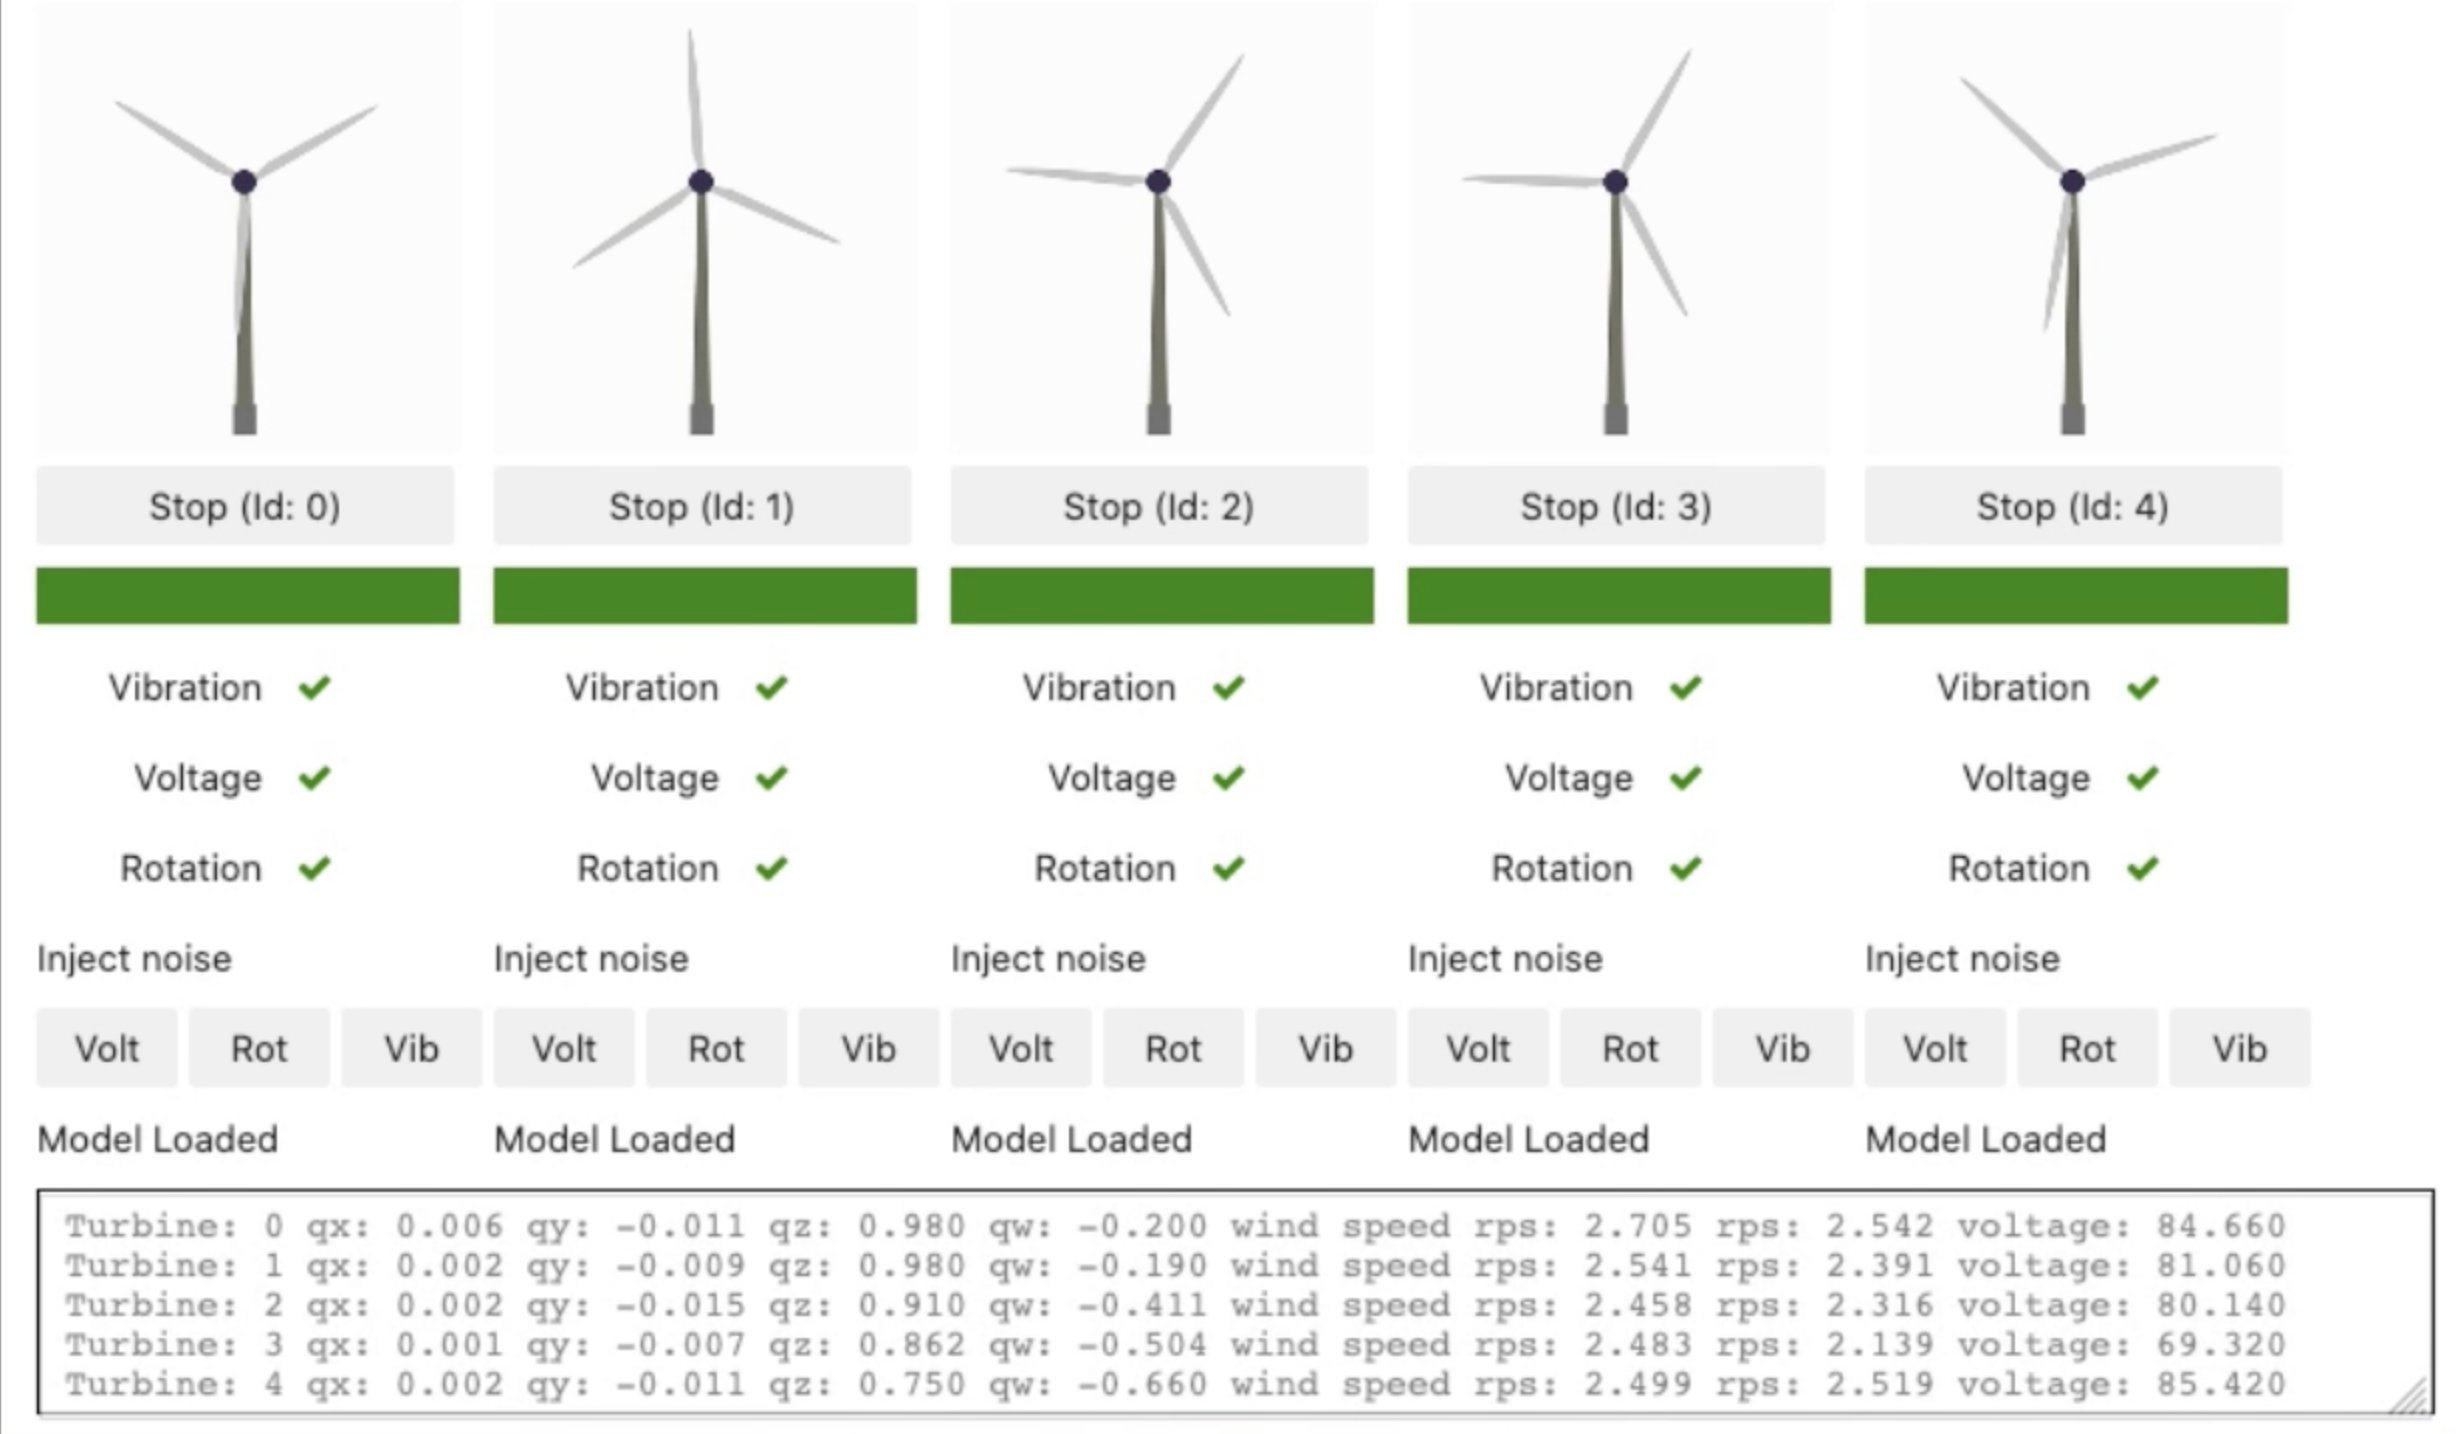
We can use the simulator UI to start and stop the virtual wind turbine and inject noise in the Volt, Rot, and Vib measurements to simulate anomalies that are detected by the application running on the device. In the following screenshot, the simulator shows a virtual representation of five wind turbines that are currently running. We can choose Stop to stop any of the turbines, or choose Volt, Rot, or Vib to inject noise in the turbines. For example, if we choose Volt for turbine with ID 0, the Voltage status changes from a green check mark to a red x, denoting the voltage readings of the turbine are anomalous.

Conclusion

Securely and reliably maintaining the lifecycle of an ML model deployed across a fleet of devices isn’t an easy task. However, with Edge Manager and AWS IoT Greengrass, we can reduce the implementation effort and operational cost of such a solution. This solution increases the agility in experimenting and optimizing the ML model with full automation of the ML pipelines, from data acquisition, data preparation, model training, model validation, and deployment to the devices.

In addition to the benefits described, Edge Manager offers further benefits, like having access to a device fleet dashboard on the Edge Manager console, which can display near-real-time health of the devices by capturing heartbeat requests. You can use this inference data with Amazon SageMaker Model Monitor to check for data and model quality drift issues.

To build a solution for your own needs, get the code and artifacts from the GitHub repo. The repository shows two different ways of deploying the models:

  • Using IoT jobs
  • Using AWS IoT Greengrass (covered in this post)

Although this post focuses on deployment using AWS IoT Greengrass, interested readers look at the solution using IoT jobs as well to better understand the differences.


About the Authors

Vikesh Pandey is a Machine Learning Specialist Specialist Solutions Architect at AWS, helping customers in the Nordics and wider EMEA region design and build ML solutions. Outside of work, Vikesh enjoys trying out different cuisines and playing outdoor sports.

Massimiliano Angelino is Lead Architect for the EMEA Prototyping team. During the last 3 and half years he has been an IoT Specialist Solution Architect with a particular focus on edge computing, and he contributed to the launch of AWS IoT Greengrass v2 service and its integration with Amazon SageMaker Edge Manager. Based in Stockholm, he enjoys skating on frozen lakes.

Read More

What Is GauGAN? How AI Turns Your Words and Pictures Into Stunning Art

GauGAN, an AI demo for photorealistic image generation, allows anyone to create stunning landscapes using generative adversarial networks. Named after post-Impressionist painter Paul Gauguin, it was created by NVIDIA Research and can be experienced free through NVIDIA AI Demos.

How to Create With GauGAN

The latest version of the demo, GauGAN2, turns any combination of words and drawings into a lifelike image. Users can simply type a phrase like “lake in front of mountain” and press a button to generate a scene in real time. By tweaking the text to a “lake in front of snowy mountain” or “forest in front of mountain,” the AI model instantly modifies the image.

Artists who prefer to draw a scene themselves can use the demo’s smart paintbrush to modify these text-prompted scenes or start from scratch, drawing in boulders, trees or fluffy clouds. Clicking on a filter (or uploading a custom image) allows users to experiment with different lighting or apply a specific painting style to their creations.

AI Behind the GauGAN2 Demo

At the heart of GauGAN2 are generative adversarial networks, or GANs — a kind of deep learning model that involves a pair of neural networks: a generator and a discriminator. The generator creates synthetic images. The discriminator, trained on millions of real landscape images, gives the generator network pixel-by-pixel feedback on how to make the synthetic images more realistic.

Over time, the GAN model learns to create convincing imitations of the real world, with mountains reflected in AI-generated lakes and trees losing their leaves when a scene is modified with the word “winter.”

Landscape generated by GauGAN2

When users draw their own doodle or modify an existing scene in the GauGAN2 demo, they’re working with segmentation maps — high-level outlines that record the location of objects in a scene. Individual areas are labeled with features like sand, river, grass or flower, giving the AI model instructions on how to fill in the scene.

GauGAN has been wildly popular since it debuted at NVIDIA GTC in 2019 — it’s been used by art teachers in schools, in museums as an interactive art exhibit and by millions online.

Art directors and concept artists from top film studios and video game companies had been among the creative professionals interested in GauGAN as a tool to prototype ideas for their work. So NVIDIA Studio, a platform to assist creators, came out with a desktop application: NVIDIA Canvas.

NVIDIA Canvas brings the technology behind GauGAN to professionals in a format compatible with existing tools like Adobe Photoshop, and lets artists use NVIDIA RTX GPUs for a more fluid, interactive experience.

To learn more about the AI behind GauGAN, register free for NVIDIA GTC and tune in to the session “Expressing Your Imagination with GauGAN2,” Thursday, March 24, at 10 a.m. Pacific.

NVIDIA GTC runs online March 21-24. To hear the latest in AI research, tune in to the keynote address by NVIDIA CEO Jensen Huang on March 22 at 8 a.m. Pacific.

The post What Is GauGAN? How AI Turns Your Words and Pictures Into Stunning Art appeared first on NVIDIA Blog.

Read More

Study examines how machine learning boosts manufacturing

Which companies deploy machine intelligence (MI) and data analytics successfully for manufacturing and operations? Why are those leading adopters so far ahead — and what can others learn from them?

MIT Machine Intelligence for Manufacturing and Operations (MIMO) and McKinsey and Company have the answer, revealed in a first-of-its-kind Harvard Business Review article. The piece chronicles how MIMO and McKinsey partnered for a sweeping 100-company survey to explain how high-performing companies successfully wield machine learning technologies (and where others could improve).

Created by the MIT Leaders for Global Operations (LGO) program, MIMO is a research and educational program designed to boost industrial competitiveness by accelerating machine intelligence’s deployment and understanding. The goal is to “find the shortest path from data to impact,” says managing director Bruce Lawler SM ’92.

As such, the McKinsey project encapsulates MIMO’s mission of demystifying effective machine-learning use. The survey studied companies across sectors, probing their digital, data analytics, and MI tech usage; goals (ranging from efficiency to customer experience to environmental impact); and tracking. Respondents were drawn from MIT and McKinsey’s wide-ranging networks.

“The study is probably the broadest that anybody has done in the space: 100 companies and 21 performance indicators,” says Vijay D’Silva SM ’92, a senior partner at McKinsey and Company who collaborated with MIMO on the project.

Overall, those who extracted the biggest gains from digital technologies had strong governance, deployment, partnerships, MI-trained employees, and data availability. They also spent up to 60 percent more on machine learning than their competitors.

One standout company is biopharmaceutical giant Amgen, which uses deep-learning image-augmentation to maximize efficiency of visual inspection systems. This technique pays off by increasing particle detection by 70 percent and reduces the need for manual inspections. AJ Tan PhD ’19, MBA ’21, SM ’21 was instrumental in the effort: He wrote his LGO thesis about the project, winning last year’s Best Thesis Award at graduation.

Lawler says Tan’s work exemplifies MIMO’s mission of bridging the gap between machine learning and manufacturing before it’s too late.

“We saw a need to bring these powerful new technologies into manufacturing more quickly. In the next 20 to 30 years, we’re going to add another 3 billion people to the globe, and they’re going to want the lifestyles that you and I enjoy. Those typically require manufactured things. How do we get better at translating natural resources into human well-being? One of the big vehicles for doing that is manufacturing, and one of the newest tools is AI and machine learning,” he says.

For the survey, MIMO issued each company a 30-page playbook analyzing how they compared against other companies across a range of categories and metrics, from strategy to governance to data execution. This will help them to target areas of opportunity or where to invest. Lawler hopes that this will be a longitudinal study with a wider scope and playbook each year — a vast but impactful undertaking with LGO brainpower as the driving engine.

“MIT was hugely important and critical to the piece of work and an amazing partner for us. We had talented MIT students on the team who did most of the analysis jointly with McKinsey, which improved the quality of the work as a result,” says D’Silva.

This collaborative approach is central to MIMO’s philosophy as an information convener and partner for the private sector. The goal is drive “an effective transformation in industries that achieve not just technical goals, but also business goals and social goals,” says Duane Boning, engineering faculty director at MIT LGO, and faculty lead at MIMO.

This fusion of research and collaboration is the logical next step for LGO, he says, because it’s always been at the forefront of problem-solving for global operations. Machine learning is definitely the latest big knowledge gap for many businesses, but not the first, and MIMO can teach companies how to apply it.

“[I liken] it to 30 years ago when LGO got started, when it was all about lean manufacturing principles. About 15 years ago, it was the supply chain idea. That sparked us to think — not just for our LGO students, but for the benefit of industry more broadly — for understanding this big change, for facilitating it, for doing research and getting connections into other actual research activities, we need some effort to catalyze this,” Boning says. “That’s [MIMO’s] real excitement: What are ideas that work? What are methodologies that work? What are technologies that work? And LGO students, in some sense, are the perfect vehicle to discover some of that.”

Read More

Injecting fairness into machine-learning models

If a machine-learning model is trained using an unbalanced dataset, such as one that contains far more images of people with lighter skin than people with darker skin, there is serious risk the model’s predictions will be unfair when it is deployed in the real world.

But this is only one part of the problem. MIT researchers have found that machine-learning models that are popular for image recognition tasks actually encode bias when trained on unbalanced data. This bias within the model is impossible to fix later on, even with state-of-the-art fairness-boosting techniques, and even when retraining the model with a balanced dataset.      

So, the researchers came up with a technique to introduce fairness directly into the model’s internal representation itself. This enables the model to produce fair outputs even if it is trained on unfair data, which is especially important because there are very few well-balanced datasets for machine learning.

The solution they developed not only leads to models that make more balanced predictions, but also improves their performance on downstream tasks like facial recognition and animal species classification.

“In machine learning, it is common to blame the data for bias in models. But we don’t always have balanced data. So, we need to come up with methods that actually fix the problem with imbalanced data,” says lead author Natalie Dullerud, a graduate student in the Healthy ML Group of the Computer Science and Artificial Intelligence Laboratory (CSAIL) at MIT.

Dullerud’s co-authors include Kimia Hamidieh, a graduate student in the Healthy ML Group; Karsten Roth, a former visiting researcher who is now a graduate student at the University of Tubingen; Nicolas Papernot, an assistant professor in the University of Toronto’s Department of Electrical Engineering and Computer Science; and senior author Marzyeh Ghassemi, an assistant professor and head of the Healthy ML Group. The research will be presented at the International Conference on Learning Representations.

Defining fairness

The machine-learning technique the researchers studied is known as deep metric learning, which is a broad form of representation learning. In deep metric learning, a neural network learns the similarity between objects by mapping similar photos close together and dissimilar photos far apart. During training, this neural network maps images in an “embedding space” where a similarity metric between photos corresponds to the distance between them.

For example, if a deep metric learning model is being used to classify bird species, it will map photos of golden finches together in one part of the embedding space and cardinals together in another part of the embedding space. Once trained, the model can effectively measure the similarity of new images it hasn’t seen before. It would learn to cluster images of an unseen bird species close together, but farther from cardinals or golden finches within the embedding space.

The similarity metrics the model learns are very robust, which is why deep metric learning is so often employed for facial recognition, Dullerud says. But she and her colleagues wondered how to determine if a similarity metric is biased.

“We know that data reflect the biases of processes in society. This means we have to shift our focus to designing methods that are better suited to reality,” says Ghassemi.

The researchers defined two ways that a similarity metric can be unfair. Using the example of facial recognition, the metric will be unfair if it is more likely to embed individuals with darker-skinned faces closer to each other, even if they are not the same person, than it would if those images were people with lighter-skinned faces. Second, it will be unfair if the features it learns for measuring similarity are better for the majority group than for the minority group.

The researchers ran a number of experiments on models with unfair similarity metrics and were unable to overcome the bias the model had learned in its embedding space.

“This is quite scary because it is a very common practice for companies to release these embedding models and then people finetune them for some downstream classification task. But no matter what you do downstream, you simply can’t fix the fairness problems that were induced in the embedding space,” Dullerud says.

Even if a user retrains the model on a balanced dataset for the downstream task, which is the best-case scenario for fixing the fairness problem, there are still performance gaps of at least 20 percent, she says.

The only way to solve this problem is to ensure the embedding space is fair to begin with.

Learning separate metrics

The researchers’ solution, called Partial Attribute Decorrelation (PARADE), involves training the model to learn a separate similarity metric for a sensitive attribute, like skin tone, and then decorrelating the skin tone similarity metric from the targeted similarity metric. If the model is learning the similarity metrics of different human faces, it will learn to map similar faces close together and dissimilar faces far apart using features other than skin tone.

Any number of sensitive attributes can be decorrelated from the targeted similarity metric in this way. And because the similarity metric for the sensitive attribute is learned in a separate embedding space, it is discarded after training so only the targeted similarity metric remains in the model.

Their method is applicable to many situations because the user can control the amount of decorrelation between similarity metrics. For instance, if the model will be diagnosing breast cancer from mammogram images, a clinician likely wants some information about biological sex to remain in the final embedding space because it is much more likely that women will have breast cancer than men, Dullerud explains.

They tested their method on two tasks, facial recognition and classifying bird species, and found that it reduced performance gaps caused by bias, both in the embedding space and in the downstream task, regardless of the dataset they used.

Moving forward, Dullerud is interested in studying how to force a deep metric learning model to learn good features in the first place.

“How do you properly audit fairness? That is an open question right now. How can you tell that a model is going to be fair, or that it is only going to be fair in certain situations, and what are those situations? Those are questions I am really interested in moving forward,” she says.

Read More