Sensational Surrealism Astonishes This Week ‘In the NVIDIA Studio’

Editor’s note: This post is part of our weekly In the NVIDIA Studio series, which celebrates featured artists, offers creative tips and tricks, and demonstrates how NVIDIA Studio technology accelerates creative workflows. 

3D phenom FESQ joins us In the NVIDIA Studio this week to share his sensational and surreal animation Double/Sided as well as an inside look into his creative workflow.

FESQ’s unique cyberpunk style with a futuristic aesthetic, rooted in emotion, screams originality.

Double/Sided is deeply personal to FESQ, who said the piece “translates really well to a certain period of my life when I was juggling both a programmer career and an artist career.”

He candidly admitted “that time was pretty hard on me with some intense work hours, so I had the constant lingering feeling that I needed to choose one or the other.”

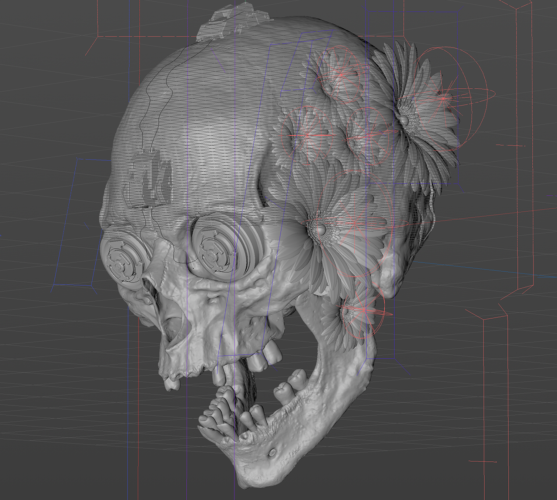
The piece eloquently and cleverly displays this duality with flowers representing nature and FESQ’s passion for creativity, while the skull contains elements of tech, all with a futuristic cyberpunk aesthetic.

Duality Examined

Double/Sided, like most of FESQ’s projects, was carefully researched and concepted, using Figma to create moodboards and gather visual references. Literal stick figures and sketches allow him to lay out possible compositions and configurations, scanned into Figma, complementing his moodboard, which prepared him to begin the 3D stage.

FESQ deployed Cinema 4D to build out the base model for the skull. Cinema 4D let him select from popular GPU-accelerated 3D renderers, such as V-Ray, OctaneRender and Redshift, giving him the freedom to switch depending on which renderer is more advantageous.

“Double/Sided” base model with supplemental assets.

As his system is equipped with a GeForce RTX 3080 Ti GPU, the viewport becomes GPU-accelerated, enabling smooth interactivity while editing the 3D model. Satisfied with the look, FESQ turned his attention towards creating supplemental assets that were placed on the skull, such as the flowers and electrical emitters. FESQ often tabs Daz Studio at this point in his projects. While not needed with Double/Sided, Daz offers the largest 3D model library with a wide selection of free and premium 3D content, and artists benefit from its RTX-accelerated AI denoiser.

Individual flowers are created then exported into Cinema 4D.

FESQ quickly renders out high-quality files with his GPU’s RTX-accelerated NVIDIA Iray renderer, saving valuable time without having to wait.

This shade of purple is just right.

Next, FESQ pivoted to Adobe Substance 3D Painter to apply colors and textures. This “might be one of the most important aspects of my work,” he stated.

And for good reason, as FESQ is colorblind. One of the more challenging aspects in his creative work is distinguishing between different colors. This makes FESQ’s ability to create stunning, vibrant art all the more impressive.

FESQ then applied various colors and light materials directly to his 3D model. NVIDIA RTX and NVIDIA Iray technology in the viewport enabled him to ideate in real time and use ray-traced baking for faster rendering speeds — all accelerated by his GPU.


He returned to Cinema 4D to rig the asset, apply meshes and finish animating the scene, leaving final composite work to be completed in Adobe After Effects.

Realism can be further enhanced by adding accurate depth effects. For more insights, watch FESQ’s Studio Session tutorial Using MoGraph to Create Depth in Animations in Cinema 4D & Redshift.

FESQ’s color scheme manifested over time as the consistent use of red and blue morphs into a distinct purple.

Here FESQ used the Lumetri Color effect panel to apply professional-quality grading and color correction tools to the animation, directly on his timeline, with GPU-accelerated speed. The Glow feature, also GPU accelerated, added the neon light look that makes Double/Sided simply stunning.

For tips on how to create neon cables like these, check out FESQ’s Studio Session tutorial Easily Create Animated Neon Cables in Cinema 4D & Redshift to bring animated pieces to life.


FESQ couldn’t contemplate how he’d complete his vision without his GPU, noting “pretty much my entire workflow relies on GPU acceleration.”

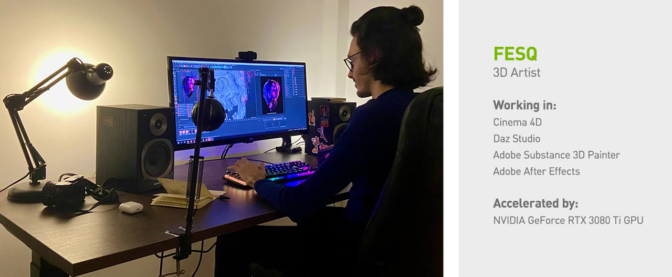
3D artist FESQ.

Artists seeking ways to create surreal landscapes can view FESQ’s Studio Session tutorial Creating Surreal Landscapes Using Cloners in Cinema 4D & Redshift.

Check out FESQ’s Instagram for a sampling of his work.

Follow NVIDIA Studio on Instagram, Twitter and Facebook. Access tutorials on the Studio YouTube channel and get updates directly in your inbox by subscribing to the NVIDIA Studio newsletter.

The post Sensational Surrealism Astonishes This Week ‘In the NVIDIA Studio’ appeared first on NVIDIA Blog.

Read More

Using artificial intelligence to control digital manufacturing

Scientists and engineers are constantly developing new materials with unique properties that can be used for 3D printing, but figuring out how to print with these materials can be a complex, costly conundrum.

Often, an expert operator must use manual trial-and-error — possibly making thousands of prints — to determine ideal parameters that consistently print a new material effectively. These parameters include printing speed and how much material the printer deposits.

MIT researchers have now used artificial intelligence to streamline this procedure. They developed a machine-learning system that uses computer vision to watch the manufacturing process and then correct errors in how it handles the material in real-time.

They used simulations to teach a neural network how to adjust printing parameters to minimize error, and then applied that controller to a real 3D printer. Their system printed objects more accurately than all the other 3D printing controllers they compared it to.

The work avoids the prohibitively expensive process of printing thousands or millions of real objects to train the neural network. And it could enable engineers to more easily incorporate novel materials into their prints, which could help them develop objects with special electrical or chemical properties. It could also help technicians make adjustments to the printing process on-the-fly if material or environmental conditions change unexpectedly.

“This project is really the first demonstration of building a manufacturing system that uses machine learning to learn a complex control policy,” says senior author Wojciech Matusik, professor of electrical engineering and computer science at MIT who leads the Computational Design and Fabrication Group (CDFG) within the Computer Science and Artificial Intelligence Laboratory (CSAIL). “If you have manufacturing machines that are more intelligent, they can adapt to the changing environment in the workplace in real-time, to improve the yields or the accuracy of the system. You can squeeze more out of the machine.”

The co-lead authors on the research are Mike Foshey, a mechanical engineer and project manager in the CDFG, and Michal Piovarci, a postdoc at the Institute of Science and Technology in Austria. MIT co-authors include Jie Xu, a graduate student in electrical engineering and computer science, and Timothy Erps, a former technical associate with the CDFG.

Picking parameters

Determining the ideal parameters of a digital manufacturing process can be one of the most expensive parts of the process because so much trial-and-error is required. And once a technician finds a combination that works well, those parameters are only ideal for one specific situation. She has little data on how the material will behave in other environments, on different hardware, or if a new batch exhibits different properties.

Using a machine-learning system is fraught with challenges, too. First, the researchers needed to measure what was happening on the printer in real-time.

To do this, they developed a machine-vision system using two cameras aimed at the nozzle of the 3D printer. The system shines light at material as it is deposited and, based on how much light passes through, calculates the material’s thickness.

“You can think of the vision system as a set of eyes watching the process in real-time,” Foshey says.

The controller would then process images it receives from the vision system and, based on any error it sees, adjust the feed rate and the direction of the printer.

But training a neural network-based controller to understand this manufacturing process is data-intensive, and would require making millions of prints. So, the researchers built a simulator instead.

Successful simulation

To train their controller, they used a process known as reinforcement learning in which the model learns through trial-and-error with a reward. The model was tasked with selecting printing parameters that would create a certain object in a simulated environment. After being shown the expected output, the model was rewarded when the parameters it chose minimized the error between its print and the expected outcome.

In this case, an “error” means the model either dispensed too much material, placing it in areas that should have been left open, or did not dispense enough, leaving open spots that should be filled in. As the model performed more simulated prints, it updated its control policy to maximize the reward, becoming more and more accurate.

However, the real world is messier than a simulation. In practice, conditions typically change due to slight variations or noise in the printing process. So the researchers created a numerical model that approximates noise from the 3D printer. They used this model to add noise to the simulation, which led to more realistic results.

“The interesting thing we found was that, by implementing this noise model, we were able to transfer the control policy that was purely trained in simulation onto hardware without training with any physical experimentation,” Foshey says. “We didn’t need to do any fine-tuning on the actual equipment afterwards.”

When they tested the controller, it printed objects more accurately than any other control method they evaluated. It performed especially well at infill printing, which is printing the interior of an object. Some other controllers deposited so much material that the printed object bulged up, but the researchers’ controller adjusted the printing path so the object stayed level.

Their control policy can even learn how materials spread after being deposited and adjust parameters accordingly.

“We were also able to design control policies that could control for different types of materials on-the-fly. So if you had a manufacturing process out in the field and you wanted to change the material, you wouldn’t have to revalidate the manufacturing process. You could just load the new material and the controller would automatically adjust,” Foshey says.

Now that they have shown the effectiveness of this technique for 3D printing, the researchers want to develop controllers for other manufacturing processes. They’d also like to see how the approach can be modified for scenarios where there are multiple layers of material, or multiple materials being printed at once. In addition, their approach assumed each material has a fixed viscosity (“syrupiness”), but a future iteration could use AI to recognize and adjust for viscosity in real-time.

Additional co-authors on this work include Vahid Babaei, who leads the Artificial Intelligence Aided Design and Manufacturing Group at the Max Planck Institute; Piotr Didyk, associate professor at the University of Lugano in Switzerland; Szymon Rusinkiewicz, the David M. Siegel ’83 Professor of computer science at Princeton University; and Bernd Bickel, professor at the Institute of Science and Technology in Austria.

The work was supported, in part, by the FWF Lise-Meitner program, a European Research Council starting grant, and the U.S. National Science Foundation.

Read More

Simplify iterative machine learning model development by adding features to existing feature groups in Amazon SageMaker Feature Store

Feature engineering is one of the most challenging aspects of the machine learning (ML) lifecycle and a phase where the most amount of time is spent—data scientists and ML engineers spend 60–70% of their time on feature engineering. AWS introduced Amazon SageMaker Feature Store during AWS re:Invent 2020, which is a purpose-built, fully managed, centralized store for features and associated metadata. Features are signals extracted from data to train ML models. The advantage of Feature Store is that the feature engineering logic is authored one time, and the features generated are stored on a central platform. The central store of features can be used for training and inference and be reused across different data engineering teams.

Features in a feature store are stored in a collection called feature group. A feature group is analogous to a database table schema where columns represent features and rows represent individual records. Feature groups have been immutable since Feature Store was introduced. If we had to add features to an existing feature group, the process was cumbersome—we had to create a new feature group, backfill the new feature group with historical data, and modify downstream systems to use this new feature group. ML development is an iterative process of trial and error where we may identify new features continuously that can improve model performance. It’s evident that not being able to add features to feature groups can lead to a complex ML model development lifecycle.

Feature Store recently introduced the ability to add new features to existing feature groups. A feature group schema evolves over time as a result of new business requirements or because new features have been identified that yield better model performance. Data scientists and ML engineers need to easily add features to an existing feature group. This ability reduces the overhead associated with creating and maintaining multiple feature groups and therefore lends itself to iterative ML model development. Model training and inference can take advantage of new features using the same feature group by making minimal changes.

In this post, we demonstrate how to add features to a feature group using the newly released UpdateFeatureGroup API.

Overview of solution

Feature Store acts as a single source of truth for feature engineered data that is used in ML training and inference. When we store features in Feature Store, we store them in feature groups.

We can enable feature groups for offline only mode, online only mode, or online and offline modes.

An online store is a low-latency data store and always has the latest snapshot of the data. An offline store has a historical set of records persisted in Amazon Simple Storage Service (Amazon S3). Feature Store automatically creates an AWS Glue Data Catalog for the offline store, which enables us to run SQL queries against the offline data using Amazon Athena.

The following diagram illustrates the process of feature creation and ingestion into Feature Store.

Feature Group Update workflow

The workflow contains the following steps:

  1. Define a feature group and create the feature group in Feature Store.
  2. Ingest data into the feature group, which writes to the online store immediately and then to the offline store.
  3. Use the offline store data stored in Amazon S3 for training one or more models.
  4. Use the offline store for batch inference.
  5. Use the online store supporting low-latency reads for real-time inference.
  6. To update the feature group to add a new feature, we use the new Amazon SageMaker UpdateFeatureGroup API. This also updates the underlying AWS Glue Data Catalog. After the schema has been updated, we can ingest data into this updated feature group and use the updated offline and online store for inference and model training.

Dataset

To demonstrate this new functionality, we use a synthetically generated customer dataset. The dataset has unique IDs for customer, sex, marital status, age range, and how long since they have been actively purchasing.

Customer data sample

Let’s assume a scenario where a business is trying to predict the propensity of a customer purchasing a certain product, and data scientists have developed a model to predict this intended outcome. Let’s also assume that the data scientists have identified a new signal for the customer that could potentially improve model performance and better predict the outcome. We work through this use case to understand how to update feature group definition to add the new feature, ingest data into this new feature, and finally explore the online and offline feature store to verify the changes.

Prerequisites

For this walkthrough, you should have the following prerequisites:

git clone https://github.com/aws-samples/amazon-sagemaker-feature-store-update-feature-group.git

Add features to a feature group

In this post, we walk through the update_feature_group.ipynb notebook, in which we create a feature group, ingest an initial dataset, update the feature group to add a new feature, and re-ingest data that includes the new feature. At the end, we verify the online and offline store for the updates. The fully functional notebook and sample data can be found in the GitHub repository. Let’s explore some of the key parts of the notebook here.

  1. We create a feature group to store the feature-engineered customer data using the FeatureGroup.create API of the SageMaker SDK.
    customers_feature_group = FeatureGroup(name=customers_feature_group_name, 
                                          sagemaker_session=sagemaker_session)
    
    customers_feature_group.create(s3_uri=f's3://{default_bucket}/{prefix}', 
                                   record_identifier_name='customer_id', 
                                   event_time_feature_name='event_time', 
                                   role_arn=role, 
                                   enable_online_store=True)
    

  1. We create a Pandas DataFrame with the initial CSV data. We use the current time as the timestamp for the event_time feature. This corresponds to the time when the event occurred, which implies when the record is added or updated in the feature group.
  2. We ingest the DataFrame into the feature group using the SageMaker SDK FeatureGroup.ingest API. This is a small dataset and therefore can be loaded into a Pandas DataFrame. When we work with large amounts of data and millions of rows, there are other scalable mechanisms to ingest data into Feature Store, such as batch ingestion with Apache Spark.
    customers_feature_group.ingest(data_frame=customers_df,
                                   max_workers=3,
                                   wait=True)

  1. We can verify that data has been ingested into the feature group by running Athena queries in the notebook or running queries on the Athena console.
  2. After we verify that the offline feature store has the initial data, we add the new feature has_kids to the feature group using the Boto3 update_feature_group API
    sagemaker_runtime.update_feature_group(
                              FeatureGroupName=customers_feature_group_name,
                              FeatureAdditions=[
                                 {"FeatureName": "has_kids", "FeatureType": "Integral"}
                              ])

    The Data Catalog gets automatically updated as part of this API call. The API supports adding multiple features at a time by specifying them in the FeatureAdditions dictionary.

  1. We verify that feature has been added by checking the updated feature group definition
    describe_feature_group_result = sagemaker_runtime.describe_feature_group(
                                               FeatureGroupName=customers_feature_group_name)
    pretty_printer.pprint(describe_feature_group_result)

    The LastUpdateStatus in the describe_feature_group API response initially shows the status InProgress. After the operation is successful, the LastUpdateStatus status changes to Successful. If for any reason the operation encounters an error, the lastUpdateStatus status shows as Failed, with the detailed error message in FailureReason.
    Update Feature Group API response
    When the update_feature_group API is invoked, the control plane reflects the schema change immediately, but the data plane takes up to 5 minutes to update its feature group schema. We must ensure that enough time is given for the update operation before proceeding to data ingestion.

  1. We prepare data for the has_kids feature by generating random 1s and 0s to indicate whether a customer has kids or not.
    customers_df['has_kids'] =np.random.randint(0, 2, customers_df.shape[0])

  1. We ingest the DataFrame that has the newly added column into the feature group using the SageMaker SDK FeatureGroup.ingest API
    customers_feature_group.ingest(data_frame=customers_df,
                                   max_workers=3,
                                   wait=True)

  1. Next, we verify the feature record in the online store for a single customer using the Boto3 get_record API.
    get_record_result = featurestore_runtime.get_record(
                                              FeatureGroupName=customers_feature_group_name,
                                              RecordIdentifierValueAsString=customer_id)
    pretty_printer.pprint(get_record_result)

    Get Record API response

  2. Let’s query the same customer record on the Athena console to verify the offline data store. The data is appended to the offline store to maintain historical writes and updates. Therefore, we see two records here: a newer record that has the feature updated to value 1, and an older record that doesn’t have this feature and therefore shows the value as empty. The offline store persistence happens in batches within 15 minutes, so this step could take time.

Athena query

Now that we have this feature added to our feature group, we can extract this new feature into our training dataset and retrain models. The goal of the post is to highlight the ease of modifying a feature group, ingesting data into the new feature, and then using the updated data in the feature group for model training and inference.

Clean up

Don’t forget to clean up the resources created as part of this post to avoid incurring ongoing charges.

  1. Delete the S3 objects in the offline store:
    s3_config = describe_feature_group_result['OfflineStoreConfig']['S3StorageConfig']
    s3_uri = s3_config['ResolvedOutputS3Uri']
    full_prefix = '/'.join(s3_uri.split('/')[3:])
    bucket = s3.Bucket(default_bucket)
    offline_objects = bucket.objects.filter(Prefix=full_prefix)
    offline_objects.delete()

  1. Delete the feature group:
    customers_feature_group.delete()

  1. Stop the SageMaker Jupyter notebook instance. For instructions, refer to Clean Up.

Conclusion

Feature Store is a fully managed, purpose-built repository to store, share, and manage features for ML models. Being able to add features to existing feature groups simplifies iterative model development and alleviates the challenges we see in creating and maintaining multiple feature groups.

In this post, we showed you how to add features to existing feature groups via the newly released SageMaker UpdateFeatureGroup API. The steps shown in this post are available as a Jupyter notebook in the GitHub repository. Give it a try and let us know your feedback in the comments.

Further reading

If you’re interested in exploring the complete scenario mentioned earlier in this post of predicting a customer ordering a certain product, check out the following notebook, which modifies the feature group, ingests data, and trains an XGBoost model with the data from the updated offline store. This notebook is part of a comprehensive workshop developed to demonstrate Feature Store functionality.

References

More information is available at the following resources:


About the authors

Chaitra Mathur is a Principal Solutions Architect at AWS. She guides customers and partners in building highly scalable, reliable, secure, and cost-effective solutions on AWS. She is passionate about Machine Learning and helps customers translate their ML needs into solutions using AWS AI/ML services. She holds 5 certifications including the ML Specialty certification. In her spare time, she enjoys reading, yoga, and spending time with her daughters.

Mark Roy is a Principal Machine Learning Architect for AWS, helping customers design and build AI/ML solutions. Mark’s work covers a wide range of ML use cases, with a primary interest in computer vision, deep learning, and scaling ML across the enterprise. He has helped companies in many industries, including insurance, financial services, media and entertainment, healthcare, utilities, and manufacturing. Mark holds six AWS certifications, including the ML Specialty Certification. Prior to joining AWS, Mark was an architect, developer, and technology leader for over 25 years, including 19 years in financial services.

Charu Sareen is a Sr. Product Manager for Amazon SageMaker Feature Store. Prior to AWS, she was leading growth and monetization strategy for SaaS services at VMware. She is a data and machine learning enthusiast and has over a decade of experience spanning product management, data engineering, and advanced analytics. She has a bachelor’s degree in Information Technology from National Institute of Technology, India and an MBA from University of Michigan, Ross School of Business.

Frank McQuillan is a Principal Product Manager for Amazon SageMaker Feature Store.

Read More

Meet the Omnivore: Developer Builds Bots With NVIDIA Omniverse and Isaac Sim

Editor’s note: This post is a part of our Meet the Omnivore series, which features individual creators and developers who use NVIDIA Omniverse to accelerate their 3D workflows and create virtual worlds.

Antonio Serrano-Muñoz

While still in grad school, Antonio Serrano-Muñoz has helped author papers spanning planetary gravities, AI-powered diagnosis of rheumatoid arthritis and robots that precisely track millimetric-sized walkers, like ants.

Now, the Ph.D. student in applied robotics at Mondragon University in northern Spain, is using robotics and AI in remanufacturing to tackle issues of climate change and pollution.

In short, Serrano-Muñoz is busy discovering unique ways to apply technology to complex, real-world issues — and, in his free time, he makes extensions for NVIDIA Omniverse, a platform for real-time 3D design collaboration and world simulation.

Omniverse Extensions are core building blocks that enable anyone to create and extend the functionality of Omniverse Apps to meet the specific needs of their workflows with just a few lines of Python code.

Serrano-Muñoz has created six open-source Omniverse Extensions that can be accessed on GitHub, one of which enhances the capabilities of NVIDIA Isaac Sim, an Omniverse-powered application framework for creating photorealistic, physically accurate virtual environments in which to develop, train and simulate AI robots.

“Since the beginning of my Ph.D. studies, I decided to work with Isaac Sim to simulate robots,” Serrano-Muñoz said. “It offers a powerful, real-time simulation platform with an ultra-realistic physics engine and graphics — as well as a clean, simple application programming interface that makes it easy to interact with the whole system.”

Omniverse for Robotics Simulation

Serrano-Muñoz has pursued robotics for as long as he can remember. Growing up in Cuba, he always fiddled with electronics, and he fell deeper in love with technology when he began coding in college.

“Robots can assist humans with strenuous, high-precision, repetitive and sometimes hazardous tasks,” Serrano-Muñoz said. “They have the potential to improve our lives, and I hope my work advances robotics in a way that allows us to build a better present and achieve a better future.”

He believes Omniverse is crucial to his doctoral studies in applied robotics.

“Performing real-time, graphically realistic simulations of robotics environments wasn’t possible before Omniverse,” he said. “The platform opens the door to a new era of revolutionary changes in robotics, simulation and real-time collaboration.”

Omniverse links specialists of all kinds — engineers, designers, content creators — for the development of simulation systems, he added. Key for this is Universal Scene Description (USD), an open source 3D scene description and extensible file framework serving as the common language for virtual worlds.

“USD plays an important role in the process of authoring, composing and reading a hierarchically organized scene to create and manipulate its rendering elements and objects,” Serrano-Muñoz said.

Extending Omniverse for Isaac Sim

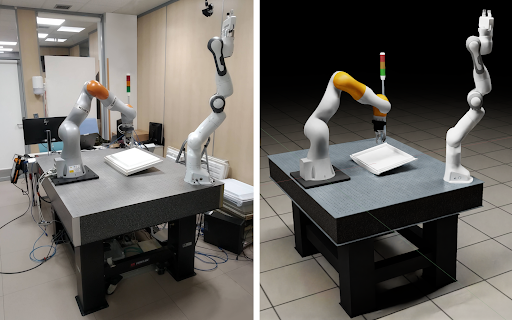
Using NVIDIA Omniverse, the developer has created robot simulations for industrial use cases and a digital twin of Mondragon University’s laboratory for robotics prototyping.

A digital twin of a bench in Mondragon University’s robotics lab, made with NVIDIA Omniverse.

And while working on such projects, Serrano-Muñoz wanted to integrate with Isaac Sim a tool he was already familiar with: Robot Operating System, or ROS, a set of software libraries for building robot applications. So, he created an Omniverse Extension to enable just that.

The extension lets users manipulate simulated robotic systems in the Omniverse-powered Isaac Sim application via ROS control interfaces. ROS MoveIt, a motion planning framework for robots, can be used in conjunction with Isaac Sim’s dynamic control extension and PhysX capabilities, which bring physical accuracy to high-fidelity robotics simulations.

“It’s easy to develop code without leaving the Omniverse Kit,” Serrano-Muñoz said. “Omniverse Extensions come with a system-wide integration API, installation, activation and reload mechanisms to augment the functionality of Omniverse Apps.”

This particular extension for ROS, he added, boosts agile prototyping for robotics applications — which is further accelerated by his NVIDIA RTX 3080 Laptop GPU — making his workflow faster than ever.

Hear more from Serrano-Muñoz about using digital twins for industrial robotics by watching his NVIDIA GTC session on demand. And watch his Community Spotlight on the Omniverse Twitch channel happening Aug. 3 at 11 a.m. PT.

Join in on the Creation

Creators and developers across the world can download NVIDIA Omniverse for free, and enterprise teams can use the platform for their 3D projects.

Developers like Serrano-Muñoz will join NVIDIA at SIGGRAPH, a global computer graphics conference running Aug. 8-11. Watch the Omniverse community livestream at SIGGRAPH on Tuesday, Aug. 9, at noon PT to learn how Omniverse and other design and visualization technologies are driving breakthroughs in graphics and GPU-accelerated software.

Plus, anyone can submit to the inaugural #ExtendOmniverse developer contest through Friday, Aug. 19. Create an Omniverse Extension using Omniverse Code for a chance to win an NVIDIA RTX GPU.

Check out artwork from other “Omnivores” and submit projects in the gallery. Connect your workflows to Omniverse with software from Adobe, Autodesk, Epic Games, Maxon, Reallusion and more.

Follow NVIDIA Omniverse on Instagram, Twitter, YouTube and Medium for additional resources and inspiration. Check out the Omniverse forums, and join our Discord server and Twitch channel to chat with the community.

The post Meet the Omnivore: Developer Builds Bots With NVIDIA Omniverse and Isaac Sim appeared first on NVIDIA Blog.

Read More