Teaching old labels new tricks in heterogeneous graphs

Teaching old labels new tricks in heterogeneous graphs

Industrial applications of machine learning are commonly composed of various items that have differing data modalities or feature distributions. Heterogeneous graphs (HGs) offer a unified view of these multimodal data systems by defining multiple types of nodes (for each data type) and edges (for the relation between data items). For instance, e-commerce networks might have [user, product, review] nodes or video platforms might have [channel, user, video, comment] nodes. Heterogeneous graph neural networks (HGNNs) learn node embeddings summarizing each node’s relationships into a vector. However, in real world HGs, there is often a label imbalance issue between different node types. This means that label-scarce node types cannot exploit HGNNs, which hampers the broader applicability of HGNNs.

In “Zero-shot Transfer Learning within a Heterogeneous Graph via Knowledge Transfer Networks”, presented at NeurIPS 2022, we propose a model called a Knowledge Transfer Network (KTN), which transfers knowledge from label-abundant node types to zero-labeled node types using the rich relational information given in a HG. We describe how we pre-train a HGNN model without the need for fine-tuning. KTNs outperform state-of-the-art transfer learning baselines by up to 140% on zero-shot learning tasks, and can be used to improve many existing HGNN models on these tasks by 24% (or more).

KTNs transform labels from one type of information (squares) through a graph to another type (stars).

What is a heterogeneous graph?

A HG is composed of multiple node and edge types. The figure below shows an e-commerce network presented as a HG. In e-commerce, “users” purchase “products” and write “reviews”. A HG presents this ecosystem using three node types [user, product, review] and three edge types [user-buy-product, user-write-review, review-on-product]. Individual products, users, and reviews are then presented as nodes and their relationships as edges in the HG with the corresponding node and edge types.

E-commerce heterogeneous graph.

In addition to all connectivity information, HGs are commonly given with input node attributes that summarize each node’s information. Input node attributes could have different modalities across different node types. For instance, images of products could be given as input node attributes for the product nodes, while text can be given as input attributes to review nodes. Node labels (e.g., the category of each product or the category that most interests each user) are what we want to predict on each node.

HGNNs and label scarcity issues

HGNNs compute node embeddings that summarize each node’s local structures (including the node and its neighbor’s information). These node embeddings are utilized by a classifier to predict each node’s label. To train a HGNN model and a classifier to predict labels for a specific node type, we require a good amount of labels for the type.

A common issue in industrial applications of deep learning is label scarcity, and with their diverse node types, HGNNs are even more likely to face this challenge. For instance, publicly available content node types (e.g., product nodes) are abundantly labeled, whereas labels for user or account nodes may not be available due to privacy restrictions. This means that in most standard training settings, HGNN models can only learn to make good inferences for a few label-abundant node types and can usually not make any inferences for any remaining node types (given the absence of any labels for them).

Transfer learning on heterogeneous graphs

Zero-shot transfer learning is a technique used to improve the performance of a model on a target domain with no labels by using the knowledge learned by the model from another related source domain with adequately labeled data. To apply transfer learning to solve this label scarcity issue for certain node types in HGs, the target domain would be the zero-labeled node types. Then what would be the source domain? Previous work commonly sets the source domain as the same type of nodes located in a different HG, assuming those nodes are abundantly labeled. This graph-to-graph transfer learning approach pre-trains a HGNN model on the external HG and then runs the model on the original (label-scarce) HG.

However, these approaches are not applicable in many real-world scenarios for three reasons. First, any external HG that could be used in a graph-to-graph transfer learning setting would almost surely be proprietary, thus, likely unavailable. Second, even if practitioners could obtain access to an external HG, it is unlikely the distribution of that source HG would match their target HG well enough to apply transfer learning. Finally, node types suffering from label scarcity are likely to suffer the same issue on other HGs (e.g., privacy issues on user nodes).

Our approach: Transfer learning between node types within a heterogeneous graph

Here, we shed light on a more practical source domain, other node types with abundant labels located on the same HG. Instead of using extra HGs, we transfer knowledge within a single HG (assumed to be fully owned by the practitioners) across different types of nodes. More specifically, we pre-train a HGNN model and a classifier on a label-abundant (source) node type, then reuse the models on the zero-labeled (target) node types located in the same HG without additional fine-tuning. The one requirement is that the source and target node types share the same label set (e.g., in the e-commerce HG, product nodes have a label set describing product categories, and user nodes share the same label set describing their favorite shopping categories).

Why is it challenging?

Unfortunately, we cannot directly reuse the pre-trained HGNN and classifier on the target node type. One crucial characteristic of HGNN architectures is that they are composed of modules specialized to each node type to fully learn the multiplicity of HGs. HGNNs use distinct sets of modules to compute embeddings for each node type. In the figure below, blue- and red-colored modules are used to compute node embeddings for the source and target node types, respectively.

HGNNs are composed of modules specialized to each node type and use distinct sets of modules to compute embeddings of different node types. More details can be found in the paper.

While pre-training HGNNs on the source node type, source-specific modules in the HGNNs are well trained, however target-specific modules are under-trained as they have only a small amount of gradients flowing into them. This is shown below, where we see that the L2 norm of gradients for target node types (i.e., Mtt) are much lower than for source types (i.e., Mss). In this case a HGNN model outputs poor node embeddings for the target node type, which results in poor task performance.

In HGNNs, target type-specific modules receive zero or only a small amount of gradients during pre-training on the source node type, leading to poor performance on the target node type.

KTN: Trainable cross-type transfer learning for HGNNs

Our work focuses on transforming the (poor) target node embeddings computed by a pre-trained HGNN model to follow the distribution of the source node embeddings. Then the classifier, pre-trained on the source node type, can be reused for the target node type. How can we map the target node embeddings to the source domain? To answer this question, we investigate how HGNNs compute node embeddings to learn the relationship between source and target distributions.

HGNNs aggregate connected node embeddings to augment a target node’s embeddings in each layer. In other words, the node embeddings for both source and target node types are updated using the same input — the previous layer’s node embeddings of any connected node types. This means that they can be represented by each other. We prove this relationship theoretically and find there is a mapping matrix (defined by HGNN parameters) from the target domain to the source domain (more details in Theorem 1 in the paper). Based on this theorem, we introduce an auxiliary neural network, which we refer to as a Knowledge Transfer Network (KTN), that receives the target node embeddings and then transforms them by multiplying them with a (trainable) mapping matrix. We then define a regularizer that is minimized along with the performance loss in the pre-training phase to train the KTN. At test time, we map the target embeddings computed from the pre-trained HGNN to the source domain using the trained KTN for classification.

In HGNNs, the final node embeddings of both source and target types are computed from different mathematical functions (f(): source, g(): target) which use the same input — the previous layer’s node embeddings.

Experimental results

To examine the effectiveness of KTNs, we ran 18 different zero-shot transfer learning tasks on two public heterogeneous graphs, Open Academic Graph and Pubmed. We compare KTN with eight state-of-the-art transfer learning methods (DAN, JAN, DANN, CDAN, CDAN-E, WDGRL, LP, EP). Shown below, KTN consistently outperforms all baselines on all tasks, beating transfer learning baselines by up to 140% (as measured by Normalized Discounted Cumulative Gain, a ranking metric).

Zero-shot transfer learning on Open Academic Graph (OAG-CS) and Pubmed datasets. The colors represent different categories of transfer learning baselines against which the results are compared. Yellow: Use statistical properties (e.g., mean, variance) of distributions. Green: Use adversarial models to transfer knowledge. Orange: Transfer knowledge directly via graph structure using label propagation.

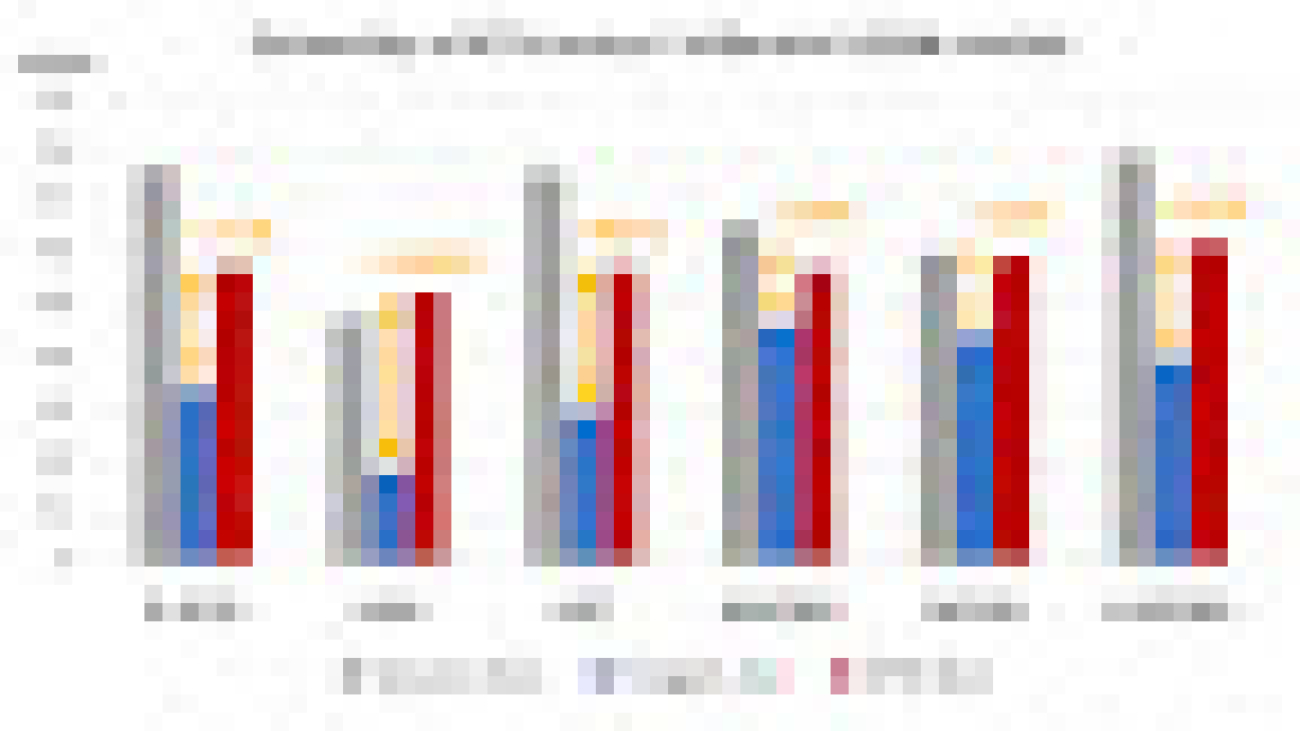
Most importantly, KTN can be applied to almost all HGNN models that have node and edge type-specific parameters and improve their zero-shot performance on target domains. As shown below, KTN improves accuracy on zero-labeled node types across six different HGNN models(R-GCN, HAN, HGT, MAGNN, MPNN, H-MPNN) by up to 190%.

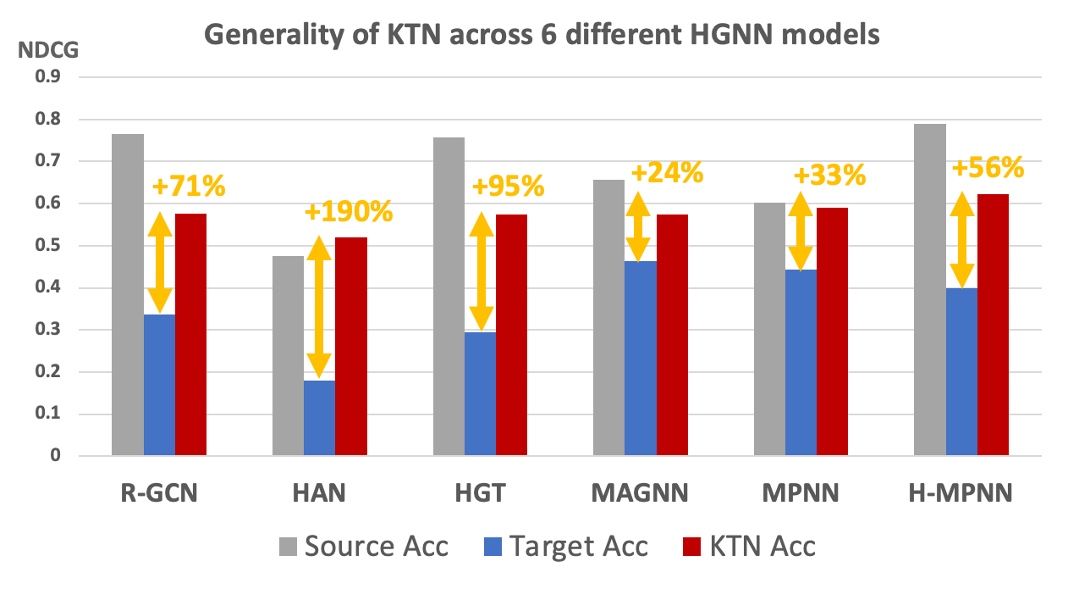
KTN can be applied to six different HGNN models and improve their zero-shot performance on target domains.

Takeaways

Various ecosystems in industry can be presented as heterogeneous graphs. HGNNs summarize heterogeneous graph information into effective representations. However, label scarcity issues on certain types of nodes prevent the wider application of HGNNs. In this post, we introduced KTN, the first cross-type transfer learning method designed for HGNNs. With KTN, we can fully exploit the richness of heterogeneous graphs via HGNNs regardless of label scarcity. See the paper for more details.

Acknowledgements

This paper is joint work with our co-authors John Palowitch (Google Research), Dustin Zelle (Google Research), Ziniu Hu (Intern, Google Research), and Russ Salakhutdinov (CMU). We thank Tom Small for creating the animated figure in this blog post.

Read More

What Is Confidential Computing?

What Is Confidential Computing?

Cloud and edge networks are setting up a new line of defense, called confidential computing, to protect the growing wealth of data users process in those environments.

Confidential Computing Defined

Confidential computing is a way of protecting data in use, for example while in memory or during computation, and preventing anyone from viewing or altering the work.

Using cryptographic keys linked to the processors, confidential computing creates a trusted execution environment or secure enclave. That safe digital space supports a cryptographically signed proof, called attestation, that the hardware and firmware is correctly configured to prevent the viewing or alteration of their data or application code.

In the language of security specialists, confidential computing provides assurances of data and code privacy as well as data and code integrity.

What Makes Confidential Computing Unique?

Confidential computing is a relatively new capability for protecting data in use.

For many years, computers have used encryption to protect data that’s in transit on a network and data at rest, stored in a drive or non-volatile memory chip. But with no practical way to run calculations on encrypted data, users faced a risk of having their data seen, scrambled or stolen while it was in use inside a processor or main memory.

With confidential computing, systems can now cover all three legs of the data-lifecycle stool, so data is never in the clear.

Confidential computing protects data in use
Confidential computing adds a new layer in computer security — protecting data in use while running on a processor.

In the past, computer security mainly focused on protecting data on systems users owned, like their enterprise servers. In this scenario, it’s okay that system software sees the user’s data and code.

With the advent of cloud and edge computing, users now routinely run their workloads on computers they don’t own.  So confidential computing flips the focus to protecting the users’ data from whoever owns the machine.

With confidential computing, software running on the cloud or edge computer, like an operating system or hypervisor, still manages work. For example, it allocates memory to the user program, but it can never read or alter the data in memory allocated by the user.

How Confidential Computing Got Its Name

A 2015 research paper was one of several using new Security Guard Extensions (Intel SGX) in x86 CPUs to show what’s possible. It called its approach VC3, for Verifiable Confidential Cloud Computing, and the name — or at least part of it — stuck.

“We started calling it confidential cloud computing,” said Felix Schuster, lead author on the 2015 paper.

Four years later, Schuster co-founded Edgeless Systems, a company in Bochum, Germany, that develops tools so users can create their own confidential-computing apps to improve data protection.

Confidential computing is “like attaching a contract to your data that only allows certain things to be done with it,” he said.

How Does Confidential Computing Work?

Taking a deeper look, confidential computing sits on a foundation called a root of trust, which is based on a secured key unique to each processor.

The processor checks it has the right firmware to start operating with what’s called a secure, measured boot. That process spawns reference data, verifying the chip is in a known safe state to start work.

Next, the processor establishes a secure enclave or trusted execution environment (TEE) sealed off from the rest of the system where the user’s application runs. The app brings encrypted data into the TEE, decrypts it, runs the user’s program, encrypts the result and sends it off.

At no time could the machine owner view the user’s code or data.

One other piece is crucial: It proves to the user no one could tamper with the data or software.

How attestation works in confidential computing
Attestation uses a private key to create security certificates stored in public logs. Users can access them with the web’s transport layer security (TLS) to verify confidentiality defenses are intact, protecting their workloads.

The proof is delivered through a multi-step process called attestation (see diagram above).

The good news is researchers and commercially available services have demonstrated confidential computing works, often providing data security without significantly impacting performance.

Diagram of how confidential computing works
A high-level look at how confidential computing works.

Shrinking the Security Perimeters

As a result, users no longer need to trust all the software and systems administrators in separate cloud and edge companies at remote locations.

Confidential computing closes many doors hackers like to use. It isolates programs and their data from attacks that could come from firmware, operating systems, hypervisors, virtual machines — even physical interfaces like a USB port or PCI Express connector on the computer.

The new level of security promises to reduce data breaches that rose from 662 in 2010 to more than 1,000 by 2021 in the U.S. alone, according to a report from the Identity Theft Resource Center.

That said, no security measure is a panacea, but confidential computing is a great security tool, placing control directly in the hands of “data owners”.

Use Cases for Confidential Computing

Users with sensitive datasets and regulated industries like banks, healthcare providers and governments are among the first to use confidential computing. But that’s just the start.

Because it protects sensitive data and intellectual property, confidential computing will let groups feel they can collaborate safely. They share an attested proof their content and code was secured.

Example applications for confidential computing include:

  • Companies executing smart contracts with blockchains
  • Research hospitals collaborating to train AI models that analyze trends in patient data
  • Retailers, telecom providers and others at the network’s edge, protecting personal information in locations where physical access to the computer is possible
  • Software vendors can distribute products which include AI models and proprietary algorithms while preserving their intellectual property

While confidential computing is getting its start in public cloud services, it will spread rapidly.

Users need confidential computing to protect edge servers in unattended or hard-to-reach locations. Enterprise data centers can use it to guard against insider attacks and protect one confidential workload from another.

growth forecast for confidential computing
Market researchers at Everest Group estimate the available market for confidential computing could grow 26x in five years.

So far, most users are in a proof-of-concept stage with hopes of putting workloads into production soon, said Schuster.

Looking forward, confidential computing will not be limited to special-purpose or sensitive workloads. It will be used broadly, like the cloud services hosting this new level of security.

Indeed, experts predict confidential computing will become as widely used as encryption.

The technology’s potential motivated vendors in 2019 to launch the Confidential Computing Consortium, part of the Linux Foundation. CCC’s members include processor and cloud leaders as well as dozens of software companies.

The group’s projects include the Open Enclave SDK, a framework for building trusted execution environments.

“Our biggest mandate is supporting all the open-source projects that are foundational parts of the ecosystem,” said Jethro Beekman, a member of the CCC’s technical advisory council and vice president of technology at Fortanix, one of the first startups founded to develop confidential computing software.

“It’s a compelling paradigm to put security at the data level, rather than worry about the details of the infrastructure — that should result in not needing to read about data breaches in the paper every day,” said Beekman, who wrote his 2016 Ph.D. dissertation on confidential computing.

Chart of companies active in confidential computing
A growing sector of security companies is working in confidential computing and adjacent areas. (Source: GradientFlow)

How Confidential Computing Is Evolving

Implementations of confidential computing are evolving rapidly.

At the CPU level, AMD has released Secure Encrypted Virtualization with Secure Nested Paging (SEV-SNP). It extends the process-level protection in Intel SGX to full virtual machines, so users can implement confidential computing without needing to rewrite their applications.

Top processor makers have aligned on supporting this approach. Intel’s support comes via new Trusted Domain Extensions. Arm has described its implementation, called Realms.

Proponents of the RISC-V processor architecture are implementing confidential computing in an open-source project called Keystone.

Accelerating Confidential Computing

NVIDIA is bringing GPU acceleration to VM-style confidential computing to market with its Hopper architecture GPUs.

The H100 Tensor Core GPUs enable confidential computing for a broad swath of AI and high performance computing use cases. This gives users of these security services access to accelerated computing.

How GPUs and CPUs collaborate in NVIDIA's implementation of confidential computing
An example of how GPUs and CPUs work together to deliver an accelerated confidential computing service.

Meanwhile, cloud service providers are offering services today based on one or more of the underlying technologies or their own unique hybrids.

What’s Next for Confidential Computing

Over time, industry guidelines and standards will emerge and evolve for aspects of confidential computing such as attestation and efficient, secure I/O, said Beekman of CCC.

While it’s a relatively new privacy tool, confidential computing’s ability to protect code and data and provide guarantees of confidentiality makes it a powerful one.

Looking ahead, experts expect confidential computing will be blended with other privacy methods like fully homomorphic encryption (FHE), federated learning, differential privacy, and other forms of multiparty computing.

Using all the elements of the modern privacy toolbox will be key to success as demand for AI and privacy grows.

So, there are many moves ahead in the great chess game of security to overcome the challenges and realize the benefits of confidential computing.

Take a Deeper Dive

To learn more, watch “Hopper Confidential Computing: How it Works Under the Hood,” session S51709 at GTC on March 22 or later (free with registration).

Check out “Confidential Computing: The Developer’s View to Secure an Application and Data on NVIDIA H100,” session S51684 on March 23 or later.

You also can attend a March 15 panel discussion at the Open Confidential Computing Conference moderated by Schuster and featuring Ian Buck, NVIDIA’s vice president of hyperscale and HPC. And watch the video below.

Read More

Simplify continuous learning of Amazon Comprehend custom models using Comprehend flywheel

Simplify continuous learning of Amazon Comprehend custom models using Comprehend flywheel

Amazon Comprehend is a managed AI service that uses natural language processing (NLP) with ready-made intelligence to extract insights about the content of documents. It develops insights by recognizing the entities, key phrases, language, sentiments, and other common elements in a document. The ability to train custom models through the Custom classification and Custom entity recognition features of Comprehend has enabled customers to explore out-of-the-box NLP capabilities tied to their requirements without having to take the approach of building classification and entity recognition models from scratch.

Today, users invest a significant amount of resources to build, train, and maintain custom models. However, these models are sensitive to changes in the real world. For example, since 2020, COVID has become a new entity type that businesses need to extract from documents. In order to do so, customers have to retrain their existing entity extraction models with new training data that includes COVID. Custom Comprehend users need to manually monitor model performance to assess drifts, maintain data to retrain models, and select the right models that improve performance.

Comprehend flywheel is a new Amazon Comprehend resource that simplifies the process of improving a custom model over time. You can use a flywheel to orchestrate the tasks associated with training and evaluating new custom model versions. You can create a flywheel to use an existing trained model, or Amazon Comprehend can create and train a new model for the flywheel. Flywheel creates a data lake (in Amazon S3) in your account where all the training and test data for all versions of the model are managed and stored. Periodically, the new labeled data (to retrain the model) can be made available to flywheel by creating datasets. To incorporate the new datasets into your custom model, you create and run a flywheel iteration. A flywheel iteration is a workflow that uses the new datasets to evaluate the active model version and to train a new model version.

Based on the quality metrics for the existing and new model versions, you set the active model version to be the version of the flywheel model that you want to use for inference jobs. You can use the flywheel active model version to run custom analysis (real-time or asynchronous jobs). To use the flywheel model for real-time analysis, you must create an endpoint for the flywheel.

This post demonstrates how you can build a custom text classifier (no prior ML knowledge needed) that can assign a specific label to a given text. We will also illustrate how flywheel can be used to orchestrate the training of a new model version and improve the accuracy of the model using new labeled data.

Prerequisites

To complete this walkthrough, you need an AWS account and access to create resources in AWS Identity and Access Management (IAM), Amazon S3 and Amazon Comprehend within the account.

  • Configure IAM user permissions for users to access flywheel operations (CreateFlywheel, DeleteFlywheel, UpdateFlywheel, CreateDataset, StartFlywheelIteration).
  • (Optional) Configure permissions for AWS KMS keys for AWS KMS keys for the datalake.
  • Create a data access role that authorizes Amazon Comprehend to access the datalake.

For information about creating IAM policies for Amazon Comprehend, see Permissions to perform Amazon Comprehend actions. 

In this post, we use the Yahoo corpus from Text Understanding from scratch by Xiang Zhang and Yann LeCun. The data can be accessed from AWS Open Data Registry. Please refer to section 4, “Preparing data,” from the post Building a custom classifier using Amazon Comprehend for the script and detailed information on data preparation and structure.

Alternatively, for even more convenience, you can download the prepared data by entering the following two command lines:

Admin:~/environment $ aws s3 cp s3://aws-blogs-artifacts-public/artifacts/ML-13607/custom-classifier-partial-dataset.csv .

Admin:~/environment $ aws s3 cp s3://aws-blogs-artifacts-public/artifacts/ML-13607/custom-classifier-complete-dataset.csv .

We will be using the custom-classifier-partial-dataset.csv (about 15,000 documents) dataset to create the initial version of the custom classifier.  Next, we will create a flywheel to orchestrate the retraining of the initial version of the model using the complete dataset custom-classifier-complete-dataset.csv (about 100,000 documents). Upon retraining the model by triggering a flywheel iteration, we evaluate the model performance metrics of the two versions of the custom model and choose the better-performing one as the active model version and demonstrate real-time custom classification using the same.

Solution overview

Please find the following steps to set up the environment and the data lake to create a Comprehend flywheel iteration to retrain the custom models.

  1. Setting up the environment
  2. Creating S3 buckets
  3. Training the custom classifier
  4. Creating a flywheel
  5. Configuring datasets
  6. Triggering flywheel iterations
  7. Update active model version
  8. Using flywheel for custom classification
  9. Cleaning up the resources

1. Setting up the environment

You can interact with Amazon Comprehend via the AWS Management ConsoleAWS Command Line Interface (AWS CLI), or Amazon Comprehend API. For more information, refer to Getting started with Amazon Comprehend.

In this post, we use AWS CLI to create and manage the resources. AWS Cloud9 is a cloud-based integrated development environment (IDE) that lets you write, run, and debug your code. It includes a code editor, debugger, and terminal. AWS Cloud9 comes prepackaged with AWS CLI.

Please refer to  Creating an environment in AWS Cloud9 to set up the environment.

2. Creating S3 buckets

  1. Create two S3 buckets
    • One for managing the datasets custom-classifier-partial-dataset.csv and custom-classifier-complete-dataset.csv.
    • One for the data lake for Comprehend flywheel.
  2. Create the first bucket using the following command (replace ‘123456789012’ with your account ID):
    $ aws s3api create-bucket --acl private --bucket '123456789012-comprehend' --region us-east-1

  3. Create the bucket to be used as the data lake for flywheel:
    $ aws s3api create-bucket --acl private --bucket '123456789012-comprehend-flywheel-datalake' --region us-east-1

  4. Upload the training datasets to the “123456789012-comprehend” bucket:
    $ aws s3 cp custom-classifier-partial-dataset.csv s3://123456789012-comprehend/
    
    $ aws s3 cp custom-classifier-complete-dataset.csv s3://123456789012-comprehend/

3. Training the custom classifier

Use the following command to create a custom classifier: yahoo-answers-version1 using the dataset: custom-classifier-partial-dataset.csv. Replace the data access role ARN and the S3 bucket locations with your own.

$ aws comprehend create-document-classifier  --document-classifier-name "yahoo-answers-version1"  --data-access-role-arn arn:aws:iam::123456789012:role/comprehend-data-access-role  --input-data-config S3Uri=s3://123456789012-comprehend/custom-classifier-partial-dataset.csv  --output-data-config S3Uri=s3://123456789012-comprehend/TrainingOutput/ --language-code en

The above API call results in the following output:

{  "DocumentClassifierArn": "arn:aws:comprehend:us-east-1:123456789012:document-classifier/yahoo-answers-version1"}

CreateDocumentClassifier starts the training of the custom classifier model. In order to further track the progress of the training, use DescribeDocumentClassifier.

$ aws comprehend describe-document-classifier --document-classifier-arn arn:aws:comprehend:us-east-1:123456789012:document-classifier/yahoo-answers-version1

{ "DocumentClassifierProperties": { "DocumentClassifierArn": "arn:aws:comprehend:us-east-1:123456789012:document-classifier/yahoo-answers-version1", "LanguageCode": "en", "Status": "TRAINED", "SubmitTime": "2022-09-22T21:17:53.380000+05:30", "EndTime": "2022-09-22T23:04:52.243000+05:30", "TrainingStartTime": "2022-09-22T21:21:55.670000+05:30", "TrainingEndTime": "2022-09-22T23:04:17.057000+05:30", "InputDataConfig": { "DataFormat": "COMPREHEND_CSV", "S3Uri": "s3://123456789012-comprehend/custom-classifier-partial-dataset.csv" }, "OutputDataConfig": { "S3Uri": "s3://123456789012-comprehend/TrainingOutput/333997476486-CLR-4ea35141e42aa6b2eb2b3d3aadcbe731/output/output.tar.gz" }, "ClassifierMetadata": { "NumberOfLabels": 10, "NumberOfTrainedDocuments": 13501, "NumberOfTestDocuments": 1500, "EvaluationMetrics": { "Accuracy": 0.6827, "Precision": 0.7002, "Recall": 0.6906, "F1Score": 0.693, "MicroPrecision": 0.6827, "MicroRecall": 0.6827, "MicroF1Score": 0.6827, "HammingLoss": 0.3173 } }, "DataAccessRoleArn": "arn:aws:iam::123456789012:role/comprehend-data-access-role", "Mode": "MULTI_CLASS" }}
Console view of the initial version of the custom classifier as a result of the create-document-classifier command previously described:

Console view of the initial version of the custom classifier as a result of the create-document-classifier command previously described

Model Performance

Model Performance

Once Status shows TRAINED, the classifier is ready to use. The initial version of the model has an F1-score of 0.69. F1-score is an important evaluation metric in machine learning. It sums up the predictive performance of a model by combining two otherwise competing metrics—precision and recall.

4. Create a flywheel

As the next step, create a new version of the model with the updated dataset (custom-classifier-complete-dataset.csv). For retraining, we will be using Comprehend flywheel to help orchestrate and simplify the process of retraining the model.

You can create a flywheel for an existing trained model (as in our case) or train a new model for the flywheel. When you create a flywheel, Amazon Comprehend creates a data lake to hold all the data that the flywheel needs, such as the training data and test data for each version of the model.  When Amazon Comprehend creates the data lake, it sets up the following folder structure in the Amazon S3 location.

Datasets 
Annotations pool 
Model datasets 
       (data for each version of the model) 
       VersionID-1 
                Training 
                Test 
                ModelStats 
       VersionID-2 
                Training 
                Test 
                ModelStats 

Warning: Amazon Comprehend manages the data lake folder organization and contents. If you modify the datalake folders, your flywheel may not operate correctly.

How to create a flywheel (for the existing custom model):

Note: If you create a flywheel for an existing trained model version, the model type and model configuration are preconfigured.

Be sure to replace the model ARN, data access role, and data lake S3 URI with your resource’s ARNs. Use the second S3 bucket  123456789012-comprehend-flywheel-datalake created in the “Setting up S3 buckets” step as the data lake for flywheel.

$ aws comprehend create-flywheel --flywheel-name custom-model-flywheel-test --active-model-arn arn:aws:comprehend:us-east-1:123456789012:document-classifier/yahoo-answers-version1 -- data-access-role-arn arn:aws:iam::123456789012:role/comprehend-data-access-role --data-lake-s3-uri s3://123456789012-comprehend-flywheel-datalake/

The above API call results in a FlyWheelArn.

{ "FlywheelArn": "arn:aws:comprehend:us-east-1:123456789012:flywheel/custom-model-flywheel-test"}
Console view of the Flywheel

Console view of the flywheel

5. Configuring datasets

To add labeled training or test data to a flywheel, use the Amazon Comprehend console or API to create a dataset.

  1. Create an inputConfig.json file containing the following content:
    {"DataFormat": "COMPREHEND_CSV","DocumentClassifierInputDataConfig": {"S3Uri": "s3://123456789012-comprehend/custom-classifier-complete-dataset.csv"}}

  2. Use the relevant flywheel ARN from your account to create the dataset.
    $ aws comprehend create-dataset --flywheel-arn "arn:aws:comprehend:us-east-1:123456789012:flywheel/custom-model-flywheel-test" --dataset-name "training-dataset-complete" --dataset-type "TRAIN" --description "my training dataset" --input-data-config file://inputConfig.json

  3. This results in the creation of a dataset:
    {   "DatasetArn": "arn:aws:comprehend:us-east-1:123456789012:flywheel/custom-model-flywheel-test/dataset/training-dataset-complete"   }
    {   "DatasetArn": "arn:aws:comprehend:us-east-1:123456789012:flywheel/custom-model-flywheel-test/dataset/training-dataset-complete"   }

6. Triggering flywheel iterations

Use flywheel iterations to help you create and manage new model versions. Users can also view per-dataset metrics in the “model stats” folder in the data lake in S3 bucket. Run the following command to start the flywheel iteration:

$ aws comprehend start-flywheel-iteration --flywheel-arn  "arn:aws:comprehend:us-east-1:123456789012:flywheel/custom-model-flywheel-test"

The response contains the following content :

{ "FlywheelArn": "arn:aws:comprehend:us-east-1:123456789012:flywheel/custom-model-flywheel-test", "FlywheelIterationId": "20220922T192911Z"}

When you run the flywheel, it creates a new iteration that trains and evaluates a new model version with the updated dataset. You can promote the new model version if its performance is superior to the existing active model version.

Result of the flywheel iteration

Result of the flywheel iteration

7. Update active model version

We notice that the model performance has improved as a result of the recent iteration (highlighted above). To promote the new model version as the active model version for inferences, use UpdateFlywheel API call:

$  aws comprehend update-flywheel --flywheel-arn arn:aws:comprehend:us-east-1:123456789012:flywheel/custom-model-flywheel-test --active-model-arn  "arn:aws:comprehend:us-east-1:123456789012:document-classifier/yahoo-answers-version1/version/Comprehend-Generated-v1-1b235dd0"

The response contains the following contents, which shows that the newly trained model is being promoted as the active version:

{"FlywheelProperties": {"FlywheelArn": "arn:aws:comprehend:us-east-1:123456789012:flywheel/custom-model-flywheel-test","ActiveModelArn": "arn:aws:comprehend:us-east-1:123456789012:document-classifier/yahoo-answers-version1/version/Comprehend-Generated-v1-1b235dd0","DataAccessRoleArn": "arn:aws:iam::123456789012:role/comprehend-data-access-role","TaskConfig": {"LanguageCode": "en","DocumentClassificationConfig": {"Mode": "MULTI_CLASS"}},"DataLakeS3Uri": "s3://123456789012-comprehend-flywheel-datalake/custom-model-flywheel-test/schemaVersion=1/20220922T175848Z/","Status": "ACTIVE","ModelType": "DOCUMENT_CLASSIFIER","CreationTime": "2022-09-22T23:28:48.959000+05:30","LastModifiedTime": "2022-09-23T07:05:54.826000+05:30","LatestFlywheelIteration": "20220922T192911Z"}}

8. Using flywheel for custom classification

You can use the flywheel’s active model version to run analysis jobs for custom classification. This can be for both real-time analysis or for asynchronous classification jobs.

  • Asynchronous jobs: Use the StartDocumentClassificationJob API request to start an asynchronous job for custom classification. Provide the FlywheelArn parameter instead of the DocumentClassifierArn.
  • Real-time analysis: You use an endpoint to run real-time analysis. When you create the endpoint, you configure it with the flywheel ARN instead of a model ARN. When you run the real-time analysis, select the endpoint associated with the flywheel. Amazon Comprehend runs the analysis using the active model version of the flywheel.

Run the following command to create the endpoint:

$ aws comprehend —endpoint-name custom-classification-endpoint —model-arn arn:aws:comprehend:us-east-1:123456789012:flywheel/custom-model-flywheel-test —desired-inference-units 1

Warning: You will be charged for this endpoint from the time it is created until it is deleted. Ensure you delete the endpoint when not in use to avoid charges.

For API, use the ClassifyDocument API operation. Provide the endpoint of the flywheel for the EndpointArn parameter OR use the console to classify documents in real time.

Pricing details

Flywheel APIs are free of charge. However, you will be billed for custom model training and management. You are charged $3 per hour for model training (billed by the second) and $0.50 per month for custom model management. For synchronous custom classification and entities inference requests, you provision an endpoint with the appropriate throughput. For more details, please visit Comprehend Pricing.

9. Cleaning up the resources

As discussed, you are charged from the time that you start your endpoint until it is deleted. Once you no longer need your endpoint, you should delete it so that you stop incurring costs from it. You can easily create another endpoint whenever you need it from the Endpoints section. For more information, refer to Deleting endpoints.

Conclusion

In this post, we walked through the capabilities of Comprehend flywheel and how it simplifies the process of retraining and improving custom models over time. As part of the next steps, you can explore the following:

  • Create and manage Comprehend flywheel resources from other mediums such as SDK and console.
  • In this blog, we created a flywheel for an already trained custom model. You can explore the option of creating a flywheel and training a model for it from scratch.
  • Use flywheel for custom entity recognizers.

There are many possibilities, and we are excited to see how you use Amazon Comprehend for your NLP use cases. Happy learning and experimentation!


About the Author

Supreeth S Angadi is a Greenfield Startup Solutions Architect at AWS and a member of AI/ML technical field community. He works closely with ML Core , SaaS and Fintech startups to help accelerate their journey to the cloud. Supreeth likes spending his time with family and friends, loves playing football and follows the sport immensely. His day is incomplete without a walk and playing fetch with his ‘DJ’ (Golden Retriever).

Read More

Introducing the Amazon Comprehend flywheel for MLOps

Introducing the Amazon Comprehend flywheel for MLOps

The world we live in is rapidly changing, and so are the data and features that companies and customers use to train their models. Retraining models to keep them in sync with these changes is critical to maintain accuracy. Therefore, you need an agile and dynamic approach to keep models up to date and adapt them to new inputs. This combination of great models and continuous adaptation is what will lead to a successful machine learning (ML) strategy.

Today, we are excited to announce the launch of Amazon Comprehend flywheel—a one-stop machine learning operations (MLOps) feature for an Amazon Comprehend model. In this post, we demonstrate how you can create an end-to-end workflow with an Amazon Comprehend flywheel.

Solution overview

Amazon Comprehend is a fully managed service that uses natural language processing (NLP) to extract insights about the content of documents. It helps you extract information by recognizing sentiments, key phrases, entities, and much more, allowing you to take advantage of state-of-the-art models and adapt them for your specific use case.

MLOps focuses on the intersection of data science and data engineering in combination with existing DevOps practices to streamline model delivery across the ML development lifecycle. MLOps is the discipline of integrating ML workloads into release management, CI/CD, and operations. MLOps requires the integration of software development, operations, data engineering, and data science.

This is why Amazon Comprehend is introducing the flywheel. The flywheel is intended to be your one stop to perform MLOPs for your Amazon Comprehend models. This new feature will allow you to keep your models up to date, improve upon your models, and deploy the best version faster.

The following diagram represents the model lifecycle inside an Amazon Comprehend flywheel.

The current process to create a new model consists of a sequence of steps. First, you gather data and prepare the dataset. Then, you train the model using this dataset. After the model is trained, it’s evaluated for accuracy and performance. Finally, you deploy the model to an endpoint to perform inference. When new models are created, these steps need to be repeated, and the endpoint needs to be manually updated.

An Amazon Comprehend flywheel automates this ML process, from data ingestion to deploying the model in production. With this new feature, you can manage training and testing of the created models inside Amazon Comprehend. This feature also allows you to automate model retraining after new datasets are ingested and available in the flywheel´s data lake.

The flywheel provides integration with custom classification and custom entity recognition APIs, and can help different roles such as data engineers and developers automate and manage the NLP workflow with no-code services.

First, let’s introduce some concepts:

  • Flywheel – A flywheel is an AWS resource that orchestrates the ongoing training of a model for custom classification or custom entity recognition.
  • Dataset – A dataset is a set of training or test data that is used in a single flywheel. Flywheel uses the training datasets to train new model versions and evaluate their performance on the test datasets.
  • Data lake – A flywheel’s data lake is a location in your Amazon Simple Storage Service (Amazon S3) bucket that stores all its datasets and model artifacts. Each flywheel has its own dedicated data lake.
  • Flywheel iteration – A flywheel iteration is a run of the flywheel when triggered by the user. Depending on the availability of new train or test datasets, the flywheel will train a new model version or assess the performance of the active model on new test data.
  • Active model – An active model is the selected version of the model by the user for predictions. As the performance of the model is improved with new flywheel iterations, you can change the active version to the one that has the best performance.

The following diagram illustrates the flywheel workflow.

flywheel workflow

These steps are detailed as follows:

  • Create a flywheel – A flywheel automates the training of model versions for a custom classifier or custom entity recognizer. You can either select an existing Amazon Comprehend model as a starting point for the flywheel or you can start from scratch with no models. In both cases, a flywheel’s data lake location must be specified for the flywheel.
  • Data ingestion – You can create new datasets for training or testing in the flywheel. All the training and test data for all versions of the model are managed and stored in the flywheel’s data lake created in your S3 bucket. The supported file formats are CSV and augmented manifest from an S3 location. You can find more information for preparing the dataset for custom classification and custom entity recognition.
  • Train and evaluate the model – When you don’t indicate the model ARN (Amazon Resource Name) to use, it implies that a new one is going to be built from scratch. For that, the first iteration of flywheel will create the model based on the train dataset uploaded. For successive iterations, these are the possible cases:
    • If no new train or test datasets are uploaded since the last iteration, the flywheel iteration will finish without any change.
    • If there are only new test datasets since the last iteration, the flywheel iteration will report the performance of the current active model based on the new test datasets.
    • If there are only new train datasets, the flywheel iteration will train a new model.
    • If there are new train and test datasets, the flywheel iteration will train a new model and report the performance of the current active model.
  • Promote new active model version – Based on the performance of the different flywheel iterations, you can update the active model version to the best one.
  • Deploy an endpoint – After running a flywheel iteration and updating the active model version, you can run real-time (synchronous) inference on your model. You can create an endpoint with the flywheel ARN, which will by default use the currently active model version. When the active model for the flywheel changes, the endpoint automatically starts using the new active model without any customer intervention. An endpoint includes all the managed resources that make your custom model available for real-time inference.

In the following sections, we demonstrate the different ways to create a new Amazon Comprehend flywheel.

Prerequisites

You need the following:

  • An active AWS account
  • An S3 bucket for your data location
  • An AWS Identity and Access Management (IAM) role with permissions to create an Amazon Comprehend flywheel and permissions to read and write to your data location S3 bucket

Create a flywheel with AWS CloudFormation

To start using an Amazon Comprehend flywheel with AWS CloudFormation, you need the following information about the AWS::Comprehend::Flywheel resource:

  • DataAccessRoleArn – The ARN of the IAM role that grants Amazon Comprehend permission to access the flywheel data
  • DataLakeS3Uri – The Amazon S3 URI of the flywheel’s data lake location
  • FlywheelName – The name for the flywheel

For more information, refer to AWS CloudFormation documentation.

Create a flywheel on the Amazon Comprehend console

In this example, we demonstrate how to build a flywheel for a custom classifier model on the Amazon Comprehend console that figures out the topic of the news.

Create a dataset

First, you need to create the dataset. For this post, we use the AG News Classification Dataset. In this dataset, data is classified in four news categories: WORLD, SPORTS, BUSINESS, and SCI_TEC.

Run the notebook following the steps to preprocess data in the Comprehend Immersion Day Lab 2 for the training and testing dataset and save the data in Amazon S3.

Create a flywheel

Now we can create our flywheel. Complete the following steps:

  1. On the Amazon Comprehend console, choose Flywheels in the navigation pane.
    choose Flywheels in the navigation pane.
  2. Choose Create new flywheel.
    create new flywheel

You can create a new flywheel from an existing model or create a new model. In this case, we create a new model from scratch.

  1. For Flywheel name, enter a name (for this example, custom-news-flywheel).
  2. Leave the Model field empty.
  3. Select Custom classification for Custom model type.
  4. For Language, leave the setting as English.
  5. Select Using Multi-label mode for Classifier mode.
  6. For Custom labels, enter BUSINESS,SCI_TECH,SPORTS,WORLD.
    For Custom labels, enter BUSINESS,SCI_TECH,SPORTS,WORLD.
  7. For the encryption settings, keep Use AWS owned key.
  8. For the flywheel’s data lake location, select an S3 URI in your account that can be dedicated to this flywheel.

Each flywheel has an S3 data lake location where it stores flywheel assets and artifacts such as datasets and model statistics. Make sure not to modify or delete any objects from this location because it’s meant to be managed exclusively by the flywheel.

  1. Choose Create an IAM role and enter a name for the role (CustomNewsFlywheelRole in our case).
  2. Choose Create.

It will take a couple of minutes to create the flywheel. Once created, the status will change to Active.

Once created, the status will change to Active.

  1. On the custom-news-flywheel details page, choose Create dataset.
    Create dataset
  2. For Dataset name, enter a name for the training dataset.
  3. Leave CSV file for Data format.
  4. Choose Training and select the training dataset from the S3 bucket.
  5. Choose Create.
  6. Repeat these steps to create a test dataset.
  7. After the uploaded dataset status changes to Completed, go to the Flywheel iterations tab and choose Run flywheel.
    go to the Flywheel iterations tab and choose Run flywheel.
  8. When the training is complete, go to the Model versions tab, select the recently trained model, and choose Make active model.

You can also observe the objective metrics F1 score, precision, and recall.

objective metrics F1 score, precision, and recall.

  1. Return to the Datasets tab and choose Create dataset in the Test datasets section.
    Create dataset in the Test datasets section.
  2. Enter the location of text.csv in the S3 bucket.
    Enter the location of text.csv in the S3 bucket.

Wait until the status shows as Completed. This will create metrics on the active model using the test dataset.

status shows as Completed.

If you choose Custom classification in the navigation pane, you can see all the document classifier models, even the ones trained using flywheels.

document classifier models

Create an endpoint

To create your model endpoint, complete the following steps:

  1. On the Amazon Comprehend console, navigate to the flywheel you created.
  2. On the Endpoints tab, choose Create endpoint.
    Create endpoint.
  3. Name the endpoint news-topic.
  4. Under Classification models and flywheels, the active model version is already selected.
    active model version is already selected.
  5. For Inference Units, choose 1 IU.
  6. Select the acknowledgement check box, then choose Create endpoint.
  7. After the endpoint has been created and is active, navigate to Use in real-time analysis on the endpoint’s details page.
  8. Test the model by entering text in the Input text box.
  9. Under Results, check the labels for the news topics.
    labels for the news topics.

Create an asynchronous analysis job

To create an analysis job, complete the following steps:

  1. On the Amazon Comprehend console, navigate to the active model version.
  2. Choose Create job.
    create job
  3. For Name, enter batch-news.
  4. For Analysis type¸ choose Custom classification.
  5. For Classification models and flywheels, choose the flywheel you created (custom-news-flywheel).
    create analysis job
  6. Browse Amazon S3 to select the input file with the different news texts we want to create the analysis with and then choose One document per line (one news text per line).

The following screenshot shows the document uploaded for this exercise.

the document uploaded for this exercise.

  1. Choose where you want to save the output file in your S3 location.
  2. For Access permissions, choose the IAM role CustomNewsFlywheelRole that you created earlier.
  3. Choose Create job.
  4. When the job is complete, download the output file and check the predictions.
    download the output file

Clean up

To avoid future charges, clean up the resources you created.

  1. On the Amazon Comprehend console, choose Flywheels in the navigation pane.
  2. Select your flywheel and choose Delete.
    delete flywheel
  3. Delete any endpoints you created.
  4. Empty and delete the S3 buckets you created.

Conclusion

In this post, we saw how an Amazon Comprehend flywheel serves as a one-stop shop to perform MLOPs for your Amazon Comprehend models. We also discussed its value proposition and introduced basic flywheel concepts. Then we walked you through the different steps starting from creating a flywheel to creating an endpoint.

Learn more about Simplify continuous learning of Amazon Comprehend custom models using Comprehend flywheel. Try it out now and get started with our newly launched service, the Amazon Comprehend flywheel.


About the Authors

Alberto Menendez is an Associate DevOps Consultant in Professional Services at AWS and a member of Comprehend Champions. He loves helping accelerate customers´ journey to the cloud and creating solutions to solve their business challenges. In his free time, he enjoys practicing sports, especially basketball and padel, spending time with family and friends, and learning about technology.

Irene Arroyo Delgado is an Associate AI/ML Consultant in Professional Services at AWS and a member of Comprehend Champions. She focuses on productionizing ML workloads to achieve customers’ desired business outcomes by automating end-to-end ML lifecycles. She has experience building performant ML platforms and their integration with a data lake on AWS. In her free time, Irene enjoys traveling and hiking in the mountains.

Shweta Thapa is a Solutions Architect in Enterprise Engaged at AWS and a member of Comprehend Champions. She enjoys helping her customers with their journey and growth in the cloud, listening to their business needs, and offering them the best solutions. In her free time, Shweta enjoys going out for a run, traveling, and most of all spending time with her baby daughter.

Read More

Glean Founders Talk AI-Powered Enterprise Search

Glean Founders Talk AI-Powered Enterprise Search

The quest for knowledge at work can feel like searching for a needle in a haystack. But what if the haystack itself could reveal where the needle is?

That’s the promise of large language models, or LLMs, the subject of this week’s episode of the NVIDIA AI Podcast featuring DeeDee Das and Eddie Zhou, founding engineers at Silicon Valley-based startup Glean, in conversation with our host, Noah Kravitz.

With LLMs, the haystack can become a source of intelligence, helping guide knowledge workers on what they need to know.

Glean is focused on providing better tools for enterprise search by indexing everything employees have access to in the company, including Slack, Confluence, GSuite and much more. The company raised a series C financing round last year, valuing the company at $1 billion.

Large language models can provide a comprehensive view of the enterprise and its data, which makes finding the information needed to get work done easier.

In the podcast, Das and Zhou discuss the challenges and opportunities of bringing LLMs into the enterprise, and how this technology can help people spend less time searching and more time working.

You Might Also Like

Sequoia Capital’s Pat Grady and Sonya Huang on Generative AI

Pat Grady and Sonya Huang, partners at Sequoia Capital, to discuss their recent essay, “Generative AI: A Creative New World.” The authors delve into the potential of generative AI to enable new forms of creativity and expression, as well as the challenges and ethical considerations of this technology. They also offer insights into the future of generative AI.

Real or Not Real? Attorney Steven Frank Uses Deep Learning to Authenticate Art

Steven Frank is a partner at the law firm Morgan Lewis, specializing in intellectual property and commercial technology law. He’s also half of the husband-wife team that used convolutional neural networks to authenticate artistic masterpieces, including da Vinci’s Salvador Mundi, with AI’s help.

GANTheftAuto: Harrison Kinsley on AI-Generated Gaming Environments

Humans playing games against machines is nothing new, but now computers can develop games for people to play. Programming enthusiast and social media influencer Harrison Kinsley created GANTheftAuto, an AI-based neural network that generates a playable chunk of the classic video game Grand Theft Auto V.

Subscribe to the AI Podcast on Your Favorite Platform

You can now listen to the AI Podcast through Amazon Music, Apple Music, Google Podcasts, Google Play, Castbox, DoggCatcher, Overcast, PlayerFM, Pocket Casts, Podbay, PodBean, PodCruncher, PodKicker, Soundcloud, Spotify, Stitcher and TuneIn.


Read More