Introducing Hidet: A Deep Learning Compiler for Efficient Model Serving

Introducing Hidet: A Deep Learning Compiler for Efficient Model Serving

Hidet is a powerful deep learning compiler that simplifies the process of implementing high-performing deep learning operators on modern accelerators (e.g., NVIDIA GPUs). With the new feature of torch.compile(...) in PyTorch 2.0, integrating a novel compiler into PyTorch is easier than ever – Hidet now can be used as a torch.compile(...) backend to accelerate PyTorch models, making it an attractive option for PyTorch users who want to improve the inference performance of their models, especially for those who also need to implement extremely optimized custom operators.

Using Hidet to Compile A PyTorch Model

To use Hidet in PyTorch, you need to first install the hidet package via pip:

pip install hidet

Hidet is integrated with PyTorch as a torch.compile(...) backend following the Custom Backends tutorial. You can specify hidet as the backend when you compile a model. (Note: requires PyTorch version 2.0+):

torch.compile(..., backend='hidet')

Hidet converts the given PyTorch model in the torch.fx.Graph format into its internal graph representation, and conducts a series of optimizations. Hidet provides a few options to configure the optimizations. For example, we can use hidet.torch.dynamo_config.use_tensor_core(<strong>True</strong>) to allow Hidet to generate CUDA kernels that leverage the Tensor Cores on NVIDIA GPUs, and use hidet.torch.dynamo_config.search_space(2) to allow Hidet to search for the best operator schedule specific for your hardware and input sizes. More configurations can be found in Hidet’s documentation.

Here’s a complete example of how to use Hidet to compile and optimize a pre-trained ResNet50 model from torchvision:

import hidet
import torch

# Load a pre-trained ResNet50 model
x = torch.randn(1, 3, 224, 224, device='cuda').half()
model = torch.hub.load(
    'pytorch/vision:v0.6.0', 'resnet50', pretrained=True
).cuda().half().eval()

# Configure hidet to use tensor core and enable tuning
hidet.torch.dynamo_config.use_tensor_core(True)
hidet.torch.dynamo_config.search_space(2) 

# Compile the model using Hidet
model_opt = torch.compile(model, backend='hidet')

# Check correctness
torch.testing.assert_close(actual=model_opt(x), expected=model(x), rtol=1e-2, atol=1e-2)

# Benchmark
from hidet.utils import benchmark_func
print('eager: {:2f}'.format(benchmark_func(lambda: model(x))))
print('hidet: {:2f}'.format(benchmark_func(lambda: model_opt(x))))

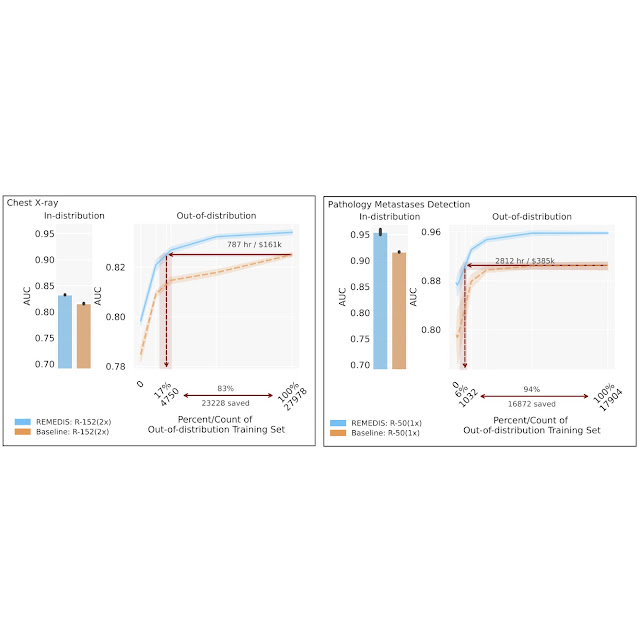
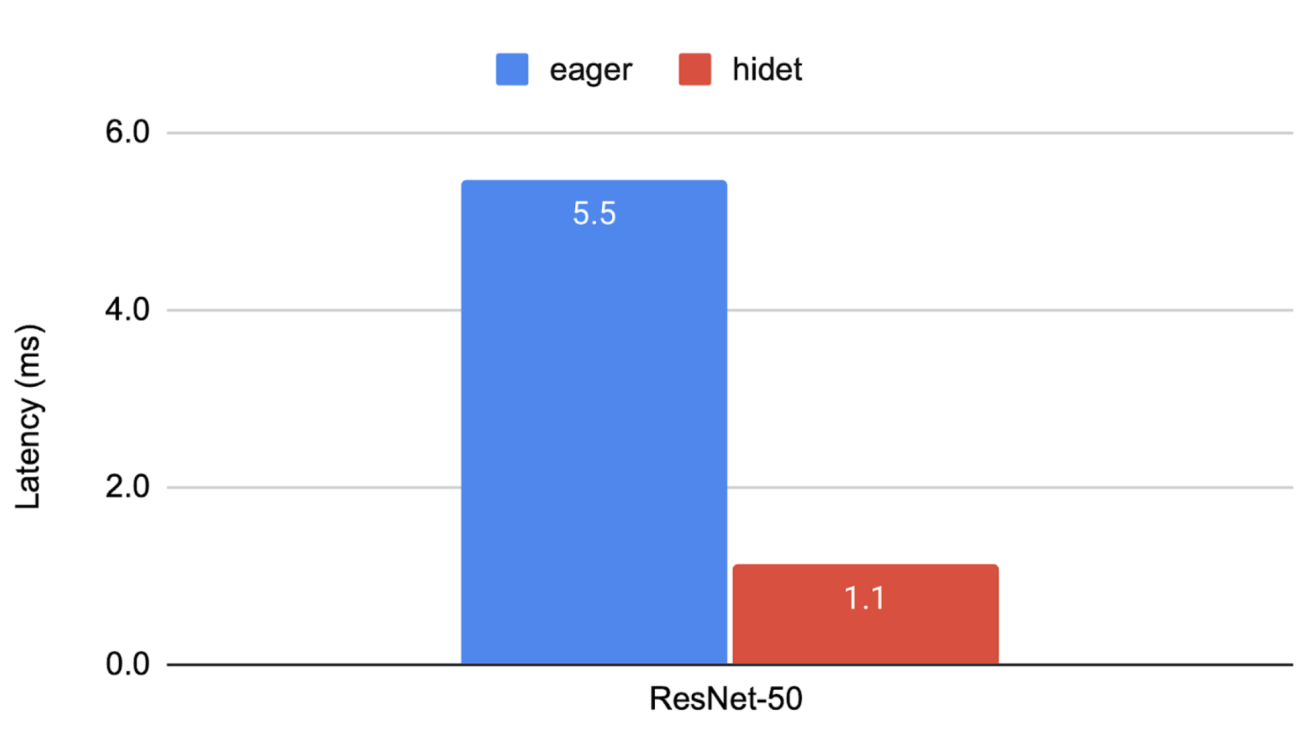
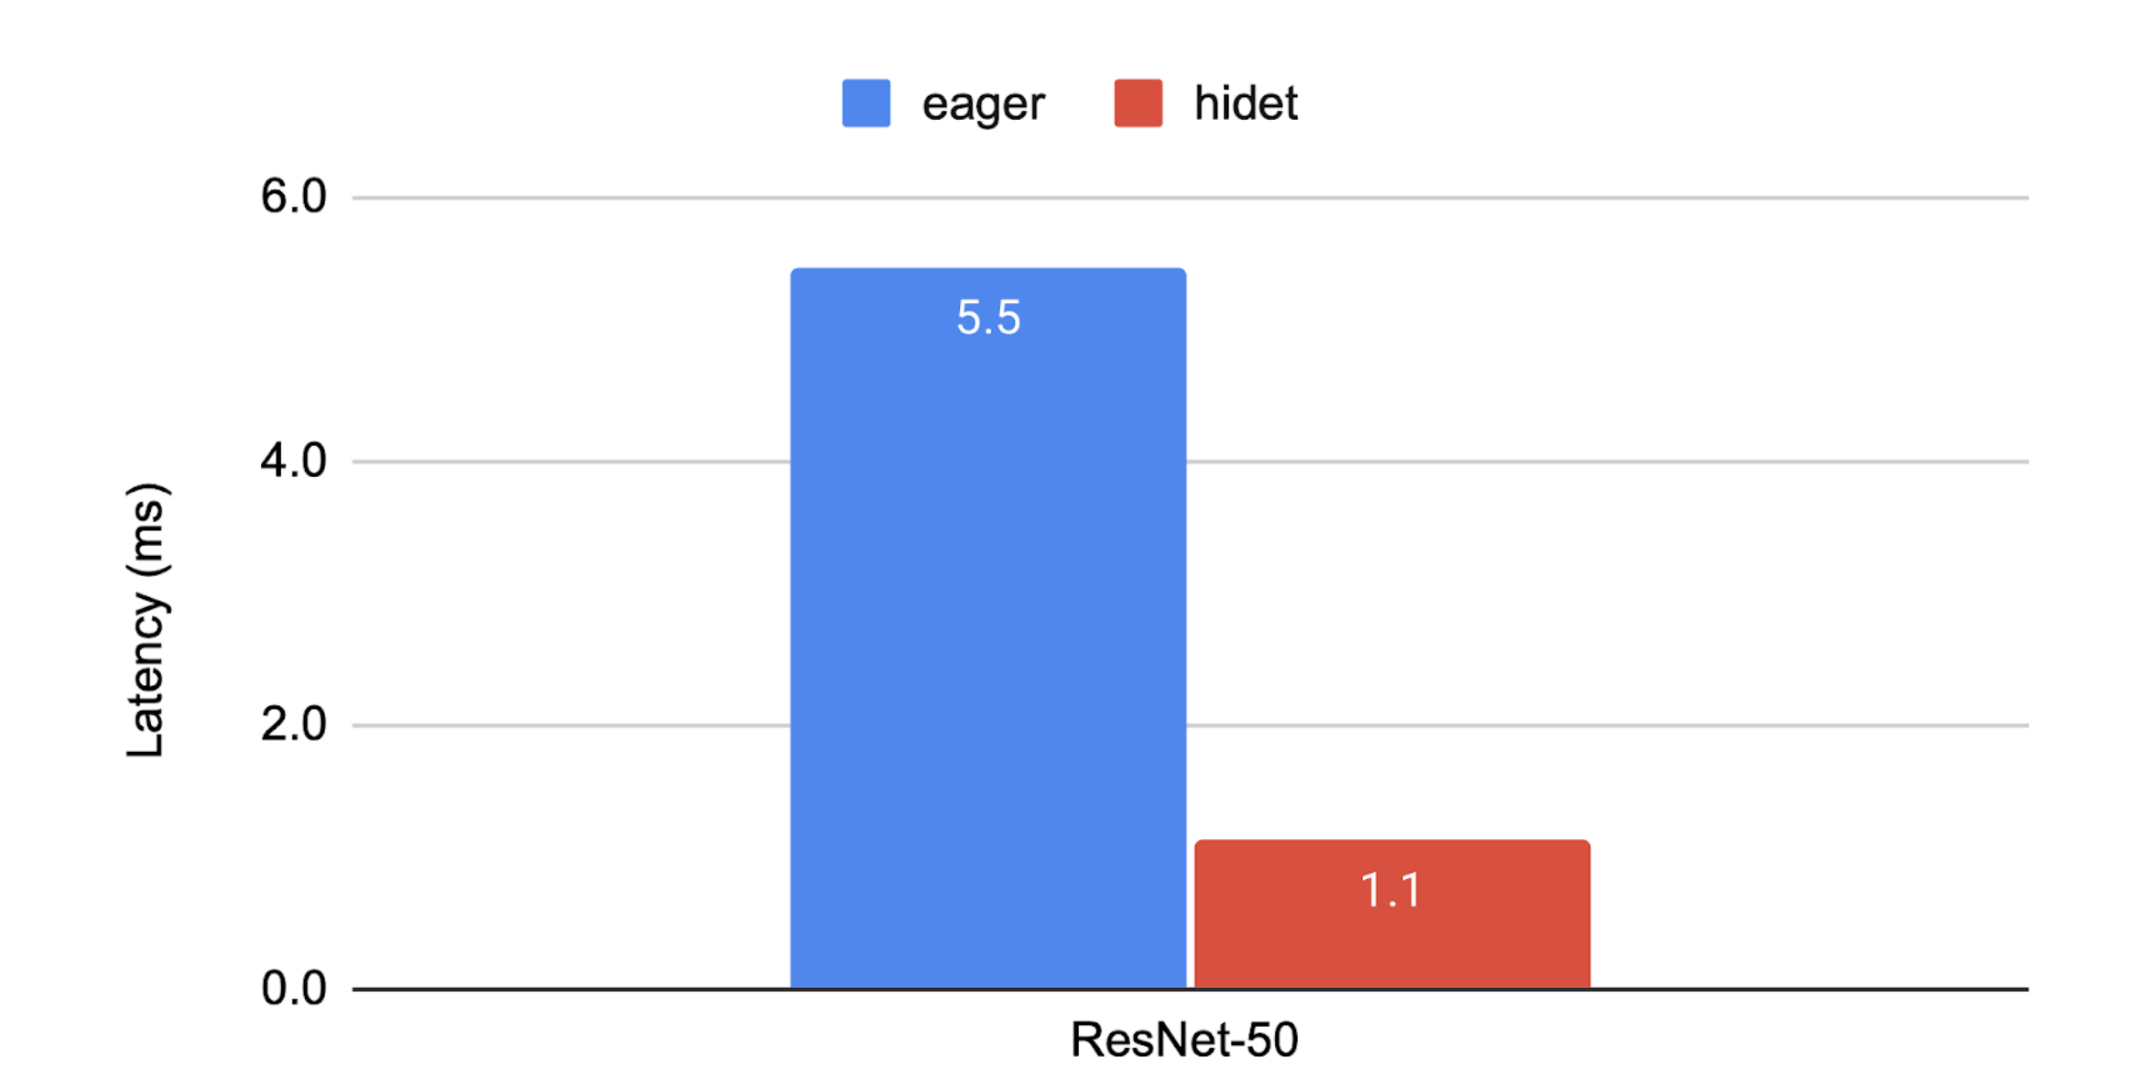
We encourage you to try out the above script on your own NVIDIA GPU(s)! If you run this script on an aws.g5.2xlarge instance, you would get the result shown in the following figure. Hidet achieves the speedup because it could automatically fuse multiple operators, tune operator schedules, and use CUDA Graph to reduce framework-level overhead. More results can be found in the ASPLOS’23 publication of Hidet (vs. PyTorch 1.11) and our performance tracking (vs. PyTorch 2.0).

Eager vs Hidet latency

Using Hidet Script to Write Custom Operators

Hidet Script is one approach to implement tensor operators in Python. The following example shows how to implement a naive matrix multiplication using Hidet Script and integrate it as a PyTorch operator.

import torch
import hidet


def matmul(m_size, n_size, k_size):
    from hidet.lang import f32, attr
    from hidet.lang.cuda import threadIdx, blockIdx, blockDim

    with hidet.script_module() as script_module:
        @hidet.script
        def matmul(
            a: f32[m_size, k_size],
            b: f32[k_size, n_size],
            c: f32[m_size, n_size]
        ):
            attr.cuda_grid_dim = ((m_size + 31) // 32, (n_size + 31) // 32)
            attr.cuda_block_dim = (32, 32)
            i = threadIdx.x + blockIdx.x * blockDim.x
            j = threadIdx.y + blockIdx.y * blockDim.y
            if i < m_size and j < n_size:
                c[i, j] = 0.0
                for k in range(k_size):
                    c[i, j] += a[i, k] * b[k, j]

    ir_module = script_module.ir_module()
    func = hidet.driver.build_ir_module(ir_module)
    return func


class NaiveMatmul(torch.autograd.Function):
    @staticmethod
    def forward(ctx, a, b):
        m, k = a.shape
        k, n = b.shape
        c = torch.empty([m, n], dtype=a.dtype, device=a.device)
        func = matmul(m, n, k)
        func(a, b, c)
        return c


a = torch.randn([3, 4], device='cuda')
b = torch.randn([4, 5], device='cuda')
c = NaiveMatmul.apply(a, b)
cc = torch.matmul(a, b)
torch.testing.assert_close(c, cc)

More optimizations can be applied, see the example in our documentation to learn more.

Hidet Script vs. Triton: Triton greatly simplifies the CUDA programming by introducing the tile-based programming model where the parallel execution unit is thread blocks instead of threads. However, this simplification also prevents the tensor program developers from manipulating the fine-grained computation and memory resources (e.g., warps, shared memory) in their preferred ways. It would be challenging to implement an optimization that requires fine-grained control of these resources using Triton if it has not been implemented by the Triton compiler itself. Hidet Script, on the other hand, simplifies tensor programming while still enabling users to implement their own optimizations with extensive flexibility. It’s worth noting that the more granular control of Hidet Script also brings added complexity compared to Triton.

More about Hidet

Hidet originates from a research project led by the EcoSystem lab at the University of Toronto (UofT) and AWS. The authors propose a new way, named the task-mapping programming paradigm, to construct tensor programs. It aims to simplify the tensor programming without sacrificing any optimization opportunity. Now, Hidet is an open-source project, jointly supported by CentML and the EcoSystem lab, that aims to provide an efficient solution to end-to-end inference on modern accelerators (e.g., NVIDIA GPUs).

Additional Resources

Acknowledgement

We would like to thank Jerry Park, Mark Saroufim, Jason Liang and Helen Suk for their valuable help on preparing the blog post and feedback on the text. We also would like to thank Nikita Shulga, Jason Ansel, and Dmytro Dzhulgakov for reviewing and improving our PyTorch PR73873 on the 3rd-party dynamo backend registration.

Read More

DeepMind’s latest research at ICLR 2023

Next week marks the start of the 11th International Conference on Learning Representations (ICLR), taking place 1-5 May in Kigali, Rwanda. This will be the first major artificial intelligence (AI) conference to be hosted in Africa and the first in-person event since the start of the pandemic. Researchers from around the world will gather to share their cutting-edge work in deep learning spanning the fields of AI, statistics and data science, and applications including machine vision, gaming and robotics. We’re proud to support the conference as a Diamond sponsor and DEI champion.Read More

DeepMind’s latest research at ICLR 2023

DeepMind’s latest research at ICLR 2023

Next week marks the start of the 11th International Conference on Learning Representations (ICLR), taking place 1-5 May in Kigali, Rwanda. This will be the first major artificial intelligence (AI) conference to be hosted in Africa and the first in-person event since the start of the pandemic. Researchers from around the world will gather to share their cutting-edge work in deep learning spanning the fields of AI, statistics and data science, and applications including machine vision, gaming and robotics. We’re proud to support the conference as a Diamond sponsor and DEI champion.Read More

Robust and efficient medical imaging with self-supervision

Robust and efficient medical imaging with self-supervision

Despite recent progress in the field of medical artificial intelligence (AI), most existing models are narrow, single-task systems that require large quantities of labeled data to train. Moreover, these models cannot be easily reused in new clinical contexts as they often require the collection, de-identification and annotation of site-specific data for every new deployment environment, which is both laborious and expensive. This problem of data-efficient generalization (a model’s ability to generalize to new settings using minimal new data) continues to be a key translational challenge for medical machine learning (ML) models and has in turn, prevented their broad uptake in real world healthcare settings.

The emergence of foundation models offers a significant opportunity to rethink development of medical AI to make it more performant, safer, and equitable. These models are trained using data at scale, often by self-supervised learning. This process results in generalist models that can rapidly be adapted to new tasks and environments with less need for supervised data. With foundation models, it may be possible to safely and efficiently deploy models across various clinical contexts and environments.

In “Robust and Efficient MEDical Imaging with Self-supervision” (REMEDIS), to be published in Nature Biomedical Engineering, we introduce a unified large-scale self-supervised learning framework for building foundation medical imaging models. This strategy combines large scale supervised transfer learning with self-supervised learning and requires minimal task-specific customization. REMEDIS shows significant improvement in data-efficient generalization across medical imaging tasks and modalities with a 3–100x reduction in site-specific data for adapting models to new clinical contexts and environments. Building on this, we are excited to announce Medical AI Research Foundations (hosted by PhysioNet), an expansion of the public release of chest X-ray Foundations in 2022. Medical AI Research Foundations is a collection of open-source non-diagnostic models (starting with REMEDIS models), APIs, and resources to help researchers and developers accelerate medical AI research.

Large scale self-supervision for medical imaging

REMEDIS uses a combination of natural (non-medical) images and unlabeled medical images to develop strong medical imaging foundation models. Its pre-training strategy consists of two steps. The first involves supervised representation learning on a large-scale dataset of labeled natural images (pulled from Imagenet 21k or JFT) using the Big Transfer (BiT) method.

The second step involves intermediate self-supervised learning, which does not require any labels and instead, trains a model to learn medical data representations independently of labels. The specific approach used for pre-training and learning representations is SimCLR. The method works by maximizing agreement between differently augmented views of the same training example via a contrastive loss in a hidden layer of a feed-forward neural network with multilayer perceptron (MLP) outputs. However, REMEDIS is equally compatible with other contrastive self-supervised learning methods. This training method is applicable for healthcare environments as many hospitals acquire raw data (images) as a routine practice. While processes would have to be implemented to make this data usable within models (i.e., patient consent prior to gathering the data, de-identification, etc.), the costly, time-consuming, and difficult task of labeling that data could be avoided using REMEDIS.

REMEDIS leverages large-scale supervised learning using natural images and self-supervised learning using unlabeled medical data to create strong foundation models for medical imaging.

Given ML model parameter constraints, it is important that our proposed approach works when using both small and large model architecture sizes. To study this in detail, we considered two ResNet architectures with commonly used depth and width multipliers, ResNet-50 (1×) and ResNet-152 (2×) as the backbone encoder networks.

After pre-training, the model was fine-tuned using labeled task-specific medical data and evaluated for in-distribution task performance. In addition, to evaluate the data-efficient generalization, the model was also optionally fine-tuned using small amounts of out-of-distribution (OOD) data.

REMEDIS starts with representations initialized using large-scale natural image pretraining following the Big Transfer (BiT) method. We then adapt the model to the medical domain using intermediate contrastive self-supervised learning without using any labeled medical data. Finally, we fine-tune the model to specific downstream medical imaging tasks. We evaluate the ML model both in an in-distribution (ID) setting and in an out-of-distribution (OOD) setting to establish the data-efficient generalization performance of the model.

Evaluation and results

To evaluate the REMEDIS model’s performance, we simulate realistic scenarios using retrospective de-identified data across a broad range of medical imaging tasks and modalities, including dermatology, retinal imaging, chest X-ray interpretation, pathology and mammography. We further introduce the notion of data-efficient generalization, capturing the model’s ability to generalize to new deployment distributions with a significantly reduced need for expert annotated data from the new clinical setting. In-distribution performance is measured as (1) improvement in zero-shot generalization to OOD settings (assessing performance in an OOD evaluation set, with zero access to training data from the OOD dataset) and (2) significant reduction in the need for annotated data from the OOD settings to reach performance equivalent to clinical experts (or threshold demonstrating clinical utility). REMEDIS exhibits significantly improved in-distribution performance with up to 11.5% relative improvement in diagnostic accuracy over a strongly supervised baseline.

More importantly, our strategy leads to data-efficient generalization of medical imaging models, matching strong supervised baselines resulting in a 3–100x reduction in the need for retraining data. While SimCLR is the primary self-supervised learning approach used in the study, we also show that REMEDIS is compatible with other approaches, such as MoCo-V2, RELIC and Barlow Twins. Furthermore, the approach works across model architecture sizes.

REMEDIS outperformed the supervised baseline pre-trained on JFT-300M for various medical tasks and demonstrated improved data-efficient generalization, reducing data needs by 3–100x for adapting models to new clinical settings. This could potentially translate to significant reduction in clinician hours saved annotating data and cost of developing robust medical imaging systems.
REMEDIS is compatible with MoCo-V2, RELIC and Barlow Twins as alternate self-supervised learning strategies. All the REMEDIS variants lead to data-efficient generalization improvements over the strong supervised baseline for dermatology condition classification (T1), diabetic macular edema classification (T2), and chest X-ray condition classification (T3). The gray shaded area indicates the performance of the strong supervised baseline pre-trained on JFT.

Medical AI Research Foundations

Building on REMEDIS, we are excited to announce Medical AI Research Foundations, an expansion of the public release of chest X-ray Foundations in 2022. Medical AI Research Foundations is a repository of open-source medical foundation models hosted by PhysioNet. This expands the previous API-based approach to also encompass non-diagnostic models, to help researchers and developers accelerate their medical AI research. We believe that REMEDIS and the release of the Medical AI Research Foundations are a step toward building medical models that can generalize across healthcare settings and tasks.

We are seeding Medical AI Research Foundations with REMEDIS models for chest X-ray and pathology (with related code). Whereas the existing chest X-ray Foundation approach focuses on providing frozen embeddings for application-specific fine tuning from a model trained on several large private datasets, the REMEDIS models (trained on public datasets) enable users to fine-tune end-to-end for their application, and to run on local devices. We recommend users test different approaches based on their unique needs for their desired application. We expect to add more models and resources for training medical foundation models such as datasets and benchmarks in the future. We also welcome the medical AI research community to contribute to this.

Conclusion

These results suggest that REMEDIS has the potential to significantly accelerate the development of ML systems for medical imaging, which can preserve their strong performance when deployed in a variety of changing contexts. We believe this is an important step forward for medical imaging AI to deliver a broad impact. Beyond the experimental results presented, the approach and insights described here have been integrated into several of Google’s medical imaging research projects, such as dermatology, mammography and radiology among others. We’re using a similar self-supervised learning approach with our non-imaging foundation model efforts, such as Med-PaLM and Med-PaLM 2.

With REMEDIS, we demonstrated the potential of foundation models for medical imaging applications. Such models hold exciting possibilities in medical applications with the opportunity of multimodal representation learning. The practice of medicine is inherently multimodal and incorporates information from images, electronic health records, sensors, wearables, genomics and more. We believe ML systems that leverage these data at scale using self-supervised learning with careful consideration of privacy, safety, fairness and ethics will help lay the groundwork for the next generation of learning health systems that scale world-class healthcare to everyone.

Acknowledgements

This work involved extensive collaborative efforts from a multidisciplinary team of researchers, software engineers, clinicians, and cross-functional contributors across Google Health AI and Google Brain. In particular, we would like to thank our first co-author Jan Freyberg and our lead senior authors of these projects, Vivek Natarajan, Alan Karthikesalingam, Mohammad Norouzi and Neil Houlsby for their invaluable contributions and support. We also thank Lauren Winer, Sami Lachgar, Yun Liu and Karan Singhal for their feedback on this post and Tom Small for support in creating the visuals. Finally, we also thank the PhysioNet team for their support on hosting Medical AI Research Foundations. Users with questions can reach out to medical-ai-research-foundations at google.com.

Read More

Deliver your first ML use case in 8–12 weeks

Deliver your first ML use case in 8–12 weeks

Do you need help to move your organization’s Machine Learning (ML) journey from pilot to production? You’re not alone. Most executives think ML can apply to any business decision, but on average only half of the ML projects make it to production.

This post describes how to implement your first ML use case using Amazon SageMaker in just 8–12 weeks by leveraging a methodology called Experience-based Acceleration (EBA).

Challenges

Customers may face several challenges when implementing machine learning (ML) solutions.

  • You may struggle to connect your ML technology efforts to your business value proposition, making it difficult for IT and business leadership to justify the investment it requires to operationalize models.
  • You may often select low-value use cases as proof of concept rather than solving a meaningful business or customer problem.
  • You may have gaps in skills and technologies, including operationalizing ML solutions, implementing ML services, and managing ML projects for rapid iterations.
  • Ensuring data quality, governance, and security may slow down or stall ML projects.

Solution overview: Machine Learning Experience-based Acceleration (ML EBA)

Machine learning EBA is a 3-day, sprint-based, interactive workshop (called a party) that uses SageMaker to accelerate business outcomes by guiding you through an accelerated and a prescriptive ML lifecycle. It starts with identifying business goals and ML problem framing, and takes you through data processing, model development, production deployment, and monitoring.

The following visual illustrates a sample ML lifecycle.

Sample Machine Learning Lifecycle

Two primary customer scenarios apply. The first is by using low-code or no-code ML services such as Amazon SageMaker Canvas, Amazon SageMaker Data Wrangler, Amazon SageMaker Autopilot, and Amazon SageMaker JumpStart to help data analysts prepare data, build models, and generate predictions. The second is by using SageMaker to help data scientists and ML engineers build, train, and deploy custom ML models.

We recognize that customers have different starting points. If you’re starting from scratch, it’s often simpler to begin with low-code or no-code solutions and gradually transition to developing custom models. In contrast, if you have an existing on-premises ML infrastructure, you can begin directly by using SageMaker to alleviate challenges with your current solution.

Through ML EBA, experienced AWS ML subject matter experts work side by side with your cross-functional team to provide prescriptive guidance, remove blockers, and build organizational capability for a continued ML adoption. This party steers you to solve a compelling business problem as opposed to thinking in terms of data and ML technology environments. Additionally, the party gets you started on driving material business value from untapped data.

ML EBA helps you to think big, start small, and scale fast. Although it creates a minimum viable ML model in 3 days, there are 4–6 weeks of preparation leading up to the EBA. Furthermore, you spend 4–6 weeks post-EBA to fine-tune the model with additional feature engineering and hyperparameter optimization before production deployment.

Let’s dive into what the whole process looks like and how you can use the ML EBA methodology to address the common blockers.

EBA prep (4–6 weeks)

In this section, we detail the 4–6 weeks of preparation leading up to the EBA.

6 weeks before the party: Problem framing and qualification

The first step is to frame and qualify the ML problem, which includes the following:

  • Identify the right business outcome – You must have a clear understanding of the problem you are trying to solve and the desired outcome you hope to achieve through the use of ML. You must be able to measure the business value gained against specific objectives and success criteria. Furthermore, you must be able to identify what should be observed, and what should be predicted. AWS works with you to help answer the following important questions before embarking on the ML EBA:
    • Does the ML use case solve a meaningful business problem?
    • Is it important enough to get the attention of business leadership?
    • Do you already have data to solve the ML use case?
    • Can the use case eventually be operationalized into production?
    • Does it really require ML?
    • Are there organizational processes in place for the business to use the model’s output?

The AI Use Case Explorer is a good starting point to explore the right use cases by industry, business function, or desired business outcome and discover relevant customer success stories.

  • Executive sponsorship – To help you move faster than you would have organically, AWS meets with the executive sponsor to confirm buy-in, remove internal obstacles, and commit resources. Additionally, AWS can offer financial incentives to help offset the costs for your first ML use case.
  • Meeting you where you are at in your ML journey – AWS assesses your current state—people, process, and technology. We help you detail requirements and dependencies; specifically, what teams and data are required to begin the journey successfully. Additionally, we provide recommendations on the technical path: starting with low-code or no-code services, or building a custom model using SageMaker.

5 weeks before the party: Workstream configuration and transition into action

The next step is to identify the teams needed to support the EBA effort. Commonly, the work is split up between the following workstreams:

  • Cloud engineering (infrastructure and security) – Focuses on verifying that the AWS accounts and infrastructure are set up and secure ahead of EBA. This includes AWS Identity and Access Management (IAM) or single sign-on (SSO) access, security guardrails, Amazon SageMaker Studio provisioning, automated stop/start to save costs, and Amazon Simple Storage Service (Amazon S3) set up.
  • Data engineering – Identifies the data sources, sets up data ingestion and pipelines, and prepares data using Data Wrangler.
  • Data science – The heart of ML EBA and focuses on feature engineering, model training, hyperparameter tuning, and model validation.
  • MLOps engineering – Focuses on automating the DevOps pipelines for operationalizing the ML use case. This may often be the same team as cloud engineering.
  • Leadership team – Responsible for orchestrating the effort, removing blockers, aligning with the executive sponsors, and is ultimately accountable for delivering the expected outcomes.

After these efforts have been completed, we must transition into action. A standard baseline 4-week timeline should be strictly adhered to make sure the EBA stays on track. Experienced AWS subject matter experts will guide and coach you through this preparation leading up to the EBA party.

4 weeks before the party: Inspire builders and curate a technical plan

Every customer is different; AWS helps you curate a technical plan of activities to be completed in the next 4 weeks leading up to the party.

AWS conducts Immersion Days to inspire your builders and build momentum for the party. An Immersion Day is a half or full day workshop with the right mix of presentation, hands-on labs, and Q&A to introduce AWS services or solutions. AWS will help you select the right Immersion Days from the AI/ML Workshops catalog.

We recognize that every builder in your organization is at a different level. We recommend that your builders use the ML ramp-up guide resources or digital or classroom training to start where they are at and build the necessary skills for the party.

3 weeks before the party: Tech prep focused on cloud and data engineering

Your cloud and data engineering teams should work on the following with guidance from AWS:

  • Create AWS accounts with network and security set up
  • Set up Amazon SageMaker Studio
  • Create Amazon S3 buckets to store data
  • Identify data sources (or producers)
  • Integrate external sources to dump data into S3 buckets

2 weeks before the party: Tech prep focused on data science

Your data science team should work on the following with guidance from AWS:

1 week before the party: Assess readiness (go/no-go)

AWS works with you to assess go/no-go readiness for technical activities, skills, and momentum for the party. Then we solidify the scope for the 3-day party, prioritizing progress over perfection.

EBA (3-day party)

Although the EBA party itself is customized for your organization, the recommended agenda for the 3 days is shown in the following table. You will learn by doing during the EBA with guidance from AWS subject matter experts.

. Day 1 Day 2 Day 3
Data Science

AM: Try AutoPilot or JumpStart models.

PM: Pick 1–2 models based on AutoPilot outcomes to experiment further.

Improve model accuracy:

  • In-depth feature engineering (example, PCA)
  • Hyperparameter optimization (HPO)

Quality assurance and validation with test data.

Deploy to production (inference endpoint).

Monitoring setup (model, data drift).

Data Engineering Explore using feature store for future ML use cases. Create a backlog of items for data governance and associated guardrails.
Cloud/MLOps Engineering Evaluate the MLOps framework solution library. Assess if this can be used for a repeatable MLOps framework. Identify gaps and create a backlog of things to enhance the solution library or create your own MLOps framework. Implement backlog items to create a repeatable MLOps framework. Continue implementing backlog items to create a repeatable MLOps framework.

Post-EBA

ML involves extensive experimentation, and it’s common to not reach your desired model accuracy during the 3-day EBA. Therefore, creating a well-defined backlog or path to production is essential, including improving model accuracy through experimentation, feature engineering, hyperparameter optimization, and production deployment. AWS will continue to assist you through production deployment.

Conclusion

By complementing ML EBA methodology with SageMaker, you can achieve the following results:

  • Move from pilot to production value in 8-12 weeks – Bring together business and technology teams to deploy the first ML use case to production in 8-12 weeks.
  • Build the organizational capability to speed up and scale ML across lines of business – The ML EBA inspires and up-skills builders with real work experience. It establishes a successful working model (a collaboration and iteration model) to sustain and scale ML initiatives across lines of business. It also creates reusable assets to speed up and scale ML in a repeatable way.
  • Reduce technical debt, pain points, and cost from existing on-premises ML models – The on-premises solutions may have challenges related to higher costs, inability to scale infrastructure, undifferentiated infrastructure management, and lack of advanced feature sets such as hyperparameter optimization, explainability for predictions, and more. Adoption of AWS ML services such as SageMaker reduces these issues.

Contact your AWS account team (Account Manager or Customer Solutions Manager) to learn more and get started.


About the Authors

Ritesh Shah is Senior Customer Solutions Manager at Amazon Web Services. He helps large US-Central enterprises accelerate their cloud-enabled transformation and build modern cloud-native solutions. He is passionate about accelerating customers’ ML journeys. In his free time, Ritesh enjoys spending time with his daughter, cooking, and learning something new, while also evangelizing cloud and ML. Connect with him on LinkedIn.

Nicholaus Lawson is a Solution Architect at AWS and part of the AIML specialty group. He has a background in software engineering and AI research. Outside of work, Nicholaus is often coding, learning something new, or woodworking. Connect with him on LinkedIn.

Read More

Collaborative Machine Learning Model Building with Families Using Co-ML

Existing novice-friendly machine learning (ML) modeling tools center around a solo user experience, where a single user collects only their own data to build a model. However, solo modeling experiences limit valuable opportunities for encountering alternative ideas and approaches that can arise when learners work together; consequently, it often precludes encountering critical issues in ML around data representation and diversity that can surface when different perspectives are manifested in a group-constructed data set. To address this issue, we created Co-ML – a tablet-based app for learners…Apple Machine Learning Research

Research Focus: Week of April 24, 2023

Research Focus: Week of April 24, 2023

Microsoft Research Focus 14 edition, week of April 24, 2023

Welcome to Research Focus, a series of blog posts that highlights notable publications, events, code/datasets, new hires and other milestones from across the research community at Microsoft.

AWARD

Microsoft researcher Kalai awarded 2022 ACM Prize in Computing

Yael Tauman Kalai, a senior principal researcher at Microsoft Research, has been awarded the 2022 ACM Prize in Computing. Kalai was recognized for breakthroughs in verifiable delegation of computation and fundamental contributions to cryptography. According to the award announcement, “Kalai’s contributions have helped shape modern cryptographic practices and provided a strong foundation for further advancements.”

The ACM Prize in Computing recognizes early-to-mid-career computer scientists whose research contributions have fundamental impact and broad implications.

Spotlight: On-demand video

AI Explainer: Foundation models ​and the next era of AI

Explore how the transformer architecture, larger models and more data, and in-context learning have helped advance AI from perception to creation.

Among the multiple accomplishments cited for the award, Kalai has developed methods for producing succinct proofs that certify the correctness of any computation. This method enables a weak device to offload any computation to a stronger device in a way that enables the results to be efficiently checked for correctness. Such succinct proofs have been used by blockchain companies to certify transaction validity, thereby overcoming key obstacles in blockchain scalability and enabling faster and more reliable transactions.

Kalai was also cited for her breakthrough work on the security of the “Fiat-Shamir paradigm,” a general technique for eliminating interaction from interactive protocols. This paradigm is extensively utilized in real-world applications, including the most prevalent digital signature scheme (ECDSA), which is used by all iOS and Android mobile devices.


NEW RESEARCH

Empowering Azure Storage with RDMA

High performance and highly reliable storage are fundamental requirements of public clouds. Given the wide adoption of disaggregated storage in the cloud, networking is essential for enabling high performance and high reliability. Microsoft’s Azure cloud service uses remote direct memory access (RDMA) as its transport and aims to enable it for both storage frontend traffic (between compute virtual machines and storage clusters) and backend traffic (within a storage cluster) to fully realize its benefits. As compute and storage clusters may be located in different datacenters within an Azure region, RDMA needs to be supported at regional scale.

In a new paper: Empowering Azure Storage with RDMA, Microsoft Azure and Microsoft Research report on their intra-region RDMA deployment to support storage workloads in Azure. The high complexity and heterogeneity of Azure infrastructure creates challenges, such as the problem of interoperability between different types of RDMA network interface cards. Several changes were made to the network infrastructure to address these challenges. Today, around 70% of traffic in Azure is RDMA and intra-region RDMA is supported in all Azure public regions. This helps achieve significant disk I/O performance improvements and CPU core savings.


NEW RESEARCH

LIDA: Automatic Generation of Grammar-Agnostic Visualizations and Infographics using Large Language Models

Systems that support users in the automatic creation of visualizations must address several subtasks—understand the semantics of data; enumerate relevant visualization goals; and generate visualization specifications. In a new paper: LIDA: Automatic Generation of Grammar-Agnostic Visualizations and Infographics using Large Language Models, researchers from Microsoft pose visualization generation as a multi-stage generation problem and argue that well-orchestrated pipelines based on large language models (LLMs) and image generation models (IGMs) are suitable to addressing these tasks.

LIDA is a novel tool for generating grammar-agnostic visualizations and infographics. It is comprised of four modules—a summarizer that converts data into a rich but compact natural language summary; a goal explorer that enumerates visualization goals given the data; a visgenerator that generates, evaluates, refines, executes, and filters visualization code; and an infographer module that yields data-faithful stylized graphics using IGMs. LIDA provides a python API and a hybrid user interface (direct manipulation and multilingual natural language) for interactive chart, infographics and data story generation.


NEW RELEASE

Announcing DeepSpeed-Chat: Easy, fast, affordable RLHF Training of ChatGPT-like models at all scales

Microsoft’s AI at Scale initiative has released DeepSpeed-Chat, an easy, fast, and low-cost open-source solution for reinforcement learning from human feedback (RLHF) training that can create high-quality ChatGPT-like models ranging in size from a few to hundreds of billions of parameters. DeepSpeed-Chat provides complete RLHF training experience with a single click. It combines the prowess of DeepSpeed-Inference and DeepSpeed-Training to offer 15x faster throughput than the previous state of the art, while also supporting model sizes that are up to 8x larger on the same hardware. With DeepSpeed-Chat, practitioners can train an OPT-13B ChatGPT-like model in under 1.5 hours or a massive 175B model in a day on a modest GPU cluster. For those who don’t have a GPU cluster handy, DeepSpeed-Chat enables practitioners to train up to a 13B model on a single GPU, or at $300 to train on Azure Cloud. 


NEWS

Gov4git: Decentralized community governance to fuel open-source projects

Communal open-source projects have helped build countless applications for sourcing and sharing information like bug details and scientific data, as well as decentralized planning, design and policymaking. 

But the lack of a standardized and secure governance solution prevents many open-source projects from getting started—and holds them back when they get too big to be managed through ad-hoc methods. These small communities often resort to external mechanisms to manage their projects and protect them from malicious actors.

Microsoft Research and Protocol Labs, an open-source R&D company, are collaborating to develop Gov4git, a decentralized, git-native protocol with configurable governance rules to help launch more open-source projects and communities and support their growth.

Gov4git comes with many of the transparency, decentralization, and security benefits of blockchains while also harnessing the power of formal governance to avoid costly approaches to validation and dispute resolution. 

Git is the worldwide standard for version control and management of collaborative software development projects. Gov4git is designed as a secure and cost-effective framework solution which can be tailored to the specific needs of any one community and deployed by non-technical users anywhere where access to git is present. Gov4git can strengthen the security of such communities against the risks of malicious actors posing as collaborators with the intent to negatively impact community maintenance.

The post Research Focus: Week of April 24, 2023 appeared first on Microsoft Research.

Read More

Viral NVIDIA Broadcast Demo Drops Hammer on Imperfect Audio This Week ‘In the NVIDIA Studio’

Viral NVIDIA Broadcast Demo Drops Hammer on Imperfect Audio This Week ‘In the NVIDIA Studio’

Editor’s note: This post is part of our weekly In the NVIDIA Studio series, which celebrates featured artists, offers creative tips and tricks, and demonstrates how NVIDIA Studio technology improves creative workflows.

Content creators in all fields can benefit from free, AI-powered technology available from NVIDIA Studio.

The Studio platform delivers RTX acceleration in over 110 popular creative apps plus an exclusive suite of AI-powered Studio software. NVIDIA Omniverse interconnects 3D workflows, Canvas turns simple brushstrokes into realistic landscape images and RTX Remix helps modders create stunning RTX remasters of classic PC games.

Spotlighted by this week’s In the NVIDIA Studio featured artist Unmesh Dinda, NVIDIA Broadcast transforms the homes, apartments and dorm rooms of content creators, livestreamers and people working from home through the power of AI — all without the need for specialized equipment.

Host of the widely watched YouTube channel PiXimperfect, Dinda takes the noise-canceling and echo-removal AI features in Broadcast to extremes. He turned the perfect demo into a viral hit faster, powered by RTX acceleration in his go-to video-editing software, Adobe Premiere Pro.

It’s Hammer Time

NVIDIA Broadcast has several popular features, including visual background, autoframing, video noise removal, eye contact and vignette effects.

Two of the most frequently used features, noise and echo removal, caught the attention of Dinda, who saw Broadcast’s potential and wanted to show creators how to instantly improve their content.

The foundation of Dinda’s tutorial style came from his childhood. “My father would sit with me every day to help me with schoolwork,” he said. “He always used to explain with examples which were crystal clear to me, so now I do the same with my channel.”

Dinda contemplated how to demonstrate this incredible technology in a quick, relatable way.

“Think of a crazy idea that grabs attention instantly,” said Dinda. “Concepts like holding a drill in both hands or having a friend play drums right next to me.”

Dinda took the advice of famed British novelist William Golding, who once said, “The greatest ideas are the simplest.” Dinda’s final concept ended up as a scene of a hammer hitting a helmet on his head.

It turns out that seeing — and hearing — is believing.

Even with an electric fan whirring directly into his microphone and intense hammering on his helmet, Dinda can be heard crystal clear with Broadcast’s noise-removal feature turned on. To help emphasize the sorcery, Dinda briefly turns the feature off in the demo to reveal the painful sound his viewers would hear without it.

The demo launched on Instagram a few months ago and went viral overnight. Across social media platforms, the video now has over 12 million views and counting.

Dinda wasn’t harmed in the making of this video.

Views are fantastic, but the real gratification of Dinda’s work comes from a genuine desire to improve his followers’ skillsets, he said.

“The biggest inspiration comes from viewers,” said Dinda. “When they comment, message or meet me at an event to say how much the content has helped their career, it inspires me to create more and reach more creatives.”


Learn more and download Broadcast, free for all GeForce RTX GPU owners.

Hammer Out the Details

Dinda uses Adobe Premiere Pro to edit his videos, and his GeForce RTX 3080 Ti plays a major part in accelerating his creative workflow.

“I work with and render high-resolution videos on a daily basis, especially with Adobe Premiere Pro. Having a GPU like the GeForce RTX 3080 Ti helps me render and publish in time.” — Unmesh Dinda

He uses the GPU-accelerated decoder, called NVDEC, to unlock smooth playback and scrubbing of the high-resolution video footage he often works in.

As his hammer-filled Broadcast demo launched on several social media platforms, Dinda had the option to deploy the AI-powered, RTX-accelerated auto reframe feature. It automatically and intelligently tracks objects, and crops landscape video to social-media-friendly aspect ratios, saving even more time.

Dinda also used Adobe Photoshop to add graphical overlays to the video. With more than 30 GPU-accelerated features at his disposal — such as super resolution, blur gallery, object selection, smart sharpen and perspective warp — he can improve and adjust footage, quickly and easily.


Dinda used the GPU-accelerated NVIDIA encoder, aka NVENC, to speed up video exports up to 5x faster with his RTX GPU, leading to more time saved on the project.

Though he’s a full-time, successful video creator, Dinda stressed, “I have a normal life outside Adobe Photoshop, I promise!”

Streamer Unmesh Dinda.

Check out Dinda’s PiXimperfect channel, a free resource for learning Adobe Photoshop — another RTX-accelerated Studio app.

Follow NVIDIA Studio on Instagram, Twitter and Facebook. Access tutorials on the Studio YouTube channel and get updates directly in your inbox by subscribing to the Studio newsletter.

Read More

The Future of Intelligent Vehicle Interiors: Building Trust with HMI & AI

The Future of Intelligent Vehicle Interiors: Building Trust with HMI & AI

Imagine a future where your vehicle’s interior offers personalized experiences and builds trust through human-machine interfaces (HMI) and AI. In this episode of the NVIDIA AI Podcast, Andreas Binner, chief technology officer at Rightware, delves into this fascinating topic with host Katie Burke Washabaugh.

Rightware is a Helsinki-based company at the forefront of developing in-vehicle HMI. Its platform, Kanzi, works in tandem with NVIDIA DRIVE IX to provide a complete toolchain for designing personalized vehicle interiors for the next generation of transportation, including detailed visualizations of the car’s AI.

Binner touches on his journey into automotive technology and HMI, the evolution of infotainment in the automotive industry over the past decade, and surprising trends in HMI. They explore the influence of AI on HMI, novel AI-enabled features and the importance of trust in new technologies.

Other topics include the role of HMI in fostering trust between vehicle occupants and the vehicle, the implications of autonomous vehicle visualization, balancing larger in-vehicle screens with driver distraction risks, additional features for trust-building between autonomous vehicles and passengers, and predictions for intelligent cockpits in the next decade.

Tune in to learn about the innovations that Rightware’s Kanzi platform and NVIDIA DRIVE IX bring to the automotive industry and how they contribute to developing intelligent vehicle interiors.

Read more on the NVIDIA Blog:  NVIDIA DRIVE Ecosystem Creates Pioneering In-Cabin Features With NVIDIA DRIVE IX

You Might Also Like

Driver’s Ed: How Waabi Uses AI, Simulation to Teach Autonomous Vehicles to Drive

Teaching the AI brains of autonomous vehicles to understand the world as humans do requires billions of miles of driving experience. The road to achieving this astronomical level of driving leads to the virtual world. Learn how Waabi uses powerful high-fidelity simulations to train and develop production-level autonomous vehicles.

Polestar’s Dennis Nobelius on the Sustainable Performance Brand’s Plans

Driving enjoyment and autonomous driving capabilities can complement one another in intelligent, sustainable vehicles. Learn about the automaker’s plans to unveil its third vehicle, the Polestar 3, the tech inside it, and what the company’s racing heritage brings to the intersection of smarts and sustainability.

GANTheftAuto: Harrison Kinsley on AI-Generated Gaming Environments

Humans playing games against machines is nothing new, but now computers can develop their own games for people to play. Programming enthusiast and social media influencer Harrison Kinsley created GANTheftAuto, an AI-based neural network that generates a playable chunk of the classic video game Grand Theft Auto V.

Subscribe to the AI Podcast: Now Available on Amazon Music

The AI Podcast is now available through Amazon Music.

In addition, get the AI Podcast through iTunes, Google Podcasts, Google Play, Castbox, DoggCatcher, Overcast, PlayerFM, Pocket Casts, Podbay, PodBean, PodCruncher, PodKicker, Soundcloud, Spotify, Stitcher and TuneIn.

Make the AI Podcast better: Have a few minutes to spare? Fill out this listener survey.

Read More

Run your local machine learning code as Amazon SageMaker Training jobs with minimal code changes

Run your local machine learning code as Amazon SageMaker Training jobs with minimal code changes

We recently introduced a new capability in the Amazon SageMaker Python SDK that lets data scientists run their machine learning (ML) code authored in their preferred integrated developer environment (IDE) and notebooks along with the associated runtime dependencies as Amazon SageMaker training jobs with minimal code changes to the experimentation done locally. Data scientists typically carry out several iterations of experimentation in data processing and training models while working on any ML problem. They want to run this ML code and carry out the experimentation with ease of use and minimal code change. Amazon SageMaker Model Training helps data scientists run fully managed large-scale training jobs on AWS’s compute infrastructure. SageMaker Training also helps data scientists with advanced tools such as Amazon SageMaker Debugger and Profiler to debug and analyze their large-scale training jobs.

For customers with small budgets, small teams, and tight timelines, every single new concept and line of code rewritten to run on SageMaker makes them less productive towards their core tasks, namely data processing and training ML models. They want to write code once in the framework of their choice and be able to move seamlessly from running code in their notebooks or laptops to running code at scale using SageMaker capabilities.

With this new capability of the SageMaker Python SDK, data scientists can onboard their ML code to the SageMaker Training platform in a few minutes. You just need to add a single line of code to your ML code, and SageMaker intelligently comprehends your code along with the datasets and workspace environment setup and runs it as a SageMaker Training job. You can then take advantage of the key capabilities of the SageMaker Training platform, like the ability to scale jobs easily, and other associated tools like Debugger and Profiler. In this release, you can run your local machine learning (ML) Python code as a single-node Amazon SageMaker training job or multiple parallel jobs. Distributed training jobs(across multiple nodes) are not supported by remote functions.

In this post, we show you how to use this new capability to run local ML code as a SageMaker Training job.

Solution overview

You can now run your ML code written in your IDE or notebook as a SageMaker Training job by annotating the function, which acts as an entry point to the user’s code base, with a simple decorator. Upon invocation, this capability automatically takes a snapshot of all the associated variables, functions, packages, environment variables, and other runtime requirements from your ML code, serializes them, and submits them as a SageMaker Training job. It integrates with the recently announced SageMaker Python SDK feature for setting default values for parameters. This capability simplifies the SageMaker constructs that you need to learn to be able to run code using SageMaker Training. Data scientists can write, debug, and iterate their code in any preferred IDE (such as Amazon SageMaker Studio, notebooks, VS Code, or PyCharm). When ready, you can annotate your Python function with the @remote decorator and run it as a SageMaker job at scale.

This capability takes familiar open-source Python objects as arguments and outputs. Furthermore, you don’t need to understand container lifecycle management and can simply run your workloads across different compute contexts (such as a local IDE, Studio, or training jobs) with minimal configuration overheads. To run any local code as a SageMaker Training job, this capability infers the configurations required to run jobs, such as the AWS Identity and Access Management (IAM) role, encryption key, and network configuration, from the Studio or IDE settings (which can be the default settings) and passes them to the platform by default. You have the flexibility to customize your runtime in the SageMaker managed infrastructure using the inferred configuration or override them at the SDK-level by passing them as arguments to the decorator.

This new capability of the SageMaker Python SDK transforms your ML code in an existing workspace environment and any associated data processing code and datasets into a SageMaker Training job. This capability looks for ML code wrapped inside a @remote decorator and automatically translates it into a job that runs in either Studio or a local IDE such as PyCharm.

In the following sections, we walk through the features of this new capability and how to launch python functions as SageMaker Training jobs.

Prerequisites

To use this new SageMaker Python SDK capability and run the code associated with this post, you need the following prerequisites:

  • An AWS account that will contain all your AWS resources
  • An IAM role to access SageMaker
  • Access to Studio or a SageMaker notebook instance or an IDE such as PyCharm

Use the SDK from Studio and SageMaker notebooks

You can use this capability from Studio by launching a notebook and wrapping your code with a @remote decorator inside the notebook. You first need to import the remote function using the following code:

from sagemaker.remote_function import remote

When you use the decorator function, this capability will automatically interpret the function of your code and run it as a SageMaker Training job.

You can also use this capability from a SageMaker notebook instance. You first need to start a notebook instance, open Jupyter or Jupyter Lab on it, and launch a notebook. Then import the remote function as shown in the preceding code and wrap your code with the @remote decorator. We include an example of how to use the decorator function and the associated settings later in this post.

Use the SDK from your local environment

You can also use this capability from your local IDE. As a prerequisite, you must have the AWS Command Line Interface (AWS CLI), SageMaker Python SDK, and AWS SDK for Python (Boto3) installed in your local environment. You need to import these libraries in your code, set the SageMaker session, specify settings, and decorate your function with the @remote decorator. In the following example code, we run a simple divide function as a SageMaker Training job:

import boto3
import sagemaker
from sagemaker.remote_function import remote

sm_session = sagemaker.Session(boto_session=boto3.session.Session(region_name="us-west-2"))
settings = dict(
    sagemaker_session=sm_session,
    role=<IAM_ROLE_NAME>
    instance_type="ml.m5.xlarge",
)
@remote(**settings)
def divide(x, y):
    return x / y
if __name__ == "__main__":
    print(divide(2, 3.0))

We can use a similar methodology to run advanced functions as training jobs, as shown in the next section.

Launch Python functions as SageMaker jobs

The new SageMaker Python SDK feature allows you to run Python functions as SageMaker Training jobs. Any Python code, ML training code developed by data scientists using their preferred local IDEs (PyCharm, VS Code), SageMaker notebooks, or Studio notebooks can be launched as a managed SageMaker job.

In ML workloads using this capability, associated datasets, dependencies, and workspace environment setups are serialized using the ML code and run as a SageMaker job synchronously and asynchronously.

You can add a @remote decorator annotation to any Python code including a local ML processing or training function to launch it as a managed SageMaker Training job, thereby taking advantage of the scale, performance, and cost benefits of SageMaker. This can be achieved with minimal code changes by adding a decorator to the Python function code. Invocation to the decorated function is run synchronously, and the function run waits until the SageMaker job is complete.

In the following example, we use the @remote decorator to launch SageMaker jobs in decorator mode using an ml.m5.large instance. SageMaker uses training jobs to launch this function as a managed job.

from sagemaker.remote_function import remote
from numpy as np

@remote(instance_type="ml.m5.large")
def matrix_multiply(a, b):
    return np.matmul(a, b)

a = np.array([[1, 0], [0, 1]])
b = np.array([1, 2])

assert matrix_multiply(a, b) == np.array([1,2])

You can also use decorator mode to launch SageMaker jobs, Python packages, and dependencies. You can include environment variables such as VPC, subnets, and security groups to launch SageMaker training jobs in the environment.yml file. This allows ML engineers and admins to configure these environment variables so data scientists can focus on ML model building and iterate faster. See the following code:

from sagemaker.remote_function import remote

@remote(instance_type="ml.g4dn.xlarge",dependencies = "./environment.yml")
def train_hf_model(
    train_input_path,test_input_path,s3_output_path = None,
    *,epochs = 1, train_batch_size = 32, eval_batch_size = 64,
    warmup_steps = 500,learning_rate = 5e-5
    ):  
    model_name = "distilbert-base-uncased"
    model = AutoModelForSequenceClassification.from_pretrained(model_name)
    ... <TRUCNATED>
    return os.path.join(s3_output_path, model_dir), eval_result

You can use RemoteExecutor to launch Python functions as SageMaker jobs asynchronously. The executor asynchronously polls SageMaker Training jobs to update the status of the job. The RemoteExecutor class is an implementation of the concurrent.futures.Executor, which is used to submit SageMaker Training jobs asynchronously. See the following code:

from sagemaker.remote_function import RemoteExecutor

def train_hf_model(
    train_input_path,test_input_path,s3_output_path = None,
    *,epochs = 1, train_batch_size = 32, eval_batch_size = 64,
    warmup_steps = 500,learning_rate = 5e-5
    ):  
    model_name = "distilbert-base-uncased"
    model = AutoModelForSequenceClassification.from_pretrained(model_name)
    ...<TRUNCATED>
    return os.path.join(s3_output_path, model_dir), eval_result


with RemoteExecutor(instance_type="ml.g4dn.xlarge", dependencies = './requirements.txt') as e:
    future = e.submit(divide, train_input_path,test_input_path,s3_output_path,
                      epochs, train_batch_size, eval_batch_size,warmup_steps,learning_rate)

Customize the runtime environment

Decorator mode and RemoteExecutor allow you to define and customize the runtime environments for the SageMaker job. The runtime dependencies, including Python packages and environment variables for SageMaker jobs, can be specified to customize the runtime. In order to run local Python code as SageMaker managed jobs, the Python package and dependencies need to be made available to SageMaker. ML engineers or data science administrators can configure networking and security configurations such as VPC, subnets, and security groups for SageMaker jobs, so data scientists can use these centrally managed configurations while launching SageMaker jobs. You can use either a requirements.txt file or a Conda environment.yaml file.

When dependencies are defined with requirements.txt, the packages will be installed using pip in the job runtime. If the image used for running the job comes with Conda environments, packages will be installed in the Conda environment declared to use for jobs. The following code shows an example requirements.txt file:

datasets
transformers
torch
scikit-learn
s3fs==0.4.2
sagemaker>=2.148.0

You can pass your Conda environment.yaml file to create the Conda environment you would like your code to run in during the training job. If the image used for running the job declares a Conda environment to run the code under, we will update the declared Conda environment with the given specification. The following code is an example of a Conda environment.yaml file:

name: sagemaker_example
channels:
  - conda-forge
dependencies:
  - python=3.10
  - pandas
  - pip:
      - sagemaker

Alternatively, you can set dependencies=”auto_capture” to let the SageMaker Python SDK capture the installed dependencies in the active Conda environment. You must have an active Conda environment for auto_capture to work. Note that there are prerequisites for auto_capture to work; we recommend that you pass in your dependencies as a requirement.txt or Conda environment.yml file as described in the previous section.

For more details, refer to Run your local code as a SageMaker Training job.

Configurations for SageMaker jobs

Infrastructure-related settings can be offloaded to a configuration file that admin users could help set up. You only need to set it up one time. Infrastructure settings cover the network configuration, IAM roles, Amazon Simple Storage Service (Amazon S3) folder for input, output data, and tags. Refer to Configuring and using defaults with the SageMaker Python SDK for more details.

SchemaVersion: '1.0'
SageMaker:
  PythonSDK:
    Modules:
      RemoteFunction:
        Dependencies: path/to/requirements.txt
        EnvironmentVariables: {"EnvVarKey": "EnvVarValue"}
        ImageUri: 366666666666.dkr.ecr.us-west-2.amazonaws.com/my-image:latest
        InstanceType: ml.m5.large
        RoleArn: arn:aws:iam::366666666666:role/MyRole
        S3KmsKeyId: somekmskeyid
        S3RootUri: s3://my-bucket/my-project
        SecurityGroupIds:
          - sg123
        Subnets:
          - subnet-1234
        Tags:
          - {"Key": "someTagKey", "Value": "someTagValue"}
        VolumeKmsKeyId: somekmskeyid

Implementation

Deep learning models like PyTorch or TensorFlow can also be run within Studio by running the code as a training job within the notebook. To showcase this capability in Studio, you can clone this repo into your Studio and run the notebook located in the GitHub repository.

This example demonstrates an end-to-end binary text classification use case. We are using the Hugging Face transformers and datasets library to fine-tune a pre-trained transformer on binary text classification. In particular, the pre-trained model will be fine-tuned using the IMDb dataset.

When you clone the repository, you should locate the following files:

  • config.yaml – Most of the decorator arguments can be offloaded to the configuration file in order to separate out the infrastructure-related settings from the code base
  • huggingface.ipynb – This contains the code to train a pre-trained HuggingFace model, which will be fine-tuned using the IMDB dataset
  • requirements.txt – This file contains all the dependencies to run the function that will be used in this notebook for running the code and running the training remotely in a GPU instance as a training job

When you open the notebook, you will be prompted to set up the notebook environment. You can select the Data Science 3.0 image with the Python 3 kernel and ml.m5.large as the fast launch instance type for running the notebook code. This instance type is significantly faster in spinning up an environment.

The training job will be run in an ml.g4dn.xlarge instance as defined in the config.yaml file:

SchemaVersion: '1.0'
SageMaker:
  PythonSDK:
    Modules:
      RemoteFunction:
        # role arn is not required if in SageMaker Notebook instance or SageMaker Studio
        # Uncomment the following line and replace with the right execution role if in a local IDE
        # RoleArn: <IAM_ROLE_ARN>
        InstanceType: ml.g4dn.xlarge
        Dependencies: ./requirements.txt

The requirements.txt file dependencies to run the function for training the Hugging Face model include the following:

datasets
transformers
torch
scikit-learn
# lock s3fs to this specific version as more recent ones introduce dependency on aiobotocore, which is not compatible with botocore
s3fs==0.4.2
sagemaker>=2.148.0,<3

The Hugging Face notebook showcases how to run the training remotely via the @remote function, which is run synchronously. Therefore, the function run for training the model will wait until the SageMaker Training job is complete. The training will be run remotely with a GPU instance wherein the instance type is defined in the preceding configuration file.

from sagemaker.remote_function import remote

@remote(s3_root_uri=s3_root_folder, keep_alive_period_in_seconds=600)
def train_hf_model(
    train_input_path,
    test_input_path,
    s3_output_path = None,
    *,
    epochs = 1,
    train_batch_size = 32,
    eval_batch_size = 64,
    warmup_steps = 500,
    learning_rate = 5e-5
):  
    model_dir = 'model'

    train_dataset = load_from_disk(train_input_path, keep_in_memory=True)
    test_dataset = load_from_disk(test_input_path, keep_in_memory=True)
    
    model_name = 'distilbert-base-uncased'
    model = AutoModelForSequenceClassification.from_pretrained(model_name)
    
    training_args = TrainingArguments(
        output_dir=model_dir,
        num_train_epochs=epochs,
        per_device_train_batch_size=train_batch_size,
        per_device_eval_batch_size=eval_batch_size,
        warmup_steps=warmup_steps,
        evaluation_strategy="epoch",
        logging_dir="logs/",
        learning_rate=float(learning_rate),
    )

    # create Trainer instance
    trainer = Trainer(
        model=model,
        args=training_args,
        compute_metrics=compute_metrics,
        train_dataset=train_dataset,
        eval_dataset=test_dataset,
        tokenizer=tokenizer,
    )
    
    print("Starting model training..")
    trainer.train()
        
    trainer.save_model(model_dir)

After you run the training job, you can run the rest of the cells in the notebook to inspect the evaluation metrics and classify the text on our trained model.

You can also view the training job status that got remotely triggered in the GPU instance on the SageMaker dashboard by navigating back to the SageMaker console.

As soon as the training job is complete, it continues to run the instructions in the notebook for evaluation and classification. Similar jobs can be trained and run via the remote executor function embedded within Studio notebooks to carry out the runs asynchronously.

Integration with SageMaker experiments inside a @remote function

You can pass your experiment name, run name, and other parameters into your remote function to create a SageMaker experiments run. The following code example imports the experiment name, the name of the run, and the parameters to log for each run:

from sagemaker.remote_function import remote
from sagemaker.experiments.run import Run
# Define your remote function
@remote
def train(value_1, value_2, exp_name, run_name):
...
...
#Creates the experiment
with Run(
  experiment_name=exp_name,
  run_name=run_name,
  sagemaker_session=sagemaker_session
) as run:
...
...
#Define values for the parameters to log
run.log_parameter("param_1", value_1)
run.log_parameter("param_2", value_2)
...
...
#Define metrics to log
run.log_metric("metric_a", 0.5)
run.log_metric("metric_b", 0.1)

# Invoke your remote function
train(1.0, 2.0, "my-exp-name", "my-run-name")  

In the preceding example, the parameters p1 and p2 are logged over time inside a training loop. Common parameters may include batch size or epochs. In the example, the metrics A and B are logged for a run over time inside a training loop. Common metrics may include accuracy or loss. For more information, see Create an Amazon SageMaker Experiment.

Conclusion

In this post, we introduced a new SageMaker Python SDK capability that enables data scientists to run their ML code in their preferred IDE as SageMaker Training jobs. We discussed the prerequisites needed to use this capability along with its features. We also showed how to use this capability in Studio, SageMaker notebook instances, and your local IDE. In addition, we provided sample code examples to demonstrate how to use this capability. As a next step, we recommend trying this capability in your IDE or SageMaker by following the code examples referenced in this post.


About the Authors

Dipankar Patro is a Software Development Engineer at AWS SageMaker, innovating and building MLOps solutions to help customers adopt AI/ML solutions at scale. He has an MS in Computer Science and his areas of interest are Computer Security, Distributed Systems and AI/ML.

Farooq Sabir is a Senior Artificial Intelligence and Machine Learning Specialist Solutions Architect at AWS. He holds PhD and MS degrees in Electrical Engineering from the University of Texas at Austin and an MS in Computer Science from Georgia Institute of Technology. He has over 15 years of work experience and also likes to teach and mentor college students. At AWS, he helps customers formulate and solve their business problems in data science, machine learning, computer vision, artificial intelligence, numerical optimization, and related domains. Based in Dallas, Texas, he and his family love to travel and go on long road trips.

Manoj Ravi is a Senior Product Manager for Amazon SageMaker. He is passionate about building next-gen AI products and works on software and tools to make large-scale machine learning easier for customers. He holds an MBA from Haas School of Business and a Masters in Information Systems Management from Carnegie Mellon University. In his spare time, Manoj enjoys playing tennis and pursuing landscape photography.

Shikhar Kwatra is an AI/ML Specialist Solutions Architect at Amazon Web Services, working with a leading Global System Integrator. He has earned the title of one of the Youngest Indian Master Inventors with over 500 patents in the AI/ML and IoT domains. Shikhar aids in architecting, building, and maintaining cost-efficient, scalable cloud environments for the organization, and supports the GSI partner in building strategic industry solutions on AWS. Shikhar enjoys playing guitar, composing music, and practicing mindfulness in his spare time.

Vikram Elango is a Sr. AI/ML Specialist Solutions Architect at AWS, based in Virginia, US. He is currently focused on generative AI, LLMs, prompt engineering, large model inference optimization, and scaling ML across enterprises. Vikram helps financial and insurance industry customers with design and thought leadership to build and deploy machine learning applications at scale. In his spare time, he enjoys traveling, hiking, cooking, and camping.

Read More