Do you need help to move your organization’s Machine Learning (ML) journey from pilot to production? You’re not alone. Most executives think ML can apply to any business decision, but on average only half of the ML projects make it to production.
This post describes how to implement your first ML use case using Amazon SageMaker in just 8–12 weeks by leveraging a methodology called Experience-based Acceleration (EBA).
Challenges
Customers may face several challenges when implementing machine learning (ML) solutions.
- You may struggle to connect your ML technology efforts to your business value proposition, making it difficult for IT and business leadership to justify the investment it requires to operationalize models.
- You may often select low-value use cases as proof of concept rather than solving a meaningful business or customer problem.
- You may have gaps in skills and technologies, including operationalizing ML solutions, implementing ML services, and managing ML projects for rapid iterations.
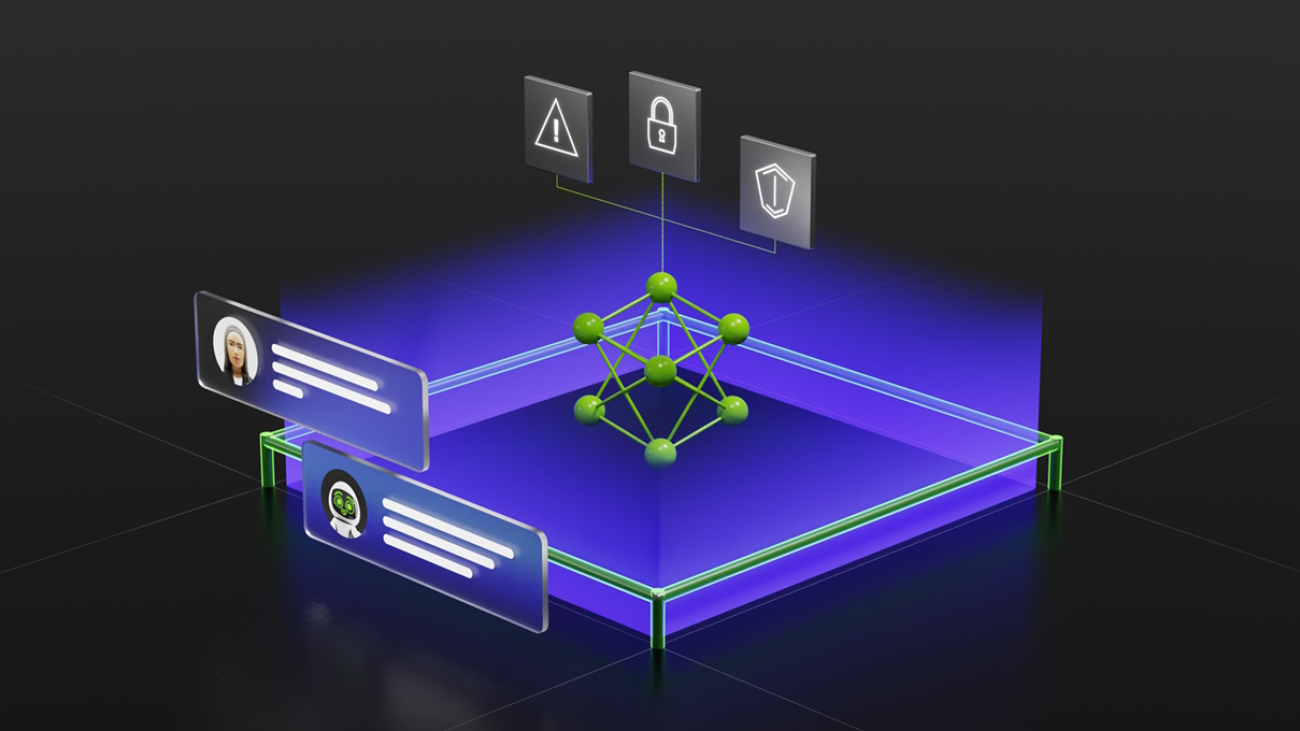
- Ensuring data quality, governance, and security may slow down or stall ML projects.
Solution overview: Machine Learning Experience-based Acceleration (ML EBA)
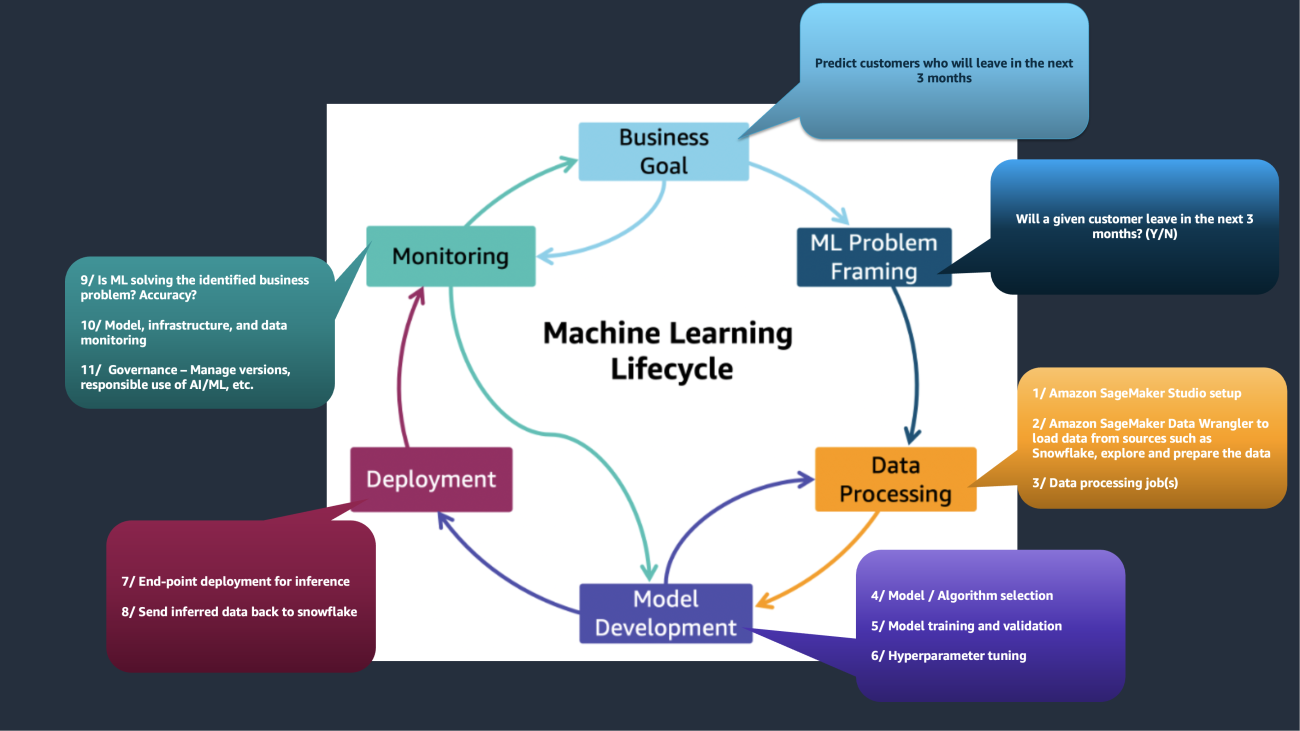
Machine learning EBA is a 3-day, sprint-based, interactive workshop (called a party) that uses SageMaker to accelerate business outcomes by guiding you through an accelerated and a prescriptive ML lifecycle. It starts with identifying business goals and ML problem framing, and takes you through data processing, model development, production deployment, and monitoring.
The following visual illustrates a sample ML lifecycle.

Two primary customer scenarios apply. The first is by using low-code or no-code ML services such as Amazon SageMaker Canvas, Amazon SageMaker Data Wrangler, Amazon SageMaker Autopilot, and Amazon SageMaker JumpStart to help data analysts prepare data, build models, and generate predictions. The second is by using SageMaker to help data scientists and ML engineers build, train, and deploy custom ML models.
We recognize that customers have different starting points. If you’re starting from scratch, it’s often simpler to begin with low-code or no-code solutions and gradually transition to developing custom models. In contrast, if you have an existing on-premises ML infrastructure, you can begin directly by using SageMaker to alleviate challenges with your current solution.
Through ML EBA, experienced AWS ML subject matter experts work side by side with your cross-functional team to provide prescriptive guidance, remove blockers, and build organizational capability for a continued ML adoption. This party steers you to solve a compelling business problem as opposed to thinking in terms of data and ML technology environments. Additionally, the party gets you started on driving material business value from untapped data.
ML EBA helps you to think big, start small, and scale fast. Although it creates a minimum viable ML model in 3 days, there are 4–6 weeks of preparation leading up to the EBA. Furthermore, you spend 4–6 weeks post-EBA to fine-tune the model with additional feature engineering and hyperparameter optimization before production deployment.
Let’s dive into what the whole process looks like and how you can use the ML EBA methodology to address the common blockers.
EBA prep (4–6 weeks)
In this section, we detail the 4–6 weeks of preparation leading up to the EBA.
6 weeks before the party: Problem framing and qualification
The first step is to frame and qualify the ML problem, which includes the following:
- Identify the right business outcome – You must have a clear understanding of the problem you are trying to solve and the desired outcome you hope to achieve through the use of ML. You must be able to measure the business value gained against specific objectives and success criteria. Furthermore, you must be able to identify what should be observed, and what should be predicted. AWS works with you to help answer the following important questions before embarking on the ML EBA:
- Does the ML use case solve a meaningful business problem?
- Is it important enough to get the attention of business leadership?
- Do you already have data to solve the ML use case?
- Can the use case eventually be operationalized into production?
- Does it really require ML?
- Are there organizational processes in place for the business to use the model’s output?
The AI Use Case Explorer is a good starting point to explore the right use cases by industry, business function, or desired business outcome and discover relevant customer success stories.
- Executive sponsorship – To help you move faster than you would have organically, AWS meets with the executive sponsor to confirm buy-in, remove internal obstacles, and commit resources. Additionally, AWS can offer financial incentives to help offset the costs for your first ML use case.
- Meeting you where you are at in your ML journey – AWS assesses your current state—people, process, and technology. We help you detail requirements and dependencies; specifically, what teams and data are required to begin the journey successfully. Additionally, we provide recommendations on the technical path: starting with low-code or no-code services, or building a custom model using SageMaker.
5 weeks before the party: Workstream configuration and transition into action
The next step is to identify the teams needed to support the EBA effort. Commonly, the work is split up between the following workstreams:
- Cloud engineering (infrastructure and security) – Focuses on verifying that the AWS accounts and infrastructure are set up and secure ahead of EBA. This includes AWS Identity and Access Management (IAM) or single sign-on (SSO) access, security guardrails, Amazon SageMaker Studio provisioning, automated stop/start to save costs, and Amazon Simple Storage Service (Amazon S3) set up.
- Data engineering – Identifies the data sources, sets up data ingestion and pipelines, and prepares data using Data Wrangler.
- Data science – The heart of ML EBA and focuses on feature engineering, model training, hyperparameter tuning, and model validation.
- MLOps engineering – Focuses on automating the DevOps pipelines for operationalizing the ML use case. This may often be the same team as cloud engineering.
- Leadership team – Responsible for orchestrating the effort, removing blockers, aligning with the executive sponsors, and is ultimately accountable for delivering the expected outcomes.
After these efforts have been completed, we must transition into action. A standard baseline 4-week timeline should be strictly adhered to make sure the EBA stays on track. Experienced AWS subject matter experts will guide and coach you through this preparation leading up to the EBA party.
4 weeks before the party: Inspire builders and curate a technical plan
Every customer is different; AWS helps you curate a technical plan of activities to be completed in the next 4 weeks leading up to the party.
AWS conducts Immersion Days to inspire your builders and build momentum for the party. An Immersion Day is a half or full day workshop with the right mix of presentation, hands-on labs, and Q&A to introduce AWS services or solutions. AWS will help you select the right Immersion Days from the AI/ML Workshops catalog.
We recognize that every builder in your organization is at a different level. We recommend that your builders use the ML ramp-up guide resources or digital or classroom training to start where they are at and build the necessary skills for the party.
3 weeks before the party: Tech prep focused on cloud and data engineering
Your cloud and data engineering teams should work on the following with guidance from AWS:
- Create AWS accounts with network and security set up
- Set up Amazon SageMaker Studio
- Create Amazon S3 buckets to store data
- Identify data sources (or producers)
- Integrate external sources to dump data into S3 buckets
2 weeks before the party: Tech prep focused on data science
Your data science team should work on the following with guidance from AWS:
- Test SageMaker sample notebooks relevant for the ML use case.
- Conduct exploratory analysis and data preparation.
- Determine the ML algorithm, if known or possible. Otherwise, use Amazon SageMaker Autopilot or Amazon SageMaker JumpStart.
- Integrate with external continuous integration and continuous deployment (CI/CD) tools such as Git or SonarQube.
- Participate in walkthroughs or deep dives with AWS on SageMaker features such as Amazon SageMaker Experiments, Amazon SageMaker Clarify, Amazon SageMaker Debugger, and Amazon SageMaker Model Monitor which may be required for the EBA.
1 week before the party: Assess readiness (go/no-go)
AWS works with you to assess go/no-go readiness for technical activities, skills, and momentum for the party. Then we solidify the scope for the 3-day party, prioritizing progress over perfection.
EBA (3-day party)
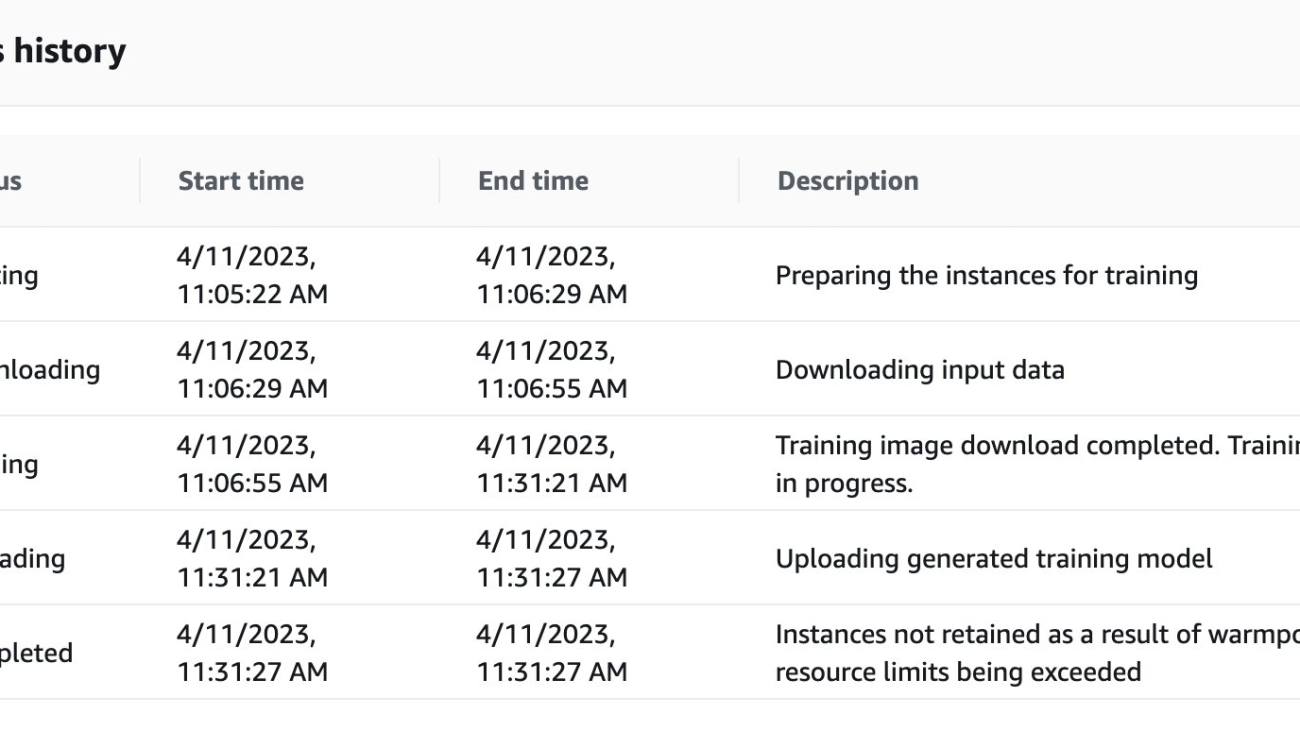
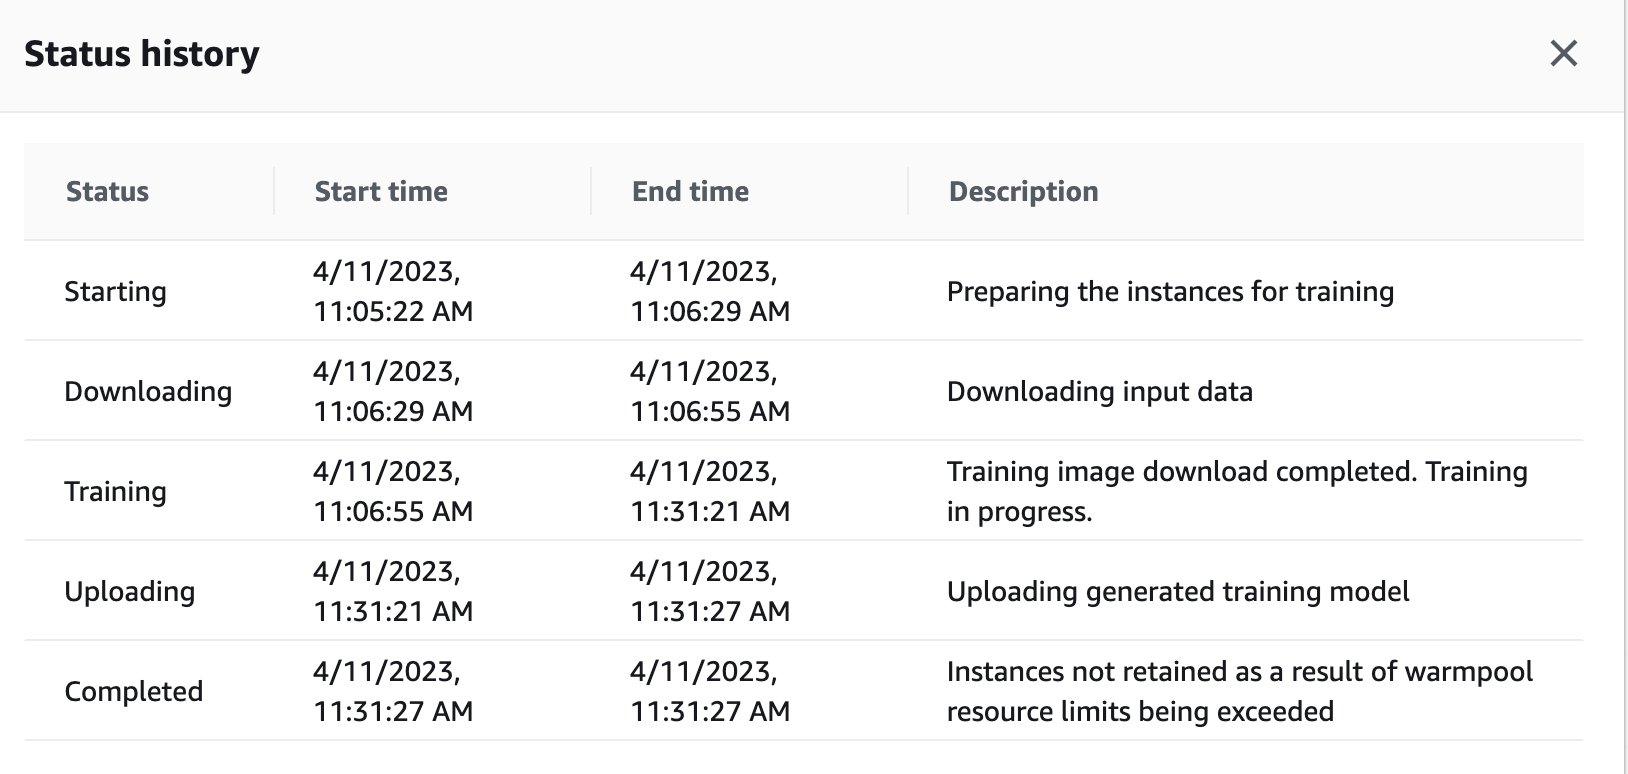
Although the EBA party itself is customized for your organization, the recommended agenda for the 3 days is shown in the following table. You will learn by doing during the EBA with guidance from AWS subject matter experts.
| . | Day 1 | Day 2 | Day 3 |
| Data Science |
AM: Try AutoPilot or JumpStart models. PM: Pick 1–2 models based on AutoPilot outcomes to experiment further. |
Improve model accuracy:
|
Quality assurance and validation with test data. Deploy to production (inference endpoint). Monitoring setup (model, data drift). |
| Data Engineering | Explore using feature store for future ML use cases. Create a backlog of items for data governance and associated guardrails. | ||
| Cloud/MLOps Engineering | Evaluate the MLOps framework solution library. Assess if this can be used for a repeatable MLOps framework. Identify gaps and create a backlog of things to enhance the solution library or create your own MLOps framework. | Implement backlog items to create a repeatable MLOps framework. | Continue implementing backlog items to create a repeatable MLOps framework. |
Post-EBA
ML involves extensive experimentation, and it’s common to not reach your desired model accuracy during the 3-day EBA. Therefore, creating a well-defined backlog or path to production is essential, including improving model accuracy through experimentation, feature engineering, hyperparameter optimization, and production deployment. AWS will continue to assist you through production deployment.
Conclusion
By complementing ML EBA methodology with SageMaker, you can achieve the following results:
- Move from pilot to production value in 8-12 weeks – Bring together business and technology teams to deploy the first ML use case to production in 8-12 weeks.
- Build the organizational capability to speed up and scale ML across lines of business – The ML EBA inspires and up-skills builders with real work experience. It establishes a successful working model (a collaboration and iteration model) to sustain and scale ML initiatives across lines of business. It also creates reusable assets to speed up and scale ML in a repeatable way.
- Reduce technical debt, pain points, and cost from existing on-premises ML models – The on-premises solutions may have challenges related to higher costs, inability to scale infrastructure, undifferentiated infrastructure management, and lack of advanced feature sets such as hyperparameter optimization, explainability for predictions, and more. Adoption of AWS ML services such as SageMaker reduces these issues.
Contact your AWS account team (Account Manager or Customer Solutions Manager) to learn more and get started.
About the Authors
 Ritesh Shah is Senior Customer Solutions Manager at Amazon Web Services. He helps large US-Central enterprises accelerate their cloud-enabled transformation and build modern cloud-native solutions. He is passionate about accelerating customers’ ML journeys. In his free time, Ritesh enjoys spending time with his daughter, cooking, and learning something new, while also evangelizing cloud and ML. Connect with him on LinkedIn.
 Nicholaus Lawson is a Solution Architect at AWS and part of the AIML specialty group. He has a background in software engineering and AI research. Outside of work, Nicholaus is often coding, learning something new, or woodworking. Connect with him on LinkedIn.


 Farooq Sabir is a Senior Artificial Intelligence and Machine Learning Specialist Solutions Architect at AWS. He holds PhD and MS degrees in Electrical Engineering from the University of Texas at Austin and an MS in Computer Science from Georgia Institute of Technology. He has over 15 years of work experience and also likes to teach and mentor college students. At AWS, he helps customers formulate and solve their business problems in data science, machine learning, computer vision, artificial intelligence, numerical optimization, and related domains. Based in Dallas, Texas, he and his family love to travel and go on long road trips.

 Vikram Elango is a Sr. AI/ML Specialist Solutions Architect at AWS, based in Virginia, US. He is currently focused on generative AI, LLMs, prompt engineering, large model inference optimization, and scaling ML across enterprises. Vikram helps financial and insurance industry customers with design and thought leadership to build and deploy machine learning applications at scale. In his spare time, he enjoys traveling, hiking, cooking, and camping.


 Roshan Thomas is a Senior Solutions Architect at Amazon Web Services. He is based in Melbourne, Australia, and works closely with power and utilities customers to accelerate their journey in the cloud. He is passionate about technology and helping customers architect and build solutions on AWS.