Analyze Amazon SageMaker spend and determine cost optimization opportunities based on usage, Part 3: Processing and Data Wrangler jobs

Analyze Amazon SageMaker spend and determine cost optimization opportunities based on usage, Part 3: Processing and Data Wrangler jobs

In 2021, we launched AWS Support Proactive Services as part of the AWS Enterprise Support plan. Since its introduction, we’ve helped hundreds of customers optimize their workloads, set guardrails, and improve the visibility of their machine learning (ML) workloads’ cost and usage.

In this series of posts, we share lessons learned about optimizing costs in Amazon SageMaker. In this post, we focus on data preprocessing using Amazon SageMaker Processing and Amazon SageMaker Data Wrangler jobs.

Data preprocessing holds a pivotal role in a data-centric AI approach. However, preparing raw data for ML training and evaluation is often a tedious and demanding task in terms of compute resources, time, and human effort. Data preparation commonly needs to be integrated from different sources and deal with missing or noisy values, outliers, and so on.

Furthermore, in addition to common extract, transform, and load (ETL) tasks, ML teams occasionally require more advanced capabilities like creating quick models to evaluate data and produce feature importance scores or post-training model evaluation as part of an MLOps pipeline.

SageMaker offers two features specifically designed to help with those issues: SageMaker Processing and Data Wrangler. SageMaker Processing enables you to easily run preprocessing, postprocessing, and model evaluation on a fully managed infrastructure. Data Wrangler reduces the time it takes to aggregate and prepare data by simplifying the process of data source integration and feature engineering using a single visual interface and a fully distributed data processing environment.

Both SageMaker features provide great flexibility with several options for I/O, storage, and computation. However, setting those options incorrectly may lead to unnecessary cost, especially when dealing with large datasets.

In this post, we analyze the pricing factors and provide cost optimization guidance for SageMaker Processing and Data Wrangler jobs.

Analyze Amazon SageMaker spend and determine cost optimization opportunities based on usage:

SageMaker Processing

SageMaker Processing is a managed solution to run data processing and model evaluation workloads. You can use it in data processing steps such as feature engineering, data validation, model evaluation, and model interpretation in ML workflows. With SageMaker Processing, you can bring your own custom processing scripts and choose to build a custom container or use a SageMaker managed container with common frameworks like scikit-learn, Lime, Spark and more.

SageMaker Processing charges you for the instance type you choose, based on the duration of use and provisioned storage that is attached to that instance. In Part 1, we showed how to get started using AWS Cost Explorer to identify cost optimization opportunities in SageMaker.

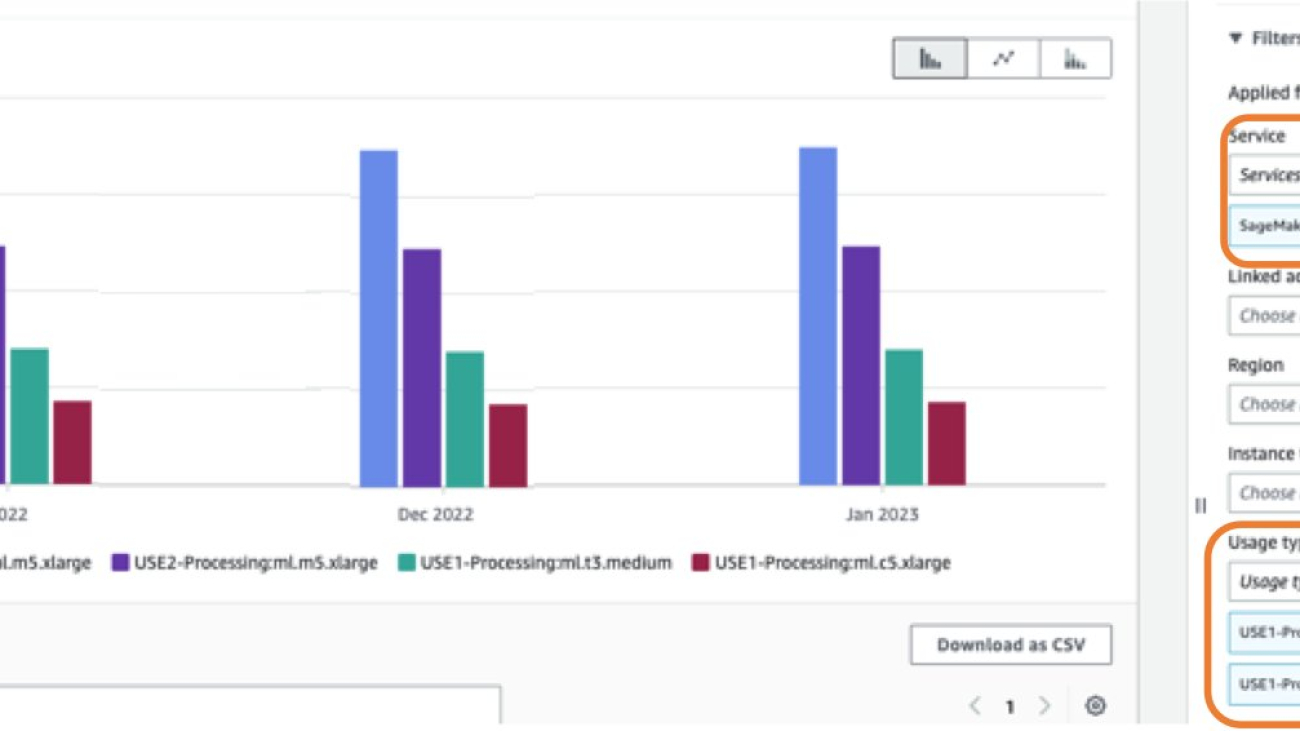
You can filter processing costs by applying a filter on the usage type. The names of these usage types are as follows:

  • REGION-Processing:instanceType (for example, USE1-Processing:ml.m5.large)
  • REGION-Processing:VolumeUsage.gp2 (for example, USE1-Processing:VolumeUsage.gp2)

To review your SageMaker Processing cost in Cost Explorer, start by filtering with SageMaker for Service, and for Usage type, you can select all processing instances running hours by entering the processing:ml prefix and selecting the list on the menu.

Avoid cost in processing and pipeline development

Before right-sizing and optimizing a SageMaker Processing job’s run duration, we check for high-level metrics about historic job runs. You can choose from two methods to do this.

First, you can access the Processing page on the SageMaker console.

Alternatively, you can use the list_processing_jobs API.

A Processing job status can be InProgress, Completed, Failed, Stopping, or Stopped.

A high number of failed jobs is common when developing new MLOps pipelines. However, you should always test and make every effort to validate jobs before launching them on SageMaker because there are charges for resources used. For that purpose, you can use SageMaker Processing in local mode. Local mode is a SageMaker SDK feature that allows you to create estimators, processors, and pipelines, and deploy them to your local development environment. This is a great way to test your scripts before running them in a SageMaker managed environment. Local mode is supported by SageMaker managed containers and the ones you supply yourself. To learn more about how to use local mode with Amazon SageMaker Pipelines, refer to Local Mode.

Optimize I/O-related cost

SageMaker Processing jobs offer access to three data sources as part of the managed processing input: Amazon Simple Storage Service (Amazon S3), Amazon Athena, and Amazon Redshift. For more information, refer to ProcessingS3Input, AthenaDatasetDefinition, and RedshiftDatasetDefinition, respectively.

Before looking into optimization, it’s important to note that although SageMaker Processing jobs support these data sources, they are not mandatory. In your processing code, you can implement any method for downloading the accessing data from any source (provided that the processing instance can access it).

To gain better insights into processing performance and detecting optimization opportunities, we recommend following logging best practices in your processing script. SageMaker publishes your processing logs to Amazon CloudWatch.

In the following example job log, we see that the script processing took 15 minutes (between Start custom script and End custom script).
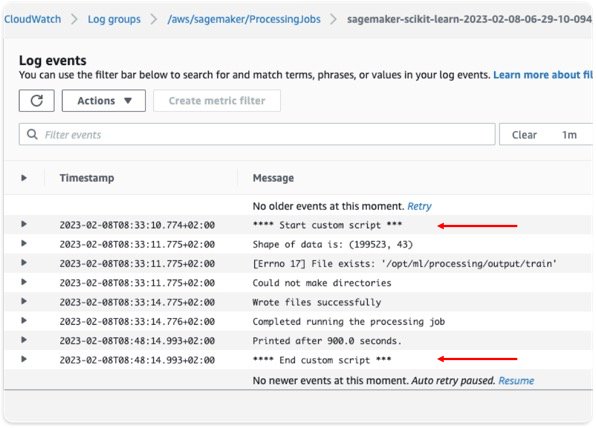
However, on the SageMaker console, we see that the job took 4 additional minutes (almost 25% of the job’s total runtime).
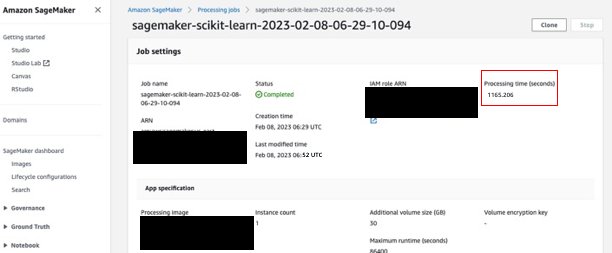
This is due to the fact that in addition to the time our processing script took, SageMaker-managed data downloading and uploading also took time (4 minutes). If this proves to be a big part of the cost, consider alternate ways to speed up downloading time, such as using the Boto3 API with multiprocessing to download files concurrently, or using third-party libraries as WebDataset or s5cmd for faster download from Amazon S3. For more information, refer to Parallelizing S3 Workloads with s5cmd. Note that such methods might introduce charges in Amazon S3 due to data transfer.

Processing jobs also support Pipe mode. With this method, SageMaker streams input data from the source directly to your processing container into named pipes without using the ML storage volume, thereby eliminating the data download time and a smaller disk volume. However, this requires a more complicated programming model than simply reading from files on a disk.

As mentioned earlier, SageMaker Processing also supports Athena and Amazon Redshift as data sources. When setting up a Processing job with these sources, SageMaker automatically copies the data to Amazon S3, and the processing instance fetches the data from the Amazon S3 location. However, when the job is finished, there is no managed cleanup process and the data copied will still remain in Amazon S3 and might incur unwanted storage charges. Therefore, when using Athena and Amazon Redshift data sources, make sure to implement a cleanup procedure, such as a Lambda function that runs on a schedule or in a Lambda Step as part of a SageMaker pipeline.

Like downloading, uploading processing artifacts can also be an opportunity for optimization. When a Processing job’s output is configured using the ProcessingS3Output parameter, you can specify which S3UploadMode to use. The S3UploadMode parameter default value is EndOfJob, which will get SageMaker to upload the results after the job completes. However, if your Processing job produces multiple files, you can set S3UploadMode to Continuous, thereby enabling the upload of artifacts simultaneously as processing continues, and decreasing the job runtime.

Right-size processing job instances

Choosing the right instance type and size is a major factor in optimizing the cost of SageMaker Processing jobs. You can right-size an instance by migrating to a different version within the same instance family or by migrating to another instance family. When migrating within the same instance family, you only need to consider CPU/GPU and memory. For more information and general guidance on choosing the right processing resources, refer to Ensure efficient compute resources on Amazon SageMaker.

To fine-tune instance selection, we start by analyzing Processing job metrics in CloudWatch. For more information, refer to Monitor Amazon SageMaker with Amazon CloudWatch.

CloudWatch collects raw data from SageMaker and processes it into readable, near-real-time metrics. Although these statistics are kept for 15 months, the CloudWatch console limits the search to metrics that were updated in the last 2 weeks (this ensures that only current jobs are shown). Processing jobs metrics can be found in the /aws/sagemaker/ProcessingJobs namespace and the metrics collected are CPUUtilization, MemoryUtilization, GPUUtilization, GPUMemoryUtilization, and DiskUtilization.

The following screenshot shows an example in CloudWatch of the Processing job we saw earlier.
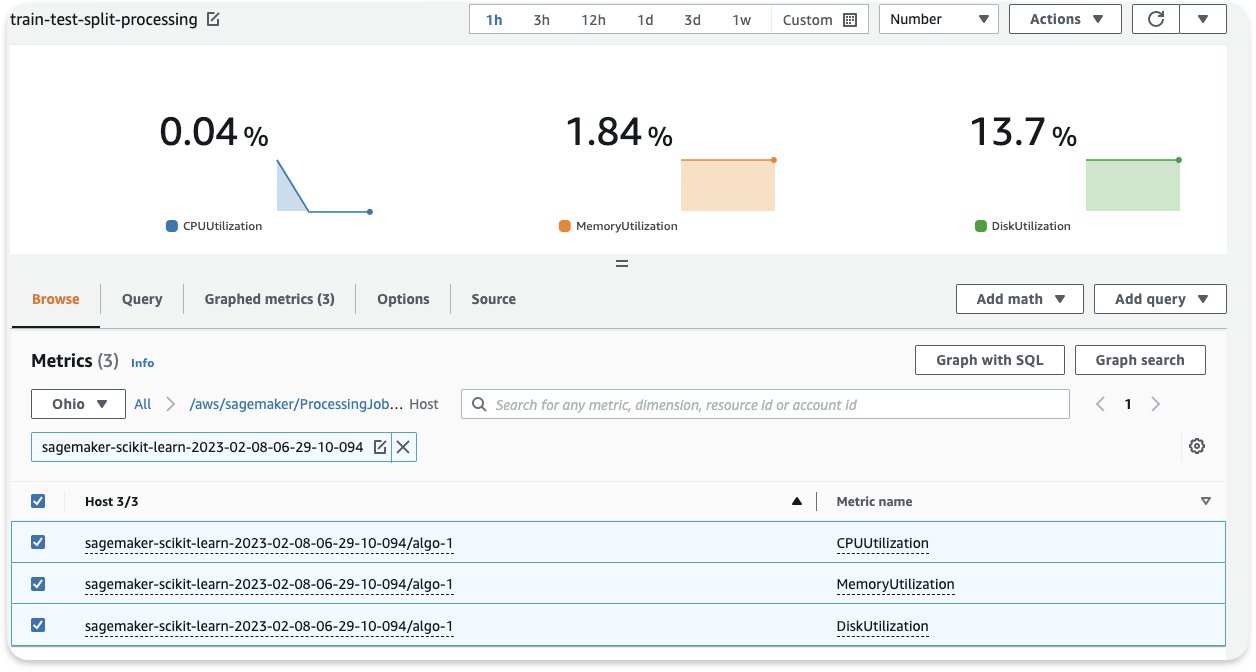
In this example, we see the averaged CPU and memory values (which is the default in CloudWatch): the average CPU usage is 0.04%, memory 1.84%, and disk usage 13.7%. In order to right-size, always consider the maximum CPU and memory usage (in this example, the maximum CPU utilization was 98% in the first 3 minutes). As a general rule, if your maximum CPU and memory usage is consistently less than 40%, you can safely cut the machine in half. For example, if you were using an ml.c5.4xlarge instance, you could move to an ml.c5.2xlarge, which could reduce your cost by 50%.

Data Wrangler jobs

Data Wrangler is a feature of Amazon SageMaker Studio that provides a repeatable and scalable solution for data exploration and processing. You use the Data Wrangler interface to interactively import, analyze, transform, and featurize your data. Those steps are captured in a recipe (a .flow file) that you can then use in a Data Wrangler job. This helps you reapply the same data transformations on your data and also scale to a distributed batch data processing job, either as part of an ML pipeline or independently.

For guidance on optimizing your Data Wrangler app in Studio, refer to Part 2 in this series.

In this section, we focus on optimizing Data Wrangler jobs.

Data Wrangler uses SageMaker Spark processing jobs with a Data Wrangler-managed container. This container runs the directions from the .flow file in the job. Like any processing jobs, Data Wrangler charges you for the instances you choose, based on the duration of use and provisioned storage that is attached to that instance.

In Cost Explorer, you can filter Data Wrangler jobs costs by applying a filter on the usage type. The names of these usage types are:

  • REGION-processing_DW:instanceType (for example, USE1-processing_DW:ml.m5.large)
  • REGION-processing_DW:VolumeUsage.gp2 (for example, USE1-processing_DW:VolumeUsage.gp2)

To view your Data Wrangler cost in Cost Explorer, filter the service to use SageMaker, and for Usage type, choose the processing_DW prefix and select the list on the menu. This will show you both instance usage (hours) and storage volume (GB) related costs. (If you want to see Studio Data Wrangler costs you can filter the usage type by the Studio_DW prefix.)

Right-size and schedule Data Wrangler job instances

At the moment, Data Wrangler supports only m5 instances with following instance sizes: ml.m5.4xlarge, ml.m5.12xlarge, and ml.m5.24xlarge. You can use the distributed job feature to fine-tune your job cost. For example, suppose you need to process a dataset that requires 350 GiB in RAM. The 4xlarge (128 GiB) and 12xlarge (256 GiB) might not be able to process and will lead you to use the m5.24xlarge instance (768 GiB). However, you could use two m5.12xlarge instances (2 * 256 GiB = 512 GiB) and reduce the cost by 40% or three m5.4xlarge instances (3 * 128 GiB = 384 GiB) and save 50% of the m5.24xlarge instance cost. You should note that these are estimates and that distributed processing might introduce some overhead that will affect the overall runtime.

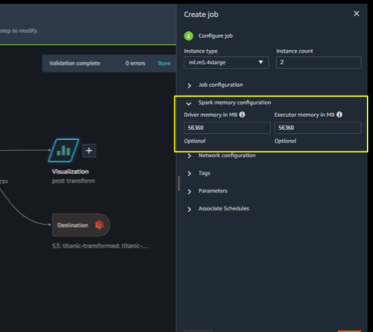
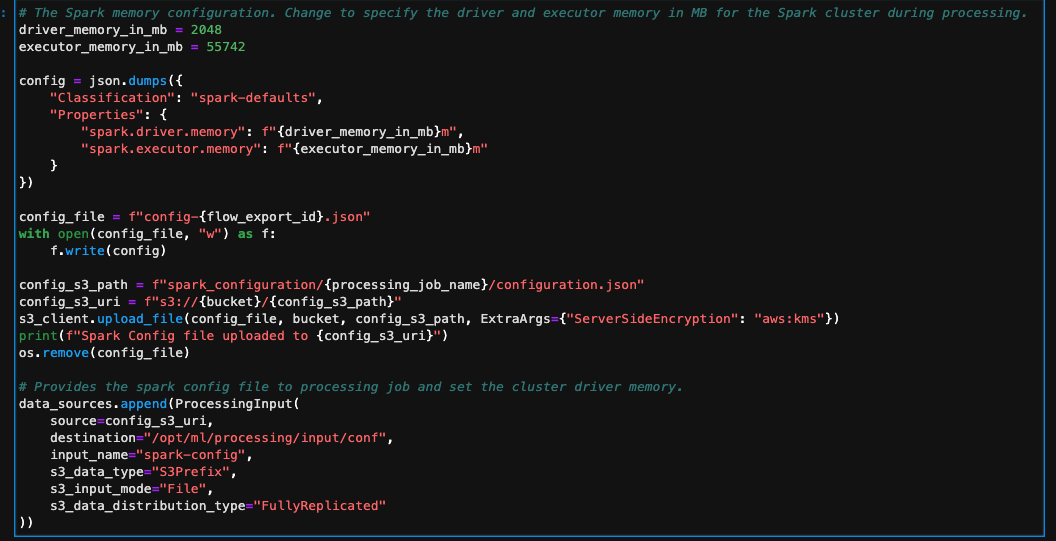
When changing the instance type, make sure you update the Spark config accordingly. For example, if you have an initial ml.m5.4xlarge instance job configured with properties spark.driver.memory set to 2048 and spark.executor.memory set to 55742, and later scale up to ml.m5.12xlarge, those configuration values need to be increased, otherwise they will be the bottleneck in the processing job. You can update these variables in the Data Wrangler GUI or in a configuration file appended to the config path (see the following examples).
Another compelling feature in Data Wrangler is the ability to set a scheduled job. If you’re processing data periodically, you can create a schedule to run the processing job automatically. For example, you can create a schedule that runs a processing job automatically when you get new data (for examples, see Export to Amazon S3 or Export to Amazon SageMaker Feature Store). However, you should note that when you create a schedule, Data Wrangler creates an eventRule in EventBridge. This means you also be charged for the event rules that you create (as well as the instances used to run the processing job). For more information, see Amazon EventBridge pricing.

Conclusion

In this post, we provided guidance on cost analysis and best practices when preprocessing

data using SageMaker Processing and Data Wrangler jobs. Similar to preprocessing, there are many options and configuration settings in building, training, and running ML models that may lead to unnecessary costs. Therefore, as machine learning establishes itself as a powerful tool across industries, ML workloads needs to remain cost-effective.

SageMaker offers a wide and deep feature set for facilitating each step in the ML pipeline.

This robustness also provides continuous cost optimization opportunities without compromising performance or agility.

Refer to the following posts in this series for more information about optimizing cost for SageMaker:


About the Authors

Deepali Rajale is a Senior AI/ML Specialist at AWS. She works with enterprise customers providing technical guidance with best practices for deploying and maintaining AI/ML solutions in the AWS ecosystem. She has worked with a wide range of organizations on various deep learning use cases involving NLP and computer vision. She is passionate about empowering organizations to leverage generative AI to enhance their use experience. In her spare time, she enjoys movies, music, and literature.

Uri Rosenberg is the AI & ML Specialist Technical Manager for Europe, Middle East, and Africa. Based out of Israel, Uri works to empower enterprise customers on all things ML to design, build, and operate at scale. In his spare time, he enjoys cycling, hiking, and watching sunsets (at minimum once a day).

Read More

Analyze Amazon SageMaker spend and determine cost optimization opportunities based on usage, Part 2: SageMaker notebooks and Studio

Analyze Amazon SageMaker spend and determine cost optimization opportunities based on usage, Part 2: SageMaker notebooks and Studio

In 2021, we launched AWS Support Proactive Services as part of the AWS Enterprise Support offering. Since its introduction, we have helped hundreds of customers optimize their workloads, set guardrails, and improve the visibility of their machine learning (ML) workloads’ cost and usage.

In this series of posts, we share lessons learned about optimizing costs in Amazon SageMaker. In Part 1, we showed how to get started using AWS Cost Explorer to identify cost optimization opportunities in SageMaker. In this post, we focus on various ways to analyze SageMaker usage and identify cost optimization opportunities for SageMaker notebook instances and Amazon SageMaker Studio.

Analyze Amazon SageMaker spend and determine cost optimization opportunities based on usage:

SageMaker notebook instances

A SageMaker notebook instance is a fully managed compute instance running the Jupyter Notebook app. SageMaker manages creating the instance and related resources. Notebooks contain everything needed to run or recreate an ML workflow. You can use Jupyter notebooks in your notebook instance to prepare and process data, write code to train models, deploy models to SageMaker Hosting, and test or validate your models. SageMaker notebook instances’ cost is based on the instance-hours consumed while the notebook instance is running, as well as the cost of GB-month of provisioned storage, as outlined in Amazon SageMaker Pricing.

In Cost Explorer, you can filter notebook costs by applying a filter on Usage type. The names of these usage types are structured as follows:

  • REGION-Notebk:instanceType (for example, USE1-Notebk:ml.g4dn.8xlarge)
  • REGION-Notebk:VolumeUsage.gp2 (for example, USE2-Notebk:VolumeUsage.gp2)

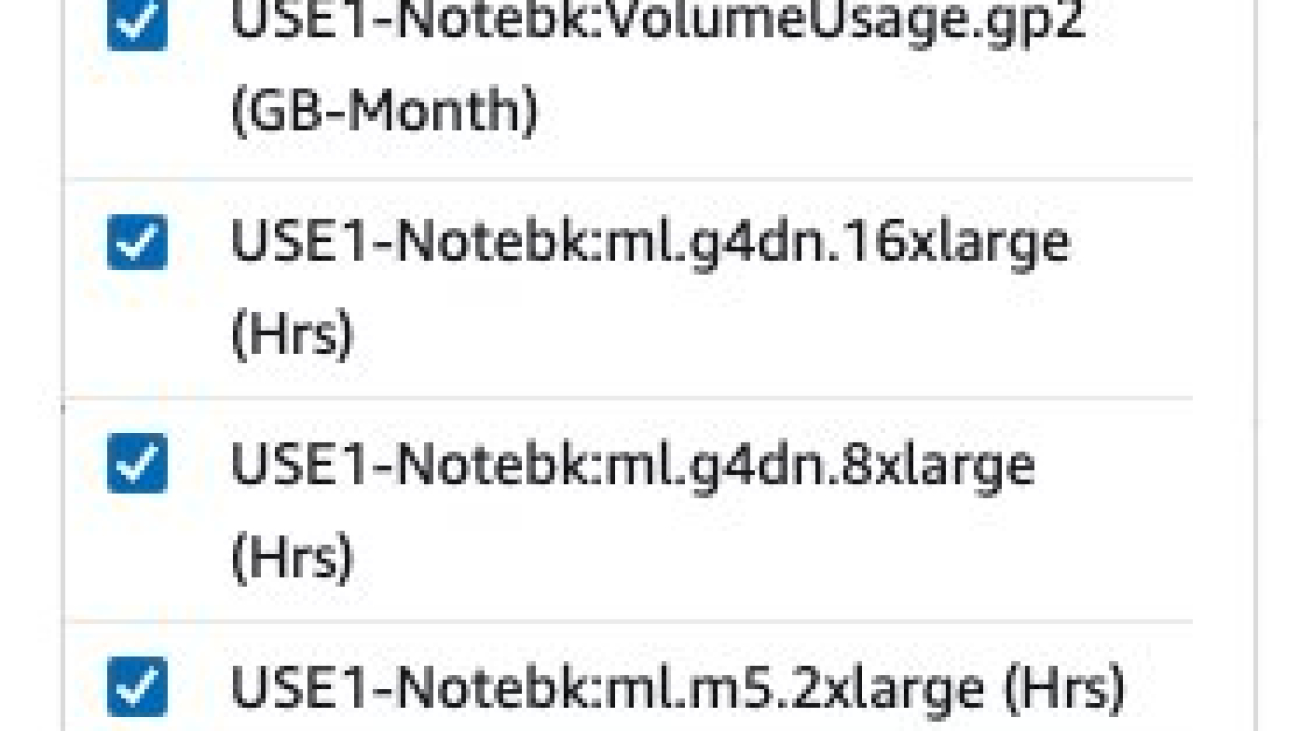
Filtering by the usage type Notebk: will show you a list of notebook usage types in an account. As shown in the following screenshot, you can select Select All and choose Apply to display the cost breakdown of your notebook usage.

To see the cost breakdown of the selected notebook usage type by the number of usage hours, you need to de-select all the REGION-Notebk:VolumeUsage.gp2 usage types from the preceding list and choose Apply to apply the filter. The following screenshot shows the cost and usage graphs for the selected notebook usage types.

You can also apply additional filters such as account number, Amazon Elastic Compute Cloud (Amazon EC2) instance type, cost allocation tag, Region, and more. Changing the granularity to Daily gives you daily cost and usage charts based on the selected usage types and dimension, as shown in the following screenshot.

In the preceding example, the notebook instance of type ml.t2.medium in the USE2 Region is reporting a daily usage of 24 hours between the period of July 2 and September 26. Similarly, the notebook instance of type ml.t3.medium in the USE1 Region is reporting a daily usage of 24 hours between August 3 and September 26, and a daily usage of 48 hours between September 26 and December 31. Daily usage of 24 hours or more for multiple consecutive days could indicate that a notebook instance has been left running for multiple days but is not in active use. This type of pattern could benefit from applying cost control guardrails such as manual or auto-shutdown of notebook instances to prevent idle runtime.

Although Cost Explorer helps you understand cost and usage data at the granularity of the instance type, you can use AWS Cost and Usage Reports (AWS CUR) to get data at the granularity of a resource such as notebook ARN. You can build custom queries to look up AWS CUR data using standard SQL. You can also include cost-allocation tags in your query for an additional level of granularity. The following query returns notebook resource usage for the last 3 months from your AWS CUR data:

SELECT
      bill_payer_account_id,
      line_item_usage_account_id,
      line_item_resource_id AS notebook_arn,
      line_item_usage_type,
      DATE_FORMAT((line_item_usage_start_date),'%Y-%m-%d') AS day_line_item_usage_start_date,
      SUM(CAST(line_item_usage_amount AS DOUBLE)) AS sum_line_item_usage_amount,
      line_item_unblended_rate,
      SUM(CAST(line_item_unblended_cost AS DECIMAL(16,8))) AS sum_line_item_unblended_cost,
      line_item_blended_rate,
      SUM(CAST(line_item_blended_cost AS DECIMAL(16,8))) AS sum_line_item_blended_cost,
      line_item_line_item_description,
      line_item_line_item_type
    FROM 
      {$table_name}
    WHERE
      line_item_usage_start_date >= date_trunc('month',current_date - interval '3' month)
      AND line_item_product_code = 'AmazonSageMaker'
      AND line_item_line_item_type  IN ('DiscountedUsage', 'Usage', 'SavingsPlanCoveredUsage')
      AND line_item_usage_type like '%Notebk%'
        AND line_item_operation = 'RunInstance'
        AND bill_payer_account_id = 'xxxxxxxxxxxx'
    GROUP BY
      bill_payer_account_id, 
      line_item_usage_account_id,
      line_item_resource_id,
      line_item_usage_type,
      line_item_unblended_rate,
      line_item_blended_rate,
      line_item_line_item_type,
      DATE_FORMAT((line_item_usage_start_date),'%Y-%m-%d'),
      line_item_line_item_description
      ORDER BY 
      line_item_resource_id, day_line_item_usage_start_date

The following screenshot shows the results obtained from running the AWS CUR query using Amazon Athena. For more information about using Athena, refer to Querying Cost and Usage Reports using Amazon Athena.

The result of the query shows that notebook dev-notebook running on an ml.t2.medium instance is reporting 24 hours of usage for multiple consecutive days. The instance rate is $0.0464/hour and the daily cost for running for 24 hours is $1.1136.

AWS CUR query results can help you identify patterns of notebooks running for consecutive days, which can be analyzed for cost optimization. More information and example queries can be found in the AWS CUR Query Library.

You can also feed AWS CUR data into Amazon QuickSight, where you can slice and dice it any way you’d like for reporting or visualization purposes. For instructions on ingesting AWS CUR data into QuickSight, see How do I ingest and visualize the AWS Cost and Usage Report (CUR) into Amazon QuickSight.

Optimize notebook instance cost

SageMaker notebooks are suitable for ML model development, which includes interactive data exploration, script writing, prototyping of feature engineering, and modeling. Each of these tasks may have varying computing resource requirements. Estimating the right type of computing resources to serve various workloads is challenging, and may lead to over-provisioning of resources, resulting in increased cost.

For ML model development, the size of a SageMaker notebook instance depends on the amount of data you need to load in-memory for meaningful exploratory data analyses (EDA) and the amount of computation required. We recommend starting small with general-purpose instances (such as T or M families) and scaling up as needed. For example, ml.t2.medium is sufficient for most basic data processing, feature engineering, and EDA that deals with small datasets that can be held within 4 GB memory. If your model development involves heavy computational work (such as image processing), you can stop your smaller notebook instance and change the instance type to the desired larger instance, such as ml.c5.xlarge. You can switch back to the smaller instance when you no longer need a larger instance. This will help keep the compute costs down.

Consider the following best practices to help reduce the cost of your notebook instances.

CPU vs. GPU

Considering CPU vs. GPU notebook instances is important for instance right-sizing. CPUs are best at handling single, more complex calculations sequentially, whereas GPUs are better at handling multiple but simple calculations in parallel. For many use cases, a standard current generation instance type from an instance family such as M provides enough computing power, memory, and network performance for notebooks to perform well.

GPUs provide a great price/performance ratio if you take advantage of them effectively. For example, if you are training your deep learning model on a SageMaker notebook and your neural network is relatively big, performing a large number of calculations involving hundreds of thousands of parameters, then your model can take advantage of the accelerated compute and hardware parallelism offered by GPU instances such as P instance families. However, it’s recommended to use GPU instances only when you really need them because they’re expensive and GPU communication overhead might even degrade performance if your notebook doesn’t need them. We recommend using notebooks with instances that are smaller in compute for interactive building and leaving the heavy lifting to ephemeral training, tuning, and processing jobs with larger instances, including GPU-enabled instances. This way, you don’t keep a large instance (or a GPU) constantly running with your notebook. If you need accelerated computing in your notebook environment, you can stop your m* family notebook instance, switch to a GPU-enabled P* family instance, and start it again. Don’t forget to switch it back when you no longer need that extra boost in your development environment.

Restrict user access to specific instance types

Administrators can restrict users from creating notebooks that are too large through AWS Identity and Access Management (IAM) policies. For example, the following sample policy only allows users to create smaller t3 SageMaker notebook instances:

{
    "Action": [
        "sagemaker:CreateNotebookInstances"
    ],
    "Resource": [
        "*"
    ],
    "Effect": "Deny",
    "Sid": "BlockLargeNotebookInstances",
    "Condition": {
        "ForAnyValue:StringNotLike": {
            "sagemaker:InstanceTypes": [
                "ml.t3.medium",
                "ml.t3.large"
            ]
        }
    }
}

Administrators can also use AWS Service Catalog to allow for self-service of SageMaker notebooks. This allows you to restrict the instance types that are available to users when creating a notebook. For more information, see Enable self-service, secured data science using Amazon SageMaker notebooks and AWS Service Catalog and Launch Amazon SageMaker Studio using AWS Service Catalog and AWS SSO in AWS Control Tower Environment.

Stop idle notebook instances

To keep your costs down, we recommend stopping your notebook instances when you don’t need them and starting them when you do need them. Consider auto-detecting idle notebook instances and managing their lifecycle using a lifecycle configuration script. For example, auto-stop-idle is a sample shell script that stops a SageMaker notebook when it’s idle for more than 1 hour.

AWS maintains a public repository of notebook lifecycle configuration scripts that address common use cases for customizing notebook instances, including a sample bash script for stopping idle notebooks.

Schedule automatic start and stop of notebook instances

Another approach to save on notebooks cost is to automatically start and stop your notebooks at specific times. You can accomplish this by using Amazon EventBridge rules and AWS Lambda functions. For more information about configuring your Lambda functions, see Configuring Lambda function options. After you have created the functions, you can create rules to trigger these functions on a specific schedule, for example, start the notebooks every weekday at 7:00 AM. See Creating an Amazon EventBridge rule that runs on a schedule for instructions. For the scripts to start and stop notebooks with a Lambda function, refer to Ensure efficient compute resources on Amazon SageMaker.

SageMaker Studio

Studio provides a fully managed solution for data scientists to interactively build, train, and deploy ML models. Studio notebooks are one-click collaborative Jupyter notebooks that can be spun up quickly because you don’t need to set up compute instances and file storage beforehand. You are charged for the compute instance type you choose to run your notebooks on, based on the duration of use. There is no additional charge for using Studio. The costs incurred for running Studio notebooks, interactive shells, consoles, and terminals are based on ML compute instance usage.

When launched, the resource is run on an ML compute instance of the chosen instance type. If an instance of that type was previously launched and is available, the resource is run on that instance. For CPU-based images, the default suggested instance type is ml.t3.medium. For GPU-based images, the default suggested instance type is ml.g4dn.xlarge. Billing occurs per instance and starts when the first instance of a given instance type is launched.

If you want to create or open a notebook without the risk of incurring charges, open the notebook from the File menu and choose No Kernel from the Select Kernel dialog. You can read and edit a notebook without a running kernel, but you can’t run cells. You are billed separately for each instance. Billing ends when all the KernelGateway apps on the instance are shut down, or the instance is shut down. For information about billing along with pricing examples, see Amazon SageMaker Pricing.

In Cost Explorer, you can filter Studio notebook costs by applying a filter on Usage type. The name of this usage types is structured as: REGION-studio:KernelGateway-instanceType (for example, USE1-Studio:KernelGateway-ml.m5.large)

Filtering by the usage type studio: in Cost Explorer will show you the list of Studio usage types in an account. You can select the necessary usage types, or select Select All and choose Apply to display the cost breakdown of Studio app usage. The following screenshot shows the selection all the studio usage types for cost analysis.

You can also apply additional filters such as Region, linked account, or instance type for more granular cost analysis. Changing the granularity to Daily gives you daily cost and usage charts based selected usage types and dimension, as shown in the following screenshot.

In the preceding example, the Studio KernelGateway instance of type ml.t3.medium in the USE1 Region is reporting a daily usage of 48 hours between the period of January 1 and January 24, followed by a daily usage of 24 hours until February 11. Similarly, Studio KernelGateway instance of type ml.m5.large in USE1 Region is reporting 24 hours of daily usage of between January 1 and January 23. A daily usage of 24 hours or more for multiple consecutive days indicates a possibility of Studio notebook instances running continuously for multiple days. This type of pattern could benefit from applying cost control guardrails such as manual or automatic shutdown of Studio apps when not in use.

As mentioned earlier, you can use AWS CUR to get data at the granularity of a resource and build custom queries to look up AWS CUR data using standard SQL. You can also include cost-allocation tags in your query for an additional level of granularity. The following query returns Studio KernelGateway resource usage for the last 3 months from your AWS CUR data:

SELECT
      bill_payer_account_id,
      line_item_usage_account_id,
      line_item_resource_id AS studio_notebook_arn,
      line_item_usage_type,
      DATE_FORMAT((line_item_usage_start_date),'%Y-%m-%d') AS day_line_item_usage_start_date,
      SUM(CAST(line_item_usage_amount AS DOUBLE)) AS sum_line_item_usage_amount,
      line_item_unblended_rate,
      SUM(CAST(line_item_unblended_cost AS DECIMAL(16,8))) AS sum_line_item_unblended_cost,
      line_item_blended_rate,
      SUM(CAST(line_item_blended_cost AS DECIMAL(16,8))) AS sum_line_item_blended_cost,
      line_item_line_item_description,
      line_item_line_item_type
    FROM 
      customer_all
    WHERE
      line_item_usage_start_date >= date_trunc('month',current_date - interval '3' month)
      AND line_item_product_code = 'AmazonSageMaker'
      AND line_item_line_item_type  IN ('DiscountedUsage', 'Usage', 'SavingsPlanCoveredUsage')
      AND line_item_usage_type like '%Studio:KernelGateway%'
        AND line_item_operation = 'RunInstance'
        AND bill_payer_account_id = 'xxxxxxxxxxxx'
    GROUP BY
      bill_payer_account_id, 
      line_item_usage_account_id,
      line_item_resource_id,
      line_item_usage_type,
      line_item_unblended_rate,
      line_item_blended_rate,
      line_item_line_item_type,
      DATE_FORMAT((line_item_usage_start_date),'%Y-%m-%d'),
      line_item_line_item_description
      ORDER BY 
      line_item_resource_id, day_line_item_usage_start_date

The following screenshot shows the results obtained from running the AWS CUR query using Athena.

The result of the query shows that the Studio KernelGateway app named datascience-1-0-ml-t3-medium-1abf3407f667f989be9d86559395 running in account 111111111111, Studio domain d-domain1234, and user profile user1 on an ml.t3.medium instance is reporting 24 hours of usage for multiple consecutive days. The instance rate is $0.05/hour and the daily cost for running for 24 hours is $1.20.

AWS CUR query results can help you identify patterns of resources running for consecutive days at a granular level of hourly or daily usage, which can be analyzed for cost optimization. As with SageMaker notebooks, you can also feed AWS CUR data into QuickSight for reporting or visualization purposes.

SageMaker Data Wrangler

Amazon SageMaker Data Wrangler is a feature of Studio that helps you simplify the process of data preparation and feature engineering from a low-code visual interface. The usage type name for a Studio Data Wrangler app is structured as REGION-Studio_DW:KernelGateway-instanceType (for example, USE1-Studio_DW:KernelGateway-ml.m5.4xlarge).

Filtering by the usage type studio_DW: in Cost Explorer will show you the list of Studio Data Wrangler usage types in an account. You can select the necessary usage types, or select Select All and choose Apply to display the cost breakdown of Studio Data Wrangler app usage. The following screenshot shows the selection all the studio_DW usage types for cost analysis.

As noted earlier, you can also apply additional filters for more granular cost analysis. For example, the following screenshot shows 24 hours of daily usage of the Studio Data Wrangler instance type ml.m5.4xlarge in the USE1 Region for multiple days and its associated cost. Insights like this can be used to apply cost control measures such as shutting down Studio apps when not in use.

You can obtain resource-level information from AWS CUR, and build custom queries to look up AWS CUR data using standard SQL. The following query returns Studio Data Wrangler app resource usage and associated cost for the last 3 months from your AWS CUR data:

SELECT
      bill_payer_account_id,
      line_item_usage_account_id,
      line_item_resource_id AS studio_notebook_arn,
      line_item_usage_type,
      DATE_FORMAT((line_item_usage_start_date),'%Y-%m-%d') AS day_line_item_usage_start_date,
      SUM(CAST(line_item_usage_amount AS DOUBLE)) AS sum_line_item_usage_amount,
      line_item_unblended_rate,
      SUM(CAST(line_item_unblended_cost AS DECIMAL(16,8))) AS sum_line_item_unblended_cost,
      line_item_blended_rate,
      SUM(CAST(line_item_blended_cost AS DECIMAL(16,8))) AS sum_line_item_blended_cost,
      line_item_line_item_description,
      line_item_line_item_type
    FROM 
      {$table_name}
    WHERE
      line_item_usage_start_date >= date_trunc('month',current_date - interval '3' month)
      AND line_item_product_code = 'AmazonSageMaker'
      AND line_item_line_item_type  IN ('DiscountedUsage', 'Usage', 'SavingsPlanCoveredUsage')
      AND line_item_usage_type like '%Studio_DW:KernelGateway%'
        AND line_item_operation = 'RunInstance'
        AND bill_payer_account_id = 'xxxxxxxxxxxx'
    GROUP BY
      bill_payer_account_id, 
      line_item_usage_account_id,
      line_item_resource_id,
      line_item_usage_type,
      line_item_unblended_rate,
      line_item_blended_rate,
      line_item_line_item_type,
      DATE_FORMAT((line_item_usage_start_date),'%Y-%m-%d'),
      line_item_line_item_description
      ORDER BY 
      line_item_resource_id, day_line_item_usage_start_date

The following screenshot shows the results obtained from running the AWS CUR query using Athena.

The result of the query shows that the Studio Data Wrangler app named sagemaker-data-wrang-ml-m5-4xlarge-b741c1a025d542c78bb538373f2d running in account 111111111111, Studio domain d-domain1234, and user profile user1 on an ml.m5.4xlarge instance is reporting 24 hours of usage for multiple consecutive days. The instance rate is $0.922/hour and the daily cost for running for 24 hours is $22.128.

Optimize Studio cost

Studio notebooks are charged for the instance type you choose, based on the duration of use. You must shut down the instance to stop incurring charges. If you shut down the notebook running on the instance but don’t shut down the instance, you will still incur charges. When you shut down the Studio notebook instances, any additional resources, such as SageMaker endpoints, Amazon EMR clusters, and Amazon Simple Storage Service (Amazon S3) buckets created from Studio are not deleted. Delete those resources if they are no longer needed to stop accrual of charges. For more details about shutting down Studio resources, refer to Shut Down Resources. If you’re using Data Wrangler, it’s important to shut it down after your work is done to save cost. For details, refer to Shut Down Data Wrangler.

Consider the following best practices to help reduce the cost of your Studio notebooks.

Automatically stop idle Studio notebook instances

You can automatically stop idle Studio notebook resources with lifecycle configurations in Studio. You can also install and use a JupyterLab extension available on GitHub as a Studio lifecycle configuration. For detailed instructions on the Studio architecture and adding the extension, see Save costs by automatically shutting down idle resources within Amazon SageMaker Studio.

Resize on the fly

The benefit of Studio notebooks over notebook instances is that with Studio, the underlying compute resources are fully elastic and you can change the instance on the fly. This allows you to scale the compute up and down as your compute demand changes, for example from ml.t3.medium to ml.m5.4xlarge, without interrupting your work or managing infrastructure. Moving from one instance to another is seamless, and you can continue working while the instance launches. With on-demand notebook instances, you need to stop the instance, update the setting, and restart with the new instance type. For more information, see Learn how to select ML instances on the fly in Amazon SageMaker Studio.

Restrict user access to specific instance types

Administrators can use IAM condition keys as an effective way to restrict certain instance types, such as GPU instances, for specific users, thereby controlling costs. For example, in the following sample policy, access is denied for all instances except ml.t3.medium and ml.g4dn.xlarge. Note that you need to allow the system instance for the default Jupyter Server apps.

{
    "Action": [
        "sagemaker:CreateApp"
    ],
    "Resource": [
        "*"
    ],
    "Effect": "Deny",
    "Sid": "BlockSagemakerLargeInstances",
    "Condition": {
        "ForAnyValue:StringNotLike": {
            "sagemaker:InstanceTypes": [
                "ml.t3.medium",
                "ml.g4dn.xlarge",
                "system"
            ]
        }
    }
}

For comprehensive guidance on best practices to optimize Studio cost, refer to Ensure efficient compute resources on Amazon SageMaker.

Use tags to keep track of Studio cost

In Studio, you can assign custom tags to your Studio domain as well as users who are provisioned access to the domain. Studio will automatically copy and assign these tags to the Studio notebooks created by the users, so you can easily track and categorize the cost of Studio notebooks and create cost chargeback models for your organization.

By default, SageMaker automatically tags new SageMaker resources such as training jobs, processing jobs, experiments, pipelines, and model registry entries with their respective sagemaker:domain-arn. SageMaker also tags the resource with the sagemaker:user-profile-arn or sagemaker:space-arn to designate the resource creation at an even more granular level.

Administrators can use automated tagging to easily monitor costs associated with their line of business, teams, individual users, or individual business problems by using tools such as AWS Budgets and Cost Explorer. For example, you can attach a cost allocation tag for the sagemaker:domain-arn tag.

This allows you to utilize Cost Explorer to visualize the Studio notebook spend for a given domain.

Consider storage costs

When the first member of your team onboards to Studio, SageMaker creates an Amazon Elastic File System (Amazon EFS) volume for the team. When this member, or any member of the team, opens Studio, a home directory is created in the volume for the member. A storage charge is incurred for this directory. Subsequently, additional storage charges are incurred for the notebooks and data files stored in the member’s home directory. For more information, see Amazon EFS Pricing.

Conclusion

In this post, we provided guidance on cost analysis and best practices when building ML models using notebook instances and Studio. As machine learning establishes itself as a powerful tool across industries, training and running ML models needs to remain cost-effective. SageMaker offers a wide and deep feature set for facilitating each step in the ML pipeline and provides cost optimization opportunities without impacting performance or agility.

Refer to the following posts in this series for more information about optimizing cost for SageMaker:


About the Authors

Deepali Rajale is a Senior AI/ML Specialist at AWS. She works with enterprise customers providing technical guidance with best practices for deploying and maintaining AI/ML solutions in the AWS ecosystem. She has worked with a wide range of organizations on various deep learning use cases involving NLP and computer vision. She is passionate about empowering organizations to leverage generative AI to enhance their use experience. In her spare time, she enjoys movies, music, and literature.

Uri Rosenberg is the AI & ML Specialist Technical Manager for Europe, Middle East, and Africa. Based out of Israel, Uri works to empower enterprise customers on all things ML to design, build, and operate at scale. In his spare time, he enjoys cycling, hiking, breakfast, lunch and dinner.

Read More

Analyze Amazon SageMaker spend and determine cost optimization opportunities based on usage, Part 1

Analyze Amazon SageMaker spend and determine cost optimization opportunities based on usage, Part 1

Cost optimization is one of the pillars of the AWS Well-Architected Framework, and it’s a continual process of refinement and improvement over the span of a workload’s lifecycle. It enables building and operating cost-aware systems that minimize costs, maximize return on investment, and achieve business outcomes.

Amazon SageMaker is a fully managed machine learning (ML) service that offers a variety of cost optimization options and capabilities like managed spot training, multi-model endpoints, AWS Inferentia, ML Savings Plans, and many others that help reduce the total cost of ownership (TCO) of ML workloads compared to other cloud-based options, such as self-managed Amazon Elastic Compute Cloud (Amazon EC2) and AWS-managed Amazon Elastic Kubernetes Service (Amazon EKS).

AWS is dedicated to helping you achieve the highest savings by offering extensive service and pricing options. We provide tools for flexible cost management and improved visibility of detailed cost and usage of your workloads.

In 2021, we launched AWS Support Proactive Services as part of the AWS Enterprise Support plan. Since its introduction, we’ve helped hundreds of customers optimize their workloads, set guardrails, and improve the visibility of their ML workloads’ cost and usage.

In this post, we share lessons learned and walk you through the various ways to analyze your SageMaker usage and identify opportunities for cost optimization.

Analyze Amazon SageMaker spend and determine cost optimization opportunities based on usage:

Analyze SageMaker cost using AWS Cost Explorer

AWS Cost Explorer provides preconfigured views that display information about your cost trends and give you a head start on understanding your cost history and trends. It allows you to filter and group by values such as AWS service, usage type, cost allocation tags, EC2 instance type, and more. If you use consolidated billing, you can also filter by linked account. In addition, you can set time intervals and granularity, as well as forecast future costs based on your historical cost and usage data.

Let’s start by using Cost Explorer to identify cost optimization opportunities in SageMaker.

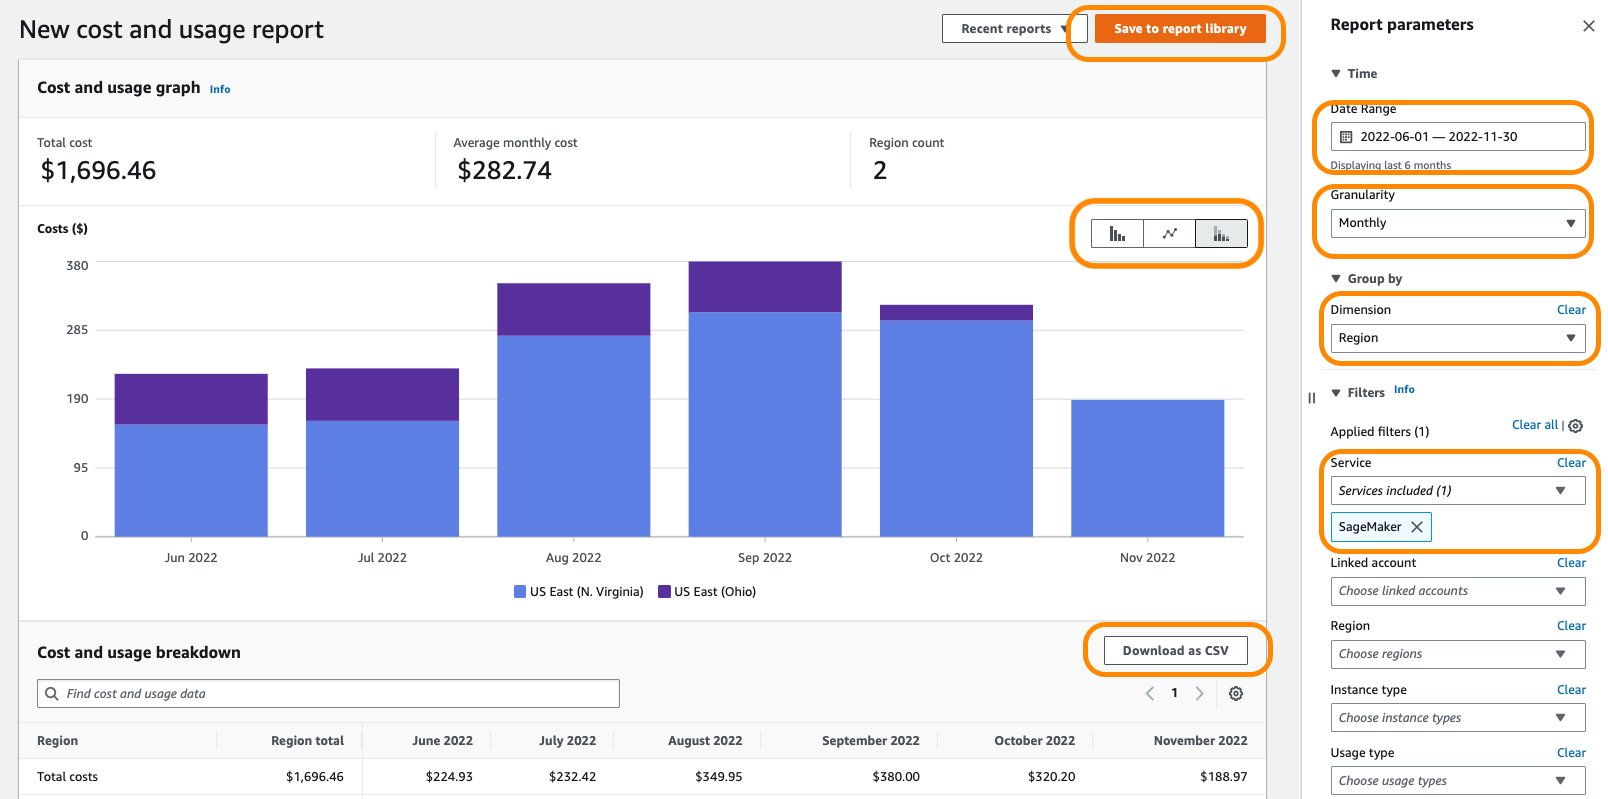
  1. On the Cost Explorer console, choose SageMaker for Service and choose Apply filters.
  2. You can set the desired time interval and granularity, as well as the Group by parameter.
  3. You can display the chart data in bar, line, or stack plot format.
  4. After you have achieved your desired results with filters and groupings, you can either download your results by choosing Download as CSV or save the report by choosing Save to report library.

The following screenshot shows SageMaker costs per month for the selected date range, grouped by Region.

For general guidance on using Cost Explorer, refer to AWS Cost Explorer’s New Look and Common Use Cases.

Optionally, you can enable AWS Cost and Usage Reports (AWS CUR) to gain insights into the cost and usage data for your accounts. The report contains hourly AWS consumption details. It is stored in Amazon Simple Storage Service (Amazon S3) in the payer account, which consolidates data for all the linked accounts. You can query the report to analyze trends in your usage and take appropriate action to optimize cost. Amazon Athena is a serverless query service you can use to analyze the data from your report in Amazon S3 using standard SQL. For more information and example queries, refer to the AWS CUR Query Library.

The following code is an example of an AWS CUR query to obtain SageMaker costs for the last 3 months of usage:

SELECT *
FROM {$table_name}
WHERE 
    line_item_usage_start_date >= date_trunc('month',current_date - interval '3' month)
    AND line_item_product_code = 'AmazonSageMaker'
    AND line_item_line_item_type  IN ('DiscountedUsage', 'Usage', 'SavingsPlanCoveredUsage')

You can also feed AWS CUR data into Amazon QuickSight, where you can slice and dice it any way you’d like for reporting or visualization purposes. For instructions on ingesting CUR data into QuickSight, see How do I ingest and visualize the AWS Cost and Usage Report (CUR) into Amazon QuickSight.

Analyze cost for SageMaker usage types

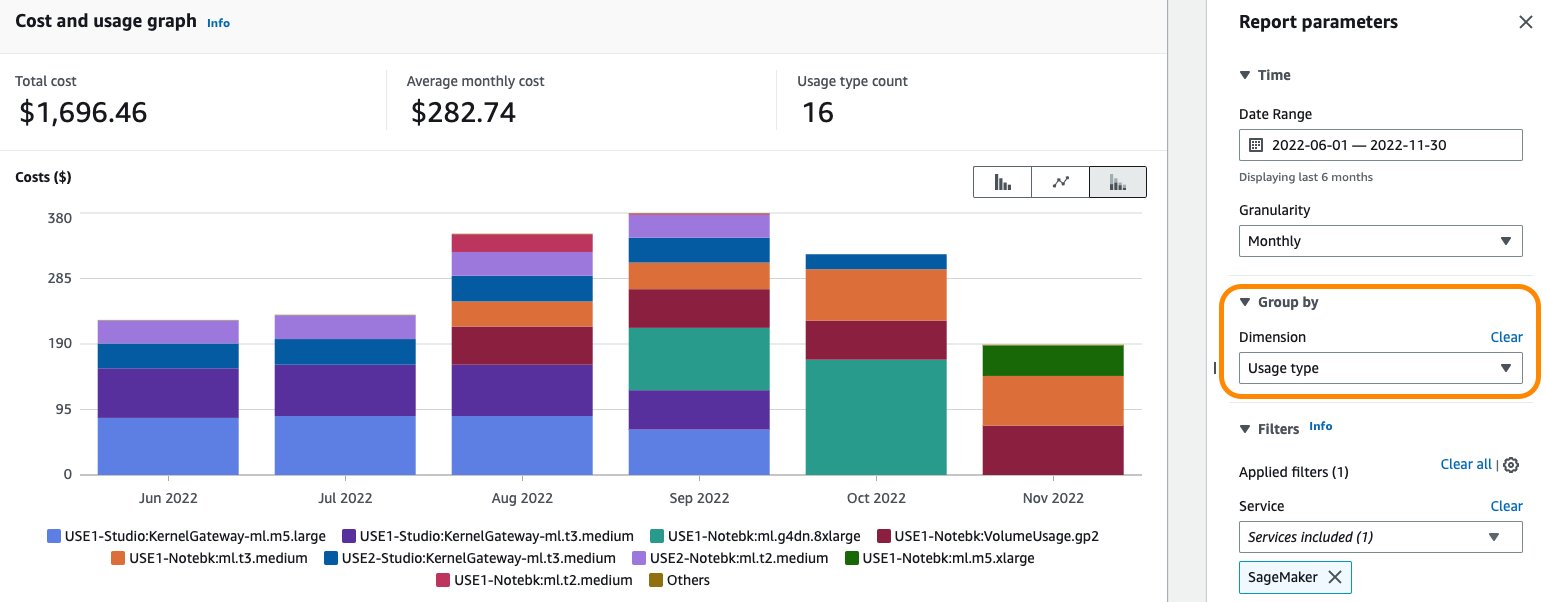
Your monthly SageMaker cost comes from different SageMaker usage types such as notebook instances, hosting, training, and processing, among others. Selecting the SageMaker service filter and grouping by the Usage type dimension in Cost Explorer gives you a general idea of cost distribution based on SageMaker usage type. The usage type is displayed in the format

REGION-UsageType:instanceType (for example, USE1-Notebk:ml.g4dn.8xlarge)

The following screenshot shows cost distribution grouped by SageMaker usage types when an account has reported usage on notebooks and Amazon SageMaker Studio KernelGateway apps.

General best practices for optimizing SageMaker cost

In this section, we share general recommendations to save on costs while using SageMaker.

Tagging

A tag is a label that you assign to an AWS resource. You can use tags to organize your resources by users, departments, or cost centers, and track your costs on a detailed level. Cost allocation tags can be used for categorizing costs in Cost Explorer or Cost and Usage Reports. For tips and best practices regarding cost allocation for your SageMaker environment and workloads, refer to Set up enterprise-level cost allocation for ML environments and workloads using resource tagging in Amazon SageMaker

AWS Budgets

AWS Budgets gives you visibility into your ML cost on AWS and helps you track your SageMaker cost, including development, training, and hosting. It lets you set custom budgets to track your cost and usage from the simplest to the most complex use cases. AWS Budgets also supports email or Amazon Simple Notification Service (Amazon SNS) notification when actual or forecasted cost and usage exceeds your budget threshold, or when your actual Savings Plans’ utilization or coverage drops below your desired threshold.

AWS Budgets is also integrated with Cost Explorer, so you can easily view and analyze your cost and usage drivers, AWS Chatbot, so you can receive AWS Budget alerts in your designated Slack channel or Amazon Chime room, and AWS Service Catalog, so you can track cost on your approved AWS portfolios and products. You can also set alerts and get a notification when your cost or usage exceeds (or is forecasted to exceed) your budgeted amount. After you create your budget, you can track the progress on the AWS Budgets console. For more information, see Managing your costs with AWS Budgets.

AWS Billing console

The AWS Billing console allows you to easily understand your AWS spending, view and pay invoices, manage billing preferences and tax settings, and access additional cloud financial management services. You can quickly evaluate whether your monthly spend is in line with prior periods, forecast, or budget, and investigate and take corrective actions in a timely manner. You can use the dashboard page of the AWS Billing console to gain a general view of your AWS spending. You can also use it to identify your highest cost service or Region and view trends in your spending over the past few months as well as to see various breakdowns of your AWS usage.

The AWS summary section of the page gives an overview of your AWS costs across all accounts, Regions, service providers, and services, and other KPIs. It also provides a comparison to your total forecasted costs for the current month. The Highest cost section shows your top service, account, or Region by estimated month-to-date (MTD) spend. The Cost trend by top five services section shows the cost trend for your top five services for the most recent three to six closed billing periods.

Planning and forecasting

Forecasting is an essential part of staying on top of your cloud costs and usage, and becomes even more important as your business scales.

AWS has multiple options to help you forecast your costs. The forecasting feature of Cost Explorer gives you the ability to create custom usage forecasts to gain a line of sight into your expected future costs. The built-in ML-powered forecasting of QuickSight allows you to forecast your key business metrics with point-and-click simplicity. It offers a straightforward way to use ML to make predictions on any time series data with minimal setup time and no ML experience required.

You can also use Amazon Forecast, a fully managed service that uses ML to deliver highly accurate forecasts, to generate forecasts for specific AWS services with data collected from AWS CUR. For more information, see Forecasting AWS spend using the AWS Cost and Usage Reports, AWS Glue DataBrew, and Amazon Forecast.

For additional information about cost forecasting options, see Using the right tools for your cloud cost forecasting.

Instance right-sizing

You can optimize SageMaker cost and only pay for what you really need by selecting the right resources. You should right-size the SageMaker compute instances before purchasing a Savings Plan in order to provide a proper commitment and obtain maximum cost savings. SageMaker currently offers ML compute instances on the various instance families. Machine learning is an iterative process with varying compute requirements for different stages of the ML lifecycle, from data preprocessing to model training and model hosting. Identifying the right type of compute instance is challenging, and may lead to over-provisioning of resources and therefore increased cost. The modular architecture of SageMaker allows you to optimize the scalability, performance, and pricing of your ML workloads based on the stage of the ML lifecycle. For more details, refer to the Right-sizing compute resources for Amazon SageMaker notebooks, processing jobs, training, and deployment section of the post Ensure efficient compute resources on Amazon SageMaker.

Amazon SageMaker Savings Plans

Amazon SageMaker Savings Plans is a flexible pricing model for SageMaker. It offers discounted rates in exchange for a commitment to a consistent amount of usage (measured in $/hour) for a 1-year or 3-year term. Savings Plans provide flexibility due to their usage-based model and help reduce your costs by up to 64%. These rates automatically apply to eligible SageMaker ML instance usages including Studio notebooks, SageMaker notebook instances, SageMaker Processing, SageMaker Data Wrangler, SageMaker training, SageMaker real-time inference, and SageMaker batch transform regardless of instance family, size, or Region. This makes it easy for you to maximize savings regardless of how your use cases and consumption evolve over time, and you can save up to 64% compared to the On-Demand price.

For example, you could start with small instances to experiment with different algorithms on a fraction of your dataset. Then, you could move to larger instances to prepare data and train at scale against your full dataset. Finally, you could deploy your models in several Regions to serve low-latency predictions to your users. All the instance size modifications and deployments across new Regions would be covered by the same Savings Plan, without any management effort required on your part.

Every type of SageMaker usage that is eligible for SageMaker Savings Plans has a Savings Plans rate and an On-Demand rate. When you sign up for the SageMaker Savings Plans, you will be charged the Savings Plan rate for your usage up to your commitment. Any usage beyond the commitment will be charged at On-Demand rates. The AWS Cost Management console provides you with recommendations that make it easy to find the right commitment level for a Savings Plan. These recommendations are based on the following:

  • Your SageMaker usage in the last 7, 30, or 60 days. You should select the time period that best represents your future usage.
  • The term of your plan: 1-year or 3-year.
  • Your payment option: No Upfront, Partial Upfront (50% or more), or All Upfront. Some customers prefer (or must use) this last option, because it gives them a clear and predictable view of their SageMaker bill.

The recommendations are based on your historical usage over the selected lookback period and don’t forecast your usage. Be sure to select a lookback period that reflects your future usage. A 3-year term plan provides the highest discount rate; similarly, an All Upfront payment option offers the highest discount rate compared to No Upfront or Partial Upfront payment options. Workloads and usage typically change over time and a consistent, steady-state usage pattern makes a good candidate for a savings plan. If you have a lot of short-lived or one-off workloads, selecting the right commitment for compute usage (measured per hour) could be difficult. It’s recommended to continually purchase small amounts of Savings Plans commitment over time. This ensures that you maintain high levels of coverage to maximize your discounts, and your plans closely match your workload and organization requirements at all times.

To understand Savings Plan recommendations, refer to Decrease Your Machine Learning Costs with Instance Price Reductions and Savings Plans for Amazon SageMaker.

Utilization report

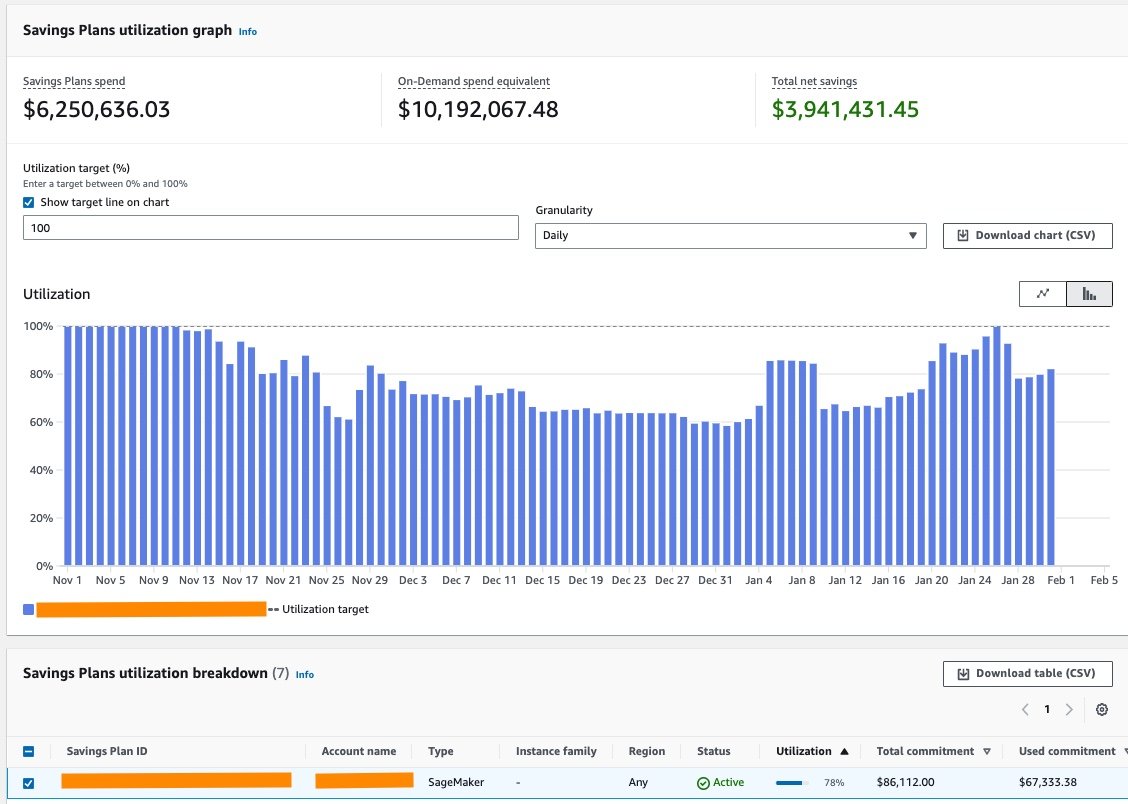
For active Savings Plans, utilization reports are available on the Savings Plans console to see the percentage of the commitment that you’ve actually used. You can use your Savings Plans utilization report to visually understand how much of your Savings Plans commitment you are using over the configured time period, as well as your savings as compared to On-Demand prices. For example, if you have a $10/hour commitment, and your usage billed with Savings Plans rates totals to $9.80 for the hour, your utilization for that hour is 98%. You can see your Savings Plans utilization at an hourly, daily, or monthly granularity, based on your lookback period. You can apply filters by Savings Plans type, member account, Region, and instance family in the Filters section. If you’re a user in a management account, you can see the aggregated utilization for the entire Consolidated Billing Family.

The following screenshot shows an example of a utilization report. You can see that even though Savings Plans coverage is not 100% on many consecutive days, the total net savings is still positive. Without Savings Plans, you would be charged at On-Demand rates for the usage. To realize maximum savings and avoid over-committing, it’s recommended to select the right commitment based on consistent, optimized usage of your SageMaker workloads.

Coverage report

Likewise, coverage reports show you how much of your eligible spend has been covered by the plan. To understand how the coverage is calculated, refer to Using your coverage report.

The following screenshot shows an example of a coverage report. You can see that the average coverage for the selected time period is 92%, along with the On-Demand spend that was not covered by the plan. Based on the On-Demand spend not covered by the plan, you can optionally buy an additional Savings Plan to obtain maximum savings. Also, it’s recommended to right-size the SageMaker compute instances before purchasing a Savings Plan and understand the workload size to avoid over- or under-committing the Savings Plan usage.

For more details on how Savings Plans apply to your AWS usage, refer to Understanding how Savings Plans apply to your AWS usage.

Conclusion

Machine learning has established itself as a powerful tool across industries, but training new models and running ML models for inference can be costly. One of the advantages of running ML on SageMaker is the wide and deep feature set offering cost optimization strategies without impacting performance or agility. This post highlighted the AWS tools and options to analyze your SageMaker costs, identify trends, and implement proactive alerts and optimization best practices.

Refer to the following posts in this series for more information about optimizing cost for SageMaker:


About the Authors

Deepali Rajale is a Senior AI/ML Specialist at AWS. She works with enterprise customers providing technical guidance with best practices for deploying and maintaining AI/ML solutions in the AWS ecosystem. She has worked with a wide range of organizations on various deep learning use cases involving NLP and computer vision. She is passionate about empowering organizations to leverage generative AI to enhance their use experience. In her spare time, she enjoys movies, music, and literature.

Uri Rosenberg is the AI & ML Specialist Technical Manager for Europe, Middle East, and Africa. Based out of Israel, Uri works to empower enterprise customers on all things ML to design, build, and operate at scale. In his spare time, he enjoys cycling, hiking, and time traveling.

Read More

High-quality human feedback for your generative AI applications from Amazon SageMaker Ground Truth Plus

High-quality human feedback for your generative AI applications from Amazon SageMaker Ground Truth Plus

Amazon SageMaker Ground Truth Plus helps you prepare high-quality training datasets by removing the undifferentiated heavy lifting associated with building data labeling applications and managing the labeling workforce. All you do is share data along with labeling requirements, and Ground Truth Plus sets up and manages your data labeling workflow based on these requirements. From there, an expert workforce that is trained on a variety of machine learning (ML) tasks labels your data. You don’t even need deep ML expertise or knowledge of workflow design and quality management to use Ground Truth Plus. Now, Ground Truth Plus is serving customers who need data labeling and human feedback for fine-tuning foundation models for generative AI applications.

In this post, you will learn about recent advancements in human feedback for generative AI available through SageMaker Ground Truth Plus. This includes new workflows and user interfaces (UIs) available for preparing demonstration datasets used in supervised fine-tuning, gathering high-quality human feedback to make preference datasets for aligning generative AI foundation models with human preferences, as well as customizing models to application builders’ requirements for style, substance, and voice.

Challenges of getting started with generative AI

Generative AI applications around the world incorporate both single-mode and multi-modal foundation models to solve for many different use cases. Common among them are chatbots, image generators, and video generators. Large language models (LLMs) are being used in chatbots for creative pursuits, academic and personal assistants, business intelligence tools, and productivity tools. You can use text-to-image models to generate abstract or realistic AI art and marketing assets. Text-to-video models are being used to generate videos for art projects, highly engaging advertisements, video game development, and even film development.

Two of the most important problems to solve for both model producers who create foundation models and application builders who use existing generative foundation models to build their own tools and applications are:

  • Fine-tuning these foundation models to be able to perform specific tasks
  • Aligning them with human preferences to ensure they output helpful, accurate, and harmless information

Foundation models are typically pre-trained on large corpora of unlabeled data, and therefore don’t perform well following natural language instructions. For an LLM, that means that they may be able to parse and generate language in general, but they may not be able to answer questions coherently or summarize text up to a user’s required quality. For example, when a user requests a summary of a text in a prompt, a model that hasn’t been fine-tuned how to summarize text may just recite the prompt text back to the user or respond with something irrelevant. If a user asks a question about a topic, the response from a model could just be a recitation of the question. For multi-modal models, such as text-to-image or text-to-video models, the models may output content unrelated to the prompt. For example, if a corporate graphic designer prompts a text-to-image model to create a new logo or an image for an advertisement, the model may not generate a relevant graphic related to the prompt if it has only a general concept of an image and elements of an image. In some cases, a model may output a harmful image or video, risking user confidence or company reputation.

Even if models are fine-tuned to perform specific tasks, they may not be aligned with human preferences with respect to the meaning, style, or substance of their output content. In an LLM, this could manifest itself as inaccurate or even harmful content being generated by the model. For example, a model that isn’t aligned with human preferences through fine-tuning may output dangerous, unethical, or even illegal instructions when prompted by a user. No care will have been taken to limit the content being generated by the model to ensure it is aligned with human preferences to be accurate, relevant, and useful. This misalignment can be a problem for companies that rely on generative AI models for their applications, such as chatbots and multimedia creation. For multi-modal models, this may take the form of toxic, dangerous, or abusive images or video being generated. This is a risk when prompts are input to the model without the intention of generating sensitive content, and also if the model producer or application builder had not intended to allow the model to generate that kind of content, but it was generated anyway.

To solve the issues of task-specific capability and aligning generative foundation models with human preferences, model producers and application builders must fine-tune the models with data using human-directed demonstrations and human feedback of model outputs.

Data and training types

There are several types of fine-tuning methods with different types of labeled data that are categorized as instruction tuning – or teaching a model how to follow instructions. Among them are supervised fine-tuning (SFT) using demonstration data, and reinforcement learning from human feedback (RLHF) using preference data.

Demonstration data for supervised fine-tuning

To fine-tune foundation models to perform specific tasks such as answering questions or summarizing text with high quality, the models undergo SFT with demonstration data. The purpose of demonstration data is to guide the model by providing it with labeled examples (demonstrations) of completed tasks being done by humans. For example, to teach an LLM how to answer questions, a human annotator will create a labeled dataset of human-generated question and answer pairs to demonstrate how a question and answer interaction works linguistically and what the content means semantically. This kind of SFT trains the model to recognize patterns of behavior demonstrated by the humans in the demonstration training data. Model producers need to do this type of fine-tuning to show that their models are capable of performing such tasks for downstream adopters. Application builders who use existing foundation models for their generative AI applications may need to fine-tune their models with demonstration data on these tasks with industry-specific or company-specific data to improve the relevancy and accuracy of their applications.

Preference data for instruction tuning such as RLHF

To further align foundation models with human preferences, model producers—and especially application builders—need to generate preference datasets to perform instruction tuning. Preference data in the context of instruction tuning is labeled data that captures human feedback with respect to a set of options output by a generative foundation model. It typically includes rating or ranking several inferences or pairwise comparing two inferences from a foundation model according to some specific attribute. For LLMs, these attributes may be helpfulness, accuracy, and harmlessness. For text-to-image models, it may be an aesthetic quality or text-image alignment. This preference data based on human feedback can then be used in various instruction tuning methods—including RLHF—in order to further fine-tune a model to align with human preferences.

Instruction tuning using preference data plays a crucial role in enhancing the personalization and effectiveness of foundation models. This is a key step in building custom applications on top of pre-trained foundation models and is a powerful method to ensure models are generating helpful, accurate, and harmless content. A common example of instruction tuning is to instruct a chatbot to generate three responses to a query, and have a human read and rank all three according to some specified dimension, such as toxicity, factual accuracy, or readability. For example, a company may use a chatbot for its marketing department and wants to make sure that content is aligned to its brand message, doesn’t exhibit biases, and is clearly readable. The company would prompt the chatbot during instruction tuning to produce three examples, and have their internal experts select the ones that most align to their goal. Over time, they build a dataset used to teach the model what style of content humans prefer through reinforcement learning. This enables the chatbot application to output more relevant, readable, and safe content.

SageMaker Ground Truth Plus

Ground Truth Plus helps you address both challenges—generating demonstration datasets with task-specific capabilities, as well as gathering preference datasets from human feedback to align models with human preferences. You can request projects for LLMs and multi-modal models such as text-to-image and text-to-video. For LLMs, key demonstration datasets include generating questions and answers (Q&A), text summarization, text generation, and text reworking for the purposes of content moderation, style change, or length change. Key LLM preference datasets include ranking and classifying text outputs. For multi-modal models, key task types include captioning images or videos as well as logging timestamps of events in videos. Therefore, Ground Truth Plus can help both model producers and application builders on their generative AI journey.

In this post, we dive deeper into the human annotator and feedback journey on four cases covering both demonstration data and preference data for both LLMs and multi-modal models: question and answer pair generation and text ranking for LLMs, as well as image captioning and video captioning for multi-modal models.

Large language models

In this section, we discuss question and answer pairs and text ranking for LLMs, along with customizations you may want for your use case.

Question and answer pairs

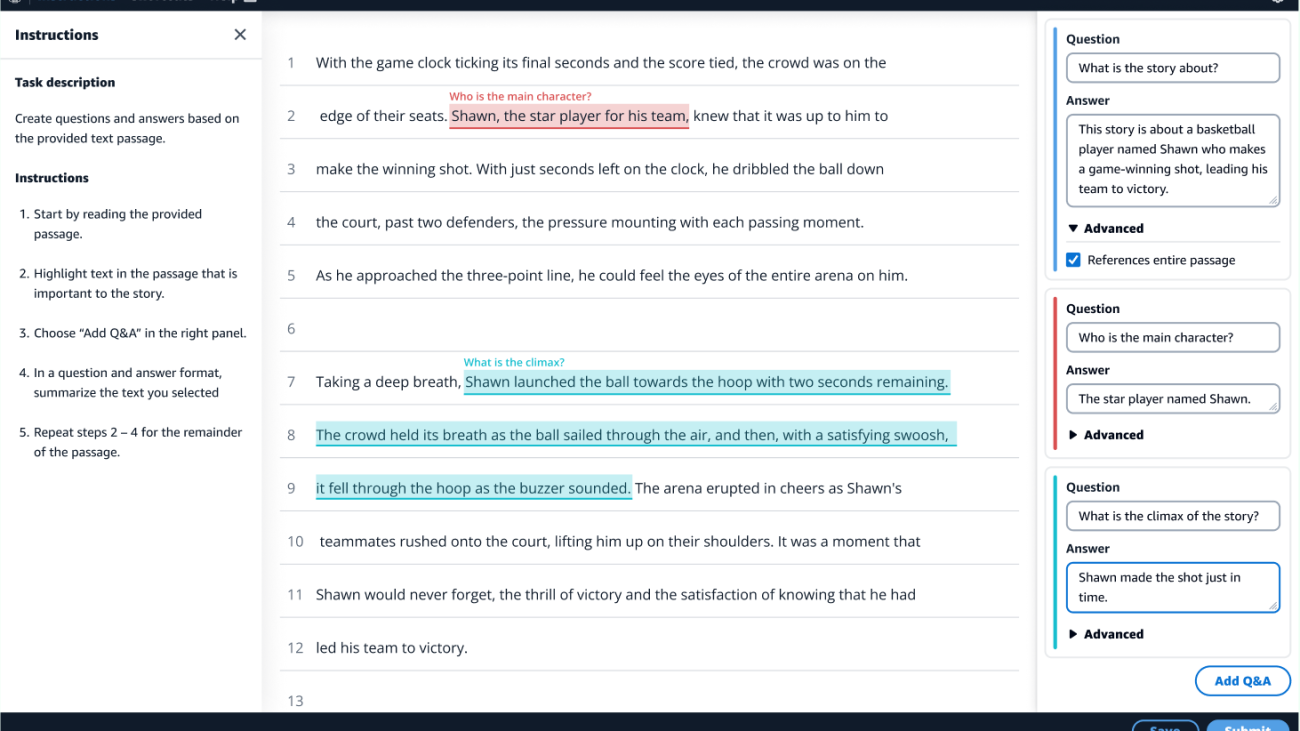
The following screenshot shows a labeling UI in which a human annotator will read a text passage and generate both questions and answers in the process of building a Q&A demonstration dataset.

Let’s walk through a tour of the UI in the annotator’s shoes. On the left side of the UI, the job requester’s specific instructions are presented to the annotator. In this case, the annotator is supposed to read the passage of text presented in the center of the UI and create questions and answers based on the text. On the right side, the questions and answers that the annotator has written are shown. The text passage as well as type, length, and number of questions and answers can all be customized by the job requester during the project setup with the Ground Truth Plus team. In this case, the annotator has created a question that requires understanding the whole text passage to answer and is marked with a References entire passage check box. The other two questions and answers are based on specific parts of the text passage, as shown by the annotator highlights with color-coded matching. Optionally, you may want to request that questions and answers are generated without a provided text passage, and provide other guidelines for human annotators—this is also supported by Ground Truth Plus.

After the questions and answers are submitted, they can flow to an optional quality control loop workflow where other human reviewers will confirm that customer-defined distribution and types of questions and answers have been created. If there is a mismatch between the customer requirements and what the human annotator has produced, the work will get funneled back to a human for rework before being exported as part of the dataset to deliver to the customer. When the dataset is delivered back to you, it’s ready to incorporate into the supervised fine-tuning workflow at your discretion.

Text ranking

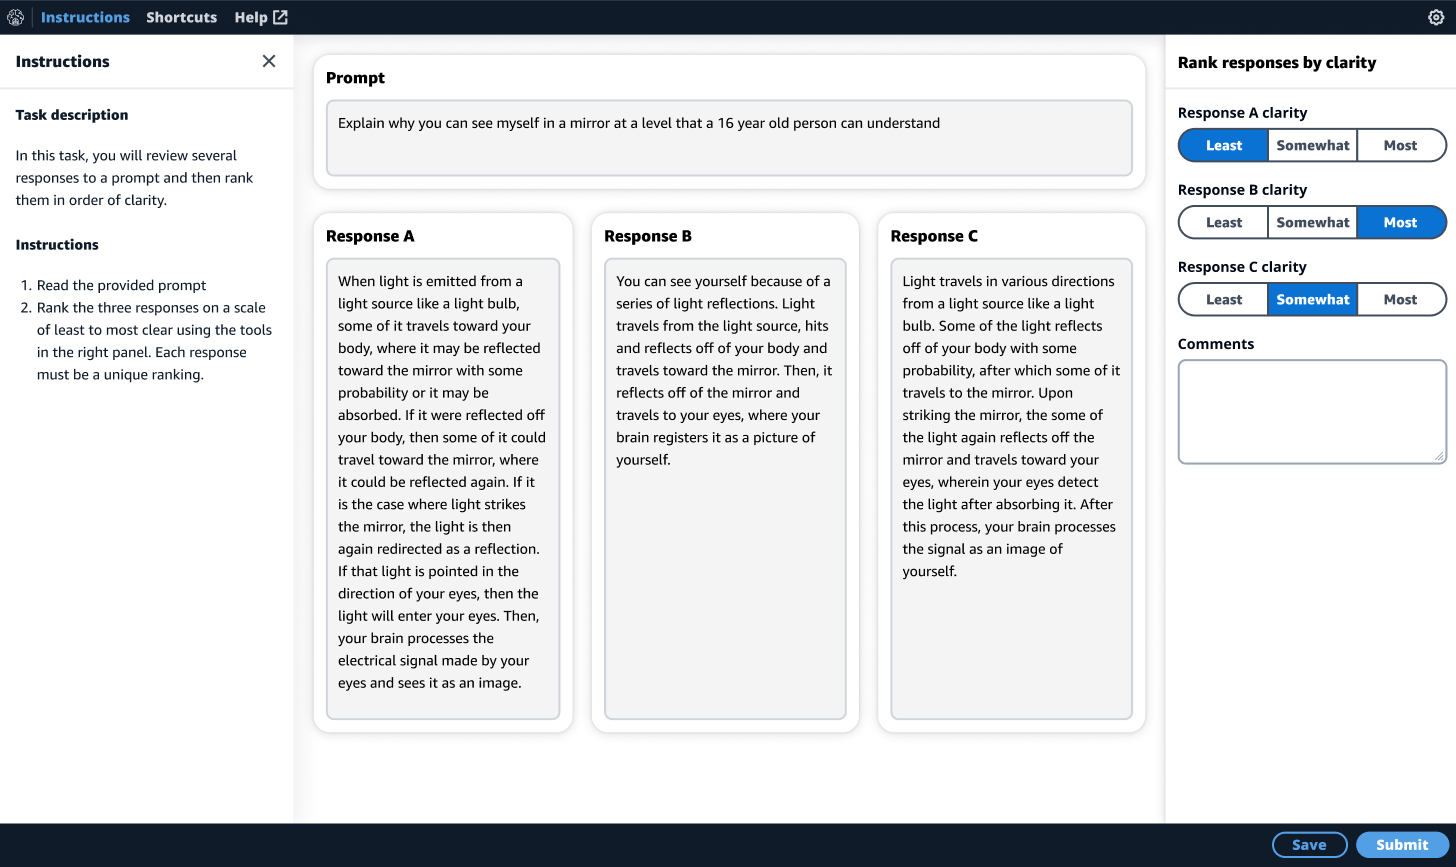
The following screenshot shows a UI for ranking the outputs from an LLM based on a prompt.

You can simply write the instructions for the human reviewer, and bring prompts and pre-generated responses to the Ground Truth Plus project team to start the job. In this case, we have requested for a human reviewer to rank three responses per prompt from an LLM on the dimension of writing clarity (readability). Again, the left pane shows the instructions given to the reviewer by the job requester. In the center, the prompt is at the top of the page, and the three pre-generated responses are the main body for ease of use. On the right side of the UI, the human reviewer will rank them in order of most to least clear writing.

Customers wanting to generate this type of preference dataset include application builders interested in building human-like chatbots, and therefore want to customize the instructions for their own use. The length of the prompt, number of responses, and ranking dimension can all be customized. For example, you may want to rank five responses in order of most to least factually accurate, biased, or toxic, or even rank and classify multiple dimensions simultaneously. These customizations are supported in Ground Truth Plus.

Multi-modal models

In this section, we discuss image and video captioning for training multi-modal models such as text-to-image and text-to-video models, as well as customizations you may want to make for your particular use case.

Image captioning

The following screenshot shows a labeling UI for image captioning. You can request a project with image captioning to gather data to train a text-to-image model or an image-to-text model.

In this case, we have requested to train a text-to-image model and have set specific requirements on the caption in terms of length and detail. The UI is designed to walk the human annotators through the cognitive process of generating rich captions by providing a mental framework through assistive and descriptive tools. We have found that providing this mental framework for annotators results in more descriptive and accurate captions than simply providing an editable text box alone.

The first step in the framework is for the human annotator to identify key objects in the image. When the annotator chooses an object in the image, a color-coded dot appears on the object. In this case, the annotator has chosen both the dog and the cat, creating two editable fields on the right side of the UI wherein the annotator will enter the names of the objects—cat and dog—along with a detailed description of each object. Next, the annotator is guided to identify all the relationships between all the objects in the image. In this case, the cat is relaxing next to the dog. Next, the annotator is asked to identify specific attributes about the image, such as the setting, background, or environment. Finally, in the caption input text box, the annotator is instructed to combine all of what they wrote in the objects, relationships, and image setting fields into a complete single descriptive caption of the image.

Optionally, you can configure this image caption to be passed through a human-based quality check loop with specific instructions to ensure that the caption meets the requirements. If there is an issue identified, such as a missing key object, that caption can be sent back for a human to correct the issue before exporting as part of the training dataset.

Video captioning

The following screenshot shows a video captioning UI to generate rich video captions with timestamp tags. You can request a video caption project to gather data to build text-to-video or video-to-text models.

In this labeling UI, we have built a similar mental framework to ensure high-quality captions are written. The human annotator can control the video on the left side and create descriptions and timestamps for each activity shown in the video on the right side with the UI elements. Similar to the image captioning UI, there is also a place for the annotator to write a detailed description of the video setting, background, and environment. Finally, the annotator is instructed to combine all the elements into a coherent video caption.

Similar to the image caption case, the video captions may optionally flow through a human-based quality control workflow to determine if your requirements are met. If there is an issue with the video captions, it will be sent for rework by the human annotator workforce.

Conclusion

Ground Truth Plus can help you prepare high-quality datasets to fine-tune foundation models for generative AI tasks, from answering questions to generating images and videos. It also allows skilled human workforces to review model outputs to ensure that they are aligned with human preferences. Additionally, it enables application builders to customize models using their industry or company data to ensure their application represents their preferred voice and style. These are the first of many innovations in Ground Truth Plus, and more are in development. Stay tuned for future posts.

Interested in starting a project to build or improve your generative AI models and applications? Get started with Ground Truth Plus by connecting with our team today.


About the authors

Jesse Manders is a Senior Product Manager in the AWS AI/ML human in the loop services team. He works at the intersection of AI and human interaction with the goal of creating and improving AI/ML products and services to meet our needs. Previously, Jesse held leadership roles in engineering at Apple and Lumileds, and was a senior scientist in a Silicon Valley startup. He has an M.S. and Ph.D. from the University of Florida, and an MBA from the University of California, Berkeley, Haas School of Business.

Romi DattaRomi Datta is a Senior Manager of Product Management in the Amazon SageMaker team responsible for Human in the Loop services. He has been in AWS for over 4 years, holding several product management leadership roles in SageMaker, S3 and IoT. Prior to AWS he worked in various product management, engineering and operational leadership roles at IBM, Texas Instruments and Nvidia. He has an M.S. and Ph.D. in Electrical and Computer Engineering from the University of Texas at Austin, and an MBA from the University of Chicago Booth School of Business.

Jonathan Buck is a Software Engineer at Amazon Web Services working at the intersection of machine learning and distributed systems. His work involves productionizing machine learning models and developing novel software applications powered by machine learning to put the latest capabilities in the hands of customers.

Alex Williams is an applied scientist in the human-in-the-loop science team at AWS AI where he conducts interactive systems research at the intersection of human-computer interaction (HCI) and machine learning. Before joining Amazon, he was a professor in the Department of Electrical Engineering and Computer Science at the University of Tennessee where he co-directed the People, Agents, Interactions, and Systems (PAIRS) research laboratory. He has also held research positions at Microsoft Research, Mozilla Research, and the University of Oxford. He regularly publishes his work at premier publication venues for HCI, such as CHI, CSCW, and UIST. He holds a PhD from the University of Waterloo.

Sarah Gao is a Software Development Manager in Amazon SageMaker Human In the Loop (HIL) responsible for building the ML based labeling platform. Sarah has been in AWS for over 4 years, holding several software management leadership roles in EC2 security and SageMaker. Prior to AWS she worked in various engineering management roles at Oracle and Sun Microsystem.

Erran Li is the applied science manager at human-in-the-loop services, AWS AI, Amazon. His research interests are 3D deep learning, and vision and language representation learning. Previously he was a senior scientist at Alexa AI, the head of machine learning at Scale AI and the chief scientist at Pony.ai. Before that, he was with the perception team at Uber ATG and the machine learning platform team at Uber working on machine learning for autonomous driving, machine learning systems and strategic initiatives of AI. He started his career at Bell Labs and was adjunct professor at Columbia University. He co-taught tutorials at ICML’17 and ICCV’19, and co-organized several workshops at NeurIPS, ICML, CVPR, ICCV on machine learning for autonomous driving, 3D vision and robotics, machine learning systems and adversarial machine learning. He has a PhD in computer science at Cornell University. He is an ACM Fellow and IEEE Fellow.

Read More

3D telemedicine brings better care to underserved and rural communities, even across continents

3D telemedicine brings better care to underserved and rural communities, even across continents

Introduction

Providing healthcare in remote or rural areas is challenging, particularly specialized medicine and surgical procedures. Patients may need to travel long distances just to get to medical facilities and to communicate with caregivers. They may not arrive in time to receive essential information before their medical appointments and may have to return home before they can receive crucial follow-up care at the hospital. Some patients may wait several days just to meet with their surgeon. This is a very different experience from that of urban or suburban residents or people in more developed areas, where patients can get to a nearby clinic or hospital with relative ease.

In recent years, telemedicine has emerged as a potential solution for underserved remote populations. The COVID-19 pandemic, which prevented many caregivers and patients from meeting in person, helped popularize virtual medical appointments. Yet 2D telemedicine (2DTM) fails to fully replicate the experience of a face-to-face consultation.

To improve the quality of virtual care, researchers from Microsoft worked with external partners in Scotland to conduct the first validated clinical use of a novel, real-time 360-degree 3D telemedicine system (3DTM). This work produced three studies beginning in 2020, in which 3DTM based on Microsoft’s HoloportationTM communication technology outperformed a 2DTM equivalent. Building on the success of this research, the collaborators conducted a follow-up trial in 2022 with partners in Ghana, where they demonstrated the first intercontinental use of 3DTM. This research provides critical progress toward increasing access to specialized healthcare for rural and underserved communities.

3DTM beats 2DTM in Scotland trials

The dramatic expansion of virtual medicine helped fill a void created by COVID restrictions, but it also underscored the need for more realistic remote consultations. While 2DTM can extend the reach of specialized medicine, it fails to provide doctors and surgeons with the same quantity and quality of information they get from an in-person consultation. Previous research efforts had theorized that 3DTM could raise the bar, but the advantages were purely speculative. Until now, real-time 3DTM had been proposed within a research setting only, because of constraints on complexity, bandwidth, and technology.

In December 2019, researchers from Microsoft began discussing the development of a 3DTM system leveraging Microsoft Holoportation™ communication technology with collaborators from the Canniesburn Plastic Surgery Unit in Glasgow, Scotland, and Korle Bu Teaching Hospital (KBTH) in Accra, Ghana.

With the emergence of COVID-19 in early 2020, this effort accelerated as part of Microsoft Research’s COVID response, with the recognition that it would allow patients, including those with weakened immune systems, to visit a specialist remotely from the relative safety of a local physician’s office, rather than having to travel to the specialist at a hospital with all the concurrent risk of infection.

The initial research included a deployment in Scotland, with 10 specialized cameras capturing patient images, combining them into a 3D model, and transmitting the 3D image to a medical professional. The patient could view the same images as their doctor, which allowed them to discuss them in real time—almost as if they were in the same room.

3D telemedicine - patient interacting with clinician on-screen in real-time
Figure 1: A patient participates in a consultation with doctors using the 3D Telemedicine system. The screen allows the patient to view the same images as the clinician.

This work produced three separate studies: a clinician feedback study (23 clinicians, November–December 2020), a patient feedback study (26 patients, July–October 2021), and a study focusing on safety and reliability (40 patients, October 2021–March 2022).

Participatory testing demonstrated improved patient metrics with 3DTM versus 2DTM. Although patients still prefer face-to-face visits, 3DTM was rated significantly higher than 2DTM. Overall patient satisfaction increased to 88 percent with 3DTM from 51 percent with 2DTM; realism, or “presence,” rated higher at 80 percent for 3DTM versus 53 percent for 2DTM; and quality as measured by a Telehealth Usability Questionnaire came in at 85 percent for 3DTM compared with 77 percent for 2DTM. Safety and clinical concordance of 3DTM with a face-to-face consultation were 95 percent – equivalent to or exceeding estimates for 2DTM.

3D Telemedicine - Three graphics displayed side-by-side. The first one describes the three studies performed: Clinician feedback study (23 clinicians, Nov-Dec 2020), Patient feedback study (26 patients, Jul-Oct 2021) and Cohort study: safety & reliability (40 patients, Oct 21-Mar 22). It also has a picture of a monitor displaying a 3D model of a patient and the corresponding photo of the individual using the system. The second graphic is titled
Figure 2: In three studies produced during a trial in Scotland, 3D telemedicine outperformed 2D telemedicine in satisfaction, realism and quality, with a direct correlation between realism and satisfaction.

One of the ultimate goals of telemedicine is to bring the quality of remote consultations closer to face-to-face experiences. This data provides the first evidence that Microsoft’s Holoportation™ communication technology moves 3DTM closer to this goal than a 2D equivalent.

“We showed that we can do it using off-the-shelf components, making it affordable. And we can deploy it and make it reliable enough so that a doctor or a clinical team could use it to conduct consultations,” said Spencer Fowers, Principal Researcher at Microsoft Research.

Ghana study: 3DTM brings doctors and patients closer

After the successful deployment in Scotland, the team turned its focus to Ghana. The research team visited KBTH in February 2022. That began the collaboration on the next phase of the project and the installation of the first known 3D telemedicine system on the African continent.

Ghana has a population of 31 million people but only 16 reconstructive surgeons, 14 of whom work at KBTH. It’s one of the largest hospitals in west Africa and the country’s main hospital for reconstructive surgery and burn treatment. Traveling to Accra can be difficult for people who live in rural areas of Ghana. It may require a 24-hour bus ride just to get to the clinic. Some patients can’t stay long enough to receive follow-up care or adequate pre-op preparation and counseling. Many people in need of surgery never receive treatment, and those that do may receive incomplete or sub-optimal follow-up care. They show up, have surgery, and go home.

“As a doctor, you typically take it for granted that a patient will come back to see you if they have complications. These are actually very complex operations. But too often in Ghana, the doctors may never see the patient again,” said Stephen Lo, a reconstructive surgeon at the Canniesburn Plastic Surgery and Burns Unit in Scotland. Lo has worked for years with KBTH and was the project’s clinical lead in Glasgow.

The researchers worked with surgical team members in Scotland and Ghana to build a portable system with enhanced lighting and camera upgrades compared to the original setup deployed in Scotland. This system would enable patients to meet in 3D with doctors in Scotland and in Ghana, both before and after their surgeries, using Microsoft Holoportation™ communication technology.

3D Telemedicine - A graphic titled
Figure 3: As part of a multidisciplinary team (MDT), doctors in Glasgow visit with patients virtually both before and after their in-person visits at the clinic in Accra. Clinicians in Accra manage follow-up care on site.

The results were multiple successful multidisciplinary team (MDT) engagements—both pre-operative and post-operative—supporting surgeries led by visiting doctors from Scotland at KBTH. The 3DTM system using Microsoft  Holoportation™ communication technology helped doctors communicate to patients precisely what their surgery would entail ahead of time and then ensure that patients had access to any necessary follow-up procedures and post-operation therapy. The medical team in Glasgow used Microsoft Holoportation™ communication technology to manipulate and mark up 3D images of their patients. Patients watching from Accra could visualize the procedure, including the exact locations where the surgical incisions would occur.

3D Telemedicine - Comparison graphic showing the step-by-step process of the Traditional approach versus the International 3D approach. In the International 3D approach, there is a pre-visit 3D international MDT meeting before the on-site clinic, followed by patient consent and the surgical procedure. Additionally, the International 3D approach incorporates post-operative virtual MDT meetings, unlike the traditional approach which relies solely on local follow-up.
Figure 4: 3DTM enables better planning, safety, and integration among the international team, plus better patient education and follow-up care.

For a patient who came to KBTH to address a chronic problem with his jaw, this visualization gave him a much better understanding than he had had with previous surgeries, said Levi Ankrah​, a reconstructive surgeon at KBTH​ who participated in the remote consultations and the surgeries in Ghana.

“These are quite complex things to explain. But when the patient could actually see it for himself from the outside, that helped him feel more involved with his care and his follow-up plan,” Ankrah said.

Two pictures captured at the Telemedicine rig in Accra. The first photo depicts a male black patient seated inside the rig, with multiple Azure Kinect cameras positioned around him. He is engaged in a conversation with a doctor standing beside him. In the second photo, two male doctors are seen focused on a monitor displaying a 3D model of a patient. One doctor in surgical attire is observing the screen, while the other in street clothes is seated in a chair, manipulating the system interface.
Figure 5: A 3D consultation between a patient in Ghana using “the rig” and doctors in Scotland, who can see the patient and transmit details about his upcoming surgery.

Conclusion

One of the ultimate goals of telemedicine is for the quality of remote consultations to get closer to the experience of face-to-face consultations. The data presented in this research suggests significant potential in moving closer to the experience of face-to-face consultations, which is particularly relevant to specialties with a strong 3D focus, such as reconstructive surgery.

Nothing can replace the authenticity and confidence that come from a face-to-face visit with a doctor. But 3DTM shows great promise as a potential state-of-the-art solution for remote telemedicine, replacing current 2DTM virtual visits and driving better access and outcomes for patients.

Acknowledgments

We would like to acknowledge the following contributors to this project: Andrea Britto; Thiago Spina; Ben Cutler; Chris O’Dowd; Amber Hoak; Spencer Fowers; David Tittsworth; Whitney Hudson; Steven Lo, Canniesburn Regional Plastic Surgery and Burns Unit, Glasgow; Kwame Darko, Levi Ankrah, and Opoku Ampomah, National Reconstructive Plastic Surgery and Burns Center, Korle Bu Teaching Hospital, Accra. 

Additional thanks to: Korle Bu Teaching Hospital, NHS Scotland West of Scotland Innovation Hub, Canniesburn Plastic Surgery and Burns Unit.

Two pictures showcasing participants of the project. In the first picture, six men and a woman are captured. The group consists of Microsoft staff members, representatives from the Korle Bu Teaching Hospital, and the surgical team from NHS Glasgow. The second picture features members of the Microsoft team, three men and a woman, alongside a doctor from the Korle Bu Teaching Hospital, all attired in surgical garments.
Figure 6: Two views of medical team members. On the left (from left to right): Daniel Dromobi Nii Ntreh, Thiago Spina, Spencer Fowers, Chris O’Dowd, Steven Lo, Arnold Godonu, Andrea Britto. 
 On the right, in medical gear (from left to right): Chris O’Dowd, Kwame Darko, Thiago Spina, Andrea Britto and Spencer Fowers.

The post 3D telemedicine brings better care to underserved and rural communities, even across continents appeared first on Microsoft Research.

Read More

NVIDIA RTX Transforming 14-Inch Laptops, Plus Simultaneous Screen Encoding and May Studio Driver Available Today

NVIDIA RTX Transforming 14-Inch Laptops, Plus Simultaneous Screen Encoding and May Studio Driver Available Today

Editor’s note: This post is part of our weekly In the NVIDIA Studio series, which celebrates featured artists, offers creative tips and tricks, and demonstrates how NVIDIA Studio technology improves creative workflows. We’re also deep diving on new GeForce RTX 40 Series GPU features, technologies and resources, and how they dramatically accelerate content creation.

New 14-inch NVIDIA Studio laptops, equipped with GeForce RTX 40 Series Laptop GPUs, give creators peak portability with a significant increase in performance over the last generation. AI-dedicated hardware called Tensor Cores power time-saving tasks in popular apps like Davinci Resolve. Ray Tracing Cores together with our neural rendering technology, DLSS 3, boost performance in real-time 3D rendering applications like D5 Render and NVIDIA Omniverse.

NVIDIA also introduced a new method for accelerating video encoding. Simultaneous Scene Encoding sends independent groups of frames, or scenes, to each NVIDIA Encoder (NVENC). With multiple NVENCs fully utilized, video export times can be reduced significantly, without affecting image quality. The first software to integrate the technology is the popular video editing app CapCut.

The May Studio Driver is ready for download now. This month’s release includes support for updates to MAGIX VEGAS Pro, D5 Render and VLC Media Player — in addition to CapCut — plus AI model optimizations for popular apps.

COMPUTEX, Asia’s biggest annual tech trade show, kicks off a flurry of updates, bringing creators new tools and performance from the NVIDIA Studio platform — and plenty of AI power.

During his keynote address at COMPUTEX, NVIDIA founder and CEO Jensen Huang introduced a new generative AI to support game development, NVIDIA Avatar Cloud Engine (ACE) for Games. The platform adds intelligence to non-playable characters (NPCs) in gaming, with AI-powered natural language interactions.

The Kairos demo — a joint venture with Convai led by NVIDIA Creative Director Gabriele Leone — demonstrates how a single model can transform into a living, breathing, lifelike character this week In the NVIDIA Studio.

Ultraportable, Ultimate Performance

NVIDIA Studio laptops, powered by the NVIDIA Ada Lovelace architecture, are the world’s fastest laptops for creating and gaming.

For the first time, GeForce RTX performance comes to 14-inch devices. In the process, it’s transforming the ultraportable market, delivering the ultimate combination of performance and portability.

ASUS Zenbook Pro 14 comes with up to a GeForce RTX 4070 Laptop GPU.

These purpose-built creative powerhouses do it all. Backed by NVIDIA Studio, the platform supercharges over 110 creative apps, provides lasting stability with NVIDIA Studio Drivers and includes a powerful suite of AI-powered Studio software, such as NVIDIA Omniverse, Canvas and Broadcast.

Fifth-generation Max-Q technologies bring an advanced suite of AI-powered technologies that optimize laptop performance, power and acoustics for peak efficiency. Battery life improves by up to 70%. And DLSS is now optimized for laptops, giving creators incredible 3D rendering performance with DLSS 3 optical multi-frame generation and super resolution in Omniverse and D5 Render, and in hit games like Cyberpunk 2077.

As the ultraportable market heats up, PC laptop makers are giving creators more options than ever. Recently announced models, with more on the way, include the Acer Swift X 14, ASUS Zenbook Pro 14, GIGABYTE Aero 14, Lenovo’s Slim Pro 9i 14 and MSI Stealth 14.

Visit the Studio Shop for the latest GeForce RTX-powered NVIDIA Studio systems and explore the range of high-performance Studio products.

Simultaneous Scene Encoding

The recent release of Video Codec SDK 12.1 added support for multi-encoder support, which can cut export times in half. Our previously announced split encoding method — which splits a frame and sends each section to an encoder — now has an API that app developers can expose to their end users. Previously, split encoding would be engaged automatically for 4K or higher video and the faster export presets. With this update, developers can simply allow users to toggle on this option.

Video Codec SDK 12.1 also introduces a new encoding method: simultaneous scene encoding. Video apps can split groups of pictures or scenes as they’re sent into the rendering pipeline. Each group can then be rendered independently and ordered properly on the final output.

The result is a significant increase in encoding speed — approximately 80% for dual encoders, and further increases when more than two NVENCs are present, like in the NVIDIA RTX 6000 Ada Generation professional GPU. Image quality is also improved compared to current split encoding methods, where individual frames are sent to each encoder and then stitched back together in the final output.

CapCut users will be the first to experience this benefit on RTX GPUs with two or more encoders, starting with the software’s current release, available today.

Massive May Studio Driver Drops

The May Studio Driver features significant upgrades and optimizations.

MAGIX partnered with NVIDIA to move its line of VEGAS Pro AI models on WinML, enabling video editors to apply AI effects much faster.

The driver also optimizes AI features for applications running on WinML, including Adobe Photoshop, Lightroom, MAGIX Vegas Pro, ON1 and DxO, among many others.

The real-time ray tracing renderer D5 Render also added NVIDIA DLSS 3, delivering a smoother viewport experience to navigate scenes with super fluid motion, massively benefiting architects, designers, interior designers and all professional 3D artists.

D5 Render and DLSS 3 work brilliantly to create photorealistic imagery.

NVIDIA RTX Video Super Resolution — video upscaling technology that uses AI and RTX Tensor Cores to upscale video quality — is now fully integrated into VLC Media Player, no longer requiring a separate download. Learn more.

Download GeForce Experience or NVIDIA RTX Experience for the easiest way to upgrade and to be notified of the latest driver releases.

Gaming’s ACE in the Hole

During NVIDIA founder and CEO Jensen Huang’s keynote address at COMPUTEX, he introduced NVIDIA ACE for Games, a new foundry that adds intelligence to NPCs in gaming with AI-powered natural language interactions.

Game developers and studios can use ACE for Games to build and deploy customized speech, conversation and animation AI models in their software and games. The AI technology can transform entire worlds, breathing new life into individuals, groups or an entire town’s worth of characters — the sky’s the limit.

ACE for Games builds on technology inside NVIDIA Omniverse, an open development platform for building and operating metaverse applications, including optimized AI foundation models for speech, conversation and character animation.

This includes the NVIDIA NeMo for conversational AI fine-tuned for game characters, NVIDIA Riva for automatic speech recognition and text-to-speech, and Omniverse Audio2Face for instantly creating expressive facial animation of game characters to match any speech tracks. Audio2Face features Omniverse connectors for Unreal Engine 5, so developers can add facial animation directly to MetaHuman characters.

Seeing Is Believing: Kairos Demo

Huang debuted for COMPUTEX attendees ACE for Games — and provided a sneak-peek of the future of gaming — in a demo dubbed Kairos.

Convai, an NVIDIA Inception startup, specializes in cutting-edge conversational AI for virtual game worlds. NVIDIA Lightspeed Studios, led by Creative Director and 3D artist Gabriele Leone, built the remarkably realistic scene and demo. Together, they’ve showcased the opportunity developers have to use NVIDIA ACE for Games to build NPCs.

In the demo, players interact with Jin, owner and proprietor of a ramen shop. The photorealistic shop was modeled after the virtual ramen shop built in NVIDIA Omniverse.

For this, an NVIDIA artist traveled to a real ramen restaurant in Tokyo and collected over 2,000 high-resolution reference images and videos. Each captured aspects from the kitchen’s distinct areas for cooking, cleaning, food preparation and storage. “We probably used 70% of the existing models, 30% new and 80% retextures,” said Leone.

Kairos: Beautifully rendered in Autodesk Maya, Blender, Unreal Engine 5 and NVIDIA Omniverse.

In the digital ramen shop, objects were modeled in Autodesk 3ds Max with RTX-accelerated AI denoising, and Blender benefiting from RTX-accelerated OptiX ray tracing for smooth, interactive movement in the viewport — all powered by the team’s arsenal of GeForce RTX 40 Series GPUs.

“It’s fair to say that without GeForce RTX GPUs and Omniverse, this project would’ve been impossible to complete without adding considerable time” — Gabriele Leone

The texture phase in Adobe Substance 3D Painter used NVIDIA Iray rendering technology with RTX-accelerated light and ambient occlusion, baking large assets in mere moments.

Next, Omniverse and the Audio2Face app, via the Unreal Engine 5 Connector, allowed the team to add facial animation and audio directly to the ramen shop NPC.

Although he is an NPC, Jin replies to natural language realistically and consistent with the narrative backstory — all with the help of generative AI.

Lighting and animation work was done in Unreal Engine 5 aided by NVIDIA DLSS using AI to upscale frames rendered at lower resolution while still retaining high-fidelity detail, again increasing interactivity in the viewport for the team.

Direct your ramen order to the NPC, ahem, interactive, conversational character.

Suddenly, NPCs just got a whole lot more engaging. And they’ve never looked this good.

Follow NVIDIA Studio on Instagram, Twitter and Facebook. Access tutorials on the Studio YouTube channel and get updates directly in your inbox by subscribing to the Studio newsletter. 

Read More

MediaTek Partners With NVIDIA to Transform Automobiles With AI and Accelerated Computing

MediaTek Partners With NVIDIA to Transform Automobiles With AI and Accelerated Computing

MediaTek, a leading innovator in connectivity and multimedia, is teaming with NVIDIA to bring drivers and passengers new experiences inside the car.

The partnership was announced today at a COMPUTEX press conference with MediaTek CEO Rick Tsai and NVIDIA founder and CEO Jensen Huang.

“NVIDIA is a world-renowned pioneer and industry leader in AI and computing. With this partnership, our collaborative vision is to provide a global one-stop shop for the automotive industry, designing the next generation of intelligent, always-connected vehicles,” said Tsai. “Through this special collaboration with NVIDIA, we will together be able to offer a truly unique platform for the compute-intensive, software-defined vehicle of the future.”

“AI and accelerated computing are fueling the transformation of the entire auto industry,” said Huang. “The combination of MediaTek’s industry-leading system-on-chip plus NVIDIA’s GPU and AI software technologies will enable new user experiences, enhanced safety and new connected services for all vehicle segments, from luxury to entry-level.”

A Collaboration to Transform Automotive

The partnership combines the best competencies of each company to deliver the most compelling solutions for the next generation of connected vehicles.

Today, NVIDIA offers GPUs for laptops, desktops, workstations and servers, along with systems-on-chips (SoCs) for automotive and robotics applications. With this new GPU chiplet, NVIDIA can extend its GPU and accelerated compute leadership across broader markets.

MediaTek will develop automotive SoCs and integrate the NVIDIA GPU chiplet, featuring NVIDIA AI and graphics intellectual property, into the design architecture. The chiplets are connected by an ultra-fast and coherent chiplet interconnect technology.

In addition, MediaTek will run the NVIDIA DRIVE OS, DRIVE IX, CUDA and TensorRT software technologies on these new automotive SoCs to enable connected infotainment and in-cabin convenience and safety functions. This partnership makes more in-vehicle infotainment options available to automakers on the NVIDIA DRIVE platform.

MediaTek will develop automotive SoCs integrating NVIDIA GPU chiplet. Image courtesy of MediaTek.

By tapping NVIDIA’s core expertise in AI, cloud, graphics technology and software ecosystem, and pairing it with NVIDIA advanced driver assistance systems, MediaTek can bolster the capabilities of its Dimensity Auto platform.

A Rich Heritage of Innovation

This collaboration empowers MediaTek’s automotive customers to offer cutting-edge NVIDIA RTX graphics and advanced AI capabilities, plus safety and security features enabled by NVIDIA DRIVE software, for all types of vehicles. According to Gartner, the infotainment and instrument cluster SoCs used within vehicles is projected to reach $12 billion in 2023.*

MediaTek’s Dimensity Auto platform draws on its decades of experience in mobile computing, high-speed connectivity, entertainment and extensive Android ecosystem. The platform includes the Dimensity Auto Cockpit, which supports smart multi-displays, high-dynamic range cameras and audio processing, so drivers and passengers can seamlessly interact with cockpit and infotainment systems.

For well over a decade, automakers have been turning to NVIDIA to help modernize their vehicle cockpits, using its technology for infotainment systems, graphical user interfaces and touchscreens.

By integrating the NVIDIA GPU chiplet into its automotive offering, MediaTek aims to enhance the performance capabilities of its Dimensity Auto platform to deliver the most advanced in-cabin experience available in the market. The platform also includes Auto Connect, a feature that will ensure drivers remain wirelessly connected with high-speed telematics and Wi-Fi networking.

With today’s announcement, MediaTek aims to raise the bar even higher for its automotive offerings — delivering intelligent, connected in-cabin solutions that cater to the evolving needs and demands of customers, while providing a safe, secure and enjoyable experience in the car.

*Gartner, Forecast Analysis: Automotive Semiconductors, Worldwide, 2021-2031; Table 1 – Automotive Semiconductor Forecast by Application (Billions of U.S. Dollars), January 18, 2023. Calculation performed by NVIDIA based on Gartner research.

Read More

Live From Taipei: NVIDIA CEO Unveils Gen AI Platforms for Every Industry

Live From Taipei: NVIDIA CEO Unveils Gen AI Platforms for Every Industry

In his first live keynote since the pandemic, NVIDIA founder and CEO Jensen Huang today kicked off the COMPUTEX conference in Taipei, announcing platforms that companies can use to ride a historic wave of generative AI that’s transforming industries from advertising to manufacturing to telecom.

“We’re back,” Huang roared as he took the stage after years of virtual keynotes, some from his home kitchen. “I haven’t given a public speech in almost four years — wish me luck!”

Speaking for nearly two hours to a packed house of some 3,500, he described accelerated computing services, software and systems that are enabling new business models and making current ones more efficient.

“Accelerated computing and AI mark a reinvention of computing,” said Huang, whose travels in his hometown over the past week have been tracked daily by local media.

In a demonstration of its power, he used the massive 8K wall he spoke in front of to show a text prompt generating a theme song for his keynote, singable as any karaoke tune. Huang, who occasionally bantered with the crowd in his native Taiwanese, briefly led the audience in singing the new anthem.

“We’re now at the tipping point of a new computing era with accelerated computing and AI that’s been embraced by almost every computing and cloud company in the world,” he said, noting 40,000 large companies and 15,000 startups now use NVIDIA technologies with 25 million downloads of CUDA software last year alone.

Top News Announcements From the Keynote

A New Engine for Enterprise AI

For enterprises that need the ultimate in AI performance, he unveiled DGX GH200, a large-memory AI supercomputer. It uses NVIDIA NVLink to combine up to 256 NVIDIA GH200 Grace Hopper Superchips into a single data-center-sized GPU.

The GH200 Superchip, which Jensen said is now in full production, combines an energy-efficient NVIDIA Grace CPU with a high-performance NVIDIA H100 Tensor Core GPU in one superchip.

The DGX GH200 packs an exaflop of performance and 144 terabytes of shared memory, nearly 500x more than in a single NVIDIA DGX A100 320GB system. That lets developers build large language models for generative AI chatbots, complex algorithms for recommender systems, and graph neural networks used for fraud detection and data analytics.

Google Cloud, Meta and Microsoft are among the first expected to gain access to the DGX GH200, which can be used as a blueprint for future hyperscale generative AI infrastructure.

NVIDIA DGX GH200
NVIDIA’s DGX GH200 AI supercomputer delivers 1 exaflop of performance for generative AI.

“DGX GH200 AI supercomputers integrate NVIDIA’s most advanced accelerated computing and networking technologies to expand the frontier of AI,” Huang told the audience in Taipei, many of whom had lined up outside the hall for hours before the doors opened.

NVIDIA is building its own massive AI supercomputer, NVIDIA Helios, coming online this year. It will use four DGX GH200 systems linked with NVIDIA Quantum-2 InfiniBand networking to supercharge data throughput for training large AI models.

The DGX GH200 forms the pinnacle of hundreds of systems announced at the event. Together, they’re bringing generative AI and accelerated computing to millions of users.

Zooming out to the big picture, Huang announced more than 400 system configurations are coming to market powered by NVIDIA’s latest Hopper, Grace, Ada Lovelace and BlueField architectures. They aim to tackle the most complex challenges in AI, data science and high performance computing.

Acceleration in Every Size

To fit the needs of data centers of every size, Huang announced NVIDIA MGX, a modular reference architecture for creating accelerated servers. System makers will use it to quickly and cost-effectively build more than a hundred different server configurations to suit a wide range of AI, HPC and NVIDIA Omniverse applications.

MGX lets manufacturers build CPU and accelerated servers using a common architecture and modular components. It supports NVIDIA’s full line of GPUs, CPUs, data processing units (DPUs) and network adapters as well as x86 and Arm processors across a variety of air- and liquid-cooled chassis.

QCT and Supermicro will be the first to market with MGX designs appearing in August. Supermicro’s ARS-221GL-NR system announced at COMPUTEX will use the Grace CPU, while QCT’s S74G-2U system, also announced at the event, uses Grace Hopper.

ASRock Rack, ASUS, GIGABYTE and Pegatron will also use MGX to create next-generation accelerated computers.

5G/6G Calls for Grace Hopper

Separately, Huang said NVIDIA is helping shape future 5G and 6G wireless and video communications. A demo showed how AI running on Grace Hopper will transform today’s 2D video calls into more lifelike 3D experiences, providing an amazing sense of presence.

Laying the groundwork for new kinds of services, Huang announced NVIDIA is working with telecom giant SoftBank to build a distributed network of data centers in Japan. It will deliver 5G services and generative AI applications on a common cloud platform.

The data centers will use NVIDIA GH200 Superchips and NVIDIA BlueField-3 DPUs in modular MGX systems as well as NVIDIA Spectrum Ethernet switches to deliver the highly precise timing the 5G protocol requires. The platform will reduce cost by increasing spectral efficiency while reducing energy consumption.

The systems will help SoftBank explore 5G applications in autonomous driving, AI factories, augmented and virtual reality, computer vision and digital twins. Future uses could even include 3D video conferencing and holographic communications.

Turbocharging Cloud Networks

Separately, Huang unveiled NVIDIA Spectrum-X, a networking platform purpose-built to improve the performance and efficiency of Ethernet-based AI clouds. It combines Spectrum-4 Ethernet switches with BlueField-3 DPUs and software to deliver 1.7x gains in AI performance and power efficiency over traditional Ethernet fabrics.

NVIDIA Spectrum-X, Spectrum-4 switches and BlueField-3 DPUs are available now from system makers including Dell Technologies, Lenovo and Supermicro.

NVIDIA Spectrum-X for Ethernet AI clouds
NVIDIA Spectrum-X accelerates AI workflows that can experience performance losses on traditional Ethernet networks.

Bringing Game Characters to Life

Generative AI impacts how people play, too.

Huang announced NVIDIA Avatar Cloud Engine (ACE) for Games, a foundry service developers can use to build and deploy custom AI models for speech, conversation and animation. It will give non-playable characters conversational skills so they can respond to questions with lifelike personalities that evolve.

NVIDIA ACE for Games includes AI foundation models such as NVIDIA Riva to detect and transcribe the player’s speech. The text prompts NVIDIA NeMo to generate customized responses animated with NVIDIA Omniverse Audio2Face.

NVIDIA ACE for Games
NVIDIA ACE for Games provides a tool chain for bringing characters to life with generative AI.

Accelerating Gen AI on Windows

Huang described how NVIDIA and Microsoft are collaborating to drive innovation for Windows PCs in the generative AI era.

New and enhanced tools, frameworks and drivers are making it easier for PC developers to develop and deploy AI. For example, the Microsoft Olive toolchain for optimizing and deploying GPU-accelerated AI models and new graphics drivers will boost DirectML performance on Windows PCs with NVIDIA GPUs.

The collaboration will enhance and extend an installed base of 100 million PCs sporting RTX GPUs with Tensor Cores that boost performance of more than 400 AI-accelerated Windows apps and games.

Digitizing the World’s Largest Industries

Generative AI is also spawning new opportunities in the $700 billion digital advertising industry.

For example, WPP, the world’s largest marketing services organization, is working with NVIDIA to build a first-of-its kind generative AI-enabled content engine on Omniverse Cloud.

In a demo, Huang showed how creative teams will connect their 3D design tools such as Adobe Substance 3D, to build digital twins of client products in NVIDIA Omniverse. Then, content from generative AI tools trained on responsibly sourced data and built with NVIDIA Picasso will let them quickly produce virtual sets. WPP clients can then use the complete scene to generate a host of ads, videos and 3D experiences for global markets and users to experience on any web device.

“Today ads are retrieved, but in the future when you engage information much of it will be generated — the computing model has changed,” Huang said.

Factories Forge an AI Future

With an estimated 10 million factories, the $46 trillion manufacturing sector is a rich field for industrial digitalization.

“The world’s largest industries make physical things. Building them digitally first can save billions,” said Huang.

The keynote showed how electronics makers including Foxconn Industrial Internet, Innodisk, Pegatron, Quanta and Wistron are forging digital workflows with NVIDIA technologies to realize the vision of an entirely digital smart factory.

They’re using Omniverse and generative AI APIs to connect their design and manufacturing tools so they can build digital twins of factories. In addition, they use NVIDIA Isaac Sim for simulating and testing robots and NVIDIA Metropolis, a vision AI framework, for automated optical inspection.

The latest component, NVIDIA Metropolis for Factories, can create custom quality-control systems, giving manufacturers a competitive advantage. It’s helping companies develop state-of-the-art AI applications.

AI Speeds Assembly Lines

For example, Pegatron — which makes 300 products worldwide, including laptops and smartphones — is creating virtual factories with Omniverse, Isaac Sim and Metropolis. That lets it try out processes in a simulated environment, saving time and cost.

Pegatron also used the NVIDIA DeepStream software development kit to develop intelligent video applications that led to a 10x improvement in throughput.

Foxconn Industrial Internet, a service arm of the world’s largest technology manufacturer, is working with NVIDIA Metropolis partners to automate significant portions of its circuit-board quality-assurance inspection points.

Computex 2023 keynote
Crowds lined up for the keynote hours before doors opened.

In a video, Huang showed how Techman Robot, a subsidiary of Quanta, tapped NVIDIA Isaac Sim to optimize inspection on the Taiwan-based giant’s manufacturing lines. It’s essentially using simulated robots to train robots how to make better robots.

In addition, Huang announced a new platform to enable the next generation of autonomous mobile robot (AMR) fleets. Isaac AMR helps simulate, deploy and manage fleets of autonomous mobile robots.

A large partner ecosystem — including ADLINK, Aetina, Deloitte, Quantiphi and Siemens — is helping bring all these manufacturing solutions to market, Huang said.

It’s one more example of how NVIDIA is helping companies feel the benefits of generative AI with accelerated computing.

“It’s been a long time since I’ve seen you, so I had a lot to tell you,” he said after the two-hour talk to enthusiastic applause.

To learn more, watch the full keynote.

Read More

NVIDIA Brings Advanced Autonomy to Mobile Robots With Isaac AMR

NVIDIA Brings Advanced Autonomy to Mobile Robots With Isaac AMR

As mobile robot shipments surge to meet the growing demands of industries seeking operational efficiencies, NVIDIA is launching a new platform to enable the next generation of autonomous mobile robot (AMR) fleets.

Isaac AMR brings advanced mapping, autonomy and simulation to mobile robots and will soon be available for early customers, NVIDIA founder and CEO Jensen Huang announced during his keynote address at the COMPUTEX technology conference in Taipei.

Isaac AMR is a platform to simulate, validate, deploy, optimize and manage fleets of autonomous mobile robots. It includes edge-to-cloud software services, computing and a set of reference sensors and robot hardware to accelerate development and deployment of AMRs, reducing costs and time to market.

Mobile robot shipments are expected to climb from 251,000 units in 2023 to 1.6 million by 2028, with revenue forecast to jump from $12.6 billion to $64.5 billion in the period, according to ABI Research.

Simplifying the Path to Autonomy

Despite the explosive adoption of robots, the intralogistics industry faces challenges.

Traditionally, software applications for autonomous navigation are often coded from scratch for each robot, making rolling out autonomy across different robots complex. Also, warehouses, factories and fulfillment centers are enormous, frequently running a million square feet or more, making them hard to map for robots and keep updated. And integrating AMRs into existing workflows, fleet management and warehouse management systems can be complicated.

For those working in advanced robotics and seeking to migrate traditional forklifts or automated guided vehicles to fully autonomous mobile robots, Isaac AMR provides the blueprint to accelerate the migration to full autonomy, reducing costs and speeding deployment of state-of-the-art AMRs.

Orin-Based Reference Architecture 

Isaac AMR is built on the foundations of the  NVIDIA Nova Orin reference architecture.

Nova Orin is the brains and eyes of Isaac AMR. It integrates multiple sensors including stereo cameras, fisheye cameras, 2D and 3D lidars with the powerful NVIDIA Jetson AGX Orin system-on-module. The reference robot hardware comes with Nova Orin pre-integrated, making it easy for developers to evaluate Isaac AMR in their own environments.

The compute engine of Nova is Orin, which delivers access to some of the most advanced AI and hardware-accelerated algorithms that can be run using 275 tera operations per second (TOPS) of edge computing in real time.

The synchronized and calibrated sensor suite offers sensor diversity and redundancy for real-time 3D perception and mapping. Cloud-native tools for record, upload and replay enable easy debugging, map creation, training and analytics.

Isaac AMR: Mapping, Autonomy, Simulation

Isaac AMR offers a foundation for mapping, autonomy and simulation.

Isaac AMR accelerates mapping and semantic understanding of large environments by tying into DeepMap’s cloud-based service to help accelerate robot mapping of large facilities from weeks to days, offering centimeter-level accuracy without the need for a highly skilled team of technicians. It can generate rich 3D voxel maps, which can be used to create occupancy maps and semantic maps for multiple types of AMRs.

Additionally, Isaac AMR shortens the time to develop and deploy robots in large, highly dynamic and unstructured environments with autonomy that’s enabled by multimodal navigation with cloud-based fleet optimization using NVIDIA cuOpt software.

An accelerated and modular framework enables real-time camera and lidar perception. Planning and control using advanced path planners, behavior planners and use of semantic information make the robot operate autonomously in complex environments. A low-code, no-code interface makes it easy to rapidly develop and customize applications for different scenarios and use cases.

Finally, Isaac AMR simplifies robot operations by tapping into physics-based simulation from Isaac Sim, powered by NVIDIA Omniverse, an open development platform for industrial digitalization. This can bring digital twins to life, so the robot application can be developed, tested and customized for each customer before deploying in the physical world. This significantly reduces the operational cost and complexity of deploying AMRs.

Sign up for early access to Isaac AMR.


Read More

Techman Robot Selects NVIDIA Isaac Sim to Optimize Automated Optical Inspection

Techman Robot Selects NVIDIA Isaac Sim to Optimize Automated Optical Inspection

How do you help robots build better robots? By simulating even more robots.

NVIDIA founder and CEO Jensen Huang today showcased how leading electronics manufacturer Quanta is using AI-enabled robots to inspect the quality of its products.

In his keynote speech at this week’s COMPUTEX trade show in Taipei, Huang presented on how electronics manufacturers are digitalizing their state-of-the art factories

For example, robots from Quanta subsidiary Techman Robot tapped NVIDIA Isaac Sim — a robotics simulation application built on NVIDIA Omniverse — to develop a custom digital twin application to improve inspection on the Taiwan-based electronics provider’s manufacturing line. 

The below demo shows how Techman uses Isaac Sim to optimize the inspection of robots by robots on the manufacturing line. In effect, it’s robots building robots.

Automated optical inspection, or AOI, helps manufacturers more quickly identify defects and deliver high-quality products to their customers around the globe. The NVIDIA Metropolis vision AI framework, now enabled for AOI, is also used to optimize inspection workflows for products ranging from automobiles to circuit boards.

Techman developed AOI with its factory-floor robots by using Isaac Sim to simulate, test and optimize its state-of-the-art collaborative robots, or cobots, while using NVIDIA AI and GPUs for training in the cloud and inference on the robots themselves.

Isaac Sim is built on NVIDIA Omniverse — an open development platform for building and operating industrial metaverse applications.

Unique features of Techman’s robotic AOI solutions include their placement of the inspection camera directly on articulated robotic arms and GPUs integrated in the robot controller.

This allows the bots to inspect areas of products that fixed cameras simply can’t access, as well as use AI at the edge to instantly detect defects.

“The distinctive features of Techman’s robots — compared to other robot brands — lie in their built-in vision system and AI inference engine,” said Scott Huang, chief operations officer at Techman. “NVIDIA RTX GPUs power up their AI performance.”

But programming the movement of these robots can be time consuming.

A developer has to determine the precise arm positions, as well as the most efficient sequence, to capture potentially hundreds of images as quickly as possible.

This can involve several days of effort, exploring tens of thousands of possibilities to determine an optimal solution.

The solution: robot simulation.

Using Omniverse, Techman built a digital twin of the inspection robot — as well as the product to be inspected — in Isaac Sim.

Programming the robot in simulation reduced time spent on the task by over 70%, compared to programming manually on the real robot. Using an accurate 3D model of the product, the application can be developed in the digital twin even before the real product is manufactured, saving valuable time on the production line.

Then, with powerful optimization tools in Isaac Sim, Techman explored a massive number of program options in parallel on NVIDIA GPUs.

The end result was an efficient solution that reduced the cycle time of each inspection by 20%, according to Huang.

Every second saved in inspection time will drop down to the bottom line of Techman’s manufacturing customers.

Gathering and labeling real-world images of defects is costly and time consuming, so Techman turned to synthetic data to improve the quality of inspections. It used the Omniverse Replicator framework to quickly generate high-quality synthetic datasets.

These perfectly labeled images are used to train the AI models in the cloud and dramatically enhance their performance.

And dozens of AI models can be run at the edge — efficiently and with low latency thanks to NVIDIA technology — while inspecting particularly complicated products, some of which take more than 40 models to scrutinize their different aspects.

Learn more about how Isaac Sim on Omniverse, Metropolis and AI are streamlining the optical inspection process across products and industries by joining NVIDIA at COMPUTEX, where the Techman cobots will be on display.

Read More