Content moderation plays a pivotal role in maintaining online safety and upholding the values and standards of websites and social media platforms. Its significance is underscored by the protection it provides users from exposure to inappropriate content, safeguarding their well-being in digital spaces. For example, in the advertising industry, content moderation serves to shield brands from unfavorable associations, thereby contributing to brand elevation and revenue growth. Advertisers prioritize their brand’s alignment with appropriate content to uphold their reputation and avert negative publicity. Content moderation also assumes critical importance in the finance and healthcare sectors, where it serves multiple functions. It plays an important role in identifying and safeguarding sensitive personal identifiable and health information (PII, PHI). By adhering to internal standards and practices and complying with external regulations, content moderation enhances digital security for users. This way, it prevents the inadvertent sharing of confidential data on public platforms, ensuring the preservation of user privacy and data security.
In this post, we introduce a novel method to perform content moderation on image data with multi-modal pre-training and a large language model (LLM). With multi-modal pre-training, we can directly query the image content based on a set of questions of interest and the model will be able to answer these questions. This enables users to chat with the image to confirm if it contains any inappropriate content that violates the organization’s policies. We use the powerful generating capability of LLMs to generate the final decision including safe/unsafe labels and category type. In addition, by designing a prompt, we can make an LLM generate the defined output format, such as JSON format. The designed prompt template allows the LLM to determine if the image violates the moderation policy, identify the category of violation, explain why, and provide the output in a structured JSON format.
We use BLIP-2 as the multi-modal pre-training method. BLIP-2 is one of the state-of-the-art models in multi-modal pre-training and outperforms most of the existing methods in visual question answering, image captioning, and image text retrieval. For our LLM, we use Llama 2, the next generation open-source LLM, which outperforms existing open-source language models on many benchmarks, including reasoning, coding, proficiency, and knowledge tests. The following diagram illustrates the solution components.

Challenges in content moderation
Traditional content moderation methods, such as human-based moderation, can’t keep up with the growing volume of user-generated content (UGC). As the volume of UGC increases, human moderators can become overwhelmed and struggle to moderate content effectively. This results in a poor user experience, high moderation costs, and brand risk. Human-based moderation is also prone to errors, which can result in inconsistent moderation and biased decisions. To address these challenges, content moderation powered by machine learning (ML) has emerged as a solution. ML algorithms can analyze large volumes of UGC and identify content that violates the organization’s policies. ML models can be trained to recognize patterns and identify problematic content, such as hate speech, spam, and inappropriate material. According to the study Protect your users, brand, and budget with AI-powered content moderation, ML-powered content moderation can help organizations reclaim up to 95% of the time their teams spend moderating content manually. This allows organizations to focus their resources on more strategic tasks, such as community building and content creation. ML-powered content moderation can also reduce moderation costs because it’s more efficient than human-based moderation.
Despite the advantages of ML-powered content moderation, it still has further improvement space. The effectiveness of ML algorithms heavily relies on the quality of the data they are trained on. When models are trained using biased or incomplete data, they can make erroneous moderation decisions, exposing organizations to brand risks and potential legal liabilities. The adoption of ML-based approaches for content moderation brings several challenges that necessitate careful consideration. These challenges include:
- Acquiring labeled data – This can be a costly process, especially for complex content moderation tasks that require training labelers. This cost can make it challenging to gather large enough datasets to train a supervised ML model with ease. Additionally, the accuracy of the model heavily relies on the quality of the training data, and biased or incomplete data can result in inaccurate moderation decisions, leading to brand risk and legal liabilities.
- Model generalization – This is critical to adopting ML-based approaches. A model trained on one dataset may not generalize well to another dataset, particularly if the datasets have different distributions. Therefore, it is essential to ensure that the model is trained on a diverse and representative dataset to ensure it generalizes well to new data.
- Operational efficiency – This is another challenge when using conventional ML-based approaches for content moderation. Constantly adding new labels and retraining the model when new classes are added can be time-consuming and costly. Additionally, it is essential to ensure that the model is regularly updated to keep up with changes in the content being moderated.
- Explainability – End users may perceive the platform as biased or unjust if content gets flagged or removed without justification, resulting in a poor user experience. Similarly, the absence of clear explanations can render the content moderation process inefficient, time-consuming, and costly for moderators.
- Adversarial nature – The adversarial nature of image-based content moderation presents a unique challenge to conventional ML-based approaches. Bad actors can attempt to evade content moderation mechanisms by altering the content in various ways, such as using synonyms of images or embedding their actual content within a larger body of non-offending content. This requires constant monitoring and updating of the model to detect and respond to such adversarial tactics.
Multi-modal reasoning with BLIP-2
Multi-modality ML models refer to models that can handle and integrate data from multiple sources or modalities, such as images, text, audio, video, and other forms of structured or unstructured data. One of the popular multi-modality models is the visual-language models such as BLIP-2, which combines computer vision and natural language processing (NLP) to understand and generate both visual and textual information. These models enable computers to interpret the meaning of images and text in a way that mimics human understanding. Vision-language models can tackle a variety of tasks, including image captioning, image text retrieval, visual question answering, and more. For example, an image captioning model can generate a natural language description of an image, and an image text retrieval model can search for images based on a text query. Visual question answering models can respond to natural language questions about images, and multi-modal chatbots can use visual and textual inputs to generate responses. In terms of content moderation, you can use this capability to query against a list of questions.
BLIP-2 contains three parts. The first component is a frozen image encoder, ViT-L/14 from CLIP, which takes image data as input. The second component is a frozen LLM, FlanT5, which outputs text. The third component is a trainable module called Q-Former, a lightweight transformer that connects the frozen image encoder with the frozen LLM. Q-Former employs learnable query vectors to extract visual features from the frozen image encoder and feeds the most useful visual feature to the LLM to output the desired text.
The pre-training process involves two stages. In the first stage, vision-language representation learning is performed to teach Q-Former to learn the most relevant visual representation for the text. In the second stage, vision-to-language generative learning is performed by connecting the output of Q-Former to a frozen LLM and training Q-Former to output visual representations that can be interpreted by the LLM.
BLIP-2 achieves state-of-the-art performance on various vision-language tasks despite having significantly fewer trainable parameters than existing methods. The model also demonstrates emerging capabilities of zero-shot image-to-text generation that can follow natural language instructions. The following illustration is modified from the original research paper.

Solution overview
The following diagram illustrates the solution architecture.

In the following sections, we demonstrate how to deploy BLIP-2 to an Amazon SageMaker endpoint, and use BLIP-2 and an LLM for content moderation.
Prerequisites
You need an AWS account with an AWS Identity and Access Management (IAM) role with permissions to manage resources created as part of the solution. For details, refer to Create a standalone AWS account.
If this is your first time working with Amazon SageMaker Studio, you first need to create a SageMaker domain. Additionally, you may need to request a service quota increase for the corresponding SageMaker hosting instances. For the BLIP-2 model, we use an ml.g5.2xlarge SageMaker hosting instance. For the Llama 2 13B model, we use an ml.g5.12xlarge SageMaker hosting instance.
Deploy BLIP-2 to a SageMaker endpoint
You can host an LLM on SageMaker using the Large Model Inference (LMI) container that is optimized for hosting large models using DJLServing. DJLServing is a high-performance universal model serving solution powered by the Deep Java Library (DJL) that is programming language agnostic. To learn more about DJL and DJLServing, refer to Deploy large models on Amazon SageMaker using DJLServing and DeepSpeed model parallel inference. With the help of the SageMaker LMI container, the BLIP-2 model can be easily implemented with the Hugging Face library and hosted on SageMaker. You can run blip2-sagemaker.ipynb for this step.
To prepare the Docker image and model file, you need to retrieve the Docker image of DJLServing, package the inference script and configuration files as a model.tar.gz file, and upload it to an Amazon Simple Storage Service (Amazon S3) bucket. You can refer to the inference script and configuration file for more details.
inference_image_uri = image_uris.retrieve(
    framework="djl-deepspeed", region=sess.boto_session.region_name, version="0.22.1"
)
! tar czvf model.tar.gz blip2/
s3_code_artifact = sess.upload_data("model.tar.gz", bucket, s3_code_prefix)
When the Docker image and inference related files are ready, you create the model, the configuration for the endpoint, and the endpoint:
from sagemaker.utils import name_from_base
blip_model_version = "blip2-flan-t5-xl"
model_name = name_from_base(blip_model_version)
model = Model(
    image_uri=inference_image_uri,
    model_data=s3_code_artifact,
    role=role,
    name=model_name,
)
model.deploy(
    initial_instance_count=1,
    instance_type="ml.g5.2xlarge",
    endpoint_name=model_name
)
When the endpoint status becomes in service, you can invoke the endpoint for image captioning and the instructed zero-shot vision-to-language generation task. For the image captioning task, you only need to pass an image to the endpoint:
import base64
import json
from PIL import Image

smr_client = boto3.client("sagemaker-runtime")

def encode_image(img_file):
    with open(img_file, "rb") as image_file:
        img_str = base64.b64encode(image_file.read())
        base64_string = img_str.decode("latin1")
    return base64_string

def run_inference(endpoint_name, inputs):
    response = smr_client.invoke_endpoint(
        EndpointName=endpoint_name, Body=json.dumps(inputs)
    )
    print(response["Body"].read())

test_image = "carcrash-ai.jpeg"
base64_string = encode_image(test_image)
inputs = {"image": base64_string}
run_inference(endpoint_name, inputs)
For the instructed zero-shot vision-to-language generation task, in addition to the input image, you need to define the question as a prompt:
base64_string = encode_image(test_image)
inputs = {"prompt": "Question: what happened in this photo? Answer:", "image": base64_string}
run_inference(endpoint_name, inputs)
Use BLIP-2 and LLM for content moderation
In this stage, you can make queries on the given image and retrieve hidden information. With the LLM, you organize the queries and retrieve information to generate the JSON format result. You can roughly split this task into the following two sub-tasks:
- Extract information from the image with the BLIP-2 model.
- Generate the final result and explanation with the LLM.
Extract information from the image with the BLIP-2 model
To retrieve enough useful hidden information from the given image, you need to define queries. Because each query will invoke the endpoint once, many queries will lead to longer processing time. Therefore, we suggest making queries high quality and cover all policies but also without duplicated. In our sample code, we define the queries as follows:
check_list = [
"Does this photo contain complete naked person?",
"Does this photo contain topless person?",
"Does this photo contain weapon?",
"Does this photo contain contact information?",
"Does this photo contain a smoker?",
"Does this photo contain blood?",
"Are there persons fighting in this photo?",
"Does this photo contain harassment words?"
]
With the preceding queries, invoke the endpoint of BLIP-2 to retrieve the information with the following code:
test_image = "./surf_swimwear.png"
raw_image = Image.open(test_image).convert('RGB')

base64_string = encode_image(test_image)
conversations = """"""
for question in check_list:
    inputs = {"prompt": f"Question: {question}? Answer:", "image": base64_string}
    response = run_inference(endpoint_name, inputs)
    conversations += f"""
Question: {question}
Answer: {response}.
"""
In addition to the information retrieved by queries, you can get information with the image captioning task by invoking the endpoint without the prompt field in the payload:
inputs = {"image": base64_string}
response = smr_client.invoke_endpoint(
EndpointName=endpoint_name, Body=json.dumps(inputs)
)
image_caption = response["Body"].read().decode('utf-8')
You can combine the contents of queries and answers with the image caption and use this retrieved information for the downstream task, described in the next section below.
Generate the final result and explanation with the LLM
Large language models (LLMs) such as Llama 2 can generate high-quality results with the right prompt template. Using Amazon SageMaker JumpStart, ML practitioners can choose from a broad selection of publicly available foundation models. With just a few clicks in SageMaker Studio, you can now discover and deploy Llama 2.
The final results rely on a LLM with a specific prompt template. Such prompt consists of: the moderation policy based on categories of inappropriate or offensive moderation categories; image information extracted from BLIP-2; the question template to the LLM asking if the photo contains unsafe content and requesting its category and reason if unsafe; and instructions to output the results in JSON format. The designed prompt template allows the LLM to determine if the image violates the moderation policy, identify the category of violation, explain why, and provide the output in a structured JSON format.
The core source code is as follows:
prompt_template = f"""
The following is our company's content moderation policy, based on the moderation policy, we gather image information from the user uploaded image. Please answer the question with json format.

###### moderation policy ######
{moderation_policy}

###### Image information ######
{conversations}

###### Question ######
Based on the following Moderation policy and QA, tell me if the photo containes unsafe content, also give its category and reason if it's unsafe. Please anwser the question with the following format and only put explanation into the reason field:
"""

prompt_template += """
{
    "flag": "xxx",
    "category": "xxx",
    "reason": "the reason is ..."
}
"""

dialog = [
    {"role": "user", "content": prompt_template}
]
You can customize the prompt based on your own use case. Refer to the notebook for more details. When the prompt is ready, you can invoke the LLM endpoint to generate results:
endpoint_name = "jumpstart-dft-meta-textgeneration-llama-2-70b-f"

def query_endpoint(payload):
    client = boto3.client("sagemaker-runtime")
    response = client.invoke_endpoint(
        EndpointName=endpoint_name,
        ContentType="application/json",
        Body=json.dumps(payload),
        CustomAttributes="accept_eula=true",
    )
    response = response["Body"].read().decode("utf8")
    response = json.loads(response)
    return response

payload = {
    "inputs": [dialog],
    "parameters": {"max_new_tokens": 256, "top_p": 0.9, "temperature": 0.5}
}
result = query_endpoint(payload)[0]
Part of the generated output is as follows:
> Assistant:  {
    "flag": "unsafe",
    "category": "Suggestive",
    "reason": "The photo contains a topless person, which is considered suggestive content."
}

Explanation:
The photo contains a topless person, which violates the moderation policy's rule number 2, which states that suggestive content includes "Female Swimwear Or Underwear, Male Swimwear Or Underwear, Partial Nudity, Barechested Male, Revealing Clothes and Sexual Situations." Therefore, the photo is considered unsafe and falls under the category of Suggestive.
Occasionally, Llama 2 attaches additional explanation besides the answer from the assistant. You could use the parsing code to extract JSON data from the original generated results:
answer = result['generation']['content'].split('}')[0]+'}'
json.loads(answer)
Advantages of generative approaches
The preceding sections showed how to implement the core part of model inference. In this section, we cover various aspects of generative approaches, including comparisons with conventional approaches and perspectives.
The following table compares each approach.
| . |
Generative Approach |
Classification Approach |
| Acquiring labeled data |
Pre-trained model on a large number of images, zero-shot inference |
Requires data from all types of categories |
| Model generalization |
Pre-trained model with various types of images |
Requires a large volume of content moderation related data to improve model generalization |
| Operational efficiency |
Zero-shot capabilities |
Requires training the model for recognizing different patterns, and retraining when labels are added |
| Explainability |
Reasoning as the text output, great user experience |
Hard to achieve reasoning, hard to explain and interpret |
| Adversarial nature |
Robust |
High frequency retraining |
Potential use cases of multi-modal reasoning beyond content moderation
The BLIP-2 models can be applied to fit multiple purposes with or without fine-tuning, which includes the following:
- Image captioning – This asks the model to generate a text description for the image’s visual content. As illustrated in the following example image (left), we can have “a man is standing on the beach with a surfboard” as the image description.
- Visual question answering – As the example image in the middle shows, we can ask “Is it commercial related content” and we have “yes” as the answer. In addition, BLIP-2 supports the multi-round conversation and outputs the following question: “Why do you think so?” Based on the visual cue and LLM capabilities, BLIP-2 outputs “it’s a sign for amazon.”
- Image text retrieval – Given the question as “Text on the image”, we can extract the image text “it’s monday but keep smiling” as demonstrated in the image on the right.
The following images show examples to demonstrate the zero-shot image-to-text capability of visual knowledge reasoning.

As we can see from various examples above, multi-modality models open up new opportunities for solving complex problems that traditional single-modality models would struggle to address.
Clean up
To avoid incurring future charges, delete the resources created as part of this post. You can do this by following the instructions in the notebook cleanup section, or delete the created endpoints via the SageMaker console and resources stored in the S3 bucket.
Conclusion
In this post, we discussed the importance of content moderation in the digital world and highlighted its challenges. We proposed a new method to help improve content moderation with image data and perform question answering against the images to automatically extract useful information. We also provided further discussion on the advantages of using a generative AI-based approach compared to the traditional classification-based approach. Lastly, we illustrated the potential use cases of visual-language models beyond content moderation.
We encourage you to learn more by exploring SageMaker and building a solution using the multi-modality solution provided in this post and a dataset relevant to your business.
About the Authors
 Gordon Wang is a Senior AI/ML Specialist TAM at AWS. He supports strategic customers with AI/ML best practices cross many industries. He is passionate about computer vision, NLP, generative AI, and MLOps. In his spare time, he loves running and hiking.
 Yanwei Cui, PhD, is a Senior Machine Learning Specialist Solutions Architect at AWS. He started machine learning research at IRISA (Research Institute of Computer Science and Random Systems), and has several years of experience building AI-powered industrial applications in computer vision, natural language processing, and online user behavior prediction. At AWS, he shares his domain expertise and helps customers unlock business potentials and drive actionable outcomes with machine learning at scale. Outside of work, he enjoys reading and traveling.
 Melanie Li, PhD, is a Senior AI/ML Specialist TAM at AWS based in Sydney, Australia. She helps enterprise customers build solutions using state-of-the-art AI/ML tools on AWS and provides guidance on architecting and implementing ML solutions with best practices. In her spare time, she loves to explore nature and spend time with family and friends.
Read More


 Since Google was founded, we’ve worked to answer hard questions, help people get answers to theirs, and move technology forward for the world.
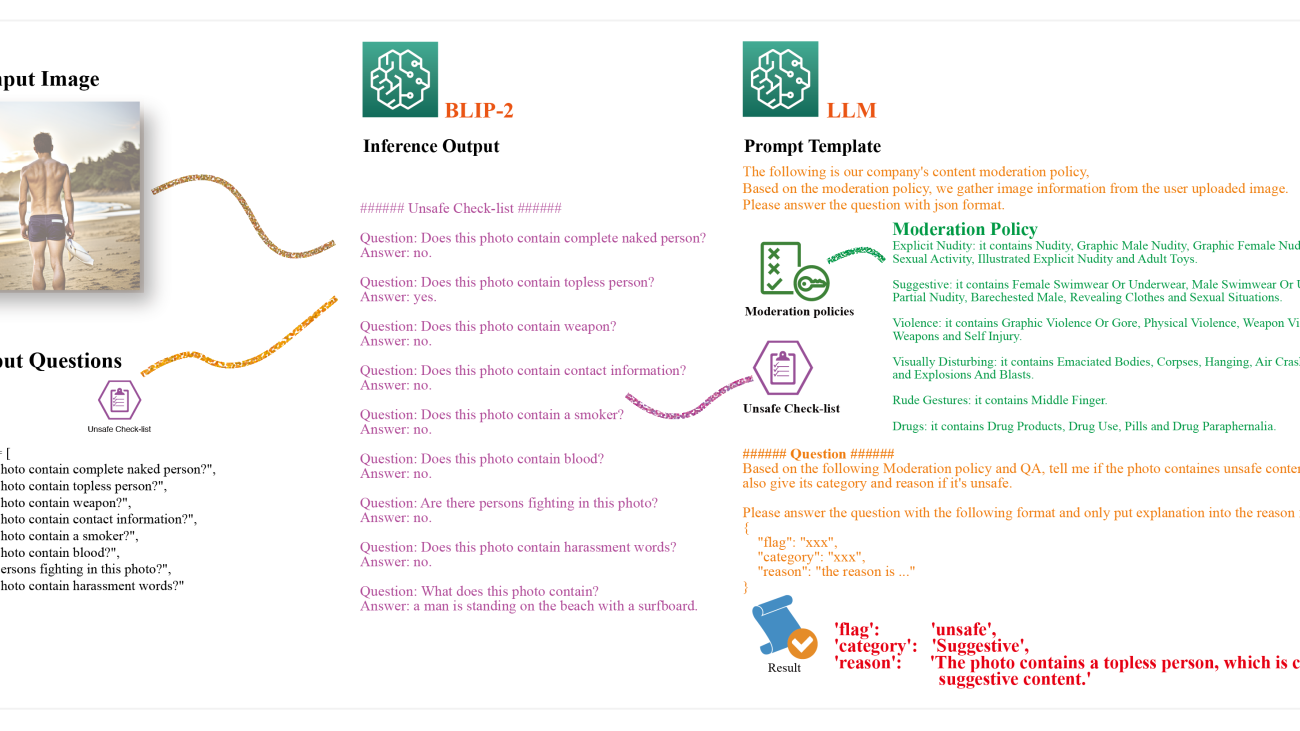


 Ravi Patankar is a technical leader for IoT related analytics at Carrier’s Residential HVAC Unit. He formulates analytics problems related to diagnostics and prognostics and provides direction for ML/deep learning-based analytics solutions and architecture.
 Dan Volk is a Data Scientist at the AWS Generative AI Innovation Center. He has ten years of experience in machine learning, deep learning and time-series analysis and holds a Master’s in Data Science from UC Berkeley. He is passionate about transforming complex business challenges into opportunities by leveraging cutting-edge AI technologies.
 Yingwei Yu is an Applied Scientist at AWS Generative AI Innovation Center. He has experience working with several organizations across industries on various proof-of-concepts in machine learning, including NLP, time-series analysis, and generative AI technologies. Yingwei received his PhD in computer science from Texas A&M University.
 Yanxiang Yu is an Applied Scientist at Amazon Web Services, working on the Generative AI Innovation Center. With over 8 years of experience building AI and machine learning models for industrial applications, he specializes in generative AI, computer vision, and time series modeling. His work focuses on finding innovative ways to apply advanced generative techniques to real-world problems.
 Diego Socolinsky is a Senior Applied Science Manager with the AWS Generative AI Innovation Center, where he leads the delivery team for the Eastern US and Latin America regions. He has over twenty years of experience in machine learning and computer vision, and holds a PhD degree in mathematics from The Johns Hopkins University.
 Kexin Ding is a fifth-year Ph.D. candidate in computer science at UNC-Charlotte. Her research focuses on applying deep learning methods for analyzing multi-modal data, including medical image and genomics sequencing data.
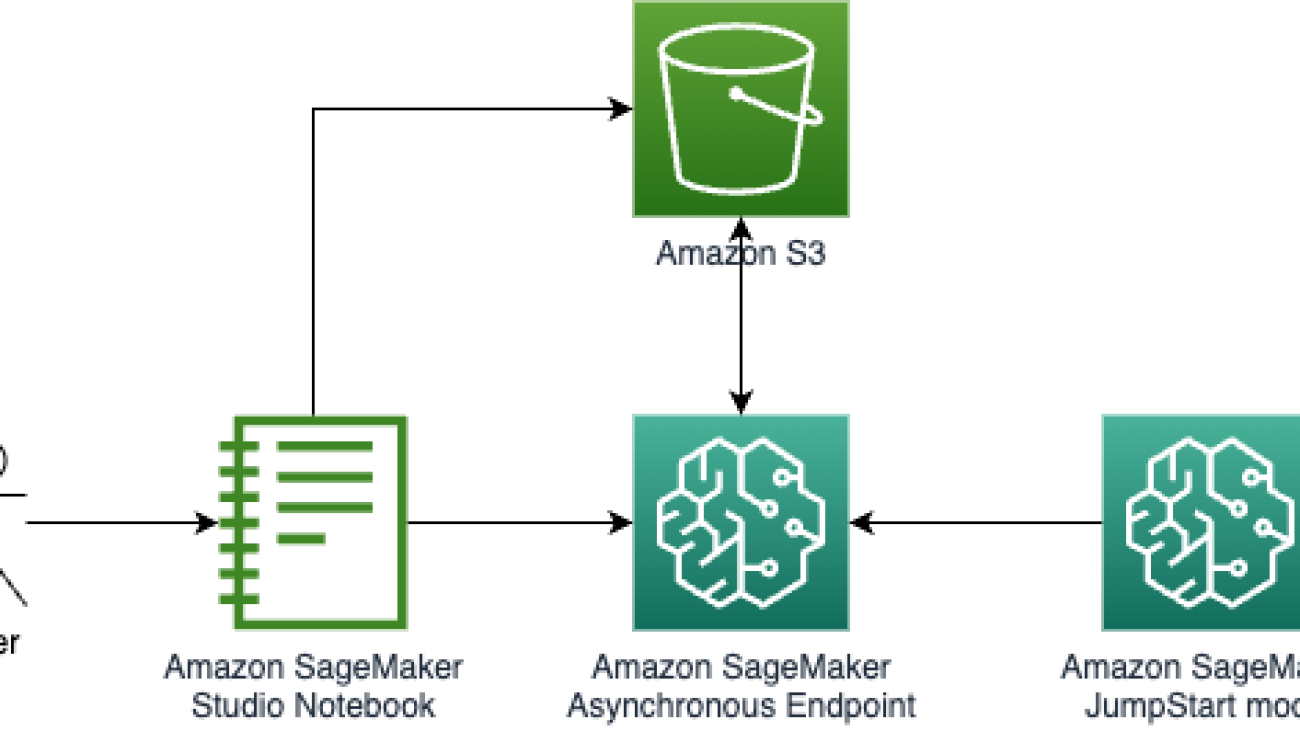


 Davide Gallitelli is a Specialist Solutions Architect for AI/ML in the EMEA region. He is based in Brussels and works closely with customers throughout Benelux. He has been a developer since he was very young, starting to code at the age of 7. He started learning AI/ML at university, and has fallen in love with it since then.