Alternating updates for efficient transformers

Alternating updates for efficient transformers

Contemporary deep learning models have been remarkably successful in many domains, ranging from natural language to computer vision. Transformer neural networks (transformers) are a popular deep learning architecture that today comprise the foundation for most tasks in natural language processing and also are starting to extend to applications in other domains, such as computer vision, robotics, and autonomous driving. Moreover, they form the backbone of all the current state-of-the-art language models.

Increasing scale in Transformer networks has led to improved performance and the emergence of behavior not present in smaller networks. However, this increase in scale often comes with prohibitive increases in compute cost and inference latency. A natural question is whether we can reap the benefits of larger models without incurring the computational burden.

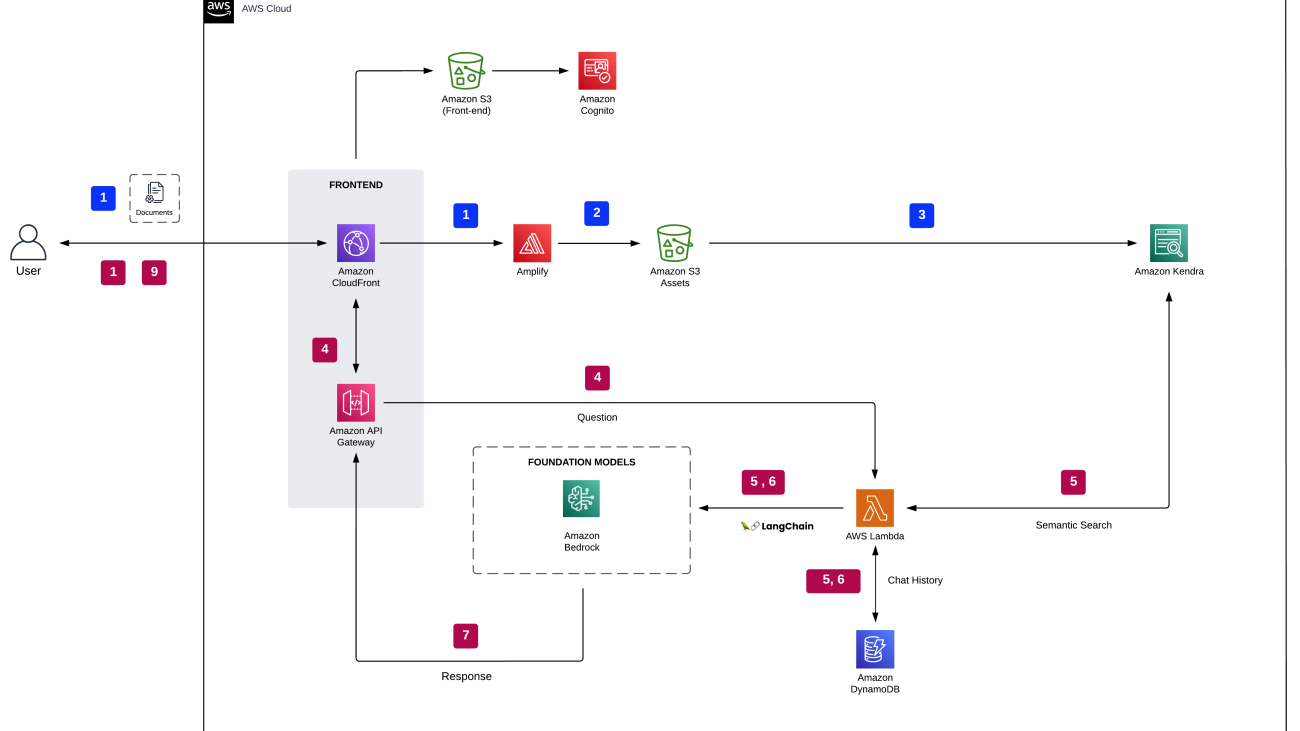
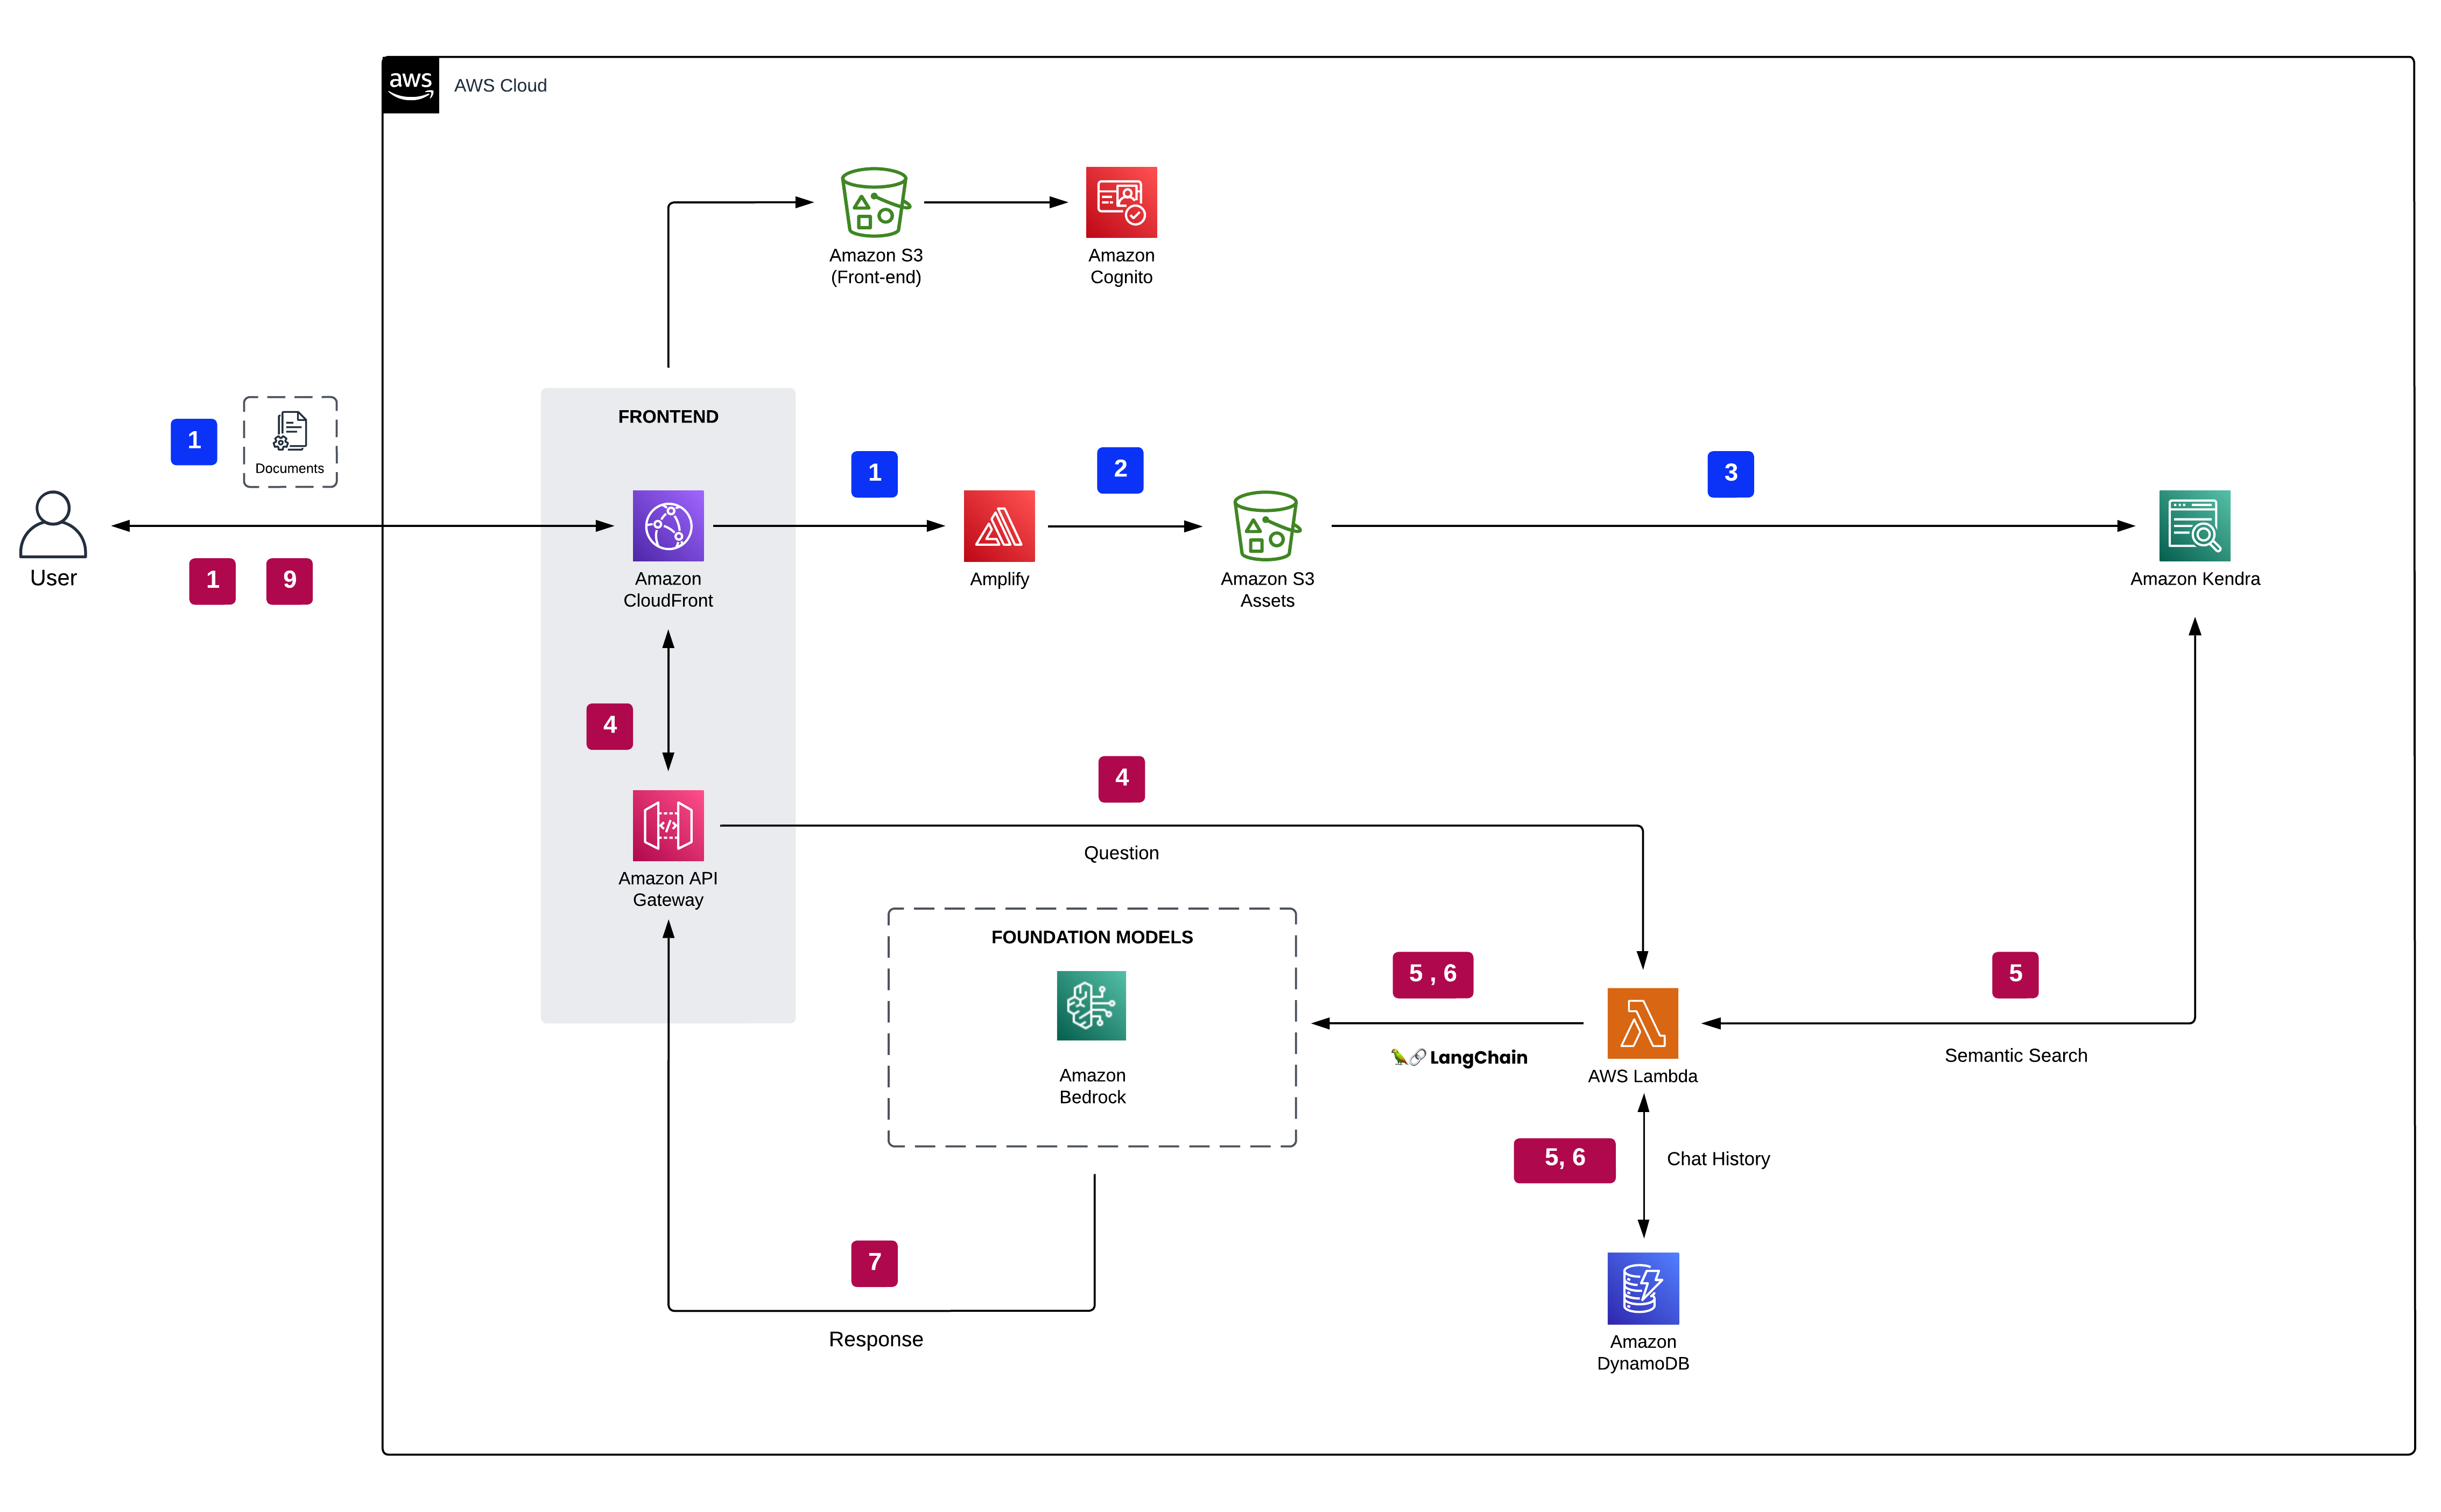
In “Alternating Updates for Efficient Transformers”, accepted as a Spotlight at NeurIPS 2023, we introduce AltUp, a method to take advantage of increased token representation without increasing the computation cost. AltUp is easy to implement, widely applicable to any transformer architecture, and requires minimal hyperparameter tuning. For instance, using a variant of AltUp on a 770M parameter T5-Large model, the addition of ~100 parameters yields a model with a significantly better quality.

Background

To understand how we can achieve this, we dig into how transformers work. First, they partition the input into a sequence of tokens. Each token is then mapped to an embedding vector (via the means of an embedding table) called the token embedding. We call the dimension of this vector the token representation dimension. The Transformer then operates on this sequence of token embeddings by applying a series of computation modules (called layers) using its network parameters. The number of parameters in each transformer layer is a function of the layer’s width, which is determined by the token representation dimension.

To achieve benefits of scale without incurring the compute burden, prior works such as sparse mixture-of-experts (Sparse MoE) models (e.g., Switch Transformer, Expert Choice, V-MoE) have predominantly focused on efficiently scaling up the network parameters (in the self-attention and feedforward layers) by conditionally activating a subset based on the input. This allows us to scale up network size without significantly increasing compute per input. However, there is a research gap on scaling up the token representation dimension itself by conditionally activating parts of the token representation vector.

Recent works (for example, scaling laws and infinite-width networks) have empirically and theoretically established that a wider token representation helps in learning more complicated functions. This phenomenon is also evident in modern architectures of increasing capability. For instance, the representation dimension grows from 512 (small) to 768 (base) and 1024 (corresponding to models with 770M, 3B, and 11B parameters respectively) in T5 models, and from 4096 (8B) to 8192 (64B) and 18432 (540B) in PaLM models. A widened representation dimension also significantly improves performance for dual encoder retrieval models. However, naïvely widening the representation vector requires one to increase the model dimension accordingly, which quadratically1 increases the amount of computation in the feedforward computation.

Method

AltUp works by partitioning a widened representation vector into equal sized blocks, processing only a single block at each layer, and using an efficient prediction-correction mechanism to infer the outputs of the other blocks (shown below on the right). This allows AltUp to simultaneously keep the model dimension, hence the computation cost, roughly constant and take advantage of using an increased token dimension. The increased token dimension allows the model to pack more information into each token’s embedding. By keeping the width of each transformer layer constant, AltUp avoids incurring the quadratic increase in computation cost that would otherwise be present with a naïve expansion of the representation.

An illustration of widening the token representation without (left) and with AltUp (right). This widening causes a near-quadratic increase in computation in a vanilla transformer due to the increased layer width. In contrast, Alternating Updates keeps the layer width constant and efficiently computes the output by operating on a sub-block of the representation at each layer.

More specifically, the input to each layer is two or more blocks, one of which is passed into the 1x width transformer layer (see figure below). We refer to this block as the “activated” block. This computation results in the exact output for the activated block. In parallel, we invoke a lightweight predictor that computes a weighted combination of all the input blocks. The predicted values, along with the computed value of the activated block, are passed on to a lightweight corrector that updates the predictions based on the observed values. This correction mechanism enables the inactivated blocks to be updated as a function of the activated one. Both the prediction and correction steps only involve a limited number of vector additions and multiplications and hence are much faster than a regular transformer layer. We note that this procedure can be generalized to an arbitrary number of blocks.

The predictor and corrector computations: The predictor mixes sub-blocks with trainable scalar coefficients; the corrector returns a weighted average of the predictor output and the transformer output. The predictor and corrector perform scalar-vector multiplications and incur negligible computation cost compared to the transformer. The predictor outputs a linear mixing of blocks with scalar mixing coefficients pi, j , and the corrector combines predictor output and transformer output with weights gi.

At a higher level, AltUp is similar to sparse MoE in that it is a method to add capacity to a model in the form of conditionally accessed (external) parameters. In sparse MoE, the additional parameters take the form of feed forward network (FFN) experts and the conditionality is with respect to the input. In AltUp, the external parameters come from the widened embedding table and the conditionality takes the form of alternating block-wise activation of the representation vector, as in the figure above. Hence, AltUp has the same underpinning as sparse MoE models.

An advantage of AltUp over sparse MoE is that it does not necessitate sharding since the number of additional parameters introduced is a factor2 of the embedding table size, which typically makes up a small fraction of the overall model size. Moreover, since AltUp focuses on conditionally activating parts of a wider token representation, it can be applied synergistically with orthogonal techniques like MoE to obtain complementary performance gains.

Evaluation

AltUp was evaluated on T5 models on various benchmark language tasks. Models augmented with AltUp are uniformly faster than the extrapolated dense models at the same accuracy. For example, we observe that a T5 Large model augmented with AltUp leads to a 27%, 39%, 87%, and 29% speedup on GLUE, SuperGLUE, SQuAD, and Trivia-QA benchmarks, respectively.

Evaluations of AltUp on T5 models of various sizes and popular benchmarks. AltUp consistently leads to sizable speedups relative to baselines at the same accuracy. Latency is measured on TPUv3 with 8 cores. Speedup is defined as the change in latency divided by the AltUp latency (B = T5 Base, L = T5 Large, XL = T5 XL models).

AltUp’s relative performance improves as we apply it to larger models — compare the relative speedup of T5 Base + AltUp to that of T5 Large + AltUp. This demonstrates the scalability of AltUp and its improved performance on even larger models. Overall, AltUp consistently leads to models with better predictive performance than the corresponding baseline models with the same speed on all evaluated model sizes and benchmarks.

Extensions: Recycled AltUp

The AltUp formulation adds an insignificant amount of per-layer computation, however, it does require using a wider embedding table. In certain scenarios where the vocabulary size (i.e., the number of distinct tokens the tokenizer can produce) is very large, this may lead to a non-trivial amount of added computation for the initial embedding lookup and the final linear + softmax operation. A very large vocabulary may also lead to an undesirable amount of added embedding parameters. To address this, Recycled-AltUp is an extension of AltUp that avoids these computational and parameter costs by keeping the embedding table’s width the same.

Illustration of the Architecture for Recycled-AltUp with K = 2.

In Recycled-AltUp, instead of widening the initial token embeddings, we replicate the embeddings K times to form a wider token representation. Hence, Recycled-AltUp adds virtually no additional parameters relative to the baseline transformer, while benefiting from a wider token representation.

Recycled-AltUp on T5-B/L/XL compared to baselines. Recycled-AltUp leads to strict improvements in pre-training performance without incurring any perceptible slowdown.

We also evaluate the lightweight extension of AltUp, Recycled-AltUp, with K = 2 on T5 base, large, and XL models and compare its pre-trained accuracy and speed to those of baselines. Since Recycled-AltUp does not require an expansion in the embedding table dimension, the models augmented with it have virtually the same number of trainable parameters as the baseline models. We again observe consistent improvements compared to the dense baselines.

Why does AltUp work?

AltUp increases a model’s capacity by adding and efficiently leveraging auxiliary parameters to the embedding table, and maintaining the higher dimensional representation across the layers. We believe that a key ingredient in this computation lies in AltUp’s prediction mechanism that performs an ensemble of the different blocks. This weighted combination enables continuous message passing to the entire vector despite activating only sub-blocks of it in each layer. Recycled-AltUp, on the other hand, does not add any additional parameters to the token embeddings. However, it still confers the benefit of simulating computation in a higher dimensional representation space since a higher dimensional representation vector is maintained when moving from one transformer layer to another. We conjecture that this aids the training by augmenting the flow of information through the network. An interesting research direction is to explore whether the benefits of Recycled-AltUp can be explained entirely by more favorable training dynamics.

Acknowledgements

We thank our collaborators Cenk Baykal, Dylan Cutler, and Rina Panigrahy at Google Research, and Nikhil Ghosh at University of California, Berkeley (work done during research internship at Google).


1This is because the feedforward layers of a Transformer are typically scaled quadratically with the model dimension. 

2This factor depends on the user-specified expansion factor, but is typically 1, i.e., we double the embedding table dimension. 

Read More

Harnessing the power of enterprise data with generative AI: Insights from Amazon Kendra, LangChain, and large language models

Harnessing the power of enterprise data with generative AI: Insights from Amazon Kendra, LangChain, and large language models

Large language models (LLMs) with their broad knowledge, can generate human-like text on almost any topic. However, their training on massive datasets also limits their usefulness for specialized tasks. Without continued learning, these models remain oblivious to new data and trends that emerge after their initial training. Furthermore, the cost to train new LLMs can prove prohibitive for many enterprise settings. However, it’s possible to cross-reference a model answer with the original specialized content, thereby avoiding the need to train a new LLM model, using Retrieval-Augmented Generation (RAG).

RAG empowers LLMs by giving them the ability to retrieve and incorporate external knowledge. Instead of relying solely on their pre-trained knowledge, RAG allows models to pull data from documents, databases, and more. The model then skillfully integrates this outside information into its generated text. By sourcing context-relevant data, the model can provide informed, up-to-date responses tailored to your use case. The knowledge augmentation also reduces the likelihood of hallucinations and inaccurate or nonsensical text. With RAG, foundation models become adaptable experts that evolve as your knowledge base grows.

Today, we are excited to unveil three generative AI demos, licensed under MIT-0 license:

  • Amazon Kendra with foundational LLM – Utilizes the deep search capabilities of Amazon Kendra combined with the expansive knowledge of LLMs. This integration provides precise and context-aware answers to complex queries by drawing from a diverse range of sources.
  • Embeddings model with foundational LLM – Merges the power of embeddings—a technique to capture semantic meanings of words and phrases—with the vast knowledge base of LLMs. This synergy enables more accurate topic modeling, content recommendation, and semantic search capabilities.
  • Foundation Models Pharma Ad Generator – A specialized application tailored for the pharmaceutical industry. Harnessing the generative capabilities of foundational models, this tool creates convincing and compliant pharmaceutical advertisements, ensuring content adheres to industry standards and regulations.

These demos can be seamlessly deployed in your AWS account, offering foundational insights and guidance on utilizing AWS services to create a state-of-the-art LLM generative AI question and answer bot and content generation.

In this post, we explore how RAG combined with Amazon Kendra or custom embeddings can overcome these challenges and provide refined responses to natural language queries.

Solution overview

By adopting this solution, you can gain the following benefits:

  • Improved information access – RAG allows models to pull in information from vast external sources, which can be especially useful when the pre-trained model’s knowledge is outdated or incomplete.
  • Scalability – Instead of training a model on all available data, RAG allows models to retrieve relevant information on the fly. This means that as new data becomes available, it can be added to the retrieval database without needing to retrain the entire model.
  • Memory efficiency – LLMs require significant memory to store parameters. With RAG, the model can be smaller because it doesn’t need to memorize all details; it can retrieve them when needed.
  • Dynamic knowledge update – Unlike conventional models with a set knowledge endpoint, RAG’s external database can undergo regular updates, granting the model access to up-to-date information. The retrieval function can be fine-tuned for distinct tasks. For example, a medical diagnostic task can source data from medical journals, ensuring the model garners expert and pertinent insights.
  • Bias mitigation – The ability to draw from a well-curated database offers the potential to minimize biases by ensuring balanced and impartial external sources.

Before diving into the integration of Amazon Kendra with foundational LLMs, it’s crucial to equip yourself with the necessary tools and system requirements. Having the right setup in place is the first step towards a seamless deployment of the demos.

Prerequisites

You must have the following prerequisites:

Although it’s possible to set up and deploy the infrastructure detailed in this tutorial from your local computer, AWS Cloud9 offers a convenient alternative. Pre-equipped with tools like AWS CLI, AWS CDK, and Docker, AWS Cloud9 can function as your deployment workstation. To use this service, simply set up the environment via the AWS Cloud9 console.

With the prerequisites out of the way, let’s dive into the features and capabilities of Amazon Kendra with foundational LLMs.

Amazon Kendra with foundational LLM

Amazon Kendra is an advanced enterprise search service enhanced by machine learning (ML) that provides out-of-the-box semantic search capabilities. Utilizing natural language processing (NLP), Amazon Kendra comprehends both the content of documents and the underlying intent of user queries, positioning it as a content retrieval tool for RAG based solutions. By using the high-accuracy search content from Kendra as a RAG payload, you can get better LLM responses. The use of Amazon Kendra in this solution also enables personalized search by filtering responses according to the end-user content access permissions.

The following diagram shows the architecture of a generative AI application using the RAG approach.

Documents are processed and indexed by Amazon Kendra through the Amazon Simple Storage Service (Amazon S3) connector. Customer requests and contextual data from Amazon Kendra are directed to an Amazon Bedrock foundation model. The demo lets you choose between Amazon’s Titan, AI21’s Jurassic, and Anthropic’s Claude models supported by Amazon Bedrock. The conversation history is saved in Amazon DynamoDB, offering added context for the LLM to generate responses.

We have provided this demo in the GitHub repo. Refer to the deployment instructions within the readme file for deploying it into your AWS account.

The following steps outline the process when a user interacts with the generative AI app:

  1. The user logs in to the web app authenticated by Amazon Cognito.
  2. The user uploads one or more documents into Amazon S3.
  3. The user runs an Amazon Kendra sync job to ingest S3 documents into the Amazon Kendra index.
  4. The user’s question is routed through a secure WebSocket API hosted on Amazon API Gateway backed by a AWS Lambda function.
  5. The Lambda function, empowered by the LangChain framework—a versatile tool designed for creating applications driven by AI language models—connects to the Amazon Bedrock endpoint to rephrase the user’s question based on chat history. After rephrasing, the question is forwarded to Amazon Kendra using the Retrieve API. In response, the Amazon Kendra index displays search outcomes, providing excerpts from pertinent documents sourced from the enterprise’s ingested data.
  6. The user’s question along with the data retrieved from the index are sent as a context in the LLM prompt. The response from the LLM is stored as chat history within DynamoDB.
  7. Finally, the response from the LLM is sent back to the user.

Document indexing workflow

The following is the procedure for processing and indexing documents:

  1. Users submit documents via the user interface (UI).
  2. Documents are transferred to an S3 bucket utilizing the AWS Amplify API.
  3. Amazon Kendra indexes new documents in the S3 bucket through the Amazon Kendra S3 connector.

Benefits

The following list highlights the advantages of this solution:

  • Enterprise-level retrieval – Amazon Kendra is designed for enterprise search, making it suitable for organizations with vast amounts of structured and unstructured data.
  • Semantic understanding – The ML capabilities of Amazon Kendra ensure that retrieval is based on deep semantic understanding and not just keyword matches.
  • Scalability – Amazon Kendra can handle large-scale data sources and provides quick and relevant search results.
  • Flexibility – The foundational model can generate answers based on a wide range of contexts, ensuring the system remains versatile.
  • Integration capabilities – Amazon Kendra can be integrated with various AWS services and data sources, making it adaptable for different organizational needs.

Embeddings model with foundational LLM

An embedding is a numerical vector that represents the core essence of diverse data types, including text, images, audio, and documents. This representation not only captures the data’s intrinsic meaning, but also adapts it for a wide range of practical applications. Embedding models, a branch of ML, transform complex data, such as words or phrases, into continuous vector spaces. These vectors inherently grasp the semantic connections between data, enabling deeper and more insightful comparisons.

RAG seamlessly combines the strengths of foundational models, like transformers, with the precision of embeddings to sift through vast databases for pertinent information. Upon receiving a query, the system utilizes embeddings to identify and extract relevant sections from an extensive body of data. The foundational model then formulates a contextually precise response based on this extracted information. This perfect synergy between data retrieval and response generation allows the system to provide thorough answers, drawing from the vast knowledge stored in expansive databases.

In the architectural layout, based on their UI selection, users are guided to either the Amazon Bedrock or Amazon SageMaker JumpStart foundation models. Documents undergo processing, and vector embeddings are produced by the embeddings model. These embeddings are then indexed using FAISS to enable efficient semantic search. Conversation histories are preserved in DynamoDB, enriching the context for the LLM to craft responses.

The following diagram illustrates the solution architecture and workflow.

We have provided this demo in the GitHub repo. Refer to the deployment instructions within the readme file for deploying it into your AWS account.

Embeddings model

The responsibilities of the embeddings model are as follows:

  • This model is responsible for converting text (like documents or passages) into dense vector representations, commonly known as embeddings.
  • These embeddings capture the semantic meaning of the text, allowing for efficient and semantically meaningful comparisons between different pieces of text.
  • The embeddings model can be trained on the same vast corpus as the foundational model or can be specialized for specific domains.

Q&A workflow

The following steps describe the workflow of the question answering over documents:

  1. The user logs in to the web app authenticated by Amazon Cognito.
  2. The user uploads one or more documents to Amazon S3.
  3. Upon document transfer, an S3 event notification triggers a Lambda function, which then calls the SageMaker embedding model endpoint to generate embeddings for the new document. The embeddings model converts the question into a dense vector representation (embedding). The resulting vector file is securely stored within the S3 bucket.
  4. The FAISS retriever compares this question embedding with the embeddings of all documents or passages in the database to find the most relevant passages.
  5. The passages, along with the user’s question, are provided as context to the foundational model. The Lambda function uses the LangChain library and connects to the Amazon Bedrock or SageMaker JumpStart endpoint with a context-stuffed query.
  6. The response from the LLM is stored in DynamoDB along with the user’s query, the timestamp, a unique identifier, and other arbitrary identifiers for the item such as question category. Storing the question and answer as discrete items allows the Lambda function to easily recreate a user’s conversation history based on the time when questions were asked.
  7. Finally, the response is sent back to the user via a HTTPs request through the API Gateway WebSocket API integration response.

Benefits

The following list describe the benefits of this solution:

  • Semantic understanding – The embeddings model ensures that the retriever selects passages based on deep semantic understanding, not just keyword matches.
  • Scalability – Embeddings allow for efficient similarity comparisons, making it feasible to search through vast databases of documents quickly.
  • Flexibility – The foundational model can generate answers based on a wide range of contexts, ensuring the system remains versatile.
  • Domain adaptability – The embeddings model can be trained or fine-tuned for specific domains, allowing the system to be adapted for various applications.

Foundation Models Pharma Ad Generator

In today’s fast-paced pharmaceutical industry, efficient and localized advertising is more crucial than ever. This is where an innovative solution comes into play, using the power of generative AI to craft localized pharma ads from source images and PDFs. Beyond merely speeding up the ad generation process, this approach streamlines the Medical Legal Review (MLR) process. MLR is a rigorous review mechanism in which medical, legal, and regulatory teams meticulously evaluate promotional materials to guarantee their accuracy, scientific backing, and regulatory compliance. Traditional content creation methods can be cumbersome, often requiring manual adjustments and extensive reviews to ensure alignment with regional compliance and relevance. However, with the advent of generative AI, we can now automate the crafting of ads that truly resonate with local audiences, all while upholding stringent standards and guidelines.

The following diagram illustrates the solution architecture.

In the architectural layout, based on their selected model and ad preferences, users are seamlessly guided to the Amazon Bedrock foundation models. This streamlined approach ensures that new ads are generated precisely according to the desired configuration. As part of the process, documents are efficiently handled by Amazon Textract, with the resultant text securely stored in DynamoDB. A standout feature is the modular design for image and text generation, granting you the flexibility to independently regenerate any component as required.

We have provided this demo in the GitHub repo. Refer to the deployment instructions within the readme file for deploying it into your AWS account.

Content generation workflow

The following steps outline the process for content generation:

  1. The user chooses their document, source image, ad placement, language, and image style.
  2. Secure access to the web application is ensured through Amazon Cognito authentication.
  3. The web application’s front end is hosted via Amplify.
  4. A WebSocket API, managed by API Gateway, facilitates user requests. These requests are authenticated through AWS Identity and Access Management (IAM).
  5. Integration with Amazon Bedrock includes the following steps:
    • A Lambda function employs the LangChain library to connect to the Amazon Bedrock endpoint using a context-rich query.
    • The text-to-text foundational model crafts a contextually appropriate ad based on the given context and settings.
    • The text-to-image foundational model creates a tailored image, influenced by the source image, chosen style, and location.
  6. The user receives the response through an HTTPS request via the integrated API Gateway WebSocket API.

Document and image processing workflow

The following is the procedure for processing documents and images:

  1. The user uploads assets via the specified UI.
  2. The Amplify API transfers the documents to an S3 bucket.
  3. After the asset is transferred to Amazon S3, one of the following actions takes place:
    • If it’s a document, a Lambda function uses Amazon Textract to process and extract text for ad generation.
    • If it’s an image, the Lambda function converts it to base64 format, suitable for the Stable Diffusion model to create a new image from the source.
  4. The extracted text or base64 image string is securely saved in DynamoDB.

Benefits

The following list describes the benefits of this solution:

  • Efficiency – The use of generative AI significantly accelerates the ad generation process, eliminating the need for manual adjustments.
  • Compliance adherence – The solution ensures that generated ads adhere to specific guidance and regulations, such as the FDA’s guidelines for marketing.
  • Cost-effective – By automating the creation of tailored ads, companies can significantly reduce costs associated with ad production and revisions.
  • Streamlined MLR process – The solution simplifies the MLR process, reducing friction points and ensuring smoother reviews.
  • Localized resonance – Generative AI produces ads that resonate with local audiences, ensuring relevance and impact in different regions.
  • Standardization – The solution maintains necessary standards and guidelines, ensuring consistency across all generated ads.
  • Scalability – The AI-driven approach can handle vast databases of source images and PDFs, making it feasible for large-scale ad generation.
  • Reduced manual intervention – The automation reduces the need for human intervention, minimizing errors and ensuring consistency.

You can deploy the infrastructure in this tutorial from your local computer or you can use AWS Cloud9 as your deployment workstation. AWS Cloud9 comes pre-loaded with the AWS CLI, AWS CDK, and Docker. If you opt for AWS Cloud9, create the environment from the AWS Cloud9 console.

Clean up

To avoid unnecessary cost, clean up all the infrastructure created via the AWS CloudFormation console or by running the following command on your workstation:

$ cdk destroy —all.

Additionally, remember to stop any SageMaker endpoints you initiated via the SageMaker console. Remember, deleting an Amazon Kendra index doesn’t remove the original documents from your storage.

Conclusion

Generative AI, epitomized by LLMs, heralds a paradigm shift in how we access and generate information. These models, while powerful, are often limited by the confines of their training data. RAG addresses this challenge, ensuring that the vast knowledge within these models is consistently infused with relevant, current insights.

Our RAG-based demos provide a tangible testament to this. They showcase the seamless synergy between Amazon Kendra, vector embeddings, and LLMs, creating a system where information is not only vast but also accurate and timely. As you dive into these demos, you’ll explore firsthand the transformational potential of merging pre-trained knowledge with the dynamic capabilities of RAG, resulting in outputs that are both trustworthy and tailored to enterprise content.

Although generative AI powered by LLMs opens up a new way of gaining information insights, these insights must be trustworthy and confined to enterprise content using the RAG approach. These RAG-based demos enable you to be equipped with insights that are accurate and up to date. The quality of these insights is dependent on semantic relevance, which is enabled by using Amazon Kendra and vector embeddings.

If you’re ready to further explore and harness the power of generative AI, here are your next steps:

  • Engage with our demos – The hands-on experience is invaluable. Explore the functionalities, understand the integrations, and familiarize yourself with the interface.
  • Deepen your knowledge – Take advantage of the resources available. AWS offers in-depth documentation, tutorials, and community support to aid in your AI journey.
  • Initiate a pilot project – Consider starting with a small-scale implementation of generative AI in your enterprise. This will provide insights into the system’s practicality and adaptability within your specific context.

For more information about generative AI applications on AWS, refer to the following:

Remember, the landscape of AI is constantly evolving. Stay updated, remain curious, and always be ready to adapt and innovate.


About The Authors

Jin Tan Ruan is a Prototyping Developer within the AWS Industries Prototyping and Customer Engineering (PACE) team, specializing in NLP and generative AI. With a background in software development and nine AWS certifications, Jin brings a wealth of experience to assist AWS customers in materializing their AI/ML and generative AI visions using the AWS platform. He holds a master’s degree in Computer Science & Software Engineering from the University of Syracuse. Outside of work, Jin enjoys playing video games and immersing himself in the thrilling world of horror movies.

Aravind Kodandaramaiah is a Senior Prototyping full stack solution builder within the AWS Industries Prototyping and Customer Engineering (PACE) team. He focuses on helping AWS customers turn innovative ideas into solutions with measurable and delightful outcomes. He is passionate about a range of topics, including cloud security, DevOps, and AI/ML, and can be usually found tinkering with these technologies.

Arjun Shakdher is a Developer on the AWS Industries Prototyping (PACE) team who is passionate about blending technology into the fabric of life. Holding a master’s degree from Purdue University, Arjun’s current role revolves around architecting and building cutting-edge prototypes that span an array of domains, presently prominently featuring the realms of AI/ML and IoT. When not immersed in code and digital landscapes, you’ll find Arjun indulging in the world of coffee, exploring the intricate mechanics of horology, or reveling in the artistry of automobiles.

Read More

Toward developing faster algorithms for minimizing submodular functions

Toward developing faster algorithms for minimizing submodular functions

This research paper was presented at the 64th IEEE Symposium on Foundations of Computer Science (FOCS) 2023 (opens in new tab), a premier forum for the latest research in theoretical computer science.

FOCS 2023 paper: Toward developing faster algorithms for minimizing submodular functions

Submodular functions are versatile mathematical tools, finding diverse applications in real-world scenarios and guiding solutions across complex domains. From dissecting the intricate networks of graphs to deciphering the complexities of economic landscapes through utility functions, and even navigating the enigmatic world of random variables via entropy functions, they offer valuable insights into challenging problems. Their wide-ranging applicability has made them pivotal tools for modeling and optimization in various theoretical computer science domains, including operations research and game theory. In recent years, submodular functions have gained prominence in solving optimization problems within machine learning (ML) applications. These tasks encompass vital areas such as feature selection and clustering, as illustrated in Figure 1. Additionally, submodular functions are instrumental in applications like sensor placement and graphical models. For further exploration, comprehensive resources are available in Bilmes’ insightful survey (opens in new tab) and Bach’s standard textbook (opens in new tab) on this subject.

Two graphics. The left graphic depicts the process of feature selection, beginning with all the features on the top, then the unselected features crossed in the middle, and finally the selected features remain at the bottom. The right graphic shows the process of clustering, where a set of points in 2D are assigned different colors so that points with the same color are physically close to each other to form a cluster.
Figure 1. Application of submodular function optimization to feature selection, on the left, and clustering on the right.

Algorithm design for submodular function minimization

In a joint paper with researchers from Stanford University, “Sparse Submodular Function Minimization(opens in new tab) (opens in new tab),” presented at FOCS 2023(opens in new tab) (opens in new tab), we investigate the problem of minimizing a submodular function in the standard model.   Here, we assume that the submodular function can be accessed through an evaluation oracle that returns the value ( f(S) ) in response to a query with a set ( S ). This is the most classical and well-studied model for studying algorithm design for minimizing submodular functions.

Before we discuss our study, it’s important to bear in mind that a submodular function ( f ) is defined on subsets of a finite set of elements ( V ) that satisfy a diminishing marginal difference property. That is, for any two subsets ( S subseteq T ) and any element ( e in V setminus T ), the marginal value of ( e ) when added to the smaller set ( f(S cup {e}) – f(S) ) is at least the marginal value of ( e ) when added to the bigger set ( f(T cup {e}) – f(T) ).

In the 1980s, foundational work (opens in new tab) revealed that submodular functions could be minimized in polynomial time, marking a significant breakthrough. Since then, researchers have made substantial progress in the quest for faster algorithms for submodular function minimization (SFM). Despite these efforts, fundamental questions persist, such as determining the minimum number of queries required to minimize any given submodular function—a concept referred to as the problem’s query complexity.

Currently, the most advanced algorithm needs to make ( widetilde{O}(n^2) ) queries for any given submodular function, while the best lower bound is only ( widetilde{Omega}(n) ), where (n) is the size of the ground set on which the submodular function is defined. This disparity results in a substantial gap, leaving an (n)-fold difference between the existing upper and lower bounds.

Given this considerable difference, a natural question arises: What additional structural assumptions could potentially pave the way for faster algorithms in submodular function minimization (SFM)? One prevalent assumption is sparsity, which posits that the size of the set minimizing the submodular function is small. This holds particular relevance in diverse applications, including signal processing, feature selection, and compressed sensing. In these scenarios, solutions are expected to exhibit sparse non-zero entries, making it important to understand how algorithmic complexity depends on sparsity, as it provides insights into the intricate combinatorial and geometric structures of the problems.

Interestingly, existing algorithmic techniques developed over the past four decades for SFM do not yield improved runtimes even when the solution is sparse. Therefore, it is imperative to develop innovative techniques that can drive advancements in sparse SFM and bridge the existing gap between upper and lower bounds.

Microsoft Research Podcast

AI Frontiers: The future of causal reasoning with Emre Kiciman and Amit Sharma

Emre Kiciman and Amit Sharma discuss their paper “Causal Reasoning and Large Language Models: Opening a New Frontier for Causality” and how it examines the causal capabilities of large language models (LLMs) and their implications.


Parallel algorithms for submodular function minimization

Exploring beyond SFM’s query complexity, recent research has shed light on the importance of sparse SFM, particularly in understanding the inherent adaptivity of parallel algorithms (known as parallel complexity) designed to solve the problem. Research has shown that any parallel algorithm for SFM requires a minimum adaptivity that is a polynomial in the size of the ground set.

Our results improve both parallel and sequential algorithms for SFM. For example, consider a scenario where the minimizer of the given submodular function is (widetilde{O}(1))-sparse. In this context, our parallel algorithm runs in a nearly constant number of rounds, while our sequential algorithm makes a nearly linear number of queries. This achievement stands in stark contrast with the previous best parallel upper bound of (widetilde{O}(n)) and the best query complexity upper bound of (widetilde{O}(n^2)).

Fast first-order methods for exact submodular function minimization

Current fast algorithms for SFM rely on cutting-plane methods, a standard class of convex optimization techniques applied to the Lovász extension—a natural continuous extension of the given submodular function. However, restricting the optimization domain to sparse solutions doesn’t significantly expedite cutting-plane methods beyond a logarithmic factor. To address this, we shifted our approach and employed first-order methods, including stochastic mirror descent, to minimize the Lovász extension. These methods, non-Euclidean generalizations of stochastic gradient descent, are more attuned to problem geometry. Unlike cutting-plane methods, first-order methods exhibit a polynomial convergence rate, rather than a polylogarithmic dependency on the additive error concerning the optimal solution. 

This rate of convergence indicates that first-order methods are better suited for approximate submodular function minimization, while our goal is to solve it exactly. Using the sparsity assumption, we developed a new algorithmic framework for SFM based on a new concept of duality. We used this framework to demonstrate how first-order methods, with substantially reduced accuracy requirements, can be applied to solve SFM exactly.

Toward faster algorithms for SFM and its applications

These techniques not only promise advancements for sparse SFM but also provide a foundation for tackling other fundamental problems in SFM theory. Our algorithms for sparse SFM serve as valuable starting points for designing improved algorithms for related problems. They offer potential insights into developing polynomial-time algorithms for SFM with lower query and parallel complexity, opening avenues for future research.

Traditionally, research on submodular function minimization has focused on the global properties of the problem over the past four decades. Sparse SFM, in contrast, enables us to explore local and more refined structures of submodular functions. Our work introduces new algorithmic tools that better use these structural properties, a vital aspect for applications in ML and operations research, because these areas often have special structures. Beyond advancing sparse SFM, our paradigm paves the way for the development of enhanced algorithms for SFM and its diverse applications.

The post Toward developing faster algorithms for minimizing submodular functions appeared first on Microsoft Research.

Read More

Digital Artist Steven Tung Shows Off So-fish-ticated Style This Week ‘In the NVIDIA Studio’

Digital Artist Steven Tung Shows Off So-fish-ticated Style This Week ‘In the NVIDIA Studio’

Editor’s note: This post is part of our weekly In the NVIDIA Studio series, which celebrates featured artists, offers creative tips and tricks, and demonstrates how NVIDIA Studio technology improves creative workflows. We’re also deep-diving on new GeForce RTX 40 Series GPU features, technologies and resources, and how they dramatically accelerate content creation.

Taiwanese artist Steven Tung creates captivating 2D and 3D digital art that explores sci-fi, minimalism and realism and pushes artistic boundaries.

This week In the NVIDIA Studio, Tung shares the inspiration and creative workflow behind his whimsical animation, The Given Fish.

Professional-grade technology, which was once available only at select special effects studios, is becoming increasingly accessible.

“Visual production capabilities continue to skyrocket, generating a growing demand for better computer hardware among the general public,” Tung said. “The evolving synergy between art and technology can spark endless possibilities for creators.”

Tung uses an MSI MEG Trident X2 desktop, powered by GeForce RTX 4090 graphics, to accelerate his creative workflow.

The MSI MEG Trident X2 desktop, powered by GeForce RTX 4090 graphics.

“The enhanced speed and performance expedites various processes, such as updating material textures in Adobe Substance 3D Painter and rendering in Blender,” said Tung. “The necessary specifications and requirements align, enabling maximum creativity without limitations.”

Exquisite Visuals Made E-fish-ciently

Tung’s 3D animation, The Given Fish, may look simple at first glance — but it’s surprisingly complex.

“GeForce RTX GPUs are indispensable hardware for 3D rendering tasks. Faster speeds bring significant benefits in production efficiency and time saved.” — Steven Tung

In the creative world behind the animation, the stone fish depicted can be consumed by people. The concept is that once taken out of the aquarium, the stone fish transforms into a real, living one.

“I have a strong desire to have an aquarium at home, but it’s not practical,” said Tung. “The next best thing is to turn that emotion into art.”

Tung began by creating concept sketches in Adobe Photoshop, where he had access to over 30 GPU-accelerated features that could help modify and adjust his canvas and maximize his efficiency.

Concept art for “The Given Fish.”

Next, Tung jumped from 2D to 3D with ZBrush. He first built a basic model and then refined critical details with custom brushes — adding greater depth and dimension with authentic, hand-sculpted textures.

Advanced sculpting in ZBrush.

He then used the UV unwrapping feature in RizomUV to ensure that his models were properly unwrapped and ready for texture application.

UV unwrapping feature in RizomUV.

Tung imported the models into Adobe 3D Substance Painter, where he meticulously painted textures, blended materials and used the built-in library to achieve lifelike stone textures. RTX-accelerated light and ambient occlusion baking optimized his assets in seconds.

Applying textures in Adobe Substance 3D Painter.

To bring all the elements together, Tung imported the models and materials into Blender. He set up texture channels, assigned texture files and assembled the models so that they would be true to the compositions outlined in the initial sketch.

Achieving realistic stone textures in Adobe 3D Substance Painter.

Next, Tung used Blender Cycles to light and render the scene.

Composition edits in Blender.

Blender Cycles’ RTX-accelerated, AI-powered OptiX ray tracing enabled interactive, photorealistic movement in the viewport and sped up animation work — all powered by his GeForce RTX 4090 GPU-equipped system.

Animation work in Blender.

RTX accelerated OptiX ray tracing in Blender Cycles enabled the fastest final frame render.

Digital artist Steven Tung.

Check out Tung’s portfolio on Instagram.

Follow NVIDIA Studio on Instagram, Twitter and Facebook. Access tutorials on the Studio YouTube channel and get updates directly in your inbox by subscribing to the Studio newsletter. 

Read More

PyTorch compile to speed up inference on Llama 2

PyTorch compile to speed up inference on Llama 2

In this blog, we discuss how to improve the inference latencies of the Llama 2 family of models using PyTorch native optimizations such as native fast kernels, compile transformations from torch compile, and tensor parallel for distributed inference. Our approach results in 29ms/token latency for single user requests on the 70B LLaMa model (as measured on 8 A100 GPUs). We are excited to share our findings with the community and make our code available here.

Background

We are amid a generative AI revolution with large language models of tens of billions of parameters becoming commoditized and available for use. However, it is well recognized in the community that deploying these large models in a cost-efficient manner remains a key challenge. Many different approaches have been attempted with varying degrees of success and offering different trade-offs. Hardware-specific optimizations (e.g., Faster Transformer from NVIDIA) are restricted to specific target hardware whereas approaches that rely on layers of abstraction (e.g., ONNX) enable arbitrary models but suffer from loss of efficiency. With the introduction of PyTorch compile last year, IBM and the PyTorch team started exploring the use of model compilation for inference optimizations with the goal of reducing the latency per token for generative models.

Model Choice

We choose to benchmark on the Llama 2 family of models, given their popularity. The models that we are interested in, and their hyper parameters relevant for this blog are given in the below table:

Model size Hidden dimension Num heads Num layers Attention type
7B 4096 32 32 MHA
13B 5120 40 40 MHA
70B 8192 64 80 GQA

These models are decoder only, which means that tokens get generated in a serialized manner, which is typically sped up using KV caching. We take a similar approach in our latency and throughput measurements.

Inference Approach

Our goal for inference is to provide a path for achieving the best possible latencies rapidly, to keep up with the velocity with which new model architectures are emerging in the community. A PyTorch native approach is appealing as it allows for the maximum flexibility in terms of “coverage” of models. We note that there are four orthogonal techniques that provide acceleration in inference: (a) Kernel fusion using compile, (b) Faster kernels, (c) Tensor parallel for larger models, and (d) Quantization. In our approach, we use the first three of these four levers – compile natively working with faster kernels from SDPA and a custom tensor parallel implementation that all work hand-in-glove to achieve inference latencies of 29ms/token on a 70B model as measured on 8 NVIDIA A100 GPUs with single user.

Compile all the way!

PyTorch Compile leverages tracing and graph capture to reduce the CPU overhead and in an ideal scenario results in a single graph execution/instruction from CPU to GPU. However, often compile introduces graph breaks due to model architecture and ops unsupported by compile. For example, complex operations such as einops are not supported by compile today. Similarly, tensor parallel inference can introduce graph breaks at each layer, since compile requires the tensor parallel implementation to use traceable communication collectives. If these graph breaks are not removed, the performance of the compiled artifacts will be hampered and could even be lower compared to eager mode execution. To get full benefit of the compiled artifacts, the graph breaks need to be removed.

Below, we describe how we went about doing this for the 70b Llama 2 model and the challenges we had to overcome to get compile to work all the way through.

Our first attempt was to try using torch.compile to compile the out-of-box Llama 2 model, but it failed because complex ops were not supported. Using TORCH_COMPILE_DEBUG = 1 we identified the RoPE positional encodings was using complex number functions resulting in graph breaks and significant slowdowns. We rewrote the RoPE function to bypass torch.einsum (Original implementation uses torch.polar that also conflicts with compile) and use torch.cos and torch.sin instead.

self.cached_freqs[dev_idx][alpha] = torch.stack(
            [
                torch.cos(freqs),
                -torch.sin(freqs),
                torch.sin(freqs),
                torch.cos(freqs),
            ],
            dim=2,
        ).view(*freqs.shape, 2, 2)

Our implementation of the frequencies computation

t = torch.arange(self.max_seq_len_cached, device=device, dtype=self.inv_freq.dtype)
t = t / self.scaling_factor

freqs = torch.einsum("i,j->ij", t, self.inv_freq)
# Different from paper, but it uses a different permutation in order to obtain the same calculation
emb = torch.cat((freqs, freqs), dim=-1)
self.register_buffer("cos_cached", emb.cos()[None, None, :, :].to(dtype), persistent=False)
self.register_buffer("sin_cached", emb.sin()[None, None, :, :].to(dtype), persistent=False)

Hugging Face implementation of the frequencies computation

Once RoPE was fixed, we were able to get 7B and 13B models to compile without ANY graph breaks on a single A100 GPU.

We used SDPA, the PyTorch native implementation of efficient attention computation with tracing enabled (for compile). To avoid graph breaks related to forcing a single algorithm choice using a Python context, the recommended way, we had to use the torch.backends.cuda.enable_*_sdp functions.

attn = torch.nn.functional.scaled_dot_product_attention(
            queries,
            keys_e,
            values_e,
            attn_mask=attn_mask,
            dropout_p=self.p_dropout if self.training else 0.0,
            is_causal=is_causal_mask,
)

Attention computation using SDPA

Next we ran the same steps for the larger 70B model and found that even with half precision, the model does not fit in a single GPU and requires tensor parallel inference. Using torch.compile for the 70B model resulted in 162 graph breaks due to two all-reduces per layer, one all-gather for forward embedding, and one all-gather for reverse embedding. Due to this, we saw no significant improvement in inference latencies. We could not use the distributed tensor implementation from PyTorch at the time of writing this blog as it did not support compile. We rewrote the tensor parallel code from scratch so that it only depends on traceable collectives to make it work with compile. After this last change, PyTorch compiler did not introduce any graph breaks and we saw a significant speedup in inference latencies. Specifically, we measured latencies for the Llama 70B model at 29ms/token when using 8 A100 GPUs, a 2.4x improvement over unoptimized inference.

Serving aspects

Finally, a point to note here is that simply performing compile on a model is not sufficient to serve the model in a production setting. To realize the above performance with high throughput, we need to support dynamic batching, nested tensors, as well as have a warm up phase where we pre-compile for bucketized sequence lengths. We are working on these aspects to realize such performance in a production setting.

Experiments and Measurements

We use nodes with 8 A100 NVIDIA GPUs with 80G cards for all our measurements in two different environments (IBM Cloud and AWS, both running OpenShift). First, we compare the various techniques – eager mode, with SDPA Flash kernel, with Compile, and with Compile and SDPA. For the 70B model, we run it in Tensor Parallel mode with compile and SDPA. For this experiment, we use 512 tokens as input length with 50 token generation. For 7 and 13B models, we use single A100 for measurement of latencies, whereas we use 8 A100s for the 70B model. In addition, for the 70B model we use the reduce-overhead option in PyTorch compile that uses CudaGraphs to reduce CPU to GPU kernel launching overheads; the use of CudaGraphs in the 7B and 13B models did not show any benefits (and are thus not reported here). We observe from Figure 1 that compile and SDPA provide very low latencies, with 70B Llama 2 model at 29ms/token.

Figure 1. Median latency across different techniques with sequence length 512 (measured on IBM Cloud A100 servers)

Fig. 1: Median latency across different techniques with sequence length 512 (measured on IBM Cloud A100 servers)

Next, we examine the impact of sequence length, where we increase it from 1024 to 4096 and observe that the median latency per token increases sub-linearly, demonstrating that when we increase context to large documents, we do not sacrifice response times.

Figure 2. Median latency for compile+SDPA with different sequence lengths (Measured on A100s on AWS)

Fig. 2: Median latency for compile+SDPA with different sequence lengths (Measured on A100s on AWS)

Finally, with increased batch sizes, we observe that the response latencies increase sub-linearly. For the 13B model, at batch size 8, we encounter an OOM. For the 70B model, given that it is running on 8 GPUs with tensor parallel, we do not see any such OOM issues.

Figure 3. Median latency for compile+SDPA with different batch sizes and sequence length fixed at 4096 (Measured on A100s on AWS)

Fig. 3: Median latency for compile+SDPA with different batch sizes and sequence length fixed at 4096 (Measured on A100s on AWS)

Final Thoughts

We have demonstrated how a PyTorch compile pathway for inference demonstrates ultra low latencies for 70B model inference. The next steps are to enable dynamic batching and nested tensors with the above levers.

Special thanks to Edward Yang, Elias Ellison, Driss Guessous, Will Feng, Will Constable, Horace He, Less Wright, and Andrew Gu from Team PyTorch, whose PRs reviews and code contributions made it possible for us to realize the latencies using PyTorch native approach. We thank the broader Team PyTorch that have been tirelessly working to make PyTorch better, special shout outs to the SDPA team for enabling tracing and compile on fast kernels, the compile team that has been closely guiding us on how to work around as well as fix issues (including identifying and raising NVIDIA driver bugs in CUDA graphs).

Inference latency has been one of the roadblocks for LLM adoption in critical enterprise workflows, but another major one is the need for safety, trustworthiness and governance. IBM’s guide for AI safety and LLM risk can be found here and Meta’s responsible user guide for LLaMa can be found here.

References

Read More

Use generative AI to increase agent productivity through automated call summarization

Use generative AI to increase agent productivity through automated call summarization

Your contact center serves as the vital link between your business and your customers. Every call to your contact center is an opportunity to learn more about your customers’ needs and how well you are meeting those needs.

Most contact centers require their agents to summarize their conversation after every call. Call summarization is a valuable tool that helps contact centers understand and gain insights from customer calls. Additionally, accurate call summaries enhance the customer journey by eliminating the need for customers to repeat information when transferred to another agent.

In this post, we explain how to use the power of generative AI to reduce the effort and improve the accuracy of creating call summaries and call dispositions. We also show how to get started quickly using the latest version of our open source solution, Live Call Analytics with Agent Assist.

Challenges with call summaries

As contact centers collect more speech data, the need for efficient call summarization has grown significantly. However, most summaries are empty or inaccurate because manually creating them is time-consuming, impacting agents’ key metrics like average handle time (AHT). Agents report that summarizing can take up to a third of the total call, so they skip it or fill in incomplete information. This hurts the customer experience—long holds frustrate customers while the agent types, and incomplete summaries mean asking customers to repeat information when transferred between agents.

The good news is that automating and solving the summarization challenge is now possible through generative AI.

Generative AI is helping summarize customer calls accurately and efficiently

Generative AI is powered by very large machine learning (ML) models referred to as foundation models (FMs) that are pre-trained on vast amounts of data at scale. A subset of these FMs focused on natural language understanding are called large language models (LLMs) and are able to generate human-like, contextually relevant summaries. The best LLMs can process even complex, non-linear sentence structures with ease and determine various aspects, including topic, intent, next steps, outcomes, and more. Using LLMs to automate call summarization allows for customer conversations to be summarized accurately and in a fraction of the time needed for manual summarization. This in turn enables contact centers to deliver superior customer experience while reducing the documentation burden on their agents.

The following screenshot shows an example of the Live Call Analytics with Agent Assist call details page, which contains information about each call.

The following video shows an example of the Live Call Analytics with Agent Assist summarizing an in-progress call, summarizing after the call ends, and generating a follow-up email.

Solution overview

The following diagram illustrates the solution workflow.

The first step to generating abstractive call summaries is transcribing the customer call. Having accurate, ready-to-use transcripts is crucial to generate accurate and effective call summaries. Amazon Transcribe can help you create transcripts with high accuracy for your contact center calls. Amazon Transcribe is a feature-rich speech-to-text API with state-of-the-art speech recognition models that are fully managed and continuously trained. Customers such as New York Times, Slack, Zillow, Wix, and thousands of others use Amazon Transcribe to generate highly accurate transcripts to improve their business outcomes. A key differentiator for Amazon Transcribe is its ability to protect customer data by redacting sensitive information from the audio and text. Although protecting customer privacy and safety is important in general to contact centers, it’s even more important to mask sensitive information such as bank account information and Social Security numbers before generating automated call summaries, so they don’t get injected into the summaries.

For customers who are already using Amazon Connect, our omnichannel cloud contact center, Contact Lens for Amazon Connect provides real-time transcription and analytics features natively. However, if you want to use generative AI with your existing contact center, we have developed solutions that do most of the heavy lifting associated with transcribing conversations in real time or post-call from your existing contact center, and generating automated call summaries using generative AI. Additionally, the solution detailed in this section allows you to integrate with your Customer Relationship Management (CRM) system to automatically update your CRM of choice with generated call summaries. In this example, we use our Live Call Analytics with Agent Assist (LCA) solution to generate real-time call transcriptions and call summaries with LLMs hosted on Amazon Bedrock. You can also write an AWS Lambda function and provide LCA the function’s Amazon Resource Name (ARN) in the AWS CloudFormation parameters, and use the LLM of your choice.

The following simplified LCA architecture illustrates call summarization with Amazon Bedrock.

LCA is provided as a CloudFormation template that deploys the preceding architecture and allows you to transcribe calls in real time. The workflow steps are as follows:

  1. Call audio can be streamed via SIPREC from your telephony system to Amazon Chime SDK Voice Connector, which buffers the audio in Amazon Kinesis Video Streams. LCA also supports other audio ingestion mechanisms, such Genesys Cloud Audiohook.
  2. Amazon Chime SDK Call Analytics then streams the audio from Kinesis Video Streams to Amazon Transcribe, and writes the JSON output to Amazon Kinesis Data Streams.
  3. A Lambda function processes the transcription segments and persists them to an Amazon DynamoDB table.
  4. After the call ends, Amazon Chime SDK Voice Connector publishes an Amazon EventBridge notification that triggers a Lambda function that reads the persisted transcript from DynamoDB, generates an LLM prompt (more on this in the following section), and runs an LLM inference with Amazon Bedrock. The generated summary is persisted to DynamoDB and can be used by the agent in the LCA user interface. You can optionally provide a Lambda function ARN that will be run after the summary is generated to integrate with third-party CRM systems.

LCA also allows the option to call the summarization Lambda function during the call, because at any time the transcript can be fetched and a prompt created, even if the call is in progress. This can be useful for times when a call is transferred to another agent or escalated to a supervisor. Rather than putting the customer on hold and explaining the call, the new agent can quickly read an auto-generated summary, and it can include what the current issue is and what the previous agent tried to do to resolve it.

Example call summarization prompt

You can run LLM inferences with prompt engineering to generate and improve your call summaries. You can modify the prompt templates to see what works best for the LLM you select. The following is an example of the default prompt for summarizing a transcript with LCA. We replace the {transcript} placeholder with the actual transcript of the call.

Human: Answer the questions below, defined in <question></question> based on the transcript defined in <transcript></transcript>. If you cannot answer the question, reply with 'n/a'. Use gender neutral pronouns. When you reply, only respond with the answer.

<question>
What is a summary of the transcript?
</question>

<transcript>
{transcript}
</transcript>

Assistant:

LCA runs the prompt and stores the generated summary. Besides summarization, you can direct the LLM to generate almost any text that is important for agent productivity. For example, you can choose from a set of topics that were covered during the call (agent disposition), generate a list of required follow-up tasks, or even write an email to the caller thanking them for the call.

The following screenshot is an example of agent follow-up email generation in the LCA user interface.

With a well-engineered prompt, some LLMs have the ability to generate all of this information in a single inference as well, reducing inference cost and processing time. The agent can then use the generated response within a few seconds of ending the call for their after-contact work. You can also integrate the generated response automatically into your CRM system.

The following screenshot shows an example summary in the LCA user interface.

It’s also possible to generate a summary while the call is still ongoing (see the following screenshot), which can be especially helpful for long customer calls.

Prior to generative AI, agents would be required to pay attention while also taking notes and performing other tasks as required. By automatically transcribing the call and using LLMs to automatically create summaries, we can lower the mental burden on the agent, so they can focus on delivering a superior customer experience. This also leads to more accurate after-call work, because the transcription is an accurate representation of what occurred during the call—not just what the agent took notes on or remembered.

Summary

The sample LCA application is provided as open source—use it as a starting point for your own solution, and help us make it better by contributing back fixes and features via GitHub pull requests. For information about deploying LCA, refer to Live call analytics and agent assist for your contact center with Amazon language AI services. Browse to the LCA GitHub repository to explore the code, sign up to be notified of new releases, and check out the README for the latest documentation updates. For customers who are already on Amazon Connect, you can learn more about generative AI with Amazon Connect by referring to How contact center leaders can prepare for generative AI.


About the authors

Christopher Lott is a Senior Solutions Architect in the AWS AI Language Services team. He has 20 years of enterprise software development experience. Chris lives in Sacramento, California and enjoys gardening, aerospace, and traveling the world.

Smriti Ranjan is a Principal Product Manager in the AWS AI/ML team focusing on language and search services. Prior to joining AWS, she worked at Amazon Devices and other technology startups leading product and growth functions. Smriti lives in Boston, MA and enjoys hiking, attending concerts and traveling the world.

Read More

Customize Amazon Textract with business-specific documents using Custom Queries

Customize Amazon Textract with business-specific documents using Custom Queries

Amazon Textract is a machine learning (ML) service that automatically extracts text, handwriting, and data from scanned documents. Queries is a feature that enables you to extract specific pieces of information from varying, complex documents using natural language. Custom Queries provides a way for you to customize the Queries feature for your business-specific, non-standard documents such as auto lending contracts, checks, and pay statements, in a self-service way. By customizing the feature to recognize the unique terms, structures, and key information specific to these document types, you can meet your downstream processing needs with greater precision and minimal human intervention. Custom Queries is easy to integrate in your existing Textract pipeline and you continue to benefit from the fully managed intelligent document processing features of Amazon Textract without having to invest in ML expertise or infrastructure management.

In this post, we show how Custom Queries can accurately extract data from checks that are complex, non-standard documents. In addition, we discuss the benefits of Custom Queries and share best practices for effectively using this feature.

Solution overview

When starting with a new use case, you can evaluate how Textract Queries performs on your documents by navigating to the Textract console and using the Analyze Document Demo or Bulk Document Uploader. Refer to Best Practices for Queries to draft queries applicable to your use case. If you identify errors in the query responses due to the nature of your business documents, you can use Custom Queries to improve accuracy. Within hours, you can annotate your sample documents using the AWS Management Console and train an adapter. Adapters are components that plug in to the Amazon Textract pre-trained deep learning model, customizing its output based on your annotated documents. You can use the adapter for inference by passing the adapter identifier as an additional parameter to the Analyze Document Queries API request.

Let’s examine how Custom Queries can improve extraction accuracy in a challenging real-world scenario such as extraction of data from checks. The primary challenge when processing checks arises from their high degree of variation depending on the type (e.g., personal or cashier’s checks), financial institution and country (e.g., MICR line format). . These variations can include the placement of the payee’s name, the amount in numbers and words, the date, and the signature. Recognizing and adapting to these variations can be a complex task during data extraction. To improve data extraction, organizations often employ manual verification and validation processes, which increases the cost and time of the extraction process.

Custom Queries addresses these challenges by enabling you to customize the pre-trained Queries features on the different variations of checks. Customization of the pre-trained feature helps you achieve a high data extraction accuracy on the specific variety of layouts that you process.

In our use case, a financial institution wants to extract the following fields from a check: payee name, payer name, account number, routing number, payment amount (in numbers), payment amount (in words), check number, date, and memo.

Let’s explore the process of generating an adapter (component that customizes the output) for checks processing. Adapters can be created via the console or programmatically via the API. This post details the console experience; however, if you’d like to programmatically create the adapter, refer to the code samples in the custom-queries-checks-blog.ipynb Jupyter notebook (Option 2).

The adapter generation process involves five high-level steps: create an adapter, upload sample documents, annotate the documents, train the adapter, and evaluate performance metrics.

Create an adapter

On the Amazon Textract console, create a new adapter by providing a name, description, and optional tags that can help you identify the adapter. You have the option to enable automatic updates, which allows Amazon Textract to update your adapter when the underlying Queries feature is updated with new capabilities.

After the adapter is created, you will see an adapter details page with a list of steps in the How it works section. This section will activate your next steps as you complete them sequentially.

Upload sample documents

The initial phase in adapter generation involves the careful selection of an appropriate set of sample documents for annotation, training, and testing. We have an option to auto split the documents into test and train datasets; however, for this process, we manually split the dataset.

It’s important to note that you can construct an adapter with as few as five test and five training samples, but it’s essential to ensure that this sample set is diverse and representative of the workload encountered in a production environment.

For this tutorial, we have curated sample check datasets that you can download. Our dataset includes variations such as personal checks, cashier’s checks, stimulus checks and checks embedded within pay stubs. We also included handwritten and printed checks; along with variations in fields such as the memo line.

Annotate sample documents

As a next step, you annotate the sample documents by associating queries with their corresponding answers via the console. You can initiate annotation via auto labeling or manual labeling. Auto labeling uses Amazon Textract Queries to pre-label the dataset. We recommend using auto labeling to fast-track the annotation process.

For this checks processing use case, we use the following queries. If your use case involves other document types, refer to Best Practices for Queries to draft queries applicable to your use case.

  • Who is the payee?
  • What is the check#?
  • What is the payee address?
  • What is the date?
  • What is the account#?
  • What is the check amount in words?
  • What is the account name/payer/drawer name?
  • What is the dollar amount?
  • What is the bank name/drawee name?
  • What is the bank routing number?
  • What is the MICR line?
  • What is the memo?

When the auto labeling process is complete, you have the option to review and make edits to the answers provided for each document. Choose Start reviewing to review the annotations against each image.

If the response to a query is missing or wrong, you can add or edit the response either by drawing a bounding box or entering the response manually.

To accelerate your walkthrough, we have pre-annotated the checks samples for you to copy to your AWS account. Run the custom-queries-checks-blog.ipynb Jupyter notebook within the Amazon Textract code samples library to automatically update your annotations.

Train the adapter

After you’ve reviewed all the sample documents to ensure the accuracy of the annotations, you can begin the adapter training process. During this step, you need to designate a storage location where the adapter should be saved. The duration of the training process will vary depending on the size of the dataset utilized for training. The training API can also be invoked programmatically if you choose to use an annotation tool of your own choice and pass the relevant input files to the API. Refer to Custom Queries for more details.

Evaluate performance metrics

After the adapter has completed training, you can assess its performance by examining evaluation metrics such as F1 score, precision, and recall. You can analyze these metrics either collectively or on a per-document basis. Using our sample checks dataset, you will see the accuracy metric (F1 score) improve from 68% to 92% with the trained adapter.

Additionally, you can test the adapter’s output on new documents by choosing Try Adapter.

Following the evaluation, you can choose to enhance the adapter’s performance by either incorporating additional sample documents into the training dataset or by re-annotating documents with scores that are lower than your threshold. To re-annotate documents, choose Verify documents on the adapter details page, select the document, and choose Review annotations.

Programmatically test the adapter

With the training successfully completed, you can now use the adapter in your AnalyzeDocument API calls. The API request is similar to the Amazon Textract Queries API request, with the addition of the AdaptersConfig object.

You can run the following sample code or directly run it within the custom-queries-checks-blog.ipynb Jupyter notebook. The sample notebook also provides code to compare results between Amazon Textract Queries and Amazon Textract Custom Queries.

Create an AdaptersConfig object with the adapter ID and adapter version, and optionally include the pages you want the adapter to be applied to:

!python -m pip install amazon-textract-caller --upgrade
!python -m pip install amazon-textract-response-parser –upgrade

import boto3
from textractcaller.t_call import call_textract, Textract_Features, Query, QueriesConfig, Adapter, AdaptersConfig
import trp.trp2 as t2
from tabulate import tabulate

# Create AdaptersConfig
adapter1 = Adapter(adapter_id=”111111111”, version="1", pages=["*"])
adapters_config = AdaptersConfig(adapters=[adapter1])

Create a QueriesConfig object with the queries you trained the adapter with and call the Amazon Textract API. Note that you can also include additional queries that the adapter has not been trained on. Amazon Textract will automatically use the Queries feature for these questions and not Custom Queries, thereby providing you with the flexibility of using Custom Queries only where needed.

# Create QueriesConfig
queries = []
queries.append(Query(text="What is the check#?", alias="CHECK_NUMBER", pages=["*"]))
queries.append(Query(text="What is the date?", alias="DATE", pages=["*"]))
queries.append(Query(text="What is the check amount in words?", alias="CHECK_AMOUNT_WORDS", pages=["*"]))
queries.append(Query(text="What is the dollar amount?", alias="DOLLAR_AMOUNT", pages=["*"]))
queries.append(Query(text="Who is the payee?", alias="PAYEE_NAME", pages=["*"]))
queries.append(Query(text="What is the customer account#", alias="ACCOUNT_NUMBER", pages=["*"]))
queries.append(Query(text="what is the payee address?", alias="PAYEE_ADDRESS", pages=["*"]))
queries.append(Query(text="What is the bank routing number?", alias="BANK_ROUTING_NUMBER", pages=["*"]))
queries.append(Query(text="What is the memo", alias="MEMO", pages=["*"]))
queries.append(Query(text="What is the account name/payer/drawer name?", alias="ACCOUNT_NAME", pages=["*"]))
queries.append(Query(text="What is the bank name/drawee name?", alias="BANK_NAME", pages=["*"]))
queries_config = QueriesConfig(queries=queries)

document_name = "<image_name>"

textract_json_with_adapter = call_textract(input_document=document_name,
                  boto3_textract_client=textract_client,
                  features=[Textract_Features.QUERIES],
                  queries_config=queries_config,
                  adapters_config=adapters_config)

Finally, we tabulate our results for better readability:

def tabulate_query_answers(textract_json):
    d = t2.TDocumentSchema().load(textract_json)
    for page in d.pages:
        query_answers = d.get_query_answers(page=page)
        print(tabulate(query_answers, tablefmt="github"))

tabulate_query_answers(textract_json_with_adapter)

Clean up

To clean up your resources, complete the following steps:

  1. On the Amazon Textract console, choose Custom Queries in the navigation pane.
  2. Select the adaptor you want to delete.
  3. Choose Delete.

Adapter management

You can regularly improve your adapters by creating new versions of a previously generated adapter. To create a new version of an adapter, you add new sample documents to an existing adapter, label the documents, and perform training. You can simultaneously maintain multiple versions of an adapter for use in your development pipelines. To update your adapters seamlessly, do not make changes to or delete your Amazon Simple Storage Service (Amazon S3) bucket where the files needed for adapter generation are saved.

Best practices

When using Custom Queries on your documents, refer to Best practices for Amazon Textract Custom Queries for additional considerations and best practices.

Benefits of Custom Queries

Custom Queries offers the following benefits:

  • Enhanced document understanding – Through its ability to extract and normalize data with high accuracy, Custom Queries reduces reliance on manual reviews, and audits, and enables you to build more reliable automation for your intelligent document processing workflows.
  • Faster time to value – When you encounter new document types where you need higher accuracy, you can use Custom Queries to generate an adapter in a self-service manner within a few hours. You don’t have to wait for a pre-trained model update when you encounter new document types or variations of existing ones in your workflow. You have complete control over your pipeline and don’t need to depend on Amazon Textract to support your new document types.
  • Data privacy – Custom Queries does not retain or use the data employed in generating adapters to enhance our general pretrained models available to all customers. The adapter is limited to the customer’s account or other accounts explicitly designated by the customer, ensuring that only such accounts can access the improvements made using the customer’s data.
  • Convenience –Custom Queries provides a fully managed inference experience similar to Queries. The adapter training is free and you will only pay for inference. Custom Queries saves you the overhead and expenses of training and operating custom models.

Conclusion

In this post, we discussed the benefits of Custom Queries, showed how Custom Queries can accurately extract data from checks, and shared best practices for effectively utilizing this feature. In just a few hours, you can create an adapter using the console and use it in the AnalyzeDocument API for your data extraction needs. For more information, refer to Custom Queries.


About the authors

Shibin Michaelraj is a Sr. Product Manager with the Amazon Textract team. He is focused on building AI/ML-based products for AWS customers. He is excited helping customers solve their complex business challenges by leveraging AI and ML technologies. In his spare time, he enjoys running, tuning into podcasts, and refining his amateur tennis skills.

Keith Mascarenhas is a Sr. Solutions Architect with the Amazon Textract service team. He is passionate about solving business problems at scale using machine learning, and currently helps our worldwide customers automate their document processing to achieve faster time to market with reduced operational costs.

Read More

Stream large language model responses in Amazon SageMaker JumpStart

Stream large language model responses in Amazon SageMaker JumpStart

We are excited to announce that Amazon SageMaker JumpStart can now stream large language model (LLM) inference responses. Token streaming allows you to see the model response output as it is being generated instead of waiting for LLMs to finish the response generation before it is made available for you to use or display. The streaming capability in SageMaker JumpStart can help you build applications with better user experience by creating a perception of low latency to the end-user.

In this post, we walk through how to deploy and stream the response from a Falcon 7B Instruct model endpoint.

At the time of this writing, the following LLMs available in SageMaker JumpStart support streaming:

  • Mistral AI 7B, Mistral AI 7B Instruct
  • Falcon 180B, Falcon 180B Chat
  • Falcon 40B, Falcon 40B Instruct
  • Falcon 7B, Falcon 7B Instruct
  • Rinna Japanese GPT NeoX 4B Instruction PPO
  • Rinna Japanese GPT NeoX 3.6B Instruction PPO

To check for updates on the list of models supporting streaming in SageMaker JumpStart, search for “huggingface-llm” at Built-in Algorithms with pre-trained Model Table.

Note that you can use the streaming feature of Amazon SageMaker hosting out of the box for any model deployed using the SageMaker TGI Deep Learning Container (DLC) as described in Announcing the launch of new Hugging Face LLM Inference containers on Amazon SageMaker.

Foundation models in SageMaker

SageMaker JumpStart provides access to a range of models from popular model hubs, including Hugging Face, PyTorch Hub, and TensorFlow Hub, which you can use within your ML development workflow in SageMaker. Recent advances in ML have given rise to a new class of models known as foundation models, which are typically trained on billions of parameters and can be adapted to a wide category of use cases, such as text summarization, generating digital art, and language translation. Because these models are expensive to train, customers want to use existing pre-trained foundation models and fine-tune them as needed, rather than train these models themselves. SageMaker provides a curated list of models that you can choose from on the SageMaker console.

You can now find foundation models from different model providers within SageMaker JumpStart, enabling you to get started with foundation models quickly. SageMaker JumpStart offers foundation models based on different tasks or model providers, and you can easily review model characteristics and usage terms. You can also try these models using a test UI widget. When you want to use a foundation model at scale, you can do so without leaving SageMaker by using prebuilt notebooks from model providers. Because the models are hosted and deployed on AWS, you trust that your data, whether used for evaluating or using the model at scale, won’t be shared with third parties.

Token streaming

Token streaming allows the inference response to be returned as it’s being generated by the model. This way, you can see the response generated incrementally rather than wait for the model to finish before providing the complete response. Streaming can help enable a better user experience because it decreases the latency perception for the end-user. You can start seeing the output as it’s generated and therefore can stop generation early if the output isn’t looking useful for your purposes. Streaming can make a big difference, especially for long-running queries, because you can start seeing outputs as it’s generated, which can create a perception of lower latency even though the end-to-end latency stays the same.

As of this writing, you can use streaming in SageMaker JumpStart for models that utilize Hugging Face LLM Text Generation Inference DLC.

Response with No Steaming Response with Streaming

Solution overview

For this post, we use the Falcon 7B Instruct model to showcase the SageMaker JumpStart streaming capability.

You can use the following code to find other models in SageMaker JumpStart that support streaming:

from sagemaker.jumpstart.notebook_utils import list_jumpstart_models
from sagemaker.jumpstart.filters import And

filter_value = And("task == llm", "framework == huggingface")
model_ids = list_jumpstart_models(filter=filter_value)
print(model_ids)

We get the following model IDs that support streaming:

['huggingface-llm-bilingual-rinna-4b-instruction-ppo-bf16', 'huggingface-llm-falcon-180b-bf16', 'huggingface-llm-falcon-180b-chat-bf16', 'huggingface-llm-falcon-40b-bf16', 'huggingface-llm-falcon-40b-instruct-bf16', 'huggingface-llm-falcon-7b-bf16', 'huggingface-llm-falcon-7b-instruct-bf16', 'huggingface-llm-mistral-7b', 'huggingface-llm-mistral-7b-instruct', 'huggingface-llm-rinna-3-6b-instruction-ppo-bf16']

Prerequisites

Before running the notebook, there are some initial steps required for setup. Run the following commands:

%pip install --upgrade sagemaker –quiet

Deploy the model

As a first step, use SageMaker JumpStart to deploy a Falcon 7B Instruct model. For full instructions, refer to Falcon 180B foundation model from TII is now available via Amazon SageMaker JumpStart. Use the following code:

from sagemaker.jumpstart.model import JumpStartModel

my_model = JumpStartModel(model_id="huggingface-llm-falcon-7b-instruct-bf16")
predictor = my_model.deploy()

Query the endpoint and stream response

Next, construct a payload to invoke your deployed endpoint with. Importantly, the payload should contain the key/value pair "stream": True. This indicates to the text generation inference server to generate a streaming response.

payload = {
    "inputs": "How do I build a website?",
    "parameters": {"max_new_tokens": 256},
    "stream": True
}

Before you query the endpoint, you need to create an iterator that can parse the bytes stream response from the endpoint. Data for each token is provided as a separate line in the response, so this iterator returns a token each time a new line is identified in the streaming buffer. This iterator is minimally designed, and you might want to adjust its behavior for your use case; for example, while this iterator returns token strings, the line data contains other information, such as token log probabilities, that could be of interest.

import io
import json

class TokenIterator:
    def __init__(self, stream):
        self.byte_iterator = iter(stream)
        self.buffer = io.BytesIO()
        self.read_pos = 0

    def __iter__(self):
        return self

    def __next__(self):
        while True:
            self.buffer.seek(self.read_pos)
            line = self.buffer.readline()
            if line and line[-1] == ord("n"):
                self.read_pos += len(line) + 1
                full_line = line[:-1].decode("utf-8")
                line_data = json.loads(full_line.lstrip("data:").rstrip("/n"))
                return line_data["token"]["text"]
            chunk = next(self.byte_iterator)
            self.buffer.seek(0, io.SEEK_END)
            self.buffer.write(chunk["PayloadPart"]["Bytes"])

Now you can use the Boto3 invoke_endpoint_with_response_stream API on the endpoint that you created and enable streaming by iterating over a TokenIterator instance:

import boto3

client = boto3.client("runtime.sagemaker")
response = client.invoke_endpoint_with_response_stream(
    EndpointName=predictor.endpoint_name,
    Body=json.dumps(payload),
    ContentType="application/json",
)

for token in TokenIterator(response["Body"]):
    print(token, end="")

Specifying an empty end parameter to the print function will enable a visual stream without new line characters inserted. This produces the following output:

Building a website can be a complex process, but it generally involves the following steps:

1. Determine the purpose and goals of your website
2. Choose a domain name and hosting provider
3. Design and develop your website using HTML, CSS, and JavaScript
4. Add content to your website and optimize it for search engines
5. Test and troubleshoot your website to ensure it is working properly
6. Maintain and update your website regularly to keep it running smoothly.

There are many resources available online to guide you through these steps, including tutorials and templates. It may also be helpful to seek the advice of a web developer or designer if you are unsure about any of these steps.<|endoftext|>

You can use this code in a notebook or other applications like Streamlit or Gradio to see the streaming in action and the experience it provides for your customers.

Clean up

Finally, remember to clean up your deployed model and endpoint to avoid incurring additional costs:

predictor.delete_model()
predictor.delete_endpoint()

Conclusion

In this post, we showed you how to use newly launched feature of streaming in SageMaker JumpStart. We hope you will use the token streaming capability to build interactive applications requiring low latency for a better user experience.


About the authors

Rachna Chadha is a Principal Solution Architect AI/ML in Strategic Accounts at AWS. Rachna is an optimist who believes that ethical and responsible use of AI can improve society in future and bring economic and social prosperity. In her spare time, Rachna likes spending time with her family, hiking, and listening to music.

Dr. Kyle Ulrich is an Applied Scientist with the Amazon SageMaker built-in algorithms team. His research interests include scalable machine learning algorithms, computer vision, time series, Bayesian non-parametrics, and Gaussian processes. His PhD is from Duke University and he has published papers in NeurIPS, Cell, and Neuron.

Dr. Ashish Khetan is a Senior Applied Scientist with Amazon SageMaker built-in algorithms and helps develop machine learning algorithms. He got his PhD from University of Illinois Urbana-Champaign. He is an active researcher in machine learning and statistical inference, and has published many papers in NeurIPS, ICML, ICLR, JMLR, ACL, and EMNLP conferences.

Read More

High-Performance Llama 2 Training and Inference with PyTorch/XLA on Cloud TPUs

High-Performance Llama 2 Training and Inference with PyTorch/XLA on Cloud TPUs

In a landscape where AI innovation is accelerating at an unprecedented pace, Meta’s Llama family of open sourced large language models (LLMs) stands out as a notable breakthrough. Llama marked a significant step forward for LLMs, demonstrating the power of pre-trained architectures for a wide range of applications. Llama 2 further pushed the boundaries of scale and capabilities, inspiring advancements in language understanding, generation, and beyond.

Shortly after the announcement of Llama, we published a blog post showcasing ultra-low inference latency for Llama using PyTorch/XLA on Cloud TPU v4. Building on these results, today, we are proud to share Llama 2 training and inference performance using PyTorch/XLA on Cloud TPU v4 and our newest AI supercomputer, Cloud TPU v5e.

In this blog post, we use Llama 2 as an example model to demonstrate the power of PyTorch/XLA on Cloud TPUs for LLM training and inference. We discuss the computation techniques and optimizations used to improve inference throughput and training model FLOPs utilization (MFU). For Llama 2 70B parameters, we deliver 53% training MFU, 17 ms/token inference latency, 42 tokens/s/chip throughput powered by PyTorch/XLA on Google Cloud TPU. We offer a training user guide and an inference user guide for reproducing the results in this article. Additionally, you may find our Google Next 2023 presentation here.

Model Overview

Llama 2 comes in various sizes, ranging from 7B to 70B parameters, catering to different needs, computational resources, and training / inference budgets. Whether it’s small-scale projects or large-scale deployments, Llama models offer versatility and scalability to accommodate a wide range of applications.

Llama 2 is an auto-regressive language model that uses an optimized transformer architecture. The largest, 70B model, uses grouped-query attention, which speeds up inference without sacrificing quality. Llama 2 is trained on 2 trillion tokens (40% more data than Llama) and has the context length of 4,096 tokens for inference (double the context length of Llama), which enables more accuracy, fluency, and creativity for the model.

Llama 2 is a state-of-the-art LLM that outperforms many other open source language models on many benchmarks, including reasoning, coding, proficiency, and knowledge tests. The model’s scale and complexity place many demands on AI accelerators, making it an ideal benchmark for LLM training and inference performance of PyTorch/XLA on Cloud TPUs.

Performance Challenge of LLMs

Large-scale distributed training for LLMs such as Llama 2 introduces technical challenges that require practical solutions to make the most efficient use of TPUs. Llama’s size can strain both memory and processing resources of TPUs. To address this, we use model sharding, which involves breaking down the model into smaller segments, each fitting within the capacity of a single TPU core. This enables parallelism across multiple TPUs, improving training speed while reducing communication overhead.

Another challenge is managing the large datasets required for training Llama 2 efficiently, which requires effective data distribution and synchronization methods. Additionally, optimizing factors like learning rate schedules, gradient aggregation, and weight synchronization across distributed TPUs is crucial for achieving convergence.

After pretraining or fine-tuning Llama 2, running inference on the model checkpoint creates additional technical challenges. All of the challenges discussed in our previous blog post, such as autoregressive decoding, variable input prompt lengths, and the need for model sharding and quantization still apply for Llama 2. In addition, Llama 2 introduced two new capabilities: grouped-query attention and early stopping. We discuss how PyTorch/XLA handles these challenges to enable high-performance, cost-efficient training and inference of Llama 2 on Cloud TPU v4 and v5e.

Large-Scale Distributed Training

PyTorch/XLA offers two major ways of doing large-scale distributed training: SPMD, which utilizes the XLA compiler to transform and partition a single-device program into a multi-device distributed program; and FSDP, which implements the widely-adopted Fully Sharded Data Parallel algorithm.

In this blog post, we show how to use the SPMD API to annotate the HuggingFace (HF) Llama 2 implementation to maximize performance. For comparison, we also show our FSDP results with the same configurations; read about PyTorch/XLA FSDP API here.

SPMD Overview

Let’s briefly review the fundamentals of SPMD. For details, please refer to our blog post and user guide.

Mesh

A multidimensional array that describes the logical topology of the TPU devices:

# Assuming you are running on a TPU host that has 8 devices attached
num_devices = xr.global_runtime_device_count()
# mesh shape will be (4,2) in this example
mesh_shape = (num_devices // 2, 2)
device_ids = np.array(range(num_devices))
# axis_names 'x' and 'y' are optional
mesh = Mesh(device_ids, mesh_shape, ('x', 'y'))

Partition Spec

A tuple that describes how the corresponding tensor’s dimensions are sharded across the mesh:

partition_spec = ('x', 'y')

Mark Sharding

An API that takes a mesh and a partition_spec, and then generates a sharding annotation for the XLA compiler.

tensor = torch.randn(4, 4).to('xla')
# Let's resue the above mesh and partition_spec.
# It means the tensor's 0th dim is sharded 4 way and 1th dim is sharded 2 way.
xs.mark_sharding(tensor, mesh, partition_spec)

2D Sharding with SPMD

In our SPMD blog post, we demonstrated using 1D FSDP style sharding. Here, we introduce a more powerful sharding strategy, called 2D sharding, where both the parameters and activations are sharded. This new sharding strategy not only allows fitting a larger model but also boosts the MFU to up to 54.3%. For more details, read the Benchmarks section.

This section introduces a set of general rules that applies to most LLMs, and for convenience we directly reference the variable names and configuration names from HF Llama.

First, let’s create a 2D Mesh with corresponding axis names: data and model. The data axis is usually where we distribute the input data, and the model axis is where we further distribute the model.

mesh = Mesh(device_ids, mesh_shape, ('data', 'model'))

The mesh_shape can be a hyper-parameter that is tuned for different model sizes and hardware configurations. The same mesh will be reused in all following sharding annotations. In the next few sections, we will cover how to use the mesh to shard parameters, activations and input data.

Parameter Sharding

Below is a table that summarizes all parameters of HF Llama 2 and corresponding partition specifications. Example HF code can be found here.

Parameter Name Explanation Parameter Shape Partition Spec
embed_tokens embedding layer (vocab_size, hidden_size) (model, data)
q_proj attention weights (num_heads x head_dim, hidden_size) (data, model)
k_proj / v_proj attention weights (num_key_value_heads x head_dim, hidden_size) (data, model)
o_proj attention weights (hidden_size, num_heads x head_dim) (model, data)
gate_proj / up_proj MLP weights (intermediate_size, hidden_size) (model, data)
down_proj MLP weights (hidden_size, intermediate_size) (data, model)
lm_head HF output embedding (vocab_size, hidden_size) (model, data)

Table 1: SPMD 2D Sharding Parameter Partition Spec

The rule is to shard the hidden_size dim of any weights except QKVO projections according to the data axis of the mesh, then shard the other dim with the remaining model axis. For QKVO, do the opposite. This model-data axis rotation methodology is similar to that of Megatron-LM to reduce communication overhead. For layernorm weights, we implicitly mark them as replicated across different devices given they are 1D tensors.

Activation Sharding

In order to better utilize the device memory, very often we need to annotate the output of some memory bound ops. That way the compiler is forced to only keep partial output on devices instead of the full output. In Llama 2, we explicitly annotate all torch.matmul and nn.Linear outputs. Table 2 summarizes the corresponding annotations; the example HF code can be found here.

Output Name Explanation Output Shape Partition Spec
inputs_embeds embedding layer output (batch_size, sequence_length, hidden_size) (data, None, model)
query_states attention nn.Linear output (batch_size, sequence_length, num_heads x head_dim) (data, None, model)
key_states / value_states attention nn.Linear output (batch_size, sequence_length, num_key_value_heads x head_dim) (data, None, model)
attn_weights attention weights (batch_size, num_attention_heads, sequence_length, sequence_length) (data, model, None, None)
attn_output attention layer output (batch_size, sequence_length, hidden_size) (data, None, model)
up_proj / gate_proj / down_proj MLP nn.Linear outputs (batch_size, sequence_length, intermediate_size) (data, None, model)
logits HF output embedding output (batch_size, sequence_length, hidden_size) (data, None, model)

Table 2: SPMD 2D Sharding Activation Partition Spec

The rule is to shard the batch_size dim of any outputs according to the data axis of the mesh, then replicate the length dims of any outputs, and finally shard the last dim along the model axis.

Input Sharding

For input sharding, the rule is to shard the batch dim along the data axis of the mesh, and replicate the sequence_length dim. Below is the example code, and the corresponding HF change may be found here.

partition_spec = ('data', None)
sharding_spec = xs.ShardingSpec(mesh, partition_spec)
# MpDeviceLoader will shard the input data before sending to the device.
pl.MpDeviceLoader(dataloader, self.args.device, input_sharding=sharding_spec, ...)

Now, all the data and model tensors that require sharding are covered!

Optimizer States & Gradients

You may be wondering whether it is necessary to shard the optimizer states and gradients as well. Great news: the sharding propagation feature of the XLA compiler automates the sharding annotation in these two scenarios, without needing more hints to improve performance.

It is important to note that optimizer states are typically initialized within the first iteration of the training loop. From the standpoint of the XLA compiler, the optimizer states are the outputs of the first graph, and therefore have the sharding annotation propagated. For subsequent iterations, the optimizer states become inputs to the second graph, with the sharding annotation propagated from the first one. This is also why PyTorch/XLA typically produces two graphs for the training loops. If the optimizer states are somehow initialized before the first iteration, users will have to manually annotate them, just like the model weights.

Again, all concrete examples of the above sharding annotation can be found in our fork of HF Transformers here. The repo also contains code for our experimental feature MultiSlice, including HybridMesh and dcn axis, which follows the same principles mentioned above.

Caveats

While using SPMD for training, there are a few important things to pay attention to:

  • Use torch.einsum instead of torch.matmul; torch.matmul usually flattens tensors and does a torch.mm at the end, and that’s bad for SPMD when the combined axes are sharded. The XLA compiler will have a hard time determining how to propagate the sharding.
  • PyTorch/XLA provides patched [nn.Linear](https://github.com/pytorch/xla/blob/master/torch_xla/experimental/xla_sharding.py#L570) to overcome the above constraint:
import torch_xla.experimental.xla_sharding as xs
from torch_xla.distributed.fsdp.utils import apply_xla_patch_to_nn_linear

 model = apply_xla_patch_to_nn_linear(model, xs.xla_patched_nn_linear_forward)
  • Always reuse the same mesh across all shardings
  • Always specify --dataloader_drop_last yes. The last smaller data is hard to annotate.
  • Large models which are initialized on the host can induce host-side OOM. One way to avoid this issue is to initialize parameters on the meta device, then create and shard real tensors layer-by-layer.

Infrastructure Improvements

Besides the above modeling techniques, we have developed additional features and improvements to maximize performance, including:

  • We enable asynchronous collective communication. This requires enhancements on the XLA compiler’s latency hiding scheduler to better optimize for the Llama 2 PyTorch code.
  • We now allow sharding annotations in the middle of the IR graph, just like JAX’s jax.lax.with_sharding_constraint. Previously, only graph inputs were annotated.
  • We also propagate replicated sharding spec from the compiler to the graph outputs. This allows us to shard the optimizer states automatically.

Inference Optimizations

All the PyTorch/XLA optimizations implemented for Llama inference are applied to Llama 2 as well. That includes Tensor Parallelism + Dynamo (torch.compile) using torch-xla collective ops, autoregressive decoding logic improvement to avoid recompilation, bucketized prompt length, KV-cache with compilation friendly index ops. Llama 2 introduces two new changes: Grouped Query Attention, and Early Stopping when eos is reached for all prompts. We applied corresponding changes to promote better performance and flexibility with PyTorch/XLA.

Grouped Query Attention

Llama 2 enables Grouped Query Attention for the 70B models. It allows the number of Key and Value heads to be smaller than the number of Query heads, while still supporting KV-cache sharding up to the number of KV heads. For the 70B models, the n_kv_heads is 8, which limits the tensor parallelism to be less or equal to 8. In order to shard the model checkpoint to run on more devices, the K, V projection weights need to be replicated first, and then split into multiple pieces. For example, to shard the 70B model checkpoint from 8 pieces to 16 pieces, the K, V projection weights are duplicated and split into 2 pieces for each shard. We provide a reshard_checkpoints.py script to handle that, and to make sure the sharded checkpoint performs mathematically identical to the original checkpoint.

EOS Early Stopping

The Llama 2 generation code added the early stopping logic. A eos_reached tensor is used to track the completion of all the prompt generations, and if the eos token is reached for all the prompts in the batch, the generation would stop early. The similar change is incorporated in the PyTorch/XLA optimized version as well, with some minor tweaks.

In PyTorch/XLA, checking the value of a tensor like eos_reached as part of the control flow condition would invoke a blocking device-to-host transfer. The tensor would be transferred from device memory to CPU memory to evaluate its value, while all other logics are waiting. This introduced a delay on the scale of ms after every new token generation. As a trade-off, we reduce the rate of checking the eos_reached value to be once every 10 new token generations. With this change, the impact of the blocking device-to-host transfer would be reduced by 10x, while the early stopping would still be effective, and at most 9 unnecessary tokens would be generated after each sequence reaches the eos token.

Model Serving

PyTorch/XLA is working on a serving strategy to enable the PyTorch community to serve their deep learning applications via Torch.Export, StableHLO, and SavedModel. PyTorch/XLA Serving is an experimental feature in PyTorch/XLA 2.1 release; for details visit our serving user guide. Users can take advantage of TorchServe to run their single-host workloads.

Benchmarks

Metrics

To measure training performance, we use the industry-standard metric: Model FLOPS Utilization (MFU). Model FLOPS are the floating point operations required to perform a single forward and backward pass. Model FLOPs are hardware and implementation independent and only depend on the underlying model. MFU measures how effectively the model is using the actual hardware during training. Achieving 100% MFU means that the model is using the hardware perfectly.

To measure inference performance, we use the industry-standard metric of throughput. First, we measure latency per token when the model has been compiled and loaded. Then, we calculate throughput by dividing batch size (BS) over latency per chip. As a result, throughput measures how the model is performing in production environments regardless of how many chips are used.

Results

Training Evaluation

Figure 1 shows Llama 2 SPMD 2D sharding training results on a range of Google TPU v4 hardware with PyTorch/XLA FSDP as the baseline. We increased MFU by 28% across all sizes of Llama 2 compared to FSDP running on the same hardware configuration. This performance improvement is largely due to: 1) 2D Sharding has less communication overhead than FSDP, and 2) asynchronous collective communication is enabled in SPMD which allows communication and computation overlapping. Also note that as the model size scales, we maintain the high MFU. Table 3 shows all the hardware configurations plus some hyperparameters used in the training benchmarks.

Figure 1. Llama 2 Training MFU on TPU v4 Hardware

Fig. 1: Llama 2 Training MFU on TPU v4 Hardware

The results in Figure 1 are produced with sequence length 1,024. Figure 2 shows how the performance behaves with larger sequence lengths. It shows our performance also scales linearly with sequence lengths. The MFU is expected to decrease a little as a smaller per device batch size is needed to accommodate the additional memory pressure introduced by the larger sequence length since the sequence length axis is not sharded in 2D sharding. And TPU is very sensitive to batch size. For Llama 2, 70B parameters, the performance decrease is as low as 4%. At the time of preparing these results, Hugging Face Llama 2 tokenizer limits the max model input to 2,048, preventing us from evaluating larger sequence lengths.

Figure 2. Llama 2 SPMD Training MFU on TPU v4 with Different Sequence Lengths

Fig. 2: Llama 2 SPMD Training MFU on TPU v4 with Different Sequence Lengths

Model Size 7B 13B 70B
TPU NumCores V4-32 V4-64 V4-256
Mesh Shape (16, 1) (32, 1) (32, 4)
Seq Len 1,024 2,048 1,024 2,048 1,024 2,048
Global Batch 256 128 256 128 512 256
Per Device Batch 16 8 8 4 16 8

Table 3: Llama 2 SPMD Training Benchmark TPU Configurations and Hyperparameters

One last thing to call out is that we use adafactor as the optimizer for better memory utilization. And once again, here is the user guide to reproduce the benchmark results listed above.

Inference Evaluation

In this section, we extend our previous evaluation of Llama on Cloud v4 TPU. Here, we demonstrate the performance properties of TPU v5e for inference applications.

We define inference throughput as the number of tokens produced by a model per second per TPU chip. Figure 3 shows Llama 2 70B throughput on a v5e-16 TPU node. Given Llama is a memory bound application, we see that applying weight-only quantization unblocks extending the model batch size to 32. Higher throughput results would be possible on larger TPU v5e hardware up to the point where the ICI network bandwidth between chips throttle the TPU slice from delivering higher throughput. Exploring the upper bound limits of TPU v5e on Llama 2 was outside of the scope of this work. Notice, to make the Llama 2 70B model run on v5e-16, we replicated the attention heads to have one head per chip as discussed in the Inference section above. As discussed previously, with increasing model batch size, per-token latency grows proportionally; quantization improves overall latency by reducing memory I/O demand.

Figure 3. Llama 2 70B Inference Per-Chip Throughput on TPU v5e vs. Batch Size

Fig. 3: Llama 2 70B Inference Per-Chip Throughput on TPU v5e vs. Batch Size

Figure 4 shows inference throughput results across different model sizes. These results highlight the largest throughput given the hardware configuration when using bf16 precision. With weight only quantization, this throughput reaches 42 on the 70B model. As mentioned above, increasing hardware resources may lead to performance gains.

Figure 4. Llama 2 Inference Per-Chip Throughput on TPU v5e

Fig. 4: Llama 2 Inference Per-Chip Throughput on TPU v5e

Figure 5 shows the cost of serving Llama 2 models (from Figure 4) on Cloud TPU v5e. We report the TPU v5e per-chip cost based on the 3-year commitment (reserved) price in the us-west4 region. All model sizes use maximum sequence length of 2,048 and maximum generation length of 1,000 tokens. Note that with quantization, the cost for the 70B model drops to $0.0036 per 1,000 tokens.

Figure 5. Llama 2 Inference Per-Chip Cost on TPU v5e

Fig. 5: Llama 2 Inference Per-Chip Cost on TPU v5e

Figure 6 summarizes our best Llama 2 inference latency results on TPU v5e. Llama 2 7B results are obtained from our non-quantized configuration (BF16 Weight, BF16 Activation) while the 13B and 70B results are from the quantized (INT8 Weight, BF16 Activation) configuration. We attribute this observation to the inherent memory saving vs. compute overhead tradeoff of quantization; as a result, for smaller models, quantization may not lead to lower inference latency.

Additionally, prompt length has a strong effect on the memory requirements of LLMs. For instance, we observe a latency of 1.2ms / token (i.e. 201 tokens / second / chip) when max_seq_len=256 at batch size of 1 with no quantization on v5e-4 running Llama2 7B.

Figure 6. Llama 2 Inference Latency on TPU v5e

Fig. 6: Llama 2 Inference Latency on TPU v5e

Final Thoughts

The recent wave of AI innovation has been nothing short of transformative, with breakthroughs in LLMs at the forefront. Meta’s Llama and Llama 2 models stand as notable milestones in this wave of progress. PyTorch/XLA uniquely enables high-performance, cost-efficient training and inference for Llama 2 and other LLMs and generative AI models on Cloud TPUs, including the new Cloud TPU v5e. Looking forward, PyTorch/XLA will continue to push the performance limits on Cloud TPUs in both throughput and scalability and at the same time maintain the same PyTorch user experience.

We are ecstatic about what’s ahead for PyTorch/XLA and invite the community to join us. PyTorch/XLA is developed fully in open source. So, please file issues, submit pull requests, and send RFCs to GitHub so that we can openly collaborate. You can also try out PyTorch/XLA for yourself on various XLA devices including TPUs and GPUs.

We would like to extend our special thanks to Marcello Maggioni, Tongfei Guo, Andy Davis, Berkin Ilbeyi for their support and collaboration in this effort.

Cheers,
The PyTorch/XLA Team at Google

Read More