This paper was accepted at the NeurIPS 2023 workshop on Diffusion Models.
We demonstrate how conditional generation from diffusion models can be used to tackle a variety of realistic tasks in the production of music in 44.1kHz stereo audio with sampling-time guidance. The scenarios we consider include continuation, inpainting and regeneration of musical audio, the creation of smooth transitions between two different music tracks, and the transfer of desired stylistic characteristics to existing audio clips. We achieve this by applying guidance at sampling time in a simple framework that…Apple Machine Learning Research
Boosting developer productivity: How Deloitte uses Amazon SageMaker Canvas for no-code/low-code machine learning
The ability to quickly build and deploy machine learning (ML) models is becoming increasingly important in today’s data-driven world. However, building ML models requires significant time, effort, and specialized expertise. From data collection and cleaning to feature engineering, model building, tuning, and deployment, ML projects often take months for developers to complete. And experienced data scientists can be hard to come by.
This is where the AWS suite of low-code and no-code ML services becomes an essential tool. With just a few clicks using Amazon SageMaker Canvas, you can take advantage of the power of ML without needing to write any code.
As a strategic systems integrator with deep ML experience, Deloitte utilizes the no-code and low-code ML tools from AWS to efficiently build and deploy ML models for Deloitte’s clients and for internal assets. These tools allow Deloitte to develop ML solutions without needing to hand-code models and pipelines. This can help speed up project delivery timelines and enable Deloitte to take on more client work.
The following are some specific reasons why Deloitte uses these tools:
- Accessibility for non-programmers – No-code tools open up ML model building to non-programmers. Team members with just domain expertise and very little coding skills can develop ML models.
- Rapid adoption of new technology – Availability and constant improvement on ready-to-use models and AutoML helps ensure that users are constantly using leading-class technology.
- Cost-effective development – No-code tools help reduce the cost and time required for ML model development, making it more accessible to clients, which can help them achieve a higher return on investment.
Additionally, these tools provide a comprehensive solution for faster workflows, enabling the following:
- Faster data preparation – SageMaker Canvas has over 300 built-in transformations and the ability to use natural language that can accelerate data preparation and making data ready for model building.
- Faster model building – SageMaker Canvas offers ready-to-use models or Amazon AutoML technology that enables you to build custom models on enterprise data with just a few clicks. This helps speed up the process compared to coding models from the ground up.
- Easier deployment – SageMaker Canvas offers the ability to deploy production-ready models to an Amazon Sagmaker endpoint in a few clicks while also registering it in Amazon SageMaker Model Registry.
Vishveshwara Vasa, Cloud CTO for Deloitte, says:
“Through AWS’s no-code ML services such as SageMaker Canvas and SageMaker Data Wrangler, we at Deloitte Consulting have unlocked new efficiencies, enhancing the speed of development and deployment productivity by 30–40% across our client-facing and internal projects.”
In this post, we demonstrate the power of building an end-to-end ML model with no code using SageMaker Canvas by showing you how to build a classification model for predicting if a customer will default on a loan. By predicting loan defaults more accurately, the model can help a financial services company manage risk, price loans appropriately, improve operations, provide additional services, and gain a competitive advantage. We demonstrate how SageMaker Canvas can help you rapidly go from raw data to a deployed binary classification model for loan default prediction.
SageMaker Canvas offers comprehensive data preparation capabilities powered by Amazon SageMaker Data Wrangler in the SageMaker Canvas workspace. This enables you to go through all the phases of a standard ML workflow, from data preparation to model building and deployment, on a single platform.
Data preparation is typically the most time-intensive phase of the ML workflow. To reduce time spent on data preparation, SageMaker Canvas allows you to prepare your data using over 300 built-in transformations. Alternatively, you can write natural language prompts, such as “drop the rows for column c that are outliers,” and be presented with the code snippet necessary for this data preparation step. You can then add this to your data preparation workflow in a few clicks. We show you how to use that in this post as well.
Solution overview
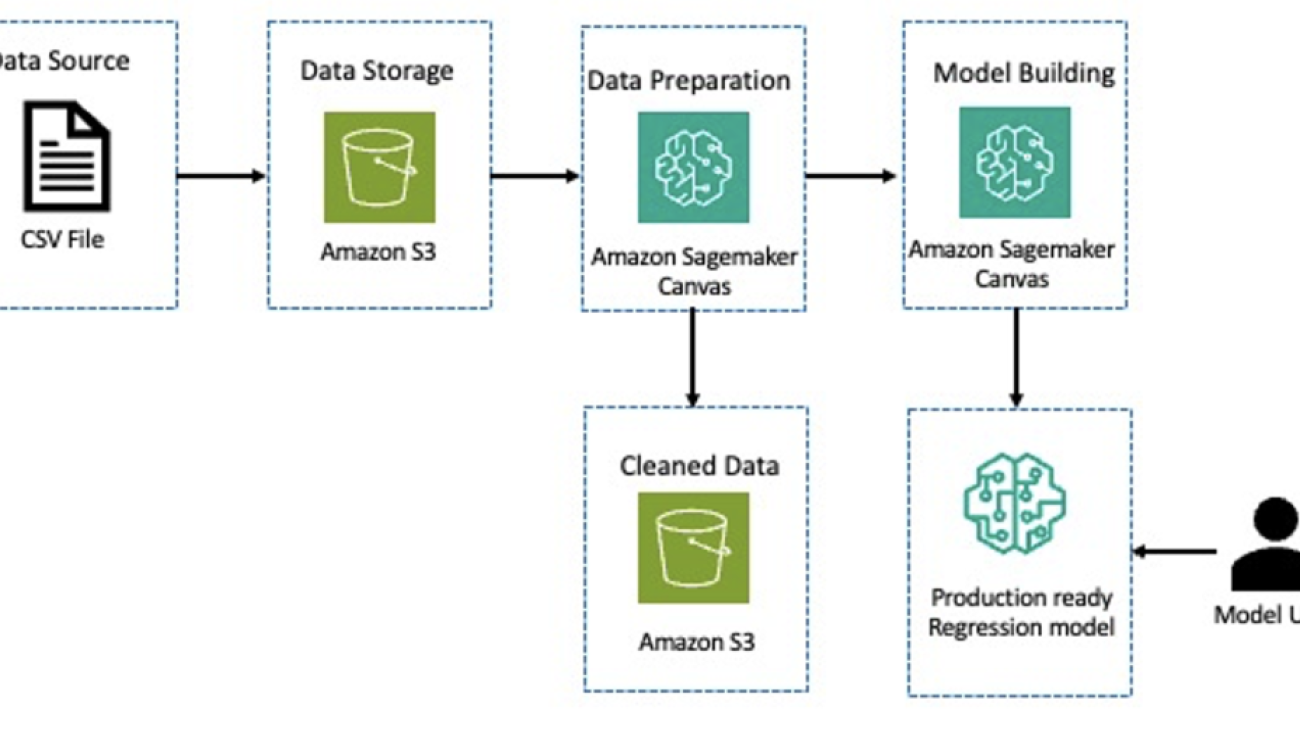
The following diagram describes the architecture for a loan default classification model using SageMaker low-code and no-code tools.
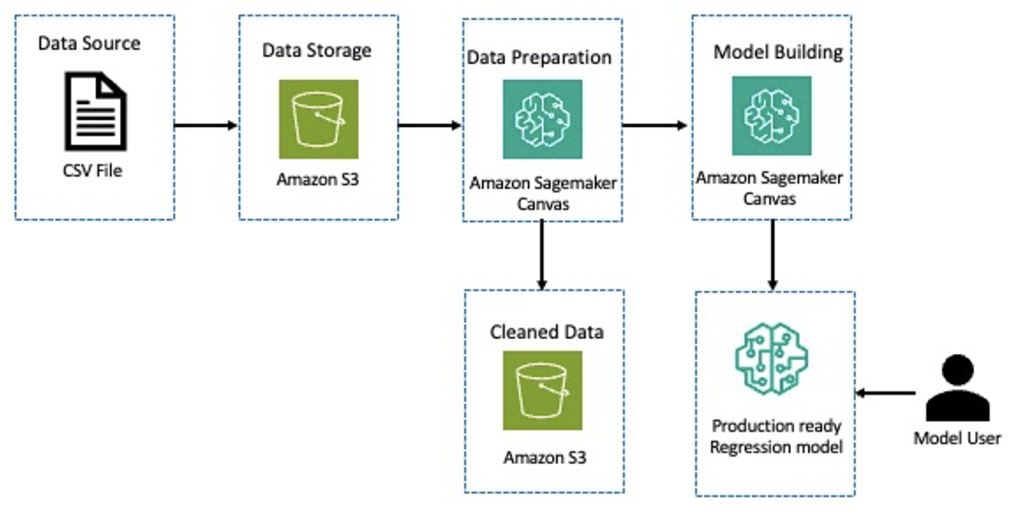
Starting with a dataset that has details about loan default data in Amazon Simple Storage Service (Amazon S3), we use SageMaker Canvas to gain insights about the data. We then perform feature engineering to apply transformations such as encoding categorical features, dropping features that are not needed, and more. Next, we store the cleansed data back in Amazon S3. We use the cleaned dataset to create a classification model for predicting loan defaults. Then we have a production-ready model for inference.
Prerequisites
Make sure that the following prerequisites are complete and that you have enabled the Canvas Ready-to-use models option when setting up the SageMaker domain. If you have already set up your domain, edit your domain settings and go to Canvas settings to enable the Enable Canvas Ready-to-use models option. Additionally, set up and create the SageMaker Canvas application, then request and enable Anthropic Claude model access on Amazon Bedrock.
Dataset
We use a public dataset from kaggle that contains information about financial loans. Each row in the dataset represents a single loan, and the columns provide details about each transaction. Download this dataset and store this in an S3 bucket of your choice. The following table lists the fields in the dataset.
| Column Name | Data Type | Description |
Person_age |
Integer | Age of the person who took a loan |
Person_income |
Integer | Income of the borrower |
Person_home_ownership |
String | Home ownership status (own or rent) |
Person_emp_length |
Decimal | Number of years they are employed |
Loan_intent |
String | Reason for loan (personal, medical, educational, and so on) |
Loan_grade |
String | Loan grade (A–E) |
Loan_int_rate |
Decimal | Interest rate |
Loan_amnt |
Integer | Total amount of the loan |
Loan_status |
Integer | Target (whether they defaulted or not) |
Loan_percent_income |
Decimal | Loan amount compared to the percentage of the income |
Cb_person_default_on_file |
Integer | Previous defaults (if any) |
Cb_person_credit_history_length |
String | Length of their credit history |
Simplify data preparation with SageMaker Canvas
Data preparation can take up to 80% of the effort in ML projects. Proper data preparation leads to better model performance and more accurate predictions. SageMaker Canvas allows interactive data exploration, transformation, and preparation without writing any SQL or Python code.
Complete the following steps to prepare your data:
- On the SageMaker Canvas console, choose Data preparation in the navigation pane.
- On the Create menu, choose Document.
- For Dataset name, enter a name for your dataset.
- Choose Create.

- Choose Amazon S3 as the data source and connect it to the dataset.
- After the dataset is loaded, create a data flow using that dataset.

- Switch to the analyses tab and create a Data Quality and Insights Report.
This is a recommended step to analyze the quality of the input dataset. The output of this report produces instant ML-powered insights such as data skew, duplicates in the data, missing values, and much more. The following screenshot shows a sample of the generated report for the loan dataset.


By generating these insights on your behalf, SageMaker Canvas provides you with a set of issues in the data that need remediation in the data preperation phase. To pick the top two issues identified by SageMaker Canvas, you need to encode the categorical features and remove the duplicate rows so your model quality is high. You can do both of these and more in a visual workflow with SageMaker Canvas.
- First, one-hot encode the
loan_intent,loan_grade, andperson_home_ownership - You can drop the
cb_person_cred_history_lengthcolumn because that column has the least predicting power, as shown in the Data Quality and Insights Report.
SageMaker Canvas recently added a Chat with data option. This feature uses the power of foundation models to interpret natural language queries and generate Python-based code to apply feature engineering transformations. This feature is powered by Amazon Bedrock, and can be configured to run entirely in a your VPC so that data never leaves the your environment. - To use this feature to remove duplicate rows, choose the plus sign next to the Drop column transform, then choose Chat with data.

- Enter your query in natural language (for example, “Remove duplicate rows from the dataset”).
- Review the generated transformation and choose Add to steps to add the transformation to the flow.

- Finally, export the output of these transformations to Amazon S3 or optionally Amazon SageMaker Feature Store to use these features across multiple projects.
You can also add another step to create an Amazon S3 destination for the dataset to scale the workflow for a large dataset. The following diagram shows the SageMaker Canvas data flow after adding visual transformations.

You have completed the entire data processing and feature engineering step using visual workflows in SageMaker Canvas. This helps reduce the time a data engineer spends on cleaning and making the data ready for model development from weeks to days. The next step is to build the ML model.
Build a model with SageMaker Canvas
Amazon SageMaker Canvas provides a no-code end-to-end workflow for building, analyzing, testing, and deploying this binary classification model. Complete the following steps:
- Create a dataset in SageMaker Canvas.
- Specify either the S3 location that was used to export the data or the S3 location that’s on the destination of the SageMaker Canvas job.

Now you’re ready to build the model. - Choose Models in the navigation pane and choose New model.
- Name the model and select Predictive analysis as the model type.
- Choose the dataset created in the previous step.

The next step is configuring the model type. - Choose the target column and the model type will be automatically set as 2 category prediction.
- Choose your build type, Standard build or Quick build.

SageMaker Canvas displays the expected build time as soon as you start building the model. Standard build usually takes between 2–4 hours; you can use the Quick build option for smaller datasets, which only takes 2–15 minutes. For this particular dataset, it should take around 45 minutes to complete the model build. SageMaker Canvas keeps you informed of the progress of the build process. - After the model is built, you can look at the model performance.

SageMaker Canvas provides various metrics like accuracy, precision, and F1 score depending on the type of the model. The following screenshot shows the accuracy and a few other advanced metrics for this binary classification model. - The next step is to make test predictions.
SageMaker Canvas allows you to make batch predictions on multiple inputs or a single prediction to quickly verify the model quality. The following screenshot shows a sample inference.
- The last step is to deploy the trained model.
SageMaker Canvas deploys the model on SageMaker endpoints, and now you have a production model ready for inference. The following screenshot shows the deployed endpoint.
After the model is deployed, you can call it through the AWS SDK or AWS Command Line Interface (AWS CLI) or make API calls to any application of your choice to confidently predict the risk of a potential borrower. For more information about testing your model, refer to Invoke real-time endpoints.
Clean up
To avoid incurring additional charges, log out of SageMaker Canvas or delete the SageMaker domain that was created. Additionally, delete the SageMaker model endpoint and delete the dataset that was uploaded to Amazon S3.
Conclusion
No-code ML accelerates development, simplifies deployment, doesn’t require programming skills, increases standardization, and reduces cost. These benefits made no-code ML attractive to Deloitte to improve its ML service offerings, and they have shortened their ML model build timelines by 30–40%.
Deloitte is a strategic global systems integrator with over 17,000 certified AWS practitioners across the globe. It continues to raise the bar through participation in the AWS Competency Program with 25 competencies, including Machine Learning. Connect with Deloitte to start using AWS no-code and low-code solutions to your enterprise.
About the authors
 Chida Sadayappan leads Deloitte’s Cloud AI/Machine Learning practice. He brings strong thought leadership experience to engagements and thrives in supporting executive stakeholders achieve performance improvement and modernization goals across industries using AI/ML. Chida is a serial tech entrepreneur and an avid community builder in the startup and developer ecosystems.
 Kuldeep Singh, a Principal Global AI/ML leader at AWS with over 20 years in tech, skillfully combines his sales and entrepreneurship expertise with a deep understanding of AI, ML, and cybersecurity. He excels in forging strategic global partnerships, driving transformative solutions and strategies across various industries with a focus on generative AI and GSIs.
 Kasi Muthu is a senior partner solutions architect focusing on data and AI/ML at AWS based out of Houston, TX. He is passionate about helping partners and customers accelerate their cloud data journey. He is a trusted advisor in this field and has plenty of experience architecting and building scalable, resilient, and performant workloads in the cloud. Outside of work, he enjoys spending time with his family.
Unsupervised speech-to-speech translation from monolingual data

Speech-to-speech translation (S2ST) is a type of machine translation that converts spoken language from one language to another. This technology has the potential to break down language barriers and facilitate communication between people from different cultures and backgrounds.
Previously, we introduced Translatotron 1 and Translatotron 2, the first ever models that were able to directly translate speech between two languages. However they were trained in supervised settings with parallel speech data. The scarcity of parallel speech data is a major challenge in this field, so much that most public datasets are semi- or fully-synthesized from text. This adds additional hurdles to learning translation and reconstruction of speech attributes that are not represented in the text and are thus not reflected in the synthesized training data.
Here we present Translatotron 3, a novel unsupervised speech-to-speech translation architecture. In Translatotron 3, we show that it is possible to learn a speech-to-speech translation task from monolingual data alone. This method opens the door not only to translation between more language pairs but also towards translation of the non-textual speech attributes such as pauses, speaking rates, and speaker identity. Our method does not include any direct supervision to target languages and therefore we believe it is the right direction for paralinguistic characteristics (e.g., such as tone, emotion) of the source speech to be preserved across translation. To enable speech-to-speech translation, we use back-translation, which is a technique from unsupervised machine translation (UMT) where a synthetic translation of the source language is used to translate texts without bilingual text datasets. Experimental results in speech-to-speech translation tasks between Spanish and English show that Translatotron 3 outperforms a baseline cascade system.
Translatotron 3
Translatotron 3 addresses the problem of unsupervised S2ST, which can eliminate the requirement for bilingual speech datasets. To do this, Translatotron 3’s design incorporates three key aspects:
- Pre-training the entire model as a masked autoencoder with SpecAugment, a simple data augmentation method for speech recognition that operates on the logarithmic mel spectogram of the input audio (instead of the raw audio itself) and is shown to effectively improve the generalization capabilities of the encoder.
- Unsupervised embedding mapping based on multilingual unsupervised embeddings (MUSE), which is trained on unpaired languages but allows the model to learn an embedding space that is shared between the source and target languages.
- A reconstruction loss based on back-translation, to train an encoder-decoder direct S2ST model in a fully unsupervised manner.
The model is trained using a combination of the unsupervised MUSE embedding loss, reconstruction loss, and S2S back-translation loss. During inference, the shared encoder is utilized to encode the input into a multilingual embedding space, which is subsequently decoded by the target language decoder.
Architecture
Translatotron 3 employs a shared encoder to encode both the source and target languages. The decoder is composed of a linguistic decoder, an acoustic synthesizer (responsible for acoustic generation of the translation speech), and a singular attention module, like Translatotron 2. However, for Translatotron 3 there are two decoders, one for the source language and another for the target language. During training, we use monolingual speech-text datasets (i.e., these data are made up of speech-text pairs; they are not translations).
Encoder
The encoder has the same architecture as the speech encoder in the Translatotron 2. The output of the encoder is split into two parts: the first part incorporates semantic information whereas the second part incorporates acoustic information. By using the MUSE loss, the first half of the output is trained to be the MUSE embeddings of the text of the input speech spectrogram. The latter half is updated without the MUSE loss. It is important to note that the same encoder is shared between source and target languages. Furthermore, the MUSE embedding is multilingual in nature. As a result, the encoder is able to learn a multilingual embedding space across source and target languages. This allows a more efficient and effective encoding of the input, as the encoder is able to encode speech from both languages into a common embedding space, rather than maintaining a separate embedding space for each language.
Decoder
Like Translatotron 2, the decoder is composed of three distinct components, namely the linguistic decoder, the acoustic synthesizer, and the attention module. To effectively handle the different properties of the source and target languages, however, Translatotron 3 has two separate decoders, for the source and target languages.
Two part training
The training methodology consists of two parts: (1) auto-encoding with reconstruction and (2) a back-translation term. In the first part, the network is trained to auto-encode the input to a multilingual embedding space using the MUSE loss and the reconstruction loss. This phase aims to ensure that the network generates meaningful multilingual representations. In the second part, the network is further trained to translate the input spectrogram by utilizing the back-translation loss. To mitigate the issue of catastrophic forgetting and enforcing the latent space to be multilingual, the MUSE loss and the reconstruction loss are also applied in this second part of training. To ensure that the encoder learns meaningful properties of the input, rather than simply reconstructing the input, we apply SpecAugment to encoder input at both phases. It has been shown to effectively improve the generalization capabilities of the encoder by augmenting the input data.
Training objective
During the back-translation training phase (illustrated in the section below), the network is trained to translate the input spectrogram to the target language and then back to the source language. The goal of back-translation is to enforce the latent space to be multilingual. To achieve this, the following losses are applied:
- MUSE loss: The MUSE loss measures the similarity between the multilingual embedding of the input spectrogram and the multilingual embedding of the back-translated spectrogram.
- Reconstruction loss: The reconstruction loss measures the similarity between the input spectrogram and the back-translated spectrogram.
In addition to these losses, SpecAugment is applied to the encoder input at both phases. Before the back-translation training phase, the network is trained to auto-encode the input to a multilingual embedding space using the MUSE loss and reconstruction loss.
MUSE loss
To ensure that the encoder generates multilingual representations that are meaningful for both decoders, we employ a MUSE loss during training. The MUSE loss forces the encoder to generate such a representation by using pre-trained MUSE embeddings. During the training process, given an input text transcript, we extract the corresponding MUSE embeddings from the embeddings of the input language. The error between MUSE embeddings and the output vectors of the encoder is then minimized. Note that the encoder is indifferent to the language of the input during inference due to the multilingual nature of the embeddings.
 |
| The training and inference in Translatotron 3. Training includes the reconstruction loss via the auto-encoding path and employs the reconstruction loss via back-translation. |
Audio samples
Following are examples of direct speech-to-speech translation from Translatotron 3:
Spanish-to-English (on Conversational dataset)
| Input (Spanish) | |
| TTS-synthesized reference (English) | |
| Translatotron 3 (English) |
Spanish-to-English (on CommonVoice11 Synthesized dataset)
| Input (Spanish) | |
| TTS-synthesized reference (English) | |
| Translatotron 3 (English) |
Spanish-to-English (on CommonVoice11 dataset)
| Input (Spanish) | |
| TTS reference (English) | |
| Translatotron 3 (English) |
Performance
To empirically evaluate the performance of the proposed approach, we conducted experiments on English and Spanish using various datasets, including the Common Voice 11 dataset, as well as two synthesized datasets derived from the Conversational and Common Voice 11 datasets.
The translation quality was measured by BLEU (higher is better) on ASR (automatic speech recognition) transcriptions from the translated speech, compared to the corresponding reference translation text. Whereas, the speech quality is measured by the MOS score (higher is better). Furthermore, the speaker similarity is measured by the average cosine similarity (higher is better).
Because Translatotron 3 is an unsupervised method, as a baseline we used a cascaded S2ST system that is combined from ASR, unsupervised machine translation (UMT), and TTS (text-to-speech). Specifically, we employ UMT that uses the nearest neighbor in the embedding space in order to create the translation.
Translatotron 3 outperforms the baseline by large margins in every aspect we measured: translation quality, speaker similarity, and speech quality. It particularly excelled on the conversational corpus. Moreover, Translatotron 3 achieves speech naturalness similar to that of the ground truth audio samples (measured by MOS, higher is better).
 |
| Translation quality (measured by BLEU, where higher is better) evaluated on three Spanish-English corpora. |
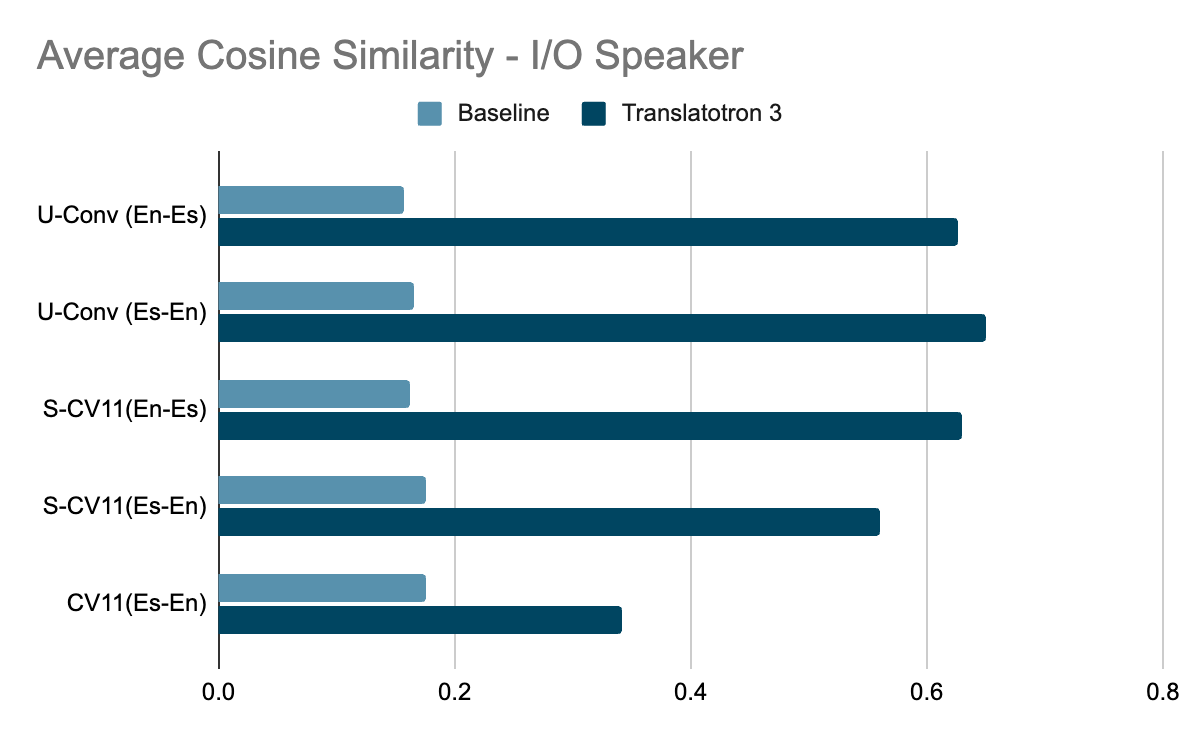 |
| Speech similarity (measured by average cosine similarity between input speaker and output speaker, where higher is better) evaluated on three Spanish-English corpora. |
 |
| Mean-opinion-score (measured by average MOS metric, where higher is better) evaluated on three Spanish-English corpora. |
Future work
As future work, we would like to extend the work to more languages and investigate whether zero-shot S2ST can be applied with the back-translation technique. We would also like to examine the use of back-translation with different types of speech data, such as noisy speech and low-resource languages.
Acknowledgments
The direct contributors to this work include Eliya Nachmani, Alon Levkovitch, Yifan Ding, Chulayutsh Asawaroengchai, Heiga Zhen, and Michelle Tadmor Ramanovich. We also thank Yu Zhang, Yuma Koizumi, Soroosh Mariooryad, RJ Skerry-Ryan, Neil Zeghidour, Christian Frank, Marco Tagliasacchi, Nadav Bar, Benny Schlesinger and Yonghui Wu.

PwR: Using representations for AI-powered software development
This research is being presented at the Agami Summit 2023 (opens in new tab), an annual forum in Maharashtra, India, for innovation in the field of law and justice.

In one scenario of the future, such as the one imagined by Matt Welsh for the Association of Computing Machinery (ACM) (opens in new tab), AI will take the lead in coding while humans oversee the process. This shift will require people to take a supervisory role, focusing on high-level tasks while leaving the code details to AI. As we envision this transformation, we face a critical question: How can we reimagine software development to not just improve developer productivity but also to ensure software safety, reliability, and maintainability while keeping it personalized to developer preferences?
Realizing this outcome relies on AI and developers establishing a common understanding. While natural language can facilitate AI-developer interaction, it also introduces the potential for misinterpreting tasks. Existing solutions address this gap, prompting AI to communicate its understanding in a structured natural-language document. This document can then be inspected, edited, and approved by the developer. While effective, the developer still needs to vet the resulting AI-generated code for safety and reliability, requiring both domain and coding expertise. Our goal is to decouple this requirement, paving the way for numerous organizations and individuals, including those without coding expertise, to develop software.
PwR approach
Programming with Representations (PwR, pronounced “power”), which we are presenting at the Agami Summit 2023 (opens in new tab), is a software development approach that relies on a domain-specific language (DSL), or representation, defined by a developer specializing in a specific domain. This representation includes built-in guardrails that are automatically implemented throughout the software development process. Once a representation is defined for a domain, PwR enables any developer interested in that domain to translate their intentions using natural language into a program in that representation. This process is illustrated in Figure 1.

PwR uses large language models (LLMs) to interpret user conversations and transform them into DSL programs. This process involves traversing a code-generation pipeline to ultimately derive executable code. However, despite advancements in LLMs’ code generation, these models still grapple with limitations like hallucinations and limited context windows. Using DSL reduces the amount of code that LLMs need to generate, as most code can be generated from the DSL, increasing accuracy throughout the process.
The DSL incorporates guardrails, ensuring that the essential components are there, such as the starting state of a workflow, clearly defined transitions, and error handling protocols. These guardrails can be automatically examined and communicated back to the developer in natural language, allowing for necessary corrections. While certain guardrails may enhance safety preferences, developers still must confirm that the intended functionality was implemented. PwR simply acts as a facilitator within the cycle involving the developer, the LLM, and the DSL checker.
PwR does not require developers to learn a custom DSL. Instead, it generates a natural-language representation (NLR) of the DSL. Developers can inspect this NLR, essentially programming in a natural language representation while the underlying DSL remains concealed. This approach grants developers the flexibility and ease of interacting with a natural-language representation while preserving the precision of their intent within the DSL. Additionally, developers can access a live test environment where their code can be hosted and tested for functionality. These capabilities are integrated into the PwR Studio tool, making it easy to get started.
PwR lowers the programming barrier, empowering nontechnical domain experts like teachers to create software tailored to their specific needs. Additionally, it can improve productivity for complex, multidisciplinary software engineering teams, enabling them to efficiently handle large volumes of changes.
Creating a welfare scheme application with PwR
Let’s take an example of how PwR can be applied. In a scenario where a nongovernment organization (NGO) aims to develop an application facilitating citizen access to government welfare schemes—enabling search, identification, and application processes involving authentication and deposits—the orchestration of multiple components is crucial. It is vital to accurately set up these components before deploying them at scale, given the program’s involvement with user data and monetary transactions.
Reliable orchestration of these types of components can significantly enhance all types applications. We initiate this process by building a custom DSL, encoding interconnected workflows comprising various tasks. Each task represents a singular action that might involve calling an external API or another workflow. This DSL seamlessly interacts with external APIs through plugins available through the PwR Studio store.
The following video demonstrates how PwR Studio, configured with the DSL workflow, constructs the NGO application. A developer augments the initial version of the application by incorporating the payment feature. This is accomplished by conversing with PwR Studio, understanding the specific requirements, and implementing necessary modifications. Additionally, the developer gains access to a test environment where they can launch and interact with the application in a controlled setting.
Looking forward
We intend to provide PwR Studio as an open-source integrated development environment (IDE) for creating software through conversations. Our initial aim is to facilitate workflow-based applications for NGOs and social enterprises that have little access to technical expertise. However, our ambitions stretch far beyond this scope.
With the recent success of GitHub Copilot for conversational code generation and recent announcements surrounding OpenAI’s GPTs framework for programming ChatGPT-like bots, it’s evident that AI is poised to democratize software development, granting everyone the ability to create software. With that, it’s imperative to prioritize safety and reliability. PwR is an approach that incorporates these priorities, where the insights of a few technical experts guide a large community of developers through the power of representation. We encourage the software development community to experiment with PwR, and similar ideas, to build safe and reliable AI-powered software.
Learn more on the PwR project page.
Acknowledgements
PwR is the result of a joined collaboration with several of our colleagues, including Sriram Rajamani, B. Ashok, Mohit Jain, Vageesh D C, Dinesh KA, and Sanoop Menon. We would also like to thank Vyshak Jain, Drishti Goel, Hamna, and Sanoop Menon for their help in creating the video.
The post PwR: Using representations for AI-powered software development appeared first on Microsoft Research.
Experience the new and improved Amazon SageMaker Studio
Launched in 2019, Amazon SageMaker Studio provides one place for all end-to-end machine learning (ML) workflows, from data preparation, building and experimentation, training, hosting, and monitoring. As we continue to innovate to increase data science productivity, we’re excited to announce the improved SageMaker Studio experience, which allows users to select the managed Integrated Development Environment (IDE) of their choice, while having access to the SageMaker Studio resources and tooling across the IDEs. This updated user experience (UX) provides data scientists, data engineers, and ML engineers more choice on where to build and train their ML models within SageMaker Studio. As a web application, SageMaker Studio has improved load time, faster IDE and kernel start up times, and automatic upgrades.
In addition to managed JupyterLab and RStudio on Amazon SageMaker, we have also launched managed Visual Studio Code open-source (Code-OSS) with SageMaker Studio. Once a user selects Code Editor and launches the Code Editor space backed by the compute and storage of their choice, they can take advantage of the SageMaker tooling and Amazon Toolkit, as well as integration with Amazon EMR, Amazon CodeWhisperer, GitHub, and the ability to customize the environment with custom images. As they can do today with JupyterLab and RStudio on SageMaker, users can switch the Code Editor compute on the fly based on their needs.
Lastly, in order to streamline the data science process and avoid users having to jump from the console to Amazon SageMaker Studio, we added the ability to view Training Jobs and Endpoint details in the SageMaker Studio user interface (UI) and have enabled the ability to view all running instances across launched applications. Additionally, we improved our Jumpstart foundation models (FMs) experience so users can quickly discover, import, register, fine tune, and deploy a FM.
Solution overview
Launch IDEs
With the new version of Amazon SageMaker Studio, the JupyterLab server is updated to provide faster startup times and a more reliable experience. SageMaker Studio is now a multi-tenant web application from where users can not only launch JupyterLab, but also have the option to launch Visual Studio Code open-source (Code-OSS), RStudio, and Canvas as managed applications. The SageMaker Studio UI enables you to access and discover SageMaker resources and ML tooling such as Jobs, Endpoints, and Pipelines in a consistent manner, regardless of your IDE of choice.

SageMaker Studio contains a default private space that only you can access and run in JupyterLab or Code Editor.

You also have the option to create a new space in SageMaker Studio Classic, which will be shared with all the users in your domain.
Enhanced ML Workflow
With the new interactive experience, there’re significant enhancements and a simplification of parts of the existing ML workflow from Amazon SageMaker. Specifically, within Training and Hosting there’s a much more intuitive UI-driven experience to create new jobs and endpoints while also providing metric tracking and monitoring interfaces.
Training
For training models on Amazon SageMaker, users can conduct training of varying flavors whether that is through a Studio Notebook through a Notebook Job, a dedicated Training Job, or a fine-tuning job via SageMaker JumpStart. With the enhanced UI experience, you can track past and current training jobs utilizing the Studio Training panel.
You can also toggle between specific Training Jobs to understand performance, model artifacts location, and also configurations such as the hardware and hyperparameters behind a training job. The UI also gives the flexibility to be able to start and stop training jobs via the Console.
Hosting
There are a variety of different Hosting options within Amazon SageMaker as well that you can utilize for model deployment within the UI. For creating a SageMaker Endpoint, you can go to the Models section where you can utilize existing models or create a new one.
Here you can utilize either a singular model to deploy an Amazon SageMaker Real-Time Endpoint or multiple models to work with the Advanced SageMaker Hosting options.
Optionally for FMs, you can also utilize the Amazon SageMaker JumpStart panel to toggle between the list of available FMs and either fine-tune or deploy through the UI.
Setup
The updated Amazon SageMaker Studio experience is launching alongside the Amazon SageMaker Studio Classic experience. You can try out the new UI and choose to opt-in to make the updated experience the default option for new and existing domains. The documentation lists the steps to migrate from SageMaker Studio Classic.
Conclusion
In this post, we showed you the features available in the new and improved Amazon SageMaker Studio. With the updated SageMaker Studio experience, users now have the ability to select their preferred IDE backed by the compute of their choice and start the kernel within seconds, with access to SageMaker tooling and resources through the SageMaker Studio web application. The addition of Training and Endpoint details within SageMaker Studio, as well as the improved Amazon SageMaker Jumpstart UX, provides a seamless integration of ML steps within the SageMaker Studio UX. Get started on SageMaker Studio here.
About the Authors
 Mair Hasco is an AI/ML Specialist for Amazon SageMaker Studio. She helps customers optimize their machine learning workloads using Amazon SageMaker.
 Ram Vegiraju is a ML Architect with the SageMaker Service team. He focuses on helping customers build and optimize their AI/ML solutions on Amazon SageMaker. In his spare time, he loves traveling and writing.
 Lauren Mullennex is a Senior AI/ML Specialist Solutions Architect at AWS. She has a decade of experience in DevOps, infrastructure, and ML. She is also the author of a book on computer vision. In her spare time, she enjoys traveling and hiking.
 Khushboo Srivastava is a Senior Product Manager for Amazon SageMaker. She enjoys building products that simplify machine learning workflows for customers, and loves playing with her 1-year old daughter.
Amazon SageMaker simplifies setting up SageMaker domain for enterprises to onboard their users to SageMaker
As organizations scale the adoption of machine learning (ML), they are looking for efficient and reliable ways to deploy new infrastructure and onboard teams to ML environments. One of the challenges is setting up authentication and fine-grained permissions for users based on their roles and activities. For example, MLOps engineers typically perform model deployment activities, whereas data scientists perform ML training and validation activities. Another challenge is the effort required to set up and manage the networking configurations. Typically, there is no simple mechanism for administrators to discover, implement, and manage the right networking and security configurations their teams need.
That’s why today we are excited to announce the new onboarding experience that makes it effortless for you to set up Amazon SageMaker domains for your organization. As a platform administrator, you can use the updated user interface (UI) and APIs to onboard users faster, with the right security settings and infrastructure.
Let’s see what’s new and how to get started!
Introducing the SageMaker domain setup UI for organizations
The new UI for organizations lets you set up a SageMaker domain via the AWS Console and onboard users and organizations with just a few clicks. The redesigned UI guides you through the setup and provides step-by-step instructions so that you can scale quickly. You can choose between using AWS Identity Access Management (IAM) or AWS IAM Identity Center authentication and map scoped-down policies to your existing groups or users. You can assign existing roles or create new ones based on their typical ML activities. An ML activity represents a set of permissions for a specific task, such as running ML training jobs.
In addition to setting up and configuring your SageMaker apps and execution roles, the new experience offers an updated UI for implementing complex networking configuration, such as VPC endpoints, subnets and security groups, and encryption settings. You can also manage your subnets and connection modes later on if changes are required.
Now let’s go through the new experience in more depth.
Prerequisites
Before you use the advanced setup for organizations, you need to have the following:
- An AWS account
- An IAM role with permissions to create the resources needed to set up a SageMaker domain
Set up a SageMaker domain for organizations
To experience the updated UI, the ML admin completes the following steps:
- On the SageMaker console, choose Set up for organizations.

This takes you to the Set up SageMaker Domain wizard, where the Set up for organizations option is already selected. - Choose Configure.

- On the Domain details page, enter a domain name, then choose Next.

- On the Users and ML Activities page, select your preferred authentication method. For this post, we select AWS Identity Center. Note that your AWS Identity Center setup must be in the same Region as where you are creating your SageMaker domain.

- In the Who will use Studio? section, you can optionally choose user groups to grant access to the SageMaker domain.

- Select Create a new role to create a new role to assign activities to, or use an existing role. For ML activities, select from the list of predefined activities.

- In the S3 Bucket Access section, enter an Amazon Simple Storage Service (Amazon S3) bucket that all the domain users will have access to, then choose Next. You can specify more than one S3 bucket.

- On the Applications page, you can specify and configure the integrated development environments (IDEs) available under the SageMaker domain. For SageMaker Studio, select the updated or classic version. You can also configure Canvas, Code Editor, and RStudio.

- Choose Next.
- On the Network page, select to use VPC only or public internet access. For this post, we select Virtual Private Cloud (VPC) Only. If you’re using a VPC, specify your VPC, subnets, and security groups, then choose Next.

- On the Storage page, you can optionally set an encryption key.
- You can also optionally configure the default and maximum space size for the Amazon Elastic Block Store (Amazon EBS) volume for the Amazon Elastic Compute Cloud (Amazon EC2) instance that hosts the JupyterLab and Code Editor.

- Choose Next.
- On the Review and create page, review your configurations, then choose Submit to create the domain.


- This starts the process of setting up the SageMaker domain, which takes 2–4 minutes to complete.

- When the domain is ready, a success banner appears.

New: Update existing domains for organizations
Now that we have gone through the user journey of an admin setting up a new SageMaker domain for organizations, the domain is ready and ML users can be onboarded to SageMaker. This process is not a one-time event; after creating the domains, the requirements may evolve and updates to the domain configuration are needed. Let’s explore some newly launched features as part of this setup that allow updates to existing domains.
Prerequisites to update domains
To use these new features, the ML admins must have access to:
- An AWS account.
- An IAM role with permissions to create the resources needed to set up a SageMaker domain.
- A SageMaker domain in your selected AWS account.
- The AWS Command Line Interface (AWS CLI). To install the AWS CLI, refer to Install or update the latest version of the AWS CLI.
Update a subnet in an existing domain via the AWS CLI
As organizations scale the adoption of ML, their needs evolve, which requires changes in their infrastructure. As you add more users and resources to your projects and teams, you require more resources (such as IP range and endpoints). You may also want to isolate a few subnets and disassociate these subnets from SageMaker Studio and therefore want to remove the subnets from your domains. One of the challenges admins face when you want to add or remove subnets is that updating the subnets of a domain requires expertise and time. We’re excited to announce that we have simplified this process, and ML admins now can update the subnets of a domain via the AWS CLI.
Let’s walk through this functionality.
In this example use case, you have created a new SageMaker Studio domain with two subnets: subnet-1 and subnet-2. You have exhausted all the domain subnet IPs and now want to add new subnets subnet-3 and subnet-4 to the domain. See the following code:
If you realize that you don’t actually need so many IPs, you can remove a subnet (for this example, subnet-4) from the existing list of subnets. See the following code:
Change your network connection mode in an existing domain via the AWS CLI
When you’re conducting tests or exploring SageMaker to learn more about the service, you might create your domain with public internet access. However, as you set up projects and scale your ML workloads, you may need to change your authentication mode to VPC only to be compliant with your organization’s existing network and security requirements. We’re excited to announce that ML admins now can change their network connection mode from public internet to VPC only mode via the AWS CLI.
For example, in the following code, we update the domain AppNetworkAccessType to VpcOnly:
In the following code, we update the domain AppNetworkAccessType to PublicInternetOnly:
Conclusion
The new UI for organizations to set up domains and the new features related to updating existing domains are available today at no additional charge in all AWS Regions where SageMaker is available, except for the AWS GovCloud and AWS China Regions.
Try out these new features and let us know what you think. We always look forward to your feedback! You can send it through your usual AWS Support contacts or post it on the AWS Forum for SageMaker.
To learn more, visit New onboarding experience in SageMaker and check Onboard to Amazon SageMaker Domain using IAM Identity Center.
About the authors
 Ozan Eken is a Senior Product Manager at Amazon Web Services. He is passionate about building onboarding products with the right infrastructure, security guardrails and governance for SageMaker. Outside of work, he likes exploring different outdoor activities and watching soccer.
 Vikesh Pandey is a Machine Learning Specialist Solutions Architect at AWS, helping customers from financial industries design and build solutions on generative AI and ML. Outside of work, Vikesh enjoys trying out different cuisines and playing outdoor sports.
 Anastasia Tzeveleka is a Machine Learning and AI Specialist Solutions Architect at AWS. She works with customers in EMEA and helps them architect machine learning solutions at scale using AWS services. She has worked on projects in different domains including Natural Language Processing (NLP), MLOps and Low Code No Code tools.

Peer Reviews of Peer Reviews: A Randomized Controlled Trial and Other Experiments
Alexander Goldberg, Ivan Stelmakh, Kyunghyun Cho, Alice Oh, Alekh Agarwal, Danielle Belgrave, and Nihar Shah
Is it possible to reliably evaluate the quality of peer reviews? We study peer reviewing of peer reviews driven by two primary motivations:
(i) Incentivizing reviewers to provide high-quality reviews is an important open problem. The ability to reliably assess the quality of reviews can help design such incentive mechanisms.
(ii) Many experiments in the peer-review processes of various scientific fields use evaluations of reviews as a “gold standard” for investigating policies and interventions. The reliability of such experiments depends on the accuracy of these review evaluations.
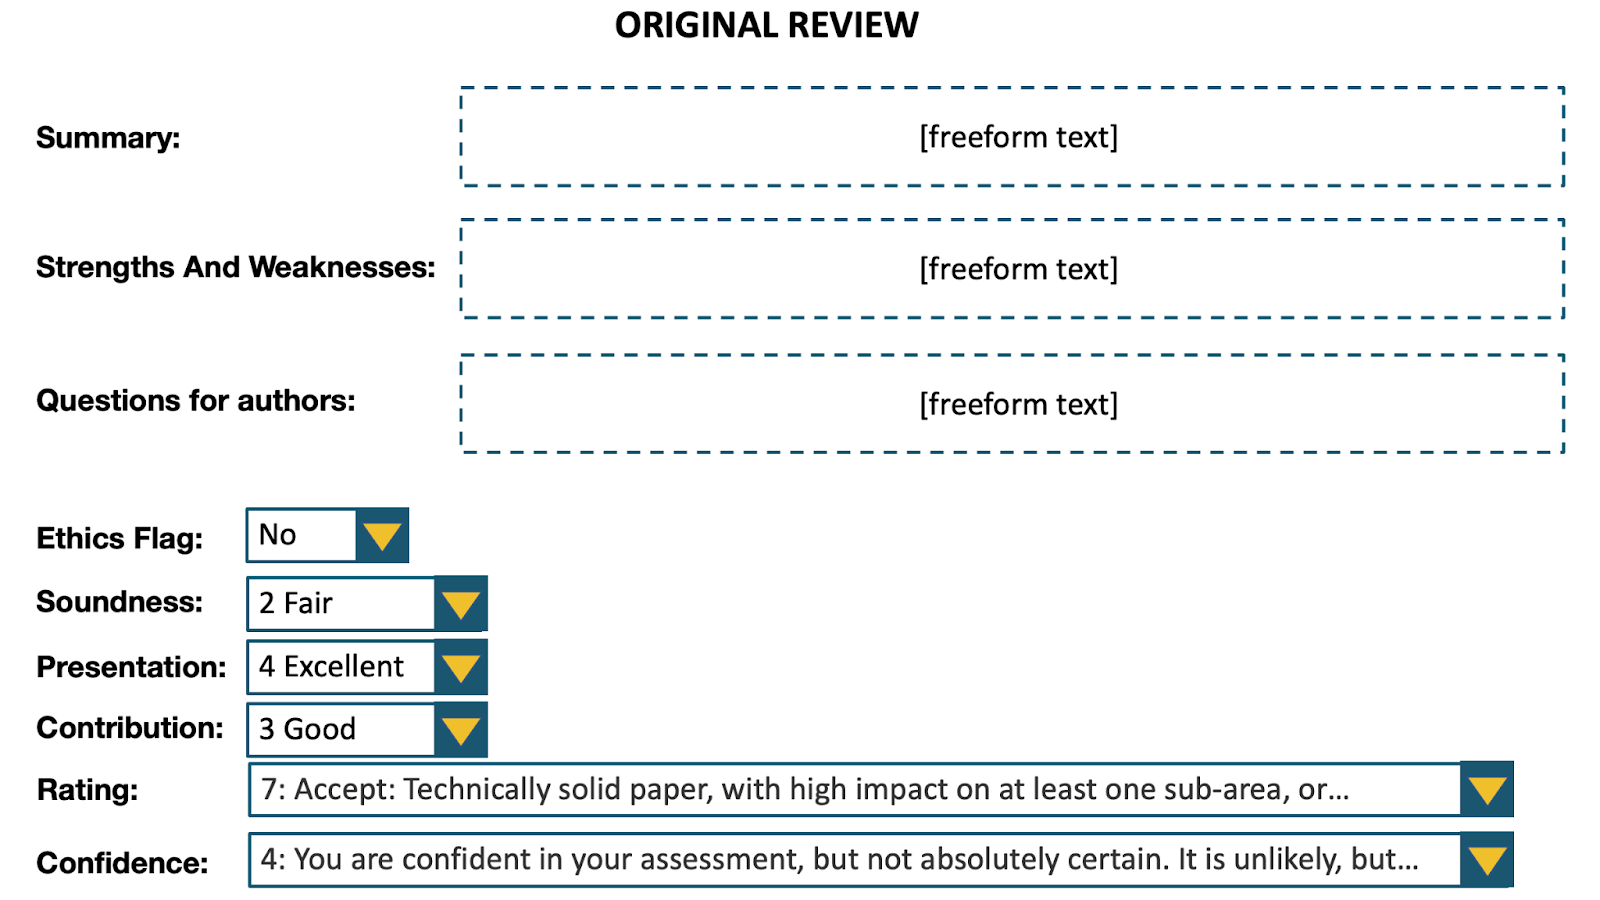
We conducted a large-scale study at the NeurIPS 2022 conference in which we invited participants to evaluate reviews given to submitted papers. The evaluators of any review comprised other reviewers for that paper, the meta reviewer, authors of the paper, and reviewers with relevant expertise who were not assigned to review that paper. Each evaluator was provided the complete review along with the associated paper. The evaluation of any review was based on four specified criteria—comprehension, thoroughness, justification, and helpfulness—using a 5-point Likert scale, accompanied by an overall score on a 7-point scale, where a higher score indicates superior quality.
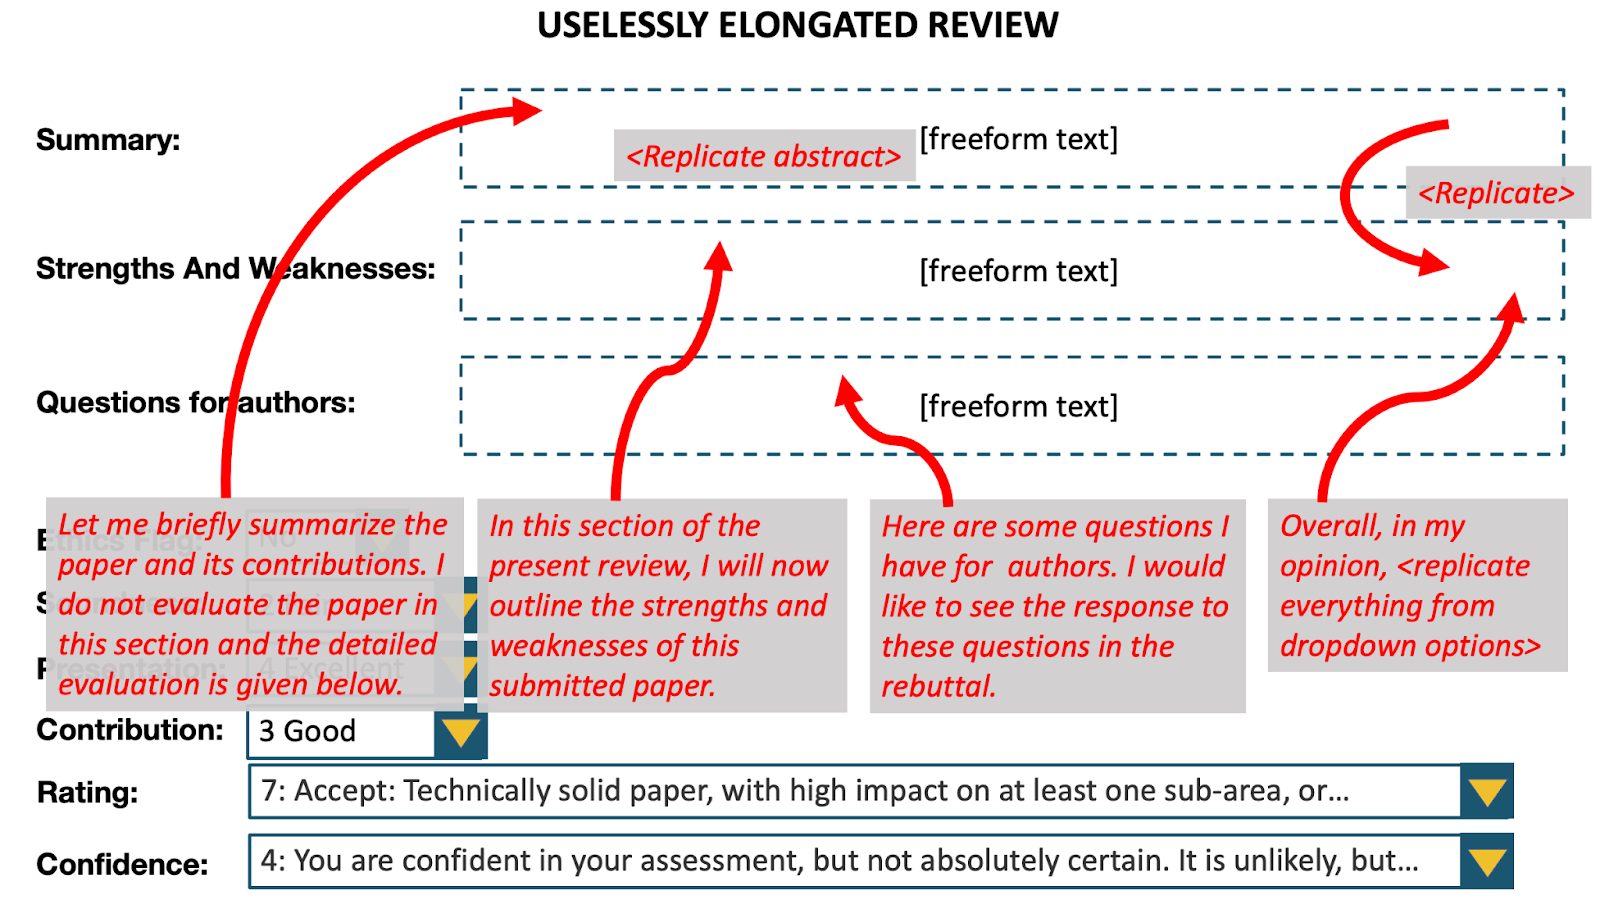
(1) Uselessly elongated review bias
We examined potential biases due to the length of reviews. We generated uselessly elongated versions of reviews by adding substantial amounts of non-informative content. Elongated because we made the reviews 2.5x–3x as long. Useless because the elongation did not provide any useful information: we added filler text, replicated the summary in another part of the review, replicated the abstract in the summary, replicated the drop-down menus in the review text.
We conducted a randomized controlled trial, in which each evaluator was shown either the original review or the uselessly elongated version at random along with the associated paper. The evaluators comprised reviewers in the research area of the paper who were not originally assigned the paper. In the results shown below, we employ the Mann-Whitney U test, and the test statistic can be interpreted as the probability that a randomly chosen elongated review is rated higher than a randomly chosen original review. The test reveals significant evidence of bias in favor of longer reviews.
| Criteria | Test statistic | 95% CI | P-value | Difference in mean scores |
|---|---|---|---|---|
| Overall score | 0.64 | [0.60, 0.69] | < 0.0001 | 0.56 |
| Understanding | 0.57 | [0.53, 0.62] | 0.04 | 0.25 |
| Coverage | 0.71 | [0.66, 0.76] | <0.0001 | 0.83 |
| Substantiation | 0.59 | [0.54, 0.64] | 0.001 | 0.31 |
| Constructiveness | 0.60 | [0.55, 0.64] | 0.001 | 0.37 |
(2) Author-outcome bias
The graphs below depict the review score given to a paper by a reviewer on the x axis, plotted against the evaluation score for that review by evaluators on the y axis.
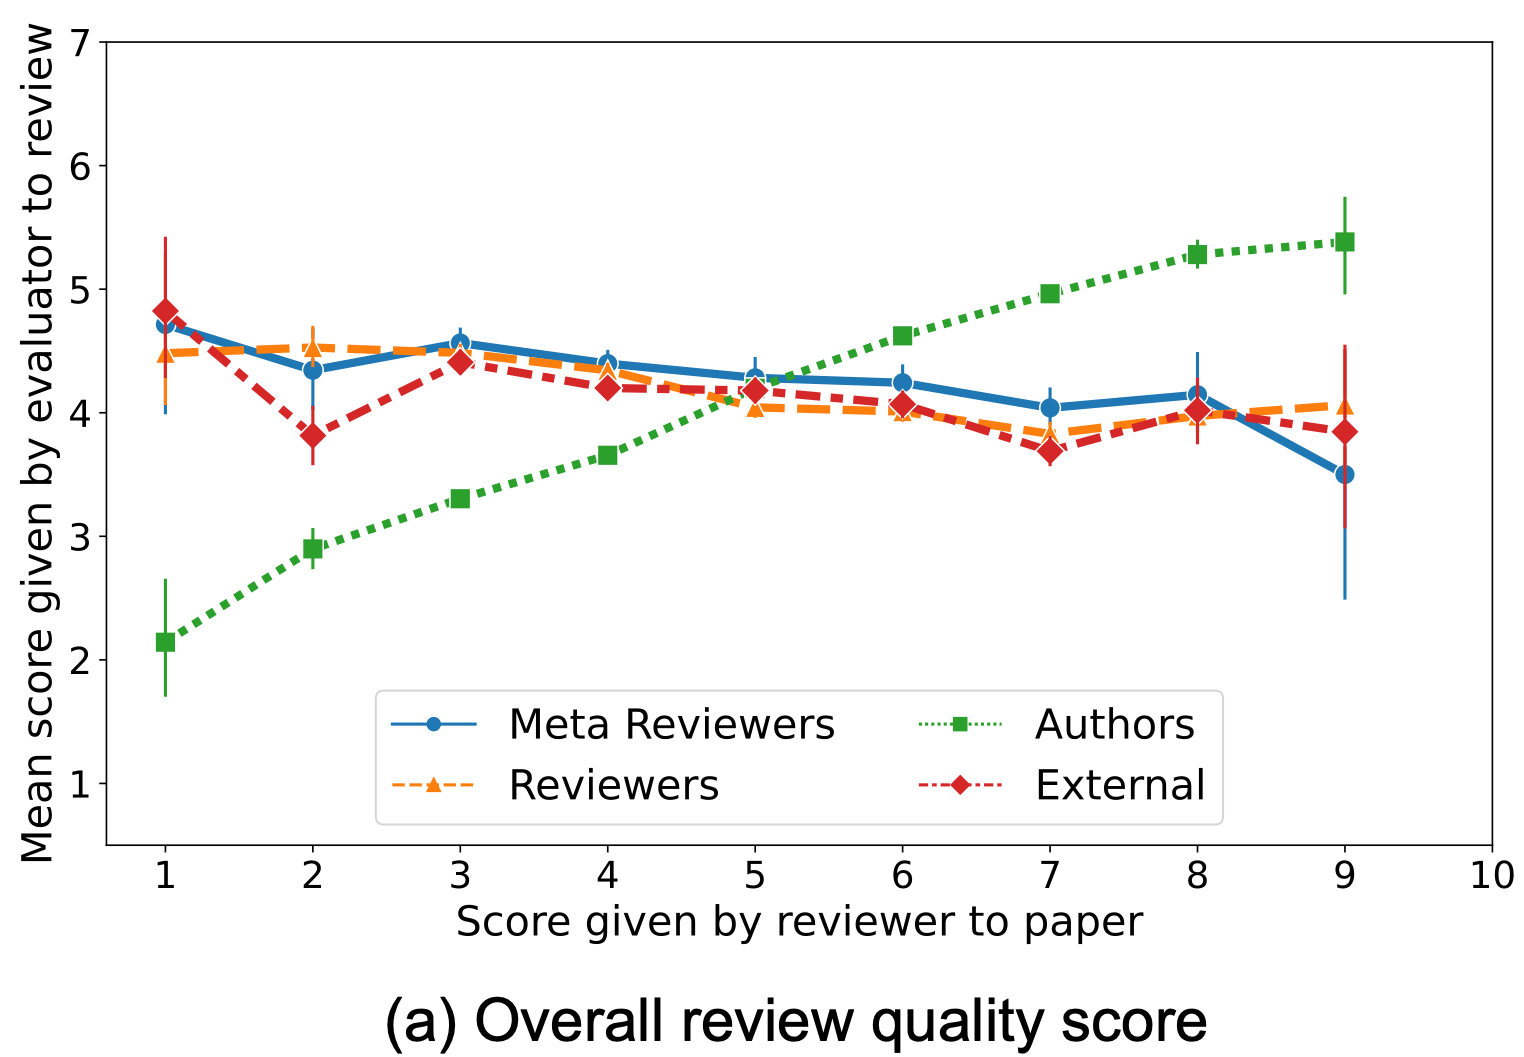
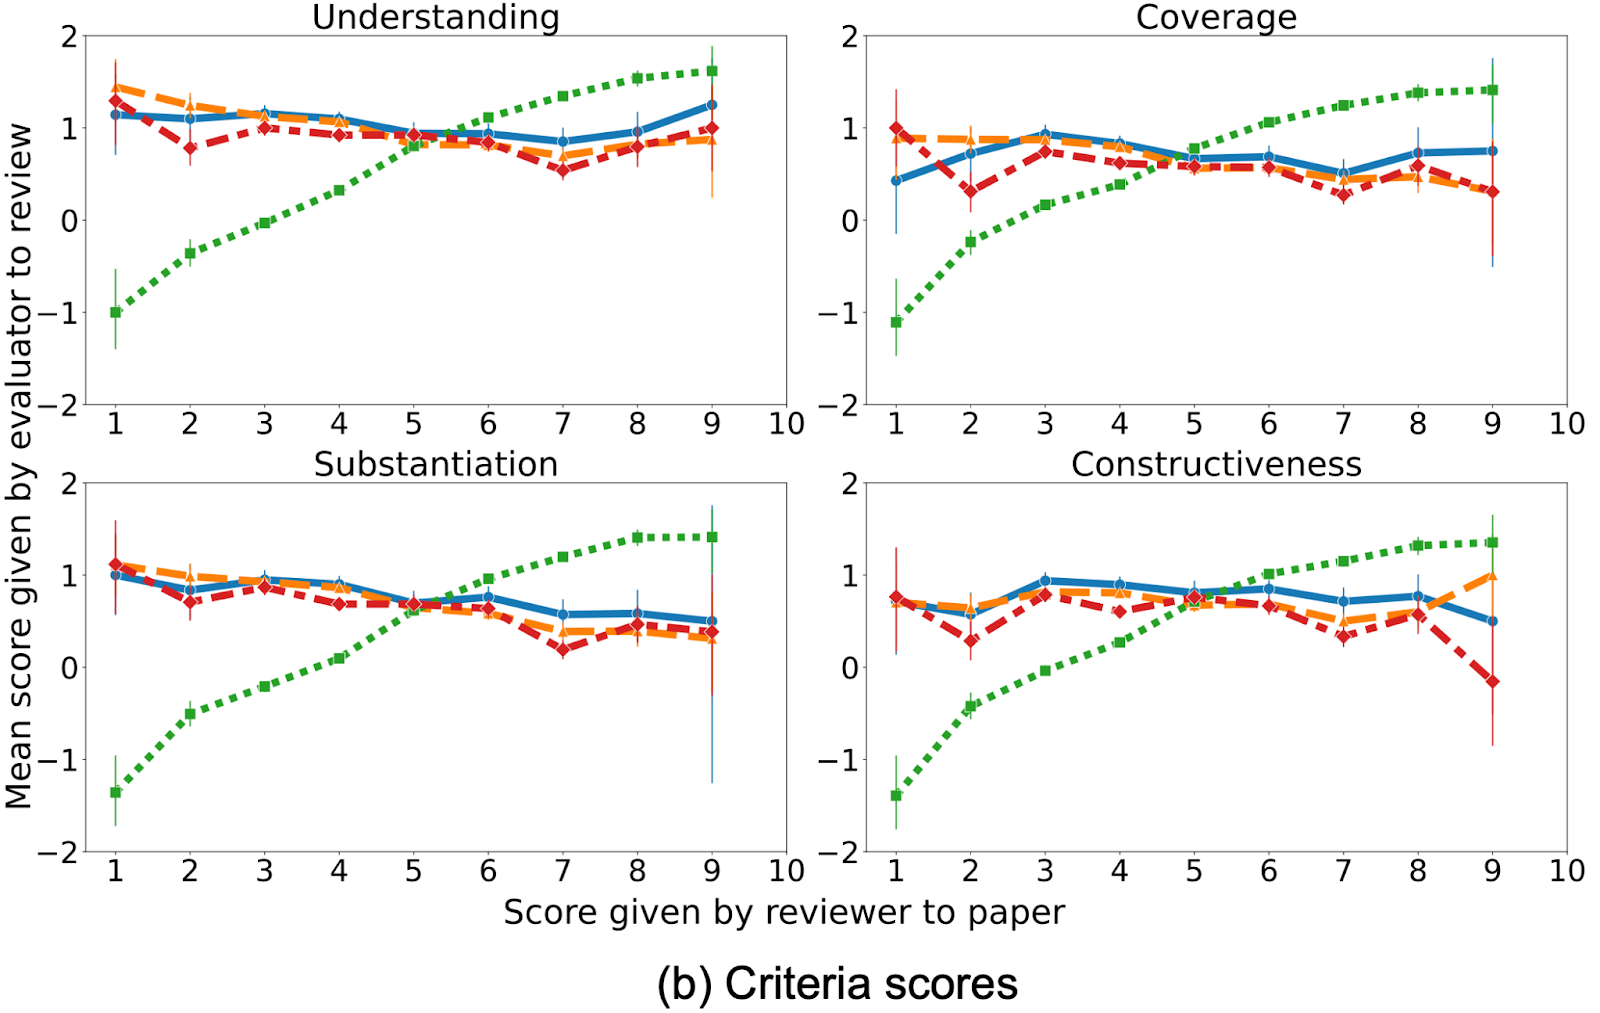
We see that authors’ evaluations of reviews are much more positive towards reviews recommending acceptance of their own papers, and negative towards reviews recommending rejection. In contrast, evaluations of reviews by other evaluators show little dependence on the score given by the review to the paper. We formally test for this bias of authors’ evaluations of reviews on the scores their papers received. Our analysis compares authors’ evaluations of reviews that recommended acceptance versus rejection of their paper, controlling for the review length, quality of review (as measured by others’ evaluations), and different numbers of accepted/rejected papers per author. The test reveals significant evidence of this bias.
| Criteria | Test statistic | 95% CI | P-value | Difference in mean scores |
|---|---|---|---|---|
| Overall score | 0.82 | [0.79, 0.85] | < 0.0001 | 1.41 |
| Understanding | 0.78 | [0.75, 0.81] | < 0.0001 | 1.12 |
| Coverage | 0.76 | [0.72, 0.79] | <0.0001 | 0.97 |
| Substantiation | 0.80 | [0.76, 0.83] | < 0.0001 | 1.28 |
| Constructiveness | 0.77 | [0.74, 0.80] | < 0.0001 | 1.15 |
(3) Inter-evaluator (dis)agreement
We measure the disagreement rates between multiple evaluations of the same review as follows. Take any pair of evaluators and any pair of reviews that receives an evaluation from both evaluators. We say the pair of evaluators agrees on this pair of reviews if both score the same review higher than the other; we say that this pair disagrees if the review scored higher by one evaluator is scored lower by the other. Ties are discarded.
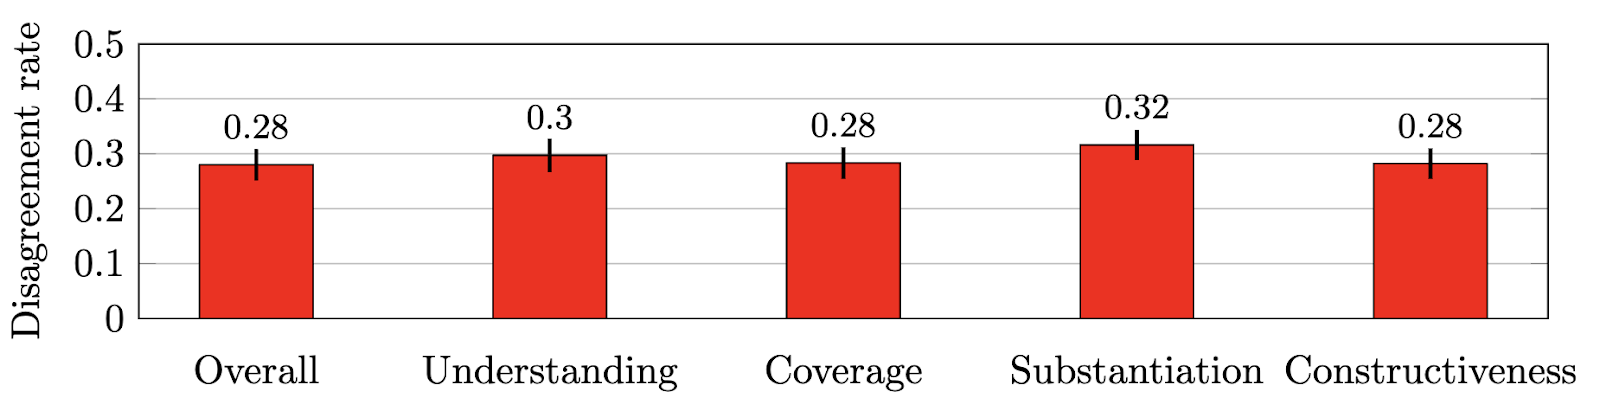
Interestingly, the rate of disagreement between reviews of papers measured in NeurIPS 2016 was in a similar range — 0.25 to 0.3.
(4) Miscalibration
Miscalibration refers to the phenomenon that reviewers have different strictness or leniency standards. We assess the amount of miscalibration of evaluators of reviews following the miscalibration analysis procedure for NeurIPS 2014 paper review data. This analysis uses a linear model of quality scores, assumes a Gaussian prior on the miscalibration of each reviewer, and the estimated variance of this prior then represents the magnitude of miscalibration. The analysis finds that the amount of miscalibration in evaluations of the reviews (in NeurIPS 2022) is higher than the reported amount of miscalibration in reviews of papers in NeurIPS 2014.
(5) Subjectivity
We evaluate a key source of subjectivity in reviews—commensuration bias—where different evaluators differently map individual criteria to overall scores. Our approach is to first learn a mapping from criteria scores to overall scores that best fits the collection of all reviews. We then compute the amount of subjectivity as the average difference between the overall scores given in the reviews and the respective overall scores determined by the learned mapping. Following previously derived theory, we use the L(1,1) norm as the loss. We find that the amount of subjectivity in the evaluation of reviews at NeurIPS 2022 is higher than that in the reviews of papers at NeurIPS 2022.
Conclusions
Our findings indicate that the issues commonly encountered in peer reviews of papers, such as inconsistency, bias, miscalibration, and subjectivity, are also prevalent in peer reviews of peer reviews. Although assessing reviews can aid in creating improved incentives for high-quality peer review and evaluating the impact of policy decisions in this domain, it is crucial to exercise caution when interpreting peer reviews of peer reviews as indicators of the underlying review quality.
More details: https://arxiv.org/pdf/2311.09497.pdf
Acknowledgements: We sincerely thank everyone involved in the NeurIPS 2022 review process who agreed to take part in this experiment. Your participation has been invaluable in shedding light on the important topic of evaluating reviews, towards improving the peer-review process.
Neural Information Processing Systems (NeurIPS) 2023
Apple Machine Learning Research
Adaptive Weight Decay
We propose adaptive weight decay, which automatically tunes the hyper-parameter for weight decay during each training iteration. For classification problems, we propose changing the value of the weight decay hyper-parameter on the fly based on the strength of updates from the classification loss (i.e., gradient of cross-entropy), and the regularization loss (i.e., -norm of the weights). We show that this simple modification can result in large improvements in adversarial robustness — an area which suffers from robust overfitting — without requiring extra data across various datasets and…Apple Machine Learning Research
4M: Massively Multimodal Masked Modeling
*=Equal Contributors
Current machine learning models for vision are often highly specialized and limited to a single modality and task. In contrast, recent large language models exhibit a wide range of capabilities, hinting at a possibility for similarly versatile models in computer vision. In this paper, we take a step in this direction and propose a multimodal training scheme called 4M. It consists of training a single unified Transformer encoder-decoder using a masked modeling objective across a wide range of input/output modalities – including text, images, geometric, and semantic…Apple Machine Learning Research