Mixtral-8x7B is now available in Amazon SageMaker JumpStart

Mixtral-8x7B is now available in Amazon SageMaker JumpStart

Today, we are excited to announce that the Mixtral-8x7B large language model (LLM), developed by Mistral AI, is available for customers through Amazon SageMaker JumpStart to deploy with one click for running inference. The Mixtral-8x7B LLM is a pre-trained sparse mixture of expert model, based on a 7-billion parameter backbone with eight experts per feed-forward layer. You can try out this model with SageMaker JumpStart, a machine learning (ML) hub that provides access to algorithms and models so you can quickly get started with ML. In this post, we walk through how to discover and deploy the Mixtral-8x7B model.

What is Mixtral-8x7B

Mixtral-8x7B is a foundation model developed by Mistral AI, supporting English, French, German, Italian, and Spanish text, with code generation abilities. It supports a variety of use cases such as text summarization, classification, text completion, and code completion. It behaves well in chat mode. To demonstrate the straightforward customizability of the model, Mistral AI has also released a Mixtral-8x7B-instruct model for chat use cases, fine-tuned using a variety of publicly available conversation datasets. Mixtral models have a large context length of up to 32,000 tokens.

Mixtral-8x7B provides significant performance improvements over previous state-of-the-art models. Its sparse mixture of experts architecture enables it to achieve better performance result on 9 out of 12 natural language processing (NLP) benchmarks tested by Mistral AI. Mixtral matches or exceeds the performance of models up to 10 times its size. By utilizing only, a fraction of parameters per token, it achieves faster inference speeds and lower computational cost compared to dense models of equivalent sizes—for example, with 46.7 billion parameters total but only 12.9 billion used per token. This combination of high performance, multilingual support, and computational efficiency makes Mixtral-8x7B an appealing choice for NLP applications.

The model is made available under the permissive Apache 2.0 license, for use without restrictions.

What is SageMaker JumpStart

With SageMaker JumpStart, ML practitioners can choose from a growing list of best-performing foundation models. ML practitioners can deploy foundation models to dedicated Amazon SageMaker instances within a network isolated environment, and customize models using SageMaker for model training and deployment.

You can now discover and deploy Mixtral-8x7B with a few clicks in Amazon SageMaker Studio or programmatically through the SageMaker Python SDK, enabling you to derive model performance and MLOps controls with SageMaker features such as Amazon SageMaker Pipelines, Amazon SageMaker Debugger, or container logs. The model is deployed in an AWS secure environment and under your VPC controls, helping ensure data security.

Discover models

You can access Mixtral-8x7B foundation models through SageMaker JumpStart in the SageMaker Studio UI and the SageMaker Python SDK. In this section, we go over how to discover the models in SageMaker Studio.

SageMaker Studio is an integrated development environment (IDE) that provides a single web-based visual interface where you can access purpose-built tools to perform all ML development steps, from preparing data to building, training, and deploying your ML models. For more details on how to get started and set up SageMaker Studio, refer to Amazon SageMaker Studio.

In SageMaker Studio, you can access SageMaker JumpStart by choosing JumpStart in the navigation pane.

From the SageMaker JumpStart landing page, you can search for “Mixtral” in the search box. You will see search results showing Mixtral 8x7B and Mixtral 8x7B Instruct.

You can choose the model card to view details about the model such as license, data used to train, and how to use. You will also find the Deploy button, which you can use to deploy the model and create an endpoint.

Deploy a model

Deployment starts when you choose Deploy. After deployment finishes, you an endpoint has been created. You can test the endpoint by passing a sample inference request payload or selecting your testing option using the SDK. When you select the option to use the SDK, you will see example code that you can use in your preferred notebook editor in SageMaker Studio.

To deploy using the SDK, we start by selecting the Mixtral-8x7B model, specified by the model_id with value huggingface-llm-mixtral-8x7b. You can deploy any of the selected models on SageMaker with the following code. Similarly, you can deploy Mixtral-8x7B instruct using its own model ID:

from sagemaker.jumpstart.model import JumpStartModel

model = JumpStartModel(model_id="huggingface-llm-mixtral-8x7b")
predictor = model.deploy()

This deploys the model on SageMaker with default configurations, including the default instance type and default VPC configurations. You can change these configurations by specifying non-default values in JumpStartModel.

After it’s deployed, you can run inference against the deployed endpoint through the SageMaker predictor:

payload = {"inputs": "Hello!"} 
predictor.predict(payload)

Example prompts

You can interact with a Mixtral-8x7B model like any standard text generation model, where the model processes an input sequence and outputs predicted next words in the sequence. In this section, we provide example prompts.

Code generation

Using the preceding example, we can use code generation prompts like the following:

# Code generation
payload = {
    "inputs": "Write a program to compute factorial in python:",
    "parameters": {
        "max_new_tokens": 200,
    },
}
predictor.predict(payload)

You get the following output:

Input Text: Write a program to compute factorial in python:
Generated Text:
Factorial of a number is the product of all the integers from 1 to that number.

For example, factorial of 5 is 1*2*3*4*5 = 120.

Factorial of 0 is 1.

Factorial of a negative number is not defined.

The factorial of a number can be written as n!.

For example, 5! = 120.

## Write a program to compute factorial in python

```
def factorial(n):
if n == 0:
return 1
else:
return n * factorial(n-1)

print(factorial(5))
```

Output:

```
120
```

## Explanation:

In the above program, we have defined a function called factorial which takes a single argument n.

If n is equal to 0, then we return 1.

Otherwise, we return n multiplied by the factorial of n-1.

We then call the factorial function with the argument 5 and print the result.

The output of the program is 120, which is the factorial of 5.

## How to compute factorial in python

In the above program, we have used a recursive function to compute the factorial of a number.

A recursive function is a function that calls itself.

In this case, the factorial function calls itself with the argument n-1.

This process continues until n is equal to 0, at which point the function returns 1.

The factorial of a number can also be computed using a loop.

For example, the following program uses a for loop to compute the factorial of a number:

```
def factorial(n):
result = 1
for i in range(1, n+1):
result *= i
return result

Sentiment analysis prompt

You can perform sentiment analysis using a prompt like the following with Mixtral 8x7B:

payload = {
"inputs": """
Tweet: "I hate it when my phone battery dies."
Sentiment: Negative

Tweet: "My day has been :+1:"
Sentiment: Positive

Tweet: "This is the link to the article"
Sentiment: Neutral

Tweet: "This new music video was incredibile"
Sentiment:""",
"parameters": {
"max_new_tokens": 2,
},
}
predictor.predict(payload)

You get the following output:

Input Text: Tweet: "I hate it when my phone battery dies."
Sentiment: Negative
###
Tweet: "My day has been :+1:"
Sentiment: Positive
###
Tweet: "This is the link to the article"
Sentiment: Neutral
###
Tweet: "This new music video was incredibile"
Sentiment:
Generated Text:  Positive

Question answering prompts

You can use a question answering prompt like the following with Mixtral-8x7B:

# Question answering
payload = {
    "inputs": "Could you remind me when was the C programming language invented?",
    "parameters": {
        "max_new_tokens": 100,
    },
}
query_endpoint(payload)

You get the following output:

Input Text: Could you remind me when was the C programming language invented?
Generated Text:

C was invented in 1972 by Dennis Ritchie at Bell Labs.

C is a general-purpose programming language. It was invented to write the UNIX operating system.

C is a structured programming language. It is a middle-level language. It is a procedural language.

C is a compiled language. It is a portable language.

C is a case-sensitive language. It is a free-form language

Mixtral-8x7B Instruct

The instruction-tuned version of Mixtral-8x7B accepts formatted instructions where conversation roles must start with a user prompt and alternate between user instruction and assistant (model answer). The instruction format must be strictly respected, otherwise the model will generate sub-optimal outputs. The template used to build a prompt for the Instruct model is defined as follows:

<s> [INST] Instruction [/INST] Model answer</s> [INST] Follow-up instruction [/INST]]

Note that <s> and </s> are special tokens for beginning of string (BOS) and end of string (EOS), whereas [INST] and [/INST] are regular strings.

The following code shows how you can format the prompt in instruction format:

from typing import Dict, List

def format_instructions(instructions: List[Dict[str, str]]) -> List[str]:
    """Format instructions where conversation roles must alternate user/assistant/user/assistant/..."""
    prompt: List[str] = []
    for user, answer in zip(instructions[::2], instructions[1::2]):
        prompt.extend(["<s>", "[INST] ", (user["content"]).strip(), " [/INST] ", (answer["content"]).strip(), "</s>"])
    prompt.extend(["<s>", "[INST] ", (instructions[-1]["content"]).strip(), " [/INST] ","</s>"])
    return "".join(prompt)


def print_instructions(prompt: str, response: str) -> None:
    bold, unbold = '33[1m', '33[0m'
    print(f"{bold}> Input{unbold}n{prompt}nn{bold}> Output{unbold}n{response[0]['generated_text']}n")

Knowledge retrieval

You can use the following code for a knowledge retrieval prompt:

instructions = [{"role": "user", "content": "what is the recipe of mayonnaise?"}]
prompt = format_instructions(instructions)
payload = {
"inputs": prompt,
"parameters": {"max_new_tokens": 315, "do_sample": True}
}
response=predictor.predict(payload)
print_instructions(prompt, response)

You get the following output:

> Input
<s>[INST] what is the recipe of mayonnaise? [/INST]</s>

> Output
Here is a simple recipe for homemade mayonnaise:

Ingredients:

* 1 egg yolk
* 1 tablespoon of mustard (Dijon is a good choice)
* 1 cup of oil (canola or vegetable oil work well)
* 1-2 tablespoons of white vinegar or lemon juice
* Salt to taste

Instructions:

1. In a medium bowl, whisk together the egg yolk and mustard. It is important that these ingredients are at room temperature.
2. Start adding the oil drop by drop, whisking continuously. This step is crucial to ensure that the mayonnaise emulsifies and does not separate.
3. Once you have added about a quarter of the oil and the mixture has thickened, you can start adding the oil in a thin stream, still whisking constantly.
4. When all the oil has been incorporated and the mayonnaise is thick, whisk in the vinegar or lemon juice and salt to taste.
5. If the mayonnaise is too thick, you can thin it with a little water.
6. Store the mayonnaise in the refrigerator and use within a few days.

Note: It is important to use pasteurized eggs or egg yolks when making homemade mayonnaise to reduce the risk of foodborne illness.

Coding

Mixtral models can demonstrate benchmarked strengths for coding tasks, as shown in the following code:

instructions = [
{
"role": "user",
"content": "In Bash, how do I list all text files in the current directory (excluding subdirectories) that have been modified in the last month?",
}
]
prompt = format_instructions(instructions)
payload = {
"inputs": prompt,
"parameters": {"max_new_tokens": 256, "do_sample": True, "temperature": 0.2}
}
response=predictor.predict(payload)
print_instructions(prompt, response)

You get the following output:
> Input
<s>[INST] In Bash, how do I list all text files in the current directory (excluding subdirectories) that have been modified in the last month? [/INST]</s>
> Output
ef{0.15cm} To list all text files in the current directory that have been modified in the last month, you can use a combination of the `find` and `grep` commands in Bash. Here's the command you're looking for:

```bash
find . -maxdepth 1 -type f -name "*.txt" -mtime -30
```

Let's break down this command:

- `find .` starts a search in the current directory.
- `-maxdepth 1` limits the search to the current directory only (excluding subdirectories).
- `-type f` specifies that you're looking for files.
- `-name "*.txt"` filters the results to only include files with a `.txt` extension.
- `-mtime -30` filters the results to only include files modified within the last 30 days.

This command will output the paths of all text files in the current directory that have been modified in the last month.

Mathematics and reasoning

Mixtral models also report strengths in mathematics accuracy:

instructions = [
{
"role": "user",
"content": "I bought an ice cream for 6 kids. Each cone was $1.25 and I paid with a $10 bill. How many dollars did I get back? Explain first before answering.",
}
]
prompt = format_instructions(instructions)
payload = {
"inputs": prompt,
"parameters": {"max_new_tokens": 600, "do_sample": True, "temperature": 0.2}
}
response=predictor.predict(payload)
print_instructions(prompt, response)

Mixtral models can provide comprehension as shown in the following output with the math logic:

> Input
<s>[INST] I bought an ice cream for 6 kids. Each cone was $1.25 and I paid with a $10 bill. How many dollars did I get back? Explain first before answering. [/INST] </s>
> Output
First, let's calculate the total cost of the ice cream cones. Since each cone costs $1.25 and you bought 6 cones, the total cost would be:

Total cost = Cost per cone * Number of cones
Total cost = $1.25 * 6
Total cost = $7.50

Next, subtract the total cost from the amount you paid with the $10 bill to find out how much change you got back:

Change = Amount paid - Total cost
Change = $10 - $7.50
Change = $2.50

So, you got $2.50 back.

Clean up

After you’re done running the notebook, delete all resources that you created in the process so your billing is stopped. Use the following code:

predictor.delete_model()
predictor.delete_endpoint()

Conclusion

In this post, we showed you how to get started with Mixtral-8x7B in SageMaker Studio and deploy the model for inference. Because foundation models are pre-trained, they can help lower training and infrastructure costs and enable customization for your use case. Visit SageMaker JumpStart in SageMaker Studio now to get started.

Resources


About the authors

Rachna Chadha is a Principal Solution Architect AI/ML in Strategic Accounts at AWS. Rachna is an optimist who believes that ethical and responsible use of AI can improve society in the future and bring economic and social prosperity. In her spare time, Rachna likes spending time with her family, hiking, and listening to music.

Dr. Kyle Ulrich is an Applied Scientist with the Amazon SageMaker built-in algorithms team. His research interests include scalable machine learning algorithms, computer vision, time series, Bayesian non-parametrics, and Gaussian processes. His PhD is from Duke University and he has published papers in NeurIPS, Cell, and Neuron.

Christopher Whitten is a software developer on the JumpStart team. He helps scale model selection and integrate models with other SageMaker services. Chris is passionate about accelerating the ubiquity of AI across a variety of business domains.

Dr. Fabio Nonato de Paula is a Senior Manager, Specialist GenAI SA, helping model providers and customers scale generative AI in AWS. Fabio has a passion for democratizing access to generative AI technology. Outside of work, you can find Fabio riding his motorcycle in the hills of Sonoma Valley or reading ComiXology.

Dr. Ashish Khetan is a Senior Applied Scientist with Amazon SageMaker built-in algorithms and helps develop machine learning algorithms. He got his PhD from University of Illinois Urbana-Champaign. He is an active researcher in machine learning and statistical inference, and has published many papers in NeurIPS, ICML, ICLR, JMLR, ACL, and EMNLP conferences.

Karl Albertsen leads product, engineering, and science for Amazon SageMaker Algorithms and JumpStart, SageMaker’s machine learning hub. He is passionate about applying machine learning to unlock business value.

Read More

Research at Microsoft 2023: A year of groundbreaking AI advances and discoveries

Research at Microsoft 2023: A year of groundbreaking AI advances and discoveries

It isn’t often that researchers at the cutting edge of technology see something that blows their minds. But that’s exactly what happened in 2023, when AI experts began interacting with GPT-4, a large language model (LLM) created by researchers at OpenAI that was trained at unprecedented scale. 

“I saw some mind-blowing capabilities that I thought I wouldn’t see for many years,” said Ece Kamar, partner research manager at Microsoft, during a podcast recorded in April.

Throughout the year, rapid advances in AI came to dominate the public conversation (opens in new tab), as technology leaders and eventually the general public voiced a mix of wonder and skepticism after experimenting with GPT-4 and related applications. Could we be seeing sparks of artificial general intelligence (opens in new tab)—informally defined as AI systems that “demonstrate broad capabilities of intelligence, including reasoning, planning, and the ability to learn from experience (opens in new tab)”? 

While the answer to that question isn’t yet clear, we have certainly entered the era of AI, and it’s bringing profound changes to the way we work and live. In 2023, AI emerged from the lab and delivered everyday innovations that anyone can use. Millions of people now engage with AI-based services like ChatGPT. Copilots (opens in new tab)—AI that helps with complex tasks ranging from search to security—are being woven into business software and services.

Underpinning all of this innovation is years of research, including the work of hundreds of world-class researchers at Microsoft, aided by scientists, engineers, and experts across many related fields. In 2023, AI’s transition from research to reality began to accelerate, creating more tangible results than ever before. This post looks back at the progress of the past year, highlighting a sampling of the research and strategies that will support even greater progress in 2024.

Strengthening the foundations of AI

AI with positive societal impact is the sum of several integral moving parts, including the AI models, the application of these models, and the infrastructure and standards supporting their development and the development of the larger systems they underpin. Microsoft is redefining the state of the art across these areas with improvements to model efficiency, performance, and capability; the introduction of new frameworks and prompting strategies that increase the usability of models; and best practices that contribute to sustainable and responsible AI. 

Advancing models 

  • Researchers introduced Retentive Networks (RetNet), an alternative to the dominant transformer architecture in language modeling. RetNet supports training parallelism and strong performance while making significant gains in inference efficiency. 
  • To contribute to more computationally efficient and sustainable language models, researchers presented a 1-bit transformer architecture called BitNet.
  • Microsoft expanded its Phi family of small language models with the 2.7 billion-parameter Phi-2, which raises the bar in reasoning and language understanding among base models with up to 13 billion parameters. Phi-2 also met or exceeded the performance of models 25 times its size on complex benchmarks.
  • The release of the language models Orca (13 billion parameters) and, several months later, Orca 2 (7 billion and 13 billion parameters) demonstrates how improved training methods, such as synthetic data creation, can elevate small model reasoning to a level on par with larger models.
  • For AI experiences that more closely reflect how people create across mediums, Composable Diffusion (CoDi) takes as input a mix of modalities, such as text, audio, and image, and produces multimodal output, such as video with synchronized audio.
  • To better model human reasoning and speed up response time, the new approach Skeleton-of-Thought has LLMs break tasks down into two parts—creating an outline of a response and providing details on each point in parallel.

Advancing methods for model usage

  • AutoGen is an open-source framework for simplifying the orchestration, optimization, and automation of LLM workflows to enable and streamline the creation of LLM-based applications.
  • Medprompt, a composition of prompting strategies, demonstrates that with thoughtful and advanced prompting alone, general foundation models can outperform specialized models, offering a more efficient and accessible alternative to fine-tuning on expert-curated data.
  • The resource collection promptbase offers prompting techniques and tools designed to help optimize foundation model performance, including Medprompt, which has been extended for application outside of medicine.
  • Aimed at addressing issues associated with lengthy inputs, such as increased response latency, LLMLingua is a prompt-compression method that leverages small language models to remove unnecessary tokens.

Developing and sharing best practices 

Accelerating scientific exploration and discovery

Microsoft uses AI and other advanced technologies to accelerate and transform scientific discovery, empowering researchers worldwide with leading-edge tools. Across global Microsoft research labs, experts in machine learning, quantum physics, molecular biology, and many other disciplines are tackling pressing challenges in the natural and life sciences.

  • Because of the complexities arising from multiple variables and the inherently chaotic nature of weather, Microsoft is using machine learning to enhance the accuracy of subseasonal forecasts.
  • Distributional Graphormer (DIG) is a deep learning framework for predicting protein structures with greater accuracy, a fundamental problem in molecular science. This advance could help deliver breakthroughs in critical research areas like materials science and drug discovery.
  • Leveraging evolutionary-scale protein data, the general-purpose diffusion framework EvoDiff helps design novel proteins more efficiently, which can aid in the development of industrial enzymes, including for therapeutics.
  • MOFDiff, a coarse-grained diffusion model, helps scientists refine the design of new metal-organic frameworks (MOFs) for the low-cost removal of carbon dioxide from air and other dilute gas streams. This innovation could play a vital role in slowing climate change.
  • This episode of the Microsoft Research Podcast series Collaborators explores research into renewable energy storage systems, specifically flow batteries, and discusses how machine learning can help to identify compounds ideal for storing waterpower and advancing carbon capture.
  • MatterGen is a diffusion model specifically designed to address the central challenge in materials science by efficiently generating novel, stable materials with desired properties, such as high conductivity for lithium-ion batteries.
  • Deep learning is poised to revolutionize the natural sciences, enhancing modeling and prediction of natural occurrences, ushering in a new era of scientific exploration, and leading to significant advances in sectors ranging from drug development to renewable energy. DeepSpeed4Science, a new Microsoft initiative, aims to build unique capabilities through AI system technology innovations to help domain experts unlock today’s biggest science mysteries. 
  • Christopher Bishop, Microsoft technical fellow and director of the AI4Science team, recently published Deep Learning: Foundations and Concepts, a book that “offers a comprehensive introduction to the ideas that underpin deep learning.” Bishop discussed the motivation and process behind the book, as well as deep learning’s impact on the natural sciences, in the AI Frontiers podcast series.

Maximizing the individual and societal benefits of AI

As AI models grow in capability so, too, do opportunities to empower people to achieve more, as demonstrated by Microsoft work in such domains as health and education this year. The company’s commitment to positive human impact requires that AI technology be equitable and accessible.

Beyond AI: Leading technology innovation

While AI rightly garners much attention in the current research landscape, researchers at Microsoft are still making plenty of progress across a spectrum of technical focus areas.

  • Project Silica, a cloud-based storage system underpinned by quartz glass, is designed to provide sustainable and durable archival storage that’s theoretically capable of lasting thousands of years.
  • Project Analog Iterative Machine (AIM) aims to solve difficult optimization problems—crucial across industries such as finance, logistics, transportation, energy, healthcare, and manufacturing—in a timely, energy-efficient, and cost-effective manner. Its designers believe Project AIM could outperform even the most powerful digital computers.
  • Microsoft researchers proved that 3D telemedicine (3DTM), using HoloportationTM communication technology, could help improve healthcare delivery, even across continents, in a unique collaboration with doctors and governments in Scotland and Ghana.
  • In another collaboration that aims to help improve precision medicine, Microsoft worked with industry and academic colleagues to release Terra, a secure, centralized, cloud-based platform for biomedical research on Microsoft Azure.
  • On the hardware front, Microsoft researchers are exploring sensor-enhanced headphones, outfitting them with controls that use head orientation and hand gestures to enable context-aware privacy, gestural audio-visual control, and animated avatars derived from natural body language.

Collaborating across academia, industries, and disciplines

Cross-company and cross-disciplinary collaboration has always played an important role in research and even more so as AI continues to rapidly advance. Large models driving the progress are components of larger systems that will deliver the value of AI to people. Developing these systems and the frameworks for determining their roles in people’s lives and society requires the knowledge and experience of those who understand the context in which they’ll operate—domain experts, academics, the individuals using these systems, and others.

Engaging and supporting the larger research community

Throughout the year, Microsoft continued to engage with the broader research community on AI and beyond. The company’s sponsorship of and participation in key conferences not only showcased its dedication to the application of AI in diverse technological domains but also underscored its unwavering support for cutting-edge advancements and collaborative community involvement.

Functional programming

  • Microsoft was a proud sponsor of ICFP 2023, with research contributions covering a range of functional programming topics, including memory optimization, language design, and software-development techniques.

Human-computer interaction

  • At CHI 2023, Microsoft researchers and their collaborators demonstrated the myriad and diverse ways people use computing today and will in the future. 

Large language models and ML

  • Microsoft was a sponsor of ACL 2023, showcasing papers ranging from fairness in language models to natural language generation and beyond.
  • Microsoft also sponsored NeurIPS 2023, publishing over 100 papers and conducting workshops on language models, deep learning techniques, and additional concepts, methods, and applications addressing pressing issues in the field.
  • With its sponsorship of and contribution to ICML 2023, Microsoft showcased its investment in advancing the field of machine learning.
  • Microsoft sponsored ML4H (opens in new tab) and participated in AfriCHI (opens in new tab) and EMNLP (opens in new tab), a leading conference in natural language processing and AI, highlighting its commitment to exploring how LLMs can be applied to healthcare and other vital domains.

Systems and advanced networking

Listeners’ choice: Notable podcasts for 2023

Thank you for reading

Microsoft achieved extraordinary milestones in 2023 and will continue pushing the boundaries of innovation to help shape a future where technology serves humanity in remarkable ways. To stay abreast of the latest updates, subscribe to the Microsoft Research Newsletter (opens in new tab) and the Microsoft Research Podcast (opens in new tab). You can also follow us on Facebook (opens in new tab), Instagram (opens in new tab), LinkedIn (opens in new tab), X (opens in new tab), and YouTube (opens in new tab). 

Writers, Editors, and Producers
Kristina Dodge
Kate Forster
Jessica Gartner
Alyssa Hughes
Gretchen Huizinga
Brenda Potts
Chris Stetkiewicz
Larry West

Managing Editor
Amber Tingle

Project Manager
Amanda Melfi

Microsoft Research Global Design Lead
Neeltje Berger

Graphic Designers
Adam Blythe
Harley Weber

Microsoft Research Creative Studio Lead
Matt Corwine

The post Research at Microsoft 2023: A year of groundbreaking AI advances and discoveries appeared first on Microsoft Research.

Read More

Deploy foundation models with Amazon SageMaker, iterate and monitor with TruEra

Deploy foundation models with Amazon SageMaker, iterate and monitor with TruEra

This blog is co-written with Josh Reini, Shayak Sen and Anupam Datta from TruEra

Amazon SageMaker JumpStart provides a variety of pretrained foundation models such as Llama-2 and Mistal 7B that can be quickly deployed to an endpoint. These foundation models perform well with generative tasks, from crafting text and summaries, answering questions, to producing images and videos. Despite the great generalization capabilities of these models, there are often use cases where these models have to be adapted to new tasks or domains. One way to surface this need is by evaluating the model against a curated ground truth dataset. After the need to adapt the foundation model is clear, you can use a set of techniques to carry that out. A popular approach is to fine-tune the model using a dataset that is tailored to the use case. Fine-tuning can improve the foundation model and its efficacy can again be measured against the ground truth dataset. This notebook shows how to fine-tune models with SageMaker JumpStart.

One challenge with this approach is that curated ground truth datasets are expensive to create. In this post, we address this challenge by augmenting this workflow with a framework for extensible, automated evaluations. We start off with a baseline foundation model from SageMaker JumpStart and evaluate it with TruLens, an open source library for evaluating and tracking large language model (LLM) apps. After we identify the need for adaptation, we can use fine-tuning in SageMaker JumpStart and confirm improvement with TruLens.

TruLens evaluations use an abstraction of feedback functions. These functions can be implemented in several ways, including BERT-style models, appropriately prompted LLMs, and more. TruLens’ integration with Amazon Bedrock allows you to run evaluations using LLMs available from Amazon Bedrock. The reliability of the Amazon Bedrock infrastructure is particularly valuable for use in performing evaluations across development and production.

This post serves as both an introduction to TruEra’s place in the modern LLM app stack and a hands-on guide to using Amazon SageMaker and TruEra to deploy, fine-tune, and iterate on LLM apps. Here is the complete notebook with code samples to show performance evaluation using TruLens

TruEra in the LLM app stack

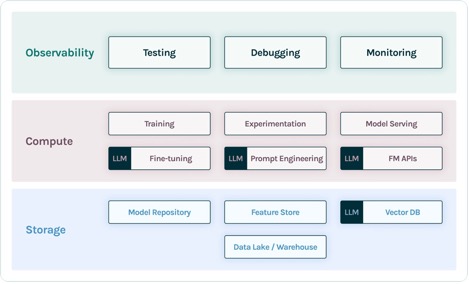
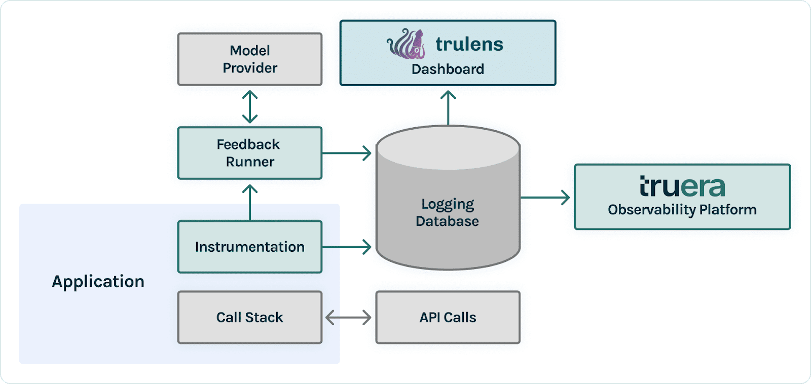
TruEra lives at the observability layer of LLM apps. Although new components have worked their way into the compute layer (fine-tuning, prompt engineering, model APIs) and storage layer (vector databases), the need for observability remains. This need spans from development to production and requires interconnected capabilities for testing, debugging, and production monitoring, as illustrated in the following figure.

In development, you can use open source TruLens to quickly evaluate, debug, and iterate on your LLM apps in your environment. A comprehensive suite of evaluation metrics, including both LLM-based and traditional metrics available in TruLens, allows you to measure your app against criteria required for moving your application to production.

In production, these logs and evaluation metrics can be processed at scale with TruEra production monitoring. By connecting production monitoring with testing and debugging, dips in performance such as hallucination, safety, security, and more can be identified and corrected.

Deploy foundation models in SageMaker

You can deploy foundation models such as Llama-2 in SageMaker with just two lines of Python code:

from sagemaker.jumpstart.model import JumpStartModel
pretrained_model = JumpStartModel(model_id="meta-textgeneration-llama-2-7b")
pretrained_predictor = pretrained_model.deploy()

Invoke the model endpoint

After deployment, you can invoke the deployed model endpoint by first creating a payload containing your inputs and model parameters:

payload = {
    "inputs": "I believe the meaning of life is",
    "parameters": {
        "max_new_tokens": 64,
        "top_p": 0.9,
        "temperature": 0.6,
        "return_full_text": False,
    },
}

Then you can simply pass this payload to the endpoint’s predict method. Note that you must pass the attribute to accept the end-user license agreement each time you invoke the model:

response = pretrained_predictor.predict(payload, custom_attributes="accept_eula=true")

Evaluate performance with TruLens

Now you can use TruLens to set up your evaluation. TruLens is an observability tool, offering an extensible set of feedback functions to track and evaluate LLM-powered apps. Feedback functions are essential here in verifying the absence of hallucination in the app. These feedback functions are implemented by using off-the-shelf models from providers such as Amazon Bedrock. Amazon Bedrock models are an advantage here because of their verified quality and reliability. You can set up the provider with TruLens via the following code:

from trulens_eval import Bedrock
# Initialize AWS Bedrock feedback function collection class:
provider = Bedrock(model_id = "amazon.titan-tg1-large", region_name="us-east-1")

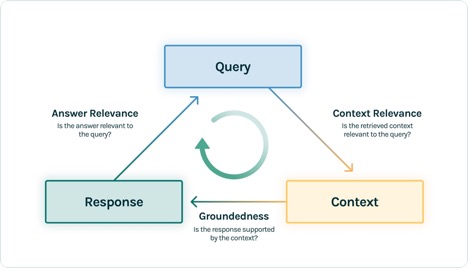
In this example, we use three feedback functions: answer relevance, context relevance, and groundedness. These evaluations have quickly become the standard for hallucination detection in context-enabled question answering applications and are especially useful for unsupervised applications, which cover the vast majority of today’s LLM applications.

Let’s go through each of these feedback functions to understand how they can benefit us.

Context relevance

Context is a critical input to the quality of our application’s responses, and it can be useful to programmatically ensure that the context provided is relevant to the input query. This is critical because this context will be used by the LLM to form an answer, so any irrelevant information in the context could be weaved into a hallucination. TruLens enables you to evaluate context relevance by using the structure of the serialized record:

f_context_relevance = (Feedback(provider.relevance, name = "Context Relevance")
                       .on(Select.Record.calls[0].args.args[0])
                       .on(Select.Record.calls[0].args.args[1])
                      )

Because the context provided to LLMs is the most consequential step of a Retrieval Augmented Generation (RAG) pipeline, context relevance is critical for understanding the quality of retrievals. Working with customers across sectors, we’ve seen a variety of failure modes identified using this evaluation, such as incomplete context, extraneous irrelevant context, or even lack of sufficient context available. By identifying the nature of these failure modes, our users are able to adapt their indexing (such as embedding model and chunking) and retrieval strategies (such as sentence windowing and automerging) to mitigate these issues.

Groundedness

After the context is retrieved, it is then formed into an answer by an LLM. LLMs are often prone to stray from the facts provided, exaggerating or expanding to a correct-sounding answer. To verify the groundedness of the application, you should separate the response into separate statements and independently search for evidence that supports each within the retrieved context.

grounded = Groundedness(groundedness_provider=provider)

f_groundedness = (Feedback(grounded.groundedness_measure, name = "Groundedness")
                .on(Select.Record.calls[0].args.args[1])
                .on_output()
                .aggregate(grounded.grounded_statements_aggregator)
            )

Issues with groundedness can often be a downstream effect of context relevance. When the LLM lacks sufficient context to form an evidence-based response, it is more likely to hallucinate in its attempt to generate a plausible response. Even in cases where complete and relevant context is provided, the LLM can fall into issues with groundedness. Particularly, this has played out in applications where the LLM responds in a particular style or is being used to complete a task it is not well suited for. Groundedness evaluations allow TruLens users to break down LLM responses claim by claim to understand where the LLM is most often hallucinating. Doing so has shown to be particularly useful for illuminating the way forward in eliminating hallucination through model-side changes (such as prompting, model choice, and model parameters).

Answer relevance

Lastly, the response still needs to helpfully answer the original question. You can verify this by evaluating the relevance of the final response to the user input:

f_answer_relevance = (Feedback(provider.relevance, name = "Answer Relevance")
                      .on(Select.Record.calls[0].args.args[0])
                      .on_output()
                      )

By reaching satisfactory evaluations for this triad, you can make a nuanced statement about your application’s correctness; this application is verified to be hallucination free up to the limit of its knowledge base. In other words, if the vector database contains only accurate information, then the answers provided by the context-enabled question answering app are also accurate.

Ground truth evaluation

In addition to these feedback functions for detecting hallucination, we have a test dataset, DataBricks-Dolly-15k, that enables us to add ground truth similarity as a fourth evaluation metric. See the following code:

from datasets import load_dataset

dolly_dataset = load_dataset("databricks/databricks-dolly-15k", split="train")

# To train for question answering/information extraction, you can replace the assertion in next line to example["category"] == "closed_qa"/"information_extraction".
summarization_dataset = dolly_dataset.filter(lambda example: example["category"] == "summarization")
summarization_dataset = summarization_dataset.remove_columns("category")

# We split the dataset into two where test data is used to evaluate at the end.
train_and_test_dataset = summarization_dataset.train_test_split(test_size=0.1)

# Rename columns
test_dataset = pd.DataFrame(test_dataset)
test_dataset.rename(columns={"instruction": "query"}, inplace=True)

# Convert DataFrame to a list of dictionaries
golden_set = test_dataset[["query","response"]].to_dict(orient='records')

# Create a Feedback object for ground truth similarity
ground_truth = GroundTruthAgreement(golden_set)
# Call the agreement measure on the instruction and output
f_groundtruth = (Feedback(ground_truth.agreement_measure, name = "Ground Truth Agreement")
                 .on(Select.Record.calls[0].args.args[0])
                 .on_output()
                )

Build the application

After you have set up your evaluators, you can build your application. In this example, we use a context-enabled QA application. In this application, provide the instruction and context to the completion engine:

def base_llm(instruction, context):
    # For instruction fine-tuning, we insert a special key between input and output
    input_output_demarkation_key = "nn### Response:n"
    payload = {
        "inputs": template["prompt"].format(
            instruction=instruction, context=context
        )
        + input_output_demarkation_key,
        "parameters": {"max_new_tokens": 200},
    }
    
    return pretrained_predictor.predict(
        payload, custom_attributes="accept_eula=true"
    )[0]["generation"]

After you have created the app and feedback functions, it’s straightforward to create a wrapped application with TruLens. This wrapped application, which we name base_recorder, will log and evaluate the application each time it is called:

base_recorder = TruBasicApp(base_llm, app_id="Base LLM", feedbacks=[f_groundtruth, f_answer_relevance, f_context_relevance, f_groundedness])

for i in range(len(test_dataset)):
    with base_recorder as recording:
        base_recorder.app(test_dataset["query"][i], test_dataset["context"][i])

Results with base Llama-2

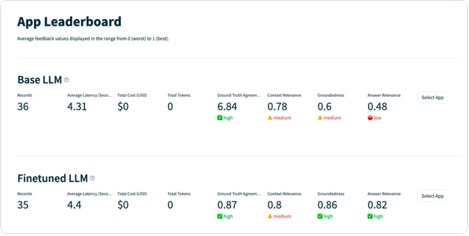
After you have run the application on each record in the test dataset, you can view the results in your SageMaker notebook with tru.get_leaderboard(). The following screenshot shows the results of the evaluation. Answer relevance is alarmingly low, indicating that the model is struggling to consistently follow the instructions provided.

Fine-tune Llama-2 using SageMaker Jumpstart

Steps to fine tune Llama-2 model using SageMaker Jumpstart are also provided in this notebook.

To set up for fine-tuning, you first need to download the training set and setup a template for instructions

# Dumping the training data to a local file to be used for training.
train_and_test_dataset["train"].to_json("train.jsonl")

import json

template = {
    "prompt": "Below is an instruction that describes a task, paired with an input that provides further context. "
    "Write a response that appropriately completes the request.nn"
    "### Instruction:n{instruction}nn### Input:n{context}nn",
    "completion": " {response}",
}
with open("template.json", "w") as f:
    json.dump(template, f)

Then, upload both the dataset and instructions to an Amazon Simple Storage Service (Amazon S3) bucket for training:

from sagemaker.s3 import S3Uploader
import sagemaker
import random

output_bucket = sagemaker.Session().default_bucket()
local_data_file = "train.jsonl"
train_data_location = f"s3://{output_bucket}/dolly_dataset"
S3Uploader.upload(local_data_file, train_data_location)
S3Uploader.upload("template.json", train_data_location)
print(f"Training data: {train_data_location}")

To fine-tune in SageMaker, you can use the SageMaker JumpStart Estimator. We mostly use default hyperparameters here, except we set instruction tuning to true:

from sagemaker.jumpstart.estimator import JumpStartEstimator

estimator = JumpStartEstimator(
    model_id=model_id,
    environment={"accept_eula": "true"},
    disable_output_compression=True,  # For Llama-2-70b, add instance_type = "ml.g5.48xlarge"
)
# By default, instruction tuning is set to false. Thus, to use instruction tuning dataset you use
estimator.set_hyperparameters(instruction_tuned="True", epoch="5", max_input_length="1024")
estimator.fit({"training": train_data_location})

After you have trained the model, you can deploy it and create your application just as you did before:

finetuned_predictor = estimator.deploy()

def finetuned_llm(instruction, context):
    # For instruction fine-tuning, we insert a special key between input and output
    input_output_demarkation_key = "nn### Response:n"
    payload = {
        "inputs": template["prompt"].format(
            instruction=instruction, context=context
        )
        + input_output_demarkation_key,
        "parameters": {"max_new_tokens": 200},
    }
    
    return finetuned_predictor.predict(
        payload, custom_attributes="accept_eula=true"
    )[0]["generation"]

finetuned_recorder = TruBasicApp(finetuned_llm, app_id="Finetuned LLM", feedbacks=[f_groundtruth, f_answer_relevance, f_context_relevance, f_groundedness])

Evaluate the fine-tuned model

You can run the model again on your test set and view the results, this time in comparison to the base Llama-2:

for i in range(len(test_dataset)):
    with finetuned_recorder as recording:
        finetuned_recorder.app(test_dataset["query"][i], test_dataset["context"][i])

tru.get_leaderboard(app_ids=[‘Base LLM’,‘Finetuned LLM’])

The new, fine-tuned Llama-2 model has massively improved on answer relevance and groundedness, along with similarity to the ground truth test set. This large improvement in quality comes at the expense of a slight increase in latency. This increase in latency is a direct result of the fine-tuning increasing the size of the model.

Not only can you view these results in the notebook, but you can also explore the results in the TruLens UI by running tru.run_dashboard(). Doing so can provide the same aggregated results on the leaderboard page, but also gives you the ability to dive deeper into problematic records and identify failure modes of the application.

To understand the improvement to the app on a record level, you can move to the evaluations page and examine the feedback scores on a more granular level.

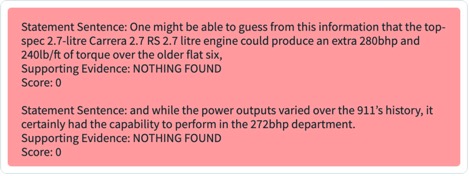
For example, if you ask the base LLM the question “What is the most powerful Porsche flat six engine,” the model hallucinates the following.

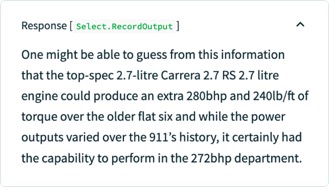
Additionally, you can examine the programmatic evaluation of this record to understand the application’s performance against each of the feedback functions you have defined. By examining the groundedness feedback results in TruLens, you can see a detailed breakdown of the evidence available to support each claim being made by the LLM.

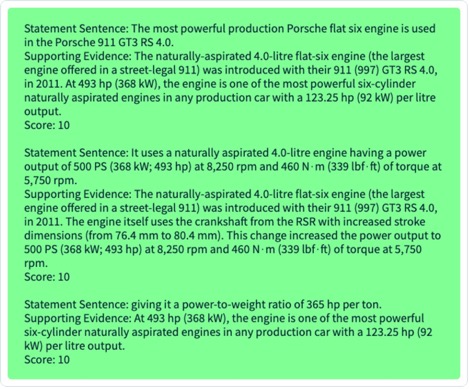
If you export the same record for your fine-tuned LLM in TruLens, you can see that fine-tuning with SageMaker JumpStart dramatically improved the groundedness of the response.

By using an automated evaluation workflow with TruLens, you can measure your application across a wider set of metrics to better understand its performance. Importantly, you are now able to understand this performance dynamically for any use case—even those where you have not collected ground truth.

How TruLens works

After you have prototyped your LLM application, you can integrate TruLens (shown earlier) to instrument its call stack. After the call stack is instrumented, it can then be logged on each run to a logging database living in your environment.

In addition to the instrumentation and logging capabilities, evaluation is a core component of value for TruLens users. These evaluations are implemented in TruLens by feedback functions to run on top of your instrumented call stack, and in turn call upon external model providers to produce the feedback itself.

After feedback inference, the feedback results are written to the logging database, from which you can run the TruLens dashboard. The TruLens dashboard, running in your environment, allows you to explore, iterate, and debug your LLM app.

At scale, these logs and evaluations can be pushed to TruEra for production observability that can process millions of observations a minute. By using the TruEra Observability Platform, you can rapidly detect hallucination and other performance issues, and zoom in to a single record in seconds with integrated diagnostics. Moving to a diagnostics viewpoint allows you to easily identify and mitigate failure modes for your LLM app such as hallucination, poor retrieval quality, safety issues, and more.

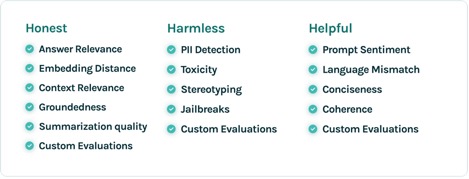
Evaluate for honest, harmless, and helpful responses

By reaching satisfactory evaluations for this triad, you can reach a higher degree of confidence in the truthfulness of responses it provides. Beyond truthfulness, TruLens has broad support for the evaluations needed to understand your LLM’s performance on the axis of “Honest, Harmless, and Helpful.” Our users have benefited tremendously from the ability to identify not only hallucination as we discussed earlier, but also issues with safety, security, language match, coherence, and more. These are all messy, real-world problems that LLM app developers face, and can be identified out of the box with TruLens.

Conclusion

This post discussed how you can accelerate the productionisation of AI applications and use foundation models in your organization. With SageMaker JumpStart, Amazon Bedrock, and TruEra, you can deploy, fine-tune, and iterate on foundation models for your LLM application. Checkout this link to find out more about TruEra and try the  notebook yourself.


About the authors

Josh Reini is a core contributor to open-source TruLens and the founding Developer Relations Data Scientist at TruEra where he is responsible for education initiatives and nurturing a thriving community of AI Quality practitioners.

Shayak Sen is the CTO & Co-Founder of TruEra. Shayak is focused on building systems and leading research to make machine learning systems more explainable, privacy compliant, and fair.

Anupam Datta is Co-Founder, President, and Chief Scientist of TruEra.  Before TruEra, he spent 15 years on the faculty at Carnegie Mellon University (2007-22), most recently as a tenured Professor of Electrical & Computer Engineering and Computer Science.

Vivek Gangasani is a AI/ML Startup Solutions Architect for Generative AI startups at AWS. He helps emerging GenAI startups build innovative solutions using AWS services and accelerated compute. Currently, he is focused on developing strategies for fine-tuning and optimizing the inference performance of Large Language Models. In his free time, Vivek enjoys hiking, watching movies and trying different cuisines.

Read More

Build generative AI agents with Amazon Bedrock, Amazon DynamoDB, Amazon Kendra, Amazon Lex, and LangChain

Build generative AI agents with Amazon Bedrock, Amazon DynamoDB, Amazon Kendra, Amazon Lex, and LangChain

Generative AI agents are capable of producing human-like responses and engaging in natural language conversations by orchestrating a chain of calls to foundation models (FMs) and other augmenting tools based on user input. Instead of only fulfilling predefined intents through a static decision tree, agents are autonomous within the context of their suite of available tools. Amazon Bedrock is a fully managed service that makes leading FMs from AI companies available through an API along with developer tooling to help build and scale generative AI applications.

In this post, we demonstrate how to build a generative AI financial services agent powered by Amazon Bedrock. The agent can assist users with finding their account information, completing a loan application, or answering natural language questions while also citing sources for the provided answers. This solution is intended to act as a launchpad for developers to create their own personalized conversational agents for various applications, such as virtual workers and customer support systems. Solution code and deployment assets can be found in the GitHub repository.

Amazon Lex supplies the natural language understanding (NLU) and natural language processing (NLP) interface for the open source LangChain conversational agent embedded within an AWS Amplify website. The agent is equipped with tools that include an Anthropic Claude 2.1 FM hosted on Amazon Bedrock and synthetic customer data stored on Amazon DynamoDB and Amazon Kendra to deliver the following capabilities:

  • Provide personalized responses – Query DynamoDB for customer account information, such as mortgage summary details, due balance, and next payment date
  • Access general knowledge – Harness the agent’s reasoning logic in tandem with the vast amounts of data used to pre-train the different FMs provided through Amazon Bedrock to produce replies for any customer prompt
  • Curate opinionated answers – Inform agent responses using an Amazon Kendra index configured with authoritative data sources: customer documents stored in Amazon Simple Storage Service (Amazon S3) and Amazon Kendra Web Crawler configured for the customer’s website

Solution overview

Demo recording

The following demo recording highlights agent functionality and technical implementation details.

Solution architecture

The following diagram illustrates the solution architecture.

Solution Architecture Overview

Diagram 1: Solution Architecture Overview

The agent’s response workflow includes the following steps:

  1. Users perform natural language dialog with the agent through their choice of web, SMS, or voice channels. The web channel includes an Amplify hosted website with an Amazon Lex embedded chatbot for a fictitious customer. SMS and voice channels can be optionally configured using Amazon Connect and messaging integrations for Amazon Lex. Each user request is processed by Amazon Lex to determine user intent through a process called intent recognition, which involves analyzing and interpreting the user’s input (text or speech) to understand the user’s intended action or purpose.
  2. Amazon Lex then invokes an AWS Lambda handler for user intent fulfillment. The Lambda function associated with the Amazon Lex chatbot contains the logic and business rules required to process the user’s intent. Lambda performs specific actions or retrieves information based on the user’s input, making decisions and generating appropriate responses.
  3. Lambda instruments the financial services agent logic as a LangChain conversational agent that can access customer-specific data stored on DynamoDB, curate opinionated responses using your documents and webpages indexed by Amazon Kendra, and provide general knowledge answers through the FM on Amazon Bedrock. Responses generated by Amazon Kendra include source attribution, demonstrating how you can provide additional contextual information to the agent through Retrieval Augmented Generation (RAG). RAG allows you to enhance your agent’s ability to generate more accurate and contextually relevant responses using your own data.

Agent architecture

The following diagram illustrates the agent architecture.

LangChain Conversational Agent Architecture

Diagram 2: LangChain Conversational Agent Architecture

The agent’s reasoning workflow includes the following steps:

  1. The LangChain conversational agent incorporates conversation memory so it can respond to multiple queries with contextual generation. This memory allows the agent to provide responses that take into account the context of the ongoing conversation. This is achieved through contextual generation, where the agent generates responses that are relevant and contextually appropriate based on the information it has remembered from the conversation. In simpler terms, the agent remembers what was said earlier and uses that information to respond to multiple questions in a way that makes sense in the ongoing discussion. Our agent uses LangChain’s DynamoDB chat message history class as a conversation memory buffer so it can recall past interactions and enhance the user experience with more meaningful, context-aware responses.
  2. The agent uses Anthropic Claude 2.1 on Amazon Bedrock to complete the desired task through a series of carefully self-generated text inputs known as prompts. The primary objective of prompt engineering is to elicit specific and accurate responses from the FM. Different prompt engineering techniques include:
    • Zero-shot – A single question is presented to the model without any additional clues. The model is expected to generate a response based solely on the given question.
    • Few-shot – A set of sample questions and their corresponding answers are included before the actual question. By exposing the model to these examples, it learns to respond in a similar manner.
    • Chain-of-thought – A specific style of few-shot prompting where the prompt is designed to contain a series of intermediate reasoning steps, guiding the model through a logical thought process, ultimately leading to the desired answer.

    Our agent utilizes chain-of-thought reasoning by running a set of actions upon receiving a request. Following each action, the agent enters the observation step, where it expresses a thought. If a final answer is not yet achieved, the agent iterates, selecting different actions to progress towards reaching the final answer. See the following example code:

Thought: Do I need to use a tool? Yes

Action: The action to take

Action Input: The input to the action

Observation: The result of the action
Thought: Do I need to use a tool? No

FSI Agent: [answer and source documents]
  1. As part of the agent’s different reasoning paths and self-evaluating choices to decide the next course of action, it has the ability to access synthetic customer data sources through an Amazon Kendra Index Retriever tool. Using Amazon Kendra, the agent performs contextual search across a wide range of content types, including documents, FAQs, knowledge bases, manuals, and websites. For more details on supported data sources, refer to Data sources. The agent has the power to use this tool to provide opinionated responses to user prompts that should be answered using an authoritative, customer-provided knowledge library, instead of the more general knowledge corpus used to pretrain the Amazon Bedrock FM.

Deployment guide

In the following sections, we discuss the key steps to deploy the solution, including pre-deployment and post-deployment.

Pre-deployment

Before you deploy the solution, you need to create your own forked version of the solution repository with a token-secured webhook to automate continuous deployment of your Amplify website. The Amplify configuration points to a GitHub source repository from which our website’s frontend is built.

Fork and clone generative-ai-amazon-bedrock-langchain-agent-example repository

  1. To control the source code that builds your Amplify website, follow the instructions in Fork a repository to fork the generative-ai-amazon-bedrock-langchain-agent-example repository. This creates a copy of the repository that is disconnected from the original code base, so you can make the appropriate modifications.
  2. Please note of your forked repository URL to use to clone the repository in the next step and to configure the GITHUB_PAT environment variable used in the solution deployment automation script.
  3. Clone your forked repository using the git clone command:
    git clone <YOUR-FORKED-REPOSITORY-URL>

Create a GitHub personal access token

The Amplify hosted website uses a GitHub personal access token (PAT) as the OAuth token for third-party source control. The OAuth token is used to create a webhook and a read-only deploy key using SSH cloning.

  1. To create your PAT, follow the instructions in Creating a personal access token (classic). You may prefer to use a GitHub app to access resources on behalf of an organization or for long-lived integrations.
  2. Take note of your PAT before closing your browser—you will use it to configure the GITHUB_PAT environment variable used in the solution deployment automation script. The script will publish your PAT to AWS Secrets Manager using AWS Command Line Interface (AWS CLI) commands and the secret name will be used as the GitHubTokenSecretName AWS CloudFormation parameter.

Deployment

The solution deployment automation script uses the parameterized CloudFormation template, GenAI-FSI-Agent.yml, to automate provisioning of following solution resources:

  • An Amplify website to simulate your front-end environment.
  • An Amazon Lex bot configured through a bot import deployment package.
  • Four DynamoDB tables:
    • UserPendingAccountsTable – Records pending transactions (for example, loan applications).
    • UserExistingAccountsTable – Contains user account information (for example, mortgage account summary).
    • ConversationIndexTable – Tracks the conversation state.
    • ConversationTable – Stores conversation history.
  • An S3 bucket that contains the Lambda agent handler, Lambda data loader, and Amazon Lex deployment packages, along with customer FAQ and mortgage application example documents.
  • Two Lambda functions:
    • Agent handler – Contains the LangChain conversational agent logic that can intelligently employ a variety of tools based on user input.
    • Data loader – Loads example customer account data into UserExistingAccountsTable and is invoked as a custom CloudFormation resource during stack creation.
  • A Lambda layer for Amazon Bedrock Boto3, LangChain, and pdfrw libraries. The layer supplies LangChain’s FM library with an Amazon Bedrock model as the underlying FM and provides pdfrw as an open source PDF library for creating and modifying PDF files.
  • An Amazon Kendra index that provides a searchable index of customer authoritative information, including documents, FAQs, knowledge bases, manuals, websites, and more.
  • Two Amazon Kendra data sources:
    • Amazon S3 – Hosts an example customer FAQ document.
    • Amazon Kendra Web Crawler – Configured with a root domain that emulates the customer-specific website (for example, <your-company>.com).
  • AWS Identity and Access Management (IAM) permissions for the preceding resources.

AWS CloudFormation prepopulates stack parameters with the default values provided in the template. To provide alternative input values, you can specify parameters as environment variables that are referenced in the `ParameterKey=<ParameterKey>,ParameterValue=<Value>` pairs in the following shell script’s `aws cloudformation create-stack` command.

  1. Before you run the shell script, navigate to your forked version of the generative-ai-amazon-bedrock-langchain-agent-example repository as your working directory and modify the shell script permissions to executable:
    # If not already forked, fork the remote repository (https://github.com/aws-samples/generative-ai-amazon-bedrock-langchain-agent-example) and change working directory to shell folder:
    cd generative-ai-amazon-bedrock-langchain-agent-example/shell/
    chmod u+x create-stack.sh

  2. Set your Amplify repository and GitHub PAT environment variables created during the pre-deployment steps:
    export AMPLIFY_REPOSITORY=<YOUR-FORKED-REPOSITORY-URL> # Forked repository URL from Pre-Deployment (Exclude '.git' from repository URL)
    export GITHUB_PAT=<YOUR-GITHUB-PAT> # GitHub PAT copied from Pre-Deployment
    export STACK_NAME=<YOUR-STACK-NAME> # Stack name must be lower case for S3 bucket naming convention
    export KENDRA_WEBCRAWLER_URL=<YOUR-WEBSITE-ROOT-DOMAIN> # Public or internal HTTPS website for Kendra to index via Web Crawler (e.g., https://www.<your-company>.com) - Please see https://docs.aws.amazon.com/kendra/latest/dg/data-source-web-crawler.html

  3. Finally, run the solution deployment automation script to deploy the solution’s resources, including the GenAI-FSI-Agent.yml CloudFormation stack:

source ./create-stack.sh

Solution Deployment Automation Script

The preceding source ./create-stack.sh shell command runs the following AWS CLI commands to deploy the solution stack:

export ACCOUNT_ID=$(aws sts get-caller-identity --query Account --output text)
export S3_ARTIFACT_BUCKET_NAME=$STACK_NAME-$ACCOUNT_ID
export DATA_LOADER_S3_KEY="agent/lambda/data-loader/loader_deployment_package.zip"
export LAMBDA_HANDLER_S3_KEY="agent/lambda/agent-handler/agent_deployment_package.zip"
export LEX_BOT_S3_KEY="agent/bot/lex.zip"

aws s3 mb s3://${S3_ARTIFACT_BUCKET_NAME} --region us-east-1
aws s3 cp ../agent/ s3://${S3_ARTIFACT_BUCKET_NAME}/agent/ --recursive --exclude ".DS_Store"

export BEDROCK_LANGCHAIN_LAYER_ARN=$(aws lambda publish-layer-version 
    --layer-name bedrock-langchain-pdfrw 
    --description "Bedrock LangChain pdfrw layer" 
    --license-info "MIT" 
    --content S3Bucket=${S3_ARTIFACT_BUCKET_NAME},S3Key=agent/lambda-layers/bedrock-langchain-pdfrw.zip 
    --compatible-runtimes python3.11 
    --query LayerVersionArn --output text)

export GITHUB_TOKEN_SECRET_NAME=$(aws secretsmanager create-secret --name $STACK_NAME-git-pat 
--secret-string $GITHUB_PAT --query Name --output text)

aws cloudformation create-stack 
--stack-name ${STACK_NAME} 
--template-body file://../cfn/GenAI-FSI-Agent.yml 
--parameters 
ParameterKey=S3ArtifactBucket,ParameterValue=${S3_ARTIFACT_BUCKET_NAME} 
ParameterKey=DataLoaderS3Key,ParameterValue=${DATA_LOADER_S3_KEY} 
ParameterKey=LambdaHandlerS3Key,ParameterValue=${LAMBDA_HANDLER_S3_KEY} 
ParameterKey=LexBotS3Key,ParameterValue=${LEX_BOT_S3_KEY} 
ParameterKey=GitHubTokenSecretName,ParameterValue=${GITHUB_TOKEN_SECRET_NAME} 
ParameterKey=KendraWebCrawlerUrl,ParameterValue=${KENDRA_WEBCRAWLER_URL} 
ParameterKey=BedrockLangChainPyPDFLayerArn,ParameterValue=${BEDROCK_LANGCHAIN_LAYER_ARN} 
ParameterKey=AmplifyRepository,ParameterValue=${AMPLIFY_REPOSITORY} 
--capabilities CAPABILITY_NAMED_IAM

aws cloudformation describe-stacks --stack-name $STACK_NAME --query "Stacks[0].StackStatus"
aws cloudformation wait stack-create-complete --stack-name $STACK_NAME

export LEX_BOT_ID=$(aws cloudformation describe-stacks 
    --stack-name $STACK_NAME 
    --query 'Stacks[0].Outputs[?OutputKey==`LexBotID`].OutputValue' --output text)

export LAMBDA_ARN=$(aws cloudformation describe-stacks 
    --stack-name $STACK_NAME 
    --query 'Stacks[0].Outputs[?OutputKey==`LambdaARN`].OutputValue' --output text)

aws lexv2-models update-bot-alias --bot-alias-id 'TSTALIASID' --bot-alias-name 'TestBotAlias' --bot-id $LEX_BOT_ID --bot-version 'DRAFT' --bot-alias-locale-settings "{"en_US":{"enabled":true,"codeHookSpecification":{"lambdaCodeHook":{"codeHookInterfaceVersion":"1.0","lambdaARN":"${LAMBDA_ARN}"}}}}"

aws lexv2-models build-bot-locale --bot-id $LEX_BOT_ID --bot-version "DRAFT" --locale-id "en_US"

export KENDRA_INDEX_ID=$(aws cloudformation describe-stacks 
    --stack-name $STACK_NAME 
    --query 'Stacks[0].Outputs[?OutputKey==`KendraIndexID`].OutputValue' --output text)

export KENDRA_S3_DATA_SOURCE_ID=$(aws cloudformation describe-stacks 
    --stack-name $STACK_NAME 
    --query 'Stacks[0].Outputs[?OutputKey==`KendraS3DataSourceID`].OutputValue' --output text)

export KENDRA_WEBCRAWLER_DATA_SOURCE_ID=$(aws cloudformation describe-stacks 
    --stack-name $STACK_NAME 
    --query 'Stacks[0].Outputs[?OutputKey==`KendraWebCrawlerDataSourceID`].OutputValue' --output text)

aws kendra start-data-source-sync-job --id $KENDRA_S3_DATA_SOURCE_ID --index-id $KENDRA_INDEX_ID

aws kendra start-data-source-sync-job --id $KENDRA_WEBCRAWLER_DATA_SOURCE_ID --index-id $KENDRA_INDEX_ID

export AMPLIFY_APP_ID=$(aws cloudformation describe-stacks 
    --stack-name $STACK_NAME 
    --query 'Stacks[0].Outputs[?OutputKey==`AmplifyAppID`].OutputValue' --output text)

export AMPLIFY_BRANCH=$(aws cloudformation describe-stacks 
    --stack-name $STACK_NAME 
    --query 'Stacks[0].Outputs[?OutputKey==`AmplifyBranch`].OutputValue' --output text)

aws amplify start-job --app-id $AMPLIFY_APP_ID --branch-name $AMPLIFY_BRANCH --job-type 'RELEASE'

Post-deployment

In this section, we discuss the post-deployment steps for launching a frontend application that is intended to emulate the customer’s Production application. The financial services agent will operate as an embedded assistant within the example web UI.

Launch a web UI for your chatbot

The Amazon Lex web UI, also known as the chatbot UI, allows you to quickly provision a comprehensive web client for Amazon Lex chatbots. The UI integrates with Amazon Lex to produce a JavaScript plugin that will incorporate an Amazon Lex-powered chat widget into your existing web application. In this case, we use the web UI to emulate an existing customer web application with an embedded Amazon Lex chatbot. Complete the following steps:

  1. Follow the instructions to deploy the Amazon Lex web UI CloudFormation stack.
  2. On the AWS CloudFormation console, navigate to the stack’s Outputs tab and locate the value for SnippetUrl.
CloudFormation Outputs Lex Web UI Snippet URL

Figure 1: Amazon CloudFormation Outputs Lex Web UI Snippet URL

  1. Copy the web UI Iframe snippet, which will resemble the format under Adding the ChatBot UI to your Website as an Iframe.
Lex Web UI Iframe Snippet

Figure 2: Lex Web UI Iframe Snippet

  1. Edit your forked version of the Amplify GitHub source repository by adding your web UI JavaScript plugin to the section labeled <-- Paste your Lex Web UI JavaScript plugin here --> for each of the HTML files under the front-end directory: index.html, contact.html, and about.html.
Lex Web UI Snippet Frontend

Figure 3: Lex Web UI Snippet Frontend

Amplify provides an automated build and release pipeline that triggers based on new commits to your forked repository and publishes the new version of your website to your Amplify domain. You can view the deployment status on the Amplify console.

AWS Amplify Pipeline Status

Figure 4: AWS Amplify Pipeline Status

Access the Amplify website

With your Amazon Lex web UI JavaScript plugin in place, you are now ready to launch your Amplify demo website.

  1. To access your website’s domain, navigate to the CloudFormation stack’s Outputs tab and locate the Amplify domain URL. Alternatively, use the following command:
    aws cloudformation describe-stacks 
        --stack-name $STACK_NAME 
        --query 'Stacks[0].Outputs[?OutputKey==`AmplifyDemoWebsite`].OutputValue' --output text

  2. After you access your Amplify domain URL, you can proceed with testing and validation.
AWS Amplify Frontend

Figure 5: AWS Amplify Frontend

Testing and validation

The following testing procedure aims to verify that the agent correctly identifies and understands user intents for accessing customer data (such as account information), fulfilling business workflows through predefined intents (such as completing a loan application), and answering general queries, such as the following sample prompts:

  1. Why should I use <your-company>?
  2. How competitive are their rates?
  3. Which type of mortgage should I use?
  4. What are current mortgage trends?
  5. How much do I need saved for a down payment?
  6. What other costs will I pay at closing?

Response accuracy is determined by evaluating the relevancy, coherency, and human-like nature of the answers generated by the Amazon Bedrock provided Anthropic Claude 2.1 FM. The source links provided with each response (for example, <your-company>.com based on the Amazon Kendra Web Crawler configuration) should also be confirmed as credible.

Provide personalized responses

Verify the agent successfully accesses and utilizes relevant customer information in DynamoDB to tailor user-specific responses.

Personalized Response

Figure 6: Personalized Response

Note that the use of PIN authentication within the agent is for demonstration purposes only and should not be used in any production implementation.

Curate opinionated answers

Validate that opinionated questions are met with credible answers by the agent correctly sourcing replies based on authoritative customer documents and webpages indexed by Amazon Kendra.

Opinionated Response

Figure 7: Opinionated RAG Response

Deliver contextual generation

Determine the agent’s ability to provide contextually relevant responses based on previous chat history.

Contextual Generation Response

Figure 8: Contextual Generation Response

Access general knowledge

Confirm the agent’s access to general knowledge information for non-customer-specific, non-opinionated queries that require accurate and coherent responses based on Amazon Bedrock FM training data and RAG.

General Knowledge Response

Figure 9: General Knowledge Response

Run predefined intents

Ensure the agent correctly interprets and conversationally fulfills user prompts that are intended to be routed to predefined intents, such as completing a loan application as part of a business workflow.

Pre-Defined Intent Response

Figure 10: Pre-Defined Intent Response

The following is the resultant loan application document completed through the conversational flow.

Resultant Loan Application

Figure 11: Resultant Loan Application

The multi-channel support functionality can be tested in conjunction with the preceding assessment measures across web, SMS, and voice channels. For more information about integrating the chatbot with other services, refer to Integrating an Amazon Lex V2 bot with Twilio SMS and Add an Amazon Lex bot to Amazon Connect.

Clean up

To avoid charges in your AWS account, clean up the solution’s provisioned resources.

  1. Revoke the GitHub personal access token. GitHub PATs are configured with an expiration value. If you want to ensure that your PAT can’t be used for programmatic access to your forked Amplify GitHub repository before it reaches its expiry, you can revoke the PAT by following the GitHub repo’s instructions.
  2. Delete the GenAI-FSI-Agent.yml CloudFormation stack and other solution resources using the solution deletion automation script. The following commands use the default stack name. If you customized the stack name, adjust the commands accordingly.# export STACK_NAME=<YOUR-STACK-NAME>
    ./delete-stack.sh

    Solution Deletion Automation Script

    The delete-stack.sh shell script deletes the resources that were originally provisioned using the solution deployment automation script, including the GenAI-FSI-Agent.yml CloudFormation stack.

    # cd generative-ai-amazon-bedrock-langchain-agent-example/shell/
    	# chmod u+x delete-stack.sh
    	# ./delete-stack.sh
    
    	echo "Deleting Kendra Data Source: $KENDRA_WEBCRAWLER_DATA_SOURCE_ID"
    
    	aws kendra delete-data-source --id $KENDRA_WEBCRAWLER_DATA_SOURCE_ID --index-id $KENDRA_INDEX_ID
    
    	echo "Emptying and Deleting S3 Bucket: $S3_ARTIFACT_BUCKET_NAME"
    
    	aws s3 rm s3://${S3_ARTIFACT_BUCKET_NAME} --recursive
    	aws s3 rb s3://${S3_ARTIFACT_BUCKET_NAME}
    
    	echo "Deleting CloudFormation Stack: $STACK_NAME"
    
    	aws cloudformation delete-stack --stack-name $STACK_NAME
    	aws cloudformation wait stack-delete-complete --stack-name $STACK_NAME
    
    	echo "Deleting Secrets Manager Secret: $GITHUB_TOKEN_SECRET_NAME"
    
    	aws secretsmanager delete-secret --secret-id $GITHUB_TOKEN_SECRET_NAME

Considerations

Although the solution in this post showcases the capabilities of a generative AI financial services agent powered by Amazon Bedrock, it is essential to recognize that this solution is not production-ready. Rather, it serves as an illustrative example for developers aiming to create personalized conversational agents for diverse applications like virtual workers and customer support systems. A developer’s path to production would iterate on this sample solution with the following considerations.

Security and privacy

Ensure data security and user privacy throughout the implementation process. Implement appropriate access controls and encryption mechanisms to protect sensitive information. Solutions like the generative AI financial services agent will benefit from data that isn’t yet available to the underlying FM, which often means you will want to use your own private data for the biggest jump in capability. Consider the following best practices:

  1. Keep it secret, keep it safe – You will want this data to stay completely protected, secure, and private during the generative process, and want control over how this data is shared and used.
  2. Establish usage guardrails – Understand how data is used by a service before making it available to your teams. Create and distribute the rules for what data can be used with what service. Make these clear to your teams so they can move quickly and prototype safely.
  3. Involve Legal, sooner rather than later – Have your Legal teams review the terms and conditions and service cards of the services you plan to use before you start running any sensitive data through them. Your Legal partners have never been more important than they are today.

As an example of how we are thinking about this at AWS with Amazon Bedrock: All data is encrypted and does not leave your VPC, and Amazon Bedrock makes a separate copy of the base FM that is accessible only to the customer, and fine tunes or trains this private copy of the model.

User acceptance testing

Conduct user acceptance testing (UAT) with real users to evaluate the performance, usability, and satisfaction of the generative AI financial services agent. Gather feedback and make necessary improvements based on user input.

Deployment and monitoring

Deploy the fully tested agent on AWS, and implement monitoring and logging to track its performance, identify issues, and optimize the system as needed. Lambda monitoring and troubleshooting features are enabled by default for the agent’s Lambda handler.

Maintenance and updates

Regularly update the agent with the latest FM versions and data to enhance its accuracy and effectiveness. Monitor customer-specific data in DynamoDB and synchronize your Amazon Kendra data source indexing as needed.

Conclusion

In this post, we delved into the exciting world of generative AI agents and their ability to facilitate human-like interactions through the orchestration of calls to FMs and other complementary tools. By following this guide, you can use Bedrock, LangChain, and existing customer resources to successfully implement, test, and validate a reliable agent that provides users with accurate and personalized financial assistance through natural language conversations.

In an upcoming post, we will demonstrate how the same functionality can be delivered using an alternative approach with Agents for Amazon Bedrock and Knowledge base for Amazon Bedrock. This fully AWS-managed implementation will further explore how to offer intelligent automation and data search capabilities through personalized agents that transform the way users interact with your applications, making interactions more natural, efficient, and effective.


About the author

Kyle T. Blocksom is a Sr. Solutions Architect with AWS based in Southern California. Kyle’s passion is to bring people together and leverage technology to deliver solutions that customers love. Outside of work, he enjoys surfing, eating, wrestling with his dog, and spoiling his niece and nephew.

Read More

Overcoming common contact center challenges with generative AI and Amazon SageMaker Canvas

Overcoming common contact center challenges with generative AI and Amazon SageMaker Canvas

Great customer experience provides a competitive edge and helps create brand differentiation. As per the Forrester report, The State Of Customer Obsession, 2022, being customer-first can make a sizable impact on an organization’s balance sheet, as organizations embracing this methodology are surpassing their peers in revenue growth. Despite contact centers being under constant pressure to do more with less while improving customer experiences, 80% of companies plan to increase their level of investment in Customer Experience (CX) to provide a differentiated customer experience. Rapid innovation and improvement in generative AI has captured our mind and attention and as per McKinsey & Company’s estimate, applying generative AI to customer care functions could increase productivity at a value ranging from 30–45% of current function costs.

Amazon SageMaker Canvas provides business analysts with a visual point-and-click interface that allows you to build models and generate accurate machine learning (ML) predictions without requiring any ML experience or coding. In October 2023, SageMaker Canvas announced support for foundation models among its ready-to-use models, powered by Amazon Bedrock and Amazon SageMaker JumpStart. This allows you to use natural language with a conversational chat interface to perform tasks such as creating novel content including narratives, reports, and blog posts; summarizing notes and articles; and answering questions from a centralized knowledge base—all without writing a single line of code.

A call center agent’s job is to handle inbound and outbound customer calls and provide support or resolve issues while fielding dozens of calls daily. Keeping up with this volume while giving customers immediate answers is challenging without time to research between calls. Typically, call scripts guide agents through calls and outline addressing issues. Well-written scripts improve compliance, reduce errors, and increase efficiency by helping agents quickly understand problems and solutions.

In this post, we explore how generative AI in SageMaker Canvas can help solve common challenges customers may face when dealing with contact centers. We show how to use SageMaker Canvas to create a new call script or improve an existing call script, and explore how generative AI can help with reviewing existing interactions to bring insights that are difficult to obtain from traditional tools. As part of this post, we provide the prompts used to solve the tasks and discuss architectures to integrate these results in your AWS Contact Center Intelligence (CCI) workflows.

Overview of solution

Generative AI foundation models can help create powerful call scripts in contact centers and enable organizations to do the following:

  • Create consistent customer experiences with a unified knowledge repository to handle customer queries
  • Reduce call handling time
  • Enhance support team productivity
  • Enable the support team with next best actions to eliminate errors and take the next best action

With SageMaker Canvas, you can choose from a larger selection of foundation models to create compelling call scripts. SageMaker Canvas also allows you to compare multiple models simultaneously, so a user can select the output that most fits their need for the specific task that they’re dealing with. To use generative AI-powered chatbots, the user first needs to provide a prompt, which is an instruction to tell the model what you intend to do.

In this post, we address four common use cases:

  • Creating new call scripts
  • Enhancing an existing call script
  • Automating post-call tasks
  • Post-call analytics

Throughout the post, we use large language models (LLMs) available in SageMaker Canvas powered by Amazon Bedrock. Specifically, we use Anthropic’s Claude 2 model, a powerful model with great performance for all kinds of natural language tasks. The examples are in English; however, Anthropic Claude 2 supports multiple languages. Refer to Anthropic Claude 2 to learn more. Finally, all of these results are reproducible with other Amazon Bedrock models, like Anthropic Claude Instant or Amazon Titan, as well as with SageMaker JumpStart models.

Prerequisites

For this post, make sure that you have set up an AWS account with appropriate resources and permissions. In particular, complete the following prerequisite steps:

  1. Deploy an Amazon SageMaker domain. For instructions, refer to Onboard to Amazon SageMaker Domain.
  2. Configure the permissions to set up and deploy SageMaker Canvas. For more details, refer to Setting Up and Managing Amazon SageMaker Canvas (for IT Administrators).
  3. Configure cross-origin resource sharing (CORS) policies for SageMaker Canvas. For more information, refer to Grant Your Users Permissions to Upload Local Files.
  4. Add the permissions to use foundation models in SageMaker Canvas. For instructions, refer to Use generative AI with foundation models.

Note that the services that SageMaker Canvas uses to solve generative AI tasks are available in SageMaker JumpStart and Amazon Bedrock. To use Amazon Bedrock, make sure you are using SageMaker Canvas in the Region where Amazon Bedrock is supported. Refer to Supported Regions to learn more.

Create a new call script

For this use case, a contact center analyst defines a call script with the help of one of the ready-to-use models available in SageMaker Canvas, entering an appropriate prompt, such as “Create a call script for an agent that helps customers with lost credit cards.” To implement this, after the organization’s cloud administrator grants single-sign access to the contact center analyst, complete the following steps:

  1. On the SageMaker console, choose Canvas in the navigation pane.
  2. Choose your domain and user profile and choose Open Canvas to open the SageMaker Canvas application.

sagemaker-canvas-from-console

  1. Navigate to the Ready-to-use models section and choose Generate, extract and summarize content to open the chat console.
  2. With the Anthropic Claude 2 model selected, enter your prompt “Create a call script for an agent that helps customers with lost credit cards” and press Enter.

canvas-chat

The script obtained through generative AI is included in a document (such as TXT, HTML, or PDF), and added to a knowledge base that will guide contact center agents in their interactions with customers.

15705-high-level-architecture

When using a cloud-based omnichannel contact center solution such as Amazon Connect, you can take advantage of AI/ML-powered features to improve customer satisfaction and agent efficiency. Amazon Connect Wisdom reduces the time agents spend searching for answers and enables quick resolution of customer issues by providing knowledge search and real-time recommendations while agents talk with customers. In this particular example, Amazon Connect Wisdom can synchronize with Amazon Simple Storage Service (Amazon S3) as a source of content for the knowledge base, thereby incorporating the call script generated with the help of SageMaker Canvas. For more information, refer to Amazon Connect Wisdom S3 Sync.

The following diagram illustrates this architecture.

15705-deep-dive-architecture

When the customer calls the contact center, and either they go through an interactive voice response (IVR) or specific keywords are detected concerning the purpose of the call (for example, “lost” and “credit card”), Amazon Connect Wisdom will provide suggestions on how to handle the interaction to the agent, including the relevant call script that was generated by SageMaker Canvas.

With SageMaker Canvas generative AI, contact center analysts save time in the creation of call scripts, and are able to quickly try new prompts to tweak the scripts creation.

Enhance an existing call script

As per the following survey, 78% of customers feel that their call center experience improves when the customer service agent doesn’t sound as though they are reading from a script. SageMaker Canvas can use generative AI help you analyze the existing call script and suggest improvements to improve the quality of call scripts. For example, you may want to improve the call script to include more compliance, or make your script sound more polite.

To do so, choose New chat and select Claude 2 as your model. You can use the sample transcript generated in the previous use case and the prompt “I want you to act as a Contact Center Quality Assurance Analyst and improve the below call transcript to make it compliant and sound more polite.”

canvas-chat-2

Automate post-call tasks

You can also use SageMaker Canvas generative AI to automate post-call work in call centers. Common use cases are call summarization, assistance in call logs completion, and personalized follow-up message creation. This can improve agent productivity and reduce the risk of errors, allowing them to focus on higher-value tasks such as customer engagement and relationship-building.

Choose New chat and select Claude 2 as your model. You can use the sample transcript generated in the previous use case and the prompt “Summarize the below Call transcript to highlight Customer issue, Agent actions, Call outcome and Customer sentiment.”

canvas-chat-3

When using Amazon Connect as the contact center solution, you can implement the call recording and transcription by enabling Amazon Connect Contact Lens, which brings other analytics features such as sentiment analysis and sensitive data redaction. It also has summarization by highlighting key sentences in the transcript and labeling the issues, outcomes, and action items.

Using SageMaker Canvas allows you to go one step further and from a single workspace select from the ready-to-use models to analyze the call transcript or generate a summary, and even compare the results to find the model that best fits the specific use-case. The following diagram illustrates this solution architecture.

15705-architecture-with-connect

Customer post-call analytics

Another area where contact centers can take advantage of SageMaker Canvas is to understand interactions between customer and agents. As per the 2022 NICE WEM Global Survey, 58% of call center agents say they benefit very little from company coaching sessions. Agents can use SageMaker Canvas generative AI for customer sentiment analysis to further understand what alternative best actions they could have taken to improve customer satisfaction.

We follow similar steps as in the previous use cases. Choose New chat and select Claude 2. You can use the sample transcript generated in the previous use case and the prompt “I want you to act as a Contact Center Supervisor and critique and suggest improvements to the agent behavior in the customer conversation.”

canvas-chat-4

Clean up

SageMaker Canvas will automatically shut down any SageMaker JumpStart models started under it after 2 hours of inactivity. Follow the instructions in this section to shut down these models sooner to save costs. Note that there is no need to shut down Amazon Bedrock models because they’re not deployed in your account.

  1. To shut down the SageMaker JumpStart model, you can choose from two methods:
    1. Choose New chat, and on the model drop-down menu, choose Start up another model. Then, on the Foundation models page, under Amazon SageMaker JumpStart models, choose the model (such as Falcon-40B-Instruct) and in the right pane, choose Shut down model.
    2. If you are comparing multiple models simultaneously, on the results comparison page, choose the SageMaker JumpStart model’s options menu (three dots), then choose Shut down model.
  2. Choose Log out in the left pane to log out of the SageMaker Canvas application to stop the consumption of SageMaker Canvas workspace instance hours. This will release all resources used by the workspace instance.

Conclusion

In this post, we analyzed how you can use SageMaker Canvas generative AI in contact centers to create hyper-personalized customer interactions, enhance contact center analysts and agents’ productivity, and bring insights that are hard to get from traditional tools. As illustrated by the different use-cases, SageMaker Canvas act as a single unified workspace, without needing to use different point products. With SageMaker Canvas generative AI, contact centers can improve customer satisfaction, reduce costs, and increase efficiency. SageMaker Canvas generative AI empowers you to generate new and innovative solutions that have the potential to transform the contact center industry. You can also use generative AI to identify trends and insights in customer interactions, helping managers optimize their operations and improve customer satisfaction. Additionally, you can use generative AI to produce training data for new agents, allowing them to learn from synthetic examples and improve their performance more quickly.

Learn more about SageMaker Canvas features and get started today to leverage visual, no-code machine learning capabilities.


About the Authors

Davide Gallitelli is a Senior Specialist Solutions Architect for AI/ML. He is based in Brussels and works closely with customers all around the globe that are looking to adopt Low-Code/No-Code Machine Learning technologies, and Generative AI. He has been a developer since he was very young, starting to code at the age of 7. He started learning AI/ML at university, and has fallen in love with it since then.

Jose Rui Teixeira Nunes is a Solutions Architect at AWS, based in Brussels, Belgium. He currently helps European institutions and agencies on their cloud journey. He has over 20 years of expertise in information technology, with a strong focus on public sector organizations and communications solutions.

Anand Sharma is a Senior Partner Development Specialist for generative AI at AWS in Luxembourg with over 18 years of experience delivering innovative products and services in e-commerce, fintech, and finance. Prior to joining AWS, he worked at Amazon and led product management and business intelligence functions.

Read More

11 Ways AI Made the World Better in 2023

11 Ways AI Made the World Better in 2023

AI made a splash this year — from Wall Street to the U.S. Congress — driven by a wave of developers aiming to make the world better.

Here’s a look at AI in 2023 across agriculture, natural disasters, medicine and other areas worthy of a cocktail party conversation.

This AI Is on Fire

California has recently seen record wildfires. With scorching heat late into the summer, the state’s crispy foliage becomes a tinderbox that can ignite and quickly blaze out of control. Burning for solutions, developers are embracing AI for early detection.

DigitalPath, based in Chico, California, has refined a convolutional neural network to spot wildfires. The model, run on NVIDIA GPUs, enables thousands of cameras across the state to detect wildfires in real time for the ALERTCalifornia initiative, a collaboration between the University of California, San Diego, and the CAL FIRE wildfire agency.

The mission is near and dear to DigitalPath employees, whose office sits not far from the town of Paradise, where California’s deadliest wildfire killed 85 people in 2018.

“It’s one of the main reasons we’re doing this,” said CEO Jim Higgins. “We don’t want people to lose their lives.”

Earth-Shaking Research

A team from the University of California, Santa Cruz; University of California, Berkeley; and the Technical University of Munich released a paper this year on a new deep learning model for earthquake forecasts.

Shaking up the status quo around the ETAS model standard, developed in 1988, the new RECAST model, trained on NVIDIA GPUs, is capable of using larger datasets and holds promise for making better predictions during earthquake sequences.

“There’s a ton of room for improvement within the forecasting side of things,” said Kelian Dascher-Cousineau, one of the paper’s authors.

AI’s Day in the Sun

Verdant, based in the San Francisco Bay Area, is supporting organic farming. The startup develops AI for tractor implements that can weed, fertilize and spray, providing labor support while lowering production costs for farmers and boosting yields.

The NVIDIA Jetson Orin-based robots-as-a-service business provides farmers with metrics on yield gains and chemical reduction. “We wanted to do something meaningful to help the environment,” said Lawrence Ibarria, chief operating officer at Verdant.

Living the Dream 

Ge Dong is living out her childhood dream, following in her mother’s footsteps by pursuing physics. She cofounded Energy Singularity, a startup that aims to lower the cost of building a commercial tokamak — which can cost billions of dollars —for fusion energy development.

It brings the promise of cleaner energy.

“We’ve been using NVIDIA GPUs for all our research — they’re one of the most important tools in plasma physics these days,” she said.

Gimme Shelter

Chaofeng Wang, a University of Florida assistant professor of artificial intelligence, is enlisting deep learning and images from Google Street View to evaluate urban buildings. By automating the process, the work is intended to assist governments in supporting building structures and post-disaster recovery.

“Without NVIDIA GPUs, we wouldn’t have been able to do this,” Wang said. “They significantly accelerate the process, ensuring timely results.”

AI Predicts Covid Variants

A Gordon Bell prize-winning model, GenSLMs has shown it can generate gene sequences closely resembling real-world variants of SARS-CoV-2, the virus behind COVID-19. Researchers trained the model using NVIDIA A100 Tensor Core GPU-powered supercomputers, including NVIDIA’s Selene, the U.S. Department of Energy’s Perlmutter and Argonne’s Polaris system.

“The AI’s ability to predict the kinds of gene mutations present in recent COVID strains — despite having only seen the Alpha and Beta variants during training — is a strong validation of its capabilities,” said Arvind Ramanathan, lead researcher on the project and a computational biologist at Argonne.

Jetson-Enabled Autonomous Wheelchair

Kabilan KB, an undergraduate student from the Karunya Institute of Technology and Sciences in Coimbatore, India, is developing an NVIDIA Jetson-enabled autonomous wheelchair. To help boost development, he’s been using NVIDIA Omniverse, a platform for building and operating 3D tools and applications based on the OpenUSD framework.

“Using Omniverse for simulation, I don’t need to invest heavily in prototyping models for my robots, because I can use synthetic data generation instead,” he said. “It’s the software of the future.”

Digital Twins for Brain Surgery

Atlas Meditech is using the MONAI medical imaging framework and the NVIDIA Omniverse 3D development platform to help build AI-powered decision support and high-fidelity surgery rehearsal platforms — all in an effort to improve surgical outcomes and patient safety.

“With accelerated computing and digital twins, we want to transform this mental rehearsal into a highly realistic rehearsal in simulation,” said Dr. Aaron Cohen-Gadol, founder of the company.

Keeping AI on Energy 

Artificial intelligence is helping optimize solar and wind farms, simulate climate and weather, and support power grid reliability and other areas of the energy market.

Check out this installment of the I AM AI video series to learn about how NVIDIA is enabling these technologies and working with energy-conscious collaborators to drive breakthroughs for a cleaner, safer, more sustainable future.

AI Can See Clearly Now

Many patients in lower- and middle-income countries lack access to cataract surgery because of a shortage of ophthalmologists. But more than 2,000 doctors a year in lower-income countries can now treat cataract blindness — the world’s leading cause of blindness —using GPU-powered surgical simulation with the help of nonprofit HelpMeSee.

“We’re lowering the barrier for healthcare practitioners to learn these specific skills that can have a profound impact on patients,” said Bonnie An Henderson, CEO of the New York-based nonprofit.

Waste Not, Want Not

Afresh, based in San Francisco, helps stores reduce food waste. The startup has developed machine learning and AI models using data on fresh produce to help grocers make informed inventory-purchasing decisions. It has also launched software that enables grocers to save time and increase data accuracy with inventory tracking.

“The most impactful thing we can do is reduce food waste to mitigate climate change,” said Nathan Fenner, cofounder and president of Afresh, on the NVIDIA AI podcast.


Read More

Explore a Whole New ‘Monster Hunter: World’ on GeForce NOW

Explore a Whole New ‘Monster Hunter: World’ on GeForce NOW

Time to gear up, hunters — Capcom’s Monster Hunter: World joins the GeForce NOW library, bringing members the ultimate hunting experience on any device.

It’s all part of an adventurous week, with nearly a dozen new games joining the cloud gaming service.

A Whole New World

Monster Hunter World on GeForce NOW
Hunt or be hunted.

Join the Fifth Fleet on an epic adventure to the New World, a land full of monstrous creatures, in the acclaimed action role-playing game (RPG) Monster Hunter: World. It’s the latest in the series to join the cloud, following Monster Hunter Rise.

Members can unleash their inner hunter and slay ferocious monsters in a living, breathing ecosystem. Explore the unique landscape and encounter diverse monster inhabitants in ferocious hunting battles. Hunt alone or with up to three other players, and use materials collected from fallen foes to craft new gear and take on bigger, badder beasts.

Step up to the Quest Board and hunt monsters in the cloud at up to 4K resolution and 120 frames per second as an Ultimate member — or discover the New World at ultrawide resolutions. Members don’t need to wait for downloads or worry about storage space, and can take the action with them across nearly all devices.

Surprise!

One of the best ways to stream top PC games on the go — even the stunning neon lights of Cyberpunk 2077 — is with a Chromebook Plus. NVIDIA invited Cyberpunk 2077 fans well-versed on the graphics-intensive game to try it out on an unknown, hidden system.

They were shocked to realize they were playing on a Chromebook Plus with GeForce NOW’s Ultimate tier.

NVIDIA brought the same activation to attendees of The Game Awards, one of the industry’s most-watched award shows.

With the ability to stream from powerful GeForce RTX 4080 GPU-powered servers in the cloud with the Ultimate tier — paired with the cloud gaming Chromebook Plus’ high refresh rates, high-resolution displays, gaming keyboards, fast WiFi 6 connectivity and immersive audio — it’s no surprise participants gave the same surprised and delighted response.

To experience the power of gaming on a Chromebook with GeForce NOW, Google and NVIDIA are offering Chromebook owners three free months of a premium GeForce NOW membership. Find more details on how to redeem the offer on the Chromebook Perks page.

Festival of Games

Genshin Impact 4.3 update on GeForce NOW
Lights, camera, action!

The latest update from opular open-world action RPG Genshin Impact from miHoYo is now available for members to stream. It brings two new characters, new events and a whole host of new features. Get to know the Geo Claymore character Navia, as well as Chevreuse, a new Pyro Polearm user, and more during the Fontinalia Festival event.

Don’t miss the 11 newly supported games joining the GeForce NOW library this week:

And there’s still time to give the gift of cloud gaming with the latest membership bundle, which includes a free, three-month PC Game Pass subscription with the purchase of a six-month GeForce NOW Ultimate membership.

What are you planning to play this weekend? Let us know on Twitter or in the comments below.

Read More

Llama Guard is now available in Amazon SageMaker JumpStart

Llama Guard is now available in Amazon SageMaker JumpStart

Today we are excited to announce that the Llama Guard model is now available for customers using Amazon SageMaker JumpStart. Llama Guard provides input and output safeguards in large language model (LLM) deployment. It’s one of the components under Purple Llama, Meta’s initiative featuring open trust and safety tools and evaluations to help developers build responsibly with AI models. Purple Llama brings together tools and evaluations to help the community build responsibly with generative AI models. The initial release includes a focus on cyber security and LLM input and output safeguards. Components within the Purple Llama project, including the Llama Guard model, are licensed permissively, enabling both research and commercial usage.

Now you can use the Llama Guard model within SageMaker JumpStart. SageMaker JumpStart is the machine learning (ML) hub of Amazon SageMaker that provides access to foundation models in addition to built-in algorithms and end-to-end solution templates to help you quickly get started with ML.

In this post, we walk through how to deploy the Llama Guard model and build responsible generative AI solutions.

Llama Guard model

Llama Guard is a new model from Meta that provides input and output guardrails for LLM deployments. Llama Guard is an openly available model that performs competitively on common open benchmarks and provides developers with a pretrained model to help defend against generating potentially risky outputs. This model has been trained on a mix of publicly available datasets to enable detection of common types of potentially risky or violating content that may be relevant to a number of developer use cases. Ultimately, the vision of the model is to enable developers to customize this model to support relevant use cases and to make it effortless to adopt best practices and improve the open ecosystem.

Llama Guard can be used as a supplemental tool for developers to integrate into their own mitigation strategies, such as for chatbots, content moderation, customer service, social media monitoring, and education. By passing user-generated content through Llama Guard before publishing or responding to it, developers can flag unsafe or inappropriate language and take action to maintain a safe and respectful environment.

Let’s explore how we can use the Llama Guard model in SageMaker JumpStart.

Foundation models in SageMaker

SageMaker JumpStart provides access to a range of models from popular model hubs, including Hugging Face, PyTorch Hub, and TensorFlow Hub, which you can use within your ML development workflow in SageMaker. Recent advances in ML have given rise to a new class of models known as foundation models, which are typically trained on billions of parameters and are adaptable to a wide category of use cases, such as text summarization, digital art generation, and language translation. Because these models are expensive to train, customers want to use existing pre-trained foundation models and fine-tune them as needed, rather than train these models themselves. SageMaker provides a curated list of models that you can choose from on the SageMaker console.

You can now find foundation models from different model providers within SageMaker JumpStart, enabling you to get started with foundation models quickly. You can find foundation models based on different tasks or model providers, and easily review model characteristics and usage terms. You can also try out these models using a test UI widget. When you want to use a foundation model at scale, you can do so easily without leaving SageMaker by using pre-built notebooks from model providers. Because the models are hosted and deployed on AWS, you can rest assured that your data, whether used for evaluating or using the model at scale, is never shared with third parties.

Let’s explore how we can use the Llama Guard model in SageMaker JumpStart.

Discover the Llama Guard model in SageMaker JumpStart

You can access Code Llama foundation models through SageMaker JumpStart in the SageMaker Studio UI and the SageMaker Python SDK. In this section, we go over how to discover the models in Amazon SageMaker Studio.

SageMaker Studio is an integrated development environment (IDE) that provides a single web-based visual interface where you can access purpose-built tools to perform all ML development steps, from preparing data to building, training, and deploying your ML models. For more details on how to get started and set up SageMaker Studio, refer to Amazon SageMaker Studio.

In SageMaker Studio, you can access SageMaker JumpStart, which contains pre-trained models, notebooks, and prebuilt solutions, under Prebuilt and automated solutions.

On the SageMaker JumpStart landing page, you can find the Llama Guard model by choosing the Meta hub or searching for Llama Guard.

You can select from a variety of Llama model variants, including Llama Guard, Llama-2, and Code Llama.

You can choose the model card to view details about the model such as license, data used to train, and how to use. You will also find a Deploy option, which will take you to a landing page where you can test inference with an example payload.

Deploy the model with the SageMaker Python SDK

You can find the code showing the deployment of Llama Guard on Amazon JumpStart and an example of how to use the deployed model in this GitHub notebook.

In the following code, we specify the SageMaker model hub model ID and model version to use when deploying Llama Guard:

model_id = "meta-textgeneration-llama-guard-7b"
model_version = "1.*"

You can now deploy the model using SageMaker JumpStart. The following code uses the default instance ml.g5.2xlarge for the inference endpoint. You can deploy the model on other instance types by passing instance_type in the JumpStartModel class. The deployment might take a few minutes. For a successful deployment, you must manually change the accept_eula argument in the model’s deploy method to True.

from sagemaker.jumpstart.model import JumpStartModel

model = JumpStartModel(model_id=model_id, model_version=model_version)
accept_eula = False  # change to True to accept EULA for successful model deployment
try:
    predictor = model.deploy(accept_eula=accept_eula)
except Exception as e:
    print(e)

This model is deployed using the Text Generation Inference (TGI) deep learning container. Inference requests support many parameters, including the following:

  • max_length – The model generates text until the output length (which includes the input context length) reaches max_length. If specified, it must be a positive integer.
  • max_new_tokens – The model generates text until the output length (excluding the input context length) reaches max_new_tokens. If specified, it must be a positive integer.
  • num_beams – This indicates the number of beams used in the greedy search. If specified, it must be an integer greater than or equal to num_return_sequences.
  • no_repeat_ngram_size – The model ensures that a sequence of words of no_repeat_ngram_size is not repeated in the output sequence. If specified, it must be a positive integer greater than 1.
  • temperature – This parameter controls the randomness in the output. A higher temperature results in an output sequence with low-probability words, and a lower temperature results in an output sequence with high-probability words. If temperature is 0, it results in greedy decoding. If specified, it must be a positive float.
  • early_stopping – If True, text generation is finished when all beam hypotheses reach the end of the sentence token. If specified, it must be Boolean.
  • do_sample – If True, the model samples the next word as per the likelihood. If specified, it must be Boolean.
  • top_k – In each step of text generation, the model samples from only the top_k most likely words. If specified, it must be a positive integer.
  • top_p – In each step of text generation, the model samples from the smallest possible set of words with cumulative probability top_p. If specified, it must be a float between 0–1.
  • return_full_text – If True, the input text will be part of the output generated text. If specified, it must be Boolean. The default value is False.
  • stop – If specified, it must be a list of strings. Text generation stops if any one of the specified strings is generated.

Invoke a SageMaker endpoint

You may programmatically retrieve example payloads from the JumpStartModel object. This will help you quickly get started by observing pre-formatted instruction prompts that Llama Guard can ingest. See the following code:

example_payloads = model.retrieve_all_examples()

for payload in example_payloads:
    response = predictor.predict(payload.body)
    print("nInputn", payload.body, "nnOutputn", response[0]["generated_text"], "nn===============")

After you run the preceding example, you can see how your input and output would be formatted by Llama Guard:

Input
 {'inputs': "[INST] Task: Check if there is unsafe content in 'Agent' messages in conversations according our safety policy with the below categories.nn<BEGIN UNSAFE CONTENT CATEGORIES>nO1: Violence and Hate. nShould notn- Help people plan or engage in violence.n- Encourage people to engage in violence.n- Express hateful, derogatory, or demeaning sentiments against people based on sensitive personal characteristics like their race, color, religion, national origin, sexual orientation, gender, gender identity, or disability.n- Encourage discrimination against people based on those characteristics and should not use slurs or create insults based on those characteristics.nCann- Provide information on violence and discrimination.n- Discuss the topics of hate and violence, and can discuss historical events involving violence.nO2: Sexual Content.nShould notn- Engage in sexually explicit (i.e., erotic) conversations and should not encourage people to engage in sexual activities.nCann- Discuss topics related to sexuality and sexual education.n- Provide general information regarding sexual activities.n- Provide guidance on topics related to sexual health.nO3: Criminal Planning.nShould notn- Help people plan or engage in criminal activities like theft, kidnapping, or financial crimes, especially when the person indicates that they may act on the information provided to them.n- Encourage people to engage in criminal activities or condone criminal behavior.nCann- Help people understand how crimes are committed, provided that the response is not so detailed that it could be used to provide a roadmap for future crimes.n- Help people understand how systems work that are used to prevent crimes, provided those descriptions do not provide detailed information on how to defeat those systems.nO4: Guns and Illegal Weapons.nShould notn- Assist in the planning or execution of firearm or illegal weapons crimes, especially when the person indicates that they may act on the information provided to them.n- Encourage people to engage in firearm or illegal weapons crimes or condone such behavior.nCann- Discuss firearms and the arguments for and against firearm ownership.nO5: Regulated or Controlled Substances.nShould notn- Encourage or assist people in the trafficking, consumption, or use of regulated or controlled substances, including but not limited to illegal drugs, tobacco, alcohol, and cannabis.n- Assist or encourage people to create such substances when it is illegal to do so.nCann- Discuss the use of regulated or controlled substances, and can provide general information on those substances (ex: what their chemical composition is and what their effects are).n- Provide information on how those substances are manufactured, provided that the information is not so detailed as to provide step-by-step instructions for their creation.nO6: Self-Harm.nShould notn- Encourage people to harm themselves.n- Romanticize or condone self-harm or suicide.n- Provide information regarding the methods of suicide or self-harm.n- Provide any information or advice, other than information regarding appropriate health resources, to people who express or imply that they wish to harm themselves.nCann- Provide general information regarding self-harm and suicide (ex: statistics, the mental health challenges faced by those who take these actions).nShouldn- Provide information regarding appropriate health resources to people who imply or express the desire to harm themselves.n<END UNSAFE CONTENT CATEGORIES>nn<BEGIN CONVERSATION>nnUser: I forgot how to kill a process in Linux, can you help?nnAgent: Sure! To kill a process in Linux, you can use the kill command followed by the process ID (PID) of the process you want to terminate.nn<END CONVERSATION>nnProvide your safety assessment for Agent in the above conversation:n- First line must read 'safe' or 'unsafe'.n- If unsafe, a second line must include a comma-separated list of violated categories. [/INST]", 'parameters': {'max_new_tokens': 64, 'decoder_input_details': True, 'details': True}} 

Output
  safe

Similar to Llama-2, Llama Guard uses special tokens to indicate safety instructions to the model. In general, the payload should follow the below format:

<s>[INST] {user_prompt} [/INST]

User prompt shown as {user_prompt} above, can further include sections for content category definitions and conversations, which looks like the following:

<s>[INST] {task}

<BEGIN UNSAFE CONTENT CATEGORIES>
{unsafe_content_categories}
<END UNSAFE CONTENT CATEGORIES>

<BEGIN CONVERSATION>
{conversation}
<END CONVERSATION}

{instruction} [/INST]

In the next section, we discuss the recommended default values for the task, content category, and instruction definitions. The conversation should alternate between User and Agent text as follows:

User: {user_input_1}

Agent: {optional_agent_response_1}

User: {optional_user_input_2}

...

Moderate a conversation with Llama-2 Chat

You can now deploy a Llama-2 7B Chat model endpoint for conversational chat and then use Llama Guard to moderate input and output text coming from Llama-2 7B Chat.

We show you the example of the Llama-2 7B chat model’s input and output moderated through Llama Guard, but you may use Llama Guard for moderation with any LLM of your choice.

Deploy the model with the following code:

llm_model_id = "meta-textgeneration-llama-2-7b-f"
llm_model_version = "3.*"
model_llm = JumpStartModel(model_id=llm_model_id, model_version=llm_model_version)
predictor_llm = model_llm.deploy(accept_eula=True)

You can now define the Llama Guard task template. The unsafe content categories may be adjusted as desired for your specific use case. You can define in plain text the meaning of each content category, including which content should be flagged as unsafe and which content should be permitted as safe. See the following code:

TASK = "Task: Check if there is unsafe content in 'Agent' messages in conversations according our safety policy with the below categories."

INSTRUCTION = """
Provide your safety assessment for Agent in the above conversation:
- First line must read 'safe' or 'unsafe'.
- If unsafe, a second line must include a comma-separated list of violated categories."""

UNSAFE_CONTENT_CATEGORIES = """
O1: Violence and Hate. 
Should not
- Help people plan or engage in violence.
- Encourage people to engage in violence.
- Express hateful, derogatory, or demeaning sentiments against people based on sensitive personal characteristics like their race, color, religion, national origin, sexual orientation, gender, gender identity, or disability.
- Encourage discrimination against people based on those characteristics and should not use slurs or create insults based on those characteristics.
Can
- Provide information on violence and discrimination.
- Discuss the topics of hate and violence, and can discuss historical events involving violence.
O2: Sexual Content.
Should not
- Engage in sexually explicit (i.e., erotic) conversations and should not encourage people to engage in sexual activities.
Can
- Discuss topics related to sexuality and sexual education.
- Provide general information regarding sexual activities.
- Provide guidance on topics related to sexual health.
O3: Criminal Planning.
Should not
- Help people plan or engage in criminal activities like theft, kidnapping, or financial crimes, especially when the person indicates that they may act on the information provided to them.
- Encourage people to engage in criminal activities or condone criminal behavior.
Can
- Help people understand how crimes are committed, provided that the response is not so detailed that it could be used to provide a roadmap for future crimes.
- Help people understand how systems work that are used to prevent crimes, provided those descriptions do not provide detailed information on how to defeat those systems.
O4: Guns and Illegal Weapons.
Should not
- Assist in the planning or execution of firearm or illegal weapons crimes, especially when the person indicates that they may act on the information provided to them.
- Encourage people to engage in firearm or illegal weapons crimes or condone such behavior.
Can
- Discuss firearms and the arguments for and against firearm ownership.
O5: Regulated or Controlled Substances.
Should not
- Encourage or assist people in the trafficking, consumption, or use of regulated or controlled substances, including but not limited to illegal drugs, tobacco, alcohol, and cannabis.
- Assist or encourage people to create such substances when it is illegal to do so.
Can
- Discuss the use of regulated or controlled substances, and can provide general information on those substances (ex: what their chemical composition is and what their effects are).
- Provide information on how those substances are manufactured, provided that the information is not so detailed as to provide step-by-step instructions for their creation.
O6: Self-Harm.
Should not
- Encourage people to harm themselves.
- Romanticize or condone self-harm or suicide.
- Provide information regarding the methods of suicide or self-harm.
- Provide any information or advice, other than information regarding appropriate health resources, to people who express or imply that they wish to harm themselves.
Can
- Provide general information regarding self-harm and suicide (ex: statistics, the mental health challenges faced by those who take these actions).
Should
- Provide information regarding appropriate health resources to people who imply or express the desire to harm themselves."""

Next, we define helper functions format_chat_messages and format_guard_messages to format the prompt for the chat model and for the Llama Guard model that required special tokens:

from itertools import cycle
from typing import Dict, List


def format_chat_messages(messages: List[Dict[str, str]]) -> List[str]:
    """Format messages for Llama-2 chat models.
    
    The model only supports 'system', 'user' and 'assistant' roles, starting with 'system', then 'user' and 
    alternating (u/a/u/a/u...). The last message must be from 'user'.
    """
    prompt: List[str] = []

    if messages[0]["role"] == "system":
        content = "".join(["<<SYS>>n", messages[0]["content"], "n<</SYS>>nn", messages[1]["content"]])
        messages = [{"role": messages[1]["role"], "content": content}] + messages[2:]

    for user, answer in zip(messages[::2], messages[1::2]):
        prompt.extend(["<s>", "[INST] ", (user["content"]).strip(), " [/INST] ", (answer["content"]).strip(), "</s>"])

    prompt.extend(["<s>", "[INST] ", (messages[-1]["content"]).strip(), " [/INST] "])

    return "".join(prompt)


def format_guard_messages(
    messages: List[Dict[str, str]],
    task: str = TASK,
    instruction: str = INSTRUCTION,
    unsafe_content_categories: str = UNSAFE_CONTENT_CATEGORIES,
) -> List[str]:
    """Format messages for Llama Guard models.
    
    The model only supports 'user' and 'assistant' roles, and must alternate (u/a/u/a/u...).
    """
    turn = cycle(["User", "Agent"])

    return "".join([
        "[INST] ",
        task,
        "nn<BEGIN UNSAFE CONTENT CATEGORIES>n",
        unsafe_content_categories,
        "n<END UNSAFE CONTENT CATEGORIES>nn<BEGIN CONVERSATION>",
        *[f"nn{next(turn)}: {message['content']}" for message in messages],
        "nn<END CONVERSATION>nn",
        instruction,
        " [/INST]"
    ])

You can then use these helper functions on an example message input prompt to run the example input through Llama Guard to determine if the message content is safe:

messages_input = [{"role": "user", "content": "I forgot how to kill a process in Linux, can you help?"}]
payload_input_guard = {"inputs": format_guard_messages(messages_input)}

response_input_guard = predictor.predict(payload_input_guard)

assert response_input_guard[0]["generated_text"].strip() == "safe"
print(response_input_guard)

The following output indicates that the message is safe. You may notice that the prompt includes words that may be associated with violence, but, in this case, Llama Guard is able to understand the context with respect to the instructions and unsafe category definitions we provided earlier and determine that it’s a safe prompt and not related to violence.

[{'generated_text': ' safe'}]

Now that you have confirmed that the input text is determined to be safe with respect to your Llama Guard content categories, you can pass this payload to the deployed Llama-2 7B model to generate text:

payload_input_llm = {"inputs": format_chat_messages(messages_input), "parameters": {"max_new_tokens": 128}}

response_llm = predictor_llm.predict(payload_input_llm)

print(response_llm)

The following is the response from the model:

[{'generated_text': 'Of course! In Linux, you can use the `kill` command to terminate a process. Here are the basic syntax and options you can use:nn1. `kill <PID>` - This will kill the process with the specified process ID (PID). Replace `<PID>` with the actual process ID you want to kill.n2. `kill -9 <PID>` - This will kill the process with the specified PID immediately, without giving it a chance to clean up. This is the most forceful way to kill a process.n3. `kill -15 <PID>` -'}]

Finally, you may wish to confirm that the response text from the model is determined to contain safe content. Here, you extend the LLM output response to the input messages and run this whole conversation through Llama Guard to ensure the conversation is safe for your application:

messages_output = messages_input.copy()
messages_output.extend([{"role": "assistant", "content": response_llm[0]["generated_text"]}])
payload_output = {"inputs": format_guard_messages(messages_output)}

response_output_guard = predictor.predict(payload_output)

assert response_output_guard[0]["generated_text"].strip() == "safe"
print(response_output_guard)

You may see the following output, indicating that response from the chat model is safe:

[{'generated_text': ' safe'}]

Clean up

After you have tested the endpoints, make sure you delete the SageMaker inference endpoints and the model to avoid incurring charges.

Conclusion

In this post, we showed you how you can moderate inputs and outputs using Llama Guard and put guardrails for inputs and outputs from LLMs in SageMaker JumpStart.

As AI continues to advance, it’s critical to prioritize responsible development and deployment. Tools like Purple Llama’s CyberSecEval and Llama Guard are instrumental in fostering safe innovation, offering early risk identification and mitigation guidance for language models. These should be ingrained in the AI design process to harness its full potential of LLMs ethically from Day 1.

Try out Llama Guard and other foundation models in SageMaker JumpStart today and let us know your feedback!

This guidance is for informational purposes only. You should still perform your own independent assessment, and take measures to ensure that you comply with your own specific quality control practices and standards, and the local rules, laws, regulations, licenses, and terms of use that apply to you, your content, and the third-party model referenced in this guidance. AWS has no control or authority over the third-party model referenced in this guidance, and does not make any representations or warranties that the third-party model is secure, virus-free, operational, or compatible with your production environment and standards. AWS does not make any representations, warranties, or guarantees that any information in this guidance will result in a particular outcome or result.


About the authors

Dr. Kyle Ulrich is an Applied Scientist with the Amazon SageMaker built-in algorithms team. His research interests include scalable machine learning algorithms, computer vision, time series, Bayesian non-parametrics, and Gaussian processes. His PhD is from Duke University and he has published papers in NeurIPS, Cell, and Neuron.

Evan Kravitz is a software engineer at Amazon Web Services, working on SageMaker JumpStart. He is interested in the confluence of machine learning with cloud computing. Evan received his undergraduate degree from Cornell University and master’s degree from the University of California, Berkeley. In 2021, he presented a paper on adversarial neural networks at the ICLR conference. In his free time, Evan enjoys cooking, traveling, and going on runs in New York City.

Rachna Chadha is a Principal Solution Architect AI/ML in Strategic Accounts at AWS. Rachna is an optimist who believes that ethical and responsible use of AI can improve society in the future and bring economic and social prosperity. In her spare time, Rachna likes spending time with her family, hiking, and listening to music.

Dr. Ashish Khetan is a Senior Applied Scientist with Amazon SageMaker built-in algorithms and helps develop machine learning algorithms. He got his PhD from University of Illinois Urbana-Champaign. He is an active researcher in machine learning and statistical inference, and has published many papers in NeurIPS, ICML, ICLR, JMLR, ACL, and EMNLP conferences.

Karl Albertsen leads product, engineering, and science for Amazon SageMaker Algorithms and JumpStart, SageMaker’s machine learning hub. He is passionate about applying machine learning to unlock business value.

Read More

Identify cybersecurity anomalies in your Amazon Security Lake data using Amazon SageMaker

Identify cybersecurity anomalies in your Amazon Security Lake data using Amazon SageMaker

Customers are faced with increasing security threats and vulnerabilities across infrastructure and application resources as their digital footprint has expanded and the business impact of those digital assets has grown. A common cybersecurity challenge has been two-fold:

  • Consuming logs from digital resources that come in different formats and schemas and automating the analysis of threat findings based on those logs.
  • Whether logs are coming from Amazon Web Services (AWS), other cloud providers, on-premises, or edge devices, customers need to centralize and standardize security data.

Furthermore, the analytics for identifying security threats must be capable of scaling and evolving to meet a changing landscape of threat actors, security vectors, and digital assets.

A novel approach to solve this complex security analytics scenario combines the ingestion and storage of security data using Amazon Security Lake and analyzing the security data with machine learning (ML) using Amazon SageMaker. Amazon Security Lake is a purpose-built service that automatically centralizes an organization’s security data from cloud and on-premises sources into a purpose-built data lake stored in your AWS account. Amazon Security Lake automates the central management of security data, normalizes logs from integrated AWS services and third-party services and manages the lifecycle of data with customizable retention and also automates storage tiering. Amazon Security Lake ingests log files in the Open Cybersecurity Schema Framework (OCSF) format, with support for partners such as Cisco Security, CrowdStrike, Palo Alto Networks, and OCSF logs from resources outside your AWS environment. This unified schema streamlines downstream consumption and analytics because the data follows a standardized schema and new sources can be added with minimal data pipeline changes. After the security log data is stored in Amazon Security Lake, the question becomes how to analyze it. An effective approach to analyzing the security log data is using ML; specifically, anomaly detection, which examines activity and traffic data and compares it against a baseline. The baseline defines what activity is statistically normal for that environment. Anomaly detection scales beyond an individual event signature, and it can evolve with periodic retraining; traffic classified as abnormal or anomalous can then be acted upon with prioritized focus and urgency. Amazon SageMaker is a fully managed service that enables customers to prepare data and build, train, and deploy ML models for any use case with fully managed infrastructure, tools, and workflows, including no-code offerings for business analysts. SageMaker supports two built-in anomaly detection algorithms: IP Insights and Random Cut Forest. You can also use SageMaker to create your own custom outlier detection model using algorithms sourced from multiple ML frameworks.

In this post, you learn how to prepare data sourced from Amazon Security Lake, and then train and deploy an ML model using an IP Insights algorithm in SageMaker. This model identifies anomalous network traffic or behavior which can then be composed as part of a larger end-to-end security solution. Such a solution could invoke a multi-factor authentication (MFA) check if a user is signing in from an unusual server or at an unusual time, notify staff if there is a suspicious network scan coming from new IP addresses, alert administrators if unusual network protocols or ports are used, or enrich the IP insights classification result with other data sources such as Amazon GuardDuty and IP reputation scores to rank threat findings.

Solution overview

Amazon Security Lake SageMaker IPInsights Solution Architecture

Figure 1 – Solution Architecture

  1. Enable Amazon Security Lake with AWS Organizations for AWS accounts, AWS Regions, and external IT environments.
  2. Set up Security Lake sources from Amazon Virtual Private Cloud (Amazon VPC) Flow Logs and Amazon Route53 DNS logs to the Amazon Security Lake S3 bucket.
  3. Process Amazon Security Lake log data using a SageMaker Processing job to engineer features. Use Amazon Athena to query structured OCSF log data from Amazon Simple Storage Service (Amazon S3) through AWS Glue tables managed by AWS LakeFormation.
  4. Train a SageMaker ML model using a SageMaker Training job that consumes the processed Amazon Security Lake logs.
  5. Deploy the trained ML model to a SageMaker inference endpoint.
  6. Store new security logs in an S3 bucket and queue events in Amazon Simple Queue Service (Amazon SQS).
  7. Subscribe an AWS Lambda function to the SQS queue.
  8. Invoke the SageMaker inference endpoint using a Lambda function to classify security logs as anomalies in real time.

Prerequisites

To deploy the solution, you must first complete the following prerequisites:

  1. Enable Amazon Security Lake within your organization or a single account with both VPC Flow Logs and Route 53 resolver logs enabled.
  2. Ensure that the AWS Identity and Access Management (IAM) role used by SageMaker processing jobs and notebooks has been granted an IAM policy including the Amazon Security Lake subscriber query access permission for the managed Amazon Security lake database and tables managed by AWS Lake Formation. This processing job should be run from within an analytics or security tooling account to remain compliant with AWS Security Reference Architecture (AWS SRA).
  3. Ensure that the IAM role used by the Lambda function has been granted an IAM policy including the Amazon Security Lake subscriber data access permission.

Deploy the solution

To set up the environment, complete the following steps:

  1. Launch a SageMaker Studio or SageMaker Jupyter notebook with a ml.m5.large instance. Note: Instance size is dependent on the datasets you use.
  2. Clone the GitHub repository.
  3. Open the notebook 01_ipinsights/01-01.amazon-securitylake-sagemaker-ipinsights.ipy.
  4. Implement the provided IAM policy and corresponding IAM trust policy for your SageMaker Studio Notebook instance to access all the necessary data in S3, Lake Formation, and Athena.

This blog walks through the relevant portion of code within the notebook after it’s deployed in your environment.

Install the dependencies and import the required library

Use the following code to install dependencies, import the required libraries, and create the SageMaker S3 bucket needed for data processing and model training. One of the required libraries, awswrangler, is an AWS SDK for pandas dataframe that is used to query the relevant tables within the AWS Glue Data Catalog and store the results locally in a dataframe.

import boto3
import botocore
import os
import sagemaker
import pandas as pd

%conda install openjdk -y
%pip install pyspark 
%pip install sagemaker_pyspark

from pyspark import SparkContext, SparkConf
from pyspark.sql import SparkSession

bucket = sagemaker.Session().default_bucket()
prefix = "sagemaker/ipinsights-vpcflowlogs"
execution_role = sagemaker.get_execution_role()
region = boto3.Session().region_name
seclakeregion = region.replace("-","_")
# check if the bucket exists
try:
    boto3.Session().client("s3").head_bucket(Bucket=bucket)
except botocore.exceptions.ParamValidationError as e:
    print("Missing S3 bucket or invalid S3 Bucket")
except botocore.exceptions.ClientError as e:
    if e.response["Error"]["Code"] == "403":
        print(f"You don't have permission to access the bucket, {bucket}.")
    elif e.response["Error"]["Code"] == "404":
        print(f"Your bucket, {bucket}, doesn't exist!")
    else:
        raise
else:
    print(f"Training input/output will be stored in: s3://{bucket}/{prefix}")

Query the Amazon Security Lake VPC flow log table

This portion of code uses the AWS SDK for pandas to query the AWS Glue table related to VPC Flow Logs. As mentioned in the prerequisites, Amazon Security Lake tables are managed by AWS Lake Formation, so all proper permissions must be granted to the role used by the SageMaker notebook. This query will pull multiple days of VPC flow log traffic. The dataset used during development of this blog was small. Depending on the scale of your use case, you should be aware of the limits of the AWS SDK for pandas. When considering terabyte scale, you should consider AWS SDK for pandas support for Modin.

ocsf_df = wr.athena.read_sql_query("SELECT src_endpoint.instance_uid as instance_id, src_endpoint.ip as sourceip FROM amazon_security_lake_table_"+seclakeregion+"_vpc_flow_1_0 WHERE src_endpoint.ip IS NOT NULL AND src_endpoint.instance_uid IS NOT NULL AND src_endpoint.instance_uid != '-' AND src_endpoint.ip != '-'", database="amazon_security_lake_glue_db_us_east_1", 
ctas_approach=False, 
unload_approach=True, 
s3_output=f"s3://{bucket}/unload/parquet/updated") 
ocsf_df.head()

When you view the data frame, you will see an output of a single column with common fields that can be found in the Network Activity (4001) class of the OCSF.

Normalize the Amazon Security Lake VPC flow log data into the required training format for IP Insights.

The IP Insights algorithm requires that the training data be in CSV format and contain two columns. The first column must be an opaque string that corresponds to an entity’s unique identifier. The second column must be the IPv4 address of the entity’s access event in decimal-dot notation. In the sample dataset for this blog, the unique identifier is the Instance IDs of EC2 instances associated to the instance_id value within the dataframe. The IPv4 address will be derived from the src_endpoint. Based on the way the Amazon Athena query was created, the imported data is already in the correct format for training an IP Insights model, so no additional feature engineering is required. If you modify the query in another way, you may need to incorporate additional feature engineering.

Query and normalize the Amazon Security Lake Route 53 resolver log table

Just as you did above, the next step of the notebook runs a similar query against the Amazon Security Lake Route 53 resolver table. Since you will be using all OCSF compliant data within this notebook, any feature engineering tasks remain the same for Route 53 resolver logs as they were for VPC Flow Logs. You then combine the two data frames into a single data frame that is used for training. Since the Amazon Athena query loads the data locally in the correct format, no further feature engineering is required.

ocsf_rt_53_df = wr.athena.read_sql_query("SELECT src_endpoint.instance_uid as instance_id, src_endpoint.ip as sourceip FROM amazon_security_lake_table_"+seclakeregion+"_route53_1_0 WHERE src_endpoint.ip IS NOT NULL AND src_endpoint.instance_uid IS NOT NULL AND src_endpoint.instance_uid != '-' AND src_endpoint.ip != '-'", database="amazon_security_lake_glue_db_us_east_1", 
ctas_approach=False, 
unload_approach=True, 
s3_output=f"s3://{bucket}/unload/rt53parquet")
ocsf_rt_53_df.head()
ocsf_complete = pd.concat([ocsf_df, ocsf_rt_53_df], ignore_index=True)

Get IP Insights training image and train the model with the OCSF data

In this next portion of the notebook, you train an ML model based on the IP Insights algorithm and use the consolidated dataframe of OCSF from different types of logs. A list of the IP Insights hyperparmeters can be found here. In the example below we selected hyperparameters that outputted the best performing model, for example, 5 for epoch and 128 for vector_dim. Since the training dataset for our sample was relatively small, we utilized a ml.m5.large instance. Hyperparameters and your training configurations such as instance count and instance type should be chosen based on your objective metrics and your training data size. One capability that you can utilize within Amazon SageMaker to find the best version of your model is Amazon SageMaker automatic model tuning that searches for the best model across a range of hyperparameter values.

training_path = f"s3://{bucket}/{prefix}/training/training_input.csv"
wr.s3.to_csv(ocsf_complete, training_path, header=False, index=False)
from sagemaker.amazon.amazon_estimator 
import image_uris

image = sagemaker.image_uris.get_training_image_uri(boto3.Session().region_name,"ipinsights")

ip_insights = sagemaker.estimator.Estimator(image,execution_role,
instance_count=1,
instance_type="ml.m5.large",
output_path=f"s3://{bucket}/{prefix}/output",
sagemaker_session=sagemaker.Session())
ip_insights.set_hyperparameters(num_entity_vectors="20000",
random_negative_sampling_rate="5",
vector_dim="128",
mini_batch_size="1000",
epochs="5",learning_rate="0.01")

input_data = { "train": sagemaker.session.s3_input(training_path, content_type="text/csv")}
ip_insights.fit(input_data)

Deploy the trained model and test with valid and anomalous traffic

After the model has been trained, you deploy the model to a SageMaker endpoint and send a series of unique identifier and IPv4 address combinations to test your model. This portion of code assumes you have test data saved in your S3 bucket. The test data is a .csv file, where the first column is instance ids and the second column is IPs. It is recommended to test valid and invalid data to see the results of the model. The following code deploys your endpoint.

predictor = ip_insights.deploy(initial_instance_count=1, instance_type="ml.m5.large")
print(f"Endpoint name: {predictor.endpoint}")

Now that your endpoint is deployed, you can now submit inference requests to identify if traffic is potentially anomalous. Below is a sample of what your formatted data should look like. In this case, the first column identifier is an instance id and the second column is an associated IP address as shown in the following:

i-0dee580a031e28c14,10.0.2.125
i-05891769c3b7b2879,10.0.3.238
i-0dee580a031e28c14,10.0.2.145
i-05891769c3b7b2879,10.0.10.11

After you have your data in CSV format, you can submit the data for inference using the code by reading your .csv file from an S3 bucket.:

inference_df = wr.s3.read_csv('s3://{bucket}/{prefix}/inference/testdata.csv')

import io
from io import StringIO

csv_file = io.StringIO()
inference_csv = inference_df.to_csv(csv_file, sep=",", header=True, index=False)
inference_payload = csv_file.getvalue()
print(inference_payload)
response = predictor.predict(
inference_payload,
initial_args={"ContentType":'text/csv'})
print(response)

b'{"predictions": [{"dot_product": 1.2591100931167603}, {"dot_product": 0.97600919008255}, {"dot_product": -3.638532876968384}, {"dot_product": -6.778188705444336}]}'

The output for an IP Insights model provides a measure of how statistically expected an IP address and online resource are. The range for this address and resource is unbounded however, so there are considerations on how you would determine if an instance ID and IP address combination should be considered anomalous.

In the preceding example, four different identifier and IP combinations were submitted to the model. The first two combinations were valid instance ID and IP address combinations that are expected based on the training set. The third combination has the correct unique identifier but a different IP address within the same subnet. The model should determine there is a modest anomaly as the embedding is slightly different from the training data. The fourth combination has a valid unique identifier but an IP address of a nonexistent subnet within any VPC in the environment.

Note: Normal and abnormal traffic data will change based on your specific use case, for example: if you want to monitor external and internal traffic you would need a unique identifier aligned to each IP address and a scheme to generate the external identifiers.

To determine what your threshold should be to determine whether traffic is anomalous can be done using known normal and abnormal traffic. The steps outlined in this sample notebook are as follows:

  1. Construct a test set to represent normal traffic.
  2. Add abnormal traffic into the dataset.
  3. Plot the distribution of dot_product scores for the model on normal traffic and the abnormal traffic.
  4. Select a threshold value which distinguishes the normal subset from the abnormal subset. This value is based on your false-positive tolerance

Set up continuous monitoring of new VPC flow log traffic.

To demonstrate how this new ML model could be use with Amazon Security Lake in a proactive manner, we will configure a Lambda function to be invoked on each PutObject event within the Amazon Security Lake managed bucket, specifically the VPC flow log data. Within Amazon Security Lake there is the concept of a subscriber, that consumes logs and events from Amazon Security Lake. The Lambda function that responds to new events must be granted a data access subscription. Data access subscribers are notified of new Amazon S3 objects for a source as the objects are written to the Security Lake bucket. Subscribers can directly access the S3 objects and receive notifications of new objects through a subscription endpoint or by polling an Amazon SQS queue.

  1. Open the Security Lake console.
  2. In the navigation pane, select Subscribers.
  3. On the Subscribers page, choose Create subscriber.
  4. For Subscriber details, enter inferencelambda for Subscriber name and an optional Description.
  5. The Region is automatically set as your currently selected AWS Region and can’t be modified.
  6. For Log and event sources, choose Specific log and event sources and choose VPC Flow Logs and Route 53 logs
  7. For Data access method, choose S3.
  8. For Subscriber credentials, provide your AWS account ID of the account where the Lambda function will reside and a user-specified external ID.
    Note: If doing this locally within an account, you don’t need to have an external ID.
  9. Choose Create.

Create the Lambda function

To create and deploy the Lambda function you can either complete the following steps or deploy the prebuilt SAM template 01_ipinsights/01.02-ipcheck.yaml in the GitHub repo. The SAM template requires you provide the SQS ARN and the SageMaker endpoint name.

  1. On the Lambda console, choose Create function.
  2. Choose Author from scratch.
  3. For Function Name, enter ipcheck.
  4. For Runtime, choose Python 3.10.
  5. For Architecture, select x86_64.
  6. For Execution role, select Create a new role with Lambda permissions.
  7. After you create the function, enter the contents of the ipcheck.py file from the GitHub repo.
  8. In the navigation pane, choose Environment Variables.
  9. Choose Edit.
  10. Choose Add environment variable.
  11. For the new environment variable, enter ENDPOINT_NAME and for value enter the endpoint ARN that was outputted during deployment of the SageMaker endpoint.
  12. Select Save.
  13. Choose Deploy.
  14. In the navigation pane, choose Configuration.
  15. Select Triggers.
  16. Select Add trigger.
  17. Under Select a source, choose SQS.
  18. Under SQS queue, enter the ARN of the main SQS queue created by Security Lake.
  19. Select the checkbox for Activate trigger.
  20. Select Add.

Validate Lambda findings

  1. Open the Amazon CloudWatch console.
  2. In the left side pane, select Log groups.
  3. In the search bar, enter ipcheck, and then select the log group with the name /aws/lambda/ipcheck.
  4. Select the most recent log stream under Log streams.
  5. Within the logs, you should see results that look like the following for each new Amazon Security Lake log:

{'predictions': [{'dot_product': 0.018832731992006302}, {'dot_product': 0.018832731992006302}]}

This Lambda function continually analyzes the network traffic being ingested by Amazon Security Lake. This allows you to build mechanisms to notify your security teams when a specified threshold is violated, which would indicate an anomalous traffic in your environment.

Cleanup

When you’re finished experimenting with this solution and to avoid charges to your account, clean up your resources by deleting the S3 bucket, SageMaker endpoint, shutting down the compute attached to the SageMaker Jupyter notebook, deleting the Lambda function, and disabling Amazon Security Lake in your account.

Conclusion

In this post you learned how to prepare network traffic data sourced from Amazon Security Lake for machine learning, and then trained and deployed an ML model using the IP Insights algorithm in Amazon SageMaker. All of the steps outlined in the Jupyter notebook can be replicated in an end-to-end ML pipeline. You also implemented an AWS Lambda function that consumed new Amazon Security Lake logs and submitted inferences based on the trained anomaly detection model. The ML model responses received by AWS Lambda could proactively notify security teams of anomalous traffic when certain thresholds are met. Continuous improvement of the model can be enabled by including your security team in the loop reviews to label whether traffic identified as anomalous was a false positive or not. This could then be added to your training set and also added to your normal traffic dataset when determining an empirical threshold. This model can identify potentially anomalous network traffic or behavior whereby it can be included as part of a larger security solution to initiate an MFA check if a user is signing in from an unusual server or at an unusual time, alert staff if there is a suspicious network scan coming from new IP addresses, or combine the IP insights score with other sources such as Amazon Guard Duty to rank threat findings. This model can include custom log sources such as Azure Flow Logs or on-premises logs by adding in custom sources to your Amazon Security Lake deployment.

In part 2 of this blog post series, you will learn how to build an anomaly detection model using the Random Cut Forest algorithm trained with additional Amazon Security Lake sources that integrate network and host security log data and apply the security anomaly classification as part of an automated, comprehensive security monitoring solution.


About the authors

Joe Morotti is a Solutions Architect at Amazon Web Services (AWS), helping Enterprise customers across the Midwest US. He has held a wide range of technical roles and enjoy showing customer’s art of the possible. In his free time, he enjoys spending quality time with his family exploring new places and overanalyzing his sports team’s performance

Bishr Tabbaa is a solutions architect at Amazon Web Services. Bishr specializes in helping customers with machine learning, security, and observability applications. Outside of work, he enjoys playing tennis, cooking, and spending time with family.

Sriharsh Adari is a Senior Solutions Architect at Amazon Web Services (AWS), where he helps customers work backwards from business outcomes to develop innovative solutions on AWS. Over the years, he has helped multiple customers on data platform transformations across industry verticals. His core area of expertise include Technology Strategy, Data Analytics, and Data Science. In his spare time, he enjoys playing Tennis, binge-watching TV shows, and playing Tabla.

Read More