MASSIVE dataset and Massively Multilingual NLU (MMNLU-22) competition and workshop will help researchers scale natural-language-understanding technology to every language on Earth.Read More
Search for knowledge in Quip documents with intelligent search using the Quip connector for Amazon Kendra
Organizations use collaborative document authoring solutions like Salesforce Quip to embed real-time, collaborative documents inside Salesforce records. Quip is Salesforce’s productivity platform that transforms the way enterprises work together, delivering modern collaboration securely and simply across any device. A Quip repository captures invaluable organizational knowledge in the form of collaborative documents and workflows. However, finding this organizational knowledge easily and securely along with other document repositories, such as Box or Amazon Simple Storage Service (Amazon S3), can be challenging. Additionally, the conversational nature of collaborative workflows renders the traditional keyword-based approach to search ineffective due to having fragmented, dispersed information in multiple places.
We’re excited to announce that you can now use the Amazon Kendra connector for Quip to search messages and documents in your Quip repository. In this post, we show you how to find the information you need in your Quip repository using the intelligent search function of Amazon Kendra, powered by machine learning.
Solution overview
With Amazon Kendra, you can configure multiple data sources to provide a central place to search across your document repository. For our solution, we demonstrate how to configure a Quip repository as a data source of a search index using the Amazon Kendra connector for Quip.
The following screenshot shows an example Quip repository.

The workspace in this example has a private folder that is not shared. That folder has a subfolder that is used to keep expense receipts. Another folder called example.com is shared with others and used to collaborate with the team. This folder has five subfolders that hold documentation for development.
To configure the Quip connector, we first note the domain name, folder IDs, and access token of the Quip repository. Then we simply create the Amazon Kendra index and add Quip as a data source.
Prerequisites
To get started using the Quip connector for Amazon Kendra, you must have a Quip repository.
Gather information from Quip
Before we set up the Quip data source, we need a few details about your repository. Let’s gather those in advance.
Domain name
Find out the domain name. For example , for the Quip URL https://example-com.quip.com/browse, the domain name is quip. Depending on how single sign-on (SSO) is set up in your organization, the domain name may vary. Save this domain name to use later.
Folder IDs
Folders in Quip have a unique ID associated with them. We need to configure the Quip connector to access the right folders by supplying the correct folder IDs. For this post, we index the folder example.com.

To find the ID of the folder, choose the folder. The URL changes to show the folder ID.

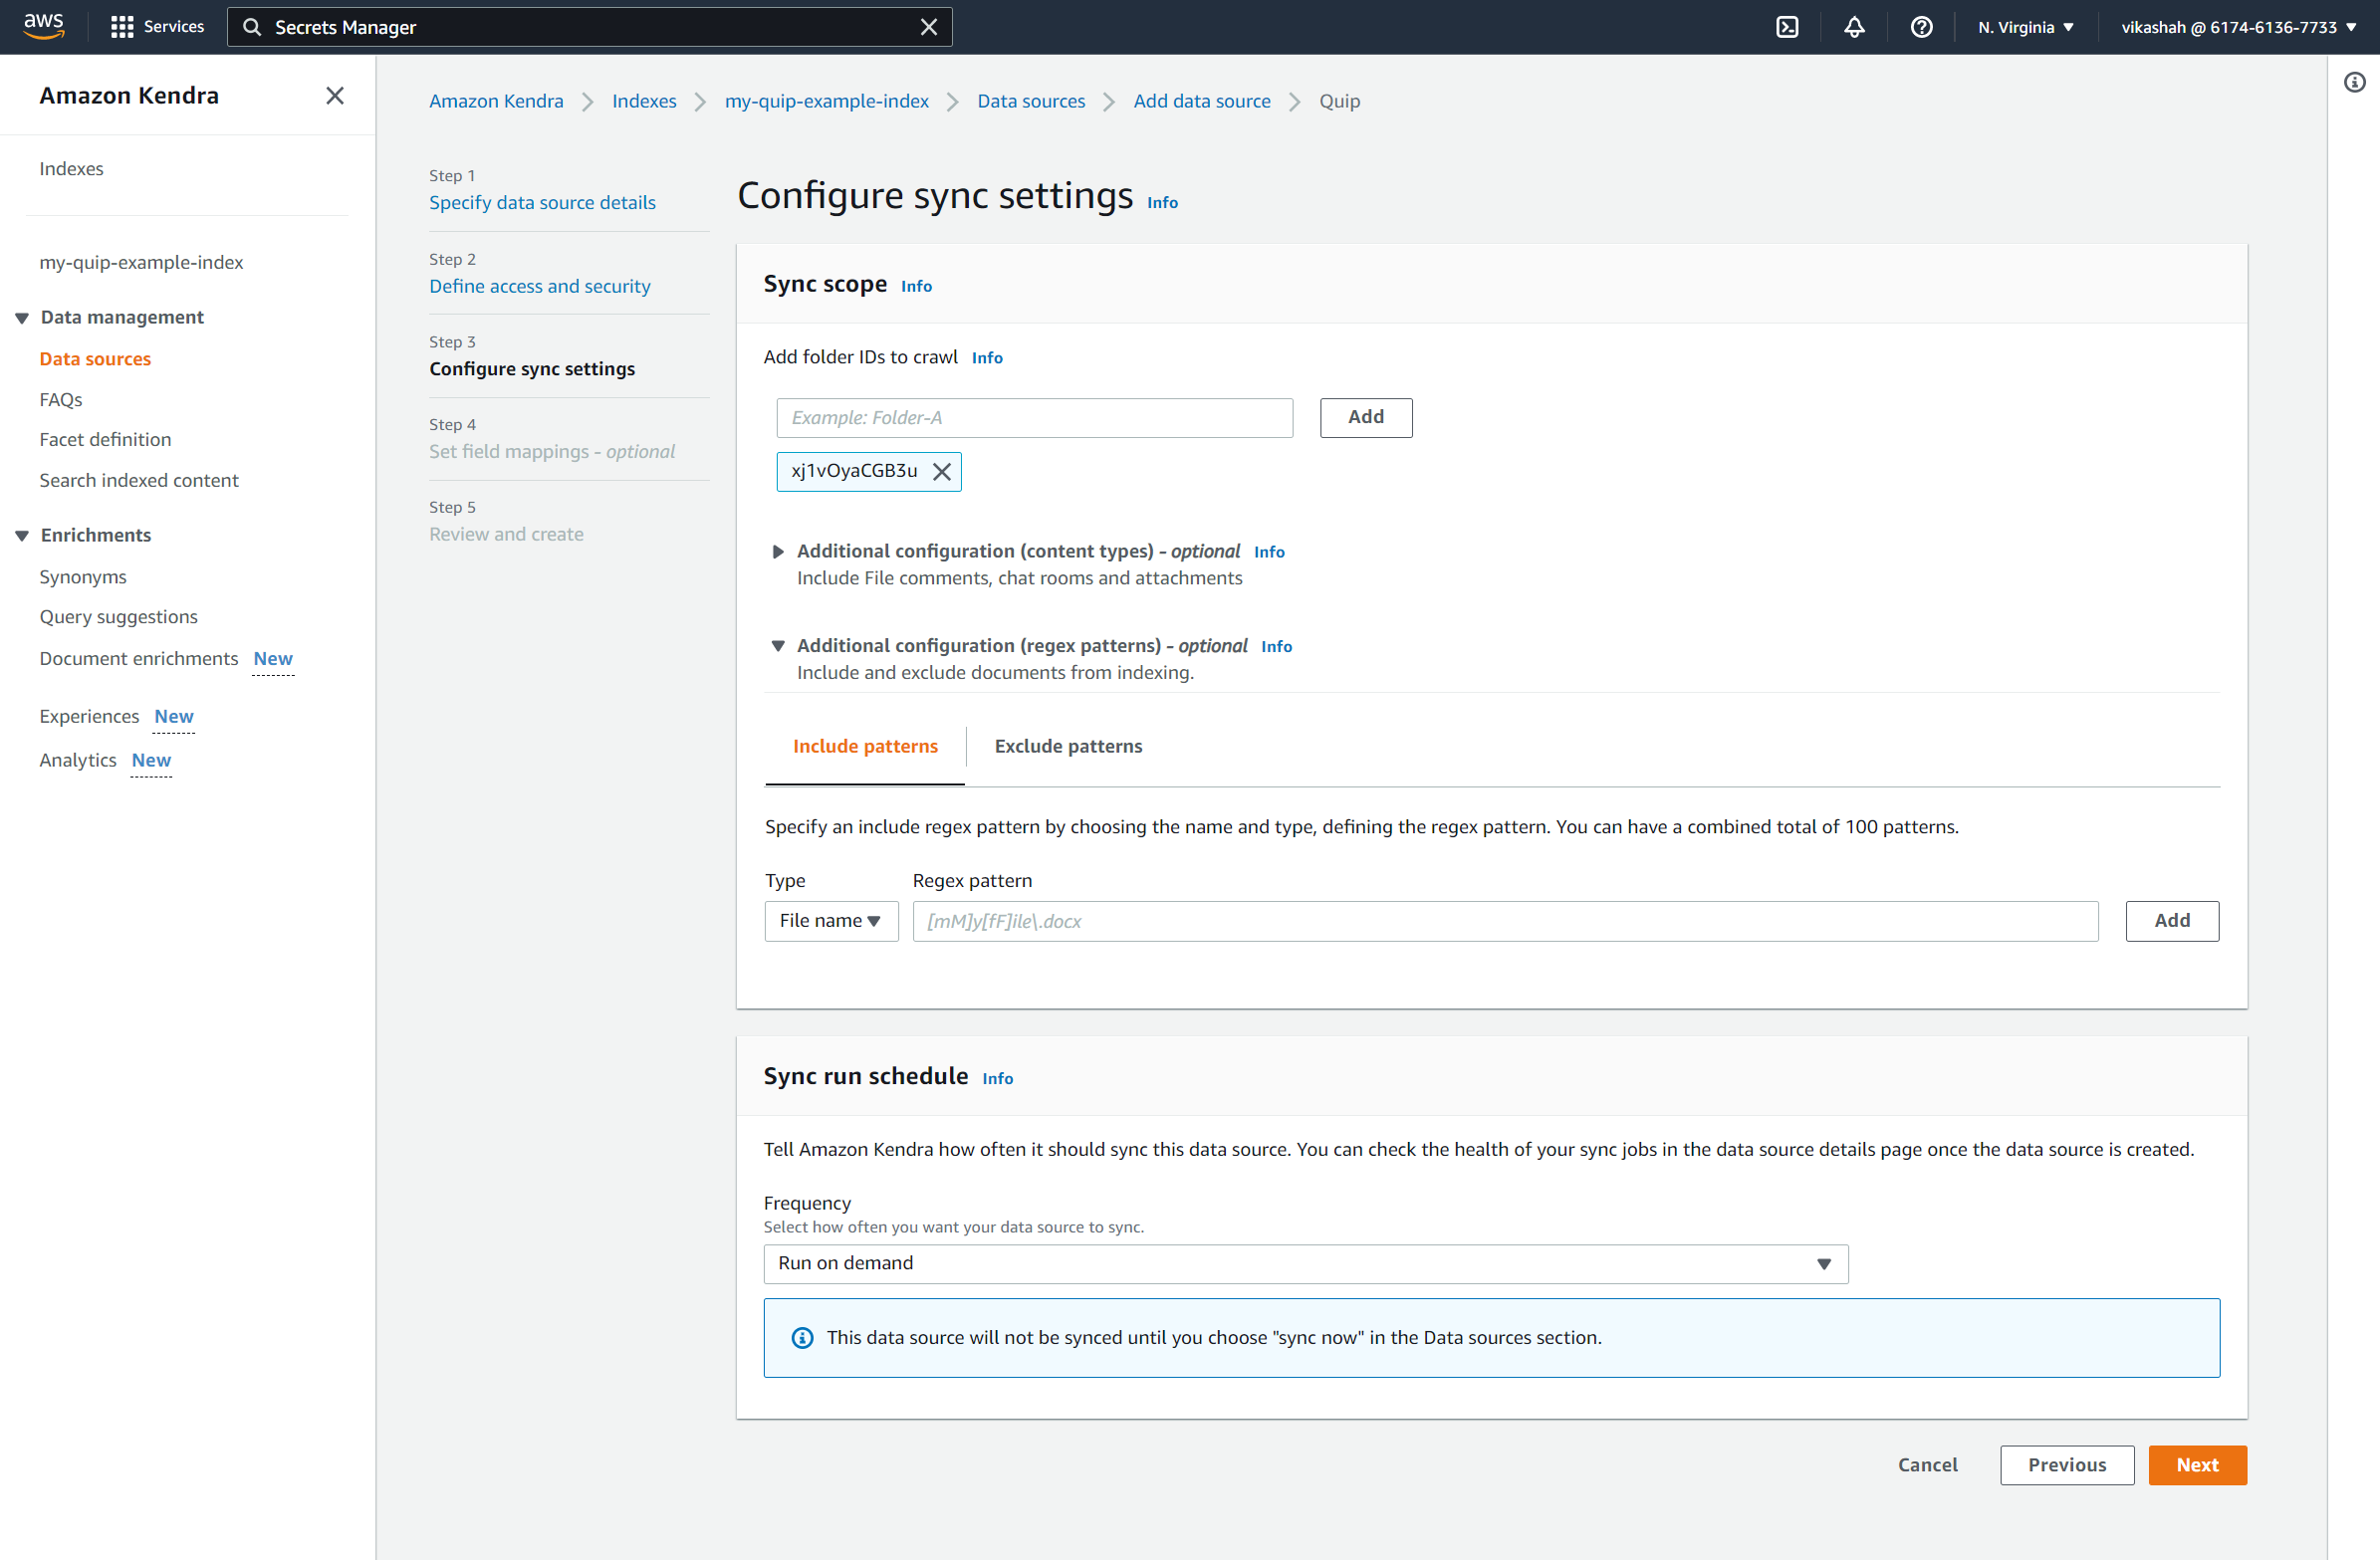
The folder ID in this case is xj1vOyaCGB3u. Make a list of the folder IDs to scan; we use these IDs when configuring the connector.
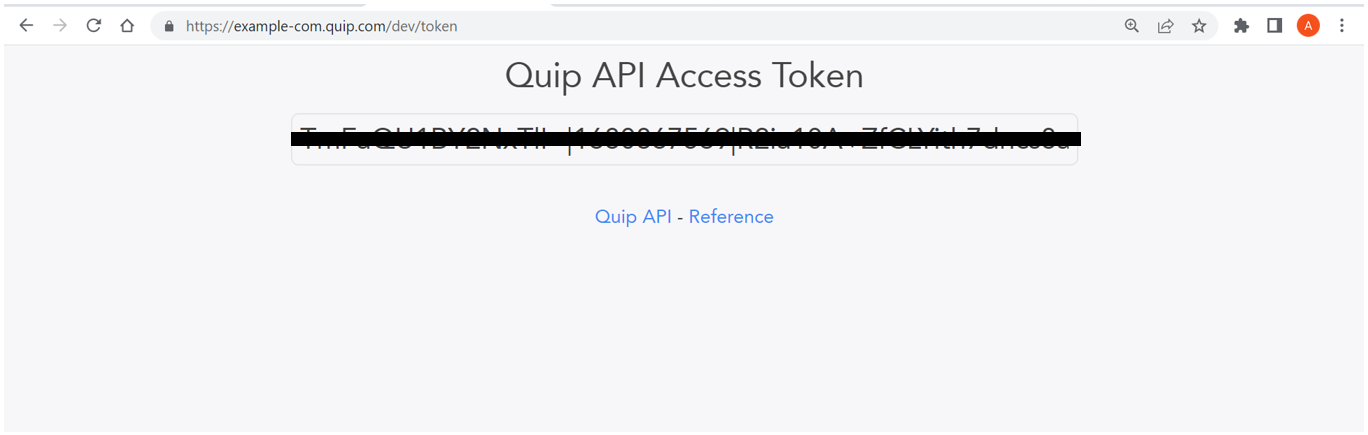
Access token
Log in to Quip and open https://{subdomain.domain}/dev/token in a web browser. In the following example, we navigate to https://example-com.quip.com/dev/token. Then choose Get Personal Access Token.

Copy the token to use in a later step.
We now have the information we need to configure the data source.
Create an Amazon Kendra index
To set up your Amazon Kendra index, complete the following steps:
- Sign in to the AWS Management Console and open the Amazon Kendra console.
If you’re using Amazon Kendra for the first time, you should see the following screenshot.
- Choose Create an index.
- For Index name, enter
my-quip-example-index. - For Description, enter an optional description.
- For IAM role, use an existing role or create a new one.
- Choose Next.

- Under Access control settings, select No to make all indexed content available to all users.
- For User-group expansion, select None.
- Choose Next.

For Provisioning editions, you can choose from two options depending on the volume of the content and frequency of access.
- For this post, select Developer edition.
- Choose Create.

Role creation takes approximately 30 seconds; index creation can take up to 30 minutes. When complete, you can view your index on the Amazon Kendra console.

Add Quip as a data source
Now let’s add Quip as a data source to the index.
- On the Amazon Kendra console, under Data management in the navigation pane, choose Data sources.
- Choose Add connector under Quip.

- For Data source name, enter
my-quip-data-source. - For Description, enter an optional description.
- Choose Next.

- Enter the Quip domain name that you saved earlier.
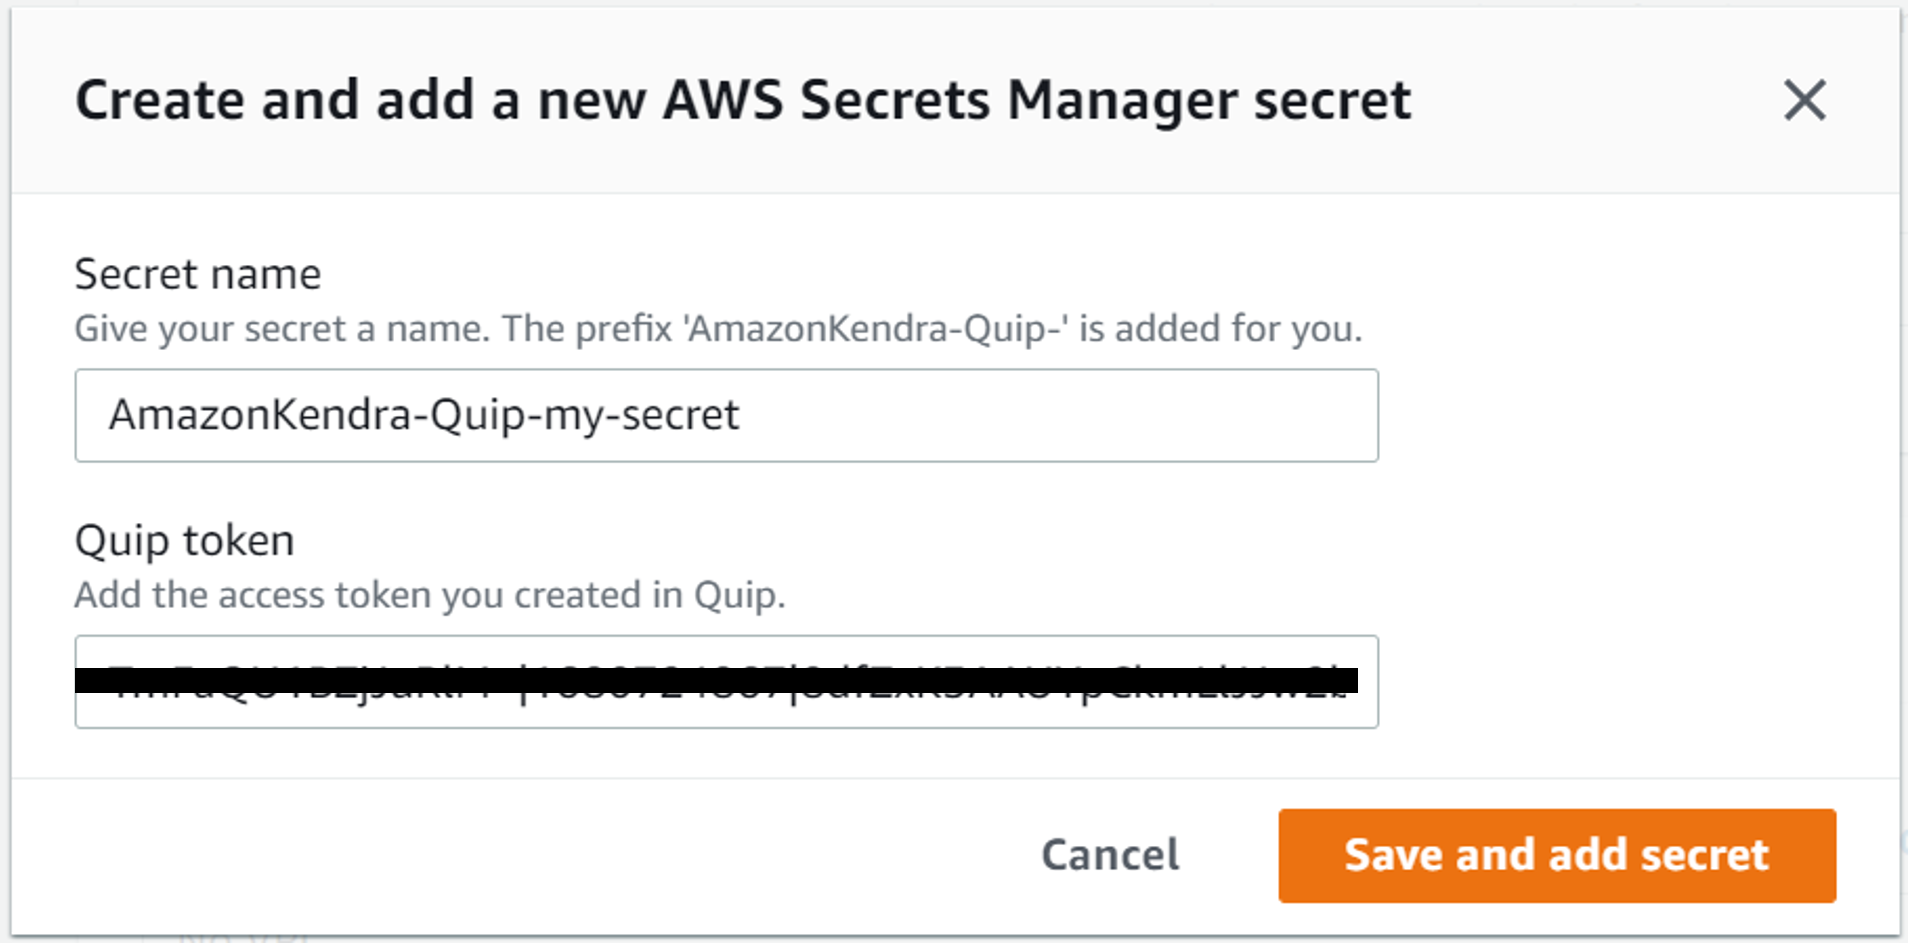
- Under Secrets, choose Create and add a new Secrets Manager secret.
- For Secret name, enter the name of your secret.
- For Quip token, enter the access token you saved earlier.
- Choose Save and add secret.
- Under IAM role, choose a role or create a new one.
- Choose Next.

- Under Sync scope, for Add folder IDs to crawl, enter the folder IDs you saved earlier.
- Under Sync run schedule¸ for Frequency, select Run on demand.
- Choose Next.
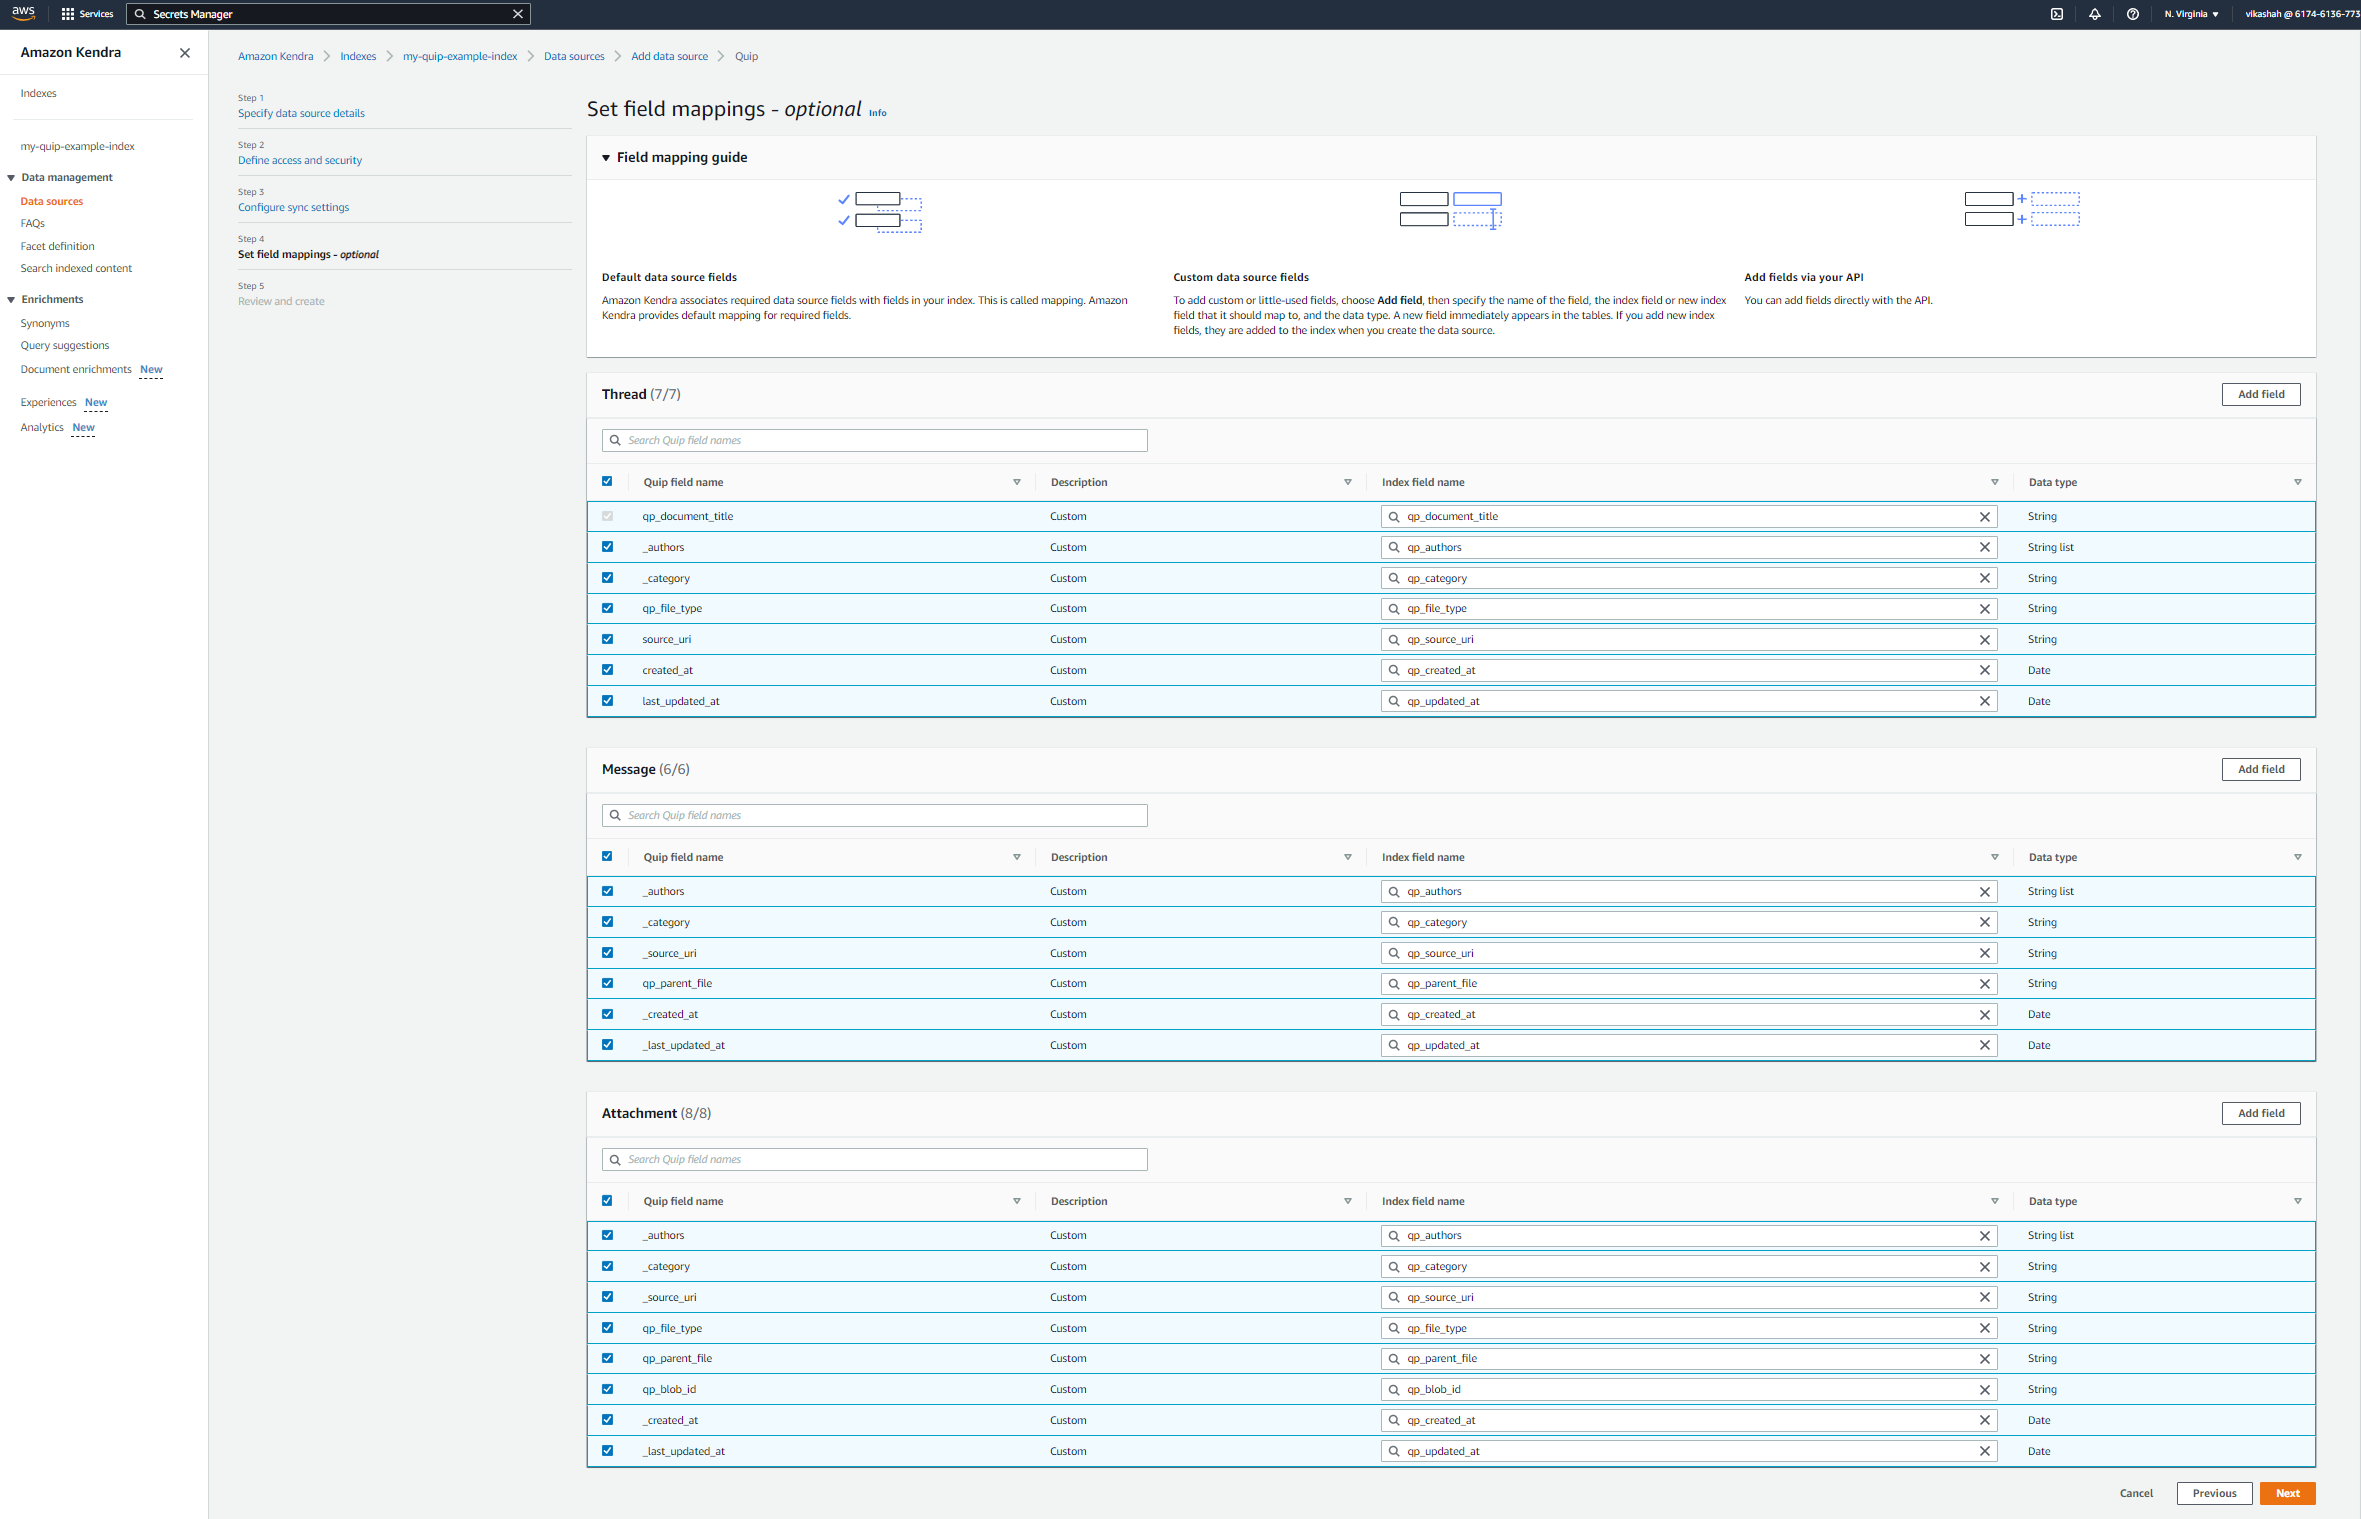
The Quip connector lets you capture additional fields like authors, categories, and folder names (and even rename as needed).
- For this post, we don’t configure any field mappings.
- Choose Next.
- Confirm all the options and add the data source.
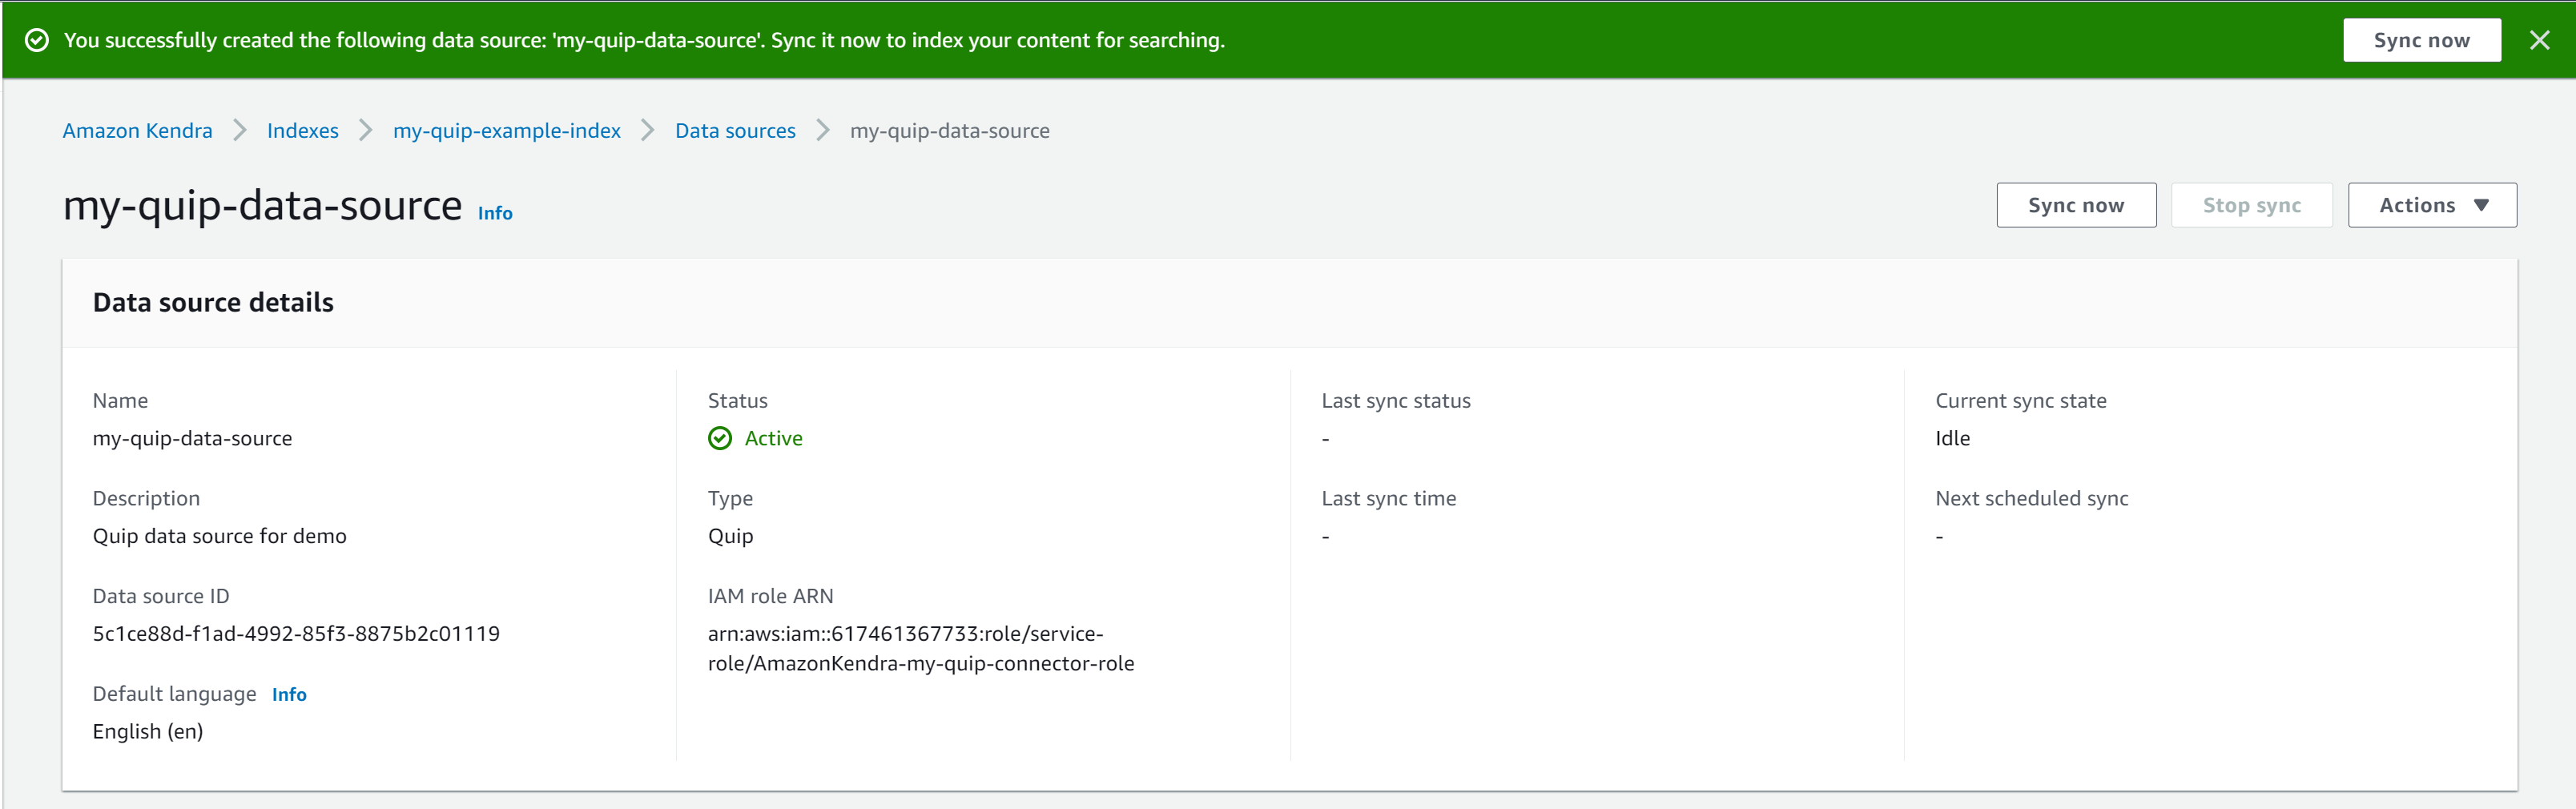
Your data source is ready in a few minutes.
- When your data source is ready, choose Sync now.
Depending on the size of the data in the Quip repository, this process can take a few minutes to a few hours. Syncing is a two-step process. First, the documents are crawled to determine the ones to index. Then the selected documents are indexed. Some factors that affect sync speed include repository throughput and throttling, network bandwidth, and the size of documents.
The sync status shows as successful when the sync is complete. Your Quip repository is now connected.

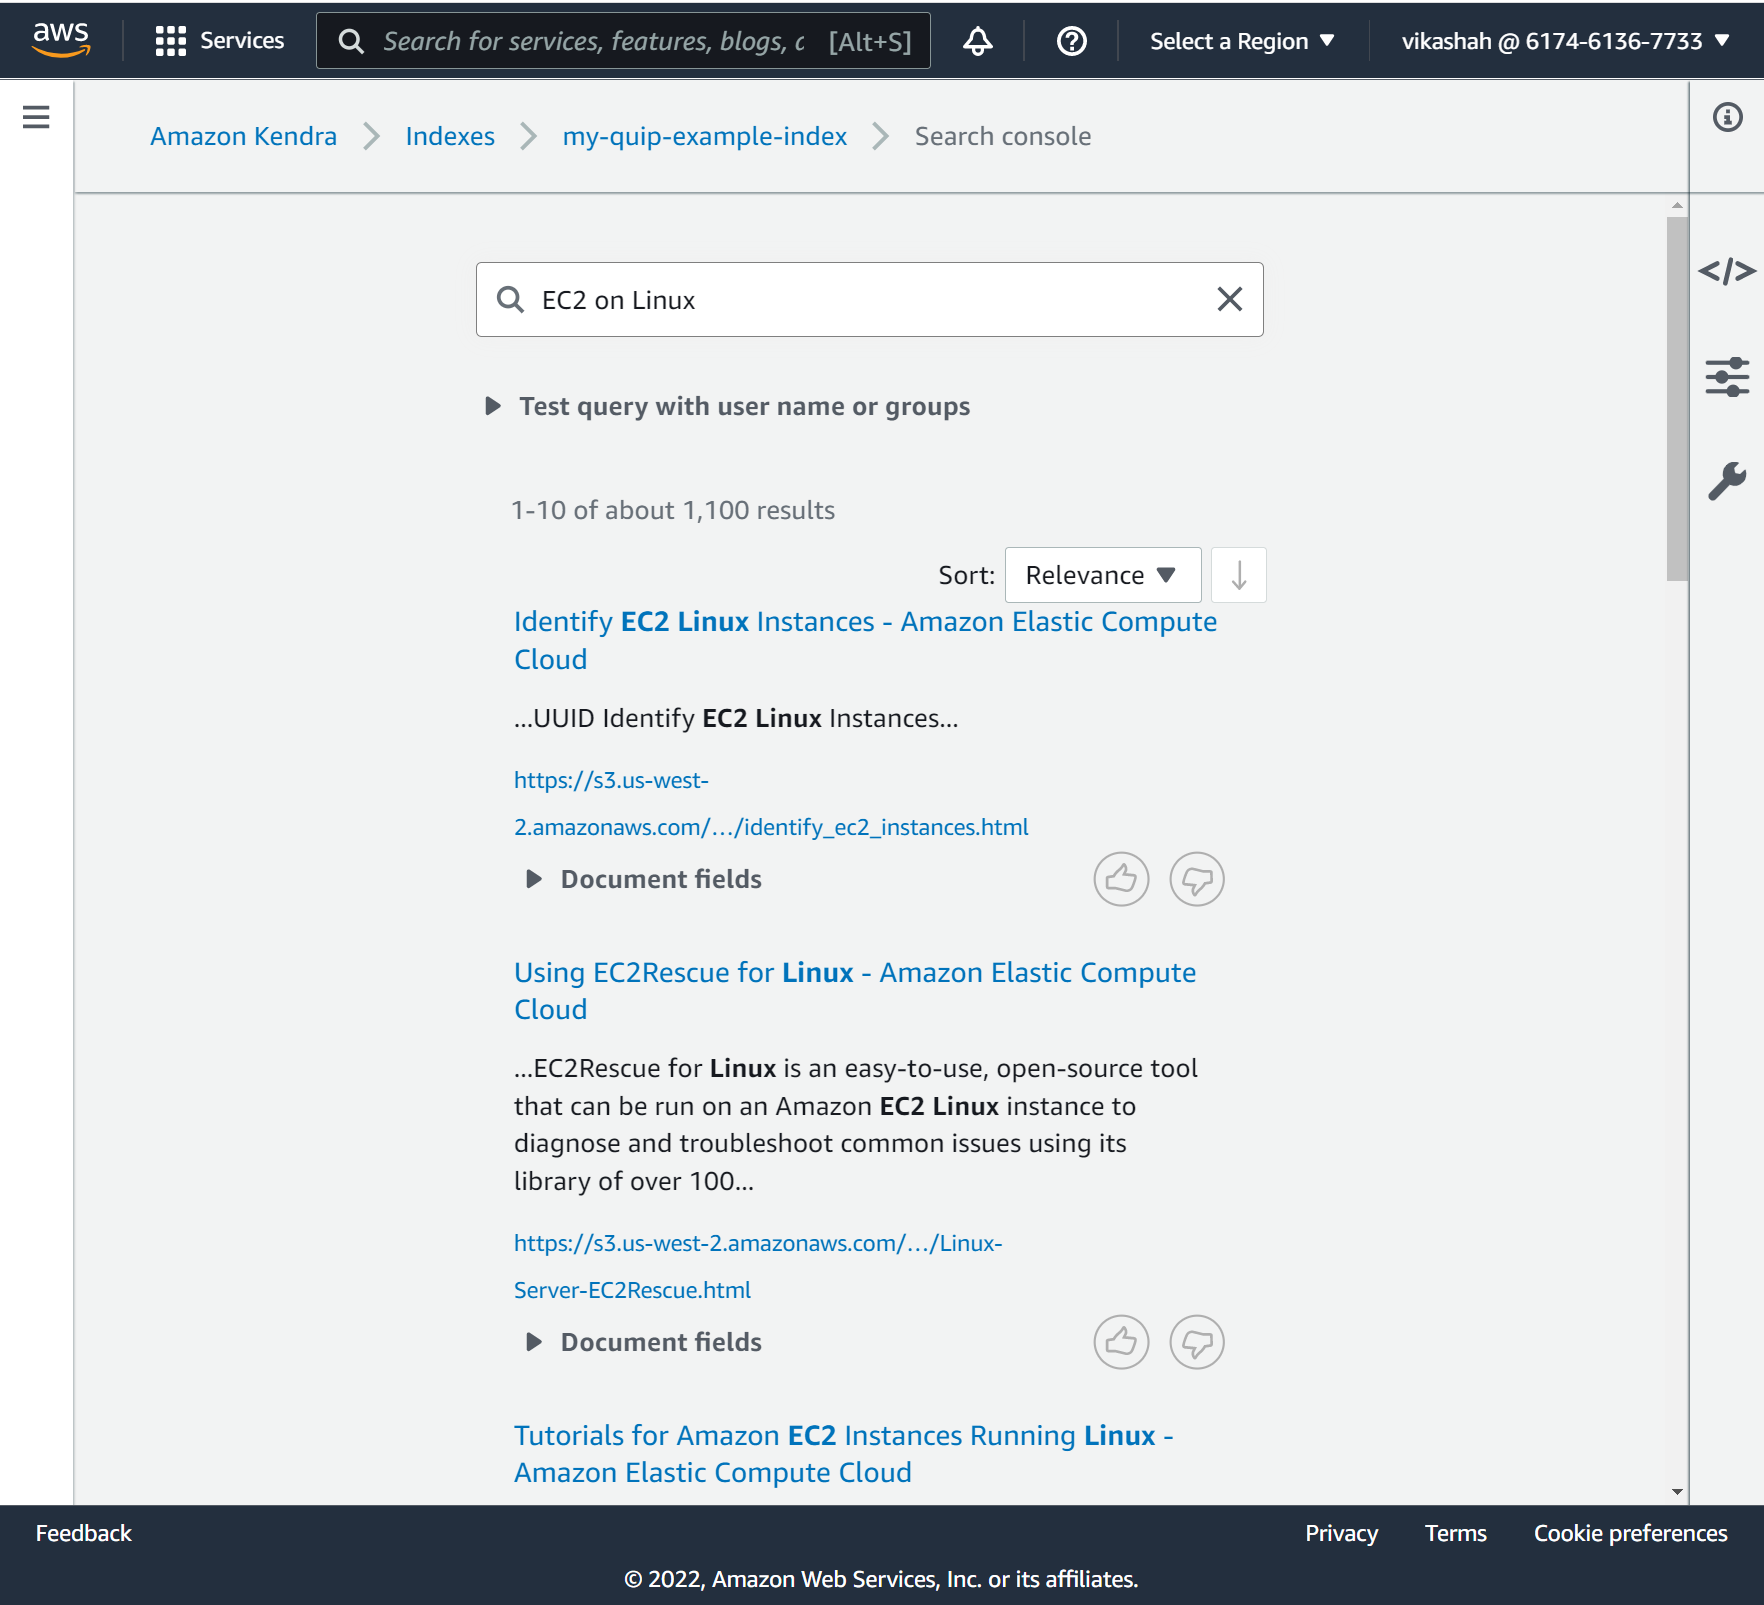
Run a search in Amazon Kendra
Let’s test the connector by running a few searches.
- On the Amazon Kendra console, under Data management in the navigation pane, choose Search indexed content.

- Enter your search in the search field. For this post, we search for
EC2 on Linux.

The following screenshot shows our results.
Limitations
There are some known limitations for the data source ingestion. Some limitations are due to the need for admin access for accessing some of the content, others due to specific implementation details. They are as follows:
- Only full crawls are supported. If you want the connector to support changelog crawls, admin API access is required, and you have to enable the admin API on the Quip website.
- Only shared folders are crawled. Even if we use the personal access token of an admin user, we can’t crawl data in the private folders of other users.
- The solution doesn’t support specifying file types for inclusion and exclusion, because Quip doesn’t store the file type extension, just the file name.
- Real-time events require a subscription and admin API access.
Conclusion
The Amazon Kendra connector for Quip enables organizations to make the invaluable information stored in Quip documents available to their users securely using intelligent search powered by Amazon Kendra. The connector also provides facets for Quip repository attributes such as authors, file type, source URI, creation dates, parent files, and category so users can interactively refine the search results based on what they’re looking for.
For more information on how you can create, modify, and delete data and metadata using custom document enrichment as content is ingested from the Quip repository, refer to Customizing document metadata during the ingestion process and Enrich your content and metadata to enhance your search experience with custom document enrichment in Amazon Kendra.
About the Authors
 Ashish Lagwankar is a Senior Enterprise Solutions Architect at AWS. His core interests include AI/ML, serverless, and container technologies. Ashish is based in the Boston, MA, area and enjoys reading, outdoors, and spending time with his family.
 Vikas Shah is an Enterprise Solutions Architect at Amazon web services. He is a technology enthusiast who enjoys helping customers find innovative solutions to complex business challenges. His areas of interest are ML, IoT, robotics and storage. In his spare time, Vikas enjoys building robots, hiking, and traveling.
Integrate ServiceNow with Amazon Lex chatbot for ticket processing
Conversational interfaces (or chatbots) can provide an intuitive interface for processes such as creating and monitoring tickets. Let’s consider a situation in which a recent hire on your team is required to cut tickets for office equipment. To do so, they have to interact with a ticketing software that the organization uses. This often requires accessing the ticketing system, knowing which ticket to open, and then tracking the ticket manually through the process until completion. In this post, we show you how to integrate an Amazon Lex chatbot with ServiceNow . The bot will make it easier for creation and tracking of tickets for day-to-day activities such as issuing new office equipment for new hires. You can also integrate the experience into a customer support call to seamlessly create tickets for the callers.
Solution overview
The following diagram illustrates the solution workflow.

The solution includes the following steps:
- A user sends a message to create a ticket or get pending tickets in the queue through a Slack app.
- Slack forwards the message to be processed by Amazon Lex.
- Amazon Lex invokes fulfillment Lambda function:
- Amazon Lex sends the event to the fulfillment AWS Lambda function.
- AWS Lambda function processes the message and makes HTTP requests to the backend ServiceNow instance.
- Response is sent to the user:
- The ServiceNow instance returns a response to the fulfillment Lambda function.
- Fulfillment Lambda function returns the response to Amazon Lex bot based on Sentiment.
- Amazon Lex returns the response to the user through Slack bot.
- The user is able to see the response on the Slack bot and reply with another query.
To implement this architecture, you create the following:
- A ServiceNow instance
- The fulfillment Lambda function
- An Amazon Lex bot
- A Slack app
Prerequisites
Before getting started, make sure you have the following prerequisites:
- A Slack account
- A ServiceNow developer account
- An active AWS account with the permission to create and modify AWS Identity and Access Management (IAM) resources
Create the ServiceNow developer instance
To create your ServiceNow instance, complete the following steps:

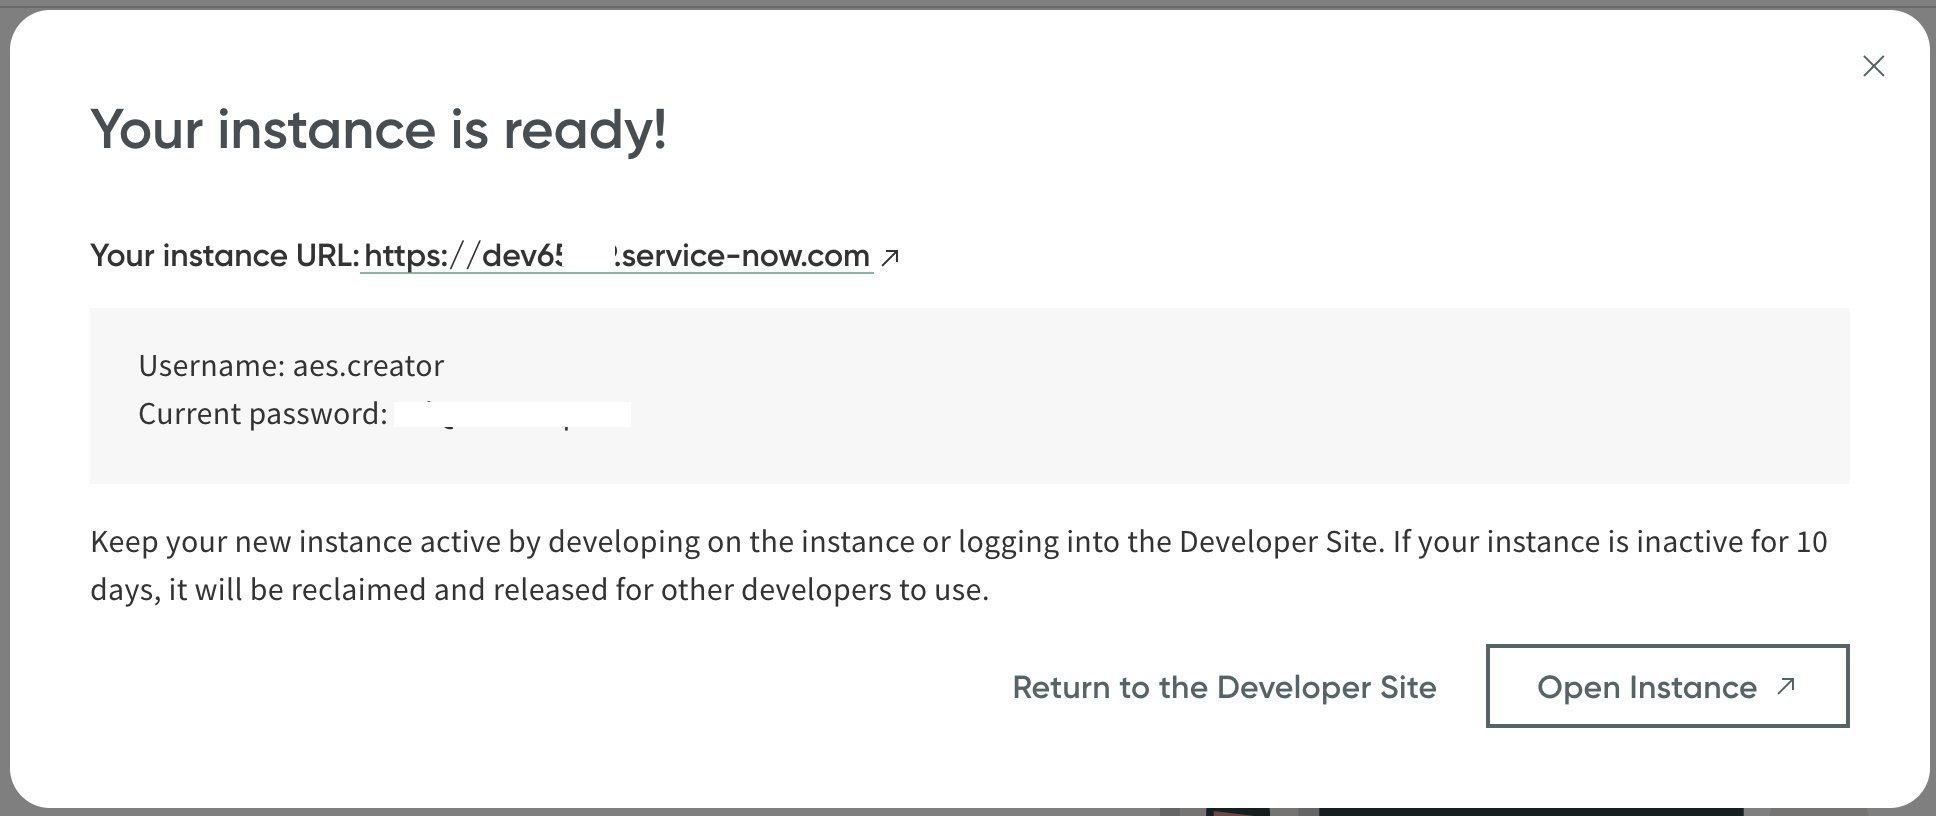
You receive an email with a personal sandbox environment in the format devNNNNN.service-now.com.
This step sends a verification email to the email that you used during the signup process.
- After you’re verified, you can sign in to your account.

- Enter your email and choose Next.

You’re asked if you need a developer oriented IDE or a guided experience.
- For this post, choose I need a guided experience.

- Select the check box to agree to the terms of service and choose Finish Setup.

You’re redirected to a page where you should be able to see that the instance is being set up.
When the instance is ready, you should be able to see the instance details.
- Note the instance URL, user name, and password, which you use in the following steps.
You need to log in as the system administrator user so you can view the ServiceNow incidents.
- Navigate to the following URL (replace
https://devNNNNN.service-now.comwith your own instance URL that you noted earlier):https://devNNNNN.service-now.com/nav_to.do?uri=change_request_list.do. - Log in using the user name
adminand the password you noted earlier.
You’re redirected to the ServiceNow console.
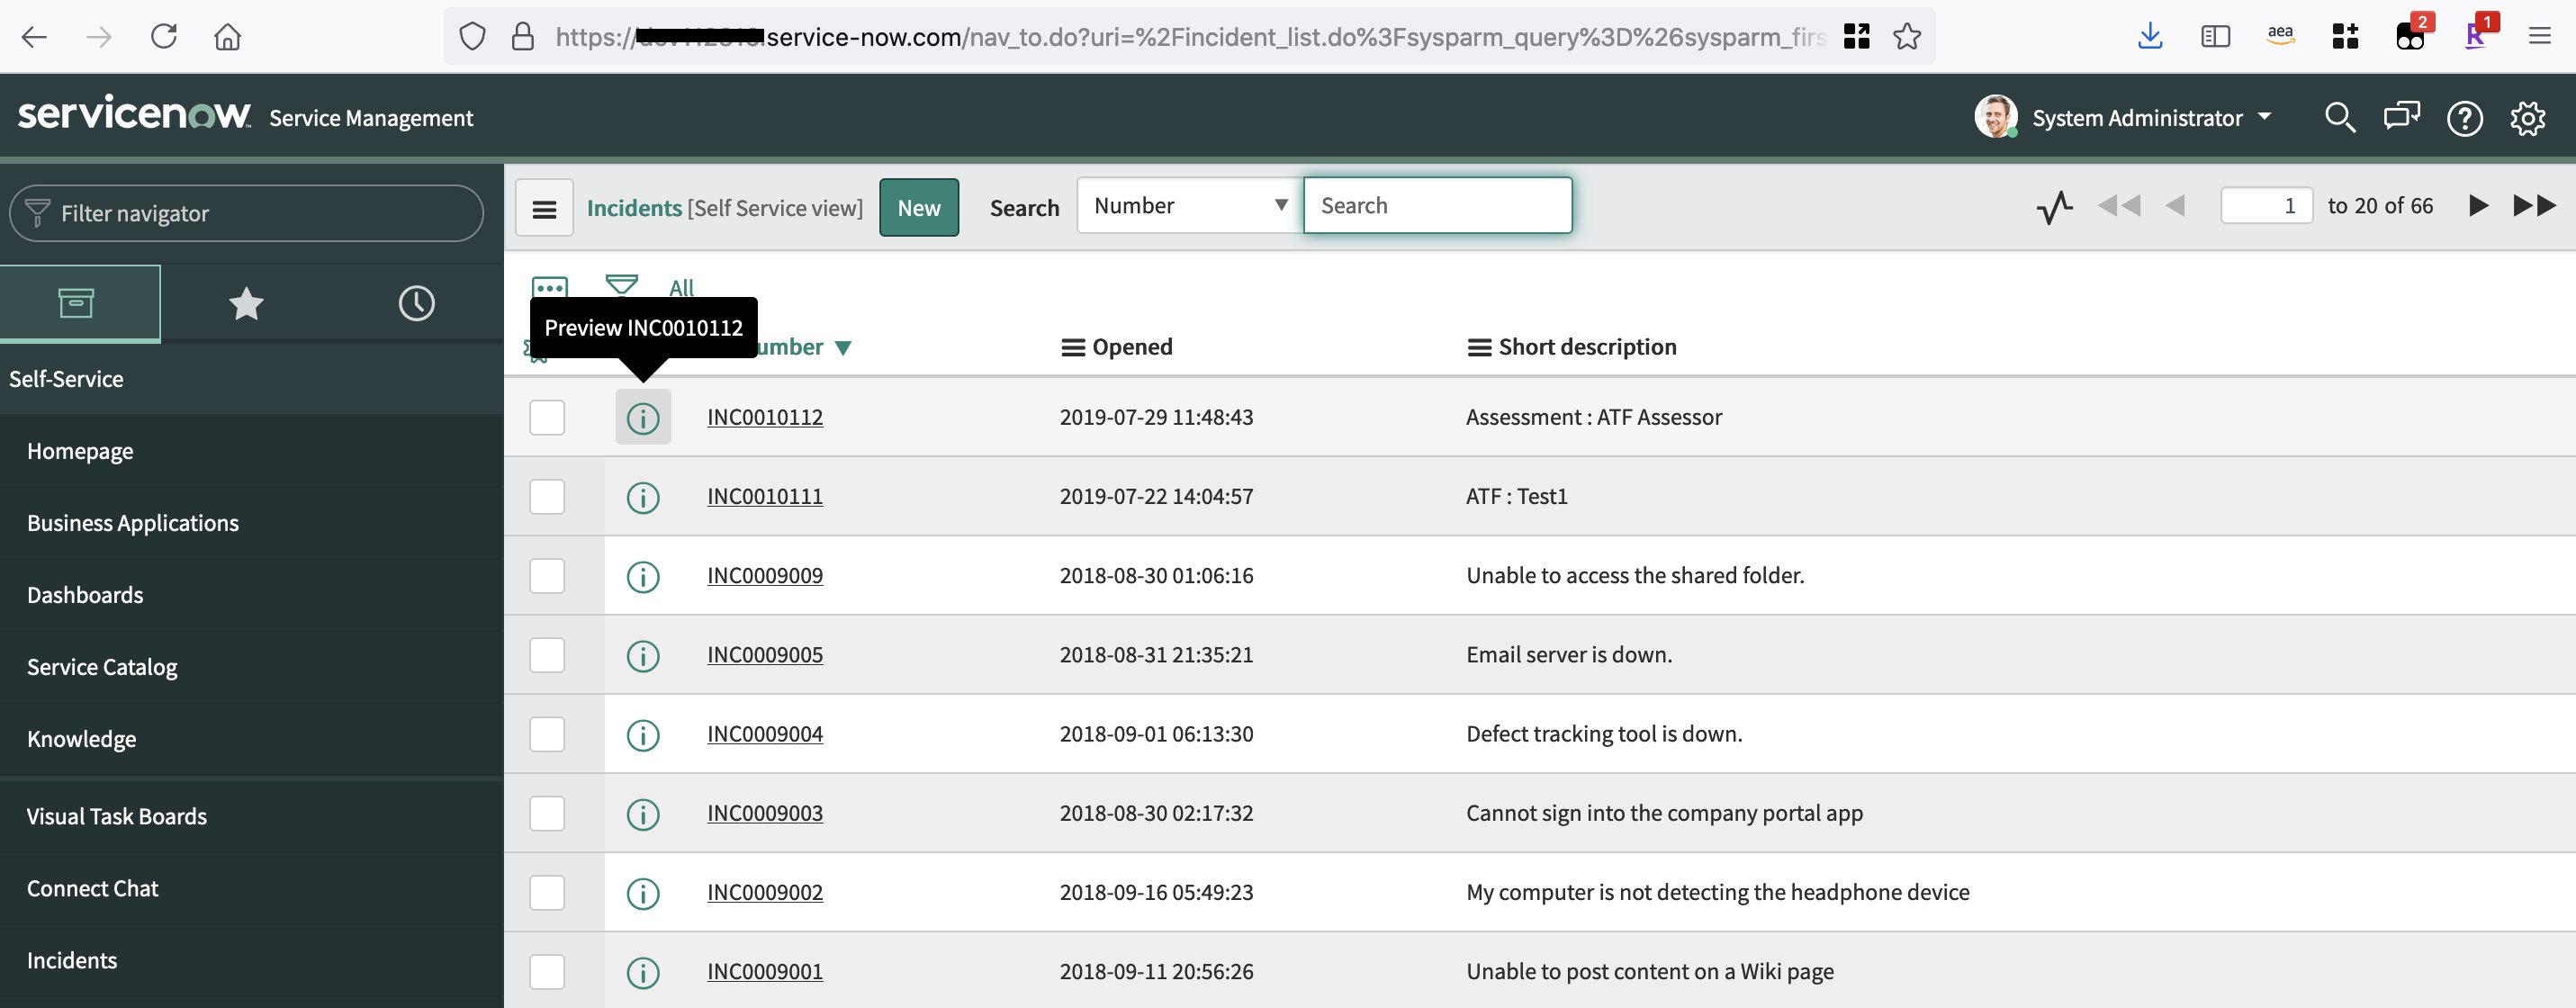
- Choose Incidents in the navigation pane.
The default search criteria should show you a sample incident.
- If you remove all the search criteria and choose Run, you should be able to see all the ServiceNow incidents available.
The following screenshot shows the search with no filters and the sample ServiceNow incidents.
Create the Lambda function
Now that you have set up a ServiceNow instance and logged in to check out the incidents, you’re ready to set up the solution. The first step is to create the Lambda function and configure environment variables for this function for storing the ServiceNow instance URL and credentials in a secure manner, and for the function to use the ServiceNow instance account.
Create the fulfillment Lambda function
In this step, you create a Lambda function that helps the Amazon Lex bot communicate with ServiceNow to create or describe the incidents, and have some logic to frame a response to Amazon Lex based on the sentiment analysis that Amazon Lex forwards to Lambda. To create your function, complete the following steps:
- On the Lambda console, choose Functions in the navigation pane.
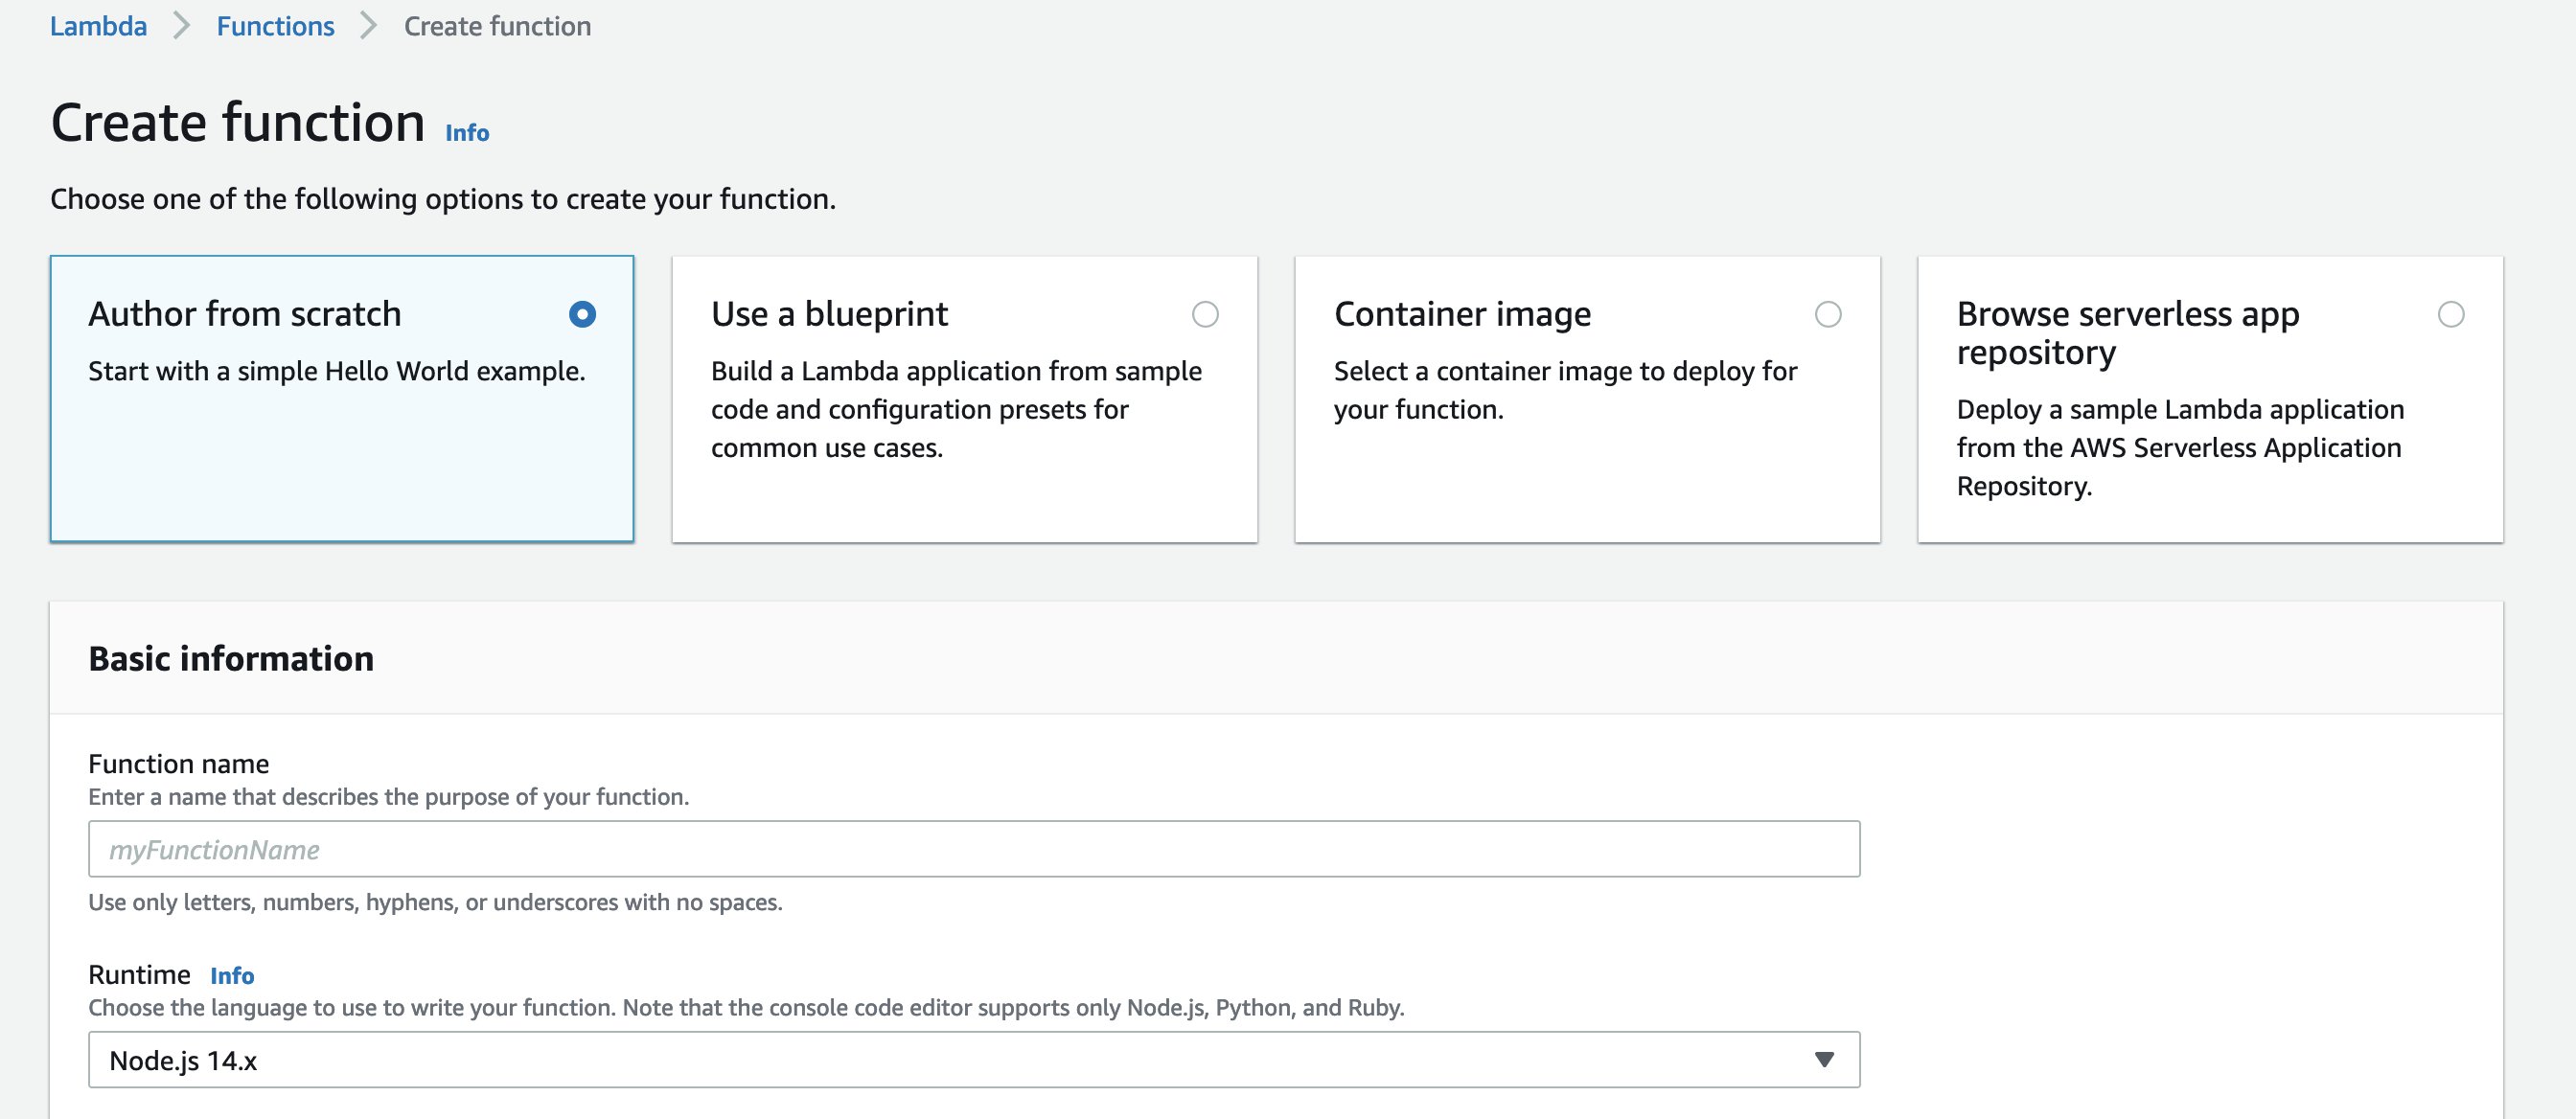
- Choose Create function.
- Select Author from scratch.
- For Function name, enter a name (for this post,
ChatBotLambda). - For Runtime, choose Node.js 14x.
We use the latest Node.js runtime (as of this writing), but you can use your preferred runtime.
- For the function permissions, select Create a new role with basic Lambda permissions.
- Use the policy
AWSLambdaBasicExecutionRole.
This execution role should be sufficient for this post. For more information, see AWS Lambda execution role.
- Choose Create function.
- After you create the function, you can use the inline editor to edit the code for index.js.
The following is sample code for the function that you’re using as the compute layer for our logic:
Before moving on to the next step, don’t forget to choose Deploy to deploy this code to the $LATEST version of the Lambda function.
Configure the fulfillment Lambda function
Next, you create the following environment variables with appropriate values. You use these variables to securely store the ServiceNow instance URL and credentials that the function uses to connect to the ServiceNow instance. Every time the user sends a message through the Amazon Lex bot to create or get incident tickets, this Lambda function is invoked to make a request to the ServiceNow instance to create or get the incidents. Therefore, it needs the instance URL and credentials in order to connect to the instance.
- SERVICENOW_HOST – The domain name for the ServiceNow instance that you created earlier
-
SERVICENOW_USERNAME – The user name for the system administrator role (
admin) - SERVICENOW_PASSWORD – The password that you received earlier
These variables are available on the Configuration tab, as shown in the following screenshot.

Create the Amazon Lex chatbot
Now that you have created the Lambda function, you create the conversational interface (the chatbot) using Amazon Lex. For this post, you build the chatbot IncidentBot to communicate with ServiceNow and read or create incident tickets to process the events. This type of bot can be created for organizations or businesses that have multiple interfaces to internal systems, ranging from HR to travel to support, which employees must memorize for bookmarks. The chatbot also performs sentiment analysis on the users’ messages sent via the bot and returns a response based on the sentiment detected.
You create two intents:
- GetTicket – Gets the existing tickets from ServiceNow
- LogTicket – Submits a new ticket, which creates a ServiceNow incident in our instance
This post uses the following conversation to model a bot:
- User: Create an incident ticket to order a new laptop.
- IncidentBot: Done! I’ve opened an incident ticket for you in ServiceNow. Your ticket number is: INC0010006.
- User: List top 2 incident.
- IncidentBot: Here are the 2 most recent incidents: Record 1 order a new laptop. Record 2 request access to ServiceNow. End of tickets.
The Lambda function that you set up earlier only works with Lex V2. If you’re using the V1 console, choose Try the new Lex V2 Console as shown in the following screenshot, or choose Switch to the new Lex V2 Console in the navigation pane.

Complete the following steps to create your chatbot:
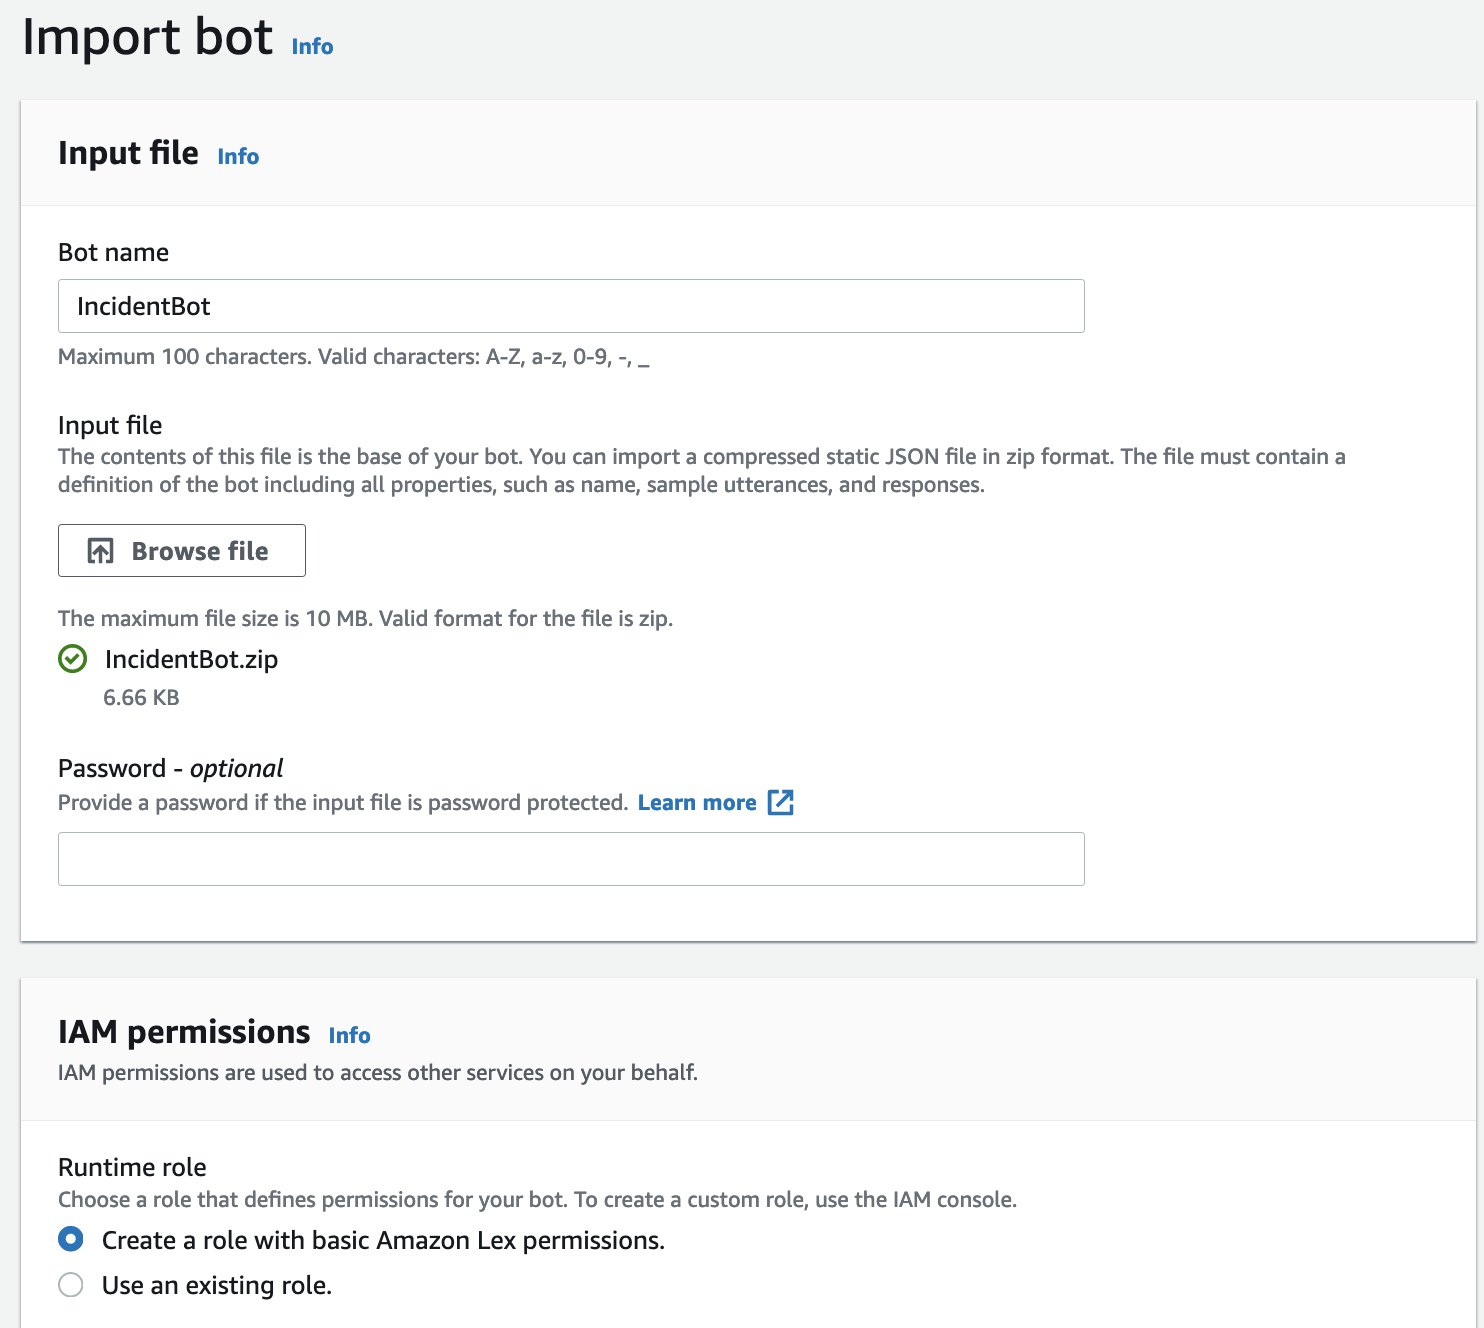
- Download the file IncidentBot.zip.
- On the Amazon Lex console, choose Bots in the navigation pane.
- On the Action menu, choose Import.

- For Bot name, enter
IncidentBot. - For Input file¸ choose Browse file and choose the .zip file you downloaded.
- Select Create a role with basic Amazon Lex permissions.
This creates a new IAM role that the chatbot uses to make requests to other AWS services.
- In the section Children’s Online Privacy Protection Act (COPPA), select No (COPPA doesn’t apply to this example).
- Keep the remaining fields at their default and choose Create bot.
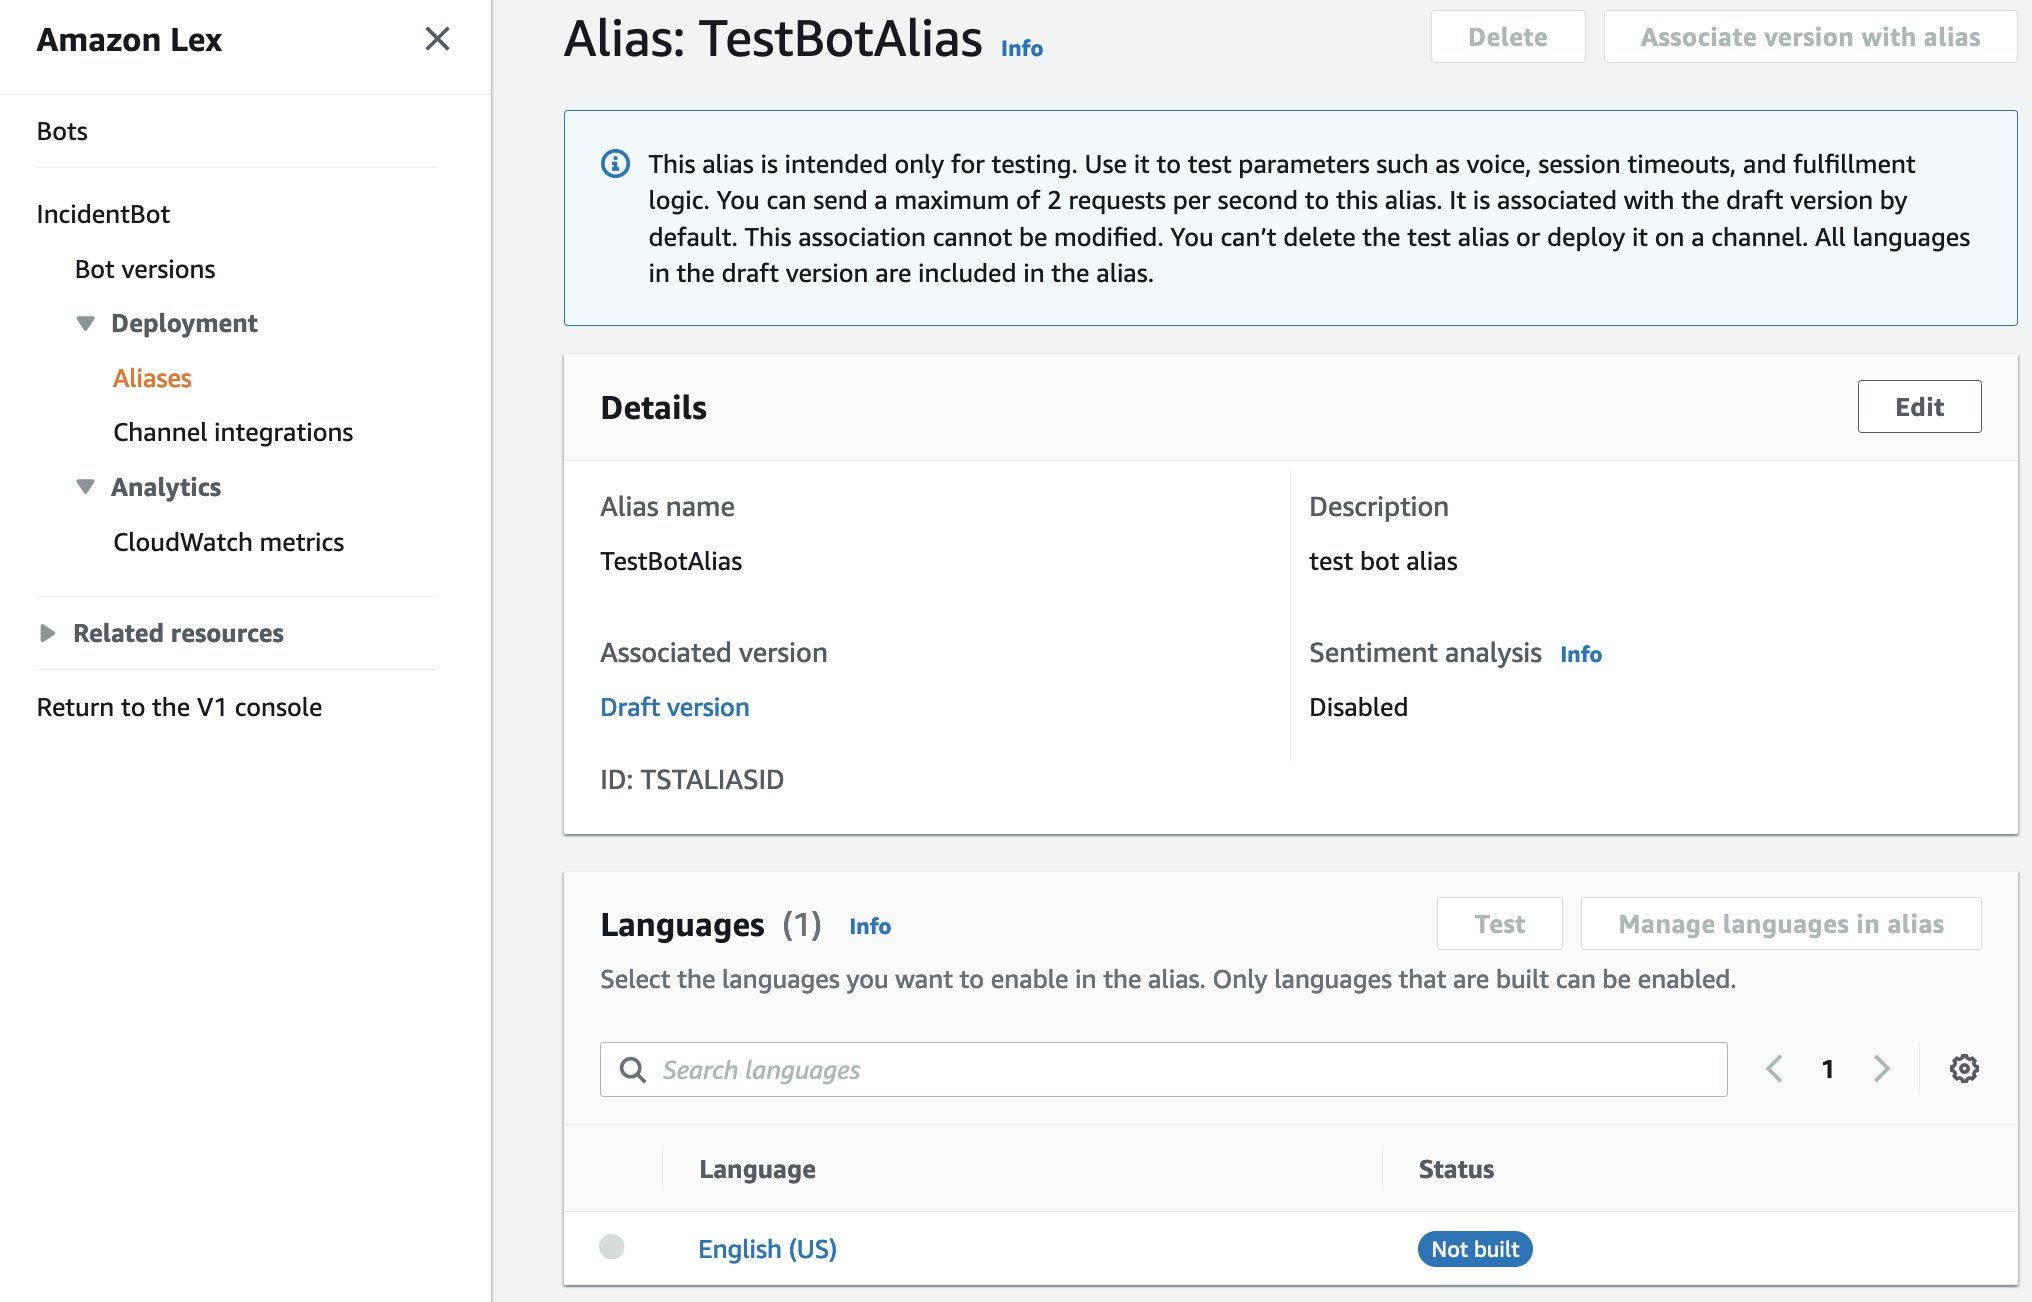
- When the bot is available, choose Aliases in the navigation pane to see the alias created for this bot.

- Choose the alias
TestBotAliasto see the alias details.
As shown in the following screenshot, this chatbot just uses the language English (US).
To have an effective conversation, it’s important to understand the sentiment and respond appropriately. In a conversation, a simple acknowledgment when talking to an unhappy user might be helpful, such as, “I am sorry you are having a bad day.”
To achieve such a conversational flow with a bot, you have to detect the sentiment expressed by the user and react appropriately. Previously, you had to build a custom integration by using Amazon Comprehend APIs. As of this writing, you can determine the sentiment natively in Amazon Lex.
You can enable sentiment analysis on the Lex V2 bot by editing the alias.
- On the alias details page, choose Edit.
- Select Enable sentiment analysis and choose Confirm.

For this post, you analyze the messages that you receive from end-users in order to understand their mood and return the appropriate response, which is governed by the Lambda logic that uses the detected sentiment to change the response text accordingly.
- To add the function to the alias, on the alias details page, choose English (US).
- For Source, choose ChatBotLamba.
- For Lambda function version or alias, chose $LATEST.
- Choose Save.

You’re now ready to build the intent.
- In the navigation pane, choose Bot versions.
- Choose the draft version of your bot to see its details.

- Choose Intents in the navigation pane to explore the intents you created.
- To build the bot, choose Build.

Test the Amazon Lex bot
We test the following scenarios:
- The user sends a message to create a new ServiceNow incident using the example utterance “create an incident ticket with request access to ServiceNow.”
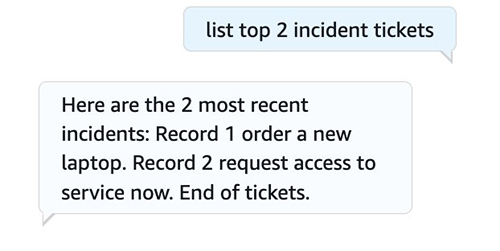
- The user retrieves the existing ServiceNow incidents using the utterance “list top 2 incident tickets.”
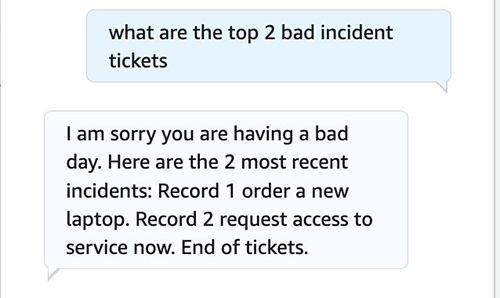
- The user can also show negative sentiment in the message and retrieve the response accordingly using the utterance “what are the top 2 bad incident tickets.”
To test the bot, on the Intents page, choose Test.
As shown in the following screenshot, you created two incident tickets using the following utterances:
- create an incident ticket with request access to service now
- create an incident ticket with order a new laptop

This creates two tickets in the ServiceNow instance.
Now let’s retrieve the last two tickets using the utterance “list top 2 incident tickets.”
You can test sentiment analysis as shown in the following screenshot, in which the bot responds to a negative sentiment.
Create a Slack app and integrate Slack with the bot
You can integrate the Amazon Lex bot with various web or mobile applications and client-side codes, in addition to popular platforms like Facebook Messenger, Slack, Kik, and Twilio SMS. For this post, you create a Slack app and integrate your Amazon Lex bot with Slack. For instructions, see Integrating an Amazon Lex Bot with Slack.
An added benefit is that the chabot can determine the sentiment of the user and respond accordingly. The real-time sentiment analysis gives the supervisors the feedback that they need in an organic and automated way without requiring any separate process for feedback collection. The sentiment analysis can be used by supervisors to track negative sentiment on tickets created by users and can also be used to return the response accordingly from our Lambda function– for example different responses for negative sentiment v/s positive or neutral sentiment.
You should now be able to use your Slack app to send messages to the Amazon Lex bot and retrieve the same responses as you tested earlier. The following screenshot shows the same messages tested on the Slack app, with the same results.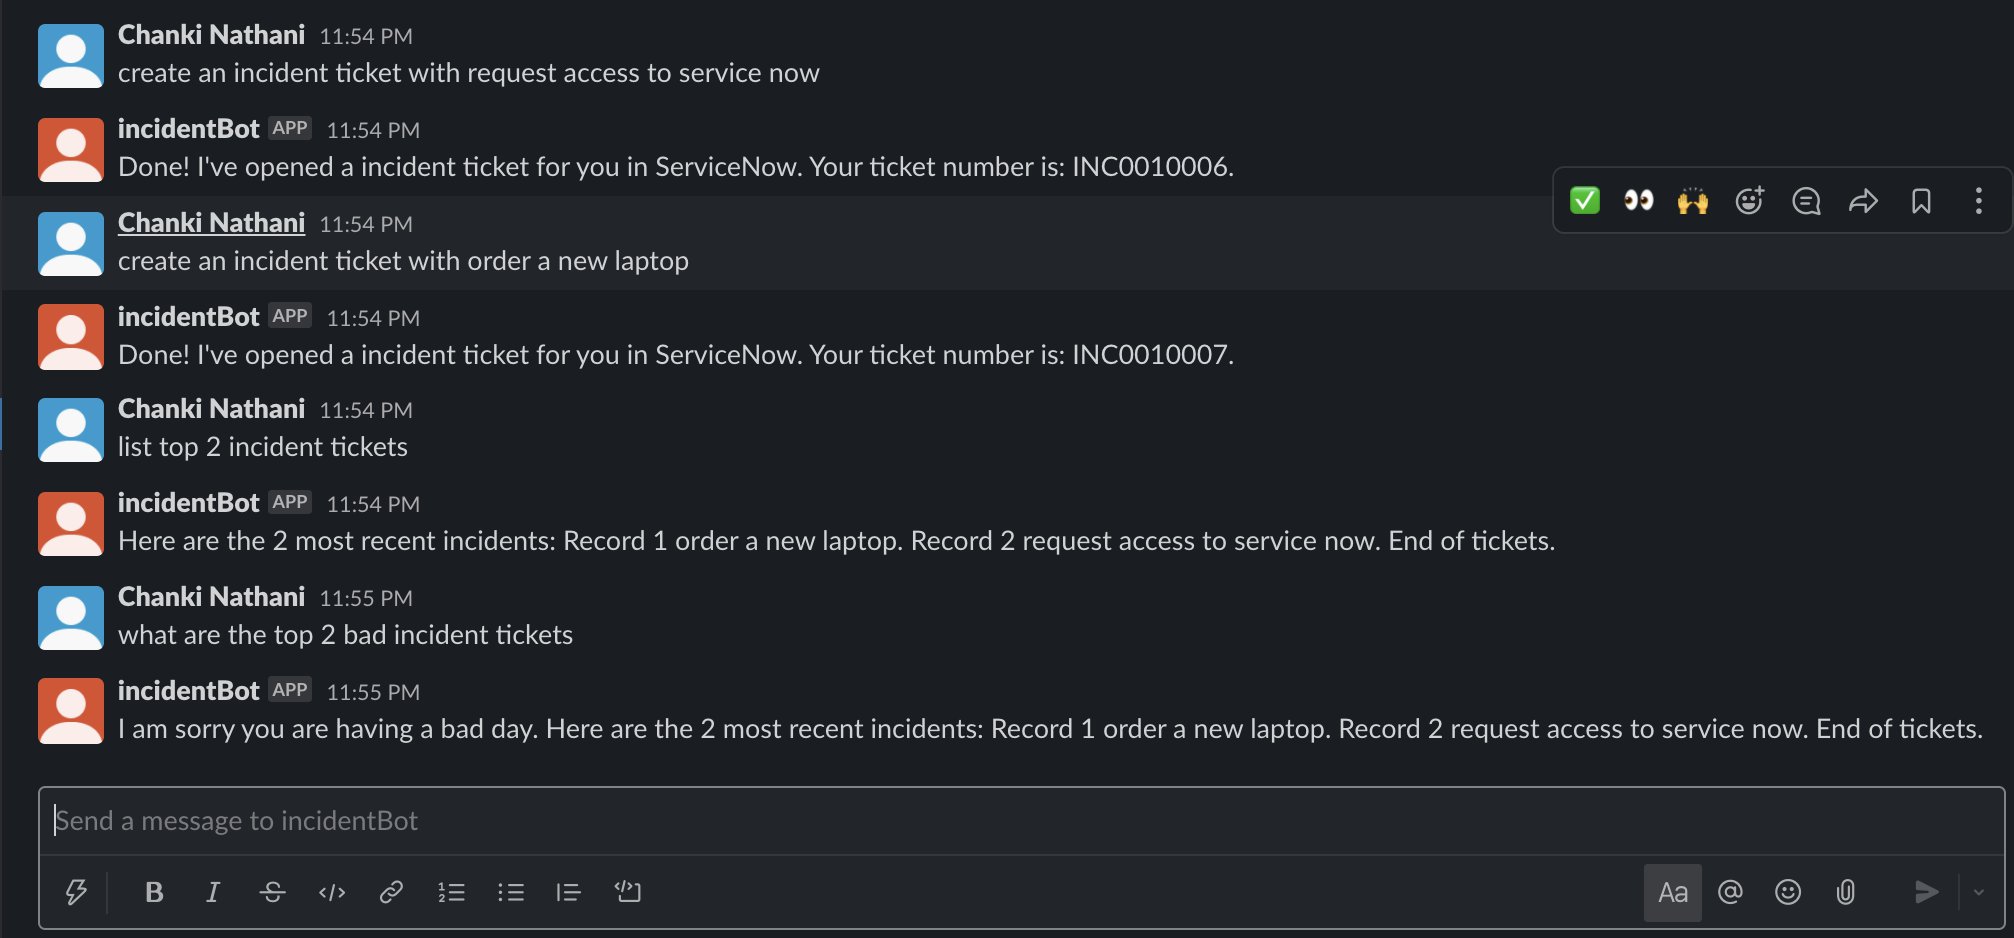
Congratulations! You just built an incident bot using Amazon Lex with sentiment analysis that integrates with ServiceNow.
Clean up
To avoid incurring future charges, delete the resources that you created and clean up your account.
You can clean up the AWS environment using the following steps:
- On the Lex V2 console, choose Bots in the navigation pane to see a list of all your Lex V2 bots.
- Select the bot you created and on the Actions menu, choose Delete.

- On the Lambda console, choose Functions in the navigation pane.
- Select the function you created and on the Actions menu, choose Delete.

Conclusion
This post showed how you can integrate Amazon Lex bot with ServiceNow incident management and a Slack app. You can integrate the same experience to create and manage tickets as part of your customer support calls. For more information about incorporating these techniques into your bots, see the Lex V2 Developer Guide.
About the Authors
 Chanki Nathani is a Cloud Application Architect for AWS Professional Services. As an architect, he supports customers with architecting, designing, automating and building new applications, as well as migrating existing applications to AWS. He is passionate about Cloud and Serverless Technologies. In his spare time, he enjoys traveling and blogging about food from different places.
 Vaibhav Chaddha is a Machine Learning Engineer with AWS Professional Services. He spends his time helping customers design and implement solutions using Amazon ML services, to address their business challenges.
How does Astro localize itself in an ever-changing home?
Deep learning to produce invariant representations, estimations of sensor reliability, and efficient map representations all contribute to Astro’s superior spatial intelligence.Read More
“Robin deals with a world where things are changing all around it”
An advanced perception system, that detects and learns from its own mistakes, enables Robin robots to select individual objects from jumbled packages — at production scale.Read More
Fine-tune and deploy a Wav2Vec2 model for speech recognition with Hugging Face and Amazon SageMaker
Automatic speech recognition (ASR) is a commonly used machine learning (ML) technology in our daily lives and business scenarios. Applications such as voice-controlled assistants like Alexa and Siri, and voice-to-text applications like automatic subtitling for videos and transcribing meetings, are all powered by this technology. These applications take audio clips as input and convert speech signals to text, also referred as speech-to-text applications.
This technology has matured in recent years, and many of the latest models can achieve a very good performance, such as transformer-based models Wav2Vec2 and Speech2Text. Transformer is a sequence-to-sequence deep learning architecture originally proposed for machine translation. Now it’s extended to solve all kinds of natural language processing (NLP) tasks, such as text classification, text summarization, and ASR. The transformer architecture yields very good model performance and results in various NLP tasks; however, the models’ sizes (the number of parameters) as well as the amount of data they’re pre-trained on increase exponentially when pursuing better performance. It becomes very time-consuming and costly to train a transformer from scratch, for example training a BERT model from scratch could take 4 days and cost $6,912 (for more information, see The Staggering Cost of Training SOTA AI Models). Hugging Face, an AI company, provides an open-source platform where developers can share and reuse thousands of pre-trained transformer models. With the transfer learning technique, you can fine-tune your model with a small set of labeled data for a target use case. This reduces the overall compute cost, speeds up the development lifecycle, and lessens the carbon footprint of the community.
AWS announced collaboration with Hugging Face in 2021. Developers can easily work with Hugging Face models on Amazon SageMaker and benefit from both worlds. You can fine-tune and optimize all models from Hugging Face, and SageMaker provides managed training and inference services that offer high performance resources and high scalability via Amazon SageMaker distributed training libraries. This collaboration can help you accelerate your NLP tasks’ productization journey and realize business benefits.
This post shows how to use SageMaker to easily fine-tune the latest Wav2Vec2 model from Hugging Face, and then deploy the model with a custom-defined inference process to a SageMaker managed inference endpoint. Finally, you can test the model performance with sample audio clips, and review the corresponding transcription as output.
Wav2Vec2 background
Wav2Vec2 is a transformer-based architecture for ASR tasks and was released in September 2020. The following diagram shows its simplified architecture. For more details, see the original paper. As the diagram shows, the model is composed of a multi-layer convolutional network (CNN) as a feature extractor, which takes an input audio signal and outputs audio representations, also considered as features. They are fed into a transformer network to generate contextualized representations. This part of training can be self-supervised; the transformer can be trained with unlabeled speech and learn from it. Then the model is fine-tuned on labeled data with the Connectionist Temporal Classification (CTC) algorithm for specific ASR tasks. The base model we use in this post is Wav2Vec2-Base-960h, fine-tuned on 960 hours of Librispeech on 16 kHz sampled speech audio.

CTC is a character-based algorithm. During training, it’s able to demarcate each character of the transcription in the speech automatically, so the timeframe alignment isn’t required between audio signal and transcription. For example, if the audio clip says “Hello World,” we don’t need to know in which second the word “hello” is located. It saves a lot of labeling effort for ASR use cases. For more information about how the algorithm works, refer to Sequence Modeling With CTC.
Solution overview
In this post, we use the SUPERB (Speech processing Universal PERformance Benchmark) dataset available from the Hugging Face Datasets library, and fine-tune the Wav2Vec2 model and deploy it as a SageMaker endpoint for real-time inference for an ASR task. SUPERB is a leaderboard to benchmark the performance of a shared model across a wide range of speech processing tasks.
The following diagram provides a high-level view of the solution workflow.
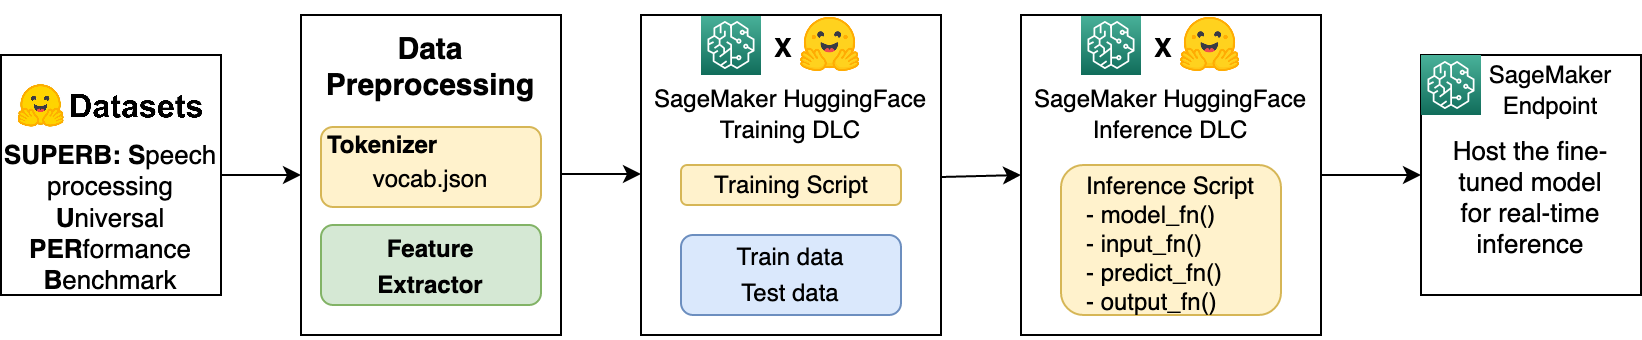
First, we show how to load and preprocess the SUPERB dataset in a SageMaker environment in order to obtain a tokenizer and feature extractor, which are required for fine-tuning the Wav2Vec2 model. Then we use SageMaker Script Mode for training and inference steps, which allows you to define and use custom training and inference scripts, and SageMaker provides supported Hugging Face framework Docker containers. For more information about training and serving Hugging Face models on SageMaker, see Use Hugging Face with Amazon SageMaker. This functionality is available through the development of Hugging Face AWS Deep Learning Containers (DLCs).
The notebook and code from this post are available on GitHub. The notebook is tested in both Amazon SageMaker Studio and SageMaker notebook environments.
Data preprocessing
In this section, we walk through the steps to preprocess the data.
Process the dataset
In this post we use SUPERB dataset, which you can load from the Hugging Face Datasets library directly using the load_dataset function. The SUPERB dataset also includes speaker_id and chapter_id; we remove these columns and only keep audio files and transcriptions to fine-tune the Wav2Vec2 model for an ASR task, which transcribes speech to text. To speed up the fine-tuning process for this example, we only take the test dataset from the original dataset, then split it into train and test datasets. See the following code:
After we process the data, the dataset structure is as follows:
Let’s print one data point from the train dataset and examine the information in each feature. ‘file’ is the audio file path where it’s saved and cached in the local repository. ‘audio’ contains three components: ‘path’ is the same as ‘file’, ‘array’ is the numerical representation of the raw waveform of the audio file in NumPy array format, and ‘sampling_rate’ shows the number of samples of audio recorded every second. ‘text’ is the transcript of the audio file.
Build a vocabulary file
The Wav2Vec2 model uses the CTC algorithm to train deep neural networks in sequence problems, and its output is a single letter or blank. It uses a character-based tokenizer. Therefore, we extract distinct letters from the dataset and build the vocabulary file using the following code:
Create a tokenizer and feature extractor
The Wav2Vec2 model contains a tokenizer and feature extractor. In this step, we use the vocab.json file that we created from the previous step to create the Wav2Vec2CTCTokenizer. We use Wav2Vec2FeatureExtractor to make sure that the dataset used in fine-tuning has the same audio sampling rate as the dataset used for pre-training. Finally, we create a Wav2Vec2 processor that can wrap the feature extractor and the tokenizer into one single processor. See the following code:
Prepare the train and test datasets
Next, we extract the array representation of the audio files and its sampling_rate from the dataset and process them using the processor, in order to have train and test data that can be consumed by the model:
Then we upload the train and test data to Amazon Simple Storage Service (Amazon S3) using the following code:
Fine-tune the Hugging Face model (Wav2Vec2)
We use SageMaker Hugging Face DLC script mode to construct the training and inference job, which allows you to write custom training and serving code and using Hugging Face framework containers that are maintained and supported by AWS.
When we create a training job using the script mode, the entry_point script, hyperparameters, its dependencies (inside requirements.txt), and input data (train and test datasets) are copied into the container. Then it invokes the entry_point training script, where the train and test datasets are loaded, training steps are performed, and model artifacts are saved in /opt/ml/model in the container. After training, artifacts in this directory are uploaded to Amazon S3 for later model hosting.
You can inspect the training script in the GitHub repo, in the scripts/ directory.
Create an estimator and start a training job
We use the Hugging Face estimator class to train our model. When creating the estimator, you need to specify the following parameters:
- entry_point – The name of the training script. It loads data from the input channels, configures training with hyperparameters, trains a model, and saves the model.
- source_dir – The location of the training scripts.
- transformers_version – The Hugging Face Transformers library version we want to use.
- pytorch_version – The PyTorch version that’s compatible with the Transformers library.
For this use case and dataset, we use one ml.p3.2xlarge instance, and the training job is able to finish in around 2 hours. You can select a more powerful instance with more memory and GPU to reduce the training time; however, it incurs more cost.
When you create a Hugging Face estimator, you can configure hyperparameters and provide a custom parameter into the training script, such as vocab_url in this example. Also, you can specify the metrics in the estimator, parse the logs of these metrics, and send them to Amazon CloudWatch to monitor and track the training performance. For more details, see Monitor and Analyze Training Jobs Using Amazon CloudWatch Metrics.
In the following figure of CloudWatch training job logs, you can see that, after 10 epochs of training, the model evaluation metrics WER (word error rate) can achieve around 0.17 for the subset of the SUPERB dataset. WER is a commonly used metric to evaluate speech recognition model performance, and the objective is to minimize it. You can increase the number of epochs or use the full SUPERB dataset to improve the model further.

Deploy the model as an endpoint on SageMaker and run inference
In this section, we walk through the steps to deploy the model and perform inference.
Inference script
We use the SageMaker Hugging Face Inference Toolkit to host our fine-tuned model. It provides default functions for preprocessing, predicting, and postprocessing for certain tasks. However, the default capabilities can’t inference our model properly. Therefore, we defined the custom functions model_fn(), input_fn(), predict_fn(), and output_fn() in the inference.py script to override the default settings with custom requirements. For more details, refer to the GitHub repo.
As of January 2022, the Inference Toolkit can inference tasks from architectures that end with 'TapasForQuestionAnswering', 'ForQuestionAnswering', 'ForTokenClassification', 'ForSequenceClassification', 'ForMultipleChoice', 'ForMaskedLM', 'ForCausalLM', 'ForConditionalGeneration', 'MTModel', 'EncoderDecoderModel','GPT2LMHeadModel', and 'T5WithLMHeadModel'. The Wav2Vec2 model is not currently supported.
You can inspect the full inference script in the GitHub repo, in the scripts/ directory.
Create a Hugging Face model from the estimator
We use the Hugging Face Model class to create a model object, which you can deploy to a SageMaker endpoint. When creating the model, specify the following parameters:
- entry_point – The name of the inference script. The methods defined in the inference script are implemented to the endpoint.
- source_dir – The location of the inference scripts.
- transformers_version – The Hugging Face Transformers library version we want to use. It should be consistent with the training step.
- pytorch_version – The PyTorch version that is compatible with the Transformers library. It should be consistent with the training step.
- model_data – The Amazon S3 location of a SageMaker model data .tar.gz file.
When you create a predictor by using the model.deploy function, you can change the instance count and instance type based on your performance requirements.
Inference audio files
After you deploy the endpoint, you can run prediction tests to check the model performance. You can download an audio file from the S3 bucket by using the following code:
Alternatively, you can download a sample audio file to run the inference request:
The predicted result is as follows:
Clean up
When you’re finished using the solution, delete the SageMaker endpoint to avoid ongoing charges:
Conclusion
In this post, we showed how to fine-tune the pre-trained Wav2Vec2 model on SageMaker using a Hugging Face estimator, and also how to host the model on SageMaker as a real-time inference endpoint using the SageMaker Hugging Face Inference Toolkit. For both training and inference steps, we provided custom defined scripts for greater flexibility, which are enabled and supported by SageMaker Hugging Face DLCs. You can use the method from this post to fine-tune a We2Vec2 model with your own datasets, or to fine-tune and deploy a different transformer model from Hugging Face.
Check out the notebook and code of this project from GitHub, and let us know your comments. For more comprehensive information, see Hugging Face on SageMaker and Use Hugging Face with Amazon SageMaker.
In addition, Hugging Face and AWS announced a partnership in 2022 that makes it even easier to train Hugging Face models on SageMaker. This functionality is available through the development of Hugging Face AWS DLCs. These containers include the Hugging Face Transformers, Tokenizers, and Datasets libraries, which allow us to use these resources for training and inference jobs. For a list of the available DLC images, see Available Deep Learning Containers Images. They are maintained and regularly updated with security patches. You can find many examples of how to train Hugging Face models with these DLCs and the Hugging Face Python SDK in the following GitHub repo.
About the Author
 Ying Hou, PhD, is a Machine Learning Prototyping Architect at AWS. Her main areas of interests are deep learning, computer vision, NLP, and time series data prediction. In her spare time, she enjoys reading novels and hiking in national parks in the UK.
Build a virtual credit approval agent with Amazon Lex, Amazon Textract, and Amazon Connect
Banking and financial institutions review thousands of credit applications per week. The credit approval process requires financial organizations to invest time and resources in reviewing documents like W2s, bank statements, and utility bills. The overall experience can be costly for the organization. At the same time, organizations have to consider borrowers, who are waiting for decisions on their credit applications. To retain customers, organizations need to process borrower applications quickly with low turnaround times.
With an automated credit approval assistant using machine learning, financial organizations can expedite the process, reduce cost, and provide better customer experience with faster decisions. Banks and Fintechs can build a virtual agent that can review a customer’s financial documents and provide a decision instantly. Building an effective credit approval process not only improves the customer experience, but also lowers the cost.
In this post, we show how to build a virtual credit approval assistant that reviews the financial documents required for loan approval and makes decisions instantly for a seamless customer experience. The solution uses Amazon Lex, Amazon Textract, and Amazon Connect, among other AWS services.
Overview of the solution
You can deploy the solution using an AWS CloudFormation template. The solution creates a virtual agent using Amazon Lex and associates it with Amazon Connect, which acts as the conversational interface with customers and asks the loan applicant to upload the necessary documents. The documents are stored in an Amazon Simple Storage Service (Amazon S3) bucket used only for that customer.
This solution is completely serverless and uses Amazon S3 to store a static website that hosts the front end and custom JavaScript to enable the rest of the requests. Amazon CloudFront serves as a content delivery network (CDN) to allow a public front end for the website. CloudFront is a fast CDN service that securely delivers data, videos, applications, and APIs to customers globally with low latency and high transfer speeds, all within a developer-friendly environment.
This is a sample project designed to be easily deployable for experimentation. The AWS Identity and Access Management (IAM) policy permissions in this solution use least privilege, however the CloudFront and Amazon API Gateway resources deployed are publicly accessible. To take the appropriate measures to secure your CloudFront distribution and API Gateway resources, refer to Configuring secure access and restricting access to content and Security in Amazon API Gateway, respectively.
Additionally, the backend features API Gateway with HTTP routes for two AWS Lambda functions. The first function creates the session with Amazon Connect for chat; the second passes the pre-signed URL link fetched by the front end from Amazon Connect to Amazon Lex. Amazon Lex triggers the Lambda function associated with it and lets Amazon Textract read the documents and capture all the fields and information in them. This function also makes the credit decisions based on business processes previously defined by the organization. The solution is integrated with Amazon Connect to let customers connect to contact center agents if the customer is having difficulty or needs help through the process.
The following example depicts the interaction between bot and borrower.

The following diagram illustrates the solution architecture.

The solution workflow is as follows:
- Customers navigate to a URL served by CloudFront, which fetches webpages from an S3 bucket and sends JavaScript to the web browser.
- The web browser renders the webpages and makes an API call to API Gateway.
- API Gateway triggers the associated Lambda function.
- The function initiates a startChatContact API call with Amazon Connect and triggers the contact flow associated with it.
- Amazon Connect triggers Amazon Lex with the utterance to classify the intent. After the intent is classified, Amazon Lex elicits the required slots and asks the customer to upload the document to fulfill the intent.
- The applicant uploads the W2 document to the S3 bucket using the upload attachment icon in the chat window.
As a best practice, consider implementing encryption at rest for the S3 bucket using AWS Key Management Service (AWS KMS). Additionally, you can attach a bucket policy to the S3 bucket to ensure data is always encrypted in transit. Consider enabling server access logging for the S3 bucket to capture detailed records of requests to assist with security and access audits. For more information, see Security Best Practices for Amazon S3.
- The web browser makes a call to Amazon Connect to retrieve a pre-signed URL of the uploaded image. Make sure the pre-signed URLs expire a few minutes after the Lambda function runs the logic.
- After the document has been uploaded successfully, the web application makes an API call to API Gateway to updates the file location for use in Amazon Lex session attributes.
- API Gateway triggers a Lambda function to pass the W2 pre-signed URL location. The function updates the session attributes in Amazon Lex with the pre-signed URL of the W2 document.
- The web browser also updates the slot to
uploaded, which fulfills the intent. - Amazon Lex triggers a Lambda function, which downloads the W2 image data and sends it to Amazon Textract for processing.
- Amazon Textract reads all the fields from the W2 image document, converts them into key-value pairs, and passes the data back to the Lambda function.
Amazon Textract conforms to the AWS shared responsibility model, which outlines the responsibilities for data protection between AWS and the customer. For more information, refer to Data Protection in Amazon Textract.
- Lambda uses the W2 data for evaluation of the loan application and returns the result to the web browser.
Follow the best practices for enabling logging in Lambda. Refer to part 1 and part 2 of the blog series “Operating Lambda: Building a solid security foundation.”
Data in-transit is secured using TLS, and it’s highly recommended to encrypt data at rest. For more information about protecting data inside your S3 bucket, refer to Strengthen the security of sensitive data stored in Amazon S3 by using additional AWS services.
Prerequisites
For this walkthrough, you should have the following prerequisites:
- An AWS account.
- An Amazon Connect contact center instance in the us-east-1 Region. You can use an existing one or create a new one. For instructions, refer to Get started with Amazon Connect. If you have an existing Amazon Connect instance and chat isn’t enabled, refer to Enabling Chat in an Existing Amazon Connect Contact Center.
- Chat attachments enabled in Amazon Connect. For instructions, refer to Enable attachments to share files using chat. For CORS setup, use option 2, which uses the * wildcard to
AllowedOrigin. - The example project located in the GitHub repository. You need to clone this repository on your local machine and use AWS Serverless Application Model (AWS SAM) to deploy the project. To install the AWS SAM CLI and configure AWS credentials, refer to Getting started with AWS SAM.
- Python 3.9 runtime to support the AWS SAM deployment.
Import the Amazon Connect flow
To import the Amazon Connect flow, complete the following steps:
- Log in to your Amazon Connect instance.
- Under Routing, choose Contact Flows.
- Choose Create contact flow.
- On the Save menu, choose Import flow.
- Choose Select and choose the import flow file located in the /flow subdirectory, called
Loan_App_Connect_Flow. - Save the flow. Do not publish yet.
- Expand Show additional flow information and choose the copy icon to capture the ARN.

- Save these IDs for use as parameters in the CloudFormation template to be deployed in the next step:
The Amazon Connect instance ID is the long alphanumeric value between the slashes immediately following instance in the ARN. For this post, the instance ID is 11111111-1111-1111-1111-111111111111.
The contact flow ID is the long value after the slash following contact-flow in the ARN. For this post, the flow ID is 22222222-2222-2222-2222-222222222222.
Deploy with AWS SAM
With the instance and flow IDs captured, we’re ready to deploy the project.
- Open a terminal window and clone the GitHub repository in a directory of your choice.
- Navigate to the
amazon-connect-virtual-credit-agentdirectory and follow the deployment instructions in GitHub repo. - Record the Amazon Lex bot name from the Outputs section of the deployment for the next steps (called
Loan_App_Botif you accepted the default name). - Return to these instructions once the AWS SAM deploy completes successfully.
Update the contact flow blocks
To update the contact flow blocks, complete the following steps:
- Log in to your Amazon Connect instance
- Under Routing, choose Contact Flows.
- Choose the flow named
Loan_App_Flow. - Choose the Get customer input block.
- Under the Amazon Lex section, choose the bot named
Loan_App_Botand the dev alias created earlier. - Choose Save.
- Choose the Set working queue block.
- Choose the X icon and on the drop-down menu, choose BasicQueue.
- Choose Save.

- Save the flow.
- Publish the flow.
Test the solution
You’re now ready to test the solution.
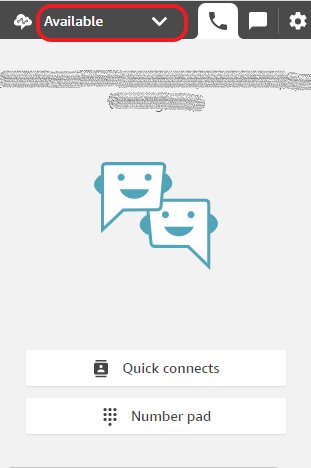
- Log in to you Amazon Connect instance for setting up an Amazon Connect agent for a chat.
- On the dashboard, choose the phone icon to open the Contact Control Panel (CCP) in a separate window.
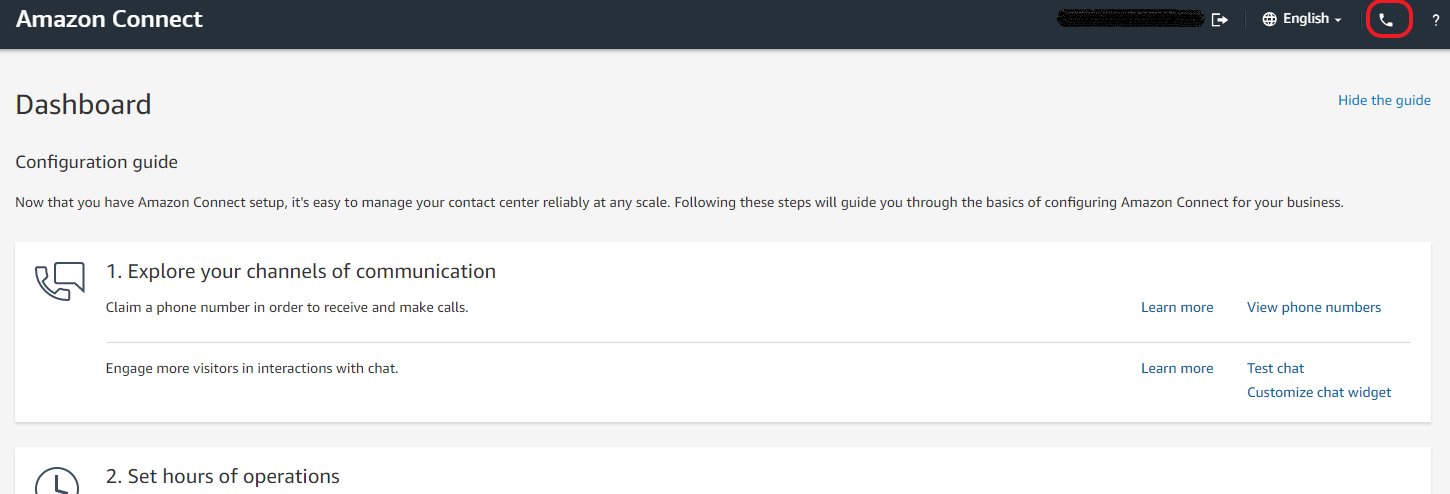
- In the CCP, change the agent state to Available.
- On the Outputs tab for your CloudFormation stack, choose the value for
cloudFrontDistribution.
This is a link to your CloudFront URL. You’re redirected to a webpage with your loan services bot. A floating action button (FAB) is on the bottom right of the screen.
- Choose the FAB to open the chat bot.
- After you get the welcome message, enter
I need a loan.
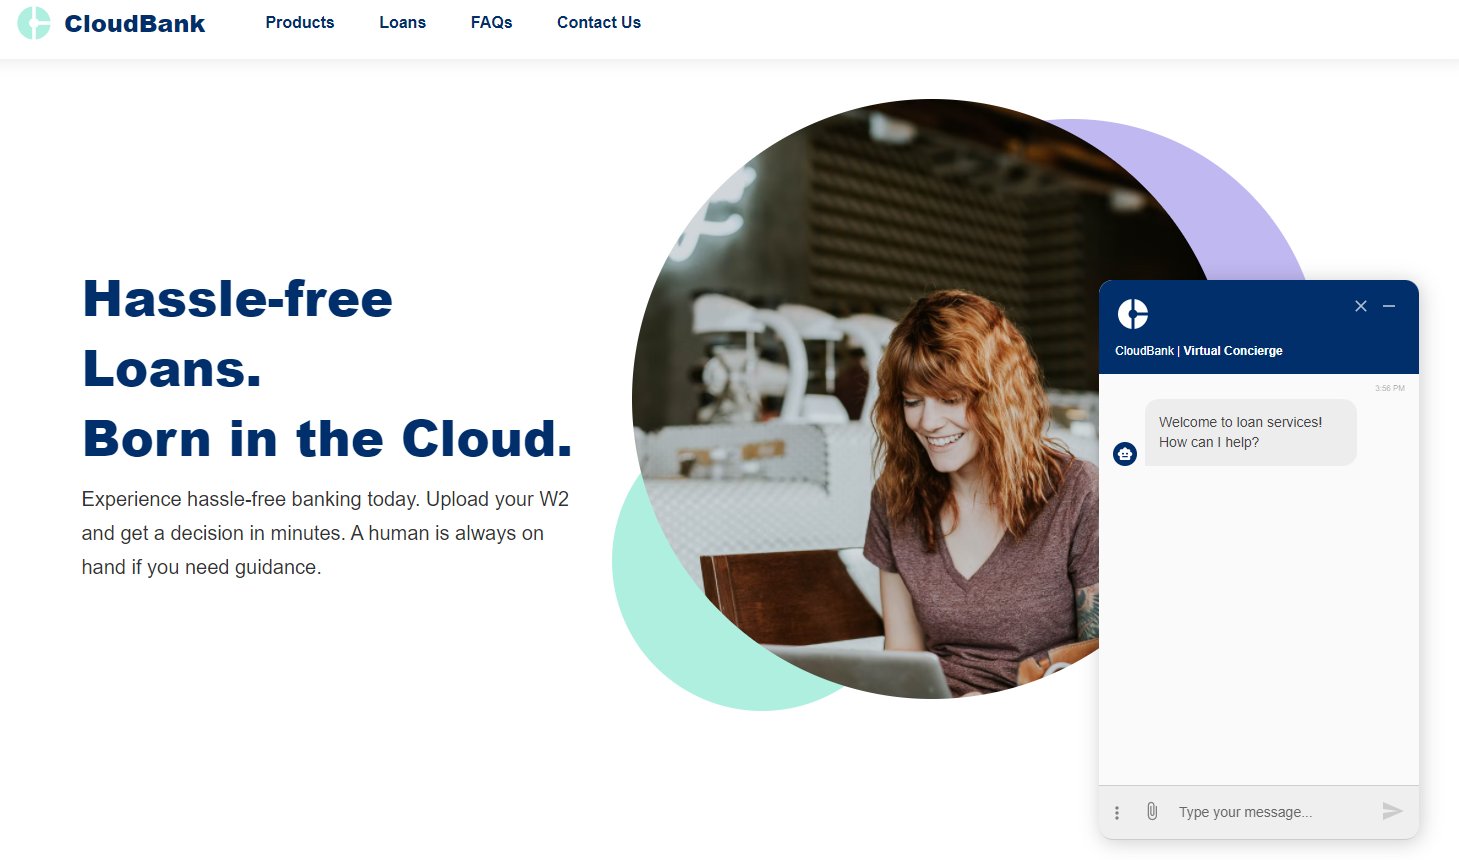
- When prompted, choose a loan type and enter a loan amount.
- Upload an image of a W2 document.
A sample W2 image file is located in the project repository in the /img subdirectory. The file is called w2.png.
After the image is uploaded, the bot asks you if you want to submit the application.
- Choose Yes to submit.
After submission, the bot evaluates the W2 image and provides a response. After a few seconds, you’re connected to an agent.
You should see a request to connect with chat in the CCP.
- Choose the request to accept.
The agent is now connected to the chat user. You can simulate each side of the conversation to test the chat session.
- Choose End Chat when you’re done.
Troubleshooting
After you deploy the stack, if you see an Amazon S3 permission error when viewing the CloudFront URL, it means the domain isn’t ready yet. The CDN can take up to 1 hour to be ready.
If you can’t add your attachments, check your CORS setting. For instructions, refer to Enable attachments to share files using chat. For CORS setup, use option 2, which uses the * wildcard to AllowedOrigin.
Clean up
To avoid incurring future charges, remove all resources created by deleting the CloudFormation stack.
Conclusion
In this post, we demonstrated how to quickly and securely set up a loan application processing solution. Data at rest and in transit are both encrypted and secured. This solution can act as a blueprint to build other self-service processing flows where Amazon Connect and Amazon Lex provide a conversational interface for customer engagement. We look forward to seeing what other solutions you build using this architecture.
Should you need assistance building these capabilities and Amazon Connect contact flows, please reach out to one of the dozens of Amazon Connect partners available worldwide.
About the Authors
 Dipkumar Mehta is a Senior Conversational AI Consultant with the Amazon ProServe Natural Language AI team. He focuses on helping customers design, deploy and scale end-to-end Conversational AI solutions in production on AWS. He is also passionate about improving customer experience and drive business outcomes by leveraging data.
 Cecil Patterson is a Natural Language AI consultant with AWS Professional services based in North Texas. He has many years of experience working with large enterprises to enable and support global infrastructure solutions. Cecil uses his experience and diverse skill set to build exceptional conversational solutions for customers of all types.
 Sanju Sunny is a Digital Innovation Specialist with Amazon ProServe. He engages with customers in a variety of industries around Amazon’s distinctive customer-obsessed innovation mechanisms in order to rapidly conceive, validate and prototype new products, services and experiences.
 Matt Kurio is a Security Transformation Consultant with the Amazon ProServe Shared Delivery Team. He excels helping enterprise customers build secure platforms and manage security effectively and efficiently. He also enjoys relaxing at the beach and outdoor activities with his family.
Xiuli Chao appointed Ralph Disney Collegiate Professor at UM
Professorship named after influential former University of Michigan professor.Read More
Amazon Scholar contributes to best student paper award
Paper proposes a method to better and more equitably place COVID vaccine clinics to encourage more vaccinations.Read More
Control access to Amazon SageMaker Feature Store offline using AWS Lake Formation
You can establish feature stores to provide a central repository for machine learning (ML) features that can be shared with data science teams across your organization for training, batch scoring, and real-time inference. Data science teams can reuse features stored in the central repository, avoiding the need to reengineer feature pipelines for different projects and as a result eliminating rework and duplication.
To satisfy security and compliance needs, you may need granular control over how these shared ML features are accessed. These needs often go beyond table- and column-level access control to individual row-level access control. For example, you may want to let account representatives see rows from a sales table for only their accounts and mask the prefix of sensitive data like credit card numbers. Fine-grained access controls are needed to protect feature store data and grant access based on an individual’s role. This is specifically important for customers and stakeholders in industries that are required to audit access to feature data and ensure the right level of security is in place.
In this post, we provide an overview of how to implement granular access control to feature groups and features stored in an offline feature store using Amazon SageMaker Feature Store and AWS Lake Formation. If you’re new to Feature Store, you may want to refer to Understanding the key capabilities of Amazon SageMaker Feature Store for additional background before diving into the rest of this post. Note that for the online feature store, you can use AWS Identity and Access Management (IAM) policies with conditions to restrict user access against feature groups.
Solution overview
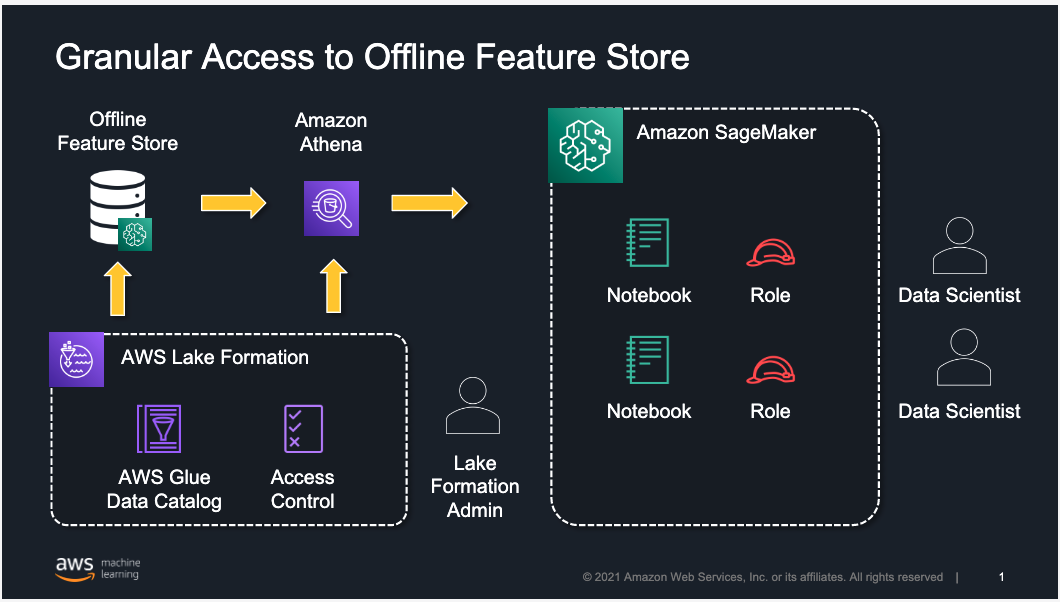
The following architecture uses Lake Formation to implement row-, column-, or cell-level access to limit which feature groups or features within a feature group can be accessed by a data scientist working in Amazon SageMaker Studio. Although we focus on restricting access to users working in Studio, the same approach is applicable for users accessing the offline feature store using services like Amazon Athena.
Feature Store is a purpose-built solution for ML feature management that helps data science teams reuse ML features across teams and models, serve features for model predictions at scale with low latency, and train and deploy new models more quickly and effectively.
Lake Formation is a fully managed service that helps you build, secure, and manage data lakes, and provide access control for data in the data lake. Lake Formation supports the following security levels:
- Row-level permissions – Restricts access to specific rows based on data compliance and governance policies
- Column-level permissions – Restricts access to specific columns based on data filters
- Cell-level permissions – Combines both row- and column-level controls by allowing you access to specific rows and columns on the database tables
Lake Formation also provides centralized auditing and compliance reporting by identifying which principals accessed what data, when, and through which services.
By combining Feature Store and Lake Formation, you can implement granular access to ML features on your existing offline feature store.
In this post, we provide an approach for use cases in which you have created feature groups in Feature Store and need to provide access to your data science teams for feature exploration and creating models for their projects. At a high level, a Lake Formation admin defines and creates a permission model in Lake Formation and assigns it to individual Studio users or groups of users.
We walk you through the following steps:
- Register the offline feature store in Lake Formation.
- Create the Lake Formation data filters for fine-grained access control.
- Grant feature groups (tables) and features (columns) permissions.
Prerequisites
To implement this solution, you need to create a Lake Formation admin user in IAM and sign in as that admin user. For instructions, refer to Create a Data Lake Administrator.
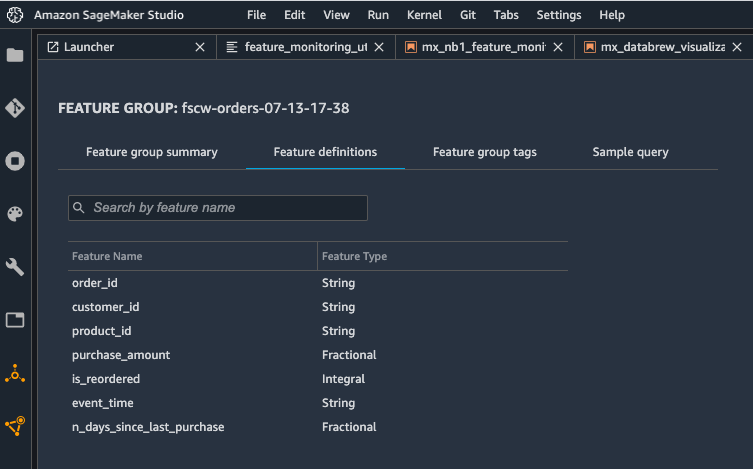
We begin with setting up test data using synthetic grocery orders from synthetically generated customer lists using the Faker Python library. You can try it yourself by following the module on GitHub. For each customer, the notebook generates between 1–10 orders, with products purchased in each order. Then you can use the following notebook to create the three feature groups for the customers, products, and orders datasets in the feature store. Before creating the feature groups, make sure that your Studio environment is set up in your AWS account. For instructions, refer to Onboard to Amazon SageMaker Domain.
The goal is to illustrate how to use Feature Store to store the features and use Lake Formation to control access to these features. The following screenshot shows the definition of the orders feature group using the Studio console.
Feature Store uses an Amazon Simple Storage Service (Amazon S3) bucket in your account to store offline data. You can use query engines like Athena against the offline data store in Amazon S3 to extract training datasets or to analyze feature data, and you can join more than one feature group in a single query. Feature Store automatically builds the AWS Glue Data Catalog for feature groups during feature group creation, which allows you to use this catalog to access and query the data from the offline store using Athena or open-source tools like Presto.
Register the offline feature store in Lake Formation
To start using Lake Formation permissions with your existing Feature Store databases and tables, you must revoke the Super permission from the IAMAllowedPrincipals group on the database and the associated feature group tables in Lake Formation.
- Sign in to the AWS Management Console as a Lake Formation administrator.
- In the navigation pane, under Data Catalog, choose Databases.
- Select the database
sagemaker_featurestore, which is the database associated to the offline feature store.
Because Feature Store automatically builds an AWS Glue Data Catalog when you create the feature groups, the offline feature store is visible as a database in Lake Formation.

- On the Actions menu, choose Edit.
- On the Edit database page, if you want Lake Formation permissions to work for newly created feature groups too and not have to revoke the
IAMAllowedPrincipalsfor each table, deselect Use only IAM access control for new tables in this database, then choose Save. - On the Databases page, select the
sagemaker_featurestoredatabase. - On the Actions menu, choose View permissions.

- Select the
IAMAllowedPrincipalsgroup and choose Revoke.

Similarly, you need to perform these steps for all feature group tables that are associated to your offline feature store.
- In the navigation pane, under Data Catalog, choose Tables.
- Select table with your feature group name.
- On the Actions menu, choose View permissions.
- Select the
IAMAllowedPrincipalsgroup and choose Revoke.
To switch the offline feature store to the Lake Formation permission model, you need to turn on Lake Formation permissions for the Amazon S3 location of the offline feature store. For this, you have to register the Amazon S3 location.
- In the navigation pane, under Register and Ingest, choose Data lake locations.
- Choose Register location.
- Select the location of the offline feature store in Amazon S3 for the Amazon S3 path.
The location is the S3Uri that was provided in the feature group’s offline store configuration and can be found in the DescribeFeatureGroup API’s ResolvedOutputS3Uri field.
- Select the default
AWSServiceRoleForLakeFormationDataAccessIAM role and choose Register location.

Lake Formation integrates with AWS Key Management Service (AWS KMS); this approach also works with Amazon S3 locations that have been encrypted with an AWS managed key or with the recommended approach of a customer managed key. For further reading, refer to Registering an encrypted Amazon S3 location.
Create Lake Formation data filters for fine-grained access control
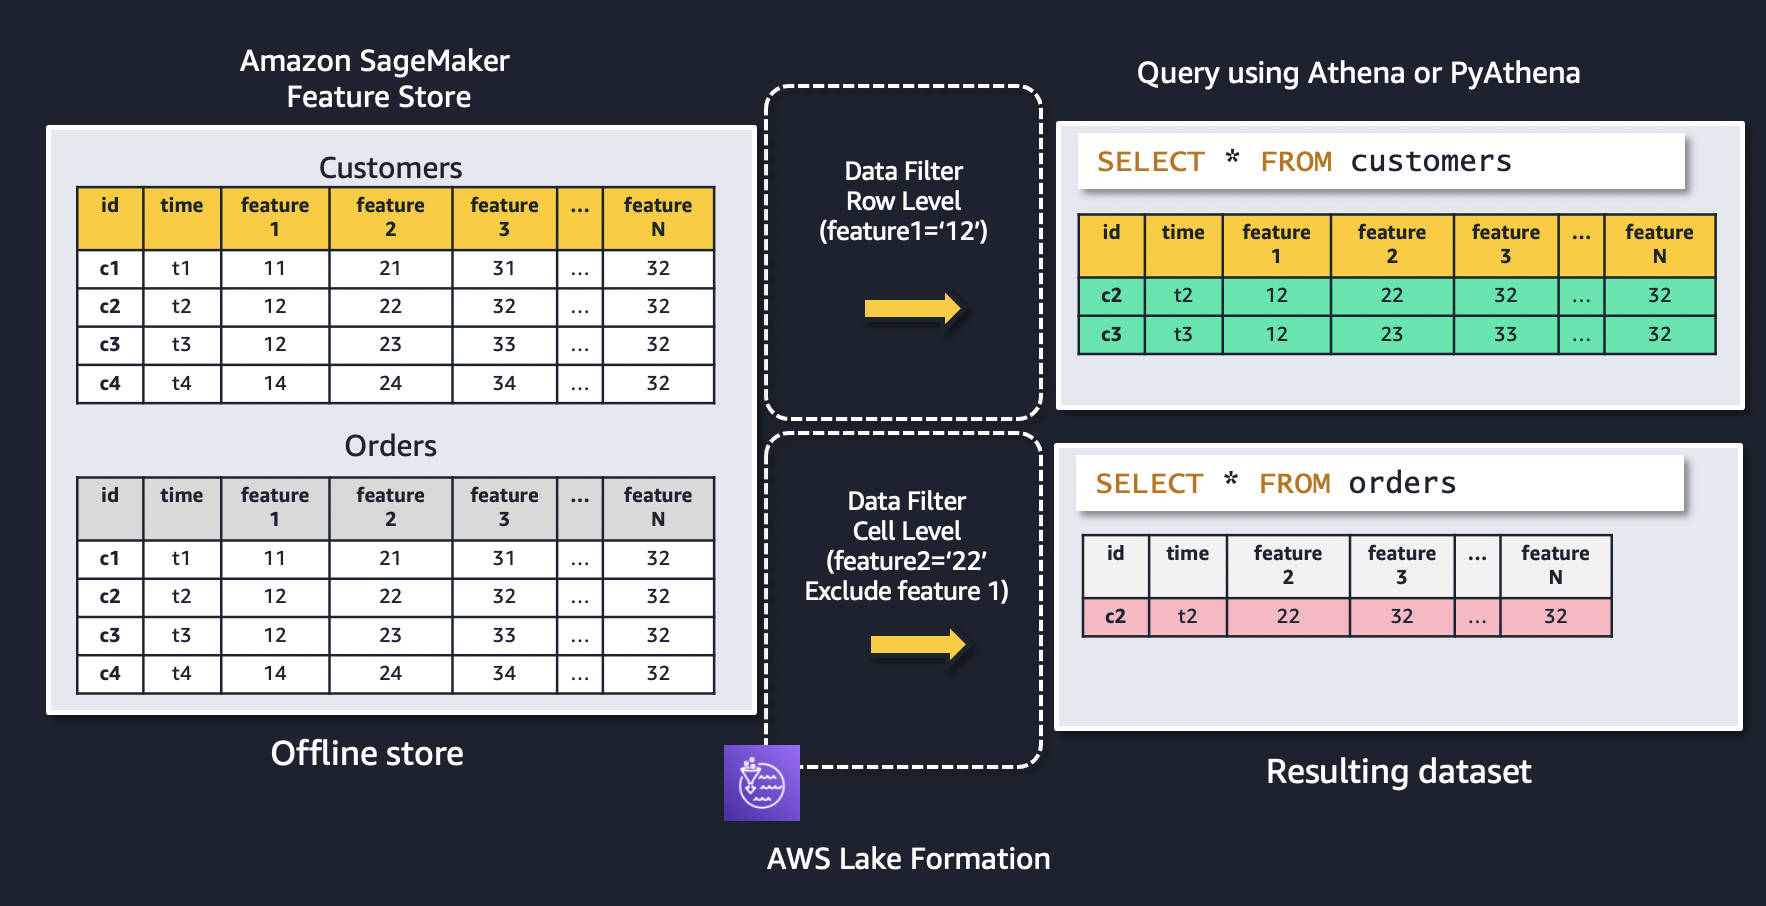
You can implement row-level and cell-level security by creating data filters. You select a data filter when you grant the SELECT Lake Formation permission on tables. In this case, we use this capability to implement a set of filters that limit access to feature groups and specific features within a feature group.
Let’s use the following figure to explain how data filters work. The figure shows two feature groups: customers and orders. A row-level data filter is applied to the customers feature group, resulting in only records where feature1 = ‘12’ is being returned. Similarly, access to the orders feature group is restricted using a cell-level data filter to only feature records where feature2 = ‘22’, as well as excluding feature 1 from the resulting dataset.
To create a new data filter, in the navigation pane on the Lake Formation console, under Data Catalog, choose Data filters and then choose Create new filter.
When you select Access to all columns and provide a row filter expression, you’re establishing row-level security (row filtering) only. In this example, we create a filter that limits access to a data scientist to only records in the orders feature group based on the value of the feature customer_id ='C7782'.

When you include or exclude specific columns and also provide a row filter expression, you’re establishing cell-level security (cell filtering). In this example, we create a filter that limits access to a data scientist to certain features of a feature group (we exclude sex and is_married) and a subset of the records in the customers feature group based on the value of the feature (customer_id ='C3126').

The following screenshot shows the data filters created.

Grant feature groups (tables) and features (columns) permission
In this section, you grant granular access control and permissions defined in Lake Formation to a SageMaker user by assigning the data filter to the SageMaker execution role associated to the user who originally created the feature groups. The SageMaker execution role is created as part of the SageMaker Studio domain setup and by default starts with AmazonSageMaker-ExecutionRole-*. You need to give this role permissions on Lake Formation APIs (GetDataAccess, StartQueryPlanning, GetQueryState, GetWorkUnits, and GetWorkUnitResults) and AWS Glue APIs (GetTables and GetDatabases) in IAM in order for it to be able to access the data.
Create the following policy in IAM, name the policy LakeFormationDataAccess, and attach it to the SageMaker execution role. You also need to attach the AmazonAthenaFullAccess policy to access Athena.
Next, you need to grant access to the Feature Store database and specific feature group table to the SageMaker execution role and assign it one of the data filters created previously. To grant data permissions inside Lake Formation, in the navigation pane, under Permissions, choose Data Lake Permissions, then choose Grant. The following screenshot demonstrates how to grant permissions with a data filter for row-level access to a SageMaker execution role.

Similarly, you can grant permissions with the data filter created for cell-level access to the SageMaker execution role.
Test Feature Store access
In this section, you validate the access controls set up in Lake Formation using a Studio notebook. This implementation uses the Feature Store Python SDK and Athena to query data from the offline feature store that has been registered in Lake Formation.
First, you test row-level access by creating an Athena query for your feature group orders with the following code. The table_name is the AWS Glue table that is automatically generated by Feature Store.
You query all records from the orders using the following query string:
Only records with customer_id = ‘C7782’ are returned as per the data filters created in Lake Formation.

Secondly, you test cell-level access by creating an Athena query for your feature group customers with the following code. The table_name is the AWS Glue table that is automatically generated by Feature Store.
You query all records from the orders using the following query string:
Only records with customer_id ='C3126' are returned as per the data filters created in Lake Formation. In addition, the features sex and is_married aren’t visible.

With this approach, you can implement granular permission access control to an offline feature store. With the Lake Formation permission model, you can limit access to certain feature groups or specific features within a feature group for individuals based on their role in the organization.
To explore the complete code example, and to try it out in your own account, see the GitHub repo.
Conclusion
SageMaker Feature Store provides a purpose-built feature management solution to help organizations scale ML development across business units and data science teams. In this post, we explained how you can use Lake Formation to implement fine-grained access control for your offline feature store. Give it a try, and let us know what you think in comments.
About the Authors
 Arnaud Lauer is a Senior Partner Solutions Architect in the Public Sector team at AWS. He enables partners and customers to understand how best to use AWS technologies to translate business needs into solutions. He brings more than 16 years of experience in delivering and architecting digital transformation projects across a range of industries, including the public sector, energy, and consumer goods. Artificial intelligence and machine learning are some of his passions. Arnaud holds 12 AWS certifications, including the ML Specialty Certification.
 Ioan Catana is an Artificial Intelligence and Machine Learning Specialist Solutions Architect at AWS. He helps customers develop and scale their ML solutions in the AWS Cloud. Ioan has over 20 years of experience, mostly in software architecture design and cloud engineering.
 Swagat Kulkarni is a Senior Solutions Architect at AWS and an AI/ML enthusiast. He is passionate about solving real-world problems for customers with cloud-native services and machine learning. Swagat has over 15 years of experience delivering several digital transformation initiatives for customers across multiple domains including retail, travel and hospitality and healthcare. Outside of work, Swagat enjoys travel, reading, and meditating.
 Charu Sareen is a Sr. Product Manager for Amazon SageMaker Feature Store. Prior to AWS, she was leading growth and monetization strategy for SaaS services at VMware. She is a data and machine learning enthusiast and has over a decade of experience spanning product management, data engineering, and advanced analytics. She has a bachelor’s degree in Information Technology from National Institute of Technology, India and an MBA from University of Michigan, Ross School of Business.