Interact with an Amazon Lex V2 bot with the AWS CLI, AWS SDK for Python (Boto3), and AWS SDK for DotNet

Amazon Lex is a service for building conversational interfaces into any application. The new Amazon Lex V2 console and APIs make it easier to build, deploy, and manage bots. The Amazon Lex V2 console and APIs provide a simple information architecture in which the bot intents and slot types are scoped to a specific language. Versioning is performed at the bot level so that resources such as intents and slot types don’t have to be versioned individually. All the resources associated with the bot (language, intents, and slot types) are archived as part of the created bot version. This new methodology makes it easier to manage your bots. You can find more information in the Amazon Lex V2 API reference.

The Amazon Lex V2 console and APIs introduce a new method to build and interact with your bots. This post illustrates different methods to interact with a Amazon Lex V2 chatbot programmatically using the:

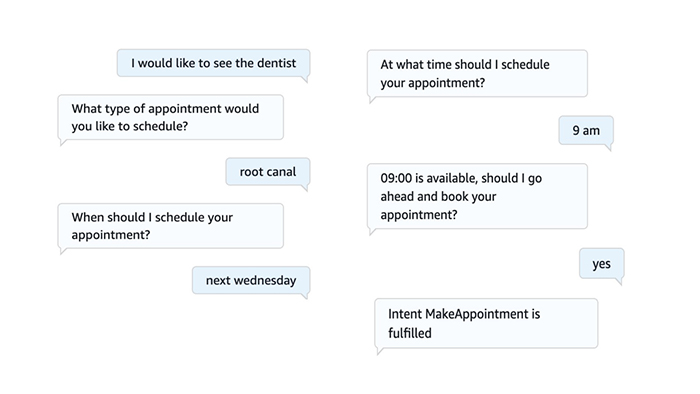
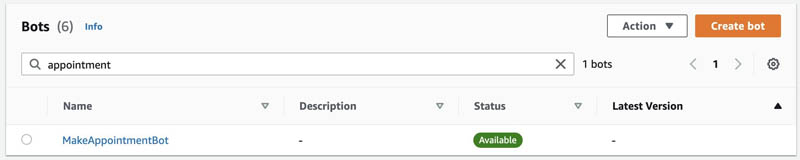
For this post, we use the MakeAppointment bot, which simulates the workflow of setting up an appointment with a dentist.

Obtain ID values for your bot

To get started, you must collect the following information:

  • Your bot ID
  • Your alias ID
  • Your locale ID (language code)

Obtain your bot ID

You can find your bot ID on the Amazon Lex V2 console.

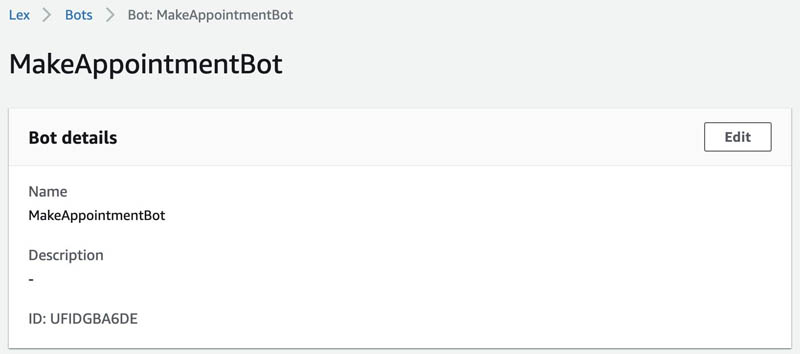
  1. On the Amazon Lex V2 console, on the Bots page, choose the bot you want to interact with.

For this post, we use MakeAppointmentBot.

  1. Choose the bot and in the Bot details section, you can find the ID.

For this post, our ID is UFIDGBA6DE.

Obtain your alias ID

To obtain your bot’s alias ID, complete the following steps:

  1. On the Amazon Lex V2 console, navigate to your bot.
  2. In the navigation pane, under Bot versions, under Deployment, choose Aliases.
  3. Choose your alias.

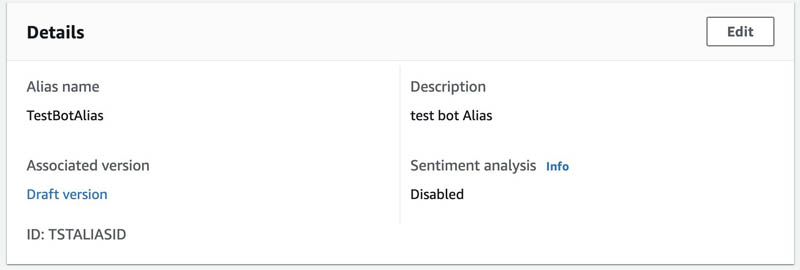
For this post, we use TestBotAlias.

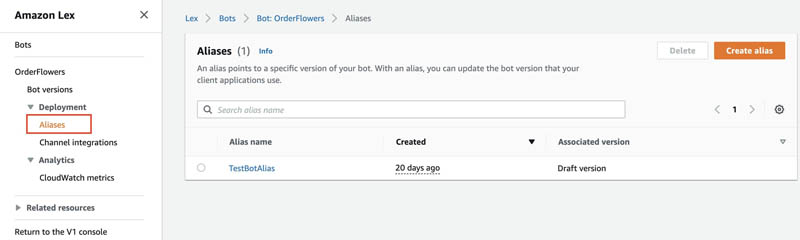
  1. In the Details section, you can find the alias ID.

For this post, our alias ID is TSTALIASID.

Obtain your locale ID

Your locale ID indicates which language your bot uses.

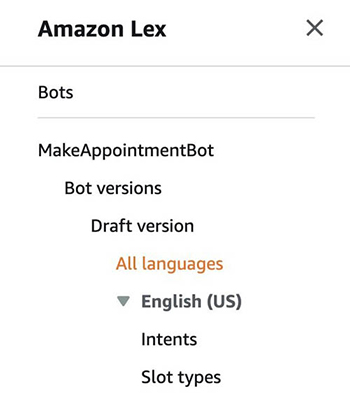
  1. On the Amazon Lex V2 console, in the navigation pane, choose Bot versions.

  1. Choose the version of your bot you want to use.

For this post, we use the version called Draft version.

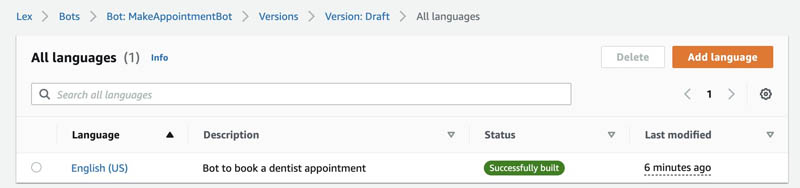
  1. In the navigation pane, under your bot version, choose All languages.

You can see a list of the available languages for your chatbot.

  1. Choose your preferred language.

For this post, we use English (US), which is en_US.

Interacting via the AWS CLI

The AWS Command Line Interface (CLI) is a unified tool to manage your AWS services. With just one tool to download and configure, you can control multiple AWS services from the command line and automate them through scripts.

To demonstrate the AWS CLI, you can use AWS CloudShell. AWS CloudShell is a browser-based shell that makes it easy to securely manage, explore, and interact with your AWS resources. CloudShell is pre-authenticated with your console credentials.

There are some cases where AWS CloudShell don’t have the latest version of the AWS CLI installed. If you receive an error “Invalid choice: ‘lexv2-runtime’”, follow the instructions contained in this guide to update the AWS CLI on AWS CloudShell.

Invalid choice: 'lexv2-runtime', maybe you meant:

  * lex-runtime
[cloudshell-user@ip-10-1-148-180 ~]$ aws --version
aws-cli/2.1.16 Python/3.7.3 Linux/4.14.209-160.339.amzn2.x86_64 exec-env/CloudShell exe/x86_64.amzn.2 prompt/off

In my case after updating, I got the following version:

[cloudshell-user@ip-10-1-148-180 ~]$ aws --version
aws-cli/2.1.28 Python/3.8.8 Linux/4.14.209-160.339.amzn2.x86_64 exec-env/CloudShell exe/x86_64.amzn.2 prompt/off

And this time when I run the “aws lexv2-runtime” command it is recognized:

[cloudshell-user@ip-10-1-148-180 ~]$ aws lexv2-runtime

usage: aws [options] <command> <subcommand> [<subcommand> ...] [parameters]
To see help text, you can run:

  aws help
  aws <command> help
  aws <command> <subcommand> help

aws: error: the following arguments are required: operation

After collecting the required information, enter your bot’s parameters (please keep in mind your IDs will be different):

bot-id='UFIDGBA6DE'
bot-alias-id='TSTALIASID'
localeId='en_US'
session-id='test-session'

To get started, you will submit the text “I would like to see the dentist” by using the following command:

aws lexv2-runtime recognize-text --bot-id 'UFIDGBA6DE' --bot-alias-id 'TSTALIASID' --locale-id 'en_US' --session-id 'test_session' --text 'I would like to see the dentist'

You will receive the following response:

{
    "messages": [
        {
            "content": "What type of appointment would you like to schedule?",
            "contentType": "PlainText"
        }
    ],
    "sessionState": {
        "dialogAction": {
            "type": "ElicitSlot",
            "slotToElicit": "AppointmentType"
        },
        "intent": {
            "name": "MakeAppointment",
            "slots": {
                "AppointmentType": null,
                "Date": null,
                "Time": null
            },
            "state": "InProgress",
            "confirmationState": "None"
        },
        "originatingRequestId": "85f22c97-b5d3-4a74-9e3d-95446768ecaa"
    },
    "interpretations": [
        {
            "nluConfidence": {
                "score": 0.84
            },
            "intent": {
                "name": "MakeAppointment",
                "slots": {
                    "AppointmentType": null,
                    "Date": null,
                    "Time": null
                },
                "state": "InProgress",
                "confirmationState": "None"
            }
        },
        {
            "intent": {
                "name": "FallbackIntent",
                "slots": {}
            }
        }
    ],
    "sessionId": "test_session"
}

Diving deep into the response you will notice the dialog state is ElicitSlot, or in other words, the chatbot is requiring the user to provide a value for the slot type ‘AppointmentType’.

 "sessionState": {
        "dialogAction": {
            "type": "ElicitSlot",
            "slotToElicit": "AppointmentType"
        }

Also, you will notice the messages:

 "messages": [
        {
            "content": "What type of appointment would you like to schedule?",
            "contentType": "PlainText"
        }

In this case you will state “Root canal” as the appointment type:

aws lexv2-runtime recognize-text --bot-id 'UFIDGBA6DE' --bot-alias-id 'TSTALIASID' --locale-id 'en_US' --session-id 'test_session' --text 'Root canal'

The response you will receive will look similar to this:

{
    "messages": [
        {
            "content": "When should I schedule your appointment?",
            "contentType": "PlainText"
        }
    ],
    "sessionState": {
        "dialogAction": {
            "type": "ElicitSlot",
            "slotToElicit": "Date"
        },
        "intent": {
            "name": "MakeAppointment",
            "slots": {
                "AppointmentType": {
                    "value": {
                        "originalValue": "Root canal",
                        "interpretedValue": "Root canal",
                        "resolvedValues": [
                            "root canal"
                        ]
                    }
                },
                "Date": null,
                "Time": null
            },
            "state": "InProgress",
            "confirmationState": "None"
        },
        "originatingRequestId": "85f22c97-b5d3-4a74-9e3d-95446768ecaa"
    },
    "interpretations": [
        {
            "nluConfidence": {
                "score": 1.0
            },
            "intent": {
                "name": "MakeAppointment",
                "slots": {
                    "AppointmentType": {
                        "value": {
                            "originalValue": "Root canal",
                            "interpretedValue": "Root canal",
                            "resolvedValues": [
                                "root canal"
                            ]
                        }
                    },
                    "Date": null,
                    "Time": null
                },
                "state": "InProgress",
                "confirmationState": "None"
            }
        },
        {
            "intent": {
                "name": "FallbackIntent",
                "slots": {}
            }
        }
    ],
    "sessionId": "test_session"
}

Check the current dialogAction:

"sessionState": {
        "dialogAction": {
            "type": "ElicitSlot",
            "slotToElicit": "Date"
        }

Also, the messages:

"messages": [
        {
            "content": "When should I schedule your appointment?",
            "contentType": "PlainText"
        }

This time you will provide the pickup date:

aws lexv2-runtime recognize-text --bot-id 'UFIDGBA6DE' --bot-alias-id 'TSTALIASID' --locale-id 'en_US' --session-id 'test_session' --text 'Next Wednesday'

This time the response will look similar to this:

{
    "messages": [
        {
            "content": "At what time should I schedule your appointment?",
            "contentType": "PlainText"
        }
    ],
    "sessionState": {
        "dialogAction": {
            "type": "ElicitSlot",
            "slotToElicit": "Time"
        },
        "intent": {
            "name": "MakeAppointment",
            "slots": {
                "AppointmentType": {
                    "value": {
                        "originalValue": "Root canal",
                        "interpretedValue": "Root canal",
                        "resolvedValues": [
                            "root canal"
                        ]
                    }
                },
                "Date": {
                    "value": {
                        "originalValue": "Next Wednesday",
                        "interpretedValue": "2021-03-17",
                        "resolvedValues": [
                            "2021-03-17"
                        ]
                    }
                },
                "Time": null
            },
            "state": "InProgress",
            "confirmationState": "None"
        },
        "originatingRequestId": "85f22c97-b5d3-4a74-9e3d-95446768ecaa"
    },
    "interpretations": [
        {
            "nluConfidence": {
                "score": 1.0
            },
            "intent": {
                "name": "MakeAppointment",
                "slots": {
                    "AppointmentType": {
                        "value": {
                            "originalValue": "Root canal",
                            "interpretedValue": "Root canal",
                            "resolvedValues": [
                                "root canal"
                            ]
                        }
                    },
                    "Date": {
                        "value": {
                            "originalValue": "Next Wednesday",
                            "interpretedValue": "2021-03-17",
                            "resolvedValues": [
                                "2021-03-17"
                            ]
                        }
                    },
                    "Time": null
                },
                "state": "InProgress",
                "confirmationState": "None"
            }
        },
        {
            "intent": {
                "name": "FallbackIntent",
                "slots": {}
            }
        }
    ],
    "sessionId": "test_session"
}

At time of writing this blog “next Wednesday” is March 17, 2021, which is what your chatbot interpreted:

chatbot interpreted:
 "Date": {
                        "value": {
                            "originalValue": "Next Wednesday",
                            "interpretedValue": "2021-03-17",
                            "resolvedValues": [
                                "2021-03-17"
                            ]
                        }

And the messages:

    "messages": [
        {
            "content": "At what time should I schedule your appointment?",
            "contentType": "PlainText"
        }

Next step is to define the Time:

aws lexv2-runtime recognize-text --bot-id 'UFIDGBA6DE' --bot-alias-id 'TSTALIASID' --locale-id 'en_US' --session-id 'test_session' --text '9 am'

The response will be similar to this:

{
    "messages": [
        {
            "content": "09:00 is available, should I go ahead and book your appointment?",
            "contentType": "PlainText"
        }
    ],
    "sessionState": {
        "dialogAction": {
            "type": "ConfirmIntent"
        },
        "intent": {
            "name": "MakeAppointment",
            "slots": {
                "AppointmentType": {
                    "value": {
                        "originalValue": "Root canal",
                        "interpretedValue": "Root canal",
                        "resolvedValues": [
                            "root canal"
                        ]
                    }
                },
                "Date": {
                    "value": {
                        "originalValue": "Next Wednesday",
                        "interpretedValue": "2021-03-17",
                        "resolvedValues": [
                            "2021-03-17"
                        ]
                    }
                },
                "Time": {
                    "value": {
                        "originalValue": "9 am",
                        "interpretedValue": "09:00",
                        "resolvedValues": [
                            "09:00"
                        ]
                    }
                }
            },
            "state": "InProgress",
            "confirmationState": "None"
        },
        "originatingRequestId": "85f22c97-b5d3-4a74-9e3d-95446768ecaa"
    },
    "interpretations": [
        {
            "nluConfidence": {
                "score": 1.0
            },
            "intent": {
                "name": "MakeAppointment",
                "slots": {
                    "AppointmentType": {
                        "value": {
                            "originalValue": "Root canal",
                            "interpretedValue": "Root canal",
                            "resolvedValues": [
                                "root canal"
                            ]
                        }
                    },
                    "Date": {
                        "value": {
                            "originalValue": "Next Wednesday",
                            "interpretedValue": "2021-03-17",
                            "resolvedValues": [
                                "2021-03-17"
                            ]
                        }
                    },
                    "Time": {
                        "value": {
                            "originalValue": "9 am",
                            "interpretedValue": "09:00",
                            "resolvedValues": [
                                "09:00"
                            ]
                        }
                    }
                },
                "state": "InProgress",
                "confirmationState": "None"
            }
        },
        {
            "intent": {
                "name": "FallbackIntent",
                "slots": {}
            }
        }
    ],
    "sessionId": "test_session"
}

This time your chatbot interpreted the value as 09:00 and used it as the value for the slot Time:

 "Time": {
                    "value": {
                        "originalValue": "9 am",
                        "interpretedValue": "09:00",
                        "resolvedValues": [
                            "09:00"
                        ]
                    }
                }

Because the slots have been set now, the sessionState dialogAction is ConfirmIntent.

'sessionState': {
        'dialogAction': {
            'type': 'ConfirmIntent'
        }

This time, messages contains the details contained in the slots.

    "messages": [
        {
            "content": "09:00 is available, should I go ahead and book your appointment?",
            "contentType": "PlainText"
        }
    ]

You will submit the confirmation:

aws lexv2-runtime recognize-text --bot-id 'UFIDGBA6DE' --bot-alias-id 'TSTALIASID' --locale-id 'en_US' --session-id 'test_session' --text 'yes'

Response will be similar to:

{
    "sessionState": {
        "dialogAction": {
            "type": "Close"
        },
        "intent": {
            "name": "MakeAppointment",
            "slots": {
                "AppointmentType": {
                    "value": {
                        "originalValue": "Root canal",
                        "interpretedValue": "Root canal",
                        "resolvedValues": [
                            "root canal"
                        ]
                    }
                },
                "Date": {
                    "value": {
                        "originalValue": "Next Wednesday",
                        "interpretedValue": "2021-03-17",
                        "resolvedValues": [
                            "2021-03-17"
                        ]
                    }
                },
                "Time": {
                    "value": {
                        "originalValue": "9 am",
                        "interpretedValue": "09:00",
                        "resolvedValues": [
                            "09:00"
                        ]
                    }
                }
            },
            "state": "ReadyForFulfillment",
            "confirmationState": "Confirmed"
        },
        "originatingRequestId": "85f22c97-b5d3-4a74-9e3d-95446768ecaa"
    },
    "interpretations": [
        {
            "nluConfidence": {
                "score": 1.0
            },
            "intent": {
                "name": "MakeAppointment",
                "slots": {
                    "AppointmentType": {
                        "value": {
                            "originalValue": "Root canal",
                            "interpretedValue": "Root canal",
                            "resolvedValues": [
                                "root canal"
                            ]
                        }
                    },
                    "Date": {
                        "value": {
                            "originalValue": "Next Wednesday",
                            "interpretedValue": "2021-03-17",
                            "resolvedValues": [
                                "2021-03-17"
                            ]
                        }
                    },
                    "Time": {
                        "value": {
                            "originalValue": "9 am",
                            "interpretedValue": "09:00",
                            "resolvedValues": [
                                "09:00"
                            ]
                        }
                    }
                },
                "state": "ReadyForFulfillment",
                "confirmationState": "Confirmed"
            }
        },
        {
            "intent": {
                "name": "FallbackIntent",
                "slots": {}
            }
        }
    ],
    "sessionId": "test_session"
}

Also the intent sate is “ReadyForFulfillment” and “Confirmed”

'state': 'ReadyForFulfillment',
'confirmationState': 'Confirmed'

Interact programmatically with Amazon Lex V2 via Boto3

Boto is the AWS SDK for Python. It enables Python developers to create, configure, and manage AWS services, such as Amazon Elastic Compute Cloud (Amazon EC2) and Amazon Simple Storage Service (Amazon S3). Boto provides an easy-to-use, object-oriented API, as well as low-level access to AWS services.

Support for Amazon Lex V2 APIs is introduced in version 1.16.59.

To interact with your Amazon Lex bot using the Boto3 lexv2-runtime, you need to use the values that you collected earlier for botID, AliasId, and localeID.

Boto3 code example

After I collected the required information, I have the following parameters (these will be different for your account):

botId='UFIDGBA6DE'
botAliasId='TSTALIASID'
localeId='en_US'

The first message you send to your bot is “I would like to see the dentist “:

import boto3
# LexV2 client uses 'lexv2-runtime'
client = boto3.client('lexv2-runtime')

# Submit the text 'I would like to see a dentist'
response = client.recognize_text(
    botId='UFIDGBA6DE',
    botAliasId='TSTALIASID',
    localeId='en_US',
    sessionId="test_session",
    text='I would like to see the dentist')

You get a response similar to the following:

{
    'ResponseMetadata': {
        'RequestId': 'e998ce7f-3381-4501-9973-970b221504a5',
        'HTTPStatusCode': 200,
        'HTTPHeaders': {
            'x-amzn-requestid': 'e998ce7f-3381-4501-9973-970b221504a5',
            'date': 'Tue,
            9Mar202123: 38: 01GMT',
            'content-type': 'application/json',
            'content-length': '666'
        },
        'RetryAttempts': 0
    },
    'messages': [
        {
            'content': 'What type of appointment would you like to schedule?',
            'contentType': 'PlainText'
        }
    ],
    'sessionState': {
        'dialogAction': {
            'type': 'ElicitSlot',
            'slotToElicit': 'AppointmentType'
        },
        'intent': {
            'name': 'MakeAppointment',
            'slots': {
                'AppointmentType': None,
                'Date': None,
                'Time': None
            },
            'state': 'InProgress',
            'confirmationState': 'None'
        },
        'originatingRequestId': '85f22c97-b5d3-4a74-9e3d-95446768ecaa'
    },
    'interpretations': [
        {
            'nluConfidence': {
                'score': 0.82
            },
            'intent': {
                'name': 'MakeAppointment',
                'slots': {
                    'AppointmentType': None,
                    'Date': None,
                    'Time': None
                },
                'state': 'InProgress',
                'confirmationState': 'None'
            }
        },
        {
            'intent': {
                'name': 'FallbackIntent',
                'slots': {
                    
                }
            }
        }
    ],
    'sessionId': 'test_session'
}

We can dive deeper into the response to see the dialog state is ElicitSlot, meaning the chatbot is requiring the user to provide a value for the slot type AppointmentType:

'sessionState': {
        'dialogAction': {
            'type': 'ElicitSlot',
            'slotToElicit': 'AppointmentType'
        }

In this case, you enter Root Canal:

response = client.recognize_text(
    botId='UFIDGBA6DE',
    botAliasId='TSTALIASID',
    localeId='en_US',
    sessionId="test_session",
    text='Root Canal')

This time, your response is the following:


{
    'ResponseMetadata': {
        'RequestId': 'fae988d3-c956-4ea4-b5f8-2646d914adf4',
        'HTTPStatusCode': 200,
        'HTTPHeaders': {
            'x-amzn-requestid': 'fae988d3-c956-4ea4-b5f8-2646d914adf4',
            'date': 'Tue,
            9Mar202123: 40: 03GMT',
            'content-type': 'application/json',
            'content-length': '842'
        },
        'RetryAttempts': 0
    },
    'messages': [
        {
            'content': 'When should I schedule your appointment?',
            'contentType': 'PlainText'
        }
    ],
    'sessionState': {
        'dialogAction': {
            'type': 'ElicitSlot',
            'slotToElicit': 'Date'
        },
        'intent': {
            'name': 'MakeAppointment',
            'slots': {
                'AppointmentType': {
                    'value': {
                        'originalValue': 'RootCanal',
                        'interpretedValue': 'RootCanal',
                        'resolvedValues': [
                            'rootcanal'
                        ]
                    }
                },
                'Date': None,
                'Time': None
            },
            'state': 'InProgress',
            'confirmationState': 'None'
        },
        'originatingRequestId': '85f22c97-b5d3-4a74-9e3d-95446768ecaa'
    },
    'interpretations': [
        {
            'nluConfidence': {
                'score': 1.0
            },
            'intent': {
                'name': 'MakeAppointment',
                'slots': {
                    'AppointmentType': {
                        'value': {
                            'originalValue': 'RootCanal',
                            'interpretedValue': 'RootCanal',
                            'resolvedValues': [
                                'rootcanal'
                            ]
                        }
                    },
                    'Date': None,
                    'Time': None
                },
                'state': 'InProgress',
                'confirmationState': 'None'
            }
        },
        {
            'intent': {
                'name': 'FallbackIntent',
                'slots': {
                    
                }
            }
        }
    ],
    'sessionId': 'test_session'
}

The chatbot interpreted that the value for the slot AppointmentType is root canal:

'slots': {
                'AppointmentType': {
                    'value': {
                        'originalValue': 'Root Canal',
                        'interpretedValue': 'Root Canal',
                        'resolvedValues': [
                            'root canal'
                        ]
                    }
                },
                'Date': None,
                'Time': None
            }

You can also check the current dialogAction:

'sessionState': {
        'dialogAction': {
            'type': 'ElicitSlot',
            'slotToElicit': 'Date'
        }

In the messages section, you can see the following:

    'messages': [
        {
            'content': 'When should I schedule your appointment?',
            'contentType': 'PlainText'
        }
    ]

Provide appointment date:

response = client.recognize_text(
    botId='UFIDGBA6DE',
    botAliasId='TSTALIASID',
    localeId='en_US',
    sessionId="test_session",
    text='Next Wednesday')

You get a response similar to the following:

{
    'ResponseMetadata': {
        'RequestId': '8639e4dd-bbfe-42a3-aa9e-96391fd821fd',
        'HTTPStatusCode': 200,
        'HTTPHeaders': {
            'x-amzn-requestid': '8639e4dd-bbfe-42a3-aa9e-96391fd821fd',
            'date': 'Tue,
            9Mar202123: 41: 51GMT',
            'content-type': 'application/json',
            'content-length': '1058'
        },
        'RetryAttempts': 0
    },
    'messages': [
        {
            'content': 'At what time should I schedule your appointment?',
            'contentType': 'PlainText'
        }
    ],
    'sessionState': {
        'dialogAction': {
            'type': 'ElicitSlot',
            'slotToElicit': 'Time'
        },
        'intent': {
            'name': 'MakeAppointment',
            'slots': {
                'AppointmentType': {
                    'value': {
                        'originalValue': 'Root Canal',
                        'interpretedValue': 'Root Canal',
                        'resolvedValues': [
                            'root canal'
                        ]
                    }
                },
                'Date': {
                    'value': {
                        'originalValue': 'Next Wednesday',
                        'interpretedValue': '2021-03-17',
                        'resolvedValues': [
                            '2021-03-17'
                        ]
                    }
                },
                'Time': None
            },
            'state': 'InProgress',
            'confirmationState': 'None'
        },
        'originatingRequestId': '85f22c97-b5d3-4a74-9e3d-95446768ecaa'
    },
    'interpretations': [
        {
            'nluConfidence': {
                'score': 1.0
            },
            'intent': {
                'name': 'MakeAppointment',
                'slots': {
                    'AppointmentType': {
                        'value': {
                            'originalValue': 'RootCanal',
                            'interpretedValue': 'RootCanal',
                            'resolvedValues': [
                                'rootcanal'
                            ]
                        }
                    },
                    'Date': {
                        'value': {
                            'originalValue': 'Next Wednesday',
                            'interpretedValue': '2021-03-17',
                            'resolvedValues': [
                                '2021-03-17'
                            ]
                        }
                    },
                    'Time': None
                },
                'state': 'InProgress',
                'confirmationState': 'None'
            }
        },
        {
            'intent': {
                'name': 'FallbackIntent',
                'slots': {
                    
                }
            }
        }
    ],
    'sessionId': 'test_session'
}

At the time of this writing, “next Wednesday” is March 17, 2021, which is exactly what your chatbot interpreted:

 'Date': {
                        'value': {
                            'originalValue': 'Next Wednesday',
                            'interpretedValue': '2021-03-17',
                            'resolvedValues': [
                                '2021-03-17'
                            ]
                        }

You can see the following in the messages section:

'messages': [
        {
            'content': 'At what time should I schedule your appointment?',
            'contentType': 'PlainText'
        }
    ]

The next step is to define the PickupTime:

'sessionState': {
        'dialogAction': {
            'type': 'ElicitSlot',
            'slotToElicit': 'Time'
        }

Use the following code:

response = client.recognize_text(
    botId='UFIDGBA6DE',
    botAliasId='TSTALIASID',
    localeId='en_US',
    sessionId="test_session",
    text='9 am')

You receive a response similar to the following:

{
    'ResponseMetadata': {
        'RequestId': 'e8c06004-960b-442f-bf0d-0d995ec366bf',
        'HTTPStatusCode': 200,
        'HTTPHeaders': {
            'x-amzn-requestid': 'e8c06004-960b-442f-bf0d-0d995ec366bf',
            'date': 'Tue,
            9Mar202123: 44: 39GMT',
            'content-type': 'application/json',
            'content-length': '1223'
        },
        'RetryAttempts': 0
    },
    'messages': [
        {
            'content': '09:00 is available, should I go ahead and book your appointment?',
            'contentType': 'PlainText'
        }
    ],
    'sessionState': {
        'dialogAction': {
            'type': 'ConfirmIntent'
        },
        'intent': {
            'name': 'MakeAppointment',
            'slots': {
                'AppointmentType': {
                    'value': {
                        'originalValue': 'Root Canal',
                        'interpretedValue': 'Root Canal',
                        'resolvedValues': [
                            'root canal'
                        ]
                    }
                },
                'Date': {
                    'value': {
                        'originalValue': 'Next Wednesday',
                        'interpretedValue': '2021-03-17',
                        'resolvedValues': [
                            '2021-03-17'
                        ]
                    }
                },
                'Time': {
                    'value': {
                        'originalValue': '9 am',
                        'interpretedValue': '09:00',
                        'resolvedValues': [
                            '09:00'
                        ]
                    }
                }
            },
            'state': 'InProgress',
            'confirmationState': 'None'
        },
        'originatingRequestId': '85f22c97-b5d3-4a74-9e3d-95446768ecaa'
    },
    'interpretations': [
        {
            'nluConfidence': {
                'score': 1.0
            },
            'intent': {
                'name': 'MakeAppointment',
                'slots': {
                    'AppointmentType': {
                        'value': {
                            'originalValue': 'Root Canal',
                            'interpretedValue': 'Root Canal',
                            'resolvedValues': [
                                'rootcanal'
                            ]
                        }
                    },
                    'Date': {
                        'value': {
                            'originalValue': 'Next Wednesday',
                            'interpretedValue': '2021-03-17',
                            'resolvedValues': [
                                '2021-03-17'
                            ]
                        }
                    },
                    'Time': {
                        'value': {
                            'originalValue': '9 am',
                            'interpretedValue': '09:00',
                            'resolvedValues': [
                                '09:00'
                            ]
                        }
                    }
                },
                'state': 'InProgress',
                'confirmationState': 'None'
            }
        },
        {
            'intent': {
                'name': 'FallbackIntent',
                'slots': {
                    
                }
            }
        }
    ],
    'sessionId': 'test_session'
}

The chatbot set your appointment Time for 9:00 AM:

 'Time': {
                        'value': {
                            'originalValue': '9 am',
                            'interpretedValue': '09:00',
                            'resolvedValues': [
                                '09:00'
                            ]
                        }

Because the slots have been set, the sessionState dialogAction is now ConfirmIntent:

'sessionState': {
        'dialogAction': {
            'type': 'ConfirmIntent'
        }

This time, the messages section contains the details contained in the slots:

'messages': [
        {
            'content': '09:00 is available, should I go ahead and book your appointment?',
            'contentType': 'PlainText'
        }

You submit the confirmation:

response = client.recognize_text(
    botId='4HKK09CVHD',
    botAliasId='TSTALIASID',
    localeId='en_US',
    sessionId="test_session",
    text='yes')

The response looks like the following:

{
    'ResponseMetadata': {
        'RequestId': '362d4478-caea-49cf-8b1b-b0ab035e324f',
        'HTTPStatusCode': 200,
        'HTTPHeaders': {
            'x-amzn-requestid': '362d4478-caea-49cf-8b1b-b0ab035e324f',
            'date': 'Tue,
            9Mar202123: 46: 48GMT',
            'content-type': 'application/json',
            'content-length': '1125'
        },
        'RetryAttempts': 0
    },
    'sessionState': {
        'dialogAction': {
            'type': 'Close'
        },
        'intent': {
            'name': 'MakeAppointment',
            'slots': {
                'AppointmentType': {
                    'value': {
                        'originalValue': 'Root Canal',
                        'interpretedValue': 'Root Canal',
                        'resolvedValues': [
                            'root canal'
                        ]
                    }
                },
                'Date': {
                    'value': {
                        'originalValue': 'Next Wednesday',
                        'interpretedValue': '2021-03-17',
                        'resolvedValues': [
                            '2021-03-17'
                        ]
                    }
                },
                'Time': {
                    'value': {
                        'originalValue': '9 am',
                        'interpretedValue': '09:00',
                        'resolvedValues': [
                            '09:00'
                        ]
                    }
                }
            },
            'state': 'ReadyForFulfillment',
            'confirmationState': 'Confirmed'
        },
        'originatingRequestId': '85f22c97-b5d3-4a74-9e3d-95446768ecaa'
    },
    'interpretations': [
        {
            'nluConfidence': {
                'score': 1.0
            },
            'intent': {
                'name': 'MakeAppointment',
                'slots': {
                    'AppointmentType': {
                        'value': {
                            'originalValue': 'Root Canal',
                            'interpretedValue': 'Root Canal',
                            'resolvedValues': [
                                'root canal'
                            ]
                        }
                    },
                    'Date': {
                        'value': {
                            'originalValue': 'Next Wednesday',
                            'interpretedValue': '2021-03-17',
                            'resolvedValues': [
                                '2021-03-17'
                            ]
                        }
                    },
                    'Time': {
                        'value': {
                            'originalValue': '9 am',
                            'interpretedValue': '09:00',
                            'resolvedValues': [
                                '09:00'
                            ]
                        }
                    }
                },
                'state': 'ReadyForFulfillment',
                'confirmationState': 'Confirmed'
            }
        },
        {
            'intent': {
                'name': 'FallbackIntent',
                'slots': {
                    
                }
            }
        }
    ],
    'sessionId': 'test_session'
}

The sessionState dialogAction this time is Close:

'sessionState': {
        'dialogAction': {
            'type': 'Close'
        }

Also, the intent state is ReadyForFulfillment and Confirmed:

'state': 'ReadyForFulfillment',
'confirmationState': 'Confirmed'

About DotNet SDK

The AWS SDK for DotNet provides an interface that you can use from your DotNet applications to interact with your bots. You can use the SDK for DotNet to build client applications for users.

The following application interacts with the . It uses the AmazonLexRuntimeV2Client from the SDK for DotNet to call the RecognizeText operation to conduct a conversation with the bot.

To run the application, you need the following values:

  • botId –The identifier assigned to the bot when you created it. You can see the bot ID on the Amazon Lex console on the Bot details
  • botAliasId – The identifier assigned to the bot alias when you created it. You can see the bot alias ID on the Amazon Lex console on the Aliases If you can’t see the alias ID in the list, choose the gear icon on the upper right and turn on Alias ID.
  • localeId – The identifier of the locale that you used for your bot. For a list of locales and language codes, see Languages and locales supported by Amazon Lex.
  • accessKey and secretKey – The authentication keys for your account. If you don’t have a set of keys, create them using the AWS Identity and Access Management (IAM) console.
  • sessionId – An identifier for the session with the Amazon Lex bot. In this case, the code uses a random UUID.

Additionally, if your bot isn’t in the US East (N. Virginia) AWS Region, make sure that you change the region value.

Let’s look at the following sample code to understand how we can easily interact with Amazon Lex V2 from the DotNet framework.

First, we create an AmazonLexRuntimeV2Client object with the access key and secret:

            // create a LexV2 runtime client
            AmazonLexRuntimeV2Client client = 
            new AmazonLexRuntimeV2Client(access_key
                                        , secret_key
                                        , Amazon.RegionEndpoint.GetBySystemName(preferred_region));
           

Provide the following information:

// provide the parameters
// Randomly generated GUID unique per session
string sessionId = Guid.NewGuid().ToString();

// provide the unique BotId
string botId = "XXXXX";
//provide the unique BotAliasId 
string botAliasId = "XXXXX";
// refer to the list of supported locales 
string localeId = "en_US"; 

The request uses the required URI parameters botAliasId, botId, localeId, and sessionId.

The user initiates the conversation by providing the intent:

string userInput1 = ""

Next, we call the GetRecongizeTextV2Response method by passing the required parameters and the AmazonLexRuntimeV2Client client object:

var response1 = GetRecongizeTextV2Response(client, botId, botAliasId, localeId, sessionId, userInput1)

Inside the GetRecongizeTextV2Response method, we create a RecognizeTextRequest object, containing the parameters to the RecognizeText operation:

RecognizeTextRequest request = new RecognizeTextRequest
{
    BotAliasId = botAliasId,
    BotId = botId,
    LocaleId = localeId,
    SessionId = sessionId,
    Text = userInput
};

The RecognizeTextRequest in JSON format looks like the following:

{
    "BotAliasId": "YOURBOTALIASID",
    "BotId": "YOURBOTID",
    "LocaleId": "en_US",
    "RequestAttributes": {
        
    },
    "SessionId": "cb447544-1920-432d-aa41-4ff2237a0a62",
    "SessionStateValue": null,
    "Text": "I would like to see the dentist"
}

Then we send the user input to Amazon Lex. Client applications can use this API to send requests to Amazon Lex at runtime. You can send requests synchronously or asynchronously. For this post, we send the request using the RecognizeTextAsync method asynchronously. Amazon Lex interprets the user input using the machine learning model that it built for the bot. See the following code:

response = client.RecognizeTextAsync(request).GetAwaiter().GetResult();

In response, Amazon Lex returns the next message to convey to the user and an optional response card to display:

{
    "Interpretations": [
        {
            "Intent": {
                "ConfirmationState": {
                    "Value": "None"
                },
                "Name": "MakeAppointment",
                "Slots": {
                    "AppointmentType": null,
                    "Date": null,
                    "Time": null
                },
                "State": {
                    "Value": "InProgress"
                }
            },
            "NluConfidence": {
                "Score": 0.84
            },
            "SentimentResponse": null
        },
        {
            "Intent": {
                "ConfirmationState": null,
                "Name": "FallbackIntent",
                "Slots": {
                    
                },
                "State": null
            },
            "NluConfidence": null,
            "SentimentResponse": null
        }
    ],
    "Messages": [
        {
            "Content": "What type of appointment would you like to schedule?",
            "ContentType": {
                "Value": "PlainText"
            },
            "ImageResponseCard": null
        }
    ],
    "RequestAttributes": {
        
    },
    "SessionId": "cb447544-1920-432d-aa41-4ff2237a0a62",
    "SessionStateValue": {
        "ActiveContexts": [
            
        ],
        "DialogAction": {
            "SlotToElicit": "AppointmentType",
            "Type": {
                "Value": "ElicitSlot"
            }
        },
        "Intent": {
            "ConfirmationState": {
                "Value": "None"
            },
            "Name": "MakeAppointment",
            "Slots": {
                "AppointmentType": null,
                "Date": null,
                "Time": null
            },
            "State": {
                "Value": "InProgress"
            }
        },
        "OriginatingRequestId": "36e1cb54-1861-45c9-8d67-898e632daf31",
        "SessionAttributes": {
            
        }
    },
    "ResponseMetadata": {
        "RequestId": "36e1cb54-1861-45c9-8d67-898e632daf31",
        "Metadata": {
            
        }
    },
    "ContentLength": 690,
    "HttpStatusCode": 200
}

As you can see, Amazon Lex returns the next message inside the Content as a plain text, with HttpStatusCode as 200.

DotNet SDK code example

The following is the full source code:

using System;
using Amazon.LexModelsV2;
using Amazon.LexRuntimeV2;
using Amazon.LexRuntimeV2.Model;

// This is a sample application to interact with a bot using RecognizeText API using DotNet.
namespace OrderFlowerV2
{
    class OrderFlowers
    {
      
        const string access_key = "XXXXXXXXXX"; // provide you access key
        const string secret_key = "XXXXXXXXXX"; // provide the secret
        const string preferred_region = "XXXXX"; // provide an appropriate region


        static void Main(string[] args)
        {
            
            // create a LexV2 runtime client
            AmazonLexRuntimeV2Client client = new AmazonLexRuntimeV2Client(access_key,
            secret_key, Amazon.RegionEndpoint.GetBySystemName(preferred_region));
            
            string sessionId = Guid.NewGuid().ToString(); // Randomly generated GUID unique per session.
            string botId = "XXXXX"; // provide the unique BotId
            string botAliasId = "XXXXX"; //provide the unique BotAliasId
            string localeId = "en_US"; // refer to the list of supported locales

            // utterance 1
            string userInput1 = "I would like to order flowers";
            var response1 = GetRecongizeTextV2Response(client
                                                        , botId, botAliasId, localeId, sessionId, userInput1);
            
            Console.WriteLine("User - "+userInput1);
            foreach (var message in response1.Messages)
            {
                Console.WriteLine("Bot - "+message.Content);
            }

            // utterance 2
            string userInput2 = "1 rose";
            var response2 = GetRecongizeTextV2Response(client
                                                       , botId, botAliasId, localeId, sessionId, userInput2);
            
            Console.WriteLine("User - "+userInput2);
            foreach (var message in response2.Messages)
            {
                Console.WriteLine("Bot - "+message.Content);
            }

            // utterance 3
            string userInput3 = "next Monday";
            var response3 = GetRecongizeTextV2Response(client, botId, botAliasId, localeId, sessionId, userInput3);
            
            Console.WriteLine("User - "+userInput3);
            foreach (var message in response3.Messages)
            {
                Console.WriteLine("Bot - "+message.Content);
            }

            // utterance 4
            string userInput4 = "7 in the evening";
            var response4 = GetRecongizeTextV2Response(client, botId, botAliasId, localeId, sessionId, userInput4);
            
            Console.WriteLine("User - "+userInput4);
            foreach (var message in response4.Messages)
            {
                Console.WriteLine("Bot - "+message.Content);
            }

            // utterance 5
            string userInput5 = "Yes";
            var response5 = GetRecongizeTextV2Response(client, botId, botAliasId, localeId, sessionId, userInput5);
            
            Console.WriteLine("User - "+userInput5);
            foreach (var message in response5.Messages)
            {
                Console.WriteLine("Bot - "+message.Content);
            }
        }
        /// <summary>
        /// Call Amazon LexV2 RecognizeTextAsync method to get the response from the Bot
        /// </summary>
         /// <param name="client"></param>
        /// <param name="botId"></param>
        /// <param name="botAliasId"></param>
        /// <param name="localeId"></param>
        /// <param name="sessionId"></param>
        /// <param name="userInput"></param>
        /// <returns></returns>
        private static RecognizeTextResponse GetRecongizeTextV2Response(AmazonLexRuntimeV2Client client, string botId, string botAliasId, string localeId, string sessionId, string userInput)
        {
            // create a RecognizeTextResponse object
            RecognizeTextResponse response = new RecognizeTextResponse();
            try
            {
                // create RecognizeTextRequest object with the required parameters
                RecognizeTextRequest request = new RecognizeTextRequest
                {
                    BotAliasId = botAliasId,
                    BotId = botId,
                    LocaleId = localeId,
                    SessionId = sessionId,
                    Text = userInput
                };
                // call the RecognizeText async method to get the response 
                response = client.RecognizeTextAsync(request).GetAwaiter().GetResult();
                
            }catch(AmazonLexModelsV2Exception exception)
            {
                Console.WriteLine("AmazonLexModelsV2Exception - "+exception.Message);
            }
            catch(AmazonLexRuntimeV2Exception exception)
            {
                Console.WriteLine("AmazonLexRuntimeV2Exception - "+exception.Message);
            }
            catch(Exception exception)
            {
                Console.WriteLine("Exception - "+exception.Message);
            }
            return response;
        }
    }
}

Conclusion

Now that you have learned how to interact with your Amazon Lex v2 chatbot programmatically with the AWS CLI, Boto3, and, the AWS SDK for DotNet, you can integrate your bots with your applications or with different platforms. If you want to learn more about Amazon Lex v2, you can explore building a banking bot with support for English and Spanish. You can also dive deep into Amazon Lex through the Developer Guide.


About the Authors

Juan Bustos is an AI Services Specialist Solutions Architect at Amazon Web Services, based in Dallas, TX. Outside of work, he loves spending time writing and playing music as well as trying random restaurants with his family.


Wrick Talukdar is a Senior Solutions Architect with Amazon Web Services and is based in Calgary, Canada. Wrick works with enterprise AWS customers to transform their business through innovative use of cloud technologies. Outside work he enjoys reading and photography.


Esther Lee is a Product Manager for AWS Language AI Services. She is passionate about the intersection of technology and education. Out of the office, Esther enjoys long walks along the beach, dinners with friends and friendly rounds of Mahjong.

Read More

DeepLearning.AI, Coursera, and AWS launch the new Practical Data Science Specialization with Amazon SageMaker

Amazon Web Services (AWS), Coursera, and DeepLearning.AI are excited to announce Practical Data Science, a three-course, 10-week, hands-on specialization designed for data professionals to quickly learn the essentials of machine learning (ML) in the AWS Cloud. DeepLearning.AI was founded in 2017 by Andrew Ng, an ML and education pioneer, to fill a need for world-class AI education. DeepLearning.AI teamed up with an all-female team of instructors including Amazon ML Solutions Architects and Developer Advocates to develop and deliver the three-course specialization on Coursera’s education platform. Sign up for the Practical Data Science Specialization today on Coursera.

Moving data science projects from idea to production requires a new set of skills to address the scale and operational efficiencies required by today’s ML problems. This specialization addresses common challenges we hear from our customers and teaches you the practical knowledge needed to efficiently deploy your data science projects at scale in the AWS Cloud.

Specialization overview

The Practical Data Science Specialization is designed for data-focused developers, scientists, and analysts familiar with Python to learn how to build, train, and deploy scalable, end-to-end ML pipelines—both automated and human-in-the-loop—in the AWS Cloud. Each of the 10 weeks features a comprehensive, hands-on lab developed specifically for this specialization and hosted by AWS Partner Vocareum. The labs provide hands-on experience with state-of-the-art algorithms for natural language processing (NLP) and natural language understanding (NLU) using Amazon SageMaker and Hugging Face’s highly-optimized implementation of the BERT algorithm.

In the first course, you learn foundational concepts for exploratory data analysis (EDA), automated machine learning (AutoML), and text classification algorithms. With Amazon SageMaker Clarify and Amazon SageMaker Data Wrangler, you analyze a dataset for statistical bias, transform the dataset into machine-readable features, and select the most important features to train a multi-class text classifier. You then perform AutoML to automatically train, tune, and deploy the best text classification algorithm for the given dataset using Amazon SageMaker Autopilot. Next, you work with Amazon SageMaker BlazingText, a highly optimized and scalable implementation of the popular FastText algorithm, to train a text classifier with very little code.

In the second course, you learn to automate an NLP task by building an end-to-end ML pipeline using BERT with Amazon SageMaker Pipelines. Your pipeline first transforms the dataset into BERT-readable features and stores the features in the Amazon SageMaker Feature Store. It then fine-tunes a text classification model to the dataset using a Hugging Face pre-trained model that has learned to understand human language from millions of Wikipedia documents. Finally, your pipeline evaluates the model’s accuracy and only deploys the model if the accuracy exceeds a given threshold.

In the third course, you learn a series of performance-improvement and cost-reduction techniques to automatically tune model accuracy, compare prediction performance, and generate new training data with human intelligence. After tuning your text classifier using hyperparameter tuning, you deploy two model candidates into an A/B test to compare their real-time prediction performance and automatically scale the winning model using Amazon SageMaker Hosting. Lastly, you set up a human-in-the-loop pipeline to fix misclassified predictions and generate new training data using Amazon Augmented AI (Amazon A2I) and Amazon SageMaker Ground Truth.

“The field of data science is constantly evolving with new tools, technologies, and methods,” says Betty Vandenbosch, Chief Content Officer at Coursera. “We’re excited to expand our collaboration with DeepLearning.AI and AWS to help data scientists around the world keep up with the many tools at their disposal. Through hands-on learning, cutting-edge technology, and expert instruction, this new content will help learners acquire the latest job-relevant data science skills.”

Register today

The Practical Data Science Specialization from DeepLearning.AI, AWS, and Coursera is a great way to learn AI and ML essentials in the cloud. The three-course specialization is a great resource to start building and operationalizing data science projects efficiently with the depth and breadth of Amazon ML services. Improve your data science skills by signing up for the Practical Data Science Specialization today at Coursera!


About the Authors

 Antje Barth is a Senior Developer Advocate for AI and Machine Learning at Amazon Web Services (AWS). She is co-author of the O’Reilly book – Data Science on AWS. Antje frequently speaks at AI / ML conferences, events, and meetups around the world. Previously, Antje worked in technical evangelism and solutions engineering at Cisco and MapR, focused on data center technologies, big data, and AI applications. Antje co-founded the Düsseldorf chapter of Women in Big Data.


Chris Fregly is a Principal Developer Advocate for AI and Machine Learning at Amazon Web Services (AWS). He is a co-author of the O’Reilly book – Data Science on AWS. Chris has founded multiple global meetups focused on Apache Spark, TensorFlow, and Kubeflow. He regularly speaks at AI / ML conferences worldwide, including O’Reilly AI & Strata, Open Data Science Conference (ODSC), and GPU Technology Conference (GTC). Previously, Chris founded PipelineAI, where he worked with many AI-first startups and enterprises to continuously deploy ML/AI Pipelines using Apache Spark ML, Kubernetes, TensorFlow, Kubeflow, Amazon EKS, and Amazon SageMaker.


Shelbee EigenbrodeShelbee Eigenbrode is a Principal AI and Machine Learning Specialist Solutions Architect at Amazon Web Services (AWS). She holds 6 AWS certifications and has been in technology for 23 years spanning multiple industries, technologies, and roles. She is currently focusing on combining her DevOps and ML background to deliver and manage ML workloads at scale. With over 35 patents granted across various technology domains, she has a passion for continuous innovation and using data to drive business outcomes. Shelbee co-founded the Denver chapter of Women in Big Data.


Sireesha Muppala is an Enterprise Principal SA, AI/ML at Amazon Web Services (AWS) who guides customers on architecting and implementing machine learning solutions at scale. She received her Ph.D. in Computer Science from the University of Colorado, Colorado Springs, and has authored several research papers, whitepapers, blog articles. Sireesha frequently speaks at industry conferences, events, and meetups. She co-founded the Denver chapter of Women in Big Data.

Read More

Use Amazon Translate in Amazon SageMaker Notebooks

Amazon Translate is a neural machine translation service that delivers fast, high-quality, and affordable language translation in 71 languages and 4,970 language pairs. Amazon Translate is great for performing batch translation when you have large quantities of pre-existing text to translate and real-time translation when you want to deliver on-demand translations of content as a feature of your applications. It can also handle documents that are written in multiple languages.

Document automation is a common use case where machine learning (ML) can be applied to simplify storing, managing, and extracting insights from documents. In this post, we look at how to run batch translation jobs using the Boto3 Python library as run from an Amazon SageMaker notebook instance. You can also generalize this process to run batch translation jobs from other AWS compute services.

Roles and permissions

We start by creating an AWS Identity and Access Management (IAM) role and access policy to allow SageMaker to run batch translation jobs. If you’re using a simple text translation (such as under 5,000 bytes), the job is synchronous and the data is passed to Amazon Translate as bytes, However, when run as a batch translation job where files are accessed from an Amazon Simple Storage Service (Amazon S3) bucket, the data is read directly by Amazon Translate instead of being passed as bytes by the code run in the SageMaker notebook (in case of shorter text strings).

This section creates the permissions need to allow Amazon Translate access the S3 files.

  1. On the IAM console, choose Roles.
  2. Choose Create a role.
  3. Choose AWS service as your trusted entity.
  4. For Common use cases, choose EC2 or Lambda (for this post, we choose Lambda).

  1. Choose Next: Permissions.

For this post, we create a policy that’s not too open.

  1. Choose Create policy.

  1. On the JSON tab, enter the following policy code, which for this post is named policy-rk-read-write (also provide the name of the bucket containing the translated files):
{
    "Version": "2012-10-17",
    "Statement": [
        {
            "Effect": "Allow",
            "Action": [
                "s3:ListBucket"
            ],
            "Resource": [
                "arn:aws:s3:::your-bucket"
            ]
        },
        {
            "Effect": "Allow",
            "Action": [
                "s3:PutObject",
                "s3:GetObject",
                "s3:DeleteObject"
            ],
            "Resource": [
                "arn:aws:s3:::your-bucket/*"
            ]
        }
    ]
}

  1. On the Create role page, attach your new policy to the role.

  1. For Role name, enter a name (for this post, we name it translates3access2).
  2. Choose Create role.

So far everything you have done is a common workflow; now we make a change that allows Amazon Translate to have that trust relationship.

  1. On the IAM console, choose the role you just created.

  1. On the Trust relationships tab, choose Edit trust relationship.

  1. In the Service section, replace the service name with translate.

For example, the following screenshot shows the code with Service defined as lambda.amazonaws.com.

The following screenshot shows the updated code as translate.amazonaws.com.

  1. Choose Update Trust Policy.

Use a SageMaker notebook with Boto3

We can now run a Jupyter notebook on SageMaker. Every notebook instance has an execution role, which we use to grant permissions for Amazon Translate. If you’re performing a synchronous translation with a short text, all you need to do is provide TranslateFullAccess to this role. In production, you can narrow down the permissions with granular Amazon Translate access.

  1. On the SageMaker console, choose the notebook instance you created.
  2. In the Permissions and encryption section, choose the role.

  1. Choose Attach policies.

  1. Search for and choose TranslateFullAccess.

If you haven’t already configured this role to have access to Amazon S3, you can do so following the same steps.

You can also choose to give access to all S3 buckets or specific S3 buckets when you create a SageMaker notebook instance and create a new role.

For this post, we attach the AmazonS3FullAccess policy to the role.

Run an Amazon Translate synchronous call

You can now run a simple synchronous Amazon Translation job on your SageMaker notebook.

Run an Amazon Translate asynchronous call

If you try to run a batch translation job using Boto3 as in the following screenshot, you have a parameter called DataAccessRoleArn. This is the SageMaker execution role we identified earlier; we need to be able to pass this role to Amazon Translate, thereby allowing Amazon Translate to access data in the S3 bucket. We can configure this on the console, wherein the role is directly passed to Amazon Translate instead of through code run from a SageMaker notebook.

You first need to locate your role ARN.

  1. On the IAM console, choose the role you created (translates3access2).
  2. On the Summary page, copy the role ARN.

  1. Create a new policy (for this post, we call it IAMPassPolicyTranslate).
  2. Enter the following JSON code (provide your role ARN):
    {
        "Version": "2012-10-17",
        "Statement": [
            {
                "Sid": "TranslateAsyncPass",
                "Effect": "Allow",
                "Action": "iam:PassRole",
                "Resource": "arn:aws:iam::XXXXXXXXXX:role/translates3access2"
                
            }
        ]
    }
    

  3. Choose Next.
  4. You can skip the tags section and choose Next
  5. Provide a name for the policy (for this post, we name it IAMPassPolicyTranslate).

This policy can now pass the translates3access2 role.

The next step is to attach this policy to the SageMaker execution role.

  1. Choose the execution role.
  2. Choose Attach policies.

  1. Attach the policy you just created (IAMPassPolicyTranslate).

You can now run the code in the SageMaker notebook instance.

Conclusion

You have seen how to run batch jobs using Amazon Translate in a SageMaker notebook. You can easily apply the same process to running the code using Amazon Elastic Container Service (Amazon ECS), Amazon Elastic Kubernetes Service (Amazon EKS), Amazon Elastic Compute Cloud (Amazon EC2), or other services. You can also as a next step combine services like Amazon Comprehend, Amazon Transcribe, or Amazon Kendra to automate managing, searching, and adding metadata to your documents or textual data.

For more information about Amazon Translate, see Amazon Translate resources.


About the Authors

Raj Kadiyala is an AI/ML Tech Business Development Manager in AWS WWPS Partner Organization. Raj has over 12 years of experience in Machine Learning and likes to spend his free time exploring machine learning for practical every day solutions and staying active in the great outdoors of Colorado.


Watson G. Srivathsan is the Sr. Product Manager for Amazon Translate, the AWS natural language processing service. On weekends you will find him exploring the outdoors in the Pacific Northwest.

Read More

Build reusable, serverless inference functions for your Amazon SageMaker models using AWS Lambda layers and containers

In AWS, you can host a trained model multiple ways, such as via Amazon SageMaker deployment, deploying to an Amazon Elastic Compute Cloud (Amazon EC2) instance (running a Flask + NGINX, for example), AWS Fargate, Amazon Elastic Kubernetes Service (Amazon EKS), or AWS Lambda.

SageMaker provides convenient model hosting services for model deployment, and provides an HTTPS endpoint where your machine learning (ML) model is available to provide inferences. This lets you focus on your deployment options such as instance type, automatic scaling policies, model versions, inference pipelines, and other features that make deployment easy and effective for handling production workloads. The other deployment options we mentioned require additional heavy lifting, such as launching a cluster or an instance, maintaining Docker containers with the inference code, or even creating your own APIs to simplify operations.

This post shows you how to use AWS Lambda to host an ML model for inference and explores several options to build layers and containers, including manually packaging and uploading a layer, and using AWS CloudFormation, AWS Serverless Application Model (AWS SAM), and containers.

Using Lambda for ML inference is an excellent alternative for some use cases for the following reasons:

  • Lambda lets you run code without provisioning or managing servers.
  • You pay only for the compute time you consume—there is no charge when you’re not doing inference.
  • Lambda automatically scales by running code in response to each trigger (or in this case, an inference call from a client application for making a prediction using the trained model). Your code runs in parallel and processes each trigger individually, scaling with the size of the workload.
  • You can limit the number of concurrent calls to an account-level default of 1,000, or request an appropriate limit increase.
  • The inference code in this case is just the Lambda code, which you can edit directly on the Lambda console or using AWS Cloud9.
  • You can store the model in the Lambda package or container, or pulled down from Amazon Simple Storage Service (Amazon S3). The latter method introduces additional latency, but it’s very low for small models.
  • You can trigger Lambda via various services internally, or via Amazon API Gateway.

One limitation of this approach when using Lambda layers is that only small models can be accommodated (50 MB zipped layer size limit for Lambda), but with SageMaker Neo, you can potentially obtain a 10x reduction in the amount of memory required by the framework to run a model. The model and framework are compiled into a single executable that can be deployed in production to make fast, low-latency predictions. Additionally, the recently launched container image support allows you to use up to a 10 GB size container for Lambda tasks. Later in this post, we discuss how to overcome some of the limitations on size. Let’s get started by looking at Lambda layers first!

Inference using Lambda layers

A Lambda layer is a .zip archive that contains libraries, a custom runtime, or other dependencies. With layers, you can use libraries in your function without needing to include them in your deployment package.

Layers let you keep your deployment package small, which makes development easier. You can avoid errors that can occur when you install and package dependencies with your function code. For Node.js, Python, and Ruby functions, you can develop your function code on the Lambda console as long as you keep your deployment package under 3 MB. A function can use up to five layers at a time. The total unzipped size of the function and all layers can’t exceed the unzipped deployment package size limit of 250 MB. For more information, see Lambda quotas.

Building a common ML Lambda layer that can be used with multiple inference functions reduces effort and streamlines the process of deployment. In the next section, we describe how to build a layer for scikit-learn, a small yet powerful ML framework.

Build a scikit-learn ML layer

The purpose of this section is to explore the process of manually building a layer step by step. In production, you will likely use AWS SAM or another option such as AWS Cloud Development Kit (AWS CDK), AWS CloudFormation, or your own container build pipeline to do the same. After we go through these steps manually, you may be able to appreciate how some of the other tools like AWS SAM simplify and automate these steps.

To ensure that you have a smooth and reliable experience building a custom layer, we recommend that you log in to an EC2 instance running Amazon Linux to build this layer. For instructions, see Connect to your Linux instance.

When you’re are logged in to your EC2 instance, follow these steps to build a sklearn layer:

Step 1 – Upgrade pip and awscli

Enter the following code to upgrade pip and awscli:

pip install --upgrade pip
pip install awscli --upgrade

Step 2 – Install pipenv and create a new Python environment

Install pipnv and create a new Python environment with the following code:

pip install pipenv
pipenv --python 3.6

Step 3 – Install your ML framework

To install your preferred ML framework (for this post, sklearn), enter the following code:

pipenv install sklearn

Step 4 – Create a build folder with the installed package and dependencies

Create a build folder with the installed package and dependencies with the following code:

ls $VIRTUAL_ENV
PY_DIR='build/python/lib/python3.6/site-packages'
mkdir -p $PY_DIR
pipenv lock -r > requirements.txt
pip install -r requirements.txt -t $PY_DIR

Step 5 – Reduce the size of the deployment package

You reduce the size of the deployment package by stripping symbols from compiled binaries and removing data files required only for training:

cd build/
find . -name "*.so" | xargs strip
find . -name '*.dat' -delete
find . -name '*.npz' -delete

Step 6 – Add a model file to the layer

If applicable, add your model file (usually a pickle (.pkl) file, joblib file, or model.tar.gz file) to the build folder. As mentioned earlier, you can also pull your model down from Amazon S3 within the Lambda function before performing inference.

Step 7 – Use 7z or zip to compress the build folder

You have two options for compressing your folder. One option is the following code:

7z a -mm=Deflate -mfb=258 -mpass=15 -r ../sklearn_layer.zip *

Alternatively, enter the following:

7z a -tzip -mx=9 -mfb=258 -mpass=20 -r ../sklearn_layer.zip *

Step 8 – Push the newly created layer to Lambda

Push your new layer to Lambda with the following code:

cd ..
rm -r build/


aws lambda publish-layer-version --layer-name sklearn_layer --zip-file fileb://sklearn_layer.zip

Step 9 – Use the newly created layer for inference

To use your new layer for inference, complete the following steps:

  1. On the Lambda console, navigate to an existing function.
  2. In the Layers section, choose Add a layer.

  1. Select Select from list of runtime compatible layers.
  2. Choose the layer you just uploaded (the sklearn layer).

You can also provide the layer’s ARN.

  1. Choose Add.

Step 10 – Add inference code to load the model and make predictions

Within the Lambda function, add some code to import the sklearn library and perform inference. We provide two examples: one using a model stored in Amazon S3 and the pickle library, and another using a locally stored model and the joblib library.

1.	from sklearn.externals import joblib  
2.	import boto3  
3.	import json  
4.	import pickle  
5.	  
6.	s3_client = boto3.client("s3")  
7.	  
8.	def lambda_handler(event, context):  
9.	  
10.	     #Using Pickle + load model from s3  
11.	     filename = "pickled_model.pkl"  
12.	     s3_client.download_file('bucket-withmodels', filename, '/tmp/' + filename)  
13.	       loaded_model = pickle.load(open('/tmp/' + filename, 'rb'))  
14.	       result = loaded_model.predict(X_test)  
15.	  
16.	       # Using Joblib + load the model from local storage  
17.	       loaded_model = joblib.load(“filename.joblib”)  
18.	       result = loaded_model.score(X_test, Y_test)  
19.	       print(result)  
20.	       return {'statusCode': 200, 'body': json.dumps(result)}

Package the ML Lambda layer code as a shell script

Alternatively, you can run a shell script with only 10 lines of code to create your Lambda layer .zip file (without all the manual steps we described).

  1. Create a shell script (.sh file) with the following code:
createlayer.sh
#!/bin/bash

if [ "$1" != "" ] || [$# -gt 1]; then
	echo "Creating layer compatible with python version $1"
	docker run -v "$PWD":/var/task "lambci/lambda:build-python$1" /bin/sh -c "pip install -r requirements.txt -t python/lib/python$1/site-packages/; exit"
	zip -r layer.zip python > /dev/null
	rm -r python
	echo "Done creating layer!"
	ls -lah layer.zip

else
	echo "Enter python version as argument - ./createlayer.sh 3.6"
fi
  1. Name the file createlayer.sh and save it.

The script requires an argument for the Python version that you want to use for the layer; the script checks for this argument and requires the following:

  • If you’re using a local machine, EC2 instance, or a laptop, you need to install Docker. When using an SageMaker notebook instance terminal window or an AWS Cloud9 terminal, Docker is already installed.
  • You need a requirements.txt file that is in the same path as the createlayer.sh script that you created and has the packages that you need to install. For more information about creating this file, see https://pip.pypa.io/en/stable/user_guide/#requirements-files.

For this example, our requirements.txt file has a single line, and looks like the following:

scikit-learn
  1. Add any other packages you may need, with version numbers with one package name per line.
  2. Make sure that your createlayer.sh script is executable; on Linux or macOS terminal window, navigate to where you saved the createlayer.sh file and enter the following:
chmod +x createlayer.sh

Now you’re ready to create a layer.

  1. In the terminal, enter the following:
./createlayer.sh 3.6

This command pulls the container that matches the Lambda runtime (which ensures that your layer is compatible by default), creates the layer using packages specified in the requirements.txt file, and saves a layer.zip that you can upload to a Lambda function.

The following code shows example logs when running this script to create a Lambda-compatible sklearn layer:

./createlayer.sh 3.6
Creating layer compatible with python version 3.6
Unable to find image 'lambci/lambda:build-python3.6' locally
build-python3.6: Pulling from lambci/lambda
d7ca5f5e6604: Pull complete 
5e23dc432ea7: Pull complete 
fd755da454b3: Pull complete 
c81981d73e17: Pull complete 
Digest: sha256:059229f10b177349539cd14d4e148b45becf01070afbba8b3a8647a8bd57371e
Status: Downloaded newer image for lambci/lambda:build-python3.6
Collecting scikit-learn
  Downloading scikit_learn-0.22.1-cp36-cp36m-manylinux1_x86_64.whl (7.0 MB)
Collecting joblib>=0.11
  Downloading joblib-0.14.1-py2.py3-none-any.whl (294 kB)
Collecting scipy>=0.17.0
  Downloading scipy-1.4.1-cp36-cp36m-manylinux1_x86_64.whl (26.1 MB)
Collecting numpy>=1.11.0
  Downloading numpy-1.18.1-cp36-cp36m-manylinux1_x86_64.whl (20.1 MB)
Installing collected packages: joblib, numpy, scipy, scikit-learn
Successfully installed joblib-0.14.1 numpy-1.18.1 scikit-learn-0.22.1 scipy-1.4.1
Done creating layer!
-rw-r--r--  1 user  ANTDomain Users    60M Feb 23 21:53 layer.zip

Managing ML Lambda layers using the AWS SAM CLI

AWS SAM is an open-source framework that you can use to build serverless applications on AWS, including Lambda functions, event sources, and other resources that work together to perform tasks. Because AWS SAM is an extension of AWS CloudFormation, you get the reliable deployment capabilities of AWS CloudFormation. In this post, we focus on how to use AWS SAM to build layers for your Python functions. For more information about getting started with AWS SAM, see the AWS SAM Developer Guide.

  1. Make sure you have the AWS SAM CLI installed by running the following code:
sam --version
SAM CLI, version 1.20.0
  1. Then, assume you have the following file structure:
./
├── my_layer
│   ├── makefile
│   └── requirements.txt
└── template.yml

Let’s look at files inside the my_layer folder individually:

  • template.yml – Defines the layer resource and compatible runtimes, and points to a makefile:
AWSTemplateFormatVersion: '2010-09-09'
Transform: 'AWS::Serverless-2016-10-31'
Resources:
  MyLayer:
    Type: AWS::Serverless::LayerVersion
    Properties:
      ContentUri: my_layer
      CompatibleRuntimes:
        - python3.8
    Metadata:
      BuildMethod: makefile
  • makefile – Defines build instructions (uses the requirements.txt file to install specific libraries in the layer):
build-MyLayer:
    mkdir -p "$(ARTIFACTS_DIR)/python"
    python -m pip install -r requirements.txt -t "$(ARTIFACTS_DIR)/python"
  • requirements.txt – Contains packages (with optional version numbers):
sklearn

You can also clone this example and modify as required. For more information, see https://github.com/aws-samples/aws-lambda-layer-create-script

  1. Run sam build:
sam build
Building layer 'MyLayer'
Running CustomMakeBuilder:CopySource
Running CustomMakeBuilder:MakeBuild
Current Artifacts Directory : /Users/path/to/samexample/.aws-sam/build/MyLayer

Build Succeeded

Built Artifacts  : .aws-sam/build
Built Template   : .aws-sam/build/template.yaml

Commands you can use next
=========================
[*] Invoke Function: sam local invoke
[*] Deploy: sam deploy --guided
  1. Run sam deploy –guided:
sam deploy --guided
Configuring SAM deploy
======================

	Looking for config file [samconfig.toml] :  Not found

	Setting default arguments for 'sam deploy'
	=========================================
	Stack Name [sam-app]: 
	AWS Region [us-east-1]: 
	#Shows you resources changes to be deployed and require a 'Y' to initiate deploy
	Confirm changes before deploy [y/N]: y
	#SAM needs permission to be able to create roles to connect to the resources in your template
	Allow SAM CLI IAM role creation [Y/n]: y
	Save arguments to configuration file [Y/n]: y
	SAM configuration file [samconfig.toml]: 
	SAM configuration environment [default]: 

	Looking for resources needed for deployment: Not found.
	Creating the required resources...
	Successfully created!

		Managed S3 bucket: aws-sam-cli-managed-default-samclisourcebucket-18scin0trolbw
		A different default S3 bucket can be set in samconfig.toml

	Saved arguments to config file
	Running 'sam deploy' for future deployments will use the parameters saved above.
	The above parameters can be changed by modifying samconfig.toml
	Learn more about samconfig.toml syntax at 
	https://docs.aws.amazon.com/serverless-application-model/latest/developerguide/serverless-sam-cli-config.html
Initiating deployment
=====================
Uploading to sam-app/1061dc436524b10ad192d1306d2ab001.template  366 / 366  (100.00%)

Waiting for changeset to be created..

CloudFormation stack changeset
-----------------------------------------------------------------------------------------------------------------------------------------
Operation                          LogicalResourceId                  ResourceType                       Replacement                      
-----------------------------------------------------------------------------------------------------------------------------------------
+ Add                              MyLayer3fa5e96c85                  AWS::Lambda::LayerVersion          N/A                              
-----------------------------------------------------------------------------------------------------------------------------------------

Changeset created successfully. arn:aws:cloudformation:us-east-1:497456752804:changeSet/samcli-deploy1615226109/ec665854-7440-42b7-8a9c-4c604ff565cb


Previewing CloudFormation changeset before deployment
======================================================
Deploy this changeset? [y/N]: y

2021-03-08 12:55:49 - Waiting for stack create/update to complete

CloudFormation events from changeset
-----------------------------------------------------------------------------------------------------------------------------------------
ResourceStatus                     ResourceType                       LogicalResourceId                  ResourceStatusReason             
-----------------------------------------------------------------------------------------------------------------------------------------
CREATE_IN_PROGRESS                 AWS::Lambda::LayerVersion          MyLayer3fa5e96c85                  -                                
CREATE_COMPLETE                    AWS::Lambda::LayerVersion          MyLayer3fa5e96c85                  -                                
CREATE_IN_PROGRESS                 AWS::Lambda::LayerVersion          MyLayer3fa5e96c85                  Resource creation Initiated      
CREATE_COMPLETE                    AWS::CloudFormation::Stack         sam-app                            -                                
----------------------------------------------------------------------------------------------------------------------------------------- 

Now you can view these updates to your stack on the AWS CloudFormation console.

You can also view the created Lambda layer on the Lambda console.


Package the ML Lambda layer and Lambda function creation as CloudFormation templates

To automate and reuse already built layers, it’s useful to have a set of CloudFormation templates. In this section, we describe two templates that build several different ML Lambda layers and launch a Lambda function within a selected layer.

Build multiple ML layers for Lambda

When building and maintaining a standard set of layers, and when the preferred route is to work directly with AWS CloudFormation, this section may be interesting to you. We present two stacks to do the following:

  • Build all layers specified in the yaml file using AWS CodeBuild
  • Create a new Lambda function with an appropriate layer attached

Typically, you run the first stack infrequently and run the second stack whenever you need to create a new Lambda function with a layer attached.

Make sure you either use Serverless-ML-1 (default name) in Step 1, or change the stack name to be used from Step 1 within the CloudFormation stack in Step 2.

Step 1 – Launch the first stack

To launch the first CloudFormation stack, choose Launch Stack:

The following diagram shows the architecture of the resources that the stack builds. We can see that multiple layers (MXNet, GluonNLP, GuonCV, Pillow, SciPy and SkLearn) are being built and created as versions. In general, you would use only one of these layers in your ML inference function. If you have a layer that uses multiple libraries, consider building a single layer that contains all the libraries you need.

Step 2 – Create a Lambda function with an existing layer

Every time you want to set up a Lambda function with the appropriate ML layer attached, you can launch the following CloudFormation stack:

The following diagram shows the new resources that the stack builds.

Inference using containers on Lambda

When dealing with the limitations introduced while using layers, such as size limitations, and when you’re invested in container-based tooling, it may be useful to use containers for building Lambda functions. Lambda functions built as container images can be as large as 10 GB, and can comfortably fit most, if not all, popular ML frameworks. Lambda functions deployed as container images benefit from the same operational simplicity, automatic scaling, high availability, and native integrations with many services. For ML frameworks to work with Lambda, these images must implement the Lambda runtime API. However, it’s still important to keep your inference container size small, so that overall latency is minimized; using large ML frameworks such as PyTorch and TensorFlow may result in larger container sizes and higher overall latencies. To make it easier to build your own base images, the Lambda team released Lambda runtime interface clients, which we use to create a sample TensorFlow container for inference. You can also follow these steps using the accompanying notebook.

Step 1 – Train your model using TensorFlow

Train your model with the following code:

model.fit(train_set,
                    steps_per_epoch=int(0.75 * dataset_size / batch_size),
                    validation_data=valid_set,
                    validation_steps=int(0.15 * dataset_size / batch_size),
                    epochs=5)

Step 2 – Save your model as a H5 file

Save the model as an H5 file with the following code:

model.save('model/1/model.h5') #saving the model

Step 3 – Build and push the Dockerfile to Amazon ECR

We start with a base TensorFlow image, enter the inference code and model file, and add the runtime interface client and emulator:

FROM tensorflow/tensorflow

ARG FUNCTION_DIR="/function"
# Set working directory to function root directory
WORKDIR ${FUNCTION_DIR}
COPY app/* ${FUNCTION_DIR}

# Copy our model folder to the container
COPY model/1 /opt/ml/model/1

RUN pip3 install --target ${FUNCTION_DIR} awslambdaric

ADD https://github.com/aws/aws-lambda-runtime-interface-emulator/releases/latest/download/aws-lambda-rie /usr/bin/aws-lambda-rie
RUN chmod 755 /usr/bin/aws-lambda-rie
COPY entry.sh /
ENTRYPOINT [ "/entry.sh" ]
CMD [ "app.handler" ]

You can use the script included in the notebook to build and push the container to Amazon Elastic Container Registry (Amazon ECR). For this post, we add the model directly to the container. For production use cases, consider downloading the latest model you want to use from Amazon S3, from within the handler function.

Step 4 – Create a function using the container on Lambda

To create a new Lambda function using the container, complete the following steps:

  1. On the Lambda console, choose Functions.
  2. Choose Create function.
  3. Select Container image.
  4. For Function name, enter a name for your function.
  5. For Container image URI, enter the URI of your container image.

Step 5 – Create a test event and test your Lambda function

On the Test tab of the function, choose Invoke to create a test event and test your function. Use the sample payload provided in the notebook.

Conclusion

In this post, we showed how to use Lambda layers and containers to load an ML framework like scikit-learn and TensorFlow for inference. You can use the same procedure to create functions for other frameworks like PyTorch and MXNet. Larger frameworks like TensorFlow and PyTorch may not fit into the current size limit for a Lambda deployment package, so it’s beneficial to use the newly launched container options for Lambda. Another workaround is to use a model format exchange framework like ONNX to convert your model to another format before using it in a layer or in a deployment package.

Now that you know how to create an ML Lambda layer and container, you can, for example, build a serverless model exchange function using ONNX in a layer. Also consider using the Amazon SageMaker Neo runtime, treelite, or similar light versions of ML runtimes to place in your Lambda layer. Consider using a framework like SageMaker Neo to help compress your models for use with specific instance types with a dedicated runtime (called deep learning runtime or DLR).

Cost is also an important consideration when deciding what option to use (layers or containers), and this is related to the overall latency. For example, the cost of running inferences at 1 TPS for an entire month on Lambda at an average latency per inference of 50 milliseconds is about $7 [(0.0000000500*50 + 0.20/1e6) *60*60*24*30* TPS ~ $7)]. Latency depends on various factors, such as function configuration (memory, vCPUs, layers, containers used), model size, framework size, input size, additional pre- and postprocessing, and more. To save on costs and have an end-to-end ML training, tuning, monitoring and deployment solution, check out other SageMaker features, including multi-model endpoints to host and dynamically load and unload multiple models within a single endpoint.

Additionally, consider disabling the model cache in multi-model endpoints on Amazon SageMaker when you have a large number of models that are called infrequently—this allows for a higher TPS than the default mode. For a fully managed set of APIs around model deployment, see Deploy a Model in Amazon SageMaker.

Finally, the ability to work with and load larger models and frameworks from Amazon Elastic File System (Amazon EFS) volumes attached to your Lambda function can help certain use cases. For more information, see Using Amazon EFS for AWS Lambda in your serverless applications.


About the Authors

Shreyas Subramanian is a AI/ML specialist Solutions Architect, and helps customers by using Machine Learning to solve their business challenges on the AWS platform.


Andrea Morandi is an AI/ML specialist solutions architect in the Strategic Specialist team. He helps customers to deliver and optimize ML applications on AWS. Andrea holds a Ph.D. in Astrophysics from the University of Bologna (Italy), he lives with his wife in the Bay area, and in his free time he likes hiking.

Read More

Automate weed detection in farm crops using Amazon Rekognition Custom Labels

Amazon Rekognition Custom Labels makes automated weed detection in crops easier. Instead of manually locating weeds, you can automate the process with Amazon Rekognition Custom Labels, which allows you to build machine learning (ML) models that can be trained with only a handful of images and yet are capable of accurately predicting which areas of a crop have weeds and need treatment. This saves farmers time, effort, and weed treatment costs.

Every farm has weeds. Weeds compete with crops and if not controlled can take up precious space, sunlight, water, and nutrients from crops and reduce their yield. Weeds grow much faster than crops and need immediate and effective control. Detecting weeds in crops is a lengthy and time-consuming process and is currently done manually. Although weed spray machines exist that can be coded to go to an exact location in a field and spray weed treatment in just those spots, the process of locating where those weeds exist is not yet automated.

Weed location automation isn’t an easy process. This is where computer vision and AI come in. Amazon Rekognition is a fully managed computer vision service that allows developers to analyze images and videos for a variety of use cases, including face identification and verification, media intelligence, custom industrial automation, and workplace safety. Detecting custom objects and scenes can be hard. Training and improving the accuracy of a computer vision model requires a large amount of data and is a complex problem. Amazon Rekognition Custom Labels allows you to detect custom labeled objects and scenes with just a handful of training images.

In this post, we use Amazon Rekognition Custom Labels to build an ML model that detects weeds in crops. We’re presently helping researchers at a US university automate this process for local farmers.

Create and train a weed detection model

We solve this problem by feeding images of crops with and without weeds to Amazon Rekognition Custom Labels and building an ML model. After the model is built and deployed, we can perform inference by feeding the model images from field cameras. This way farmers can automate weed detection in their fields. Our experiments showed that highly accurate models can be built with as few as 32 images.

  1. On the Amazon Rekognition console, choose Use Custom Labels.

  1. Choose Projects.
  2. Choose Create project.
  3. For Project name, enter a name (for example, Weed-detection-in-crops).
  4. Choose Create project.

Next, we create a dataset.

  1. On the Amazon Rekognition Custom Labels console, choose Datasets.
  2. Choose Create dataset.
  3. Enter a name for your dataset, such as crop-weed-ds.
  4. Select your training data location (for this post, we select Upload images from your computer).

  1. Choose Add images to upload your images.

For this post, we use 32 field images, of which half are images of crops without weeds and half are weed-infected crops.

  1. After you upload your training images, choose Add labels to add labels to your training data.

For this post, we define two labels: good-crop and weed.

  1. Assign your uploaded images one of these two labels depending on that image type.
  2. Save these changes.

We now have labeled images for both the classes we defined.

  1. Create another dataset for testing called test-ds, which contains four labeled images for testing purposes.

We’re now ready to train a new model.

  1. Select the project you created and choose Train new model.
  2. Choose the training dataset and test dataset that you created earlier.
  3. Choose Train.

After the model is trained, we can see how it performed. Our model was near perfect, with an F1 score of 1.0. Precision and recall were 1.0 as well.

We can choose View test results to see how this model performed on our test data. The following screenshot shows that good crops were predicted accurately as good crops and weed-infected crops were detected as containing weeds.

Test the model via your browser

We offer an AWS CloudFormation template in the GitHub repo that allows you to test the model through a browser. Choose the appropriate template depending on your Region. The template launches the required resources for you to test the model

The template asks for your email when you launch it. When the template is ready, it emails you the required credentials. The Outputs tab for the CloudFormation stack has a website URL for testing the model.

  1. On the browser front end, choose Start the model.

  1. Enter 1 for inference units.
  2. Choose Start the model.

  1. When the model is running, you can upload any image to it and get classification results.

  1. Stop the model once your testing is completed.

Perform inference using the SDK

Inference from the model is also possible using the SDK. The following code runs on the same image as in the previous section:

import boto3

def show_custom_labels(model, bucket, image, min_confidence):
    client=boto3.client('rekognition')

    #Call DetectCustomLabels
    response = client.detect_custom_labels(Image={'S3Object': {'Bucket': bucket, 'Name': image}},
        MinConfidence=min_confidence,
        ProjectVersionArn=model)

    # Print results
    for customLabel in response['CustomLabels']:
        print('Label ' + str(customLabel['Name']))
        print('Confidence ' + str(customLabel['Confidence']) + "n")

    return len(response['CustomLabels'])

def main():
    bucket = 'crop-weed-bucket'
    image = "Weed-1.jpg"
    model = 'arn:aws:rekognition:us-east-2:xxxxxxxxxxxx:project/Weed-detection-in-crops/version/Weed-detection-in-crops.2021-03-30T10.02.49/yyyyyyyyyy'
    min_confidence=1

    label_count=show_custom_labels(model, bucket, image, min_confidence)
    print("Custom labels detected: " + str(label_count))

if __name__ == "__main__":
    main()

The results from using the SDK are the same as earlier from the browser:

Label weed
Confidence 92.1469955444336

Label good-crop
Confidence 7.852999687194824

Custom labels detected: 2

Best practices

Consider the following best practices when using Amazon Rekognition Custom Labels:

  • Use images that have high resolution
  • Crop out any background noise in the image
  • Have a good contrast between the object you’re trying to detect and other objects in the image
  • Delete any resources that you have created once your project is completed

Conclusion

In this post, we showed how you can automate weed detection in crops by building custom ML models with Amazon Rekognition Custom Labels. Amazon Rekognition Custom Labels takes care of deep learning complexities behind the scenes, allowing you to build powerful image classification models with just a handful of training images. You can improve model accuracy by increasing the number of images in your training data and resolution of those images. Farmers can deploy models such as these into their weed spray machines in order to reduce cost and manual effort. To learn more, including other use cases and video tutorials, visit the Amazon Rekognition Custom Labels webpage.


About the Author

Raju Penmatcha is a Senior AI/ML Specialist Solutions Architect at AWS. He works with education, government, and nonprofit customers on machine learning and artificial intelligence related projects, helping them build solutions using AWS. When not helping customers, he likes traveling to new places.

Read More

Fine-tune and deploy the ProtBERT model for protein classification using Amazon SageMaker

Proteins, the key fundamental macromolecules governing in biological bodies, are composed of amino acids. These 20 essential amino acids, each represented by a capital letter, combine to form a protein sequence, which can be used to predict the subcellular localization (the location of protein in a cell) and structure of proteins.

Figure 1: Protein Sequence

The study of protein localization is important to comprehend the function of protein, which is essentially to structure, function, and regulate the body’s tissues and organs. Protein localization has great importance for drug design and other applications. For example, we can investigate methods to disrupt the binding of the spiky S1 protein of the SARS-Cov-2 virus. The binding of the S1 protein to the human receptor ACE2 is the mechanism which led to the COVID-19 pandemic [1]. It also plays an important role in characterizing the cellular function of hypothetical and newly discovered proteins [2].

Figure 2: SARS-Cov-2 virus binding to ACE2 human receptor

Protein sequences are constrained to adopting particular 3D shapes (referred to as protein 3D structure) optimized for accomplishing particular functions. These constraints mirror the rules of grammar and meaning in natural language, thereby allowing us to map algorithms from natural language processing (NLP) directly onto protein sequences. During training, the language model learns to extract those constraints from millions of examples and store the derived knowledge in its weights. [1] Although existing solutions in protein bioinformatics [11, 12, 13, 14, 15,16] usually have to search for evolutionary-related proteins in exponentially growing databases, language models offer a potential alternative to this increasingly time-consuming database search because they extract features directly from single protein sequences. Additionally, the performance of existing solutions deteriorates if a sufficient number of related sequences can’t be found; for example, the quality of predicted protein structures correlates strongly with the number of effective sequences found in today’s databases [17].

Several research endeavors currently aim to localize whole proteomes by using high-throughput approaches [2, 3, 4]. These large datasets provide important information about protein function, and more generally global cellular processes. However, they currently don’t achieve 100% coverage of proteomes, and the methodology used can in some cases cause mislocalization of subsets of proteins [5, 6]. Therefore, complementary methods are necessary to address these problems.

In this post, we use NLP techniques for protein sequence classification. The idea is to interpret protein sequences as sentences and their constituent—amino acids—as single words [7]. More specifically, we fine-tune the PyTorch ProtBERT model from the Hugging Face library using Amazon SageMaker.

What is ProtBERT?

ProtBERT is a pretrained model on protein sequences using a masked language modeling objective. It’s based on the BERT model, which is pretrained on a large corpus of protein sequences in a self-supervised fashion. This means it was pretrained on the raw protein sequences only, with no humans labeling them in any way (which is why it can use lots of publicly available data) with an automatic process to generate inputs and labels from those protein sequences [8]. For more information about ProtBERT, see ProtTrans: Towards Cracking the Language of Life’s Code Through Self-Supervised Deep Learning and High Performance Computing.

Solution overview

The post focuses on fine-tuning the PyTorch ProtBERT model (see the following diagram). We first extend the pretrained ProtBERT model to classify the protein sequences.

We then deploy the model using SageMaker, which is the most comprehensive and fully managed machine learning (ML) service. With SageMaker, data scientists and developers can quickly and easily build and train ML models, and then directly deploy them into a production-ready hosted environment. During the training, we use the distributed data parallel (SDP) feature in SageMaker, which extends its training capabilities on deep learning models with near-linear scaling efficiency, achieving fast time-to-train with minimal code changes.

The notebook and code from this post are available on GitHub. To run it yourself, clone the GitHub repository and open the Jupyter notebook file.

Dataset

In this post, we use an open-source DeepLoc [10] public dataset of protein sequences to train the model. The dataset is a FASTA file composed of header and protein sequence. The header is composed of the accession number from Uniprot, the annotated subcellular localization, and possibly a description field indicating if the protein was part of the test set. The subcellular localization includes an additional label, where S indicates soluble, M membrane, and U unknown [9]. The following code is a sample of the data:

>Q9SMX3 Mitochondrion-M test
MVKGPGLYTEIGKKARDLLYRDYQGDQKFSVTTYSSTGVAITTTGTNKGSLFLGDVATQVKNNNFTADVKVST
DSSLLTTLTFDEPAPGLKVIVQAKLPDHKSGKAEVQYFHDYAGISTSVGFTATPIVNFSGVVGTNGLSLGTDV
AYNTESGNFKHFNAGFNFTKDDLTASLILNDKGEKLNASYYQIVSPSTVVGAEISHNFTTKENAITVGTQHAL>
DPLTTVKARVNNAGVANALIQHEWRPKSFFTVSGEVDSKAIDKSAKVGIALALKP"

A sequence in FASTA format begins with a single-line description, followed by lines of sequence data. The definition line (defline) is distinguished from the sequence data by a greater-than (>) symbol at the beginning. The word following the > symbol is the identifier of the sequence, and the rest of the line is the description.

We download the FASTA formatted dataset and read it by directly filtering out the columns that are of interest. The dataset consists of 14,000 sequences and 6 columns in total. The columns are as follows:

  • id – Unique identifier given each sequence in the dataset.
  • sequence – Protein sequence. Each character is separated by a space. This is useful for the BERT tokenizer.
  • sequence_length – Character length of each protein sequence.
  • location – Classification given each sequence. The dataset has 10 unique classes (subcellular localization).
  • is_train – Indicates whether the record should be used for training or test. Is also used to separate the dataset for training and validation.

When we plot the sequence lengths of each record as an histogram, we observe the following distribution.

This is an important observation because the ProtBERT model receives a fixed sentence length as input. Usually, the maximum length of a sentence depends on the data we’re working on. For sentences that are shorter than this maximum length, we have to add paddings (empty tokens) to the sentences to make up the length.

In the preceding plot, most of the sequences are under 1,500 characters in length, therefore, it’s a good idea to choose max_length = 1536, but that increases the training time for this sample notebook, therefore, we use max_length = 512.

When we’re retrieving each sequence record using the Pytorch DataLoaders during training, we must ensure that each sequence is tokenized, truncated, and the necessary padding is added to make them all the same max_length value. To encapsulate this process, we define the ProteinSequenceDataset class, which uses the encode_plus() API provided by the Hugging Face transformer library:

#data_prep.py

import torch
from torch import nn
import torch.utils.data
import torch.utils.data.distributed
from torch.utils.data import Dataset, DataLoader, RandomSampler, TensorDataset

class ProteinSequenceDataset(Dataset):
    def __init__(self, sequence, targets, tokenizer, max_len):
        self.sequence = sequence
        self.targets = targets
        self.tokenizer = tokenizer
        self.max_len = max_len

    def __len__(self):
        return len(self.sequence)

    def __getitem__(self, item):
        sequence = str(self.sequence[item])
        target = self.targets[item]
        encoding = self.tokenizer.encode_plus(
            sequence,
            truncation=True,
            add_special_tokens=True,
            max_length=self.max_len,
            return_token_type_ids=False,
            padding='max_length',
            return_attention_mask=True,
            return_tensors='pt',
        )
        return {
          'protein_sequence': sequence,
          'input_ids': encoding['input_ids'].flatten(),
          'attention_mask': encoding['attention_mask'].flatten(),
          'targets': torch.tensor(target, dtype=torch.long)
        }

Next, we divide the dataset into training and test. We can use the is_train column to do the split, which results 11,231 records for the training set and 2,773 records for the test set (about a 75:25 data split). Finally, we upload this test and train data to our Amazon Simple Storage Service (Amazon S3) location in order to accommodate model training on SageMaker.

ProtBERT fine-tuning

In computational biology and bioinformatics, we have gold mines of data from protein sequences, but we need high computing resources to train the models, which can be limiting and costly. One way to overcome this challenge is to use transfer learning.

Transfer learning is an ML method in which a pretrained model, such as a pretrained BERT model for text classification, is reused as the starting point for a different but related problem. By reusing parameters from pretrained models, you can save significant amounts of training time and cost.

In our notebook, we use the pretrained prot_bert_bfd_localization model on the DeepLoc dataset for predicting protein subcellular localization by adding a classification layer, as shown in the following code:

#model_def.py
from transformers import BertModel, BertTokenizer, AdamW, get_linear_schedule_with_warmup
import torch
import torch.nn.functional as F
import torch.nn as nn

PRE_TRAINED_MODEL_NAME = 'Rostlab/prot_bert_bfd_localization'
class ProteinClassifier(nn.Module):
    def __init__(self, n_classes):
        super(ProteinClassifier, self).__init__()
        self.bert = BertModel.from_pretrained(PRE_TRAINED_MODEL_NAME)
        self.classifier = nn.Sequential(nn.Dropout(p=0.2),
                                        nn.Linear(self.bert.config.hidden_size, n_classes),
                                        nn.Tanh())
        
    def forward(self, input_ids, attention_mask):
        output = self.bert(
          input_ids=input_ids,
          attention_mask=attention_mask
        )
        return self.classifier(output.pooler_output)

We use ProteinClassifier defined in the model_def.py script for training.

Training script

We use the PyTorch-Transformers library, which contains PyTorch implementations and pretrained model weights for many NLP models, including BERT. As mentioned earlier, we use the ProtBERT model, which is pretrained on protein sequences.

We also use the distributed data parallel feature launched in December 2020 to speed up the training by distributing the data on multiple GPUs. It’s very similar to a PyTorch training script you might run outside of SageMaker, but modified to run with SDP. SDP’s PyTorch client provides an alternative to PyTorch’s native DDP. For details about how to use SDP in your native PyTorch script, see the Get Started with Distributed Training.

The following script saves the model artifacts learned during training to a file path, model_dir, as mandated by the SageMaker PyTorch image:

# SageMaker Distributed code.
from smdistributed.dataparallel.torch.parallel.distributed import DistributedDataParallel as DDP
import smdistributed.dataparallel.torch.distributed as dist

# intializes the process group for distributed training
dist.init_process_group()

When training is complete, SageMaker uploads model artifacts saved in model_dir to Amazon S3 so they’re available for deployment. The following code in the script saves the trained model artifacts:

def save_model(model, model_dir):
    path = os.path.join(model_dir, 'model.pth')
    # recommended way from http://pytorch.org/docs/master/notes/serialization.html
    torch.save(model.state_dict(), path)
    logger.info(f"Saving model: {path} n")

Because PyTorch-Transformer isn’t included natively in SageMaker PyTorch images, we have to provide a requirements.txt file so that SageMaker installs this library for training and inference. A requirements.txt file is a text file that contains a list of items that are installed by using pip install. You can also specify the version of an item to install. To install PyTorch-Transformer and other libraries, we add the following line to the requirements.txt file:

transformers
torch-optimizer
sagemaker==2.19.0
boto3

You can view the entire file in the GitHub repo, and it also goes into the code/ directory. For more information about the format of a requirements.txt file, see Requirements Files.

Train on SageMaker

We use SageMaker to train and deploy a model using our custom PyTorch code. The SageMaker Python SDK makes it easy to run a PyTorch script in SageMaker using its PyTorch estimator. After that, we can use the SageMaker Python SDK to deploy the trained model and run predictions. For more information on how to use this SDK with PyTorch, see Use PyTorch with the SageMaker Python SDK.

To start, we use the PyTorch estimator class to train our model. When creating our estimator, we make sure to specify a few things:

  • entry_point – The name of our PyTorch script. It contains our training script, which loads data from the input channels, configures training with hyperparameters, trains a model, and saves the model. It also contains code to load and run the model during inference.
  • source_dir – The location of our training scripts and requirements.txt file. The requirements file lists packages you want to use with your script.
  • framework_version – The PyTorch version we want to use.

The PyTorch estimator supports both single-machine and multi-machine, distributed PyTorch training using SDP. Our training script supports distributed training for only GPU instances.

Instance types

SDP supports model training on SageMaker with the following instance types only:

  • p3.16xlarge
  • p3dn.24xlarge (Recommended)
  • p4d.24xlarge (Recommended)

Instance count

To get the best performance out of SDP, you should use at least two instances, but you can also use one for testing this example, which implements the script in a single instance, multiple GPU mode, taking advantage of the eight GPUs on the instance to train faster and cheaper.

Distribution strategy

To use DDP mode, you update the the distribution strategy and set it to use smdistributed dataparallel.

After we create the estimator, we call fit(), which launches a training job. We use the Amazon S3 URIs that we uploaded the training data to earlier. See the following code:

from sagemaker.pytorch import PyTorch

TRAINING_JOB_NAME="protbert-training-pytorch-{}".format(time.strftime("%m-%d-%Y-%H-%M-%S")) 
print('Training job name: ', TRAINING_JOB_NAME)

estimator = PyTorch(
    entry_point="train.py",
    source_dir="code",
    role=role,
    framework_version="1.6.0",
    py_version="py36",
    instance_count=1,  # this script support distributed training for only GPU instances.
    instance_type="ml.p3.16xlarge",
    distribution={'smdistributed':{
        'dataparallel':{
            'enabled': True
        }
       }
    },
    debugger_hook_config=False,
    hyperparameters={
        "epochs": 3,
        "num_labels": num_classes,
        "batch-size": 4,
        "test-batch-size": 4,
        "log-interval": 100,
        "frozen_layers": 15,
    },
    metric_definitions=[
                   {'Name': 'train:loss', 'Regex': 'Training Loss: ([0-9\.]+)'},
                   {'Name': 'test:accuracy', 'Regex': 'Validation Accuracy: ([0-9\.]+)'},
                   {'Name': 'test:loss', 'Regex': 'Validation loss: ([0-9\.]+)'},
                ]
)
estimator.fit({"training": inputs_train, "testing": inputs_test}, job_name=TRAINING_JOB_NAME)

With max_length=512 and running the model for only three epochs, we get a validation accuracy of around 65%, which is pretty decent. You can optimize it further by trying a bigger sequence length, increasing the number of epochs, and tuning other hyperparameters. Make sure to increase the GPU memory or reduce the batch size when you increase the sequence length, otherwise you might get cuda out of memory error.

For more details on optimizing the model, see ProtTrans: Towards Cracking the Language of Life’s Code Through Self-Supervised Deep Learning and High Performance Computing.

Deploy the model on SageMaker

After we train our model, we host it on an SageMaker endpoint. To make the endpoint load the model and serve predictions, we implement a few methods in inference.py:

  • model_fn() – Loads the saved model and returns a model object that can be used for model serving. The SageMaker PyTorch model server loads our model by invoking model_fn:
def model_fn(model_dir):
    logger.info('model_fn')
    print('Loading the trained model...')
    device = torch.device("cuda" if torch.cuda.is_available() else "cpu")
    model = ProteinClassifier(10) # pass number of classes, in our case its 10
    with open(os.path.join(model_dir, 'model.pth'), 'rb') as f:
        model.load_state_dict(torch.load(f, map_location=device))
    return model.to(device)
  • input_fn() – Deserializes and prepares the prediction input. In this example, our request body is first serialized to JSON and then sent to the model serving endpoint. Therefore, in input_fn(), we first deserialize the JSON-formatted request body and return the input as a torch.tensor, as required for the ProtBERT model:
def input_fn(request_body, request_content_type):
    """An input_fn that loads a pickled tensor"""
    if request_content_type == "application/json":
        sequence = json.loads(request_body)
        print("Input protein sequence: ", sequence)
        encoded_sequence = tokenizer.encode_plus(
        sequence, 
        max_length = MAX_LEN, 
        add_special_tokens = True, 
        return_token_type_ids = False, 
        padding = 'max_length', 
        return_attention_mask = True, 
        return_tensors='pt'
        )
        input_ids = encoded_sequence['input_ids']
        attention_mask = encoded_sequence['attention_mask']

        return input_ids, attention_mask

    raise ValueError("Unsupported content type: {}".format(request_content_type))
  • predict_fn() – Performs the prediction and returns the result. To deploy our endpoint, we call deploy() on our PyTorch estimator object, passing in our desired number of instances and instance type:
def predict_fn(input_data, model):
    device = torch.device("cuda" if torch.cuda.is_available() else "cpu")
    model.to(device)
    model.eval()
    input_id, input_mask = input_data
    input_id = input_id.to(device)
    input_mask = input_mask.to(device)
    with torch.no_grad():
        output = model(input_id, input_mask)
        _, prediction = torch.max(output, dim=1)
        return prediction

Create a model object

You define the model object by using the SageMaker SDK’s PyTorchModel and pass in the model from the estimator and the entry_point. The function loads the model and sets it to use a GPU, if available. See the following code:

import sagemaker
from sagemaker.pytorch import PyTorchModel
ENDPOINT_NAME = "protbert-inference-pytorch-1-{}".format(time.strftime("%m-%d-%Y-%H-%M-%S"))
print("Endpoint name: ", ENDPOINT_NAME)
model = PyTorchModel(model_data=model_data, source_dir='code',
                entry_point='inference.py', role=role, framework_version='1.6.0', py_version='py3')

Deploy the model on an endpoint

You create a predictor by using the model.deploy function. You can optionally change both the instance count and instance type:

%%time
predictor = model.deploy(initial_instance_count=1, instance_type='ml.m5.2xlarge', endpoint_name=ENDPOINT_NAME)

Predict protein subcellular localization

Now that we have deployed the model endpoint, we can provide some protein sequences and let the model endpoint identify their subcellular localization, using the predictor we created:

prediction = predictor.predict(protein_sequence)
print(prediction)

The following table summarizes some of our results.

Sequence Ground Truth Prediction
M G K K D A S T T R T P V D Q Y R K Q I G R Q D Y K K N K P V L K A T R L K A E A K K A A I G I K E V I L V T I A I L V L L F A F Y A F F F L N L T K T D I Y E D S N N Endoplasmic.reticulum Endoplasmic.reticulum
M S M T I L P L E L I D K C I G S N L W V I M K S E R E F A G T L V G F D D Y V N I V L K D V T E Y D T V T G V T E K H S E M L L N G N G M C M L I P G G K P E Nucleus Nucleus
M G G P T R R H Q E E G S A E C L G G P S T R A A P G P G L R D F H F T T A G P S K A D R L G D A A Q I H R E R M R P V Q C G D G S G E R V F L Q S P G S I G T L Y I R L D L N S Q R S T C C C L L N A G T K G M C Cytoplasm Cytoplasm

Clean up resources

Remember to delete the SageMaker endpoint and SageMaker notebook instance created to avoid charges. See the following code:

predictor.delete_endpoint()

Conclusion

In this post, we used a pretrained ProtBERT model (prot_bert_bfd_localization) as a starting point and fine-tuned it for the downstream task of identifying the subcelluar localization of protein sequences. We used the SageMaker capabilities to train, deploy, and do the inference. Furthermore, we explored the SageMaker data parallel feature to make our training process efficient. You can use the same concept to perform other downstream tasks, such as for amino-acid level classification like predicting the secondary structure of the protein. For more about using PyTorch with SageMaker, see Using PyTorch with the SageMaker Python SDK.

References

  • [1] ProtTrans: Towards Cracking the Language of Life’s Code Through Self-Supervised Deep Learning and High Performance Computing (https://www.biorxiv.org/content/10.1101/2020.07.12.199554v2.full.pdf)
  • [2]Protein sequence Diagram : https://www.technologynetworks.com/applied-sciences/articles/essential-amino-acids-chart-abbreviations-and-structure-324357
  • [3] Refining Protein Subcellular Localization (https://www.ncbi.nlm.nih.gov/pmc/articles/PMC1289393/)
  • [4] Kumar A, Agarwal S, Heyman JA, Matson S, Heidtman M, et al. Subcellular localization of the yeast proteome. Genes Dev. 2002;16:707–719. [PMC free article] [PubMed] [Google Scholar]
  • [5] Huh WK, Falvo JV, Gerke LC, Carroll AS, Howson RW, et al. Global analysis of protein localization in budding yeast. Nature. 2003;425:686–691. [PubMed] [Google Scholar]
  • [6] Wiemann S, Arlt D, Huber W, Wellenreuther R, Schleeger S, et al. From ORFeome to biology: A functional genomics pipeline. Genome Res. 2004;14:2136–2144. [PMC free article] [PubMed] [Google Scholar]
  • [7] Davis TN. Protein localization in proteomics. Curr Opin Chem Biol. 2004;8:49–53. [PubMed] [Google Scholar]
  • [8] Scott MS, Thomas DY, Hallett MT. Predicting subcellular localization via protein motif co-occurrence. Genome Res. 2004;14:1957–1966. [PMC free article] [PubMed] [Google Scholar]
  • [9] ProtBERT Hugging Face (https://huggingface.co/Rostlab/prot_bert)
  • [10] DeepLoc-1.0: Eukaryotic protein subcellular localization predictor (http://www.cbs.dtu.dk/services/DeepLoc-1.0/data.php)
  • [11] M. S. Klausen, M. C. Jespersen et al., “NetSurfP-2.0: Improved prediction of protein structural features by integrated deep learning,” Proteins: Structure, Function, and Bioinformatics, vol. 87, no. 6, pp. 520–527, 2019, _eprint: https://onlinelibrary.wiley.com/doi/pdf/10.1002/prot.25674.
  • [12] J. J. Almagro Armenteros, C. K. Sønderby et al., “DeepLoc: Prediction of protein subcellular localization using deep learning,” Bioinformatics, vol. 33, no. 21, pp. 3387–3395, Nov. 2017.
  • [13] J. Yang, I. Anishchenko et al., “Improved protein structure prediction using predicted interresidue orientations,” Proceedings of the National Academy of Sciences, vol. 117, no. 3, pp. 1496–1503, Jan. 2020.
  • [14] A. Kulandaisamy, J. Zaucha et al., “Pred-MutHTP: Prediction of disease-causing and neutral mutations in human transmembrane proteins,” Human Mutation, vol. 41, no. 3, pp. 581–590, 2020, _eprint: https://onlinelibrary.wiley.com/doi/pdf/10.1002/humu.23961.
  • [15] M. Schelling, T. A. Hopf, and B. Rost, “Evolutionary couplings and sequence variation effect predict protein binding sites,” Proteins: Structure, Function, and Bioinformatics, vol. 86, no. 10, pp. 1064–1074, 2018, _eprint: https://onlinelibrary.wiley.com/doi/pdf/10.1002/prot.25585.
  • [16] M. Bernhofer, E. Kloppmann et al., “TMSEG: Novel prediction of transmembrane helices,” Proteins: Structure, Function, and Bioinformatics, vol. 84, no. 11, pp. 1706–1716, 2016, _eprint: https://onlinelibrary.wiley.com/doi/pdf/10.1002/prot.25155.
  • [17] D. S. Marks, L. J. Colwell et al., “Protein 3D Structure Computed from Evolutionary Sequence Variation,” PLOS ONE, vol. 6, no. 12, p. e28766, Dec. 2011.

About the Authors

 Mani Khanuja is an Artificial Intelligence and Machine Learning Specialist SA at Amazon Web Services (AWS). She helps customers using machine learning to solve their business challenges using the AWS. She spends most of her time diving deep and teaching customers on AI/ML projects related to computer vision, natural language processing, forecasting, ML at the edge, and more. She is passionate about ML at edge, therefore, she has created her own lab with self-driving kit and prototype manufacturing production line, where she spend lot of her free time.


Shamika Ariyawansa is a Solutions Architect at AWS helping customers run a variety of applications on AWS and machine learning workloads in particular. He is based out of Denver, Colorado. In his spare time, he enjoys off-roading adventures in the Colorado mountains and competing in machine learning competitions.


Vaijayanti Joshi is a Boston-based Solutions Architect for AWS. She is passionate about technology and enjoys helping customers find innovative solutions to complex business challenges. Her core areas of focus are machine learning and analytics. When she’s not working with customers on their journey to the cloud, she enjoys biking, swimming, and exploring new places.

Read More