What's new in TensorFlow 2.3?

What’s new in TensorFlow 2.3?

Posted by Josh Gordon for the TensorFlow team

TensorFlow 2.3 has been released! The focus of this release is on new tools to make it easier for you to load and preprocess data, and to solve input-pipeline bottlenecks, whether you’re working on one machine, or many.

  • tf.data adds two mechanisms to solve input pipeline bottlenecks and improve resource utilization. For advanced users, the new service API provides a way to improve training speed when the host attached to a training device can’t keep up with the data consumption needs of your model. It allows you to offload input preprocessing to a CPU cluster of data-processing workers that run alongside your training job, increasing accelerator utilization. A second new feature is the tf.data snapshot API, which allows you to persist the output of your input preprocessing pipeline to disk, so you can reuse it on a different training run. This enables you to trade storage space to free up additional CPU time.
  • The TF Profiler adds two new tools as well: a memory profiler to visualize your model’s memory usage over time, and a Python tracer that allows you to trace Python function calls in your model. You can read more about these below (and if you’re new to the TF Profiler, be sure to check out this article).
  • TensorFlow 2.3 adds experimental support for the new Keras Preprocessing Layers API. These layers allow you to package your preprocessing logic inside your model for easier deployment – so you can ship a model that takes raw strings, images, or rows from a table as input. There are also new user-friendly utilities that allow you to easily create a tf.data.Dataset from a directory of images or text files on disk, in a few lines of code.
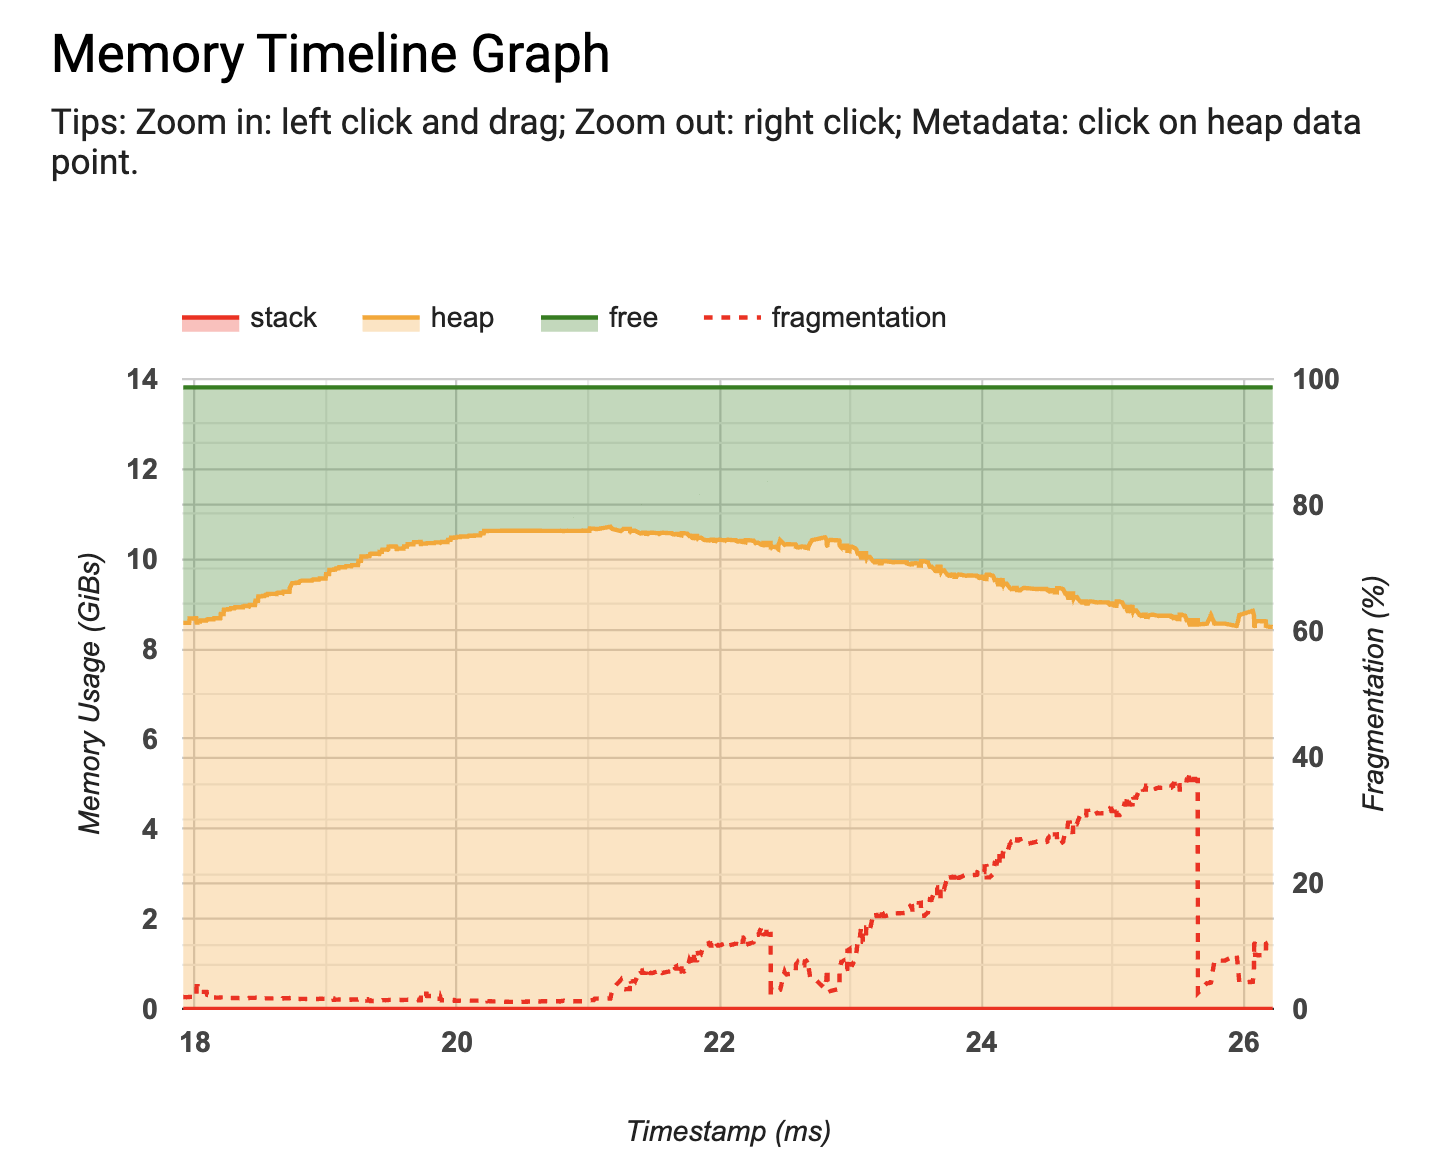
The new memory profiler

New features in tf.data

tf.data.service

Modern accelerators (GPUs, TPUs) are incredibly fast. To avoid performance bottlenecks, it’s important to ensure that your data loading and preprocessing pipeline is fast enough to provide data to the accelerator when it’s needed. For example, imagine your GPU can classify 200 examples/second, but your data input pipeline can only load 100 examples/second from disk. In this case, your GPU would be idle (waiting for data) 50% of the time. And, that’s assuming your input-pipeline is already overlapped with GPU computation (if not, your GPU would be waiting for data 66% of the time).
In this scenario, you can double training speed by using the tf.data.experimental.service to generate 200 examples/second, by distributing data loading and preprocessing to a cluster you run alongside your training job. The tf.data service has a dispatcher-worker architecture, with one dispatcher and many workers. You can find documentation on setting up a cluster here, and you can find a complete example here that shows you how to deploy a cluster using Google Kubernetes Engine.
Once you have a tf.data.service running, you can add distributed dataset processing to your existing tf.data pipelines using the distribute transformation:

ds = your_dataset()
ds = dataset.apply(tf.data.experimental.service.distribute(processing_mode="parallel_epochs", service=service_address))

Now, when you iterate over the dataset, data processing will happen using the tf.data service, instead of on your local machine.
Distributing your input pipeline is a powerful feature, but if you’re working on a single machine, tf.data has tools to help you improve input pipeline performance as well. Be sure to check out the cache and prefetch transformations – which can greatly speed up your pipeline in a single line of code.

tf.data snapshot

The tf.data.experimental.snapshot API allows you to persist the output of your preprocessing pipeline to disk, so you can materialize the preprocessed data on a different training run. This is useful for trading off storage space on disk to free up more valuable CPU and accelerator time.
For example, suppose you have a dataset that does expensive preprocessing (perhaps you are manipulating images with cropping or rotation). After developing your inputline pipeline to load and preprocess data:

dataset = create_input_pipeline()

You can snapshot the results to a directory by applying the snapshot transformation:

dataset = dataset.apply(tf.data.experimental.snapshot("/snapshot_dir"))

The snapshot will be created on disk when you iterate over the dataset for the first time. Subsequent iterations will read from snapshot_dir instead of recomputing dataset elements.
Snapshot computes a fingerprint of your dataset so it can detect changes to your input pipeline, and recompute outdated snapshots automatically. For example, if you modify a Dataset.map transformation or add additional images to a source directory, the fingerprint will change, causing the snapshot to be recomputed. Note that snapshot cannot detect changes to an existing file, though. Check out the documentation to learn more.

New features in the TF Profiler

The TF Profiler (introduced in TF 2.2) makes it easier to spot performance bottlenecks. It can help you identify when an application is input-bound, and can provide suggestions for what can be done to fix it. You can learn more about this workflow in the Analyze tf.data performance with the TF Profiler guide.
In TF 2.3, the Profiler has a few new capabilities and several usability improvements.

  • The new Memory Profiler enables you to monitor memory usage during training. If a training job runs out of memory, you can pinpoint when the peak memory usage occured and which ops consumed the most memory. If you collect a profile, the Memory Profiler tool appears in the Profiler dashboard with no extra work.
  • The new Python Tracer helps trace the Python call stack to provide additional insight on what is being executed in your program. It appears in the Profiler’s Trace Viewer. It can be enabled in programmatic mode using the ProfilerOptions or in sampling mode through the TensorBoard “capture profile” UI (you can find more information about these modes in this guide).

New Keras data loading utilities

In TF 2.3, Keras adds new user-friendly utilities (image_dataset_from_directory and text_dataset_from_directory) to make it easy for you to create a tf.data.Dataset from a directory of images or text files on disk, in just one function call. For example, if your directory structure is:

flowers_photos/
daisy/
dandelion/
roses/
sunflowers/
tulips/

You can use image_dataset_from_directory to create a tf.data.Dataset that yields batches of images from the subdirectories and labels:

train_ds = tf.keras.preprocessing.image_dataset_from_directory(
“datasets/cats_and_dogs”,
validation_split=0.2,
subset="training",
seed=0,
image_size=(img_height, img_width),
batch_size=32)

If you’re starting a new project, we recommend using image_dataset_from_directory over the legacy ImageDataGenerator. Note this utility doesn’t perform data augmentation (this is meant to be done using the new preprocessing layers, described below). You can find a complete example of loading images with this utility (as well as how to write a similar input-pipeline from scratch with tf.data) here.

Performance tip

After creating a tf.data.Dataset (either from scratch, or using image_dataset_from_directory) remember to configure it for performance to ensure I/O doesn’t become a bottleneck when training a model. You can use a one-liner for this. With this line of code:

train_ds = train_ds.cache().prefetch(buffer_size=tf.data.experimental.AUTOTUNE)

You create a dataset that caches images in memory (once they’re loaded off disk during the first training epoch), and overlaps preprocessing work on the CPU with training work on the GPU. If your dataset is too large to fit into memory, you can also use .cache(filename) to automatically create an efficient on-disk cache, which is faster to read than many small files.
You learn more in the Better performance with the tf.data API guide.

New Keras preprocessing layers

In TF 2.3, Keras also adds new experimental preprocessing layers that can simplify deployment by allowing you to include your preprocessing logic as layers inside your model, so they are saved just like other layers when you export your model.

  • Using the new TextVectorization layer, for example, you can develop a text classification model that accepts raw strings as input (without having to re-implement any of the logic for tokenization, standardization, vectorization, or padding server-side).
  • You can also use resizing, rescaling, and normalization layers to develop an image classification model that accepts any size of image as input, and that automatically normalizes pixel values to the expected range. And, you can use new data augmentation layers (like RandomRotation) to speed up your input-pipeline by running data augmentation on the GPU.
  • For structured data, you can use layers like StringLookup to encode categorical features, so you can develop a model that takes a row from a table as input. You can check out this RFC to learn more.

The best way to learn how to use these new layers is to try the new text classification from scratch, image classification from scratch, and structured data classification from scratch examples on keras.io.
Note that all of these layers can either be included inside your model, or can be applied to your tf.data input-pipeline via the map transformation. You can find an example here.
Please keep in mind, these new preprocessing layers are experimental in TF 2.3. We’re happy with the design (and anticipate they will be made non-experimental in 2.4) but realize we might not have gotten everything right on this iteration. Your feedback is very welcome. Please file an issue on GitHub to let us know how we can better support your use case.

Next steps

Check out the release notes for more information. To stay up to date, you can read the TensorFlow blog, follow twitter.com/tensorflow, or subscribe to youtube.com/tensorflow. If you’ve built something you’d like to share, please submit it for our Community Spotlight at goo.gle/TFCS. For feedback, please file an issue on GitHub. Thank you!Read More

Taiwanese Supercomputing Center Advances Real-Time Rendering from the Cloud with NVIDIA RTX Server and Quadro vDWS

Taiwanese Supercomputing Center Advances Real-Time Rendering from the Cloud with NVIDIA RTX Server and Quadro vDWS

As the stunning visual effects in movies and television advance, so do audience expectations for ever more spectacular and realistic imagery.

The National Center for High-performance Computing, home to Taiwan’s most powerful AI supercomputer, is helping video artists keep up with increasing industry demands.

NCHC delivers computing and networking platforms for filmmakers, content creators and artists. To provide them with high-quality, accelerated rendering and simulation services, the company needed some serious GPU power.

So it chose the NVIDIA RTX Server, including Quadro RTX 8000 and RTX 6000 GPUs and NVIDIA Quadro Virtual Data Center Workstation (Quadro vDWS) software, to bring accelerated rendering performance and real-time ray tracing to its customers.

NVIDIA GPUs and VDI: Driving Force Behind the Scenes

One of NCHC’s products, Render Farm, is built on NVIDIA Quadro RTX GPUs with Quadro vDWS software. It provides users with real-time rendering for high-resolution image processing.

A cloud computing platform, Render Farm enables users to rapidly render large 3D models. Its efficiency is stunning: it can reduce the time needed for opening files from nearly three hours to only three minutes.

“Last year, a team from Hollywood that reached out to us for visual effects production anticipated spending three days working on scenes,” said Chia-Chen Kuo, director of the Arts Technology Computing Division at NCHC. “But with the Render Farm computing platform, it only took one night to finish the work. That was far beyond their expectations.”

NCHC also aims to create a powerful cloud computing environment that can be accessed by anyone around the world. Quadro vDWS technology plays an important role in allowing teams to collaborate in this environment and makes its HPC resources widely available to the public.

With the rapid growth of data, physical hardware systems can’t keep up with data size and complexity. But Quadro vDWS technology makes it easy and convenient for anyone to securely access data and applications from anywhere, on any device.

Using virtual desktop infrastructure, NCHC’s Render Farm can provide up to 100 virtual workstations so users can do image processing at the same time. They only need a Wi-Fi or 4G connection to access the platform.

VMware vSphere and Horizon technology is integrated into Render Farm to provide on-demand virtual remote computing platform services. This virtualizes the HPC environment through NVIDIA virtual GPU technology and reduces by 10x the time required for redeploying the rendering environment. It also allows flexible switching between Windows and Linux operating systems.

High-Caliber Performance for High-Caliber Performers 

Over 200 video works have already been produced with NCHC’s technology services.

NCHC recently collaborated with acclaimed Taiwanese theater artist Huang Yi for one of his most popular productions, Huang Yi and KUKA. The project, which combined modern dance with visual arts and technology, was performed in over 70 locations worldwide such as the Cloud Gate Theater in northwest Taipei, the Ars Electronica Festival in Austria, and TED Conference in Vancouver.

During the program, Huang coordinated a dance with his robot companion KUKA, whose arm possessed a camera to capture the dance movements. Those images were sent to the NCHC Render Farm in Taichung, 170 km away,  to be processed in real time before projecting back to the robot on stage — with less than one second of end-to-end latency.

“I wanted to thoroughly immerse audiences in the performance so they can sense the flow of emotions. This requires strong and stable computing power,” said Huang. “NCHC’s Render Farm, powered by NVIDIA GPUs and NVIDIA virtualization technology, provides everything we need to animate the robot: exceptional computing power, extremely low latency and the remote access that you can use whenever and wherever you are.”

LeaderTek, a 3D scanning and measurement company, also uses NCHC services for image processing. With 3D and cloud rendering technology, LeaderTek is helping the Taiwan government archive historic monuments through creating advanced digital spatial models.

“Adopting Render Farm’s cloud computing platform helps us take a huge leap forward in improving our workflows,” said Hank Huang, general manager at LeaderTek. “The robust computing capabilities with NVIDIA vGPU for Quadro Virtual Workstations is also crucial for us to deliver high-quality images in a timely manner and get things done efficiently.”

Watch Huang Yi’s performance with KUKA below. And learn more about NVIDIA Quadro RTX and NVIDIA vGPU.

The post Taiwanese Supercomputing Center Advances Real-Time Rendering from the Cloud with NVIDIA RTX Server and Quadro vDWS appeared first on The Official NVIDIA Blog.

Read More

Enhancing your chatbot experience with web browsing

Enhancing your chatbot experience with web browsing

Chatbots are popping up everywhere. They are qualifying leads, assisting with sales, and automating customer service. However, conversational chatbot experiences have been limited to the space available within the chatbot window.

What if these web-based chatbots could provide an interactive experience that expanded beyond the chat window to include relevant web content based on user inputs? In a previous post we showed you how to deploy a web UI for your chatbot. In this post we will show you how to enhance that experience.

Here is an example of how we add an interactive web UI to the Order Flowers chatbot with the lex-web-ui customization.

Installing the chatbot UI

To install your chatbot, complete the following steps:

  1. Deploy the chatbot UI in your AWS account by launching the following AWS CloudFormation stack:
  2. Set EnableCognitoLogin to true in the parameters.
  3. To check if it’s working, on the AWS CloudFormation console, choose Stacks.
  4. Choose the stack you created.
  5. In the Outputs section, choose ParentPageURL.

You have now deployed the bot in the CloudFront distribution you created.

Installing the chatbot UI enhancer

After you install the chatbot UI, launch the following AWS CloudFormation stack:

There are two parameters for this stack:

  • BotName – The chatbot UI bot you deployed. The parameter value of WebUiOrderFlowers is populated by default.
  • lexwebuiStackName – The name of the deployed in the previous step. The parameter value of lex-web-ui is populated by default.

When the stack is complete, find the URL for the new demo site on the Outputs tab on the AWS CloudFormation console.

Enhancing the existing bot with AWS Lambda

To enhance the existing bot with AWS Lambda, complete the following steps:

  1. On the Amazon Lex console, choose Bots.
  2. Choose the bot you created.
  3. In the Lambda initialization and validation section, for Lambda function, choose the function you created as part of the CloudFormation stack (enhanced-orderflowers-<stackname>).

For production workloads, you should publish a new version of the bot. Amazon Lex takes a snapshot copy of the $LATEST version to publish a new version. For more information, see Exercise 3: Publish a Version and Create an Alias.

Enhancing authentication

You have now set up the enhanced chatbot UI. It’s recommended that you authenticate for a production environment. This post uses Amazon Cognito to add a social identity provider (Google) to your user pool. For instructions, see Adding Social Identity Providers to a User Pool.

This step allows your bot to display your Google calendar while you order your flowers. If you skip this step, the bot still functions normally.

Dynamically viewing content on your webpage

Having content appear and disappear on your website based on your interactions with the bot is a powerful feature.

For example, if you ask the bot to order flowers, the bot messaging interface and the webpage change. This example actively builds HTML on the fly with values that the bot sends back to the end-user.

Enhancing pages with external content to help with flower selection

When you ask the bot to buy roses, the result depends on if you’re in unauthenticated or authenticated mode.

In authenticated mode, the iframe changes from the default homepage to a Wikipedia page about roses. The Area chart also changes to a Roses Sold graph that shows the number of roses sold per year.

In authenticated (with Google) mode, the iframe changes to your Google calendar to help you schedule a delivery day. The Area chart still changes to the Roses Sold graph.

This powerful tool allows content from various parts of the website or the internet to appear by interacting with the bot. This also allows the bot to recognize if you’re authenticated or not and tailor your browsing experience.

Parent page, iframes, session attributes, and dynamic HTML tags

Four main components make up the Order Flowers bot page and how the various pieces interact with each other:

  • Parent page – This page houses all the various components, including the chatbot iframe, dynamically created HTML, and the navigation portal (an iframe that displays various HTML pages external and internal to the website).
  • Chatbot iframe – This is the chatbot UI that the end-user interacts with. The chatbot is loaded using a JavaScript snippet that mounts an iframe to the bottom right of the parent page and preloads it with an API to interact with the parent page.
  • Session attributes – These are arbitrary values that get sent back and forth from the chatbot UI backend to the parent page. You can manipulate these values in Lambda. On the parent page, the session attributes event data is made available in a variable called sessionAttributes.
  • Dynamic HTML <Div> tags – This appears on the top right of the page and displays various charts based on the question asked. You can populate it with any data, not just charts. You manipulate the data by returning the values through the session attributes fields. In the parent page, sessionAttributes.appContext houses this data.

The following diagram illustrates the solution architecture.

Chatbot UI user login with Amazon Cognito

When you’re authenticated through the integrated Amazon Cognito feature, the chatbot UI attaches a signed token as a session attribute. The enhanced Order Flowers webpage uses the token to make additional user attributes available, including fields such as given name, family name, and email address. These fields help return personalized information (for example, addressing you by your name).

Limitations

There are certain limitations to displaying outside webpages and content through the chatbot UI parent page.

If cross-origin resource sharing (CORS) is enabled on the external content that is being pulled into the parent page iframe navigation portal, the browser blocks the content. Browsers don’t block different webpages from the same domain or external webpages that don’t have CORS enabled (for example, Wikipedia). For more information, see Cross-Origin Resource Sharing (CORS) on the MDN web docs website.

In most use cases, you should use the navigation portal to pull in content from your own domain, due to the inherent limitations of iframes and CORS.

Additional Resources

The concepts discussed in this blogpost can be used with the QnaBot. The following README goes in detailed instructions on setting up the solution.

Conclusion

This post demonstrates how to enhance the Order Flowers bot with a Lambda function that parses your JWT token and extracts the relevant information. If you are authenticated through Google, the bot extracts information like your name and email address, and displays your Google calendar to help you schedule your delivery date. The function also verifies that the JWT token signature is valid.

The chatbot UI in this post is based on the aws-lex-web-ui open-source project. For more information, see the GitHub repo.


About the Authors

Mohamed Khalil is a Consultant for AWS Professional Services. Bob Strahan is a Principal Consultant for AWS Professional Services. Bob Potterveld is a Senior Consultant for AWS Professional Services. They help our customers and partners on a variety of projects.

Read More

Processing PDF documents with a human loop using Amazon Textract and Amazon Augmented AI

Processing PDF documents with a human loop using Amazon Textract and Amazon Augmented AI

Businesses across many industries, including financial, medical, legal, and real estate, process a large number of documents for different business operations. Healthcare and life science organizations, for example, need to access data within medical records and forms to fulfill medical claims and streamline administrative processes. Amazon Textract is a machine learning (ML) service that makes it easy to process documents at a large scale by automatically extracting text and data from virtually any type of document. For example, it can extract patient information from an insurance claim or values from a table in a scanned medical chart.

Depending on the business use case, you may want to have a human review of ML predictions. For example, extracting information from a scanned mortgage application or medical claim form might require human review of certain fields due to regulatory requirements or potentially low-quality scans. Amazon Augmented AI (Amazon A2I) allows you to build and manage such human review workflows. This allows human review of ML predictions when needed based on a confidence score threshold, and you can audit the predictions on an ongoing basis. For more information, see Using with Amazon Textract with Amazon Augmented AI for processing critical documents.

In this post, we show how you can use Amazon Textract and Amazon A2I to build a workflow that enables multi-page PDF document processing with a human reviewers loop.

Solution overview

The following architecture shows how you can have a serverless architecture to process multi-page PDF documents with a human review. Although Amazon Textract can process images (PNG and JPG) and PDF documents, Amazon A2I human reviewers need to have individual pages as images and process them individually using the AnalyzeDocument API of Amazon Textract.

To implement this architecture, we take advantage of Amazon Step Functions to build the overall workflow. As the workflow starts, it extracts individual pages from the multi-page PDF document. It then uses the Map state to process multiple pages concurrently using the AnalyzeDocument API. When we call Amazon Textract, we also specify the Amazon A2I workflow as part of the request. This workflow is configured to trigger when form fields are detected below a certain confidence threshold. If triggered, Amazon Textract returns the extracted text and data along with the details. When the human review is complete, the callback task token is used to resume the state machine, combine the pages’ results, and store them in an output Amazon Simple Storage Service (Amazon S3) bucket.

For more information about the demo solution, see the GitHub repo.

Prerequisites

Before you get started, you must install the following prerequisites:

  1. Node.js
  2. Python
  3. AWS Command Line Interface (AWS CLI)—for instructions, see Installing the AWS CLI)

Deploying the solution

The following steps deploy the reference implementation in your AWS account. The solution deploys different components, including an S3 bucket, a Step Function, an Amazon Simple Queue Service (Amazon SQS) queue, and AWS Lambda functions using the AWS Cloud Development Kit (AWS CDK), which is an open-source software development framework to model and provision your cloud application resources using familiar programming languages.

  1. Install AWS CDK:
    npm install -g aws-cdk

  2. Download the GitHub repo to your local machine:
    git clone https://github.com/aws-samples/amazon-textract-a2i-pdf

  3. Go to the folder multipagepdfa2i and enter the following:
    pip install -r requirements.txt

  4. Bootstrap AWS CDK:
    cdk bootstrap

  5. Deploy:
    cdk deploy

Creating a private work team

A work team is a group of people that you select to review your documents. You can create a work team from a workforce, which is made up of Amazon Mechanical Turk workers, vendor-managed workers, or your own private workers that you invite to work on your tasks. Whichever workforce type you choose, Amazon A2I takes care of sending tasks to workers. For this post, you create a work team using a private workforce and add yourself to the team to preview the Amazon A2I workflow.

To create and manage your private workforce, you can use the Labeling workforces page on the Amazon SageMaker console. On the console, you can create a private workforce by entering worker emails or importing a pre-existing workforce from an Amazon Cognito user pool.

If you already have a work team for Amazon SageMaker Ground Truth, you can use the same work team with Amazon A2I and skip to the following section.

To create your private work team, complete the following steps:

  1. On the Amazon SageMaker console, choose Labeling workforces.
  2. On the Private tab, choose Create private team.
  3. Choose Invite new workers by email.
  4. In the Email addresses box, enter the email addresses for your work team (for this post, enter your email address).

You can enter a list of up to 50 email addresses, separated by commas.

  1. Enter an organization name and contact email.
  2. Choose Create private team.

After you create the private team, you get an email invitation. The following screenshot shows an example email.

After you click the link and change your password, you are registered as a verified worker for this team. The following screenshot shows the updated information on the Private tab.

Your one-person team is now ready, and you can create a human review workflow.

Creating a human review workflow

You use a human review workflow to do the following:

  • Define the business conditions under which the Amazon Textract predictions of the document content go to a human for review. For example, you can set confidence thresholds for important words in the form that the model must meet. If inference confidence for that word (or form key) falls below your confidence threshold, the form and prediction go for human review.
  • Create instructions to help workers complete your document review task.
  1. On the Amazon SageMaker console, navigate to the Human review workflows page
  2. Choose Create human review workflow.
  3. In the Workflow settings section, for Name, enter a unique workflow name.
  4. For S3 bucket, enter the S3 bucket that was created in CDK deployment step. It should have a name format as multipagepdfa2i-multipagepdf-xxxxxxxxx. This S3 bucket is where A2I will store the human review results.
  5. For IAM role, choose Create a new role from the drop-down menu. Amazon A2I can create a role automatically for you.
  6. For S3 buckets you specify, select Specific S3 buckets.
  7. Enter the S3 bucket you specified earlier in Step 3; for example, multipagepdfa2i-multipagepdf-xxxxxxxxx.
  8. Choose Create.

You see a confirmation when role creation is complete, and your role is now pre-populated in the IAM role drop-down menu.

  1. For Task type, select Amazon Textract – Key-value pair extraction.

Defining the trigger conditions

For this post, you want to trigger a human review if the key Mail Address is identified with a confidence score of less than 99% or not identified by Amazon Textract in the document. For all other keys, a human review starts if a key is identified with a confidence score less than 90%.

  1. Select Trigger a human review for specific form keys based on the form key confidence score or when specific form keys are missing.
  2. For Key name, enter Mail Address.
  3. Set the identification confidence threshold between 0 and 99.
  4. Set the qualification confidence threshold between 0 and 99.
  5. Select Trigger a human review for all form keys identified by Amazon Textract with confidence scores in a specific range.
  6. Set Identification confidence threshold between 0 and 90.
  7. Set Qualification confidence threshold between 0 and 90.

For model-monitoring purposes, you can also randomly send a specific percent of pages for human review. This is the third option on the Conditions for invoking human review page: Randomly send a sample of forms to humans for review. This post doesn’t include this condition.

Creating a UI template

In the next steps, you create a UI template that the worker sees for document review. Amazon A2I provides pre-built templates that workers use to identify key-value pairs in documents.

  1. In the Worker task template creation section, select Create from a default template.
  2. For Template name, enter a name.

When you use the default template, you can provide task-specific instructions to help the worker complete your task. For this post, you can enter instructions similar to the default instructions you see in the console.

  1. Under Task Description, enter something similar to Please review the Key Value Pairs in this document.
  2. Under Instructions, review the default instructions provided and make modifications as needed.
  3. In the Workers section, select Private.
  4. For Private teams, choose the work team you created earlier.
  5. Choose Create.

You’re redirected to the Human review workflows page and see a confirmation message similar to the following screenshot.

Record your new human review workflow ARN, which you use to configure your human loop in the next section.

Updating the solution with the Human Review workflow

You’re now ready to add your human review workflow ARN.

  1. Within the code you downloaded from GitHub repo, open the file multipagepdfa2i/multipagepdfa2i_stack.py.

On line 23, you should see the following code:

SAGEMAKER_WORKFLOW_AUGMENTED_AI_ARN_EV = ""
  1. Within the quotes, enter the human review workflow ARN you copied at the end of the last section.

Line 23 should now look like the following code:

SAGEMAKER_WORKFLOW_AUGMENTED_AI_ARN_EV = "arn:aws:sagemaker: ...."
  1. Save the changes you made.
  2. Deploy by entering the following code:
    cdk deploy

Testing the workflow

To test your workflow, complete the following steps:

  1. Create a folder named uploads in the S3 bucket that was created by CDK deployment (Example: multipagepdfa2i-multipagepdf-xxxxxxxxx)
  2. Upload the sample PDF document to the uploads For example, uploads/Sampledoc.pdf.
  3. On the Amazon SageMaker console, choose Labeling workforces.
  4. On the Private tab, choose the link under Labeling portal sign-in URL.
  5. Sign in with the account you configured with Amazon Cognito.

If the document required a human review, a job appears under Jobs section .

  1. Select the job you want to complete and choose Start working.

In the reviewer UI, you see instructions and the first document to work on. You can use the toolbox to zoom in and out, fit image, and reposition document. See the following screenshot.

This UI is specifically designed for document-processing tasks. On the right side of the preceding screenshot, the key-value pairs are automatically pre-filled with the Amazon Textract response. As a worker, you can quickly refer to this sidebar to make sure the key-values are identified correctly (which is the case for this post).

When you select any field on the right, a corresponding bounding box appears, which highlights its location on the document. See the following screenshot.

In the following screenshot, Amazon Textract didn’t identify Mail Address. The human review workflow identified this as an important field. Even though Amazon Textract didn’t identify it, the worker task UI asks you to enter d details on the right side.

There may be a series of pages you need to submit based on the Amazon Textract confidence score ranges you configured. When you finish reviewing them, continue with steps below.

  1. When you complete the human review, go to the S3 bucket you used earlier (Example: multipagepdfa2i-multipagepdf-xxxxxxxxx)
  2. In the complete folder, choose the folder that has the name of input document (Example: uploads-Sampledoc.pdf-b5d54fdb75b143ee99f7524de56626a3).

That folder contains output.csv, which contains all your key-value pairs.

The following screenshot shows the content of an example output.csv file.

Conclusion

In this post, we showed you how to use Amazon Textract and Amazon A2I to automatically extract data from scanned multi-page PDF documents, and the human review of the pages for given business criteria. For more information about Amazon Textract and Amazon A2I, see Using Amazon Augmented AI with Amazon Textract.

For video presentations, sample Jupyter notebooks, or more information about use cases like document processing, content moderation, sentiment analysis, text translation, and more, see Amazon Augmented AI Resources.


About the Authors

Nicholas Nelson is an AWS Solutions Architect for Strategic Accounts based out of Seattle, Washington. His interests and experience include Computer Vision, Serverless Technology, and Construction Technology. Outside of work, you can find Nicholas out cycling, paddle boarding, or grilling!


Kashif Imran is a Principal Solutions Architect at Amazon Web Services. He works with some of the largest AWS customers who are taking advantage of AI/ML to solve complex business problems. He provides technical guidance and design advice to implement computer vision applications at scale. His expertise spans application architecture, serverless, containers, NoSQL and machine learning.


Anuj Gupta is Senior Product Manager for Amazon Augmented AI. He focuses on delivering products that make it easier for customers to adopt machine learning. In his spare time, he enjoys road trips and watching Formula 1.

Read More

Accelerating TensorFlow Lite with XNNPACK Integration

Accelerating TensorFlow Lite with XNNPACK Integration

Posted by Marat Dukhan, Google Research

Leveraging the CPU for ML inference yields the widest reach across the space of edge devices. Consequently, improving neural network inference performance on CPUs has been among the top requests to the TensorFlow Lite team. We listened and are excited to bring you, on average, 2.3X faster floating-point inference through the integration of the XNNPACK library into TensorFlow Lite.

To achieve this speedup, the XNNPACK library provides highly optimized implementations of floating-point neural network operators. It launched earlier this year in the WebAssembly backend of TensorFlow.js, and with this release we are introducing additional optimizations tailored to TensorFlow Lite use-cases:

  • To deliver the greatest performance to TensorFlow Lite users on mobile devices, all operators were optimized for ARM NEON. The most critical ones (convolution, depthwise convolution, transposed convolution, fully-connected), were tuned in assembly for commonly-used ARM cores in mobile phones, e.g. Cortex-A53/A73 in Pixel 2 and Cortex-A55/A75 in Pixel 3.
  • For TensorFlow Lite users on x86-64 devices, XNNPACK added optimizations for SSE2, SSE4, AVX, AVX2, and AVX512 instruction sets.
  • Rather than executing TensorFlow Lite operators one-by-one, XNNPACK looks at the whole computational graph and optimizes it through operator fusion. For example, convolution with explicit padding is represented in TensorFlow Lite via a combination of PAD operator and a CONV_2D operator with VALID padding mode. XNNPACK detects this combination of operators and fuses the two operators into a single convolution operator with explicitly specified padding.

The XNNPACK backend for CPU joins the family of TensorFlow Lite accelerated inference engines for mobile GPUs, Android’s Neural Network API, Hexagon DSPs, Edge TPUs, and the Apple Neural Engine. It provides a strong baseline that can be used on all mobile devices, desktop systems, and Raspberry Pi boards.
With the TensorFlow 2.3 release, XNNPACK backend is included with the pre-built TensorFlow Lite binaries for Android and iOS, and can be enabled with a one-line code change. XNNPACK backend is also supported in Windows, macOS, and Linux builds of TensorFlow Lite, where it is enabled via build-time opt-in mechanism. Following wider testing and community feedback, we plan to enable it by default on all platforms in an upcoming release.

Performance Improvements

XNNPACK-accelerated inference in TensorFlow Lite has already been used in Google products in production, and we observed significant speedups across a wide variety of neural network architectures and mobile processors. The XNNPACK backend boosted background segmentation in Pixel 3a Playground by 5X and delivered 2X speedup on neural network models in Augmented Faces API in ARCore.

We found that TensorFlow Lite benefits the most from the XNNPACK backend on small neural network models and low-end mobile phones. Below, we present benchmarks on nine public models covering common computer vision tasks:

  1. MobileNet v2 image classification [download]
  2. MobileNet v3-Small image classification [download]
  3. DeepLab v3 segmentation [download]
  4. BlazeFace face detection [download]
  5. SSDLite 2D object detection [download]
  6. Objectron 3D object detection [download]
  7. Face Mesh landmarks [download]
  8. MediaPipe Hands landmarks [download]
  9. KNIFT local feature descriptor [download]
Single-threaded inference speedup with TensorFlow Lite with the XNNPACK backend compared to the default backend across 5 mobile phones. Higher numbers are better.
Single-threaded inference speedup with TensorFlow Lite with the XNNPACK backend compared to the default backend across 5 desktop, laptop, and embedded devices. Higher numbers are better.

How Can I Use It?

The XNNPACK backend is already included in pre-built TensorFlow Lite 2.3 binaries, but requires an explicit runtime opt-in to enable it. We’re working to enable it by default in a future release.

Opt-in to XNNPACK backend on Android/Java

Pre-built TensorFlow Lite 2.3 Android archive (AAR) already include XNNPACK, and it takes only a single line of code to enable it in Interpreter.Options object:

Interpreter.Options interpreterOptions = new Interpreter.Options();
interpreterOptions.setUseXNNPACK(true);
Interpreter interpreter = new Interpreter(model, interpreterOptions);

Opt-in to XNNPACK backend on iOS/Swift

Pre-built TensorFlow Lite 2.3 CocoaPods for iOS similarly include XNNPACK, and a mechanism to enable it in the InterpreterOptions class:

var options = InterpreterOptions()
options.isXNNPackEnabled = true
var interpreter = try Interpreter(modelPath: "model/path", options: options)

Opt-in to XNNPACK backend on iOS/Objective-C

On iOS XNNPACK inference can be enabled from Objective-C as well via a new property in the TFLInterpreterOptions class:

TFLInterpreterOptions *options = [[TFLInterpreterOptions alloc] init];
options.useXNNPACK = YES;
NSError *error;
TFLInterpreter *interpreter =
[[TFLInterpreter alloc] initWithModelPath:@"model/path"
options:options
error:&error];

Opt-in to XNNPACK backend on Windows, Linux, and Mac

XNNPACK backend on Windows, Linux, and Mac is enabled via a build-time opt-in mechanism. When building TensorFlow Lite with Bazel, simply add --define tflite_with_xnnpack=true, and the TensorFlow Lite interpreter will use the XNNPACK backend by default.

Try out XNNPACK with your TensorFlow Lite model

You can use the TensorFlow Lite benchmark tool and measure your TensorFlow Lite model performance with XNNPACK. You only need to enable XNNPACK by the --use_xnnpack=true flag as below, even if the benchmark tool is built without the --define tflite_with_xnnpack=true Bazel option.

adb shell /data/local/tmp/benchmark_model 
--graph=/data/local/tmp/mobilenet_quant_v1_224.tflite
--use_xnnpack=true
--num_threads=4

Which Operations Are Accelerated?

The XNNPACK backend currently supports a subset of floating-point TensorFlow Lite operators (see documentation for details and limitations). XNNPACK supports both 32-bit floating-point models and models using 16-bit floating-point quantization for weights, but not models with fixed-point quantization in weights or activations. However, you do not have to constrain your model to the operators supported by XNNPACK: any unsupported operators would transparently fall-back to the default implementation in TensorFlow Lite.

Future Work

This is just the first version of the XNNPACK backend. Along with community feedback, we intend to add the following improvements:

  • Integration of the Fast Sparse ConvNets algorithms
  • Half-precision inference on the recent ARM processors
  • Quantized inference in fixed-point representation

We encourage you to leave your thoughts and comments on our GitHub and StackOverflow pages.

Acknowledgements

We would like to thank Frank Barchard, Chao Mei, Erich Elsen, Yunlu Li, Jared Duke, Artsiom Ablavatski, Juhyun Lee, Andrei Kulik, Matthias Grundmann, Sameer Agarwal, Ming Guang Yong, Lawrence Chan, Sarah Sirajuddin. Read More

Setting up human review of your NLP-based entity recognition models with Amazon SageMaker Ground Truth, Amazon Comprehend, and Amazon A2I

Setting up human review of your NLP-based entity recognition models with Amazon SageMaker Ground Truth, Amazon Comprehend, and Amazon A2I

Organizations across industries have a lot of unstructured data that you can evaluate to get entity-based insights. You may also want to add your own entity types unique to your business, like proprietary part codes or industry-specific terms. To create a natural language processing (NLP)-based model, you need to label this data based on your specific entities.

Amazon SageMaker Ground Truth makes it easy to build highly accurate training datasets for machine learning (ML), and Amazon Comprehend lets you train a model without worrying about selecting the right algorithms and parameters for model training. Amazon Augmented AI (Amazon A2I) lets you audit, review, and augment these predicted results.

In this post, we cover how to build a labeled dataset of custom entities using the Ground Truth named entity recognition (NER) labeling feature, train a custom entity recognizer using Amazon Comprehend, and review the predictions below a certain confidence threshold from Amazon Comprehend using human reviewers with Amazon A2I.

We walk you through the following steps using this Amazon SageMaker Jupyter notebook:

  1. Preprocess your input documents.
  2. Create a Ground Truth NER labeling Job.
  3. Train an Amazon Comprehend custom entity recognizer model.
  4. Set up a human review loop for low-confidence detection using Amazon A2I.

Prerequisites

Before you get started, complete the following steps to set up the Jupyter notebook:

  1. Create a notebook instance in Amazon SageMaker.

Make sure your Amazon SageMaker notebook has the necessary AWS Identity and Access Management (IAM) roles and permissions mentioned in the prerequisite section of the notebook.

  1. When the notebook is active, choose Open Jupyter.
  2. On the Jupyter dashboard, choose New, and choose Terminal.
  3. In the terminal, enter the following code:
    cd SageMaker
    git clone “https://github.com/aws-samples/augmentedai-comprehendner-groundtruth”

  4. Open the notebook by choosing SageMakerGT-ComprehendNER-A2I-Notebook.ipynb in the root folder.

You’re now ready to run the following steps through the notebook cells.

Preprocessing your input documents

For this use case, you’re reviewing at chat messages or several service tickets. You want to know if they’re related to an AWS offering. We use the NER labeling feature in Ground Truth to label a SERVICE or VERSION entity from the input messages. We then train an Amazon Comprehend custom entity recognizer to recognize the entities from text like tweets or ticket comments.

The sample dataset is provided at data/rawinput/aws-service-offerings.txt in the GitHub repo. The following screenshot shows an example of the content.

You preprocess this file to generate the following:

  • inputs.csv – You use this file to generate input manifest file for Ground Truth NER labeling.
  • Train.csv and test.csv – You use these files as input for training custom entities. You can find these files in the Amazon Simple Storage Service (Amazon S3) bucket.

Refer to Steps 1a and 1b in the notebook for dataset generation.

Creating a Ground Truth NER labeling job

The purpose is to annotate and label sentences within the input document as belonging to a custom entity that we define. In this section, you complete the following steps:

  1. Create the manifest file that Ground Truth needs.
  2. Set up a labeling workforce.
  3. Create your labeling job.
  4. Start your labeling job and verify its output.

Creating a manifest file

We use the inputs.csv file generated during prepossessing to create a manifest file that the NER labeling feature needs. We generate a manifest file named prefix+-text-input.manifest, which you use for data labeling while creating a Ground Truth job. See the following code:

# Create and upload the input manifest by appending a source tag to each of the lines in the input text file. 
# Ground Truth uses the manifest file to determine labeling tasks

manifest_name = prefix + '-text-input.manifest'
# remove existing file with the same name to avoid duplicate entries
!rm *.manifest
s3bucket = s3res.Bucket(BUCKET)

with open(manifest_name, 'w') as f:
    for fn in s3bucket.objects.filter(Prefix=prefix +'/input/'):
        fn_obj = s3res.Object(BUCKET, fn.key)
        for line in fn_obj.get()['Body'].read().splitlines():                
            f.write('{"source":"' + line.decode('utf-8') +'"}n')
f.close()
s3.upload_file(manifest_name, BUCKET, prefix + "/manifest/" + manifest_name)

The NER labeling job requires its input manifest in the {"source": "embedded text"}. The following screenshot shows the generated input.manifest file from inputs.csv.

Creating a private labeling workforce

With Ground Truth, we use a private workforce to create a labeled dataset.

You create your private workforce on the Amazon SageMaker console. For instructions, see the section Creating a private work team in Developing NER models with Amazon SageMaker Ground Truth and Amazon Comprehend.

Alternatively, follow the steps in the notebook.

For this walkthrough, we use the same private workforce to label and augment low-confidence data using Amazon A2I after custom entity training.

Creating a labeling job

The next step is to create the NER labeling job. This post highlights the key steps. For more information, see Adding a data labeling workflow for named entity recognition with Amazon SageMaker Ground Truth.

  1. On the Amazon SageMaker console, under Ground Truth, choose Labeling jobs.
  2. Choose Create labeling job.
  3. For Job name, enter a job name.
  4. For Input dataset location, enter the Amazon S3 location of the input manifest file you created (s3://bucket//path-to-your-manifest.json).
  5. For Output Dataset Location, enter a S3 bucket with an output prefix (for example, s3://bucket-name/output).
  6. For IAM role, choose Create a new Role.
  7. Select Any S3 Bucket.
  8. Choose Create.
  9. For Task category, choose Text.
  10. Select Named entity recognition.
  11. Choose Next.
  12. For Worker type, select Private.
  13. In Private Teams, select the team you created.
  14. In the Named Entity Recognition Labeling Tool section, for Enter a brief description of the task, enter Highlight the word or group of words and select the corresponding most appropriate label from the right.
  15. In the Instructions box, enter Your labeling will be used to train an ML model for predictions. Please think carefully on the most appropriate label for the word selection. Remember to label at least 200 annotations per label type.
  16. Choose Bold Italics.
  17. In the Labels section, enter the label names you want to display to your workforce.
  18. Choose Create.

Starting your labeling job

Your workforce (or you, if you chose yourself as your workforce) received an email with login instructions.

  1. Choose the URL provided and enter your user name and password.

You are directed to the labeling task UI.

  1. Complete the labeling task by choosing labels for groups of words.
  2. Choose Submit.
  3. After you label all the entries, the UI automatically exits.
  4. To check your job’s status, on the Amazon SageMaker console, under Ground Truth, choose Labeling jobs.
  5. Wait until the job status shows as Complete.

Verifying annotation outputs

To verify your annotation outputs, open your S3 bucket and locate <S3 Bucket Name>/output/<labeling-job-name>/manifests/output/output.manifest. You can review the manifest file that Ground Truth created. The following screenshot shows an example of the entries you see.

Training a custom entity model

We now use the annotated dataset or output.manifest Ground Truth created to train a custom entity recognizer. This section walks you through the steps in the notebook.

Processing the annotated dataset

You can provide labels for Amazon Comprehend custom entities through an entity list or annotations. In this post, we use annotations generated using Ground Truth labeling jobs. You need to convert the annotated output.manifest file to the following CSV format:

File, Line, Begin Offset, End Offset, Type
documents.txt, 0, 0, 11, VERSION

Run the following code in the notebook to generate the annotations.csv file:

# Read the output manifest json and convert into a csv format as expected by Amazon Comprehend Custom Entity Recognizer
import json
import csv

# this will be the file that will be written by the format conversion code block below
csvout = 'annotations.csv'

with open(csvout, 'w', encoding="utf-8") as nf:
    csv_writer = csv.writer(nf)
    csv_writer.writerow(["File", "Line", "Begin Offset", "End Offset", "Type"])
    with open("data/groundtruth/output.manifest", "r") as fr:
        for num, line in enumerate(fr.readlines()):
            lj = json.loads(line)
            #print(str(lj))
            if lj and labeling_job_name in lj:
                for ent in lj[labeling_job_name]['annotations']['entities']:
                    csv_writer.writerow([fntrain,num,ent['startOffset'],ent['endOffset'],ent['label'].upper()])
    fr.close()
nf.close()        

s3_annot_key = "output/" + labeling_job_name + "/comprehend/" + csvout

upload_to_s3(s3_annot_key, csvout)

The following screenshot shows the contents of the file.

Setting up a custom entity recognizer

This post uses the API, but you can optionally create the recognizer and batch analysis job on the Amazon Comprehend console. For instructions, see Build a custom entity recognizer using Amazon Comprehend.

  1. Enter the following code. For s3_train_channel, use the train.csv file you generated in preprocessing step for training the recognizer. For s3_annot_channel, use annotations.csv as a label to train your custom entity recognizer.
    custom_entity_request = {
    
          "Documents": { 
             "S3Uri": s3_train_channel
          },
          "Annotations": { 
             "S3Uri": s3_annot_channel
          },
          "EntityTypes": [
                    {
                        "Type": "SERVICE"
                    },
                    {
                        "Type": "VERSION"
                    }
          ]
    }

  2. Create the entity recognizer using CreateEntityRecognizer The entity recognizer is trained with the minimum required number of training samples to generate some low confidence predictions required for our Amazon A2I workflow. See the following code:
    import datetime
    
    id = str(datetime.datetime.now().strftime("%s"))
    create_custom_entity_response = comprehend.create_entity_recognizer(
            RecognizerName = prefix + "-CER", 
            DataAccessRoleArn = role,
            InputDataConfig = custom_entity_request,
            LanguageCode = "en"
    )
    

    When the entity recognizer job is complete, it creates a recognizer with a performance score. As mentioned earlier we trained the entity recognizer with a minimum number of training samples to generate low confidence predictions we need to trigger the Amazon A2I human loop. You can find these metrics on the Amazon Comprehend console. See the following screenshot.

  3. Create a batch entity detection analysis job to detect entities over a large number of documents.

Use the Amazon Comprehend StartEntitiesDetectionJob operation to detect custom entities in your documents. For instructions on creating an endpoint for real-time analysis using your custom entity recognizer, see Announcing the launch of Amazon Comprehend custom entity recognition real-time endpoints.

To use the EntityRecognizerArn for custom entity recognition, you must provide access to the recognizer to detect the custom entity. This ARN is supplied by the response to the CreateEntityRecognizer operation.

  1. Run the custom entity detection job to get predictions on the test dataset you created during the preprocessing step by running the following cell in the notebook:
    s3_test_channel = 's3://{}/{}'.format(BUCKET, s3_test_key) s3_output_test_data = 's3://{}/{}'.format(BUCKET, "output/testresults/") 
    test_response = comprehend.start_entities_detection_job(   InputDataConfig={ 
    'S3Uri': s3_test_channel, 
    'InputFormat': 'ONE_DOC_PER_LINE'
    }, 
    OutputDataConfig={'S3Uri': s3_output_test_data 
    }, 
    DataAccessRoleArn=role, 
    JobName='a2i-comprehend-gt-blog', 
    EntityRecognizerArn=jobArn, 
    LanguageCode='en')
    

    The following screenshot shows the test results.

Setting up a human review loop

In this section, you set up a human review loop for low-confidence detections in Amazon A2I. It includes the following steps:

  1. Choose your workforce.
  2. Create a human task UI.
  3. Create a worker task template creator function.
  4. Create the flow definition.
  5. Check the human loop status and wait for reviewers to complete the task.

Choosing your workforce

For this post, we use the private workforce we created for the Ground Truth labeling jobs. Use the workforce ARN to set up the workforce for Amazon A2I.

Creating a human task UI

Create a human task UI resource with a UI template in liquid HTML. This template is used whenever a human loop is required.

The following example code is compatible with Amazon Comprehend entity detection:

template = """
<script src="https://assets.crowd.aws/crowd-html-elements.js"></script>

<style>
    .highlight {
        background-color: yellow;
    }
</style>

<crowd-entity-annotation
        name="crowd-entity-annotation"
        header="Highlight parts of the text below"
        labels="[{'label': 'service', 'fullDisplayName': 'Service'}, {'label': 'version', 'fullDisplayName': 'Version'}]"
        text="{{ task.input.originalText }}"
>
    <full-instructions header="Named entity recognition instructions">
        <ol>
            <li><strong>Read</strong> the text carefully.</li>
            <li><strong>Highlight</strong> words, phrases, or sections of the text.</li>
            <li><strong>Choose</strong> the label that best matches what you have highlighted.</li>
            <li>To <strong>change</strong> a label, choose highlighted text and select a new label.</li>
            <li>To <strong>remove</strong> a label from highlighted text, choose the X next to the abbreviated label name on the highlighted text.</li>
            <li>You can select all of a previously highlighted text, but not a portion of it.</li>
        </ol>
    </full-instructions>

    <short-instructions>
        Select the word or words in the displayed text corresponding to the entity, label it and click submit
    </short-instructions>

    <div id="recognizedEntities" style="margin-top: 20px">
                <h3>Label the Entity below in the text above</h3>
                <p>{{ task.input.entities }}</p>
    </div>
</crowd-entity-annotation>

<script>

    function highlight(text) {
        var inputText = document.getElementById("inputText");
        var innerHTML = inputText.innerHTML;
        var index = innerHTML.indexOf(text);
        if (index >= 0) {
            innerHTML = innerHTML.substring(0,index) + "<span class='highlight'>" + innerHTML.substring(index,index+text.length) + "</span>" + innerHTML.substring(index + text.length);
            inputText.innerHTML = innerHTML;
        }
    }

    document.addEventListener('all-crowd-elements-ready', () => {
        document
            .querySelector('crowd-entity-annotation')
            .shadowRoot
            .querySelector('crowd-form')
            .form
            .appendChild(recognizedEntities);
    });
</script>
"""

Creating a worker task template creator function

This function is a higher-level abstraction on the Amazon SageMaker package’s method to create the worker task template, which we use to create a human review workflow. See the following code:

def create_task_ui():
    '''
    Creates a Human Task UI resource.

    Returns:
    struct: HumanTaskUiArn
    '''
    response = sagemaker.create_human_task_ui(
        HumanTaskUiName=taskUIName,
        UiTemplate={'Content': template})
    return response
# Task UI name - this value is unique per account and region. You can also provide your own value here.
taskUIName = prefix + '-ui' 

# Create task UI
humanTaskUiResponse = create_task_ui()
humanTaskUiArn = humanTaskUiResponse['HumanTaskUiArn']
print(humanTaskUiArn)

Creating the flow definition

Flow definitions allow you to specify the following:

  • The workforce that your tasks are sent to
  • The instructions that your workforce receives

This post uses the API, but you can optionally create this workflow definition on the Amazon A2I console.

For more information, see Create a Flow Definition.

To set up the condition to trigger the human loop review, enter the following code (you can change the value of the CONFIDENCE_SCORE_THRESHOLD based on what confidence level you want to trigger the human review):

human_loops_started = []

import json

CONFIDENCE_SCORE_THRESHOLD = 90
for line in data:
    print("Line is: " + str(line))
    begin_offset=line['BEGIN_OFFSET']
    end_offset=line['END_OFFSET']
    if(line['CONFIDENCE_SCORE'] < CONFIDENCE_SCORE_THRESHOLD):
        humanLoopName = str(uuid.uuid4())
        human_loop_input = {}
        human_loop_input['labels'] = line['ENTITY']
        human_loop_input['entities']= line['ENTITY']
        human_loop_input['originalText'] = line['ORIGINAL_TEXT']
        start_loop_response = a2i_runtime_client.start_human_loop(
        HumanLoopName=humanLoopName,
        FlowDefinitionArn=flowDefinitionArn,
        HumanLoopInput={
                "InputContent": json.dumps(human_loop_input)
            }
        )
        print(human_loop_input)
        human_loops_started.append(humanLoopName)
        print(f'Score is less than the threshold of {CONFIDENCE_SCORE_THRESHOLD}')
        print(f'Starting human loop with name: {humanLoopName}  n')
    else:
         print('No human loop created. n')

Checking the human loop status and waiting for reviewers to complete the task

To define a function that allows you to check the human loop’s status, enter the following code:

completed_human_loops = []
for human_loop_name in human_loops_started:
    resp = a2i_runtime_client.describe_human_loop(HumanLoopName=human_loop_name)
    print(f'HumanLoop Name: {human_loop_name}')
    print(f'HumanLoop Status: {resp["HumanLoopStatus"]}')
    print(f'HumanLoop Output Destination: {resp["HumanLoopOutput"]}')
    print('n')
    
    if resp["HumanLoopStatus"] == "Completed":
        completed_human_loops.append(resp)

Navigate to the private workforce portal that’s provided as the output of cell 2 from the previous step in the notebook. See the following code:

workteamName = WORKTEAM_ARN[WORKTEAM_ARN.rfind('/') + 1:]
print("Navigate to the private worker portal and do the tasks. Make sure you've invited yourself to your workteam!")
print('https://' + sagemaker.describe_workteam(WorkteamName=workteamName)['Workteam']['SubDomain'])

The UI template is similar to the Ground Truth NER labeling feature. Amazon A2I displays the entity identified from the input text (this is a low-confidence prediction). The human worker can then update or validate the entity labeling as required and choose Submit.

This action generates an updated annotation with offsets and entities as highlighted by the human reviewer.

Cleaning up

To avoid incurring future charges, stop and delete resources such as the Amazon SageMaker notebook instance, Amazon Comprehend custom entity recognizer, and the model artifacts in Amazon S3 when not in use.

Conclusion

This post demonstrated how to create annotations for an Amazon Comprehend custom entity recognition using Ground Truth NER. We used Amazon A2I to augment the low-confidence predictions from Amazon Comprehend.

You can use the annotations that Amazon A2I generated to update the annotations file you created and incrementally train the custom recognizer to improve the model’s accuracy.

For video presentations, sample Jupyter notebooks, or more information about use cases like document processing, content moderation, sentiment analysis, text translation, and more, see Amazon Augmented AI Resources. We’re interested in how you want to extend this solution for your use case and welcome your feedback.


About the Authors

Mona Mona is an AI/ML Specialist Solutions Architect based out of Arlington, VA. She works with World Wide Public Sector team and helps customers adopt machine learning on a large scale. She is passionate about NLP and ML Explainability areas in AI/ML.


Prem Ranga is an Enterprise Solutions Architect based out of Houston, Texas. He is part of the Machine Learning Technical Field Community and loves working with customers on their ML and AI journey. Prem is passionate about robotics, is an Autonomous Vehicles researcher, and also built the Alexa-controlled Beer Pours in Houston and other locations.


Read More

Banking on AI: RBC Builds a DGX-Powered Private Cloud

Banking on AI: RBC Builds a DGX-Powered Private Cloud

Royal Bank of Canada built an NVIDIA DGX-powered cloud and tied it to a strategic investment in AI. Despite headwinds from a global pandemic, it will further enable RBC to transform client experiences.

The voyage started in the fall of 2017. That’s when RBC, Canada’s largest bank with 17 million clients in 36 countries, created  its dedicated research institute, Borealis AI. The institute is headquartered next to Toronto’s MaRS Discovery District, a global hub for machine-learning experts.

Borealis AI quickly attracted dozens of top researchers. That’s no surprise given the institute is led by the bank’s chief science officer, Foteini Agrafioti, a patent-holding serial entrepreneur and Ph.D. in electrical and computer engineering who co-chairs Canada’s AI advisory council.

The bank initially booted up Borealis AI into a mix of systems. But as the group and the AI models it developed grew, it needed a larger, dedicated AI engine.

Brokering a Private AI Cloud for Banking

“I had the good fortune to help commission our first infrastructure for Borealis AI, but it wasn’t adequate to meet our evolving AI needs,” said Mike Tardif, a senior vice president of tech infrastructure at RBC.

The team wanted a distributed AI system that would serve four locations, from Vancouver to Montreal, securely behind the bank’s firewall. It needed to scale as workloads grew and leverage the regular flow of AI innovations in open source software without requiring hardware upgrades to do so.

In short, the bank aimed to build a state-of-the-art private AI cloud. For its key planks, RBC chose six NVIDIA DGX systems and Red Hat’s OpenShift to orchestrate containers running on those systems.

“We see NVIDIA as a leader in AI infrastructure. We were already using its DGX systems and wanted to expand our AI capabilities, so it was an obvious choice,” said Tardif.

AI Steers Bank Toward Smart Apps

RBC is already reporting solid results with the system despite commissioning it early this year in the face of the oncoming COVID-19 storm.

The private AI cloud can run thousands of simulations and analyze millions of data points in a fraction of the time that it could before, the bank says. As a result, it expects to transform the customer banking experience with a new generation of smart applications. And that’s just the beginning.

“For instance, in our capital markets business we are now able to train thousands of statistical models in parallel to cover this vast space of possibilities,” said Agrafioti, head of Borealis AI.

“This would be impossible without a distributed and fully automated environment. We can populate the entire cluster with a single click using the automated pipeline that this new solution has delivered,” she added.

The platform has already helped reduce client calls and resulted in faster delivery of new applications for RBC clients, thanks to the performance of GPUs combined with the automation of orchestrated containers.

RBC deployed Red Hat OpenShift in combination with NVIDIA DGX infrastructure to rapidly spin up AI compute instances in a fraction of the time it used to take.

OpenShift helps by creating an environment where users can run thousands of containers simultaneously, extracting datasets to train AI models and run them in production on DGX systems, said Yan Fisher, a global evangelist for emerging technologies at Red Hat.

OpenShift and NGC, NVIDIA’s software hub, let the companies support the bank remotely through the pandemic, he added.

“Building our AI infrastructure with NVIDIA DGX has given us in-house capabilities similar to what the Amazons and Googles of the world offer and we’ve achieved some significant savings in total cost of ownership,” said Tardif.

He singled out as key hardware assets the NVLink interconnect and NVIDIA’s support for enterprise networking standards with maximum bandwidth and reduced latency. They let users quickly access multiple GPUs within and between systems across data centers that host the bank’s AI cloud.

How a Bank with a Long History Stays Innovative

Though it’s 150 years old, RBC keeps in tune with the times by investing early in emerging technologies, as it did with Borealis AI.

“Innovation is in our DNA — we’re always looking at what’s coming around the corner and how we can operationalize it, and AI is a top strategic priority,” said Tardif.

Although its main expertise is in banking, RBC has tech chops, too. During the COVID lockdown it managed to “pressure test” the latest systems, pushing them well beyond they thought were their limits.

“We’re co-creating this vision of AI infrastructure with NVIDIA, and through this journey we’re raising the bar for AI innovation which everyone in the financial services industry can benefit from,” Tardif said.

Visit NVIDIA’s financial services industry page to learn more.

The post Banking on AI: RBC Builds a DGX-Powered Private Cloud appeared first on The Official NVIDIA Blog.

Read More

Commentary: America must invest in its ability to innovate

In July of 1945, in an America just beginning to establish a postwar identity, former MIT vice president Vannevar Bush set forth a vision that guided the country to decades of scientific dominance and economic prosperity. Bush’s report to the president of the United States, “Science: The Endless Frontier,” called on the government to support basic research in university labs. Its ideas, including the creation of the National Science Foundation (NSF), are credited with helping to make U.S. scientific and technological innovation the envy of the world.

Today, America’s lead in science and technology is being challenged as never before, write MIT President L. Rafael Reif and Indiana University President Michael A. McRobbie in an op-ed published today by The Chicago Tribune. They describe a “triple challenge” of bolder foreign competitors, faster technological change, and a merciless race to get from lab to market.

The government’s decision to adopt Bush’s ideas was bold and controversial at the time, and similarly bold action is needed now, they write.

“The U.S. has the fundamental building blocks for success, including many of the world’s top research universities that are at the forefront of the fight against COVID-19,” reads the op-ed. “But without a major, sustained funding commitment, a focus on key technologies and a faster system for transforming discoveries into new businesses, products and quality jobs, in today’s arena, America will not prevail.”

McRobbie and Reif believe a bipartisan bill recently introduced in both chambers of Congress can help America’s innovation ecosystem meet the challenges of the day. Named the “Endless Frontier Act,” the bill would support research focused on advancing key technologies like artificial intelligence and quantum computing. It does not seek to alter or replace the NSF, but to “create new strength in parallel,” they write. 

The bill would also create scholarships, fellowships, and other forms of assistance to help build an American workforce ready to develop and deploy the latest technologies. And, it would facilitate experiments to help commercialize new ideas more quickly.

“Today’s leaders have the opportunity to display the far-sighted vision their predecessors showed after World War II — to expand and shape of our institutions, and to make the investments to adapt to a changing world,” Reif and McRobbie write.

Both university presidents acknowledge that measures such as the Endless Frontier Act require audacious choices. But if leaders take the right steps now, they write, those choices will seem, in retrospect, obvious and wise.

“Now as then, our national prosperity hinges on the next generation of technical triumphs,” Reif and Mcrobbie write. “Now as then, that success is not inevitable, and it will not come by chance. But with focused funding and imaginative policy, we believe it remains in reach.”

Read More