Exploring Exploration: Comparing Children with RL Agents in Unified Environments

Exploring Exploration: Comparing Children with RL Agents in Unified Environments

Despite recent advances in artificial intelligence (AI) research, human
children are still by far the best learners we know of, learning impressive
skills like language and high-level reasoning from very little data. Children’s
learning is supported by highly efficient, hypothesis-driven exploration: in
fact, they explore so well that many machine learning researchers have been
inspired to put videos like the one below in their talks to motivate research
into exploration methods. However, because applying results from studies in
developmental psychology can be difficult, this video is often the extent to
which such research actually connects with human cognition.


A time-lapse of a baby playing with toys. Source.

Top Content Creation Applications Turn ‘RTX On’ for Faster Performance

Top Content Creation Applications Turn ‘RTX On’ for Faster Performance

Whether tackling complex visualization challenges or creating Hollywood-caliber visual effects, artists and designers require powerful hardware to create their best work.

The latest application releases from Foundry, Chaos Group and Redshift by Maxon provide advanced features powered by NVIDIA RTX so creators can experience faster ray tracing and accelerated performance to elevate any design workflow.

Foundry Delivers New Features in Modo and Nuke

Foundry recently hosted Foundry LIVE, a series of virtual events where they announced the latest enhancements to their leading content creation applications, including NVIDIA OptiX 7.1 support in Modo.

Modo is Foundry’s powerful and flexible 3D modeling, texturing and rendering toolset. By upgrading to OptiX 7.1 in the mPath renderer, Version 14.1 delivers faster rendering, denoising and real-time feedback with up to 2x the memory savings on the GPU for greater flexibility when working with complex scenes.

Earlier this week, the team announced Nuke 12.2, the latest version of Foundry’s compositing, editorial and review tools. The recent release of Nuke 12.1, the NukeX Cara VR toolset for working with 360-degree video, as well as Nuke’s SphericalTransform and Bilateral nodes, takes advantage of new GPU-caching functionality to deliver significant improvements in viewer processing and rendering. The GPU-caching architecture is also available to developers creating custom GPU-accelerated tools using BlinkScript.

“Moving mPath to OptiX 7.1 dramatically reduces render times and memory usage, but the feature I’m particularly excited by is the addition of linear curves support, which now allows mPath to accelerate hair and fur rendering on the GPU,” said Allen Hastings, head of rendering at Foundry.

Image Courtesy of Foundry, model supplied by Aaron Sims Creative

NVIDIA Quadro RTX GPUs combined with Dell Precision workstations provide the performance, scalability and reliability to help artists and designers boost productivity and create amazing content faster than before. Learn more about how Foundry members in the U.S. can receive exclusive discounts and save on all Dell desktops, notebooks, servers, electronics and accessories.

Chaos Group Releases V-Ray 5 for Autodesk Maya

Chaos Group will soon release V-Ray 5 for Autodesk Maya, with a host of new GPU-accelerated features for lighting and materials.

Using LightMix in the new V-Ray Frame Buffer allows artists to freely experiment with lighting changes after they render, save out permutations and push back improvements in scenes. The new Layer Compositor allows users to fine-tune and finish images directly in the V-Ray frame buffer — without the need for a separate post-processing app.

“V-Ray 5 for Maya brings tremendous advancements for Maya artists wanting to improve their efficiency,” said Phillip Miller, vice president of product management at Chaos Group. “In addition, every new feature is supported equally by V-Ray GPU which can utilize RTX acceleration.”

V-Ray 5 for Maya image for the Nissan GTR. Image courtesy of Millergo CG.

V-Ray 5 also adds support for out-of-core geometry for rendering using NVIDIA CUDA, improving performance for artists and designers working with large scenes that aren’t able to fit into the GPU’s frame buffer.

V-Ray 5 for Autodesk Maya will be generally available in early August.

Redshift Brings Faster Ray Tracing, Bigger Memory

Maxon hosted The 3D and Motion Design Show this week, where they demonstrated Redshift 3.0 with OptiX 7 ray-tracing acceleration and NVLink for both geometry and textures.

Additional features of Redshift 3.0 include:

  • General performance improved 30 percent or more
  • Automatic sampling so users no longer need to manually tweak sampling settings
  • Maxon shader noises for all supported 3D apps
  • Hydra/Solaris support
  • Deeper traces and nested shader blending for even more visually compelling shaders

“Redshift 3.0 incorporates NVIDIA technologies such as OptiX 7 and NVLink. OptiX 7 enables hardware ray tracing so our users can now render their scenes faster than ever. And NVLink allows the rendering of larger scenes with less or no out-of-core memory access — which also means faster render times,” said Panos Zompolas, CTO at Redshift Rendering Technologies. “The introduction of Hydra and Blender support means more artists can join the ever growing Redshift family and render their projects at an incredible speed and quality.”

Redshift 3.0 will soon introduce OSL and Blender support. Redshift 3.0 is currently available to licensed customers, with general availability coming soon.

All registered participants of the 3D Motion and Design Show will be automatically entered for a chance to win an NVIDIA Quadro RTX GPU. See all prizes here.

Check out other RTX-accelerated applications that help professionals transform design workflows. And learn more about how RTX GPUs are powering high-performance NVIDIA Studio systems built to handle the most demanding creative workflows.

For developers looking to get the most out of RTX GPUs, learn more about integrating OptiX 7 into applications.


Featured blog image courtesy of Foundry.

The post Top Content Creation Applications Turn ‘RTX On’ for Faster Performance appeared first on The Official NVIDIA Blog.

Read More

Closing data gaps with Lacuna Fund

Closing data gaps with Lacuna Fund

Machine learning has shown enormous promise for social good, whether in helping respond to global health pandemics or reach citizens before natural disasters hit. But even as machine learning technology becomes increasingly accessible, social innovators still face significant barriers in their efforts to use this technology to unlock new solutions. From languages to health and agriculture, there is a lack of relevant, labeled data to represent and address the challenges that face much of the world’s population.

To help close this gap, Google.org is making a $2.5 million grant alongside The Rockefeller Foundation, Canada’s International Development Resource Center (IDRC) and Germany’s GiZ FAIR Forward to launch Lacuna Fund, the world’s first collaborative nonprofit effort to directly address this missing data. The Fund aims to unlock the power of machine learning by providing data scientists, researchers, and social entrepreneurs in low- and middle-income communities around the world with resources to produce labeled datasets that address urgent problems.  

Labeled data is a particular type of data that is useful in generating machine learning models: This data provides the “ground truth” that a model can use to guess about cases that it hasn’t yet seen. To create a labeled dataset, example data is systematically “tagged” by knowledgeable humans with one or more concepts or entities each one represents. For example, a researcher might label short videos of insects with their type; images of fungi with whether or not they are harmful to plants around them; or passages of Swahili text with the parts of speech that each word represents. In turn, these datasets could enable biologists to track insect migration; farmers to accurately identify threats to their crops; and Swahili speakers to use an automated text messaging service to get vital health information.  

Guided by committees of domain and machine learning experts and facilitated by Meridian Institute, the Fund will provide resources and support to produce new labeled datasets, as well as augment or update existing ones to be more representative, relevant and sustainable. The Fund’s initial work will focus on agriculture and underrepresented languages, but we welcome additional collaborators and anticipate the fund will grow in the years to come. And our work is bigger than just individual datasets: Lacuna Fund will focus explicitly on growing the capacity of local organizations to be data collectors, curators and owners. While following best practices for responsible collection, publication and use, we endeavor to make all datasets as broadly available as possible.

Thanks in part to the rise of cloud computing, in particular services like Cloud AutoML and libraries like TensorFlow, AI is increasingly able to help address society’s most pressing issues. Yet we’ve seen firsthand in our work on the Google AI Impact Challenge the gap between the potential of AI and the ability to successfully implement it. The need for data is quickly becoming one of the most salient barriers to progress. It’s our hope that the Fund provides not only a way for social sector organizations to fund high-impact, immediately-applicable data collection and labeling, but also a foundation from which changemakers can build a better future.

Image at top: A team from AI Challenge Grantee Wadhwani Institute for Artificial Intelligence in India is working with local farmers to manage pest damage to crop.

Read More

Using AI to identify the aggressiveness of prostate cancer

Using AI to identify the aggressiveness of prostate cancer

Prostate cancer diagnoses are common, with 1 in 9 men developing prostate cancer in their lifetime. A cancer diagnosis relies on specialized doctors, called pathologists, looking at biological tissue samples under the microscope for signs of abnormality in the cells. The difficulty and subjectivity of pathology diagnoses led us to develop an artificial intelligence (AI) system that can identify the aggressiveness of prostate cancer.

Since many prostate tumors are non-aggressive, doctors first obtain small samples (biopsies) to better understand the tumor for the initial cancer diagnosis. If signs of tumor aggressiveness are found, radiation or invasive surgery to remove the whole prostate may be recommended. Because these treatments can have painful side effects, understanding tumor aggressiveness is important to avoid unnecessary treatment.

Grading the biopsies

One of the most crucial factors in this process is to “grade” any cancer in the sample for how abnormal it looks, through a process called Gleason grading. Gleason grading involves first matching each cancerous region to one of three Gleason patterns, followed by assigning an overall “grade group” based on the relative amounts of each Gleason pattern in the whole sample. Gleason grading is a challenging task that relies on subjective visual inspection and estimation, resulting in pathologists disagreeing on the right grade for a tumor as much as 50 percent of the time. To explore whether AI could assist in this grading, we previously developed an algorithm that Gleason grades large samples (i.e. surgically-removed prostates) with high accuracy, a step that confirms the original diagnosis and informs patient prognosis.

Our research

In our recent work, “Development and Validation of a Deep Learning Algorithm for Gleason Grading of Prostate Cancer from Biopsy Specimens”, published in JAMA Oncology, we explored whether an AI system could accurately Gleason grade smaller prostate samples (biopsies). Biopsies are done during the initial part of prostate cancer care to get the initial cancer diagnosis and determine patient treatment, and so are more commonly performed than surgeries. However, biopsies can be more difficult to grade than surgical samples due to the smaller amount of tissue and unintended changes to the sample from tissue extraction and preparation process. The AI system we developed first “grades” each region of biopsy, and then summarizes the region-level classifications into an overall biopsy-level score.

Gleason grading

The first stage of the deep learning system Gleason grades every region in a biopsy. In this biopsy, green indicates Gleason pattern 3 while yellow indicates Gleason pattern 4.

Our results 

Given the complexity of Gleason grading, we worked with six experienced expert pathologists to evaluate the AI system. These experts, who have specialized training in prostate cancer and an average of 25 years of experience, determined the Gleason grades of 498 tumor samples. Highlighting how difficult Gleason grading is, a cohort of 19 “general” pathologists (without specialist training in prostate cancer) achieved an average accuracy of 58 percent on these samples. By contrast, our AI system’s accuracy was substantially higher at 72 percent. Finally, some prostate cancers have ambiguous appearances, resulting in disagreements even amongst experts. Taking this uncertainty into account, the deep learning system’s agreement rate with experts was comparable to the agreement rate between the experts themselves.

Cancer pathology workflow

Potential cancer pathology workflow augmented with AI-based assistive tools: a tumor sample is first collected and digitized using a high-magnification scanner. Next, the AI system provides a grade group for each sample.

These promising results indicate that the deep learning system has the potential to support expert-level diagnoses and expand access to high-quality cancer care. To evaluate if it could improve the accuracy and consistency of prostate cancer diagnoses, this technology needs to be validated as an assistive tool in further clinical studies and on larger and more diverse patient groups. However, we believe that AI-based tools could help pathologists in their work, particularly in situations where specialist expertise is limited.

Our research advancements in both prostate and breast cancer were the result of collaborations with the Naval Medical Center San Diego and support from Verily. Our appreciation also goes to several institutions that provided access to de-identified data, and many pathologists who provided advice or reviewed prostate cancer samples. We look forward to future research and investigation into how our technology can be best validated, designed and used to improve patient care and cancer outcomes.

Read More

Announcing the winners of the 2020 AI System Hardware/Software Co-Design request for proposals

In March 2020, Facebook launched the AI Systems Hardware/Software Co-Design request for proposals (RFP) at MLSys. This new research award opportunity is part of our continued goal of strengthening our ties with academics working in the wide range of AI hardware/algorithm co-design research. Today, we’re announcing the recipients of these research awards.
View RFPWe launched this RFP after the success of the 2019 RFP and the AI Systems Faculty Summit. This year, we were particularly interested in proposals related to any of the following areas:

  • Recommendation models
    • Compression, quantization, pruning techniques
    • Graph-based systems with implications on hardware (graph learning)
  • Hardware/software co-design for deep learning
    • Energy-efficient hardware architectures
    • Hardware efficiency–aware neural architecture search
    • Mixed-precision linear algebra and tensor-based frameworks
  • Distributed training
    • Software frameworks for efficient use of programmable hardware
    • Scalable communication-aware and data movement-aware algorithms
    • High-performance and fault-tolerant communication middleware
    • High-performance fabric topology and network transport for distributed training
  • Performance, programmability, and efficiency at data center scale
    • Machine learning–driven data access optimization (e.g., prefetching and caching)
    • Enabling large model deployment through intelligent memory and storage
    • Training un/self/semi-supervised models on large-scale video data sets

“We received 132 proposals from 74 universities, which was an increase from last year’s 88 proposals. It was a difficult task to select a few research awards from a large pool of high-quality proposals,” says Maxim Naumov, a Research Scientist working on AI system co-design at Facebook. “We believe that the winners will help advance the state-of-the-art in ML/DL system design. Thank you to all the researchers who took the time to submit a proposal, and congratulations to the award recipients.”

Research award recipients

Principal investigators are listed first unless otherwise noted.

Algorithm-systems co-optimization for near-data graph learning
Zhiru Zhang (Cornell University)

Analytical models for efficient data orchestration in DL workloads
Tze Meng Low (Carnegie Mellon University)

Efficient DNN training at scale: From algorithms to hardware
Gennady Pekhimenko (University of Toronto)

HW/SW co-design for real-time learning with memory augmented networks
Priyanka Raina, Burak Bartan, Haitong Li, and Mert Pilanci (Stanford University)

HW/SW co-design of next-generation training platforms for DLRMs
Tushar Krishna (Georgia Institute of Technology)

ML-driven hardware-software co-design for data access optimization
Sophia Shao and Seah Kim (University of California, Berkeley)

Rank-adaptive and low-precision tensorized training for DLRM
Zheng Zhang (University of California, Santa Barbara)

Scaling and accelerating distributed training with FlexFlow
Alexander Aiken (Stanford University)

Unsupervised training for large-scale video representation learning
Avideh Zakhor (University of California, Berkeley)

The post Announcing the winners of the 2020 AI System Hardware/Software Co-Design request for proposals appeared first on Facebook Research.

Read More

Extracting custom entities from documents with Amazon Textract and Amazon Comprehend

Extracting custom entities from documents with Amazon Textract and Amazon Comprehend

Amazon Textract is a machine learning (ML) service that makes it easy to extract text and data from scanned documents. Textract goes beyond simple optical character recognition (OCR) to identify the contents of fields in forms and information stored in tables. This allows you to use Amazon Textract to instantly “read” virtually any type of document and accurately extract text and data without needing any manual effort or custom code.

Amazon Textract has multiple applications in a variety of fields. For example, talent management companies can use Amazon Textract to automate the process of extracting a candidate’s skill set. Healthcare organizations can extract patient information from documents to fulfill medical claims.

When your organization processes a variety of documents, you sometimes need to extract entities from unstructured text in the documents. A contract document, for example, can have paragraphs of text where names and other contract terms are listed in the paragraph of text instead of as a key/value or form structure. Amazon Comprehend is a natural language processing (NLP) service that can extract key phrases, places, names, organizations, events, sentiment from unstructured text, and more. With custom entity recognition, you can to identify new entity types not supported as one of the preset generic entity types. This allows you to extract business-specific entities to address your needs.

In this post, we show how to extract custom entities from scanned documents using Amazon Textract and Amazon Comprehend.

Use case overview

For this post, we process resume documents from the Resume Entities for NER dataset to get insights such as candidates’ skills by automating this workflow. We use Amazon Textract to extract text from these resumes and Amazon Comprehend custom entity recognition to detect skills such as AWS, C, and C++ as custom entities. The following screenshot shows a sample input document.

The following screenshot shows the corresponding output generated using Amazon Textract and Amazon Comprehend.

Solution overview

The following diagram shows a serverless architecture that processes incoming documents for custom entity extraction using Amazon Textract and custom model trained using Amazon Comprehend. As documents are uploaded to an Amazon Simple Storage Service (Amazon S3) bucket, it triggers an AWS Lambda function. The function calls the Amazon Textract DetectDocumentText API to extract the text and calls Amazon Comprehend with the extracted text to detect custom entities.

The solution consists of two parts:

  1. Training:
    1. Extract text from PDF documents using Amazon Textract
    2. Label the resulting data using Amazon SageMaker Ground Truth
    3. Train custom entity recognition using Amazon Comprehend with the labeled data
  2. Inference:
    1. Send the document to Amazon Textract for data extraction
    2. Send the extracted data to the Amazon Comprehend custom model for entity extraction

Launching your AWS CloudFormation stack

For this post, we use an AWS CloudFormation stack to deploy the solution and create the resources it needs. These resources include an S3 bucket, Amazon SageMaker instance, and the necessary AWS Identity and Access Management (IAM) roles. For more information about stacks, see Walkthrough: Updating a stack.

  1. Download the following CloudFormation template and save to your local disk.
  2. Sign in to the AWS Management Console with your IAM user name and password.
  3. On the AWS CloudFormation console, choose Create Stack.

Alternatively, you can choose Launch Stack directly.

  1. On the Create Stack page, choose Upload a template file and upload the CloudFormation template you downloaded.
  2. Choose Next.
  3. On the next page, enter a name for the stack.
  4. Leave everything else at their default setting.
  5. On the Review page, select I acknowledge that AWS CloudFormation might create IAM resources with custom names.
  6. Choose Create stack.
  7. Wait for the stack to finish running.

You can examine various events from the stack creation process on the Events tab. After the stack creation is complete, look at the Resources tab to see all the resources the template created.

  1. On the Outputs tab of the CloudFormation stack, record the Amazon SageMaker instance URL.

Running the workflow on a Jupyter notebook

To run your workflow, complete the following steps:

  1. Open the Amazon SageMaker instance URL that you saved from the previous step.
  2. Under the New drop-down menu, choose Terminal.
  3. On the terminal, clone the GitHub cd Sagemaker; git clone URL.

You can check the folder structure (see the following screenshot).

  1. Open Textract_Comprehend_Custom_Entity_Recognition.ipynb.
  2. Run the cells.

Code walkthrough

Upload the documents to your S3 bucket.

The PDFs are now ready for Amazon Textract to perform OCR. Start the process with a StartDocumentTextDetection asynchronous API call.

For this post, we process two resumes in PDF format for demonstration, but you can process all 220 if needed. The results have all been processed and are ready for you to use.

Because we need to train a custom entity recognition model with Amazon Comprehend (as with any ML model), we need training data. In this post, we use Ground Truth to label our entities. By default, Amazon Comprehend can recognize entities like person, title, and organization. For more information, see Detect Entities. To demonstrate custom entity recognition capability, we focus on candidate skills as entities inside these resumes. We have the labeled data from Ground Truth. The data is available in the GitHub repo <(see: entity_list.csv)>. For instructions on labeling your data, see Developing NER models with Amazon SageMaker Ground Truth and Amazon Comprehend.

Now we have our raw and labeled data and are ready to train our model. To start the process, use the create_entity_recognizer API call. When the training job is submitted, you can see the recognizer being trained on the Amazon Comprehend console.

In the training, Amazon Comprehend sets aside some data for testing. When the recognizer is trained, you can see the performance of each entity and the recognizer overall.

We have prepared a small sample of text to test out the newly trained custom entity recognizer. We run the same step to perform OCR, then upload the Amazon Textract output to Amazon S3 and start a custom recognizer job.

When the job is submitted, you can see the progress on the Amazon Comprehend console under Analysis Jobs.

When the analysis job is complete, you can download the output and see the results. For this post, we converted the JSON result into table format for readability.

Conclusion

ML and artificial intelligence allow organizations to be agile. It can automate manual tasks to improve efficiency. In this post, we demonstrated an end-to-end architecture for extracting entities such as a candidate’s skills on their resume by using Amazon Textract and Amazon Comprehend. This post showed you how to use Amazon Textract to do data extraction and use Amazon Comprehend to train a custom entity recognizer from your own dataset and recognize custom entities. You can apply this process to a variety of industries, such as healthcare and financial services.

To learn more about different text and data extraction features of Amazon Textract, see How Amazon Textract Works.


About the Authors

Yuan Jiang is a Solution Architect with a focus on machine learning. He is a member of the Amazon Computer Vision Hero program.


Sonali Sahu is a Solution Architect and a member of Amazon Machine Learning Technical Field Community. She is also a member of the Amazon Computer Vision Hero program.


Kashif Imran is a Principal Solution Architect and the leader of Amazon Computer Vision Hero program.


Read More

Increasing engagement with personalized online sports content

Increasing engagement with personalized online sports content

This is a guest post by Mark Wood at Pulselive. In their own words, “Pulselive, based out of the UK, is the proud digital partner to some of the biggest names in sports.”


At Pulselive, we create experiences sports fans can’t live without; whether that’s the official Cricket World Cup website or the English Premier League’s iOS and Android apps.

One of the key things our customers measure us on is fan engagement with digital content such as videos. But until recently, the videos each fan saw were based on a most recently published list, which wasn’t personalized.

Sports organizations are trying to understand who their fans are and what they want. The wealth of digital behavioral data that can be collected for each fan tells a story of how unique they are and how they engage with our content. Based on the increase of available data and the increasing presence of machine learning (ML), Pulselive was asked by customers to provide tailored content recommendations.

In this post, we share our experience of adding Amazon Personalize to our platform as our new recommendation engine and how we increased video consumption by 20%.

Implementing Amazon Personalize

Before we could start, Pulselive had two main challenges: we didn’t have any data scientists on staff and we needed to find a solution that our engineers with minimal ML experience would understand and would still produce measurable results. We considered using external companies to assist (expensive), using tools such as Amazon SageMaker (still quite the learning curve), or Amazon Personalize.

We ultimately chose to use Amazon Personalize for several reasons:

  1. The barrier to entry was low, both technically and financially.
  2. We could quickly conduct an A/B test to demonstrate the value of a recommendation engine.
  3. We could create a simple proof of concept (PoC) with minimal disruption to the existing site.
  4. We were more concerned about the impact and improving the results than having a clear understanding of what was going on under the hood of Amazon Personalize.

Like any other business, we couldn’t afford to have an adverse impact on our daily operations, but still needed the confidence that the solution would work for our environment. Therefore, we started out with A/B testing in a PoC that we could spin up and execute in a matter of days.

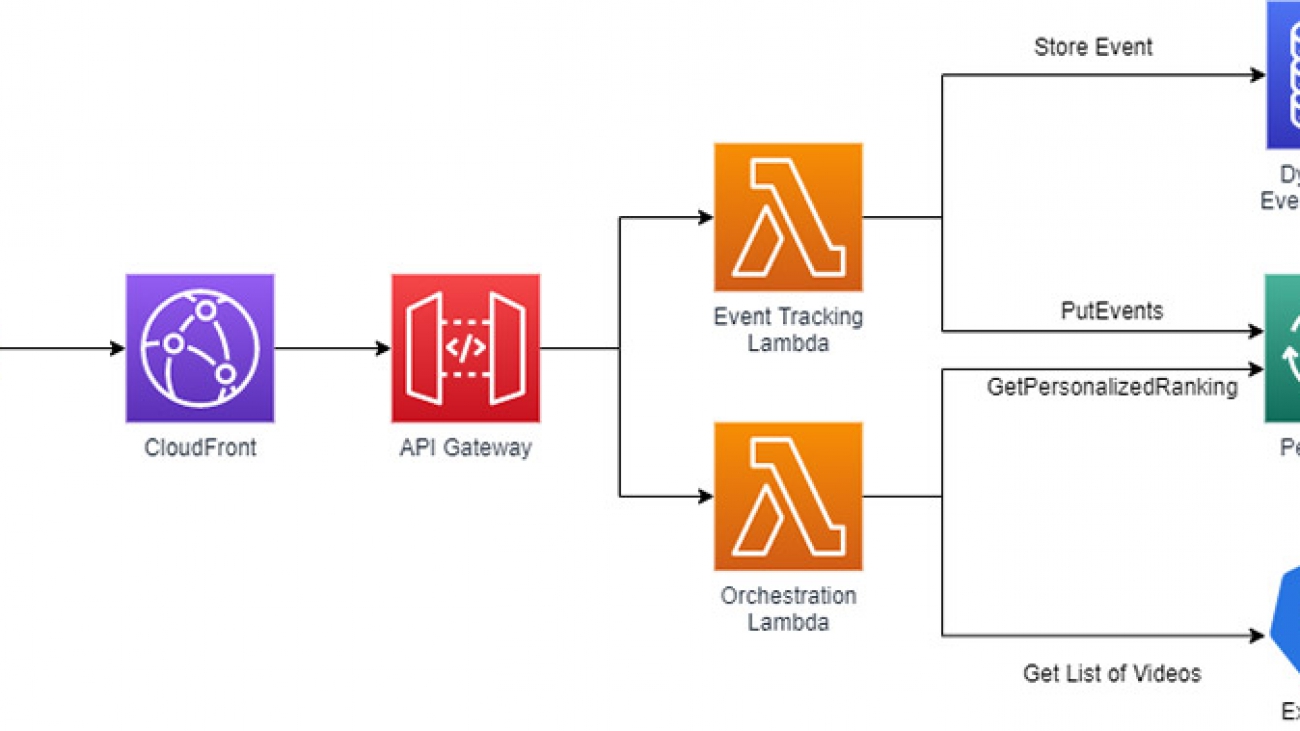
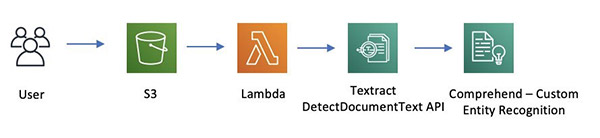
Working with the Amazon Prototyping team, we narrowed down a range of options for our first integration to one that would require minimal changes to the website and be easily A/B tested. After examining all locations where a user is presented with a list of videos, we decided that re-ranking the list of videos to watch next would be the quickest to implement personalized content. For this prototype, we used an AWS Lambda function and Amazon API Gateway to provide a new API that would intercept the request for more videos and re-rank them using the Amazon Personalize GetPersonalizedRanking API.

To be considered successful, the experiment needed to demonstrate that statistically significant improvements had been made to either total video views or completion percentage. To make this possible, we needed to test across a sufficiently long enough period of time to make sure that we covered days with multiple sporting events and quieter days with no matches. We hoped to eliminate any behavior that would be dependent on the time of day or whether a match had recently been played by testing across different usage patterns. We set a time frame of 2 weeks to gather initial data. All users were part of the experiment and randomly assigned to either the control group or the test group. To keep the experiment as simple as possible, all videos were part of the experiment. The following diagram illustrates the architecture of our solution.

To get started, we needed to build an Amazon Personalize solution that provided us with the starting point for the experiment. Amazon Personalize requires a user-item interactions dataset to be able to define a solution and create a campaign to recommend videos to a user. We satisfied these requirements by creating a CSV file that contains a timestamp, user ID, and video ID for each video view across several weeks of usage. Uploading the interaction history to Amazon Personalize was a simple process, and we could immediately test the recommendations on the AWS Management Console. To train the model, we used a dataset of 30,000 recent interactions.

To compare metrics for total videos viewed and video completion percentage, we built a second API to record all video interactions in Amazon DynamoDB. This second API solved the problem of telling Amazon Personalize about new interactions via the PutEvents API, which helped keep the ML model up to date.

We tracked all video views and what prompted video views for all users in the experiment. Video prompts included direct linking (for example, from social media), linking from another part of the website, and linking from a list of videos. Each time a user viewed a video page, they were presented with the current list of videos or the new re-ranked list, depending on whether they were in the control or test group. We started our experiment with 5% of total users in the test group. When our approach showed no problems (no obvious drop in video consumption or increase in API errors), we increased this to 50%, with the remaining users acting as the control group, and started to collect data.

Learning from our experiment

After two weeks of A/B testing, we pulled the KPIs we collected from DynamoDB and compared the two variants we tested across several KPIs. We opted to use a few simple KPIs for this initial experiment, but other organizations’ KPIs may vary.

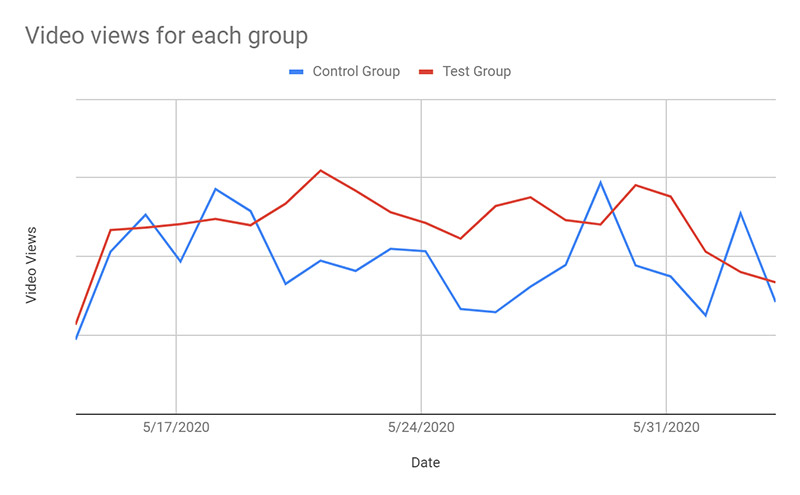
Our first KPI was the number of video views per user per session. Our initial hypothesis was that we wouldn’t see meaningful change given that we were re-ranking a list of videos; however, we measured an increase in views per user by 20%. The following graph summarizes our video views for each group.

In addition to measuring total view count, we wanted to make sure that users were watching videos in full. We tracked this by sending an event for each 25% of the video a user viewed. For each video, we found that the average completion percentage didn’t change very much based on whether the video was recommended by Amazon Personalize or by the original list view. In combination with the number of videos viewed, we concluded that overall viewing time had increased for each user when presented with a personalized list of recommended videos.

We also tracked the position of each video in users’ “recommended video” bar and which item they selected. This allowed us to compare the ranking of a personalized list vs. a publication ordered list. We found that this didn’t make much difference between the two variants, which suggested that our users would most likely select a video that was visible on their screen rather than scrolling to see the entire list.

After we analyzed the results of the experiment, we presented them to the customer with the recommendation that we enable Amazon Personalize as the default method of ranking videos in the future.

Lessons learned

We learned the following lessons on our journey, which may help you when implementing your own solution:

  1. Gather your historical data of user-item interactions; we used about 30,000 interactions.
  2. Focus on recent historical data. Although your immediate position is to get as much historical data as you can, recent interactions are more valuable than older interactions. If you have a very large dataset of historical interactions, you can filter out older interactions to reduce the size of the dataset and training time.
  3. Make sure you can give all users a consistent and unique ID, either by using your SSO solution or by generating session IDs.
  4. Find a spot in your site or app where you can run an A/B test either re-ranking an existing list or displaying a list of recommended items.
  5. Update your API to call Amazon Personalize and fetch the new list of items.
  6. Deploy the A/B test and gradually increase the percentage of users in the experiment.
  7. Instrument and measure so that you can understand the outcome of your experiment.

Conclusion and future steps

We were thrilled by our first foray into the world of ML with Amazon Personalize. We found the entire process of integrating a trained model into our workflow was incredibly simple; and we spent far more time making sure that we had the right KPIs and data capture to prove the usefulness of the experiment than we did implementing Amazon Personalize.

In the future, we will be developing the following enhancements:

  1. Integrating Amazon Personalize throughout our workflow much more frequently by providing our development teams the opportunity to use Amazon Personalize everywhere a list of content is provided.
  2. Expanding the use cases beyond re-ranking to include recommended items. This should allow us to surface older items that are likely to be more popular with each user.
  3. Experiment with how often the model should be retrained—inserting new interactions into the model in real time is a great way to keep things fresh, but the models still needs daily retraining to be most effective.
  4. Exploring options for how we can use Amazon Personalize with all of our customers to help improve fan engagement by recommending the most relevant content in all forms.
  5. Using recommendation filters to expand the range of parameters available for each request. We will soon be targeting additional options such as filtering to include videos of your favorite players.

About the Author

Mark Wood is the Product Solutions Director at Pulselive. Mark has been at Pulselive for over 6 years and has held both Technical Director as well as Software Engineer roles during his tenure with the company. Prior to Pulselive, Mark was a Senior Engineer at Roke and a Developer at Querix. Mark is a graduate from the University of Southampton with a degree in Mathematics with Computer Science.

Read More