Learn how Alexa Conversations helps developers in authoring complex dialogue management rules.Read More

Top Healthcare Innovators Share AI Developments at GTC
Healthcare is under the microscope this year like never before. Hospitals are being asked to do more with less, and researchers are working around the clock to answer pressing questions.
NVIDIA’s GPU Technology Conference brings everything you need to know about the future of AI and HPC in healthcare together in one place.
Innovators across healthcare will come together at the event to share how they are using AI and GPUs to supercharge their medical devices and biomedical research.
Scores of on-demand talks and hands-on training sessions will focus on AI in medical imaging, genomics, drug discovery, medical instruments and smart hospitals.
And advancements powered by GPU acceleration in fields such as imaging, genomics and drug discovery, which are playing a vital role in COVID-19 research, will take center stage at the conference.
There are over 120 healthcare sessions taking place at GTC, which will feature amazing demos, hands-on training, breakthrough research and more from October 5-9.
Turning Months into Minutes for Drug Discovery
 AI and HPC are improving speed, accuracy and scalability for drug discovery. Companies and researchers are turning to AI to enhance current methods in the field. Molecular simulation like docking, free energy pertubation (FEP) and molecular dynamics requires a huge amount of computing power. At every phase of drug discovery, researchers are incorporating AI methods to accelerate the process.
Here are some drug discovery sessions you won’t want to miss:
- Powering Computational Drug Design with NVIDIA GPUs
- The Summit Supercomputer as a Virtual Drug Discovery Lab for COVID-19
- Revealing Hidden Determinants of Molecular Recognition in Hit-to-lead Optimization with Graph Convolutional Networks
Architecting the Next Generation of Hospitals
AI can greatly improve hospital efficiency and prevent costs from ballooning. Autonomous robots can help with surgeries, deliver blankets to patients’ rooms and perform automatic check-ins. AI systems can search patient records, monitor blood pressure and oxygen saturation levels, flag thoracic radiology images that show pneumonia, take patient temperatures and notify staff immediately of changes.
Here are some sessions on smart hospitals you won’t want to miss:
- Improve Patient Care with Everyday Sensors and Multimodal AI
- Architecting AI-Powered Medical Instruments
- Combining Design and GPUs to Improve Surgical Performance
 Training AI for Medical Imaging

AI models are being developed at a rapid pace to optimize medical imaging analysis for both radiology and pathology. Get exposure to cutting-edge use cases for AI in medical imaging and how developers can use the NVIDIA Clara Imaging application framework to deploy their own AI applications.
Building robust AI requires massive amounts of data. In the past, hospitals and medical institutions have struggled to share and combine their local knowledge without compromising patient privacy, but federated learning is making this possible. The learning paradigm enables different clients to securely collaborate, train and contribute to a global model. Register for this session to learn more about federated learning and its use on AI COVID-19 model development from a panel of experts.
Must-see medical imaging sessions include:
- Bringing AI to Hospitals: How to Design a Clinical Imaging Infrastructure for AI at the Edge
- The National Swedish Platform for AI Research in Medical Imaging
- XNAT and NVIDIA Clara In Practice: Building a Medical Imaging Research Ecosystem
Accelerating Genomic Analysis
Genomic data is foundational in making precision medicine a reality. As next-generation sequencing becomes more routine, large genomic datasets are becoming more prevalent. Transforming the sequencing data into genetic information is just the first step in a complicated, data-intensive workflow. With high performance computing, genomic analysis is being streamlined and accelerated to enable novel discoveries about the human genome.
Genomic sessions you won’t want to miss include:
- Accelerating Whole Genome Analysis to Make the Most of Your Sequencing Data
- Real-Time Sequencing Meets High Performance Compute
The Best of MICCAI at GTC
This year’s GTC is also bringing to attendees the best of MICCAI, a conference focused on cutting-edge deep learning medical imaging research. Developers will have the opportunity to dive into the papers presented, connect with the researchers at a variety of networking opportunities, and watch on-demand trainings from the first ever MONAI Bootcamp hosted at MICCAI.
Game-Changing Healthcare Startups
Over 70 healthcare AI startups from the NVIDIA Inception program will showcase their latest breakthroughs at GTC. Get inspired by the AI- and HPC-powered technologies these startups are developing for personalized medicine and next-generation clinics.
Here are some Inception member-led talks not to miss:
- Distributed Learning on Sensitive Data
- Cutting-Edge AI Tools Aid in Safe Patient Care in a Smart Hospital
- A Universal, Fast, Auto-Focusing System for Whole Slide Imaging Using Deep Learning
Make New Connections, Share Ideas
GTC will have new ways to connect with fellow attendees who are blazing the trail for healthcare and biomedical innovation. Join a Dinner with Strangers conversation to network with peers on topics spanning drug discovery, medical imaging, genomics and intelligent instrument development. Or, book a Braindate to have a knowledge-sharing conversation on a topic of your choice with a small group or one-on-one.
Learn more about networking opportunities at GTC.
Brilliant Minds Never Turn Off
GTC will showcase the hard work and groundbreaking discoveries of developers, researchers, engineers, business leaders and technologists from around the world. Nowhere else can you access five days of continuous programming with regionally tailored content. This international event will unveil the future of healthcare technology, all in one place.
Check out the full healthcare session lineup at GTC, including talks from over 80 startups using AI to transform healthcare, and register for the event today.
The post Top Healthcare Innovators Share AI Developments at GTC appeared first on The Official NVIDIA Blog.

Detecting and redacting PII using Amazon Comprehend
Amazon Comprehend is a natural language processing (NLP) service that uses machine learning (ML) to find insights and relationships like people, places, sentiments, and topics in unstructured text. You can now use Amazon Comprehend ML capabilities to detect and redact personally identifiable information (PII) in customer emails, support tickets, product reviews, social media, and more. No ML experience required. For example, you can analyze support tickets and knowledge articles to detect PII entities and redact the text before you index the documents in the search solution. After that, search solutions are free of PII entities in documents. Redacting PII entities helps you protect privacy and comply with local laws and regulations.
Customer use case: TeraDact Solutions
TeraDact Solutions has already put this new feature to work. TeraDact Solutions’ software offers a robust alternative for secure information sharing in a world of ever-increasing compliance and privacy concerns. With its signature Information Identification & Presentation (IIaP ) capabilities, TeraDact’s tools provide the user with a safe information sharing environment. “Using Amazon Comprehend for PII redaction with our tokenization system not only helps us reach a larger set of our customers but also helps us overcome the shortcomings of rules-based PII detection which can result in false alarms or missed details. PII detection is critical for businesses and with the power of context-aware NLP models from Comprehend we can uphold the trust customers place in us with their information. Amazon is innovating in ways to help push our business forward by adding new features which are critical to our business thereby providing enhanced service to 100% of customers able to access Comprehend in AWS.” said Chris Schrichte, CEO, TeraDact Solutions, Inc.
In this post, I cover how to use Amazon Comprehend to detect PII and redact the PII entities via the AWS Management Console and the AWS Command Line Interface (AWS CLI).
Detecting PII in Amazon Comprehend
When you analyze text using Amazon Comprehend real-time analysis, Amazon Comprehend automatically identifies PII, as summarized in the following table.
| PII entity category | PII entity types |
| Financial |
BANK_ACCOUNT_NUMBER BANK_ROUTING CREDIT_DEBIT_NUMBER CREDIT_DEBIT_CVV CREDIT_DEBIT_EXPIRY PIN |
| Personal |
NAME ADDRESS PHONE AGE |
| Technical security |
USERNAME PASSWORD URL AWS_ACCESS_KEY AWS_SECRET_KEY IP_ADDRESS MAC_ADDRESS |
| National |
SSN PASSPORT_NUMBER DRIVER_ID |
| Other | DATE_TIME |
For each detected PII entity, you get the type of PII, a confidence score, and begin and end offset. These offsets help you locate PII entities in your documents for document processing to redact it at the secure storage or downstream solutions.
Analyzing text on the Amazon Comprehend console
To get started with Amazon Comprehend, all you need is an AWS account. To use the console, complete the following steps:
- On the Amazon Comprehend console, in the Input text section, select Built-in.
- For Input text, enter your text.
- Choose Analyze.

- On the Insights page, choose the PII
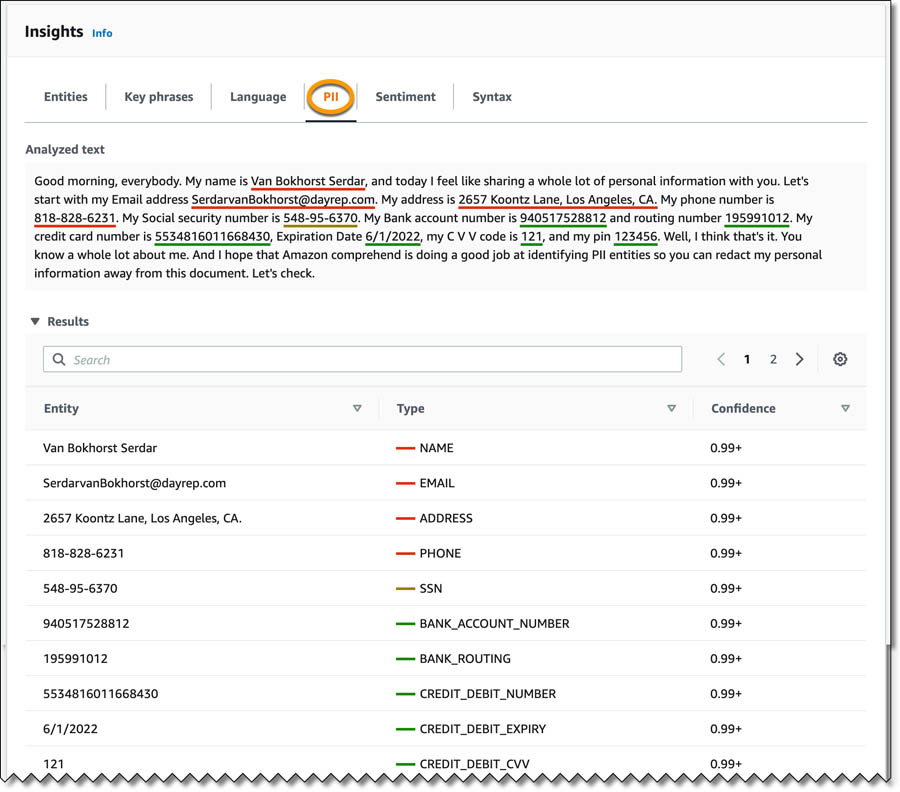
The PII tab shows color-coded text to indicate different PII entity types, such as name, email, address, phone, and others. The Results section shows more information about the text. Each entry shows the PII entity, its type, and the level of confidence Amazon Comprehend has in this analysis.
Analyzing text via the AWS CLI
To perform real-time analysis using the AWS CLI, enter the following code:
aws comprehend detect-pii-entities
--language-code en
--text
" Good morning, everybody. My name is Van Bokhorst Serdar, and today I feel like sharing a whole lot of personal information with you. Let's start with my Email address SerdarvanBokhorst@dayrep.com. My address is 2657 Koontz Lane, Los Angeles, CA. My phone number is 818-828-6231. My Social security number is 548-95-6370. My Bank account number is 940517528812 and routing number 195991012. My credit card number is 5534816011668430, Expiration Date 6/1/2022, my C V V code is 121, and my pin 123456. Well, I think that's it. You know a whole lot about me. And I hope that Amazon comprehend is doing a good job at identifying PII entities so you can redact my personal information away from this document. Let's check."
To view the output, open the JSON response object and look at the detected PII entities. For each entity, the service returns the type of PII, confidence score metric, BeginOffset, and EndOffset. See the following code:
{
    "Entities": [
        {
            "Score": 0.9996334314346313,
            "Type": "NAME",
            "BeginOffset": 36,
            "EndOffset": 55
        },
        {
            "Score": 0.9999902248382568,
            "Type": "EMAIL",
            "BeginOffset": 167,
            "EndOffset": 195
        },
        {
            "Score": 0.9999983310699463,
            "Type": "ADDRESS",
            "BeginOffset": 211,
            "EndOffset": 245
        },
        {
            "Score": 0.9999997615814209,
            "Type": "PHONE",
            "BeginOffset": 265,
            "EndOffset": 277
        },
        {
            "Score": 0.9999996423721313,
            "Type": "SSN",
            "BeginOffset": 308,
            "EndOffset": 319
        },
        {
            "Score": 0.9999984502792358,
            "Type": "BANK_ACCOUNT_NUMBER",
            "BeginOffset": 347,
            "EndOffset": 359
        },
        {
            "Score": 0.9999974966049194,
            "Type": "BANK_ROUTING",
            "BeginOffset": 379,
            "EndOffset": 388
        },
        {
            "Score": 0.9999991655349731,
            "Type": "CREDIT_DEBIT_NUMBER",
            "BeginOffset": 415,
            "EndOffset": 431
        },
        {
            "Score": 0.9923601746559143,
            "Type": "CREDIT_DEBIT_EXPIRY",
            "BeginOffset": 449,
            "EndOffset": 457
        },
        {
            "Score": 0.9999997615814209,
            "Type": "CREDIT_DEBIT_CVV",
            "BeginOffset": 476,
            "EndOffset": 479
        },
        {
            "Score": 0.9998345375061035,
            "Type": "PIN",
            "BeginOffset": 492,
            "EndOffset": 498
        }
    ]
}
Asynchronous PII redaction batch processing on the Amazon Comprehend console
You can redact documents by using Amazon Comprehend asynchronous operations. You can choose redaction mode Replace with PII entity to replace PII entities with PII entity type, or choose to mask PII entity with redaction mode Replace with character and replace the characters in PII entities with a character of your choice (!, #, $, %, &, *, or @).
To analyze and redact large documents and large collections of documents, ensure that the documents are stored in an Amazon Simple Storage Service (Amazon S3) bucket and start an asynchronous operation to detect and redact PII in the documents. The results of the analysis are returned in an S3 bucket.
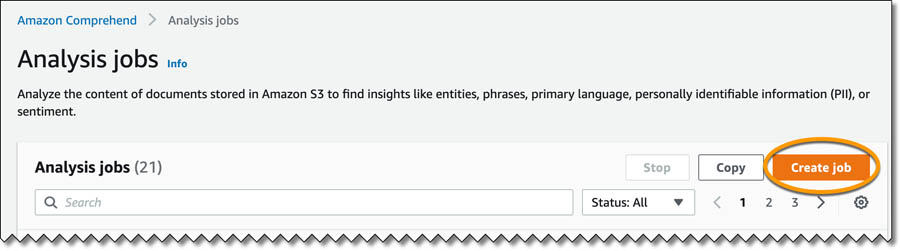
- On the Amazon Comprehend console, choose Analysis jobs.
- Choose Create job.
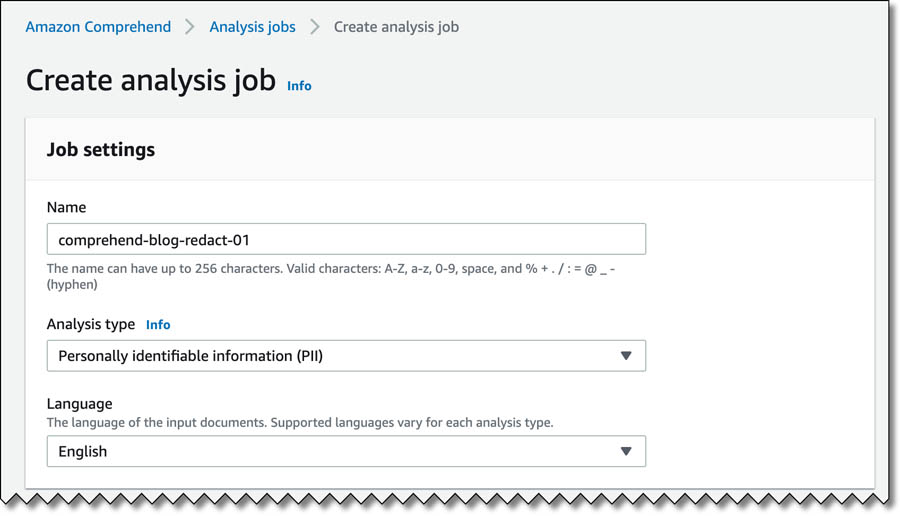
- On the Create analysis job page, for Name, enter a name (for this post, we enter comprehend-blog-redact-01).
- For Analysis type, choose Personally identifiable information (PII).
- For Language, choose English.
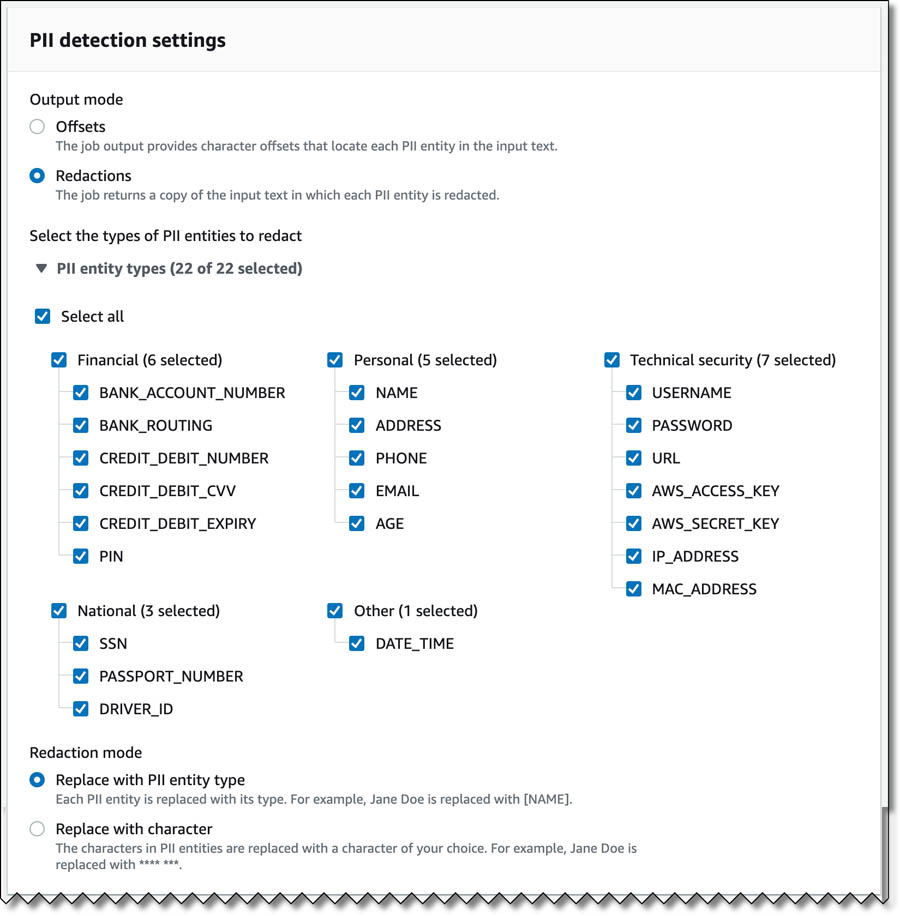
- In the PII detection settings section, for Output mode, select Redactions.
- Expand PII entity types and select the entity types to redact.
- For Redaction mode, choose Replace with PII entity type.
Alternatively, you can choose Replace with character to replace PII entities with a character of your choice (!, #, $, %, &, *, or @).
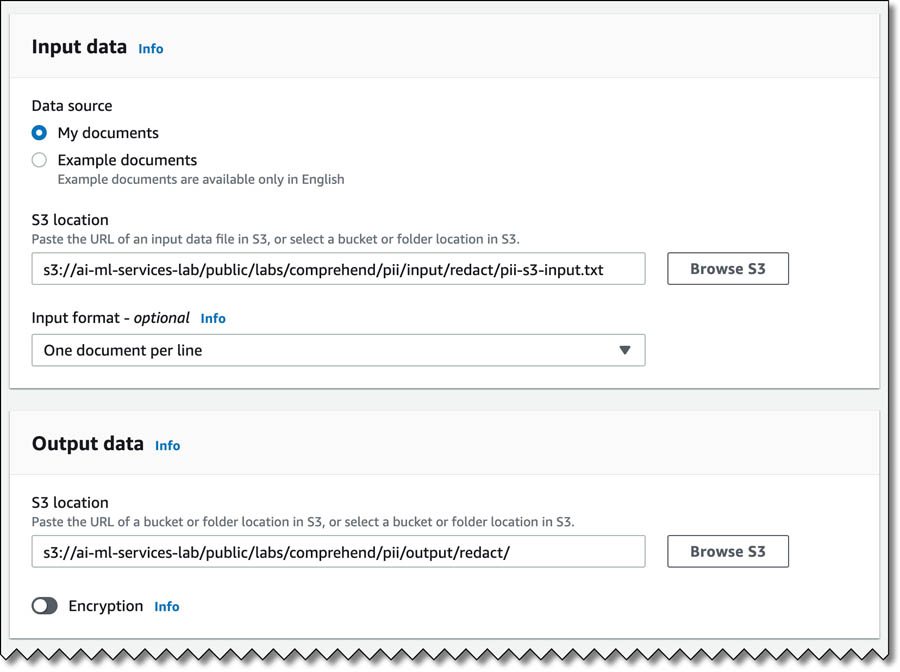
- In the Input data section, for Data source, select My documents.
- For S3 location, enter the S3 path for pii-s3-input.txt.
This text file has the same example content we used earlier for real-time analysis.
- In the Output data section, for S3 location, enter the path to the output folder in Amazon S3.
Make sure you choose the correct input and output paths based on how you organized the document.
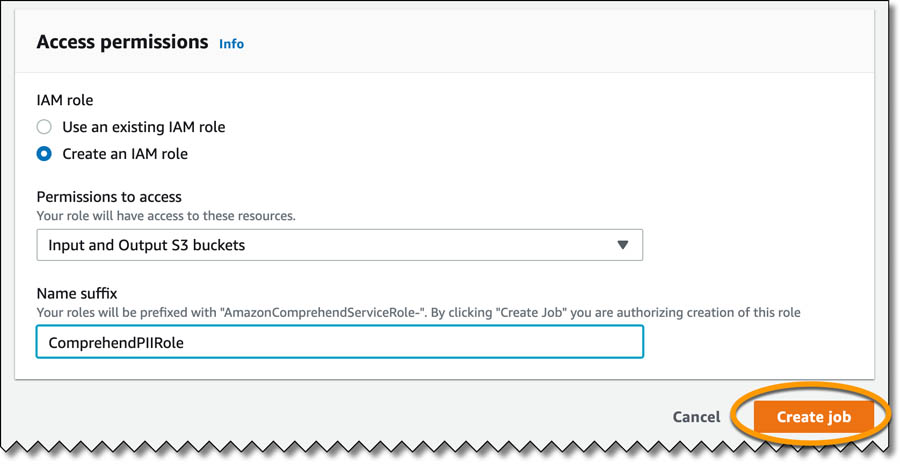
- In the Access permissions section, for IAM role, select Create an IAM role.
You need an AWS Identity and Access Management (IAM) role with required permissions to access the input and output S3 buckets for the job that is created and propagated.
- For Permissions to access, choose Input and Output S3 buckets.
- For Name suffix, enter a suffix for your role (for this post, we enter ComprehendPIIRole).
- Choose Create job.
You can see the job comprehend-blog-redact-01 with the job status In progress.
When the job status changes to Completed, you can access the output file to view the output. The pii-s3-input.txt file has the same example content we used earlier, and using redaction mode replaces PII with its PII entity type. Your output looks like the following text:
Good morning, everybody. My name is [NAME], and today I feel like sharing a whole lot of personal information with you. Let's start with my Email address [EMAIL]. My address is [ADDRESS] My phone number is [PHONE]. My Social security number is [SSN]. My Bank account number is [BANK-ACCOUNT-NUMBER] and routing number [BANK-ROUTING]. My credit card number is [CREDIT-DEBIT-NUMBER], Expiration Date [CREDIT-DEBIT-EXPIRY], my C V V code is [CREDIT-DEBIT-CVV], and my pin [PIN]. Well, I think that's it. You know a whole lot about me. And I hope that Amazon comprehend is doing a good job at identifying PII entities so you can redact my personal information away from this document. Let's check.
If you have very long entity types, you may prefer to mask PII with a character. If you choose to replace PII with the character *, your output looks like the following text. :
Good morning, everybody. My name is *******************, and today I feel like sharing a whole lot of personal information with you. Let's start with my Email address ****************************. My address is ********************************** My phone number is ************. My Social security number is ***********. My Bank account number is ************ and routing number *********. My credit card number is ****************, Expiration Date ********, my C V V code is ***, and my pin ******. Well, I think that's it. You know a whole lot about me. And I hope that Amazon comprehend is doing a good job at identifying PII entities so you can redact my personal information away from this document. Let's check.
Asynchronous PII redaction batch processing via the AWS CLI
To perform the PII redaction job using the AWS CLI, enter the following code:
aws comprehend start-pii-entities-detection-job
 --input-data-config S3Uri="s3://ai-ml-services-lab/public/labs/comprehend/pii/input/redact/pii-s3-input.txt"
 --output-data-config S3Uri="s3://ai-ml-services-lab/public/labs/comprehend/pii/output/redact/"
 --mode "ONLY_REDACTION"
 --redaction-config PiiEntityTypes="BANK_ACCOUNT_NUMBER","BANK_ROUTING","CREDIT_DEBIT_NUMBER","CREDIT_DEBIT_CVV","CREDIT_DEBIT_EXPIRY","PIN","EMAIL","ADDRESS","NAME","PHONE","SSN",MaskMode="REPLACE_WITH_PII_ENTITY_TYPE"
 --data-access-role-arn "arn:aws:iam::<ACCOUNTID>:role/service-role/AmazonComprehendServiceRole-ComprehendPIIRole"
 --job-name "comprehend-blog-redact-001"
 --language-code "en"
The request yields the following output:
{
    "JobId": "e41101e2f0919a320bc0583a50f86b5f",
    "JobStatus": "SUBMITTED"
}
To monitor the job request, enter the following code:
aws comprehend describe-pii-entities-detection-job --job-id " e41101e2f0919a320bc0583a50f86b5f "The following output shows that the job is complete:
{
    "PiiEntitiesDetectionJobProperties": {
        "JobId": "e41101e2f0919a320bc0583a50f86b5f",
        "JobName": "comprehend-blog-redact-001",
        "JobStatus": "COMPLETED",
        "SubmitTime": <SubmitTime>,
        "EndTime": <EndTime>,
        "InputDataConfig": {
            "S3Uri": "s3://ai-ml-services-lab/public/labs/comprehend/pii/input/redact/pii-s3-input.txt",
            "InputFormat": "ONE_DOC_PER_LINE"
        },
        "OutputDataConfig": {
            "S3Uri": "s3://ai-ml-services-lab/public/labs/comprehend/pii/output/redact/<AccountID>-PII-e41101e2f0919a320bc0583a50f86b5f/output/"
        },
        "RedactionConfig": {
            "PiiEntityTypes": [
                "BANK_ACCOUNT_NUMBER",
                "BANK_ROUTING",
                "CREDIT_DEBIT_NUMBER",
                "CREDIT_DEBIT_CVV",
                "CREDIT_DEBIT_EXPIRY",
                "PIN",
                "EMAIL",
                "ADDRESS",
                "NAME",
                "PHONE",
                "SSN"
            ],
            "MaskMode": "REPLACE_WITH_PII_ENTITY_TYPE"
        },
        "LanguageCode": "en",
        "DataAccessRoleArn": "arn:aws:iam::<AccountID>:role/ComprehendBucketAccessRole",
        "Mode": "ONLY_REDACTION"
    }
}
After the job is complete, the output file is plain text (same as the input file). Other Amazon Comprehend asynchronous jobs (start-entities-detection-job) have an output file called output.tar.gz, which is a compressed archive that contains the output of the operation. Start-pii-entities-detection-job retains the folder and file structure as input. Our comprehend-blog-redact-001 job input file pii-s3-input.txt has the respective pii-s3-input.txt.out file with the redacted text in the jobs output folder. You can find the Amazon S3 location in the output from monitoring the job; the JSON element PiiEntitiesDetectionJobProperties.OutputDataConfig.S3uri has the file pii-s3-input.txt.out and the redacted content with PII entity type.
Conclusion
As of this writing, the PII detection feature in Amazon Comprehend is available for US English in the following Regions:
- US East (Ohio)
- US East (N. Virginia)
- US West (Oregon),
- Asia Pacific (Mumbai)
- Asia Pacific (Seoul)
- Asia Pacific (Singapore)
- Asia Pacific (Sydney)
- Asia Pacific (Tokyo)
- EU (Frankfurt)
- EU (Ireland)
- EU (London)
- AWS GovCloud (US-West)
Take a look at the pricing page, give the feature a try, and please send us feedback either via the AWS forum for Amazon Comprehend or through your usual AWS support contacts.
About the Author
 Sriharsha M S is an AI/ML specialist solution architect in the Strategic Specialist team at Amazon Web Services. He works with strategic AWS customers who are taking advantage of AI/ML to solve complex business problems. He provides technical guidance and design advice to implement AI/ML applications at scale. His expertise spans application architecture, bigdata, analytics and machine learning.
Build alerting and human review for images using Amazon Rekognition and Amazon A2I
The volume of user-generated content (UGC) and third-party content has been increasing substantially in sectors like social media, ecommerce, online advertising, and photo sharing. However, such content needs to be reviewed to ensure that end-users aren’t exposed to inappropriate or offensive material, such as nudity, violence, adult products, or disturbing images. Today, some companies simply react to user complaints to take down offensive images, ads, or videos, whereas many employ teams of human moderators to review small samples of content. However, human moderators alone can’t scale to meet these needs, leading to a poor user experience or even a loss of brand reputation.
With Amazon Rekognition, you can automate or streamline your image and video analysis workflows using machine learning (ML). Amazon Rekognition provides an image moderation API that can detect unsafe or inappropriate content containing nudity, suggestiveness, violence, and more. You get a hierarchical taxonomy of labels that you can use to define your business rules, without needing any ML experience. Each detection by Amazon Rekognition comes with a confidence score between 0–100, which provides a measure of how confident the ML model is in its prediction.
Content moderation still requires human reviewers to audit results and judge nuanced situations where AI may not be certain in its prediction. Combining machine predictions with human judgment and managing the infrastructure needed to set up such workflows is hard, expensive, and time-consuming to do at scale. This is why we built Amazon Augmented AI (Amazon A2I), which lets you implement a human review of ML predictions and is directly integrated with Amazon Rekognition. Amazon A2I allows you to use in-house, private, or third-party vendor workforces with a web interface that has instructions and tools they need to complete their review tasks.
You can easily set up the criteria that triggers a human review of a machine prediction; for example, you can send an image for further human review if Amazon Rekognition’s confidence score is between 50–90. Amazon Rekognition handles the bulk of the work and makes sure that every image gets scanned, and Amazon A2I helps send the remaining content for further review to best utilize human judgment. Together, this helps ensure that you get full moderation coverage while maintaining very high accuracy, at a fraction of the cost to review each image manually.
In this post, we show you how to use Amazon Rekognition image moderation APIs to automatically detect explicit adult, suggestive, violent, and disturbing content in an image and use Amazon A2I to onboard human workforces, set up human review thresholds of the images, and define human review tasks. When these conditions are met, images are sent to human reviewers for further review, which is performed according to the instructions in the human review task definition.
Prerequisites
This post requires you to complete the following prerequisites:
- Create an AWS Identity and Access Management (IAM) role. To create a human review workflow, you need to provide an IAM role that grants Amazon A2I permission to access Amazon Simple Storage Service (Amazon S3) for reading objects to render in a human task UI and writing the results of the human review. This role also needs an attached trust policy to give Amazon SageMaker permission to assume the role. This allows Amazon A2I to perform actions in accordance with permissions that you attach to the role. For example policies that you can modify and attach to the role you use to create a flow definition, see Add Permissions to the IAM Role Used to Create a Flow Definition.
- Configure permission to invoke the Amazon Rekognition DetectModerationLabels You need to attach the
AmazonRekognitionFullAccesspolicy to the AWS Lambda function that calls the Amazon Rekognitiondetect_moderation_labelsAPI. - Provide Amazon S3 Access, Put, and Get permission to Lambda if you wish to have Lambda use Amazon S3 to access images for analysis.
- Give the Lambda function
AmazonSageMakerFullAccessaccess to the Amazon A2I services for the human review.
Creating a private work team
A work team is a group of people that you select to review your documents. You can create a work team from a workforce, which is made up of Amazon Mechanical Turk workers, vendor-managed workers, or your own private workers that you invite to work on your tasks. Whichever workforce type you choose, Amazon A2I takes care of sending tasks to workers. For this post, you create a work team using a private workforce and add yourself to the team to preview the Amazon A2I workflow.
To create your private work team, complete the following steps:
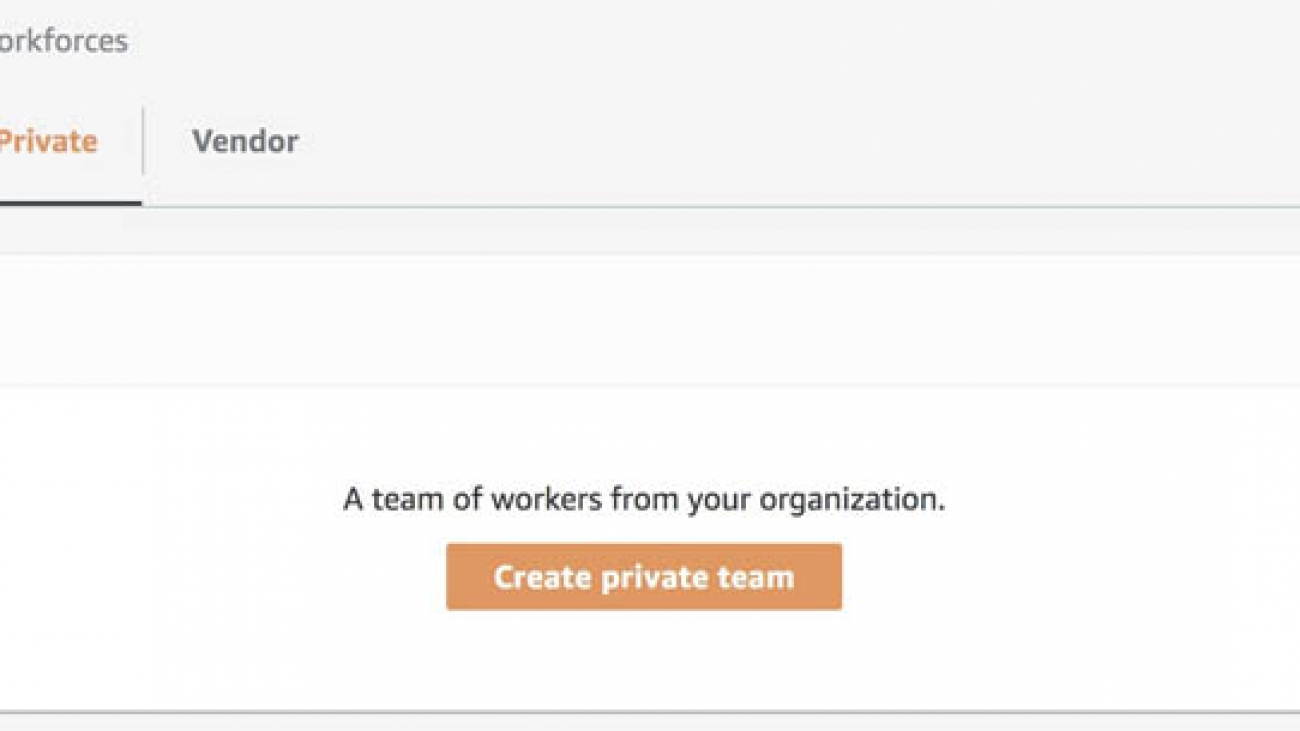
- Navigate to the Labeling workforces page on the Amazon SageMaker console.
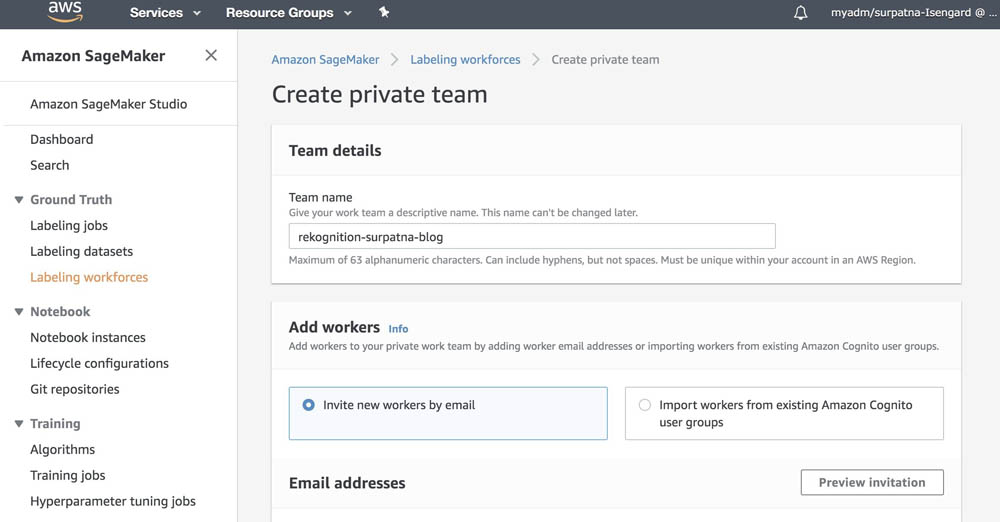
- On the Private tab, choose Create private team.

- For Team name, enter an appropriate team name.
- For Add workers, you can choose to add workers to your workforce by importing workers from an existing user group in AWS Cognito or by inviting new workers by email.
For this post, we suggest adding workers by email. If you create a workforce using an existing AWS Cognito user group, be sure that you can access an email in that workforce to complete this use case.
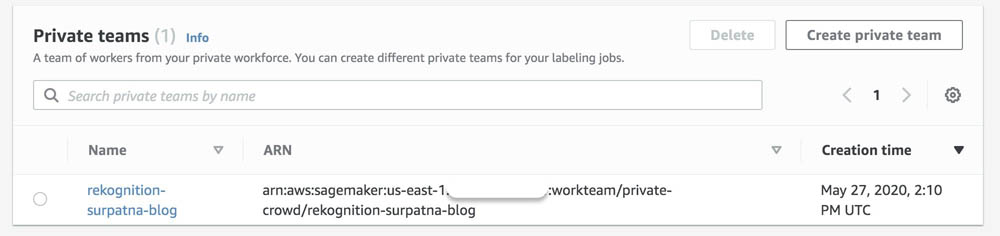
- Choose Create private team.

- On the Private tab, choose the work team you just created to view your work team ARN.
- Record the ARN to use when you create a flow definition in the next section.
After you create the private team, you get an email invitation. The following screenshot shows an example email.
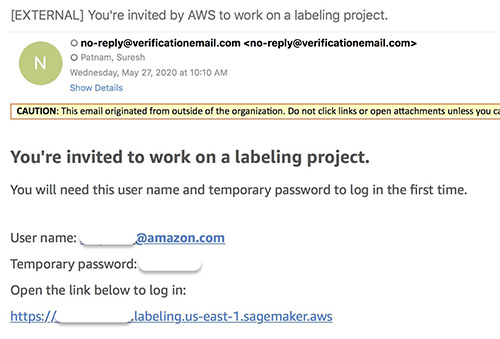
- Choose the link to log in and change your password.
You’re now registered as a verified worker for this team. The following screenshot shows the updated information on the Private tab.
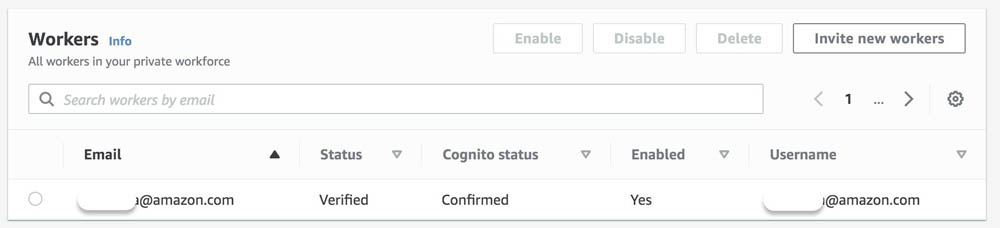
Your one-person team is now ready, and you can create a human review workflow.
Creating a human review workflow
In this step, you create a human review workflow, where you specify your work team, identify where you want output data to be stored in Amazon S3, and create instructions to help workers complete your document review task.
To create a human review workflow, complete the following:
- In the Augmented AI section on the Amazon SageMaker console, navigate to the Human review workflows
- Choose Create human review workflow.

On this page, you configure your workflow.
- Enter a name for your workflow.
- Choose an S3 bucket where you want Amazon A2I to store the output of the human review.
- Choose an IAM role for the workflow.
You can create a new role automatically with Amazon S3 access and an Amazon SageMaker execution policy attached, or you can choose a role that already has these permissions attached.
- In the Task type section, select Rekognition – Image moderation.

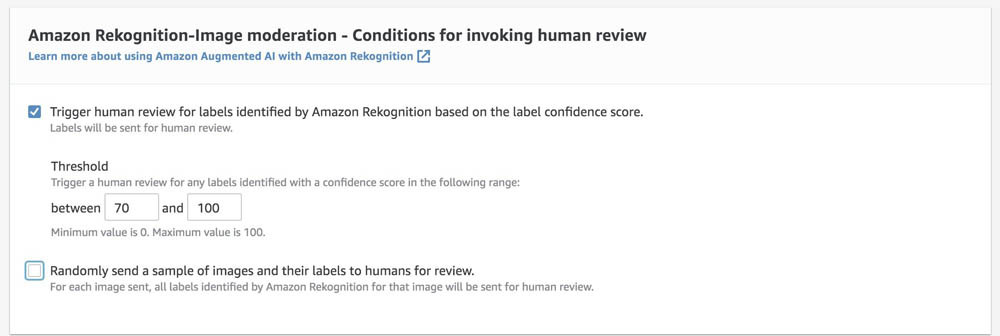
- In the Amazon Rekognition-Image Moderation – Conditions for invoking human review section, you can specify conditions that trigger a human review.
For example, if the confidence of the output label produced by Amazon Rekognition is between the range provided (70–100, for this use case), the document is sent to the portal for human review. You can also select different confidence thresholds for each image moderation output label through Amazon A2I APIs.
- In the Worker task template creation section, if you already have an A2I worker task template, you can choose Use your own template. Otherwise, select Create from a default template and enter a name and task description. For this use case, you can use the default worker instructions provided.
- In the Workers section, select Private.
- For Private teams, choose the private work team you created earlier.

- Choose Create.
You’re redirected to the Human review workflows page, where you can see the name and ARN of the human review workflow you just created.
- Record the ARN to use in the next section.

Configuring Lambda to run Amazon Rekognition
In this step, you create a Lambda function to call the Amazon Rekognition API detect_moderation_labels. You use the HumanLoopConfig parameter of detect_moderation_labels to integrate an Amazon A2I human review workflow into your Amazon Rekognition image moderation job.
- On the Lambda console, create a new function called
A2IRegok. - For Runtime, choose Python 3.7.
- Under Permission, choose Use an existing role.
- Choose the role you created.
- In the Function code section, remove the function code and replace it with the following code.
- Inside the Lambda function, import two libraries:
uuidandboto3. - Modify the function code as follows:
- Replace the
FlowDefinationArnin line 12 with one you saved in the last step. - On line 13, provide a unique name to the
HumanLoopNameor useuuidto generate a unique ID. - You use the
detect_moderation_labelsAPI operation to analyze the picture (JPG, PNG). To use the picture from the Amazon S3 bucket, specify the bucket name and key of the file inside the API call as shown in lines 7 and 8.
- Replace the
- Inside the Lambda function, import two libraries:
  1 import boto3
  2 import uuid
  3
  4 def lambda_handler(event, context):
  5     if event:
  6
  7      bucket_name = "a2idemorekog". # Add your sourcebucketname
  8      src_filename = "1.png".       # Add the src filename
  9      rekognition = boto3.client('rekognition')
 10      human_loop_unique_id = str(uuid.uuid4()) + '1'
 11      humanLoopConfig = {
 12                 'FlowDefinitionArn':"arn:aws:sagemaker:us-east-1:123456789123:flow-definition/a2i-rekognition-wf",
 13                 'HumanLoopName':human_loop_unique_id
 14             }
 15
 16      response = rekognition.detect_moderation_labels(
 17                 Image = {
 18                     "S3Object": {
 19                      "Bucket": bucket_name,
 20                      "Name": src_filename,
 21                      }
 22                     },
 23      HumanLoopConfig = humanLoopConfig
 24             )
Calling Amazon Rekognition using Lambda
To configure and run a serverless function, complete the following steps:
- On the Lambda console, choose your function.
- Choose Configure test events from the drop-down menu.

The editor appears to enter an event to test your function.
- On the Configure test event page, select Create new test event.
- For Event template, choose hello-world.
- For Event name, enter a name; for example,
DemoEvent. - You can change the values in the sample JSON. For this use case, no change is needed.
For more information, see Run a Serverless “Hello, World!” and Create a Lambda function with the console.

- Choose Create.
- To run the function, choose Test.
When the test is complete, you can view the results on the console:
- Execution result – Verifies that the test succeeded
- Summary – Shows the key information reported in the log output
- Log output – Shows the logs the Lambda function generated
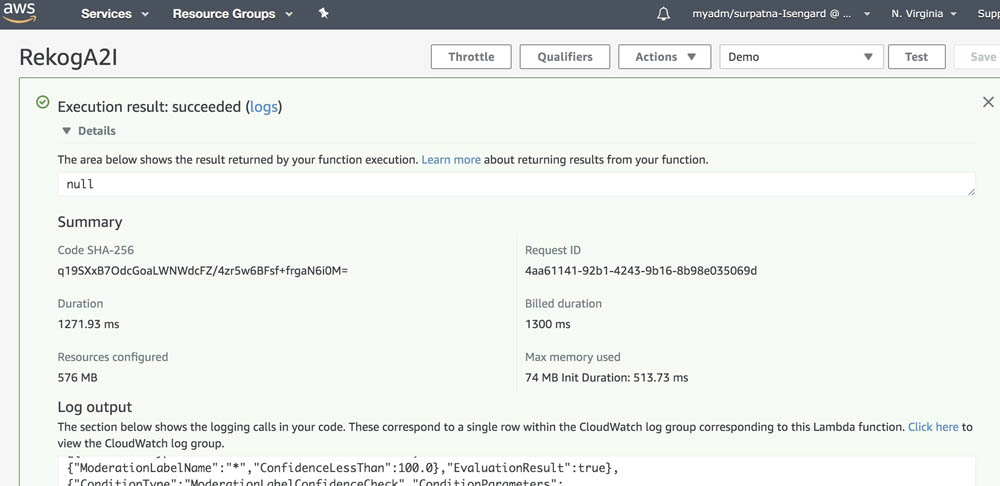
The response to this call contains the inference from Amazon Rekognition and the evaluated activation conditions that may or may not have led to a human loop creation. If a human loop is created, the output contains HumanLoopArn. You can track its status using the Amazon A2I API operation DescribeHumanLoop.
Completing a human review of your image
To complete a human review of your image, complete the following steps:
- Open the URL in the email you received.
You see a list of reviews you are assigned to.
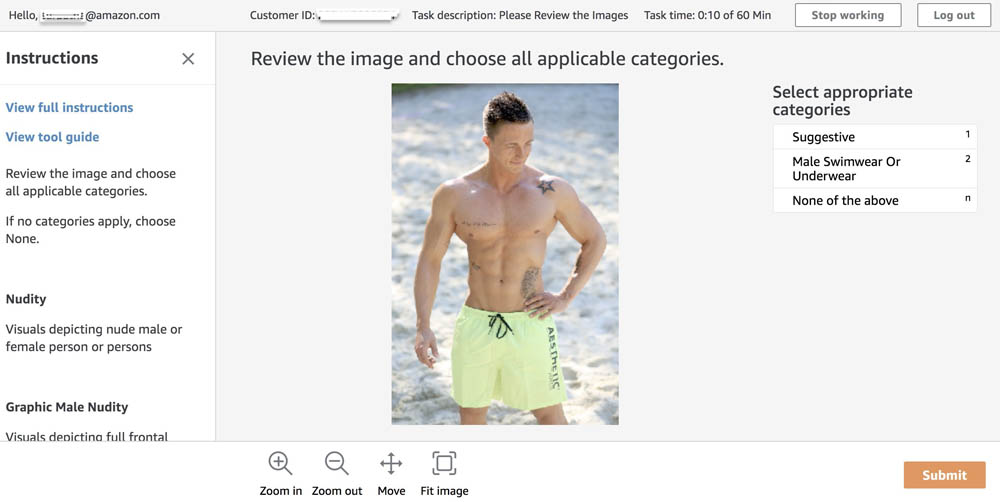
- Choose the image you want to review.
- Choose Start working.

After you start working, you must complete the task within 60 minutes.
- Choose an appropriate category for the image.
Before choosing Submit, if you go to the Human review workflow page on the Amazon SageMaker console and choose the human review workflow you created, you can see a Human loops summary section for that workflow.

- In your worker portal, when you’re done working, choose Submit.
After you complete your job, the status of the human loop workflow is updated.
If you navigate back to the Human review workflow page, you can see the human loop you just completed has the status Completed.

Processing the output
The output data from your review is located in Bucket when you configured your human review workflow on the Amazon A2I console. The path to the data uses the following pattern: YYYY/MM/DD/hh/mm/ss.
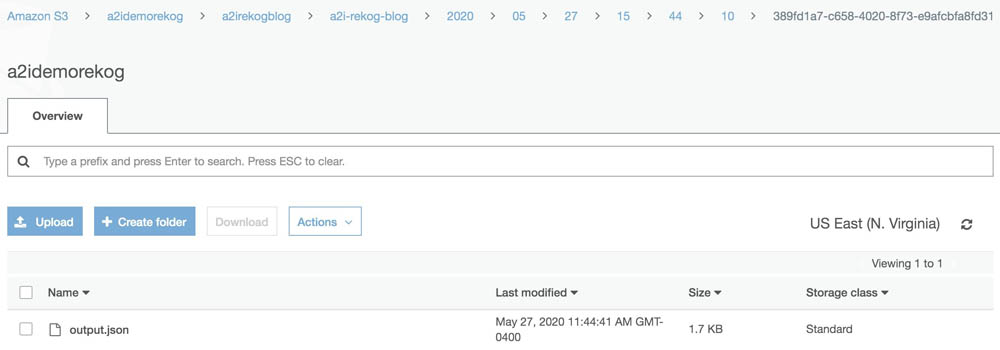
The output file (output.json) is structured as follows:
{
    "awsManagedHumanLoopRequestSource": "AWS/Rekognition/DetectModerationLabels/Image/V3",
    "flowDefinitionArn": "arn:aws:sagemaker:us-east-1:111122223333:flow-definition/a2i-rekog-blog",
    "humanAnswers": [
        {
            "answerContent": {
                "AWS/Rekognition/DetectModerationLabels/Image/V3": {
                    "moderationLabels": [
                        {
                            "name": "Weapon Violence",
                            "parentName": "Violence"
                        },
                        {
                            "name": "Violence",
                            "parentName": ""
                        }
                    ]
                }
            },
            "submissionTime": "2020-05-27T15:44:39.726Z",
            "workerId": "000cd1c234b5fcc7",
            "workerMetadata": {
                "identityData": {
                    "identityProviderType": "Cognito",
                    "issuer": "https://cognito-idp.us-east-1.amazonaws.com/us-east-1_00aa00a",
                    "sub": "b000a000-0b00-0ae0-bf00-0000f0bfd00d"
                }
            }
        }
    ],
    "humanLoopName": "389fd1a7-c658-4020-8f73-e9afcbfa8fd31",
    "inputContent": {
        "aiServiceRequest": {
            "humanLoopConfig": {
                "flowDefinitionArn": "arn:aws:sagemaker:us-east-1:111122223333:flow-definition/a2i-rekog-blog",
                "humanLoopName": "389fd1a7-c658-4020-8f73-e9afcbfa8fd31"
            },
            "image": {
                "s3Object": {
                    "bucket": "AWSDOC-EXAMPLE-BUCKET",
                    "name": "1.png"
                }
            }
        },
        "aiServiceResponse": {
            "moderationLabels": [
                {
                    "confidence": 80.41172,
                    "name": "Weapon Violence",
                    "parentName": "Violence"
                },
                {
                    "confidence": 80.41172,
                    "name": "Violence",
                    "parentName": ""
                }
            ],
            "moderationModelVersion": "3.0"
        },
        "humanTaskActivationConditionResults": {
            "Conditions": [
                {
                    "And": [
                        {
                            "ConditionParameters": {
                                "ConfidenceLessThan": 100,
                                "ModerationLabelName": "*"
                            },
                            "ConditionType": "ModerationLabelConfidenceCheck",
                            "EvaluationResult": true
                        },
                        {
                            "ConditionParameters": {
                                "ConfidenceGreaterThan": 60,
                                "ModerationLabelName": "*"
                            },
                            "ConditionType": "ModerationLabelConfidenceCheck",
                            "EvaluationResult": true
                        }
                    ],
                    "EvaluationResult": true
                }
            ]
        },
        "selectedAiServiceResponse": {
            "moderationLabels": [
                {
                    "confidence": 80.4117202758789,
                    "name": "Weapon Violence",
                    "parentName": "Violence"
                },
                {
                    "confidence": 80.4117202758789,
                    "name": "Violence",
                    "parentName": ""
                }
            ],
            "moderationModelVersion": "3.0"
        }
    }
}
In this JSON object, you have all the input and output content in one place so that you can parse one file to get the following:
- humanAnswers – Contains
answerContent, which lists the labels chosen by the human reviewer, andworkerMetadata, which contains information that you can use to track private workers - inputContent – Contains information about the input data object that was reviewed, the label category options available to workers, and the responses workers submitted
For more information about the location and format of your output data, see Monitor and Manage Your Human Loop.
Conclusion
This post has merely scratched the surface of what Amazon A2I can do. Amazon A2I is available in 12 Regions. For more information, see Region Table. To learn more about the Amazon Rekognition DetectModerationLabels API integration with Amazon A2I, see Use Amazon Augmented AI with Amazon Rekognition.
For video presentations, sample Jupyter notebooks, or more information about use cases like document processing, object detection, sentiment analysis, text translation, and others, see Amazon Augmented AI Resources.
About the Author
 Suresh Patnam is a Solutions Architect at AWS. He helps customers innovate on the AWS platform by building highly available, scalable, and secure architectures on Big Data and AI/ML. In his spare time, Suresh enjoys playing tennis and spending time with his family.

Examining racial attitudes in virtual spaces through gaming
The national dialogue on race has progressed powerfully and painfully in the past year, and issues of racial bias in the news have become ubiquitous. However, for over a decade, researchers from MIT’s Imagination, Computation, and Expression Laboratory (ICE Lab) have been developing systems to model, simulate, and analyze such issues of identity.
In recent years there’s been a rise in popularity of video games or virtual reality (VR) experiences addressing racial issues for educational or training purposes, coinciding with the rapid development of the academic field of serious or “impact” games such as “Walk a Mile in Digital Shoes” or “1000 Cut Journey.”
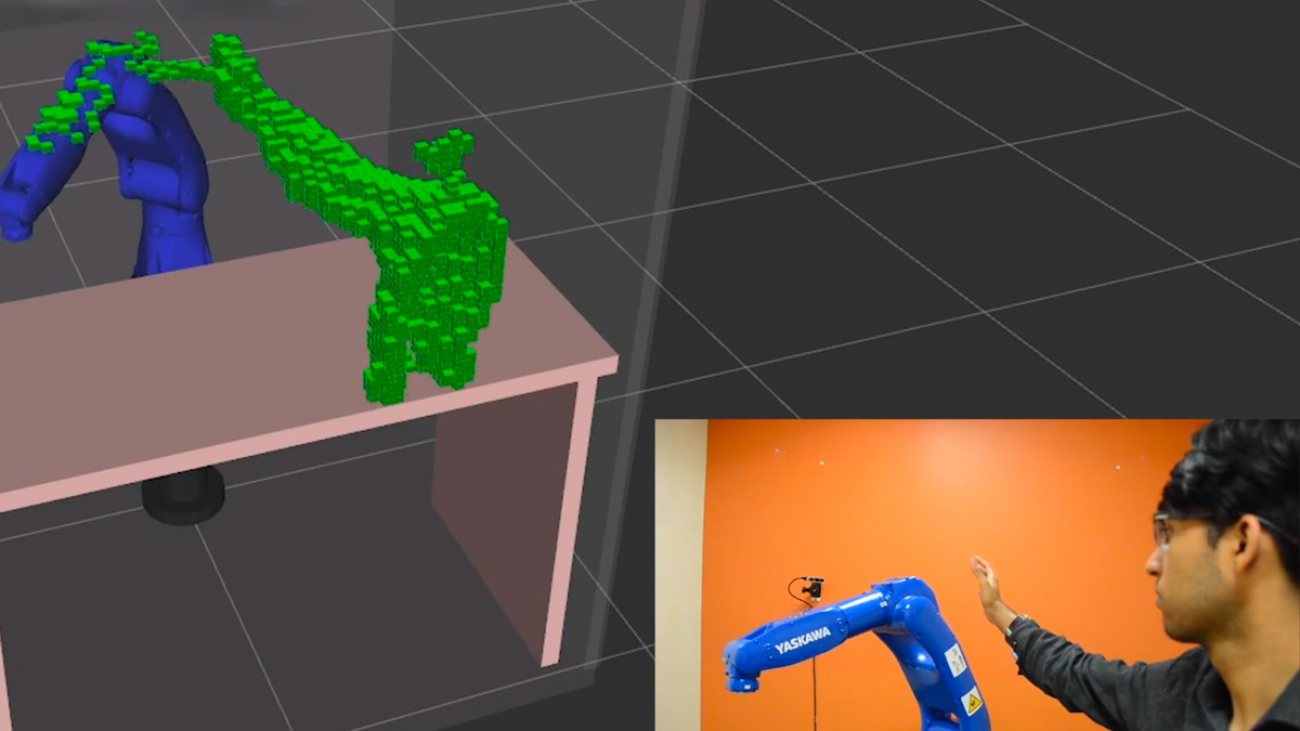
Now researchers from the ICE Lab, part of MIT’s Computer Science and Artificial Intelligence Laboratory (CSAIL) and the MIT Center for Advanced Virtuality, have updated a 2019 computational model to better understand our behavioral choices, by way of a video game simulation of a discriminatory racial encounter between a Black student and her white teacher.
A paper on the game will be presented this week the 2020 Foundations of Digital Games conference.
The system, which was informed by the social science research of collaborators at the University of Michigan’s Engaging, Managing, and Bonding through Race (EMBRace) lab, is supported by the Racial Encounter Coping Appraisal and Socialization Theory (RECAST). RECAST provides a way of understanding how racial socialization, or the way one has been taught to think about race, cushions the influence between racial stress and coping.
The game, called “Passage Home,” is used to help understand the attitudes of PreK-12 educators, with the eventual goal of providing an innovative tool for clinicians to better understand the behavioral choices adolescents make when encountered with racial injustice.
Following user studies conducted with the original version of Passage Home in 2019, the team worked with Riana Elyse Anderson, assistant professor in the Department of Health Behavior and Health Education at the University of Michigan’s School of Public Health, and Nkemka Anyiwo, vice provost and National Science Foundation Postdoctoral Fellow in the Graduate School of Education at the University of Pennsylvania, to iterate on the original prototype and improve it to align more closely with RECAST theory. Since creating the latest version of “Passage Home” VR, they sought to understand the opportunities and challenges for using it as a tool for capturing insights about how individuals perceive and respond to racialized encounters.
Experiments from “Passage Home” revealed that players’ existing colorblind racial attitudes and their ethnic identity development hindered their ability to accurately interpret racist subtexts.
The interactive game puts the player into the first-person perspective of “Tiffany,” a Black student who is falsely accused of plagiarism by her white female English teacher, “Mrs. Smith.” In the game, Mrs. Smith holds the inherently racist belief that Black students are incapable of producing high-quality work as the basis of her accusation.
“There has been much focus on understanding the efficacy of these systems as interventions to reduce racial bias, but there’s been less attention on how individuals’ prior physical-world racial attitudes influence their experiences of such games about racial issues,” says MIT CSAIL PhD student Danielle Olson, lead author on the paper being presented this week.
“Danielle Olson is at the forefront of computational modeling of social phenomena, including race and racialized experiences,” says her thesis supervisor D. Fox Harrell, professor of digital media and AI in CSAIL and director of the ICE Lab and MIT Center for Advanced Virtuality. “What is crucial about her dissertation research and system ‘Passage Home’ is that it does not only model race as physical experience, rather it simulates how people are socialized to think about race, which often has more a profound impact on their racial biases regarding others and themselves than merely what they look like.”
Many mainstream strategies for portraying race in VR experiences are often rooted in negative racial stereotypes, and the questions are often focused on “right” and “wrong” actions. In contrast, with “Passage Home,” the researchers aimed to take into account the nuance and complexity of how people think about race, which involves systemic social structures, history, lived experiences, interpersonal interactions, and discourse.
In the game, prior to the discriminatory interaction, the player is provided with a note that they (Tiffany) are academically high-achieving and did not commit plagiarism. The player is prompted to make a series of choices to capture their thoughts, feelings, and desired actions in response to the allegation.
The player then chooses which internal thoughts are most closely aligned with their own, and the verbal responses, body language, or gesture they want to express. These combinations contribute to how the narrative unfolds.
One educator, for example, expressed that, “This situation could have happened to any student of any race, but the way [the student] was raised, she took it as being treated unfairly.”
The game makes it clear that the student did not cheat, and the student never complains of unfairness, so in this case, the educator’s prior racial attitude results in not only misreading the situation, but actually imputing an attitude to the student that was never there. (The team notes that many people failed to recognize the racist nature of the comments because their racial literacy inhibited them from decoding anti-Black subtexts.)
The results of the game demonstrated statistically significant relationships within the following categories:
- Competence (players’ feelings of skillfulness and success in the game)
- Positively associated with unawareness of racial privilege
- Negative affect (players’ feelings of boredom and monotony in the game)
- Positively associated with unawareness of blatant racial issues
- Empathy (players’ feelings of empathy towards Mrs. Smith, who is racially biased towards Tiffany)
- Negatively associated with ethnic identity search, and positively associated with unawareness of racial privilege, blatant racial issues, and institutional discrimination
- Perceived competence of Tiffany, the student
- How well did the player think she handled the situation?
- Perceived unfairness of Mrs. Smith, the teacher
- Was Mrs. Smith unfair to Tiffany?
“Even if developers create these games to attempt to encourage white educators to understand how racism negatively impacts their Black students, their prior worldviews may cause them to identify with the teacher who is the perpetrator of racial violence, not the student who is the target,” says Olson. “These results can aid developers in avoiding assumptions about players’ racial literacy by creating systems informed by evidence-based research on racial socialization and coping.”
While this work demonstrates a promising tool, the team notes that because racism exists at individual, cultural, institutional and systemic levels, there are limitations to which levels and how much impact emergent technologies such as VR can make.
Future games could be personalized to attend to differences in players’ racial socialization and attitudes, rather than assuming players will interpret racialized content in a similar way. By improving players’ in-game experiences, the hope is that this will increase the possibility for transformative learning with educators, and aid in the pursuit of racial equity for students.
This material is based upon work supported by the following grant programs: National Science Foundation Graduate Research Fellowship Program, the Ford Foundation Predoctoral Fellowship Program, the MIT Abdul Latif Jameel World Education Lab pK-12 Education Innovation Grant, and the International Chapter of the P.E.O. Scholar Award.
Helping robots avoid collisions
George Konidaris still remembers his disheartening introduction to robotics.
“When you’re a young student and you want to program a robot, the first thing that hits you is this immense disappointment at how much you can’t do with that robot,” he says.
Most new roboticists want to program their robots to solve interesting, complex tasks — but it turns out that just moving them through space without colliding with objects is more difficult than it sounds.
Fortunately, Konidaris is hopeful that future roboticists will have a more exciting start in the field. That’s because roughly four years ago, he co-founded Realtime Robotics, a startup that’s solving the “motion planning problem” for robots.
The company has invented a solution that gives robots the ability to quickly adjust their path to avoid objects as they move to a target. The Realtime controller is a box that can be connected to a variety of robots and deployed in dynamic environments.
“Our box simply runs the robot according to the customer’s program,” explains Konidaris, who currently serves as Realtime’s chief roboticist. “It takes care of the movement, the speed of the robot, detecting obstacles, collision detection. All [our customers] need to say is, ‘I want this robot to move here.’”
Realtime’s key enabling technology is a unique circuit design that, when combined with proprietary software, has the effect of a plug-in motor cortex for robots. In addition to helping to fulfill the expectations of starry-eyed roboticists, the technology also represents a fundamental advance toward robots that can work effectively in changing environments.
Helping robots get around
Konidaris was not the first person to get discouraged about the motion planning problem in robotics. Researchers in the field have been working on it for 40 years. During a four-year postdoc at MIT, Konidaris worked with School of Engineering Professor in Teaching Excellence Tomas Lozano-Perez, a pioneer in the field who was publishing papers on motion planning before Konidaris was born.
Humans take collision avoidance for granted. Konidaris points out that the simple act of grabbing a beer from the fridge actually requires a series of tasks such as opening the fridge, positioning your body to reach in, avoiding other objects in the fridge, and deciding where to grab the beer can.
“You actually need to compute more than one plan,” Konidaris says. “You might need to compute hundreds of plans to get the action you want. … It’s weird how the simplest things humans do hundreds of times a day actually require immense computation.”
In robotics, the motion planning problem revolves around the computational power required to carry out frequent tests as robots move through space. At each stage of a planned path, the tests help determine if various tiny movements will make the robot collide with objects around it. Such tests have inspired researchers to think up ever more complicated algorithms in recent years, but Konidaris believes that’s the wrong approach.
“People were trying to make algorithms smarter and more complex, but usually that’s a sign that you’re going down the wrong path,” Konidaris says. “It’s actually not that common that super technically sophisticated techniques solve problems like that.”
Konidaris left MIT in 2014 to join the faculty at Duke University, but he continued to collaborate with researchers at MIT’s Computer Science and Artificial Intelligence Laboratory (CSAIL). Duke is also where Konidaris met Realtime co-founders Sean Murray, Dan Sorin, and Will Floyd-Jones. In 2015, the co-founders collaborated to make a new type of computer chip with circuits specifically designed to perform the frequent collision tests required to move a robot safely through space. The custom circuits could perform operations in parallel to more efficiently test short motion collisions.
“When I left MIT for Duke, one thing bugging me was this motion planning thing should really be solved by now,” Konidaris says. “It really did come directly out of a lot of experiences at MIT. I wouldn’t have been able to write a single paper on motion planning before I got to MIT.”
The researchers founded Realtime in 2016 and quickly brought on robotics industry veteran Peter Howard MBA ’87, who currently serves as Realtime’s CEO and is also considered a co-founder.
“I wanted to start the company in Boston because I knew MIT and lot of robotics work was happening there,” says Konidaris, who moved to Brown University in 2016. “Boston is a hub for robotics. There’s a ton of local talent, and I think a lot of that is because MIT is here — PhDs from MIT became faculty at local schools, and those people started robotics programs. That network effect is very strong.”
Removing robot restraints
Today the majority of Realtime’s customers are in the automotive, manufacturing, and logistics industries. The robots using Realtime’s solution are doing everything from spot welding to making inspections to picking items from bins.
After customers purchase Realtime’s control box, they load in a file describing the configuration of the robot’s work cell, information about the robot such as its end-of-arm tool, and the task the robot is completing. Realtime can also help optimally place the robot and its accompanying sensors around a work area. Konidaris says Realtime can shorten the process of deploying robots from an average of 15 weeks to one week.
Once the robot is up and running, Realtime’s box controls its movement, giving it instant collision-avoidance capabilities.
“You can use it for any robot,” Konidaris says. “You tell it where it needs to go and we’ll handle the rest.”
Realtime is part of MIT’s Industrial Liaison Program (ILP), which helps companies make connections with larger industrial partners, and it recently joined ILP’s STEX25 startup accelerator.
With a few large rollouts planned for the coming months, the Realtime team’s excitement is driven by the belief that solving a problem as fundamental as motion planning unlocks a slew of new applications for the robotics field.
“What I find most exciting about Realtime is that we are a true technology company,” says Konidaris. “The vast majority of startups are aimed at finding a new application for existing technology; often, there’s no real pushing of the technical boundaries with a new app or website, or even a new robotics ‘vertical.’ But we really did invent something new, and that edge and that energy is what drives us. All of that feels very MIT to me.”

Serving PyTorch models in production with the Amazon SageMaker native TorchServe integration
In April 2020, AWS and Facebook announced the launch of TorchServe to allow researches and machine learning (ML) developers from the PyTorch community to bring their models to production more quickly and without needing to write custom code. TorchServe is an open-source project that answers the industry question of how to go from a notebook to production using PyTorch and customers around the world, such as Matroid, are experiencing the benefits firsthand. Similarly, over 10,000 customers have adopted Amazon SageMaker to quickly build, train, and deploy ML models at scale, and many of them have made it their standard platform for ML. From a model serving perspective, Amazon SageMaker abstracts all the infrastructure-centric heavy lifting and allows you to deliver low-latency predictions securely and reliably to millions of concurrent users around the world.
TorchServe’s native integration with Amazon SageMaker
AWS is excited to announce that TorchServe is now natively supported in Amazon SageMaker as the default model server for PyTorch inference. Previously, you could use TorchServe with Amazon SageMaker by installing it on a notebook instance and starting a server to perform local inference or by building a TorchServe container and referencing its image to create a hosted endpoint. However, full notebook installations can be time-intensive and some data scientists and ML developers may not prefer to manage all the steps and AWS Identity and Access Management (IAM) permissions involved with building the Docker container and storing the image on Amazon Elastic Container Registry (Amazon ECR) before ultimately uploading the model to Amazon Simple Storage Service (Amazon S3) and deploying the model endpoint. With this release, you can use the native Amazon SageMaker SDK to serve PyTorch models with TorchServe.
To support TorchServe natively in Amazon SageMaker, the AWS engineering teams submitted pull requests to the aws/sagemaker-pytorch-inference-toolkit and the aws/deep-learning-containers repositories. After these were merged, we could use TorchServe via the Amazon SageMaker APIs for PyTorch inference. This change introduces a tighter integration with the PyTorch community. As more features related to the TorchServe serving framework are released in the future, they are tested, ported over, and made available as an AWS Deep Learning Container image. It’s important to note that our implementation hides the .mar from the user while still using the Amazon SageMaker PyTorch API everyone is used to.
The TorchServe architecture in Amazon SageMaker
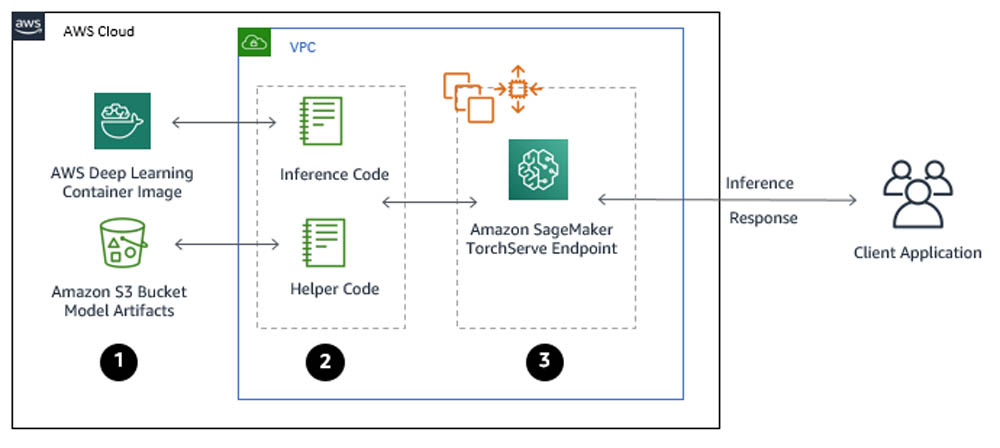
You can use TorchServe natively with Amazon SageMaker through the following steps:
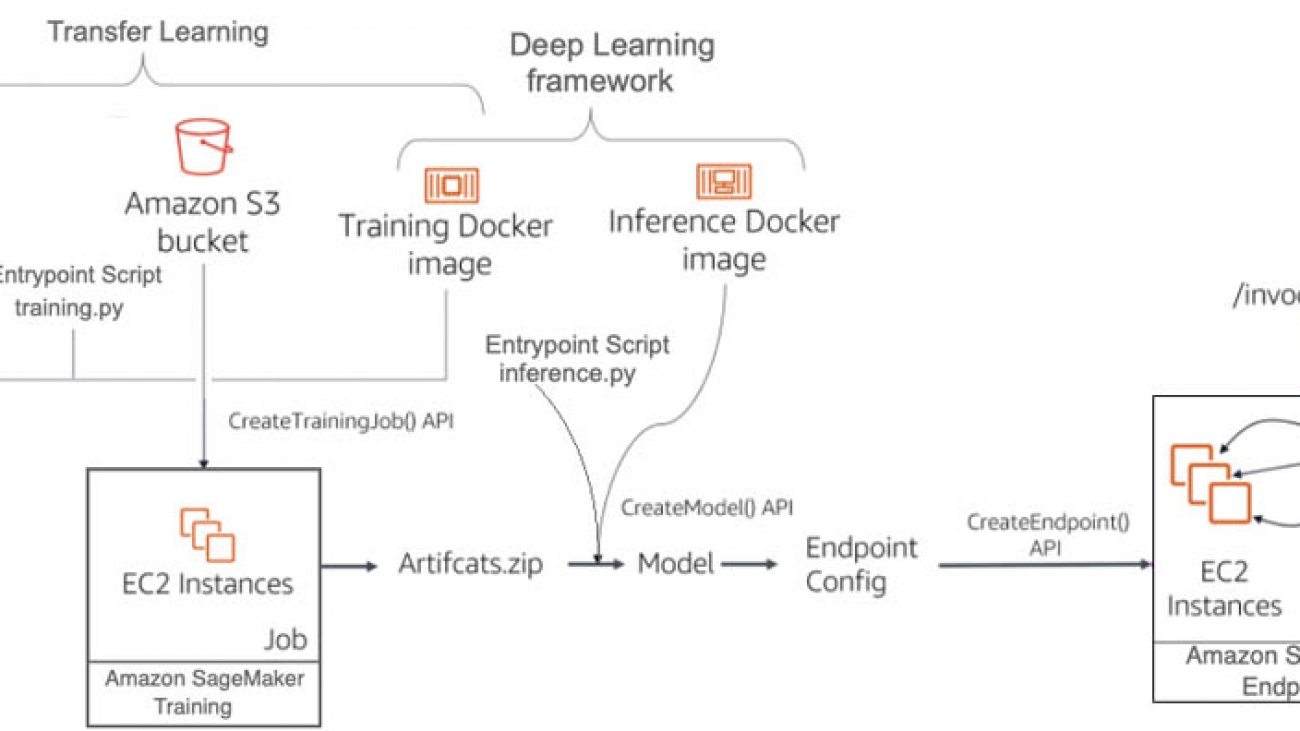
- Create a model in Amazon SageMaker. By creating a model, you tell Amazon SageMaker where it can find the model components. This includes the Amazon S3 path where the model artifacts are stored and the Docker registry path for the Amazon SageMaker TorchServe image. In subsequent deployment steps, you specify the model by name. For more information, see CreateModel.
- Create an endpoint configuration for an HTTPS endpoint. You specify the name of one or more models in production variants and the ML compute instances that you want Amazon SageMaker to launch to host each production variant. When hosting models in production, you can configure the endpoint to elastically scale the deployed ML compute instances. For each production variant, you specify the number of ML compute instances that you want to deploy. When you specify two or more instances, Amazon SageMaker launches them in multiple Availability Zones. This provides continuous availability. Amazon SageMaker manages deploying the instances. For more information, see CreateEndpointConfig.
- Create an HTTPS endpoint. Provide the endpoint configuration to Amazon SageMaker. The service launches the ML compute instances and deploys the model or models as specified in the configuration. For more information, see CreateEndpoint. To get inferences from the model, client applications send requests to the Amazon SageMaker Runtime HTTPS endpoint. For more information about the API, see InvokeEndpoint.
The Amazon SageMaker Python SDK simplifies these steps as we will demonstrate in the following example notebook.
Using a fine-tuned HuggingFace base transformer (RoBERTa)
For this post, we use a HuggingFace transformer, which provides us with a general-purpose architecture for Natural Language Understanding (NLU). Specifically, we present you with a RoBERTa base transformer that was fined tuned to perform sentiment analysis. The pre-trained checkpoint loads the additional head layers and the model will outputs positive, neutral, and negative sentiment of text.

Deploying a CloudFormation Stack and verifying notebook creation
You will deploy an ml.m5.xlarge Amazon SageMaker notebook instance. For more information about pricing, see Amazon SageMaker Pricing.
- Sign in to the AWS Management Console.
- Choose from the following table to launch your template.
| Launch Template | Region |
| N.Virginia (us-east-1) | |
| Ireland (eu-west-1) | |
| Singapore (ap-southeast-1) |
You can launch this stack for any Region by updating the hyperlink’s Region value.
- In the Capabilities and transforms section, select the three acknowledgement boxes.
- Choose Create stack.

Your CloudFormation stack takes about 5 minutes to complete creating the Amazon SageMaker notebook instance and its IAM role.
- When the stack creation is complete, check the output on the Resources tab.

- On the Amazon SageMaker console, under Notebook, choose Notebook instances.
- Locate your newly created notebook and choose Open Jupyter.

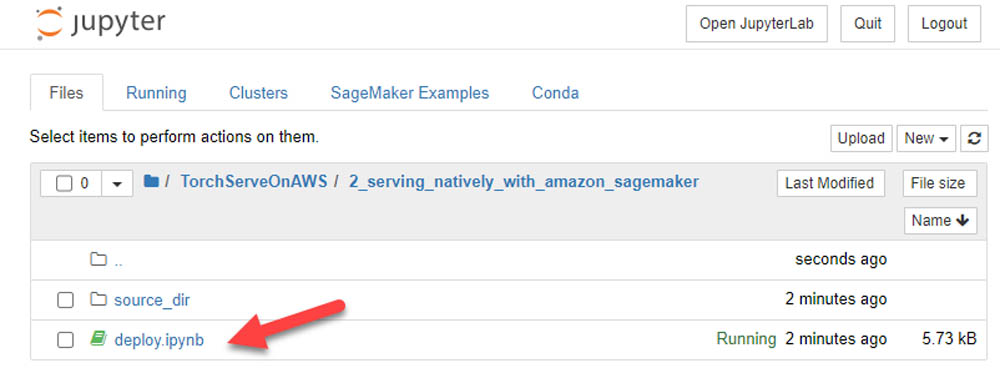
Accessing the Lab
From within the notebook instance, navigate to the serving_natively_with_amazon_sagemaker directory and open deploy.ipynb.
You can now run through the steps within the Jupyter notebook:
- Set up your hosting environment.
- Create your endpoint.
- Perform predictions with a TorchServe backend Amazon SageMaker endpoint.
After setting up your hosting environment, creating an Amazon SageMaker endpoint using the native TorchServe estimator is as easy as:
model = PyTorchModel(model_data=model_artifact,
                   name=name_from_base('roberta-model'),
                   role=role,
                   entry_point='torchserve-predictor.py',
                   source_dir='source_dir',
                   framework_version='1.6.0',
                   predictor_cls=SentimentAnalysis)

endpoint_name = name_from_base('roberta-model')
predictor = model.deploy(initial_instance_count=1, instance_type='ml.m5.xlarge', endpoint_name=endpoint_name)
Cleaning Up
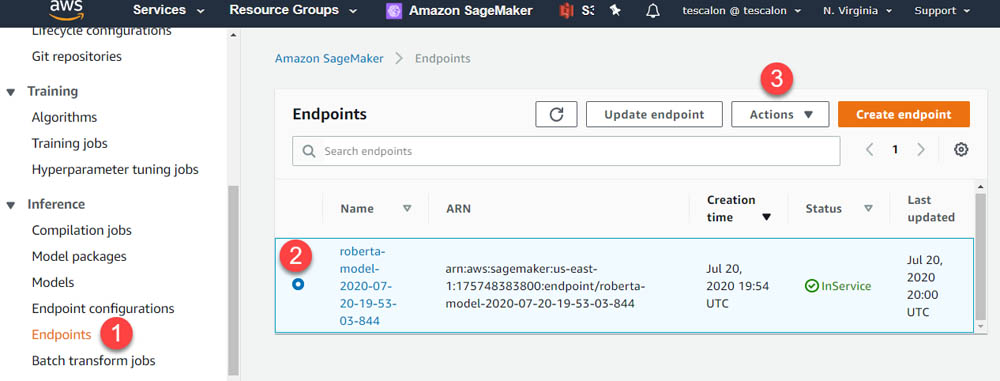
When you’re finished with this lab, your Amazon SageMaker endpoint should have already been deleted. If not, complete the following steps to delete it:
- On the Amazon SageMaker console, under Inference, choose Endpoints.
- Select the endpoint (it should begin with
roberta-model). - From the Actions drop-down menu, choose Delete.
On the AWS CloudFormation console, delete the rest of your environment choosing the torchserve-on-aws stack and choosing Delete.

You can see two other stack names that were built based off of the original CloudFormation template. These are nested stacks and are automatically deleted with the main stack. The cleanup process takes just over 3 minutes to spin down your environment and will delete your notebook instance and the associated IAM role.
Conclusion
As TorchServe continues to evolve around the very specific needs of the PyTorch community, AWS is focused on ensuring that you have a common and performant way to serve models with PyTorch. Whether you’re using Amazon SageMaker, Amazon Elastic Compute Cloud (Amazon EC2), or Amazon Elastic Kubernetes Service (Amazon EKS), you can expect AWS to continue to optimize the backend infrastructure in support of our open-source community. We encourage all of you to submit pull requests and/or create issues in our repositories (TorchServe, AWS Deep learning containers, PyTorch inference toolkit, etc) as needed.
About the Author
 As a Principal Solutions Architect, Todd spends his time working with strategic and global customers to define business requirements, provide architectural guidance around specific use cases, and design applications and services that are scalable, reliable, and performant. He has helped launch and scale the reinforcement learning powered AWS DeepRacer service, is a host for the AWS video series “This is My Architecture”, and speaks regularly at AWS re:Invent, AWS Summits, and technology conferences around the world.
Women in Tech coffee talk at VLDB 2020
Six female leaders host a discussion on innovation trends, their career paths, and their experience as women in tech during VLDB.Read More
Activity detection on a live video stream with Amazon SageMaker
Live video streams are continuously generated across industries including media and entertainment, retail, and many more. Live events like sports, music, news, and other special events are broadcast for viewers on TV and other online streaming platforms.
AWS customers increasingly rely on machine learning (ML) to generate actionable insights in real time and deliver an enhanced viewing experience or timely alert notifications. For example, AWS Sports explains how leagues, broadcasters, and partners can train teams, engage fans, and transform the business of sports with ML.
Amazon Rekognition makes it easy to add image and video analysis to your applications using proven, highly scalable, deep learning technology that requires no ML expertise to use. With Amazon Rekognition, you can identify objects, people, text, scenes, and some pre-defined activities in videos.
However, if you want to use your own video activity dataset and your own model or algorithm, you can use Amazon SageMaker. Amazon SageMaker is a fully managed service that allows you to build, train, and deploy ML models quickly. Amazon SageMaker removes the heavy lifting from each step of the ML process to make it easier to develop high-quality models.
In this post, you use Amazon SageMaker to automatically detect activities from a custom dataset in a live video stream.
The large volume of live video streams generated needs to be stored, processed in real time, and reviewed by a human team at low latency and low cost. Such pipelines include additional processing steps if specific activities are automatically detected in a video segment, such as penalty kicks in football triggering the generation of highlight clips for viewer replay.
ML inference on a live video stream can have the following challenges:
- Input source – The live stream video input must be segmented and made available in a data store for consumption with negligible latency.
- Large payload size – A video segment of 10 seconds can range from 1–15 MB. This is significantly larger than a typical tabular data record.
- Frame sampling – Video frames must be extracted at a sampling rate generally lesser than the original video FPS (frames per second) efficiently and without a loss in output accuracy.
- Frame preprocessing – Video frames must be preprocessed to reduce image size and resolution without a loss in output accuracy. They also need to be normalized across all the images used in training.
- External dependencies – External libraries like opencv and ffmpeg with different license types are generally used for image processing.
- 3D model network – Video models are typically 3D networks with an additional temporal dimension to image networks. They work on 5D input (batch size, time, RGB channel, height, width) and require a large volume of annotated input videos.
- Low latency, low cost – The output ML inference needs to be generated within an acceptable latency and at a low cost to demonstrate value.
This post describes two phases of a ML lifecycle. In the first phase, you build, train, and deploy a 3D video classification model on Amazon SageMaker. You fine-tune a pre-trained model with a ResNet50 backbone by transfer learning on another dataset and test inference on a sample video segment. The pre-trained model from a well-known model zoo reduces the need for large volumes of annotated input videos and can be adapted for tasks in another domain.
In the second phase, you deploy the fine-tuned model on an Amazon SageMaker endpoint in a production context of an end-to-end solution with a live video stream. The live video stream is simulated by a sample video in a continuous playback loop with AWS Elemental MediaLive. Video segments from the live stream are delivered to Amazon Simple Storage Service (Amazon S3), which invokes the Amazon SageMaker endpoint for inference. The inference payload is the Amazon S3 URI of the video segment. The use of the Amazon S3 URI is efficient because it eliminates the need to serialize and deserialize a large video frame payload over a REST API and transfers the responsibility of ingesting the video to the endpoint. The endpoint inference performs frame sampling and pre-processing followed by video segment classification, and outputs the result to Amazon DynamoDB.
Finally, the solution performance is summarized with respect to latency, throughput, and cost.
For the complete code associated with this post, see the GitHub repo.
Building, training, and deploying an activity detection model with Amazon SageMaker
In this section, you use Amazon SageMaker to build, train, and deploy an activity detection model in a development environment. The following diagram depicts the Amazon SageMaker ML pipeline used to perform the end-to-end model development. The training and inference Docker images are available for any deep learning framework of choice, like TensorFlow, Pytorch, and MXNet. You use the “bring your own script” capability of Amazon SageMaker to provide a custom entrypoint script for training and inference. For this use case, you use transfer learning to fine-tune a pretrained model from a model zoo with another dataset loaded in Amazon S3. You use model artifacts from the training job to deploy an endpoint with automatic scaling, which dynamically adjusts the number of instances in response to changes in the invocation workload.

For this use case, you use two popular activity detection datasets: Kinetics400 and UCF101. Dataset size is a big factor in the performance of deep learning models. Kinetics400 has 306,245 short trimmed videos from 400 action categories. However, you may not have such a high volume of annotated videos in other domains. Training a deep learning model on small datasets from scratch may lead to severe overfitting, which is why you need transfer learning.
UCF101 has 13,320 videos from 101 action categories. For this post, we use UCF101 as a dataset from another domain for transfer learning. The pre-trained model is fine-tuned by replacing the last classification (dense) layer to the number of classes in the UCF101 dataset. The final test inference is run on new sample videos from Pexels that were unavailable during the training phase. Similarly, you can train good models on activity videos from your own domain without large annotated datasets and with less computing resource utilization.
We chose Apache MXNet as the deep learning framework for this use case because of the availability of the GluonCV toolkit. GluonCV provides implementations of state-of-the-art deep learning algorithms in computer vision. It features training scripts that reproduce state-of-the-art results reported in the latest research papers, a model zoo with a large set of pre-trained models, carefully designed APIs, and easy-to-understand implementations and community support. The action recognition model zoo contains multiple pre-trained models with the Kinetics400 dataset. The following graph shows the inference throughputs vs. validation accuracy and device memory footprint for each of them.

I3D (Inflated 3D Networks) and SlowFast are 3D video classification networks with varying trade-offs between accuracy and efficiency. For this post, we chose the Inflated 3D model (I3D) with ResNet50 backbone trained on the Kinetics400 dataset. It uses 3D convolution to learn spatiotemporal information directly from videos. The input to this model is of the form (N x C x T x H x W), where N is the batch size, C is the number of colour channels, T is the number of frames in the video segment, H is the height of the video frame, and W is the width of the video frame.
Both model training and inference require efficient and convenient slicing methods for video preprocessing. Decord provides such methods based on a thin wrapper on top of hardware accelerated video decoders. We use Decord as a video reader, and use VideoClsCustom as a custom GluonCV video data loader for pre-processing.
We launch the training script mode with the Amazon SageMaker MXNet training toolkit and the AWS Deep Learning container for training on Apache MXNet. The training process includes the following steps for the entire dataset:
- Frame sampling and center cropping
- Frame normalization with mean and standard deviation across all ImageNet images
- Transfer learning on the pre-trained model with a new dataset
After you have a trained model artifact, you can include it in a Docker container that runs your inference script and deploys to an Amazon SageMaker endpoint. Inference is launched with the Amazon SageMaker MXNet inference toolkit and the AWS Deep Learning container for inference on Apache MXNet. The inference process includes the following steps for the video segment payload:
- Pre-processing (similar to training)
- Activity classification
We use the Amazon Elastic Compute Cloud (Amazon EC2) G4 instance for our Amazon SageMaker endpoint hosting. G4 instances provide the latest generation NVIDIA T4 GPUs, AWS custom Intel Cascade Lake CPUs, up to 100 Gbps of networking throughput, and up to 1.8 TB of local NVMe storage. G4 instances are optimized for computer vision application deployments like image classification and object detection. For more information about inference benchmarks, see NVIDIA Data Center Deep Learning Product Performance.
We test the model inference deployed as an Amazon SageMaker endpoint using the following video examples (included in the code repository).
Output activity : TennisSwingOutput activity : SkiingNote that the UCF101 dataset does not have a snowboarding activity class. The most similar activity present in the dataset is skiing and the model predicts skiing when evaluated with a snowboarding video.
You can find the complete Amazon SageMaker Jupyter notebook example with transfer learning and inference on the GitHub repo. After the model is trained, deployed to an Amazon SageMaker endpoint, and tested with the sample videos in the development environment, you can deploy it in a production context of an end-to-end solution.
Deploying the solution with AWS CloudFormation
In this step, you deploy the end-to-end activity detection solution using an AWS CloudFormation template. After a successful deployment, you use the model to automatically detect an activity in a video segment from a live video stream. The following diagram depicts the roles of the AWS services in the solution.

The AWS Elemental MediaLive livestreaming channel that is created from a sample video file in S3 bucket is used to demonstrate the real-time architecture. You can use other live streaming services as well that are capable of delivering live video segments to S3.
- AWS Elemental MediaLive sends live video with HTTP Live Streaming (HLS) and regularly generates fragments of equal length (10 seconds) as .ts files and an index file that contains references of the fragmented files as a .m3u8 file in a S3 bucket.
- An upload of each video .ts fragment into the S3 bucket triggers a lambda function.
- The lambda function simply invokes a SageMaker endpoint for activity detection with the S3 URI of the video fragment as the REST API payload input.
- The SageMaker inference container reads the video from S3, pre-processes it, detects an activity and saves the prediction results to an Amazon DynamoDB table.
For this post, we use the sample Skiing People video to create the MediaLive live stream channel (also included in the code repository). In addition, the deployed model is the I3D model with Resnet50 backbone fine-tuned with the UCF101 dataset, as explained in the previous section. Autoscaling is enabled for the Amazon SageMaker endpoint to adjust the number of instances based on the actual workload.
The end-to-end solution example is provided in the GitHub repo. You can also use your own sample video and fine-tuned model.
There is a cost associated with deploying and running the solution, as mentioned in the Cost Estimation section of this post. Make sure to delete the CloudFormation stack if you no longer need it. The steps to delete the solution are detailed in the section Cleaning up.
You can deploy the solution by launching the CloudFormation stack:
![]()
The solution is deployed in the us-east-1 Region. For instructions on changing your Region, see the GitHub repo. After you launch the CloudFormation stack, you can update the parameters for your environments or leave the defaults. All their descriptions are provided when you launch it. Don’t create or select any other options in the configuration. In addition, don’t create or select an AWS Identity and Access Management (IAM) role on the Permissions tab. At the final page of the CloudFormation creation process, you need to select the two check-boxes under Capabilities. To create the AWS resources associated with the solution, you should have permissions to create CloudFormation stacks.
After you launch the stack, make sure that the root stack with its nested sub-stacks are successfully created by viewing the stack on the AWS CloudFormation console.

Wait until all the stacks are successfully created before you proceed to the next session. It takes 15–20 minutes to deploy the architecture.
The root CloudFormation stack ActivityDetectionCFN is mainly used to call the other nested sub-stacks and create the corresponding AWS resources.
The sub-stacks have the root stack name as their prefix. This is mainly to show that they are nested. In addition, the AWS Region name and account ID are added as suffices in the live stream S3 bucket name to avoid naming conflicts.
After the solution is successfully deployed, the following AWS resources are created:
- S3 bucket – The bucket
activity-detection-livestream-bucket-us-east-1-<account-id>stores video segments from the live video stream - MediaLive channel – The channel
activity-detection-channelcreates video segments from the live video stream and saves them to the S3 bucket - Lambda function – The function
activity-detection-lambdainvokes the Amazon SageMaker endpoint to detect activities from each video segment - SageMaker endpoint – The
endpoint activity-detection-endpointloads a video segment, detects an activity, and saves the results into a DynamoDB table - DynamoDB table – The table
activity-detection-tablestores the prediction results from the endpoint
Other supporting resources, like IAM roles, are also created to provide permissions to their respective resources.
Using the Solution
After the solution is successfully deployed, it’s time to test the model with a live video stream. You can start the channel on the MediaLive console.

Wait for the channel state to change to Running. When the channel state changes to Running, .ts-formatted video segments are saved into the live stream S3 bucket.

Only the most recent 21 video segments are kept in the S3 bucket to save storage. For more information about increasing the number of segments, see the GitHub repo.
Each .ts-formatted video upload triggers a Lambda function. The function invokes the Amazon SageMaker endpoint with an Amazon S3 URI to the .ts video as the payload. The deployed model predicts the activity and saves the results to the DynamoDB table.

Evaluating performance results
The Amazon SageMaker endpoint instance in this post is a ml.g4dn.2xlarge with 8 vCPU and 1 Nvidia T4 Tensor Core GPU. The solution generates one video segment every 10 seconds at 30 FPS. Therefore, there are six endpoint requests per minute (RPM). The overhead latency in video segment creation from the live stream up to delivery in Amazon S3 is approximately 1 second.
Amazon SageMaker supports automatic scaling for your hosted models. Autoscaling dynamically adjusts the number of instances provisioned for a model in response to changes in your workload. You can simulate a load test to determine the throughput of the system and the scaling policy for autoscaling in Amazon SageMaker. For the activity detection model in this post, a single ml.g4dn.2xlarge instance hosting the endpoint can handle 600 RPM with a latency of 300 milliseconds and with less than 5% number of HTTP errors. With a SAFETY_FACTOR = 0.5, the autoscaling target metric can be set as SageMakerVariantInvocationsPerInstance = 600 * 0.5 = 300 RPM.

For more information on load testing, see Load testing your autoscaling configuration.
Observe the differences between two scenarios under the same increasing load up to 1,700 invocations per minute in a period of 15 minutes. The BEFORE scenario is for a single instance without autoscaling, and the AFTER scenario is after two additional instances are launched by autoscaling.
The following graphs report the number of invocations and invocations per instance per minute. In the BEFORE scenario, with a single instance, both lines merge. In the AFTER scenario, the load pattern and Invocations (the blue line) are similar, but InvocationsPerInstance (the red line) is lower because the endpoint has scaled out.

The following graphs report average ModelLatency per minute. In the BEFORE scenario, the average latency remains under 300 milliseconds for the first 3 minutes of the test. The average ModelLatency exceeds 1 second after the endpoint gets more than 600 RPS and goes up to 8 seconds during peak load. In the AFTER scenario, the endpoint has already scaled to three instances and the average ModelLatency per minute remains close to 300 milliseconds.

The following graphs report the errors from the endpoint. In the BEFORE scenario, as the load exceeds 300 RPS, the endpoint starts to error out for some requests and increases as the number of invocations increase. In the AFTER scenario, the endpoint has scaled out already and reports no errors.

In the AFTER scenario, at peak load, average CPU utilization across instances is near maximum (100 % * 8 vcpu = 800 %) and average GPU utilization across instances is about 35%. To improve GPU utilization, additional effort can be made to optimize the CPU intensive pre-processing.

Cost Estimation
The following table summarizes the cost estimation for this solution. The cost includes the per hour pricing for one Amazon SageMaker endpoint instance of type ml.g4dn.2xlarge in the us-east-1 Region. If autoscaling is applied, the cost per hour includes the cost of the number of active instances. Also, MediaLive channel pricing is governed by the input and output configuration for the channel.
| Component | Details | Pricing (N.Virginia) | Cost per hour |
| Elemental Media Live | Single pipeline, On-Demand, SD | $0.036 / hr input + $0.8496 / hr output |
$ 0.8856
|
| S3 | 30 mb per minute | $0.023 per gb | $ 0.0414 |
| Lambda | Only invoke sm, minimum config (128 mb) | $0.0000002083 per 100 ms |
$ 0.00007
|
| SageMaker endpoint | (ml.g4dn.2xlarge) single instance | $1.053 per hour | $1.053 |
| DynamoDB | $1.25 per million write request units | $ 0.0015 |
Cleaning up
If you no longer need the solution, complete the following steps to properly delete all the associated AWS resources:
- On the MediaLive console, stop the live stream channel.
- On the Amazon S3 console, delete the S3 bucket you created earlier.
- On the AWS CloudFormation console, delete the root
ActivityDetectionCFNThis also removes all nested sub-stacks.
Conclusion
In this post, you used Amazon SageMaker to automatically detect activity in a simulated live video stream. You used a pre-trained model from the gluon-cv model zoo and Apache MXNet framework for transfer learning on another dataset. You also used Amazon SageMaker inference to preprocess and classify a video segment delivered to Amazon S3. Finally, you evaluated the solution respect to model latency, system throughput, and cost.
About the Authors
 Hasan Poonawala is a Machine Learning Specialist Solution Architect at AWS, based in London, UK. Hasan helps customers design and deploy machine learning applications in production on AWS. He is passionate about the use of machine learning to solve business problems across various industries. In his spare time, Hasan loves to explore nature outdoors and spend time with friends and family.
 Tesfagabir Meharizghi is a Data Scientist at the Amazon ML Solutions Lab where he works with customers across different verticals accelerate their use of machine learning and AWS cloud services to solve their business challenges. Outside of work, he enjoys spending time with his family and reading books.
How to reduce communication overhead for database queries by up to 97%
Amazon researchers describe new method for distributing database tables across servers.Read More