Automating the analysis of multi-speaker audio files using Amazon Transcribe and Amazon Athena

Automating the analysis of multi-speaker audio files using Amazon Transcribe and Amazon Athena

In an effort to drive customer service improvements, many companies record the phone conversations between their customers and call center representatives. These call recordings are typically stored as audio files and processed to uncover insights such as customer sentiment, product or service issues, and agent effectiveness. To provide an accurate analysis of these audio files, the transcriptions need to clearly identify who spoke what and when.

However, given the average customer service agent handles 30–50 calls a day, the sheer volume of audio files to analyze quickly becomes a challenge. Companies need a robust system for transcribing audio files in large batches to improve call center quality management. Similarly, legal investigations often need to efficiently analyze case-related audio files in search of potential evidence or insight that can help win legal cases. Also, in the healthcare sector, there is a growing need for this solution to help transcribe and analyze virtual patient-provider interactions.

Amazon Transcribe is an automatic speech recognition (ASR) service that makes it easy to convert audio to text. One key feature of the service is called speaker identification, which you can use to label each individual speaker when transcribing multi-speaker audio files. You can specify Amazon Transcribe to identify 2–10 speakers in the audio clip. For the best results, define the correct number of speakers for the audio input.

A contact center, which often records multi-channel audio, can also benefit from using a feature called channel identification. The feature can separate each channel from within a single audio file and simultaneously transcribe each track. Typically, an agent and a caller are recorded on separate channels, which are merged into a single audio file. Contact center applications like Amazon Connect record agent and customer conversations on different channels (for example, the agent’s voice is captured in the left channel, and the customer’s in the right for a two-channel stereo recording). Contact centers can submit the single audio file to Amazon Transcribe, which identifies the two channels and produces a coherent merged transcript with channel labels.

In this post, we walk through a solution that analyzes audio files involving multiple speakers using Amazon Transcribe and Amazon Athena, a serverless query service for big data. Combining these two services together, you can easily set up a serverless, pay-per-use solution for processing audio files into readable text and analyze the data using standard query language (SQL).

Solution overview

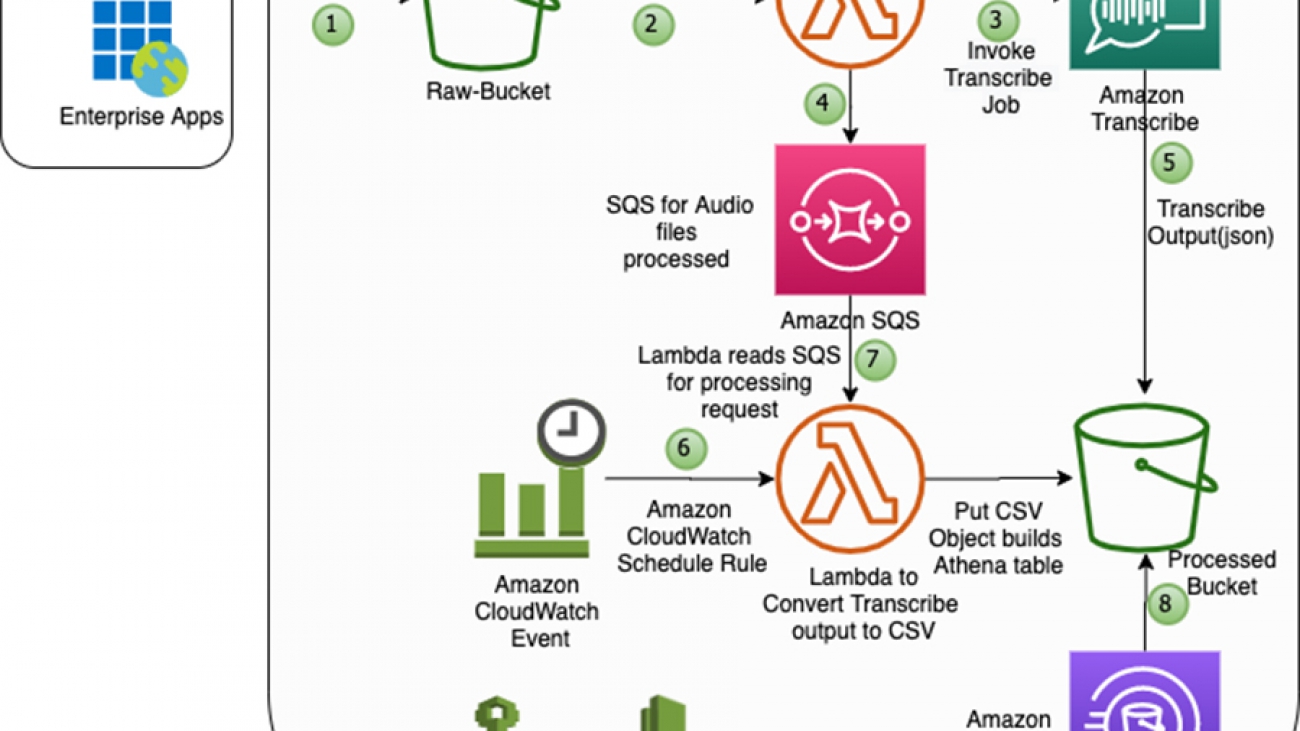
The following diagram illustrates the solution architecture.

The solution contains the following steps:

  1. You upload the audio file to the Amazon Simple Storage Service (Amazon S3) bucket AudioRawBucket.
  2. The Amazon S3 PUT event triggers the AWS Lambda function LambdaFunction1.
  3. The function invokes an asynchronous Amazon Transcribe API call on the uploaded audio file.
  4. The function also writes a message into Amazon Simple Queue Service (Amazon SQS) with the transcription job information.
  5. The transcription job runs and writes the output in JSON format to the target S3 bucket, AudioPrcsdBucket.
  6. An Amazon CloudWatch Events rule triggers the function(LambdaFunction2) to run for every 2 minutes interval.
  7. The function LambdaFunction2 reads the SQS queue for transcription jobs, checks for job completion, converts the JSON file to CSV, and loads an Athena table with the audio text data.
  8. You can access the processed audio file transcription from the AudioPrcsdBucket.
  9. You also query the data with Amazon Athena.

Prerequisites

To get started, you need the following:

  • A valid AWS account with access to AWS services
  • The Athena database “default” in an AWS account in us-east-1
  • A multi-speaker audio file—for this post, we use medical-diarization.wav

To achieve the best results, we recommend the following:

  • Use a lossless format, such as WAV or FLAC, with PCM 16-bit encoding
  • Use a sample rate of 8000 Hz for low-fidelity audio and 16000 Hz for high-fidelity audio

Deploying the solution

You can use the provided AWS CloudFormation template to launch and configure all the resources for the solution.

  1. Choose Launch Stack:

This takes you to the Create stack wizard on the AWS CloudFormation console. The template is launched in the US East (N. Virginia) Region by default.

The CloudFormation templates used in this post are designed to work only in the us-east-1 Region. These templates are also not intended for production use without modification.

  1. On the Select Template page, keep the default URL for the CloudFormation template, and choose Next.
  2. On the Specify Details page, review and provide values for the required parameters in the template.
    • For EnvName, enter Dev.

Dev is your environment, where you want to deploy the template. AWS CloudFormation uses this value for resources in Lambda, Amazon SQS, and other services.

  1. After you specify the template details, choose Next.
  2. On the Options page, choose Next again.
  3. On the Review page, select I acknowledge that AWS CloudFormation might create IAM resources with custom names.
  4. Choose Create Stack

It takes approximately 5–10 minutes for the deployment to complete. When the stack launch is complete, it returns outputs with information about the resources that were created.

You can view the stack outputs on the AWS Management Console or by using the following AWS Command Line Interface (AWS CLI) command:

aws cloudformation describe-stacks --stack-name <stack-name> --region us-east-1 --query 	Stacks[0].Outputs

Resources created by the CloudFormation stack

  • AudioRawBucket – Stores raw audio files based on the PUT event Lambda function for Amazon Transcribe to run
  • AudioPrcsdBucket – Stores the processed output
  • LambdaRole1 – The Lambda role with required permissions for S3 buckets, Amazon SQS, Amazon Transcribe, and CloudWatch
  • LambdaFunction1 – The initial function to run Amazon Transcribe to process the audio file, create a JSON file, and update Amazon SQS
  • LambdaFunction2 – The post function that reads the SQS queue, converts (aggregates) the JSON to CSV format, and loads it into an Athena table
  • TaskAudioQueue– The SQS queue for storing all audio processing requests
  • ScheduledRule– The CloudWatch schedule for LambdaFunction2
  • AthenaNamedQuery – The Athena table definition for storing processed audio files transcriptions with object information

The Athena table for the audio text has the following definitions:

  • audio_transcribe_job – The job submitted to transcribe the audio
  • time_start – The beginning timestamp for the speaker
  • speaker – Speaker tags (for example, spk_0, spk-1, and so on)
  • speaker_text – The text from the speaker audio

Validating the solution

You can now validate that the solution works.

  1. Verify the AWS CloudFormation resources were created (see previous section for instructions via the console or AWS CLI).
  2. Upload the sample audio file to the S3 bucket AudioRawBucket.

The transcription process is asynchronous, so it can take a few minutes for the job to complete. You can check the job status on the Amazon Transcribe console and CloudWatch console.

When the transcription job is complete and Athena table transcribe_data created, you can run Athena queries to verify the transcription output. See the following select statement:

select * from "default"."transcribe_data" order by 1,2

The following table shows the output for the above select statement.

audio_transcribe_job time_start speaker speaker_text
medical-diarization.wav 0:00:01 spk_0  Hey, Jane. So what brings you into my office today?
medical-diarization.wav 0:00:03 spk_1  Hey, Dr Michaels. Good to see you. I’m just coming in from a routine checkup.
medical-diarization.wav 0:00:07 spk_0  All right, let’s see, I last saw you. About what, Like a year ago. And at that time, I think you were having some minor headaches. I don’t recall prescribing anything, and we said we’d maintain some observations unless things were getting worse.
medical-diarization.wav 0:00:20 spk_1  That’s right. Actually, the headaches have gone away. I think getting more sleep with super helpful. I’ve also been more careful about my water intake throughout my work day.
medical-diarization.wav 0:00:29 spk_0  Yeah, I’m not surprised at all. Sleep deprivation and chronic dehydration or to common contributors to potential headaches. Rest is definitely vital when you become dehydrated. Also, your brain tissue loses water, causing your brain to shrink and, you know, kind of pull away from the skull. And this contributor, the pain receptors around the brain, giving you the sensation of a headache. So how much water are you roughly taking in each day
medical-diarization.wav 0:00:52 spk_1  of? I’ve become obsessed with drinking enough water. I have one of those fancy water bottles that have graduated markers on the side. I’ve also been logging my water intake pretty regularly on average. Drink about three litres a day.
medical-diarization.wav 0:01:06 spk_0  That’s excellent. Before I start the routine physical exam is there anything else you like me to know? Anything you like to share? What else has been bothering you?

Cleaning up

To avoid incurring additional charges, complete the following steps to clean up your resources when you are done with the solution:

  1. Delete the Athena table transcribe_data from default
  2. Delete the prefixes and objects you created from the buckets AudioRawBucket and AudioPrcsdBucket.
  3. Delete the CloudFormation stack, which removes your additional resources.

Conclusion

In this post, we walked through the solution, reviewed sample implementation of audio file conversion using Amazon S3, Amazon Transcribe, Amazon SQS, Lambda, and Athena, and validated the steps for processing and analyzing multi-speaker audio files.

You can further extend this solution to perform sentiment analytics and improve your customer experience. For more information, see Detect sentiment from customer reviews using Amazon Comprehend. For more information about live call and post-call analytics, see AWS announces AWS Contact Center Intelligence solutions.


About the Authors

Mahendar Gajula is a Big Data Consultant at AWS. He works with AWS customers in their journey to the cloud with a focus on Big data, Data warehouse and AI/ML projects. In his spare time, he enjoys playing tennis and spending time with his family.


Rajarao Vijjapu is a data architect with AWS. He works with AWS customers and partners to provide guidance and technical assistance about Big Data, Analytics, AI/ML and Security projects, helping them improve the value of their solutions when using AWS.

Read More

Improving Sparse Training with RigL

Improving Sparse Training with RigL

Posted by Utku Evci and Pablo Samuel Castro, Research Engineers, Google Research, Montreal

Modern deep neural network architectures are often highly redundant [1, 2, 3], making it possible to remove a significant fraction of connections without harming performance. The sparse neural networks that result have been shown to be more parameter and compute efficient compared to dense networks, and, in many cases, can significantly decrease wall clock inference times.

By far the most popular method for training sparse neural networks is pruning, (dense-to-sparse training) which usually requires first training a dense model, and then “sparsifying” it by cutting out the connections with negligible weights. However, this process has two limitations.

  1. The size of the largest trainable sparse model is limited by that of the largest trainable dense model. Even if sparse models are more parameter efficient, one cannot use pruning to train models that are larger and more accurate than the largest possible dense models.
  2. Pruning is inefficient, meaning that large amounts of computation must be performed for parameters that are zero valued or that will be zero during inference. Additionally, it remains unknown if the performance of the current best pruning algorithms are an upper bound on the quality of sparse models.

Training sparse networks from scratch, on the other hand, is efficient, however often achieves inferior performance compared to pruning.

In “Rigging the Lottery: Making All Tickets Winners”, presented at ICML 2020, we introduce RigL, an algorithm for training sparse neural networks that uses a fixed parameter count and computational cost throughout training, without sacrificing accuracy relative to existing dense-to-sparse training methods. The algorithm identifies which neurons should be active during training, which helps the optimization process to utilize the most relevant connections and results in better sparse solutions. An example of this is shown below, where, during the training of a multilayer perceptron (MLP) network on MNIST, our sparse network trained with RigL learns to focus on the center of the images, discarding the uninformative pixels from the edges. A Tensorflow implementation of our method along with three other baselines (SET, SNFS, SNIP) can be found at github.com/google-research/rigl.

Left: Average MNIST image. Right: Evolution of the connectivity of the input throughout the training of a 98% sparse, 2-layer MLP on MNIST. Training starts from a random sparse mask, where each input pixel has roughly six outgoing connections. Connections that originate from the edges do not exhibit meaningful gradients and are therefore replaced by more informative connections that originate from the center pixels.

RigL Overview
The RigL method starts with a network initialized with a random sparse topology. At regularly spaced intervals we remove a fraction of the connections with the smallest weight magnitudes. Such a strategy has been shown to have very little effect on the loss. RigL then activates new connections using instantaneous gradient information, i.e., without using past gradient information. After updating the connectivity, training continues with the updated network until the next scheduled update. Next, the system activates connections with large gradients, since these connections are expected to decrease the loss most quickly.

RigL begins with a random sparse initialization of the network. It then trains the network and trims out those connections with weak activations. Based on the gradients calculated for the new configuration, it grows new connections and trains again, repeating the cycle.

Evaluating Performance
By changing the connectivity of the neurons dynamically during training, RigL helps optimize to find better solutions. To demonstrate this, we restart training from a bad solution that exhibits poor accuracy and show that RigL’s mask updates help the optimization achieve better loss compared to static training, in which connectivity of the sparse network remains the same.

Training loss of RigL and Static methods starting from the same static sparse solution, shown together with their final test accuracies.

The figure below summarizes the performance of various methods on training an 80% sparse ResNet-50 architecture. We compare RigL with two recent sparse training methods, SET and SNFS and three baseline training methods: Static, Small-Dense and Pruning. Two of these methods (SNFS and Pruning) require dense resources as they need to either train a large network or store the gradients of it. Overall, we observe that the performance of all methods improves with additional training time; thus, for each method we run extended training with up to 5x the training steps of the original 100 epochs.

As noted in a number of studies [4, 5, 6, 7], training a network with fixed sparsity from scratch (Static) leads to inferior performance compared to solutions found by pruning. Training a small, dense network (Small-Dense) with the same number of parameters gets better results than Static, but fails to match the performance of dynamic sparse models. Similarly, SET improves the performance over Small-Dense, but saturates at around 75% accuracy, revealing the limits of growing new connections randomly. Methods that use gradient information to grow new connections (RigL and SNFS) obtain higher accuracy in general, but RigL achieves the highest accuracy, while also consistently requiring fewer FLOPs (and memory footprint) than the other methods.

Performance of sparse training methods on training an 80% sparse ResNet-50 architecture with uniform sparsity distribution. Points at each curve correspond to the individual training runs with increasing training length. The number of FLOPs required to train a standard dense ResNet-50 along with its performance is indicated with a dashed red line. RigL matches the standard ResNet-50 performance, even though it is 5x smaller in size.

Observing the trend between extended training and performance, we compare the results using longer training runs. Within the interval considered (i.e., 1x-100x) RigL’s performance constantly improves with additional training. RigL achieves state of art performance of 68.07% Top-1 accuracy at training with a 99% sparse ResNet-50 architecture. Similarly extended training of a 90% sparse MobileNet-v1 architecture with RigL achieves 70.55% Top-1 accuracy. Obtaining the same results with fewer training iterations is an exciting future research direction.

Effect of training time on RigL accuracy at training 99% sparse ResNet-50 (left) and 90% sparse MobileNets-v1 (right) architectures.

Other experiments include image classification on CIFAR-10 datasets and character-based language modelling using RNNs with the WikiText-103 dataset and can be found in the full paper.

Future Work
RigL is useful in three different scenarios:

  1. Improving the accuracy of sparse models intended for deployment.
  2. Improving the accuracy of large sparse models that can only be trained for a limited number of iterations.
  3. Combining with sparse primitives to enable training of extremely large sparse models which otherwise would not be possible.

The third scenario is unexplored due to the lack of hardware and software support for sparsity. Nonetheless, work continues [8, 9, 10] to improve the performance of sparse networks on current hardware and new types of hardware accelerators are expected to have better support for parameter sparsity [11, 12]. We hope RigL provides the tools to take advantage of, and motivation for, such advances.

AcknowledgementsWe would like to thank Eleni Triantafillou, Hugo Larochelle, Bart van Merrienboer, Fabian Pedregosa, Joan Puigcerver, Danny Tarlow, Nicolas Le Roux, Karen Simonyan for giving feedback on the preprint of the paper; Namhoon Lee for helping us verify and debug our SNIP implementation; Chris Jones for helping us discover and solve the distributed training bug; and Tom Small for creating the visualization of the algorithm.

Read More

“Insanely Fast,” “Biggest Generational Leap” “New High-End Gaming Champion”: Reviewers Rave for GeForce RTX 3080

Reviewers have just finished testing NVIDIA’s new flagship GPU — the NVIDIA RTX 3080 — and the raves are rolling in.

NVIDIA CEO Jensen Huang promised “a giant step into the future,” when he revealed NVIDIA’s GeForce RTX 30 Series GPUs on Sept. 1.

The NVIDIA Ampere GPU architecture, introduced in May, has already stormed through supercomputing and hyperscale data centers.

But no one knew for sure what the new architecture would be capable of when unleashed on gaming.

Now they do:

The GeForce RTX 30 Series, NVIDIA’s second-generation RTX GPUs, deliver up to 2x the performance and up to 1.9x the power efficiency over previous-generation GPUs.

This leap in performance will deliver incredible performance in upcoming games such as Cyberpunk 2077, Call of Duty: Black Ops Cold War and Watch Dogs: Legion, currently bundled with select GeForce RTX 3080 graphics cards at participating retailers.

In addition to the trio of new GPUs — the flagship GeForce RTX 3080, the GeForce RTX 3070 and the “ferocious” GeForce RTX 3090 — gamers get a slate of new tools.

They include NVIDIA Reflex — which makes competitive gamers quicker; NVIDIA Omniverse Machinima — for those using real-time computer graphics engines to create movies; and NVIDIA Broadcast — which harnesses AI to build virtual broadcast studios for streamers.

And new 2nd Gen Ray Tracing Cores and 3rd Gen Tensor Cores make ray-traced and DLSS-accelerated experiences even faster.

GeForce RTX 3080 will be out from NVIDIA and our partners Sept. 17.

The post “Insanely Fast,” “Biggest Generational Leap” “New High-End Gaming Champion”: Reviewers Rave for GeForce RTX 3080 appeared first on The Official NVIDIA Blog.

Read More

Announcing the winners of the Explorations of Trust in AR, VR, and Smart Devices request for proposals

In April, Facebook invited university faculty to respond to the Explorations of Trust in AR, VR, and Smart Devices request for proposals (RFP) to help accelerate research in security, privacy, integrity, and ethics for mixed-reality and smart device products. We were interested in a broad range of topics relating to applications like AR glasses, VR headsets, other AR or VR form-factors, smart home products, and more. Today, we are announcing the recipients and finalists of these research awards.
View RFPThe mixed-reality and smart device industries are continuing to evolve, with unique products, use cases, and devices coming to bear in this new space. With an entirely new category of technologies come entirely new security, privacy, and integrity challenges. But this new category also presents entirely new possibilities and models for considering trust.

The first round of awardees’ research will explore the following:

  • Secure and usable authentication methods in AR and VR devices
  • Unravelling privacy risks of 3D spatial mixed reality data
  • User impacts of novel attacks in AR
  • Building multi-layer defensive frameworks for next-gen intelligent systems
  • Deepfake Detection Methods in 3D mixed reality

Funding these ongoing research efforts will help Facebook Reality Labs and the XR industry better understand and address these nascent risk areas in our efforts to build trustworthy products.

For more information about this RFP, such as topics of interest, eligibility, requirements, and more, visit the application page.

Research award recipients

Principal investigators are listed first unless otherwise noted.

Deepfakes and virtual conferences: Facial motion analysis for ID verification
Ronald Fedkiw (Stanford University)

Experimental analysis of user impacts of novel attacks in augmented reality
Franziska Roesner, Tadayashi Kohno (University of Washington)

Secure and usable authentication for augmented and virtual reality devices
Melanie Volkamer, Peter Mayer, Reyhan Duzgun (Karlsruhe Institute of Technology), Sanchari Das (University of Denver)

SmartShield: Building next generation trustworthy intelligent systems
Sara Rampazzi (University of Florida), Daniel Genkin (University of Michigan)

Unravelling the nascent privacy risks of 3D spatial mixed reality data
Kanchana Thilakarathna, Albert Zomaya (University of Sydney)

Research award finalists

Enforcing spatial content-mediation constraints for augmented reality
Carlos Ernesto Rubio-Medrano (Texas A&M University), Ziming Zhao (University at Buffalo)

Exploring authentication mechanisms for augmented reality glasses
Rahul Chatterjee, Earlence Fernandez (University of Wisconsin – Madison), Yuhang Zhao (Cornell University)

Exploring the design space of trust-worthy voice user interfaces
Yuan Tian (University of Virginia), Sauvik Das (Georgia Institute of Technology)

Intelligent and Interactive Design Fictions to Study and Shape Trust
Elizabeth Murnane (Dartmouth College)

Robust and Efficient Adversarial Machine Learning for Mobile AR
Maria Gorlatova, Neil Gong (Duke University)

Secure Hardware for Trust in AR/VR
G. Edward Suh (Cornell University)

Securing AR/VR and Smart Devices via Cross-domain Low-effort Authentication
Yingying Chen (Rutgers University), Nitesh Saxena (University of Alabama at Birmingham)

Understanding Side-channel Attack Surfaces of AR Devices
Yinqian Zhang (Ohio State University)

The post Announcing the winners of the Explorations of Trust in AR, VR, and Smart Devices request for proposals appeared first on Facebook Research.

Read More

What’s new in TensorFlow Lite for NLP

What’s new in TensorFlow Lite for NLP

Posted by Tian Lin, Yicheng Fan, Jaesung Chung and Chen Cen

TensorFlow Lite has been widely adopted in many applications to provide machine learning features on edge devices such as mobile phones, microcontroller units, and Edge TPUs. Among all popular applications that make people’s life easier and more productive, Natural Language Understanding is one of the key areas that attracts much attention from both the research community and the industry. After the demo of the on-device question-answering use case at TensorFlow World in 2019, we got a lot of interest and feedback from the community on making more such NLP models available for on-device inference.

Inspired by that feedback, today we are delighted to announce an end-to-end support for NLP tasks based on TensorFlow Lite. With this infrastructure work, more and more NLP models are able to run on mobile phones, and users can enjoy the advantage of NLP models, while keeping their personal data on-device. In this blog, we will introduce the new features that allow: (1) Using new pre-trained NLP Models, (2) Creating your own NLP models, (3) Better support for converting TensorFlow NLP Models to TensorFlow Lite format and (4) Deploying these models on mobile devices.

Using new pre-trained NLP models

Reference apps

Reference apps are a set of open-source mobile applications that encapsulate pretrained machine learning models, inference code and runnable demos. We provide a series of NLP reference apps that are integrated with Android Studio and XCode, so developers can build with just one click and deploy on Android or iOS phones.

Using the NLP reference apps below, mobile developers can learn the end to end flow of integrating existing NLP models (powered by BERT, MobileBERT or ALBERT), transforming raw text data, and connecting the model’s inputs and outputs to generate prediction results,

  • Text classification: The model predicts labels based on given text data.
  • Question answering app: Given an article and a user question, the model can answer the question within the article.
  • Smart reply app: Given previous context, the model can predict and generate potential auto replies.

The pretrained models used in the above reference apps are available in TensorFlow Hub. The chart below shows a comparison of the latency, size and F1 score between the models.

Benchmark on Pixel 4 CPU, 4 Threads, March 2020
Model hyper parameters: Sequence length 128, Vocab size 30K

Optimizing NLP Models for on-device use cases

On-device models have different constraints compared to server-side models. They run on devices with less memories and slower chips and hence need to be optimized for size and inference speed.Here are several examples of how we optimize models for NLP tasks.

Quantized MobileBERT

MobileBERT is a compact BERT model open sourced on GitHub. It is 4.3x smaller & 5.5x faster than BERT base (float32) while achieving comparable results on GLUE and SQuAD datasets.
After the initial release, we further improved the model by using quantization to optimize its model size and performance, so that it can utilize accelerators like GPU/DSP if available. The quantized MobileBERT is 16x smaller & 8x faster than the BERT base, with little accuracy loss. The MLPerf for Mobile community is leveraging the quantized MobileBERT model for mobile inference benchmarking, and the model can also run in Chrome using TensorFlow.js.
Compared with the original BERT base model (416MB), the below table shows the performance of quantized MobileBERT under the same setting.

Embedding-free NLP models with projection methods

Language Identification is a type of problems to classify the language of a given text. Recently we open source two models using projection methods, namely SGNN and PRADO.
We used SGNN to show how easy and efficient to use Tensorflow Lite for NLP Tasks. SGNN projects texts to fixed-length features followed by fully connected layers. With annotations to tell TensorFlow Lite converter to fuse TF.Text API, we can get a more efficient model for inference on TensorFlow Lite. Previously, the model took 1332.87 μs to run on benchmark; and after fusion, we see 64.06 μs on the same machine. This brings the magic of 20x speed-up.
We also demonstrate a model architecture called PRADO. PRADO first computes trainable projected features from the sequence of word tokens, then applies convolution and attention to map features to a fixed-length encoding. By combining a projection layer, a convolutional and attention encoder mechanism, PRADO achieves similar accuracy as LSTM, but with 100x smaller model size.
The idea behind these models is to use projection to compute features from texts, so that the model does not need to maintain a big embedding table to convert text features to embeddings. In this way, we’ve proven the model will be much smaller than embedding based models, while maintaining similar performance and inference latency.

Creating your own NLP Models

In addition to using pre-trained models, TensorFlow Lite also provides you with tools such as Model Maker to customize existing models for your own data.

TensorFlow Lite Model Maker: Transfer Learning Toolkit for machine learning beginners

TensorFlow Lite Model Maker is an easy-to-use transfer learning tool to adapt state-of-the-art machine learning models to your dataset. It allows mobile developers to create a model without any machine learning expertise, reduces the required training data and shortens the training time through transfer learning.
After the initial release focusing on vision tasks, we recently added two new NLP tasks to Model Maker. You can follow the colab and guide for Text Classification and Question Answer. To install Model Maker:

pip install tflite-model-maker

To customize the model, developers need to write a few lines of python code as follow:

# Loads Data.
train_data = TextClassifierDataLoader.from_csv(train_csv_file, mode_spec=spec)
test_data = TextClassifierDataLoader.from_csv(test_csv_file, mode_spec=spec)

# Customize the TensorFlow model.
model = text_classifier.create(train_data, model_spec=spec)

# Evaluate the model.
loss, acc = model.evaluate(test_data)

# Export as a TensorFlow Lite model.
model.export(export_dir, quantization_config=config)

Conversion: Better support to convert NLP models to TensorFlow Lite

Since the TensorFlow Lite builtin operator library only supports a subset of TensorFlow operators, you may have run into issues while converting your NLP model to TensorFlow Lite, either due to missing ops or unsupported data types (like RaggedTensor support, hash table support, and asset file handling, etc.). Here are a few tips on how to resolve the conversion issues in such cases.

Run TensorFlow ops and TF.text ops in TensorFlow Lite

We have enhanced Select TensorFlow ops to support various cases. With Select TF ops, developers can leverage TensorFlow ops to run models on TensorFlow Lite, when there are no built-in TensorFlow Lite equivalent ops. For example, it’s common to use TF.Text ops and RaggedTensor when training TensorFlow models, and now those models can be easily converted to TensorFlow Lite and run with necessary ops.
Furthermore, we provide the solution of using op selectively building, so that we get a trimmed binary for mobile deployment. It can select a small set of used ops in the final build target, and thus reduces the binary size in deployment.

More efficient and friendly custom ops

In TensorFlow Lite, we provide a few new mobile-friendly ops for NLP, such as Ngram, SentencePieceTokenizer, WordPieceTokenizer and WhitespaceTokenizer.
Previously, there were several restrictions blocking models with SentencePiece from being converted to TensorFlow Lite. The new SentencePieceTokenizer API for mobile resolves these challenges, and simultaneously optimizes the implementation to make it run faster.
Similarly, Ngram and WhitespaceTokenizer are now not only supported, but will also be executed more efficiently on devices.
TensorFlow Lite recently announced operation fusion with MLIR. We used the same mechanism to fuse TF.Text APIs into custom TensorFlow Lite ops, improving inference efficiency significantly. For example, the WhitespaceTokenizer API was made up of multiple ops, and took 0.9ms to run in the original graph in TensorFlow Lite. After fusing these ops into a single op, it finishes in 0.04ms, a 23x speed-up. This approach has been proven to bring a huge gain in inference latency in the SGNN model mentioned above.

Hash table support

Hash table is important for many NLP models, since we usually need to utilize numeric computation in the language model by transforming words into token IDs and vice versa. Hash table will be enabled in TensorFlow Lite soon. It is supported by handling asset files natively in the TensorFlow Lite format and delivering op kernels as TensorFlow Lite built-in operators.

Deployment: How to run NLP models on-device

Running inference with TensorFlow Lite is now much easier than before. You can use pre-built inference APIs to integrate your model within 5 lines of code, or use utilities to build your own Android/iOS inference APIs.

Simple model deployment using TensorFlow Lite Task Library

The TensorFlow Lite Task Library is a powerful and easy-to-use task-specific library that provides out of the box pre- and post-processing utilities required for ML inference, enabling app developers to easily create machine learning features with TensorFlow Lite. There are three text APIs supported in the Task Library, which correspond to the use cases and models mentioned above:

  • NLClassifier: classifies the input text to a set of known categories.
  • BertNLClassifier: classifies text optimized for BERT-family models.
  • BertQuestionAnswerer: answers questions based on the content of a given passage with BERT-family models.

The Task Library works cross-platform on both Android and iOS. The following example shows inference with a BertQA model in Java/Swift:

// Initialization
BertQuestionAnswerer answerer = BertQuestionAnswerer.createFromFile(androidContext, modelFile);
// Answer a question
List answers = answerer.answer(context, question);
Java code for Android
// Initialization
let mobileBertAnswerer = TFLBertQuestionAnswerer.mobilebertQuestionAnswerer(modelPath: modelPath)
// Answer a question
let answers = mobileBertAnswerer.answer(context: context, question: question)
Swift code for iOS

Customized Inference APIs

If your use case is not supported by the existing task libraries, you can also leverage the Task API Infrastructure and build your own C++/Android/iOS inference APIs using common NLP utilities such as Wordpiece and Sentencepiece tokenizers in the same repo.

Conclusion

In this article, we introduced the new support for NLP tasks in TensorFlow Lite. With the latest update of TensorFlow Lite, developers can easily create, convert and deploy NLP models on-device. We will continue providing more useful tools, and accelerate the development of on-device NLP models from research to production. We would love to hear your feedback, and suggestions for newer NLP tools and utilities. Please email tflite@tensorflow.org or create a TensorFlow Lite support GitHub issue.

Acknowledgments

We like to thank Khanh LeViet, Arun Venkatesan, Max Gubin, Robby Neale, Terry Huang, Peter Young, Gaurav Nemade, Prabhu Kaliamoorthi, Ping Yu, Renjie Liu, Lu Wang, Xunkai Zhang, Yuqi Li, Sijia Ma, Thai Nguyen, Xingying Song, Chung-Ching Chang, Shuangfeng Li to contribute to the blogpost.Read More

Learn from the winner of the AWS DeepComposer Chartbusters Spin the Model Challenge

Learn from the winner of the AWS DeepComposer Chartbusters Spin the Model Challenge

AWS is excited to announce the winner of the second AWS DeepComposer Chartbusters challenge, Lena Taupier. AWS DeepComposer gives developers a creative way to get started with machine learning (ML). In June, we launched the Chartbusters challenge, a global competition where developers use AWS DeepComposer to create original compositions and compete to showcase their ML and generative AI skills. The second challenge, Spin the Model, required developers to bring their own data and create a custom genre model using a sample Amazon SageMaker notebook.

When Lena Taupier first attended the AWS DeepComposer workshop at re:Invent 2019, she had no idea she would be the winner of the Spin the Model challenge. Lena, a software developer for Blubrry, helps lead the company’s cloud infrastructure and applications development team. She also has her own blog in which she creates tutorials to make AWS skills more accessible. She describes herself as an ML novice and never would have thought she’d be experimenting with machine learning today.

We interviewed Lena about her experience competing in the second Chartbusters challenge, which ran from July 31 to August 23, and asked her to tell us more about how she created her winning composition.

Lena with her AWS DeepComposer keyboard

Getting started with machine learning

Lena has a background in classical piano, so when she first learned about AWS DeepComposer, she was intrigued to learn more.

“When I was younger, I studied classical piano pretty seriously and I still enjoy playing piano very much. I was at re:Invent last year when AWS DeepComposer was announced, and I was so excited by the thought of learning about AI while creating music. I ended up waiting in line for several hours to attend one of the demo sessions, but I was so eager to try it out that I didn’t even mind!”

Lena first heard about the AWS DeepComposer Chartbusters challenge through the AWS blog, and thought the challenge was a great way to get started with ML.

Building in AWS DeepComposer

To get started, Lena used the AWS DeepComposer learning capsules to learn more about AR-CNN models. The learning capsules provide easy-to-consume, bite-size content to help you learn the concepts of generative AI algorithms.

“The first thing I did was to go through the learning capsules about autoregressive convolutional neural networks and how to train AR-CNN models. It was a great resource for learning about different generative AI techniques.”

The Chartbusters Spin the Model challenge required developers to get creative and make a custom genre model by bringing their own dataset to train. Lena drew from her own background, having grown up in St. Lucia, a city with a history of oral and folk traditional music.

“Once I had a good understanding, I started brainstorming about what kind of music I wanted to use to train my model. I’m from St. Lucia, a small island in the Caribbean, where there is a rich history of unique music, so I thought it would be interesting to incorporate songs from there. I decided to create some of my own music clips inspired by Calypso and St. Lucian folk music to supplement my dataset.”

Lena’s workstation for the AWS DeepComposer Chartbusters challenge

Next, Lena began training her model using Amazon SageMaker.

“Once I had my dataset, I created a Jupyter notebook within Amazon SageMaker, using the repository provided as a starting point. I experimented with the hyperparameters and then let the training run overnight because I knew it would take many hours to process. The next day, I was finally able to use my trained model to make new music!”

Lena used her AWS DeepComposer keyboard and the music studio to generate different melodies and compositions until she was satisfied with her two final compositions.

“I submitted two AI-generated songs. The main theme in “Little Banjo” was inspired by a famous St. Lucian folk song. Layered on top of the melody generated by my AR-CNN model, I also used the MuseGAN Rock model to generate additional instruments for accompaniment. The other song is meant to resemble the style of Calypso, and has a rich beat with trumpet lines to complement the melody. I named it “Home Sweet Home” because I started feeling nostalgic about home after listening to so much St. Lucian music for this project!”

Lena working on her compositions in the AWS DeepComposer console

You can listen to Lena’s winning composition, “Home Sweet Home,” on the AWS DeepComposer SoundCloud page.

Conclusion

The AWS DeepComposer Chartbusters challenge Spin the Model helped Lena learn about generative AI through a hands-on and fun experience.

“By participating in this challenge, I was able to learn a lot about different generative AI techniques in a very hands-on way, which is the best way to learn. As someone with very little experience in AI and machine learning, it was a great feeling of accomplishment to be able to train a custom AR-CNN model and actually generate results.”

The Chartbusters challenge empowered Lena to go from beginner knowledge ML to creating winning compositions with AWS DeepComposer.

“I think AWS DeepComposer is such a great tool for reducing the barrier of entry into machine learning and making those concepts accessible to more people […] Even just a few months ago, I never would have thought I’d be experimenting with AI/ML. This challenge was such a great learning experience! I know there’s so much more to learn so I will definitely continue to explore and dive deeper.”

Her advice to future competitors? Now is the time to get started with ML.

“As a developer, I think it’s such an exciting time to have access to the cloud, because it really widens your horizons on what you can do […] The Chartbusters challenge is the perfect opportunity to get involved and start learning in a fun, creative, and hands-on manner!”

Congratulations to Lena for her well-deserved win!

We hope Lena’s story has inspired you to learn more about ML and get started with AWS DeepComposer. Check out the next AWS DeepComposer Chartbusters challenge, The Sounds of Science, running now until September 23.


About the Author

Paloma Pineda is a Product Marketing Manager for AWS Artificial Intelligence Devices. She is passionate about the intersection of technology, art, and human centered design. Out of the office, Paloma enjoys photography, watching foreign films, and cooking French cuisine.


Read More

Applying twice: How Facebook Fellow David Pujol adjusted his application for success

The Facebook Fellowship Program supports promising PhD students conducting research in areas related to computer science and engineering. Each year, thousands of PhD students apply to become a Facebook Fellow, and only a handful are selected. To prepare for the end of this year’s application cycle on October 1, we reached out to 2020 Fellow David Pujol to offer some insight for those who may not succeed the first time they apply.
Apply

Pujol is a PhD student at Duke University, advised by Ashwin Machanavajjhala. His research interests lie in the fields of data privacy and algorithmic fairness. Pujol, like other Fellows we’ve chatted with, applied to become a Facebook Fellow in 2018 and was unsuccessful. In 2019, he applied again — and won.

In this Q&A, Pujol tells us about his first approach to his Fellowship application, what changed the second time, what he spent the most time on in his applications, and more.

Q: How did you approach your Fellowship application the first time you applied?

David Pujol: When I first applied, my goal was to impress the reviewers. I tried — in my opinion, unsuccessfully — to make my research sound like some grand project that would change how we view data. In reality, it wasn’t that. I ended up writing a confusing, unfocused, and overly technical piece that failed to convey the information that I wanted it to.

I eventually learned that most projects don’t need to be major, paradigm-changing work. In fact, most are small steps in the right direction.

Q: How did you approach your application the second time around, when you won?

DP: The second time around, I was more process-oriented, and I focused less on making my research look more impressive or more important than it already was. I decided to instead highlight what my research was and why I thought it was important. That meant toning things down — everything from the technical points to the overall vision. Where my first attempt ended with a grand vision of my research, my second attempt highlighted a system that solves a practical problem that has been given little attention.

One of my primary goals was to write in a way that my family (with no technical background) could read my proposal and understand three things: the problem being addressed, why it was important, and why my system was an effective answer.

Q: What made you want to approach things differently?

DP: I think the primary difference was having more experience and more confidence. When I wrote my first proposal, I was completely new to the ins and outs of academia — at least in this field. The second time around, I had a better understanding of how the system at large worked and, more important, I had a bit more confidence in my research. I more fully understood the role my work played and why it was important. I felt better writing about those aspects of the research and didn’t feel the need to overstate their value.

Q: What did you spend the most time on for each application?

DP: Editing, editing, and editing. The first draft of my second application was five pages long. (I think it goes without saying that it was past the word limit.) I asked people to help me edit that draft until it was in a condition that I thought satisfied my standards.

First, I sent my research statement to my adviser, mainly to make sure it was coherent and had no egregious errors. I then edited it myself while taking into consideration the points my adviser had brought up. Then I sent it to one of my friends who had a technical background but not at the PhD level. I asked him to edit so that the draft could be understood by most people, and to make sure nothing went too deep into technicalities. Again, I edited it myself afterwards.

The last round of editing came from my wife, who has no technical background. She adjusted it so that the messaging was clear. We made sure that if I took out everything describing my research, the reader could still tell that there was a problem that needed to be solved and that the solution given addressed that problem and not something else.

I also can’t stress enough how important it is to give yourself some time before editing. It is difficult to be self-critical, especially when you have just finished writing something. Having some time in between edits helps clear up your mind and gives you time to acknowledge your own mistakes.

Q: What advice would you give to someone who doesn’t win the first time they apply?

DP: Just because you didn’t get the fellowship the first time doesn’t mean that your work isn’t relevant enough or that you don’t “deserve it.” It’s always worth trying again once you have some more research experience under your belt. The difference between a good application and a bad one could just be the way you approach things. It might not have anything to do with the research itself. However, it’s different for everyone, so I suggest doing some research to figure out where you could improve.

For me, both of my proposals were about the same project. The only difference is how I went about presenting it.

The post Applying twice: How Facebook Fellow David Pujol adjusted his application for success appeared first on Facebook Research.

Read More

Amazon Personalize now available in EU (Frankfurt) Region

Amazon Personalize now available in EU (Frankfurt) Region

Amazon Personalize is a machine learning (ML) service that enables you to personalize your website, app, ads, emails, and more with private, custom ML models that you can create with no prior ML experience. We’re excited to announce the general availability of Amazon Personalize in the EU (Frankfurt) Region. You can use Amazon Personalize to create higher-quality recommendations that respond to the specific needs, preferences, and changing behavior of your users, improving engagement and conversion. For more information, see Amazon Personalize Is Now Generally Available.

To use Amazon Personalize, you need to provide the service user interaction(events) data (such as page views, sign-ups, purchases etc.) from your applications, along with optional user demographic information (such as age, location) and a catalog of the items you want to recommend (such as articles, products, videos, or music). This data can be provided via Amazon S3 or be sent as a stream of user events via a JavaScript tracker or a server-side integration (learn more). Amazon Personalize then automatically processes and examines the data, identifies what is meaningful, and trains and optimizes a personalization model that is customized for your data. You can then easily invoke Amazon Personalize APIs from your business application and fetch personalized recommendations for your users.

Learn how our customers are using Amazon Personalize to improve product and content recommendations and for targeted marketing communications.

For more information about all the Regions Amazon Personalize is available in, see the AWS Region Table. Get started with Amazon Personalize by visiting the Amazon Personalize console and Developer Guide.


About the Author

Vaibhav Sethi is the Product Manager for Amazon Personalize. He focuses on delivering products that make it easier to build machine learning solutions. In his spare time, he enjoys hiking and reading.

Read More