Knowledge distillation technique for shrinking neural networks yields relative performance increases of up to 122%.Read More
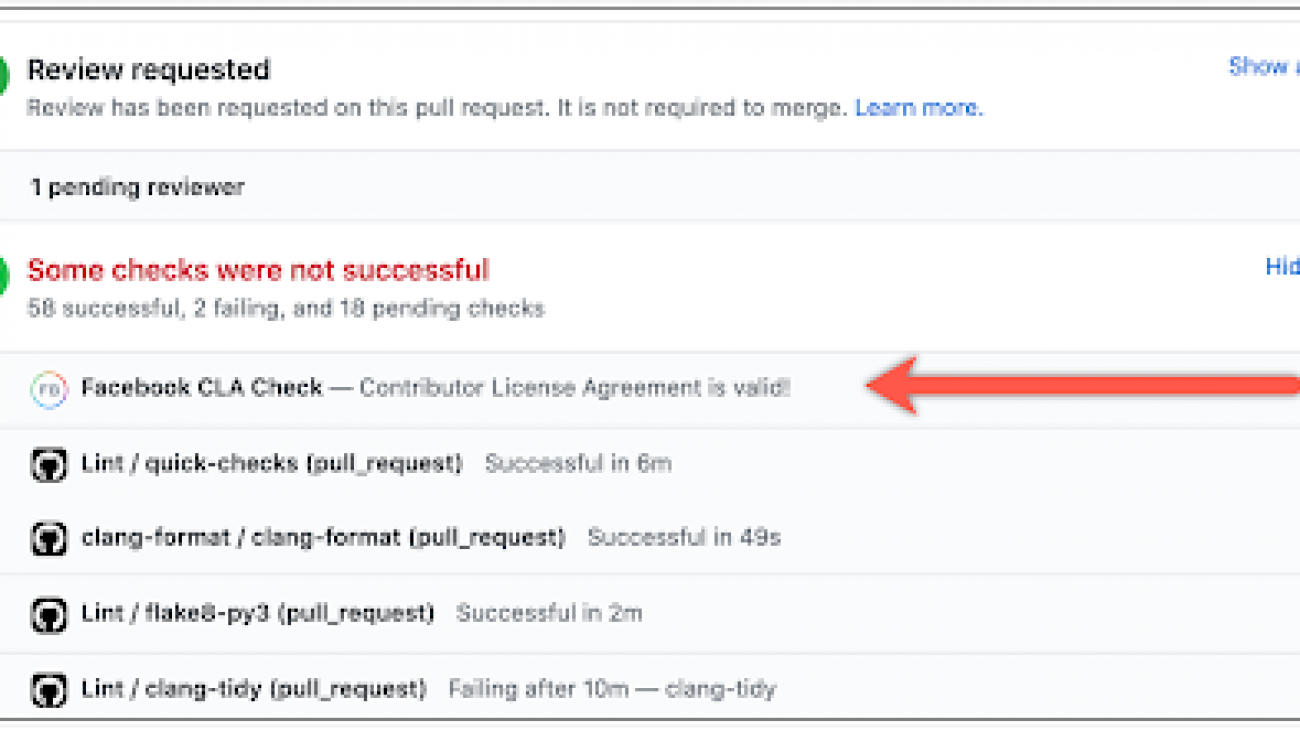
Adding a Contributor License Agreement for PyTorch
To ensure the ongoing growth and success of the framework, we’re introducing the use of the Apache Contributor License Agreement (CLA) for PyTorch. We care deeply about the broad community of contributors who make PyTorch such a great framework, so we want to take a moment to explain why we are adding a CLA.
Why Does PyTorch Need a CLA?
CLAs help clarify that users and maintainers have the relevant rights to use and maintain code contributed to an open source project, while allowing contributors to retain ownership rights to their code.
PyTorch has grown from a small group of enthusiasts to a now global community with over 1,600 contributors from dozens of countries, each bringing their own diverse perspectives, values and approaches to collaboration. Looking forward, clarity about how this collaboration is happening is an important milestone for the framework as we continue to build a stronger, safer and more scalable community around PyTorch.
The text of the Apache CLA can be found here, together with an accompanying FAQ. The language in the PyTorch CLA is identical to the Apache template. Although CLAs have been the subject of significant discussion in the open source community, we are seeing that using a CLA, and particularly the Apache CLA, is now standard practice when projects and communities reach a certain scale. Popular projects that have adopted some type of CLA include: Visual Studio Code, Flutter, TensorFlow, kubernetes, Ubuntu, Django, Python, Go, Android and many others.
What is Not Changing
PyTorch’s BSD license is not changing. There is no impact to PyTorch users. CLAs will only be required for new contributions to the project. For past contributions, no action is necessary. Everything else stays the same, whether it’s IP ownership, workflows, contributor roles or anything else that you’ve come to expect from PyTorch.
How the New CLA will Work
Moving forward, all contributors to projects under the PyTorch GitHub organization will need to sign a CLA to merge their contributions.

If you’ve contributed to other Facebook Open Source projects, you may have already signed the CLA, and no action is required. If you have not signed the CLA, a GitHub check will prompt you to sign it before your pull requests can be merged. You can reach the CLA from this link.

If you’re contributing as an individual, meaning the code is not something you worked on as part of your job, you should sign the individual contributor agreement. This agreement associates your GitHub username with future contributions and only needs to be signed once.
If you’re contributing as part of your employment, you may need to sign the corporate contributor agreement. Check with your legal team on filling this out. Also you will include a list of github ids from your company.
As always, we continue to be humbled and grateful for all your support, and we look forward to scaling PyTorch together to even greater heights in the years to come.
Thank you!
Team PyTorch
Optimizing costs for machine learning with Amazon SageMaker
Applications based on machine learning (ML) can provide tremendous business value. Using ML, we can solve some of the most complex engineering problems that previously were infeasible. One of the advantages of running ML on the AWS Cloud is that you can continually optimize your workloads and reduce your costs. In this post, we discuss how to apply such optimization to ML workloads. We consider available options such as elasticity, different pricing models in cloud, automation, advantage of scale, and more.
Developing, training, maintaining, and performance tuning ML models is an iterative process that requires continuous improvement. Determining the optimum state in the model while going through the permutations and combinations of model parameters and data dependencies to adjust is just one leg of the journey. There is more to optimizing the cost of ML than just algorithm performance and model tuning. There is also some effort required to integrate developed models into applications and realize their benefits. Throughout this process, you can keep the cost down in numerous ways. Amazon SageMaker has made most of this journey smooth so developers and data scientists can spend most of their time focusing on what matters the most—delivering business value.
Amazon SageMaker notebook instances
An Amazon SageMaker notebook instance is an ML compute instance running the Jupyter Notebook app. This notebook instance comes with sample notebooks, several optimized algorithms, and complete code walkthroughs. Amazon SageMaker manages the creation of this instance and related resources. Consider using Amazon SageMaker Studio notebooks for collaborative workloads and when you don’t need to set up compute instances and file storage beforehand.
You can follow these best practices to help reduce the cost of notebook instances.
GPU or CPU?
CPUs are best at handling single, more complex calculations sequentially, whereas GPUs are better at handling multiple but simple calculations in parallel. For many use cases, a standard current generation instance type from an instance family such as ml.m* provides enough computing power, memory, and network performance for many Jupyter notebooks to perform well. GPUs provide a great price/performance ratio if you take advantage of them effectively. However, GPUs also cost more, and you should choose GPU-based notebooks only when you really need them.
Ask yourself: Is my neural network relatively small scale? Is my network performing tons of calculations involving hundreds of thousands of parameters? Can my model take advantage of hardware parallelism such as P3 and P3dn instance families?
Depending on the model, the GPU communication overhead might even degrade performance. So, take a step back and start with what you think is the minimum requirement in terms of ml instance specification and work your way up to identifying the best instance type and family for your model.
If you’re using your notebook instance to train multiple jobs, decide when you need a GPU-enabled instance and when you don’t. If you need accelerated computing in your notebook environment, you can stop your m* family notebook instance, switch to a GPU-enabled P* family instance, and start it again. Don’t forget to switch it back when you no longer need that extra boost in your development environment.
If you’re using massive datasets for training and don’t want to wait for days or weeks to finish your training job, you can speed up the process by distributing training on multiple machines or processes in a cluster.
It’s recommended to use a small subset of your data for development in your notebook instance. You can use the full dataset for a training job that is distributed across optimized instances such as P2 or P3 GPU instances or an instance with powerful CPU, such as c5.
Maximize instance utilization
You can optimize your Amazon SageMaker notebook utilization many different ways. One simple way is to stop your notebook instance when you’re not using it and start when you need it. Consider auto-detecting idle notebook instances and managing their lifecycle using a lifecycle configuration script. For detailed implementation, see Right-sizing resources and avoiding unnecessary costs in Amazon SageMaker. Remember that the instance is only useful when you’re using the Jupyter notebook. If you’re not working on a notebook overnight or over the weekend, it’s a good idea to schedule a stop and start. Another way to save instance cost is by scheduling an AWS Lambda function. For example, you can stop all instances at 7:00 PM and start them at 7:00 AM.
You can also use Amazon CloudWatch Events to start and stop the instance based on an event. If you’re feeling geeky, connect it to your Amazon Rekognition based system to start a data scientist’s notebook instance when they step into the office or have Amazon Alexa do it as you grab a coffee.
Training jobs
The following are some best practices for saving costs on training jobs.
Use pre-trained models or even APIs
Pre-trained models eliminate the time spent gathering data and training models with that data. Consider using higher-level APIs such as provided by Amazon Rekognition or Amazon Comprehend to help you avoid spending on tasks that are already done for you. As an example, Amazon Comprehend simplifies topic modeling on a large corpus of documents. You can also use the Neural topic modeling (NTM) algorithm in Amazon SageMaker to get similar results with more effort. Although you have more control over hyperparameters when training your own model, your use case may not need it. A lot of engineering work and experience goes into creating ready-to-consume and highly optimized models, therefore an upfront ROI analysis is highly recommended if you’re embarking on a journey to develop similar models.
Use Pipe mode (where applicable) to reduce training time
Certain algorithms in Amazon SageMaker like Blazing text work on a large corpus of data. When these jobs are launched, significant time goes into downloading the data from Amazon Simple Storage Service (Amazon S3) into the local Amazon Elastic Block Storage (Amazon EBS) store. Your training jobs don’t start until this download finishes. These algorithms can take advantage of Pipe mode, in which training data is streamed from Amazon S3 into Amazon EBS and your training jobs start immediately. For example, training Blazing text on common crawl (3 TB) can take a few days, out of which a significant number of hours are just lost in download. This process can take advantage of Pipe mode to reduce significant training time.
Managed spot training in Amazon SageMaker
Managed spot training can optimize the cost of training models up to 90% over On-Demand Instances. Amazon SageMaker manages the Spot interruptions on your behalf. If your training job can be interrupted, use managed spot training. You can specify which training jobs use Spot Instances and a stopping condition that specifies how long Amazon SageMaker waits for a job to run using EC2 Spot Instances.
You may also consider using EC2 Spot Instances if you’re willing to do some extra work and if your algorithm is resilient enough to interruptions. For more information, see Managed Spot Training: Save Up to 90% On Your Amazon SageMaker Training Jobs.
Test your code locally
Resolve issues with code and data so you don’t need to pay to run training clusters for failed training jobs. This also saves you time spent initializing the training cluster. Before you submit a training job, try to run the fit function in local mode to fetch some early feedback:
mxnet_estimator = MXNet('train.py', train_instance_type='local', train_instance_count=1)Monitor the performance of your training jobs to identify waste
Amazon SageMaker is integrated with CloudWatch out of the box and publishes instance metrics of the training cluster in CloudWatch. You can use these metrics to see if you should make adjustments to your cluster, such as CPUs, memory, number of instances, and more. To view the CloudWatch metric for your training jobs, navigate to the Jobs page on the Amazon SageMaker console and choose View Instance metrics in the Monitor section.
Also, use Amazon SageMaker Debugger, which provides full visibility into model training by monitoring, recording, analyzing, and visualizing training process tensors. Debugger can dramatically reduce the time, resources, and cost needed to train models.
Find the right balance: Performance vs. accuracy
Compare the throughput of 16-bit floating point and 32-bit floating point calculations and determine what is right for your model. 32-bit (single precision or FP32) and even 64-bit (double precision or FP64) floating point variables are popular for many applications that require high precision. These are workloads like engineering simulations that simulate real-world behavior and need the mathematical model to be as exact as possible. In many cases, however, reducing memory usage and increasing speed gained by moving to half or mixed precision (16-bit or FP16) is worth the minor tradeoffs in accuracy. For more information, see Accelerating GPU computation through mixed-precision methods.
A similar trade-off also applies when deciding on the number of layers in your neural network for your classification algorithms, such as image classification.
Tuning (hyperparameter optimization) jobs
Use hyperparameter optimization (HPO) when needed and choose the hyperparameters and their ranges to tune on wisely.
Some API calls can result in a bill of hundreds or even thousands of dollars, and tuning jobs are one of those. A good tuning job can save you many working days of expensive data scientists’ time and provide a significant lift in model performance, which is highly beneficial. HPO in Amazon SageMaker finds good hyperparameters quicker if the search space is narrow (for example, a learning rate of 0.01–0.05 rather than 0.001–0.9). If you have some relevant prior knowledge about the hyperparameter range, start with that. For wide hyperparameter ranges, you may want to consider logarithmic transformations.
Amazon SageMaker also reduces the amount of time spent tuning models using built-in HPO. This technology automatically adjusts hundreds of different combinations of parameters to quickly arrive at the best solution for your ML problem. With high-performance algorithms, distributed computing, managed infrastructure, and HPO, Amazon SageMaker drastically decreases the training time and overall cost of building production grade systems. You can see examples of HPO in some of the Amazon SageMaker built-in algorithms.
For longer training jobs and as the training time for each training job gets longer, you may also want to consider early stopping of training jobs.
Hosting endpoints
The following section discusses how to save cost when hosting endpoints using Amazon SageMaker hosting services.
Delete endpoints that aren’t in use
Amazon SageMaker is great for testing new models because you can easily deploy them into an A/B testing environment. When you’re done with your tests and not using the endpoint extensively anymore, you should delete it. You can always recreate it when you need it again because the model is stored in Amazon S3.
Use Automatic Scaling
Auto Scaling your Amazon SageMaker endpoint doesn’t just provide high availability, better throughput, and better performance, it also optimizes the cost of your endpoint. Make sure that you configure Auto Scaling for your endpoint, monitor your model endpoint, and adjust the scaling policy based on the CloudWatch metrics. For more information, see Load test and optimize and Amazon SageMaker endpoint using automatic scaling.
Amazon Elastic Inference for deep learning
Selecting a GPU instance type that is big enough to satisfy the requirements of the most demanding resource for inference may not be a smart move. Even at peak load, a deep learning application may not fully utilize the capacity offered by a GPU. Consider using Amazon Elastic Inference, which allows you to attach low-cost GPU-powered acceleration to Amazon EC2 and Amazon SageMaker instances to reduce the cost of running deep learning inference by up to 75%.
Host multiple models with multi-model endpoints
You can create an endpoint that can host multiple models. Multi-model endpoints reduce hosting costs by improving endpoint utilization and provide a scalable and cost-effective solution to deploying a large number of models. Multi-model endpoints enable time-sharing of memory resources across models. It also reduces deployment overhead because Amazon SageMaker manages loading models in memory and scaling them based on traffic patterns to models.
Reducing labeling time with Amazon SageMaker Ground Truth
Data labeling is a key process of identifying raw data (such as images, text files, and videos) and adding one or more meaningful and informative labels to provide context so that an ML model can learn from it. This process is essential because the accuracy of trained model depends on accuracy of properly labeled dataset, or ground truth.
Amazon SageMaker Ground Truth uses combination of ML and a human workforce (vetted by AWS) to label images and text. Many ML projects are delayed because of insufficient labeled data. You can use Ground Truth to accelerate the ML cycle and reduce overall costs.
Tagging your resources
Consider tagging your Amazon SageMaker notebook instances and the hosting endpoints. Tags such as name of the project, business unit, environment (such as development, testing, or production) are useful for cost-optimization and can provide a clear visibility into where the money is spent. Cost allocation tags can help track and categorize your cost of ML. It can answer questions such as “Can I delete this resource to save cost?”
Keeping track of cost
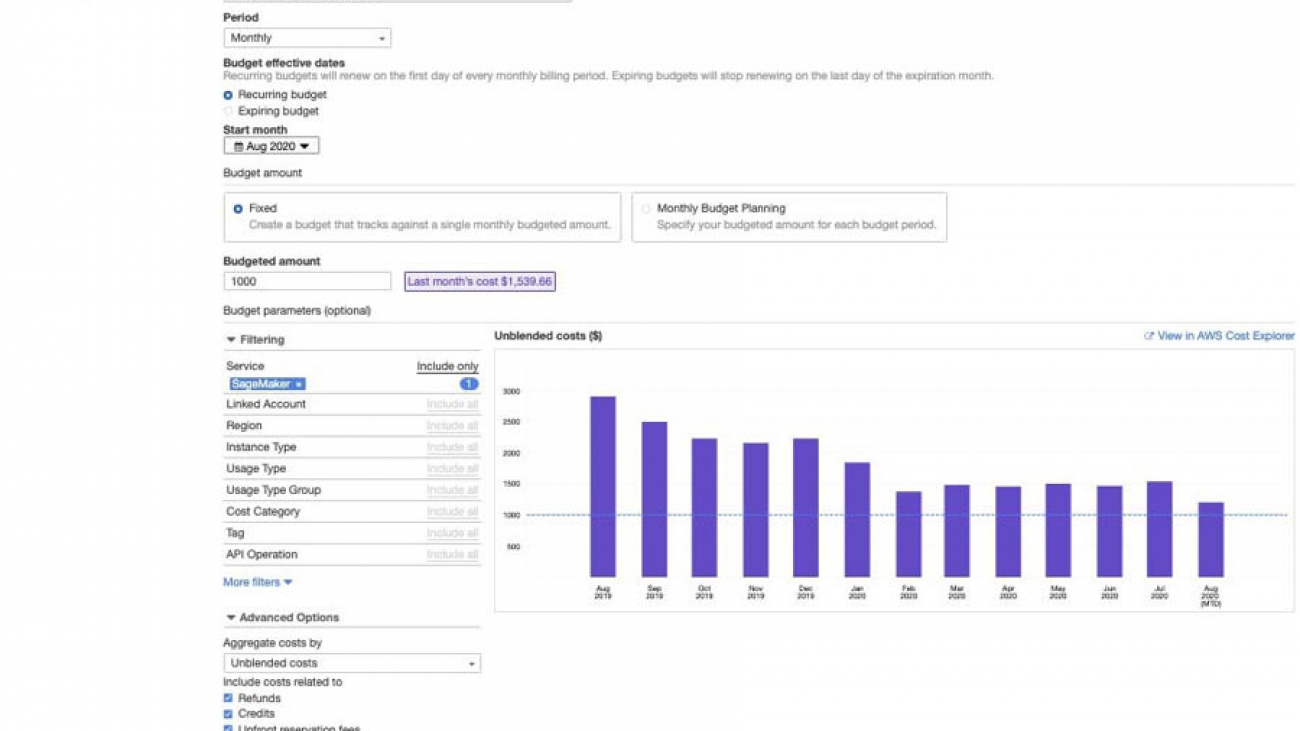
If you need visibility of your ML cost on AWS, use AWS Budgets. This helps you track your Amazon SageMaker cost, including development, training, and hosting. You can also set alerts and get a notification when your cost or usage exceeds (or is forecasted to exceed) your budgeted amount. After you create your budget, you can track the progress on the AWS Budgets console.

Conclusion
In this post, I highlighted a few approaches and techniques to optimize cost without compromising on the implementation flexibility so you can deliver best-in-class ML-based business applications.
For more information about optimizing costs, consider the following:
- Refer to more ways of optimizing your cost on the cloud by right-sizing your infrastructure. Also take a look at best practices.
- For an in-depth cost saving analysis when using an Elastic Inference accelerator, see Serving deep learning at Curalate with Apache MXNet, AWS Lambda, and Amazon Elastic Inference.
- Give Amazon SageMaker a try with any of the several sample Jupyter notebooks. For more information about getting started, see Amazon SageMaker – Accelerated Machine Learning.
- Learn more about managing ML projects in the whitepaper Managing Machine Learning Projects.
About the Author
 BK Chaurasiya is a Principal Product Manager at Amazon Web Services R&D and Innovation team. He provides technical guidance, design advice, and thought leadership to some of the largest and successful AWS customers and partners. A technologist by heart, BK specializes in driving DevOps, continuous delivery, and large-scale cloud transformation initiatives to success.
zomato digitizes menus using Amazon Textract and Amazon SageMaker
This post is co-written by Chiranjeev Ghai, ML Engineer at zomato. zomato is a global food-tech company based in India.
Are you the kind of person who has very specific cravings? Maybe when the mood hits, you don’t want just any kind of Indian food—you want Chicken Chettinad with a side of paratha, and nothing else will hit the spot! To help picky eaters satisfy their cravings, we at zomato have recently added enhanced search engine capabilities to our restaurant aggregation and food delivery platform. These capabilities enable us to recommend restaurants to zomato users based on searches for specific dishes.
We power this functionality with machine learning (ML), using it to extract and structure text data from menu images. To develop this menu digitization technology, we partnered with Amazon ML Solutions Lab to explore the capabilities of the AWS ML Stack. This post summarizes how we used Amazon Textract and Amazon SageMaker to develop a customized menu digitization solution.
Extracting raw text from menus with Amazon Textract
The first component of this solution was to accurately extract all the text in the menu image. This process is known as optical character recognition (OCR). For our use case, we experimented with both in-house and commercial OCR solutions.
We first created an in-house OCR solution by stacking a pre-trained text detection model and a pre-trained text recognition model. The challenge with these models was that they were trained on a standard text dataset that didn’t match the eclectic fonts found in restaurant menus. To improve system performance, we fine-tuned these models by generating a dataset of 1.5 million synthetic text images that were more representative of text in menus.
After evaluating our in-house solution and several commercial OCR solutions, we found that Amazon Textract offers the best text recognition precision and recall. Restaurants often get creative when designing their menus, so OCR robustness was crucial for this use case. Amazon Textract particularly differentiated itself when processing menus with unique fonts, background images, and low image resolutions. Using it is as simple as making an API call:
#Python 3.6
import boto3
textract_client = boto3.client(
    'textract',
    region_name = '' #insert the AWS region you're working in
)
textract_response = textract_client.detect_document_text(
    Document={
        'S3Object': {
        'Bucket': '', #insert the name of the S3 bucket containing your image
        'Name': '' #insert the S3 key of your image
        }
    }
)

print(textract_response)
The following code is the Amazon Textract output for a sample image:
{'DocumentMetadata': {'Pages': 1},
 'Blocks': [{'BlockType': 'PAGE',
   'Geometry': {'BoundingBox': {'Width': 1.0,
     'Height': 1.0,
     'Left': 0.0,
     'Top': 0.0},
  ...
  {'BlockType': 'WORD',
   'Text': 'Dim',
   'Geometry': {'BoundingBox': {'Width': 0.10242128372192383,
     'Height': 0. 048968635499477386,
     'Left': 0. 24052166938781738,
     'Top': 0. 02556285448372364},
...
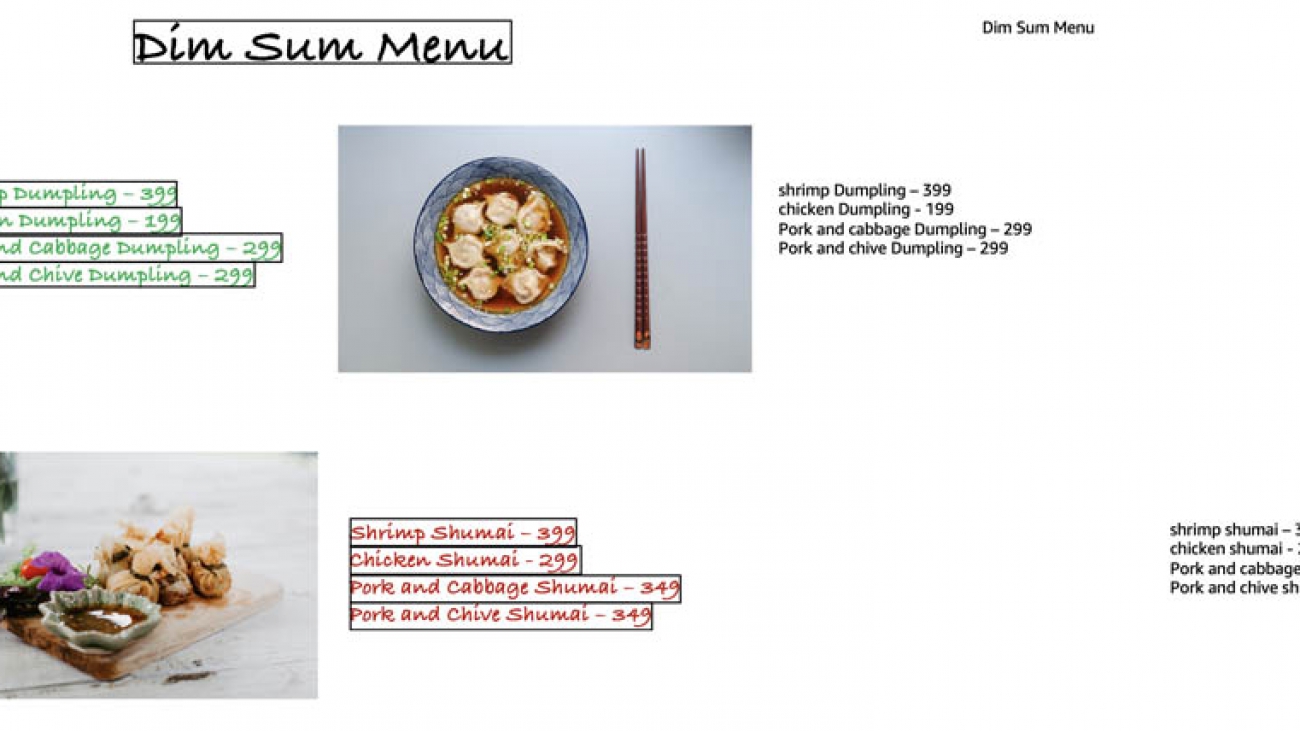
The raw outputs are visualized by overlaying them on top of the image. The following image visualizes the preceding raw output. The black boxes are the text-detection bounding boxes provided by Amazon Textract. Extracted text is displayed on the right. Note the unconventional fonts, colors, and images on this menu.

The following image visualizes Amazon Textract outputs for a menu with a different design. Black boxes are the text-detection bounding boxes provided by Amazon Textract. Extracted text is displayed on the right. Again, this menu has unconventional fonts, colors, and images.

Using Amazon SageMaker to build a menu structure detector
The next component of this solution was to group the detections from Amazon Textract by menu section. This enabled our search engine to distinguish between entrees, desserts, beverages, and so on. We framed this as a computer vision problem—object detection, to be precise—and used Amazon SageMaker Ground Truth to collect training data. Ground Truth accelerated this process by providing a fully managed annotation tool that we customized to ask human annotators to draw bounding boxes around every menu section in the image. We used an annotation workforce from AWS Marketplace because this was a niche labeling task, and public labelers from Amazon Mechanical Turk didn’t perform well. With Ground Truth, it took just a few days and approximately $1,400 to label 4,086 images with triplicate redundancy.
With labeled data in hand, we faced a paradox of choice when selecting model-building approaches because object detection is such a thoroughly studied problem. Our choices included:
- Removing low-confidence labels from the labeled dataset – Because even human annotators can make mistakes, Ground Truth calculates confidence scores for labels by having multiple annotators (for this use case, three) label the same image. Setting a higher confidence threshold for labels can decrease the noise in the training data at the expense of having less training data.
- Data augmentation – Techniques for image data augmentation include horizontal flipping, cropping, shearing, and rotation. Data augmentation can make models more robust by increasing the amount of training data. However, excessive data augmentation may result in poor model convergence.
- Feature engineering – From our experience in applying computer vision to processing menus, we had a variety of techniques in mind to emphasize or de-emphasize various aspects of the input images. For example, see the following images.
The following is the original image of a menu.

The following image shows the redacted image (overlay white boxes on a black background where text detections were found).

The following is a text cropped image. On a black background, the image has overlay crops from the original image where text detections were found.

The following is a single channel and text cropped image. The image is encoded as a single RGB channel (for this image, green). You can apply this with other transformations, in this case text cropping.

We also had the following additional model-building methods to choose from:
- Model architectures like YOLO, SSD, and RCNN, with VGG or ResNet backbones – Each architecture has different trade-offs of model accuracy, inference time, model size, and more. For this use case, model accuracy was the most important metric because menu images were batch processed.
- Using a model pre-trained on a general object detection task or starting from scratch – Transfer learning can be helpful when training complex models on small datasets. However, the task of detecting menu sections is very different from a general object detection task (for example, PASCAL VOC), so the pre-training may not be relevant.
- Optimizer parameters – These include learning rate, momentum, regularization coefficients, and early stopping configuration.
With so many hyperparameters to consider, we turned to the automatic tuning feature of Amazon SageMaker to coordinate a massive tuning job across all these variables. The following code is an example of tuning a single model architecture and input data configuration:
import sagemaker
import boto3
from sagemaker.amazon.amazon_estimator import get_image_uri
from sagemaker.estimator import Estimator
from sagemaker.tuner import HyperparameterTuner, IntegerParameter, CategoricalParameter, ContinuousParameter
import itertools
from time import sleep

#set to the region you're working in
REGION_NAME = ''
#set a S3 path for SageMaker to store the outputs of the training jobs
S3_OUTPUT_PATH = ''
#set a S3 location for your training dataset,
#assumed to be an augmented manifest file
#see: https://docs.aws.amazon.com/sagemaker/latest/dg/augmented-manifest.html
TRAIN_DATA_LOCATION = ''
#set a S3 location for your validation data,
#assumed to be an augmented manifest file
VAL_DATA_LOCATION = ''
#specify which fields in the augmented manifest file are relevant for training
DATA_ATTRIBUTE_NAMES = [,]
#specify image shape
IMAGE_SHAPE =
#specify label width
LABEL_WIDTH =
#specify number of samples in the training dataset
NUM_TRAINING_SAMPLES =

sgm_role = sagemaker.get_execution_role()
boto_session = boto3.session.Session(
    region_name = REGION_NAME
)
sgm_session = sagemaker.Session(
    boto_session = boto_session
)
training_image = get_image_uri(
    region_name = REGION_NAME,
    repo_name = 'object-detection',
    repo_version = 'latest'
)

#set training job configuration
object_detection_estimator = Estimator(
    image_name = training_image,
    role = sgm_role,
    train_instance_count = 1,
    train_instance_type = 'ml.p3.2xlarge',
    train_volume_size = 50,
    train_max_run = 360000,
    input_mode = 'Pipe',
    output_path = S3_OUTPUT_PATH,
    sagemaker_session = sgm_session
)

#set input data configuration
train_data = sagemaker.session.s3_input(
    s3_data = TRAIN_DATA_LOCATION,
    distribution = 'FullyReplicated',
    record_wrapping = 'RecordIO',
    s3_data_type = 'AugmentedManifestFile',
    attribute_names = DATA_ATTRIBUTE_NAMES
)

val_data = sagemaker.session.s3_input(
    s3_data = VAL_DATA_LOCATION,
    distribution = 'FullyReplicated',
    record_wrapping = 'RecordIO',
    s3_data_type = 'AugmentedManifestFile',
    attribute_names = DATA_ATTRIBUTE_NAMES
)

data_channels = {
    'train': train_data,
    'validation' : val_data
}

#set static hyperparameters
#see: https://docs.aws.amazon.com/sagemaker/latest/dg/object-detection-api-config.html
static_hyperparameters = {
    'num_classes' : 1,
    'epochs' : 100,
    'lr_scheduler_step' : '15,30',
    'lr_scheduler_factor' : 0.1,
    'overlap_threshold' : 0.5,
    'nms_threshold' : 0.45,
    'image_shape' : IMAGE_SHAPE,
    'label_width' : LABEL_WIDTH,
    'num_training_samples' : NUM_TRAINING_SAMPLES,
    'early_stopping' : True,
    'early_stopping_min_epochs' : 5,
    'early_stopping_patience' : 1,
    'early_stopping_tolerance' : 0.05,
}

#set ranges for tunable hyperparameters
hyperparameter_ranges = {
    'learning_rate': ContinuousParameter(
        min_value = 1e-5,
        max_value = 1e-2,
        scaling_type = 'Auto'
    ),
    'mini_batch_size': IntegerParameter(
        min_value = 8,
        max_value = 64,
        scaling_type = 'Auto'
    )
}

#Not all hyperparameters are feasible to tune directly
#see: https://docs.aws.amazon.com/sagemaker/latest/dg/object-detection-tuning.html
#For these we run model tuning jobs in parallel using a for loop
#We take this approach for tuning over different model architectures
#and different feature engineering configurations
use_pretrained_options = [0, 1]
base_network_options = ['resnet-50', 'vgg-16']

for use_pretrained, base_network in itertools.product(use_pretrained_options, base_network_options):
    static_hyperparameter_configuration = {
        **static_hyperparameters,
        'use_pretrained_model' : use_pretrained,
        'base_network' : base_network
    }

    object_detection_estimator.set_hyperparameters(
        **static_hyperparameter_configuration
    )

    tuner = HyperparameterTuner(
        estimator = object_detection_estimator,
        objective_metric_name = 'validation:mAP',
        strategy = 'Bayesian',
        hyperparameter_ranges = hyperparameter_ranges,
        max_jobs = 24,
        max_parallel_jobs = 2,
        early_stopping_type = 'Auto',
    )

    tuner.fit(
        inputs = data_channels
    )

    print(f'Started tuning job: {tuner.latest_tuning_job.name}')

    #wait a bit before starting next job so auto generated names don't conflict
    sleep(60)
This code uses version 1.72.0 of the Amazon SageMaker Python SDK, which is the default version installed in Amazon SageMaker notebook instances. Version 2.X introduces breaking changes. For more information, see Use Version 2.x of the SageMaker Python SDK.
We used powerful GPU hardware (p3.2xlarge instances), and it took us just 1 week and approximately $1,500 to explore 455 unique parameter configurations. Of these configurations, Amazon SageMaker found that a fine-tuned Faster R-CNN model with text cropping performed the best, with a mean average precision score of 0.93. This aligned with results from our prior work in this space, which found that two-stage detectors generally outperform single-stage detectors in processing menus.
The following is an example of how the object detection model processed a menu. In this image, the purple boxes are the predicted bounding boxes from the menu section detection model. Black boxes are the text detection bounding boxes provided by Amazon Textract.

Using Amazon SageMaker to build rule- and ML-based text classifiers
The final component in the solution was a layer of text classification. To enable our enhanced search functionality, we had to know if each detection within a menu section was the menu section title, name of a dish, price of a dish, or something else (such as a description of a dish or the name of the restaurant). To this end, we developed a hybrid rule- and ML-based text classification system.
The first step of the classification was to use a rule to determine if a detection was a price or not. This rule simply calculated the proportion of numeric characters in the detection. If the proportion was greater than 40%, the detection was classified as a price. Although simple, this classifier worked well in practice. We used Amazon SageMaker notebook instances as a convenient interactive environment to develop this and other rules.
After the prices were filtered out, the remaining detections were classified as dish or not dish. From our experience in processing menus, we intuitively knew that in many cases, the location of prices was sufficient to do this classification. For these menus, dishes and prices are listed side by side, so simply classifying detections located to the left of prices as dishes worked well.
The following example shows how the rules-based text classification system processed a menu. Green boxes are detections classified as dishes (by the price location rule). Red boxes are detections classified as not dishes (by the price location rule). Blue boxes are detections classified as prices. Final dish detections are on the right.
Some menus might include lengthy dish descriptions or may not list prices next to individual dishes. These menus violate the assumptions of the price location rules, so we turned to model-based text classification. We used Amazon SageMaker training jobs to experiment with many modeling approaches in parallel, including an XGBoost model trained on hashed word count vectors. In the end, we found that a fine-tuned BERT model from GluonNLP achieved the best performance with an AUROC score of 0.86.
The following image is an example of how the model-based text classification system processed a menu. Green boxes are detections classified as dishes (by the BERT model). Red boxes are detections classified as not dishes (by the BERT model). Blue boxes are detections classified as prices. The final dish detections are on the right.

Of the remaining detections (those not classified as prices or dishes), a final round of classification identified menu section titles. We created features that captured the font size of the detection, the location of the detection on the menu, and the length of the words within the detection. We used these features as inputs to a logistic regression model that predicted if a detection is a menu section title or not.
Key features of Amazon SageMaker
In the end, we found that doing OCR was as simple as making an API call to Amazon Textract. However, our use case required additional customization. We selected Amazon SageMaker as an ML platform to develop this customization because it offered several key features:
- Amazon SageMaker Notebooks made it easy to spin up Jupyter notebook environments for prototyping and testing rules and models.
- Ground Truth helped us build and deploy a custom image annotation tool with no front-end experience required.
- Amazon SageMaker automatic tuning enabled us to run massive hyperparameter tuning jobs on powerful hardware, and included an intuitive interface for tracking the results of hundreds of experiments. You can implement tuning jobs with early stopping conditions, which makes experimentation cost-effective.
Amazon SageMaker offers additional integration benefits from including all the preceding features in a single platform:
- Amazon SageMaker Notebooks come pre-installed with all the dependencies needed to build models that can be optimized with automatic tuning.
- Ground Truth offers easy access to labelers from Mechanical Turk or AWS Marketplace.
- Automatic tuning can directly ingest the manifest files created by Amazon SageMaker Ground Truth.
Putting it all together
Our menu digitization system can extract text from images of menus, group it by menu section, extract the title of the section, extract the dishes within each section, and pair each dish with its price. The following is a visualization of the end-to-end solution.

The workflow contains the following steps:
- The input is an image of a menu.
- Amazon Textract performs OCR on the input image.
- An ML-based computer vision model predicts bounding boxes for menu sections in the menu image.
- A rules-based classifier classifies Amazon Textract detections as
priceornot price. - A rules-based classifier (5a) attempts to use the location of price detections to classify the not price detections as dish or not dish. If this rule doesn’t successfully classify most of the detections on the page, an ML-based classifier is used instead (5b).
- The ML-based classifier uses hand-crafted features to classify
not dishdetections asmenu section titleornot menu section title. - The menu text is structured by combining the
menu sectiondetections and the text classification results.
The following image visualizes a sample output of the system. Green boxes are detections classified as dishes. Blue boxes are detections classified as prices. Yellow boxes are detections classified as menu section titles. Purple boxes are predicted menu section bounding boxes.

The following code is the structured output:
[
   {
      "title":{
         "text":"Shrimp Dishes"
      },
      "dishes":[
         {
            "text":"Shrimp Masala",
            "price":{
               "text":"140"
            }
         },
         {
            "text":"Shrimp Biryani",
            "price":{
               "text":"170"
            }
         },
         {
            "text":"Shrimp Pulav",
            "price":{
               "text":"160"
            }
         }
      ]
   },
   ...
]
Conclusion
We built a system that uses ML to digitize menus without any human input required. This system will improve user experience by powering new features such as advanced dish search and review highlight verification. Our content team will also use it to accelerate creating menus for online ordering.
To explore these capabilities of Amazon Textract and Amazon SageMaker in more depth, see Automatically extract text and structured data from documents with Amazon Textract and Amazon SageMaker Automatic Model Tuning: Using Machine Learning for Machine Learning.
The Amazon ML Solutions Lab helped us accelerate our use of ML by pairing our team with ML experts. The ML Solutions Lab brings to every customer engagement learnings from more than 20 years of Amazon’s ML innovations in areas such as fulfillment and logistics, personalization and recommendations, computer vision and translation, fraud prevention, forecasting, and supply chain optimization. To learn more about the AWS ML Solutions Lab, contact your account manager or visit Amazon Machine Learning Solutions Lab.
About the Authors
 Chiranjeev Ghai is a Machine Learning Engineer. In his current role, he has been aiding automation at zomato by leveraging a wide variety of ML optimisations ranging from Image Classification, Product Recommendation, and Text Detection. When not building models, he likes to spend his time playing video games at home.
 Ryan Cheng is a Deep Learning Architect in the Amazon ML Solutions Lab. He has worked on a wide range of ML use cases from sports analytics to optical character recognition. In his spare time, Ryan enjoys cooking.
 Andrew Ang is a Deep Learning Architect at the Amazon ML Solutions Lab, where he helps AWS customers identify and build AI/ML solutions to address their business problems.
 Vinayak Arannil is a Data Scientist at the Amazon Machine Learning Solutions Lab. He has worked on various domains of data science like computer vision, natural language processing, recommendation systems, etc.

Listening to the Siren Call: Virginia Tech Works with NVIDIA to Test AV Interactions with Emergency Vehicles
Move over, self-driving cars.
The Virginia Tech Transportation Institute has received a federal grant from the U.S. Department of Transportation to study how autonomous vehicles interact with emergency vehicles and public safety providers.
VTTI, the second largest transportation research institute in the country, will use vehicles equipped with the NVIDIA DRIVE Hyperion platform to conduct these evaluations on public roads.
Emergencies or unexpected events can change the flow of traffic in a matter of minutes. Human drivers are trained to listen for sirens and watch for police officers directing traffic; however, this behavior may not be as instinctual to autonomous vehicles.
VTTI is working with NVIDIA as well as a consortium of automotive manufacturers organized through Crash Avoidance Metrics Partners (CAMP LLC) to study challenging and dynamic scenarios involving automated driving systems, such as encounters with public safety providers. Participating CAMP LLC members include General Motors, Ford, Nissan and Daimler. The team will also address ways to facilitate communications between these systems and with their supporting physical infrastructure.
The project will identify solutions and build highly automated Level 4 reference vehicles retrofitted with autonomous driving technology, as well as connected infrastructure to support them. In the final phase, VTTI and its partners will hold demonstrations on Washington, D.C., area highways to showcase the technology safely navigating challenging scenarios.
Safety First
Safely maneuvering around emergency vehicles, including ambulances, fire trucks and police vehicles, is a key component to everyday driving.
The consequences of not doing so are serious. Over the past decade, ambulances experienced an average of about 170 crash-related delays per year, costing precious time in responding to and transporting emergency patients.
Additionally, not moving over for emergency vehicles is illegal. Every state has a “move over” law, requiring vehicles passing stopped police cars, ambulances or utility vehicles to vacate the nearest lane and slow down while passing.
Autonomous vehicles must comply with these traffic norms to deploy safely and at scale. AV fleets will need to be able to identify emergency vehicles, recognize whether lights or sirens are running and obey officers directing traffic.
Leveling Up with DRIVE Hyperion
VTTI will use Level 4 autonomous test vehicles to study how this technology will behave in emergency scenarios, helping determine what measures must be taken in development and infrastructure to facilitate seamless and safe interactions.
NVIDIA DRIVE Hyperion is an autonomous vehicle data collection and perception platform. It consists of a complete sensor suite and NVIDIA DRIVE AGX Pegasus in-car AI computing platform, along with the full software stack for autonomous driving, driver monitoring and visualization.
The high-performance, energy-efficient DRIVE AGX Pegasus AI computer achieves an unprecedented 320 trillion operations per second. The platform is designed and built for Level 4 and Level 5 autonomous systems, like those being tested in the VTTI pilot.

The DRIVE Hyperion developer kit can be integrated into a test vehicle, letting developers use DRIVE AV software and perform data collection for their autonomous vehicle fleet.
Using this technology, researchers can quickly develop a test fleet without having to build from the ground up. The ability to collect data with DRIVE Hyperion also ensures an efficient pipeline of conducting tests and studying the results.
With the collaboration among NVIDIA, VTTI and its automotive partners, this pilot program is slated to significantly advance research on the safe integration of autonomous driving technology into U.S. roadways.
The post Listening to the Siren Call: Virginia Tech Works with NVIDIA to Test AV Interactions with Emergency Vehicles appeared first on The Official NVIDIA Blog.
Inside blockchain and cryptoeconomics research at Facebook
Blockchains provide an excellent example of how foundational computer science and economic research can change the trajectory of entire industries. As a result of the work of many researchers over decades, we are starting to see a transformation in the technology underlying payment systems.
At Facebook, we’re contributing to this effort with a world-class research team that sits within Novi, a regulated financial company building for the Libra payment system. We’re a group of research scientists, economists, and software engineers working across interdisciplinary fields, including cryptography, programming languages, distributed systems, program verification, game theory, security, privacy, financial inclusion, economic development, macroeconomics, and market design. Check out the Blockchain and Cryptoeconomics page to learn more about us.
As an impact-driven research team, we’re focused on supporting the development of the Novi wallet and contributing to a variety of blockchain and research communities, including the Libra project, which is built on an open source blockchain. We are addressing the limitations of blockchain systems by incubating open source tech and pursuing research that will make these systems more scalable, safer, and more accessible.
We’re excited to share more about the technical advancements we’ve made and the economic research we’re undertaking to advance Novi’s goal of making money move more freely for more people.
Novi technical publications
We share many of the same ambitions outlined in the Initiative for CryptoCurrencies and Contracts’ Seven Grand Challenges, which identify the major blockers to blockchain adoption. Based on the work we’ve published to date, we’ve made some early progress toward addressing issues of scaling and performance, correctness, and safety — but we are just getting started. Here’s a shortlist of recent publications that highlight our work across several key dimensions:
Scaling and performance
- State machine replication in the Libra blockchain: A state-of-the-art Byzantine fault tolerance algorithm for Libra (LibraBFT) for forming agreement on ordering and finalizing transactions among a configurable set of validators.
- Cogsworth: A new Byzantine view synchronization algorithm that has optimistically linear communication complexity and constant latency. Faced with benign failures, Cogsworth has expected linear communication and constant latency.
- FastPay: A set of distributed authorities that allows organizations to leverage prefunded quorums to settle transactions at ~80,000 tps.
Correctness by design and construction
- Move: A language with programmable resources: An executable bytecode language used to implement custom transactions and smart contracts. With Move, a resource can never be copied or implicitly discarded, only moved between program storage locations.
- The Move Prover: A formal verification system that enables automatic verification of functional correctness for Move modules.
- Twins: White-glove approach for BFT testing: A novel approach to emulate common Byzantine behaviors. The main idea of Twins is that we can emulate Byzantine behavior by running two instances of a node with the same identity. Each of the two instances (or Twins) runs unmodified, correct code.
Safety and compliance
- Proof of liabilities: A novel algorithm for proving liabilities with privacy that allows entities to undergo a distributed audit of their liabilities. It is the first scheme to protect users against dishonest entities, without leaking individual identifiable data.
- Taming the many EdDSAs: A novel technique to check compatibility of cryptographic libraries that implement the EdDSA signature scheme. It surfaces discrepancies between libraries and the standards, and it justifies the best way of implementing the scheme securely focusing on practical aspects.
Novi Cryptoeconomics
In addition to our open source technical advancements, economists on the Novi cryptoeconomics team conduct research into financial inclusion, applied microeconomics, macroeconomics, and market design. We work closely with computer scientists, translating economic theory into real-world, practical solutions for blockchain-based problems. Here are more details on where the team is focused within each of our core research areas:
- Financial inclusion: Designing, testing, and scaling low-cost financial tools that could improve the lives of the world’s unbanked and underbanked populations. Using the power of smart contracts and programmable payments to reduce costs, increase efficiency and access to financial services.
- Applied microeconomics: Using experiments to learn about the behavior of people and businesses in a global payment system.
- Macroeconomics: Investigating stablecoin systems and reserves that are solvent, liquid, and support financial stability. Creating a competitive environment that allows for financial opportunity and innovation.
- Market design: Designing objective and transparent mechanisms that help establish and maintain proper governance in stablecoin systems, to ensure that operations are aligned with the long-run needs of their users.
Getting involved
If you’re inspired by any of this work, we’d love to hear from you. As new opportunities arise for roles on the team, including for visiting researchers, we will post them to our careers page. Be sure to check back often for updates.
We also regularly offer PhD fellowships in the area of blockchain and cryptoeconomics. Learn more by visiting the Facebook Fellowship Program page. Applications open every fall, and winners are announced the following January.
We also actively participate in industry and academic conferences, whether they’re virtual or in-person. Feel free to say hello if you spot any members of our group.
The post Inside blockchain and cryptoeconomics research at Facebook appeared first on Facebook Research.

Video streaming and deep learning: Using Amazon Kinesis Video Streams with Deep Java Library
Amazon Kinesis Video Streams allows you to easily ingest video data from connected devices for processing. One of the most effective ways to process this video data is using the power of deep learning. You can create an efficient service infrastructure to run these computations with a Java server, but Java support for deep learning has traditionally been difficult to come by.
Deep Java Library (DJL) is a new open-source deep learning framework for Java built by AWS. It sits on top of native engines, so you can train entirely in DJL while using different engines on the backend, such as PyTorch and Apache MXNet. It can also import and run models built using Tensorflow, Keras, and PyTorch. DJL can bridge the ease of Kinesis Video Streams with the power of deep learning for your own video analytics application.
In this tutorial, we walk through running an object detection model against a Kinesis video stream. In object detection, the computer finds different types of objects in an image and draws a bounding box, describing their locations inside the image. For example, you can use detection to recognize objects like dogs or people to avoid false alarms in a home security camera.
The full project and instructions to run it are available in the DJL demo repository.
Setting up
To begin, create a new Java project with the following dependencies, shown here in gradle format:
dependencies {
    implementation platform("ai.djl:bom:0.8.0")
    implementation "ai.djl:api"

    runtimeOnly "ai.djl.mxnet:mxnet-model-zoo"
    runtimeOnly "ai.djl.mxnet:mxnet-native-auto"

    implementation "software.amazon.awssdk:kinesisvideo:2.10.75"
    implementation "software.amazon.kinesis:amazon-kinesis-client:2.2.9"
    implementation "com.amazonaws:amazon-kinesis-video-streams-parser-library:1.0.13"
}
The DJL ImageVisitor
Because the model works on images, you can create a DJL FrameVisitor that visits and runs your model on each frame in the video. In real applications, it might help to only run your model on a fraction of the frames in the video. See the following code:
FrameVisitor frameVisitor = FrameVisitor.create(new DjlImageVisitor());The DjlImageVisitor class extends the H264FrameDecoder to provide the capability to convert the frame into a standard Java BufferedImage. Because DJL natively supports this class, you can run it directly from the BufferedImage.
In DJL, the Predictor is used to run the trained model against live data. This is often referred to as inference or prediction. It fully encapsulates the inference experience by taking your input through preprocessing to prepare it into the model’s data structure, running the model itself, and postprocessing the data into an easy-to-use output class. In the following code block, the Predictor converts an Image to the set of outputs, DetectedObjects. An ImageFactory converts a standard Java BufferedImage into the DJL Image class:
public class DjlImageVisitor extends H264FrameDecoder {

    Predictor<Image, DetectedObjects> predictor;
    ImageFactory factory = ImageFactory.getInstance();

    ...

}
DJL also provides a model zoo where you can find many models trained on different tasks, datasets, and engines. For now, create a Predictor using the basic SSD object detection model. You can also use the default preprocessing and postprocessing defined within the model zoo to directly create a Predictor. For your own applications, you can define custom processing in a Translator and pass it in when creating a new Predictor:
Criteria<Image, DetectedObjects> criteria = Criteria.builder()
    .setTypes(Image.class, DetectedObjects.class)
    .optArtifactId("ai.djl.mxnet:ssd")
    .build();
predictor = ModelZoo.loadModel(criteria).newPredictor();
Then, you just need to define the FrameVisitors process method that is called to handle the various frames as follows. You convert the Frame into a BufferedImage using the decodeH264Frame method defined within the H264FrameDecoder. You wrap that into an Image using the ImageFactory you created earlier. Then, you use your Predictor to run prediction using the SSD model. See the following code:
    @Override
    public void process(
            Frame frame,
            MkvTrackMetadata trackMetadata,
            Optional<FragmentMetadata> fragmentMetadata)
            throws FrameProcessException {

        Image image = factory.fromImage(decodeH264Frame(frame, trackMetadata));
        DetectedObjects prediction = predictor.predict(image);
    }
Using the prediction
At this point, you have the detected objects and can use them for whatever your application requires. For a simple application, you could just print out all the class names that you detected to standard out as follows:
        String classStr =
                prediction
                        .items()
                        .stream()
                        .map(Classification::getClassName)
                        .collect(Collectors.joining(", "));
        System.out.println("Found objects: " + classStr);
You could also find out if there is a high probability that a person was in the image using the following code:
        boolean hasPerson =
                prediction
                        .items()
                        .stream()
                        .anyMatch(
                                c ->
                                        "person".equals(c.getClassName())
                                                && c.getProbability() > 0.5);
Another option is to use the image visualization methods in the Image class to draw the bounding boxes on top of the original image. Then, you can get a visual representation of the detected objects. See the following code:
        image.drawBoundingBoxes(prediction);
        Path outputFile = Paths.get("out/annotatedImage.png");
        try (OutputStream os = Files.newOutputStream(outputFile)) {
            image.save(os, "png");
        }
Running the stream
You’re now ready to set up your video stream. For instructions, see Create a Kinesis Video Stream. Make sure to record the REGION and STREAM_NAME that you used so you can pass it into your application.
Then, create a new thread pool to run your application. You also need to build a GetMediaWorker with all the data for your video stream and run it on the thread pool. For your getMediaworker, you need to pass in the data you pulled from the Kinesis Video Streams console describing your video stream. You also need to provide the AWS credentials for accessing the stream. Use the SystemPropertiesCredentialsProvider, which finds the credentials in the JVM System Properties. You can find more details about providing these credentials in the demo repository. Lastly, we need to pass in the StartSelectorType.NOW to start using the stream immediately. See the following code:
ExecutorService executorService = Executors.newFixedThreadPool(1);

AmazonKinesisVideoClientBuilder amazonKinesisVideoBuilder =
        AmazonKinesisVideoClientBuilder.standard();
amazonKinesisVideoBuilder.setRegion(REGION.getName());
amazonKinesisVideoBuilder.setCredentials(new SystemPropertiesCredentialsProvider());
AmazonKinesisVideo amazonKinesisVideo = amazonKinesisVideoBuilder.build();


GetMediaWorker getMediaWorker =
        GetMediaWorker.create(
                REGION,
                new SystemPropertiesCredentialsProvider(),
                STREAM_NAME,
                new StartSelector().withStartSelectorType(StartSelectorType.NOW),
                amazonKinesisVideo,
                frameVisitor);
executorService.submit(getMediaWorker);
Conclusion
That’s it! You’re ready to begin sending data to your stream and detecting the objects in the video. You can find more information about the Kinesis Video Streams API in the Amazon Kinesis Video Streams Producer SDK Java GitHub repo. The full Kinesis Video Streams DJL demo is available with the rest of the DJL demo applications and integrations with many other AWS and Java tools in the demo repository.
Now that you have integrated Kinesis Video Streams and DJL, you can improve your application in many different ways. You can choose additional object detection and image-based models from the more than 70 pre-trained and ready-to-use models in our model zoo from GluonCV, TorchHub, and Keras. You can run these or custom models across any of the engines supported by DJL, including Tensorflow, PyTorch, MXNet, and ONNX Runtime. DJL even has full training support so you can build your own model to add to your video streaming application instead of relying on a pre-trained one.
Don’t forget to follow our GitHub repo, demo repository, Slack channel, and Twitter for more documentation and examples of DJL!
About the Authors
 Zach Kimberg is a Software Engineer with AWS Deep Learning working mainly on Apache MXNet for Java and Scala. Outside of work he enjoys reading, especially Fantasy.
 Frank Liu is a Software Engineer for AWS Deep Learning. He focuses on building innovative deep learning tools for software engineers and scientists. In his spare time, he enjoys hiking with friends and family.
For Neha Rungta, it’s the journey that matters
Rungta had a promising career with NASA, but decided the stars aligned for her at Amazon.Read More

Partnerships for advanced weather and climate prediction
When I was a child, growing up on an almond farm in central California, the day always began by turning on the radio and listening to the forecasters talking about temperature, precipitation, and something called “evapotranspiration rate.” I didn’t know what all those terms meant at the time, but I could see how my father made decisions based on what he heard, like when to water, or when to harvest.
Now, when I chat with my colleagues around the world on video conference, they’re making daily decisions based on the weather around them, just like my father did on the farm. Some decisions are routine and others are dramatic, including decisions about what to wear for a walk outside, or how to prepare a family for extreme events like hurricanes and wildfires.
At Google, we’ve been using AI research to develop new methods for understanding and predicting the weather, including hyperlocal precipitation forecasting to support precise personal decision making, flood forecasting in India and Bangladesh, and computational methods that can help improve the accuracy of forecasting technology.
We’re also partnering with institutions that supply forecasts and technology. This month, we began working with the National Oceanic and Atmospheric Administration (NOAA) Satellite and Information Service (NESDIS) to explore the benefits of artificial intelligence (AI) and machine learning (ML) for enhancing NOAA’s use of satellite and environmental data.
Together, NESDIS and Google will use AI and ML to amplify NOAA’s environmental monitoring, weather forecasting and climate research using Google Cloud infrastructure. By working directly with NOAA’s forecast scientists, we’ll be able to utilize the vast amount of satellite and other environmental data that NOAA collects to enhance prediction for extreme weather events, such as hurricanes and tornadoes.
Related, in August, the U.S. National Science Foundation (NSF) announced the AI Institute for Research on Trustworthy AI in Weather, Climate, and Coastal Oceanography (AI2ES) led by Amy McGovern at the University of Oklahoma, with Google as a founding member. This Institute includes seven academic institutions, four private-sector partners, as well as U.S. government and federally-funded labs. AI2ES assembles researchers from the atmospheric and ocean sciences and risk communication to develop trustworthy AI technology to address concerns in weather, climate, and coastal hazards prediction. The team will create educational pathways to develop a more diverse AI and environmental science workforce.

AI2ES logo
Now, when I look at the fundamental scope and depth of these partnerships in the atmospheric sciences, I know my father would approve that the work is meaningful and relevant. And then he’d tell me to get back to work.
How Eurovision inspired a research intern’s project
Research happens at Google everyday, on many different embedded teams throughout the company. For example, Amit Moryossef developed a machine learning model for sign language detection while interning this year with our Language team in Zurich. Since our 2021 Research Internship applications opened this month, Amit chatted with us to discuss what his experience has been like.
How did you end up pursuing research around sign language processing?
After finishing college, I started a master’s degree in computer science at Bar-Ilan University. While I was there, I was introduced to deep learning, and to doing research. I worked on natural language processing, specifically looking at text generation and gender bias in machine translation. I planned for those years to be my final years in an academic setting, and then I’d go into the workforce.
Everything changed, surprisingly, after I watched the 2019 Eurovision Song Contest. They had sign-language interpretations of the songs. I realized how much of the world is not built to be accessible to the Deaf and hard of hearing communities, and this led to a bit of a shift in my plans.
Today I’m doing a PhD in computer science, working on sign language processing with the hope of making the world more accessible. This is also the topic of research I worked on at Google during my internship.
Why did you apply for an internship at Google?
Google always seemed to me like a great place to work — a place that would have all of the resources I could ever need, both computationally and personally. I applied to Google with the honest belief that this is the best place for me to do research on what I am passionate about, and make that research available to everyone.
How did the ongoing pandemic affect your internship?
In March, I was still in denial that this would affect me, and I was hoping the internship would go as planned. In April, I received the message saying the internship would move to a virtual model which was initially disappointing on a personal level, but made sense as the world was going deeper into lockdown.
The remote nature of the internship introduced new challenges. Having a supportive manager and caring recruiter were some of the key factors for me in dealing with some of these challenges successfully—helping me get assistance with unfamiliar tools, fostering relationships with new colleagues and helping me to create and maintain a work-life balance.
What project was your internship focused on?
My internship project was about sign language detection for video conferencing applications. This task is simply defined as to detect when someone uses sign language on a video call, and set them as the current “speaker” of that call, just like a person using their voice would be. This work goes hand in hand with my PhD research—making the world more accessible to people who use sign language.
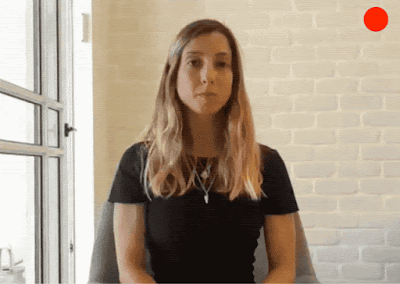
Maayan Gazuli, an Israeli Sign Language interpreter, demonstrates the sign language detection system.
What was the outcome of your internship?
We designed the sign-language detection model and built an application that runs this on-device, and works with all video-conferencing applications. This means we empower signers to use whichever video conferencing applications they would like, and our system should work just as well.
We published and presented a long paper in the SLRTP workshop, as well as an academic demo and a Google AI blog post. You can try our experimental demo right now! By default, the demo acts as a sign language detector. The training code and models as well as the web demo source code is available on GitHub.
What impact has this internship experience had on your research?
I learned how to better communicate and work with folks who were previously unaware of my research and how to operate within a large organization (compared to academia).
My experience showed me the practical application of my research, and that it is possible to change the world for the better.