In a major scientific advance, the latest version of our AI systemAlphaFoldhas been recognised as a solution to the protein folding problem by the organisers of the biennial Critical Assessment of protein Structure Prediction (CASP).Read More
Creating Amazon SageMaker Studio domains and user profiles using AWS CloudFormation
Amazon SageMaker Studio is the first fully integrated development environment (IDE) for machine learning (ML). It provides a single, web-based visual interface where you can perform all ML development steps required to build, train, tune, debug, deploy, and monitor models. In this post, we demonstrate how you can create a SageMaker Studio domain and user profile using AWS CloudFormation. AWS CloudFormation gives you an easy way to model a collection of related AWS and third-party resources, provision them quickly and consistently, and manage them throughout their lifecycle by treating infrastructure as code.
Because AWS CloudFormation isn’t natively integrated with SageMaker Studio at the time of this writing, we use AWS CloudFormation to provision two AWS Lambda functions and then invoke these functions to create, delete, and update the Studio domain and user profile. In the rest of this post, we walk through the Lambda function to create the Studio domain (the code for creating a Studio user profile works similarly) and then the CloudFormation template. All the code is available in the GitHub repo.
Lambda function for creating, deleting, and updating a Studio domain
In the Lambda function, the lambda_handler calls one of the three functions, handle_create, handle_update, and handle_delete, to create, update, and delete the Studio domain, respectively. Because we invoke this function using an AWS CloudFormation custom resource, the custom resource request type is sent in the RequestType field from AWS CloudFormation. RequestType determines which function to call inside the lambda_handler function. For example, when AWS CloudFormation detects any changes in the custom::StudioDomain section of our CloudFormation template, the RequestType is set to Update by AWS CloudFormation, and the handle_update function is called. The following is the lambda_handler code:
def lambda_handler(event, context):
    try:
        if event['RequestType'] == 'Create':
            handle_create(event, context)
        elif event['RequestType'] == 'Update':
            handle_update(event, context)
        elif event['RequestType'] == 'Delete':
            handle_delete(event, context)
    except ClientError as exception:
        logging.error(exception)
        cfnresponse.send(event, context, cfnresponse.FAILED,
                         {}, error=str(exception))
The three functions for creating, updating, and deleting the domain work similarly. For this post, we walk through the code responsible for creating a domain. When invoking the Lambda function through an AWS CloudFormation custom resource, we pass key parameters that help define our Studio domain via the custom resource Properties. We extract these parameters from the AWS CloudFormation event source in the Lambda function. In the handle_create function, parameters are read in from the event and passed on to the create_studio_domain function. See the following code for handle_create:
def handle_create(event, context):
    print("**Starting running the SageMaker workshop setup code")
    resource_config = event['ResourceProperties']
    print("**Creating studio domain")
    response_data = create_studio_domain(resource_config)
    cfnresponse.send(event, context, cfnresponse.SUCCESS,
                     {}, physicalResourceId=response_data['DomainArn'])
We use a boto3 SageMaker client to create Studio domains. For this post, we set the domain name, the VPC and subnet that Studio uses, and the SageMaker execution role for the Studio domain. After the create_domain API is made, we check the creation status every 5 seconds. When creation is complete, we return the Amazon Resource Name (ARN) and the URL of the created domain. The amount of time that Lambda allows a function to run before stopping it is 3 seconds by default. Therefore, make sure that the timeout limit of your Lambda function is set appropriately. We set the timeout limit to 900 seconds. The following is the create_studio_domain code (the functions for deleting and updating domains are also implemented using boto3 and constructed in a similar fashion):
client = boto3.client('sagemaker')
def create_studio_domain(config):
    vpc_id = config['VPC']
    subnet_ids = config['SubnetIds']
    default_user_settings = config['DefaultUserSettings']
    domain_name = config['DomainName']

    response = client.create_domain(
        DomainName=domain_name,
        AuthMode='IAM',
        DefaultUserSettings=default_user_settings,
        SubnetIds=subnet_ids.split(','),
        VpcId=vpc_id
    )

    domain_id = response['DomainArn'].split('/')[-1]
    created = False
    while not created:
        response = client.describe_domain(DomainId=domain_id)
        time.sleep(5)
        if response['Status'] == 'InService':
            created = True

    logging.info("**SageMaker domain created successfully: %s", domain_id)
    return response
Finally, we zip the Python script, save it as domain_function.zip, and upload it to Amazon Simple Storage Service (Amazon S3).
The Lambda function used for creating a user profile is constructed similarly. For more information, see the UserProfile_function.py script in the GitHub repo.
CloudFormation template
In the CloudFormation template, we create an execution role for Lambda, an execution role for SageMaker Studio, and the Lambda function using the code explained in the previous section. We invoke this function by specifying it as the target of a customer resource. For more information about invoking a Lambda function with AWS CloudFormation, see Using AWS Lambda with AWS CloudFormation.
Lambda execution role
This role gives our Lambda function the permission to create an Amazon CloudWatch Logs stream and write logs to CloudWatch. Because we create, delete, and update Studio domains in our function, we also grant this role the permission to do so. See the following code:
LambdaExecutionRole:
    Type: "AWS::IAM::Role"
    Properties:
      AssumeRolePolicyDocument:
        Version: 2012-10-17
        Statement:
          - Effect: Allow
            Principal:
              Service:
                - lambda.amazonaws.com
            Action:
              - "sts:AssumeRole"
      Path: /

  LambdaExecutionPolicy:
    Type: AWS::IAM::ManagedPolicy
    Properties:
      Path: /
      PolicyDocument:
        Version: 2012-10-17
        Statement:
          - Sid: CloudWatchLogsPermissions
            Effect: Allow
            Action:
              - logs:CreateLogGroup
              - logs:CreateLogStream
              - logs:PutLogEvents
            Resource: !Sub "arn:${AWS::Partition}:logs:*:*:*"
          - Sid: SageMakerDomainPermission
            Effect: Allow
            Action:
              - sagemaker:CreateDomain
              - sagemaker:DescribeDomain
              - sagemaker:DeleteDomain
              - sagemaker:UpdateDomain
              - sagemaker:CreateUserProfile
              - sagemaker:UpdateUserProfile
              - sagemaker:DeleteUserProfile
              - sagemaker:DescribeUserProfile
            Resource:
              - !Sub "arn:${AWS::Partition}:sagemaker:*:*:domain/*"
              - !Sub "arn:${AWS::Partition}:sagemaker:*:*:user-profile/*"
          - Sid: SageMakerExecPassRole
            Effect: Allow
            Action:
              - iam:PassRole
            Resource: !GetAtt  SageMakerExecutionRole.Arn
      Roles:
        - !Ref LambdaExecutionRole
SageMaker execution role
The following SageMaker execution role is attached to Studio (for demonstration purposes, we grant this role SageMakerFullAccess):
SageMakerExecutionRole:
    Type: "AWS::IAM::Role"
    Properties:
      AssumeRolePolicyDocument:
        Version: 2012-10-17
        Statement:
          - Effect: Allow
            Principal:
              Service:
                - sagemaker.amazonaws.com
            Action:
              - "sts:AssumeRole"
      Path: /
      ManagedPolicyArns:
        - arn:aws:iam::aws:policy/AmazonSageMakerFullAccess
Lambda function
The AWS::Lambda::Function resource creates a Lambda function. To create a function, we need a deployment package and an execution role. The deployment package contains our function code (function.zip). The execution role, which is the LambdaExecutionRole created from previous step, grants the function permission to create a Lambda function. We also added the CfnResponseLayer to our function’s execution environment. CfnResponseLayer enables the function to interact with an AWS CloudFormation custom resource. It contains a send method to send responses from Lambda to AWS CloudFormation. See the following code:
Resources:
...
 StudioDomainFunction:
    Type: AWS::Lambda::Function
    Properties:
      Handler: lambda_function.lambda_handler
      Role: !GetAtt LambdaExecutionRole.Arn
      Code:
        S3Bucket: !Ref S3Bucket
        S3Key: function.zip
        S3ObjectVersion: !Ref S3ObjectVersion
      Runtime: python3.8
      Timeout: 900
      Layers:
        - !Ref CfnResponseLayer

  CfnResponseLayer:
    Type: AWS::Lambda::LayerVersion
    Properties:
      CompatibleRuntimes:
        - python3.8
      Content:
        S3Bucket: !Ref S3Bucket
        S3Key: cfnResponse-layer.zip
      Description: cfn-response layer
      LayerName: cfn-response
Invoking the Lambda function using an AWS CloudFormation custom resource
Custom resources provide a way for you to write custom provisioning logic in a CloudFormation template and have AWS CloudFormation run it during a stack operation, such as when you create, update, or delete a stack. For more information, see Custom resources. We get the Lambda function’s ARN created from previous step and pass it to AWS CloudFormation as our service token. This allows AWS CloudFormation to invoke the Lambda function. We pass parameters required for creating, updating, and deleting our domain under Properties. See the following code:
StudioDomain:
    Type: Custom::StudioDomain
    Properties:
      ServiceToken: !GetAtt StudioDomainFunction.Arn
      VPC: !Ref VPCId
      SubnetIds: !Ref SubnetIds
      DomainName: "MyDomainName"
      DefaultUserSettings:
        ExecutionRole: !GetAtt SageMakerExecutionRole.Arn
In the same fashion, we invoke the Lambda function for creating a user profile:
UserProfile:
    Type: Custom::UserProfile
    Properties:
      ServiceToken: !GetAtt UserProfileFunction.Arn
      DomainId: !GetAtt StudioDomain.DomainId
      UserProfileName: !Ref UserProfileName
      UserSettings:
        ExecutionRole: !GetAtt SageMakerExecutionRole.Arn
Conclusion
In this post, we walked through the steps of creating, deleting, and updating SageMaker Studio domains using AWS CloudFormation and Lambda. The sample files are available in the GitHub repo. For information about creating Studio domain inside a VPC, see Securing Amazon SageMaker Studio connectivity using a private VPC. For more information about SageMaker Studio, see Get Started with Amazon SageMaker Studio.
About the Authors
 Qingwei Li is a Machine Learning Specialist at Amazon Web Services. He received his Ph.D. in Operations Research after he broke his advisor’s research grant account and failed to deliver the Nobel Prize he promised. Currently he helps customers in the financial service and insurance industry build machine learning solutions on AWS. In his spare time, he likes reading and teaching.
 Joseph Jegan is a Cloud Application Architect at Amazon Web Services. He helps AWS customers use AWS services to design scalable and secure applications. He has over 20 years of software development experience prior to AWS, working on developing e-commerce platform for large retail customers. He is based out of New York metro and enjoys learning emerging cloud native technologies.
 David Ping is a Principal Machine Learning Solutions Architect and Sr. Manager of AI/ML Solutions Architecture at Amazon Web Services. He helps enterprise customers build and operate machine learning solutions on AWS. In his spare time, David enjoys hiking and reading the latest machine learning articles.
Machine learning models that act on encrypted data
A privacy-preserving version of the popular XGBoost machine learning algorithm would let customers feel even more secure about uploading sensitive data to the cloud.Read More
My experience with TensorFlow Quantum
A guest post by Owen Lockwood, Rensselaer Polytechnic Institute
Quantum mechanics was once a very controversial theory. Early detractors such as Albert Einstein famously said of quantum mechanics that “God does not play dice” (referring to the probabilistic nature of quantum measurements), to which Niels Bohr replied, “Einstein, stop telling God what to do”. However, all agreed that, to quote John Wheeler “If you are not completely confused by quantum mechanics, you do not understand it”. As our understanding of quantum mechanics has grown, not only has it led to numerous important physical discoveries but it also resulted in the field of quantum computing. Quantum computing is a different paradigm of computing from classical computing. It relies on and exploits the principles of quantum mechanics to achieve speedups (in some cases superpolynomial) over classical computers.
In this article I will be discussing some of the challenges I faced as a beginning researcher in quantum machine learning (QML) and how TensowFlow Quantum (TFQ) and Cirq enabled me and can help other researchers investigate the field of quantum computing and QML. I have previous experience with TensorFlow, which made the transition to using TensorFlow Quantum seamless. TFQ proved instrumental in enabling my work and ultimately my work utilizing TFQ culminated in my first publication on quantum reinforcement learning in the 16th AIIDE conference. I hope that this article helps and inspires other researchers, neophytes and experts alike, to leverage TFQ to help advance the field of QML.
QML Background
QML has important similarities and differences to traditional neural network/deep learning approaches to machine learning. Both methodologies can be seen as using “stacked layers” of transformations that make up a larger model. In both cases, data is used to inform updates to model parameters, typically to minimize some loss function (usually, but not exclusively via gradient based methods). Where they differ is QML models have access to the power of quantum mechanics and deep neural networks do not. An important type of QML that TFQ provides techniques for is called variational quantum circuits (QVC). QVCs are also called quantum neural networks (QNN).
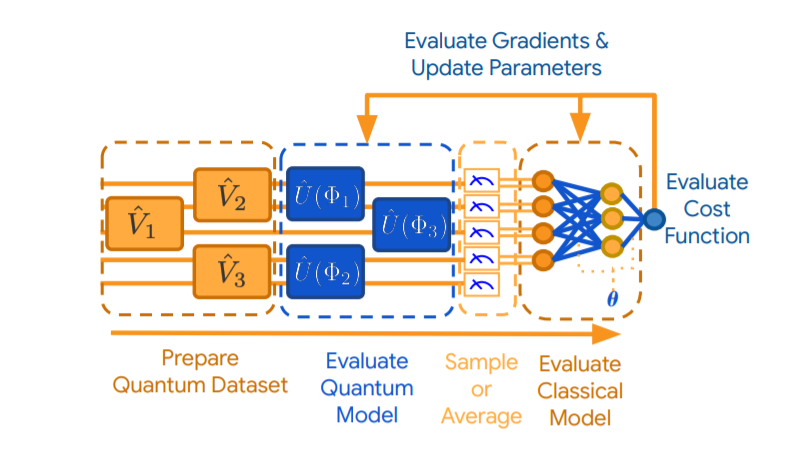
A QVC can be visualized below (from the TFQ white paper). The diagram is read from left to right, with the qubits being represented by the horizontal lines. In a QVC there are three important and distinct parts: the encoder circuit, the variational circuit and the measurement operators. The encoder circuit either takes naturally quantum data (i.e. a nonparametrized quantum circuit) or converts classical data into quantum data. This circuit is connected to the variational circuit which is defined by its learnable parameters. The parametrized part of the circuit is the part that is updated during the learning process. The last part of the QVC is the measurement operators. In order to extract information from the QVC some sort of quantum measurement (such as a Pauli X, Y, or Z basis measurements) must be applied. With the information extracted from these measurements a loss function (and gradients) can be calculated on a classical computer and the parameters can be updated. These gradients can be optimized with the same optimizers as traditional neural networks such as Adam or RMSProp. QVC’s can also be combined with traditional neural networks (as is shown in the diagram) as the quantum circuit is differentiable and thus gradients can be backpropagated through.
However, the intuitive models and mathematical framework surrounding QVCs have some important differences from traditional neural networks, and in these differences lies the potential for quantum speedups. Quantum computing and QML can harness quantum phenomena, such as superposition and entanglement. Superposition stems from the wavefunction being a linear combination of multiple states and enables a qubit to represent two different states simultaneously (in a probabilistic manner). The ability to operate on these superpositions, i.e. operate on multiple states simultaneously, is integral to the power of quantum computing. Entanglement is a complex phenomenon that is induced via multi-qubit gates. Getting a basic understanding of these concepts and of quantum computing is an important first step for QML. There are a number of great resources available for this such as Preskill’s Quantum Computing Course, and de Wolf’s lecture notes.
Currently, access to real quantum hardware is limited and as such, many quantum computing researchers conduct work on simulations of quantum computers. Near term and current quantum devices have 10s-100s of quantum bits (qubits) like the Google sycamore processor. Because of their size and the noise, this hardware is often called Noisy Intermediate Scale Quantum (NISQ) technology. TFQ and Cirq are built for these near term NISQ devices. These devices are far smaller than what some of the most famous quantum algorithms require to achieve quantum speedups given current error correction techniques; e.g. Shor’s algorithm requires upwards of thousands of qubits and the Quantum Approximate Optimization Algorithm (QAOA) could require at least 420 qubits for quantum advantages. However, there is still significant potential for NISQ devices to achieve quantum speedups (as Google demonstrated with 53 qubits).
My Work With TFQ
TFQ was announced in mid March this year (2020) and I began to use it shortly after. Around that time I had begun research into QML, specifically QML for reinforcement learning (RL). While there have been great strides in the accessibility of quantum circuit simulators, QML can be a difficult field to get into. Not only are there difficulties from a mathematical and physical perspective, but the time investment for implementation can be substantial. The time it would take to code QVCs from scratch and properly test and debug them (not to mention the optimization) is a challenge, especially for those coming from classical machine learning. Spending so much time building something for an experiment that has the potential to not work is a big risk – especially for an undergraduate student on a deadline! Thankfully I did not have to take this risk. With the release of TFQ it was easy to immediately start on the implementations of my ideas. Realistically, I would never have done this work if TFQ had not been released. Inspired by previous work, we expanded upon applying QML to RL tasks.
In our work we demonstrate the potential to use QVCs in place of neural networks in contemporary RL algorithms (specifically DQN and DDQN). We also show the potential to use multiple types of QVC models, using QVCs with either a dense layer or quantum pooling layers (denoted hybrid and pure respectively) to shrink the number of qubits to the correct output space.
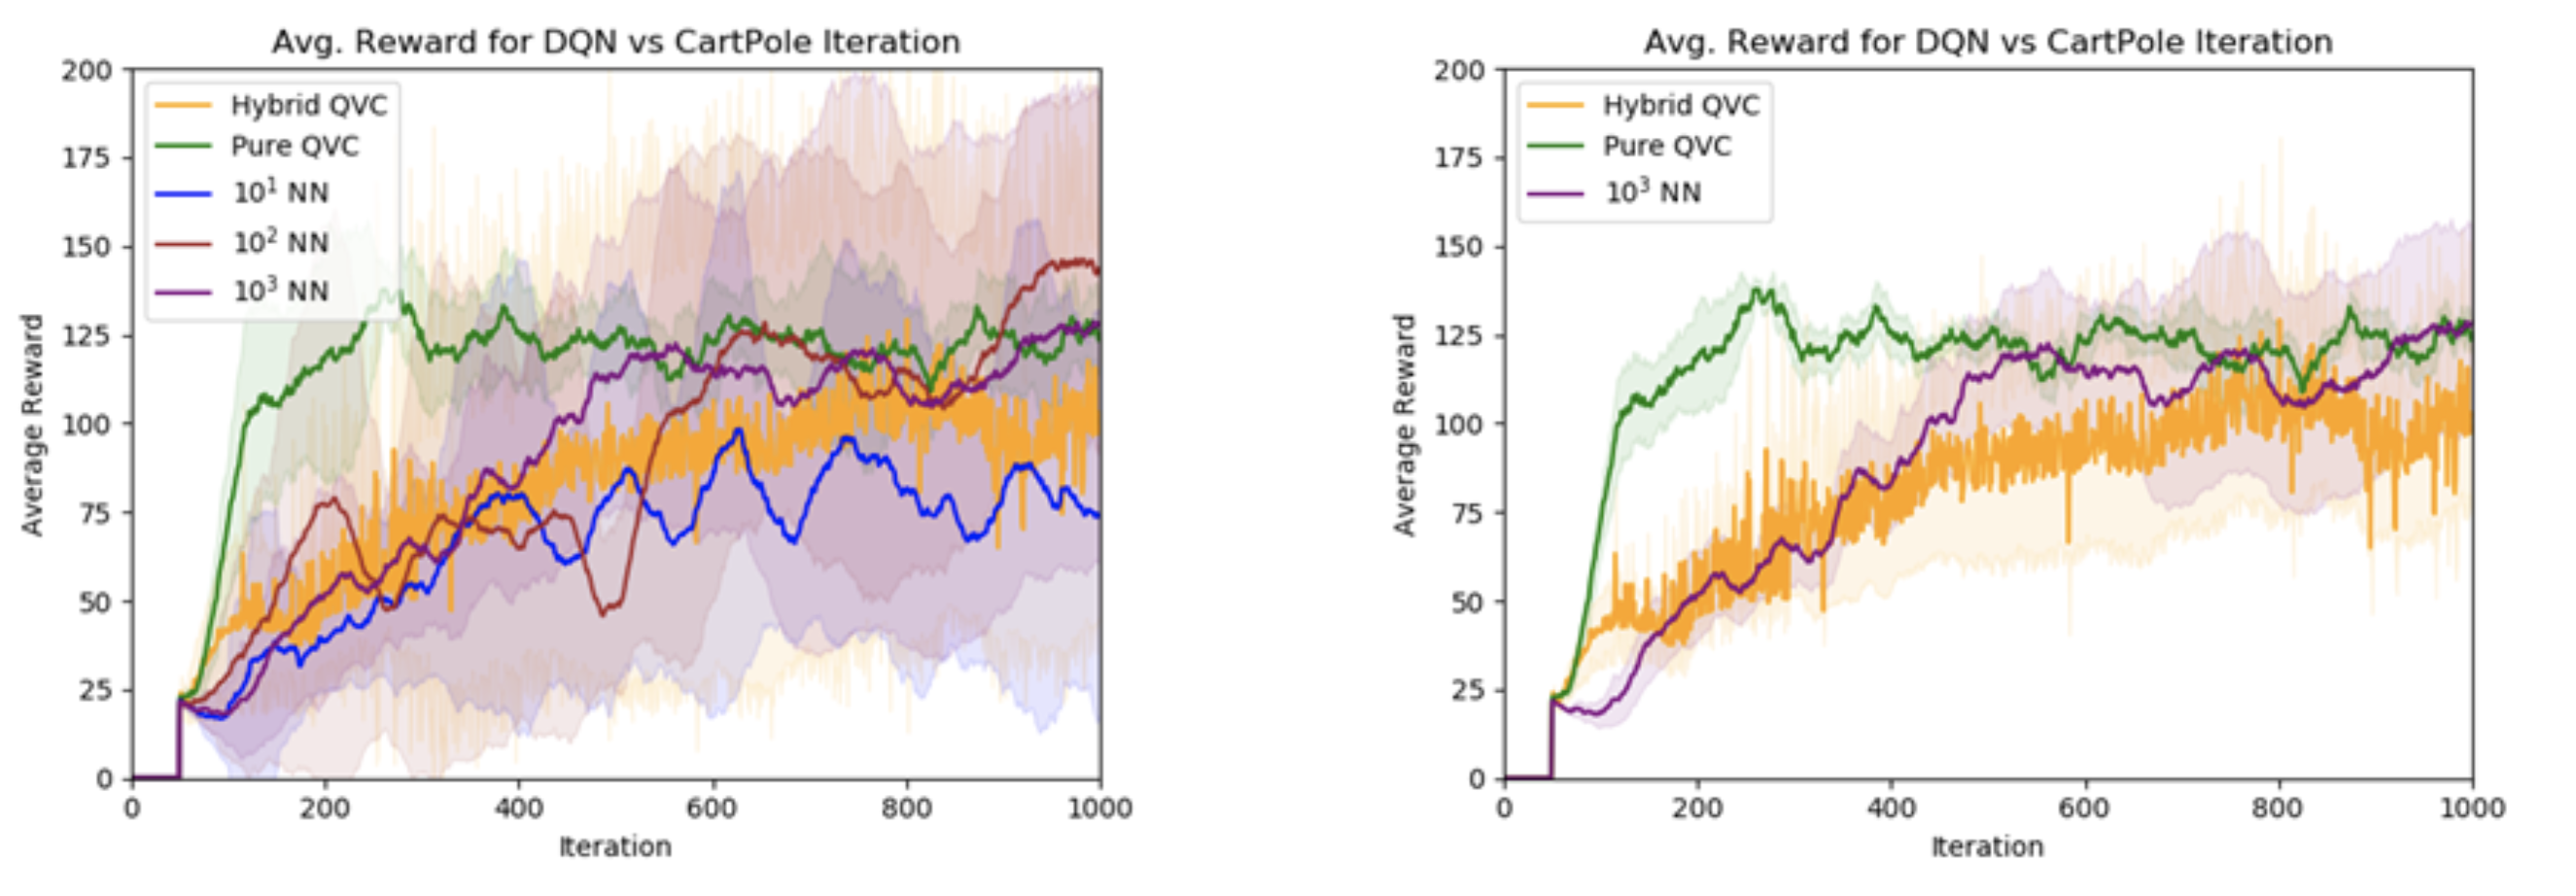
The representational power of QVCs is also put on display; using a QVC with ~50 parameters we were able to achieve comparable performance to neural networks with orders of magnitude more parameters. See the graphs for a comparison of the reward achieved on the canonical CartPole environment (balancing a pole on a cart), the left graph includes all neural networks and the right shows only the largest neural network. The number in front of the NN represents the size of the parameter space.
We are continuing to work with QML applications to RL and have more manuscripts in submission. Continuation of this work has been accepted into the 2020 NeurIPS workshop: “The pre-registration experiment: an alternative publication model for machine learning research”.
Suggested use of TFQ
TFQ can be an incredible tool for anyone interested in QML research no matter your background. All too common in scientific communities is a ‘publish or perish’ mentality which can stifle innovative work and is prohibitive to intellectual risk taking, especially for experiments that require significant implementation efforts. Not only can TFQ help speed up any experiments you may have, but it also allows for easy implementation of ideas that would otherwise never get tested. Implementation is a common hindrance to new and interesting ideas, and far too many projects never progress out of the idea stage due to difficulties in transitioning the idea to reality, something TFQ makes easy.
For beginners, TFQ enables a first foray into the field without substantial time investment in coding and allows for significant learning. Being able to try and experiment with QVCs without having to build from the ground up is an incredible tool. For classical ML researchers with experience in TensorFlow, TFQ makes it easy to transition and experiment with QML at small or large scales. The API of TFQ and the modules it provides (i.e. Keras-esque layers and differentiators) share design principles with TF and their similarities make for an easier programming transition. For researchers already in the QML field, TFQ can certainly help.
In order to get started with TFQ it is important to become familiar with the basics of quantum computing, with either the references mentioned above or with any of the many other great resources out there. Another important step that often gets overlooked, is reading the TFQ white paper. The white paper is accessible to QML beginners and is an invaluable introduction to QML and the basic as well as advanced usage of TFQ. Just as important is to play around with TFQ. Try different things out, experiment; it is a great way to expand not only understanding of the software but of the theory and mathematics as well. Reading other contemporary papers and the papers that cite TFQ is a great way to become immersed with the current research going on in the field.
The science behind Endel’s AI-powered soundscapes
Alexa Fund company releases updated and streamlined skill for Alexa that includes “AI Lullaby” soundscape with vocals, music, and voiceovers by Grimes.Read More
Mitigating social bias in knowledge graph embeddings
Method significantly reduces bias while maintaining comparable performance on machine learning tasks.Read More
Amazon panel discusses fairness in AI
Watch the recorded panel discussion that aired the week of NeurIPS 2020.Read More
Amazon panel discusses fairness in AI
Watch the recorded panel discussion that aired the week of NeurIPS 2020.Read More
Amazon panel discusses fairness in AI
Watch the recorded panel discussion that aired the week of NeurIPS 2020.Read More