AI Researcher Explains Deep Learning’s Collision Course with Particle Physics

For a particle physicist, the world’s biggest questions — how did the universe originate and what’s beyond it — can only be answered with help from the world’s smallest building blocks.

James Kahn, a consultant with German research platform Helmholtz AI and a collaborator on the global Belle II particle physics experiment, uses AI and the NVIDIA DGX A100 to understand the fundamental rules governing particle decay.

Kahn spoke with NVIDIA AI Podcast host Noah Kravitz about the specifics of how AI is accelerating particle physics.

He also touched on his work at Helmholtz AI. Khan helps researchers in fields spanning medicine to earth sciences apply AI to the problems they’re solving. His wide-ranging career — from particle physicist to computer scientist — shows how AI accelerates every industry.

Key Points From This Episode:

  • The nature of particle physics research, which requires numerous simulations and constant adjustments, requires massive AI horsepower. Kahn’s team used the DGX A100 to reduce the time it takes to optimize simulations from a week to roughly a day.
  • The majority of Kahn’s work is global — at Helmholtz AI, he collaborates with researchers from Beijing to Tel Aviv, with projects located anywhere from the Southern Ocean to Spain. And at the Belle II experiment, Kahn is one of more than 1,000 researchers from 26 countries.

Tweetables:

“If you’re trying to simulate all the laws of physics, that’s a lot of simulations … that’s where these big, powerful machines come into play.” — James Kahn [6:02]

“AI is seeping into every aspect of research.” — James Kahn [16:37]

You Might Also Like:

Speed of Light: SLAC’s Ryan Coffee Talks Ultrafast Science

Particle physicist Ryan Coffee, senior staff scientist at the SLAC National Accelerator Laboratory, talks about how he is putting deep learning to work.

A Conversation About Go, Sci-Fi, Deep Learning and Computational Chemistry

Olexandr Isayev, an assistant professor at the UNC Eshelman School of Pharmacy at the University of North Carolina at Chapel Hill, explains how deep learning, abstract strategy board game Go, sci-fi and computational chemistry intersect.

How Deep Learning Can Accelerate the Quest for Cheap, Clean Fusion Energy

William Tang, principal research physicist at the Princeton Plasma Physics Laboratory, is one of the world’s foremost experts on how the science of fusion energy and HPC intersect. He talks about how he sees AI enabling the quest to deliver fusion energy.

Tune in to the AI Podcast

Get the AI Podcast through iTunes, Google Podcasts, Google Play, Castbox, DoggCatcher, Overcast, PlayerFM, Pocket Casts, Podbay, PodBean, PodCruncher, PodKicker, Soundcloud, Spotify, Stitcher and TuneIn. If your favorite isn’t listed here, drop us a note.

Tune in to the Apple Podcast Tune in to the Google Podcast Tune in to the Spotify Podcast

Make the AI Podcast Better

Have a few minutes to spare? Fill out this listener survey. Your answers will help us make a better podcast.

The post AI Researcher Explains Deep Learning’s Collision Course with Particle Physics appeared first on The Official NVIDIA Blog.

Read More

From Gaming to Enterprise AI: Don’t Miss NVIDIA’s Computex 2021 Keynote

NVIDIA will deliver a double-barrelled keynote packed with innovations in AI, the cloud, data centers and gaming at Computex 2021 in Taiwan, on June 1.

NVIDIA’s Jeff Fisher, senior vice president of GeForce gaming products, will discuss how NVIDIA is addressing the explosive growth in worldwide gaming. And Manuvir Das, head of enterprise computing at the company, will talk about democratizing AI to put more AI capabilities within reach of more enterprises.

Hosted by the Taiwan External Trade and Development Council, Computex has long been one of the world’s largest enterprise and consumer trade shows. Alongside its partners, NVIDIA has introduced a host of innovations at Computex over the years.

This year’s show will be both live and digital, giving technology enthusiasts around the world an opportunity to watch. You can tune in to the keynote, titled “The Transformational Power of Accelerated Computing, from Gaming to the Enterprise Data Center,” from our event landing page, or from our YouTube channel starting at 1 p.m. Taiwan time on June 1 (10 p.m. Pacific time on May 31).

Besides the keynote, NVIDIA will hold three talks at Computex forums.

Ali Kani, vice president and general manager of automotive at NVIDIA, will talk about “Transforming the Transportation Industry with AI” at the Future Car Forum on June 1, from 11 a.m. to 1 p.m. Taiwan time.

Jerry Chen, NVIDIA’s head of global business development for manufacturing and industrials, will discuss “The Promise of Digital Transformation: How AI-Infused Industrial Systems Are Rising to Meet the Challenges” at the AIoT Forum on June 2, at 11 a.m. Taiwan time.

And Richard Kerris, head of worldwide developer relations and general manager of NVIDIA Omniverse, will deliver a talk on the topic of “The Metaverse Begins: NVIDIA Omniverse and a Future of Shared Worlds,” on June 3 from 3:30 to 4 p.m. Taiwan time.

Key image credit: Arlene Hu, some rights reserved

The post From Gaming to Enterprise AI: Don’t Miss NVIDIA’s Computex 2021 Keynote appeared first on The Official NVIDIA Blog.

Read More

Speed up YOLOv4 inference to twice as fast on Amazon SageMaker

Machine learning (ML) models have been deployed successfully across a variety of use cases and industries, but due to the high computational complexity of recent ML models such as deep neural networks, inference deployments have been limited by performance and cost constraints. To add to the challenge, preparing a model for inference involves packaging the model in the right format and optimizing the model for each target hardware such as CPU, GPU, or AWS Inferentia. ML acceleration technologies have evolved to close the gap between productivity-focused ML frameworks and performance-oriented and efficiency-oriented hardware backends. However, optimizing a model for target hardware still involves assembling a complex tool chain of framework-specific converters and hardware-specific compilers, each with their own dependencies and configuration choices that can be difficult to understand, and then using it to compile the model.

Amazon SageMaker is a fully managed service that enables data scientists and developers to build, train, and deploy ML models at 50% lower total cost of ownership than self-managed deployments on Amazon Elastic Compute Cloud (Amazon EC2). Amazon SageMaker Neo is a capability of SageMaker that automatically compiles ML models for any ML framework and to any target hardware. With Neo, you don’t need to set up third-party or framework-specific compiler software, or tune the model manually for optimizing inference performance. We’re continually updating Neo to support more operators and expand model coverage for frameworks, including TensorFlow, PyTorch, XGBoost, MXNet, Darknet, and ONNX.

In this post, we show you how to deploy a PyTorch YOLOv4 model on a SageMaker ML CPU-based instance. You download a pre-trained model artifact, compile your pre-trained model using Neo, set up a SageMaker endpoint for both compiled and uncompiled model versions, and benchmark performance to evaluate latency, comparing a compiled and uncompiled YOLOv4 model on the same instance.

In our performance comparison, deploying YOLOv4 with Neo improved performance on SageMaker ML instances. Benchmark testing on a SageMaker ML c5.9xlarge instance revealed improved inference performance compared to a baseline model without Neo optimizations running on the same instance type. The Neo compiled model achieved a speedup in latency twice as fast compared to an uncompiled model on the same SageMaker ML instance.

You Only Look Once

Object detection stands out as a computer vision (CV) task that has seen large accuracy improvements due to deep learning (DL) model architectures. An object detection model tries to localize and classify objects in an image, allowing for applications ranging from real-time inspection of manufacturing defects to medical imaging.

YOLO (You Only Look Once) is part of the DL single-stage object detection model family, which includes models such as Single Shot Detector (SSD) and RetinaNet. These models are built by stacking neural networks (backbone, neck, and head) that together perform detection and classification tasks. The prediction outputs are bounding boxes with confidence scores for identified objects and associated classes.

The backbone network takes care of extracting features of the input image, while the head gets trained on a supervised prediction task to predict the edges of the bounding box and classify its contents. The addition of a neck neural network allows the head network to process features from intermediate steps of the backbone. The whole pipeline processes the images only once, hence the name You Only Look Once.

Single-stage models allow for multiple predictions of the same object in a single image. These predictions get disambiguated by a process called non-maximal suppression (NMS), which takes care of leaving only the highest detection probability bounding boxes that don’t overlap significantly. It’s a less computationally expensive workflow than the two-stage approach and is commonly used in real-time inference. With YOLOv4, you can achieve real-time inference above the human perception of around 30 frames per second (FPS). In this post, you explore ways to push the performance of this model even further using Neo as an accelerator for real-time object detection.

Prerequisites

For this walkthrough, you need an AWS account and an environment running Python 3.x.

Setup

First, we need to ensure we have SageMaker Python SDK 1.x and import the necessary Python packages. If you’re using SageMaker notebook instances, select conda_pytorch_p36 as your kernel. You may have to restart your kernel after upgrading packages. Use the following code to import your packages:

import numpy as np
import time
import json
import requests
import boto3
import os
import sagemaker

Next, we get the AWS Identity and Access Management (IAM) execution role and a few other SageMaker-specific variables from our notebook environment, so that SageMaker can access resources in your AWS account later:

from sagemaker import get_execution_role
from sagemaker.session import Session

role = get_execution_role()
sess = Session()
region = sess.boto_region_name
bucket = sess.default_bucket()

import torch
print(torch.__version__)

1.6.0

import sys
print(sys.version)

3.6.13 | packaged by conda-forge | (default, Feb 19 2021, 05:36:01)
[GCC 9.3.0]

Import pre-trained YOLOv4

The original pre-trained model is from GitHub. For this post, we provide a traced version of the model artifact packaged in a tarball. Tracing requires no changes to your Python code and converts your PyTorch model to TorchScript, a more portable format for usage with the model server included in SageMaker containers. See the following code:

model_archive = 'yolov4.tar.gz'
!wget https://aws-ml-blog-artifacts.s3.us-east-2.amazonaws.com/yolov4.tar.gz
--2021-03-30 20:07:02--  https://aws-ml-blog-artifacts.s3.us-east-2.amazonaws.com/yolov4.tar.gz
Resolving aws-ml-blog-artifacts.s3.us-east-2.amazonaws.com (aws-ml-blog-artifacts.s3.us-east-2.amazonaws.com)... 52.219.84.136
Connecting to aws-ml-blog-artifacts.s3.us-east-2.amazonaws.com (aws-ml-blog-artifacts.s3.us-east-2.amazonaws.com)|52.219.84.136|:443... connected.
HTTP request sent, awaiting response... 200 OK
Length: 239656714 (229M) [application/x-gzip]
Saving to: ‘yolov4.tar.gz’

yolov4.tar.gz       100%[===================>] 228.55M  87.7MB/s    in 2.6s    

2021-03-30 20:07:05 (87.7 MB/s) - ‘yolov4.tar.gz’ saved [239656714/239656714]

We upload the model archive to Amazon Simple Storage Service (Amazon S3) with the following code:

from sagemaker.utils import name_from_base
compilation_job_name = name_from_base('torchvision-yolov4-neo-1')
prefix = compilation_job_name+'/model'
model_path = sess.upload_data(path=model_archive, key_prefix=prefix)
compiled_model_path = 's3://{}/{}/output'.format(bucket, compilation_job_name)

Create a SageMaker model and endpoint

Now that the model archive is in Amazon S3, we can create a SageMaker model and deploy it to a SageMaker endpoint. An entry_point script isn’t necessary and can be a blank file. The environment variables in the env parameter are also optional. Create the model and deploy it with the following code:

framework_version = '1.6'
py_version = 'py3'
instance_type = 'ml.c5.9xlarge'
from sagemaker.pytorch.model import PyTorchModel
from sagemaker.predictor import Predictor

sm_model = PyTorchModel(model_data=model_path,
                               framework_version=framework_version,
                               role=role,
                               sagemaker_session=sess,
                               entry_point='code/inference.py',
                               py_version=py_version,
                               env={"COMPILEDMODEL": 'False', 'MMS_MAX_RESPONSE_SIZE': '100000000', 'MMS_DEFAULT_RESPONSE_TIMEOUT': '500'}
                              )
uncompiled_predictor = sm_model.deploy(initial_instance_count=1, instance_type=instance_type)
-------------!

Use Neo to compile the model

Next, we can compile the model using Neo. The resulting compiled_model is also a SageMaker model and can be deployed to a SageMaker endpoint. When the compiled model is deployed, SageMaker automatically integrates the TVM runtime to interpret the compiled model. Compile the model with the following code:

input_layer_name = 'input0'
input_shape = [1,3,416,416]
data_shape = json.dumps({input_layer_name: input_shape})
target_device = 'ml_c5'
framework = 'PYTORCH'
compiled_env = {"MMS_DEFAULT_WORKERS_PER_MODEL":'1', "TVM_NUM_THREADS": '36', "COMPILEDMODEL": 'True', 'MMS_MAX_RESPONSE_SIZE': '100000000', 'MMS_DEFAULT_RESPONSE_TIMEOUT': '500'}
sm_model_compiled = PyTorchModel(model_data=model_path,
                               framework_version = framework_version,
                               role=role,
                               sagemaker_session=sess,
                               entry_point='code/inference.py',
                               py_version=py_version,
                               env=compiled_env
                              )
compiled_model = sm_model_compiled.compile(target_instance_family=target_device, 
                                         input_shape=data_shape,
                                         job_name=compilation_job_name,
                                         role=role,
                                         framework=framework.lower(),
                                         framework_version=framework_version,
                                         output_path=compiled_model_path
                                        )
?...............................................!
compiled_model.env = compiled_env

Deploy the compiled model as an optimized predictor with the following code:

optimized_predictor = compiled_model.deploy(initial_instance_count = 1,
                                  instance_type = instance_type
                                 )
--------------------------!!

Make predictions using the endpoints

Finally, we can compare the performance between the uncompiled and compiled models. We run 1,000 sequential iterations and calculate the round trip latency for each endpoint request:

iters = 1000
warmup = 100
client = boto3.client('sagemaker-runtime', region_name=region)

content_type = 'application/x-image'

sample_img_url = "https://github.com/ultralytics/yolov5/raw/master/data/images/zidane.jpg"
body = requests.get(sample_img_url).content
   
compiled_perf = []
uncompiled_perf = []
  
for i in range(iters):
    t0 = time.time()
    response = client.invoke_endpoint(EndpointName=optimized_predictor.endpoint_name, Body=body, ContentType=content_type)
    t1 = time.time()
    #convert to millis
    compiled_elapsed = (t1-t0)*1000

    t0 = time.time()
    response = client.invoke_endpoint(EndpointName=uncompiled_predictor.endpoint_name, Body=body, ContentType=content_type)
    t1 = time.time()
    #convert to millis
    uncompiled_elapsed = (t1-t0)*1000
    

    if warmup == 0:
        compiled_perf.append(compiled_elapsed)
        uncompiled_perf.append(uncompiled_elapsed)
    else:
        print(f'warmup ({i}, {iters}) : c - {compiled_elapsed} ms . uc - {uncompiled_elapsed} ms')
        warmup = warmup – 1

Performance comparison

The following graph shows the measured latency speedup of the compiled model compared with a uncompiled model on the same instance. The default SageMaker PyTorch container uses Intel one-DNN libraries for inference acceleration, so any speedup from Neo is on top of what’s provided by Intel libraries. Speedup is specific to the model and instance type, so the performance gain achieved with Neo varies based on your model architecture and target instance type.

On the ml.c5.9xlarge instance, we see an average latency of 397 milliseconds for the baseline endpoint and 188 milliseconds for the Neo optimized endpoint. Similarly, for the tail latency (95th percentile), we see 446 milliseconds for the baseline endpoint and 254 milliseconds for the Neo optimized endpoint. Optimizing the model with Neo resulted in twice as fast performance.

Speedup across common models and frameworks

As you saw in the preceding section, using Neo for model compilation provides a speedup over an uncompiled model using Intel one-DNN libraries alone. The following table lists latency speedups that you might see from a few other common models across frameworks in CPU and GPU instances.

Task Framework Model Target SageMaker Speedup
Image Classification TensorFlow mobilenetv2 GPU 200%
Image Classification TensorFlow resnet50 CPU 286%
Image Classification PyTorch resnet152 CPU 33%
Semantic Segmentation TensorFlow u-net CPU 22%

These numbers are only benchmarks and vary for your specific model, instance type, and payload. The numbers in the table are measured end to end on SageMaker. Other optimizations such as pruning and quantization are also worth looking into as part of your overall model optimization strategy.

Summary

In this post, we deployed a PyTorch YOLOv4 model on a SageMaker ML CPU-based instance and compared performance between an uncompiled model and a model compiled with Neo. We saw a performance increase in the Neo compiled model—twice as fast compared to an uncompiled model on the same SageMaker ML instance.

We continue to improve Neo’s operator coverage and performance across different frameworks and models. If you have any questions or comments, use the Amazon SageMaker Discussion Forums or send an email to amazon-ei-feedback@amazon.com.


About the Author

Santosh Bhavani is a Senior Technical Product Manager with the Amazon SageMaker Elastic Inference team. He focuses on helping SageMaker customers accelerate model inference and deployment. In his spare time, he enjoys traveling, playing tennis, and drinking lots of Pu’er tea.


Vamshidhar Dantu is a Software Developer with AWS Deep Learning. He focuses on building scalable and easily deployable deep learning systems. In his spare time, he enjoy spending time with family and playing badminton.


Read More

Amazon Lookout for Vision Accelerator Proof of Concept (PoC) Kit

Amazon Lookout for Vision is a machine learning service that spots defects and anomalies in visual representations using computer vision. With Amazon Lookout for Vision, manufacturing companies can increase quality and reduce operational costs by quickly identifying differences in images of objects at scale.

Basler and Amazon Lookout for Vision have collaborated to launch the “Amazon Lookout for Vision Accelerator PoC Kit” (APK) to help customers complete a Lookout for Vision PoC in less than six weeks. The APK is an “out-of-the-box” vision system (hardware + software) to capture and transmit images to the Lookout for Vision service and train/evaluate Lookout for Vision models. The APK simplifies camera selection/installation and capturing/analyzing images, enabling you to quickly validate Lookout for Vision performance before moving to a production setup.

Most manufacturing and industrial customers have multiple use cases (such as multiple production lines or multiple product SKUs) in which Amazon Lookout for Vision can provide support in automated visual inspection. The APK enables customers to use the kit to test Lookout for Vision functionalities for their use case first and then decide on purchasing a customized vision solution for multiple lines. Without the APK, you would have to procure and set up a vision system that integrates with Amazon Lookout for Vision, which is resource and time-consuming and can delay PoC starts. The integrated hardware and software design of the APK comprises an automated AWS Cloud connection, image preprocessing, and direct image transmission to Amazon Lookout for Vision – saving you time and resources.

The APK is intended to be set up and installed by technical staff with easy-to-follow instructions.

The APK enables you to quickly capture and transmit images, train Amazon Lookout for Vision models, run inferences to detect anomalies, and assess model performance. The following diagram illustrates our solution architecture.

The kit comes equipped with a:

  1. Basler ace camera
  2. Camera lens
  3. USB cable
  4. Network cable
  5. Power cable for the ring light
  6. Basler standard ring light
  7. Basler camera mount
  8. NVIDIA Jetson Nano development board (in its housing)
  9. Development board power supply

See corresponding items in the following image:

In the next section, we will walk through the steps for acquiring an image, extracting the region of interest (ROI) with image preprocessing, uploading training images to an Amazon Simple Storage Service (Amazon S3) bucket, training an Amazon Lookout for Vision model, and running inference on test images. The train and test images are of a printed circuit board. The Lookout for Vision model will learn to classify images into normal and anomaly (scratches, bent pins, bad solder, and missing components). In this blog, we will create a training dataset using the Lookout for Vision auto-split feature on the console with a single dataset. You can also set up a separate training and test dataset using the kit.

Kit Setup

After you unbox the kit, complete the following steps:

  1. Firmly screw the lens onto the camera mount.
  2. Connect the camera to the board with the supplied USB cable.
  3. For poorly lighted areas, use the supplied ring light. Note: If you use the ring light for training images, you should also use it to capture inference images.

  1. Connect the board to the network using a network cable (you can optionally use the supplied cable).
  2. Connect the board to its power supply and plug it in. In the image below, please note the camera stand and the base platform show an example set, but they are not provided as part of the APK.

  1. A monitor, keyboard, and mouse have to be attached when turning on the system for the first time.
  2. On the first boot, accept the end user licensing agreement from NVIDIA. You will see a series of prompts to set up the location, user name, and password, etc. For more information, see the first boot section on the initial setup.
  3. Log in to APK with the user name and password. You will see the following screen. Bring up the Linux terminal window using the search icon (green icon on the top left). This will display the APK IP address.

  1. Enter the command “ip addr show” command. This will display the APK IP address (For, e.g., 192.168.0.22 as shown in the following screenshot)

  1. Go to your Chrome browser on a machine on the same network and enter the APK IP address. The kit’s webpage should come up with a live stream from the camera.

Now we can do the optical setup (as described in the next section), and start taking pictures.

Image acquisition, preprocessing, and cloud connection setup

  1. With the browser running and showing the webpage of the kit, choose Configuration.

In a few seconds, a live image from the camera appears.

  1. Create an AWS account if you don’t have one. One can create an AWS account for free. The new user has access to AWS free tier service for the first 12 months. For more information, see creating and activating a new AWS account.
  2. Now you set up the connection in the cloud to your AWS account.
  3. Choose Create AWS Resources.

  1. In the dialog box that appears, choose Create AWS Resources.

You are redirected to the AWS Management Console, where you are asked to run the AWS CloudFormation stack.

  1. As part of creating the stack, create an S3 bucket in your specified region. Accept the check box to create AWS Identity and Access Management (IAM) resources.
  2. Choose Create Stack.

  1. When the stack is created, on the Outputs tab, copy the value for DeviceCertUrl.

  1. Return to the kit’s webpage and enter the URL value.
  2. Choose OK
  3. You are redirected back to the live image; the setup is now complete.
  4. Place the camera some distance away from the object to be inspected so that the object is fully in the live camera view and fills up the view as much as possible.
  5. As a general guideline, the operator should be able to see the anomaly in the image so that the Amazon Lookout for Vision models can learn the defects from the normal image. Since the supplied lens has a minimal distance to the object of 100 millimeters, the object should be placed at or greater than the minimal distance.
  6. If the object at this distance doesn’t fill up the image, you can cut out the background using the region-of-interest (ROI) tool described below.
  7. Check the focus, and either change the object’s distance to the lens or turn the focus on the lens (most likely a combination).
  8. If the live image appears too dark or too light, adjust the Gain and Exposure Times Note: Too much gain causes more noise in the image, and a long exposure time causes blurriness if the object is moving.

  1. If the object is focused and takes up a large part of the picture, use the ROI tool to reduce the unnecessary “background information”.

  1. The ROI tool selects the relevant part of the image and reduces background information. The image in the ROI is sent to the Amazon S3 bucket and will be used for Lookout for Vision training and inference.

  1. Choose Apply to reconfigure the camera to concentrate on this region.
  2. You can see the ROI on the live view. If you change the camera angle or distance to the object, you may need to change or reset the ROI. You can do this by choosing “Select Region of Interest” again and repeating the process.

Upload training images

 We are now ready to upload our training images.

  1. Choose the Training tab on the browser webpage.

  1. On the drop-down menu, choose Training: Normal or Training: Anomaly. Images are sent to the appropriate folder in the Amazon S3 bucket.

  1. Choose Trigger to trigger images from an object with and without anomalies. The camera may also be triggered by a hardware trigger direct to its I/O pins. For more information, see connector pin numbering and assignments.

It’s essential that each image captured is of a unique object and not the same object captured multiple times. If you repeat the same image, the model will not learn normal, defect-free variations of your object, and it could negatively impact model performance.

  1. After every trigger, the image is sent to the S3 bucket. At a minimum, you need to capture 20 normal and 10 anomalous images to use the single dataset auto-split option on the Amazon Lookout for Vision console. In general, the more images you capture, the better model performance you can expect. A table on the website shows the last image sent as a thumbnail and the number of images in each category.

Lookout for Vision Model Dataset and Training

 In this step, we prepare the dataset and start training.

  1. Choose Add to Lookout for Vision button when you have a minimum of 20 normal and 10 anomalous images. Because we’re using the single dataset and the auto-split option, it’s OK to have no test images. The auto-split option automatically divides the 30 images into a training and test dataset internally.

  1. Choose Create Dataset in Lookout for Vision

  1. You are redirected to the Amazon Lookout for Vision console.
  2. Select Create a single dataset.

  1. Select Import images from S3 bucket

  1. For S3 URL, enter the URL for the S3 training images directory as shown in the following picture.
  2. Select Automatically attach labels to images based on the folder name.
  3. This option imports the images with the correct labels in the dataset.
  4. Choose Create dataset

  1. Choose Train model button to start training

On the Models page, you can see the status indicate Training in progress and change to Training complete when the model is trained.

  1. Choose your model to see the model performance.

The model reports the precision, recall, and F1 scores. Precision is a measure of the number of correct anomalies out of the total predictions. A recall is a measure of the number of predicted anomalies out of the total anomalies. The F1 score is an average of precision and recall measures.

In general, you can improve model performance by adding more training images and providing a consistent lighting setup. Please note lighting can change during the day depending on your environment. (such as sunlight coming through the windows). You can control the lighting by closing the curtains and using the provided ring light. For more information, see how to light up your vision system.

Run Inference on new images

To run inferences on new images, complete the following steps:

  1. On the kit webpage, choose the Inference
  2. Choose Start the model to host the Lookout for Vision model.

  1. On the drop-down menu, choose the project you want to use and the model version.

  1. Place a new object that the model hasn’t seen before in front of the camera, and choose trigger in the browser webpage of the kit.

Make sure the object pose and lighting is similar to the training object pose and lighting. This is important to prevent the model from identifying a false anomaly due to lighting or pose changes.

Inference results for the current image are shown in the browser window. You can repeat this exercise with new objects and test your model performance on different anomaly types.

The cumulated inference results are available on the Amazon Lookout for Vision console on the Dashboard page.

In most cases, you can expect to implement these steps in a few hours, get a quick assessment of your use case fit by running inferences on unseen test images, and correlate the inference results with the model precision, recall, and F1 scores.

Conclusion

Basler and Amazon Web Services collaborated on an “Amazon Lookout for Vision Accelerator PoC Kit” (APK). The APK is a testing camera system that customers can use for fast prototyping of their Lookout for Vision application. It includes out-of-the-box vision hardware (camera, processing unit, lighting, and accessories) with integrated software components to quickly connect to the AWS Cloud and Lookout for Vision.

With direct integration with Lookout for Vision, the APK offers you a new and efficient approach for rapid prototyping and shortens your proof-of-concept evaluation by weeks. The APK can give you the confidence to evaluate your anomaly detection model performance before moving to production. As the kit is a bundle of fixed components, changes in the hard-and software may be necessary for the next step, depending on the customer application. After completing your PoC with the APK, Basler and AWS will offer customers a gap analysis to determine if the scope of the kit met your use case requirements or adjustments are needed in terms of a customized solution.

Note: To help ensure the highest level of success in your prototyping efforts, we require you to have a kit qualification discussion with Basler before purchase.

Contact Basler today to discuss your use case fit for APK: AWSBASLER@baslerweb.com

Learn more | Basler Tools for Component Selection


About the Authors

Amit Gupta is an AI Services Solutions Architect at AWS. He is passionate about enabling customers with well-architected machine learning solutions at scale.


Mark Hebbel is Head of IoT and Applications at Basler AG. He and his team implement camera based solutions for customers in the machine vision space. He has a special interest in decentralized architectures.

Read More

Project Guideline: Enabling Those with Low Vision to Run Independently

Posted by Xuan Yang, Software Engineer, Google Research

For the 285 million people around the world living with blindness or low vision, exercising independently can be challenging. Earlier this year, we announced Project Guideline, an early-stage research project, developed in partnership with Guiding Eyes for the Blind, that uses machine learning to guide runners through a variety of environments that have been marked with a painted line. Using only a phone running Guideline technology and a pair of headphones, Guiding Eyes for the Blind CEO Thomas Panek was able to run independently for the first time in decades and complete an unassisted 5K in New York City’s Central Park.

Safely and reliably guiding a blind runner in unpredictable environments requires addressing a number of challenges. Here, we will walk through the technology behind Guideline and the process by which we were able to create an on-device machine learning model that could guide Thomas on an independent outdoor run. The project is still very much under development, but we’re hopeful it can help explore how on-device technology delivered by a mobile phone can provide reliable, enhanced mobility and orientation experiences for those who are blind or low vision.

Thomas Panek using Guideline technology to run independently outdoors.

Project Guideline
The Guideline system consists of a mobile device worn around the user’s waist with a custom belt and harness, a guideline on the running path marked with paint or tape, and bone conduction headphones. Core to the Guideline technology is an on-device segmentation model that takes frames from a mobile device’s camera as input and classifies every pixel in the frame into two classes, “guideline” and “not guideline”. This simple confidence mask, applied to every frame, allows the Guideline app to predict where runners are with respect to a line on the path, without using location data. Based on this prediction and the proceeding smoothing/filtering function, the app sends audio signals to the runners to help them orient and stay on the line, or audio alerts to tell runners to stop if they veer too far away.

Project Guideline uses Android’s built-in Camera 2 and MLKit APIs and adds custom modules to segment the guideline, detect its position and orientation, filter false signals, and send a stereo audio signal to the user in real-time.

We faced a number of important challenges in building the preliminary Guideline system:

  1. System accuracy: Mobility for the blind and low vision community is a challenge in which user safety is of paramount importance. It demands a machine learning model that is capable of generating accurate and generalized segmentation results to ensure the safety of the runner in different locations and under various environmental conditions.
  2. System performance: In addition to addressing user safety, the system needs to be performative, efficient, and reliable. It must process at least 15 frames per second (FPS) in order to provide real-time feedback for the runner. It must also be able to run for at least 3 hours without draining the phone battery, and must work offline, without the need for internet connection should the walking/running path be in an area without data service.
  3. Lack of in-domain data: In order to train the segmentation model, we needed a large volume of video consisting of roads and running paths that have a yellow line on them. To generalize the model, data variety is equally as critical as data quantity, requiring video frames taken at different times of day, with different lighting conditions, under different weather conditions, at different locations, etc.

Below, we introduce solutions for each of these challenges.

Network Architecture
To meet the latency and power requirements, we built the line segmentation model on the DeepLabv3 framework, utilizing MobilenetV3-Small as the backbone, while simplifying the outputs to two classes – guideline and background.

The model takes an RGB frame and generates an output grayscale mask, representing the confidence of each pixel’s prediction.

To increase throughput speed, we downsize the camera feed from 1920 x 1080 pixels to 513 x 513 pixels as input to the DeepLab segmentation model. To further speed-up the DeepLab model for use on mobile devices, we skipped the last up-sample layer, and directly output the 65 x 65 pixel predicted masks. These 65 x 65 pixel predicted masks are provided as input to the post processing. By minimizing the input resolution in both stages, we’re able to improve the runtime of the segmentation model and speed up post-processing.

Data Collection
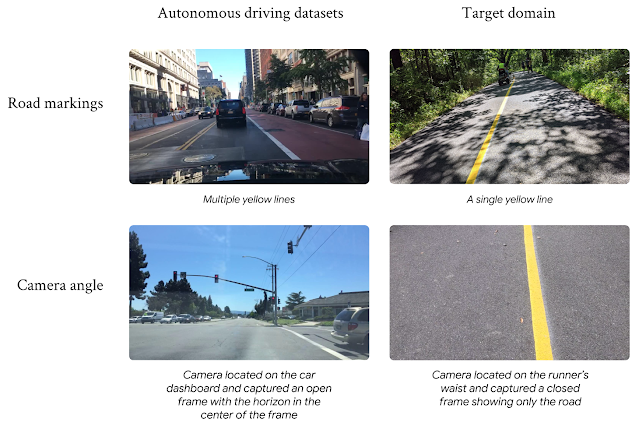
To train the model, we required a large set of training images in the target domain that exhibited a variety of path conditions. Not surprisingly, the publicly available datasets were for autonomous driving use cases, with roof mounted cameras and cars driving between the lines, and were not in the target domain. We found that training models on these datasets delivered unsatisfying results due to the large domain gap. Instead, the Guideline model needed data collected with cameras worn around a person’s waist, running on top of the line, without the adversarial objects found on highways and crowded city streets.

The large domain gap between autonomous driving datasets and the target domain. Images on the left courtesy of the Berkeley DeepDrive dataset.

With preexisting open-source datasets proving unhelpful for our use case, we created our own training dataset composed of the following:

  1. Hand-collected data: Team members temporarily placed guidelines on paved pathways using duct tape in bright colors and recorded themselves running on and around the lines at different times of the day and in different weather conditions.
  2. Synthetic data: The data capture efforts were complicated and severely limited due to COVID-19 restrictions. This led us to build a custom rendering pipeline to synthesize tens of thousands of images, varying the environment, weather, lighting, shadows, and adversarial objects. When the model struggled with certain conditions in real-world testing, we were able to generate specific synthetic datasets to address the situation. For example, the model originally struggled with segmenting the guideline amidst piles of fallen autumn leaves. With additional synthetic training data, we were able to correct for that in subsequent model releases.
Rendering pipeline generates synthetic images to capture a broad spectrum of environments.

We also created a small regression dataset, which consisted of annotated samples of the most frequently seen scenarios combined with the most challenging scenarios, including tree and human shadows, fallen leaves, adversarial road markings, sunlight reflecting off the guideline, sharp turns, steep slopes, etc. We used this dataset to compare new models to previous ones and to make sure that an overall improvement in accuracy of the new model did not hide a reduction in accuracy in particularly important or challenging scenarios.

Training Procedure
We designed a three-stage training procedure and used transfer learning to overcome the limited in-domain training dataset problem. We started with a model that was pre-trained on Cityscape, and then trained the model using the synthetic images, as this dataset is larger but of lower quality. Finally, we fine-tuned the model using the limited in-domain data we collected.

Three-stage training procedure to overcome the limited data issue. Images in the left column courtesy of Cityscapes.

Early in development, it became clear that the segmentation model’s performance suffered at the top of the image frame. As the guidelines travel further away from the camera’s point of view at the top of the frame, the lines themselves start to vanish. This causes the predicted masks to be less accurate at the top parts of the frame. To address this problem, we computed a loss value that was based on the top k pixel rows in every frame. We used this value to select those frames that included the vanishing guidelines with which the model struggled, and trained the model repeatedly on those frames. This process proved to be very helpful not only in addressing the vanishing line problem, but also for solving other problems we encountered, such as blurry frames, curved lines and line occlusion by adversarial objects.

The segmentation model’s accuracy and robustness continuously improved even in challenging cases.

System Performance
Together with Tensorflow Lite and ML Kit, the end-to-end system runs remarkably fast on Pixel devices, achieving 29+ FPS on Pixel 4 XL and 20+ FPS on Pixel 5. We deployed the segmentation model entirely on DSP, running at 6 ms on Pixel 4 XL and 12 ms on Pixel 5 with high accuracy. The end-to-end system achieves 99.5% frame success rate, 93% mIoU on our evaluation dataset, and passes our regression test. These model performance metrics are incredibly important and enable the system to provide real-time feedback to the user.

What’s Next
We’re still at the beginning of our exploration, but we’re excited about our progress and what’s to come. We’re starting to collaborate with additional leading non-profit organizations that serve the blind and low vision communities to put more Guidelines in parks, schools, and public places. By painting more lines, getting direct feedback from users, and collecting more data under a wider variety of conditions, we hope to further generalize our segmentation model and improve the existing feature-set. At the same time, we are investigating new research and techniques, as well as new features and capabilities that would improve the overall system robustness and reliability.

To learn more about the project and how it came to be, read Thomas Panek’s story. If you want to help us put more Guidelines in the world, please visit goo.gle/ProjectGuideline.

Acknowledgements
Project Guideline is a collaboration across Google Research, Google Creative Lab, and the Accessibility Team. We especially would like to thank our team members: Mikhail Sirotenko, Sagar Waghmare, Lucian Lonita, Tomer Meron, Hartwig Adam, Ryan Burke, Dror Ayalon, Amit Pitaru, Matt Hall, John Watkinson, Phil Bayer, John Mernacaj, Cliff Lungaretti, Dorian Douglass, Kyndra LoCoco. We also thank Fangting Xia, Jack Sim and our other colleagues and friends from the Mobile Vision team and Guiding Eyes for the Blind.

Read More

Google I/O 2021: Being helpful in moments that matter

It’s great to be back hosting our I/O Developers Conference this year. Pulling up to our Mountain View campus this morning, I felt a sense of normalcy for the first time in a long while. Of course, it’s not the same without our developer community here in person. COVID-19 has deeply affected our entire global community over the past year and continues to take a toll. Places such as Brazil, and my home country of India, are now going through their most difficult moments of the pandemic yet. Our thoughts are with everyone who has been affected by COVID and we are all hoping for better days ahead.

The last year has put a lot into perspective. At Google, it’s also given renewed purpose to our mission to organize the world’s information and make it universally accessible and useful. We continue to approach that mission with a singular goal: building a more helpful Google, for everyone. That means being helpful to people in the moments that matter and giving everyone the tools to increase their knowledge, success, health and happiness. 

Helping in moments that matter

Sometimes it’s about helping in big moments, like keeping 150 million students and educators learning virtually over the last year with Google Classroom. Other times it’s about helping in little moments that add up to big changes for everyone. For example, we’re introducing safer routing in Maps. This AI-powered capability in Maps can identify road, weather and traffic conditions where you are likely to brake suddenly; our aim is to reduce up to 100 million events like this every year. 

Reimagining the future of work

One of the biggest ways we can help is by reimagining the future of work. Over the last year, we’ve seen work transform in unprecedented ways, as offices and coworkers have been replaced by kitchen countertops and pets. Many companies, including ours, will continue to offer flexibility even when it’s safe to be in the same office again. Collaboration tools have never been more critical, and today we announced a new smart canvas experience in Google Workspace that enables even richer collaboration. 

GIF of Smart Canvas integration with Google Meet

 Smart Canvas integration with Google Meet

Responsible next-generation AI

We’ve made remarkable advances over the past 22 years, thanks to our progress in some of the most challenging areas of AI, including translation, images and voice. These advances have powered improvements across Google products, making it possible to talk to someone in another language using Assistant’s interpreter mode, view cherished memories on Photos or use Google Lens to solve a tricky math problem. 

We’ve also used AI to improve the core Search experience for billions of people by taking a huge leap forward in a computer’s ability to process natural language. Yet, there are still moments when computers just don’t understand us. That’s because language is endlessly complex: We use it to tell stories, crack jokes and share ideas — weaving in concepts we’ve learned over the course of our lives. The richness and flexibility of language make it one of humanity’s greatest tools and one of computer science’s greatest challenges. 

Today I am excited to share our latest research in natural language understanding: LaMDA. LaMDA is a language model for dialogue applications. It’s open domain, which means it is designed to converse on any topic. For example, LaMDA understands quite a bit about the planet Pluto. So if a student wanted to discover more about space, they could ask about Pluto and the model would give sensible responses, making learning even more fun and engaging. If that student then wanted to switch over to a different topic — say, how to make a good paper airplane — LaMDA could continue the conversation without any retraining.

This is one of the ways we believe LaMDA can make information and computing radically more accessible and easier to use (and you can learn more about that here). 

We have been researching and developing language models for many years. We’re focused on ensuring LaMDA meets our incredibly high standards on fairness, accuracy, safety and privacy, and that it is developed consistently with our AI Principles. And we look forward to incorporating conversation features into products like Google Assistant, Search and Workspace, as well as exploring how to give capabilities to developers and enterprise customers.

LaMDA is a huge step forward in natural conversation, but it’s still only trained on text. When people communicate with each other they do it across images, text, audio and video. So we need to build multimodal models (MUM) to allow people to naturally ask questions across different types of information. With MUM you could one day plan a road trip by asking Google to “find a route with beautiful mountain views.” This is one example of how we’re making progress towards more natural and intuitive ways of interacting with Search.

Pushing the frontier of computing

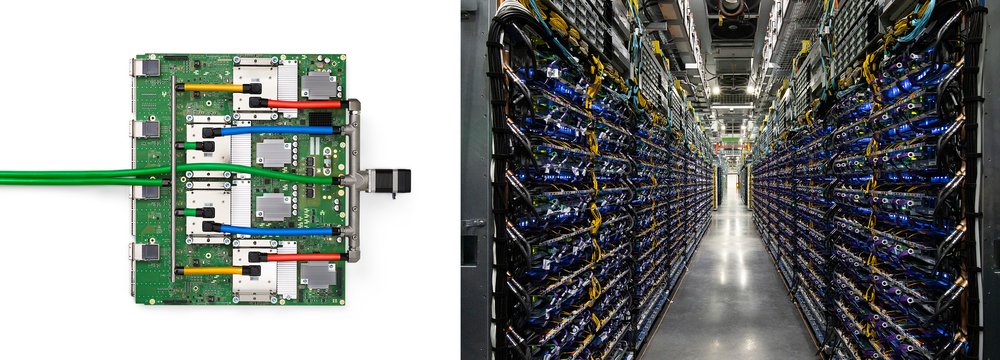
Translation, image recognition and voice recognition laid the foundation for complex models like LaMDA and multimodal models. Our compute infrastructure is how we drive and sustain these advances, and TPUs, our custom-built machine learning processes, are a big part of that. Today we announced our next generation of TPUs: the TPU v4. These are powered by the v4 chip, which is more than twice as fast as the previous generation. One pod can deliver more than one exaflop, equivalent to the computing power of 10 million laptops combined. This is the fastest system we’ve ever deployed, and a historic milestone for us. Previously to get to an exaflop, you needed to build a custom supercomputer. And we’ll soon have dozens of TPUv4 pods in our data centers, many of which will be operating at or near 90% carbon-free energy. They’ll be available to our Cloud customers later this year.

Images of a TPU v4 chip tray, and of TPU v4 pods at our Oklahoma data center

Left: TPU v4 chip tray; Right: TPU v4 pods at our Oklahoma data center 

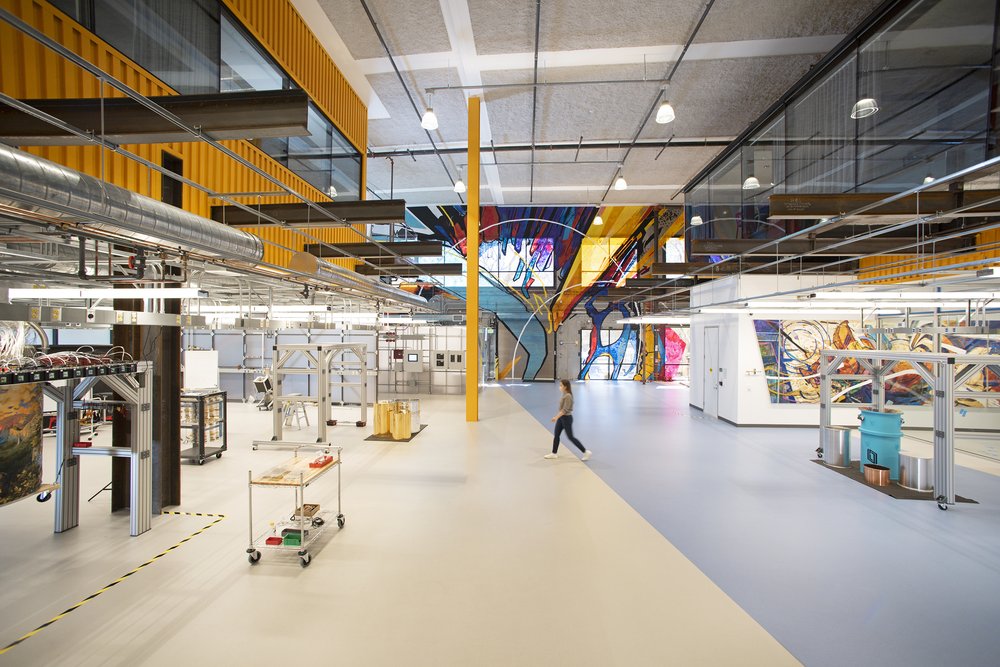
It’s tremendously exciting to see this pace of innovation. As we look further into the future, there are types of problems that classical computing will not be able to solve in reasonable time. Quantum computing can help. Achieving our quantum milestone was a tremendous accomplishment, but we’re still at the beginning of a multiyear journey. We continue to work to get to our next big milestone in quantum computing: building an error-corrected quantum computer, which could help us increase battery efficiency, create more sustainable energy and improve drug discovery. To help us get there, we’ve opened a new state of the art Quantum AI campus with our first quantum data center and quantum processor chip fabrication facilities.

A photo of the interior of our new Quantum AI campus

Inside our new Quantum AI campus.

Safer with Google

At Google we know that our products can only be as helpful as they are safe. And advances in computer science and AI are how we continue to make them better. We keep more users safe by blocking malware, phishing attempts, spam messages and potential cyber attacks than anyone else in the world.

Our focus on data minimization pushes us to do more, with less data. Two years ago at I/O, I announced Auto-Delete, which encourages users to have their activity data automatically and continuously deleted. We’ve since made Auto-Delete the default for all new Google Accounts. Now, after 18 months we automatically delete your activity data, unless you tell us to do it sooner. It’s now active for over 2 billion accounts.

All of our products are guided by three important principles: With one of the world’s most advanced security infrastructures, our products are secure by default. We strictly uphold responsible data practices so every product we build is private by design. And we create easy to use privacy and security settings so you’re in control.

Long-term research: Project Starline

We were all grateful to have video conferencing over the last year to stay in touch with family and friends, and keep schools and businesses going. But there is no substitute for being together in the room with someone. 

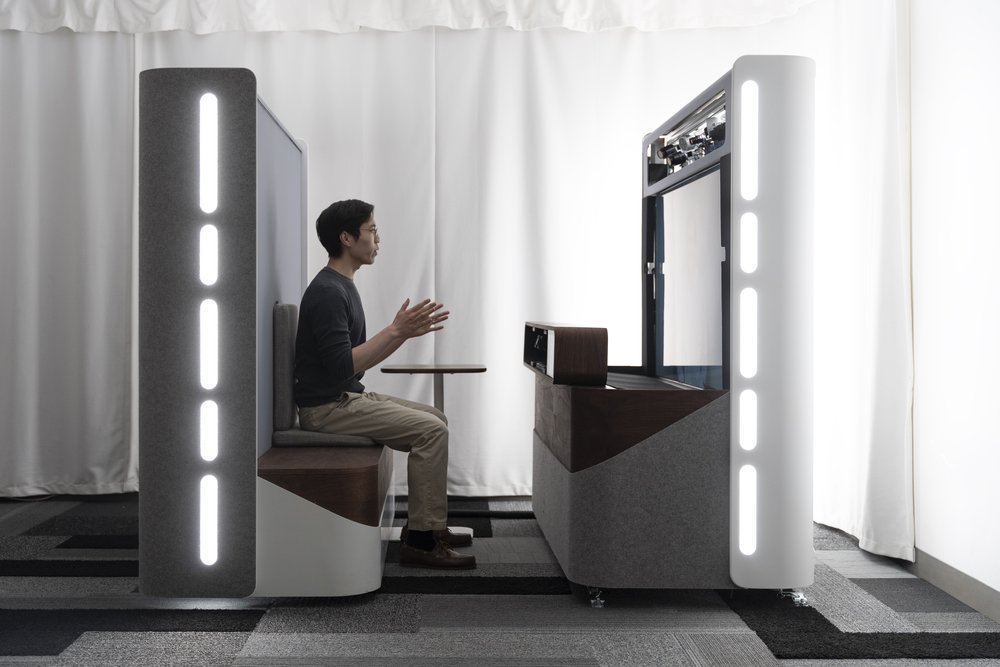
Several years ago we kicked off a project called Project Starline to use technology to explore what’s possible. Using high-resolution cameras and custom-built depth sensors, it captures your shape and appearance from multiple perspectives, and then fuses them together to create an extremely detailed, real-time 3D model. The resulting data is many gigabits per second, so to send an image this size over existing networks, we developed novel compression and streaming algorithms that reduce the data by a factor of more than 100. We also developed a breakthrough light-field display that shows you the realistic representation of someone sitting in front of you. As sophisticated as the technology is, it vanishes, so you can focus on what’s most important. 

We’ve spent thousands of hours testing it at our own offices, and the results are promising. There’s also excitement from our lead enterprise partners, and we’re working with partners in health care and media to get early feedback. In pushing the boundaries of remote collaboration, we’ve made technical advances that will improve our entire suite of communications products. We look forward to sharing more in the months ahead.

A person in a booth talking to someone over Project Starline

A person having a conversation with someone over Project Starline.

Solving complex sustainability challenges

Another area of research is our work to drive forward sustainability. Sustainability has been a core value for us for more than 20 years. We were the first major company to become carbon neutral in 2007. We were the first to match our operations with 100% renewable energy in 2017, and we’ve been doing it ever since. Last year we eliminated our entire carbon legacy. 

Our next ambition is our biggest yet: operating on carbon free energy by the year 2030. This represents a significant step change from current approaches and is a moonshot on the same scale as quantum computing. It presents equally hard problems to solve, from sourcing carbon-free energy in every place we operate to ensuring it can run every hour of every day. 

Building on the first carbon-intelligent computing platform that we rolled out last year, we’ll soon be the first company to implement carbon-intelligent load shifting across both time and place within our data center network. By this time next year we’ll be shifting more than a third of non-production compute to times and places with greater availability of carbon-free energy. And we are working to apply our Cloud AI with novel drilling techniques and fiber optic sensing to deliver geothermal power in more places, starting in our Nevada data centers next year.

Investments like these are needed to get to 24/7 carbon-free energy, and it’s happening in Mountain View, California, too. We’re building our new campus to the highest sustainability standards. When completed, these buildings will feature a first-of-its-kind dragonscale solar skin, equipped with 90,000 silver solar panels and the capacity to generate nearly 7 megawatts. They will house the largest geothermal pile system in North America to help heat buildings in the winter and cool them in the summer. It’s been amazing to see it come to life.

Images with a rendering of the new Charleston East campus in Mountain View, California; and a model view with dragon scale solar skin.

Left: Rendering of the new Charleston East campus in Mountain View, California; Right: Model view with dragon scale solar skin.

A celebration of technology

I/O isn’t just a celebration of technology but of the people who use it, and build it — including the millions of developers around the world who joined us virtually today. Over the past year we’ve seen people use technology in profound ways: To keep themselves healthy and safe, to learn and grow, to connect and to help one another through really difficult times. It’s been inspiring to see and has made us more committed than ever to being helpful in the moments that matter. 

I look forward to seeing everyone at next year’s I/O — in person, I hope. Until then, be safe and well.

Read More

Tackling tuberculosis screening with AI

Today we’re sharing new AI research that aims to improve screening for one of the top causes of death worldwide: tuberculosis (TB). TB infects 10 million people per year and disproportionately affects people in low-to-middle-income countries. Diagnosing TB early is difficult because its symptoms can mimic those of common respiratory diseases.

Cost-effective screening, specifically chest X-rays, has been identified as one way to improve the screening process. However, experts aren’t always available to interpret results. That’s why the World Health Organization (WHO) recently recommended the use of computer-aided detection (CAD) for screening and triaging.

To help catch the disease early and work toward eventually eradicating it, Google researchers developed an AI-based tool that builds on our existing work in medical imaging to identify potential TB patients for follow-up testing. 

A deep learning system to detect active pulmonary tuberculosis  

In a new study released this week, we found that the right deep learning system can be used to accurately identify patients who are likely to have active TB based on their chest X-ray. By using this screening tool as a preliminary step before ordering a more expensive diagnostic test, our study showed that effective AI-powered screening could save up to 80% of the cost per positive TB case detected. 

Our AI-based tool was able to accurately detect active pulmonary TB cases with false-negative and false-positive detection rates that were similar to 14 radiologists. This accuracy was maintained even when examining patients who were HIV-positive, a population that is at higher risk of developing TB and is challenging to screen because their chest X-rays may differ from typical TB cases.

To make sure the model worked for patients from a wide range of races and ethnicities, we used de-identified data from nine countries to train the model and tested it on cases from five countries. These findings build on our previousresearch that showed AI can detect common issues like collapsed lungs, nodules or fractures in chest X-rays. 

Applying these findings in the real world

The AI system produces a number between 0 and 1 that indicates the risk of TB. For the system to be useful in a real-world setting, there needs to be agreement about what risk level indicates that patients should be recommended for additional testing. Calibrating this threshold can be time-consuming and expensive because administrators can only come to this number after running the system on hundreds of patients, testing these patients, and analyzing the results. 

Based on the performance of our model, our research suggests that any clinic could start from this default threshold and be confident that the model will perform similarly to radiologists, making it easier to deploy this technology. From there, clinics can adjust the threshold based on local needs and resources. For example, regions with fewer resources may use a higher cut-off point to reduce the number of follow-up tests needed. 

The path to eradicating tuberculosis

The WHO’s “The End TB Strategy” lays out the global efforts that are underway to dramatically reduce the incidence of tuberculosis in the coming decade. Because TB can remain pervasive in communities, even if a relatively low number of people have it at a given time, more and earlier screenings are critical to reducing its prevalence. 

We’ll keep contributing to these efforts — especially when it comes to research and development. Later this year, we plan to expand this work through two separate research studies with our partners, Apollo Hospitals in India and the Centre for Infectious Disease Research in Zambia (CIDRZ). 

Read More

Using AI to help find answers to common skin conditions

Artificial intelligence (AI) has the potential to help clinicians care for patients and treat disease — from improving the screening process for breast cancer to helping detect tuberculosis more efficiently. When we combine these advances in AI with other technologies, like smartphone cameras, we can unlock new ways for people to stay better informed about their health, too.  

Today at  I/O, we shared a preview of an AI-powered dermatology assist tool that helps you understand what’s going on with issues related to your body’s largest organ: your skin, hair and nails. Using many of the same techniques that detect diabetic eye disease or lung cancer in CT scans, this tool gets you closer to identifying dermatologic issues — like a rash on your arm that’s bugging you — using your phone’s camera. 

How our AI-powered dermatology tool works 

Each year we see almost ten billion Google Searches related to skin, nail and hair issues. Two billion people worldwide suffer from dermatologic issues, but there’s a global shortage of specialists. While many people’s first step involves going to a Google Search bar, it can be difficult to describe what you’re seeing on your skin through words alone.

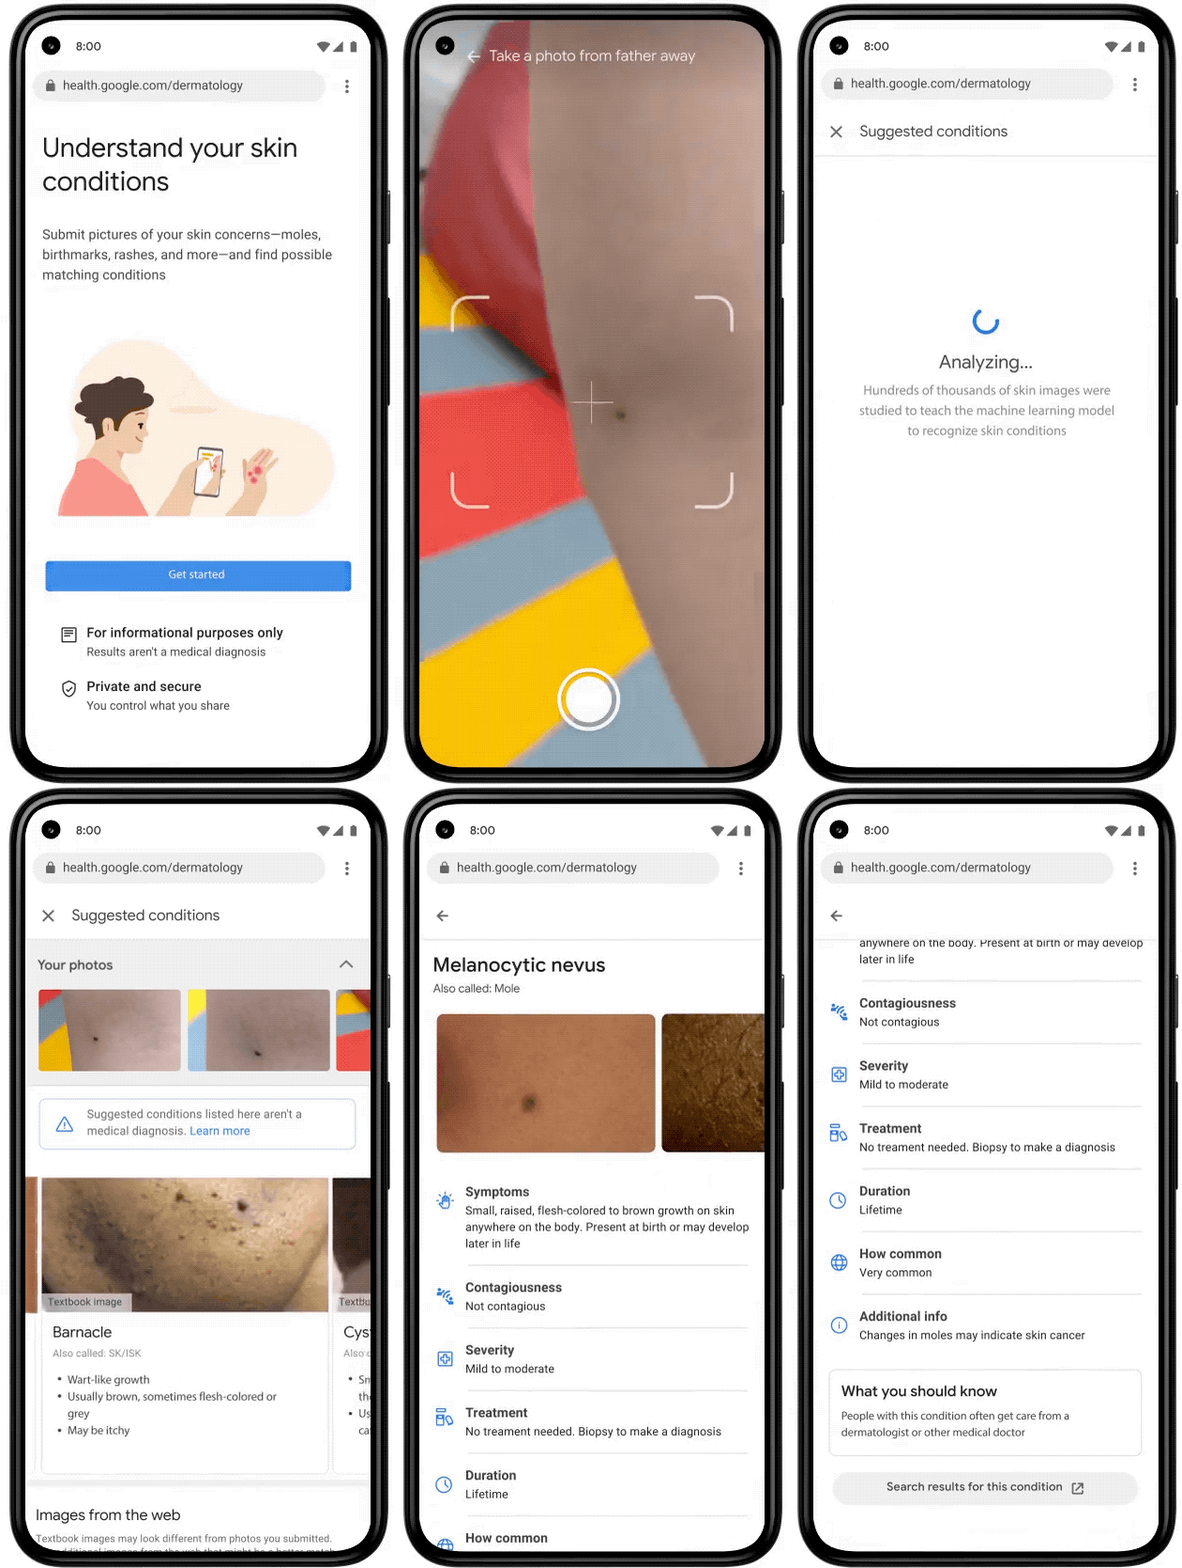
Our AI-powered dermatology assist tool is a web-based application that we hope to launch as a pilot later this year, to make it easier to figure out what might be going on with your skin. Once you launch the tool, simply use your phone’s camera to take three images of the skin, hair or nail concern from different angles. You’ll then be asked questions about your skin type, how long you’ve had the issue and other symptoms that help the tool narrow down the possibilities. The AI model analyzes this information and draws from its knowledge of 288 conditions to give you a list of possible matching conditions that you can then research further.

For each matching condition, the tool will show dermatologist-reviewed information and answers to commonly asked questions, along with similar matching images from the web. The tool is not intended to provide a diagnosis nor be a substitute for medical advice as many conditions require clinician review, in-person examination, or additional testing like a biopsy. Rather we hope it gives you access to authoritative information so you can make a more informed decision about your next step.

Image of a phone showing you each step of using the AI-powered dermatology assist tool.

Based on the photos and information you provide, our AI-powered dermatology assist tool will offer suggested conditions. This product has been CE marked as a Class I medical device in the EU. It is not available in the United States.

Developing an AI model that assesses issues for all skin types 

Our tool is the culmination of over three years of machine learning research and product development. To date, we’ve published several peer-reviewed papers that validate our AI model and more are in the works. 

Our landmark study, featured in Nature Medicine, debuted our deep learning approach to assessing skin diseases and showed that our AI system can achieve accuracy that is on par with U.S. board-certified dermatologists. Our most recent paper in JAMA Network Open demonstrated how non-specialist doctors can use AI-based tools to improve their ability to interpret skin conditions

To make sure we’re building for everyone, our model accounts for factors like age, sex, race and skin types — from pale skin that does not tan to brown skin that rarely burns. We developed and fine-tuned our model with de-identified data encompassing around 65,000 images and case data of diagnosed skin conditions, millions of curated skin concern images and thousands of examples of healthy skin — all across different demographics. 

Recently, the AI model that powers our tool successfully passed clinical validation, and the tool has been CE marked as a Class I medical device in the EU.¹ In the coming months, we plan to build on this work so more people can use this tool to answer questions about common skin issues. If you’re interested in this tool, sign up here to be notified (subject to availability in your region).

¹This tool has not been evaluated by the U.S. FDA for safety or efficacy. It is not available in the United States.

Read More

A smoother ride and a more detailed Map thanks to AI

AI is a critical part of what makes Google Maps so helpful. With it, we’re able to map roads over 10 times faster than we could five years ago, and we can bring maps filled with useful information to virtually every corner of the world. Today, we’re giving you a behind-the-scenes look at how AI makes two of the features we announced at I/O possible.

Teaching Maps to identify and forecast when people are hitting the brakes

Let’s start with our routing update that helps you avoid situations that cause you to slam on the brakes, such as confusing lane changes or freeway exits. We use AI and navigation information to identify hard-braking events — moments that cause drivers to decelerate sharply and are known indicators of car crash likelihood — and then suggest alternate routes when available. We believe these updates have the potential to eliminate over 100 million hard-braking events in routes driven with Google Maps each year. But how exactly do we find when and where these moments are likely to occur?

That’s where AI comes in. To do this, we train our machine learning models on two sets of data. The first set of information comes from phones using Google Maps. Mobile phone sensors can determine deceleration along a route, but this data is highly prone to false alarms because your phone can move independently of your car. This is what makes it hard for our systems to decipher you tossing your phone into the cupholder or accidentally dropping it on the floor from an actual hard-braking moment. To combat this, we also use information from routes driven with Google Maps when it’s projected on a car’s display, like Android Auto. This represents a relatively small subset of data, but it’s highly accurate because Maps is now tethered to a stable spot — your car display. Training our models on both sets of data makes it possible to spot actual deceleration moments from fake ones, making detection across all trips more accurate. 

Understanding spots along a route that are likely to cause hard-braking is just one part of the equation. We’re also working to identify other contextual factors that lead to hard-braking events, like construction or visibility conditions. For example, if there’s a sudden increase in hard-braking events along a route during a certain time of day when people are likely to be driving toward the glare of the sun, our system could detect those events and offer alternate routes. These details inform future routing so we can suggest safer, smoother routes.

Using AI to go beyond driving

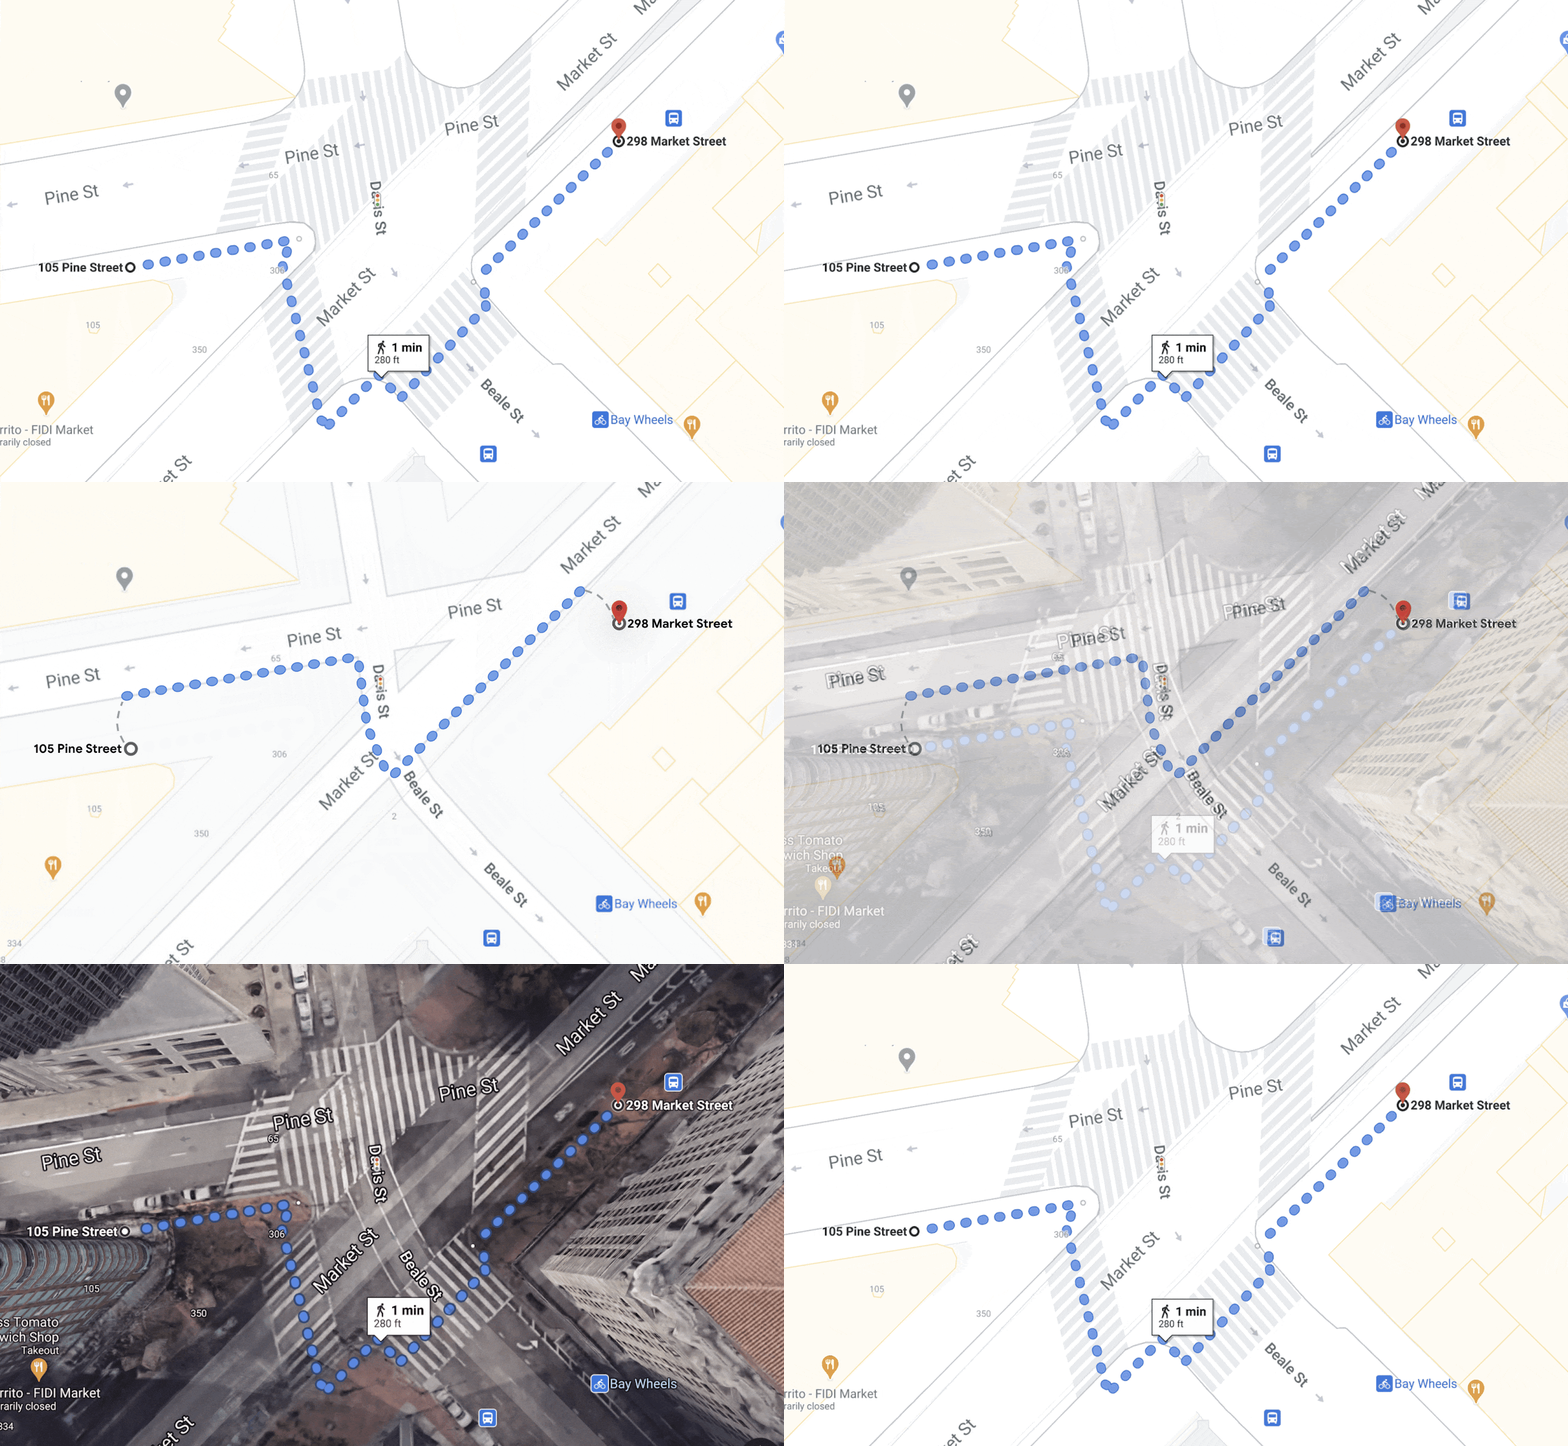
When you’re walking or biking or taking public transit, AI is also there helping you move along safely and easily. Last August we launched detailed street maps which show accurate road widths, along with details about where the sidewalks, crosswalks and pedestrian islands are in an area so people can better understand its layout and how to navigate it. Today, we announced that detailed street maps will expand to 50 more cities by the end of 2021. While this sounds straightforward, a lot is going on under the hood — especially with AI — to make this possible! 

A GIF that shows a before and after comparison of detailed streets maps built from satellite imagery

A before and after comparison of detailed streets maps built from satellite imagery

Imagine that you’re taking a stroll down a typical San Francisco street. As you approach the intersection, you’ll notice that the crosswalk uses a “zebra” pattern — vertical stripes that show you where to walk. But if you were in another city, say London, then parallel dotted lines would define the crosswalks. To account for these differences and accurately display them on the map, our systems need to know what crosswalks look like — not just in one city but across the entire world. It gets even trickier since urban design can change at the country, state, and even city level.

  • A street-level picture of crosswalks in San Francisco

    Crosswalks in San Francisco

  • A street-level image of crosswalks in London

    Crosswalks in London

  • A street-level image of crosswalks in Tokyo

    Crosswalks in Tokyo

  • A street-level image of crosswalks in Madrid

    Crosswalks in Madrid

  • A street-level image of crosswalks in Zurich

    Crosswalks in Zurich

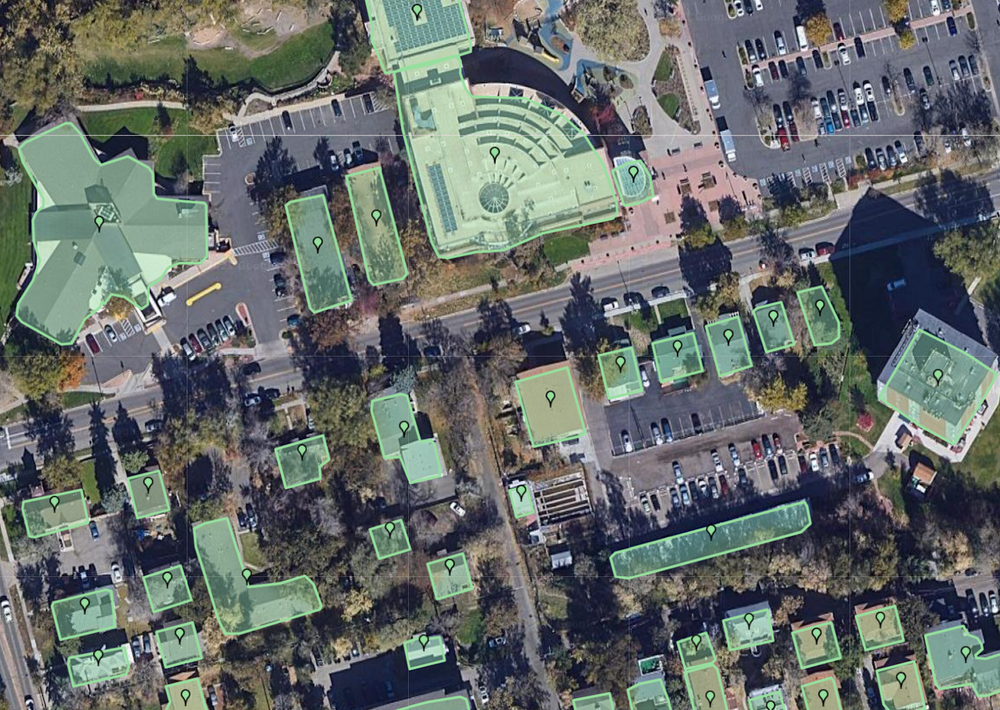
To expand globally and account for local differences, we needed to completely revamp our mapmaking process. Traditionally, we’ve approached mapmaking like baking a cake — one layer at a time. We trained machine learning models to identify and classify features one by one across our index of millions of Street View, satellite and aerial images — starting first with roads, then addresses, buildings and so on. 

But detailed street maps require significantly more granularity and precision than a normal map. To map these dense urban features correctly, we’ve updated our models to identify all objects in a scene at once. This requires a ton of AI smarts. The model has to understand not only what the objects are, but the relationships between them — like where exactly a street ends and a sidewalk begins. With these new full-scene models, we’re able to detect and classify broad sets of features at a time without sacrificing accuracy, allowing us to map a single city faster than ever before. 

An image of Google Maps’ single-feature AI models

Single-feature AI model that classifies buildings.

An image of Google Maps’ full-scene AI models

Full-scene AI models that capture multiple categories of objects at once.

Once we have a model trained on a particular city, we can then expand it to other cities with similar urban designs. For example, the sidewalks, curbs, and traffic lights look similar in Atlanta and Ho Chi Minh City — despite being over 9,000 miles away. And the same model works in Madrid as it does in Dallas, something that may be hard to believe at first glance. With our new advanced machine learning techniques combined with our collection of high-definition imagery, we’re on track to bring a level of detail to the map at scale like never before.

AI will continue to play an important role as we build the most helpful map for people around the globe. For more behind-the-scenes looks at the technology that powers Google Maps, check out the rest of our Maps 101 blog series.

More from this Series

Maps 101

Google Maps helps you navigate, explore, and get things done every single day. In this series, we’ll take a look under the hood at how Google Maps uses technology to build helpful products—from using flocks of sheep and laser beams to gather high-definition imagery to predicting traffic jams that haven’t even happened yet.

View more from Maps 101

Read More

Unveiling our new Quantum AI campus

Within the decade, Google aims to build a useful, error-corrected quantum computer. This will accelerate solutions for some of the world’s most pressing problems, like sustainable energy and reduced emissions to feed the world’s growing population, and unlocking new scientific discoveries, like more helpful AI.

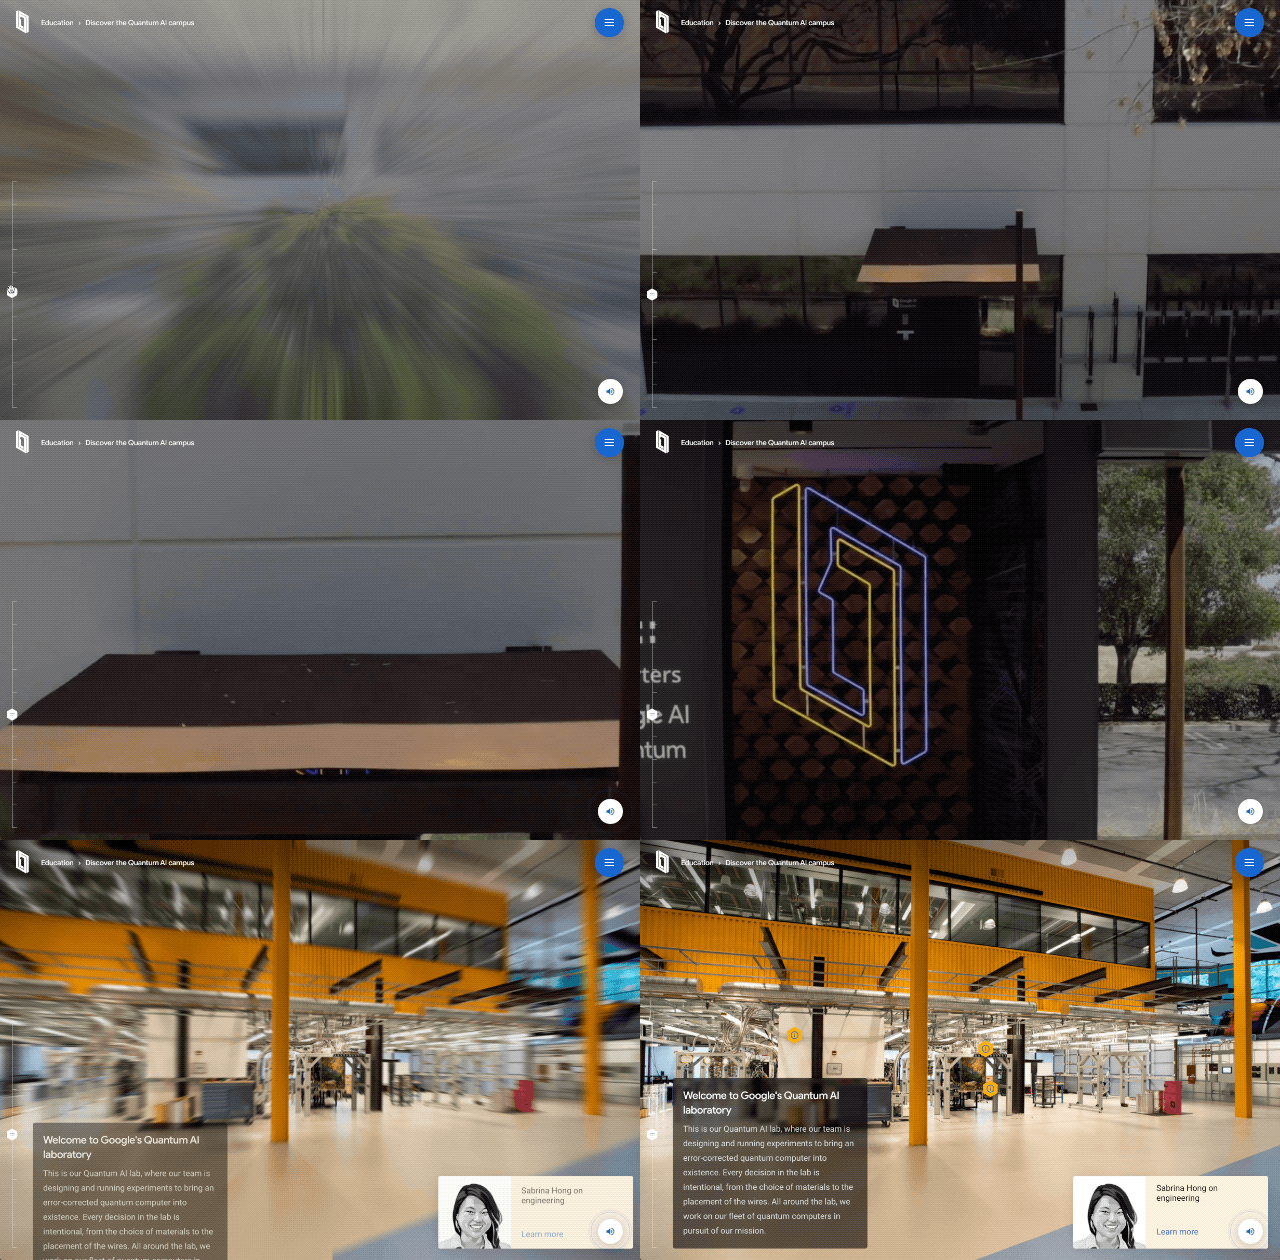
To begin our journey, today we’re unveiling our new Quantum AI campus in Santa Barbara, California. This campus includes our first quantum data center, our quantum hardware research laboratories, and our own quantum processor chip fabrication facilities. Here, our team is working to build an error-corrected quantum computer for the world.

This is a drone's perspective of entering the new Quantum AI campus

Our new Quantum AI campus in Santa Barbara, CA will include our first quantum data center, new research laboratories, and quantum processor fabrication facilities.

Google began using machine learning 20 years ago (for spell checking in Search), and led the deep learning revolution 10 years ago (advancing neural nets, the leading approach to modern AI). These advances in AI and other technologies have enabled many of the incredible applications we’re seeing today. As we look 10 years into the future, many of the greatest global challenges, from climate change to handling the next pandemic, demand a new kind of computing.

To build better batteries (to lighten the load on the power grid), or to create fertilizer to feed the world without creating 2% of global carbon emissions (as nitrogen fixation does today), or to create more targeted medicines (to stop the next pandemic before it starts), we need to understand and design molecules better. That means simulating nature accurately. But you can’t simulate molecules very well using classical computers. As you get to even modestly sized molecules, you quickly run out of computing resources. Nature is quantum mechanical: The bonds and interactions among atoms behave probabilistically, with richer dynamics that exhaust the simple classical computing logic.

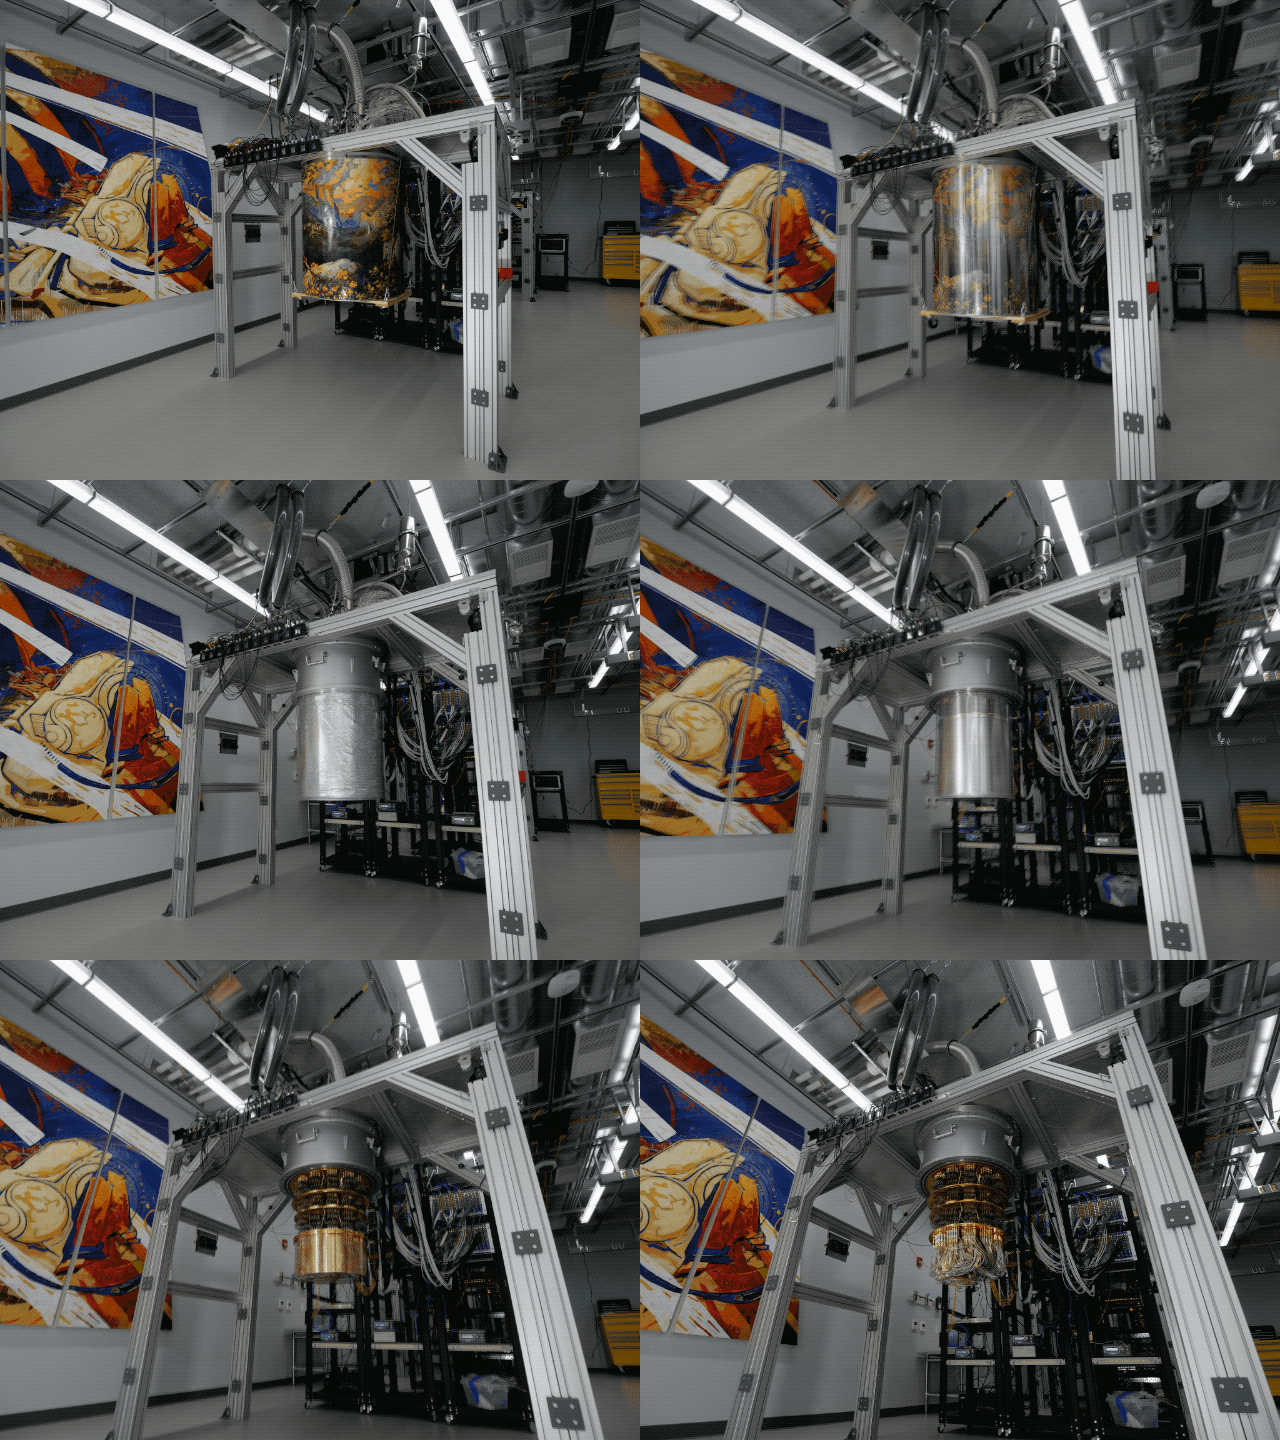
A look inside of our cryostats

The inside of our cryostats, like the ones found in the Quantum AI campus, are some of the coldest places in the universe, reaching temperatures around 10 milliKelvin

This is where quantum computers come in. Quantum computers use quantum bits, or “qubits,” which can be entangled in a complex superposition of states, naturally mirroring the complexity of molecules in the real world. With an error-corrected quantum computer, we’ll be able to simulate how molecules behave and interact, so we can test and invent new chemical processes and new materials before investing in costly real-life prototypes. These new computing capabilities will help to accelerate the discovery of better batteries, energy-efficient fertilizers, and targeted medicines, as well as improved optimization, new AI architectures, and more.

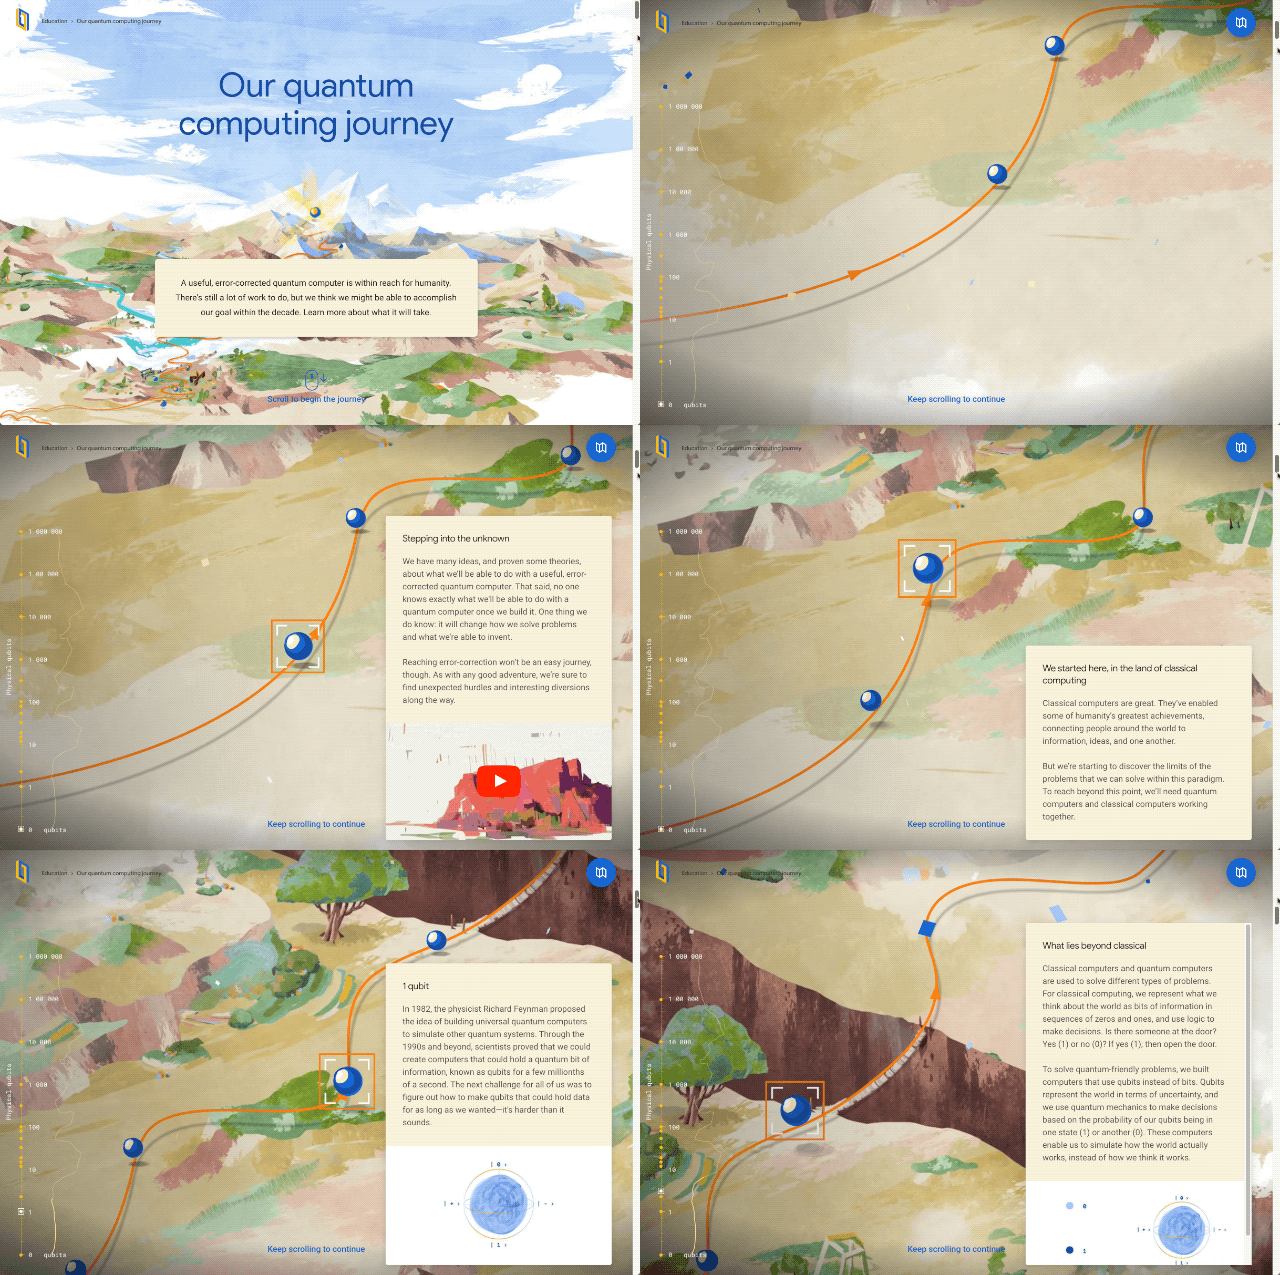
Depicting the journey to building an error-corrected quantum computer

Our journey to build an error-corrected quantum computer within the decade includes several scientific milestones, including building an error-corrected logical qubit.

To reach this goal, we’re on a journey to build 1,000,000 physical qubits that work in concert inside a room-sized error-corrected quantum computer. That’s a big leap from today’s modestly-sized systems of fewer than 100 qubits.

To get there, we must build the world’s first “quantum transistor” — two error-corrected “logical qubits” performing quantum operations together — and then figure out how to tile hundreds to thousands of them to form the error-corrected quantum computer. That will take years.

To get there, we need to show we can encode one logical qubit — with 1,000 physical qubits. Using quantum error-correction, these physical qubits work together to form a long-lived nearly perfect qubit — a forever qubit that maintains coherence until power is removed, ushering in the digital era of quantum computing. Again, we expect years of concerted development to achieve this goal.

And to get THERE(!), we need to show that the more physical qubits participate in error correction, the more you can cut down on errors in the first place — this is a crucial step given how error-prone physical qubits are. We’re doing that research right now on our Quantum AI campus.

Already we run quantum computers that can perform calculations beyond the reach of classical computers. To continue this journey towards a useful error-corrected quantum computer and provide humanity with a new tool tuned to the way nature works, we’re assembling an amazing team to invent the future of computing together right here, right now, at Google’s Quantum AI campus.

  • Picture of the Sycamore quantum processor

    The Sycamore quantum processor has 54 individually controllable qubits, and 88 tunable couplers. The couplers are used to enable fast quantum operations between qubits.

  • Current generation of cryostats

    The current generation of cryostats that hold our quantum processors are about the size of three household refrigerators.

  • Art in the Quantum AI campus

    Quantum computing could help us understand and simulate the natural world around us. The art in the Quantum AI campus is influenced by nature.

Read More