Evaluating the quality of AI responses across multiple languages presents significant challenges for organizations deploying generative AI solutions globally. How can you maintain consistent performance when human evaluations require substantial resources, especially across diverse languages? Many companies find themselves struggling to scale their evaluation processes without compromising quality or breaking their budgets.
Amazon Bedrock Evaluations offers an efficient solution through its LLM-as-a-judge capability, so you can assess AI outputs consistently across linguistic barriers. This approach reduces the time and resources typically required for multilingual evaluations while maintaining high-quality standards.
In this post, we demonstrate how to use the evaluation features of Amazon Bedrock to deliver reliable results across language barriers without the need for localized prompts or custom infrastructure. Through comprehensive testing and analysis, we share practical strategies to help reduce the cost and complexity of multilingual evaluation while maintaining high standards across global large language model (LLM) deployments.
Solution overview
To scale and streamline the evaluation process, we used Amazon Bedrock Evaluations, which offers both automatic and human-based methods for assessing model and RAG system quality. To learn more, see Evaluate the performance of Amazon Bedrock resources.
Automatic evaluations
Amazon Bedrock supports two modes of automatic evaluation:
- LLM-as-a-judge evaluations – An evaluator model scores the outputs of another model or system
- Programmatic metric-based evaluations – This approach assesses metrics like accuracy, robustness, and toxicity for different task types by other means than LLMs
For LLM-as-a-judge evaluations, you can choose from a set of built-in metrics or define your own custom metrics tailored to your specific use case. You can run these evaluations on models hosted in Amazon Bedrock or on external models by uploading your own prompt-response pairs.
Human evaluations
For use cases that require subject-matter expert judgment, Amazon Bedrock also supports human evaluation jobs. You can assign evaluations to human experts, and Amazon Bedrock manages task distribution, scoring, and result aggregation.
Human evaluations are especially valuable for establishing a baseline against which automated scores, like those from judge model evaluations, can be compared.
Evaluation dataset preparation
We used the Indonesian splits from the SEA-MTBench dataset. It is based on MT-Bench, a widely used benchmark for conversational AI assessment. The Indonesian version was manually translated by native speakers and consisted of 58 records covering a diverse range of categories such as math, reasoning, and writing.
We converted multi-turn conversations into single-turn interactions while preserving context. This allows each turn to be evaluated independently with consistent context. This conversion process resulted in 116 records for evaluation. Here’s how we approached this conversion:
For each record, we generated responses using a stronger LLM (Model Strong-A) and a relatively weaker LLM (Model Weak-A). These outputs were later evaluated by both human annotators and LLM judges.
Establishing a human evaluation baseline
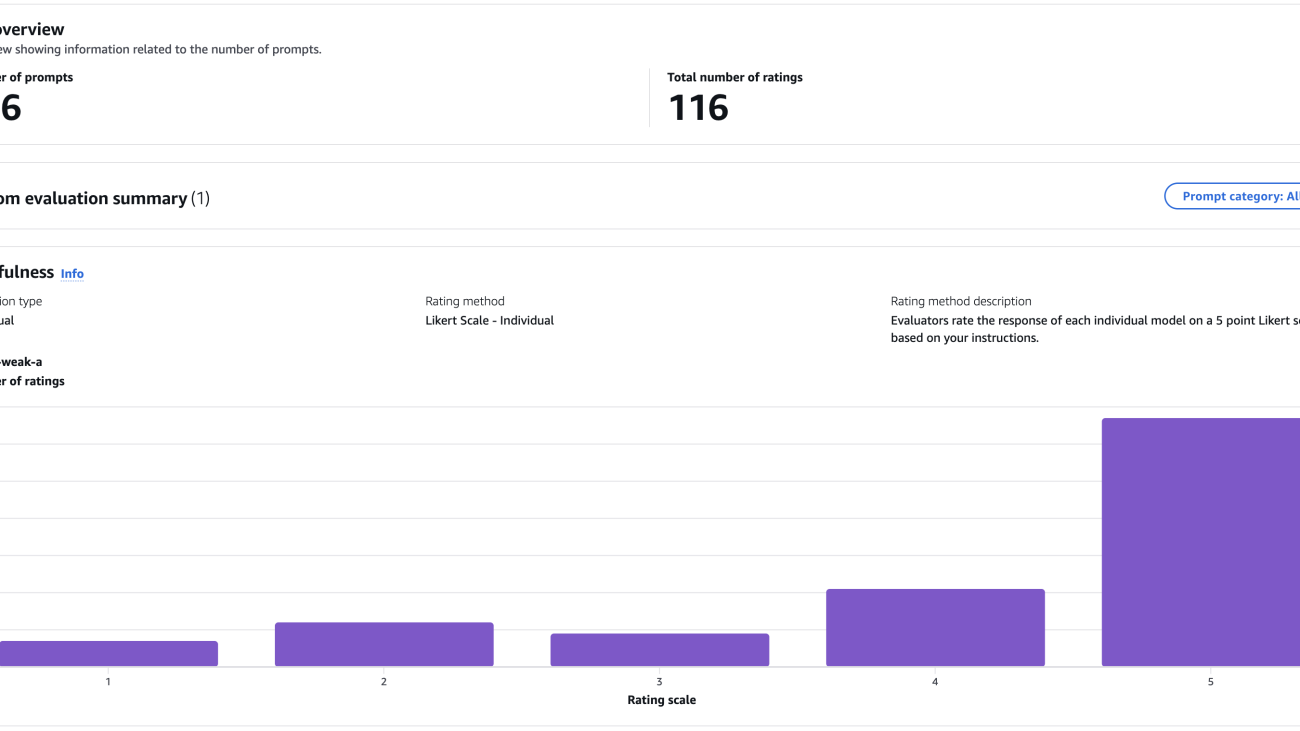
To assess evaluation quality, we first established a set of human evaluations as the baseline for comparing LLM-as-a-judge scores. A native-speaking evaluator rated each response from Model Strong-A and Model Weak-A on a 1–5 Likert helpfulness scale, using the same rubric applied in our LLM evaluator prompts.
We conducted manual evaluations on the full evaluation dataset using the human evaluation feature in Amazon Bedrock. Setting up human evaluations in Amazon Bedrock is straightforward: you upload a dataset and define the worker group, and Amazon Bedrock automatically generates the annotation UI and manages the scoring workflow and result aggregation.
The following screenshot shows a sample result from an Amazon Bedrock human evaluation job.

LLM-as-a-judge evaluation setup
We evaluated responses from Model Strong-A and Model Weak-A using four judge models: Model Strong-A, Model Strong-B, Model Weak-A, and Model Weak-B. These evaluations were run using custom metrics in an LLM-as-a-judge evaluation in Amazon Bedrock, which allows flexible prompt definition and scoring without the need to manage your own infrastructure.
Each judge model was given a custom evaluation prompt aligned with the same helpfulness rubric used in the human evaluation. The prompt asked the evaluator to rate each response on a 1–5 Likert scale based on clarity, task completion, instruction adherence, and factual accuracy. We prepared both English and Indonesian versions to support multilingual testing. The following table compares the English and Indonesian prompts.
| English prompt | Indonesian prompt |
To measure alignment, we used two standard metrics:
- Pearson correlation – Measures the linear relationship between score values. Useful for detecting overall similarity in score trends.
- Cohen’s kappa (linear weighted) – Captures agreement between evaluators, adjusted for chance. Especially useful for discrete scales like Likert scores.
Alignment between LLM judges and human evaluations
We began by comparing the average helpfulness scores given by each evaluator using the English judge prompt. The following chart shows the evaluation results.

When evaluating responses from the stronger model, LLM judges tended to agree with human ratings. But on responses from the weaker model, most LLMs gave noticeably higher scores than humans. This suggests that LLM judges tend to be more generous when response quality is lower.
We designed the evaluation prompt to guide models toward scoring behavior similar to human annotators, but score patterns still showed signs of potential bias. Model Strong-A rated its own outputs highly (4.93), whereas Model Weak-A gave its own responses a higher score than humans did. In contrast, Model Strong-B, which didn’t evaluate its own outputs, gave scores that were closer to human ratings.
To better understand alignment between LLM judges and human preferences, we analyzed Pearson and Cohen’s kappa correlations between them. On responses from Model Weak-A, alignment was strong. Model Strong-A and Model Strong-B achieved Pearson correlations of 0.45 and 0.61, with kappa scores of 0.33 and 0.4.
LLM judges and human alignment on responses from Model Strong-A was more moderate. All evaluators had Pearson correlations between 0.26–0.33 and weighted Kappa scores between 0.2–0.22. This might be due to limited variation in either human or model scores, which reduces the ability to detect strong correlation patterns.
To complete our analysis, we also conducted a qualitative deep dive. Amazon Bedrock makes this straightforward by providing JSONL outputs from each LLM-as-a-judge run that include both the evaluation score and the model’s reasoning. This helped us review evaluator justifications and identify cases where scores were incorrectly extracted or parsed.
From this review, we identified several factors behind the misalignment between LLM and human judgments:
- Evaluator capability ceiling – In some cases, especially in reasoning tasks, the LLM evaluator couldn’t solve the original task itself. This made its evaluations flawed and unreliable at identifying whether a response was correct.
- Evaluation hallucination – In other cases, the LLM evaluator assigned low scores to correct answers not because of reasoning failure, but because it imagined errors or flawed logic in responses that were actually valid.
- Overriding instructions – Certain models occasionally overrode explicit instructions based on ethical judgment. For example, two evaluator models rated a response that created misleading political campaign content as very unhelpful (even though the response included its own warnings), whereas human evaluators rated it very helpful for following the task.
These problems highlight the importance of using human evaluations as a baseline and performing qualitative deep dives to fully understand LLM-as-a-judge results.
Cross-lingual evaluation capabilities
After analyzing evaluation results from the English judge prompt, we moved to the final step of our analysis: comparing evaluation results between English and Indonesian judge prompts.
We began by comparing overall helpfulness scores and alignment with human ratings. Helpfulness scores remained nearly identical for all models, with most shifts within ±0.05. Alignment with human ratings was also similar: Pearson correlations between human scores and LLM-as-a-judge using Indonesian judge prompts closely matched those using English judge prompts. In statistically meaningful cases, correlation score differences were typically within ±0.1.
To further assess cross-language consistency, we computed Pearson correlation and Cohen’s kappa directly between LLM-as-a-judge evaluation scores generated using English and Indonesian judge prompts on the same response set. The following tables show correlation between scores from Indonesian and English judge prompts for each evaluator LLM, on responses generated by Model Weak-A and Model Strong-A.
The first table summarizes the evaluation of Model Weak-A responses.
| Metric | Model Strong-A | Model Strong-B | Model Weak-A | Model Weak-B |
| Pearson correlation | 0.73 | 0.79 | 0.64 | 0.64 |
| Cohen’s Kappa | 0.59 | 0.69 | 0.42 | 0.49 |
The next table summarizes the evaluation of Model Strong-A responses.
| Metric | Model Strong-A | Model Strong-B | Model Weak-A | Model Weak-B |
| Pearson correlation | 0.41 | 0.8 | 0.51 | 0.7 |
| Cohen’s Kappa | 0.36 | 0.65 | 0.43 | 0.61 |
Correlation between evaluation results from both judge prompt languages was strong across all evaluator models. On average, Pearson correlation was 0.65 and Cohen’s kappa was 0.53 across all models.
We also conducted a qualitative review comparing evaluations from both evaluation prompt languages for Model Strong-A and Model Strong-B. Overall, both models showed consistent reasoning across languages in most cases. However, occasional hallucinated errors or flawed logic occurred at similar rates across both languages (we should note that humans make occasional mistakes as well).
One interesting pattern we observed with one of the stronger evaluator models was that it tended to follow the evaluation prompt more strictly in the Indonesian version. For example, it rated a response as unhelpful when it refused to generate misleading political content, even though the task explicitly asked for it. This behavior differed from the English prompt evaluation. In a few cases, it also assigned a noticeably stricter score compared to the English evaluator prompt even though the reasoning across both languages was similar, better matching how humans typically evaluate.
These results confirm that although prompt translation remains a useful option, it is not required to achieve consistent evaluation. You can rely on English evaluator prompts even for non-English outputs, for example by using Amazon Bedrock LLM-as-a-judge predefined and custom metrics to make multilingual evaluation simpler and more scalable.
Takeaways
The following are key takeaways for building a robust LLM evaluation framework:
- LLM-as-a-judge is a practical evaluation method – It offers faster, cheaper, and scalable assessments while maintaining reasonable judgment quality across languages. This makes it suitable for large-scale deployments.
- Choose a judge model based on practical evaluation needs – Across our experiments, stronger models aligned better with human ratings, especially on weaker outputs. However, even top models can misjudge harder tasks or show self-bias. Use capable, neutral evaluators to facilitate fair comparisons.
- Manual human evaluations remain essential – Human evaluations provide the reference baseline for benchmarking automated scoring and understanding model judgment behavior.
- Prompt design meaningfully shapes evaluator behavior – Aligning your evaluation prompt with how humans actually score improves quality and trust in LLM-based evaluations.
- Translated evaluation prompts are helpful but not required – English evaluator prompts reliably judge non-English responses, especially for evaluator models that support multilingual input.
- Always be ready to deep dive with qualitative analysis – Reviewing evaluation disagreements by hand helps uncover hidden model behaviors and makes sure that statistical metrics tell the full story.
- Simplify your evaluation workflow using Amazon Bedrock evaluation features – Amazon Bedrock built-in human evaluation and LLM-as-a-judge evaluation capabilities simplify iteration and streamline your evaluation workflow.
Conclusion
Through our experiments, we demonstrated that LLM-as-a-judge evaluations can deliver consistent and reliable results across languages, even without prompt translation. With properly designed evaluation prompts, LLMs can maintain high alignment with human ratings regardless of evaluator prompt language. Though we focused on Indonesian, the results indicate similar techniques are likely effective for other non-English languages, but you are encouraged to assess for yourself on any language you choose. This reduces the need to create localized evaluation prompts for every target audience.
To level up your evaluation practices, consider the following ways to extend your approach beyond foundation model scoring:
- Evaluate your Retrieval Augmented Generation (RAG) pipeline, assessing not just LLM responses but also retrieval quality using Amazon Bedrock RAG evaluation capabilities
- Evaluate and monitor continuously, and run evaluations before production launch, during live operation, and ahead of any major system upgrades
Begin your cross-lingual evaluation journey today with Amazon Bedrock Evaluations and scale your AI solutions confidently across global landscapes.
About the authors
 Riza Saputra is a Senior Solutions Architect at AWS, working with startups of all stages to help them grow securely, scale efficiently, and innovate faster. His current focus is on generative AI, guiding organizations in building and scaling AI solutions securely and efficiently. With experience across roles, industries, and company sizes, he brings a versatile perspective to solving technical and business challenges. Riza also shares his knowledge through public speaking and content to support the broader tech community.


 James Yi is a Senior AI/ML Partner Solutions Architect at AWS. He spearheads AWS’s strategic partnerships in Emerging Technologies, guiding engineering teams to design and develop cutting-edge joint solutions in generative AI. He enables field and technical teams to seamlessly deploy, operate, secure, and integrate partner solutions on AWS. James collaborates closely with business leaders to define and execute joint Go-To-Market strategies, driving cloud-based business growth. Outside of work, he enjoys playing soccer, traveling, and spending time with his family.
 Karan Singh is a Generative AI Specialist at AWS, where he works with top-tier third-party foundation model and agentic frameworks providers to develop and execute joint go-to-market strategies, enabling customers to effectively deploy and scale solutions to solve enterprise generative AI challenges.
 Mehran Najafi, PhD, serves as AWS Principal Solutions Architect and leads the Generative AI Solution Architects team for AWS Canada. His expertise lies in ensuring the scalability, optimization, and production deployment of multi-tenant generative AI solutions for enterprise customers.
 John Liu has 15 years of experience as a product executive and 9 years of experience as a portfolio manager. At AWS, John is a Principal Product Manager for Amazon Bedrock. Previously, he was the Head of Product for AWS Web3 / Blockchain. Prior to AWS, John held various product leadership roles at public blockchain protocols, fintech companies and also spent 9 years as a portfolio manager at various hedge funds.
 Hugo Tse is a Solutions Architect at AWS, with a focus on Generative AI and Storage solutions. He is dedicated to empowering customers to overcome challenges and unlock new business opportunities using technology. He holds a Bachelor of Arts in Economics from the University of Chicago and a Master of Science in Information Technology from Arizona State University.
 Payal Singh is a Solutions Architect at Cohere with over 15 years of cross-domain expertise in DevOps, Cloud, Security, SDN, Data Center Architecture, and Virtualization. She drives partnerships at Cohere and helps customers with complex GenAI solution integrations.


 Arun is a Senior Solutions Architect at AWS, supporting enterprise customers in the Pacific Northwest. He’s passionate about solving business and technology challenges as an AWS customer advocate, with his recent interest being AI strategy. When not at work, Arun enjoys listening to podcasts, going for short trail runs, and spending quality time with his family.
 Alicja Kwasniewska, PhD, is an AI leader driving generative AI innovations in enterprise solutions and decision intelligence for customer engagements in North America, advertisement and marketing verticals at AWS. She is recognized among the top 10 women in AI and 100 women in data science. Alicja published in more than 40 peer-reviewed publications. She also serves as a reviewer for top-tier conferences, including ICML,NeurIPS,and ICCV. She advises organizations on AI adoption, bridging research and industry to accelerate real-world AI applications.
 Shashank is the VP of Engineering at INRIX, where he leads multiple verticals, including generative AI and traffic. He is passionate about using technology to make roads safer for drivers, bikers, and pedestrians every day. Prior to working at INRIX, he held engineering leadership roles at Amazon and Lyft. Shashank brings deep experience in building impactful products and high-performing teams at scale. Outside of work, he enjoys traveling, listening to music, and spending time with his family.
 Nat Gale is the Head of Product at INRIX, where he manages the Safety and Traffic product verticals. Nat leads the development of data products and software that help transportation professionals make smart, more informed decisions. He previously ran the City of Los Angeles’ Vision Zero program and was the Director of Capital Projects and Operations for the City of Hartford, CT.
 Durran is a Lead Software Engineer at INRIX, where he designs scalable backend systems and mentors engineers across multiple product lines. With over a decade of experience in software development, he specializes in distributed systems, generative AI, and cloud infrastructure. Durran is passionate about writing clean, maintainable code and sharing best practices with the developer community. Outside of work, he enjoys spending quality time with his family and deepening his Japanese language skills.


 Niithiyn Vijeaswaran is a Generative AI Specialist Solutions Architect with the Third-Party Model Science team at AWS. His area of focus is AWS AI accelerators (AWS Neuron). He holds a Bachelor’s degree in Computer Science and Bioinformatics.
 Avan Bala is a Solutions Architect at AWS. His area of focus is AI for DevOps and machine learning. He holds a bachelor’s degree in Computer Science with a minor in Mathematics and Statistics from the University of Maryland. Avan is currently working with the Enterprise Engaged East Team and likes to specialize in projects about emerging AI technologies.
 Mohhid Kidwai is a Solutions Architect at AWS. His area of focus is generative AI and machine learning solutions for small-medium businesses. He holds a bachelor’s degree in Computer Science with a minor in Biological Science from North Carolina State University. Mohhid is currently working with the SMB Engaged East Team at AWS.
 Yousuf Athar is a Solutions Architect at AWS specializing in generative AI and AI/ML. With a Bachelor’s degree in Information Technology and a concentration in Cloud Computing, he helps customers integrate advanced generative AI capabilities into their systems, driving innovation and competitive edge. Outside of work, Yousuf loves to travel, watch sports, and play football.
 Rohit Talluri is a Generative AI GTM Specialist at Amazon Web Services (AWS). He is partnering with top generative AI model builders, strategic customers, key AI/ML partners, and AWS Service Teams to enable the next generation of artificial intelligence, machine learning, and accelerated computing on AWS. He was previously an Enterprise Solutions Architect and the Global Solutions Lead for AWS Mergers & Acquisitions Advisory.
 Varun Morishetty is a Software Engineer with Amazon SageMaker JumpStart and Bedrock Marketplace. Varun received his Bachelor’s degree in Computer Science from Northeastern University. In his free time, he enjoys cooking, baking and exploring New York City.


 Steven Warwick is a Senior Solutions Architect at AWS, where he leads customer engagements to drive successful cloud adoption and specializes in SaaS architectures and Generative AI solutions. He produces educational content including blog posts and sample code to help customers implement best practices, and has led programs on GenAI topics for solution architects. Steven brings decades of technology experience to his role, helping customers with architectural reviews, cost optimization, and proof-of-concept development.


 Kiowa Jackson is a Senior Machine Learning Engineer at AWS ProServe, specializing in computer vision and agentic systems for industrial applications. His work bridges classical machine learning approaches with generative AI to enhance industrial automation capabilities. His past work includes collaborations with Amazon Robotics, NFL, and Koch Georgia Pacific.
 Piotr Chotkowski is a Senior Cloud Application Architect at AWS Generative AI Innovation Center. He has experience in hands-on software engineering as well as software architecture design. In his role at AWS, he helps customers design and build production grade generative AI applications in the cloud.


 Pablo García Benedicto is an experienced Data & AI Cloud Engineer with strong expertise in cloud hyperscalers and data engineering. With a background in telecommunications, he currently works at Swisscom, where he leads and contributes to projects involving Generative AI applications and agents using Amazon Bedrock. Aiming for AI and data specialization, his latest projects focus on building intelligent assistants and autonomous agents that streamline business information retrieval, leveraging cloud-native architectures and scalable data pipelines to reduce toil and drive operational efficiency.
 Ruben Merz Ruben Merz is a Principal Solutions Architect at AWS. With a background in distributed systems and networking, his work with customers at AWS focuses on digital sovereignty, AI, and networking.
 Jordi Montoliu Nerin is a Data & AI Leader currently serving as Senior AI/ML Specialist at AWS, where he helps worldwide telecommunications customers implement AI strategies after previously driving Data & Analytics business across EMEA regions. He has over 10 years of experience, where he has led multiple Data & AI implementations at scale, led executions of data strategy and data governance frameworks, and has driven strategic technical and business development programs across multiple industries and continents. Outside of work, he enjoys sports, cooking and traveling.


 Mona Mona currently works as a Sr World Wide Gen AI Specialist Solutions Architect at Amazon focusing on Gen AI Solutions. She was a Lead Generative AI specialist in Google Public Sector at Google before joining Amazon. She is a published author of two books – Natural Language Processing with AWS AI Services and Google Cloud Certified Professional Machine Learning Study Guide. She has authored 19 blogs on AI/ML and cloud technology and a co-author on a research paper on CORD19 Neural Search which won an award for Best Research Paper at the prestigious AAAI (Association for the Advancement of Artificial Intelligence) conference.
 Bruno Pistone is a Senior Generative AI and ML Specialist Solutions Architect for AWS based in Milan. He works with large customers helping them to deeply understand their technical needs and design AI and Machine Learning solutions that make the best use of the AWS Cloud and the Amazon Machine Learning stack. His expertise include: Machine Learning end to end, Machine Learning Industrialization, and Generative AI. He enjoys spending time with his friends and exploring new places, as well as travelling to new destinations.
 Lauren Mullennex is a Senior GenAI/ML Specialist Solutions Architect at AWS. She has a decade of experience in DevOps, infrastructure, and ML. Her areas of focus include MLOps/LLMOps, generative AI, and computer vision.


 Vivek Gangasani is a Lead Specialist Solutions Architect for Inference at AWS. He helps emerging generative AI companies build innovative solutions using AWS services and accelerated compute. Currently, he is focused on developing strategies for fine-tuning and optimizing the inference performance of large language models. In his free time, Vivek enjoys hiking, watching movies, and trying different cuisines.

 Sohaib Katariwala is a Sr. Specialist Solutions Architect at AWS focused on Amazon OpenSearch Service. His interests are in all things data and analytics. More specifically he loves to help customers use AI in their data strategy to solve modern day challenges.
 Karan Jain is a Senior Machine Learning Specialist at AWS, where he leads the worldwide Go-To-Market strategy for Amazon SageMaker Inference. He helps customers accelerate their generative AI and ML journey on AWS by providing guidance on deployment, cost-optimization, and GTM strategy. He has led product, marketing, and business development efforts across industries for over 10 years, and is passionate about mapping complex service features to customer solutions.


 Deepak Chandrasekar is the VP of Software Engineering & User Experience and leads multidisciplinary teams at Boomi. He oversees flagship initiatives like Boomi’s Agent Control Tower, Task Automation, and Market Reach, while driving a cohesive and intelligent experience layer across products. Previously, Deepak held a key leadership role at Unifi Software, which was acquired by Boomi. With a passion for building scalable, and intuitive AI-powered solutions, he brings a commitment to engineering excellence and responsible innovation.
 Sandeep Singh is Director of Engineering at Boomi, where he leads global teams building solutions that enable enterprise integration and automation at scale. He drives initiatives like Boomi Agent Control Tower, Marketplace, and Labs, empowering partners and customers with intelligent, trusted solutions. With leadership experience at GE and Fujitsu, Sandeep brings expertise in API strategy, product engineering, and AI/ML solutions. A former solution architect, he is passionate about designing mission-critical systems and driving innovation through scalable, intelligent solutions.
 Santosh Ameti is a seasoned Engineering leader in the Amazon Bedrock team and has built Agents, Evaluation, Guardrails, and Prompt Management solutions. His team continuously innovates in the agentic space, delivering one of the most secure and managed agentic solutions for enterprises.
 Greg Sligh is a Senior Solutions Architect at AWS with more than 25 years of experience in software engineering, software architecture, consulting, and IT and Engineering leadership roles across multiple industries. For the majority of his career, he has focused on creating and delivering distributed, data-driven applications with particular focus on scale, performance, and resiliency. Now he helps ISVs meet their objectives across technologies, with particular focus on AI/ML.
 Padma Iyer is a Senior Customer Solutions Manager at Amazon Web Services, where she specializes in supporting ISVs. With a passion for cloud transformation and financial technology, Padma works closely with ISVs to guide them through successful cloud transformations, using best practices to optimize their operations and drive business growth. Padma has over 20 years of industry experience spanning banking, tech, and consulting.