Building and deploying an object detection computer vision application at the edge with AWS Panorama

Building and deploying an object detection computer vision application at the edge with AWS Panorama

Computer vision (CV) is sought after technology among companies looking to take advantage of machine learning (ML) to improve their business processes. Enterprises have access to large amounts of video assets from their existing cameras, but the data remains largely untapped without the right tools to gain insights from it. CV provides the tools to unlock opportunities with this data, so you can automate processes that typically require visual inspection, such as evaluating manufacturing quality or identifying bottlenecks in industrial processes. You can take advantage of CV models running in the cloud to automate these inspection tasks, but there are circumstances when relying exclusively on the cloud isn’t optimal due to latency requirements or intermittent connectivity that make a round trip to the cloud infeasible.

AWS Panorama enables you to bring CV to on-premises cameras and make predictions locally with high accuracy and low latency. On the AWS Panorama console, you can easily bring custom trained models to the edge and build applications that integrate with custom business logic. You can then deploy these applications on the AWS Panorama Appliance, which auto-discovers existing IP cameras and runs the applications on video streams to make real-time predictions. You can easily integrate the inference results with other AWS services such as Amazon QuickSight to derive ML-powered business intelligence (BI) or route the results to your on-premises systems to trigger an immediate action.

Sign up for the preview to learn more and start building your own CV applications.

In this post, we look at how you can use AWS Panorama to build and deploy a parking lot car counter application.

Parking lot car counter application

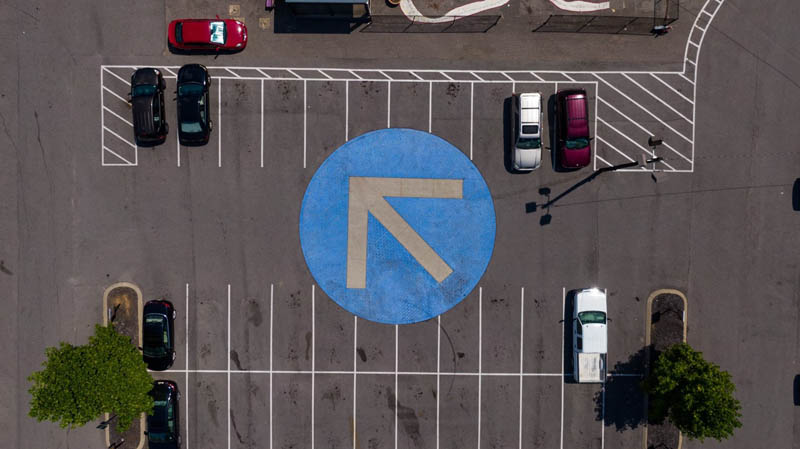
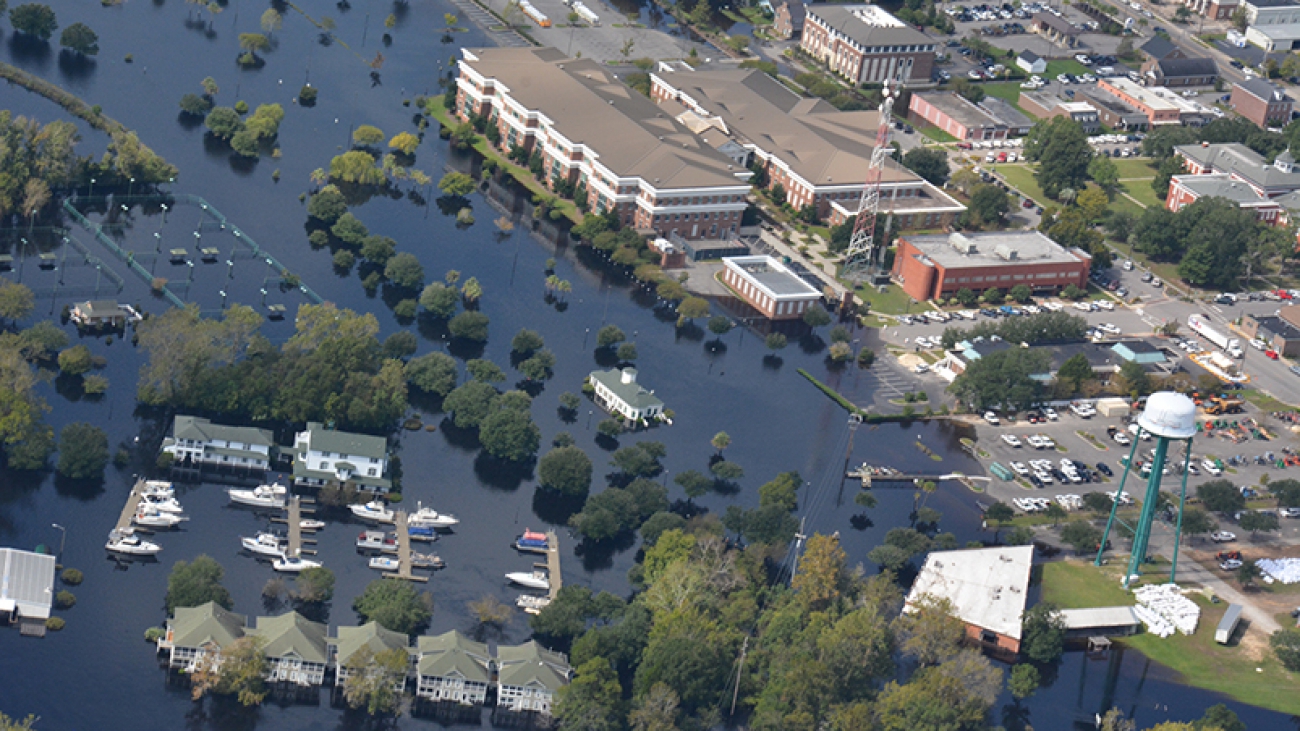
Parking facilities, like the one in the image below, need to know how many cars are parked in a given facility at any point of time, to assess vacancy and intake more customers. You also want to keep track of the number of cars that enter and exit your facility during any given time. You can use this information to improve operations, such as adding more parking payment centers, optimizing price, directing cars to different floors, and more. Parking center owners typically operate more than one facility and are looking for real-time aggregate details of vacancy in order to direct traffic to less-populated facilities and offer real-time discounts.

To achieve these goals, parking centers sometimes manually count the cars to provide a tally. This inspection can be error prone and isn’t optimal for capturing real-time data. Some parking facilities install sensors that give the number of cars in a particular lot, but these sensors are typically not integrated with analytics systems to derive actionable insights.

With the AWS Panorama Appliance, you can get a real-time count of number of cars, collect metrics across sites, and correlate them to improve your operations. Let’s see how we can solve this once manual (and expensive) problem using CV at the edge. We go through the details of the trained model, the business logic code, and walk through the steps to create and deploy an application on your AWS Panorama Appliance Developer Kit so you can view the inferences on a connected HDMI screen.

Computer vision model

A CV model helps us extract useful information from images and video frames. We can detect and localize objects in a scene, and identity and classify images and action recognition. You can choose from a variety of frameworks such as TensorFlow, MXNet, and PyTorch to build your CV models, or you can choose from a variety of pre-trained models available from AWS or from third parties such as ISVs.

For this example, we use a pre-trained GluonCV model downloaded from the GluonCV model zoo.

The model we use is the ssd_512_resnet50_v1_voc model. It’s trained on the very popular PASCAL VOC dataset. It has 20 classes of objects annotated and labeled for a model to be trained on. The following code shows the classes and their indexes.

voc_classes = {
	'aeroplane'		: 0,
	'bicycle'		: 1,
	'bird'			: 2,
	'boat'			: 3,
	'bottle'		: 4,
	'bus'			: 5,
	'car'			: 6,
	'cat'			: 7,
	'chair'			: 8,
	'cow'			: 9,
	'diningtable'	: 10,
	'dog'			: 11,
	'horse'			: 12,
	'motorbike'		: 13,
	'person'		: 14,
	'pottedplant'	: 15,
	'sheep'			: 16,
	'sofa'			: 17,
	'train'			: 18,
	'tvmonitor'		: 19
}


For our use case, we’re detecting and counting cars. Because we’re talking about cars, we use class 6 as the index in our business logic later in this post.

Our input image shape is [1, 3, 512, 512]. These are the dimensions of the input image the model expects to be given:

  • Batch size – 1
  • Number of channels – 3
  • Width and height of the input image – 512, 512

Uploading the model artifacts

We need to upload the model artifacts to an Amazon Simple Storage Service (Amazon S3) bucket. The bucket name should have aws-panorama- in the beginning of the name. After downloading the model artifacts, we upload the ssd_512_resnet50_v1_voc.tar.gz file to the S3 bucket. To create your bucket, complete the following steps:

  1. Download the model artifacts.
  2. On the Amazon S3 console, choose Create bucket.
  3. For Bucket name, enter a name starting with aws-panorama-.

  1. Choose Create bucket.

You can view the object details in the Object overview section. The model URI is s3://aws-panorama-models-bucket/ssd_512_resnet50_v1_voc.tar.gz.

The business logic code

After we upload the model artifacts to an S3 bucket, let’s turn our attention to the business logic code. For more information about the sample developer code, see Sample application code. For a comparative example of code samples, see AWS Panorama People Counter Example on GitHub.

Before we look at the full code, let’s look at a skeleton of the business logic code we use:

### Lambda skeleton

class car_counter(object):
    def interface(self):
        # defines the parameters that interface with other services from Panorama
        return

    def init(self, parameters, inputs, outputs):
        # defines the attributes such as arrays and model objects that will be used in the application
        return

    def entry(self, inputs, outputs):
        # defines the application logic responsible for predicting using the inputs and handles what to do
        # with the outputs
        return

The business logic code and AWS Lambda function expect to have at least the interface method, init method, and the entry method.

Let’s go through the python business logic code next.

import panoramasdk
import cv2
import numpy as np
import time
import boto3

# Global Variables 

HEIGHT = 512
WIDTH = 512

class car_counter(panoramasdk.base):
    
    def interface(self):
        return {
                "parameters":
                (
                    ("float", "threshold", "Detection threshold", 0.10),
                    ("model", "car_counter", "Model for car counting", "ssd_512_resnet50_v1_voc"), 
                    ("int", "batch_size", "Model batch size", 1),
                    ("float", "car_index", "car index based on dataset used", 6),
                ),
                "inputs":
                (
                    ("media[]", "video_in", "Camera input stream"),
                ),
                "outputs":
                (
                    ("media[video_in]", "video_out", "Camera output stream"),
                    
                ) 
            }
    
            
    def init(self, parameters, inputs, outputs):  
        try:  
            
            print('Loading Model')
            self.model = panoramasdk.model()
            self.model.open(parameters.car_counter, 1)
            print('Model Loaded')
            
            # Detection probability threshold.
            self.threshold = parameters.threshold
            # Frame Number Initialization
            self.frame_num = 0
            # Number of cars
            self.number_cars = 0
            # Bounding Box Colors
            self.colours = np.random.rand(32, 3)
            # Car Index for Model from parameters
            self.car_index = parameters.car_index
            # Set threshold for model from parameters 
            self.threshold = parameters.threshold
                        
            class_info = self.model.get_output(0)
            prob_info = self.model.get_output(1)
            rect_info = self.model.get_output(2)

            self.class_array = np.empty(class_info.get_dims(), dtype=class_info.get_type())
            self.prob_array = np.empty(prob_info.get_dims(), dtype=prob_info.get_type())
            self.rect_array = np.empty(rect_info.get_dims(), dtype=rect_info.get_type())

            return True
        
        except Exception as e:
            print("Exception: {}".format(e))
            return False

    def preprocess(self, img, size):
        
        resized = cv2.resize(img, (size, size))
        mean = [0.485, 0.456, 0.406]  # RGB
        std = [0.229, 0.224, 0.225]  # RGB
        
        # converting array of ints to floats
        img = resized.astype(np.float32) / 255. 
        img_a = img[:, :, 0]
        img_b = img[:, :, 1]
        img_c = img[:, :, 2]
        
        # Extracting single channels from 3 channel image
        # The above code could also be replaced with cv2.split(img)
        # normalizing per channel data:
        
        img_a = (img_a - mean[0]) / std[0]
        img_b = (img_b - mean[1]) / std[1]
        img_c = (img_c - mean[2]) / std[2]
        
        # putting the 3 channels back together:
        x1 = [[[], [], []]]
        x1[0][0] = img_a
        x1[0][1] = img_b
        x1[0][2] = img_c
        x1 = np.asarray(x1)
        
        return x1
    
    def get_number_cars(self, class_data, prob_data):
        
        # get indices of car detections in class data
        car_indices = [i for i in range(len(class_data)) if int(class_data[i]) == self.car_index]
        # use these indices to filter out anything that is less than self.threshold
        prob_car_indices = [i for i in car_indices if prob_data[i] >= self.threshold]
        return prob_car_indices

    
    def entry(self, inputs, outputs):        
        for i in range(len(inputs.video_in)):
            stream = inputs.video_in[i]
            car_image = stream.image

            # Pre Process Frame
            x1 = self.preprocess(car_image, 512)
                                    
            # Do inference on the new frame.
            
            self.model.batch(0, x1)        
            self.model.flush()
            
            # Get the results.            
            resultBatchSet = self.model.get_result()
            class_batch = resultBatchSet.get(0)
            prob_batch = resultBatchSet.get(1)
            rect_batch = resultBatchSet.get(2)

            class_batch.get(0, self.class_array)
            prob_batch.get(1, self.prob_array)
            rect_batch.get(2, self.rect_array)

            class_data = self.class_array[0]
            prob_data = self.prob_array[0]
            rect_data = self.rect_array[0]
            
            
            # Get Indices of classes that correspond to Cars
            car_indices = self.get_number_cars(class_data, prob_data)
            
            try:
                self.number_cars = len(car_indices)
            except:
                self.number_cars = 0
            
            # Visualize with Opencv or stream.(media) 
            
            # Draw Bounding boxes on HDMI output
            if self.number_cars > 0:
                for index in car_indices:
                    
                    left = np.clip(rect_data[index][0] / np.float(HEIGHT), 0, 1)
                    top = np.clip(rect_data[index][1] / np.float(WIDTH), 0, 1)
                    right = np.clip(rect_data[index][2] / np.float(HEIGHT), 0, 1)
                    bottom = np.clip(rect_data[index][3] / np.float(WIDTH), 0, 1)
                    
                    stream.add_rect(left, top, right, bottom)
                    stream.add_label(str(prob_data[index][0]), right, bottom) 
                    
            stream.add_label('Number of Cars : {}'.format(self.number_cars), 0.8, 0.05)
        
            self.model.release_result(resultBatchSet)            
            outputs.video_out[i] = stream
        return True


def main():
        
    car_counter().run()
main()

For a full explanation of the code and the methods used, see the AWS Panorama Developer Guide.

The code has the following notable features:

  • car_index6
  • model_used ssd_512_resnet50_v1_voc (parameters.car_counter)
  • add_label – Adds text to the HDMI output
  • add_rect – Adds bounding boxes around the object of interest
  • Image – Gets the NumPy array of the frame read from the camera

Now that we have the code ready, we need to create a Lambda function with the preceding code.

  1. On the Lambda console, choose Functions.
  2. Choose Create function.
  3. For Function name, enter a name.
  4. Choose Create function.

  1. Rename the Python file to car_counter.py.

  1. Change the handler to car_counter_main.

  1. In the Basic settings section, confirm that the memory is 2048 MB and the timeout is 2 minutes.

  1. On the Actions menu, choose Publish new version.

We’re now ready to create our application and deploy to the device. We use the model we uploaded and the Lambda function we created in the subsequent steps.

Creating the application

To create your application, complete the following steps:

  1. On the AWS Panorama console, choose My applications.
  2. Choose Create application.

  1. Choose Begin creation.

  1. For Name, enter car_counter.
  2. For Description, enter an optional description.
  3. Choose Next.

  1. Click Choose model.

  1. For Model artifact path, enter the model S3 URI.
  2. For Model name¸ enter the same name that you used in the business logic code.
  3. In the Input configuration section, choose Add input.
  4. For Input name, enter the input Tensor name (for this post, data).
  5. For Shape, enter the frame shape (for this post, 1, 3, 512, 512).

  1. Choose Next.
  2. Under Lambda functions, select your function (CarCounter).

  1. Choose Next.
  2. Choose Proceed to deployment.

Deploying your application

To deploy your new application, complete the following steps:

  1. Choose Choose appliance.

  1. Choose the appliance you created.
  2. Choose Choose camera streams.

  1. Select your camera stream.

  1. Choose Deploy.

Checking the output

After we deploy the application, we can check the output HDMI output or use Amazon CloudWatch Logs. For more information, see Setting up the AWS Panorama Appliance Developer Kit or Viewing AWS Panorama event logs in CloudWatch Logs, respectively.

If we have an HDMI output connected to the device, we should see the output from the device on the HDMI screen, as in the following screenshot.

And that’s it. We have successfully deployed a car counting use case to the AWS Panorama Appliance.

Extending the solution

We can do so much more with this application and extend it to other parking-related use cases, such as the following:

  • Parking lot routing – Where are the vacant parking spots?
  • Parking lot monitoring – Are cars parked in appropriate spots? Are they too close to each other?

You can integrate these use cases with other AWS services like QuickSight, S3 buckets, and MQTT, just to name a few, and get real-time inference data for monitoring cars in a parking lot.

You can adapt this example and build other object detection applications for your use case. We will also continue to share more examples with you so you can build, develop, and test with the AWS Panorama Appliance Developer Kit.

Conclusion

The applications of computer vision at the edge are only now being imagined and built out. As a data scientist, I’m very excited to be innovating in lockstep with AWS Panorama customers to help you ideate and build CV models that are uniquely tailored to solve your problems.

And we’re just scratching the surface of what’s possible with CV at the edge and the AWS Panorama ecosystem.

Resources

For more information about using AWS Panorama, see the following resources:


About the Author

Surya Kari is a Data Scientist who works on AI devices within AWS. His interests lie in computer vision and autonomous systems.

Read More

Population health applications with Amazon HealthLake – Part 1: Analytics and monitoring using Amazon QuickSight

Population health applications with Amazon HealthLake – Part 1: Analytics and monitoring using Amazon QuickSight

Healthcare has recently been transformed by two remarkable innovations: Medical Interoperability and machine learning (ML). Medical Interoperability refers to the ability to share healthcare information across multiple systems. To take advantage of these transformations, we launched a new HIPAA-eligible healthcare service, Amazon HealthLake, now in preview at re:Invent 2020. In the re:Invent announcement, we talk about how HealthLake enables organizations to structure, tag, index, query, and apply ML to analyze health data at scale. In a series of posts, starting with this one, we show you how to use HealthLake to derive insights or ask new questions of your health data using advanced analytics.

The primary source of healthcare data are patient electronic health records (EHR). Health Level Seven International (HL7), a non-profit standards development organization, announced a standard for exchanging structured medical data called the Fast Healthcare Interoperability Resources (FHIR). FHIR is widely supported by healthcare software vendors and was supported at an American Medical Informatics Association meeting by EHR vendors. The FHIR specification makes structured medical data easily accessible to clinical researchers and informaticians, and also makes it easy for ML tools to process this data and extract valuable information from it. For example, FHIR provides a resource to capture documents, such as doctor’s notes or lab report summaries. However, this data needs to be extracted and transformed before it can be searched and analyzed.

As the FHIR-formatted medical data is ingested, HealthLake uses natural language processing trained to understand medical terminology to enrich unstructured data with standardized labels (such as for medications, conditions, diagnoses, and procedures), so all this information can be normalized and easily searched. One example is parsing clinical narratives in the FHIR DocumentReference resource to extract, tag, and structure the medical entities, including ICD-10-CM codes. This transformed data is then added to the patient’s record, providing a complete view of all of the patient’s attributes (such as medications, tests, procedures, and diagnoses) that is optimized for search and applying advanced analytics. In this post, we walk you through the process of creating a population health dashboard on this enriched data, using AWS Glue, Amazon Athena, and Amazon QuickSight.

Building a population health dashboard

After HealthLake extracts and tags the FHIR-formatted data, you can use advanced analytics and ML with your now normalized data to make sense of it all. Next, we walk through using QuickSight to build a population health dashboard to quickly analyze data from HealthLake. The following diagram illustrates the solution architecture.

In this example, we build a dashboard for patients diagnosed with congestive heart failure (CHF), a chronic medical condition in which the heart doesn’t pump blood as well as it should. We use the MIMIC-III (Medical Information Mart for Intensive Care III) data, a large, freely-available database comprising de-identified health-related data associated with over 40,000 patients who stayed in critical care units of the Beth Israel Deaconess Medical Center between 2001–2012. [1]

The tools used for processing the data and building the dashboard include AWS Glue, Athena, and QuickSight. AWS Glue is a serverless data preparation service that makes it easy to extract, transform, and load (ETL) data, in order to prepare the data for subsequent analytical processing and presentation in charts and dashboards. An AWS Glue crawler is a program that determines the schema of data and creates a metadata table in the AWS Glue Data Catalog that describes the data schema. An AWS Glue job encapsulates a script that reads, processes, and writes data to a new schema. Finally, we use Athena, an interactive query service that can query data in Amazon Simple Storage Service (Amazon S3) using standard SQL queries on tables in a Data Catalog.

Connecting Athena with HealthLake

We first convert the MIMIC-III data to FHIR format and then copy the formatted data into a data store in HealthLake, which extracts medical entities from textual narratives such as doctors’ notes and discharge summaries. The clinical notes are stored in the DocumentReference resource, whereby the extracted entities are tagged to each patient’s record in the DocumentReference with FHIR extension fields represented in the JSON object. The following screenshot is an example of how the augmented DocumentResource looks.

Now that data is indexed and tagged in the HealthLake, we export the normalized data to an S3 bucket. The exported data is in NDJSON format, with one folder per resource.

An AWS Glue crawler is written for each folder to crawl the NDJSON file and create tables in the Data Catalog. Because the default classifiers can work with NDJSON files directly, no special classifiers are needed. There is one crawler per FHIR resource and each crawler creates one table. These tables are then queried directly from within Athena; however, for some queries, we use AWS Glue jobs to transform and partition the data to make the queries simpler and faster.

We create two AWS Glue jobs for this project to transform the DocumentReference and Condition tables. Both jobs transform the data from JSON to Apache Parquet, to improve query performance and reduce data storage and scanning costs. In addition, both jobs partition the data by patient first, and then by the identity of the individual FHIR resources. This improves the performance of patient- and record-based queries issued through Athena. The resulting Parquet files are tabular in structure, which also simplifies queries issued via clients, because they can reference detected entities and ICD-10 codes directly, and no longer need to navigate the nested FHIR structure of the DocumentReference extension element. After these jobs create the Parquet files in Amazon S3, we create and run crawlers to add the table schema into the Data Catalog.

Finally, to support keyword-based queries for conditions via the QuickSight dashboard, we create a view of the transformed DocumentReference table that includes ICD-10-CM textual descriptions and the corresponding ICD-10-CM codes.

Building a population health dashboard with QuickSight

QuickSight is a cloud-based business intelligence (BI) services that makes it easy to build dashboards in the cloud. It can obtain data from various sources, but for our use case, we use Athena to create a data source for our QuickSight dashboard. From the previous step, we have Athena tables that use data from HealthLake. As the next step, we create a dataset in QuickSight from a table in Athena. We use SPICE (Super-fast, Parallel, In-memory Calculation Engine) to store the data because this allows us to import the data only one time and use it multiple times.

After creating the dataset, we create a number of analytic components in the dashboard. These components allow us to aggregate the data and create charts and time-series visualizations at the patient and population levels.

The first tab of the dashboard that we build provides a view into the entire patient population and their encounters with the health system (see the following screenshot). The target audience for this dashboard consists of healthcare providers or caregivers.

The dashboard contains filters that allows us to further drill on the results by referring hospital or by date. It shows the number of patients, their demographic distribution, the number of encounters, the average hospital stay, and more.

The second tab joins hospital encounters with patient medical conditions. This view provides the number of encounters per referring hospital, broken by type of encounter and by age. We also create a word cloud for major medical conditions to easily drill down on the details and understand the distribution of these conditions across the entire population by encounter type.

The third component contains a patient timeline. The timeline is in the form of a tree table. The first column is the patient name. The second column contains the start date of the encounter sorted chronologically. The third column contains the list of ranked conditions diagnosed in that encounter. The last column contains the list of procedures performed during that encounter.

To build the patient timeline, we create a view in Athena that joins multiple tables. We build the preceding view by joining the condition, patient, encounter, and observation tables. The encounter table contains an array of conditions, and therefore we need to use the unnest command. The following code is a sample SQL query to join the tables:

SELECT o.code.text, o.effectivedatetime, o.valuequantity, p.name[1].family, e.hospitalization.dischargedisposition.coding[1].display as dischargeddisposition, e.period.start, e.period."end", e.hospitalization.admitsource.coding[1].display as admitsource, e.class.display as encounter_class, c.code.coding[1].display as condition
    FROM "healthai_mimic"."encounter" e, unnest(diagnosis) t(cond), condition c, patient p, observation o
    AND ("split"("cond"."condition"."reference", '/')[2] = "c"."id")
    AND ("split"("e"."subject"."reference", '/')[2] = "p"."id")
    AND ("split"("o"."subject"."reference", '/')[2] = "p"."id")
    AND ("split"("o"."encounter"."reference", '/')[2] = "e"."id")

The last but probably most exciting part is where we compare patient data found in structured fields vs. data parsed from text. As described before, the AWS Glue job has transformed the DocumentReference and Condition table so that the modified DocumentReference tables can now be queried to retrieve parsed medical entities.

In the following screenshot, we search for all patients that have the word [s]epsis in the condition text. The condition equals field is a filter that allows us to filter all conditions that match a text. The results show that 209 patients have a sepsis-related condition in their structured data. However, 288 patients have sepsis-related conditions as parsed from textual notes. The table on the left shows timelines for patients based on structured data, and the table on right shows timelines for patients based on parsed data.

Next steps

In this post, we joined the data from multiple FHIR references to create a holistic view for a patient. We also used Athena to search for a single patient. If the data volume is high, it’s a good idea to create year, month, and day partitions within Amazon S3 and store the NDJSON files in those partitions. This allows the dashboard to be created for a restricted time period, such as current month or current year, making the dashboard faster and cost-effective.

Conclusion

HealthLake creates exciting new possibilities for extracting medical entities from unstructured data and quickly building a dashboard on top of it. The dashboard helps clinicians and health administrators make informed decisions and improve patient care. It also helps researchers improve the performance of their ML models by incorporating medical entities that were hidden in unstructured data. You can start building a dashboard on your raw FHIR data by importing it into Amazon S3, creating AWS Glue crawlers and Data Catalog tables, and creating a QuickSight dashboard!

[1] MIMIC-III, a freely accessible critical care database. Johnson AEW, Pollard TJ, Shen L, Lehman L, Feng M, Ghassemi M, Moody B, Szolovits P, Celi LA, and Mark RG. Scientific Data (2016).


About the Author

Mithil Shah is an ML/AI Specialist at Amazon Web Services. Currently he helps public sector customers improve lives of citizens by building Machine Learning solutions on AWS.


Paul Saxman is a Principal Solutions Architect at AWS, where he helps clinicians, researchers, executives, and staff at academic medical centers to adopt and leverage cloud technologies. As a clinical and biomedical informatics, Paul is passionate about accelerating healthcare advancement and innovation, by supporting the translation of science into medical practice.

Read More

Inception to the Rule: AI Startups Thrive Amid Tough 2020

Inception to the Rule: AI Startups Thrive Amid Tough 2020

2020 served up a global pandemic that roiled the economy. Yet the startup ecosystem has managed to thrive and even flourish amid the tumult. That may be no coincidence.

Crisis breeds opportunity. And nowhere has that been more prevalent than with startups using AI, machine learning and data science to address a worldwide medical emergency and the upending of typical workplace practices.

This is also reflected in NVIDIA Inception, our program to nurture startups transforming industries with AI and data science. Here are a few highlights from a tremendous year for the program and the members it’s designed to propel toward growth and success.

Increased membership:

  • Inception hit a record 7,000 members — that’s up 25 percent on the year.
  • IT services, healthcare, and media and entertainment were the top three segments, reflecting the global pandemic’s impact on remote work, medicine and home-based entertainment.
  • Early-stage and seed-stage startups continue to lead the rate of joining NVIDIA Inception. This has been a consistent trend over recent years.

Startups ramp up: 

  • 100+ Inception startups reached the program’s Premier level, which unlocks increased marketing support, engineering access and exposure to senior customer contacts.
  • Developers from Inception startups enrolled in more than 2,000 sessions with the NVIDIA Deep Learning Institute, which offers hands-on training and workshops.
  • GPU Ventures, the venture capital arm of NVIDIA Inception, made investments in three startup companies — Plotly, Artisight and Rescale.

Deepening partnerships: 

  • NVIDIA Inception added Oracle’s Oracle for Startups program to its list of accelerator partners, which already includes AWS Activate and Microsoft for Startups, as well as a variety of regional programs. These tie-ups open the door for startups to access free cloud credits, new marketing channels, expanded customer networks, and other benefits across programs.
  • The NVIDIA Inception Alliance for Healthcare launched earlier this month, starting with healthcare leaders GE Healthcare and Nuance, to provide a clear go-to-market path for medical imaging startups.

At its core, NVIDIA Inception is about forging connections for prime AI startups, finding new paths for them to pursue success, and providing them with the tools or resources to take their business to the next level.

Read more about NVIDIA Inception partners on our blog and learn more about the program at https://www.nvidia.com/en-us/deep-learning-ai/startups/.

The post Inception to the Rule: AI Startups Thrive Amid Tough 2020 appeared first on The Official NVIDIA Blog.

Read More

Shifting Paradigms, Not Gears: How the Auto Industry Will Solve the Robotaxi Problem

Shifting Paradigms, Not Gears: How the Auto Industry Will Solve the Robotaxi Problem

A giant toaster with windows. That’s the image for many when they hear the term “robotaxi.” But there’s much more to these futuristic, driverless vehicles than meets the eye. They could be, in fact, the next generation of transportation.

Automakers, suppliers and startups have been dedicated to developing fully autonomous vehicles for the past decade, though none has yet to deploy a self-driving fleet at scale.

The process is taking longer than anticipated because creating and deploying robotaxis aren’t the same as pushing out next year’s new car model. Instead, they’re complex supercomputers on wheels with no human supervision, requiring a unique end-to-end process to develop, roll out and continually enhance.

The difference between these two types of vehicles is staggering. The amount of sensor data a robotaxi needs to process is 100 times greater than today’s most advanced vehicles. The complexity in software also increases exponentially, with an array of redundant and diverse deep neural networks (DNNs) running simultaneously as part of an integrated software stack.

These autonomous vehicles also must be constantly upgradeable to take advantage of the latest advances in AI algorithms. Traditional cars are at their highest level of capability at the point of sale. With yearslong product development processes and a closed architecture, these vehicles can’t take advantage of features that come about after they leave the factory.

Vehicles That Get Better and Better Over Time

With an open, software-defined architecture, robotaxis will be at their most basic capability when they first hit the road. Powered by DNNs that are continuously improved and updated in the vehicle, self-driving cars will constantly be at the cutting edge.

These new capabilities all require high-performance, centralized compute. Achieving this paradigm shift in personal transportation requires reworking the entire development pipeline from end to end, with a unified architecture from training, to validation, to real-time processing.

NVIDIA is the only company that enables this end-to-end development, which is why virtually every robotaxi maker and supplier — from Zoox and Voyage in the U.S., to DiDi Chuxing in China, to Yandex in Russia — is using its GPU-powered offerings.

Installing New Infrastructure

Current advanced driver assistance systems are built on features that have become more capable over time, but don’t necessarily rely on AI. Autonomous vehicles, however, are born out of the data center. To operate in thousands of conditions around the world requires intensive DNN training using mountains of data. And that data grows exponentially as the number of AVs on the road increases.

To put that in perspective, a fleet of just 50 vehicles driving six hours a day generates about 1.6 petabytes of sensor data daily. If all that data were stored on standard 1GB flash drives, they’d cover more than 100 football fields. This data must then be curated and labeled to train the DNNs that will run in the car, performing a variety of dedicated functions, such as object detection and localization.

NVIDIA DRIVE infrastructure provides the unified architecture needed to train self-driving DNNs on massive amounts of data.

This data center infrastructure isn’t also used to test and validate DNNs before vehicles operate on public roads. The NVIDIA DRIVE Sim software and NVIDIA DRIVE Constellation autonomous vehicle simulator deliver a scalable, comprehensive and diverse testing environment. DRIVE Sim is an open platform with plug-ins for third-party models from ecosystem partners, allowing users to customize it for their unique use cases.

NVIDIA DRIVE Constellation and NVIDIA DRIVE Sim deliver a virtual proving ground for autonomous vehicles.

This entire development infrastructure is critical to deploying robotaxis at scale and is only possible through the unified, open and high-performance compute delivered by GPU technology.

Re-Thinking the Wheel

The same processing capabilities required to train, test and validate robotaxis are just as necessary in the vehicle itself.

A centralized AI compute architecture makes it possible to run the redundant and diverse DNNs needed to replace the human driver all at once. This architecture must also be open to take advantage of new features and DNNs.

The DRIVE family is built on a single scalable architecture ranging from one NVIDIA Orin variant that sips just five watts of energy and delivers 10 TOPS of performance all the way up to the new DRIVE AGX Pegasus, featuring the next-generation Orin SoC and NVIDIA Ampere architecture for thousands of operations per second.

With a single scalable architecture, robotaxi makers have the flexibility to develop new types of vehicles on NVIDIA DRIVE AGX.

Such a high level of performance is necessary to replace and perform better than a human driver. Additionally, the open and modular nature of the platform enables robotaxi companies to create custom configurations to accommodate the new designs opened up by removing the human driver (along with steering wheel and pedals).

With the ability to use as many processors as needed to analyze data from the dozens of onboard sensors, developers can ensure safety through diversity and redundancy of systems and algorithms.

This level of performance has taken years of investment and expertise to achieve. And, by using a single scalable architecture, companies can easily transition to the latest platforms without sacrificing valuable software development time.

Continuous Improvement

By combining data center and in-vehicle solutions, robotaxi companies can create a continuous, end-to-end development cycle for constant improvement.

As DNNs undergo improvement and learn new capabilities in the data center, the validated algorithms can be delivered to the car’s compute platform over the air for a vehicle that is forever featuring the latest and greatest technology.

This continuous development cycle extends joy to riders and opens new, transformative business models to the companies building this technology.

The post Shifting Paradigms, Not Gears: How the Auto Industry Will Solve the Robotaxi Problem appeared first on The Official NVIDIA Blog.

Read More

How to generate super resolution images using TensorFlow Lite on Android

How to generate super resolution images using TensorFlow Lite on Android

Posted by Wei Wei, TensorFlow Developer Advocate

The task of recovering a high resolution (HR) image from its low resolution counterpart is commonly referred to as Single Image Super Resolution (SISR). While interpolation methods, such as bilinear or cubic interpolation, can be used to upsample low resolution images, the quality of resulting images is generally less appealing. Deep learning, especially Generative Adversarial Networks, has successfully been applied to generate more photo-realistic images, for example, SRGAN and ESRGAN. In this blog, we are going to use a pre-trained ESRGAN model from TensorFlow Hub and generate super resolution images using TensorFlow Lite in an Android app. The final app looks like below and the complete code has been released in TensorFlow examples repo for reference.

Screencap of TensorFlow Lite

First, we can conveniently load the ESRGAN model from TFHub and easily convert it to a TFLite model. Note that here we are using dynamic range quantization and fixing the input image dimensions to 50×50. The converted model has been uploaded to TFHub but we want to demonstrate how to do it just in case you want to convert it yourself (for example, try a different input size in your own app):

model = hub.load("https://tfhub.dev/captain-pool/esrgan-tf2/1")
concrete_func = model.signatures[tf.saved_model.DEFAULT_SERVING_SIGNATURE_DEF_KEY]
concrete_func.inputs[0].set_shape([1, 50, 50, 3])
converter = tf.lite.TFLiteConverter.from_concrete_functions([concrete_func])
converter.optimizations = [tf.lite.Optimize.DEFAULT]
tflite_model = converter.convert()

# Save the TF Lite model.
with tf.io.gfile.GFile('ESRGAN.tflite', 'wb') as f:
f.write(tflite_model)

esrgan_model_path = './ESRGAN.tflite'

You can also convert the model without hardcoding the input dimensions at conversion time and later resize the input tensor at runtime, as TFLite now supports inputs of dynamic shapes. Please refer to this example for more information.

Once the model is converted, we can quickly verify that the ESRGAN TFLite model does generate a much better image than bicubic interpolation. We also have another tutorial on ESRGAN if you want to better understand the model.

lr = cv2.imread(test_img_path)
lr = cv2.cvtColor(lr, cv2.COLOR_BGR2RGB)
lr = tf.expand_dims(lr, axis=0)
lr = tf.cast(lr, tf.float32)

# Load TFLite model and allocate tensors.
interpreter = tf.lite.Interpreter(model_path=esrgan_model_path)
interpreter.allocate_tensors()

# Get input and output tensors.
input_details = interpreter.get_input_details()
output_details = interpreter.get_output_details()

# Run the model
interpreter.set_tensor(input_details[0]['index'], lr)
interpreter.invoke()

# Extract the output and postprocess it
output_data = interpreter.get_tensor(output_details[0]['index'])
sr = tf.squeeze(output_data, axis=0)
sr = tf.clip_by_value(sr, 0, 255)
sr = tf.round(sr)
sr = tf.cast(sr, tf.uint8)
ESRGAN model with low res and high res image
LR: low resolution input image cropped from an butterfly image in DIV2K dataset. ESRGAN (x4): super resolution output image generated using ESRGAN model with upscale_ratio=4. Bicubic: output image generated using bicubic interpolation. As can be seen here, bicubic interpolation-generated image is much blurrier than the ESRGAN-generated one. PSNR is also higher on the ESRGAN-generated image.

As you may already know, TensorFlow Lite is the official framework to run inference with TensorFlow models on edge devices and is deployed on more than 4 billions edge devices worldwide, supporting Android, iOS, Linux-based IoT devices and microcontrollers. You can use TFLite in Java, C/C++ or other languages to build Android apps. In this blog we will use TFLite C API since many developers have asked for such an example.

We distribute TFLite C header files and libraries in prebuilt AAR files (the core library and the GPU library). To set up the Android build correctly, the first thing we need to do is download the AAR files and extract the header files and shared libraries. Have a look at how this is done in the download.gradle file.

Since we are using Android NDK to build the app (NDK r20 is confirmed to work), we need to let Android Studio know how native files should be handled. This is done in CMakeList.txt file:

We included 3 sample images in the app, so a user may easily run the same model multiple times, which means we need to cache the interpreter for better efficiency. This is done by passing the interpreter pointer from C++ code to Java code, after the interpreter is successfully created:

extern "C" JNIEXPORT jlong JNICALL
Java_org_tensorflow_lite_examples_superresolution_MainActivity_initWithByteBufferFromJNI(JNIEnv *env, jobject thiz, jobject model_buffer, jboolean use_gpu) {
const void *model_data = static_cast<void *>(env->GetDirectBufferAddress(model_buffer));
jlong model_size_bytes = env->GetDirectBufferCapacity(model_buffer);
SuperResolution *super_resolution = new SuperResolution(model_data, static_cast<size_t>(model_size_bytes), use_gpu);
if (super_resolution->IsInterpreterCreated()) {
LOGI("Interpreter is created successfully");
return reinterpret_cast<jlong>(super_resolution);
} else {
delete super_resolution;
return 0;
}
}

Once the interpreter is created, running the model is fairly straightforward as we can follow the TFLite C API documentation. We first need to carefully extract RGB values from each pixel. Now we can run the interpreter:

// Feed input into model
status = TfLiteTensorCopyFromBuffer(input_tensor, input_buffer, kNumberOfInputPixels * kImageChannels * sizeof(float));
…...

// Run the interpreter
status = TfLiteInterpreterInvoke(interpreter_);
…...

// Extract the output tensor data
const TfLiteTensor* output_tensor = TfLiteInterpreterGetOutputTensor(interpreter_, 0);
float output_buffer[kNumberOfOutputPixels * kImageChannels];
status = TfLiteTensorCopyToBuffer(output_tensor, output_buffer, kNumberOfOutputPixels * kImageChannels * sizeof(float));
…...

With the models results at hand, we can pack the RGB values back into each pixel.

There you have it. A reference Android app using TFLite to generate super resolution images on device. More details can be found in the code repository. Hopefully this is useful as a reference to Android developers who are getting started to use TFLite in C/C++ to build amazing ML apps.

Feedback

We are looking forward to seeing what you have built with TensorFlow Lite, as well as hearing your feedback. Share your use cases with us directly or on Twitter with hashtags #TFLite and #PoweredByTF. To report bugs and issues, please reach out to us on GitHub.

Acknowledgements

The author would like to thank @captain__pool for uploading the ESRGAN model to TFHub, and Tian Lin and Jared Duke for the helpful feedback.

[1] Christian Ledig, Lucas Theis, Ferenc Huszar, Jose Caballero, Andrew Cunningham, Alejandro Acosta, Andrew Aitken, Alykhan Tejani, Johannes Totz, Zehan Wang, Wenzhe Shi. 2016. Photo-Realistic Single Image Super-Resolution Using a Generative Adversarial Network.

[2] Xintao Wang, Ke Yu, Shixiang Wu, Jinjin Gu, Yihao Liu, Chao Dong, Chen Change Loy, Yu Qiao, Xiaoou Tang. 2018. ESRGAN: Enhanced Super-Resolution Generative Adversarial Networks.

[3] Tensorflow 2.x based implementation of EDSR, WDSR and SRGAN for single image super-resolution

[4] @captain__pool’s ESGRAN code implementation

[5] Eirikur Agustsson, Radu Timofte. 2017. NTIRE 2017 Challenge on Single Image Super-Resolution: Dataset and Study.

Read More

Role of the New Machine: Amid Shutdown, NVIDIA’s Selene Supercomputer Busier Than Ever

Role of the New Machine: Amid Shutdown, NVIDIA’s Selene Supercomputer Busier Than Ever

And you think you’ve mastered social distancing.

Selene is at the center of some of NVIDIA’s most ambitious technology efforts.

Selene sends thousands of messages a day to colleagues on Slack.

Selene’s wired into GitLab, a key industry tool for tracking the deployment of code, providing instant updates to colleagues on how their projects are going.

One of NVIDIA’s best resources works just a block from NVIDIA’s Silicon Valley, Calif., campus, but Selene can only be visited during the pandemic only with the aid of a remote-controlled robot.

Selene is, of course, a supercomputer.

The world’s fastest commercial machine, Selene was named the world’s fifth-fastest supercomputer in the world on November’s closely watched list of TOP500 supercomputers.

Built with new NVIDIA A100 GPUs, Selene achieved 63.4 petaflops on HPL, a key benchmark for high-performance computing, on that same TOP500 list.

While the TOP500 benchmark, originally launched in 1993, continues to be closely watched, a more important metric today is peak AI performance.

By that metric, using the A100’s 3rd generation tensor core, Selene delivers over 2,795 petaflops*, or nearly 2.8 exaflops, of peak AI performance.

The new version of Selene doubles the performance over the prior version, which holds all eight performance records on MLPerf AI Training benchmarks for commercially available products.

But what’s remarkable about this machine isn’t its raw performance. Or how long it takes the two-wheeled, NVIDIA Jetson TX2 powered robot, dubbed “Trip,” tending Selene to traverse the co-location facility — a kind of hotel for computers — housing the machine.

Or even the quiet (by supercomputing standards) hum of the fans cooling its 555,520 computing cores and 1,120,000 gigabytes of memory, all connected by NVIDIA Mellanox HDR InfiniBand networking technology.

It’s how closely it’s wired into the day-to-day work of some of NVIDIA’s top researchers.

That’s why — with the rest of the company downshifting for the holidays — Mike Houston is busier than ever.

In Demand

Houston, who holds a Ph.D. in computer science from Stanford and is a recent winner of the ACM Gordon Bell Prize, is NVIDIA’s AI systems architect, coordinating time on Selene among more than 450 active users at the company.

Sorting through proposals to do work on the machine is a big part of his job. To do that, Houston says he aims to balance research, advanced development and production workloads.

NVIDIA researchers such as Bryan Catanzaro, vice president for applied deep learning research, say there’s nothing else like Selene.

“Selene is the only way for us to do our most challenging work,” Catanzaro said, whose team will be putting the machine to work the week of the 21st. “We would not be able to do our jobs without it.”

Catanzaro leads a team of more than 40 researchers who are using the machine to help advance their work in large-scale language modeling, one of the toughest AI challenges

His words are echoed by researchers across NVIDIA vying for time on the machine.

Built in just three weeks this spring, Selene’s capacity has more than doubled since it was first turned on. That makes it the crown jewel in an ever-growing, interconnected complex of supercomputing power at NVIDIA.

In addition to large-scale language modeling, and, of course, performance runs, NVIDIA’s computing power is used by teams working on everything from autonomous vehicles to next-generation graphics rendering to tools for quantum chemistry and genomics.

Having the ability to scale up to tackle big jobs, or tear off just enough power to tackle smaller tasks, is key, explains Marc Hamilton, vice president for solutions architecture and engineering at NVIDIA.

Hamilton matter of factly compares it to moving dirt. Sometimes a wheelbarrow is enough to get the job done. But for other jobs, where you need more dirt, you can’t get the job done without a dump truck.

“We didn’t do it to say it’s the fifth-fastest supercomputer on Earth, but because we need it, because we use it every day,” Hamilton says.

The Fast and the Flexible

It helps that the key component Selene is built with, NVIDIA DGX SuperPOD, is incredibly efficient.

A SuperPOD achieved 26.2 gigaflops/watt power-efficiency during its 2.4 HPL performance run, placing it atop the latest Green500 list of world’s most efficient supercomputers.

That efficiency is a key factor in its ability to scale up, or carry bigger computing loads, by merely adding more SuperPODs.

Each SuperPOD, in turn, is comprised of compact, pre-configured DGX A100 systems, which are built using the latest NVIDIA Ampere architecture A100 GPUs and  NVIDIA Mellanox InfiniBand for the compute and storage fabric.

Continental, Lockheed Martin and Microsoft are among the businesses that have adopted DGX SuperPODs.

The University of Florida’s new supercomputer, expected to be the fastest in academia when it goes online, is also based on SuperPOD.

Selene is now composed of four SuperPODs, each with a total of 140 nodes, each a NVIDIA DGX A100, giving Selene a total of 560 nodes, up from 280 earlier this year.

A Need for Speed

That’s all well and good, but Catanzaro wants all the computing power he can get.

Catanzaro, who holds a doctorate in computer science from UC Berkeley, helped pioneer the use of GPUs to accelerate machine learning a decade ago by swapping out a 1,000 CPU system for three off-the-shelf NVIDIA Geforce GTX 580 GPUs, letting him work faster.

It was one of a number of key developments that led to the deep learning revolution. Now, nearly a decade later, Catanzaro figures he has access to roughly a million times more power thanks to Selene.

“I would say our team is being really well supported by NVIDIA right now, we can do world-class, state-of-the-art things on Selene,” Catanzaro says. “And we still want more.”

That’s why — while NVIDIANs have set up Microsoft Outlook to respond with an away message as they take the week off — Selene will be busier than ever.


*2,795 petaflops FP16/BF16 with structural sparsity enabled.


The post Role of the New Machine: Amid Shutdown, NVIDIA’s Selene Supercomputer Busier Than Ever appeared first on The Official NVIDIA Blog.

Read More

AI at Your Fingertips: NVIDIA Launches Storefront in AWS Marketplace

AI at Your Fingertips: NVIDIA Launches Storefront in AWS Marketplace

AI is transforming businesses across every industry, but like any journey, the first steps can be the most important.

To help enterprises get a running start, we’re collaborating with Amazon Web Services to bring 21 NVIDIA NGC software resources directly to the AWS Marketplace. The AWS Marketplace is where customers find, buy and immediately start using software and services that run on AWS.

NGC is a catalog of software that is optimized to run on NVIDIA GPU cloud instances, such as the Amazon EC2 P4d instance featuring the record-breaking performance of NVIDIA A100 Tensor Core GPUs. AWS customers can deploy this software free of charge to accelerate their AI deployments.

We first began providing GPU-optimized software through the NVIDIA NGC catalog in 2017. Since then, industry demand for these resources has skyrocketed. More than 250,000 unique users have now downloaded more than 1 million of the AI containers, pretrained models, application frameworks, Helm charts and other machine learning resources available on the catalog.

Teaming Up for Another First in the Cloud

AWS is the first cloud service provider to offer the NGC catalog on their marketplace. Many organizations look to the cloud first for new deployment, so having NGC software available at the fingertips of data scientists and developers can help enterprises hit the ground running. With NGC, they can easily get started on new AI projects without having to leave the AWS ecosystem.

“AWS and NVIDIA have been working together to accelerate computing for more than a decade, and we are delighted to offer the NVIDIA NGC catalog in AWS Marketplace,” said Chris Grusz, director of AWS Marketplace at Amazon Web Services. “With NVIDIA NGC software now available directly in AWS Marketplace, customers will be able to simplify and speed up their AI deployment pipeline by accessing and deploying these specialized software resources directly on AWS.”

NGC AI Containers Debuting Today in AWS Marketplace

To help data scientists and developers build and deploy AI-powered solutions, the NGC catalog offers hundreds of NVIDIA GPU-accelerated machine learning frameworks and industry-specific software development kits. Today’s launch of NGC on AWS Marketplace features many of NVIDIA’s most popular GPU-accelerated AI software in healthcare, recommender systems, conversational AI, computer vision, HPC, robotics, data science and machine learning, including:

  • NVIDIA AI: A suite of frameworks and tools, including MXNet, TensorFlow, NVIDIA Triton Inference Server and PyTorch.
  • NVIDIA Clara Imaging: NVIDIA’s domain-optimized application framework that accelerates deep learning training and inference for medical imaging use cases.
  • NVIDIA DeepStream SDK: A multiplatform scalable video analytics framework to deploy on the edge and connect to any cloud.
  • NVIDIA HPC SDK: A suite of compilers, libraries and software tools for high performance computing.
  • NVIDIA Isaac Sim ML Training: A toolkit to help robotics machine learning engineers use Isaac Sim to generate synthetic images to train an object detection deep neural network.
  • NVIDIA Merlin: An open beta framework for building large-scale deep learning recommender systems.
  • NVIDIA NeMo: An open-source Python toolkit for developing state-of-the-art conversation AI models.
  • RAPIDS: A suite of open-source data science software libraries.

Instant Access to Performance-Optimized AI Software

NGC software in AWS Marketplace provides a number of benefits to help data scientists and developers build the foundations for success in AI.

  • Faster software discovery: Through the AWS Marketplace, developers and data scientists can access the latest versions of NVIDIA’s AI software with a single click.
  • The latest NVIDIA software: The NGC software in AWS Marketplace is federated, giving AWS users access to the latest versions as soon as they’re available in the NGC catalog. The software is constantly optimized, and the monthly releases give users access to the latest features and performance improvements.
  • Simplified software deployment: Users of Amazon EC2, Amazon SageMaker, Amazon Elastic Kubernetes Service (EKS) and Amazon Elastic Container Service (ECS) can quickly subscribe, pull and run NGC software on NVIDIA GPU instances, all within the AWS console. Additionally, SageMaker users can simplify their workflows by eliminating the need to first store a container in Amazon Elastic Container Registry (ECR).
  • Continuous integration and development: NGC Helm charts are also available in AWS Marketplace to help DevOps teams quickly and consistently deploy their services.

The post AI at Your Fingertips: NVIDIA Launches Storefront in AWS Marketplace appeared first on The Official NVIDIA Blog.

Read More

Focusing on disaster response with Amazon Augmented AI and Mechanical Turk

Focusing on disaster response with Amazon Augmented AI and Mechanical Turk

It’s easy to distinguish a lake from a flood. But when you’re looking at an aerial photograph, factors like angle, altitude, cloud cover, and context can make the task more difficult. And when you need to identify 100,000 aerial images in order to give first responders the information they need to accelerate disaster response efforts? That’s when you need to combine the speed and accuracy of machine learning (ML) with the precision of human judgement.

With a constant supply of low altitude disaster imagery and satellite imagery coming online, researchers are looking for faster and more affordable ways to label this content so that it can be utilized by stakeholders like first responders and state, local, and federal agencies. Because the process of labeling this data is expensive, manual, and time consuming, developing ML models that can automate image labeling (or annotation) is critical to bringing this data into a more usable state. And to develop an effective ML model, you need a ground truth dataset: a labeled set of data that is used to train your model. The lack of an adequate ground truth dataset for LADI images put model development out of reach until now.

A broad array of organizations and agencies are developing solutions to this problem, and Amazon is there to support them with technology, infrastructure, and expertise. By integrating the full suite of human-in-the-loop services into a single AWS data pipeline, we can improve model performance, reduce the cost of human review, simplify the process of implementing an annotation pipeline, and provide prebuilt templates for the worker user interface, all while supplying access to an elastic, on-demand Amazon Mechanical Turk workforce that can scale to natural disaster event-driven annotation task volumes.

One of the projects that has made headway in the annotation of disaster imagery was developed by students at Penn State. Working alongside a team of MIT Lincoln Laboratory researchers, students at Penn State College of Information Sciences and Technology (IST) developed a computer model that can improve the classification of disaster scene images and inform disaster response.

Developing solutions

The Penn State project began with an analysis of imagery from the Low Altitude Disaster Imagery (LADI) dataset, a collection of aerial images taken above disaster scenes since 2015. Based on work supported by the United States Air Force, the LADI dataset was developed by the New Jersey Office of Homeland Security and Preparedness and MIT Lincoln Laboratory, with support from the National Institute of Standards and Technology’s Public Safety Innovation Accelerator Program (NIST PSIAP) and AWS.

“We met with the MIT Lincoln Laboratory team in June 2019 and recognized shared goals around improving annotation models for satellite and LADI objects, as we’ve been developing similar computer vision solutions here at AWS,” says Kumar Chellapilla, General Manager of Amazon Mechanical Turk, Amazon SageMaker Ground Truth, and Amazon Augmented AI (Amazon A2I) at AWS. “We connected the team with the AWS Machine Learning Research Awards (now part of the Amazon Research Awards program) and the AWS Open Data Program and funded MTurk credits for the development of MIT Lincoln Laboratory’s ground truth dataset.” Mechanical Turk is a global marketplace for requesters and workers to interact on human intelligence-related work, and is often leveraged by ML and artificial intelligence researchers to label large datasets.

With the annotated dataset hosted as part of the AWS Open Data Program, the Penn State students developed a computer model to create an augmented classification system for the images. This work has led to a trained model with an expected accuracy of 79%. The students’ code and models are now being integrated into the LADI project as an open-source baseline classifier and tutorial.

“They worked on training the model with only a subset of the full dataset, and I anticipate the precision will get even better,” says Dr. Jeff Liu, Technical Staff at MIT Lincoln Laboratory. “So we’ve seen, just over the course of a couple of weeks, very significant improvements in precision. It’s very promising for the future of classifiers built on this dataset.”

“During a disaster, a lot of data can be collected very quickly,” explains Andrew Weinert, Staff Research Associate at MIT Lincoln Laboratory who helped facilitate the project with the College of IST. “But collecting data and actually putting information together for decision-makers is a very different thing.”

Integrating human-in-the-loop services

Amazon also supported the development of an annotation user interface (UI) that aligned with common disaster classification codes, such as those used by urban search and rescue teams, which enabled MIT Lincoln Laboratory to pilot real-time Civil Air Patrol (CAP) image annotation following Hurricane Dorian. The MIT Lincoln Laboratory team is in the process of building a pipeline to bring CAP data through this classifier using Amazon A2I to route low-confidence results to Mechanical Turk for human review. Amazon A2I seamlessly integrates human intelligence with AI to offer human-level accuracy at machine-level scale for AWS AI services and custom models, and enables routing low-confidence ML results for human review.

“Amazon A2I is like ‘phone a friend’ for the model,” Weinert says. “It helps us route the images that can’t confidently be labeled by the classifier to MTurk workers for review. Ultimately, developing the tools that can be used by first responders to get help to those that need it is on top of our mind when working on this type of classifier, so we are now building a service to combine our results with other datasets like GIS (geographic information systems) to make it useful to first responders in the field.”

Weinert says that in a hurricane or other large-scale disaster, there could be up to 100,000 aerial images for emergency officers to analyze. For example, an official may be seeking images of bridges to assess damage or flooding nearby and needs a way to review the images quickly.

“Say you have a picture that at first glance looks like a lake,” says Dr. Marc Rigas, Assistant Teaching Professor, Penn State College of IST. “Then you see trees sticking out of it and realize it’s a flood zone. The computer has to know that and be able to distinguish what is a lake and what isn’t.” If it can’t distinguish between the two with confidence, Amazon A2I can route that image for human review.

There is a critical need to develop new technology to support incident and disaster response following natural disasters, such as computer vision models that detect damaged infrastructure or dangerous conditions. Looking forward, we will use Amazon A2I to combine the power of custom ML models with Amazon A2I to route low-confidence predictions to workers who annotate images to identify categories of natural disaster damage.

During hurricane season, providing the capacity for redundant systems that enables a workforce to access systems from home can provide the ability to annotate data in real time as new image sets become available.

Looking forward

Grace Kitzmiller from the Amazon Disaster Response team envisions a future where projects such as these can change how disaster response is handled. “By working with researchers and students, we can partner with the computer vision community to build a set of open-source resources that enable rich collaboration among diverse stakeholders,” Kitzmiller says. “With the idea that open-source development can be driven on the academic side with support from Amazon, we can accelerate the process of bringing some of these microservices into production for first responders.”

Joe Flasher of the AWS Open Data Program discussed the huge strides in predictive accuracy that classifiers have made in the last few years. “Using what we know about a specific image, its GIS coordinates and other metadata can help us improve classifier performance of both LADI and satellite datasets,” Flasher says. “As we begin to combine and layer complementary datasets based on geospatial metadata, we can both improve accuracy and enhance the depth and granularity of results by incorporating attributes from each dataset in the results of the selected set.”

Mechanical Turk and the MIT Lincoln Laboratory are putting together a workshop that enables a broader group of researchers to leverage the LADI ground truth dataset to train classifiers using SageMaker Ground Truth. Low-confidence results are routed through Amazon A2I for human annotation using Mechanical Turk, and the team can rerun models using the enhanced ground truth set to measure improvements in model performance. The workshop results will contribute to the open-source resources shared through the AWS Open Data Program. “We are very excited to support these academic efforts through the Amazon Research Awards,” says An Luo, Senior Technical Program Manager for academic programs, Amazon AI. “We look for opportunities where the work being done by academics advances ML research and is complementary to AWS goals while advancing educational opportunities for students.”

To start using Amazon Augmented AI check out the resources here. There are resources available here for use with the Low Altitude Disaster Imagery (LADI) Dataset. You can learn more about Mechanical Turk here.


About the Author

Morgan Dutton is a Senior Program Manager with the Amazon Augmented AI and Mechanical Turk team. She works with academic and public sector customers to accelerate their use of human-in-the-loop ML services. Morgan is interested in collaborating with academic customers to support adoption of ML technologies by students and educators.

Read More